RFID Mifare Classic "clone"
Saturday, April 21. 2018
Toying around with RFID, tags has always been something I wanted to do, but never had the time. Contactless payment is gaining traction all around the world. The reason is very simple: it is fast and convenient for both the customer and vendor to just touch'n'go with your credit card or mobile phone on a point-of-sale.
Credit/Debit card payments are based on EMV, or Europay MasterCard and Visa, standard. See generic EMV info at https://en.wikipedia.org/wiki/EMV. Back in 2011 Visa started driving the contactless standard worldwide, and given the situation today, their efforts paid off. However, my understanding is, that at the time of writing this, regardless number of people attempting it, there are no known vulnerabilities in the contactless EMV. Finding one, would be sweet, but finding one would also be extremely hard and time consuming. So, I decided to go for something easier. MIFARE Classic.
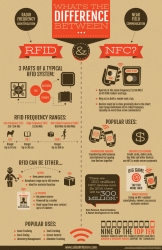
What's this RFID, isn't it NFC?
Short answer: yes and no.
This infographic is courtesy of atlasRFIDstore
http://blog.atlasrfidstore.com/rfid-vs-nfc
MIFARE Classic info
Since this topic isn't especially new, I'm just posting some useful sites I found to be very useful when doing RFID-hacks:
- Finding the encryption keys:
- Cloning the tag:
- Information about Mifare Classic encryption key hacking:
- ISO/IEC 14443 Type A generations:
Going to eBay for the hardware
I had a real-world RFID -tag, and wanted to take a peek into it. For that to happen, I needed some hardware.
The choice for reader/writer is obvious, an ACR122. Info is at: https://www.acs.com.hk/en/products/3/acr122u-usb-nfc-reader/. The thing costs almost nothing and is extremely well supported by all kinds of hacking software.
Going to GitHub for the software
All the software needed in this project can be found from GitHub:
- libusb, https://github.com/libusb/libusb
- Some software want libusb 0.1 some 1.0. I had only 0.1 installed so I had to compile the latest also.
- libnfc, https://github.com/nfc-tools/libnfc
- Latest installed
- MiFare Classic Universal toolKit, mfcuk, https://github.com/nfc-tools/mfcuk
- Installed, because it has Mifare Classic DarkSide Key Recovery Tool. This is an advanced approach into cracking the encryption keys.
- mfoc, https://github.com/nfc-tools/mfoc
- offline nested attack by Nethemba
- This is the one, NXP tried to prevent the hack to be publicly released, see info from https://www.secureidnews.com/news-item/nxp-sues-to-prevent-hackers-from-releasing-mifare-flaws/
- Creating an own encryption algorithm and expecting nobody to figure out how it works will work for a very short period of time. Going to a judge to prevent the information from leaking also works... if you're high on something!
 But on real life it works never.
All of the above software was installed with ./configure --prefix=/usr/local/rfid to avoid breaking anything already installed into the system.
Running the tools
Basic information from the tag (the actual tag UID is omitted):
# nfc-list

NFC device: ACS / ACR122U PICC Interface opened

1 ISO14443A passive target(s) found:

ISO/IEC 14443A (106 kbps) target:

    ATQA (SENS_RES): 00  04

       UID (NFCID1): 11  22  33  44

      SAK (SEL_RES): 08
ATQA 00, 04 is listed in ISO/IEC 14443 Type A generations and is identified as MIFARE Classic. Goody! It's weak and hackable.
Just running mfoc to see if a slow attack can proceed:
# mfoc -O card.dmp

Found Mifare Classic 1k tag

ISO/IEC 14443A (106 kbps) target:

    ATQA (SENS_RES): 00  04

 UID size: single

 bit frame anticollision supported

       UID (NFCID1): 11  22  33  44

      SAK (SEL_RES): 08

 Not compliant with ISO/IEC 14443-4

 Not compliant with ISO/IEC 18092


Fingerprinting based on MIFARE type Identification Procedure:

 MIFARE Classic 1K

 MIFARE Plus (4 Byte UID or 4 Byte RID) 2K, Security level 1

* SmartMX with MIFARE 1K emulation
And very soon, it results:
We have all sectors encrypted with the default keys..


Auth with all sectors succeeded, dumping keys to a file!
WHAAT! The card wasn't encrypted at all! ![]()
A closer look into card.dmp reveals, that there was no payload in the 1024 bytes this particular MIFARE Classic stored.
Since, the card doesn't have any payload, the application has to work based on childish assumption, that the UID of a RFID-tag cannot be changed. Nice! Because it can be set to whatever I want it to be! Like this:
# nfc-mfsetuid 11223344

NFC reader: ACS / ACR122U PICC Interface opened
Found tag with

 UID: 01234567

ATQA: 0004

 SAK: 08
My blank UID-writable tag had UID of 01 02 03 04, but I changed it into something else. Note: This is not allowed by the specs, but using very cheap eBay-hardware, obviously it can be done! Nice. ![]()
To verify my hack:
I walked into the appliation and used my clone successfully. Also, I informed the owners, that their security is ... well ... not secure. ![]() They shouldn't use UIDs as the only authentication mechanism. It's only 4 bytes and anybody in the world can use that 4-byte password. Using encrypted payload would make more sense, if MIFARE Classic wouldn't have a major security flaw in it's key generation algorithm.
They shouldn't use UIDs as the only authentication mechanism. It's only 4 bytes and anybody in the world can use that 4-byte password. Using encrypted payload would make more sense, if MIFARE Classic wouldn't have a major security flaw in it's key generation algorithm.
This was one of the easiest hacks I've completed for years.
iPhone Mobile Profile for a new CA root certificate - Case CAcert.org
Friday, April 20. 2018
Year ago, I posted about CAcert root certificate being re-hashed with SHA-256 to comply with modern requirements. The obvious problem with that is, that it is not especially easy to install own certificates (or the new CAcert root) into a phone anymore.
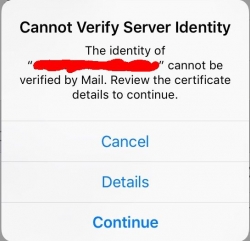
When you try to access your mail server (or any other resource via HTTPS), the result will be something like this:

Not very cool. Getting the "Cannot Verify Server Identity" -error. This is especially bad, because in modern iOS you really don't have a clue how to get the new root cert installed and trusted. No worries! I can describe the generic process here.
Apple Configurator 2
Get it from https://itunes.apple.com/us/app/apple-configurator-2/id1037126344. Install it into your Mac. It doesn't cost anything, but will help you a lot!
If you dream on running it on a Windows/Linux/BSD, just briefly visit your nearest Mac-store and with your newly purchased Mac start over from the part "Get it from..."
Root certificate to be installed
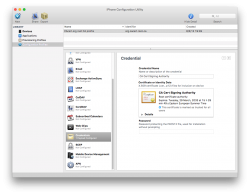
Get a root certificate you want to distribute as trusted root CA. With the Apple Configurator 2, create a profile containing only one payload. The certificate in question.
This is what it would look like:

When that mobile profile is exported from Apple Configurator 2, you will get an unsigned .mobileconfig-file. That will work, but just give grievance during install-time about not being unsigned. If you can live with an extra notice, then just go to next step. If you cannot, get a real code-signing -certificate and sign your profile with that.
Publishing your .mobileconfig from a web server
Your precious .mobileconfig-doesn't just automatically fly into your iOS-device, you need to do some heavy lifting first.
On your favorite web-server, which can be accessed from your iOS-device and you can fully control, place the .mobileconfig-file there as a static resource and make it have content-type application/x-apple-aspen-config.
On Apache:
AddType application/x-apple-aspen-config .mobileconfig
On Nginx:
types {
    application/x-apple-aspen-config mobileconfig;

}
Testing the content-type setting with curl:
# curl --verbose "https:...."

> User-Agent: curl/7.32.0

>

< HTTP/1.1 200 OK

< Content-Type: application/x-apple-aspen-config
Install the profile into your iOS-gadget
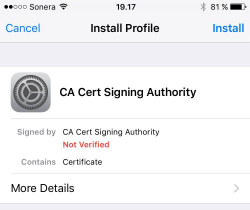
That's simple: just whip up Mobile Safari and surf to the URL. Given the correctly set content-type, it will launch profile installer:

During the process you will need to punch in your PIN-code (if you're using one in your device). There are way too many confirmations, if you really, really, for sure want to install that particular profile. The questions are there for a very good reason. A mobile profile can contain a combination of settings that will eventually either leave you powerless to control your own device, or alternatively allow remote control of your very own device. Or both. So, be very careful when installing those mobile profiles!
Finally
Now you have your new root certificate installed and trusted. Go test it!
For those who are very brave:
My recommendation is not to do this. Do not trust me or my published files!
I have published my own .mobileconfig into the web server of this blog. The address for the profile is:
https://blog.hqcodeshop.fi/CAcert/CAcert.org%20root%20CA%20profile.mobileconfig
I'll repeat: That is there for your reference only. Do not trust me for such a security-sensitive file.


