RAID Controller Upgrade
Saturday, January 31. 2026
It hasn't been an especially good couple of weeks. I've suffered couple hardware failures. One of my recent posts is about 13 year old SSD getting a retirement. There are other hardware failures waiting for a write-up.
A Linux gets security updates every once in a while. I have two boxes with a bleeding/cutting edge distro. The obvious difference between those is, that a "bleeding" edge is so new stuff, it doesn't let wounds heal. It literally breaks because of way too new components. A "cutting" edge is pretty new, but more tested. Concrete example of a bleeding edge would be ArchLinux and a cutting edge would be Fedora Linux.
My box got a new kernel version and I wanted to start running it. To my surprise, booting into the new version failed. Boot was stuck. Going to recover, I realized there was a physical storage device missing preventing automatic filesystem mount to happen, preventing successful boot. Rebooting again. This time eyeballing console display.
Whoa!
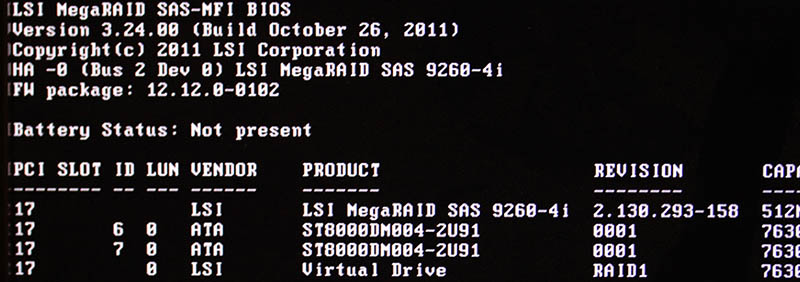
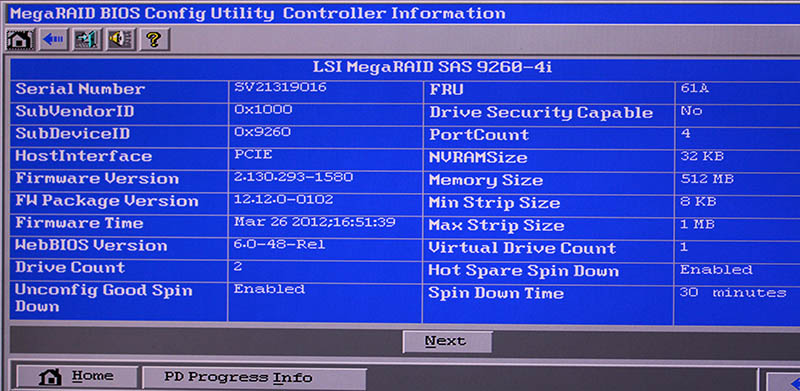
LSI 9260-4i
RAID status was missing from boot-sequence. This is what I was expecting to see, but was missing:
Hitting reset-button. Nothing.
Powering off the entire box. Oh yes! Now the PCIe-card was found, Linux booted and mounted the drive.
It was pretty obvious, any reliability the system may have had - was gone. From this point on, I was in a recovery mode. Any data on that mirrored pair of HDDs was on verge of being lost. Or, to be exact: system stability was at risk, not the data. On this quality RAID-controller from 2011, data saved to a mirrored drive has no header of any kind. Unplugging a drive from RAID-controller and plugging it into a USB3-dock makes the drive completely visible without tricks. Data not being lost at any point is a valuable thing.
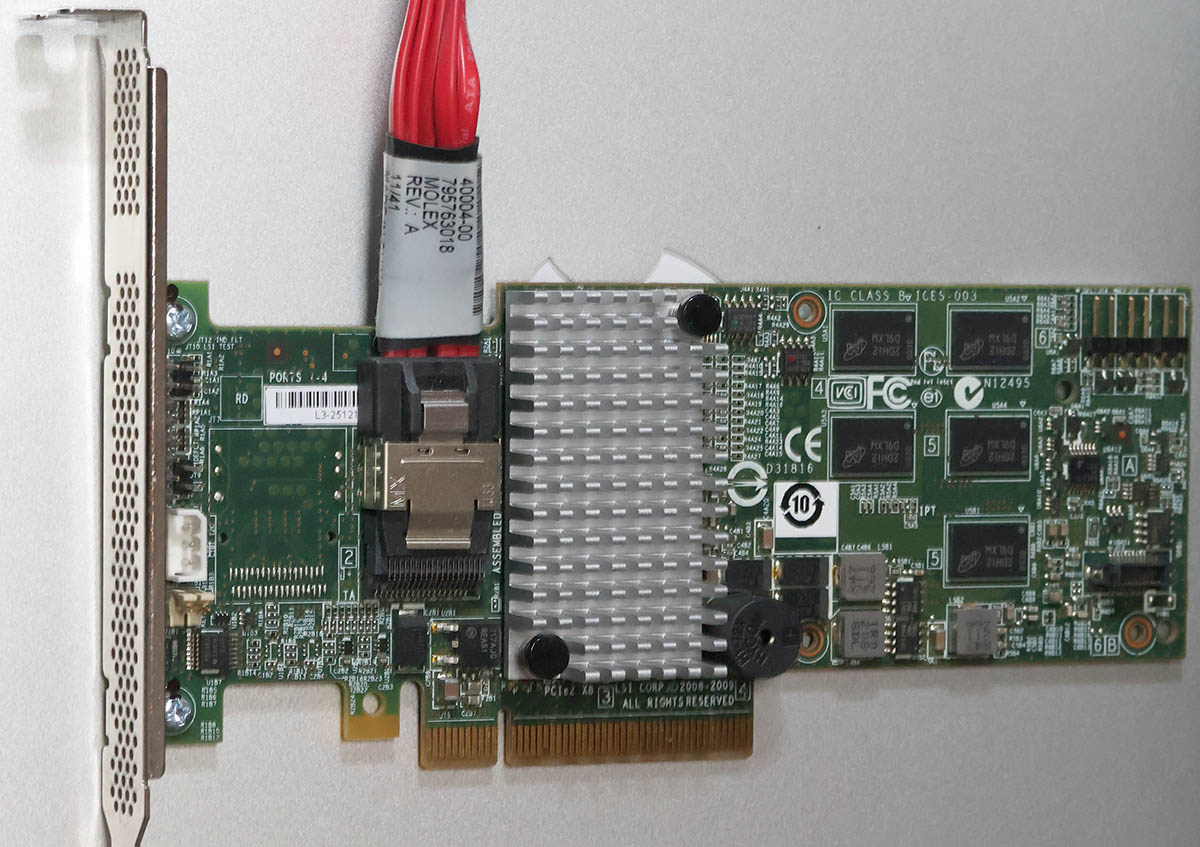
This is what a LSI 9240-4i would look like:
On a Linux, the card would look like (if UEFI finds it in boot):
kernel: scsi host6: Avago SAS based MegaRAID driver
kernel: scsi 6:2:1:0: Direct-Access     LSI      MR9260-4i        2.13 PQ: 0 ANSI: 5
kernel: sd 6:2:1:0: Attached scsi generic sg2 type 0
kernel: sd 6:2:1:0: [sdb] 11719933952 512-byte logical blocks: (6.00 TB/5.46 TiB)
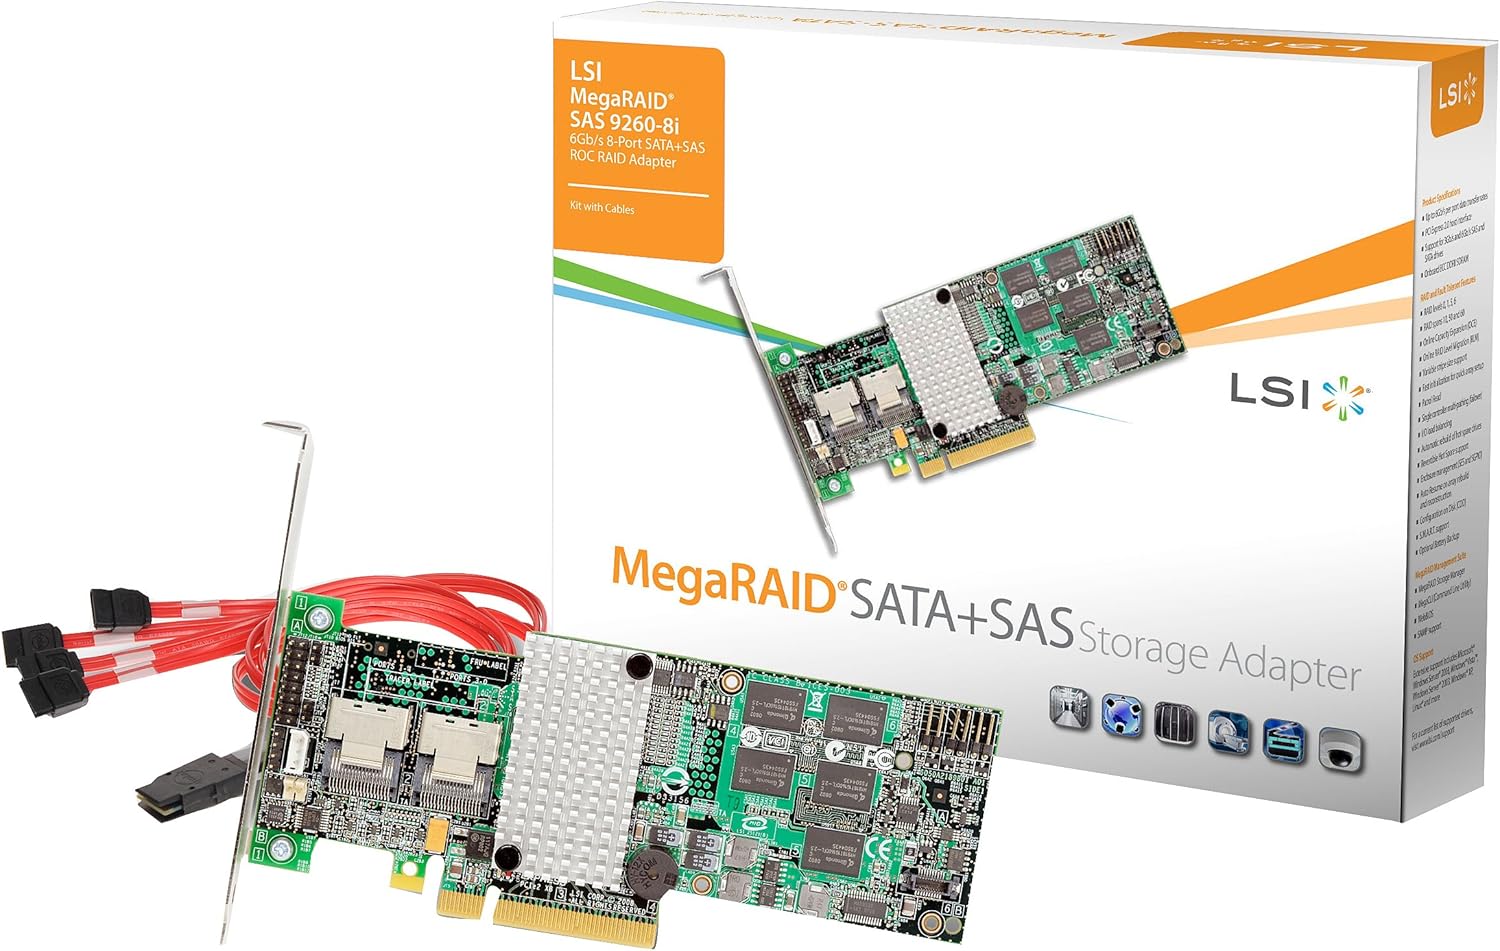
LSI 9560-8i
Proper RAID controllers as brand new are expensive. Like 1000€ a piece. This is just a hobby, so I didn't need a supported device. My broken one was 14 years old. I could easily settle for an older model.
To eBay. Shopping for a replacement.
Surprisingly, 9240-4i was still available. I didn't want one. That model was End-of-Life'd years ago. I wanted something that might be still supported or went just out of support.
This is what I got:
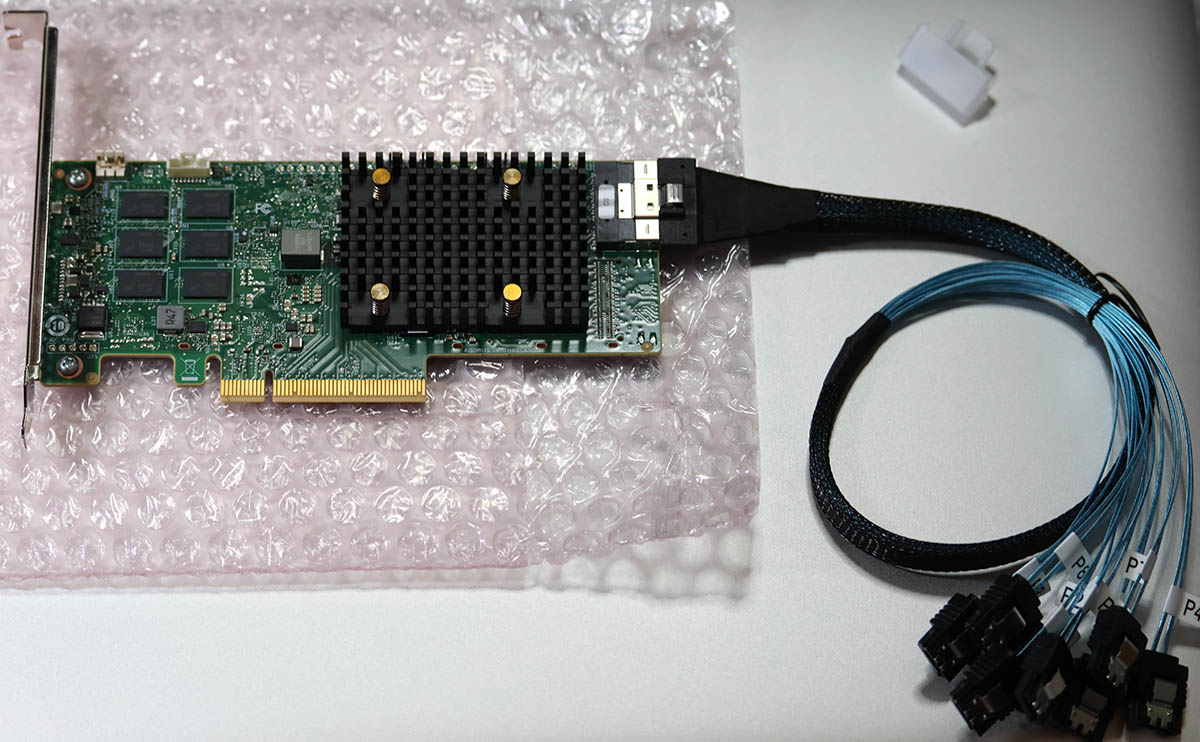
Lovely piece of hardware. Affordable even as second-hand PCIe -card.
On a Linux, the card shows as:
02:00.0 RAID bus controller: Broadcom / LSI MegaRAID 12GSAS/PCIe Secure SAS39xx
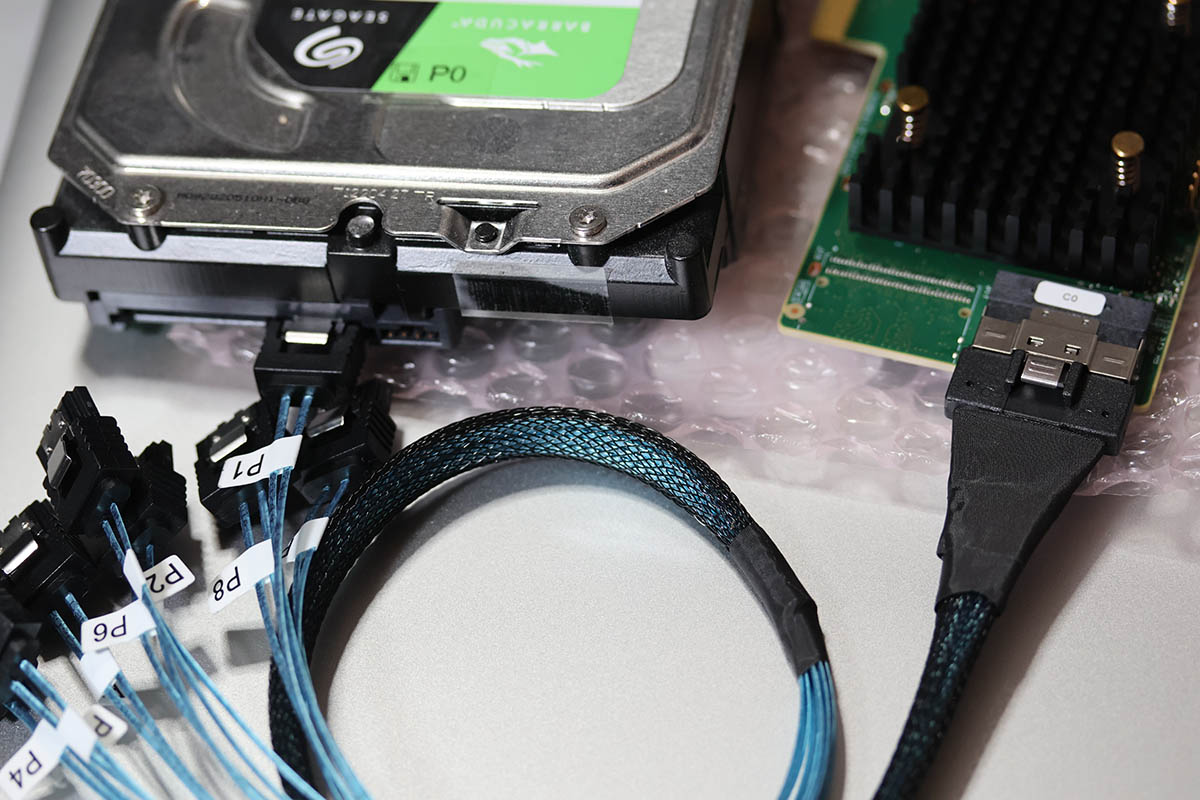
On 9560-8i Cabling
Boy, oh boy! This wasn't easy. This was nowhere near easy. Actually, this was very difficult part. Involving multiple nights spent with googling and talking to AI.
The internal connector is a single SFF-8654 (SlimSAS). Additionally, the card when you purchase one, doesn't come with any cabling with it. 9240-4i did have a proper breakout cable for its Mini-SAS SFF-8087. On the other end, there was a SAS/S-ATA -connector. As a SFF-8654 will typically be used to connect into a some sort of hot-swap bay, there a re multiple cabling options.
Unfortunately to me, SFF-spec doesn't have anything like that. But waitaminute! In the above picture, there is a SFF-8654 8i breakout cable with 8 SAS/S-ATA connectors in it. One is even connected to a HDD to demonstrate it working perfectly.
Well, this is where AliExpress steps up. Though, the spec doesn't say such thing exists, it doesn't mean that you couldn't buy such cable with money. I went with one vendor. It seemed semi-reliable with hundreds of 5-star transactions completed. Real, certified SFF-8654 -cables are expensive. 100+€ and much more. This puppy cost me 23€. What a bargain! I was in a hurry, so I paid 50€ for the shipping. And duty and duty invoicing fees and ... ah.
Configuring a replacment RAID-array
This was the easy part of the project. Apparently LSI/Broadcom -controllers write metadata to a drive. When I plugged in all the cables and booted the computer, it fould the previously configured array. RAID-configuration data IS stored to the drive somewhere, it's just not at a header of the drive. This is handy two-ways: unplugged drive looks like a regular drive, but on an appropriate controller the configs are readable.
Obviously the data on the drive was transferred away to an external USB-drive for safe-keeping. First I waited 12 hours for a degraded RAID-array to become intact again, then LVMing the data back.
A copy of drive was on an external drive connected via USB3. Recovery procedure with LVM:
- Partition the new RAID1-mirror as LVM with parted
- pvcreate the new physical device to make it visible into LVM
- vgextend the logical volume residing in external USB-drive to utilize newly created physical device. Note: Doing this does NOT move any data.
- pvmove:ing all data from external drive into internal drive. This forces logical volume to NOT use any extents on the drive. Result is moving data.
- Waiting. For 8 hours. This is a live system accessing the drive at all times.
- vgreduce:in the logical volume to stop using external drive.
- pvremove:in the external drive from LVM.
- Done!
On LSI/Broadcom Linux Software
This is what I learned:
- MegaRAID:
- Unsupported at the time of writing this blog post
- For RAID-controllers series 92xx
- My previous 9240 worked fine with MegaCli64
- StorCLI:
- Unsupported at the time of writing this blog post
- For RAID-controller series 93xx, 94xx and 95xx
- My 9560 worked fine with storcli64
- StorCLI2:
- Still supported!
- For RAID-controller series 96xx onwards
Running MegaCli64 with 95xx-series controller installed will make the command stuck. Like properly stuck. Stuck so well, that not even kill -9 does anything -stuck.
Running StorCLI2 with 95xx-series controller installed does nothing. There is a complaint, that no supported controller was found on the system. Nothing stuck. Much less dangerous than MegaCli64.
Status
On boot:


Note the complaing about battery backup:
The battery hardware is missing or malfunctioning, or the battery is unplugged, or the battery could be fully discharged. If you continue to boot the system, the battery-backed cache will not function.
If battery is connected and has been allowed to charge for 30 minutes sand this message continues to appear, then contact technical support for lassistance.Battery Status: Missing
On Linux prompt by running command storcli64 /c0 /vall show:
CLI Version = 007.3007.0000.0000 May 16, 2024
Operating system = Linux 6.16.3-100.fc41.x86_64
Controller = 0
Status = Success
Description = None


Virtual Drives :
==============

-------------------------------------------------------------
DG/VD TYPE  State Access Consist Cache Cac sCC     Size Name
-------------------------------------------------------------
0/239 RAID1 Optl  RW     Yes     RWTD  -   ON  5.457 TB
-------------------------------------------------------------

VD=Virtual Drive| DG=Drive Group|Rec=Recovery
Cac=CacheCade|OfLn=OffLine|Pdgd=Partially Degraded|Dgrd=Degraded
Optl=Optimal|dflt=Default|RO=Read Only|RW=Read Write|HD=Hidden|TRANS=TransportReady
B=Blocked|Consist=Consistent|R=Read Ahead Always|NR=No Read Ahead|WB=WriteBack
AWB=Always WriteBack|WT=WriteThrough|C=Cached IO|D=Direct IO|sCC=Scheduled
Check Consistency
Finally
Hopefully I don't need to touch these drives for couple years. In -23, I upgraded the drives. Something really weird happened in January this year and I had to replace the replacement drives. As I wrote in the article, the drives were in perfect condition.
Now I know, the controller started falling apart. I simply didn't realize it at the time.
SSD Trouble - Replacement of a tired unit
Sunday, August 31. 2025
Trouble
Operating multiple physical computers is a chore. Things do happen, especially at times when you don't expect any trouble. On a random Saturday morning, an email sent by a system daemon during early hours would look something like this:
The following warning/error was logged by the smartd daemon:

Device: /dev/sda [SAT], FAILED SMART self-check. BACK UP DATA NOW!

Device info:
SAMSUNG MZ7PC128HAFU-000L1, S/N:S0U8NSAC900712, FW:CXM06L1Q, 128 GB

For details see host's SYSLOG.
Aow crap! I'm about to lose data unless rapid action is taken.
Details of the trouble
Details from journalctl -u smartd:
Aug 30 00:27:40 smartd[1258]: Device: /dev/sda [SAT], FAILED SMART self-check. BACK UP DATA NOW!
Aug 30 00:27:40 smartd[1258]: Sending warning via /usr/libexec/smartmontools/smartdnotify to root ...
Aug 30 00:27:40 smartd[1258]: Warning via /usr/libexec/smartmontools/smartdnotify to root: successful
Then it hit me: My M.2 SSD is a WD. What is this Samsung I'm getting alerted about? Its this one:
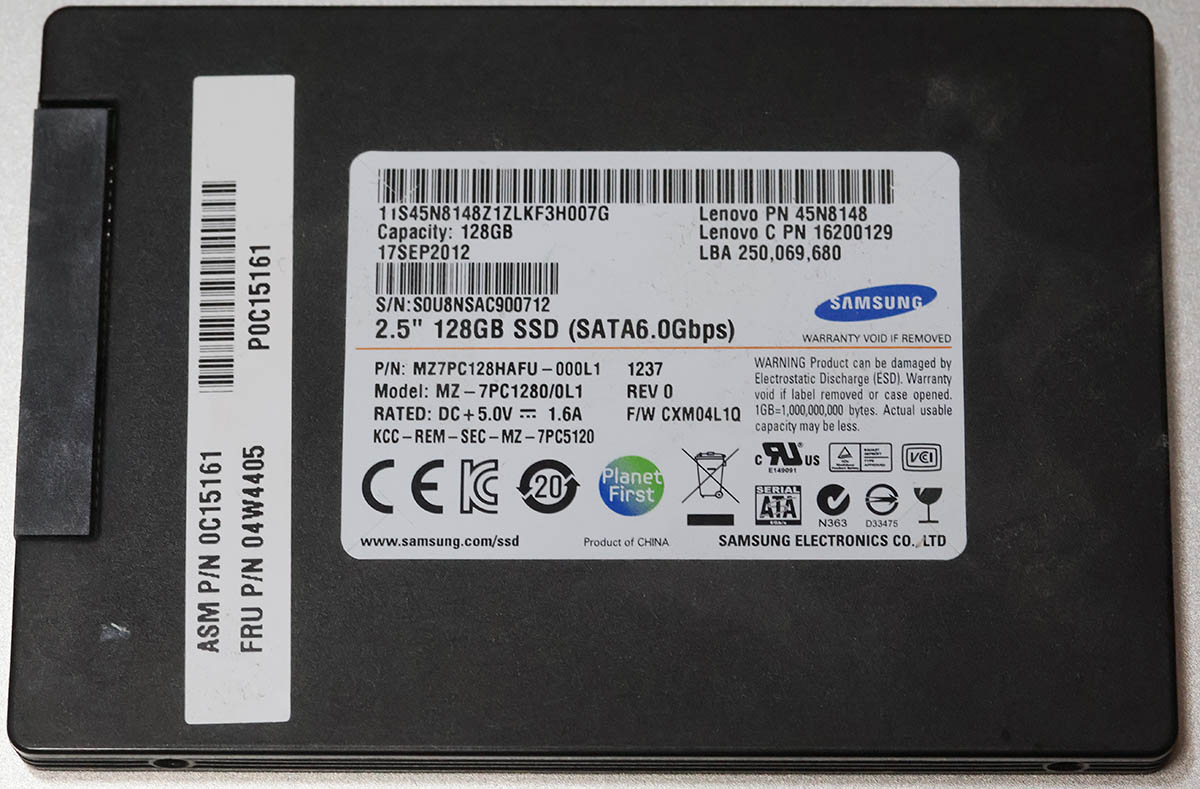
Oh. THAT one! It's just a 2.5" S-ATA SSD used for testing stuff. I think I have a Windows VM running on it. If you look closely, there is word "FRU P/N" written in block letters. Also under the barcode there is "Lenovo PN" and "Lenovo C PN". Right, this unit manufactured in September 2012 was liberated from a Laptop needing more capacity. Then it ran one Linux box for a while and after I upgraded that box, drive ended up gathering dust to one of my shelves. Then I popped it back into another server and used it for testing.
It all starts coming back to me.
More details with parted /dev/sda print:
Model: ATA SAMSUNG MZ7PC128 (scsi)
Disk /dev/sda: 128GB
Sector size (logical/physical): 512B/512B
Partition Table: gpt
Disk Flags:

Number  Start   End    Size    File system  Name                          Flags
 1      1049kB  106MB  105MB   fat32        EFI system partition          boot, esp, no_automount
 2      106MB   123MB  16.8MB               Microsoft reserved partition  msftres, no_automount
 3      123MB   127GB  127GB   ntfs         Basic data partition          msftdata, no_automount
 4      127GB   128GB  633MB   ntfs                                       hidden, diag, no_automount
Oh yes, Definitely a Windows-drive. Further troubleshooting with smartctl /dev/sda -x:
Vendor Specific SMART Attributes with Thresholds:
ID# ATTRIBUTE_NAME          FLAGS    VALUE WORST THRESH FAIL RAW_VALUE
  9 Power_On_Hours          -O--CK   090   090   000    -    47985
 12 Power_Cycle_Count       -O--CK   095   095   000    -    4057
177 Wear_Leveling_Count     PO--C-   017   017   017    NOW  2998
178 Used_Rsvd_Blk_Cnt_Chip  PO--C-   093   093   010    -    126
179 Used_Rsvd_Blk_Cnt_Tot   PO--C-   094   094   010    -    244
180 Unused_Rsvd_Blk_Cnt_Tot PO--C-   094   094   010    -    3788
190 Airflow_Temperature_Cel -O--CK   073   039   000    -    27
195 Hardware_ECC_Recovered  -O-RC-   200   200   000    -    0
198 Offline_Uncorrectable   ----CK   100   100   000    -    0
199 UDMA_CRC_Error_Count    -OSRCK   253   253   000    -    0
233 Media_Wearout_Indicator -O-RCK   198   198   000    -    195
Just to keep this blog post brief, above is a shortened list of the good bits. Running the command spits out ~150 lines of information on the drive. Walking through what we see:
- Power on hours: ~48.000 is roughly 5,5 years.
- Since the unit manufacture of Sep -12 it has been powered on for over 40% of the time.
- Thank you for your service!
- Power cycle count: ~4000, well ... that's a few
- Wear level: ~3000. Or when processed 17. I have no idea what the unit of this would be or the meaning of this reading.
- Reserve blocks: 126 reserve used, still 3788 unused.
- That's good. Drive's internal diagnostics has found unreliable storage and moved my precious data out of it into reserve area.
- There is still plenty of reserve remaining.
- The worrying bit is obvious: bad blocks do exist in the drive.
- ECC & CRC errors: 0. Reading and writing still works, no hiccups there.
- Media wear: 195. Again, no idea of the unit nor meaning. Maybe a downwards counter?
Replacement

Yeah. Let's state the obvious. Going for the cheapest available unit is perfectly ok in this scenario. The data I'm about to lose won't be the most precious one. However, every single time I lose data, that's a tiny chunk stripped directly from my soul. I don't want any of that to happen.
Data Recovery
A simple transfer time dd if=/dev/sda of=/dev/sdd:
250069680+0 records in
250069680+0 records out
128035676160 bytes (128 GB, 119 GiB) copied, 4586.76 s, 27.9 MB/s

real    76m26.771s
user    4m30.605s
sys     14m49.729s
Hour and 16 minutes later my Windows-image was on a new drive. I/O-speed of 30 MB/second isn't much. With M.2 I'm used to a whole different readings. Do note, the replacement drive has twice the capacity. As it stands, 120 GB is plenty for the use-ase.
Going Mechanical
Some assembly with Fractal case:
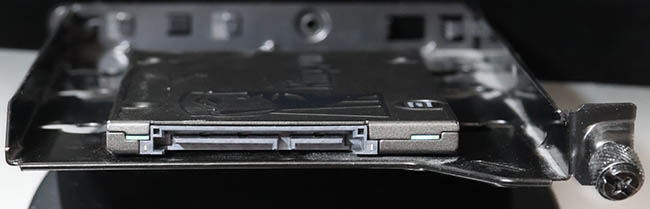
Four phillips screws to the bottom of the drive. Plugging cables back. That's a solid 10 minute job. Closing the side cover of the case and booting the server to validate everything still working as expected.
New SMART
Doing a 2nd round of smartctl /dev/sda -x on the new drive:
Vendor Specific SMART Attributes with Thresholds:
ID# ATTRIBUTE_NAME          FLAGS    VALUE WORST THRESH FAIL RAW_VALUE
  1 Raw_Read_Error_Rate     -O--CK   100   100   000    -    0
  9 Power_On_Hours          -O--CK   100   100   000    -    1
 12 Power_Cycle_Count       -O--CK   100   100   000    -    4
148 Unknown_Attribute       ------   100   100   000    -    0
149 Unknown_Attribute       ------   100   100   000    -    0
167 Write_Protect_Mode      ------   100   100   000    -    0
168 SATA_Phy_Error_Count    -O--C-   100   100   000    -    0
169 Bad_Block_Rate          ------   100   100   000    -    54
170 Bad_Blk_Ct_Lat/Erl      ------   100   100   010    -    0/47
172 Erase_Fail_Count        -O--CK   100   100   000    -    0
173 MaxAvgErase_Ct          ------   100   100   000    -    2 (Average 1)
181 Program_Fail_Count      -O--CK   100   100   000    -    0
182 Erase_Fail_Count        ------   100   100   000    -    0
187 Reported_Uncorrect      -O--CK   100   100   000    -    0
192 Unsafe_Shutdown_Count   -O--C-   100   100   000    -    3
194 Temperature_Celsius     -O---K   026   035   000    -    26 (Min/Max 23/35)
196 Reallocated_Event_Count -O--CK   100   100   000    -    0
199 SATA_CRC_Error_Count    -O--CK   100   100   000    -    131093
218 CRC_Error_Count         -O--CK   100   100   000    -    0
231 SSD_Life_Left           ------   099   099   000    -    99
233 Flash_Writes_GiB        -O--CK   100   100   000    -    173
241 Lifetime_Writes_GiB     -O--CK   100   100   000    -    119
242 Lifetime_Reads_GiB      -O--CK   100   100   000    -    1
244 Average_Erase_Count     ------   100   100   000    -    1
245 Max_Erase_Count         ------   100   100   000    -    2
246 Total_Erase_Count       ------   100   100   000    -    10512
                            ||||||_ K auto-keep
                            |||||__ C event count
                            ||||___ R error rate
                            |||____ S speed/performance
                            ||_____ O updated online
                            |______ P prefailure warning
Whoa! That's the fourth power on to a drive unboxed from a retail packaking. Three of them had to be in the manufacturing plant. Power on hours reads 1, that's not much. SSD life left 99 (I'm guessing %).
Finally
All's well. No data lost. Just my stress level jumping up.
My thinking is: If that new drive survives next 3 years running a Windows on top of a Linux, then it has served its purpose.
On Profitability of Solar Panel Installation
Sunday, August 17. 2025
Solar panel, photovoltaic system, solar generator. These babies have many names.
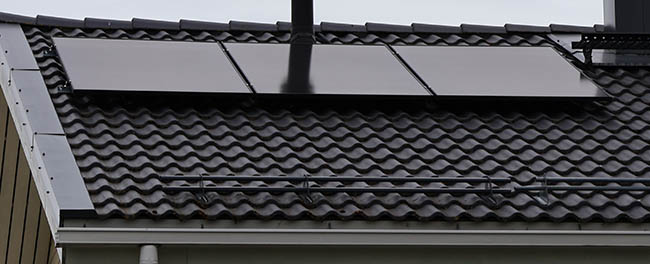
There are three of 505 watt panels on my roof. Besides the ones in the picture, I do have more panels. This is just my 1500W on sunrise side. Having micro-inverters works well for east-west -installations.
Conversation around solar panels is constantly bubbling. Lot of discussion, not so much facts. Plenty of opinions back and forth. Topics being reviewed include:
- "Installation is expensive. Is this profitable?"
- "Installation is expensive. What's the breakeven in years?"
- "Sun doesn't shine in Finland! Will this make any sense?"
All of those are valid questions. As I was tempted to find out, I went and ordered an installation last year. In this blog post summarize my experience with solar power since last summer.
Summary
Here's the thing briefly with spoilers:
- No, the thing isn't profitable. It doesn't make any sense as breakeven in cost savings to cover the installation fees is many many many years.
- When it goes to electricity, I wanted some security of supply by having those panels on my roof. That went completely sideways! Those things won't do anything, unless there is a functioning electicity network.
- This is because inverter needs a place to feed excess electricity into.
- If no such sink exists, inverter chooses to go silent.
- This behavior can be altered by going for a more expensive offgrid installation. I do not have such thing.
- Sun does shine in Finland. Savings in electricity is real and tangible.
Measuring stuff
Last summer I wrote a piece about HAN/P1 -port. This is the basis. It is imperative to get exact readings on electricity consumption and readings on exported excess energy. This is available at electricity meter. Second thing to measure is the solar production, for this I have a TCP-based M-bus solution from solar panel controller hub.
I'm skipping a ton of details, this is what a Grafana-visualization would look like:
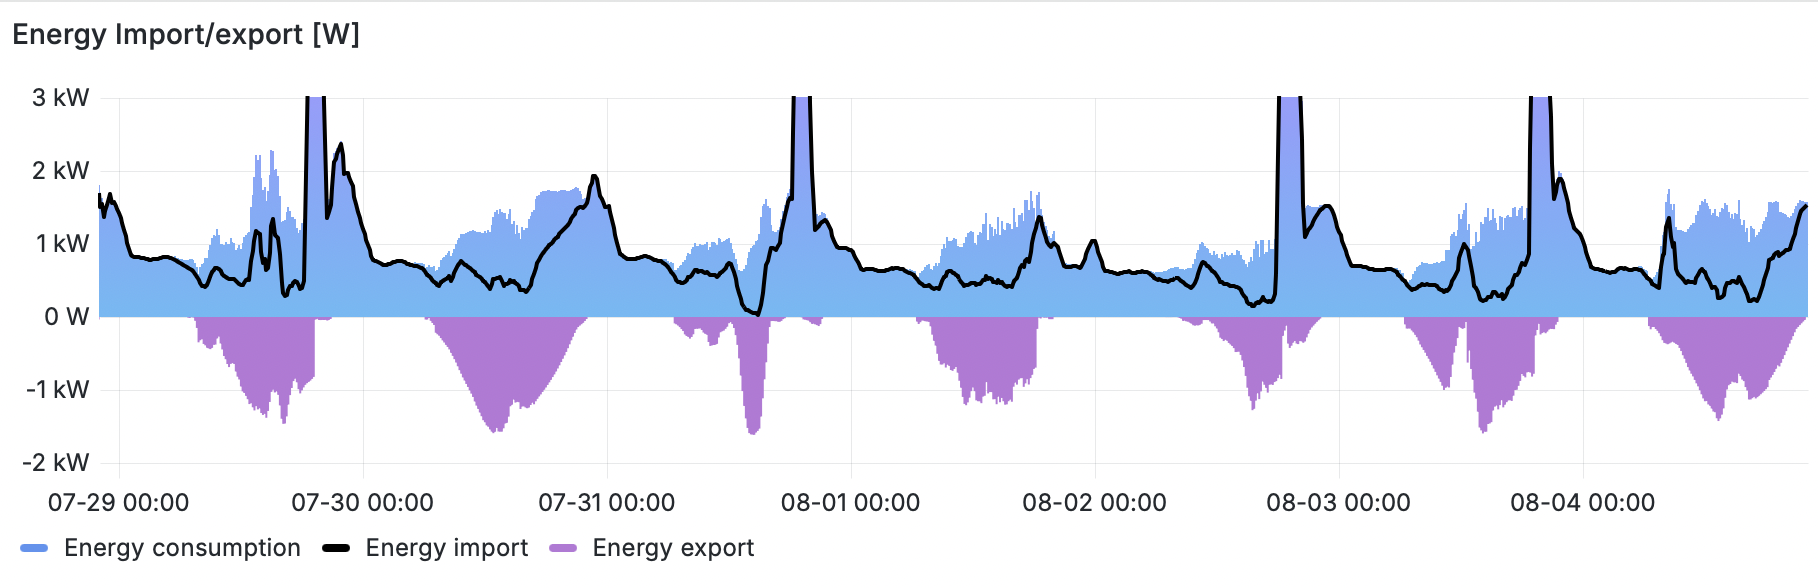
Key:
- Blue area: total electricity consumption of my house
- Black line: amount of imported electricity
- Purple area: amount of exported electricity
Findings:
- When there is solar production indicated by purple excess export, black line for imported energy drops nicely below total consumption.
- Panels do reduce my electricity bill by providing some of my consumption from own production.
- There are cases where import actually reaches zero. Momentarily, I'm not paying anything for my electricity. Nice!
- There are many cases where black line for import isn't at zero while there is plenty of export.
- This is the design flaw with solar panel installation.
- The only real way of keeping all the solar harvest is to have a battery where export would go to at all times.
- Also, this is how electricity works. Panel must have a destination where harvested energy goes into each millisecond. If there isn't one, it goes to export.
Results of Measurement
For a period of 10 months, staring from 3rd August 2023 to 29th May 2024 is a reference. No own electricity production. From 29th May 2024 to 3rd August 2025 is the "new normal", panel assisted consumption. As a weekly average, a year with and without solar panels look like this:
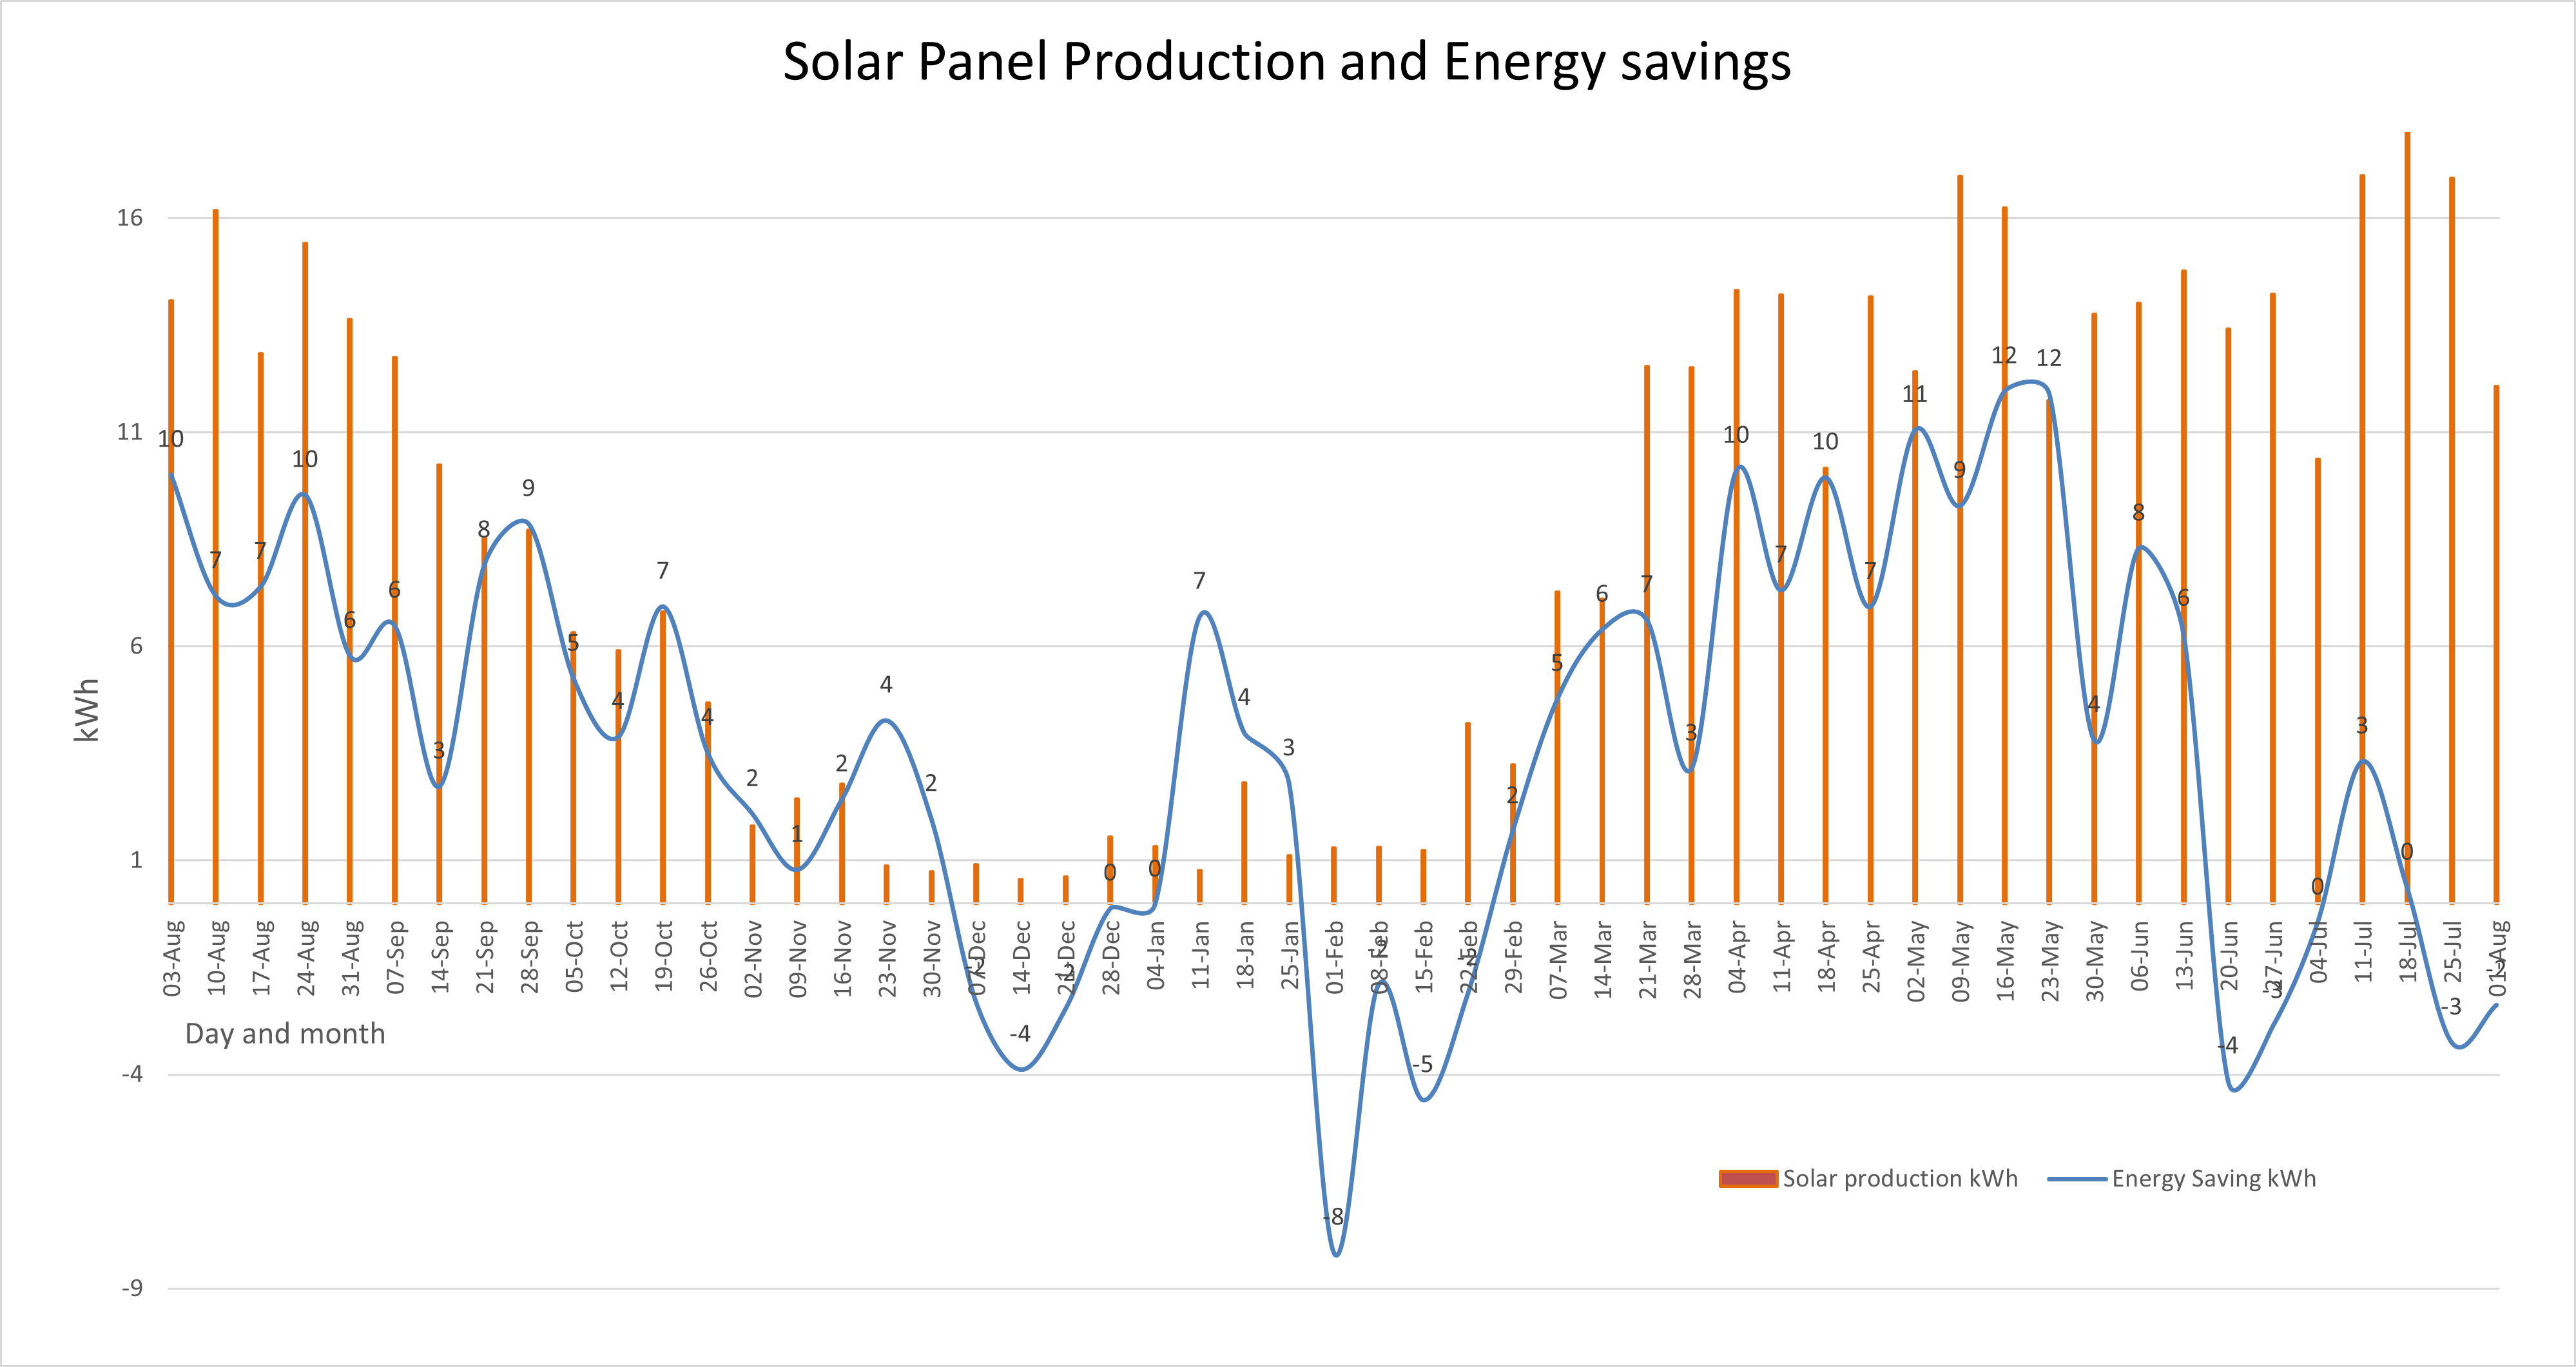
Key:
- Orange bars indicate weekly average of produced energy.
- Blue line indicates difference between year without panels and year with panels. There are occasions where saving exceeds produced amount.
- Years are not comparable. Weather tends to do whatever it likes.
Findings:
- It would have been really nice to have a "clean" reference data for entire 12 month period. Unfortunately, this wasn't possible. Still, 10 months of a year is still a good reference material to measure improvement. The improvement is there.
- There is miniscule amount of solar production in November, December and January.
- Indeed. Sun does shine occasionally during nothern hemisphere dark months.
- Energy savings are real
- On the right hand side of the graph, months June and July indicate no energy saving as both years have solar panels. This is the flaw in refenrence consumption data.
The Important Stuff
Lots of graphs and details. What's the key takeaway here? Can we summarize all this somehow?
What Others Say on Profitability
There is a Master's Thesis from Feb 2024: Techno-economic analysis on optimizing the value of photovoltaic electricity in a high-latitude location.
Gist of the thesis is twofold: First, to maximize the profitability, consume your own production. Second, (this is self-evident) installation direction is a factor. In plain words, eat your own dog food and on northern hemisphere, install your panels to southernly direction. The design of PV system installation must be to capture as much sun as possible and consume your own production as much as possible.
Measuring Self-consumption
My Home Assistant setup comes with Energy-dashboard as default:
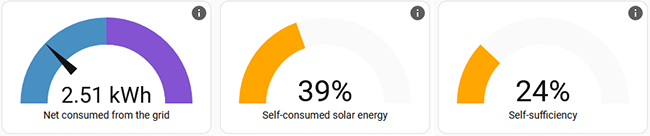
It has a reading for "self-consumed solar energy". Exactly what I should be monitoring!
As this is important, there is a discussion on calculation "Computation of self-sufficiency/autarkie and self-usage of PV". From the discussion thread following useful math can be found:
energy_used = energy_imported + energy_production - energy_exportednet_returned_to_grid = energy_exported - energy_importedself_sufficiency_perc = (energy_used - energy_imported ) / energy_used * 100.0self_consumed_solar_energy_perc = (energy_production - energy_exported ) / energy_production * 100.0
Doing the same with Home Assistant is rather simple. Btw. I'm using VictoriaMetrics add-on. Doing something like this in MetricsQL shows following data for the past year:
delta(sensor.active_energy_import[1y]) = 9000 kWhdelta(sensor.active_energy_export[1y]) = 1700 kWhdelta(sensor.total_production[1y]) = 3400 kWh
This is exactly what I'll need to get: self_consumed_solar_energy_perc = 49%
I can self-consume roughly half of my production and rest is exported as excess.
This is a vital metric, as indicated by the thesis on profitability. To increase this percentage, I'd need to store the production in a battery. This battery might be in a car. Little bit of Home Assistant -tinkering and I'd be able to charge the car on excess export energy. Alternative is to double my investment and go for a (expensive) solar battery storage. On those two, I'd might choose the EV.
Measuring Profitability
All the relevant numbers are there, let's convert all this into time and money. More math:
energy_saved = energy_production - energy_exportedenergy_saved = 3400 - 1700 = 1700 kWh
That is the amount I used of my own production, but didn't have to pay for import. My local network provider takes 4 cents / kWh for transfer. Assuming my energy costs 7 cents / kWh for the entire period, then 1700 kWh would have cost me 190€.
Assuming I'd have a good year and save 200€ on my electricity bill. Further, assuming my PV system cost after tax deductions would be 5000€. A simple 5000/200 division gives the breakeven. That's 25 years! No way, this is profitable nor sensible. Well, at least I have security of supply, when there is an outage .... oh, wait! As mentioned earlier, the panels turn off when there is no electricity. A complete bust!
Finally
On financial perspective, this is not sane. Without batteries, I simply cannot reach the self-consumption numbers needed.
Tinkering with these is a fun hobby, but that's as far it goes.
Wifi-6 USB on a Linux - Working!
Sunday, January 26. 2025
Last summer I wrote about an attempt to get 802.11ax / Wifi 6 to work on a Linux. Spoiler: It didn't.
A week ago, the author of many Realtek-drivers, Nick Morrow contacted me to inform of a new driver version for RTL8832BU and RTL8852BU Chipsets.
After ./install-driver.sh, the kernel module 8852bu is installed. Dmesg will still display product as 802.11ac WLAN Adapter, however incorrect information that will be. After couple of retries, I managed to get WPA3 authentication working.
Ah joy. The USB-stick works! Performs quite fast also.
Very quirky driver, still. I can't seem to get the thing working on every plugin. Need to try multiple times. Typical failure is "No secrets were provided" -error with "state change: need-auth -> failed (reason 'no-secrets', managed-type: 'full')" in message log. I have absolutely no idea why this is happening, the built-in Realtek works every time.
Confessions of a Server Hugger - Fixing a RAID Array
Sunday, January 12. 2025
I have to confess: I'm a server hugger. Everything is in cloud or going there. My work is 100% in the clouds, my home pretty much is not.
There are drawbacks.
5.58am, fast asleep, there is a faint beeping waking you. It's relentless and won't go way. Not loud one to alarm you on fire, but not silent one to convince you to go back to sleep. Yup. RAID-controller.
What I have is a LSI MegaRAID SAS 9260-4i. The controller is from 2013. Year later LSI ceased to exist by aquisition. Also the product is rather extinct, Broadcom isn't known for their end user support. As there is proper Linux-driver and tooling after 11 years, I'm still running the thing.
A trivial MegaCli64 -AdpSetProp -AlarmSilence -aALL makes the annoying beep go silent. Next, status of the volume: MegaCli64 -LDInfo -Lall -aALL reveals the source for alarm:
Adapter 0 -- Virtual Drive Information:
Virtual Drive: 0 (Target Id: 0)
Name                :
RAID Level          : Primary-1, Secondary-0, RAID Level Qualifier-0
Size                : 7.276 TB
Sector Size         : 512
Mirror Data         : 7.276 TB
State               : Degraded
Strip Size          : 64 KB
Number Of Drives    : 2
Darn! Degraded. Uh/oh. One out of two drives in a RAID-1 mirror is gone.
In detail, drive list MegaCli64 -PDList -a0 (for clarity, I'm omitting a LOT of details here):
Adapter #0

Enclosure Device ID: 252
Slot Number: 0
Drive's position: DiskGroup: 0, Span: 0, Arm: 1
Device Id: 7
PD Type: SATA

Raw Size: 7.277 TB [0x3a3812ab0 Sectors]
Firmware state: Online, Spun Up
Connected Port Number: 1(path0)
Inquiry Data:             ZR14F8DXST8000DM004-2U9188                      0001
Port status: Active
Port's Linkspeed: 6.0Gb/s
Drive has flagged a S.M.A.R.T alert : No


Enclosure Device ID: 252
Slot Number: 1
Drive's position: DiskGroup: 0, Span: 0, Arm: 0
Device Id: 6
PD Type: SATA

Raw Size: 7.277 TB [0x3a3812ab0 Sectors]
Firmware state: Failed
Connected Port Number: 0(path0)
Inquiry Data:             ZR14F8PSST8000DM004-2U9188                      0001
Port's Linkspeed: 6.0Gb/s
Drive has flagged a S.M.A.R.T alert : No
For slots 0-3, the one connected to cable #1 is off-line. I've never go the idea why ports have different numbering to slots. When doing the mechanical installation with physical devices, it is easy to verify cables matching the slot numbers, not port numbers.
From this point on, everything became clear. Need to replace the 8 TB Seagate BarraCudas with a fresh pair of drives. Time was of the essence, and 6 TB WD Reds were instantly available.
To recovery!
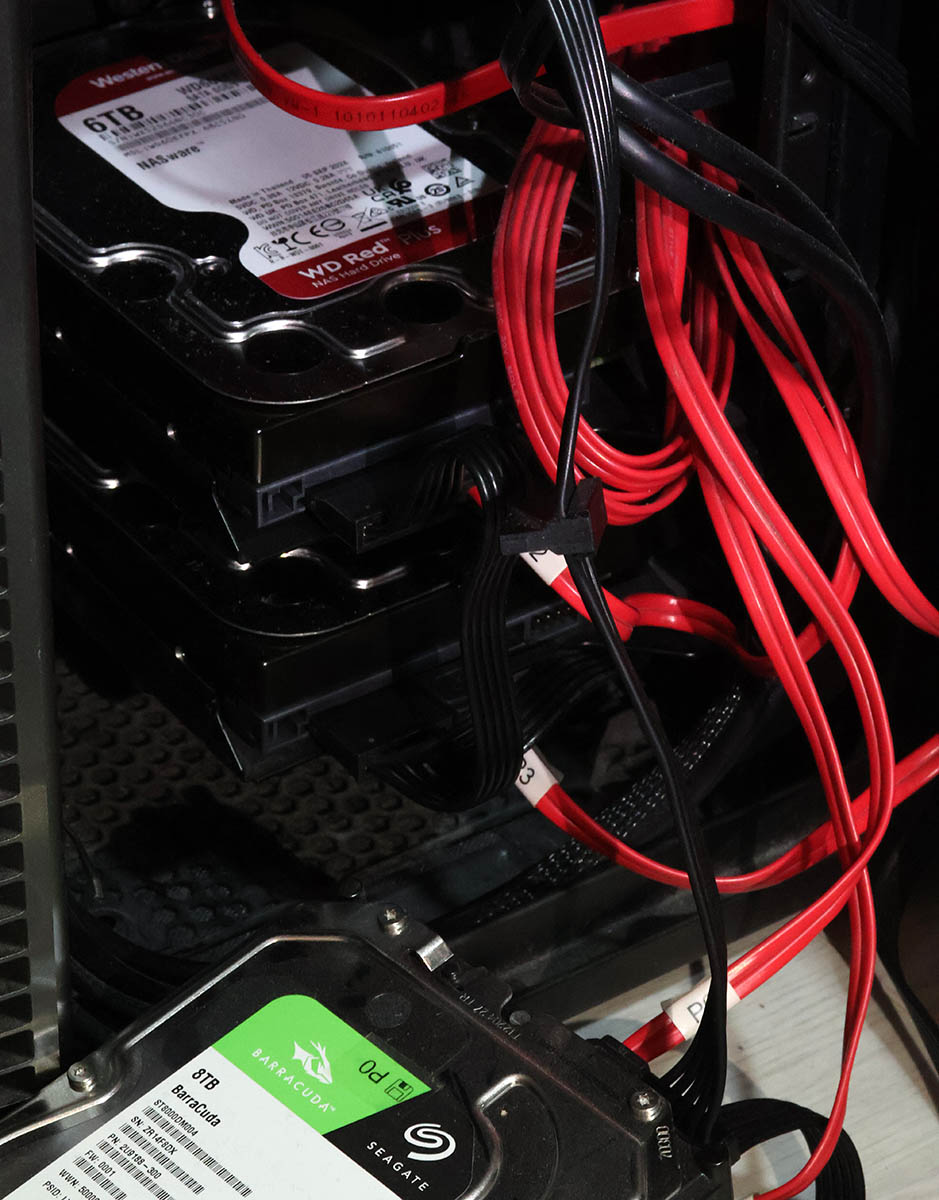
New Reds where in their allotted trays. BarraCudas where on my floor hanging from the cables.
Btw. for those interested, case is Fractal Define R6. Rack servers are NOISY! and I really cannot have them inside the house.
Creating a new array: MegaCli64 -CfgLdAdd -r1 [252:2,252:3] WT RA Direct NoCachedBadBBU -a0. Verify the result: MegaCli64 -LDInfo -L1 -a0
Virtual Drive: 1 (Target Id: 1)
Name                :
RAID Level          : Primary-1, Secondary-0, RAID Level Qualifier-0
Size                : 5.457 TB
Sector Size         : 512
Mirror Data         : 5.457 TB
State               : Optimal
Strip Size          : 64 KB
Number Of Drives    : 2
Span Depth          : 1
Default Cache Policy: WriteThrough, ReadAhead, Direct, No Write Cache if Bad BBU
Current Cache Policy: WriteThrough, ReadAhead, Direct, No Write Cache if Bad BBU
Default Access Policy: Read/Write
Current Access Policy: Read/Write
Disk Cache Policy   : Disk's Default
Encryption Type     : None
Is VD Cached: No
To my surprise, the RAID-volume hot-plugged into Linux also! ls -l /dev/sdd resulted in a happy:
brw-rw----. 1 root disk 8, 48 Jan 5 09:32 /dev/sdd
Hot-plug was also visible in dmesg:
kernel: scsi 6:2:1:0: Direct-Access     LSI      MR9260-4i        2.13 PQ: 0 ANSI: 5
kernel: sd 6:2:1:0: [sdd] 11719933952 512-byte logical blocks: (6.00 TB/5.46 TiB)
kernel: sd 6:2:1:0: Attached scsi generic sg4 type 0
kernel: sd 6:2:1:0: [sdd] Write Protect is off
kernel: sd 6:2:1:0: [sdd] Write cache: disabled, read cache: enabled, supports DPO and FUA
kernel: sd 6:2:1:0: [sdd] Attached SCSI disk
Next up: Onboarding the new capacity while transferring data out of the old one. With Linux's Logical Volume Manager, or LVM, this is surprisingly easy. Solaris/BSD people are screaming: "It's sooooo much easier with ZFS!" and they would be right. Its capabilities are 2nd to none. However, what I have is Linux, a Fedora Linux, so LVM it is.
Creating LVM partition: parted /dev/sdd
GNU Parted 3.6
Using /dev/sdd
Welcome to GNU Parted! Type 'help' to view a list of commands.
(parted) mktable gpt

(parted) mkpart LVM 0% 100%
(parted) set 1 lvm on
(parted) p
Model: LSI MR9260-4i (scsi)
Disk /dev/sdd: 6001GB
Sector size (logical/physical): 512B/512B
Partition Table: gpt
Disk Flags:

Number  Start   End     Size    File system  Name  Flags
 1      1049kB  6001GB  6001GB               LVM   lvm

(parted) q
With LVM, inform of a new physical volume: pvcreate /dev/sdd1
  Physical volume "/dev/sdd1" successfully created.
  Not creating system devices file due to existing VGs.
Extend the LVM volume group to the new physical volume: vgextend My_Precious_vg0 /dev/sdd1
Finally, inform LVM to vacate all data from degraded RAID-mirror. As VG has two PVs in it, this effectively copies all the data. On-the-fly. With no downtime. System running all the time. Command is: pvmove /dev/sdb1 /dev/sdd1
Such moving isn't fast. With time, the measured wallclock-time for command execution was 360 minutes. That's 6 hours! Doing more math with lvs -o +seg_pe_ranges,vg_extent_size, indicates PV extent size to be 32 MiB. On the PV, 108480 extents were allocated to VGs. That's 3471360 MiB in total. For 6 hour transfer, that's 161 MiB/s on average. To set that value into real World, my NVMe SSD benchmarks 5X faster on write. To repeat the good side: my system was running all the time, services were on-line without noticeable performance issues.
Before tearing down the hardware, final thing with LVM is to vacate broken array from VG: vgreduce My_Precious_vg0 /dev/sdb1 followed by pvremove /dev/sdb1.
Now that LVM was in The Desired State®, final command to run was to remove degraded volume from LSI: MegaCli64 -CfgLdDel -L0 -a0
To conclude this entire shit-show, it was time to shutdown system, remove BarraCudas and put case back together. After booting the system, annoying beep was gone.
Dust having settled, it was time to take a quick looksie on the old drives. Popping BarraCudas to a USB3.0 S-ATA -bridge revealed both drives being functional. Drives weren't that old, 2+ years of 24/7 runtime on them. Still today, I don't know exactly what happened. I only know LSI stopped loving one of the drives for good.
Old Computers and Hardware @ Museum of Technology, Finland
Friday, January 10. 2025
For a couple months, there is an exhibition of "operators and automated data processing designers" in Museum of Technology.
I visited the exhibit as tons of old hardware was shipped from Computer Museum of Finland, Jyväskylä. As there were so many interesting pieces of hardware, I'm presenting a few pictures here. On any typical blog post, I'd blanket my text with links. Here, on purpose, I'm omitting them. "Do your own research" as conspiracy lunatics say!
Funet Cisco AGS+
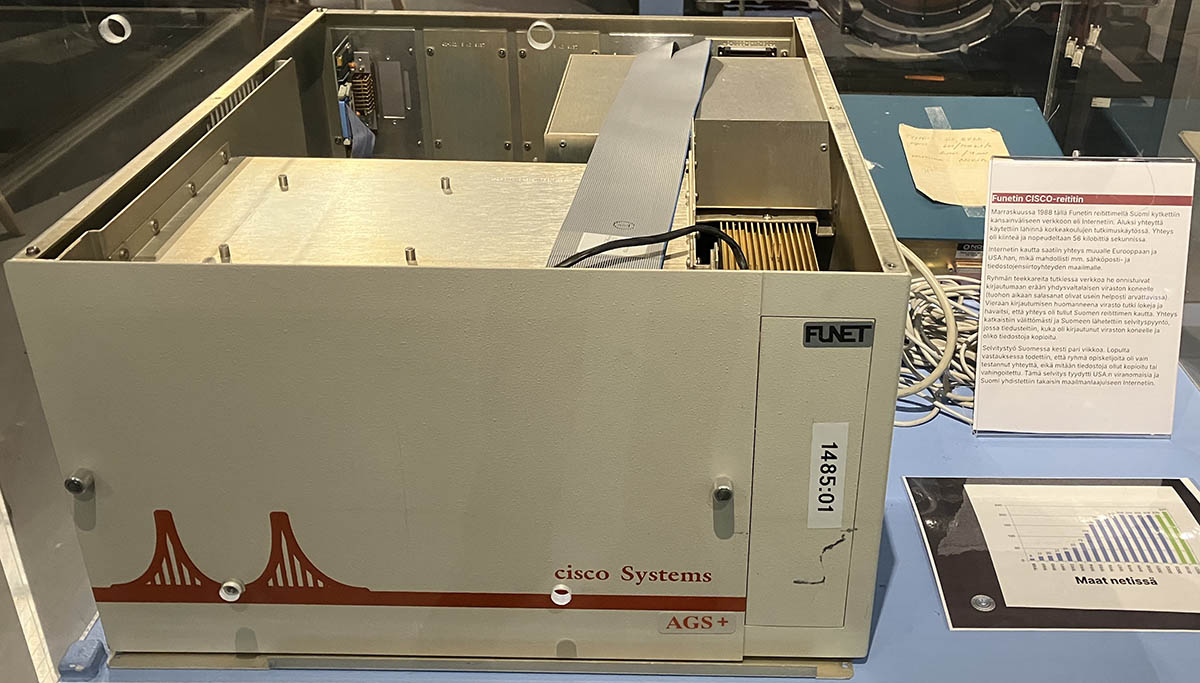
Back in the day, in 1988, when you visited ftp.funet.fi, your traffic when through this exact router. It was the first ever router manufactured by Cisco Systems.
Psion Revo
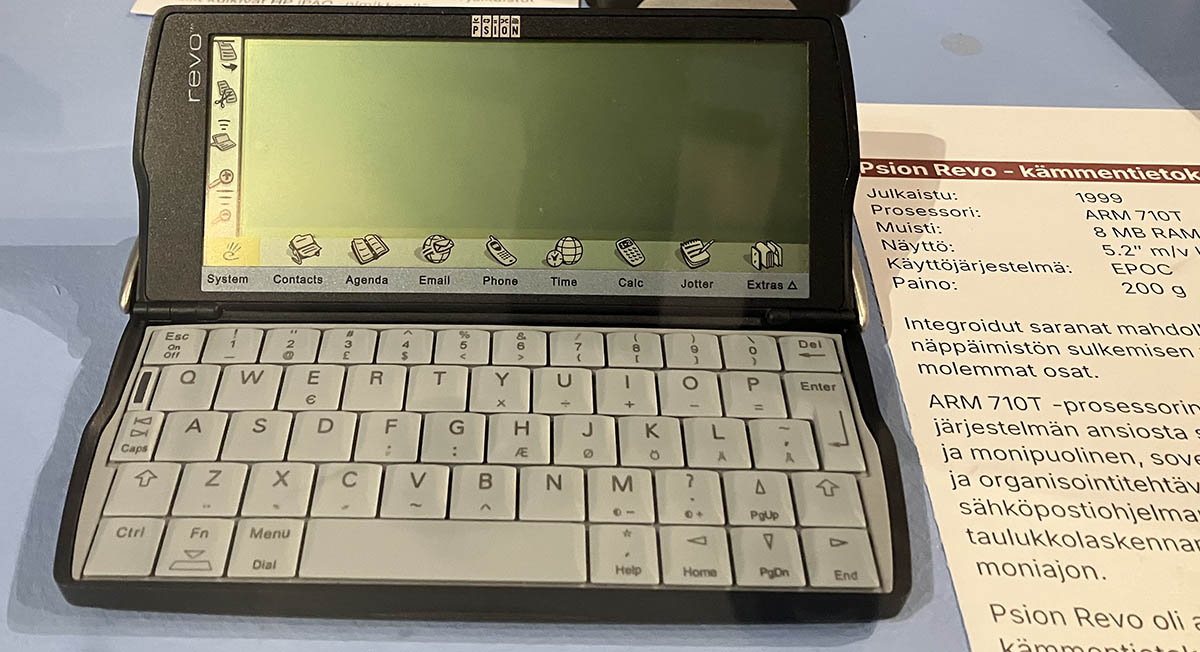
I owned one. It was a magnificant piece of pocket-size computing power! As a minus, any kind of transfer required the thing to be plugged into a PC. This minor drawback didn't slow me. Neither did the black&white screen.
Later Nokia purchased Epoc and made it Symbian.
Nokia Communicator 9210
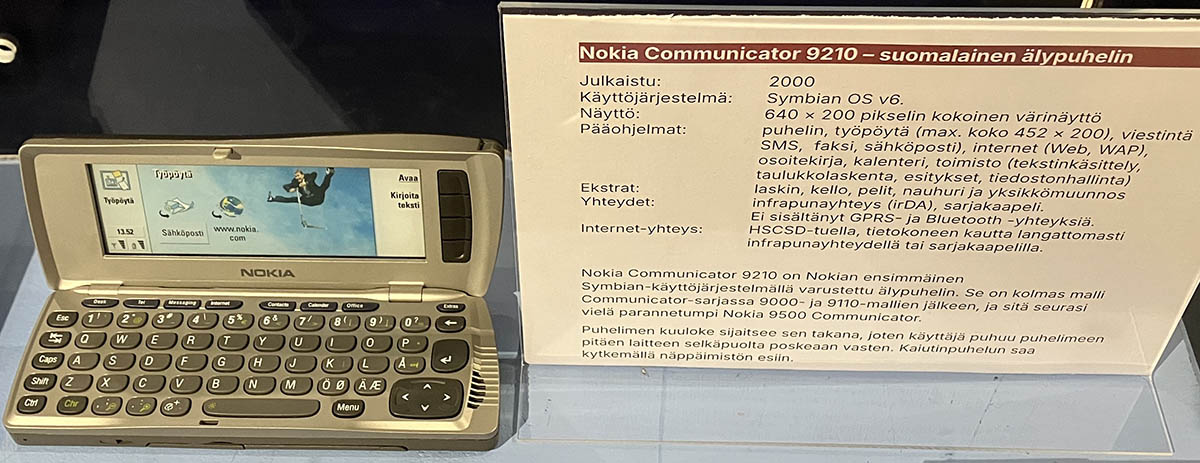
While this wasn't the first ever communicator by Nokia, it was the best one. Proper screen, good keyboard, Symbian 5, ah.
Back-in-the-days, I was poached to a company to write Symbian C++ code for this device. Fun times!
IBM PC
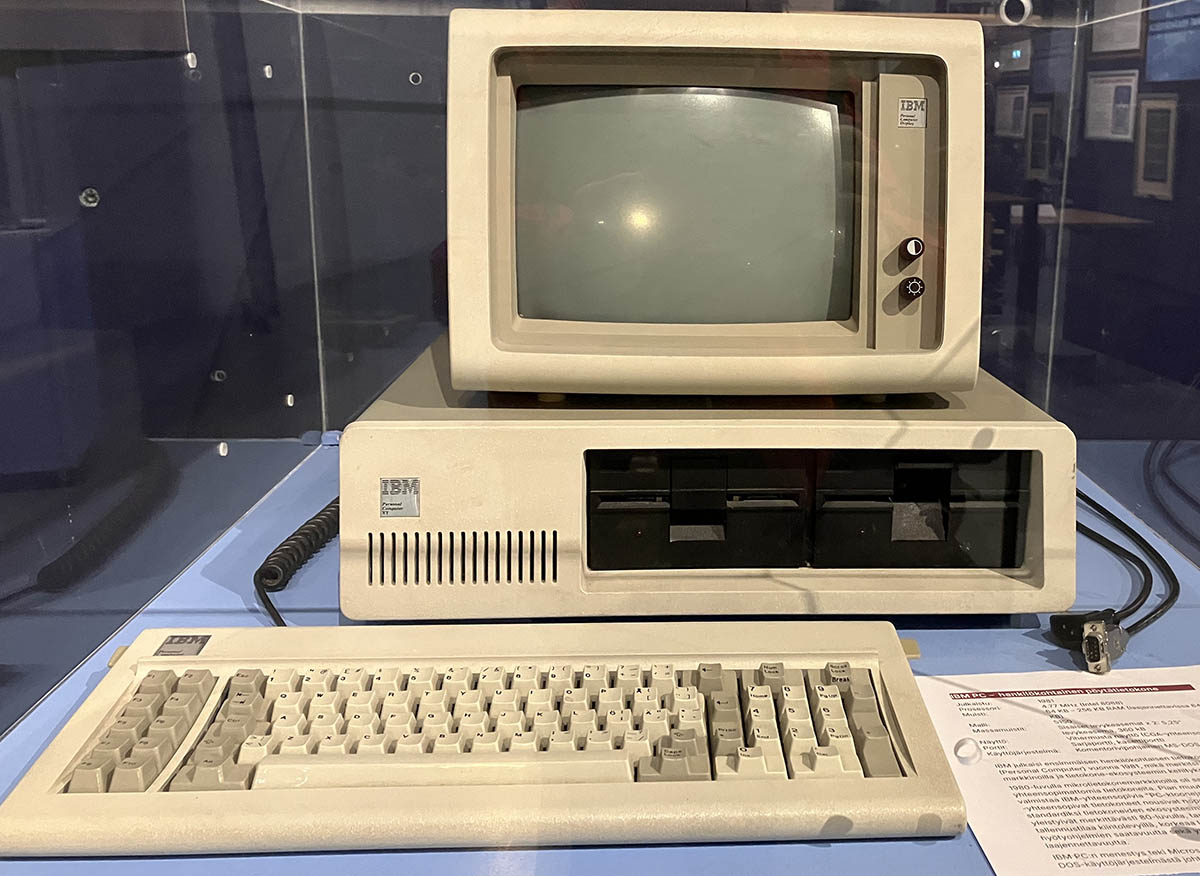
As in - the first one. Ever! From 1981.
For this invention everybody on this globe owes a lot. If IBM had kept the system closed, there wouldn't be no ecosystem for hardware manufacturers nor software crafters. This ecosystem made all the next rounds of evolution possible landing us where we are today.
Ancient: IBM 3380 HDD
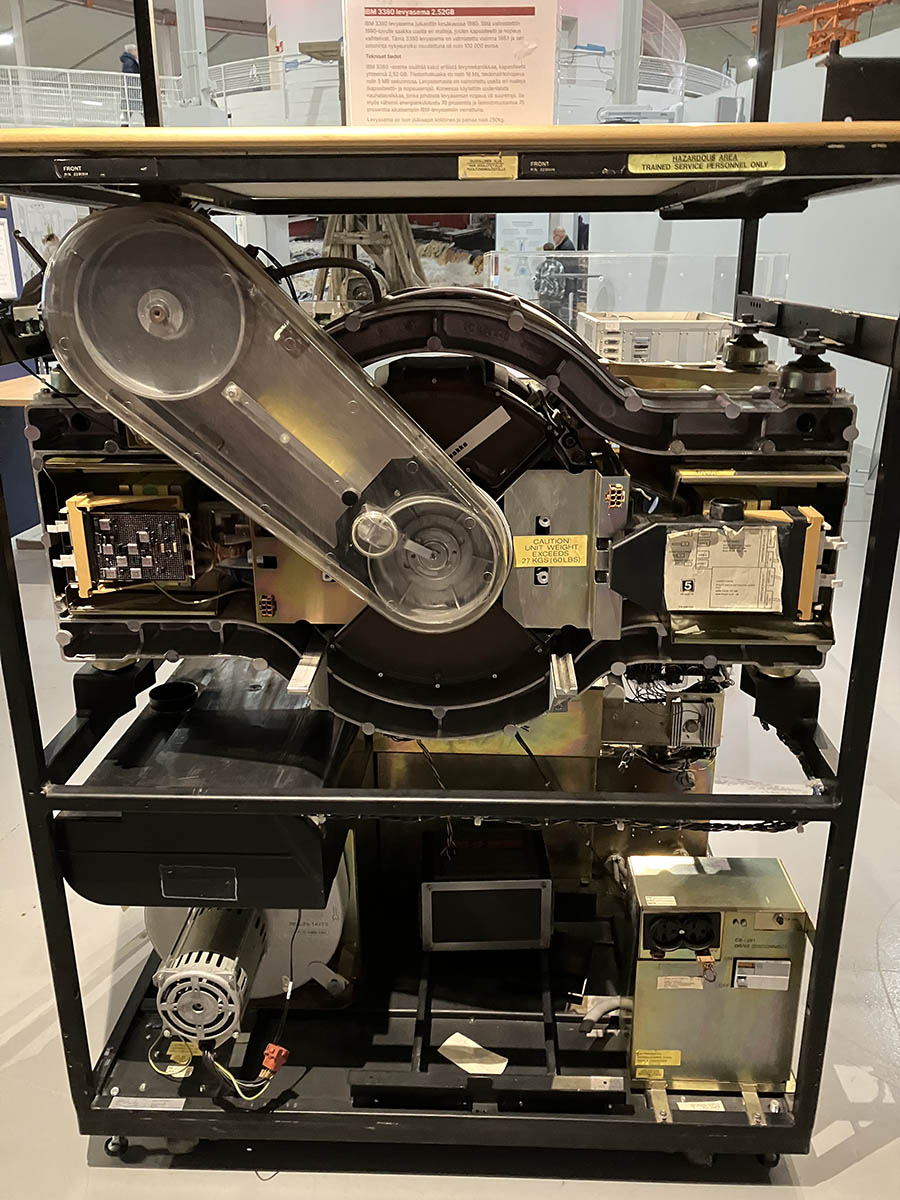
Moving to antics. Back in 60s this refridgerator-sized thing was one of the early HDDs invented by IBM. Capacity was 2,5 gigabytes. During that era RAM was in kilobytes, floppy disks barely reached megabyte.
Ancient: PDP-11
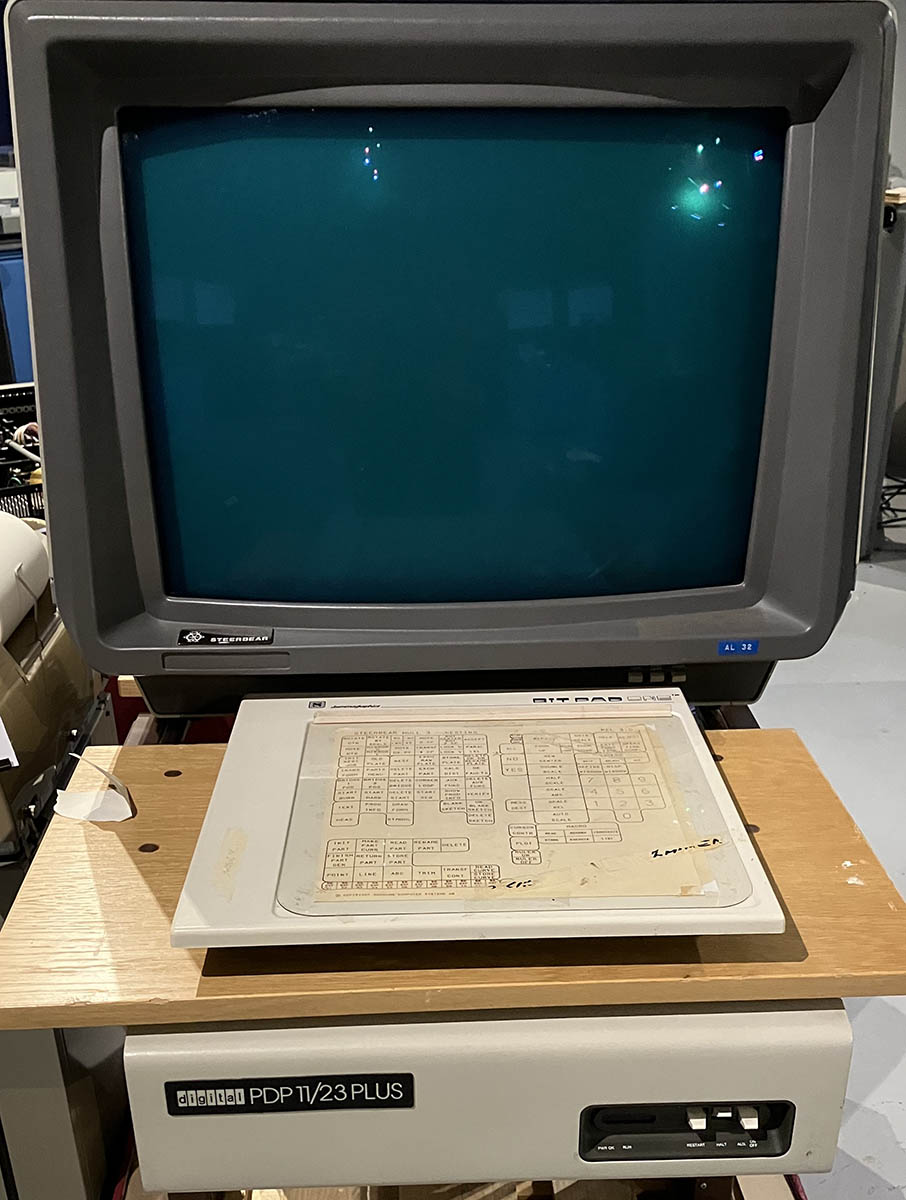
This DEC thing pre-dates me. Those things from 60s were so rare, I'm sure not many ever landed shores of Finland. The screen size is something from 2020s. However, the display is 1m x 1m x 1m and has to weigh a ton!
Ancient: DEC VT102 Terminal for the PDP-11
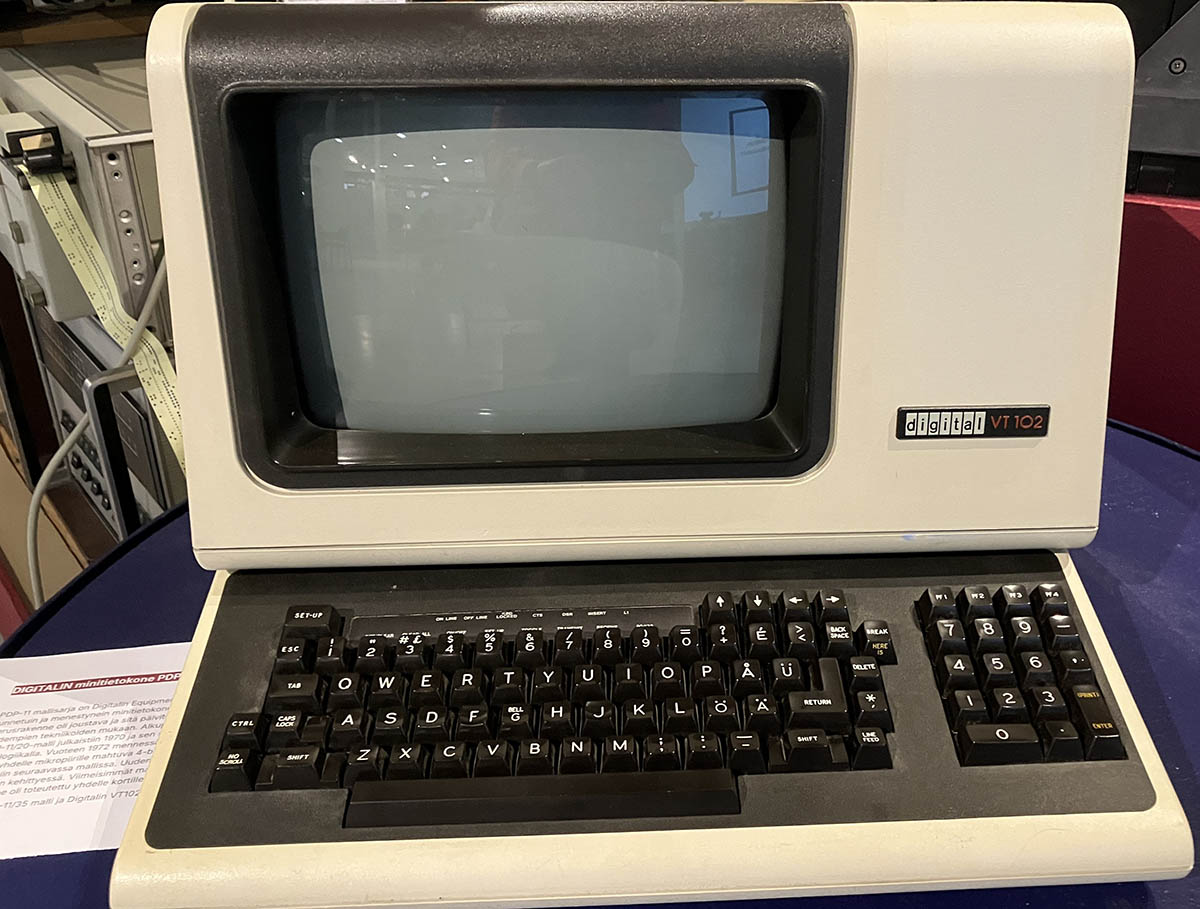
When you open a "terminal" in OS of your choice, it's a software version of that. Funny thing is, VT102 is still a common terminal type to emulate.
Ancient: IBM System/360 Control Panel
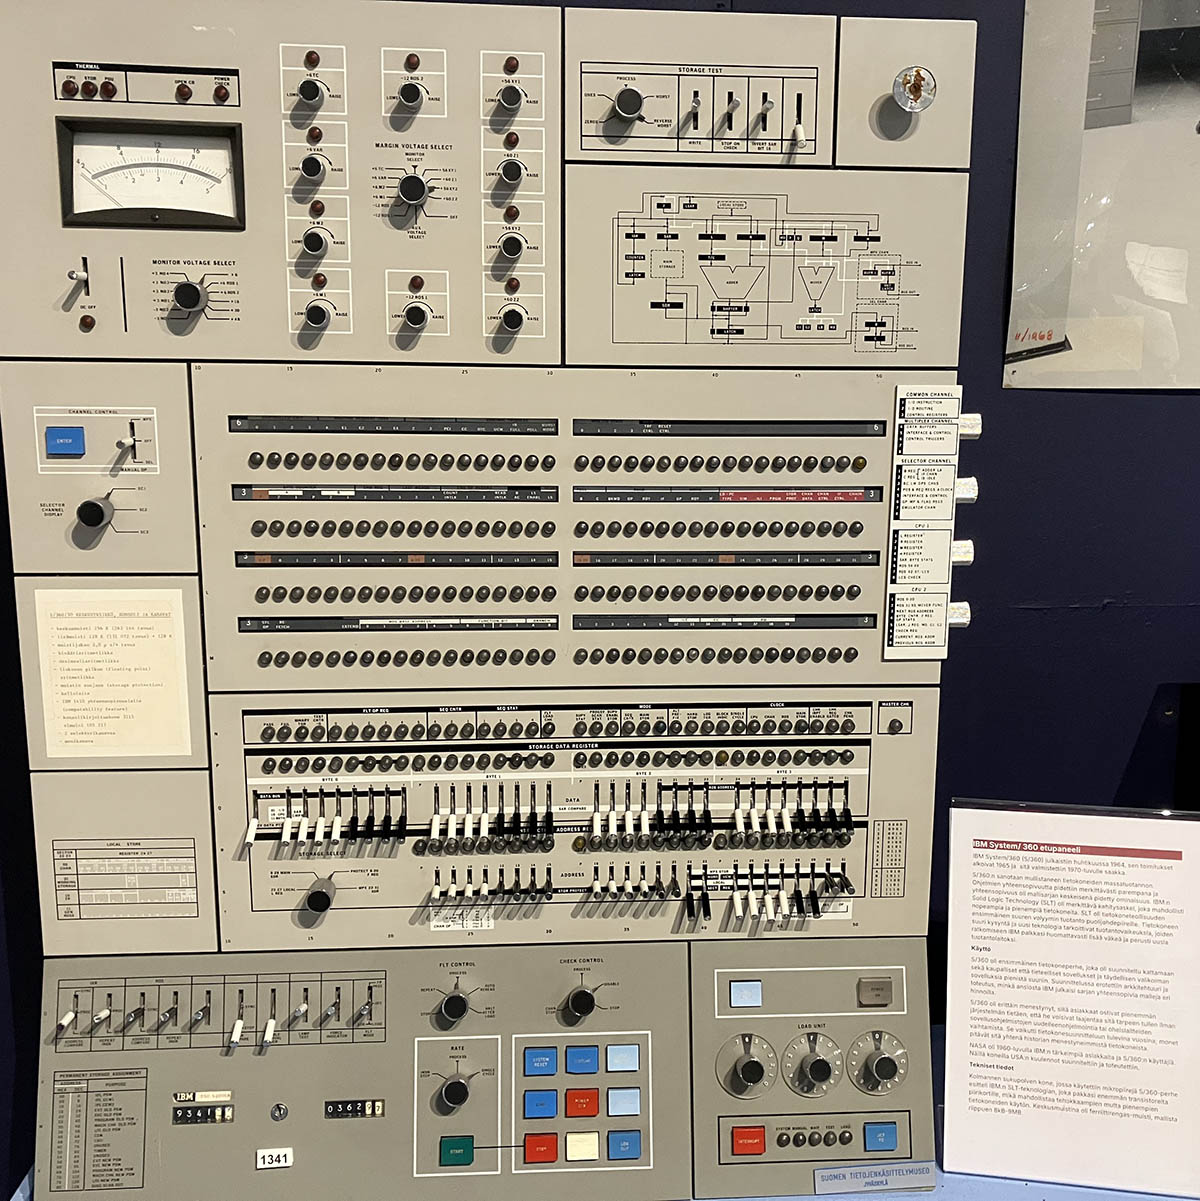
Your Windows 7 had a Control Panel. This is the same thing, but for IBM S/360. That's how you'd manage your computer's settings back in the 60s.
iPhone iOS 18 Password manager
Thursday, September 12. 2024
It took "couple" iterations on Apple to realize they'll must add a password manager to their mobile operating system.
Next Monday, iOS 18 will be released with one. It's called "Passwords":

As I already have a password manager, this isn't a big deal. However, this new password-thingie extends functionality beyond passwords and has something The World has never seen: Possibility to edit Passkeys. (Anti-climatic, huh!)
Taking a closer look, this is what the password-app contains:

Further dill-down on (the never-seen-before) Passkeys:
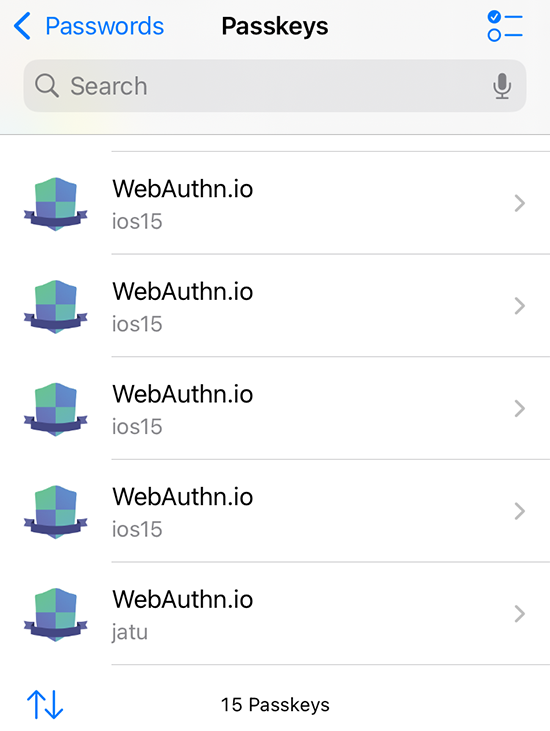
See how many dupes I have for https://webauthn.io/!
Three years back, I wrote a piece about Passkeys and it required a lot of research, testing and snooping around. Toying around throw-away Passkeys resulted in lot of junk, it seems.
While muttering "my precious", Yubico declared all information on existing passkeys a state secret. After the first one's example all other major Passkeys-providers like Appe and Google followed suit. They hid Passkeys well out of your reach.
I really never got the logic behind that. Why is it not allowed to see your own passkeys? Maybe if your security device is lost, also the criminals can see the list of your passkeys? Puzzling.
Finally I can get rid of all test junk. It took unbelievebly long to get this feature. However, I love the fact it is there.
Wifi-6 USB on a Linux - BrosTrend AX1
Thursday, August 29. 2024
My previous post was about 10+ year old laptops. At that time Broadcom ruled the chipset Wifi chipset market.
Since those days balance has shifted. Today, most common chipset for Wifi is Realtek. I also have couple Mediatek Wi-Fi chips working perfectly with Linux. To repeat what I said previously: These guys have their Linux support via open-source drivers. Broadcom doesn't. Hm. I dunno, maybe that's what made them decline and the other guy thrive? Most certainly, I wish it was their open-source support. 😁
So, my old laptop lost wireless connectivity and I needed SOMETHING to get the thing going to The Internet. I happened to have a brand new USB-stick on a test drive. As there aren't many Linux-supported chipsets, most USB-sticks won't work with 802.11ax / Wi-Fi 6 and you have to settle for slower speeds combined with less security. This product is supposed to beat competition on that.
Spoiler: I doesn't! (yet)
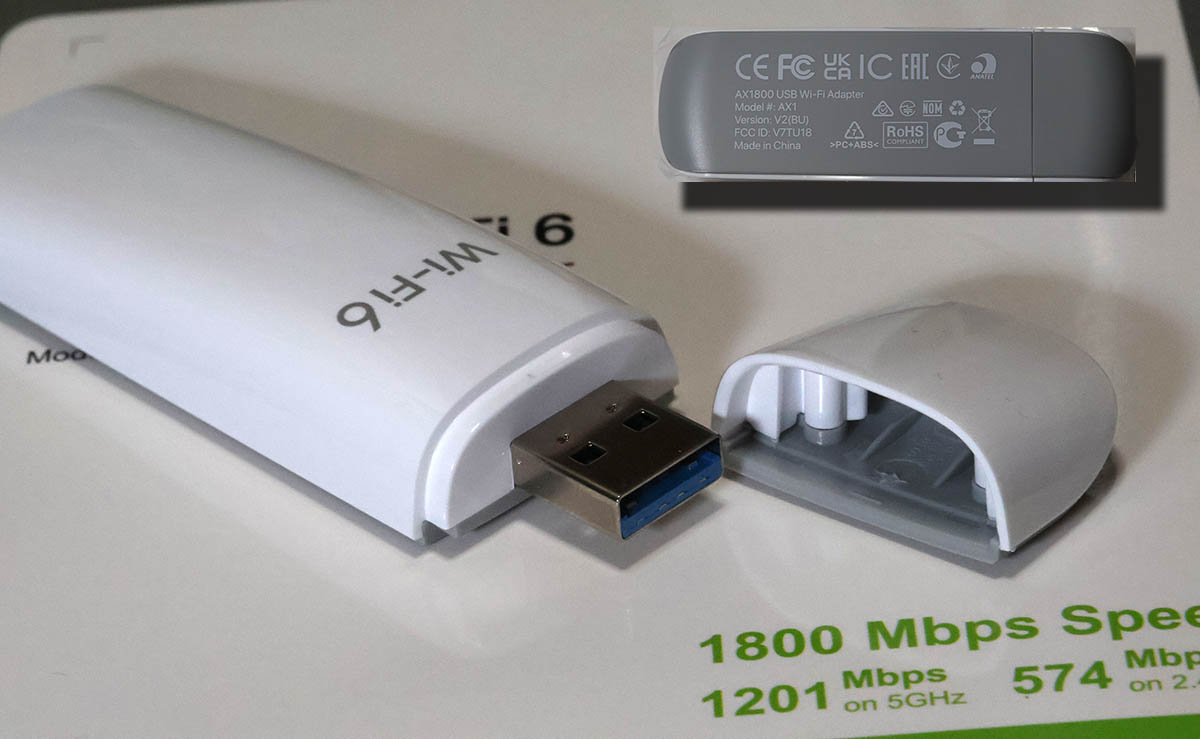
The product is BrosTrend AX1. The speed rating is AX1800 and it's supposed to be WiFi 6 Linux Compatible WiFi Adapter:
lsusb information:
Bus 001 Device 013: ID 0bda:b832 Realtek Semiconductor Corp. 802.11ac WLAN Adapter
Device Descriptor:
  bLength                18
  bDescriptorType         1
  bcdUSB               2.00
  bDeviceClass            0 [unknown]
  bDeviceSubClass         0 [unknown]
  bDeviceProtocol         0
  bMaxPacketSize0        64
  idVendor           0x0bda Realtek Semiconductor Corp.
  idProduct          0xb832 802.11ac WLAN Adapter
  bcdDevice            0.00
  iManufacturer           1 Realtek
  iProduct                2 802.11ac WLAN Adapter
Btw. See how USB-identification is for 802.11ac. Confusing, that.
At this point, there is no pre-baked Linux kernel module. You can build one in a jiffy. Source code is at https://github.com/morrownr/rtl8852bu. Getting that C-code to work in your favor, after git clone, you need to run ./install-driver.sh. This script does a lot for you. At end, the script even stealthily copies the kernel module into proper directory to make loading the driver very easy. This is confusing and not all module builds do the install without asking.
When I modprobe 8852bu on Fedora 40, module does little bit of whining, but comes up. For the crash I sent some information to author: https://github.com/morrownr/rtl8852bu/issues/38
On my laptop, connection to 802.11ac / Wi-Fi 5 works ok. I suspect, there is something off with WPA3 as connections to 802.11ax / Wi-Fi 6 simply keep asking for network password in a forever loop. But hey! It worked. I got to The Net and was able to fix things. The thought of 802.11ax support is left unanswered. If USB-information doesn't state 802.11ax either, does the stick really support it or not? I dunno.
I'm hoping, WPA3-issue would be fixed one day, so that I'd be able to join any network of my choosing, not the one the device is capable of going.
Update - 20th January 2025: There is an updated driver with full 802.11ax -support in Linux.
SD Case - Storing the cards
Wednesday, August 14. 2024
Few years ago I got interested in hieroglyphs ... erhm. SD-card markings. My piece about them is here.
Now that we have established the fact that I have too many SD-cards, where do I store them? Well. I didn't. They where around equipment, desk and shelves all around the clutter. There was a point in time, I decided to do something about it.
This is my recent storage solution:
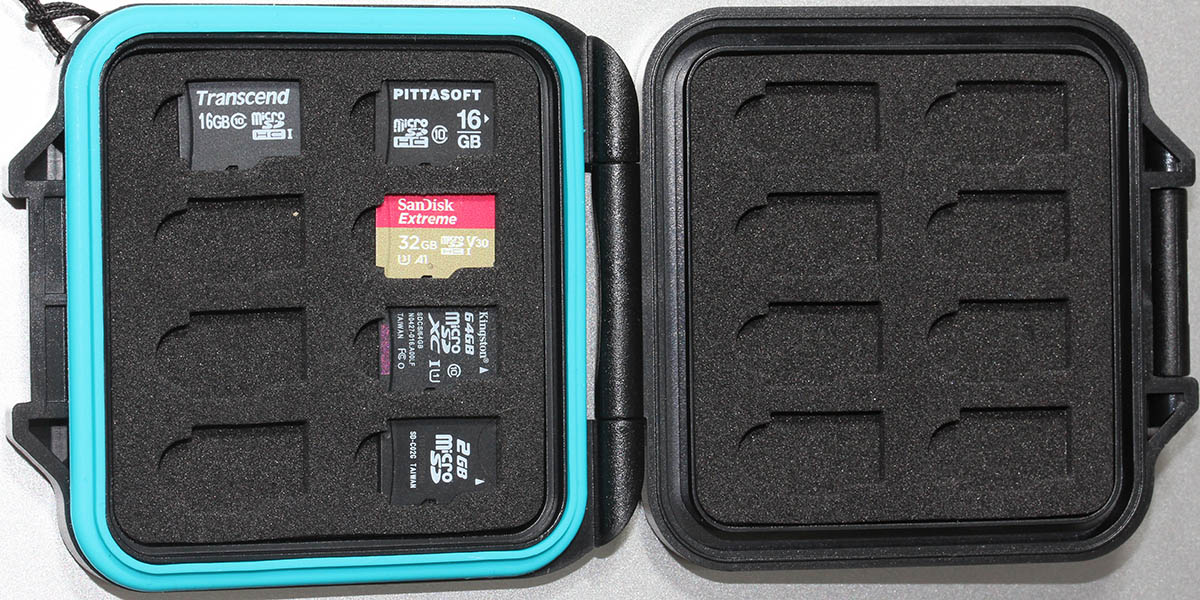
This type of case isn't available easily. It took me a while to hunt down such an item from a Chinese on-line shop. I wanted one with enough capacity for the future. Also, I wanted one that won't break or get lost easily.

This one meets the spec. Also, I went further and pimped it with appropriate labels:
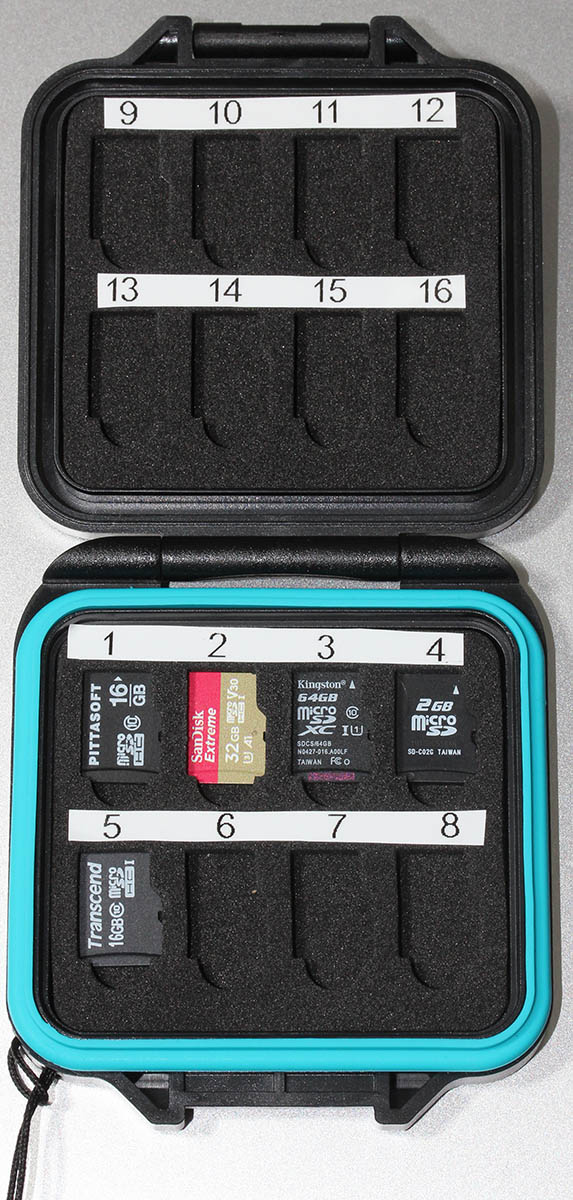
There is a tiny piece of paper to translate the numbers into real-life meanings. It's simply omitted from the pic.
Now I know where my RasPi OS-images and photos are. No need to go finding the cards anymore!
DLMS part 2 - Reading data from an utility meter via HAN/P1 port
Monday, July 29. 2024
Remember this one?
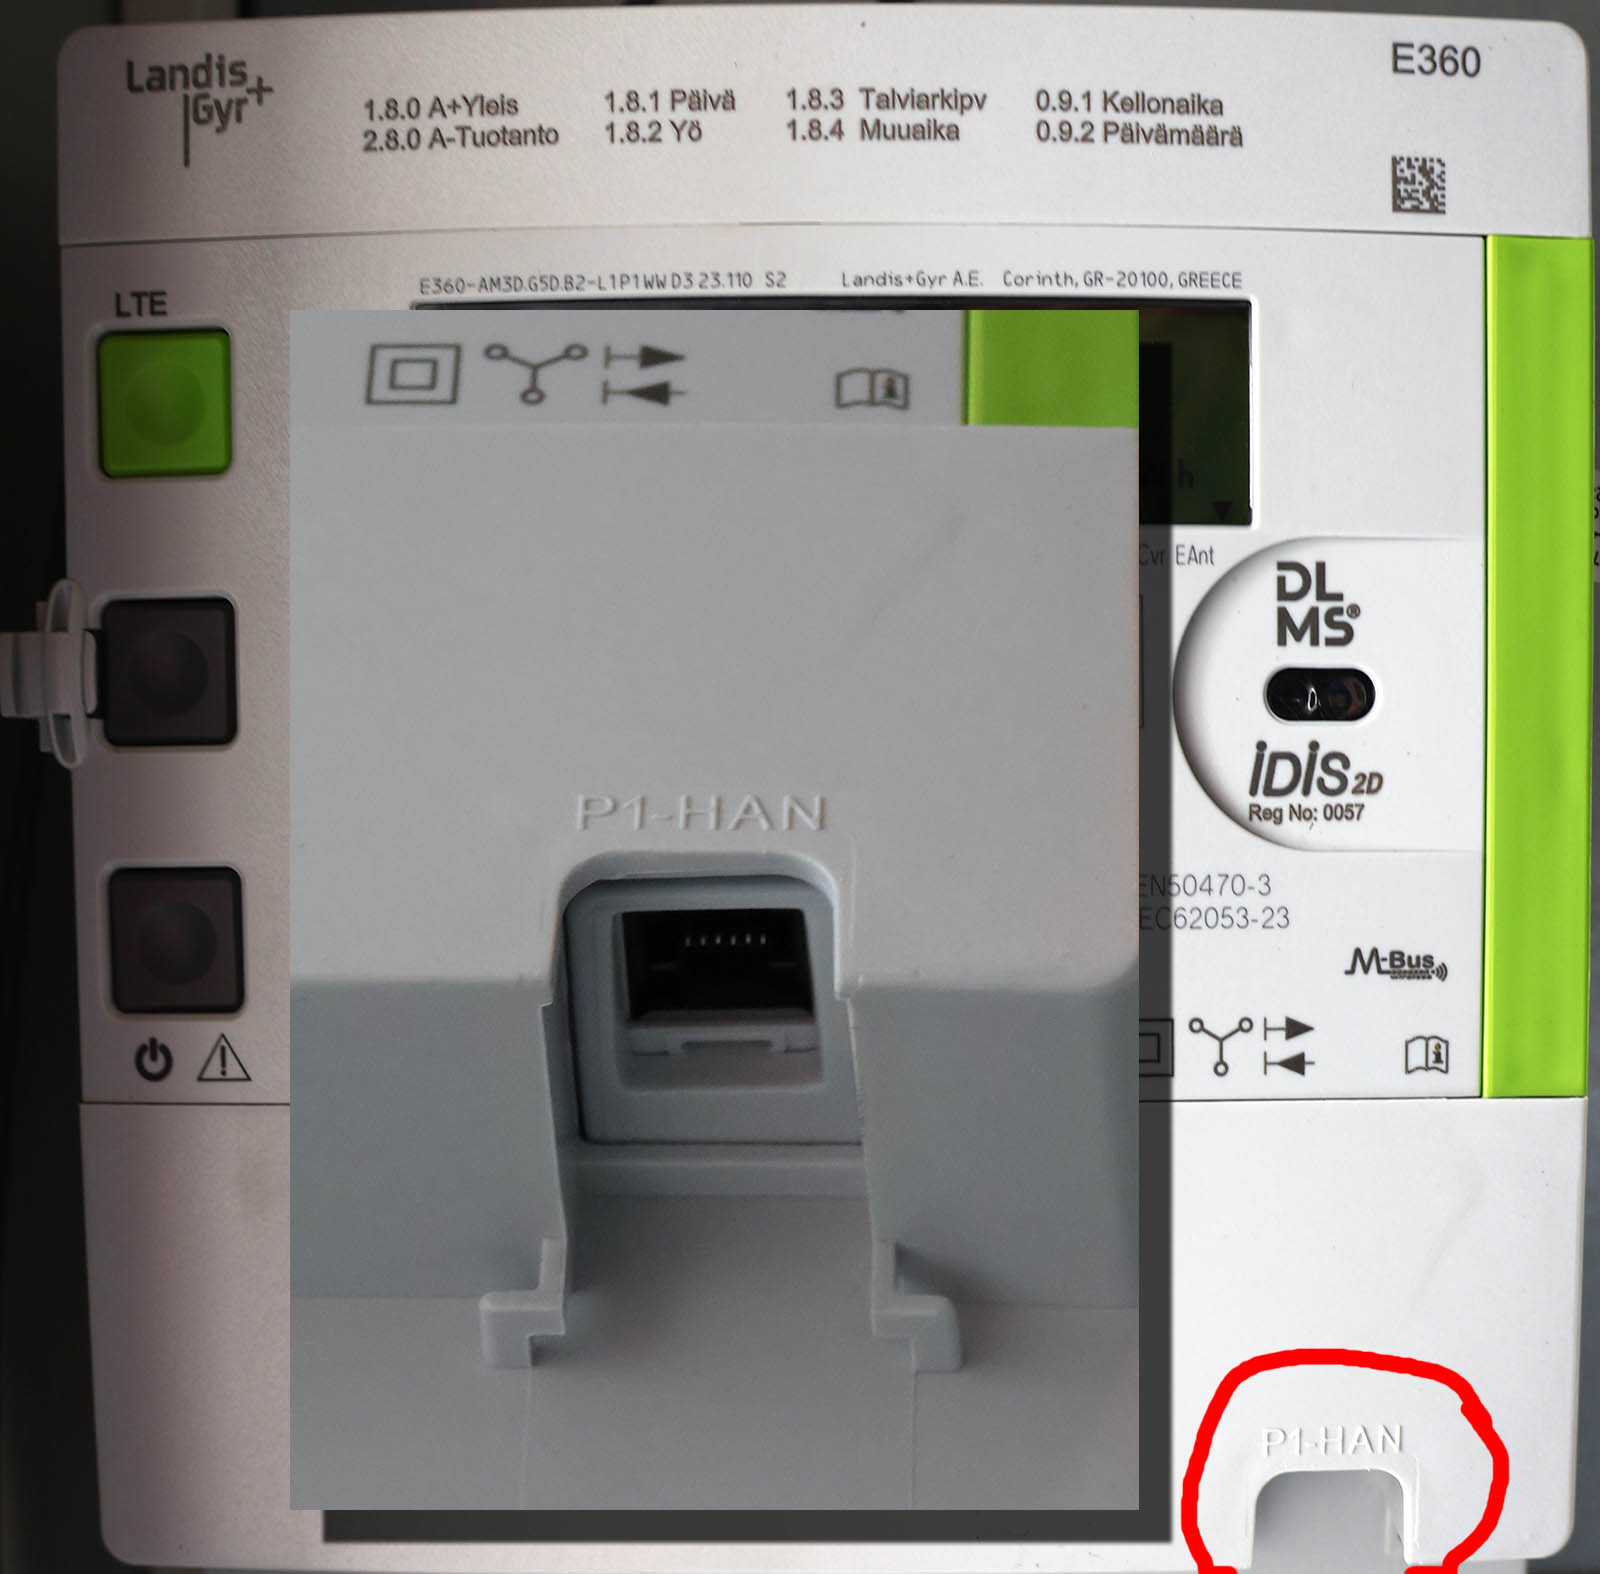
My new utility meter has an RJ-12 in the bottom of the unit. Naming of this port is really weird as it is called HAN, P1, HAN/P1 or P1/HAN. In Norway the port is RJ-45 and they call it HAN, for Home Area Network. Original RJ-12 from Netherlands was called P1, which is short for ... P1? I dunno! Just to be safe, manufacturers combine those two. In reality they just add to confusion.
Assuming, one wanted to see in detail how much energy is created by solar panels on the roof and combine that information with data from electricity utility meter, it would be possible to see how much money is being saved with the panels. Having detailed information on how regular household utilized electricity is a nice side effect of that.
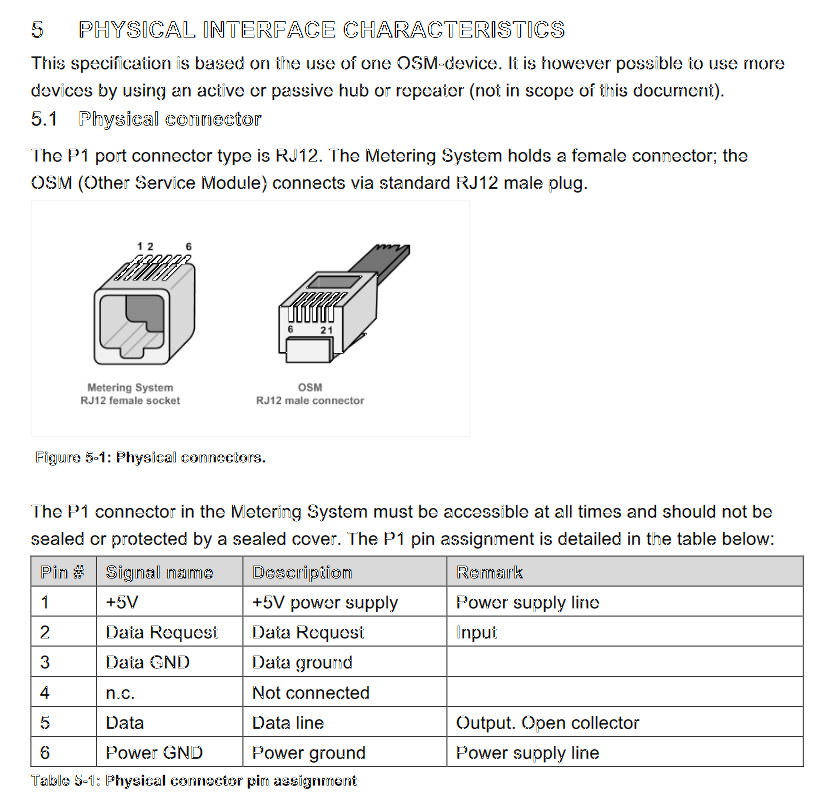
Now that we're in Finland (not Norway, not Netherlands), the regulation is from SESKO and in section 4.6 Physical Interface is as follows:
The RJ12 connector (6P6C connector) is used as the physical interface and the interface meets the requirements of "P1 Companion Standard".
Further, the mentioned document is from Netherlands and describes the physical interface:
Now two things need to happen:
- Utility company needs to enable the P1/HAN -port. The port is disabled by default. Utility company needs to pay license money for each open port to Landis+Gyr.
- Data pouring from the port needs to be read with a suitable piece of hardware. Protocol is M-Bus, a TTL signal.
Given Internet has tons of possibilities, a suitable open-source reader exists: P1IB. All the necessary data is freely available at https://github.com/remne/p1ib. Software, hardware and 3D-printer models for the case. Obviously, there is an option to go buy one pre-built.
After tinkering with hardware, enabling a MQTT data-pump on both solar panels and utility meter. Setting up a MQTT-broker to receive the published data and a Home Assistant software to have a cherry on top. Final result looks like this:
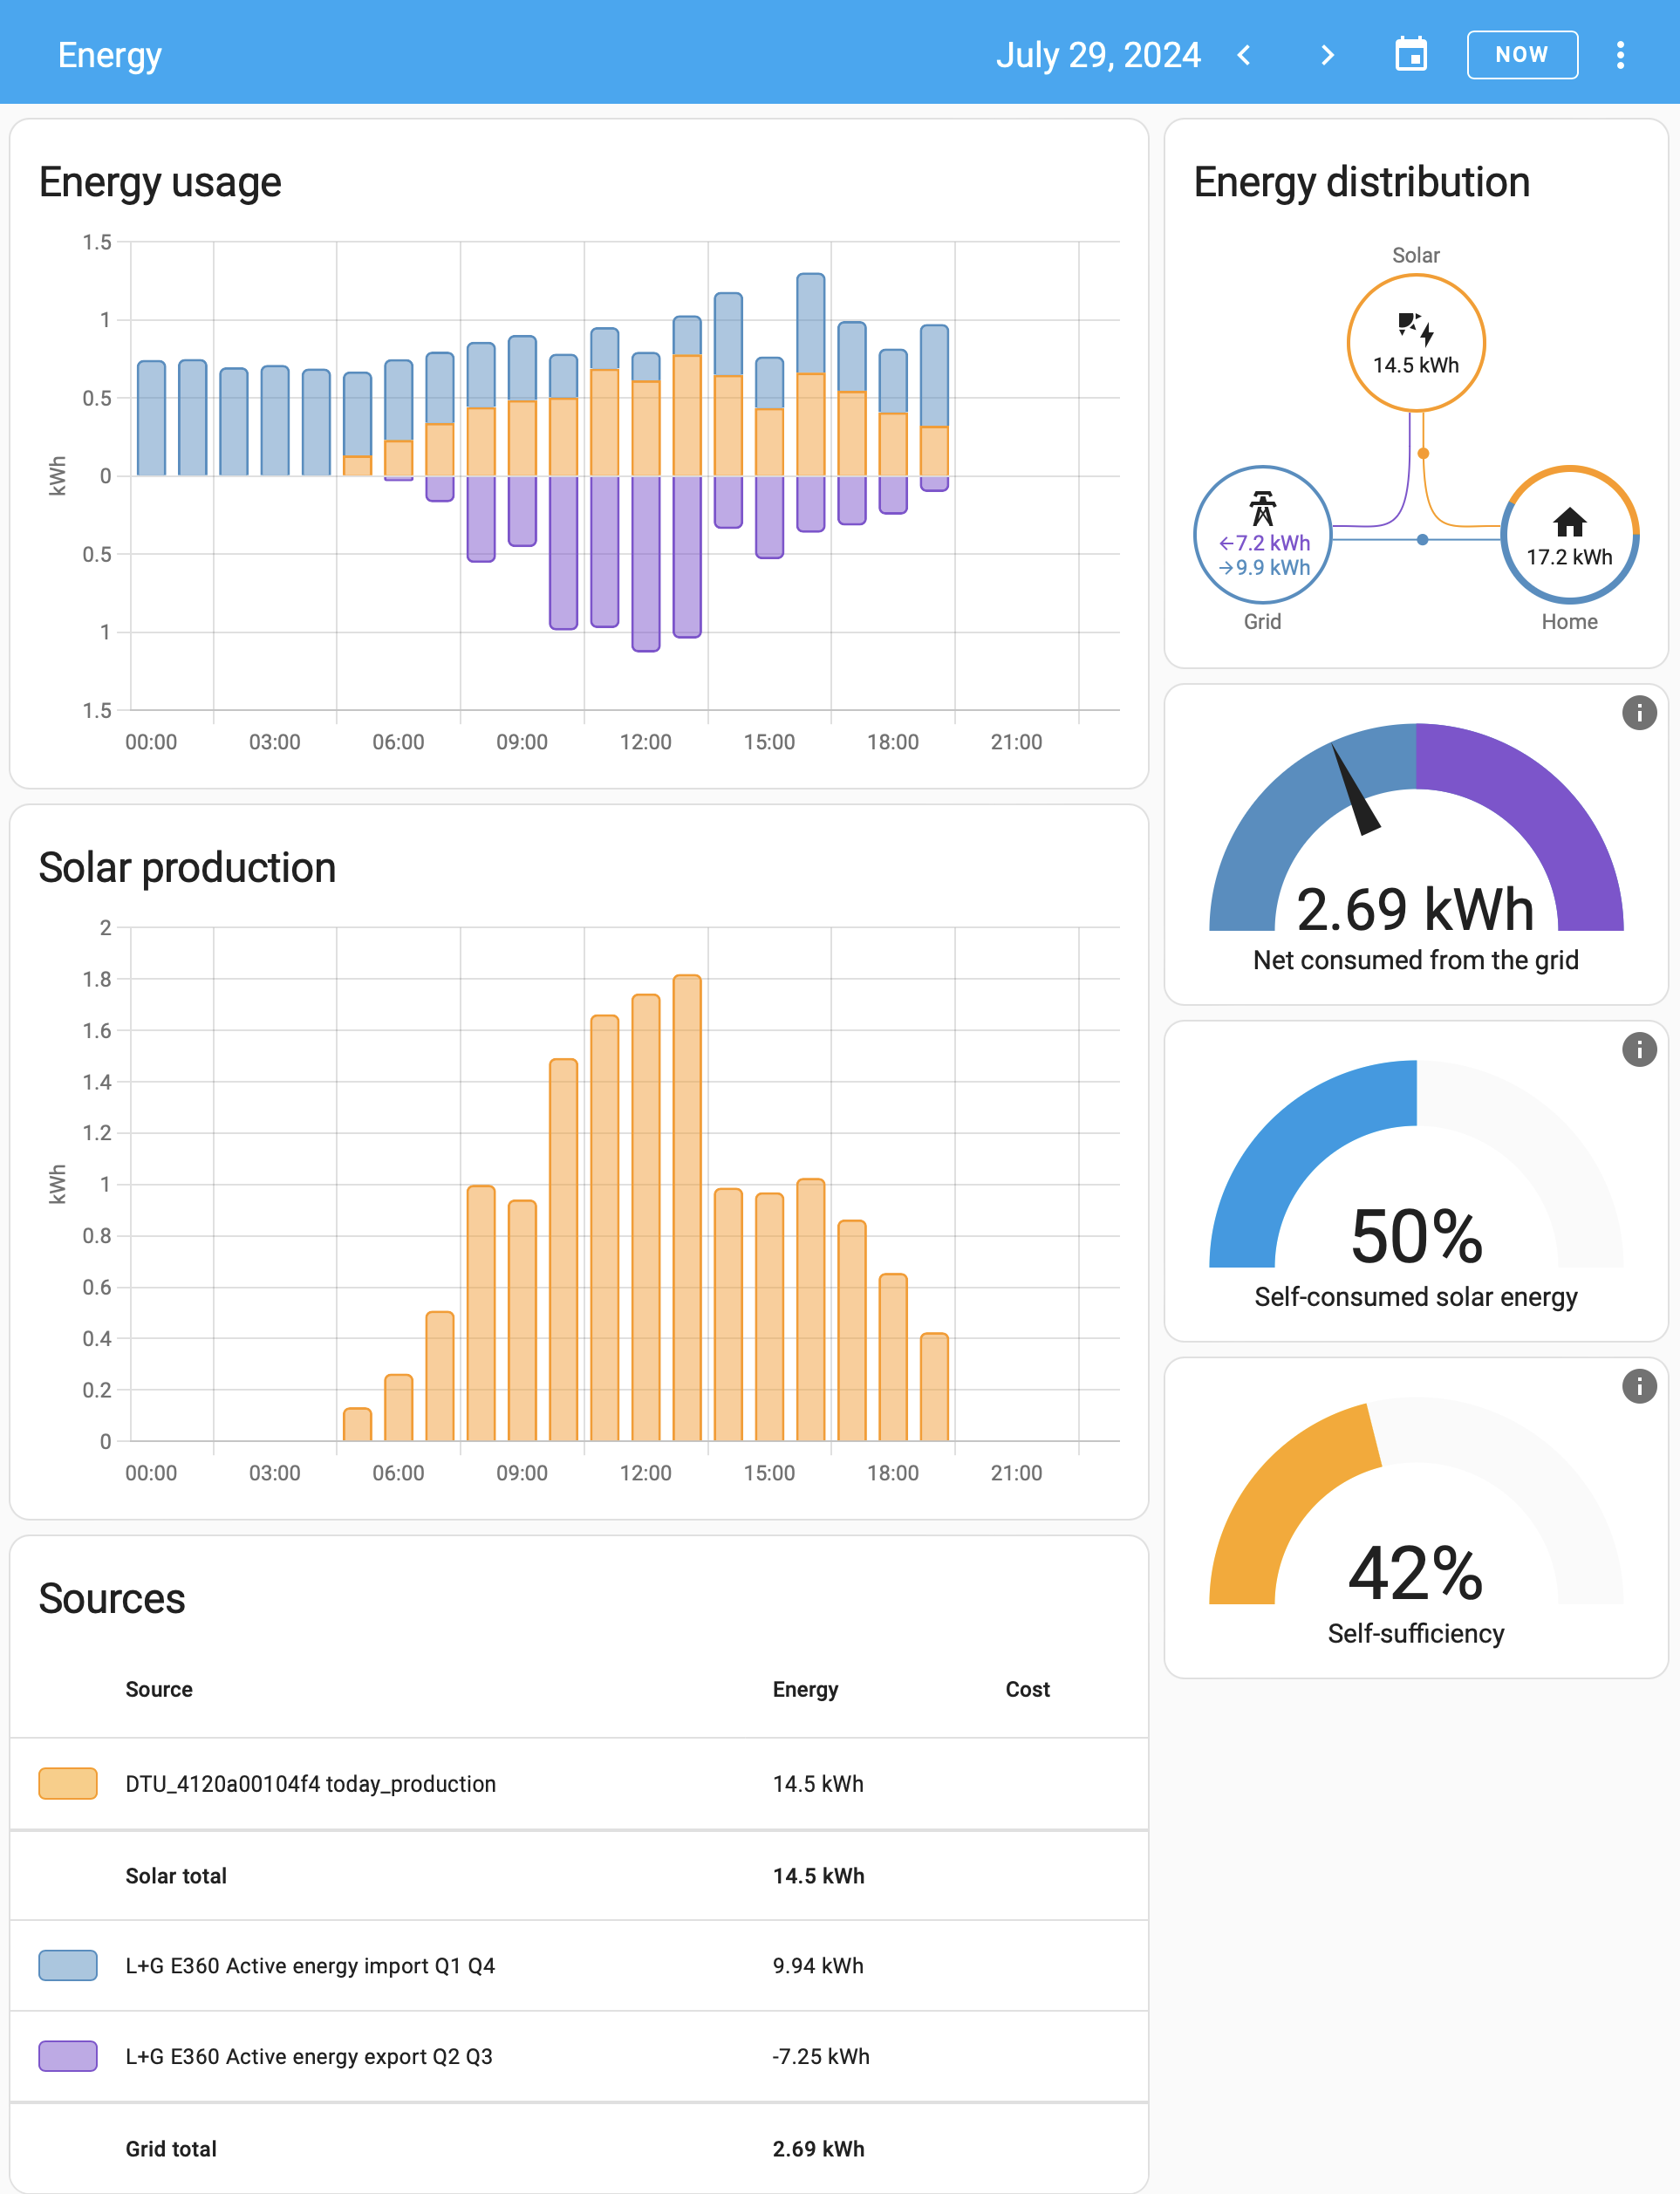
In Energy-section of Home Assistant, there are number of data visualizations. Top-left bar diagram indicates how much electricity is being consumed by the household. Blue is electricity purhcase from grid with money. Yellow is electricity produced by solar panels. Bottom side, purple, is electricity sold to utility company's grid from solar panels.
Bracket with time 12:00 has hours 11, 12 and 13 in it. As an example, during hour 12 house consumed 0.8 kWh of electricity. Of that 0.61 kWh was solar power (yay! free!) and 0.18 kWh was purchased from utility company (uff! €). However, during that hour solar production was 1,74 kWh, of which 1,13 kWh was returned back to grid. Funny how averages work, there must have been clouds or spike in consumption for the need to purchase more. On the other hand, there were plenty of times where excess energy was available. In theory, I'll get some money out of that excess. Practically: I don't. Transfer in and out costs money to me and all my potential proceeds go to transfer.
Looking at other parts of the visualizations: Obviously, the good thing is I do consume 50% of my own production, making it 42% of all my consumption. What happened after taking the screenshot was the obvious sunset. My solar panels are unable to produce anything, so all my consumed electricyt was from the grid. As a daily record, after sunset hours did increase daily net consumption by couple kWh.
Next up: Now that we know what electricity costs and the rate it flows in and out, it is easy to apply money on top of all this. It should be possible to estimate correctness of initial payback time of solar panel investment.
DLMS - Reading data from an utility meter
Thursday, July 11. 2024
DLMS/COSEM or Device Language Message Specification / Companion Specification for Energy Metering is something IEC 62056 set of standards define. The use case is to enable a consumer to access readings of a smart meter. Technology is robust, it was introduced in Netherlands nearly 30 years ago. Accessing data is also very straightforward, DLMS.dev has instructions for this.
Port and magnet-attaching reader look like these:
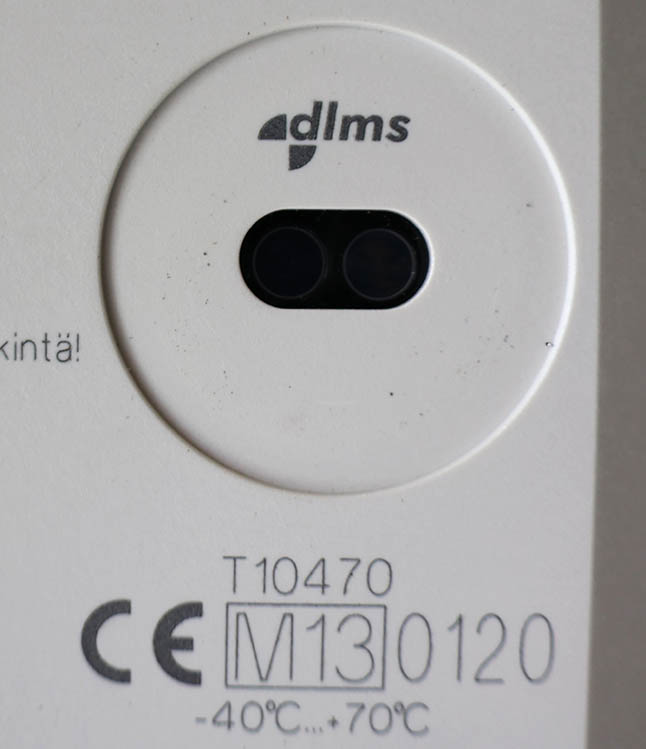
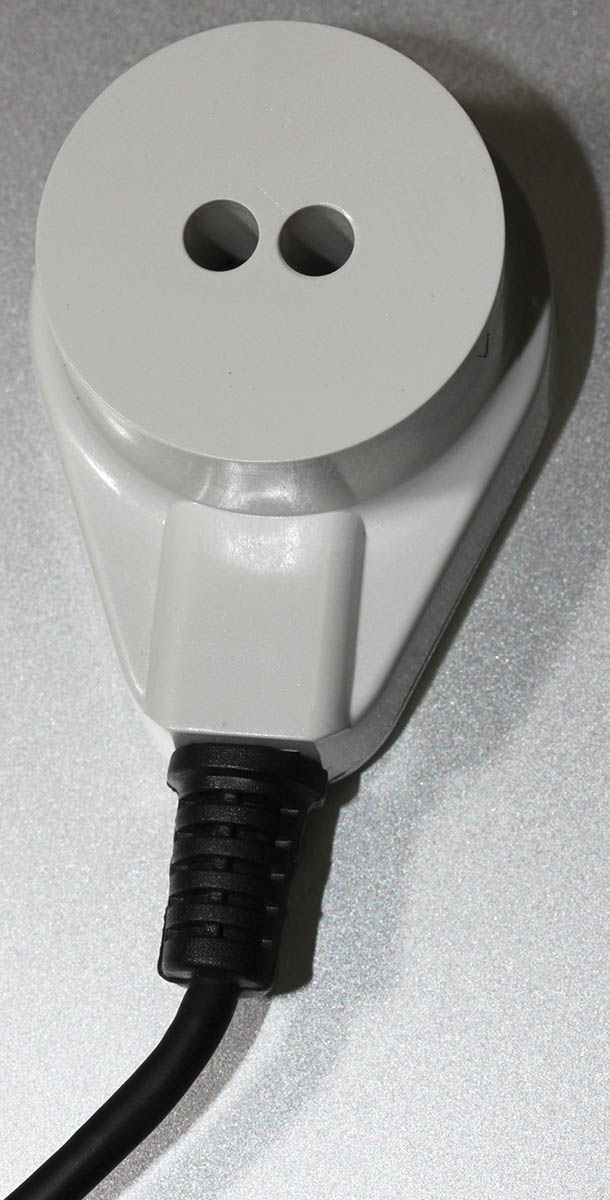
Simple & robust. Then there is the but -part. (there always is one)
My electricity meter (let's state the obvious: provided by my utility company) looks like this:
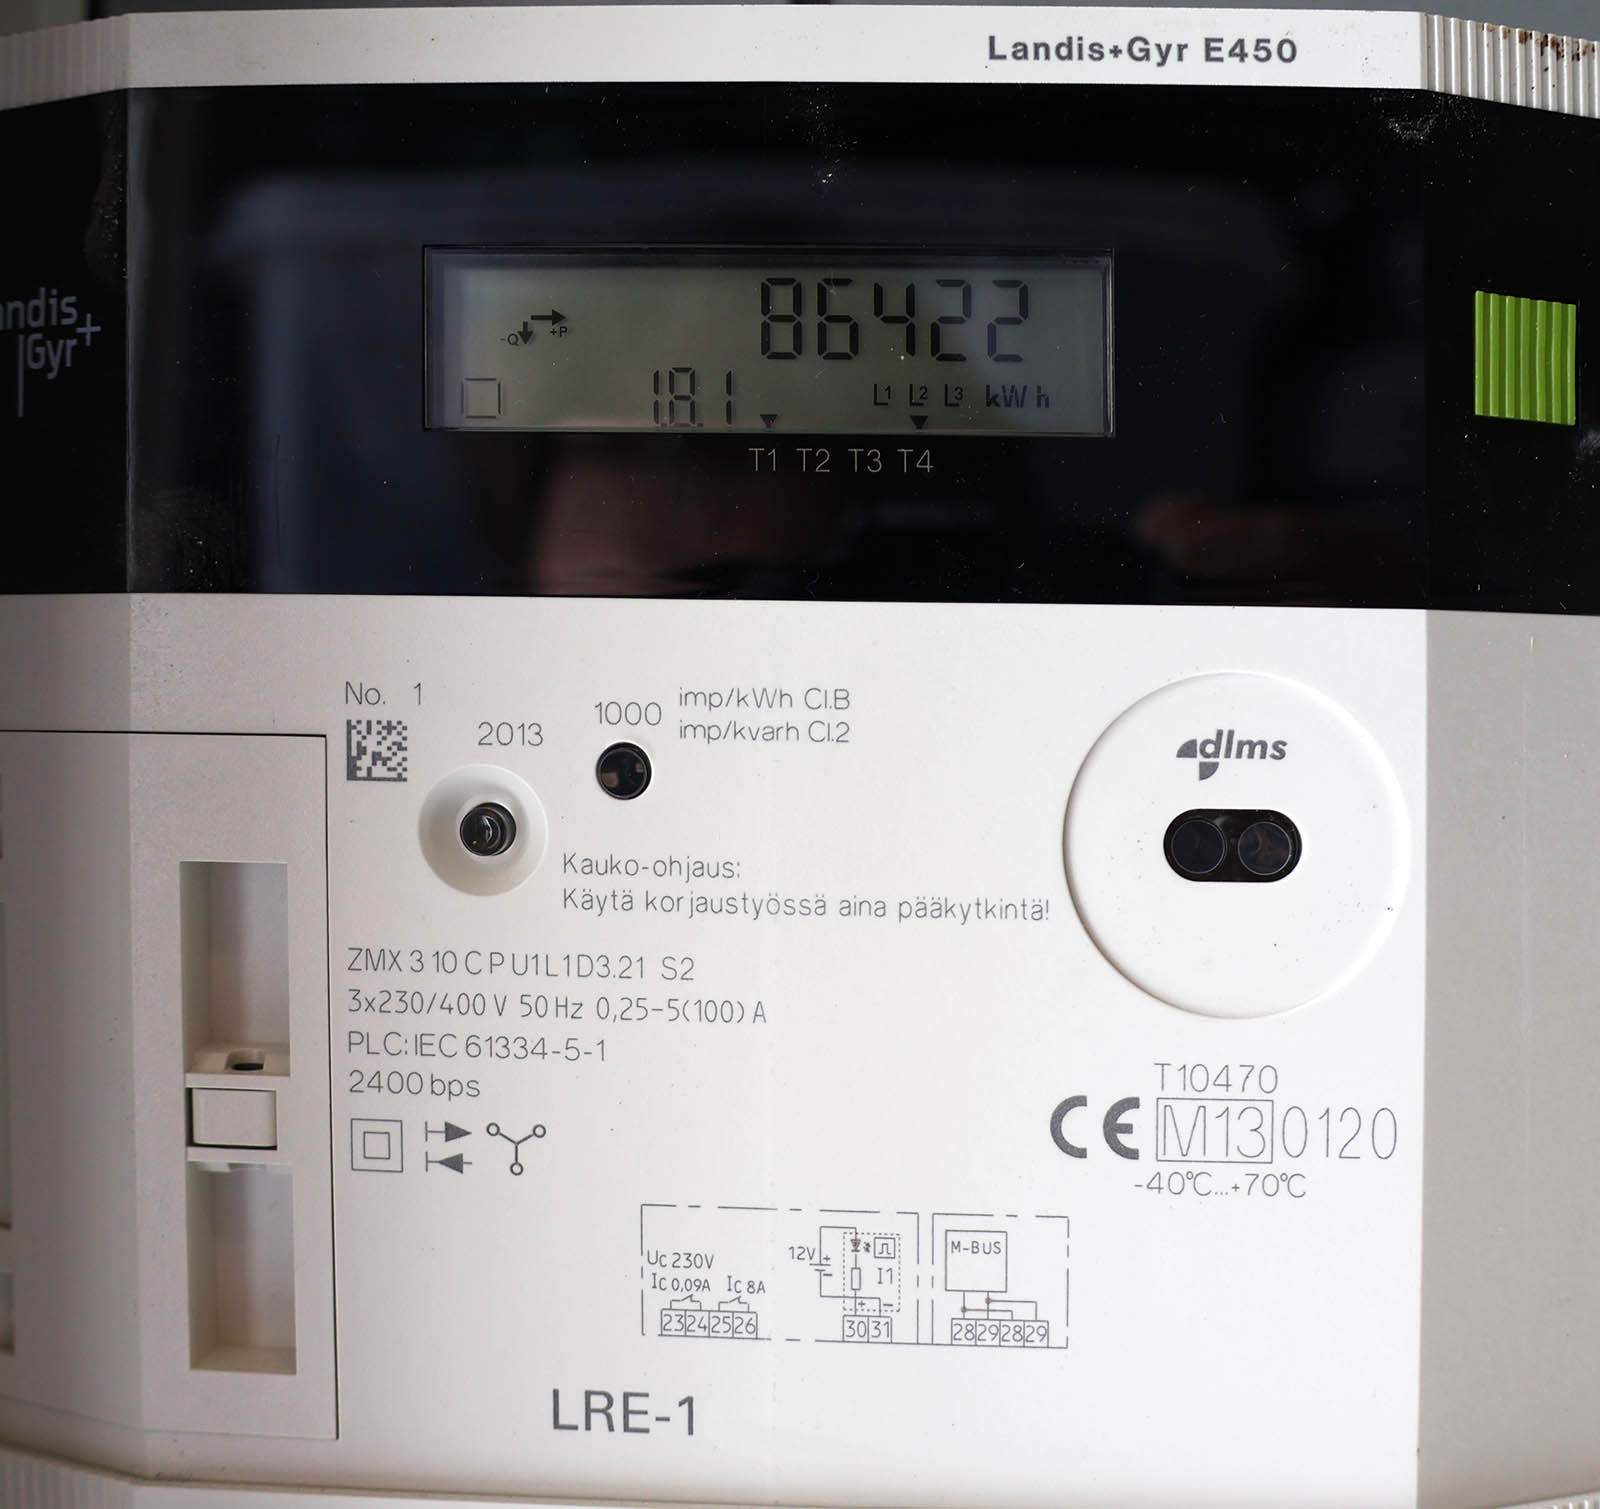
Unit is a Landis+Gyr E450 and it has the port ... aaand the port doesn't work. In my books "work" would indicate some sort of data flow. To sort this out, I contacted tech support with questions. The reply I got was astonishing! DLMS is disabled for all units because of expensive license fee. The greedy bastards at Landis+Gyr want more money for (EU) 2019/944 given consumer rights. As the price is steep, my provider chose not to comply, which translates into no data for me.
Given EU laws and regulations, the story does not end there. In their infinite wisdom, L+G license fee for HAN P1 interface makes commercial sense, so:
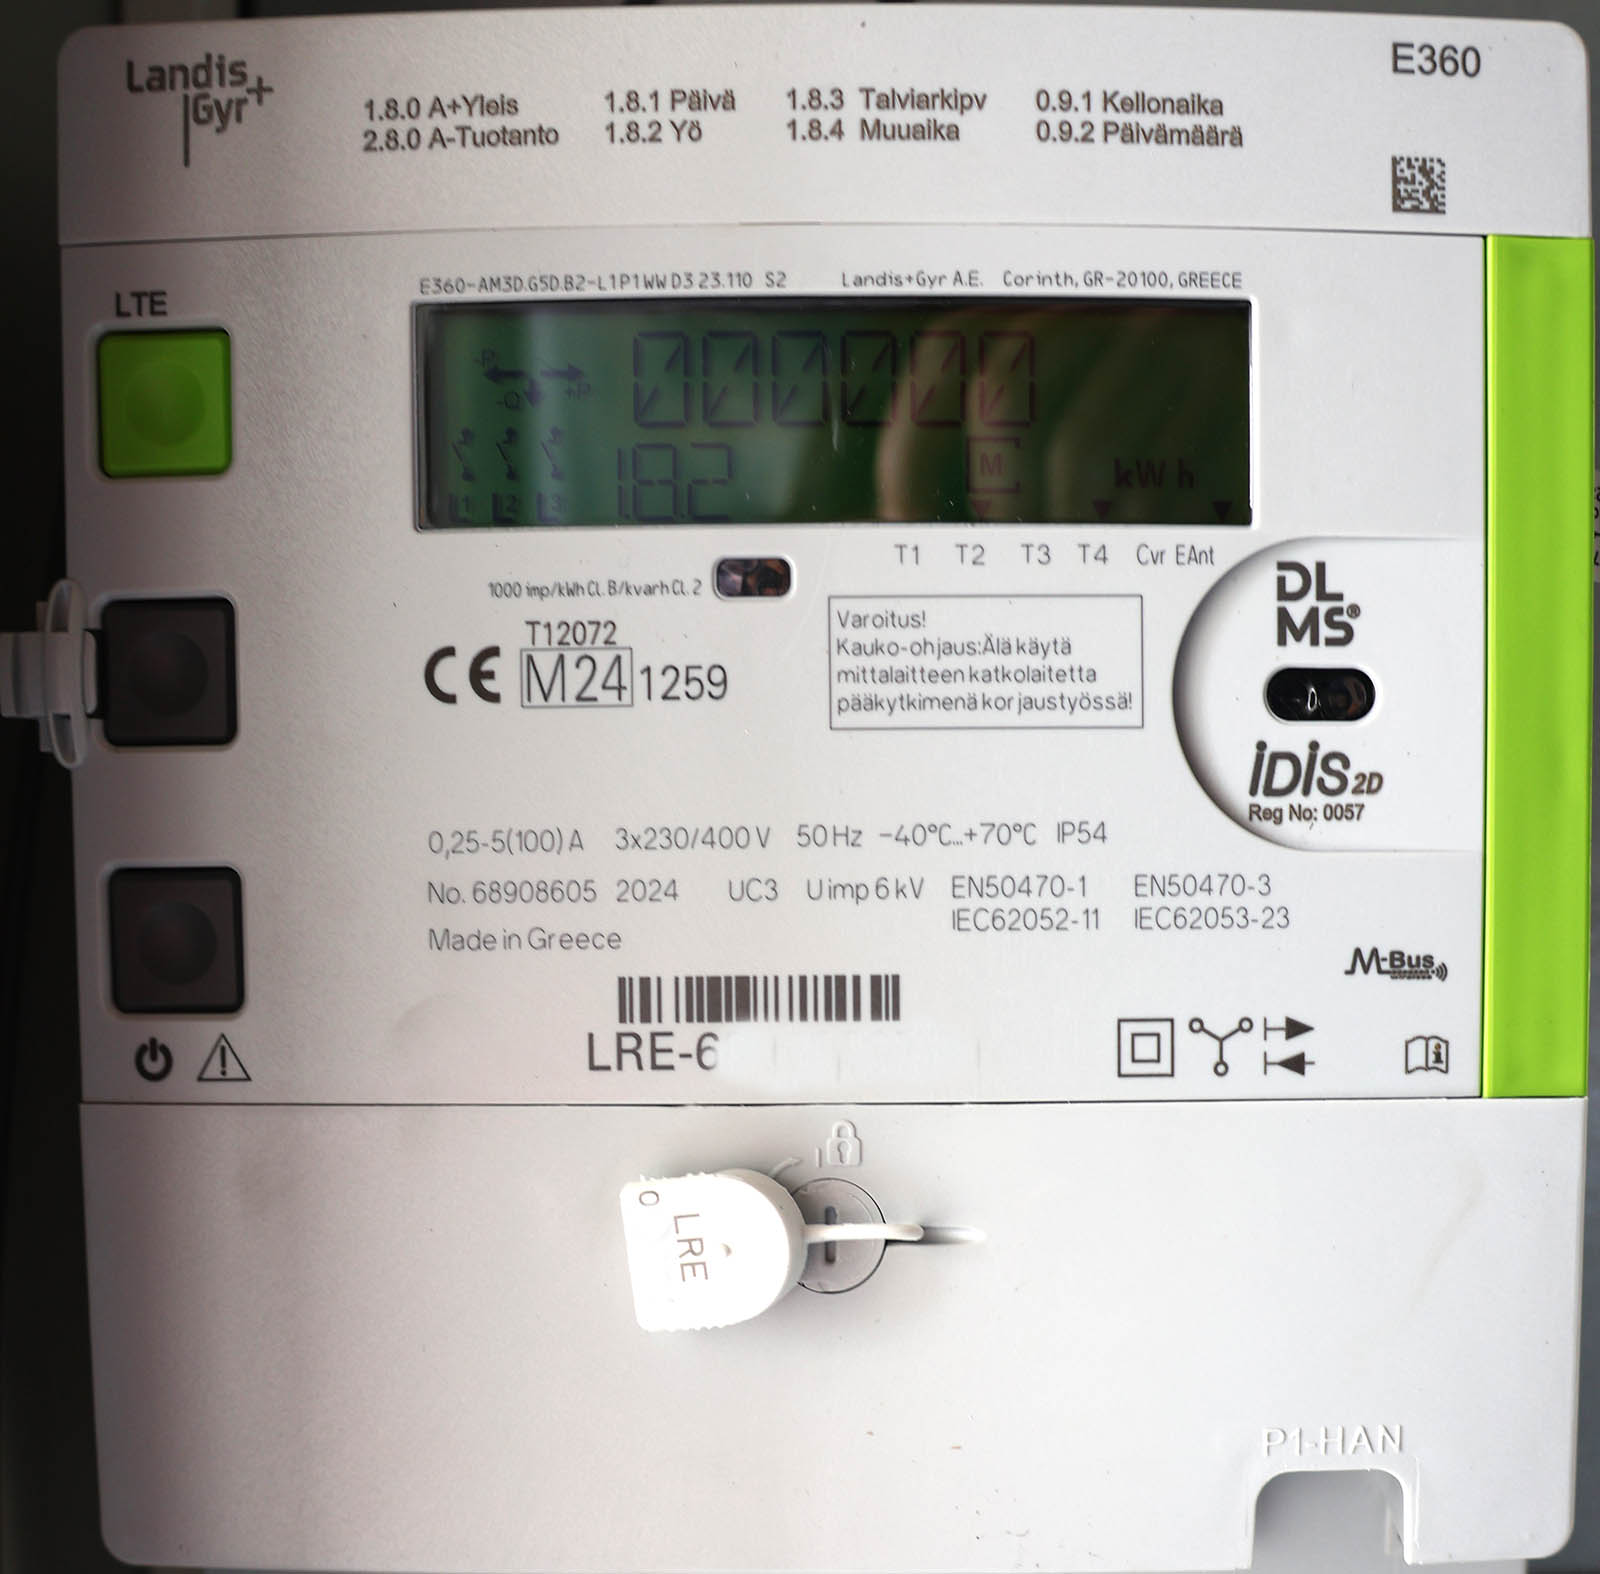
Now I'm running a Landis+Gyr E360.
Obviously, the HAN P1 doesn't work yet. It needs to be enabled from network control. For the mentioned license fee. I'll get back to this when I have any data.
DisplayPort Cables - Follow up
Sunday, July 7. 2024
Last month I bumped into an incompatible DisplayPort -cable. There are many different speeds and DP 2.0 requires so much more on your cable to achieve those speeds 4K, 5K and 8K monitors require.
A famous phrase states "Go big or go home!" So I did that. Went big:
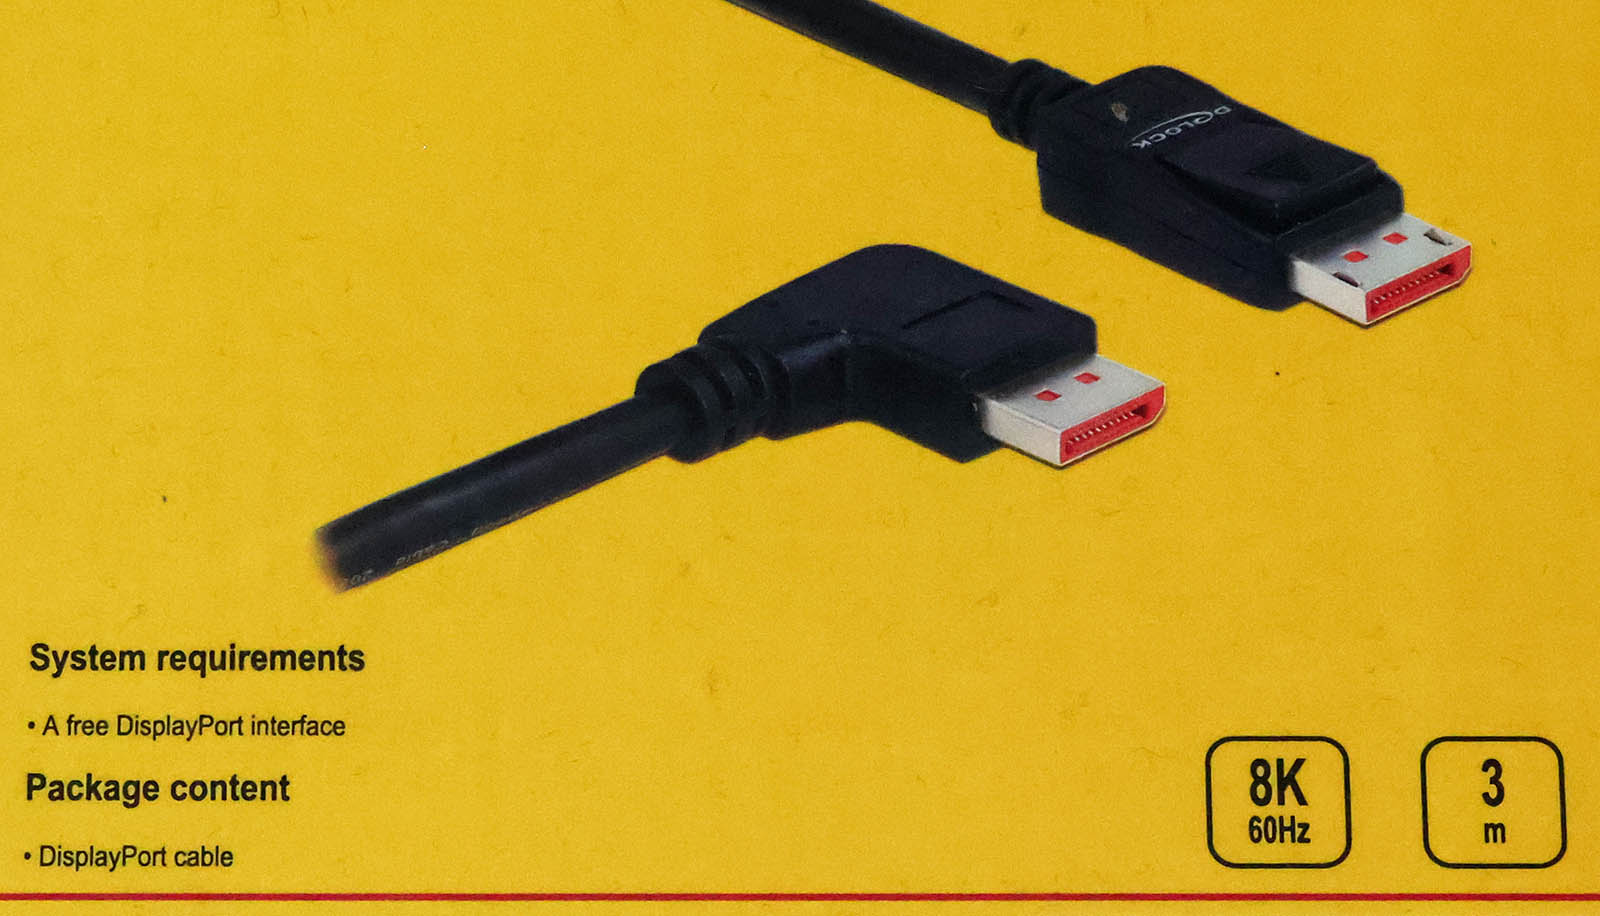
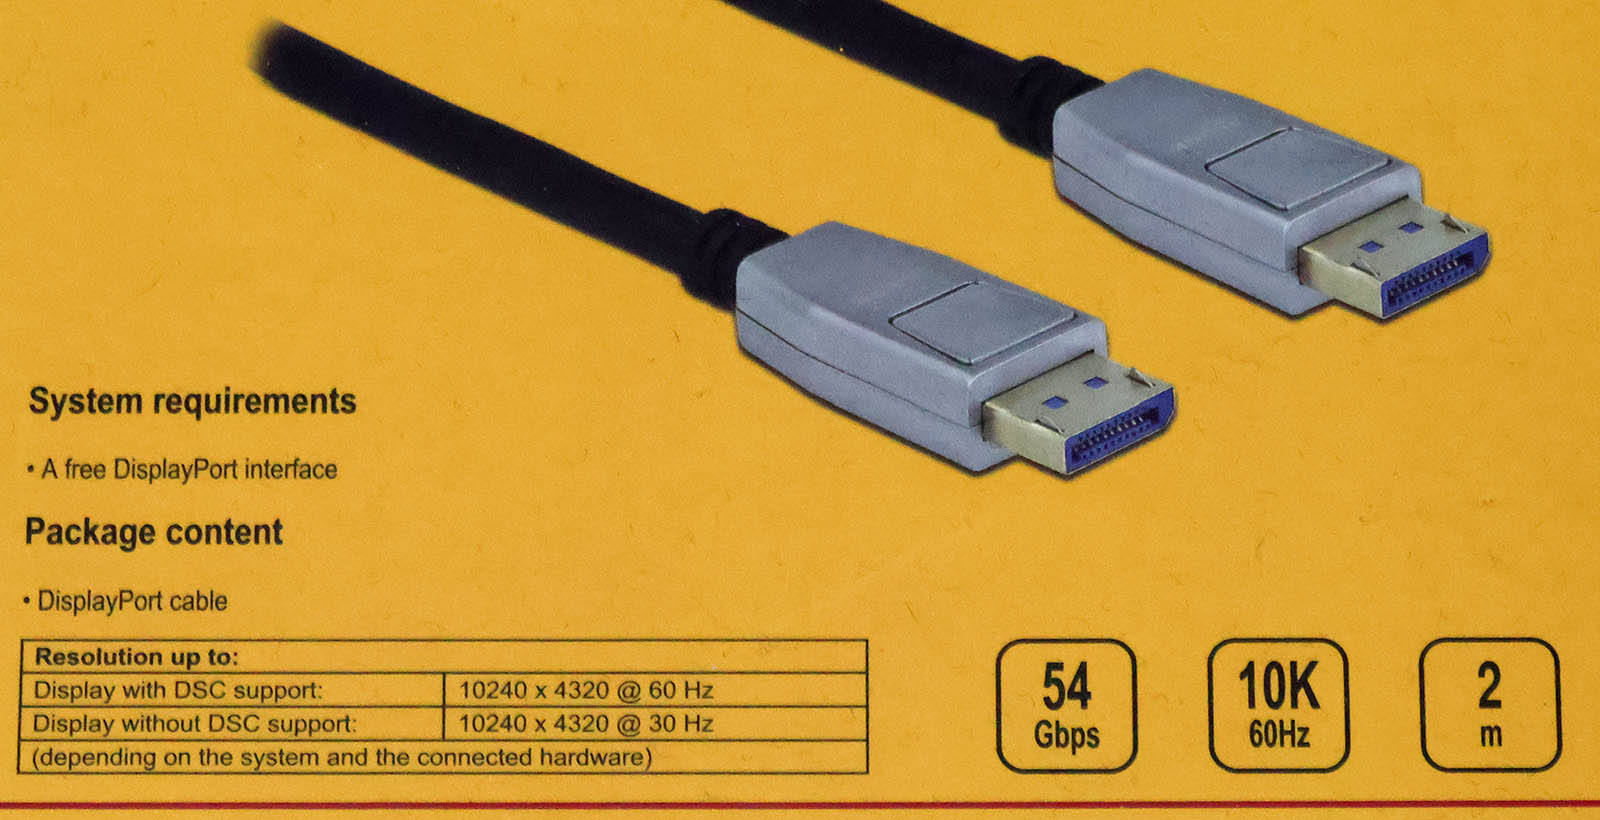
These two cables with 8K and 10K spec should have the oompf required to run any of my future monitors.
Color-coding is puzzling to me:
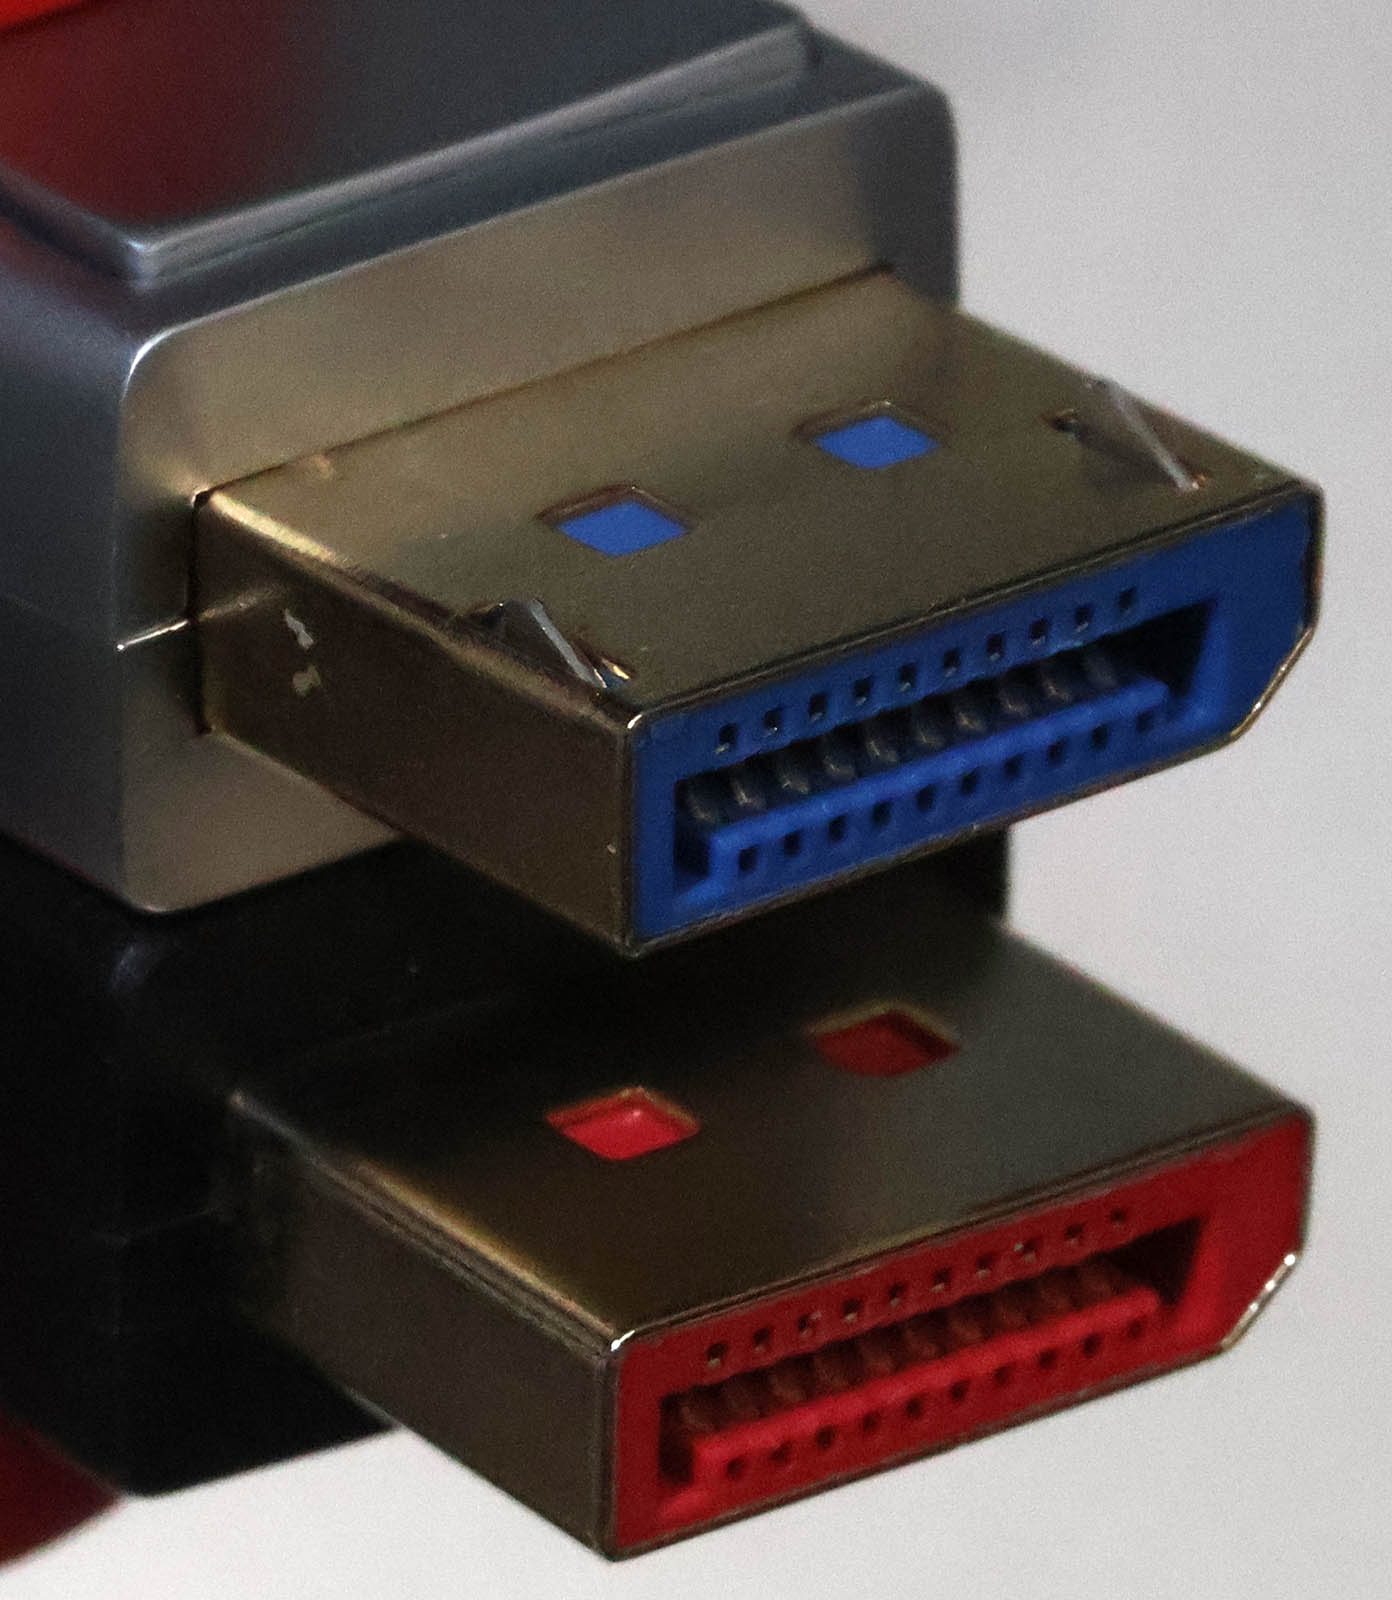
No matter how much I do looking & searching, there isn't anything I can find on those colors. My obvious assumption is for the manufacturer Deltaco to mark 8K with a red connector and 10K with a blue. Exactly what cable speed that translates into, I dunno. My speculation is with UHBR13.5 and UHBR20, but that's only my guess.
In my previous post on the topic I did complain on lacking markings. The boxes have semi-reasonable markings, cables have none. Besides the undocumented color coding.
I you'd compare USB-A -connectors:
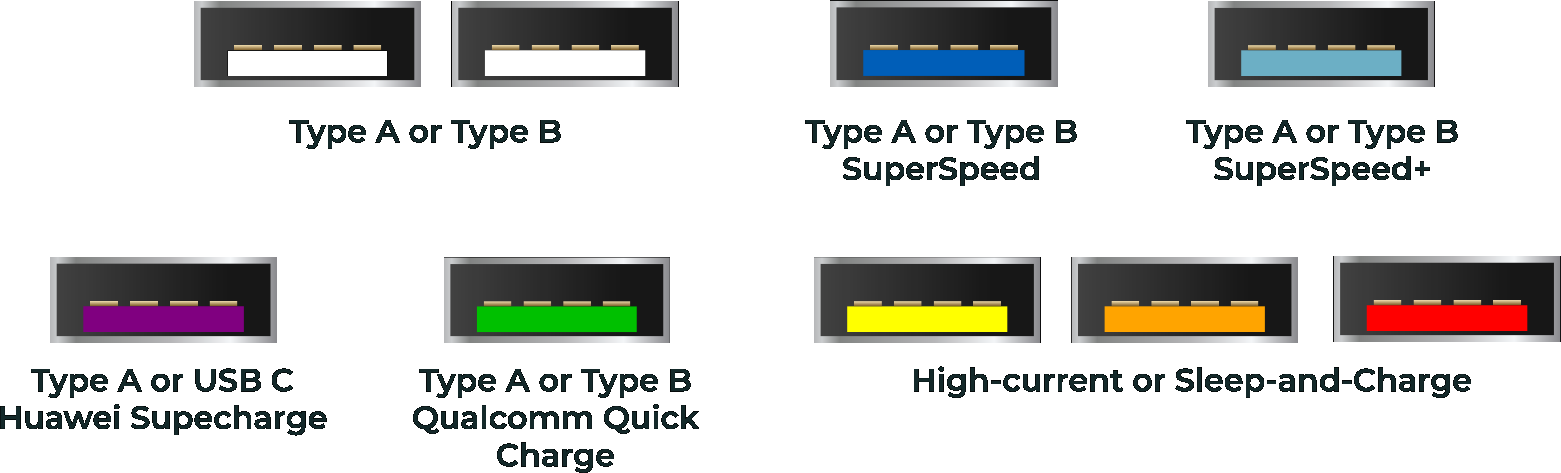
Or USB4-connectors:
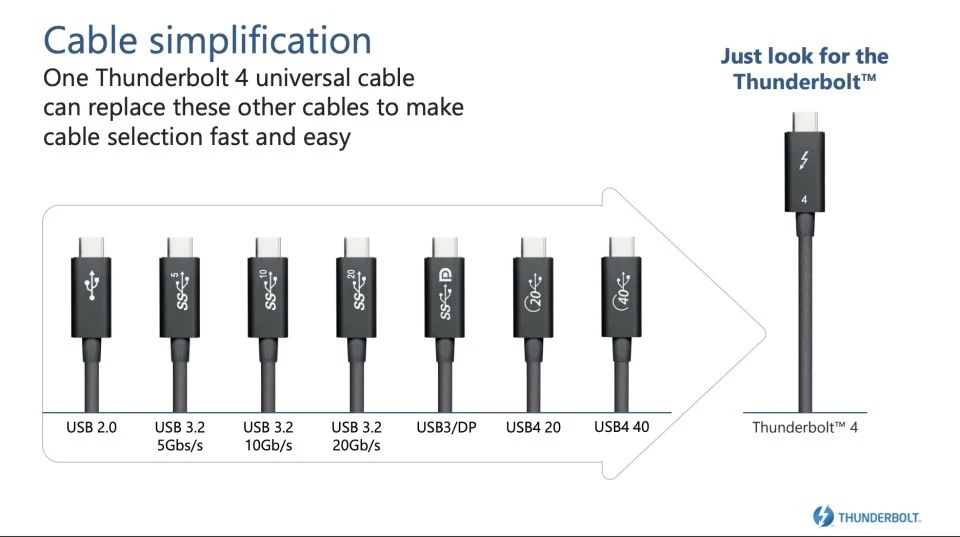
Both have well documented system. DisplayPort, not so much.
New monitor DisplayPort trouble: Flickering / Blackout
Sunday, April 28. 2024
I spend lot of time doing stuff with a computer or computers to be exact. As a heavy-duty user, I love to have good displays to do the computing with. As every thing in consumer electronics, also monitor technology has improved a lot.
One of these days, I wanted a new monitor with really good spec.
Delivery guy brought me one, I installed it into my VESA monitor arm and then everything turned sour.
My expensive monitor "kinda" worked. Picture was there, it was crisp, backlight was really good, HDR-colors were really vivid until the monitor chose to flicker a bit and black out. This unfortunate blackout was a totally random event. It could occur three times per minute, or alternatively there could easily be 20 minutes without problems. Such random problems are very difficult to troubleshoot. In any easy case, reproducability is the key. No such joy here.
When in doubt - Google the problem!
Obviously, I went online with a description of the symptoms. Quite soon, this is what I found from Reddit: I'm having screen flickering/blackout via Displayport on my new 1440p 144 hz monitor. The suggestions pointed towards testing different cables and discussion about DisplayPort versions. Good ideas!
GPU
From GPU spec:

Confirmed GPU DisplayPort to be at version 1.4.
Previous Monitor
Spec says:
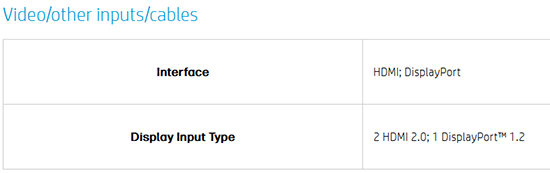
Confirmed old monitor DisplayPort to be at version 1.2. Hm. Everything worked at 4K resolution, no 144Hz though.
New Monitor
Spec:
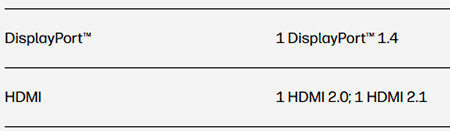
Confirmed monitor DisplayPort to be at version 1.4. Equal to GPU.
Maybe the problem IS with the cable as suggested in Reddit!
Theory: DisplayPort Cable
Doing research on DisplayPort: DisplayPort 1.4 vs. 1.2: What's the Difference?
DisplayPort 1.2, originally released in 2010, offers more bandwidth than all but the latest HDMI standards.
DisplayPort 1.4 is a much more capable standard, with limited competition from even the latest and greatest
DisplayPort 1.4 supports resolutions of up to 8K at 60Hz or 4K at 240Hz
DisplayPort 1.2 supports resolutions of up to 4K at 60Hz
Doing research on cabling: How to Tell the Difference Between Display Port 1.2 and 1.4 Cables
Just to be clear, DisplayPort cables are not classified by version, they are classified by the amount of bandwidth they can handle.
Good thing there was a DisplayPort cable with the monitor. Changed it into use and oh yes! Flickering was gone.
Wikipedia says in DisplayPort -article:
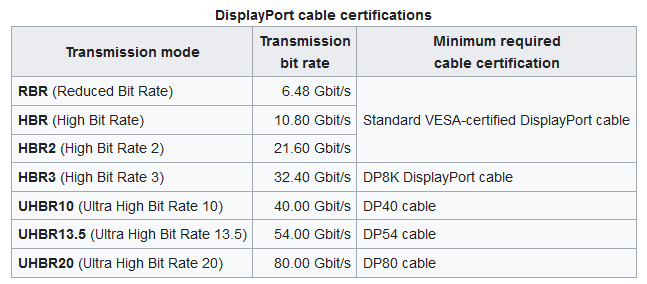
There are seven (7) different specs for a cable. Well, that's a surprise.
Practice: DisplayPort Cable
Let's look at those cables bit closer. This is the non-functioning one:
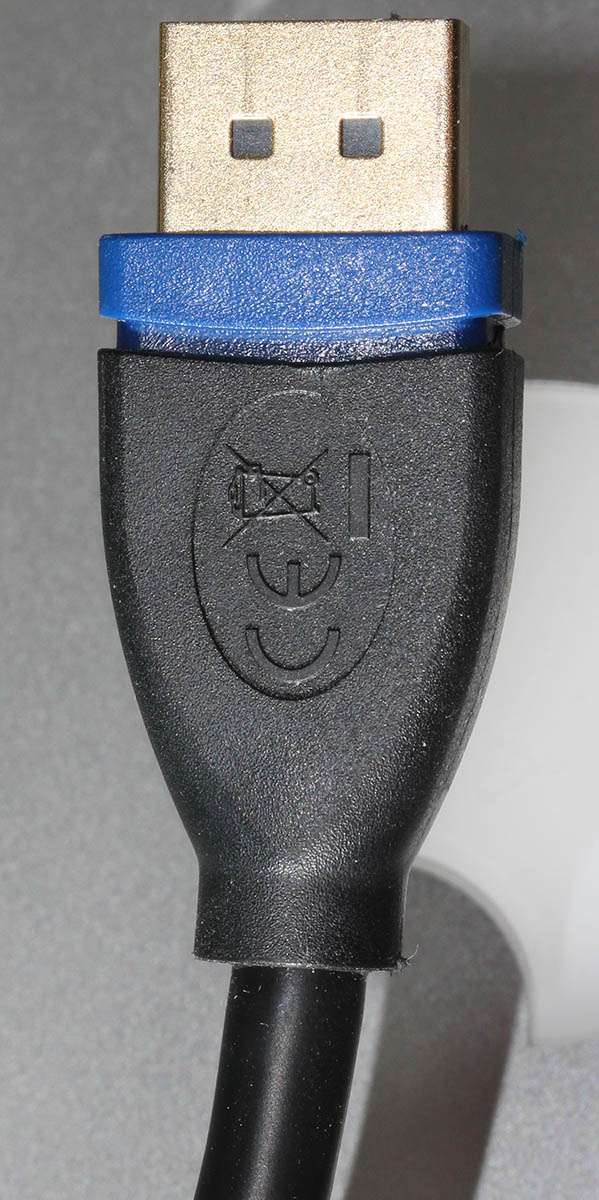
There are zero clues on cable spec. Nothing! It has WEEE label and CE marking, that's all. Given reality, I'm guessing it is HBR / HBR2 -spec.
This is the good cable:
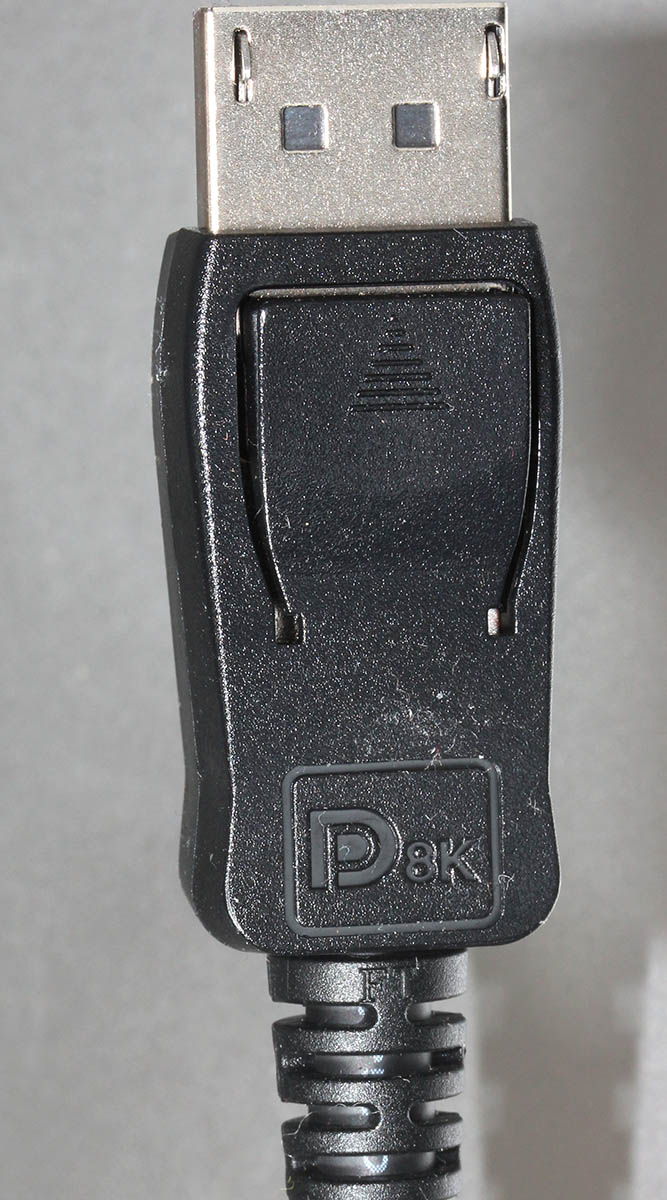
Still no idea of cable details. DisplayPort-logo with 8K suggests spec to be at least HBR3.
Reality Check
There is really no way of telling how fast a DisplayPort-cable is by hooking it into a computer or eyeballing it.
Beware: Most DisplayPort cables aren't sold with correct information
Aow come on! This is horrible. 
Good thing is my money wasn't wasted on a faulty unit.
Wi-Fi Router Lifespan: A Threat to National Security?
Sunday, October 15. 2023
Wireless LAN, or Wi-Fi, is topic I've written a lot about. Router hardware is common. Most end-user appliance people use are wireless. Wi-Fi combined with proper Internet connection has tons of bandwidth and is responsive. From hacking perspective quite many of those boxes run Linux or a thing with hackable endpoints. Or alternatively, on the electronics board, there are interesting pins that a person with knowledge can lure the box do things manufacturer didn't expect to happen. Oh, I love hardware hacks! 
Routers are exploitable
Back in 2016 these routers were harnessed to a new use. From hacker's perspective, there exists a thing which works perfectly, but doesn't do the thing hacker wishes it to do. So, after little bit of hacking, the device "learns" a new skill. This new skill was to participate in criminal activity as a DDoS traffic generator. Geekflare article How to Secure Your Router Against Mirai Botnet Attacks explains as follows:
According to Paras Jha, one of the authors of the Mirai bot, most of the IoT devices infected and used by the Mirai Botnet were routers.
A word from national intelligence organization
Fast forward nine years to 2023. Things really haven't changed much. There exists even more Wi-Fi routers. The routers are manufactured in huge volumes, designed to make maximum profit for the manufacturer and are lacking a ton of security features. Combine these hackable routers with all the geopolitical tension in the World right now our beloved routers have become the interest of Finnish Security and Intelligence Service (or Supo, acronym in Finnish).
This month, in their annual National Security Overview 2023, in Threats to national security are continually evolving, they issued a warning: "Cyber espionage exploits unprotected consumer devices". Actually, they did pretty much the same thing back in March -21 with following statement: "Supo has observed that the intelligence services of authoritarian states have been exploiting dozens of network devices and servers of Finnish individuals and businesses in cyber espionage operations."
How?
Having a national intelligence service to warn about crappy network hardware is a big deal. They don't do the same warning about your toaster or dish washer or cheap Android phone. Same characteristics don't really apply to anything else. A device needs to be:
- On-line / Internet connected
- See Mr. Hyppönen's book: If It’s Smart, It’s Vulnerable
- And btw., all routers are computers. Any computer is considered as a "smart" device.
- Insecure
- Yeah. Even the expensive Wi-Fi routers have crappy manufacturer firmware in them. Cheap ones are especially vulnerable. And even the good ones expire after couple of years as manufacturer loses interest and ceases publishing new upgrades.
- Exist in masses
- Literally every home and business has at least one. I don't know the total number of homes and businesses in the World, but it must be a big number!
On those three characteristics, following things are true:
- Every single vulnerable device can be found easily.
- As the internet, there are 3,706,452,992 public IPv4 addresses. That seems like a big number, but in reality it isn't. (Actually, the scale of the number is same as the number of homes+businesses.)
- In 2013 the entire address space could be scanned in 44 minutes. (See Washington Post article Here’s what you find when you scan the entire Internet in an hour)
- Every single vulnerable device can be cracked wide open without human interaction by automated tools in a split second.
- Every single cracked device can be made to do whatever the attacker wants.
- Any typical scenario is some sort of criminal activity.
Why?
100% of all lay-persons I've talked to state "I don't care if I'm hacked. I'm not an important person and have nothing to hide." What they miss is, attacker wanting to use their paid connection while impersonating as them to commit crimes.
We also have learned not all attackers are after money, some of them are state actors doing espionage. There are multiple types of attackers ranging from teenagers smearing their school's website to cybercriminals stealing money to government sponsored spies stealing state secrets.
Now we're getting to the reason why intelligence services are issuing warnings!
Scaring consumers - There is profit to be made
Since these intelligence service warnings have existed for couple years, in May -23 a major ISP / Telco in Finland, DNA, issued a press release (this is in Finnish, sorry) stating following:
Does you home have over four year old router? An expert reveals why it can be a risk.
Translated quote:
As a rule of thumb I'd say: a four year old router for basic user is aged. Advanced users may replace their routers every two years.
Going open-source!
For clarity: I'm not disputing the fact an aged router with never being upgraded to latest available firmware wouldn't be a security risk. It is! As a hacker I'm disputing is the need to purchase a new one. Gen. pop. will never ever be able to hack their devices into running OpenWrt or DD-WRT, that's for sure. Instead, educating people with risks involved with cheap consumer electronics and offering advice on smart choices would be preferred.
Here is my advice:
- Router manufacturers (and ISPs) are commercial entities targeting to maximize their profit. Their intent is to sell you a new router even when the hardware of your old device is still ok.
- Part of profit maximizing is to abandon the device after couple years of its release. There exists manufacturers which have never released a single security patch. Profit maximizing is very insecure for you as consumer.
- Hardware doesn't expire as fast as software does. There are exeptions to this. Power supplies and radio frequency electronics takes the greatest wear&tear on your 24/7 enabled device, sometimes getting a new box is the best option.
- Your old hardware may be eligible for re-purposing with open-source options. Ask your local hacker for details.
- Open-source firmware gets upgrades for both features and security for any forseeable future. This can happen as open-source firmware unifies all various hardware under a single umbrella.
- Make a habit of upgrading your open-source firmware every now and then. New firmwares will be made available on a regular basis.
Personally, for the past 19 years I've only purchased Wi-Fi routers which have OpenWrt or DD-WRT -support. Typically, after unboxing the thing, factory firmware runs only those precious minutes to get a proper Linux running into them. This is what I recommend everybody else to do!
PS. Kudos to those manufacturers who skipped the part with creating something and abandoning firmware of their own and license open-source solutions. There aren't many of you. Keep it up!
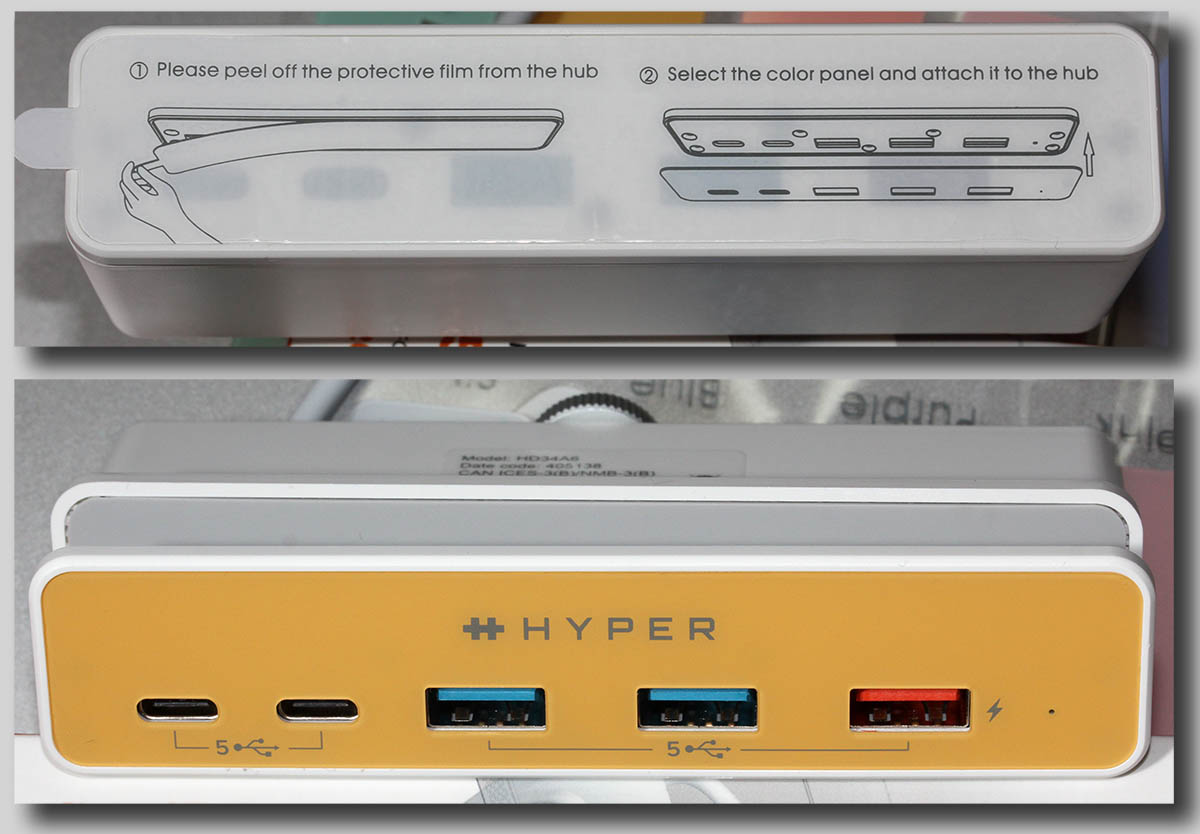
More USB Ports for iMac - HyperDrive 5-in-1 USB-C Hub
Sunday, September 3. 2023
Apple computers are known to have not-so-many ports. Design philosophy is for a machine to be self-sufficient and to not need any extensions nor ports for extensions. Reality bites and eats any ideology for a breakfast. I definitely need the extensions!
So, for my new iMac, I went shopping for more ports. Whenever I need to do this, I'll first check Hyper. Their products are known to be of highest quality and well designed to meet the specific requirements of a Mac. To be clear: on an iMac there are four ports: two USB-C and two Thunderbolt 4. This ought to be enough for everybody, right? Nope. All of them are in the back of the computer. What if you need something with easy access?
This is what's in a HyperDrive for iMac box:
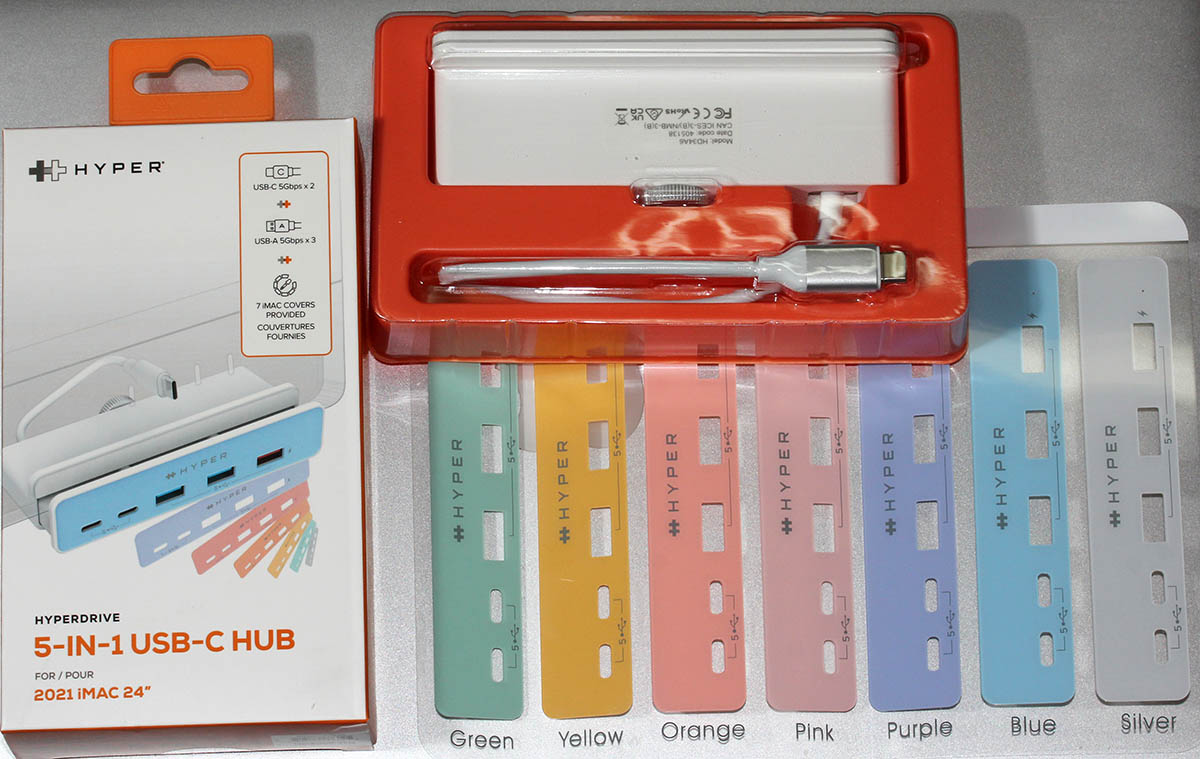
Those changeable covers are designed to match the colour of the iMac. This reminds me of 1998 when Nokia introduced the Xpress-on Covers for 5110:
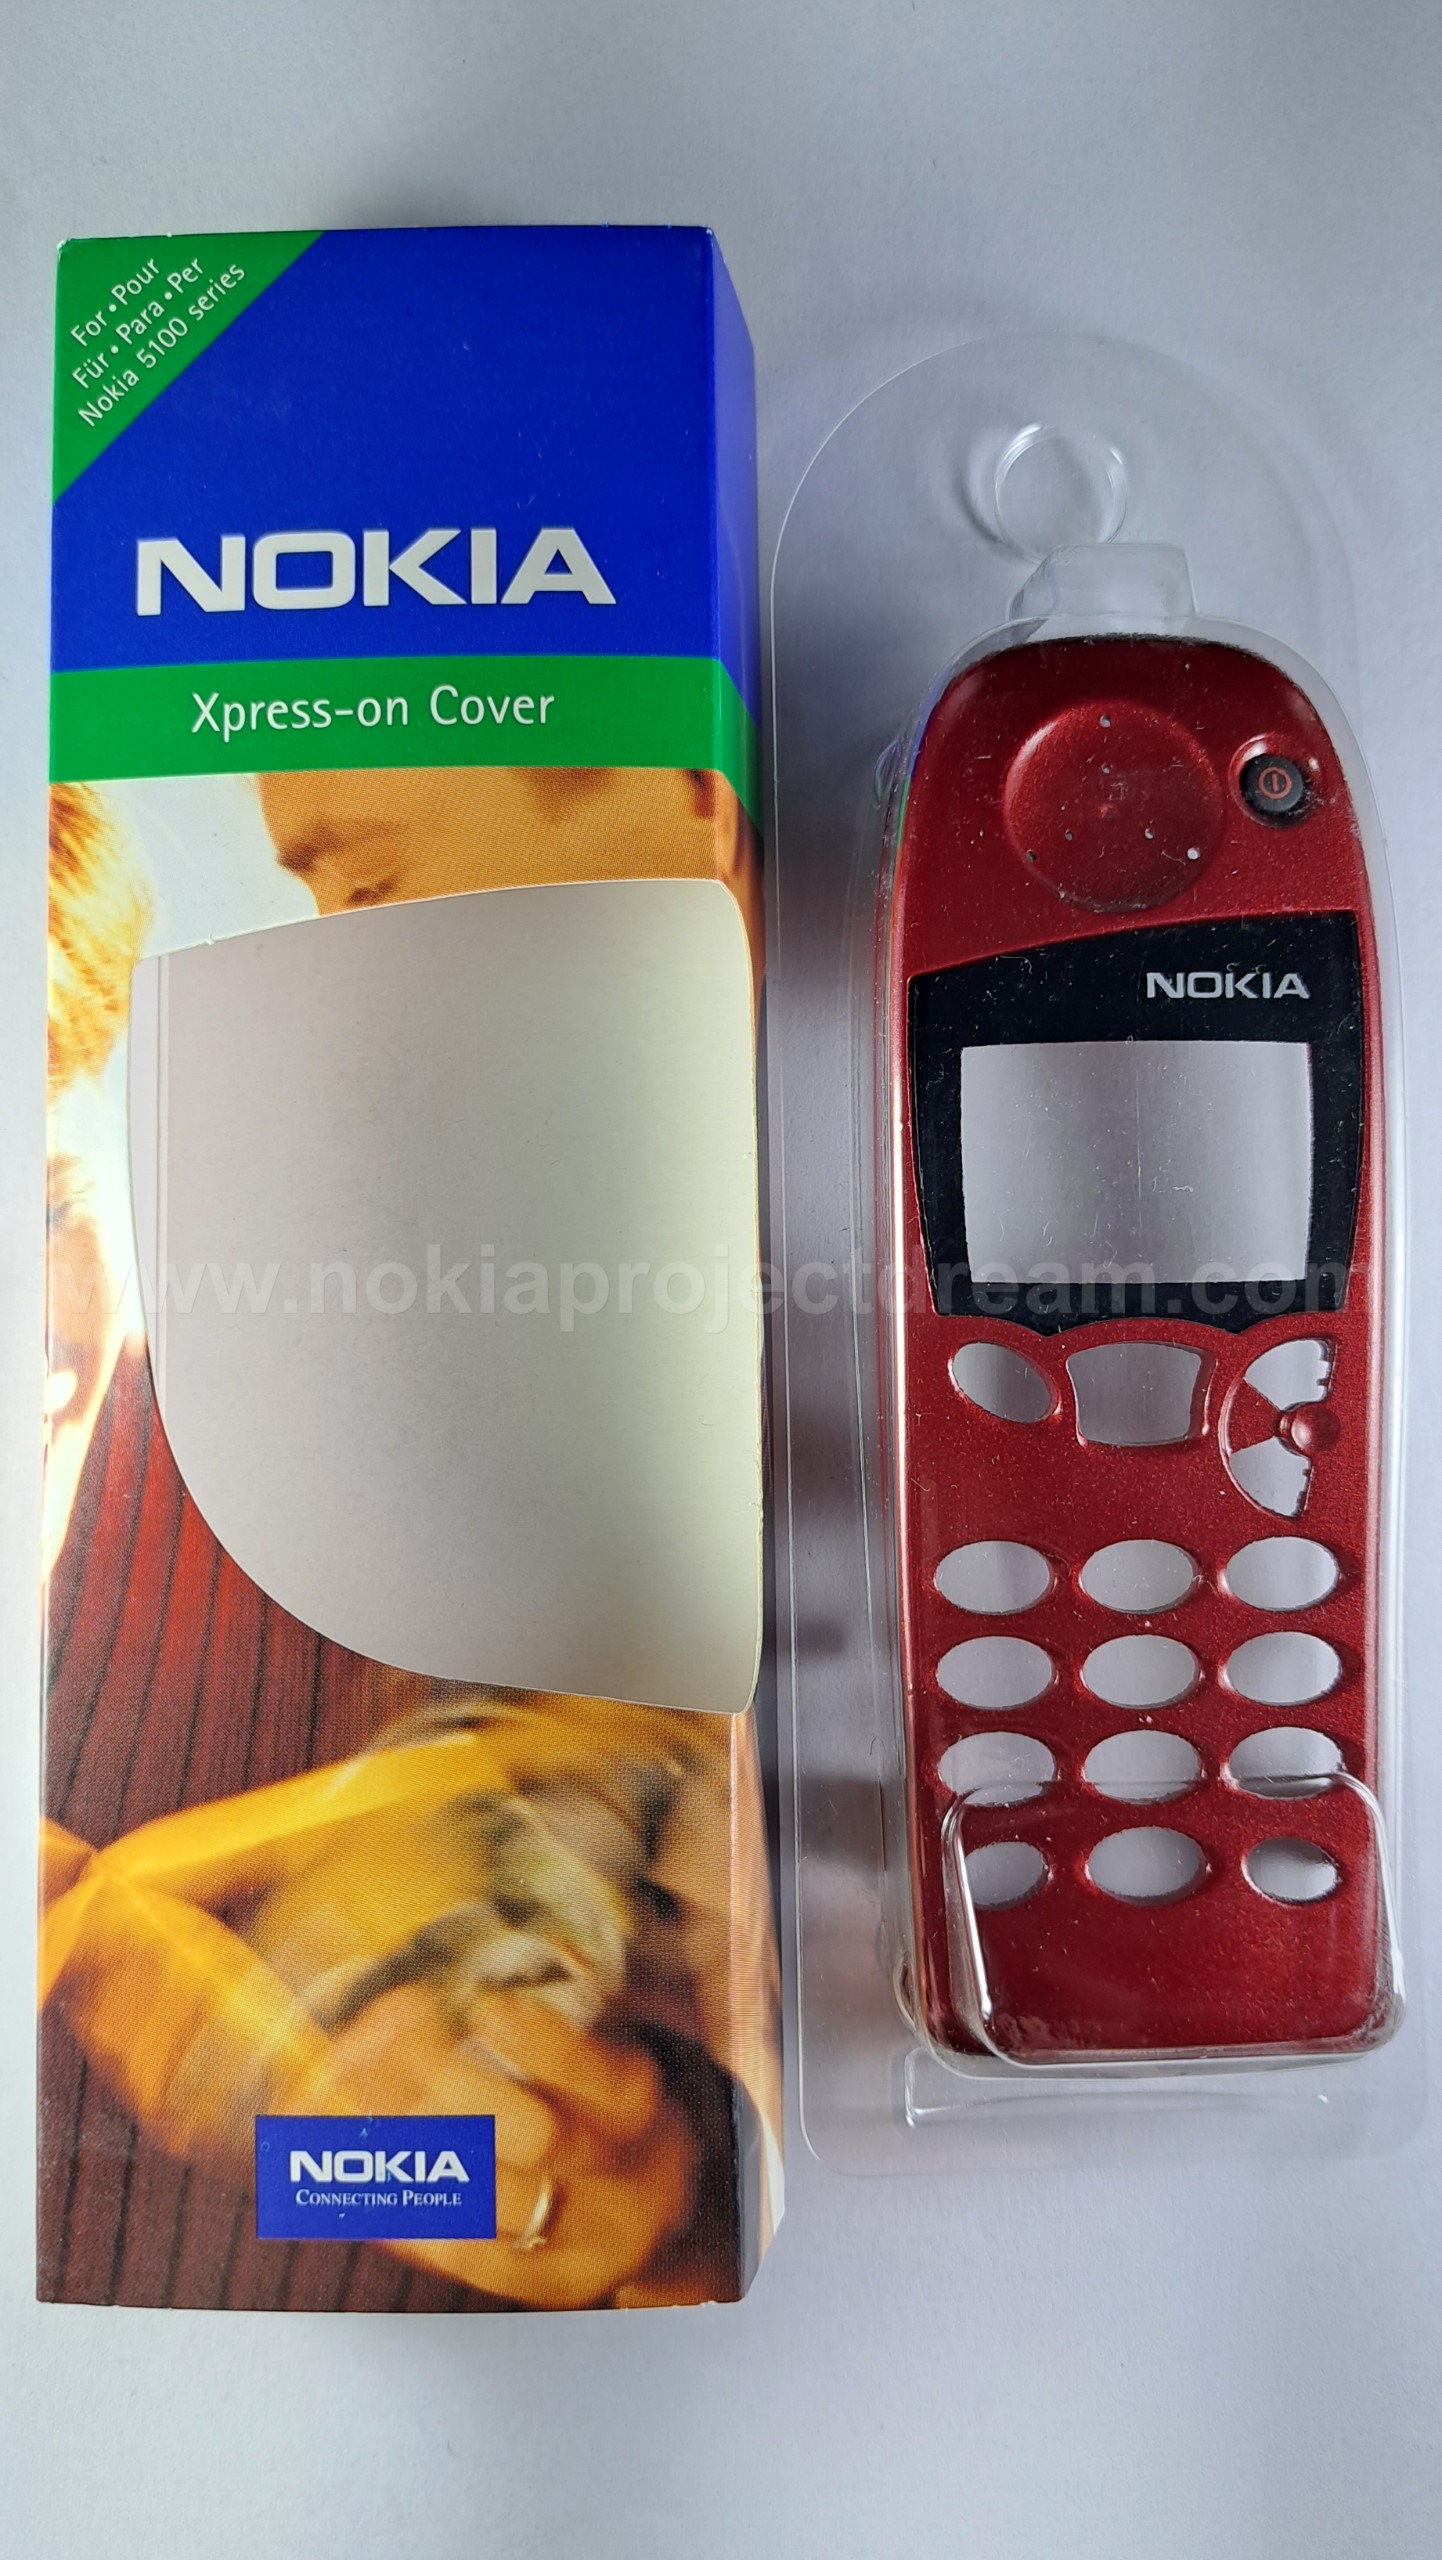
Image courtesy of nokiaprojectdream.com.
This is how the USB-hub clamps into iMac:

Now I don't have to try and blindly attempt to touchy/feely the location of a port behind the computer. On my desk, back of the iMac is definitely not visible nor available. Also, it is noteworthy, somebody might declare the setup "ugly" or complain of my choice of color express-on cover. The iMac is silver, but I have a yellow cover on the HyperDrive. That's how I roll! 

