RAID Controller Upgrade
Saturday, January 31. 2026
It hasn't been an especially good couple of weeks. I've suffered couple hardware failures. One of my recent posts is about 13 year old SSD getting a retirement. There are other hardware failures waiting for a write-up.
A Linux gets security updates every once in a while. I have two boxes with a bleeding/cutting edge distro. The obvious difference between those is, that a "bleeding" edge is so new stuff, it doesn't let wounds heal. It literally breaks because of way too new components. A "cutting" edge is pretty new, but more tested. Concrete example of a bleeding edge would be ArchLinux and a cutting edge would be Fedora Linux.
My box got a new kernel version and I wanted to start running it. To my surprise, booting into the new version failed. Boot was stuck. Going to recover, I realized there was a physical storage device missing preventing automatic filesystem mount to happen, preventing successful boot. Rebooting again. This time eyeballing console display.
Whoa!
LSI 9260-4i
RAID status was missing from boot-sequence. This is what I was expecting to see, but was missing:
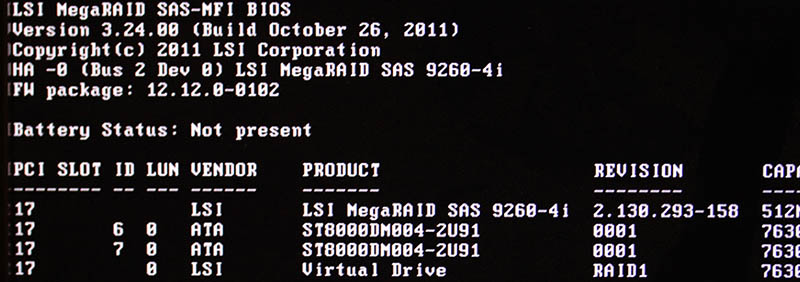
Hitting reset-button. Nothing.
Powering off the entire box. Oh yes! Now the PCIe-card was found, Linux booted and mounted the drive.
It was pretty obvious, any reliability the system may have had - was gone. From this point on, I was in a recovery mode. Any data on that mirrored pair of HDDs was on verge of being lost. Or, to be exact: system stability was at risk, not the data. On this quality RAID-controller from 2011, data saved to a mirrored drive has no header of any kind. Unplugging a drive from RAID-controller and plugging it into a USB3-dock makes the drive completely visible without tricks. Data not being lost at any point is a valuable thing.
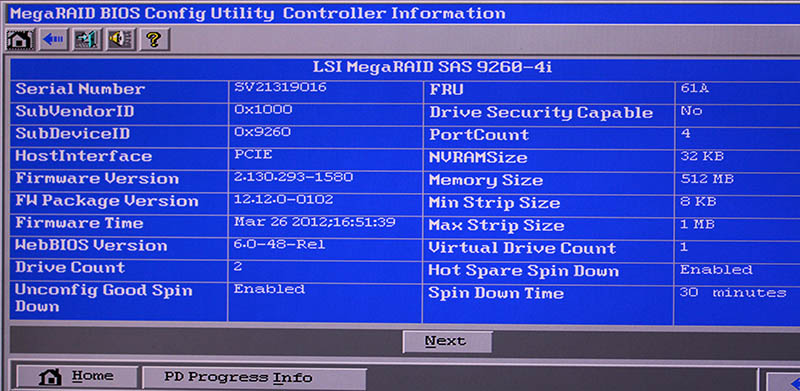
This is what a LSI 9240-4i would look like:
On a Linux, the card would look like (if UEFI finds it in boot):
kernel: scsi host6: Avago SAS based MegaRAID driver
kernel: scsi 6:2:1:0: Direct-Access     LSI      MR9260-4i        2.13 PQ: 0 ANSI: 5
kernel: sd 6:2:1:0: Attached scsi generic sg2 type 0
kernel: sd 6:2:1:0: [sdb] 11719933952 512-byte logical blocks: (6.00 TB/5.46 TiB)
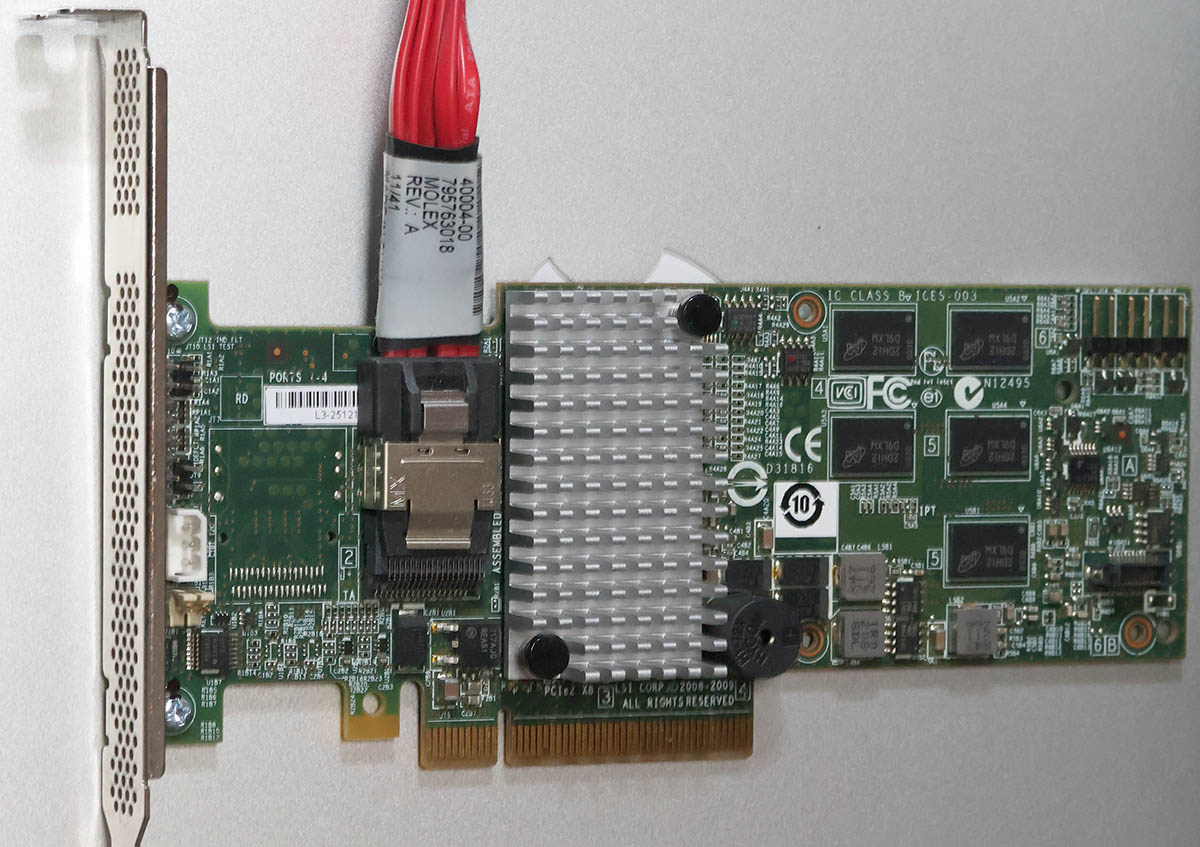
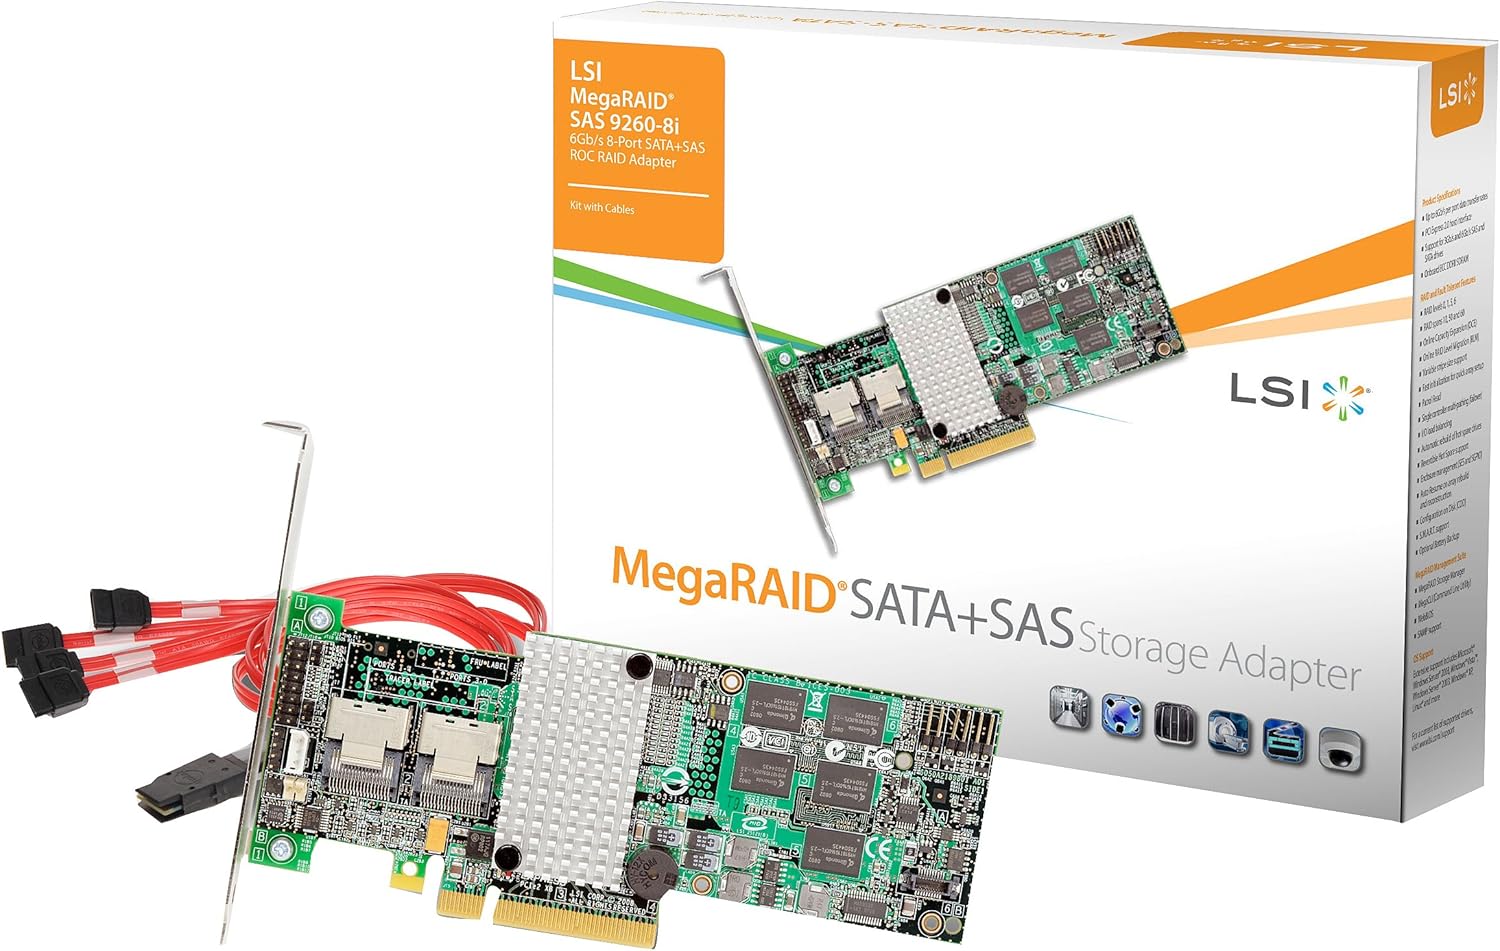
LSI 9560-8i
Proper RAID controllers as brand new are expensive. Like 1000€ a piece. This is just a hobby, so I didn't need a supported device. My broken one was 14 years old. I could easily settle for an older model.
To eBay. Shopping for a replacement.
Surprisingly, 9240-4i was still available. I didn't want one. That model was End-of-Life'd years ago. I wanted something that might be still supported or went just out of support.
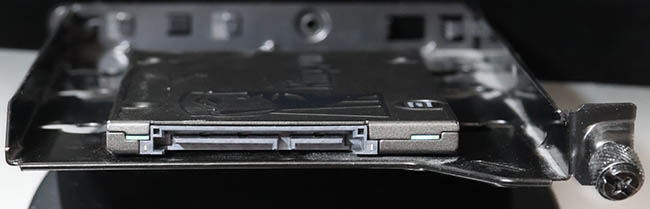
This is what I got:
Lovely piece of hardware. Affordable even as second-hand PCIe -card.
On a Linux, the card shows as:
02:00.0 RAID bus controller: Broadcom / LSI MegaRAID 12GSAS/PCIe Secure SAS39xx
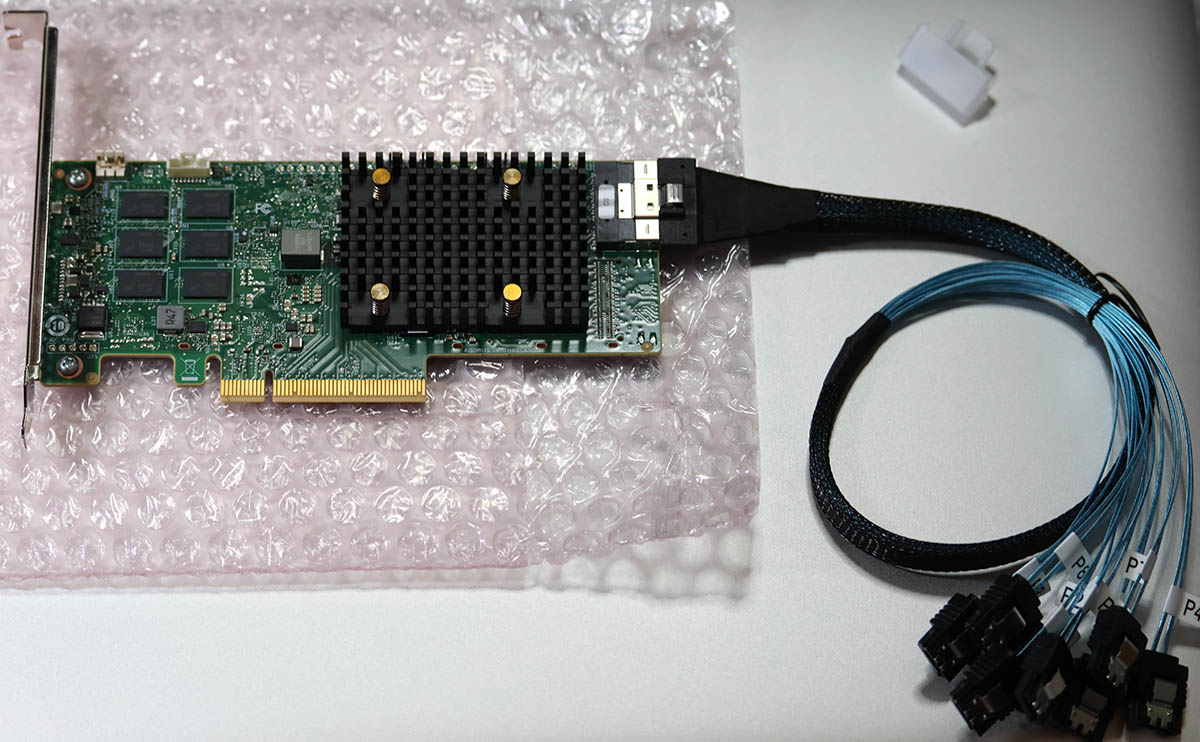
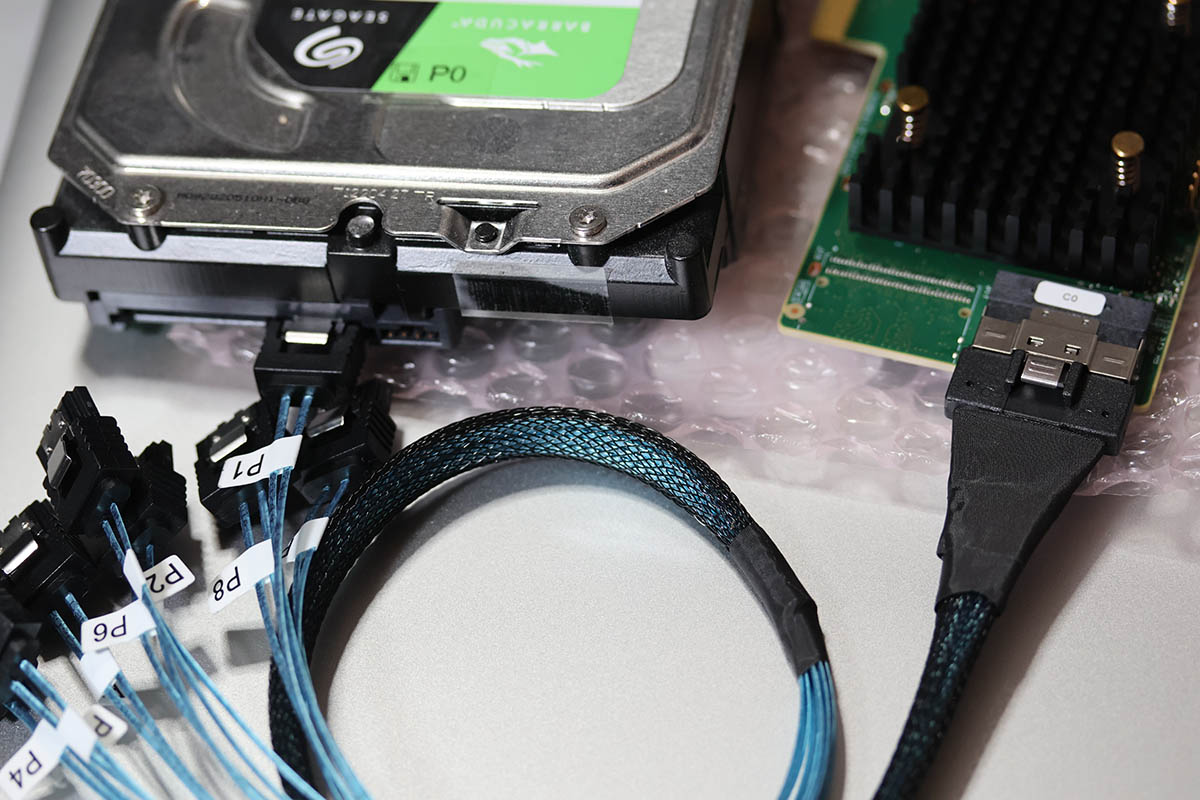
On 9560-8i Cabling
Boy, oh boy! This wasn't easy. This was nowhere near easy. Actually, this was very difficult part. Involving multiple nights spent with googling and talking to AI.
The internal connector is a single SFF-8654 (SlimSAS). Additionally, the card when you purchase one, doesn't come with any cabling with it. 9240-4i did have a proper breakout cable for its Mini-SAS SFF-8087. On the other end, there was a SAS/S-ATA -connector. As a SFF-8654 will typically be used to connect into a some sort of hot-swap bay, there a re multiple cabling options.
Unfortunately to me, SFF-spec doesn't have anything like that. But waitaminute! In the above picture, there is a SFF-8654 8i breakout cable with 8 SAS/S-ATA connectors in it. One is even connected to a HDD to demonstrate it working perfectly.
Well, this is where AliExpress steps up. Though, the spec doesn't say such thing exists, it doesn't mean that you couldn't buy such cable with money. I went with one vendor. It seemed semi-reliable with hundreds of 5-star transactions completed. Real, certified SFF-8654 -cables are expensive. 100+€ and much more. This puppy cost me 23€. What a bargain! I was in a hurry, so I paid 50€ for the shipping. And duty and duty invoicing fees and ... ah.
Configuring a replacment RAID-array
This was the easy part of the project. Apparently LSI/Broadcom -controllers write metadata to a drive. When I plugged in all the cables and booted the computer, it fould the previously configured array. RAID-configuration data IS stored to the drive somewhere, it's just not at a header of the drive. This is handy two-ways: unplugged drive looks like a regular drive, but on an appropriate controller the configs are readable.
Obviously the data on the drive was transferred away to an external USB-drive for safe-keeping. First I waited 12 hours for a degraded RAID-array to become intact again, then LVMing the data back.
A copy of drive was on an external drive connected via USB3. Recovery procedure with LVM:
- Partition the new RAID1-mirror as LVM with parted
- pvcreate the new physical device to make it visible into LVM
- vgextend the logical volume residing in external USB-drive to utilize newly created physical device. Note: Doing this does NOT move any data.
- pvmove:ing all data from external drive into internal drive. This forces logical volume to NOT use any extents on the drive. Result is moving data.
- Waiting. For 8 hours. This is a live system accessing the drive at all times.
- vgreduce:in the logical volume to stop using external drive.
- pvremove:in the external drive from LVM.
- Done!
On LSI/Broadcom Linux Software
This is what I learned:
- MegaRAID:
- Unsupported at the time of writing this blog post
- For RAID-controllers series 92xx
- My previous 9240 worked fine with MegaCli64
- StorCLI:
- Unsupported at the time of writing this blog post
- For RAID-controller series 93xx, 94xx and 95xx
- My 9560 worked fine with storcli64
- StorCLI2:
- Still supported!
- For RAID-controller series 96xx onwards
Running MegaCli64 with 95xx-series controller installed will make the command stuck. Like properly stuck. Stuck so well, that not even kill -9 does anything -stuck.
Running StorCLI2 with 95xx-series controller installed does nothing. There is a complaint, that no supported controller was found on the system. Nothing stuck. Much less dangerous than MegaCli64.
Status
On boot:


Note the complaing about battery backup:
The battery hardware is missing or malfunctioning, or the battery is unplugged, or the battery could be fully discharged. If you continue to boot the system, the battery-backed cache will not function.
If battery is connected and has been allowed to charge for 30 minutes sand this message continues to appear, then contact technical support for lassistance.Battery Status: Missing
On Linux prompt by running command storcli64 /c0 /vall show:
CLI Version = 007.3007.0000.0000 May 16, 2024
Operating system = Linux 6.16.3-100.fc41.x86_64
Controller = 0
Status = Success
Description = None


Virtual Drives :
==============

-------------------------------------------------------------
DG/VD TYPE  State Access Consist Cache Cac sCC     Size Name
-------------------------------------------------------------
0/239 RAID1 Optl  RW     Yes     RWTD  -   ON  5.457 TB
-------------------------------------------------------------

VD=Virtual Drive| DG=Drive Group|Rec=Recovery
Cac=CacheCade|OfLn=OffLine|Pdgd=Partially Degraded|Dgrd=Degraded
Optl=Optimal|dflt=Default|RO=Read Only|RW=Read Write|HD=Hidden|TRANS=TransportReady
B=Blocked|Consist=Consistent|R=Read Ahead Always|NR=No Read Ahead|WB=WriteBack
AWB=Always WriteBack|WT=WriteThrough|C=Cached IO|D=Direct IO|sCC=Scheduled
Check Consistency
Finally
Hopefully I don't need to touch these drives for couple years. In -23, I upgraded the drives. Something really weird happened in January this year and I had to replace the replacement drives. As I wrote in the article, the drives were in perfect condition.
Now I know, the controller started falling apart. I simply didn't realize it at the time.
Native IPv6 from Elisa FTTH
Thursday, September 25. 2025
My beloved ISP whom I love to hate has finally ... after all the two decades of waiting ... in Their infinite wisdom ... decided to grant us mere humans, humble payers of their monthly bills a native IPv6.
This is easily a day I thought would never happen. Like ever.
Eight years ago, when I was living in Stockholm, I had proper and good IPv6. There is a blog post of that with title Com Hem offering IPv6 via DHCPv6 to its customers.
By this post, I don't want to judge ongoing work nor say anything negative. This is just a heads-up. Something is about to happen. Everything isn't like it should be, but I have had patience this far. I can wait a bit longer.
Current Status
Here is a list of my observations as of 25th Sep 2025:
- There is no SLAAC yet. Delivery is via DHCPv6.
- One, as in a single, IPv6-address per DHCP-client host ID. I don't know how many addresses would I be able to extract. IPv6 has a "few" of them.
- No Prefix Delegation. 1 IPv6, no more. Not possible to run a LAN at this point.
- No default gateway in the DHCPv6 options. DNS ok. Connectivity to Internet is not there yet.
- No ISP firewall. Example: outgoing SMTP to TCP/25 egresses ok.
- Incoming IPv6 ok.
I'm sure many of these things will change to better and improve even during upcoming weeks and months.
Overcoming the obstacle: Figuring out a default gateway
Oh, did I mention there is no default gateway? That's a blocker!
Good thing is, that there is a gateway and it does route your IPv6-traffic as you'd expect. Getting the address is bit tricky and ISP doesn't announce it. (Credit: mijutu)
Running:
tcpdump -i eth0 -vv 'udp and (port 546 or port 547)'
while flipping the interface down&up will reveal something like this:
21:40:50.541022
IP6 (class 0xc0, hlim 255, next-header UDP (17) payload length: 144)
fe80::12e8:78ff:fe23:5401.dhcpv6-server > my-precious-box.dhcpv6-client:
[udp sum ok] dhcp6 advertise
That long porridge of a line is split up for clarity. The good bit is fe80::12e8:78ff:fe23:5401.dhcpv6-server. Now I have the link-local address of the DHCPv6-server. What would be the odds, it would also route my traffic if asked nicely?
ip -6 route add default via fe80::12e8:78ff:fe23:5401 dev eth0
Testing the Thing
Oh yes! My typical IPv6-test of ping -6 -c 5 ftp.funet.fi will yield:
PING ftp.funet.fi (2001:708:10:8::2) 56 data bytes
64 bytes from ipv6.ftp.funet.fi (2001:708:10:8::2): icmp_seq=1 ttl=60 time=5.42 ms
64 bytes from ipv6.ftp.funet.fi (2001:708:10:8::2): icmp_seq=2 ttl=60 time=5.34 ms
64 bytes from ipv6.ftp.funet.fi (2001:708:10:8::2): icmp_seq=3 ttl=60 time=5.29 ms
64 bytes from ipv6.ftp.funet.fi (2001:708:10:8::2): icmp_seq=4 ttl=60 time=5.31 ms
64 bytes from ipv6.ftp.funet.fi (2001:708:10:8::2): icmp_seq=5 ttl=60 time=5.39 ms
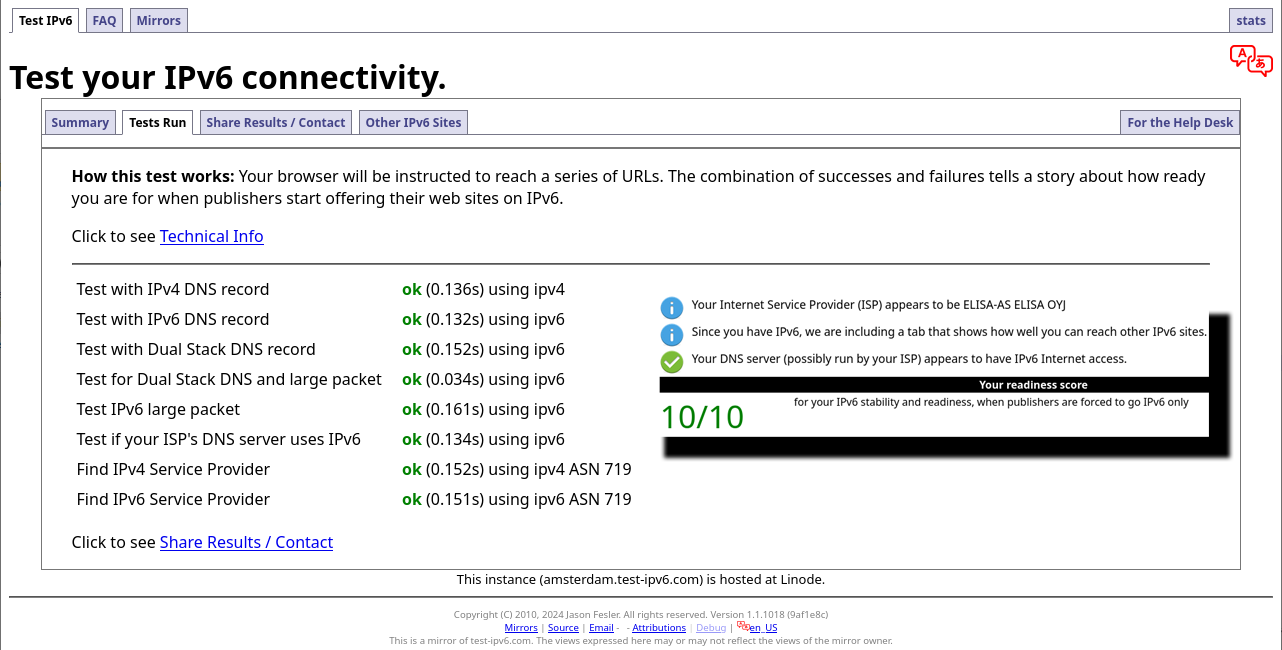
Outgoing SSH/HTTP/whatever works ok. Incoming SSH and HTTPS work ok. Everything works! Test-ipv6.com result:
Cloudflare Speedtest result:
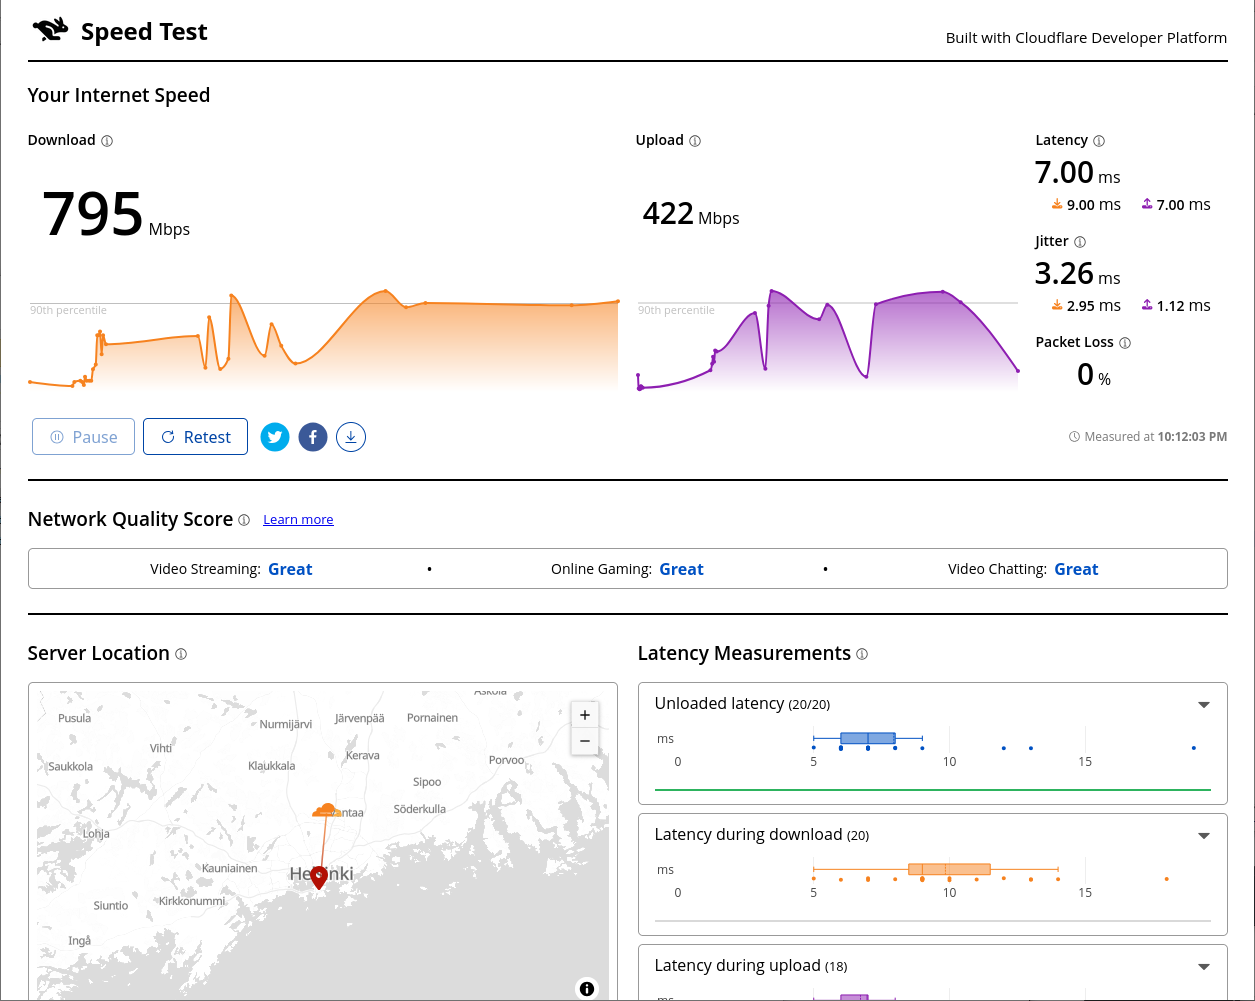
This is very flaky. I ran it from Linux console over X11.
Also, the typical Speedtest.net, which I'd typically run, won't support IPv6 at all.
Finally
I'm so excited! I can not wait for Elisa's project to complete
SSD Trouble - Replacement of a tired unit
Sunday, August 31. 2025
Trouble
Operating multiple physical computers is a chore. Things do happen, especially at times when you don't expect any trouble. On a random Saturday morning, an email sent by a system daemon during early hours would look something like this:
The following warning/error was logged by the smartd daemon:

Device: /dev/sda [SAT], FAILED SMART self-check. BACK UP DATA NOW!

Device info:
SAMSUNG MZ7PC128HAFU-000L1, S/N:S0U8NSAC900712, FW:CXM06L1Q, 128 GB

For details see host's SYSLOG.
Aow crap! I'm about to lose data unless rapid action is taken.
Details of the trouble
Details from journalctl -u smartd:
Aug 30 00:27:40 smartd[1258]: Device: /dev/sda [SAT], FAILED SMART self-check. BACK UP DATA NOW!
Aug 30 00:27:40 smartd[1258]: Sending warning via /usr/libexec/smartmontools/smartdnotify to root ...
Aug 30 00:27:40 smartd[1258]: Warning via /usr/libexec/smartmontools/smartdnotify to root: successful
Then it hit me: My M.2 SSD is a WD. What is this Samsung I'm getting alerted about? Its this one:
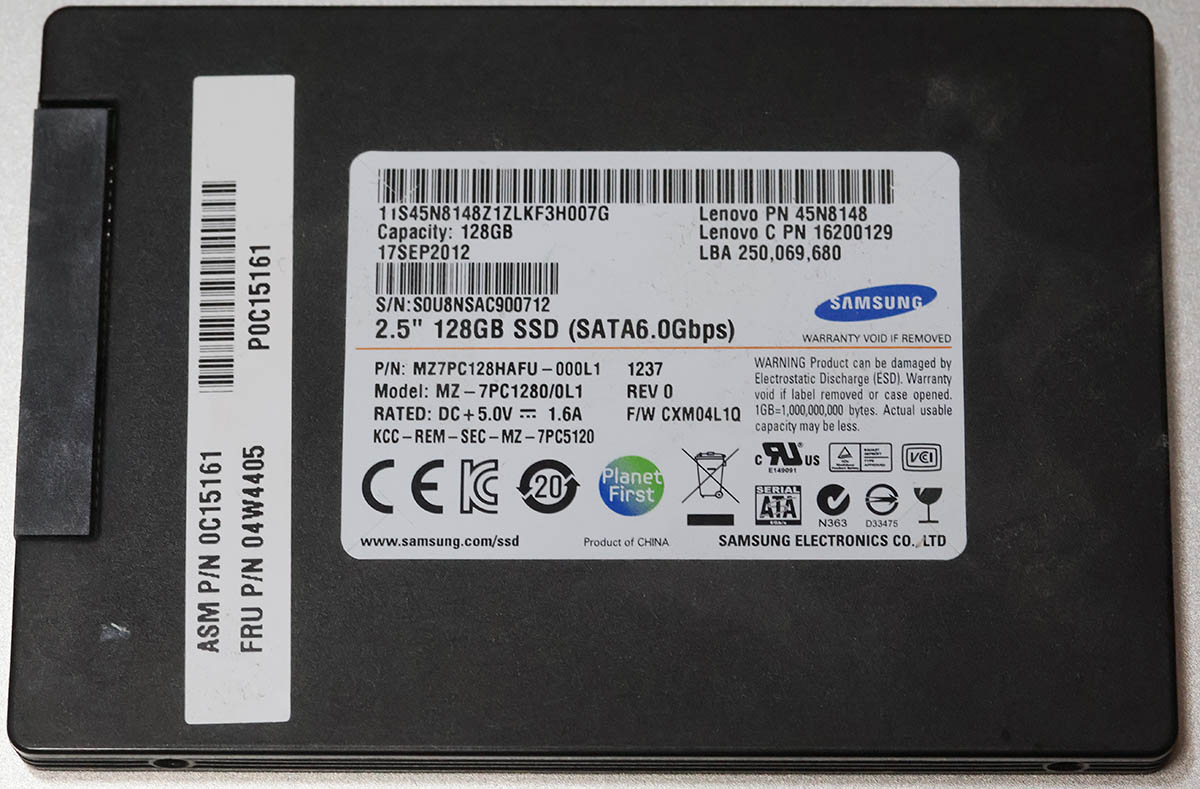
Oh. THAT one! It's just a 2.5" S-ATA SSD used for testing stuff. I think I have a Windows VM running on it. If you look closely, there is word "FRU P/N" written in block letters. Also under the barcode there is "Lenovo PN" and "Lenovo C PN". Right, this unit manufactured in September 2012 was liberated from a Laptop needing more capacity. Then it ran one Linux box for a while and after I upgraded that box, drive ended up gathering dust to one of my shelves. Then I popped it back into another server and used it for testing.
It all starts coming back to me.
More details with parted /dev/sda print:
Model: ATA SAMSUNG MZ7PC128 (scsi)
Disk /dev/sda: 128GB
Sector size (logical/physical): 512B/512B
Partition Table: gpt
Disk Flags:

Number  Start   End    Size    File system  Name                          Flags
 1      1049kB  106MB  105MB   fat32        EFI system partition          boot, esp, no_automount
 2      106MB   123MB  16.8MB               Microsoft reserved partition  msftres, no_automount
 3      123MB   127GB  127GB   ntfs         Basic data partition          msftdata, no_automount
 4      127GB   128GB  633MB   ntfs                                       hidden, diag, no_automount
Oh yes, Definitely a Windows-drive. Further troubleshooting with smartctl /dev/sda -x:
Vendor Specific SMART Attributes with Thresholds:
ID# ATTRIBUTE_NAME          FLAGS    VALUE WORST THRESH FAIL RAW_VALUE
  9 Power_On_Hours          -O--CK   090   090   000    -    47985
 12 Power_Cycle_Count       -O--CK   095   095   000    -    4057
177 Wear_Leveling_Count     PO--C-   017   017   017    NOW  2998
178 Used_Rsvd_Blk_Cnt_Chip  PO--C-   093   093   010    -    126
179 Used_Rsvd_Blk_Cnt_Tot   PO--C-   094   094   010    -    244
180 Unused_Rsvd_Blk_Cnt_Tot PO--C-   094   094   010    -    3788
190 Airflow_Temperature_Cel -O--CK   073   039   000    -    27
195 Hardware_ECC_Recovered  -O-RC-   200   200   000    -    0
198 Offline_Uncorrectable   ----CK   100   100   000    -    0
199 UDMA_CRC_Error_Count    -OSRCK   253   253   000    -    0
233 Media_Wearout_Indicator -O-RCK   198   198   000    -    195
Just to keep this blog post brief, above is a shortened list of the good bits. Running the command spits out ~150 lines of information on the drive. Walking through what we see:
- Power on hours: ~48.000 is roughly 5,5 years.
- Since the unit manufacture of Sep -12 it has been powered on for over 40% of the time.
- Thank you for your service!
- Power cycle count: ~4000, well ... that's a few
- Wear level: ~3000. Or when processed 17. I have no idea what the unit of this would be or the meaning of this reading.
- Reserve blocks: 126 reserve used, still 3788 unused.
- That's good. Drive's internal diagnostics has found unreliable storage and moved my precious data out of it into reserve area.
- There is still plenty of reserve remaining.
- The worrying bit is obvious: bad blocks do exist in the drive.
- ECC & CRC errors: 0. Reading and writing still works, no hiccups there.
- Media wear: 195. Again, no idea of the unit nor meaning. Maybe a downwards counter?
Replacement

Yeah. Let's state the obvious. Going for the cheapest available unit is perfectly ok in this scenario. The data I'm about to lose won't be the most precious one. However, every single time I lose data, that's a tiny chunk stripped directly from my soul. I don't want any of that to happen.
Data Recovery
A simple transfer time dd if=/dev/sda of=/dev/sdd:
250069680+0 records in
250069680+0 records out
128035676160 bytes (128 GB, 119 GiB) copied, 4586.76 s, 27.9 MB/s

real    76m26.771s
user    4m30.605s
sys     14m49.729s
Hour and 16 minutes later my Windows-image was on a new drive. I/O-speed of 30 MB/second isn't much. With M.2 I'm used to a whole different readings. Do note, the replacement drive has twice the capacity. As it stands, 120 GB is plenty for the use-ase.
Going Mechanical
Some assembly with Fractal case:
Four phillips screws to the bottom of the drive. Plugging cables back. That's a solid 10 minute job. Closing the side cover of the case and booting the server to validate everything still working as expected.
New SMART
Doing a 2nd round of smartctl /dev/sda -x on the new drive:
Vendor Specific SMART Attributes with Thresholds:
ID# ATTRIBUTE_NAME          FLAGS    VALUE WORST THRESH FAIL RAW_VALUE
  1 Raw_Read_Error_Rate     -O--CK   100   100   000    -    0
  9 Power_On_Hours          -O--CK   100   100   000    -    1
 12 Power_Cycle_Count       -O--CK   100   100   000    -    4
148 Unknown_Attribute       ------   100   100   000    -    0
149 Unknown_Attribute       ------   100   100   000    -    0
167 Write_Protect_Mode      ------   100   100   000    -    0
168 SATA_Phy_Error_Count    -O--C-   100   100   000    -    0
169 Bad_Block_Rate          ------   100   100   000    -    54
170 Bad_Blk_Ct_Lat/Erl      ------   100   100   010    -    0/47
172 Erase_Fail_Count        -O--CK   100   100   000    -    0
173 MaxAvgErase_Ct          ------   100   100   000    -    2 (Average 1)
181 Program_Fail_Count      -O--CK   100   100   000    -    0
182 Erase_Fail_Count        ------   100   100   000    -    0
187 Reported_Uncorrect      -O--CK   100   100   000    -    0
192 Unsafe_Shutdown_Count   -O--C-   100   100   000    -    3
194 Temperature_Celsius     -O---K   026   035   000    -    26 (Min/Max 23/35)
196 Reallocated_Event_Count -O--CK   100   100   000    -    0
199 SATA_CRC_Error_Count    -O--CK   100   100   000    -    131093
218 CRC_Error_Count         -O--CK   100   100   000    -    0
231 SSD_Life_Left           ------   099   099   000    -    99
233 Flash_Writes_GiB        -O--CK   100   100   000    -    173
241 Lifetime_Writes_GiB     -O--CK   100   100   000    -    119
242 Lifetime_Reads_GiB      -O--CK   100   100   000    -    1
244 Average_Erase_Count     ------   100   100   000    -    1
245 Max_Erase_Count         ------   100   100   000    -    2
246 Total_Erase_Count       ------   100   100   000    -    10512
                            ||||||_ K auto-keep
                            |||||__ C event count
                            ||||___ R error rate
                            |||____ S speed/performance
                            ||_____ O updated online
                            |______ P prefailure warning
Whoa! That's the fourth power on to a drive unboxed from a retail packaking. Three of them had to be in the manufacturing plant. Power on hours reads 1, that's not much. SSD life left 99 (I'm guessing %).
Finally
All's well. No data lost. Just my stress level jumping up.
My thinking is: If that new drive survives next 3 years running a Windows on top of a Linux, then it has served its purpose.
Arch Linux 6.15.5 upgrade fail
Thursday, July 31. 2025
On my Arch, I was doing the basic update with pacman -Syu. There was an announcement on linux-6.15.5.arch1-1. Nice!
Aaaaaand it failed. 
(75/75) checking for file conflicts                [####################] 100%
error: failed to commit transaction (conflicting files)
linux-firmware-nvidia: /usr/lib/firmware/nvidia/ad103 exists in filesystem
linux-firmware-nvidia: /usr/lib/firmware/nvidia/ad104 exists in filesystem
linux-firmware-nvidia: /usr/lib/firmware/nvidia/ad106 exists in filesystem
linux-firmware-nvidia: /usr/lib/firmware/nvidia/ad107 exists in filesystem
Errors occurred, no packages were upgraded.
Oh. How unfortunate, that. How to get past that obstacle? I tried all kinds of pacman -S --overwrite "*" linux-firmware-nvidia and such, but kept failing. I was just getting error messages spat at me. That's a weird package as it contains number of subpackages, which in reality don't exist at all. Confusing!
The winning sequence was to first let the thing go pacman --remove linux-firmware and follow that with install pacman -S linux-firmware.
Before: Linux version 6.14.4-arch1-2
A reboot later: Linux version 6.15.5-arch1-1
Maybe that's why people think Arch isn't for regular users. Its only for nerds.
Wifi-6 USB on a Linux - Working!
Sunday, January 26. 2025
Last summer I wrote about an attempt to get 802.11ax / Wifi 6 to work on a Linux. Spoiler: It didn't.
A week ago, the author of many Realtek-drivers, Nick Morrow contacted me to inform of a new driver version for RTL8832BU and RTL8852BU Chipsets.
After ./install-driver.sh, the kernel module 8852bu is installed. Dmesg will still display product as 802.11ac WLAN Adapter, however incorrect information that will be. After couple of retries, I managed to get WPA3 authentication working.
Ah joy. The USB-stick works! Performs quite fast also.
Very quirky driver, still. I can't seem to get the thing working on every plugin. Need to try multiple times. Typical failure is "No secrets were provided" -error with "state change: need-auth -> failed (reason 'no-secrets', managed-type: 'full')" in message log. I have absolutely no idea why this is happening, the built-in Realtek works every time.
Confessions of a Server Hugger - Fixing a RAID Array
Sunday, January 12. 2025
I have to confess: I'm a server hugger. Everything is in cloud or going there. My work is 100% in the clouds, my home pretty much is not.
There are drawbacks.
5.58am, fast asleep, there is a faint beeping waking you. It's relentless and won't go way. Not loud one to alarm you on fire, but not silent one to convince you to go back to sleep. Yup. RAID-controller.
What I have is a LSI MegaRAID SAS 9260-4i. The controller is from 2013. Year later LSI ceased to exist by aquisition. Also the product is rather extinct, Broadcom isn't known for their end user support. As there is proper Linux-driver and tooling after 11 years, I'm still running the thing.
A trivial MegaCli64 -AdpSetProp -AlarmSilence -aALL makes the annoying beep go silent. Next, status of the volume: MegaCli64 -LDInfo -Lall -aALL reveals the source for alarm:
Adapter 0 -- Virtual Drive Information:
Virtual Drive: 0 (Target Id: 0)
Name                :
RAID Level          : Primary-1, Secondary-0, RAID Level Qualifier-0
Size                : 7.276 TB
Sector Size         : 512
Mirror Data         : 7.276 TB
State               : Degraded
Strip Size          : 64 KB
Number Of Drives    : 2
Darn! Degraded. Uh/oh. One out of two drives in a RAID-1 mirror is gone.
In detail, drive list MegaCli64 -PDList -a0 (for clarity, I'm omitting a LOT of details here):
Adapter #0

Enclosure Device ID: 252
Slot Number: 0
Drive's position: DiskGroup: 0, Span: 0, Arm: 1
Device Id: 7
PD Type: SATA

Raw Size: 7.277 TB [0x3a3812ab0 Sectors]
Firmware state: Online, Spun Up
Connected Port Number: 1(path0)
Inquiry Data:             ZR14F8DXST8000DM004-2U9188                      0001
Port status: Active
Port's Linkspeed: 6.0Gb/s
Drive has flagged a S.M.A.R.T alert : No


Enclosure Device ID: 252
Slot Number: 1
Drive's position: DiskGroup: 0, Span: 0, Arm: 0
Device Id: 6
PD Type: SATA

Raw Size: 7.277 TB [0x3a3812ab0 Sectors]
Firmware state: Failed
Connected Port Number: 0(path0)
Inquiry Data:             ZR14F8PSST8000DM004-2U9188                      0001
Port's Linkspeed: 6.0Gb/s
Drive has flagged a S.M.A.R.T alert : No
For slots 0-3, the one connected to cable #1 is off-line. I've never go the idea why ports have different numbering to slots. When doing the mechanical installation with physical devices, it is easy to verify cables matching the slot numbers, not port numbers.
From this point on, everything became clear. Need to replace the 8 TB Seagate BarraCudas with a fresh pair of drives. Time was of the essence, and 6 TB WD Reds were instantly available.
To recovery!
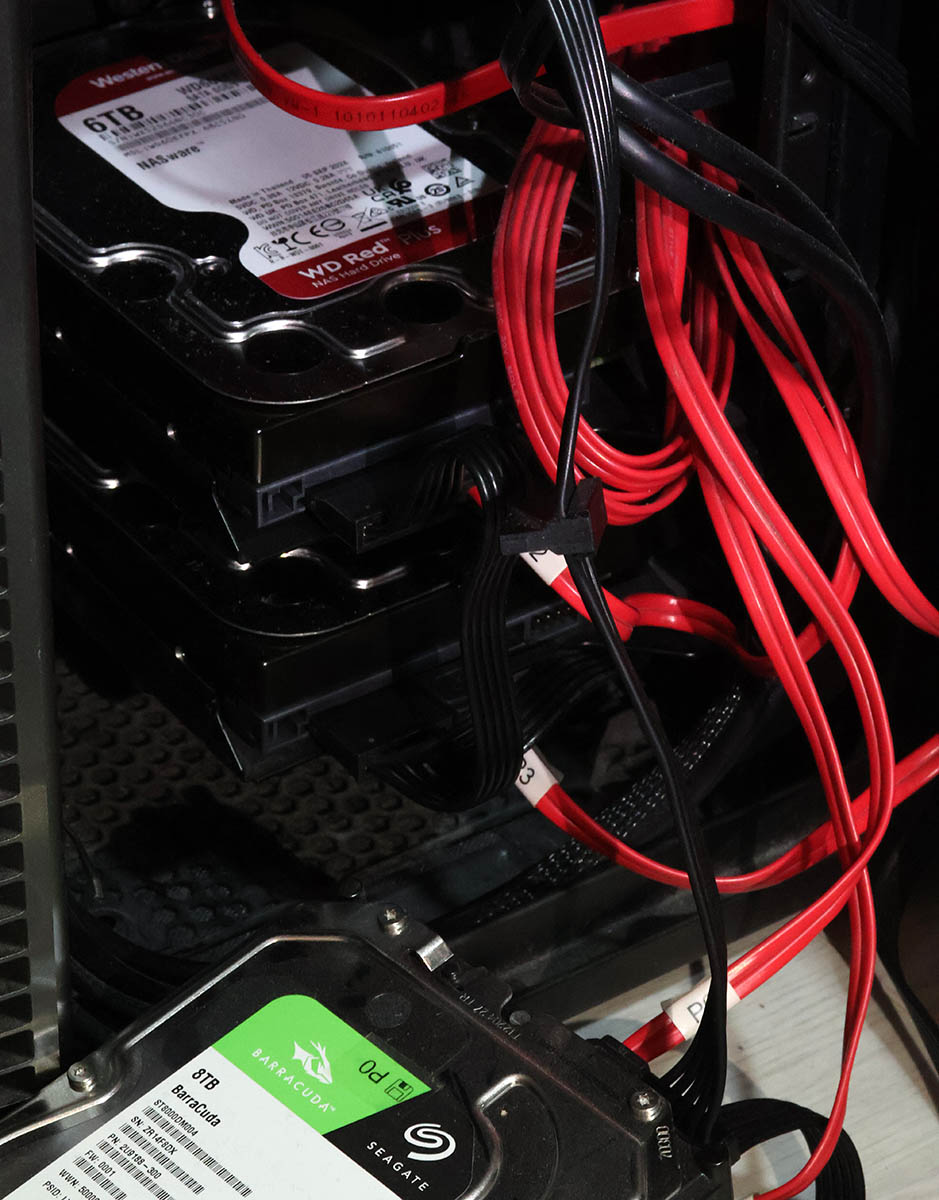
New Reds where in their allotted trays. BarraCudas where on my floor hanging from the cables.
Btw. for those interested, case is Fractal Define R6. Rack servers are NOISY! and I really cannot have them inside the house.
Creating a new array: MegaCli64 -CfgLdAdd -r1 [252:2,252:3] WT RA Direct NoCachedBadBBU -a0. Verify the result: MegaCli64 -LDInfo -L1 -a0
Virtual Drive: 1 (Target Id: 1)
Name                :
RAID Level          : Primary-1, Secondary-0, RAID Level Qualifier-0
Size                : 5.457 TB
Sector Size         : 512
Mirror Data         : 5.457 TB
State               : Optimal
Strip Size          : 64 KB
Number Of Drives    : 2
Span Depth          : 1
Default Cache Policy: WriteThrough, ReadAhead, Direct, No Write Cache if Bad BBU
Current Cache Policy: WriteThrough, ReadAhead, Direct, No Write Cache if Bad BBU
Default Access Policy: Read/Write
Current Access Policy: Read/Write
Disk Cache Policy   : Disk's Default
Encryption Type     : None
Is VD Cached: No
To my surprise, the RAID-volume hot-plugged into Linux also! ls -l /dev/sdd resulted in a happy:
brw-rw----. 1 root disk 8, 48 Jan 5 09:32 /dev/sdd
Hot-plug was also visible in dmesg:
kernel: scsi 6:2:1:0: Direct-Access     LSI      MR9260-4i        2.13 PQ: 0 ANSI: 5
kernel: sd 6:2:1:0: [sdd] 11719933952 512-byte logical blocks: (6.00 TB/5.46 TiB)
kernel: sd 6:2:1:0: Attached scsi generic sg4 type 0
kernel: sd 6:2:1:0: [sdd] Write Protect is off
kernel: sd 6:2:1:0: [sdd] Write cache: disabled, read cache: enabled, supports DPO and FUA
kernel: sd 6:2:1:0: [sdd] Attached SCSI disk
Next up: Onboarding the new capacity while transferring data out of the old one. With Linux's Logical Volume Manager, or LVM, this is surprisingly easy. Solaris/BSD people are screaming: "It's sooooo much easier with ZFS!" and they would be right. Its capabilities are 2nd to none. However, what I have is Linux, a Fedora Linux, so LVM it is.
Creating LVM partition: parted /dev/sdd
GNU Parted 3.6
Using /dev/sdd
Welcome to GNU Parted! Type 'help' to view a list of commands.
(parted) mktable gpt

(parted) mkpart LVM 0% 100%
(parted) set 1 lvm on
(parted) p
Model: LSI MR9260-4i (scsi)
Disk /dev/sdd: 6001GB
Sector size (logical/physical): 512B/512B
Partition Table: gpt
Disk Flags:

Number  Start   End     Size    File system  Name  Flags
 1      1049kB  6001GB  6001GB               LVM   lvm

(parted) q
With LVM, inform of a new physical volume: pvcreate /dev/sdd1
  Physical volume "/dev/sdd1" successfully created.
  Not creating system devices file due to existing VGs.
Extend the LVM volume group to the new physical volume: vgextend My_Precious_vg0 /dev/sdd1
Finally, inform LVM to vacate all data from degraded RAID-mirror. As VG has two PVs in it, this effectively copies all the data. On-the-fly. With no downtime. System running all the time. Command is: pvmove /dev/sdb1 /dev/sdd1
Such moving isn't fast. With time, the measured wallclock-time for command execution was 360 minutes. That's 6 hours! Doing more math with lvs -o +seg_pe_ranges,vg_extent_size, indicates PV extent size to be 32 MiB. On the PV, 108480 extents were allocated to VGs. That's 3471360 MiB in total. For 6 hour transfer, that's 161 MiB/s on average. To set that value into real World, my NVMe SSD benchmarks 5X faster on write. To repeat the good side: my system was running all the time, services were on-line without noticeable performance issues.
Before tearing down the hardware, final thing with LVM is to vacate broken array from VG: vgreduce My_Precious_vg0 /dev/sdb1 followed by pvremove /dev/sdb1.
Now that LVM was in The Desired State®, final command to run was to remove degraded volume from LSI: MegaCli64 -CfgLdDel -L0 -a0
To conclude this entire shit-show, it was time to shutdown system, remove BarraCudas and put case back together. After booting the system, annoying beep was gone.
Dust having settled, it was time to take a quick looksie on the old drives. Popping BarraCudas to a USB3.0 S-ATA -bridge revealed both drives being functional. Drives weren't that old, 2+ years of 24/7 runtime on them. Still today, I don't know exactly what happened. I only know LSI stopped loving one of the drives for good.
Fedora 41 Upgrade - Gone bad
Thursday, October 31. 2024
As scheduled to end of October 2024: Announcing Fedora 41 from Red Hat.![]()
Such distro has mechanism to do in-place upgrade: Upgrading Fedora Linux Using DNF System Plugin. It is based on DNF System Upgrade.
Priciple is to run dnf system-upgrade download --releasever=41, tap Yes couple times and then dnf system-upgrade reboot. It works (mostly) and I have used such in-place upgrade many times on a VM running in Hetzner.
If you haven't read between the lines yet, let's state the obvious: I'm posting this in a scenario where everyhing didn't go as planned.
Imagine a virtual machine running in a data center far far away. There is interaction via SSH or if needed, a browser-based console can be used for dire needs. A failed update was indeed such.
41 Upgrade Begins - And Fails
 Simultaneously with
 dnf system-upgrade reboot, I start sending ICMP echo requests to my VM to see the point in time when it begins pinging me back. This is a clear indication of upgrade being finished. I waited roughly 20 minutes without a response. Such a long time is an obvious indicator of a problem. Subsequently I logged in Hetzner's portal to pop open a console. Console showed me an upgraded system in the middle of a reboot-cycle. Stuck doing nothing.
That being unexpected, I chose to go for a Ctrl-Alt-Del. My wish came trough, a request to reboot nicely recycled the stuck system and a login-prompt greeted me on the console. Still, ping didn't. On the console, the only single keyboard layout made available is hard-coded ANSI US. On hardware, all my keyboards have layout ISO Finnish. That makes those elusive often used characters like dash (-), slash (/), pipe (|) or colon (:) be in very very different places slowing the entire process.
On the Console - Missing Package
Poking around the system on console indicated an upgraded VM. Everything else on the system was nice & peachy besides networking. There was no IP-addresses assigned. Actually entire NetworkManager was missing from the system. It did not exist. At all! Also every single bit of configuration at /etc/NetworkManager/ was absent.
Transferrring the muich-needed RPM-package NetworkManager-1.50.0-1.fc41 by eyeballing a rather dumb virtual console is fruitless. A quick analysis of the thing ended with a harsh one: it doesn't support any sensible means of transmitting files. Receiving any sent data with copy/paste or any other low-level means was absent. Something else was needed.
The Fix - Scraping
I opted to fix the network by hand. ip-command was installed in the system and it worked perfectly. That's all I needed. Or, almost all.
In my infinite wisdom, I didn't have any of the IP-details at hand. I reasoned to myself the system upgrade having worked flawlessly multiple times before this. I didn't NEED to save IPv4 or IPv6 -addresses, their routing setup or DNS-resolvers. I knew from tinkering with these boxes that on x86-64 architecture Hetzner VMs all those details are static, manually set to Hetzner-assigned values. Their modern setup on Arm v8 does utilize DHCP for IPv4. My box was on a traditional rack and I couldn't count on automation to assist on this one.
Scraping all the bits and pieces of information was surprisingly easy. My own DNS-records helped. After the fact, I realized a shortcoming, if I would have looked at the bottom of the web-console, those IP-addresses would have been shown there. At the time I didn't. Routing defaults can be found from documentation such as Static IP configuration.
Now I knew what to set for the values.
The Fix - Manual Labor
Now the "fun" begun. I need to setup IPv4 address complete with routing to restore functionality of dnf-command. This would make it possible to install NetworkManager to get nmcli-command back.
Sequence is as follows:
ip addr add 192.0.2.1/32 dev eth0
ip route add 172.31.1.1 dev eth0 src 192.0.2.1
ip route add default via 173.31.1.1 src 192.0.2.1
Btw. see RFC5737 for IPv4-addresses and RFC3849 for IPv6-addresses reserved for documentation. I'm not going to post my box's coordinates here.
Fedora DNS-setup is via systemd-resolved, checking file /etc/systemd/resolved.conf. File had survived the update intact. It still had the content of:
DNS=185.12.64.1 185.12.64.2 2a01:4ff:ff00::add:1
A perfect & valid solution.
The Fix - Managing Network
Ta-daaa! Ping worked. dnf worked! Everything worked! The joy!
At this point running dnf install NetworkManager wasn't much. Trying to figure out what was wrong proved to be a headache.
On initial glance nmcli conn show:
NAME  UUID                                  TYPE      DEVICE
eth0  12345678-1234-1234-1234-123456789abc  ethernet  --
What!? Why isn't my eth0-connection associated with a device! No amount of attempts, tinkering, cursing nor yelling helped. I could not associate a device with the connection. My only option was to drop the hammer on the thing: nmcli conn del eth0
Now my eth0 didn't work as it didn't exist. A delete made sure of it. Next, getting it back:
nmcli conn add type ethernet ifname eth0 con-name eth0 ipv4.method manual ipv4.addr 192.0.2.1
nmcli conn modify eth0 ipv4.gateway 172.31.1.1
nmcli conn modify eth0 ipv6.addr 2001:db8::1/64
nmcli conn modify eth0 ipv6.gateway fe80::1
Final twist was to make those changes effective: nmcli device reapply eth0
IPv6 begun operating, IPv4 was unchanged. Everything was where it should have been after the upgrade.
That was it for NetworkManager, moving on.
Outcome
The only true measure of a possible success is a system reboot. If my tinkering survived a normal cycle, then all was good. Nothing special to report on that. Everything stuck and survived a rinse-cycle. File eth0.nmconnection stored NetworkManager configs as expected.
Why this thing exploded remains unknown. Missing any critical pieces of a system is always a disaster. Surviving this one with very little damage was lucky. I may need to increase my odds and re-image the VM. My guess is, this box survives only so-and-so many upgrades. I may have used all of the lives it has.
Wifi-6 USB on a Linux - BrosTrend AX1
Thursday, August 29. 2024
My previous post was about 10+ year old laptops. At that time Broadcom ruled the chipset Wifi chipset market.
Since those days balance has shifted. Today, most common chipset for Wifi is Realtek. I also have couple Mediatek Wi-Fi chips working perfectly with Linux. To repeat what I said previously: These guys have their Linux support via open-source drivers. Broadcom doesn't. Hm. I dunno, maybe that's what made them decline and the other guy thrive? Most certainly, I wish it was their open-source support. 😁
So, my old laptop lost wireless connectivity and I needed SOMETHING to get the thing going to The Internet. I happened to have a brand new USB-stick on a test drive. As there aren't many Linux-supported chipsets, most USB-sticks won't work with 802.11ax / Wi-Fi 6 and you have to settle for slower speeds combined with less security. This product is supposed to beat competition on that.
Spoiler: I doesn't! (yet)
The product is BrosTrend AX1. The speed rating is AX1800 and it's supposed to be WiFi 6 Linux Compatible WiFi Adapter:
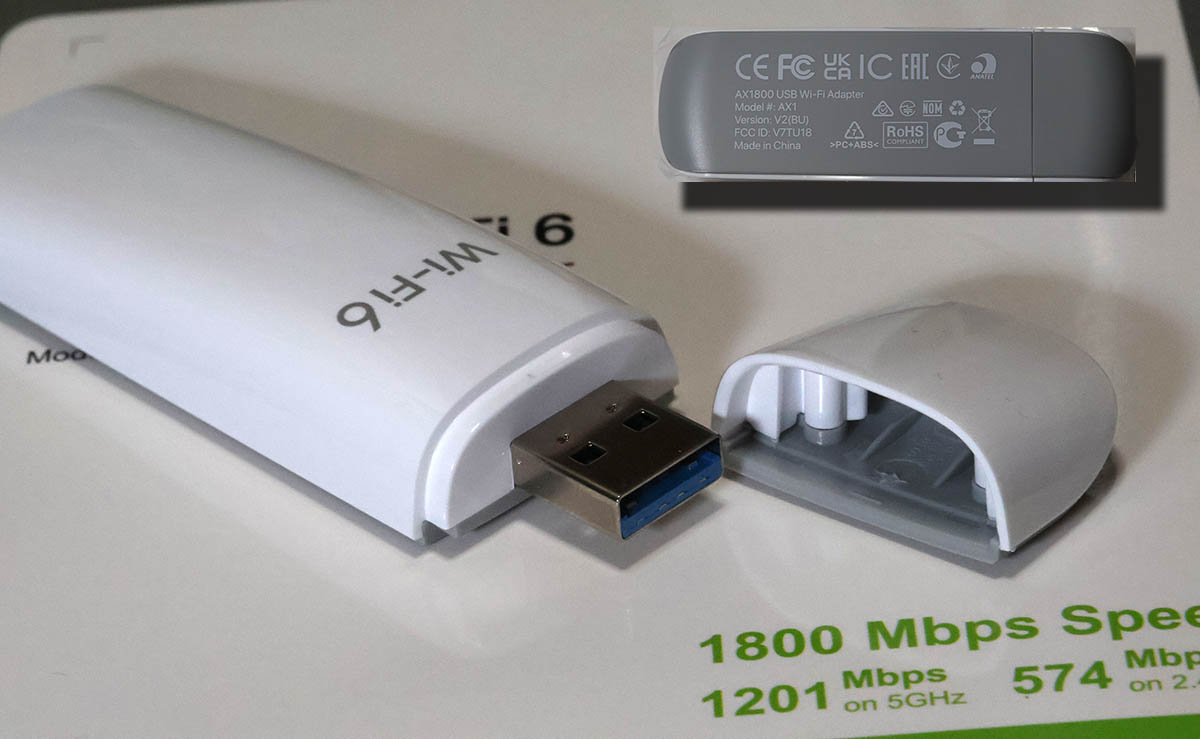
lsusb information:
Bus 001 Device 013: ID 0bda:b832 Realtek Semiconductor Corp. 802.11ac WLAN Adapter
Device Descriptor:
  bLength                18
  bDescriptorType         1
  bcdUSB               2.00
  bDeviceClass            0 [unknown]
  bDeviceSubClass         0 [unknown]
  bDeviceProtocol         0
  bMaxPacketSize0        64
  idVendor           0x0bda Realtek Semiconductor Corp.
  idProduct          0xb832 802.11ac WLAN Adapter
  bcdDevice            0.00
  iManufacturer           1 Realtek
  iProduct                2 802.11ac WLAN Adapter
Btw. See how USB-identification is for 802.11ac. Confusing, that.
At this point, there is no pre-baked Linux kernel module. You can build one in a jiffy. Source code is at https://github.com/morrownr/rtl8852bu. Getting that C-code to work in your favor, after git clone, you need to run ./install-driver.sh. This script does a lot for you. At end, the script even stealthily copies the kernel module into proper directory to make loading the driver very easy. This is confusing and not all module builds do the install without asking.
When I modprobe 8852bu on Fedora 40, module does little bit of whining, but comes up. For the crash I sent some information to author: https://github.com/morrownr/rtl8852bu/issues/38
On my laptop, connection to 802.11ac / Wi-Fi 5 works ok. I suspect, there is something off with WPA3 as connections to 802.11ax / Wi-Fi 6 simply keep asking for network password in a forever loop. But hey! It worked. I got to The Net and was able to fix things. The thought of 802.11ax support is left unanswered. If USB-information doesn't state 802.11ax either, does the stick really support it or not? I dunno.
I'm hoping, WPA3-issue would be fixed one day, so that I'd be able to join any network of my choosing, not the one the device is capable of going.
Update - 20th January 2025: There is an updated driver with full 802.11ax -support in Linux.
Broadcom Wi-Fi in a Linux - Fedora 40 case
Tuesday, August 27. 2024
Is that combo really impossible?![]()
I've been running Linux in multiple old/oldish laptops. Broadcom is such a popular chip vendor, it is the most typical choice regardless of the laptop manufacturer. As Broadcom is full of idiots, their device drivers are proprietary. In their infinte wisdom, they pre-build Linux binaries and hand them out. This, obviously, is much better than not having the closed-source driver package at all. However, they really don't care. Every once in a while something happens in Linux kernel and their driver becomes less-than-operational.
Also, by lack of one official source, there are number of packages made out of the binary distribution. Key naming convention will include letters W and L in them, so you as an end user have to know wl stands for Broadcom BCM4311, BCM4312, BCM4313, BCM4321, BCM4322, BCM43224, BCM43225, BCM43227, BCM43228, BCM43142, BCM4331, BCM4352, BCM4360 devices. Simple! (No, not simple)
As an example: Fedora doesn't support Broadcom at all (as default), Arch Linux has packages brcm80211, b43 and broadcom-wl, Debian has broadcom-wl as non-free package.
Recently my Fedora 40 refused to find a working Wifi. It all started on from 6.9.10 up to 6.10.5. Oh, I forgot to mention, altough Fedora doesn't have the support, there exist number of alternative RPM-repos for Fedora carrying Broadcom. An example, RPM Fusion., non-free package of broadcom-wl. To make this mess even messier, RPM Fusion also has kmod-wl and akmod-wl.
Ok, many packages, back to the problem: my laptop lost Wifi and I really struggled to figure out why, which kernel module caused the problem and for what reason. At the time both broadcom-wl and kmod-wl were installed.
This is VERY confusing! You have to be super-smart to understand much of my less-than-coherent story above. Unfortunately, that is the reality. Everything gets convoluted, confusing and chaos.
In RPM Fusion Bugzilla, there is a bug #6991 Kernel hangs due to broadcom wifi driver. This bug report is specifically for akmod-wl, which was not installed in my laptop. Using an USB-dongle, uninstalling both broadcom-wl and kmod-wl, followed by installing akmod-wl did not solve the problem either. Unlike with original packages, with akmod-wl there was no kernel crash on modprobe. With this package NetworkManager didn't work either. Weird.
When I wrote comments to bug report and Mr. Vieville, author of akmod-wl, replied with a suggestion. There existed an unreleased version of 6.30.223.271-53. Little bit of dnf installing and testing ... it works! Now my laptop had native Wifi-connectivity and I could un-plug the USB-dongle.
This incident left me really confused and happy.
System update of 2024
Thursday, February 29. 2024
I''ve been way too busy with my dayjob to do any blogging nor system maintenance.
Ever since S9y 2.4.0 update, my blog has been in a disarray. This has been a tough one for me as I'd love to run my system with much better quality.
Ultimately I had to find the required time and do tons of maintenance to get out of the sad state.
Mending activities completed:
- Changed hosting provider to Hetzner
- Rented a much beefier VM for the system
- Changed host CPU:
- manufacturer from Intel to ?
- architecture from AMD64 into ARMv8
- generation from Pentium 4 into something very new
- Upgraded OS into Oracle Linux 9
- Upgraded DB into PostgreSQL 16
- Allocated more RAM for web server
- Tightened up security even more
- Made Google Search happier
- ... fixeds a ton of bugs in Brownpaper skin
Qualys SSL Report still ranks this site as A+ having HTTP/2. Netcraft Site report still ranks this site into better half of top-1-Million in The World.
Now everything should be so much better. Now this AI-generated image portrays a fixed computer system:

Fedora Linux 39 - Upgrade
Sunday, November 12. 2023

Twenty years with Fedora Linux. Release 39 is out!
I've ran Red Hat since 90s. Version 3.0.3 was released in 1996 and ever since I've had something from them running. As they scrapped Red Hat Linux in 2003 and went for Fedora Core / RHEL, I've had something from those two running. For the record: I hate those semi-working everything-done-only-half-way Debian/Ubuntu crap. When I want to toy around with something that doesn't quite fit, I choose Arch Linux.
To get your Fedora in-place-upgraded, process is rather simple. Docs are in article Performing system upgrade.
First you make sure existing system is upgraded to all latest stuff with a dnf --refresh upgrade. Then make sure upgrade tooling is installed: dnf install dnf-plugin-system-upgrade. Now you're good to go for download all the new packages with a: dnf system-upgrade download --releasever=39
Note: This workflow has existed for a long time. It is likely to work also in future. Next time all you have to do is replace the release vesion with the one you want to upgrade into.
Now all prep is done and you're good to go for the actual upgrade. To state the obvious: this is the dangerous part. Everything before this has been a warm-up run.
dnf system-upgrade reboot
If you have a console, you'll see the progress.
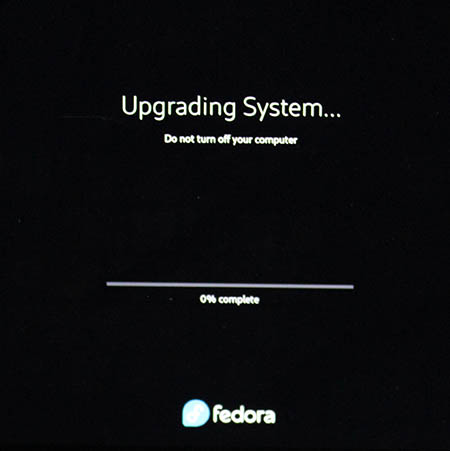
Installing the packages and rebooting into the new release shouldn't take too many minutes.
When back in, verify: cat /etc/fedora-release ; cat /proc/version
This resulted in my case:
Fedora release 39 (Thirty Nine)

Linux version 6.5.11-300.fc39.x86_64 (mockbuild@d23353abed4340e492bce6e111e27898) (gcc (GCC) 13.2.1 20231011 (Red Hat 13.2.1-4), GNU ld version 2.40-13.fc39) #1 SMP PREEMPT_DYNAMIC Wed Nov 8 22:37:57 UTC 2023
Finally, you can do optional clean-up: dnf system-upgrade clean && dnf clean packages
That's it! You're done for at least for next 6 months.
Nuvoton NCT6793D lm_sensors output
Monday, July 3. 2023
LM-Sensors is set of libraries and tools for accessing your Linux server's motheboard sensors. See more @ https://github.com/lm-sensors/lm-sensors.
If you're ever wondered why in Windows it is tricky to get readings from your CPU-fan rotation speed or core temperatures from you fancy GPU without manufacturer utilities. Obviously vendors do provide all the possible readings in their utilities, but people who would want to read, record and store the data for their own purposes, things get hairy. Nothing generic exists and for unknown reason, such API isn't even planned.
In Linux, The One toolkit to use is LM-Sensors. On kernel side, there exists The Linux Hardware Monitoring kernel API. For this stack to work, you also need a kernel module specific to your motherboard providing the requested sensor information via this beautiful API. It's also worth noting, your PC's hardware will have multiple sensors data providers. An incomplete list would include: motherboard, CPU, GPU, SSD, PSU, etc.
Now that sensors-detect found all your sensors, confirm sensors will output what you'd expect it to. In my case there was a major malfunction. On a boot, following thing happened when system started sensord (in case you didn't know, kernel-stuff can be read via dmesg):
systemd[1]: Starting lm_sensors.service - Hardware Monitoring Sensors...

kernel: nct6775: Enabling hardware monitor logical device mappings.

kernel: nct6775: Found NCT6793D or compatible chip at 0x2e:0x290

kernel: ACPI Warning: SystemIO range 0x0000000000000295-0x0000000000000296 conflicts with OpRegion 0x0000000000000290-0x0000000000000299 (_GPE.HWM) (20221020/utaddress-204)

kernel: ACPI: OSL: Resource conflict; ACPI support missing from driver?

systemd[1]: Finished lm_sensors.service - Hardware Monitoring Sensors.
This conflict resulted in no available mobo readings! NVMe, GPU and CPU-cores were ok, the part I was mostly looking for was fan RPMs and mobo temps just to verify my system health. No such joy. Uff.
It seems, this particular Linux kernel module has issues. Or another way to state it: mobo manufacturers have trouble implementing Nuvoton chip into their mobos. On Gentoo forums, there is a helpful thread: [solved] nct6775 monitoring driver conflicts with ACPI
Disclaimer: For ROG Maximus X Code -mobo adding acpi_enforce_resources=no into kernel parameters is the correct solution. Results will vary depending on what mobo you have.
Such ACPI-setting can be permanently enforced by first querying about the Linux kernel version being used (I run a Fedora): grubby --info=$(grubby --default-index). The resulting kernel version can be updated by: grubby --args="acpi_enforce_resources=no" --update-kernel DEFAULT. A reboot shows fix in effect, ACPI Warning is gone and mobo sensor data can be seen.
As a next step you'll need userland tooling to interpret the raw data into human-readable information with semantics. A new years back, I wrote about Improving Nuvoton NCT6776 lm_sensors output. It's mainly about bridging the flow of zeros and ones into something having meaning to humans. This is my LM-Sensors configuration for ROG Maximus X Code:
chip "nct6793-isa-0290"


    # 1. voltages

    ignore in0

    ignore in1

    ignore in2

    ignore in3

    ignore in4

    ignore in5

    ignore in6

    ignore in7

    ignore in8

    ignore in9

    ignore in10

    ignore in11


    label in12 "Cold Bug Killer"

    set in12_min 0.936

    set in12_max 2.613

    set in12_beep 1


    label in13 "DMI"

    set in13_min 0.550

    set in13_max 2.016

    set in13_beep 1


    ignore in14


    # 2. fans

    label fan1 "Chassis fan1"

    label fan2 "CPU fan"

    ignore fan3

    ignore fan4

    label fan5 "Ext fan?"


    # 3. temperatures

    label temp1 "MoBo"


    label temp2 "CPU"

    set temp2_max 90

    set temp2_beep 1


    ignore temp3

    ignore temp5

    ignore temp6

    ignore temp9

    ignore temp10

    ignore temp13

    ignore temp14

    ignore temp15

    ignore temp16

    ignore temp17

    ignore temp18


    # 4. other

    set beep_enable 1

    ignore intrusion0

    ignore intrusion1
I'd like to credit Mr. Peter Sulyok on his work about ASRock Z390 Taichi. This mobo happens to use the same Nuvoton NCT6793D -chip for LPC/eSPI SI/O (I have no idea what those acronyms are for, I just copy/pasted them from the chip data sheet). The configuration is in GitHub for everybody to see: https://github.com/petersulyok/asrock_z390_taichi
Also, I''d like to state my ignorance. After reading less than 500 pages of the NCT6793D data sheet, I have no idea what is:
- Cold Bug Killer voltage
- DMI voltage
- AUXTIN1 is or exactly what temperature measurement it serves
- PECI Agent 0 temperature
- PECI Agent 0 Calibration temperature
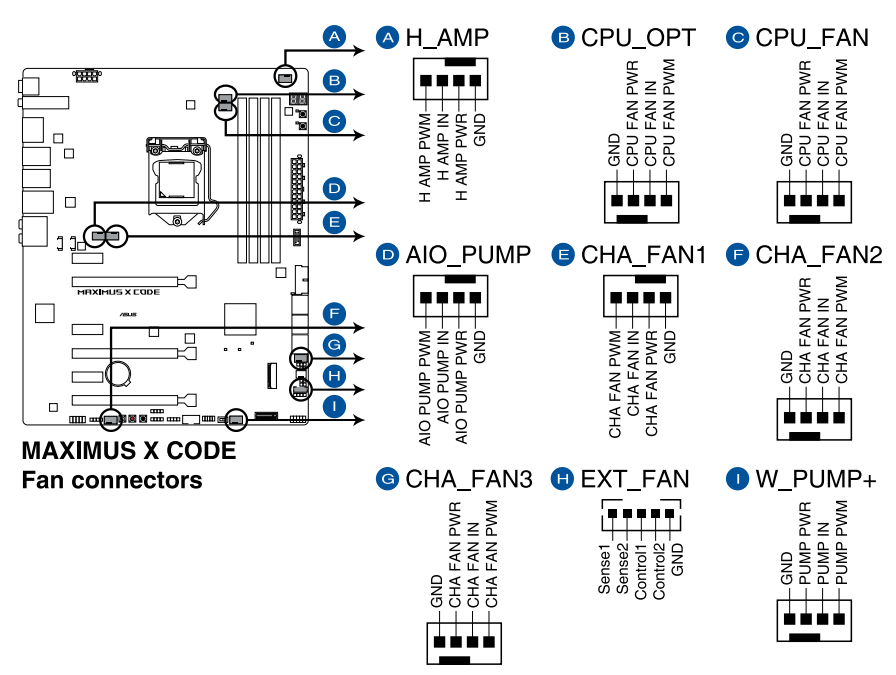
Remember, I did mention semantics. From sensors-command output I can read a reading, what it translates into, no idea! Luckily there are some of the readings seen are easy to understand and interpret. As an example, fan RPMs are really easy to measure by removing the fan from its connector. Here is an excerpt from my mobo manual to explain fan-connectors:
As data quality is taken care of and output is meaningful, next step is to start recording data. In LM-Sensors, there is sensord for that. It is a system service taking a snapshot (you can define the frequency) and storing it for later use. I'll enrich the stored data points with system load averages, this enables me to estimate a relation with high temperatures and/or fan RPMs with how much my system is working.
Finally, all data gathered into a RRDtool database can be easily visualized with rrdcgi into HTML + set of PNG-images to present a web page like this:
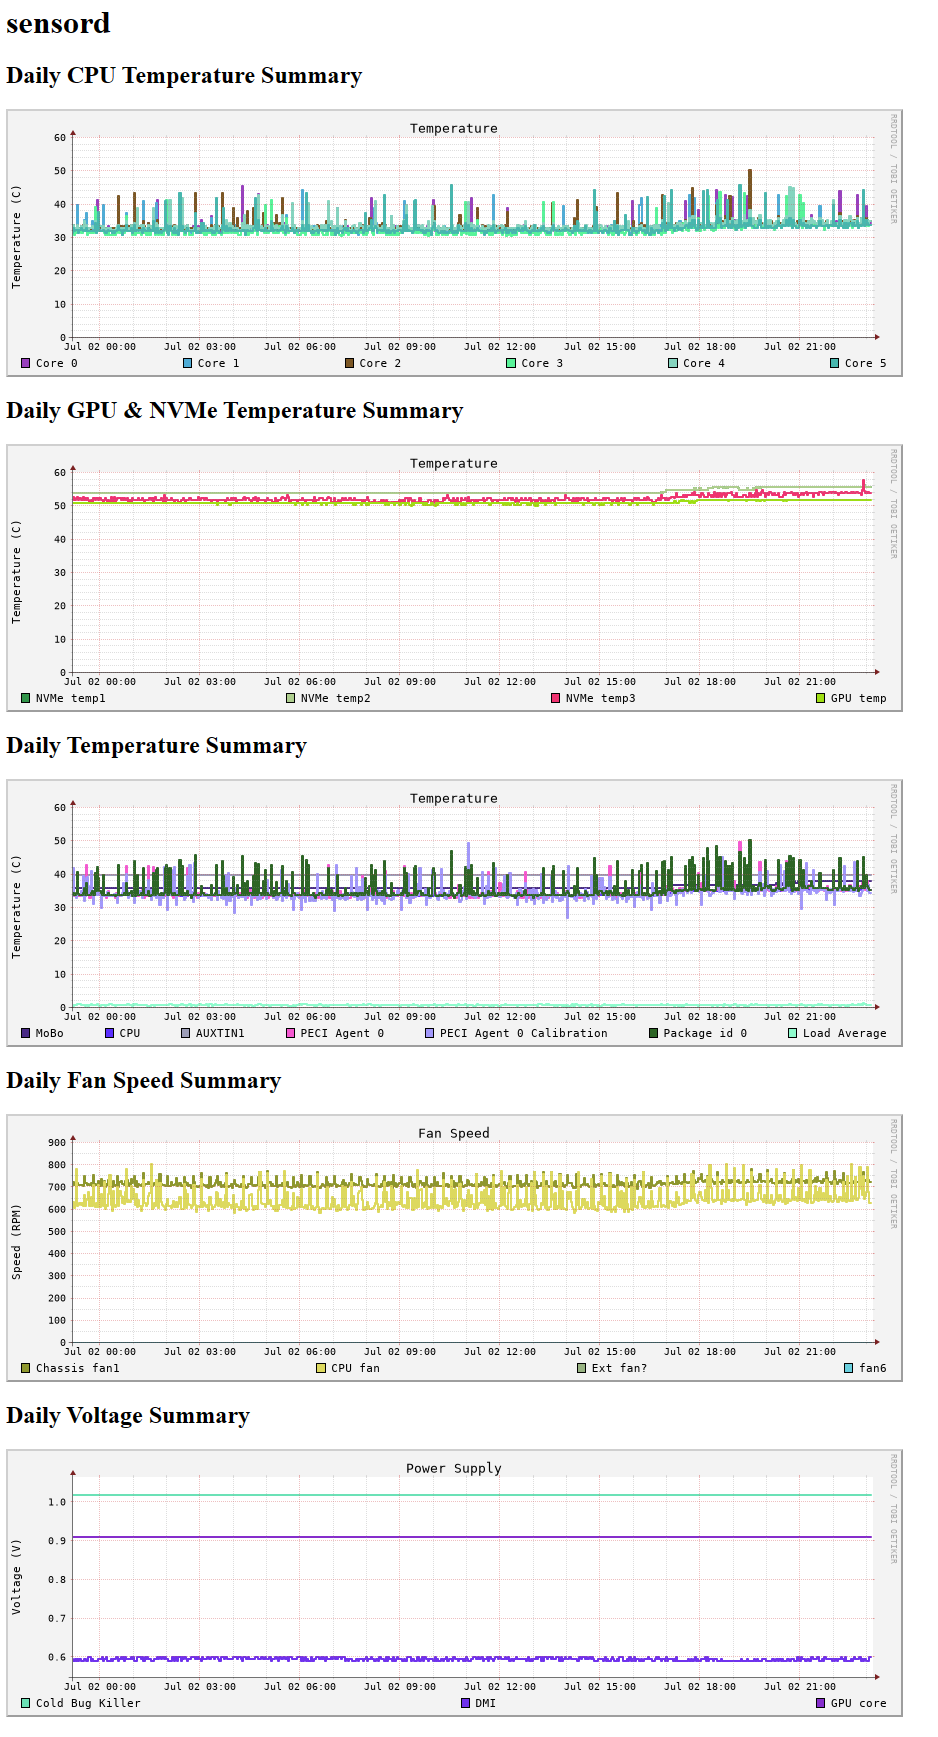
Nice!
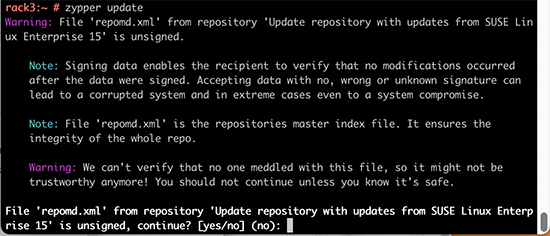
File 'repomd.xml' from repository is unsigned
Thursday, March 23. 2023
For all those years I've been running SUSE-Linux, I've never bumped into this one while running a trivial zypper update:
Warning: File 'repomd.xml' from repository 'Update repository with updates from SUSE Linux Enterprise 15' is unsigned.
Note: Signing data enables the recipient to verify that no modifications occurred
after the data were signed. Accepting data with no, wrong or unknown signature can
lead to a corrupted system and in extreme cases even to a system compromise.
Note: File 'repomd.xml' is the repositories master index file. It ensures the
integrity of the whole repo.
Warning: We can't verify that no one meddled with this file, so it might not be
trustworthy anymore! You should not continue unless you know it's safe.
continue? [yes/no] (no):
This error slash warning being weird and potentially dangerous, my obvious reaction was to hit ctrl-c and go investigate. First, my package verification mechanism should be intact and be able to verify if updates downloaded are unaltered or not. Second, there should have not been any breaking changes into my system, at least I didn't make any. As my system didn't seem to breached, I assumed a system malfunction and went investigating.
Quite soon, I learned this is less than rare event. It has happeded multiple times for other people. According to article Signature verification failed for file ‘repomd.xml’ from repository ‘openSUSE-Leap-42.2-Update’ there exists a simple fix.
By running two command zypper clean --all and zypper ref, the problem should dissolve.
Yes, that is the case. After a simple wash/clean/rinse -cycle zypper update worked again.
It was just weird to bump into that for the first time I'd assume this would have occurred some time earlier.

