On VAT Calculation / Rounding Monetary Values
Thursday, April 18. 2024
Yesterday API design was hard, today creating invoice line items with VAT on them is hard.
When calculating taxes on items, a very careful approach must be taken on rounding. Line items of an invoice need to be stand-alone units and special care must be taken when calculating sum of rounded values. For unaware developer, this could be trickier than expected.
Products
I'll demonstrate the problem with a ficticous invoice. Let's say I have five different products to sell with following unit prices:
- Product 1 1.24 €
- Product 2 2.77 €
- Product 3 3.31 €
- Product 4 4.01 €
- Product 5 5.12 €
Example invoice #1
A happy customer bought ten of Product 1. Following invoice could be generated from the transaction:
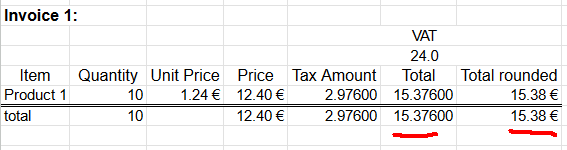
Rather trivial arithmetic with value added tax being 24% can be made. 10 units costing 1,24€ each will total 12,40€. Adding 24% tax on them will result VAT amount of 2,976€. As €-cents really needs to be between 0 and 99 rounding is needed on total amount. Minor numeric cruelty will be needed to make result feasible as money. That's ok. The end result is correct and everybody are happy.
Example invoice #2
Second happy customer bought same as the first customer and additionally 14 of Product 2. Following invoice could be generated from the transaction:
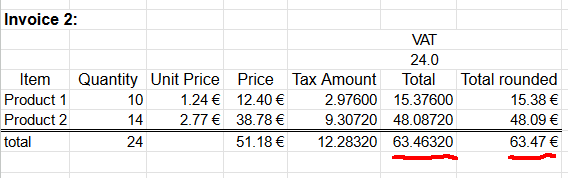
Looking at columns total and total rounded reveal the unpleasant surprise. If rounding is done once, after sum, the rounded value isn't 63,47 as expected. When rounding the total sum into two decimals 63,4632 will result 63,46. There is a cent missing! Where did it go? Or ... alternatively, where did the extra cent appear into total rounded column?
Example invoice #3
Let's escalate. A really good customer bought everything. Lots of everything. Invoice will look like this:
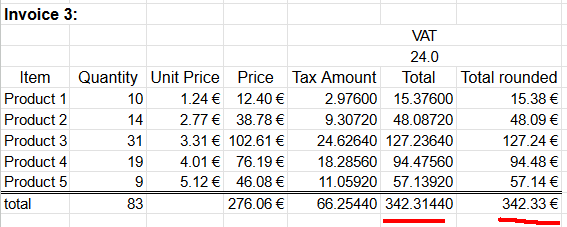
Whoooo! It escalates. Now we're missing two cents already. Total sum of 342,3144€ will round down to 342,31€.
Lesson Learned
Doing one rounding at the end is mathematically sound. Arithmetic really works like that. However, when working with money, there are additional constraints. Each line needs to be real and could be a separate invoice. Because this constraint, we're rounding on each line. Calculating sum of rounding stops making sense mathematically.
Please note, these numbers were semi-randomly selected to demonstrate the problem. In real world scenario roundings can easily cancel each other and detecting this problem will be much more difficult.
Modeling real-world into computer software is surprisingly tricky.
- Anonymous
On API design
Wednesday, April 17. 2024
API design is hard.
If your software makes the behavior hard to change, your software thwarts the very reason that software exists.
- Robert C. Martin
ref. Sandia LabNews on February 14, 2019
What happens when in a design meeting, you're sure that a thing will NEVER happen? Until it does!
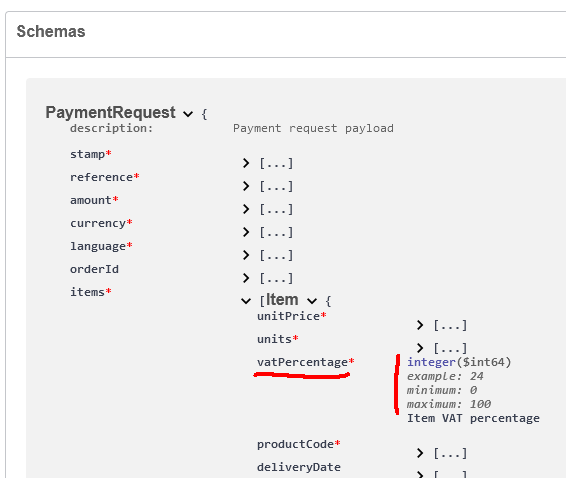
What if you were adamant, a value added tax percentage will NEVER be anything else than an integer? Until it does!
From news on 16th Apr 2024: Reports: Finnish government to raise general value-added tax rate to 25.5%
Meanwhile...
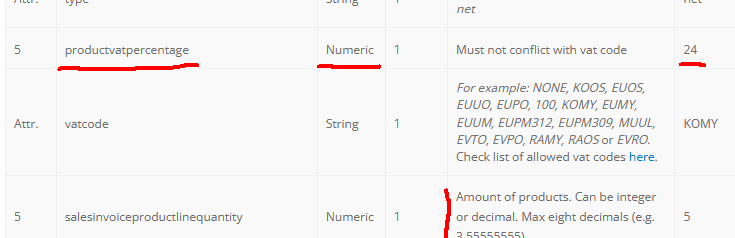
At Paytrail API (https://docs.paytrail.com/#/):
At Visma Netvisor API (https://support.netvisor.fi/en/support/solutions/articles/77000554152-import-sales-invoice-or-order-salesinvoice-nv):
I don't think there is much to do. You take yout your humility hat and start eating the bitter oat porridge to get the thing fixed.
Btw. thanks to Afterdawn on bringing this to our attention.
Bottom line: It shouldn't be too hard to figure out what politicians do. They don't think rational (thoughts nor numbers).
Examples from France and Monaco (VAT rates 20%, 10%, 5.5%, 2.1%), Ireland (VAT rates 23%, 13.5%, 9%, 4.8%), Liechtenstein (VAT rates 8.1%, 2.6%, 3.8%), Slovenia (VAT rates 22%, 9.5%, 5%) or Switzerland (VAT 8.1%, 2.6%, 3.8%).
Programming principles: SOLID vs. FLUID
Sunday, March 3. 2024
As Mr. Kralj puts it:
Everybody talks about S.O.L.I.D.
But no one mentions the opposite principles
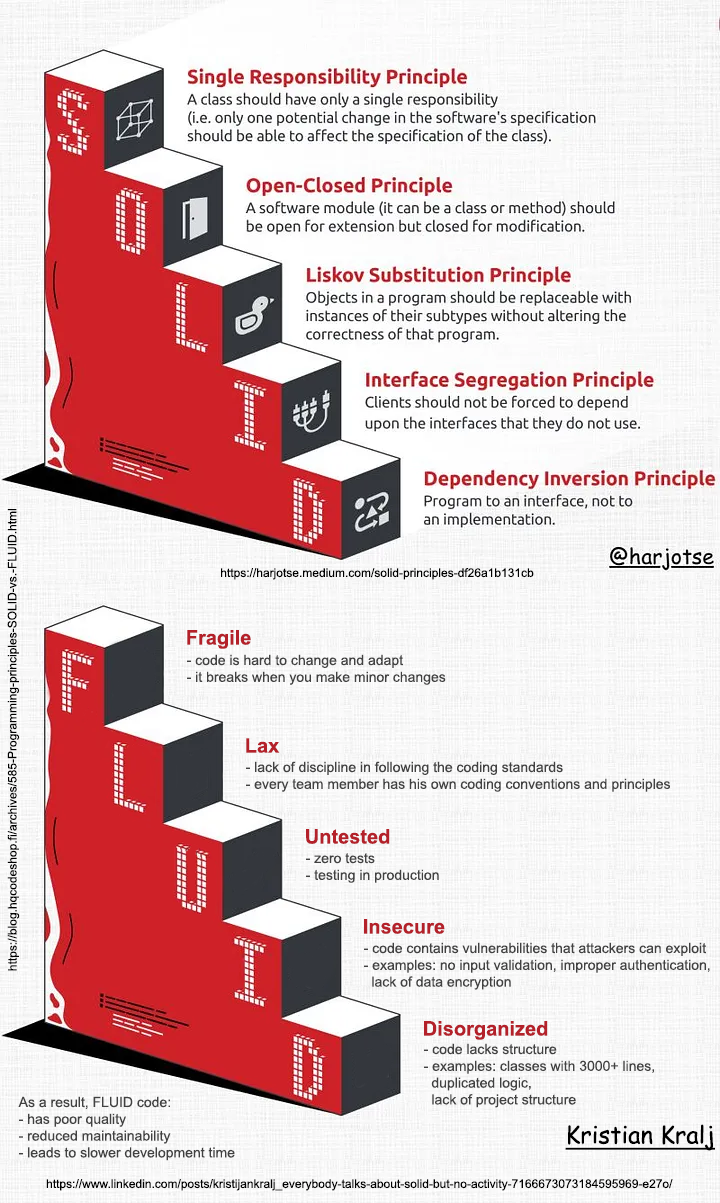
Well said!
Classic principle is defined as:
- Single Responsibility
- Open-Close (this one is hard to grasp!)
- Liskov Substitution (this one is even harder!)
- Interface Segregation
- Dependency Inversion
This new(er) priciple defines opposite for crappy code:
- Fragile
- Lax
- Untested
- Insecure
- Disorganized
Alternate F.L.U.I.D. clarifies original S.O.LI.D. and is from 2011:
- Functional
- Loose
- Unit Testable
- Introspective
- (i)Dempotent
However, I found Mr. Henney's concept of re-doing S.O.L.I.D. with clarifications and went with Mr. Kralj's derivative of defining the opposite instead.
Credits to Mr. Harjot Singh for his original artwork at https://harjotse.medium.com/solid-principles-df26a1b131cb and Kristian Kralj for his idea!
Postman Making it Mandatory to Store All Information Into Postman's Servers
Monday, June 19. 2023
Postman. Not the guy delivering letters to your mailbox, the software which makes API-development much easier.
Earlier this year I was mighty shocked to learn Postman is tightening its grip on developers.
First they made using a Postman-account mandatory. Any new installation into a workstation MUST login to a Postman-account. Earlier it was a strong suggestion, but there existed a skip-button. Anybody having an old installation can keep their way-of-working. When ever there is a need for new installation, surprise is imminent.
For the record: I do have a Postman-account. On some of my machines, I do login into it to collaborate with other developers. There are number of machines where I do not.
The traditional way-of-working is called "Scratch Pad" in the new world order. This scratchpad will contain any locally stored information such as collections of requests, URL endpoints, variables and secrets. Not sharing such delicate information with anybody is my preferred approach.
Hint: For any logged in user, getting to your scratchpad is surprisingly easy. Access to it is well hidden, but available:

Settings sprocket-wheel will contain the option for Scratch Pad.
There is a change coming.
In September 2023 Postman will force to store all passwords, API-keys, secrets, customer's endpoints to their server. There is a blog post from May 2023: Announcing the new lightweight Postman API Client and sunsetting Scratch Pad.
It remains to be seen if this "lightweight" Postman is a piece of usless crap or not. Somehow I don't see the option of storing precious secrets my customers handed me for safe-keeping to a 3rd party who can do whatever they want with it. In some cases, contractually I'm pretty sure I'm not even allowed do to that!

Custom authentication with Postman Pre-request script
Friday, May 19. 2023
Postman. Not the guy delivering letters to your mailbox, the software which makes API-development much easier.
![]()
With APIs, there are number of authentication mechanisms. All kinds of passwords and keys are used to make sure I'm allowed to make the request. Also, modern authentication mechanisms include OAuth 2.0, OpenID Connect and such. Postman does support OAuth 2.0 out-of-the-box. For those less informed, here is a brief description by Auth0:
OAuth 2.0, which stands for “Open Authorization”, is a standard designed to allow a website or application to access resources hosted by other web apps on behalf of a user.
For the record, OAuth 2.0 is a good protocol. Getting a JWT and making subsequent requests with it is among many things secure & sensible. If you didn't guess it by this far, yes, there is a glitch. RFC 6749 states following in subsection 4.3.2. Access Token Request:
The client makes a request to the token endpoint by adding the following parameters using the "application/x-www-form-urlencoded" format per Appendix B with a character encoding of UTF-8 in the HTTP request entity-body:
grant_type REQUIRED.
Value MUST be set to "password".
username REQUIRED.
The resource owner username.
password REQUIRED.
The resource owner password.
Since 1999 when RFC 2617 was written, we kinda have grown out of sending URL-encoded payloads as form responses. Today, it is 20s and JSON is the way to go. This is the glitch I mentioned, computer says: NO! Spec doesn't state "you may use JSON if you prefer to use it". I do. Many others do too. As Postman is per spec, they don't support JSON-encoded request bodies in OAuth 2.0 in their boxed authentication code. They do support all of the bells/whistles OAuth 2.0 has, but only per-spec.
Again, Postman is a good product, it does support freedom in form of a Pre-request script. I chose to exercise my freedom and crafted a plan is to following:
- Write couple lines of JavaScript to be run as Postman Pre-request script to handle authentication
- Script will be run for every request.
- It is possible to override this mechanism by writing a per-request pre-request script, in which case the collection one will be ignored.
- Per-request script can be as short as "
return" to do a no-op.
- Required authentication credential in form of JWT is stored into Postman collection variables and is generally available for authenticating any request in the collection
- Pre-request script needs to be smart:
- It will contain logic to determine if any further steps to execute an authentication is required or already existing token can be used to save time and resources.
- We don't want to flood the authentication provider by requesting a JWT for everey single time. They might get angry and kick us out if we're too greedy.
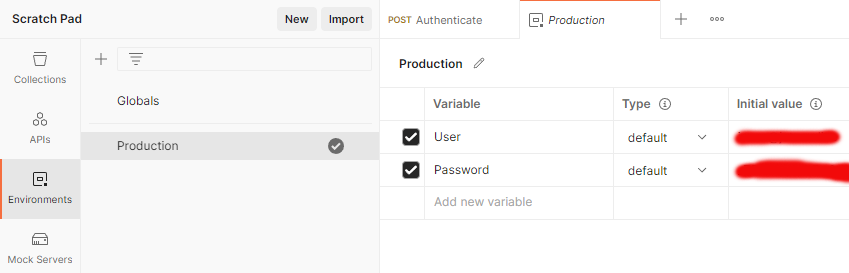
- Script is capable of reading the required authentication credentials for username and password from Postman environment.
- NOTE! Credentials are not read from Collection, from Environment.
- These credentials will be exhcnaged into a token. The token will be used for actual authentication.
- Authentication protocol used is OAuth 2.0 ish, using JSON-body and expecting a JSON-response.
- That's it. Done!
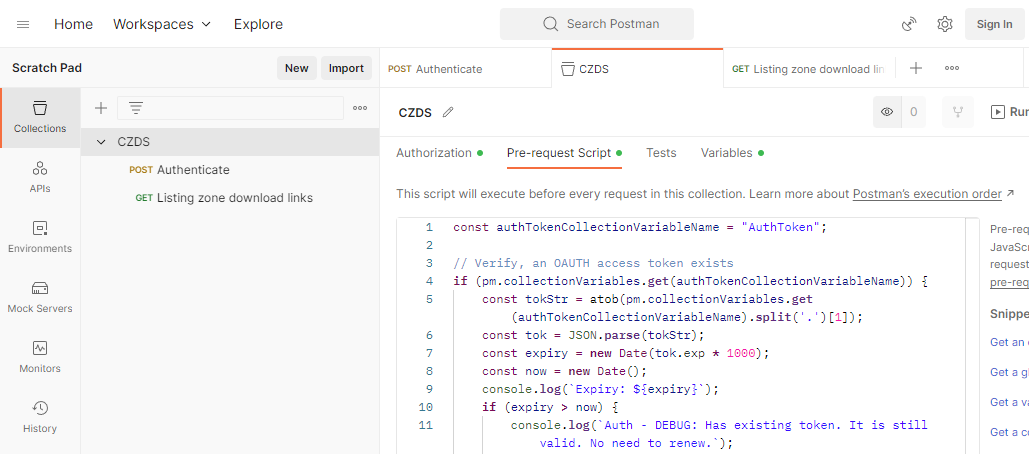
This is my Postman request-collection with the pre-request script:
Further, I have collection variables and the environment (the name I have for this environment is Production):

Here is one request using the pre-request -script from collection:
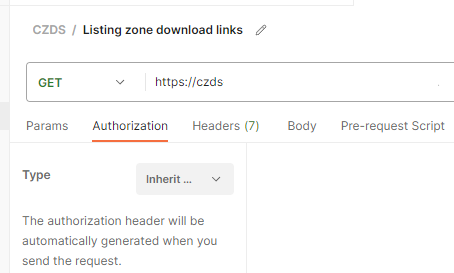
There isn't much setup needed. It just inherits the authorization setting from collection. Simple!
Full script I have is as follows:
const authTokenCollectionVariableName = "AuthToken";


// Verify, an OAUTH access token exists

if (pm.collectionVariables.get(authTokenCollectionVariableName)) {

    const tokStr = atob(pm.collectionVariables.get(authTokenCollectionVariableName).split('.')[1]);

    const tok = JSON.parse(tokStr);

    const expiry = new Date(tok.exp * 1000);

    const now = new Date();

    console.log(`Expiry: ${expiry}`);

    if (expiry > now) {

        console.log(`Auth - DEBUG: Has existing token. It is still valid. No need to renew.`);

        return;

    }

    console.log(`Auth - DEBUG: Has existing token. Renewing expired one.`);

} else {

    console.log(`Auth - DEBUG: No existing token found. Requesting one.`);

}


// Refresh the access token and set it into environment variable

pm.sendRequest({

    url: pm.collectionVariables.get("Account_API_BaseURL") + "/api/authenticate",

    method: 'POST',

    header: {

        'Accept': 'application/json',

        'Content-Type': 'application/json'

    },

    body: {

        mode: 'raw',

        raw: JSON.stringify({

            username: pm.environment.get("User"),

            password: pm.environment.get("Password")

        })

    }

}, (error, response) => {

    pm.expect(error).to.equal(null);

    pm.expect(response).to.have.property('code', 200);

    pm.collectionVariables.set(authTokenCollectionVariableName, response.json().accessToken);

    console.log(`Auth - INFO: Saved token ok.`);

});
To repeat: This script will run only inside Postman as embedded script. If you just whip up a random JavaScript environment, it most certainly will not have a pm-object in it and if it does, you cannot do all those fancy things I'm doing there.
Now the problem is solved. My requests run as smoothly and effortlessy as they would run with 100% per-RFC OAuth 2.0.
Writing a secure Systemd daemon with Python
Sunday, March 5. 2023
Python Windows update 2023: Pip requiring Build Tools for Visual Studio
Sunday, February 26. 2023
Couple years ago, I got a new Windows computer and my Python pip failed to install required modules as no suitable C/C++ -compiler was found. I obviously figured out what was wrong and how to right the wrong and posted an article about the fix.
As always, things change, new tools are made available and old tools are obsoleted. This fact was pointed out by an aggressive reader. Without doubt, he did fumble with versions and became irritated when I pointed that out. However, also without doubt, the blog post's expiration date was in the past. What worked in 2021 didn't work anymore.
Here's the update.
Given Wheel, build tools aren't required as often as they used to. See What Are Python Wheels and Why Should You Care? for details on this modern approach. Copy/pasting from the article: "A wheel is a type of built distribution. In this case, built means that the wheel comes in a ready-to-install format and allows you to skip the build stage required with source distributions."
On my Python 3.10 and 3.11, Visual Studio Build Tools 2017 do work. I tested the latest 2022 version and it does not. Older build tools come harder and harder to obtain from Microsoft. Visual Studio 2022 - Downloads -page @ Microsoft doesn't seem to carry old stuff nymore. To not confuse/irritate other people, I won't even post the link there.
As many people have this same exact problem, there is for example a question in StackOverflow: Are Visual Studio 2017 Build Tools still available for download? [closed]. Mr. Chris Wright's answer will have the link https://aka.ms/vs/15/release/vs_buildtools.exe. So, download isn't lost forever. Little bit obscured, yes, but not lost.
To test new Build Tools, I deliberately uninstalled my perfectly working Visual Studio 2017 build tools and Visual Studio 2022 and whatnot. A completely clean slate. Next, make a point on how build will fail. See how much effort it takes for not to use wheels! Running following will emit the dreaded error:
pip.exe install pyOpenSSL --no-binary :all: --no-cache-dir
Yay, the expected error will be emitted: error: Microsoft Visual C++ 14.0 or greater is required. Get it with "Microsoft C++ Build Tools"
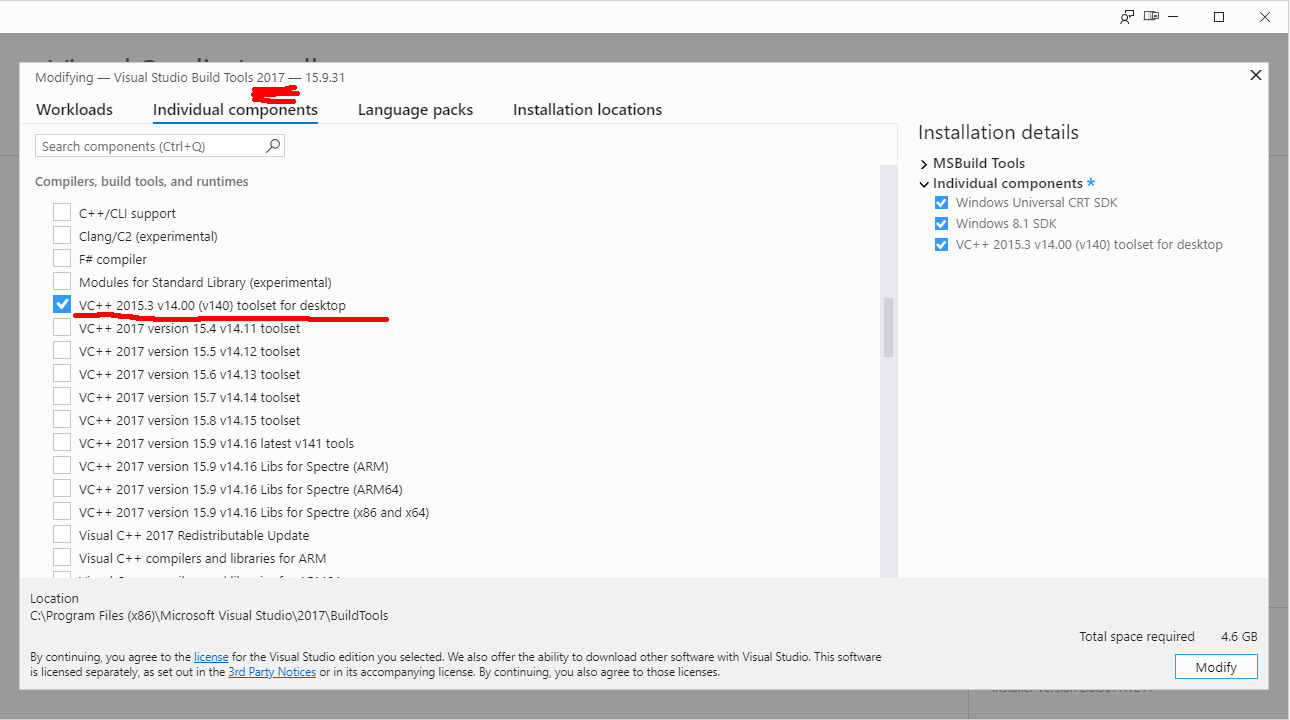
This part isn't changed, I'm using the old images from two years back. Download and install Visual Studio Build Tools 2017. Make sure to install a few gigabytes of binaries by selecting C/C++ compiler version 140:
Ta-daa! Unsurprisingly re-running the forced build-from-source -command will work:
Collecting pyOpenSSL

  Downloading pyOpenSSL-23.0.0.tar.gz (182 kB)

  Installing build dependencies ... done

  Getting requirements to build wheel ... done

  Preparing metadata (pyproject.toml) ... done

Building wheels for collected packages: pyOpenSSL

  Building wheel for pyOpenSSL(pyproject.toml) ... done

Successfully built pyOpenSSL

Installing collected packages: pyOpenSSL

Successfully installed pyOpenssl-23.0.0
This works in all those Python versions I tried. While testing, I did find some packages which wouldn't compile at all. The wheel installed just fine, so I wouldn't worry too much about that.
Final words:
It is weird how regular people in the Internet assume, that I as a blogger would have massive resources and money to maintain their systems. Why would I want to be a target of their inability to ask smart questions or ever explain what they attempted and what failed. Somehow I'm supposed to read their minds and see what's on their computer screens telepathically. Free of charge, of course!
Databricks CentOS 9 Stream containers
Thursday, October 20. 2022
Earlier this year I was tinkering with Databricks and got fed up with Ubuntu 18 and 20 with pretty old Python in it. Easy fix! I just made containers with CentOS so I could have more recent versions of stuff in my nodes.
Natural next move was to bump CentOS version from 8 to 9. While at it I discarded the previous hierarchy. Here is the original pic:
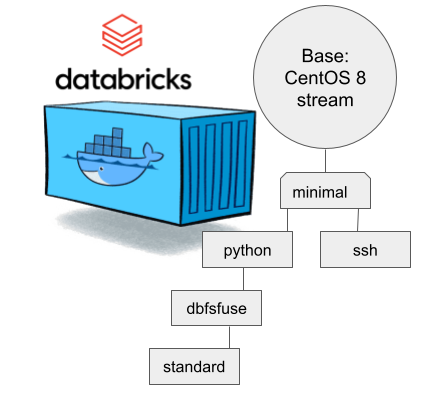
CentOS 8 containers explained:
- Minimal: CentOS 8 Stream + stuff to make CentOS work in Apache Spark / Databricks
- SSH: Minimal + OpenSSH server for those running Databricks on top of their own VNets. If you aren't this won't do you any good. TCP/22 won't be open from The World.
- Python: This here is the beef in Databricks! Running a Jupyter Notebook / IPython will absolutely definitely need this.
- DBFS FUSE: Linux user file system to attach the container into DatabricksFS / HadoopFS
- Standard: DBFS FUSE + OpenSSH, see disclaimer from SSH container about connectivity
The hierachy originates from https://github.com/databricks/containers/tree/master/experimental. Initially I just went with the flow, but as always, gaining more information and experience on Databrics, it became apparent to me this separation wasn't working.
New hierarchy for CentOS 9:
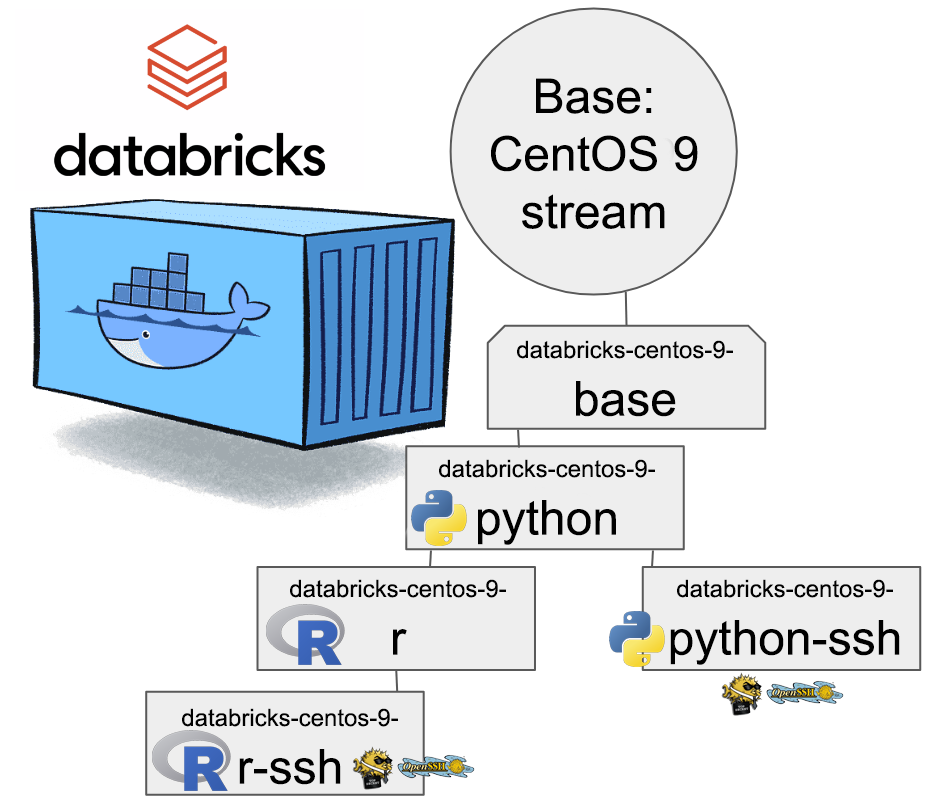
CentOS 8 containers explained:
- Base: CentOS 9 Stream + stuff to make CentOS work in Apache Spark / Databricks + FUSE
- Rationale: You will want to have DBFS mounted to your container anyway. It won't be a security risk and FUSE is a very light piece of software in a Linux.
- Note: This will not work as an Apache Spark / Databricks node.
- Python: Running a Jupyter Notebook will absolutely definitely need this.
- Rationale: A Spark node without proper Python won't boot. This should be in minimal/base to begin with, but I just wanted to separate all the required Linux components and settings from a Python.
- Note: This is the minimal. This will boot and work.
- Python-SSH: Python + OpenSSH
- Note: You will need your own VNet to get SSH-access into your Spark Driver -node.
- Note 2: If you don't specify your own, a managed VNet will be used. You just won't have any access into it.
- R: For statistical computing needs, quite a few users prefer R programming language. This here container-type will enable you to do that from a Jupyter Notebook in Databricks. Will contain Python.
- Rationale: R is a huge chunk of container. If you won't be needing this, stick with Python which is so much lighter to load and operate.
- R-SSH: R + OpenSSH
- See disclaimer from above
Python components version table
To verify what Databicks puts into their nodes, I gathered versions following Python components.
| Python component | CentOS 9 | 11.2 | 11.1 | 11.0 | 10.4 LTS | 9.1 LTS |
|---|---|---|---|---|---|---|
| ipykernel | 6.16.0 | 6.12.1 | 6.12.1 | 6.12.1 | 5.3.4 | 5.3.4 |
| ipython | 7.32.0 | 7.32.0 | 7.32.0 | 7.32.0 | 7.22.0 | 7.22.0 |
| Jinja2 | 2.11.3 | 2.11.3 | 2.11.3 | 2.11.3 | 2.11.3 | 2.11.3 |
| jupyter-core | 4.11.1 | 4.8.1 | 4.8.1 | 4.8.1 | 4.7.1 | 4.7.1 |
| matplotlib | 3.4.3 | 3.4.3 | 3.4.3 | 3.4.3 | 3.4.2 | 3.4.2 |
| numpy | 1.20.3 | 1.20.3 | 1.20.3 | 1.20.3 | 1.20.1 | 1.19.2 |
| pandas | 1.3.4 | 1.3.4 | 1.3.4 | 1.3.4 | 1.2.4 | 1.2.4 |
| pyarrow | 4.0.0 | 7.0.0 | 7.0.0 | 7.0.0 | 4.0.0 | 4.0.0 |
| six | 1.16.0 | 1.16.0 | 1.16.0 | 1.16.0 | 1.15.0 | 1.15.0 |
| virtualenv | 20.16.5 | 20.8.0 | 20.8.0 | 20.8.0 | 20.4.1 | 20.4.1 |
Comparison of other differences:
| Component | CentOS 9 | 11.2 | 11.1 | 11.0 | 10.4 LTS | 9.1 LTS |
|---|---|---|---|---|---|---|
| Scala | 2.12.14 | 2.12.14 | 2.12.14 | 2.12 | 2.12 | 2.12 |
| Spark | 3.3.0 | 3.3.0 | 3.3.0 | 3.3.0 | 3.2.1 | 3.2.1 |
| Python | 3.9.14 | 3.9.5 | 3.9.5 | 3.9.5 | 3.8.10 | 3.8.10 |
| R | 4.2.1 | 4.1.3 | 4.1.3 | 4.1.3 | 4.1.2 | 4.1.2 |
| Linux | CentOS 9 Stream |
Ubuntu 20.04.5 LTS |
Ubuntu 20.04.5 LTS |
Ubuntu 20.04.5 LTS |
Ubuntu 20.04.5 LTS |
Ubuntu 20.04.5 LTS |
These two tables explain very well my motivation of doing all this. Getting a full control of what goes into those containers. Second motivation is to publish the recipe for anybody to tailor their own custom made containers containing the versions of software they'll be needing.
Testing my container
Here is a sample notebook I used while develping this:
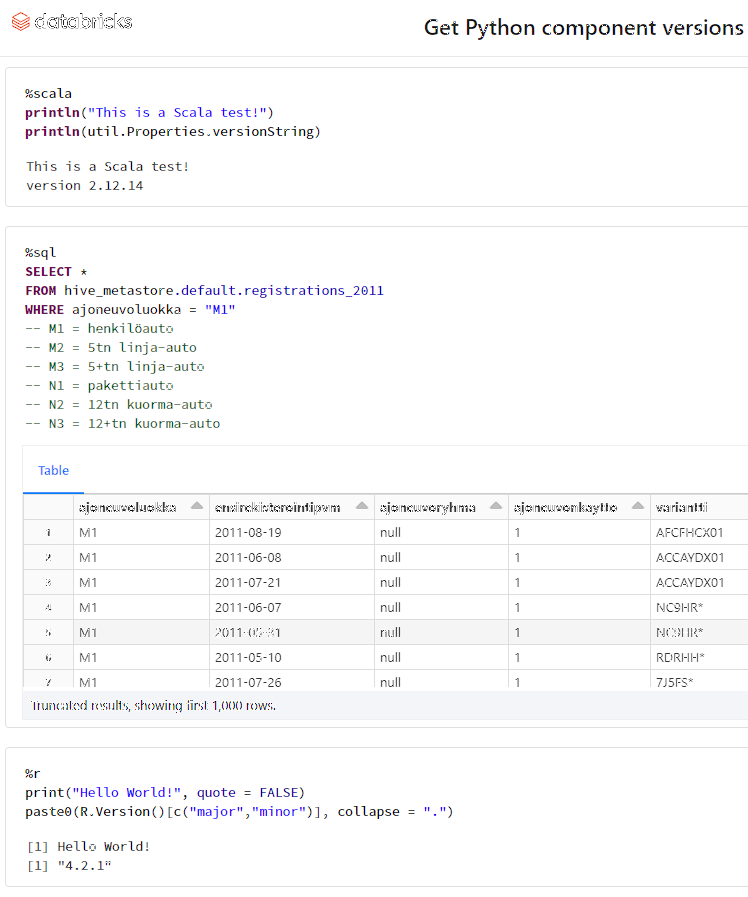
Modern Databricks notebook supports SQL, R and Scala with ease. I absolutely wanted to see what'll be needed to get all of those running.
To repeat: Python will be needed to get the entire Databricks node booting. On top of that, Scala will be included by Apache Spark. SQL will be handled by Spark. R will be provided by Rserve and interface to that is via notebook's R Python-client.
Final words
Databricks: Please, publish your own work also. For unknown reason you aren't doing that.
Google Analytics 4 migration
Monday, June 20. 2022
For number of reasons, instead of migration, I should write migraine. First is about moving from an old system into a new one. Latter is about medical condition causing severe headaches. In this case, there seems to be not much of a difference.
Google's own Make the switch to Google Analytics 4 -migration guide has 12 steps. Given complexity, the time I have to invest on this and lack of really diving into this, I probably missed most of them.
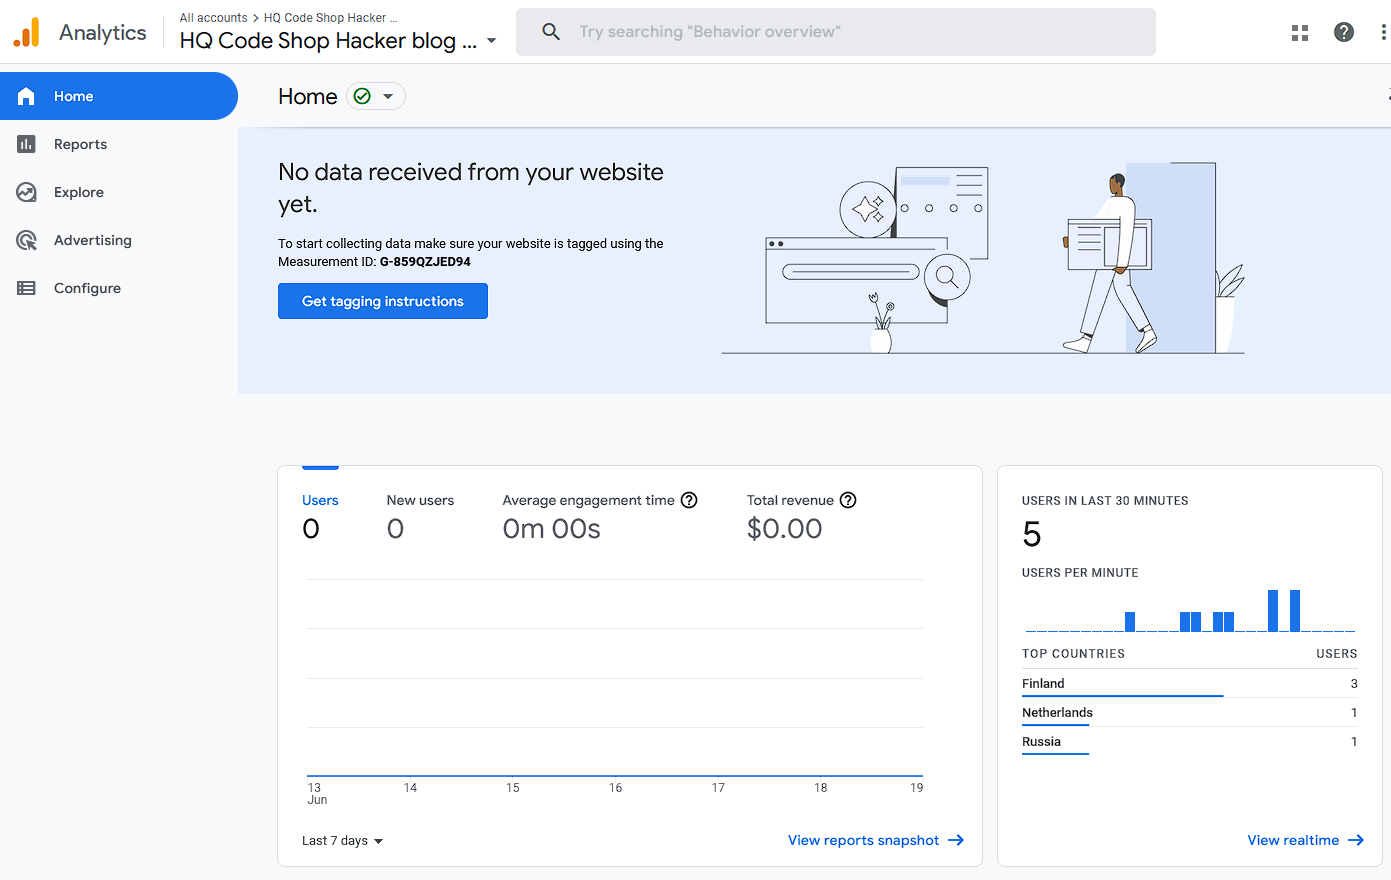
Going into GA4-console, I have this:
Clicking on Get Tagging Instructions, I'll get further information:
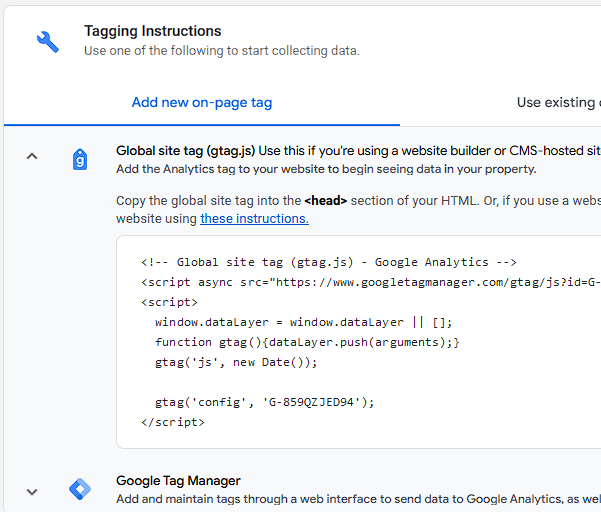
There is a snippet of JavaScript, which I can inject into this site.
<script async="" src="https://www.googletagmanager.com/gtag/js?id=G-859QZJED94"></script>

<script>

  window.dataLayer = window.dataLayer || [];

  function gtag(){dataLayer.push(arguments);}

  gtag('js', new Date());

  gtag('config', 'G-859QZJED94');

</script>
Note: My GA4-stream ID is G-859QZJED94. Make sure to use yours, not mine. As the stream ID cannot be a secret, it's ok to publish it here. The same ID can be found from HTML-code of this page.
To verify installation success, I went to GA4 portal, chose Reports and Realtime. It didn't take long, less than a minute, for that report to indicate user activity. Many other places keep saying "No data received from your website yet", "No data received in past 48 hours" or "Data collection isn’t active for your website". IMHO all of those are incorrect, as I do have stats. We'll see if I managed to do that right.
Sanuli-Konuli RPA-edition
Sunday, February 13. 2022
Previously I wrote a Wordle-solver, Sanuli-Konuli. The command-line -based user-interface isn't especially useful for non-programmers, so I took the solver a bit further and automated the heck out of it.

There is a sample Youtube-video (13+ minutes) of the solver solving 247 puzzles in-a-row. Go watch it here: https://youtu.be/Q-L946fLBgU
If you want to run this automated solver on your own computer against Sanuli, some Python-assembly is required. Process the dictionary and make sure you can run Selenium from your development environment. Solver-script is at https://github.com/HQJaTu/sanuli-konuli/blob/master/cli-utils/sanuli-solver.py
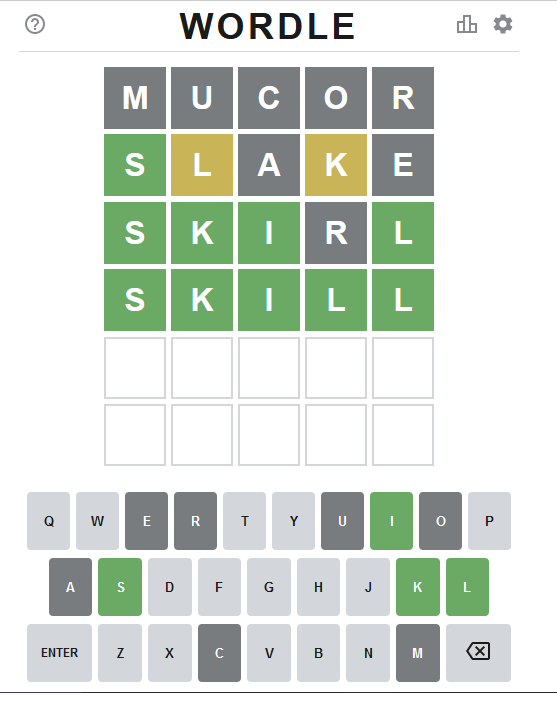
The logic I wrote earlier is rather straightforward and too naive. I added some Selenium-magic to solver to write a screenshot of every win (overwriting previous one) and every failure (timestamped). A quick analysis of 5-6 failures revealed the flaw in my logic. As above screenshot depicts, applying improved logic in a scenario where four out of five letters were known and two guesses were still left, changing only one letter may or may not work, but depends on luck before running out of guesses. In improved approach would be to write detect code and when this scenario is detected, doing a completely different kind of "guess" throwing away those four known letters, determining a set of potential letters from set of words and finding a word from dictionary containg most of the unknown letters which would fit would be much smarter approach. Then one letter should be green and rest not, then doing a last guess with that letter should solve the puzzle. So, my logic is good until a point where one letter is missing and then its fully luck-based one.
In above game, guess #4 was "liima" with M as not being correct. At that point of the puzzle, potentially matching words "liiga, liina, liira" would result in potential letters G, N and R, then guess #5 woud be "rangi" (found in dictionary). Making such a guess would reveal letter N as the correct missing letter making guess #6 succeed with "liina".
As I said, this logic has not been implemented and I don't think improving the guessing algorithm any further is beneficial. I may take a new project to work with.
Standard disclaimer applies: If you have any comments or feedback, please drop me a line.
Databricks CentOS 8 stream containers
Monday, February 7. 2022
Last November I created CentOS 8 -based Databricks containers.
At the time of tinkering with them, I failed to realize my base was off. I simply used the CentOS 8.4 image available at Docker Hub. On later inspection that was a failure. Even for 8.4, the image was old and was going to be EOLd soon after. Now that 31st Dec -21 had passed I couldn't get any security patches into my system. To put it midly: that's bad!
What I was supposed to be using, was the CentOS 8 stream image from quay.io. Initially my reaction was: "What's a quay.io? Why would I want to use that?"
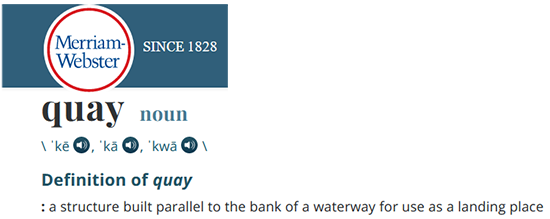
Thanks Merriam-Webster for that, but it doesn't help.
On a closer look, it looks like all RedHat container -stuff is not at docker.io, they're in quay.io.
Simple thing: update the base image, rebuild all Databricks-images and done, right? Yup. Nope. The images built from steam didn't work anymore. Uff! They failed working that bad, not even Apache Spark driver was available. No querying driver logs for errors. A major fail, that!
Well. Seeing why driver won't work should be easy, just SSH into the driver an take a peek, right? The operation is documented by Microsoft at SSH to the cluster driver node. Well, no! According to me and couple of people asking questions like How to login SSH on Azure Databricks cluster, it is NOT possible to SSH into Azure Databricks node.
Looking at Azure Databricks architecture overview gave no clues on how to see inside of a node. I started to think nobody had ever done it. Also enabling diagnostic logging required the premium (high-prized) edition of Databricks, which wasn't available to me.
At this point I was in a full whatta-hell-is-going-on!? -mode.
Digging into documentation, I found out, it was possible to run a Cluster node initialization scripts, then I knew what to do next. As I knew it was possible to make requests into the Internet from a job running in a node, I could write an intialization script which during execution would dig me a SSH-tunnel from the node being initialized into something I would fully control. Obiviously I chose one of my own servers and from that SSH-tunneled back into the node's SSH-server. Double SSH, yes, but then I was able to get an interactive session into the well-protected node. An interactive session is what all bad people would want into any of the machines they'll crack into. Tunneling-credit to other people: quite a lot of my implementation details came from How does reverse SSH tunneling work?
To implement my plan, I crafted following cluster initialization script:
LOG_FILE="/dbfs/cluster-logs/$DB_CLUSTER_ID-init-$(date +"%F-%H:%M").log"

exec >> "$LOG_FILE"


echo "$(date +"%F %H:%M:%S") Setup SSH-tunnel"

mkdir -p /root/.ssh

cat > /root/.ssh/authorized_keys <<EOT

ecdsa-sha2-nistp521 AAAAE2V0bV+TrsFVcsA==

EOT


echo "$(date +"%F %H:%M:%S") Install and setup SSH"

dnf install openssh-server openssh-clients -y

/usr/libexec/openssh/sshd-keygen ecdsa

/usr/libexec/openssh/sshd-keygen rsa

/usr/libexec/openssh/sshd-keygen ed25519

/sbin/sshd


echo "$(date +"%F %H:%M:%S") - Add p-key"


cat > /root/.ssh/nobody_id_ecdsa <<EOT

-----BEGIN OPENSSH PRIVATE KEY-----

b3BlbnNzaC1rZXktdjEAAAAABG5vbmUAAAAEbm9uZQAAAAAAAAABAAAA

1zaGEyLW5pc3RwNTIxAAAACG5pc3RwNTIxAAAAhQQA2I7t7xx9R02QO2

rsLeYmp3X6X5qyprAGiMWM7SQrA1oFr8jae+Cqx7Fvi3xPKL/SoW1+l6

Zzc2hkQHZtNC5ocWNvZGVzaG9wLmZpAQIDBA==

-----END OPENSSH PRIVATE KEY-----

EOT

chmod go= /root/.ssh/nobody_id_ecdsa

echo "$(date +"%F %H:%M:%S") - SSH dir content:"


echo "$(date +"%F %H:%M:%S") Open SSH-tunnel"

ssh -f -N -T \

  -R22222:localhost:22 \

  -i /root/.ssh/nobody_id_ecdsa \

  -o StrictHostKeyChecking=no \

  nobody@my.own.box.example.com -p 443
Note: Above ECDSA-keys have been heavily shortened making them invalid. Don't copy passwords or keys from public Internet, generate your own secrets. Always! And if you're wondering, the original keys have been removed.
Note 2: My init-script writes log into DBFS, see exec >> "$LOG_FILE" about that.
My plan succeeded. I got in, did the snooping around and then it took couple minutes when Azure/Databrics -plumbing realized driver was dead, killed the node and retried the startup-sequence. Couple minutes was plenty of time to eyeball /databricks/spark/logs/ and /databricks/driver/logs/ and deduce what was going on and what was failing.
Looking at simplified Databricks (Apache Spark) architecture diagram:
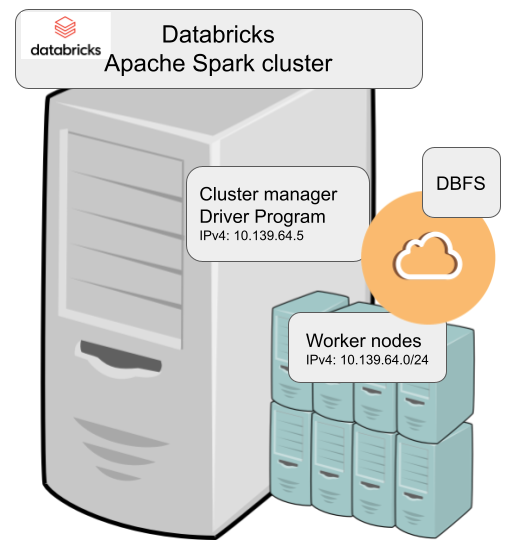
Spark driver failed to start because it couldn't connect into cluster manager. Subsequently, cluster manager failed to start as ps-command wasn't available. It was in good old CentOS, but in base stream it was removed. As I got progress, also ip-command was needed. I added both and got the desired result: a working CentOS 8 stream Spark-cluster.
Notice how I'm specifying HTTPS-port (TCP/443) in the outgoing SSH-command (see: -p 443). In my attempts to get a session into the node, I deduced following:
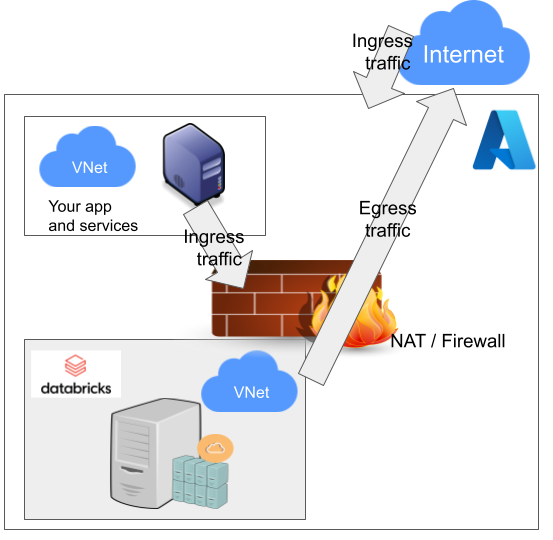
As Databricks runs in it's own sandbox, also outgoing traffic is heavily firewalled. Any attempts to access SSH (TCP/22) are blocked. Both HTTP and HTTPS are known to work as exit ports, so I spoofed my SSHd there.
There are a number of different containers. To clarify which one to choose, I drew this diagram:
In my sparking, I'll need both Python and DBFS, so my choice is dbfsfuse. Most users would be happy with standard, but it only adds SSHd which is known not to work. ssh has the same exact problem. The reason for them to exist, is because in AWS SSHd does work. Among the changes from good old CentOS into stream is lacking FUSE. Old one had FUSE even in minimal, but not anymore. You can access DBFS only with dbfsfuse or standard from now on.
If you want to take my CentOS 8 brick-containers for a spin, they are still here: https://hub.docker.com/repository/docker/kingjatu/databricks, now they are maintained and get security patches too!
Sanuli-konuli - Wordle solver
Sunday, February 6. 2022
Wordle is a popular word game. In just a couple months the popularity rose so fast New York Times bought the whole thing from Josh Wardle, the original author.
As always, a popular game gets the cloners moving. Also another thing about Worlde is the English language. What if somebody (like me) isn't a native speaker. It is very difficult in the middle of a game to come up with a word like "skirl". There is an obvious need for localized versions. In Finland, such a clone is Sanuli. A word-game, a clone of Wordle, but with Finnish words.
From software engineering point-of-view, this is a simple enough problem to solve. Get a dictionary of words, filter out all 5-letter words, store them to a list for filtering by game criteria. And that's exactly what I did in my "word machine", https://github.com/HQJaTu/sanuli-konuli/.
The code is generic to support any language and any dictionary.
Example Wordle game
Attempt #1
To get the initial word, I ran:
./cli-utils/get-initial-word.py words/nltk-wordnet2021-5-words_v1.dat.
Command's output was a randomly selected word "mucor".
As seen above, that resulted all gray tiles. No matches.
Attempt #2
Second attempt with excluded lettes:
get-initial-word.py words/nltk-wordnet2021-5-words_v1.dat "mucor".
Command's output was a randomly selected word "slake".
This time game started boucing my way! First letter 'S' is on green and two yellow ones for 'L' and 'K'.
Attempt #3
Third attempt wasn't for initial word, this time I had clues to narrow down the word. A command to do this with above clues would be:
find-matching-word.py words/nltk-wordnet2021-5-words_v1.dat "s...." "ae" ".l.k."
Out of multiple possible options, a randomly selected word matching criteria was: "skirl"
Nice result there! Four green ones.
Note: Later, when writing this blog post, I realized the command has an obvious flaw. I should have excluded all known gray letters "mucore". Should my command have been:
find-matching-word.py words/nltk-wordnet2021-5-words_v1.dat "s...." "mucorae" ".l.k."
The ONLY matching word would have been "skill" at this point.
Attempt #4 - Win!
Applying all the green letters, the command to run would be:
find-matching-word.py words/nltk-wordnet2021-5-words_v1.dat "ski.l" "ar" "....."
This results in a single word: "skill" which will win the game!
Finally
I've been told this brute-force approach of mine takes tons of joy out of the word-game. You have to forgive me, my hacker brain is wired to instantly think of a software solution to a problem not needing one. 
EU Digital COVID Certificate usage in the World
Saturday, January 22. 2022
In my previous post, I gave some statistics about which countries have issued how many X.509 certificates for signing the COVID Certificates. Also, I realized how adoption of this open-source system in non-EU -countries is wide. Actually in the list of countries using the system, there are more non-EU -countries than EU-countries.
As I wanted to learn how to progammatically alter SVG-files (they are essentially XML), I decided to write some code. Here is the result:
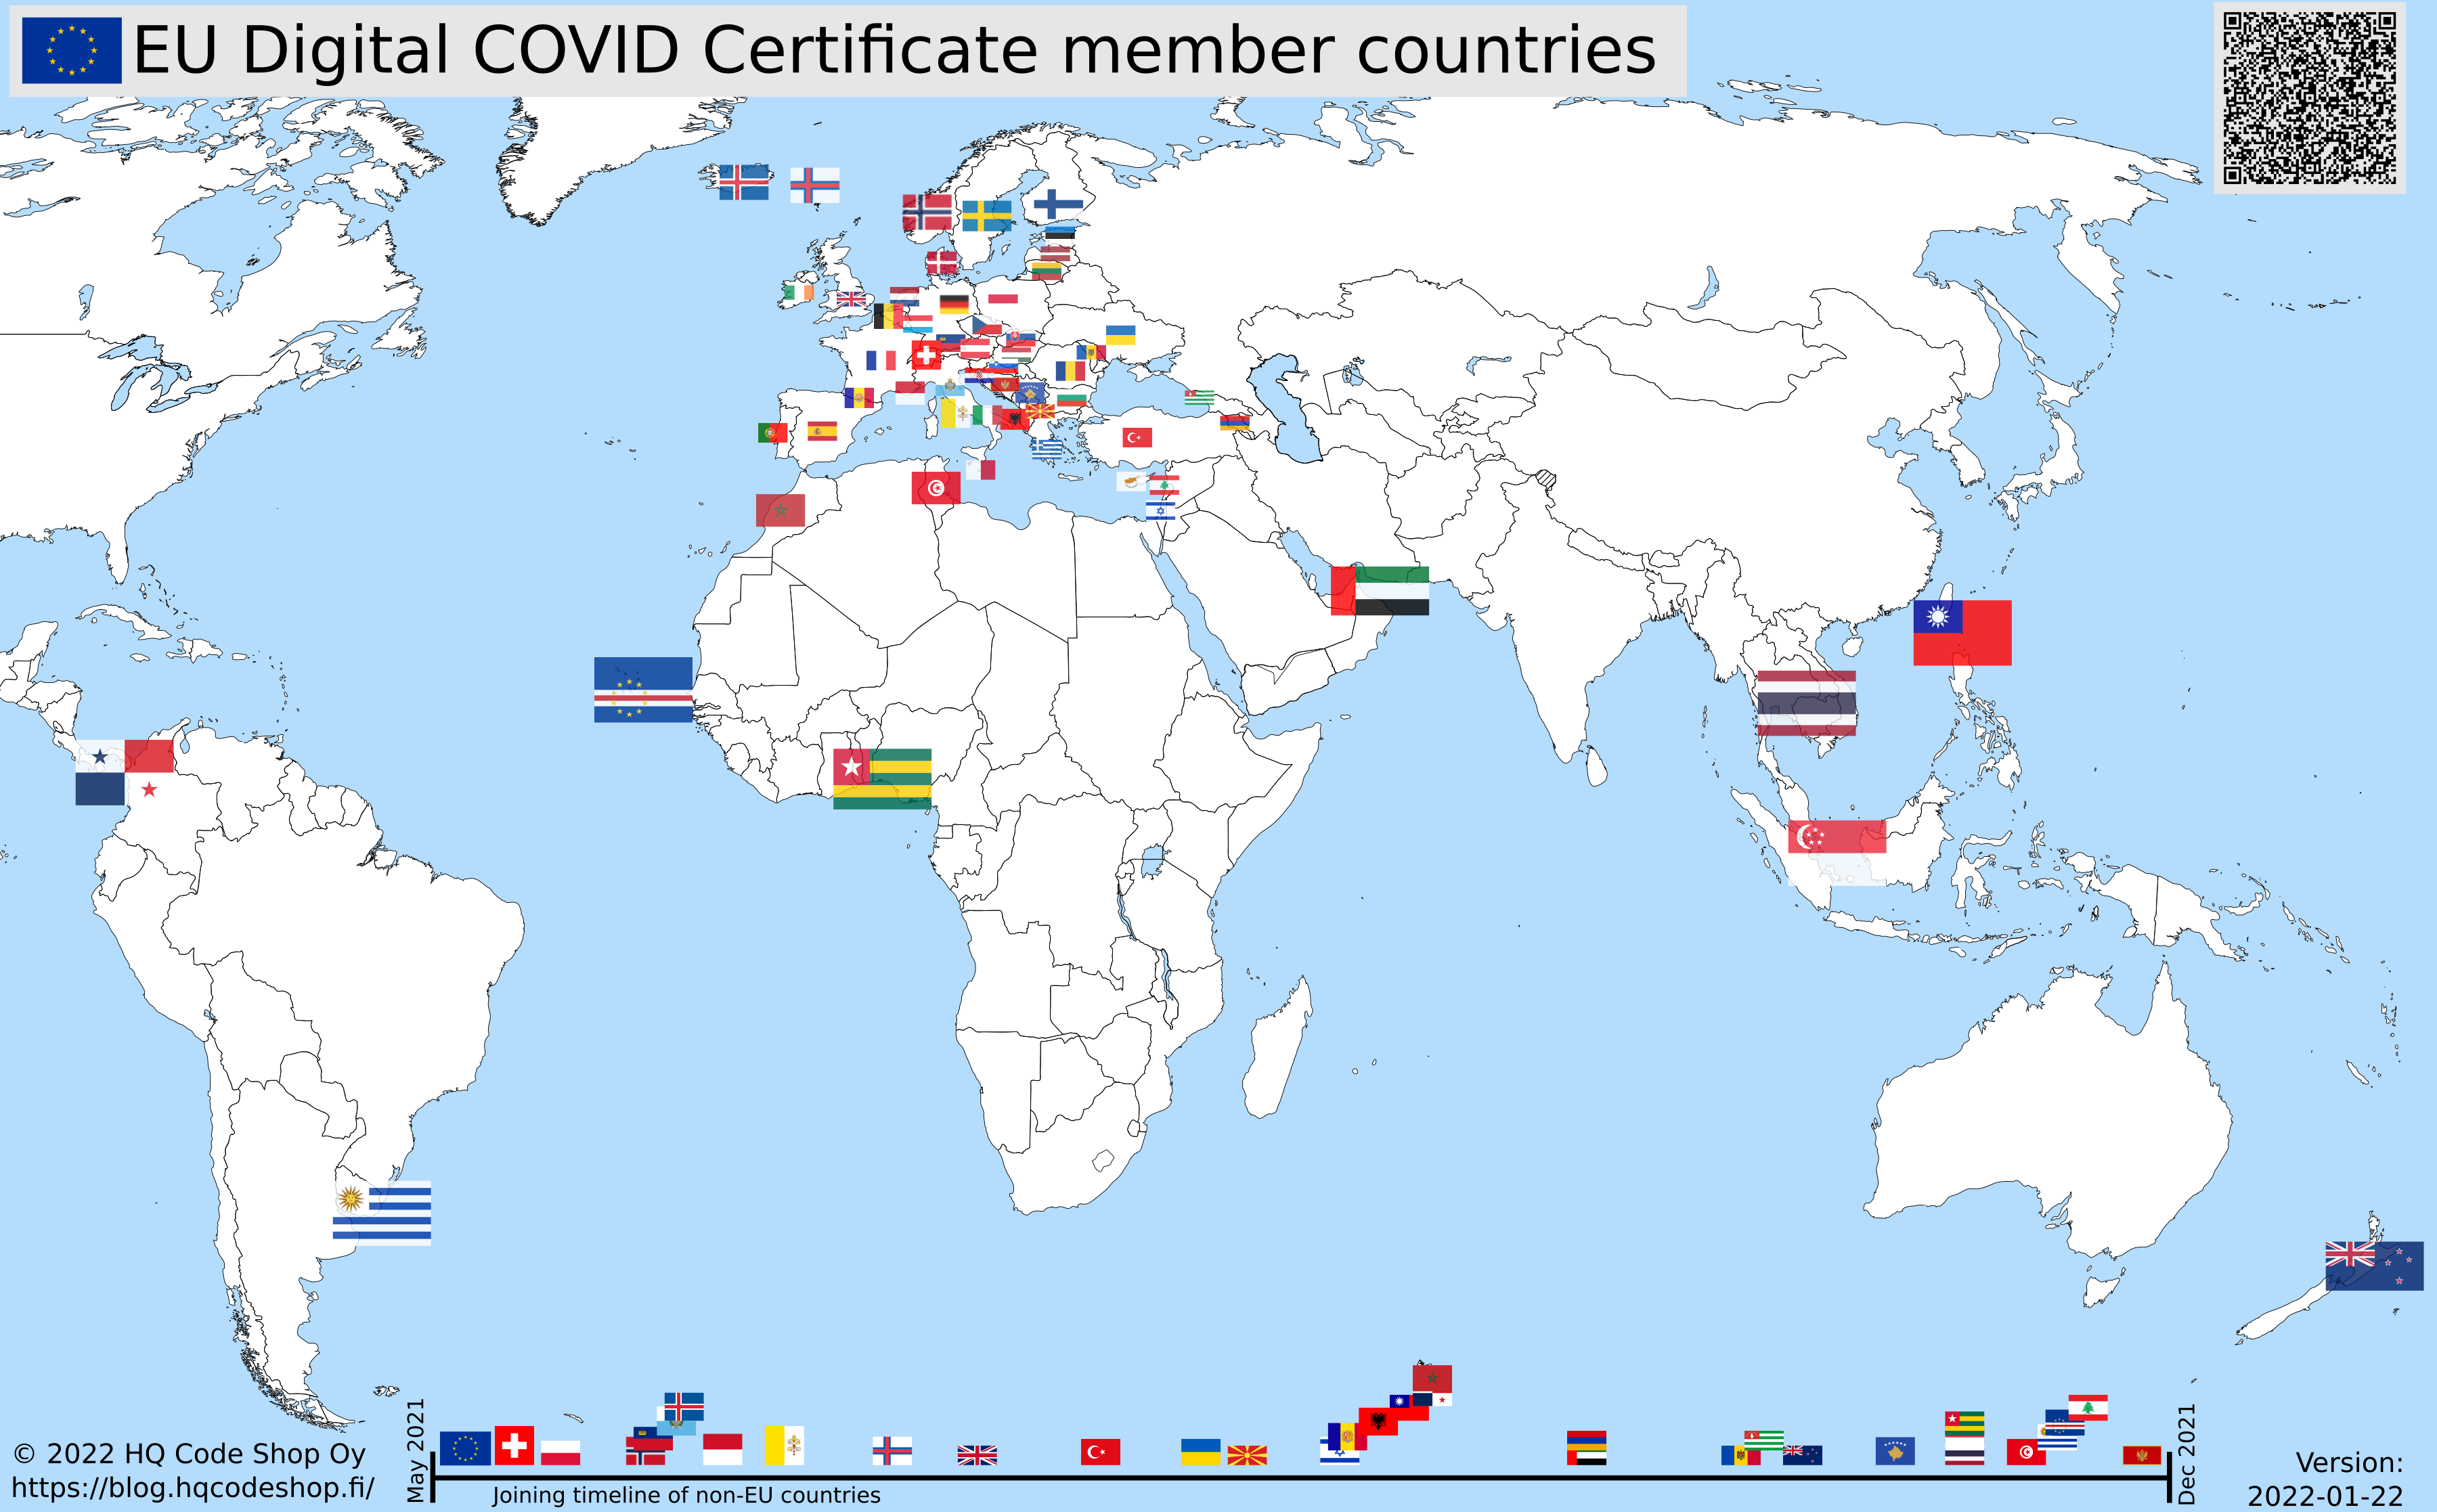
Updated map is available at https://blog.hqcodeshop.fi/vacdec-map/, also in SVG-format. Source code of how all this is created is at: https://github.com/HQJaTu/vacdec-map
The process begins with importing maps of the World from Wikipedia page Gallery of sovereign state flags (using Wikipedia API, of course). There is one shortcoming, Faroe Islands map isn't in the list as it is not a sovereign state. It is downloaded separately.
Then the flags are mapped against ISO-3166 country list. Again, some manual helping is needed, list of flags doesn't use all of the exact country names from ISO-standard. Good thing about this is, the need to do this only once. Flags and countries don't change that often.
Fetching the X.509 certificates for signing is something my code has successfully done since August -21. So, a list of known COVID Certificate signing certificates is fetched. A simple iteration is done to those X.509 certificates to find out the oldest date of any country. That date is assumed to be the system adoption date. In reality it is not, but for this coarse visualisation that accuracy will do.
Now there is a repository of all the flags with their appropriate ISO-3166-2 codes and all COVID signing certificates with their issuing dates. Then all country flags are placed on top of a World map, which has a second part in the bottom, a timeline for adoption date for non-EU -countries. Drawing EU-countries there is non-interesting as they pretty much did it all at the same time. The map SVG comes from Wikimedia Commons Carte du monde vierge (Allemagnes séparées).svg.
For optional PNG-rendering, I'm using Inkscape. There are failing attempts to do SVG-rendering with CairoSVG, PyVips and Html2Image. First two failed on accuracy, the rendering result was missing parts, had incorrect scales on various parts and was generally of low quality. Html2Image kinda worked, but wasn't applicable to be run on a server.
EU Digital COVID Certificate trust-lists
Sunday, January 9. 2022
It seems vacdec is one of my most popular public projects. I'm getting pull requests, comments and questions from number of people.
Thank you for all your input! Keep it coming. All pull requests, bug fixes and such are appreciated.
Briefly, this is about decoding EU digital COVID certificate QR-codes. For more details, see my blog post from August -21 or the Python source-code at https://github.com/HQJaTu/vacdec.
Quote from my original post: "the most difficult part was to get my hands into the national public certificates to do some ECDSA signature verifying".
My original code has tool called fetch-signing-certificates.py to do the heavy lifting. It fetches a list of X.509 certificates which are used in signing the QR-code's payload. That list is stored into your hard drive. When you do any COVID certificate decoding, that list is iterated with purpose of finding the key used when the QR-code was generated. If the trust-list contains the cert, signature will be verified and a result from that will be given.
To state the obvious: That precious trust list will contain all signature certificates from all countries using the same EU COVID certificate QR-code system. The list of countries is long and includes all 27 EU-countries. Among participating non-EU countries are: Andorra, United Arab Emirates, Swizerland, Georgia, Iceland, Liechtenstein, Morocco, Norway, Singapore, San Marino, Ukraine, Vatican. Looking at the country-list, it is easy to see how EU COVID passport is a triumph of open-source!
On the flipside, getting signing certificates from all those countries requires some effort. A participating country first needs to generate and secure (emphasis: SECURE the private key) required number of ECDSA public/private key -pairs to all organizations/parties doing the COVID certificate issuing. Of those key-pairs COVID certificate signing X.509 certificates can be created and public certificate will be added to the common trust-list.
As an example, in my home country of Finland up until recently there used to be one (1 as in single) X.509 cert for entire nation of 5,6 million people, now there is two. Ultimately, pretty much everybody gets their COVID certs signed from a single cert. This is because in Finland issuing the certs is centralized. On the other hand bigger countries need to have multiple X.509 certs as their government organization may be different and less centralized. A good example is Germany, the most populous countru in Europe and a federal state consisting of 17 constituent states. Having single cert would not make sense in their government.
Moving on. Countries deliver their public certificates into some EU "central repository". It is not known how and where this is, but I'm assuming one has to exist. From this repository the participating countries are allowed the retrieve the trust-list for their verification needs. Subsequently the list is distributed by the country to those organizations and people needing to do COVID certificate verification. Remember "get my hands into the national public certificates"? Not all countries do the distributing very easily nor publicly. Some do, and that's where I get my data from.
Now that there is access of trust-lists, factor in time. That little devil is always messing everything up!
In August, when I first download the Austrian list, the entire list had 150+ valid signing certs. Early December -21 there was 192. Early January -22 there was already 236. Today, the Austrian list contains 281 signing certificates. However, Swedish list has only 267. Argh! I'd really really need access to that EU endpoint for trust lists.
As the Austrian list is larger, here are the per-country statistics of 9th January 2022, expect this to change almost daily:
| Country ISO 3166-2 code | Count signing certs | EU member country name | Participating country name | Test data exists |
|---|---|---|---|---|
| DE | 57 | Germany | x | |
| FR | 50 | France | x | |
| ES | 23 | Spain | x | |
| NL | 21 | Netherlands | x | |
| CH | 13 | Switzerland | x | |
| MT | 12 | Malta | x | |
| LU | 8 | Luxembourg | x | |
| GB | 6 | UK | ||
| LI | 6 | Liechtenstein | x | |
| NO | 6 | Norway | x | |
| IT | 4 | Italy | x | |
| NZ | 4 | New Zealand | ||
| LT | 3 | Lithuania | x | |
| LV | 3 | Latvia | x | |
| MC | 3 | Monaco | ||
| PL | 3 | Poland | x | |
| AL | 2 | Albania | ||
| AT | 2 | Austria | x | |
| BE | 2 | Belgium | x | |
| BG | 2 | Bulgaria | x | |
| CZ | 2 | Czech Republic | x | |
| DK | 2 | Denmark | x | |
| EE | 2 | Estonia | x | |
| FI | 2 | Finland | x | |
| FO | 2 | Faroe Islands | ||
| GE | 2 | Georgia | x | |
| HR | 2 | Croatia | x | |
| IE | 2 | Ireland | x | |
| IS | 2 | Iceland | x | |
| MK | 2 | North Macedonia | ||
| SE | 2 | Sweden | x | |
| SG | 2 | Singapore | x | |
| AD | 1 | Andorra | x | |
| AE | 1 | United Arab Emirates | x | |
| AM | 1 | Armenia | ||
| CV | 1 | Cabo Verde | ||
| CY | 1 | Cyprus | x | |
| GR | 1 | Greece | x | |
| HU | 1 | Hungary | ||
| IL | 1 | Israel | ||
| LB | 1 | Lebanon | ||
| MA | 1 | Morocco | x | |
| MD | 1 | Moldova | ||
| ME | 1 | Montenegro | ||
| PA | 1 | Panama | ||
| PT | 1 | Portugal | x | |
| RO | 1 | Romania | x | |
| RS | 1 | Serbia | ||
| SI | 1 | Slovenia | x | |
| SK | 1 | Slovakia | x | |
| SM | 1 | San Marino | x | |
| TG | 1 | Togo | ||
| TH | 1 | Thailand | ||
| TN | 1 | Tunisia | ||
| TR | 1 | Turkey | ||
| TW | 1 | Taiwan | ||
| UA | 1 | Ukraine | x | |
| UY | 1 | Uruguay | ||
| VA | 1 | Vatican | x | |
| 281 | 27 | 32 | 38 |
Any test data provided by participating country is at: https://github.com/eu-digital-green-certificates/dgc-testdata
Things to note from above table:
- Countries have their government arranged with lot of different variations.
- More certificates --> more things to secure --> more things to be worried about.
- In Germany somebody got access to a cert and issued QR-codes not belonging to actual persons.
- Lot of countries outside EU chose to use this open-source the system.
- Assume more countries to join. No need for everybody to invent this system.
- Lack of test data
- In EU, it is easy to make test data mandatory. Outside EU not so much.
- Way too many countries have not provided any sample certificates.
- Faroe Islands have 50k people, two certs.
- Okokok. It makes sense to have already issued two. If one cert leaks or gets "burned" for any reason, it is fast to re-issue the COVID certificates by using the other good cert.
- Country stats:
- Liechtenstein has 40k people, 6 certs! Whooo!
- Malta and Cabo Verde have 500k people. Maltese need 12 certs for all the signing! In Cabo Verde they have to do with only one.
- Vatican is the smallest country in the entire World. Single cert needed for those 800+ persons living there.
- Italy has 60M people, they manage their passes with only 4 certs. Nice!
- In total 59 countries participating this common system. Adoption is wide, system is well designed.
Also note how "EU" COVID passport has more participating countries outside EU.
True testament of open-source, indeed!
Write Clean Code — or else …
Monday, December 13. 2021
Anybody who has written any significant amount of code into a software project will (painfully) eventually learn how the code should have been written in its early days.This phenomenon has happened to all of us and will keep happening as long as any code is being maintained.
Experienced developers know how to fight this code "rot", or debt. Here is a really good diagram on how to maintain code quality.

Credit: Artem Diashkin, 2020, https://medium.com/litslink/solid-software-design-principles-ac5be34a6cd5
So, four things:
- You must work with you code all the time to improve it. Preferably not the same exact code, but your codebase in general.
- Without automated tests, you'll be lost. Getting 100% coverage isn't easy and not the actual target even. Have SOME coverage at minimum.
- Implement sensible design patterns, have the factory factory if its applicable for what you're doing. Avoid over-kill, you don't need a factory for everything as it makes your #2 difficult requiring more #1.
- S.O.L.I.D.
- Single Responsibility Principle
- Open Closed Principle
- Liskov Substitution Principle
- Interface Segregation Principle
- Dependency Inversion Principle
Especially #4 is very difficult. Nevertheless, you need to aim towards it.
As reality bites, what happens if you don't do all of the above. Well ... shit will hit the fan. A really good example of things going wrong is Log4Shell.
Christine Dodrill in her post "Open Source" is Broken or: Why I Don't Write Useful Software Unless You Pay Me explains how huge corporations use work of non--paid volunteers while failing to direct any money towards them. When things go wrong or seriously wrong, everybody will blame those non-paid people for not doing their jobs properly. Note how I write "jobs". It was never their job, it was their hobby, something they do in their spare time.
Whatever code you work on, eventually your end result will look as this XKCD #2347 depicts:
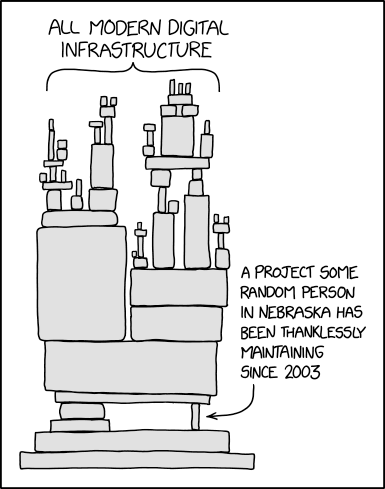
When that tiny piece crumbles, the poor Nebraskan will get the blame. Nobody offered to help before it happened, though. We had a taste of that in 2016, How one programmer broke the internet by deleting a tiny piece of code. Last month it happened again.
Everybody wanted to use Apache Log4j, nobody wanted to pay for it (actually, three users did). What these non-paid volunteers maintaining the code didn't do was have the discipline. Pyramid of clean code wasn't applied, or wasn't properly applied. They didn't bother, entire project was simply something they did on their free time. With lack of discipline, legacy version's and what not, the worst was not applying S.O.L.I.D.'s S. The same piece of code that should write the requested log entry to a log destination also does parsing of the message. That's two responsibilities, not single.
From proof-of-concept Java-code:
log.info("This is what we got:{}", someData);
Whatever the variable someData contains, by Single Responsibility Principle, no parsing must be done and any input, for example ${jndi:ldap://127.0.0.1/a}, must be taken as literal. Because of test code coverage, lack of refactoring, not using design patterns properly and lack of S.O.L.I.D. design all hell broke loose.
Internet burst into flames!
Next time you, as a software architect, designed, developer, whatever plan on adding an implicit functionality to your existing code, make sure everybody who will ever use your new toy knows of this dual-responsbility. Inform all of this implicit functionaly and how it will effect. Don't hide a parser somewhere where there should be no parser, have it a separate operation even if it will break prople's legacy applications. Doing this will keep your days boring and Internet not bursting into flames. The bad thing, obviously, is your notoriety will reamain low as nobody will ever know of your really cool feature.
My advice is:
Have it that way rather than being the underpaid guy whose code broke everything. Really, broke everything.

