New Weather Station - Davis Vantage Vue - Part 2 of 2: Linux installation
Tuesday, November 5. 2019
This is a part two out of two on my Davis Vantage Vue weather station installation story. Previous part was about hardware installation.
Datalogger expansion
The indoors console has a slot for expansion devices. I went for the RS-232 WeatherLink datalogger expansion:
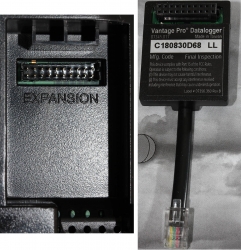
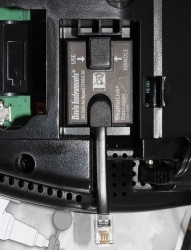
RS232 Cabling
The datalogger has a very short cable and a RJ-11 connector on the other end. The obvious good thing is the common availability of telephone extension cords to get past the 5 cm cable lenght of the datalogger. A regular landline telephone typically has such RJ-11 connectors in it and what I did was to get an inexpensive extension cord with suitable lenght.
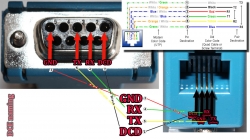
For computer connectivity, with datalogger box has a blue RJ-11 to RS232 converter. The four connected pins of the converter are as follows:
RS232 and Linux
Most computers today don't have a RS232-port in them. To overcome this, years ago I bought a quad-RS232-port USB-thingie:
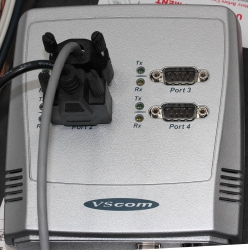
If you look closely, Port 1 of the unit has a DIY RS232-connector attached into it. That's my Vantage Vue cable connected to the indoors console. Also, note the lack of the blue RJ-11 to RS232 converter unit. I reverse engineered the pins and soldered my cable directly to a D-9 connector to get the same result.
Now the hardware parts is done. All the connectors are connected and attached to a PC.
Software
Half of the work is done. Next some software is needed to access the data in the data logger.
For Windows and macOS
Those not running Linux, there is WeatherLink software freely available at https://www.davisinstruments.com/product/weatherlink-computer-software/. It goes without saying, the software is useless without appropriate hardware it gets the inputs from. I never even installed the software, as using a non-Linux was never an option for me. So, I have no idea if the software is good or not.
For Linux
As you might expect, when going to Linux, there are no commercial software options available. However, number of open-source ones are. My personal choice is WeeWX, its available at http://www.weewx.com/ and source code at https://github.com/weewx/weewx.
Install WeeWX:
- Download software:
git clone https://github.com/weewx/weewx.git - In git-directory, create RPM-package:
make -f makefile rpm-package SIGN=0 - As root, install the newly created RPM-package:
rpm --install -h dist/weewx-3.9.2-1.rhel.noarch.rpm - That's it!
Configure WeeWX:
- (dependency) Python 2 is a requirement. Given Python version 2 deprecation (see https://pythonclock.org/ for details), at the time of writing, there is less than two months left of Python 2 lifetime, this project really should get an upgrade to 3. No such joy yet.
- (dependency) pyserial-package:
pip install pyserial - Run autoconfig:
wee_config --install --dist-config /etc/weewx/weewx.conf.dist --output /etc/weewx/weewx.conf- In the array of questions, when being asked to choose a driver, go for
Vantage (weewx.drivers.vantage)
- In the array of questions, when being asked to choose a driver, go for
- Inspect the resulting
/etc/weewx/weewx.confand edit if necessary:- Section
[Station]week_start = 0
- Section [StdReport]
HTML_ROOT = /var/www/html/weewx
- (optional for Weather Underground users), Section
[StdRESTful]- Subsection
[[Wunderground]] - Enter station name and password
enable = true
- Subsection
- Section
- Configuring done!
Now you're ready (as root) to start the thing with a systemctl start weewx.
On a working system, you should get LOOP-records out of weewxd instantly. After a little while of gathering data, you should start having set of HTML/CSS/PNG-files in /var/www/html/weewx. It's a good idea to set up a web server to publish those files for your own enjoyment. This is something you don't have to do, but I strongly advice to enable HTTP-endpoint to your results. I will immensly help determining if your system works or not.
One reason I love having a weather station around is to publish my data to The Net. I've been tagging along with Weather Underground for years. There has been good years and really bad years, when Wunderground's servers have been misbehaving a lot. Now that IBM owns the thing, there has been some improvements. The most important thing is there is somebody actually maintaining the system and making it run. Obviously, there has been some improvements in the service too.
Aggregation problem
When I got my system stable and running, I realized my wind data is flatline. In nature it is almost impossible for not to be windy for multiple days. I visually inspected the wind speed and direction gauges, they were working unobstructed. However, my console did not indicate any wind at all.
After multiple days of running, I was about to give up and RMA the thing back to Davis for replacement, the console started working! That was totally unexpected. Why: 1) the system did not work, 2) the system started working without any actions from me. That was the case for me. As the problem has not occurred since, it must have been some kind of newness.
What next
Now that everything is up, running and stays that way. There's always something to improve. What I'm planning is to do is pump the LOOP-records to Google BigQuery.
As a side note: when new information is available, it will be emitted by weewxd as LOOP: <the data here> into your system logs. However, that data isn't used. After a period of time, your Vantage Vue will aggregate all those records into a time-slot record. That will be used as your measurement. Since those LOOP-records are simply discarded I thought it might be a good idea to base some analytics on those. I happen to know Google BigQuery well from past projects, all that I need is to write a suitable subsystem into weewx to pump the data into a correct place. Then it would be possible to do some analytics of my own on those records.
macOS Catalina upgrade from USB-stick
Saturday, November 2. 2019
macOS 10.15 Catalina is a controversial one. It caused lot of commotion already before launch.
Changes in 10.15 from previous versions
64-bit Only
For those using legacy 32-bit apps Catalina brought bad news, no more 32-bit. Me, personally, didn't find any problems with that. I like my software fresh and updated. Some noisy persons in The Net found this problematic.
Breaking hardware
For some, the installation simply bricked their hardware, see Limited reports of Catalina installation bricking some Macs via EFI firmware for more details. This is bad. When UEFI upgrade does this kind of damage, that's obviously bad. The broken macs can be salvaged, but it's very tricky as they won't boot.
Installer size
For that past many years, I've had my OS X / macOS USB-stick. I own couple of macs, so you'll never know when OS installer will be needed. For catalina:
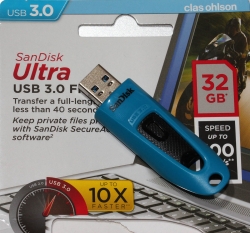
8 GiB wasn't enough! Whaaaaat? How big the installer has gone. So, I had to get a new one. Maybe it was about time. At the USB-stick shop I realized, that minimum size of a stick is 32 GiB. You can go to 128 or 256, but for example 8 isn't an option anymore.
Stupid alerts
The worst part in Catalina is the increased level of nagging:
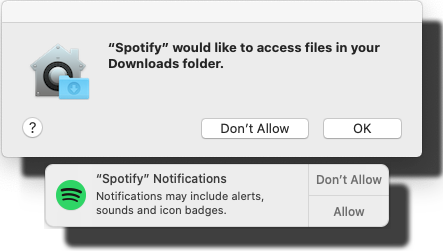
Every single app is asking me permission to do something. As usual, the questions are obscure at best. This same phenomenon is happening in Windows and Android. You're presented a question as a response to your action and the question has almost no relevance to anything you're trying to do. Yet the people designing these operating systems think it will vastly improve security to present user a Yes/No question without proper basis.
An example: For the above Spotify-question I chose to respond No. I have no idea why or for what reson Spotify needs to access any of the files in my Downloads-folder. That's so weird. Playing music doesn't mean you get to access my stuff. ![]()
Get macOS Catalina installer
The process has not changed. Go to App Store of your mac and choose macOS Catalina. It will take a while to download all of 8 GiB of it.
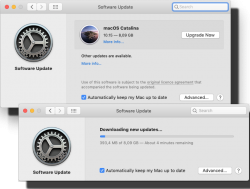
When the installer has downloaded and automatically starts, you need to quit the installer.
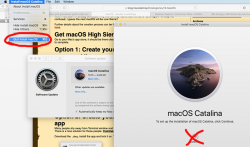
If you'd continue, the installer would upgrade your mac and at the final phase of upgrade, it would delete the precious macOS files. You need to create the USB-stick before upgrading. This is how couple past macOS versions save your disc space.
Create your USB-stick from command line
For reason I don't fully understand, DiskMaker X version 9 failed to create the stick for me. It did process the files and seemed to do something, but ultimately my USB-stick was empty, so I chose to do this the old fashioned way. Maybe there is a bug in the DiskMaker X and a new version has thata one fixed. Check it yourself @ https://diskmakerx.com.
Insert the USB-stick into the mac and from a command prompt, see what the physical USB-drive is:
diskutil list
My mac has the USB-stick as:
/dev/disk3 (external, physical)
The other drives are flagged either 'internal, physical', 'synthesized' or 'disk image'. None of them are suitable targets for creating Catalina installer stick.
Note:
Most of the commands below need root-access. So, either su - to a root-shell or prefix the commands with sudo.
Format the USB-stick. The obvious word of caution is: This will erase any data on the stick. Formatting doesn't wipe the sectors, but given a completely empty filesystem, your bits are quite lost there alone. Command is:
# diskutil partitionDisk /dev/disk3 1 GPT jhfs+ "macOS Catalina" 0b
The output is as follows:
Started partitioning on disk3

Unmounting disk

Creating the partition map

Waiting for partitions to activate

Formatting disk3s2 as Mac OS Extended (Journaled) with name macOS Catalina

Initialized /dev/rdisk3s2 as a 28 GB case-insensitive HFS Plus volume with a 8192k journal

Mounting disk

Finished partitioning on disk3

/dev/disk3 (external, physical):

   #:                    TYPE NAME                 SIZE       IDENTIFIER

   0:   GUID_partition_scheme                     *30.8 GB    disk3

   1:                     EFI EFI                  209.7 MB   disk3s1

   2:               Apple_HFS macOS Catalina       30.4 GB    disk3s2
Now your stick is ready, go transfer the macOS installer files to the stick. The newly formatted stick is already mounted (run command mount):
/dev/disk3s2 on /Volumes/macOS Catalina (hfs, local, nodev, nosuid, journaled, noowners)
Installer files are located at /Applications/Install\ macOS\ Catalina.app/Contents/Resources/:
cd /Applications/Install\ macOS\ Catalina.app/Contents/Resources/

./createinstallmedia \

  --volume /Volumes/macOS\ Catalina/ \

  --nointeraction
Output is as follows:
Erasing disk: 0%... 10%... 20%... 30%... 100%

Copying to disk: 0%... 10%... 20%... 30%... 40%... 50%... 60%... 70%... 80%... 90%... 100%

Making disk bootable...

Copying boot files...

Install media now available at "/Volumes/Install macOS Catalina"
Now your bootable USB-media is ready!
Upgrade
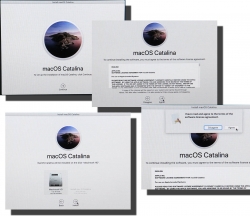
Boot your mac, press and hold your option-key pressed to access the boot-menu:
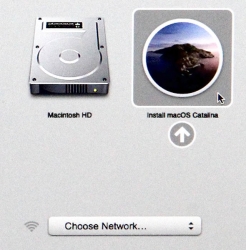
A menu will appear, select Install macOS to upgrade:
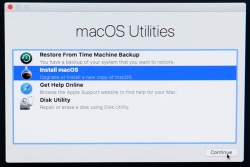
Only after those yes, I agree -clicks your upgrade kicks in. This is the part you can go grab a large cup of coffee, no user interaction is required for 30 to 60 minutes:
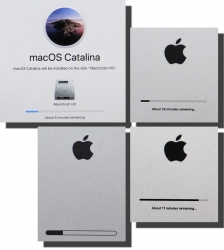
During the upgrade, there will be couple of reboots. My thinking is, that first the upgrade will do any hardware upgrades, then the actual macOS upgrade.
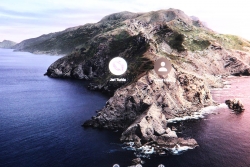
When you see the login-screen, your upgrade is done:
That's it! You're done. Enjoy your upgraded mac operating system.
