HyperDrive PRO 8-in-2 firmware upgrade
Tuesday, May 26. 2020
As mentioned in my USB-C article, I'm describing how I managed to upgrade my 8-in-2 firmware WITHOUT installing Boot Camp into my macOS.
Hyper has a support article Screen flickering with Pro? Please check this out. What they ultimately suggest, and what I instantly rejected is:
- Install Boot Camp
- Boot the Mac into Windows 10
- Run the app to do the Hyper 8-in-2 firmware upgrade
- Enjoy flicker-free life!
My mind was targeted to jump directly into step 3 and 4. I attempted a number of things and kept failing. So, I dug out my humility-hat and went to step 2. That one was a great success! For step 1 I would have never gone. That's for sure. I'm not going to taint this precious Mac with a dual-boot.
Constraints
This is the list of restrictions I painfully figured out:
- HyperDrive 8-in-2 has dual USB-C -connector, making it impossible to physically attach to anything else than a MacBook Pro.
- USB-C extension cords do exist. Purchase one (you don't need two) and lift the physical connectivity limitation.
- Provided application,
VmmUpdater.exeis a 32-bit Windows PE executable, more information can be found @ Hybrid Analysis - Firmware upgrade won't work on a random PC having USB-C -port.
VmmUpdater.exewon't detect the Synaptics chip without Apple AMD-drivers.- The driver won't install if your hardware doesn't have a suitable GPU.
- A Mac won't boot from an USB, unless allowed to do so
- A Mac will boot only to a 64-bit operating system, a 32-bit Windows 10 won't work
- A 64-bit Windows 10 installer doesn't have WoW64 in it to emulate a 32-bit Windows
- To actually upgrade the Synaptics chip's firmware, it needs to be in use
- Windows needs to understand the existence of the video-chip
- Windows needs to actually use the video-chip via HDMI to produce output. Any output will do. No picture --> no upgrade.
- Apple keyboard and touchpad will not work in a default Windows 10 installation
- Some of the Windows drivers used by a MBP can be downloaded from Internet automatically, IF you manage to get an internet connection into a Windows 10 running on a Mac.
- Some of the Windows drivers are not available
- macOS cannot write to a NTFS-partition, it can read the data ok
Requirements
- Hardware:
- A HyperDrive 8-in-2 (to state the obvious)
- A MacBook Pro (to state the nearly obvious), I used 2019 model
- A Windows 10 running in a PC (to state the not-so-obvious)
- USB-stick with at least 8 GiB of storage, capable of booting (I think all of them can)
- USB-keyboard, during tinkering your Mac's keyboard won't work at all times. Any USB-keyboard will do.
- HDMI-cable connected to an external monitor.
- Software:
- Synaptics tool and EEPROM-file provided by Hyper.
- Rufus
- Ability to:
- Download files from The Internet
- Execute Rufus on a platform of your choice to write into the USB-stick. I did this on a Windows 10 PC.
- Run Boot Camp Assistant on a macOS, I used macOS 10.15 Catalina.
- Write files into NTFS-formatted USB-stick. Any Windows 10 can do this.
Steps
1. Save a Windows 10 ISO-image into USB-stick as Windows to Go
Option: You can do this as a second thing.
Windows to Go, that's something not many have used nor ever heard. It's already obsoleted by Microsoft, but seems to work ok. The general idea is to create an USB-bootable Windows you can run at any computer.
That's definitely something I'd love to use for this kind of upgrade!
The easiest way of injecting a Windows 10 ISO-image into USB in a suitable format is Rufus. Go to https://rufus.ie/ and get it. It's free (as speech)!
GPT-partition table is a critical one make sure to choose it. These are the options I had:
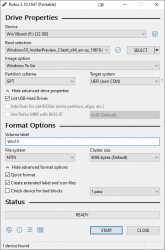
Warning: The process is slow. Writing image with Rufus will take a long time. Much longer than simply copying the bytes to USB.
2. Download Boot Camp support files
Option: You can do this first.
Recent macOS have limited Boot Camp Assistant features. Older ones could do much more, but modern versions can only Download Windows Support Software (it's in the Action-menu). Wait for the 1+ GiB download to complete.
3. Transfer files to USB-stick
Warning: The stick is formatted as NTFS. A Mac won't write into it. You need to first transfer the files into a Windows, and use the Windows to write the files into the USB.
Transfer the WindowsSupport\ folder downloaded by Boot Camp Assistant to the USB-stick prepared earlier. Subdirectory or not doesn't make a difference, I simply copied the directory into root of the USB-drive.
Also transfer the files from Hyper support article https://hypershop.zendesk.com/hc/en-us/articles/360038378871-Screen-flickering-with-Pro-Please-check-this-out-.
Note: Only the .exe and .eeprom are needed, I skipped the .docx as they're not needed during the upgrade.
After successful transfer, you won't need a Windows PC anymore. All the next steps are on a Mac.
4. Enable Mac USB-booting
Study Apple support article HT208198 About Startup Security Utility.
You need to shutdown your Mac. Then plant your fingers onto Command and r keys, put the power on and then wait. Apple logo will appear, then a white progress bar will appear. You can release the Command-r at that point. If you'll be using an encrypted hard drive like I, you'll need to know a valid user on that Mac and enter that user's password to be allowed into Startup Security Utility.
The choices you need to have are:
- Secure boot: No security
- External boot: Allow booting from external or removable media is enabled
This is how Parallels would depict the settings in their KB-article 124579 How to allow Mac to boot from external media:
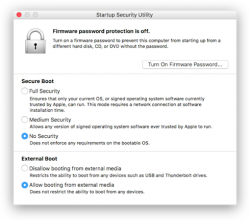
(Thanks Parallels for the pic!)
Note:
After you're done upgrading Synaptics firmware, you can go back to recovery, Startup Security Utility and put the settings back to higher security. For the one-shot upgrade the settings need to be at max. insecure settings.
5. Boot Windows 10 from USB
When you reboot a Mac, plant your finger on Option (some keyboards state Alt) key and wait. Pretty soon a boot menu will appear.
If you had the USB-stick already inserted, it will be displayed. If you didn't, this is your que to insert your Hyper 8-in-2. The Windows 10 USB can be inserted into the HyperDrive, your Mac will boot from there ok.
Your choice is to go for EFI Boot and wait for Windows 10 logo to appear.
Congrats! Now you're heading towards a Windows that won't respond to your keyboard nor touchpad.
6. Establish Windows to Go functionality
Make sure you have an USB keyboard available. This entire process can be done without Mac's own keyboard, it's just your own preference how you want to approach this. Getting the keyboard to work requires a keyboard, success is measured only on results. Make smart choices there!
If you can get the Windows 10 to connect to internet, that will solve some problems with missing drivers as they can be downloaded from a Microsoft driver repository. For Internet access, I used an USB-dongle to establish a Wi-Fi connection. Doing that requires selecting the correct Access Point and entering its password. On a machine without keyboard or mouse that WILL be difficult! Ultimately both the Apple keyboard and touchpad should start working and external keyboard won't be needed.
Note: The drivers for both are in WindowsSupport downloaded by Boot Camp Assistant. If you can point Windows Device Manager to load driver upgrades from there.
Warning!
Your Windows to Go will create a massive hiberfil.sys to enable hibernation. This can be a problem as typically the hibernate-file will be sized 75% of your RAM. This particular Mac has lots of RAM and the USB-stick would never be able to store such a file. So, eventually you're likely to run out of storage space. That is harmful, but can be easily remediated.
To fix, run command:
powercfg /hibernate off
Now the massive file is gone. Next, establish proper video. Your Windows Device Manager will look something like this:
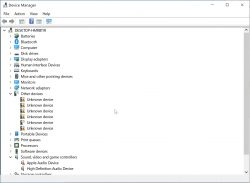
There are bunch of device drivers missing. The most critical one is for GPU. I tried running WindowsSupport\setup.exe, but it never progressed and I simply didn't do that at all. Instead, I executed WindowsSupport\BootCamp\Drivers\AMD\AMDGraphics\setup.exe which enabled proper video to be displayed.
7. Go upgrade Synaptics firmware
All the hard work only for this! Make sure your Hyper 8-in-2 has HDMI-cable connected and monitor will display Windows 10 in it. If you don't have that, when executing the VmmUpdater.exe an error will display:
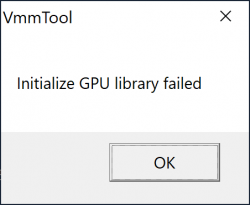
VmmTool: Initialize GPU library failed.
Also different VmmTool error variants can occur. If your Windows will detect the monitor and display video, then you're set!
When VmmTool will display current firmware information, you're golden!
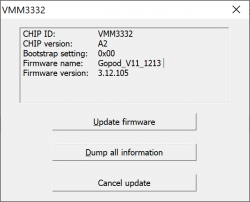
Initially my 8-in-2 had firmware version 3.12.105.
Select the .eeprom file and a progress bar will indicate:

Running the upgrade won't take long. Something like 30 seconds or so. When upgrade is done, it will be indicated:

At this point, yank the 8-in-2 out of Mac and make sure you don't have USB-C power connected to it. The general idea is to power-cycle the recently updated Synaptics chip. When done, put everything back and run VmmUpdater.exe again.
This time it will indicate the new firmware version:
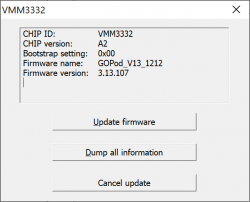
The version 3.12.105 got bumped into 3.13.107. Nice! Hopefully it will do the trick.
8. Boot into macOS and test
This is it. Will it work?
In my case it did. When my Mac wakes up, a single blink will happen in the external display, but no flickering or other types of annoyances.
Done! Mission accomplished!
(phew. that was a lot of work for a simple upgrade)

