WebAuthN Practically - iOS 15
Monday, September 20. 2021
As Apple has recently released iOS 15, and iPadOS 15 and macOS 12 will be released quite soon. Why that is important is for Apple's native support for WebAuthN. In my WebAuthN introduction -post there is the release date for the spec: W3C Recommendation, 8 April 2021. Given the finalization of the standard, Apple was the first major player to step forward and start supporting proper passwordless authentication in it's operating systems. For more details, see The Verge article iOS 15 and macOS 12 take a small but significant step towards a password-less future.
For traditional approach with USB-cased Yubikey authenticator, see my previous post.
Registration
Step 1: Enter the username you'd like to register as.
Step 2: Go for Register
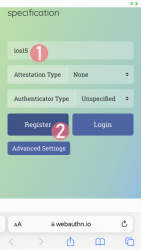
Step 3: Your browser will need a confirmation for proceeding with registration.
In Apple's ecosystem, the private key is stored into Apple's cloud (what!?). To allow access to your cloud-based secerts-storage, you must enter your device's PIN-code and before doing that, your permission to proceed is required.
Note: The option for "Use Security Key" is for using the Yubikey in Lightning-port. Both are supported. It is entirely possible to login using the same authenticator with a USB-C in my PC or Mac and Lightning with my iPhone or iPad.
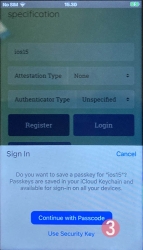
Step 4: Enter your device PIN-code
Step 5: You're done! Now you have successfully registered.
Best part: No passwords! Private key is stored into Syncing Platform Authenticator. Btw. weird name that for WebAuthN in Apple-lingo. Ok, to be honest, WebAuthN is a mouthful too.
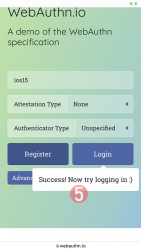
This was couple steps simpler than with Yubikey. Also there is the benefit (and danger) of cloud. Now your credential can be accessed from your other devices too.
Login
Step 1: Enter the username you'd like to log in as.
Step 2: Go for Login
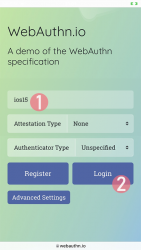
Step 3: Your browser will need a confirmation for proceeding with login. A list of known keys and associated user names will be shown.
Step 4: Enter your device PIN-code
Step 5: You're done! Now you have successfully logged in.
Best part: No passwords!

That's it. Really.
Finally
I don't think there is much more to add into it.
In comparison to Yubikey, any of your Apple-devices are authenticators and can share the private key. Obviously, you'll need iOS 15 or macOS 12 for that support.
WebAuthN Practically - Yubikey
Sunday, September 19. 2021
Basics of WebAuthN have been covered in a previous post. Go see it first.
As established earlier, WebAuthN is about specific hardware, an authenticator device. Here are some that I use:
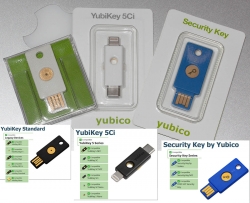
These USB-A / USB-C / Apple Lightning -connectibe Yubikey devices are manufactured by Yubico. More info about Yubikeys can be found from https://www.yubico.com/products/.
To take a WebAuthN authenticator for a test-drive is very easy. There is a demo site run by Yubico at https://demo.yubico.com/ containing WebAuthN site. However, as a personal preference I like Duo Security's demo site better. This Cisco Systems, Inc. subsidiary specializes on multi-factor authentication and are doing a great job running a WebAuthN demo site at https://webauthn.io/.
Registration
This illustrated guide is run using a Firefox in Windows 10. I've done this same thing with Chrome, Edge (the chromium one) and macOS Safari. It really doesn't differ that much from each other.
In every website, a one-time user registration needs to be done. This is how WebAuthN would handle the process.
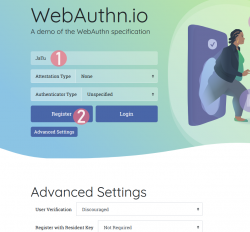
Step 1: Enter the username you'd like to register as.
Step 2: Go for Register
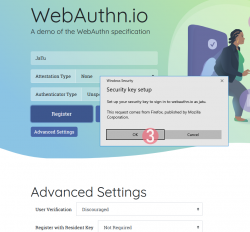
Step 3: Your browser will need a confirmation for proceeding with registration.
The main reason for doing this is to make you, as the user, aware that this is not a login. Also the authenticator devices typically have limited space for authentication keys available. For example: Yubikeys have space for 25 keys in them. The bad thing about limited space is because of high level of security yielding low level of usability. You cannot list nor manage the keys stored. What you can do is erase all of them clean.
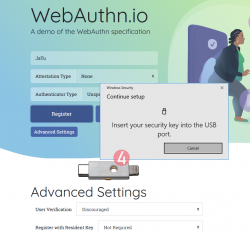
Step 4: Insert your authenticator into your computing device (PC / Mac / mobile).
If authenticator is already there, this step will not be displayed.
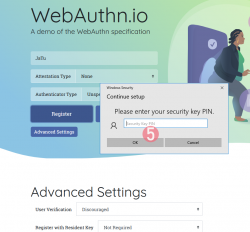
Step 5: Enter your authenticator PIN-code.
If you have not enabled the second factor, this step won't be displayed.
To state the obvious caveat here, anybody gaining access to your authenticator will be able to log in as you. You really should enable the PIN-code for increased security.
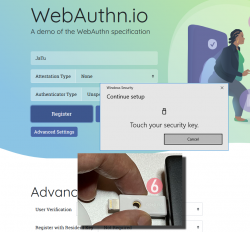
Step 6: Touch the authenticator.
The physical act of tringgering the registration is a vital part of WebAuthN. A computer, possibly run by a malicious cracker, won't be able to use your credentials without human interaction.
Step 7: You're done! Now you have successfully registered.
Best part: No passwords!
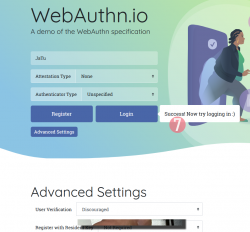
In this Duo Security test site, the sandbox will be raked on daily basis. Natually on a real non-demo site your information will be persisted much longer. Also note how your contact information like, E-mail address, mobile number or such wasn't asked. A real site would obviously query more of your personal details. Secondly, WebAuthN best practice is to have multiple authenticators associated with your user account. If you happen to misplace the device used initially for registration, having a backup(s) is advisable.
Next, let's see how this newly created user account works in a practical login -scenario.
Login
Step 1: Enter the username you'd like to log in as.
Step 2: Go for Login
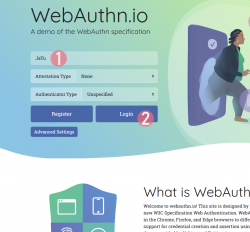
Step 3: Insert your authenticator into your computing device (PC / Mac / mobile).
If authenticator is already there, this step will not be displayed.
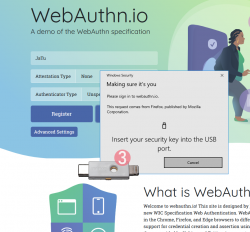
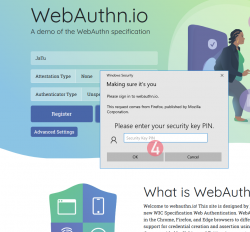
Step 4: Enter your authenticator PIN-code.
If you have not enabled the second factor, this step won't be displayed.
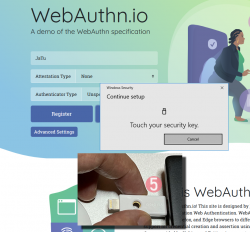
Step 5: Touch the authenticator.
Again, human is needed here to confirm the act of authentication.
Step 6: You're done! Now you have successfully logged in.
Best part: No passwords!
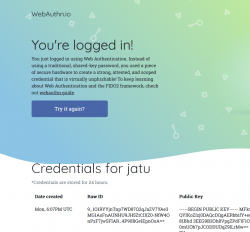
Note how the public key can be made, well... public. It really doesn't make a difference if somebody else gets a handle of my public key.
Closer look into The Public Key
As established in the previous post, you can not access the private key. Even you, the owner of the authenticator device, can not access that information. Nobody can lift the private key, possibly without you knowing about it. Just don't lose the Yubikey.
Public-part of the key is known and can be viewed. The key generated by my Yubikey in PEM-format is as follows:
-----BEGIN PUBLIC KEY-----

MFkwEwYHKoZIzj0CAQYIKoZIzj0DAQcDQgAERbbifY+euxnszcMis99CsnH81Bhd

3EEG9B2Oh8VpgZPdFlF1OQ8FEbfuSxbbAK+l0mUOb7pJCODDUDqZ9lLrMw==

-----END PUBLIC KEY-----
Popping the ASN.1 cork with a openssl ec -pubin -noout -text -in webauthn-pem.key will result:
read EC key

Public-Key: (256 bit)

pub:

    04:45:b6:e2:7d:8f:9e:bb:19:ec:cd:c3:22:b3:df:

    42:b2:71:fc:d4:18:5d:dc:41:06:f4:1d:8e:87:c5:

    69:81:93:dd:16:51:75:39:0f:05:11:b7:ee:4b:16:

    db:00:af:a5:d2:65:0e:6f:ba:49:08:e0:c3:50:3a:

    99:f6:52:eb:33

ASN1 OID: prime256v1

NIST CURVE: P-256
From that we learn, the key-pair generated is an ECDSA 256-bit. Known aliases for that are secp256r1, NIST P-256 and prime256v1. That weird naming means elliptic curves, aka. named curves.
For those into math, the actual arithmetic equation of secp256r1 -named curve can be viewed in an open-source book by Svetlin Nakov, PhD at https://cryptobook.nakov.com/. All the source code in this freely available book are at https://github.com/nakov/practical-cryptography-for-developers-book. The mathemathical theory how WebAuthN signs the messages is described in detail at https://cryptobook.nakov.com/digital-signatures/ecdsa-sign-verify-messages.
Back to those "pub"-bytes. Reading RFC5480 indicates out of those 65 bytes, the first one, valued 04, indicates this data being for an uncompressed key. With that information, we know rest of the bytes are the actual key values. What remains is a simple act of splitting the remaining 64 bytes into X and Y, resulting two 32-byte integers in hex:
X: 45b6e27d8f9ebb19eccdc322b3df42b271fcd4185ddc4106f41d8e87c5698193
Y: dd165175390f0511b7ee4b16db00afa5d2650e6fba4908e0c3503a99f652eb33
A simple conversion with bc will result in decimal:
X: 31532715897827710605755558209082448985317854901772299252353894644783958819219
Y: 100000572374103825791155746008338130915128983826116118509861921470022744730419
Yes, that's 77 and 78 decimal numbers in them. Feel free to go after the prime number with that public information! ![]()
Finally
The mantra is: No passwords.
With WebAuthN, you'll get hugely improved security with multiple authentication factors built into it. What we need is this to spread and go into popular use!

