WebAuthN Practically - iOS 15
Monday, September 20. 2021
As Apple has recently released iOS 15, and iPadOS 15 and macOS 12 will be released quite soon. Why that is important is for Apple's native support for WebAuthN. In my WebAuthN introduction -post there is the release date for the spec: W3C Recommendation, 8 April 2021. Given the finalization of the standard, Apple was the first major player to step forward and start supporting proper passwordless authentication in it's operating systems. For more details, see The Verge article iOS 15 and macOS 12 take a small but significant step towards a password-less future.
For traditional approach with USB-cased Yubikey authenticator, see my previous post.
Registration
Step 1: Enter the username you'd like to register as.
Step 2: Go for Register
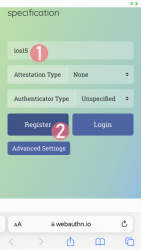
Step 3: Your browser will need a confirmation for proceeding with registration.
In Apple's ecosystem, the private key is stored into Apple's cloud (what!?). To allow access to your cloud-based secerts-storage, you must enter your device's PIN-code and before doing that, your permission to proceed is required.
Note: The option for "Use Security Key" is for using the Yubikey in Lightning-port. Both are supported. It is entirely possible to login using the same authenticator with a USB-C in my PC or Mac and Lightning with my iPhone or iPad.
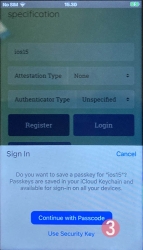
Step 4: Enter your device PIN-code
Step 5: You're done! Now you have successfully registered.
Best part: No passwords! Private key is stored into Syncing Platform Authenticator. Btw. weird name that for WebAuthN in Apple-lingo. Ok, to be honest, WebAuthN is a mouthful too.
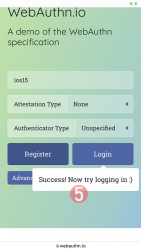
This was couple steps simpler than with Yubikey. Also there is the benefit (and danger) of cloud. Now your credential can be accessed from your other devices too.
Login
Step 1: Enter the username you'd like to log in as.
Step 2: Go for Login
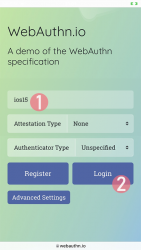
Step 3: Your browser will need a confirmation for proceeding with login. A list of known keys and associated user names will be shown.
Step 4: Enter your device PIN-code
Step 5: You're done! Now you have successfully logged in.
Best part: No passwords!

That's it. Really.
Finally
I don't think there is much more to add into it.
In comparison to Yubikey, any of your Apple-devices are authenticators and can share the private key. Obviously, you'll need iOS 15 or macOS 12 for that support.
WebAuthN Practically - Yubikey
Sunday, September 19. 2021
Basics of WebAuthN have been covered in a previous post. Go see it first.
As established earlier, WebAuthN is about specific hardware, an authenticator device. Here are some that I use:
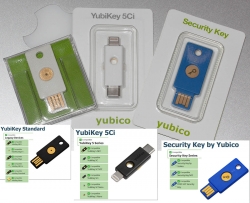
These USB-A / USB-C / Apple Lightning -connectibe Yubikey devices are manufactured by Yubico. More info about Yubikeys can be found from https://www.yubico.com/products/.
To take a WebAuthN authenticator for a test-drive is very easy. There is a demo site run by Yubico at https://demo.yubico.com/ containing WebAuthN site. However, as a personal preference I like Duo Security's demo site better. This Cisco Systems, Inc. subsidiary specializes on multi-factor authentication and are doing a great job running a WebAuthN demo site at https://webauthn.io/.
Registration
This illustrated guide is run using a Firefox in Windows 10. I've done this same thing with Chrome, Edge (the chromium one) and macOS Safari. It really doesn't differ that much from each other.
In every website, a one-time user registration needs to be done. This is how WebAuthN would handle the process.
Step 1: Enter the username you'd like to register as.
Step 2: Go for Register
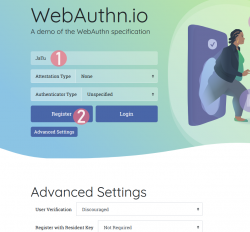
Step 3: Your browser will need a confirmation for proceeding with registration.
The main reason for doing this is to make you, as the user, aware that this is not a login. Also the authenticator devices typically have limited space for authentication keys available. For example: Yubikeys have space for 25 keys in them. The bad thing about limited space is because of high level of security yielding low level of usability. You cannot list nor manage the keys stored. What you can do is erase all of them clean.
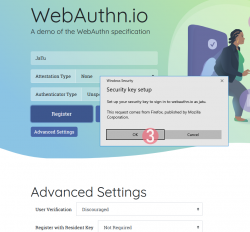
Step 4: Insert your authenticator into your computing device (PC / Mac / mobile).
If authenticator is already there, this step will not be displayed.
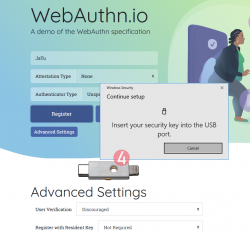
Step 5: Enter your authenticator PIN-code.
If you have not enabled the second factor, this step won't be displayed.
To state the obvious caveat here, anybody gaining access to your authenticator will be able to log in as you. You really should enable the PIN-code for increased security.
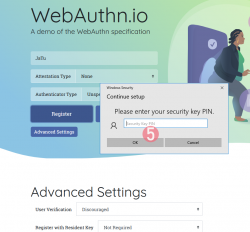
Step 6: Touch the authenticator.
The physical act of tringgering the registration is a vital part of WebAuthN. A computer, possibly run by a malicious cracker, won't be able to use your credentials without human interaction.
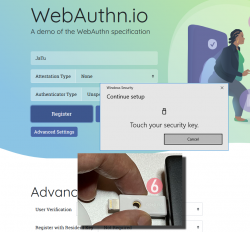
Step 7: You're done! Now you have successfully registered.
Best part: No passwords!
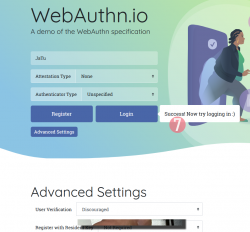
In this Duo Security test site, the sandbox will be raked on daily basis. Natually on a real non-demo site your information will be persisted much longer. Also note how your contact information like, E-mail address, mobile number or such wasn't asked. A real site would obviously query more of your personal details. Secondly, WebAuthN best practice is to have multiple authenticators associated with your user account. If you happen to misplace the device used initially for registration, having a backup(s) is advisable.
Next, let's see how this newly created user account works in a practical login -scenario.
Login
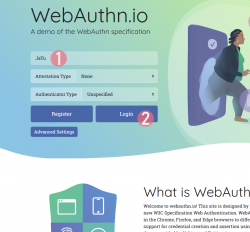
Step 1: Enter the username you'd like to log in as.
Step 2: Go for Login
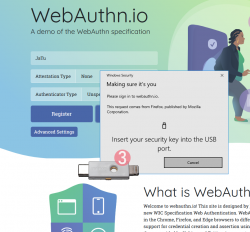
Step 3: Insert your authenticator into your computing device (PC / Mac / mobile).
If authenticator is already there, this step will not be displayed.
Step 4: Enter your authenticator PIN-code.
If you have not enabled the second factor, this step won't be displayed.
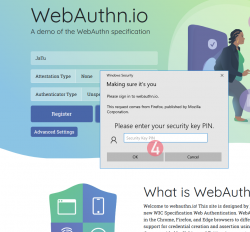
Step 5: Touch the authenticator.
Again, human is needed here to confirm the act of authentication.
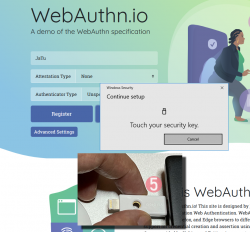
Step 6: You're done! Now you have successfully logged in.
Best part: No passwords!
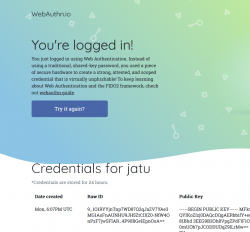
Note how the public key can be made, well... public. It really doesn't make a difference if somebody else gets a handle of my public key.
Closer look into The Public Key
As established in the previous post, you can not access the private key. Even you, the owner of the authenticator device, can not access that information. Nobody can lift the private key, possibly without you knowing about it. Just don't lose the Yubikey.
Public-part of the key is known and can be viewed. The key generated by my Yubikey in PEM-format is as follows:
-----BEGIN PUBLIC KEY-----

MFkwEwYHKoZIzj0CAQYIKoZIzj0DAQcDQgAERbbifY+euxnszcMis99CsnH81Bhd

3EEG9B2Oh8VpgZPdFlF1OQ8FEbfuSxbbAK+l0mUOb7pJCODDUDqZ9lLrMw==

-----END PUBLIC KEY-----
Popping the ASN.1 cork with a openssl ec -pubin -noout -text -in webauthn-pem.key will result:
read EC key

Public-Key: (256 bit)

pub:

    04:45:b6:e2:7d:8f:9e:bb:19:ec:cd:c3:22:b3:df:

    42:b2:71:fc:d4:18:5d:dc:41:06:f4:1d:8e:87:c5:

    69:81:93:dd:16:51:75:39:0f:05:11:b7:ee:4b:16:

    db:00:af:a5:d2:65:0e:6f:ba:49:08:e0:c3:50:3a:

    99:f6:52:eb:33

ASN1 OID: prime256v1

NIST CURVE: P-256
From that we learn, the key-pair generated is an ECDSA 256-bit. Known aliases for that are secp256r1, NIST P-256 and prime256v1. That weird naming means elliptic curves, aka. named curves.
For those into math, the actual arithmetic equation of secp256r1 -named curve can be viewed in an open-source book by Svetlin Nakov, PhD at https://cryptobook.nakov.com/. All the source code in this freely available book are at https://github.com/nakov/practical-cryptography-for-developers-book. The mathemathical theory how WebAuthN signs the messages is described in detail at https://cryptobook.nakov.com/digital-signatures/ecdsa-sign-verify-messages.
Back to those "pub"-bytes. Reading RFC5480 indicates out of those 65 bytes, the first one, valued 04, indicates this data being for an uncompressed key. With that information, we know rest of the bytes are the actual key values. What remains is a simple act of splitting the remaining 64 bytes into X and Y, resulting two 32-byte integers in hex:
X: 45b6e27d8f9ebb19eccdc322b3df42b271fcd4185ddc4106f41d8e87c5698193
Y: dd165175390f0511b7ee4b16db00afa5d2650e6fba4908e0c3503a99f652eb33
A simple conversion with bc will result in decimal:
X: 31532715897827710605755558209082448985317854901772299252353894644783958819219
Y: 100000572374103825791155746008338130915128983826116118509861921470022744730419
Yes, that's 77 and 78 decimal numbers in them. Feel free to go after the prime number with that public information! ![]()
Finally
The mantra is: No passwords.
With WebAuthN, you'll get hugely improved security with multiple authentication factors built into it. What we need is this to spread and go into popular use!
WebAuthN - Passwordless registration and authentication of users
Monday, September 13. 2021
WebAuthN, most of you have never heard of it but can easily understand it has something to do with authenticating "N" in The Web. Well, it is a standard proposed by World Wide Web Consortium or  . In spec available at https://www.w3.org/TR/webauthn/, they describe WebAuthN as follows:
Web Authentication:
An API for accessing Public Key Credentials
Level 2W3C Recommendation, 8 April 2021
What motivates engineers into inventing an entirely new form of authenticating end users to web services is obvious. Passwords are generally a bad idea as humans are not very good using memorized secrets in multiple contexts. Your password is supposed to be a secret, but when it leaks from a website and is made public for The World to see your secret isn't a secret anymore. Using a different password for every possible website isn't practical without proper tooling (which many of you won't utilize for number of reasons). As all this isn't new and I've already covered it numerous posts, example Passwords - Part 3 of 2 - Follow up, this time I'm not going there.
Instead, let's take a brief primer on how authentication works. To lay some background for WebAuthN, I'm introducing three generations of authentication. Honestly it is weird how I cannot find anybody's previous work on how to define 1st gen or 2nd gen auth mechanisms. As usual, if you want to have something done properly, you'll have to do it by yourself. I'm defining the generations of authentication techniques here.
First Generation: Password - a memorized secret
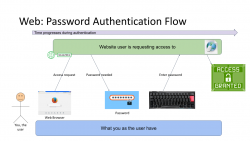
This is your basic password-scenario, something most of us know and understand easily. In the picture below is something I drew to illustrate the flow of events during user authentication. On the left is you, the user. You want to login to a website you've registered before. As anybody having access to The Internet, anywhere in the globe, they can show up and claim to be you, the mechanism to identify you being YOU is with the secret you chose during registration process, aka. your password.
Process goes as follows: You open a web browser, go to a known address of the website, when authentication is requested, using a keyboard (touch screen or a real keyboard) enter your password credential to complete the claim of you being you. Finally as your password matches what the website has in its records, you are granted access and go happily forward.
The obvious weakness in this very common authentication mechanism has already been explained. What if somebody gets your password? They saw you typing it, or found the yellow post-it sticker next to your monitor, or ... many possibilities of obtaining your secret, including a guess. To mitigate this, there are MFA of 2-FA to introduce a Multi-Factor Authentication (or Two-Factor), but for the sake of introducing this generation, we skip that. It's an add-on and doesn't really alter this most commonly used process.
It's the simplicity that made this original one the most popular method of authentication. Nothing special really needed and this approach kinda works. It won't resist much of an attack, but it works.
Second Generation: Public Key Infrastructure (PKI)
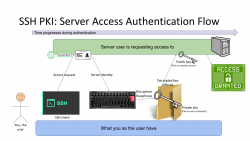
One of the most prominent attempts to stop using passwords is PKI. As this mechanism isn't widely used in The Web, note the difference for the 1st gen diagram, this is not web, this is Secure Shell, or SSH.
In reality, you can use SSH with passwords also, but it is typical for not to. Actually, I always (no exceptions!) disable password authentication in my servers by introducing PasswordAuthentication no into sshd_config. Simply by not using passwords, my security improves a lot.
Second reality check: In HTTP/1.1 you can use certificate (aka. PKI) authentication. However, on currently used HTTP/2 that is not possible. Quote: "[RFC7540] prohibits renegotiation after any application data has been sent. This completely blocks reactive certificate authentication in HTTP/2". So, that's effectively gone in the form used previously. And no, to those shouting "my national ID-card has an ISO-7816 -chip in it and I can use the certificate in it to authenticate!". That tech isn't based on any of the web standards. All nations invented their own stack of custom software attaching a running process in your computer to your browser's Security Device API. As this isn't even commonly used, this changes nothing and I'll stand behind my claim: In web there really isn't PKI-auth in use.
SSH authentication process goes as follows: On your computer (or mobile device), you open your SSH-client to enter a known server. Authentication is integral part of a connection and cannot really be bypassed. On authentication, you will get the server's identity as a response and your client will verify the address+signature -pair to a previously stored value to make sure the server is in fact The Server you have accessed before. Next your private key will be needed. You have generated this during "registration" process (in SSH there really isn't registration, but declaring the keys to be used can be considered one). Best practice is to have your private keys encrypted, so to access the key I need to enter a password (pass phrase) for decryption. Note the difference for the previous gen. here: the password I type, nor my private key does not leave my computer, only a data packet signed with my private key will. Given PKI-math, the server can verify my signature using the public key on that end. As signature matches, server has verified the claim of me being me and allows access.
In general, this is very nice and safe approach. The introduction of server identity increases your security as a random party cannot claim to act as "The Server". Also the authentication mechanism used is a seriously thought/engineered and complex enough to withstand any brute-forcing or guesswork. Even if your private key would be encrypted with a super-easy passphrase, or not encrypted at all, it won't be easy for somebody else to mimic you. They really really really need to have your private key.
There is no real obvious weakness in this (besides this is not Web). What could be described as a "weakness" is the private key storage. What if it leaks? Your keys to "The Kingdom" are gone. Remember: the private keys should be encrypted to mitigate them being lost. However, your keys being lost/stolen is a lot less likely incident to happen in comparison of somebody guessing or harvesting your password from the server database. Even if you set your mind into generating a "poor" public/private key pair, in fact it is actually very secure. Much more secure than your default "123456" easily guessable password.
On the other hand, if your public key on the server side leaks, that's not a big deal. Servers do get hacked. Data does get stolen, but public is public. You can climb to a mountain and shout your public key for all to know (actually that's literally what GPG does). The math PKI uses in either RSA or ECDSA is considered really really very safe.
Third Generation: WebAuthN
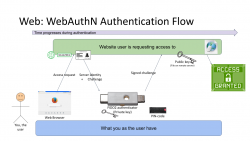
Back to web with PKI. Building on top of first and second generations, there is an improvement: in WebAuthN the private key storage isn't a file in your computer. It's a FIDO2-compliant detachable hardware device. Note: in FIDO Alliance specs, the authenticator "device" can be a software running in your computer (or mobile phone, or whatever you're using as your personal computer). However, most typically deployed WebAuthN-solutions do use actual physical devices you can plug in and out of your computer. The authenticator devices don't have any batteries, are powered from the computer and are typically small enough to be stored in your pocket.
The authentication process goes as follows: You open a web browser, go to a known address of the website. On the website you choose to login and when authentication is requested by the server, it will send you its identification and a challenge as a response to your browser. The callenge will contain data signed by your public key. Obviously your public key was stored to the server during user registration process. As your browser will require help from the authenticator device, a connection will be made there. If your authenticator is protected by a PIN, a request to unlock is indicated by your browser. Using your keyboard, you punch in the PIN-code and your browser will pass on the challenge to the authenticator device. It will check the server's identification and see if it would have a private key in its storage to match that. If it does, it will signal your browser about the found private key. You choose to go forward with authentication on your browser and authenticator device will return the challenge with a signature added into it. Then your browser will deliver signed data over the Net, server on the other side will verify the signature and on successful match you're in! This entire process is a variation of 2nd gen PKI-authentication.
Drawback is obvious: you need to have the device at your hand to be able to log in. Most of regular users like you don't have a compatible FIDO2 authenticator at hand. If you do, on a failing scenario, what if you left the device at home? Or your dog ate it? Or you made an unfortuante mistake and dropped it into a toilet by accident. Well, good thing you thought of this and have configured a spare authenticator, right? ![]() Ok, you being a carefree fellow, you forgot where you placed it. At this point you are eventually locked out of the remote system, which is bad.
Ok, you being a carefree fellow, you forgot where you placed it. At this point you are eventually locked out of the remote system, which is bad.
What's good is the fact that your private key cannot be stolen. Nobody, including you, don't know it nor can access it. All you can do with a device is to get a signed challenge (besides the obvious act of adding a new key during registration). Your security is standing on two factors, the private key stored into an unbreakable device and the fact that a PIN-code is needed on an attempt to access any of the data. That is pretty safe. Worst-case scenario is when your authenticator doesn't have PIN-code protection and somebody gets their hands on it. Then they can present themselves as you.
As WebAuthN is a new and good thing, the only reason it isn't widely used at this point is the need for a specific type of hardware device. These devices are commonly available and they aren't too expensive either. Single device can be used to authenticate into multiple sites, even. The avalability problem is simply because aren't too many manufacturers in existence yet.
Not to worry! This can be navigated around. Let's put on our future-goggles and look a bit ahead. What if "the device" needed here would be your mobile phone? Those things are commonly available and won't require anything else than operating system support and suitable software.
Practical WebAuthN
Enough theory! How does this work in real life?
Well, that's a topic for an another blog post. I'll investigate the USB-A/USB-C/Apple Lightning -solution in closer detail. Also the upcoming mobile device option will be discussed.
