Huawei B593 s-22 more RS-232 pins
Tuesday, March 24. 2015
After poking a s-22 around with an oscilloscope I managed to find a serial signal out of it. However, Mr. Asiantuntijakaveri pointed out, that it isn't especially useful. To him that serial stuff looked like the mobile-side baseband. Couple of hours tinkering with VxWorks prompt didn't result much for me. So, back to the scope ...
This is what I found:
Another 1,8 volt serial signal. RS-232 parameters are alike the other one 115200 bps 8N1. I couldn't confirm the DCE RX-pin. There is one with suitable electrical characteristics, but it looks like the box doesn't offer any input capabilities, not at least with default configuration.
The data on boot time looks like this:
v?l?space?write magic succsse!%x

24680138%s start addr:0x%x size:0x%x

first step

second step

thred step

DDR exam right !!!!!!!!!!!!!!!!!!!!!!!


press space key to enter bootrom:

Start from: vxWorks Kernel.

>>loading: VxWorks ... success.

>>loading: FastBoot ... success.


hw main id:00000400, sub id:00000001activate_fastboot...0x3CD00000

Starting from entry: 0x30004000

[ 0.000000] Linux version 2.6.35.7 (q81003564@MBB-V7R1-CPE) (gcc version 4.5.1 (ctng-1.8.1-FA) ) #1 PREEMPT Mon Jun 3 13:50:16 CST 2013

[ 0.000000] CPU: ARMv7 Processor [413fc090] revision 0 (ARMv7), cr=18c53c7f

[ 0.000000] CPU: VIPT nonaliasing data cache, VIPT nonaliasing instruction cache

[ 0.000000] Machine: Hisilicon Balong

[ 0.000000] Ignoring unrecognised tag 0x4d534d70

[ 0.000000] Memory policy: ECC disabled, Data cache writeback

[000005940ms] Built 1 zonelists in Zone order, mobility grouping on. Total pages: 36576

[000005941ms] Kernel command line: root=/dev/ram0 rw console=ttyAMA0,115200 console=uw_tty0 rdinit=/init mem=144m

[000005941ms] PID hash table entries: 1024 (order: 0, 4096 bytes)

[000005941ms] Dentry cache hash table entries: 32768 (order: 5, 131072 bytes)

[000005942ms] Inode-cache hash table entries: 16384 (order: 4, 65536 bytes)

[000005957ms] Memory: 144MB = 144MB total

[000005957ms] Memory: 133780k/133780k available, 13676k reserved, 0K highmem

[000005957ms] Virtual kernel memory layout:

[000005957ms] vector : 0xffff0000 - 0xffff1000 ( 4 kB)

[000005957ms] fixmap : 0xfff00000 - 0xfffe0000 ( 896 kB)

[000005957ms] DMA : 0xff600000 - 0xffe00000 ( 8 MB)

[000005957ms] vmalloc : 0xc9800000 - 0xf0000000 ( 616 MB)

[000005957ms] lowmem : 0xc0000000 - 0xc9000000 ( 144 MB)

[000005957ms] modules : 0xbf000000 - 0xc0000000 ( 16 MB)

[000005957ms] .init : 0xc0008000 - 0xc0028000 ( 128 kB)

[000005958ms] .text : 0xc0028000 - 0xc06ca000 (6792 kB)

[000005958ms] .data : 0xc06ca000 - 0xc0701520 ( 222 kB)

[000005958ms] SLUB: Genslabs=11, HWalign=32, Order=0-3, MinObjects=0, CPUs=1, Nodes=1

[000005958ms] Preemptable hierarchical RCU implementation.

[000005958ms] RCU-based detection of stalled CPUs is disabled.

[000005958ms] Verbose stalled-CPUs detection is disabled.

[000005958ms] NR_IRQS:160

[000005958ms] Console: colour dummy device 80x30

[000005958ms] Calibrating delay loop... 897.84 BogoMIPS (lpj=4489216)

[000006218ms] pid_max: default: 4096 minimum: 301

[000006218ms] Mount-cache hash table entries: 512

[000006218ms] CPU: Testing write buffer coherency: ok

[000006219ms] start log trace.

[000006223ms] NET: Registered protocol family 16

[000006224ms] Serial: BalongV7R1 UART driver

[000006224ms] dev:uart0: ttyAMA0 at MMIO 0x90007000 (irq = 102) is a Balong rev0

[000006435ms] console [ttyAMA0] enabled

[000006461ms] bio: create slab at 0

[000006465ms] hi_gpio_probe:gpio sync in acore.

[000006469ms] hi_gpio_probe:gpio sync over.

[000006474ms] SCSI subsystem initialized

[000006478ms] enter Acpu-softtimer-modeule-init!!!

[000006482ms] softtimer_module_start_success-,1-- >>>>>>>>>>>>>>

[000006488ms] start create the softtimer thread!!!

[000006492ms] end the Acpu_softtimer_init() !!!

[000006497ms] usbcore: registered new interface driver usbfs

[000006503ms] usbcore: registered new interface driver hub

[000006508ms] usbcore: registered new device driver usb

[000006513ms] ***************************************************************

[000006520ms] begin to init mutilcore: 0000

[000006524ms] hw id: main,0x400, sub,0x1

[000006528ms] ===== beg mem usr function =====

[000006532ms] begin to init mutilcore: 222

[000006536ms] start BSP_ICC_Init

[000006539ms] g_pstIccCtrlChan = 0xf2fc02c0

[000007098ms] ##### icc init success!, cnt=1971, connet=1

[000007103ms] end BSP_ICC_Init

[000007106ms] begin to init mutilcore: 333

[000007110ms] begin to init mutilcore: 444

[000007113ms] BSP_MODU_IFCP

IFC Process init success!

[000008606ms] A:start icc cshell...

[000008609ms] cshell_icc_open success,cshell_udi_handle is 5898241

[000008615ms] free_ok

[000008617ms] the lcr_reg is 3

[000008620ms] pTemp is 0xc8a90000

[000008623ms] UDI_BUILD_DEV_ID is 0x300

[000008626ms] start NVM_Init

[000008629ms] MSP_IPC udi_open Start

[000009297ms] MSP_IPC udi_open End Handle = 5a0002

[000009715ms] end NVM_Init

[000009718ms] begin to init mutilcore: 555

[000009721ms] BCM43239_WIFI_Release: Entering...

[000009726ms] DRV_HSIC_Release: Entering ...
Actually there is like 1000 lines more log, but it's just Linux loading. Including in the log there are SSH-passwords for 2 users admin and user. They are exactly what sshusers.cfg will have after boot.
It will take couple of seconds for the bootloader to kick on the Android-side. The bootloader serial-data starts flowing in immediately, but this one sleeps a while and starts after that.
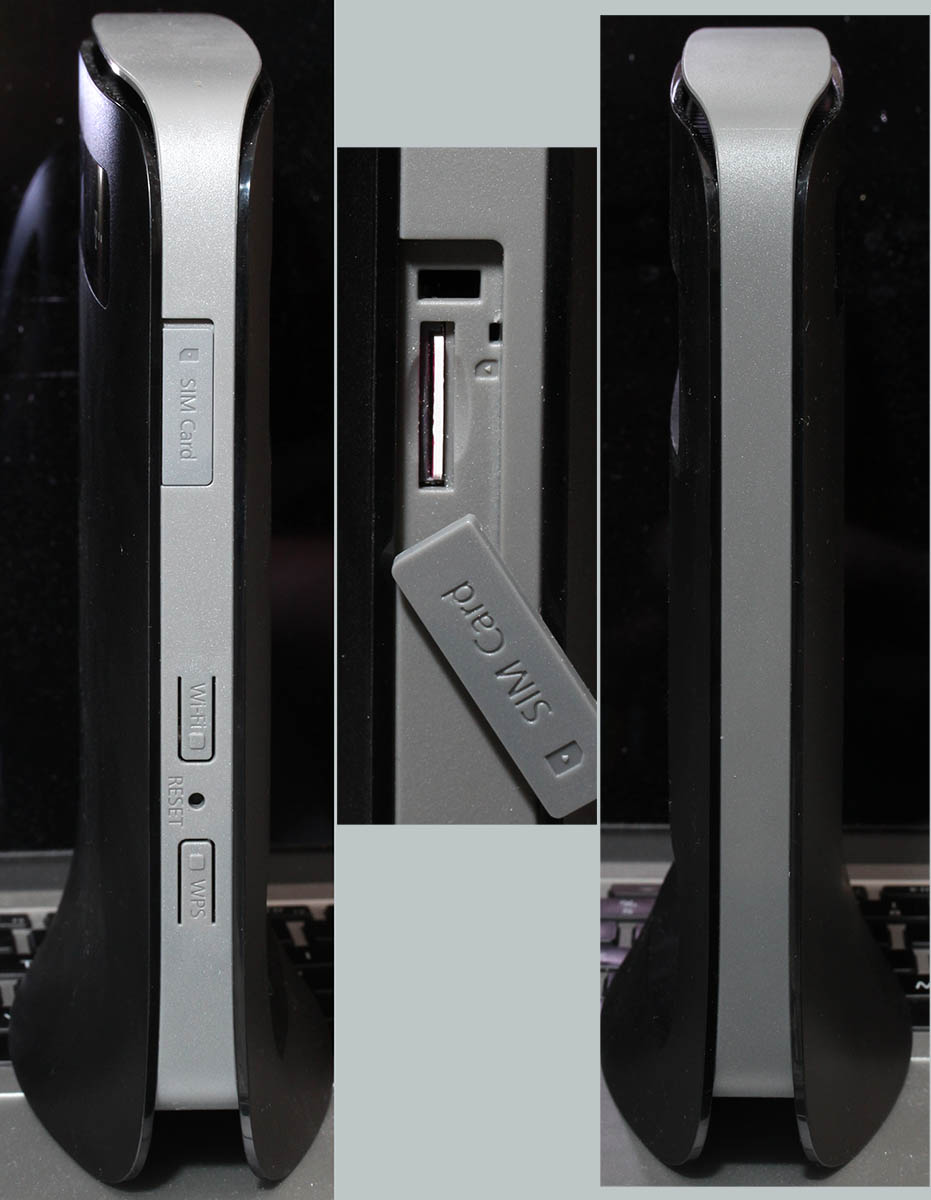
Side buttons exaplained
I have previously touched the subject of WiFi / Reset / WPS -buttons. Also I got a comment about un-bricking a s-22, but that didn't help me much. This is related to serial output in a sense, that pressing the buttons will have effect on the serial output.
Now that I have a clear view of what's happening at the box I'd like to take this opportunity of describing the three buttons' behaviour:
- (device running normally) WiFi button pressed for over 1 second: WiFi on/off
- no surprises there, you can do this from Web-GUI too
- (device running normally) Reset button pressed for over 2 seconds: Factory reset
- (device running normally) Reset button pressed for less than 2 seconds: no-operation
- (device running normally) WPS button pressed: on/off
- no surprises there, you can do this from Web-GUI too
- (device running normally) WiFi and WPS buttons pressed: no special functionality, will toggle WiFi and WPS as they would be pressed separately
- (device running normally) WiFi, Reset, WPS buttons pressed: no special functionality
- (device not powered) WiFi button pressed while powering on: baseband (VxWorks) serial console displays Android console briefly and stops
- Linux-side serial console will be completely silent
- (device not powered) WPS button pressed while powering on: no-operation
- (device not powered) Reset button pressed while powering on: no-operation
- (device not powered) WiFi and WPS buttons pressed while powering on: enter bootloader menu
- (device not powered) WiFi, Reset and WPS buttons pressed while powering on: enter bootloader menu
If you have other suggestions about the buttons, please drop me a comment.
Fixing Yleisradio (The Finnish Broadcasting Company) HTTP proxy Fail
Monday, March 23. 2015
When it comes to unlimited supply of failures, one of my absolute favorites is YLE. Whatever they try, they seem to fail at it.
They have stumbled with their on-line service (Areena) a number of times. It took them years and years, but recently it has been at level, semi-decent service, no major failures, works even on iPad.
As they are having an uphill fight with piracy and people not obeying the country limitations they are forced by distribution agreements, they did the only sensible thing anybody can do: if you're using a HTTP proxy, then you're out! The only natural ruling can be that anybody using a proxy is accessing their service from abroad.
Like this:

The license of this radio show says that they will apply geo IP restrictions to it to limit audience in Finland only "( Kuunneltavissa vain Suomessa )". It will result in sorry-you're-not-in-Finland ("Ohjelma ei ole kuunneltavissa ulkomailla") and a refusal to play. However I am in Finland, I should be allowed access to that.
These guys are known for their inability to think smart. It is impossible to know if somebody abroad is using a Finnish proxy or not. The only possible detection method is checking for X-Forwarded-For HTTP-header.
That should be an easy fix. Let's see:
# host areena.yle.fi
areena.yle.fi has address 91.229.138.2

areena.yle.fi has address 91.229.138.6
Whois information for their IP-block is:
% Information related to '91.229.138.0/23AS57066'


route: 91.229.138.0/23

descr: Yleisradio Oy

origin: AS57066

mnt-by: DATANET-NOC

source: RIPE # Filtered
Adding this to /etc/squid/squid.conf:
# Forwarded-for -stuff off for YLE

acl yle_areena dst 91.229.138.0/23

request_header_access X-Forwarded-For deny yle_areena
... and restart will do the trick! Squid-proxy fully supports this kind of behavior with acl and request_header_access -directives. Now YLE-people are blissfully ignorant about you using a proxy or not.
Update 24th Mar 2015 and 1st Jan 2016:
Also MTV katsomo.fi has gone for this stupidity. The fix is obviously:
acl mtv_katsomo dst 23.54.11.0/24 # Katsomo.fi (Akamai)

acl akamai      dst 23.32.0.0/11  # Akamai


request_header_access X-Forwarded-For deny mtv_katsomo

request_header_access X-Forwarded-For deny akamai
Now they allow you to watch via proxy.
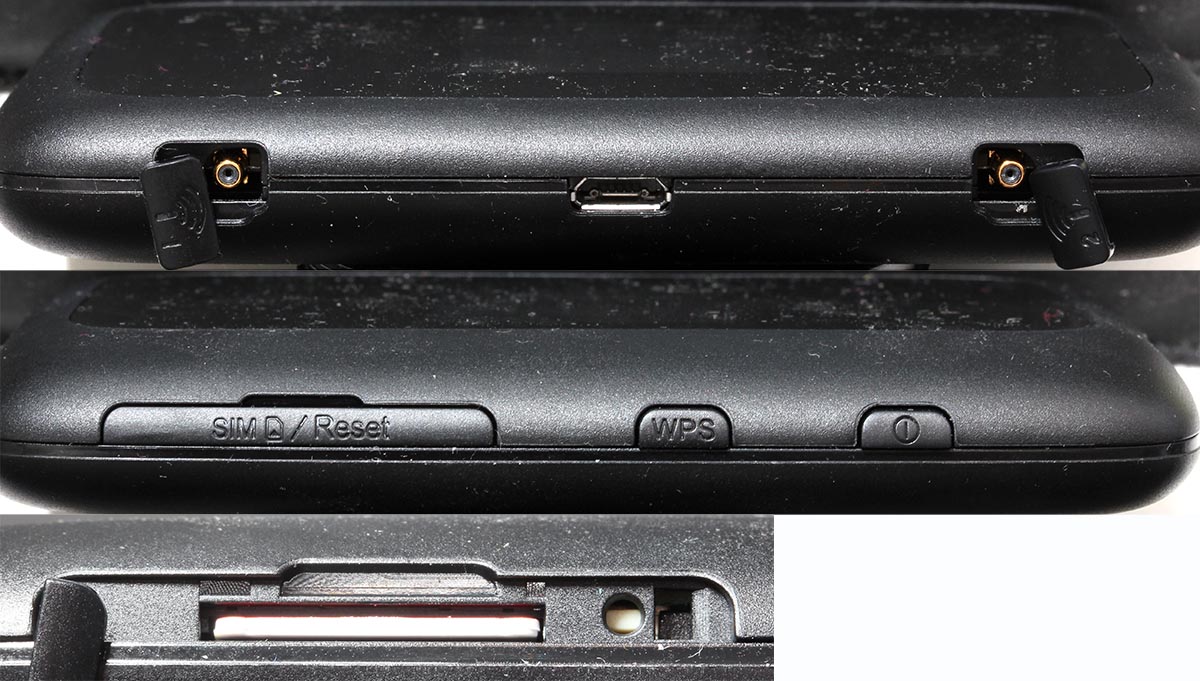
Huawei B593 s-22 RS-232 pins
Thursday, March 19. 2015
As I told earlier, I bricked one. It was a loaned one, so I really got burned on that. There was not much to do, but pop the hood of the s-22 and hope to find something interesting there. An interesting thing would be serial console (RS-232) or JTAG.
Here goes:
There are 3 Phillips PH-2 screws holding the unit together. One screw always has a thin paper on top of it. It is a "Huawei-thing". If the paper is broken, it will void your warranty. Remove the 3 screws, and you can pry the box open:
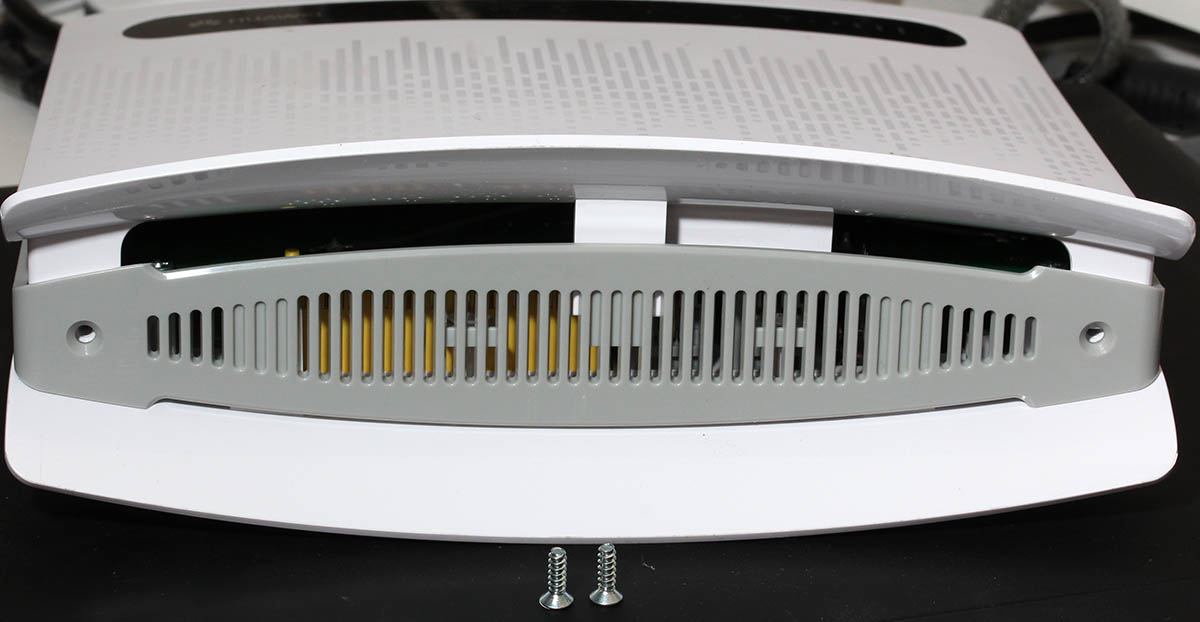
Then the front cover is gone, you have the wrong side of the motherboard in front of you. You need to detach the MoBo from the back cover. There are 4 Phillips PH-2 screws holding it:
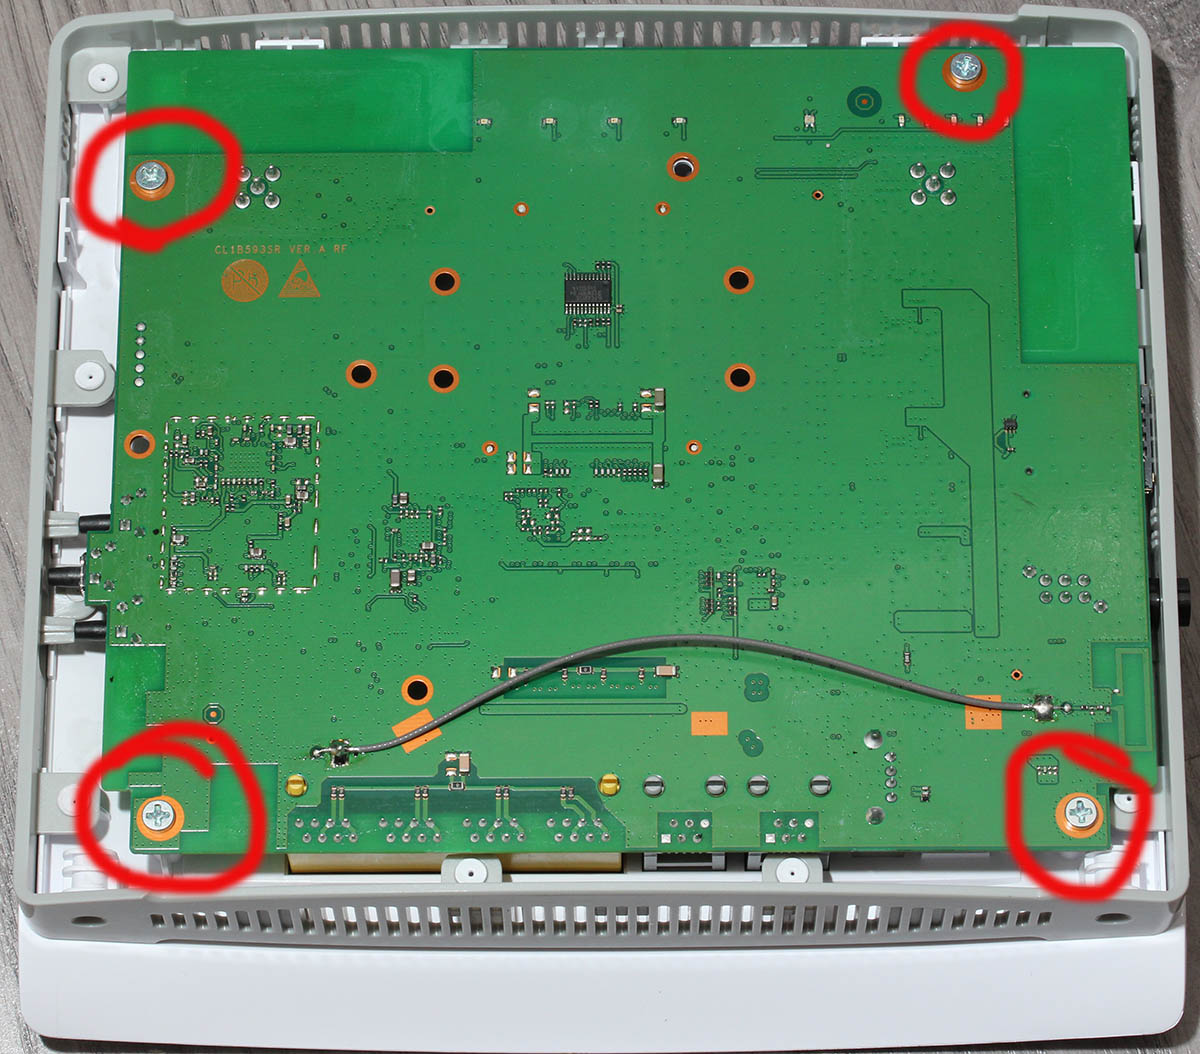
Now you're seeing the real thing:
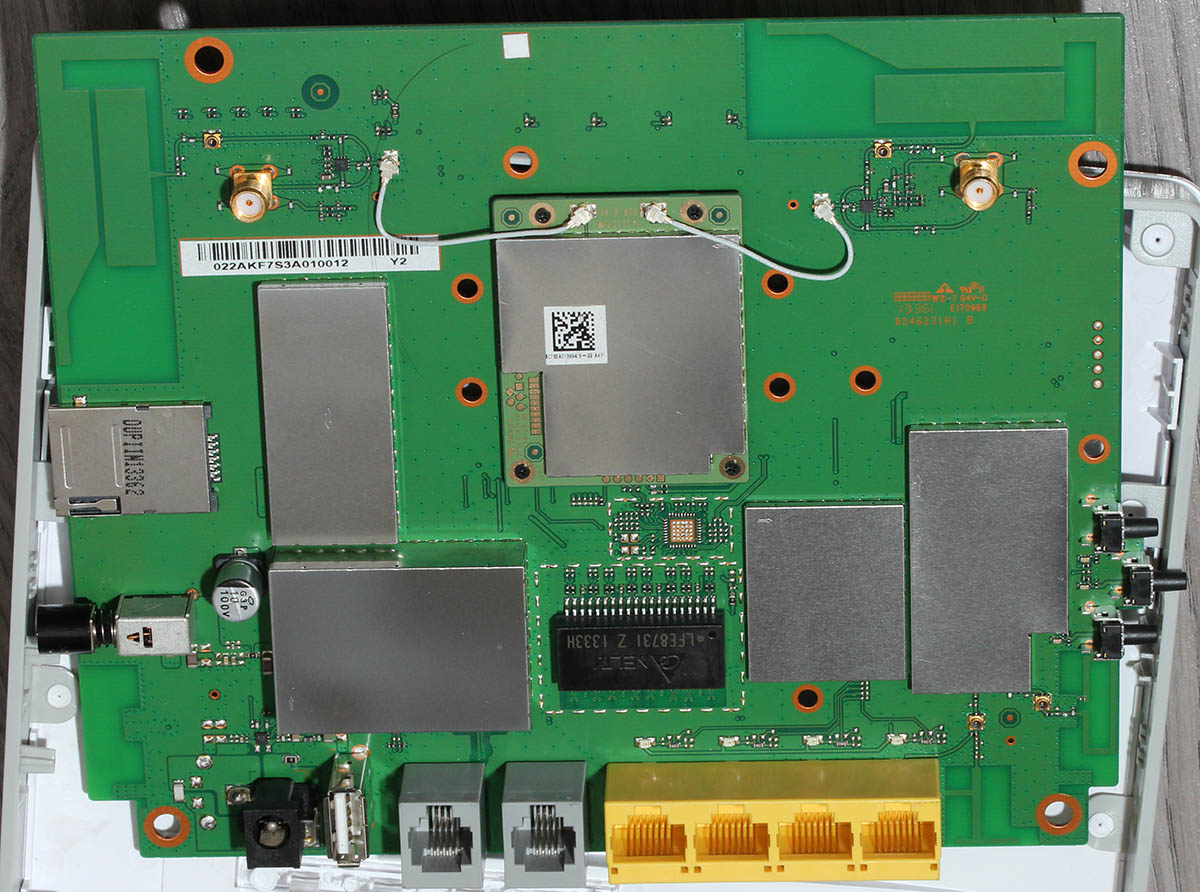
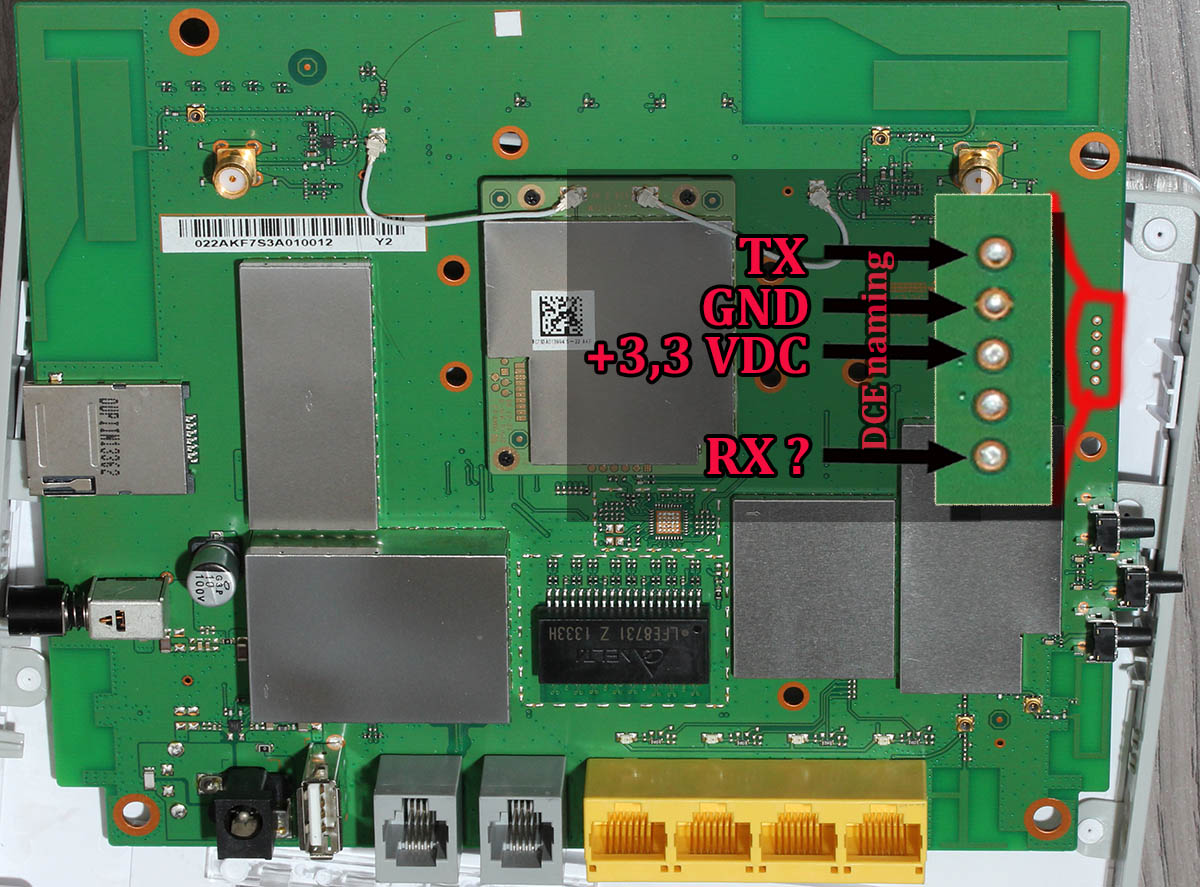
Here is a layout of all the good stuff:
Mr. Asiantuntijakaveri gave me a hint to check couple pins near the CPU for serial signal. I attached an oscilloscope into couple of interesting pins and got following:

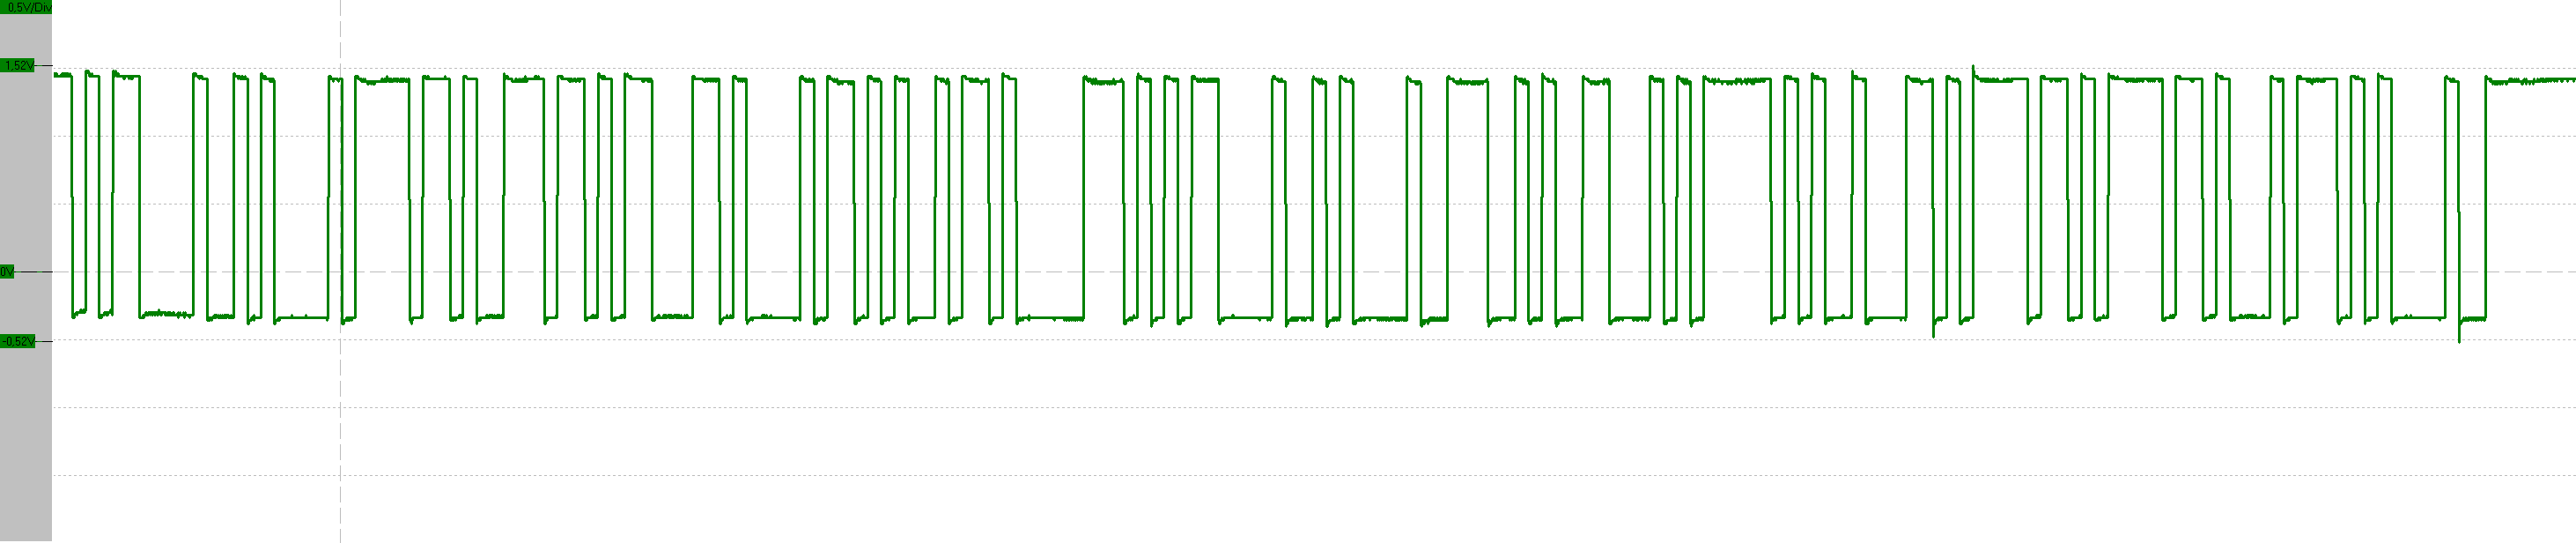
Definitely an RS-232 signal. Based on the timings, looks like 115200 bps. Just as in B593 u-12. The only thing was about the voltage. My scope said 1,792 volts peak-to-peak. That's way too low for my 3,3 volt TTL to RS-232 converter. I put in a purchase order for more capable (expensive) adapter and eventually UPS-guy brought it to me:
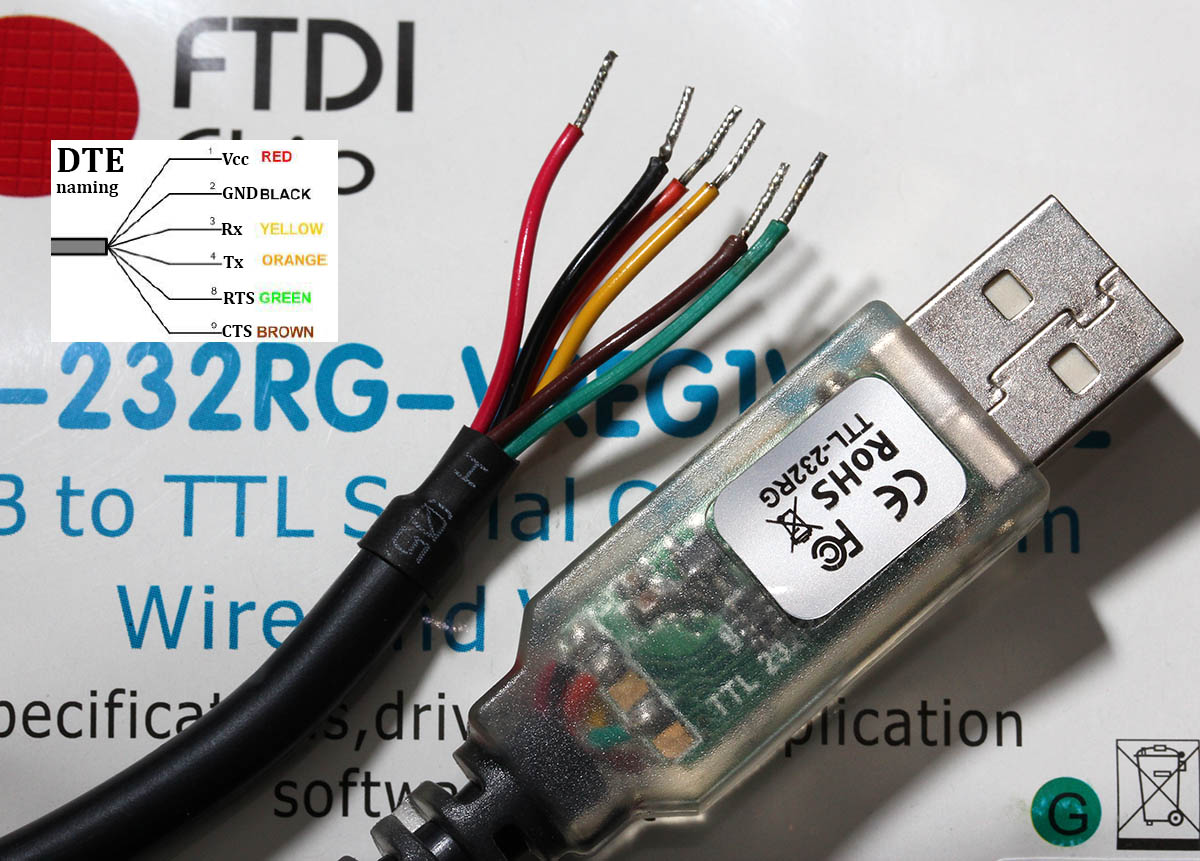
The one I have is Future Technology Devices International TTL-232RG, TTL-232RG-VREG1V8-WE to be specific. Their spec says: VREG1V8 = USB to UART cable with +5 to +1.8V TTL level UART signals and WE = wire end. A Linux sees it as a Bus 005 Device 004: ID 0403:6001 Future Technology Devices International, Ltd FT232 USB-Serial (UART) IC. It is fully working after plugging in both on a Linux and Windows 7.
I put this into a PuTTY (115200 N81, no flow control):
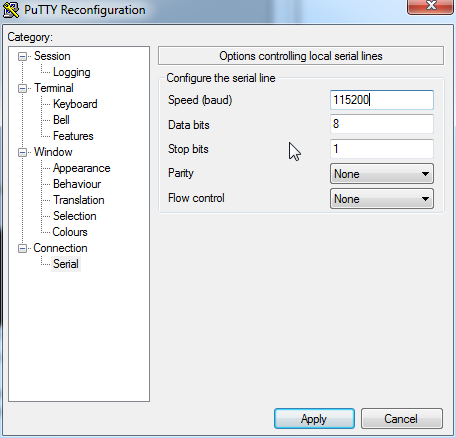
And yes, there are results:
onchip
NF_boot!
UnSec_boo
v?l?space?%s start addr:0x%x size:0x%x
first step
          second step
                     thred step
                               DDR exam right !!!!!!!!!!!!!!!!!!!!!!!

press space key to enter bootrom:
Start from: vxWorks Kernel.
>>loading: VxWorks ... success.
>>loading: FastBoot ... success.

hw main id:00000400, sub id:00000001activate_fastboot...0x3CD00000
Starting from entry: 0x30004000
That's it no more. Not very useful. Then Mr. Asiantuntijakaveri gave me another hint. Try the three-finger-salute, press WiFi, Reset and WPS buttons and then kick on the power. An u-12 will go to some sort of serial-console service mode. And yes, a s-22 does the same. All I have to do is have all three buttons pressed, kick the power on and immediately release all them. Now I have on serial:
first step
second step
thred step
DDR exam right !!!!!!!!!!!!!!!!!!!!!!!

press space key to enter bootrom:
enter load backup
IMAGE_BOOTROM load from:0x00340000>>loading: BootRom ... try inflate.
image length: 000A412A
ram_inflate_addr: 34F4382E
inflating...
return value: 00000000
inflate success! data check OK!

hw main id:00000400, sub id:00000001Starting from entry: 0x300040Target Name: vxTarget

Adding 5472 symbols for standalone.


 ]]]]]]]]]]]]]]]]]]]]]]]]]]]]]]]]]]]]]]]]
 ]]]]]]]]]]]]]]]]]]]]]]]]]]]]]]]]]]]]]]]
 ]]]]]]]]]]]]]]]]]]]]]]]]]]]]]]]]]]]]]]
      ]]]]]]]]]]]  ]]]]     ]]]]]]]]]]       ]]              ]]]]         (R)
 ]     ]]]]]]]]]  ]]]]]]     ]]]]]]]]       ]]               ]]]]
 ]]     ]]]]]]]  ]]]]]]]]     ]]]]]] ]     ]]                ]]]]
 ]]]     ]]]]] ]    ]]]  ]     ]]]] ]]]   ]]]]]]]]]  ]]]] ]] ]]]]  ]]   ]]]]]
 ]]]]     ]]]  ]]    ]  ]]]     ]] ]]]]] ]]]]]]   ]] ]]]]]]] ]]]] ]]   ]]]]
 ]]]]]     ]  ]]]]     ]]]]]      ]]]]]]]] ]]]]   ]] ]]]]    ]]]]]]]    ]]]]
 ]]]]]]      ]]]]]     ]]]]]]    ]  ]]]]]  ]]]]   ]] ]]]]    ]]]]]]]]    ]]]]
 ]]]]]]]    ]]]]]  ]    ]]]]]]  ]    ]]]   ]]]]   ]] ]]]]    ]]]] ]]]]    ]]]]
 ]]]]]]]]  ]]]]]  ]]]    ]]]]]]]      ]     ]]]]]]]  ]]]]    ]]]]  ]]]] ]]]]]
 ]]]]]]]]]]]]]]]]]]]]]]]]]]]]]]
 ]]]]]]]]]]]]]]]]]]]]]]]]]]]]]       Development System
 ]]]]]]]]]]]]]]]]]]]]]]]]]]]]
 ]]]]]]]]]]]]]]]]]]]]]]]]]]]       VxWorks 6.8
 ]]]]]]]]]]]]]]]]]]]]]]]]]]       KERNEL: WIND version 2.13
 ]]]]]]]]]]]]]]]]]]]]]]]]]       Copyright Wind River Systems, Inc., 1984-2009

 CPU: ARM RealView PBX-A9.  Processor #0.
 Memory Size: 0x4efa000.  BSP version 2.0/0.
 Created: Jun 03 2013, 13:52:34
 ED&R Policy Mode: Deployed

-> GU base addr: 0x3e200000
HIFI base addr: 0x3f800000
===== beg mem usr function =====
Hisilicon NANDC_V4.00 initialize...

NAND device: Manufacturer ID: 0xad, Chip ID: 0xbc (Hynix NAND 512MiB 1,8V 16-bit)
ptable_yaffs_mount: /yaffs0 ...yaffs: Mounting /yaffs0
yaffs: yaffs_GutsInitialise()
yaffs: yaffs_GutsInitialise() done.

OK.

ptable_yaffs_mount: /yaffs1 ...yaffs: Mounting /yaffs1
yaffs: yaffs_GutsInitialise()
yaffs: yaffs_GutsInitialise() done.

OK.

ptable_yaffs_mount: /yaffs2 ...yaffs: Mounting /yaffs2
yaffs: yaffs_GutsInitialise()
Collecting block 1136, in use 39, shrink 0, wholeBlock 0
Collecting block 1136, in use 34, shrink 0, wholeBlock 0
Collecting block 1136, in use 29, shrink 0, wholeBlock 0
Collecting block 1136, in use 24, shrink 0, wholeBlock 0
Collecting block 1136, in use 19, shrink 0, wholeBlock 0
Collecting block 1136, in use 14, shrink 0, wholeBlock 0
Collecting block 1136, in use 9, shrink 0, wholeBlock 0
Collecting block 1136, in use 4, shrink 0, wholeBlock 0
yaffs: yaffs_GutsInitialise() done.

OK.

ptable_yaffs_mount: /yaffs5 ...yaffs: Mounting /yaffs5
yaffs: yaffs_GutsInitialise()
yaffs: yaffs_GutsInitialise() done.

OK.

Collecting block 301, in use 34, shrink 0, wholeBlock 0
Collecting block 301, in use 29, shrink 0, wholeBlock 1
0x34ef9d7c (tRootTask): PMU PWR IRQ1 : 0x0

0x34ef9d7c (tRootTask): PMU PWR IRQ2 : 0x20

0x34ef9d7c (tRootTask): PMU PWR IRQ3 : 0x0

0x34ef9d7c (tRootTask): PMU REG IRQ1 : 0x0

0x34ef9d7c (tRootTask): PMU REG IRQ2 : 0x20

0x34ef9d7c (tRootTask): PMU REG IRQ3 : 0x0

0x34ef9d7c (tRootTask): PMU REG H_N_STATUS(0x43)  : 0x0

0x34ef9d7c (tRootTask): PMU REG H_N_STATUS(0x44)  : 0x0

0x34ef9d7c (tRootTask): PMU FLAG REG 0x4  : 0x0

0x34ef9d7c (tRootTask): PMU FLAG REG 0x5  : 0x0

0x34ef9d7c (tRootTask): PMU FLAG REG 0x6  : 0x0

0x34ef9d7c (tRootTask): PMU FLAG REG 0x7  : 0x5

0x34ef9d7c (tRootTask): PMU FLAG REG 0x8  : 0x0

0x34ef9d7c (tRootTask): hw main id:0x400, sub id:0x1
0x34ef9d7c (tRootTask): PMU NVM_Read ERROR.
0x34ef9d7c (tRootTask): getFactoryMode:not in factory mode!
0x34ef9d7c (tRootTask): BootRom update_getWebUIUpdateFlag: 0x8B6A7024
0x34ef9d7c (tRootTask): dloadIsDoBackupUpdate: need to do the backup update!
0x34ef9d7c (tRootTask): getBackupBinState: open file failed!
0x34ef9d7c (): task deadexcutePreBackupUpdate: the backup bin is invalid!
0x34ef9d7c (): task deadclearBkupUpdateFlag: succeed to clear the backup update flag!
0x303c32f0 (tUSBTask): BSP_USB_GetDevDescIdx: MDM+PCUI+DIAG in Bootrom image

0x303c32f0 (tUSBTask): Starting USBware stack, Version 3.4.30.21
Oh yes! I was getting somewhere. On an enter I got a prompt and threw in some commands:
[M]->?
C interp: syntax error.
[M]->help

help                           Print this list
dbgHelp                        Print debugger help info
edrHelp                        Print ED&R help info
ioHelp                         Print I/O utilities help info
nfsHelp                        Print nfs help info
netHelp                        Print network help info
rtpHelp                        Print process help info
spyHelp                        Print task histogrammer help info
timexHelp                      Print execution timer help info
h         [n]                  Print (or set) shell history
i         [task]               Summary of tasks' TCBs
ti        task                 Complete info on TCB for task
sp        adr,args...          Spawn a task, pri=100, opt=0x19, stk=20000
taskSpawn name,pri,opt,stk,adr,args... Spawn a task
tip       "dev=device1#tag=tagStr1", "dev=device2#tag=tagStr2", ...
                               Connect to one or multiple serial lines
td        task                 Delete a task
ts        task                 Suspend a task
tr        task                 Resume a task

Type  to continue, Q or q to stop:

tw        task                 Print pending task detailed info
w         [task]               Print pending task info
d         [adr[,nunits[,width]]] Display memory
m         adr[,width]          Modify memory
mRegs     [reg[,task]]         Modify a task's registers interactively
pc        [task]               Return task's program counter
iam       "user"[,"passwd"]    Set user name and passwd
whoami                         Print user name
devs                           List devices
ld        [syms[,noAbort][,"name"]] Load stdin, or file, into memory
                               (syms = add symbols to table:
                               -1 = none, 0 = globals, 1 = all)
lkup      ["substr"]           List symbols in system symbol table
lkAddr    address              List symbol table entries near address
checkStack  [task]             List task stack sizes and usage
printErrno  value              Print the name of a status value
period    secs,adr,args...     Spawn task to call function periodically
repeat    n,adr,args...        Spawn task to call function n times (0=forever)
version                        Print VxWorks version info, and boot line
shConfig  ["config"]           Display or set shell configuration variables

Type  to continue, Q or q to stop:
strFree   [address]            Free strings allocated within the shell (-1=all)

NOTE:  Arguments specifying 'task' can be either task ID or name.

value = 10 = 0xa
[M]->
I don't yet know what to do with all that, but ... if I do, I'll tell about it. The part "press space key to enter bootrom" sounds interesting. I don't know if I can un-brick this thing from VxWorks-side.
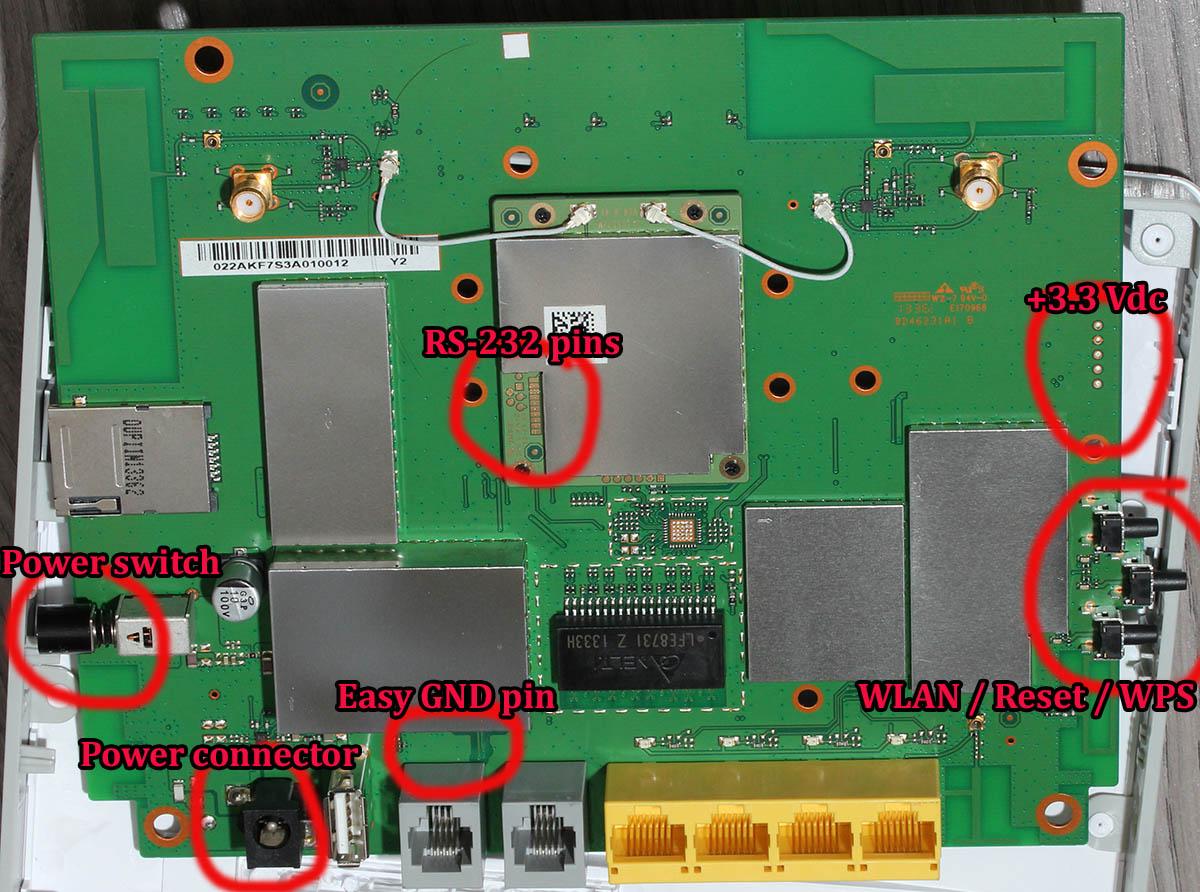
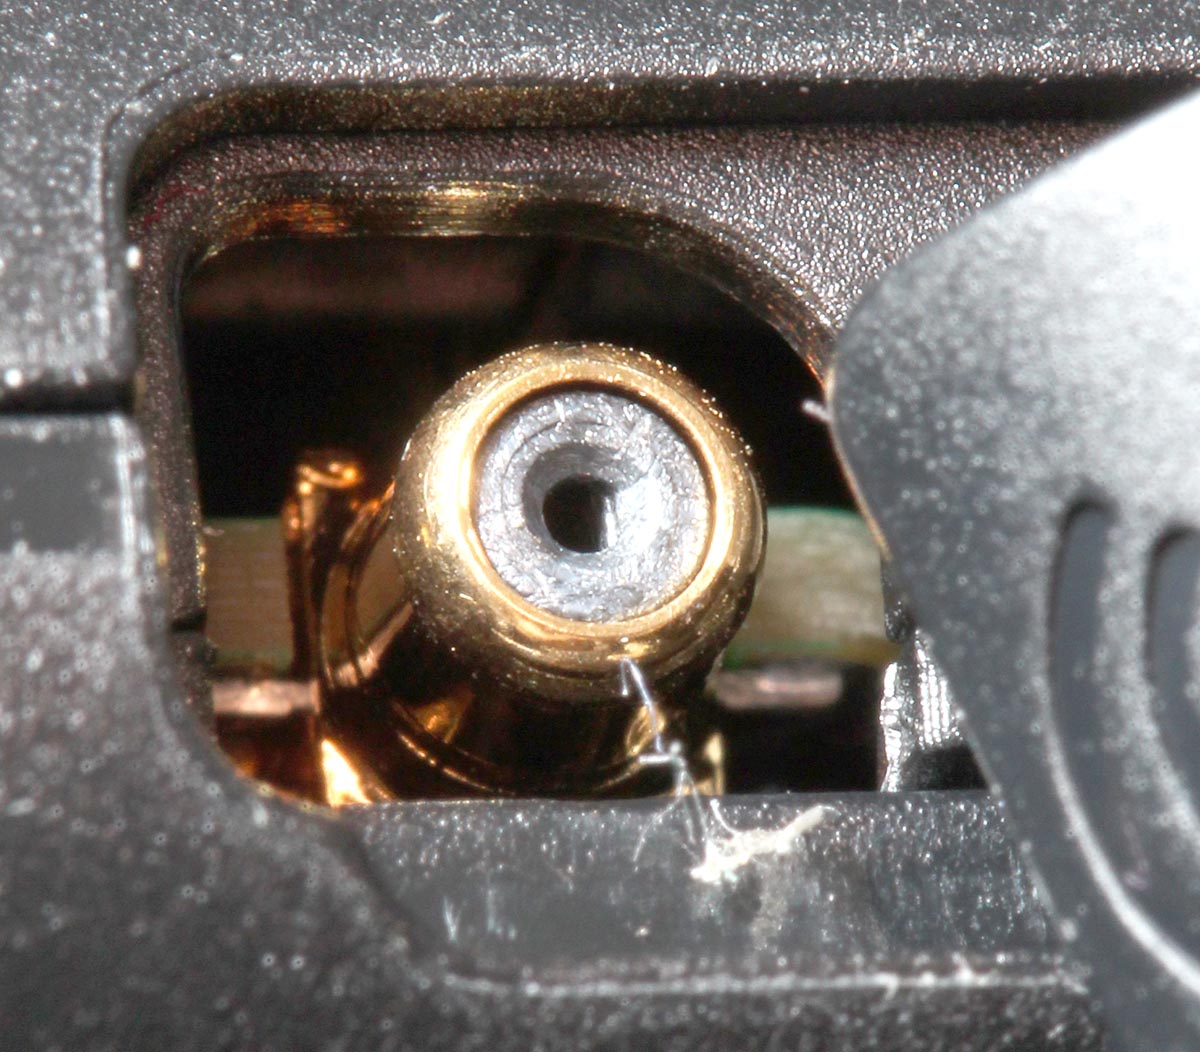
So, about the pins. First a ground is needed. Typically it's available almos everywhere. There are couple of easy points to get the ground from, especially in the PSU-area. Of all the easily available GND-pins I chose this one:
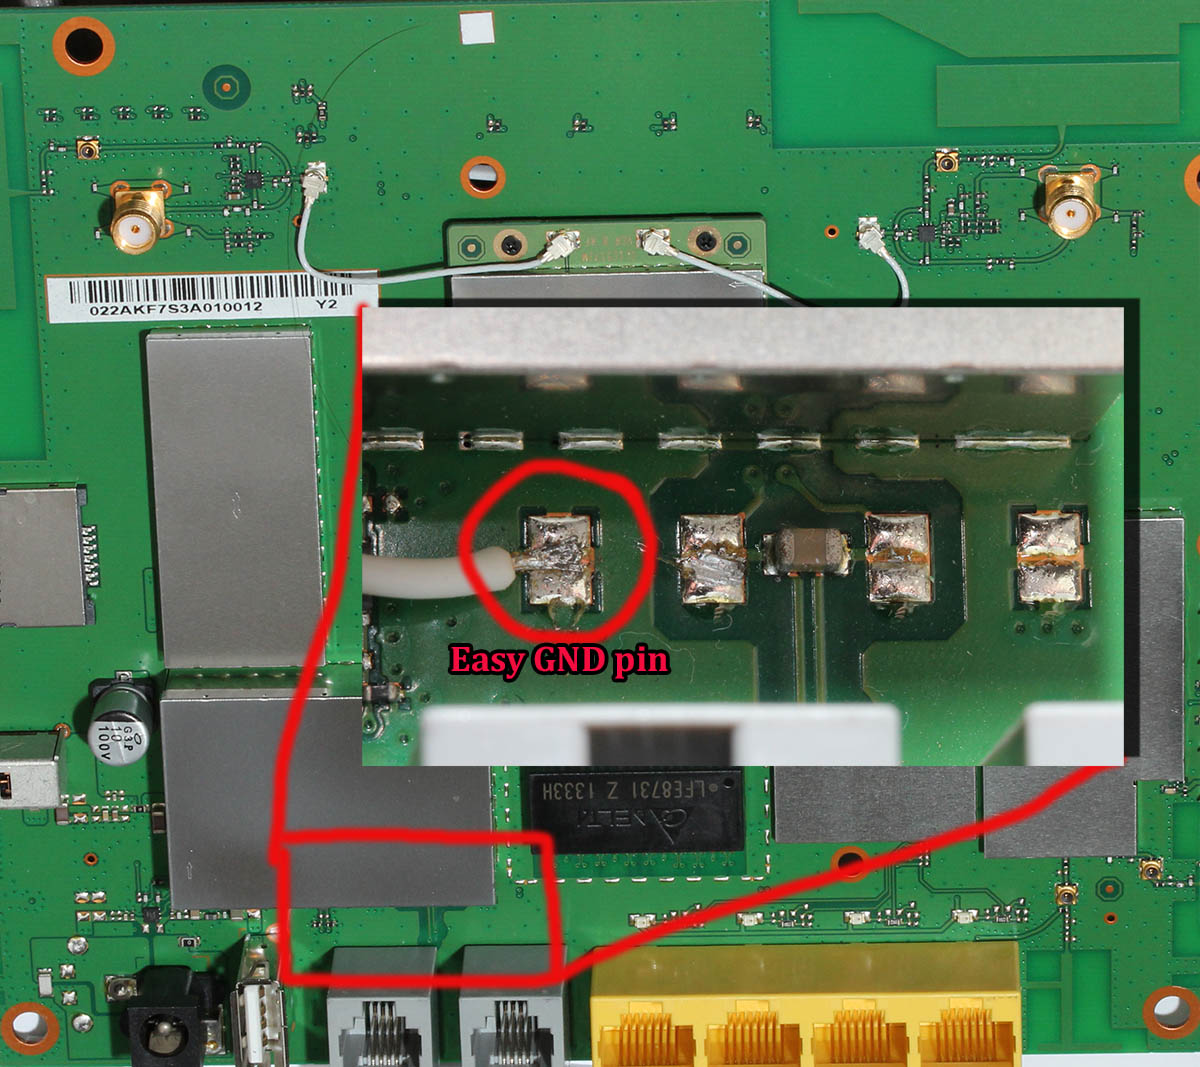
The choice was made by a simple logic, it was just an easy one to solder. Then the RS-232 DCE pins at the CPU-unit:
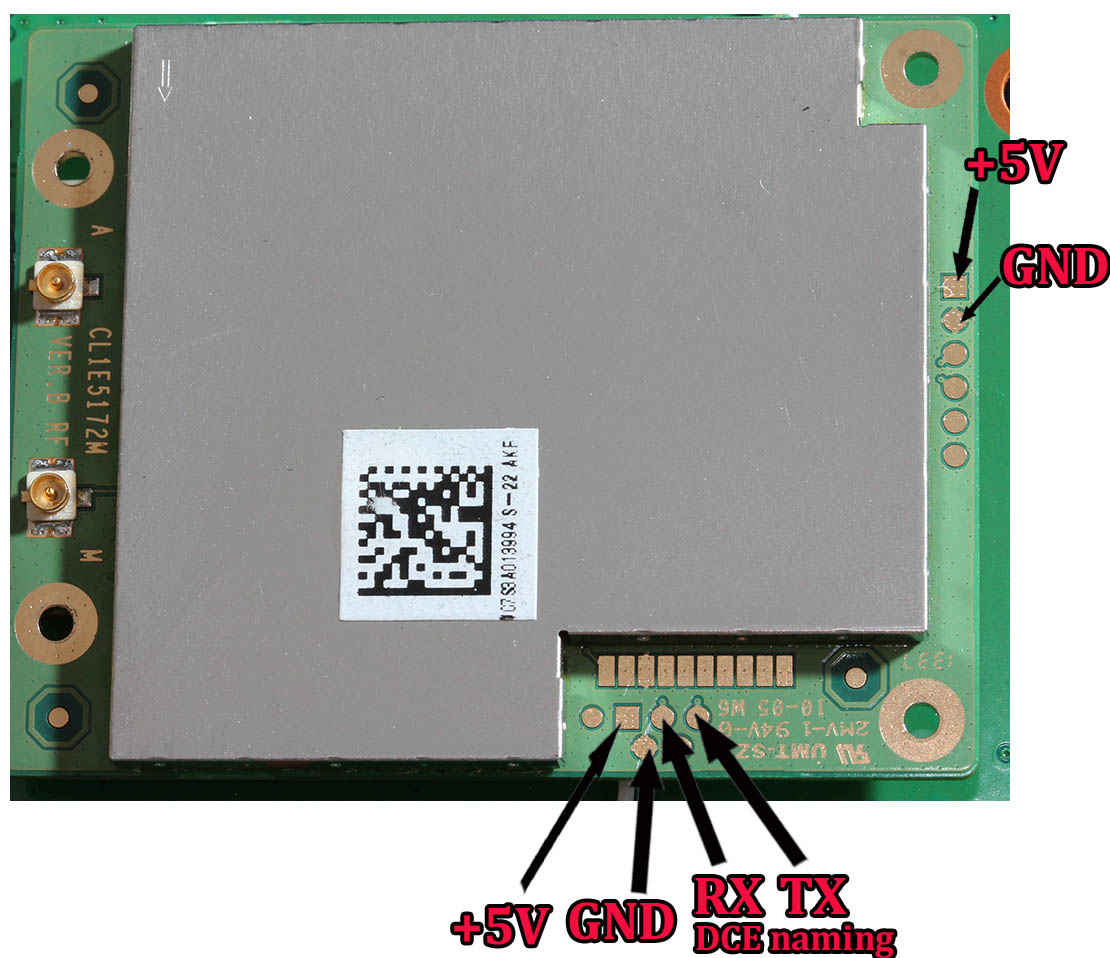
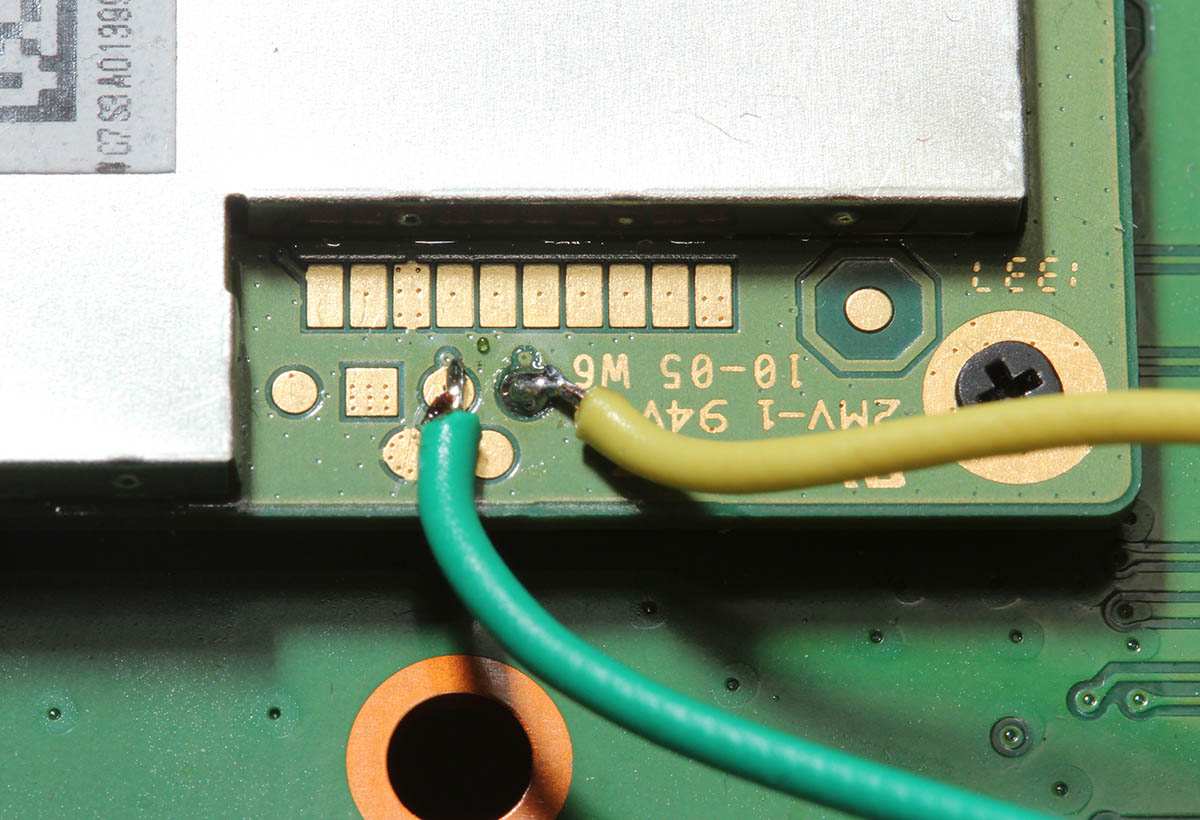
The metallic thing is simply a cover, the actual CPU is under that hood. I did check that one out, but I didn't find anything interesting under that one. Also understand about serial signals, that transmit and receive are from the point of the router (DCE), not from your computer (that would be DTE). You can think of it like this: when DCE transmits (TX), it will go to receive (RX) of a DTE.
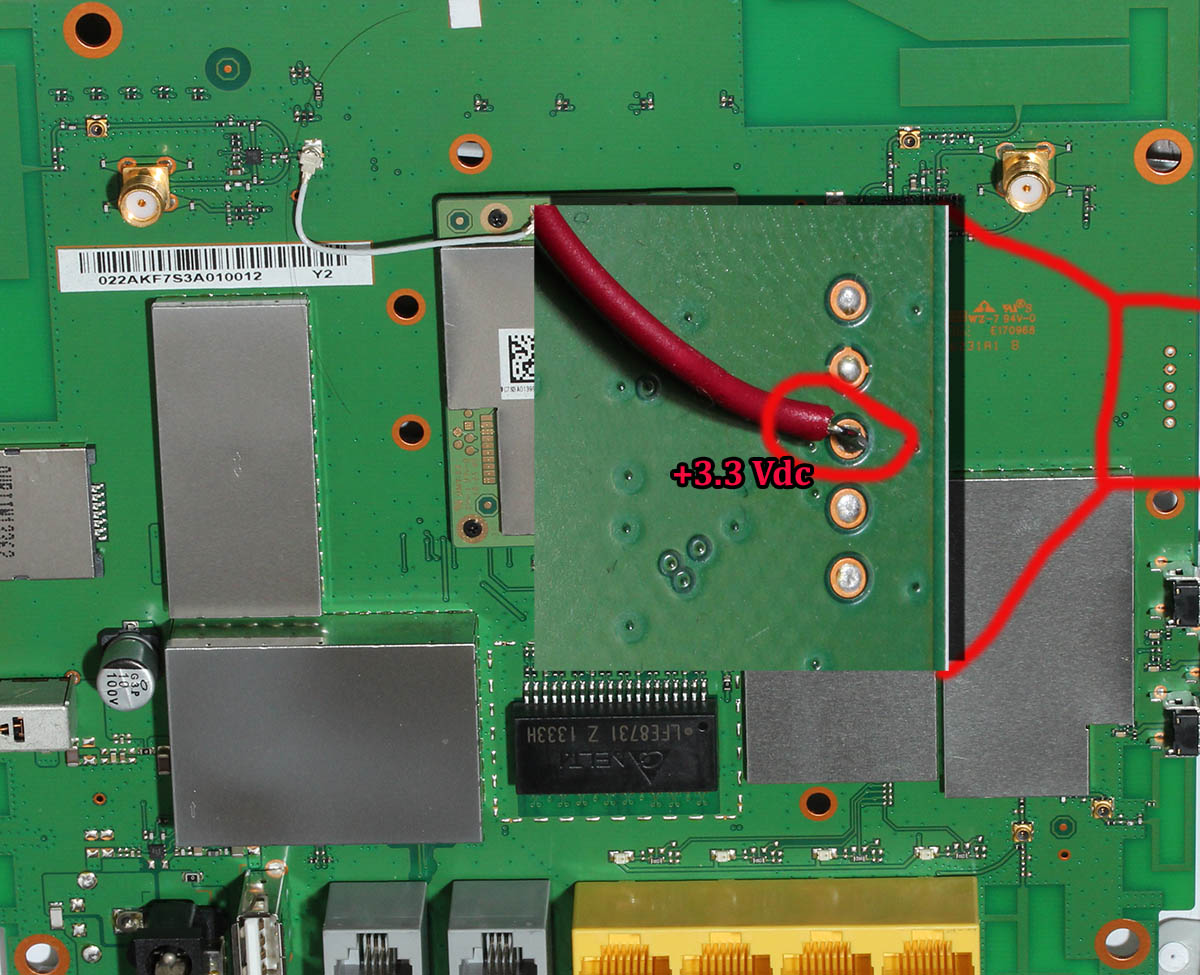
If you do your own hacks, know that the power system on a s-22 is weird one. Input is 12 VDC, majority of the Vcc pins have 5 VDC, but I seriously doubt that the system would run on that voltage. If you need it, there is one easily accessible pin with 3,3 VDC:
At the time of writing, the box is still bricked. But this time I have something to work with.
Update 24th Mar 2015:
There is more information available about this subject in this article.
Huawei E5186 AJAX API
Monday, March 16. 2015
Huawei E5186 (prototype) reviewed
Thursday, March 12. 2015
As I mentioned earlier, a reader of this blog got a Huawei E5186 and I got to test drive it. The model is still in prototype and the semi-official rumour is, that it will be released Q2/2015. As usual, they are not sold directly by Huawei, but by telcos. The one I had was from Germany, T-mobile. The mobile side is pretty much same as in B593s-22, the exact model I had was in fact E5186s-22. Frequencies and modulations are: LTE FDD DD800/900/1800/2100/2600 and TDD 2600. It is very likely, that inside the box is a HiSilicon Android running on a ARM-chip.
It looks exactly like a B593. Here are the pics:
The first things I noticed, that the Tel1 and Tel2 RJ-11 connectors are missing. Also: no USB!! What! I found information from discussion boards, that this particular T-Mobile version is a "poor man's model". There does exist other E5186 models, which have USB and the Tel-connectors.
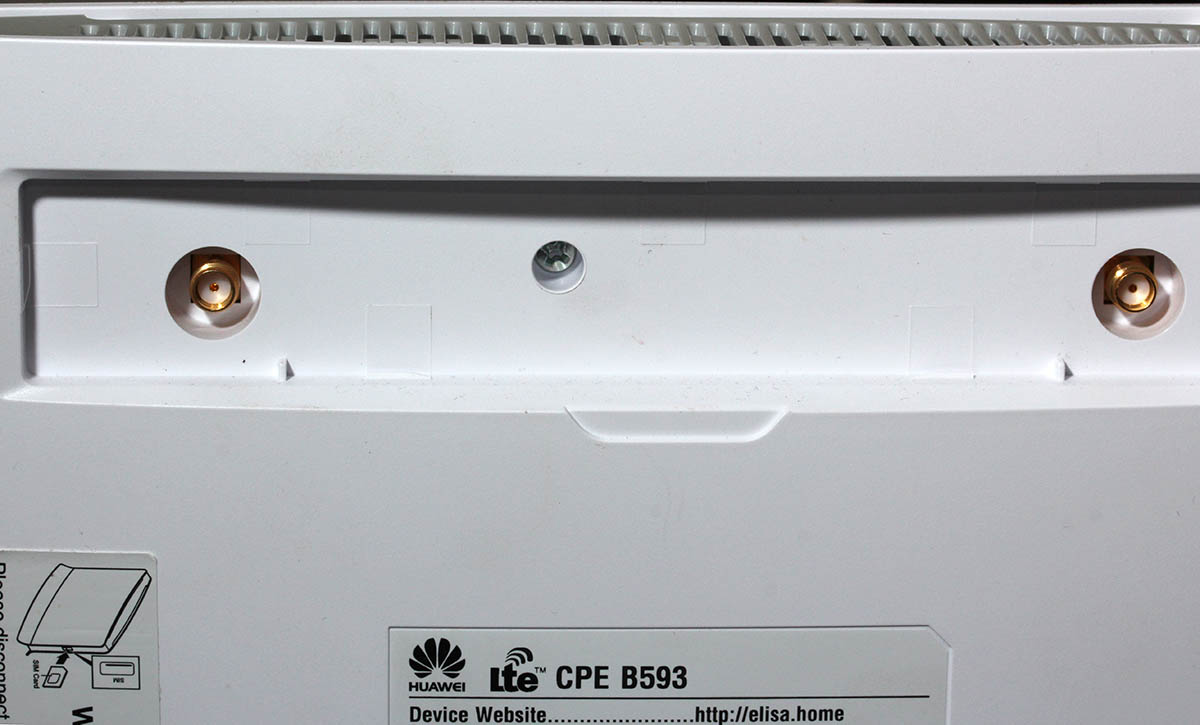
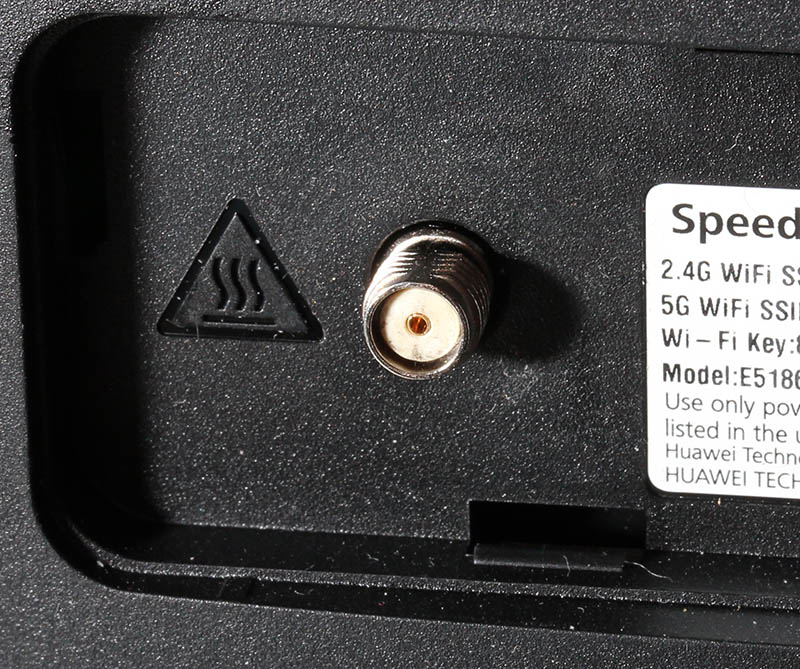
As a B593 has, there are dual antenna connectors and they are SMA:
For testing this router I didn't need external antennas, the RF-side is much more sensitive than in a B593. In a location where I normally have one bar (without external antenna), this one got three (out of five). Nice!
If you'd want to pop the hood, it opens like B593 does, from the bottom:
All Huawei-hardware has a thin paper on top of one screw. This is to indicate if that screw was removed to void any warranty. I didn't open it, it wasn't my own box.
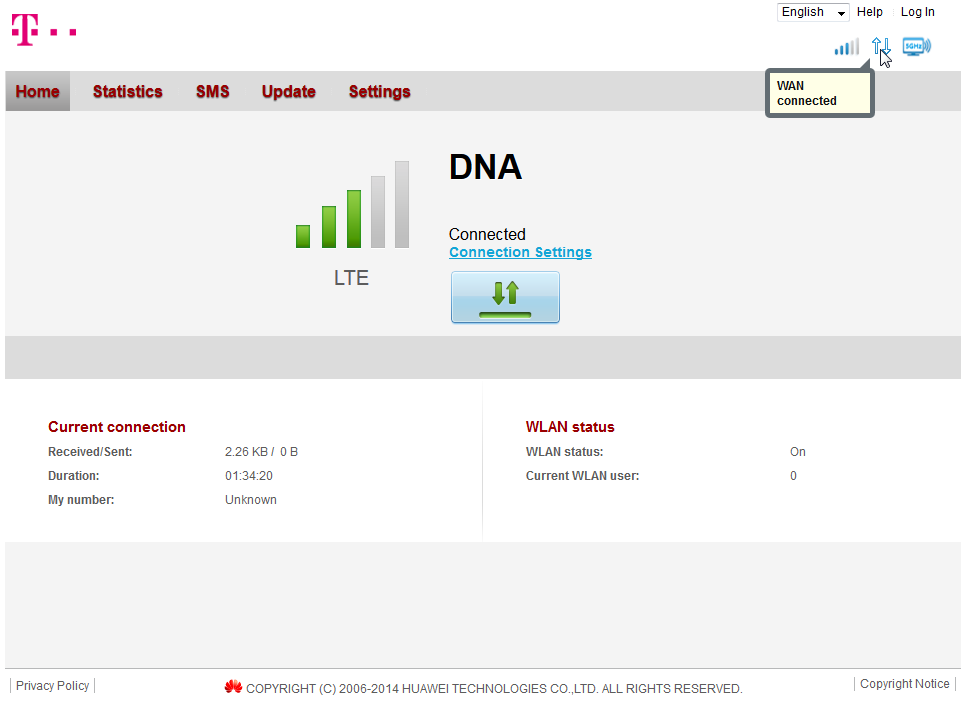
The web-GUI is completely new:
Everything looked brand new, so had to port-scan the thing:
PORT   STATE SERVICE
53/tcp open  domain
80/tcp open  http
MAC Address: 38:F8:89:03:1C:36 (Unknown)
What a surprise! Nothing there. Nothing! No SSH, no FTP, no Samba, no HTTPS. A B593 has plenty of ports open, but this beast is closed as a clam.
A cursory check on the HTML and JavaScript prooved, that entire front was re-written. B593 front has issues on security and functionality, this thing is entirely jQuery / AJAX -based thing. All the requests transfer XML. I was expecting JSON, but hey, it works. I guess there is something on back-end, which runs better on XML.
As the stripped-down hardware suggests, the web-GUI has very little options:
No real surprises there. The only thing, that really caught my eye, was the 5GHz WLAN which B593 doesn't have. There must be some new electronics inside.
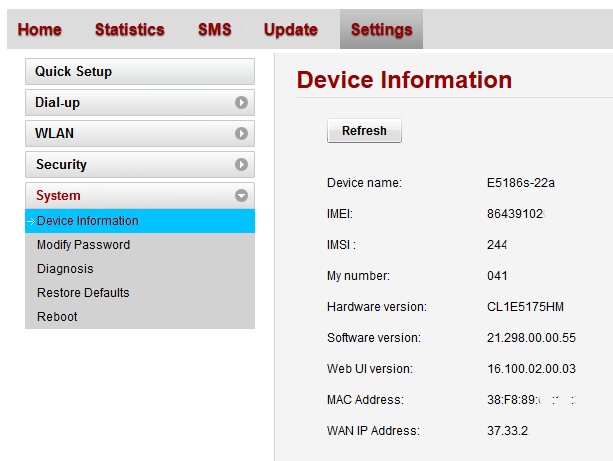
This is the device information screen:
As it happened, also Finnish magazine happened to review the E5186. I don't have a permission for reprint, but here is a small glimpse what they said:
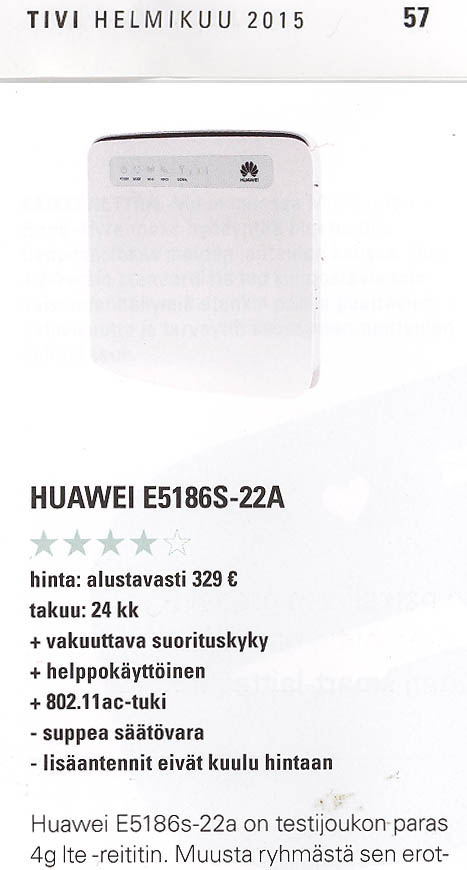
As a conclusion, the mag loved the box. I don't know which version they had, but this one without USB I don't especially love. It's too pricey without the port. Under the hood, the AJAX-API has a ton of features not available via your web browser. I'll get back to that subject later.
Finnish Pre-paid Data Plans reviewed
Saturday, March 7. 2015
SHA1 Certificates being used By Finnish financial organizations
Friday, March 6. 2015
I was browsing news feeds and read an article about Danske Bank not using SHA-256 certificate (article in Tivi, in Finnish only) in its online bank. "So what? Big deal, huh. Nobody else does either." was my instant thought. 15 seconds later ... but do they really? Let's investigate.
The reasoning about the article is, that Goole is Gradually sunsetting SHA-1. That is something they announced in September 2014, giving plenty of time for service admins to react. Google's Chrome will display HTTPS using less than SHA-256 signed certificate which is valid past 1st Jan 2017 like this:

Anbody, who takes your security seriously will be displayed like this:

The difference is with the green lock, or lack of it. Most users don't care about the lock anyway, so lot of fuss about nothing.
The bad
| Organization | URI | Expiry | Certificate signature | Certificate issuer | Intemediate certificate issuer(s) |
|---|---|---|---|---|---|
| Danske Bank | www.danskebank.fi | 2017-06-20 | SHA-1 | GMO GlobalSign | |
| OP-Pohjola | www.op.fi | 2015-12-12 | SHA-1 | Symantec | VeriSign |
| Nordea Pankki | solo1.nordea.fi | 2016-04-22 | SHA-1 | VeriSign | |
| Ålandsbanken | online.alandsbanken.fi | 2015-07-29 | SHA-1 | DigiCert | |
| POP Pankki | www.poppankki.fi | 2017-03-28 | SHA-1 | VeriSign | |
| Luottokunta (Nets) | dmp2.luottokunta.fi | 2016-03-03 | SHA-1 | VeriSign | |
| Paytrail | account.paytrail.com | 2015-05-15 | SHA-1 | VeriSign |
The good
| Organization | URI | Certificate signature | Certificate issuer | Intemediate certificate issuer(s) |
|---|---|---|---|---|
| S-Pankki | www.s-pankki.fi | SHA256 | Symantec Class 3 EV SSL CA - G3 (SHA256) |
VeriSign |
| Aktia Pankki | auth.aktia.fi | SHA256 | Symantec Class 3 EV SSL CA - G3 (SHA256) |
VeriSign |
| Säästöpankki | www4.saastopankki.fi | SHA256 | Symantec Class 3 EV SSL CA - G3 (SHA256) |
VeriSign |
| Handelsbanken | www4.handelsbanken.fi | SHA256 | Symantec Class 3 EV SSL CA - G3 (SHA256) |
VeriSign Class 3 Public Primary Certification Authority - G5 (SHA-1) |
The conclusion
Apparently somebody does.  As it happens, all the banks having SHA-256 certificates are from same source: Symantec/Verisign. However, most of the institutions haven't had the time to react. There is no point to finger point (pun intended) one of them.
The information was gathered with Gnu TLS command-line tool (gnutls-cli --print-cert).
ZTE MF910 Wireless Router reviewed
Sunday, March 1. 2015
I had a chance to setup a modern 4G/3G/2G router. Of course I took pics and share the details here!
This is what a ZTE MF910 looks like:

Pretty much the first thing that comes to my mind is: "It's a cell phone!" Yes, indeed. It is. It is an Android phone. My guess is, it is 99% of a cell phone when compared to an Android in your pocket. It is small, it has an USB-charger, runs hours from a battery. It is shiny (pretty difficult to get decent pictures of it). It has a display (no touching or anything expensive). And it costs 99,- €. There is very little differentiating it, except that it doesn't have a speaker and a microphone. I didn't pop the hood of it (that thing isn't mine, I was just helping to set it up), but I'm thinking it has all the chips and electronics a phone would have.
Screen will indicate connection type (2G/3G/4G), bars, Internet status (ok, both arrows up and down), Wi-Fi enabled, how many clients are connected to the Wi-Fi, battery charge level, operator name, cumulative time connected and the cumulative transmitted bytes.
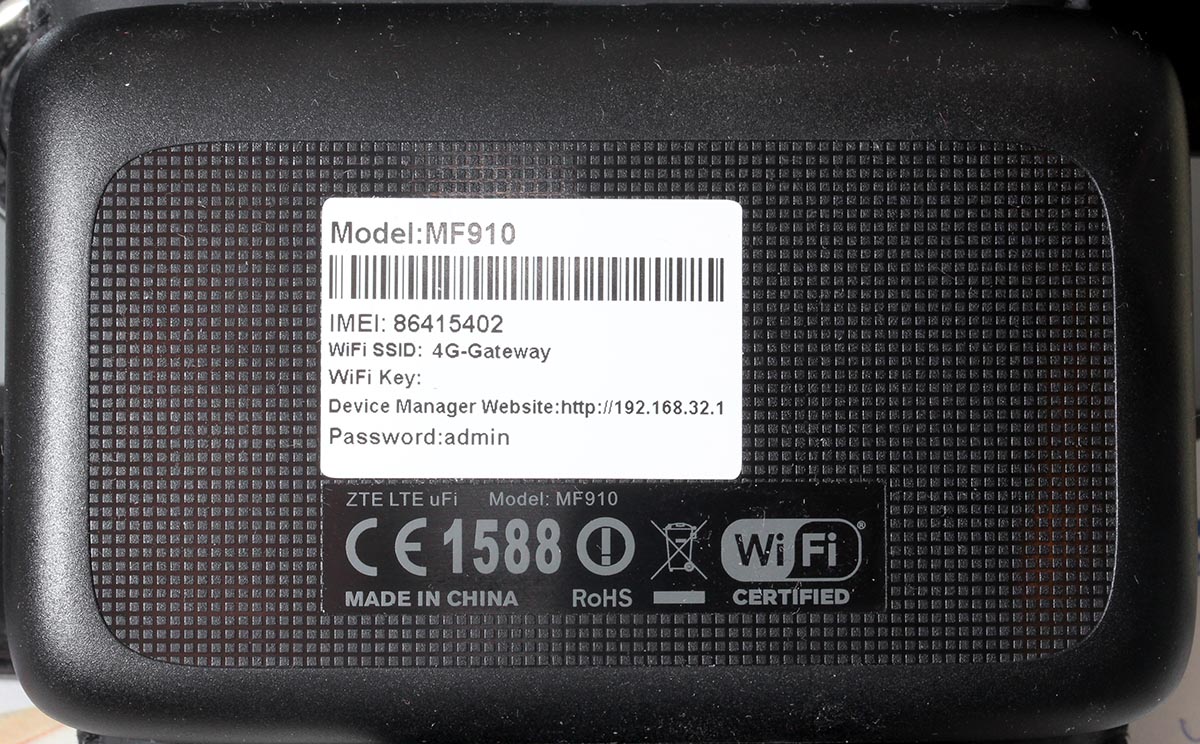
On the back there are out-of-the-box defaults and mandatory IMEI-information. The TAC-code for this one is 86415402 and I couldn't find it from any TAC databases. Must be quite a new one. What I didn't find is how to replace the battery. I guess you cannot, it is like a cell phone. It doesn't feel hot or anything when running, looks like the electronics design is also modern. It puts all the electrons where you'd expect them to go, not to dissipate heat.
Here is a clear difference to a phone:
There are two antenna connectors (TS9) on the sides. As all LTE equipment always has 2 antennas (your phone does, you just won't see them), there needs to be connectors for both of them. The intended purpose for this is to convert cellular connection into Wi-Fi. As sometimes the cell network connection is poor, adding a proper antenna (or two) can make a difference. Power button has one extra feature including the obvious one. If you press it shortly, it will display the default WLAN SSID and password on the screen. Funny thing: if you change them, the screen won't display the new ones. On the as-expected, there is a mini-SIM -slot and mini-A USB for the charger.
The antenna connector is a quirky one:
I couldn't find anything to connect to it. Any typical small appliance (like Huawei USB-sticks) have CRC9-connector, or the bigger routers (like Huawei B593) have SMA-connectors. I guess the new TS9 is suiting better for some reason.
When the SIM-card in inserted, power button pressed and box is up and running, it connects automatically to internet. It distributes an IP-address to any client devices and enables the management web-console. It looks like this:
There is a decent selection of langauges for the GUI:
And the top right corner status indicator is good one:

It provides a lot of information without need to login. This is what it looks like once in:
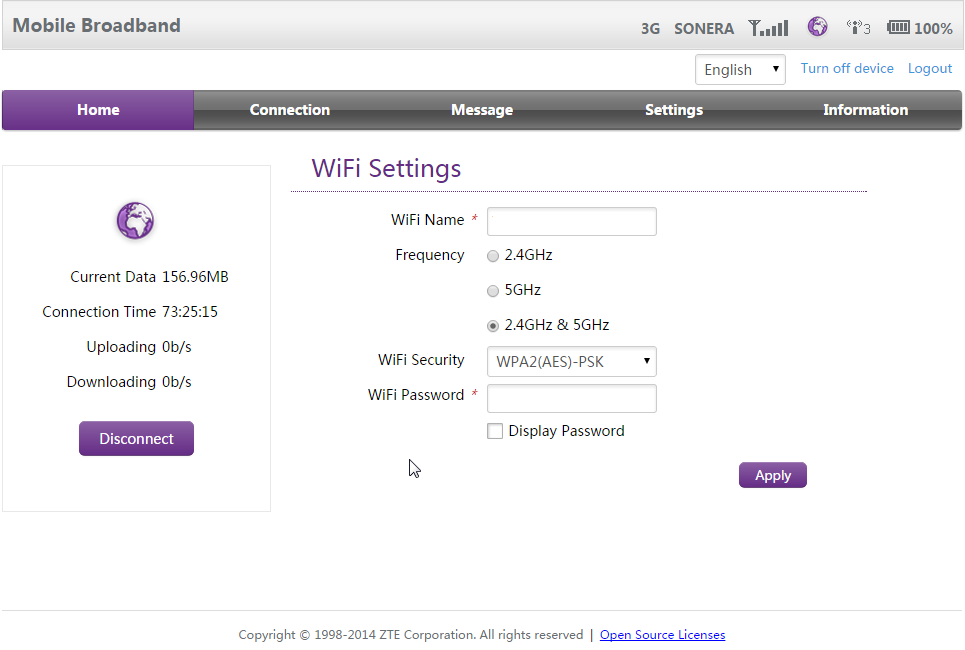
There is no need to look for Wi-Fi settings. They are right there after a login. In general I really love their approach, lot of useful features and really well thought web-GUI implemented. Also the existence of 5 GHz WLAN tells about a modern design. A while ago only 2,4 GHz existed in routers such as this.
The Internet connection details are:
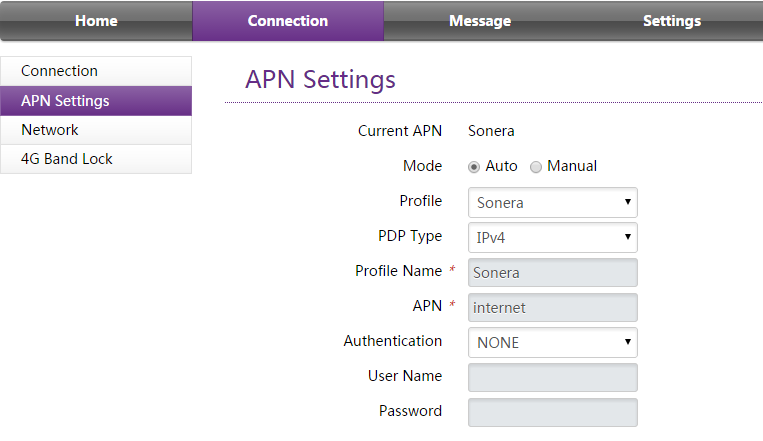
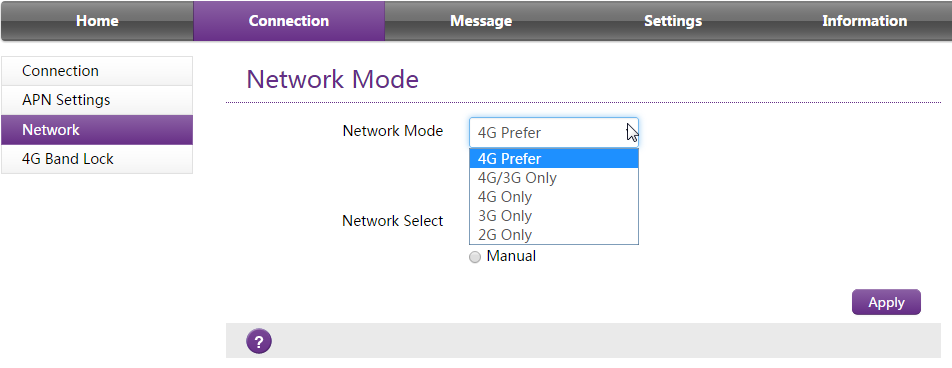
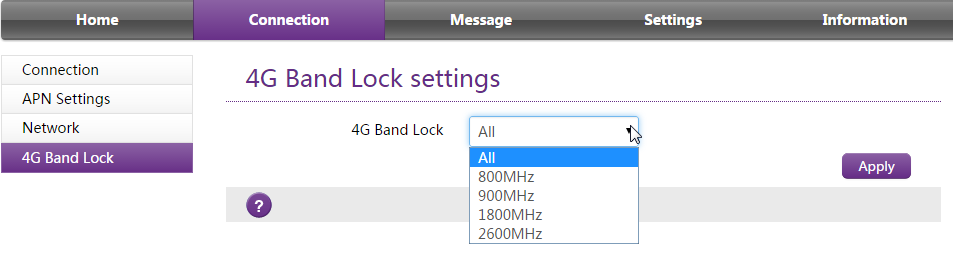
APN I didn't touch, it just worked. Network mode (2G/3G/4G) may be necessary if reception has issues. The most important thing is, that this box has a built-in freq lock in it. No need of hacking or any quirks. This is by far the most commonly asked question nowadays, how do you lock B593 into a frequency. With this el-cheapo box, setting is right there! Nice.
I also love the status screens:
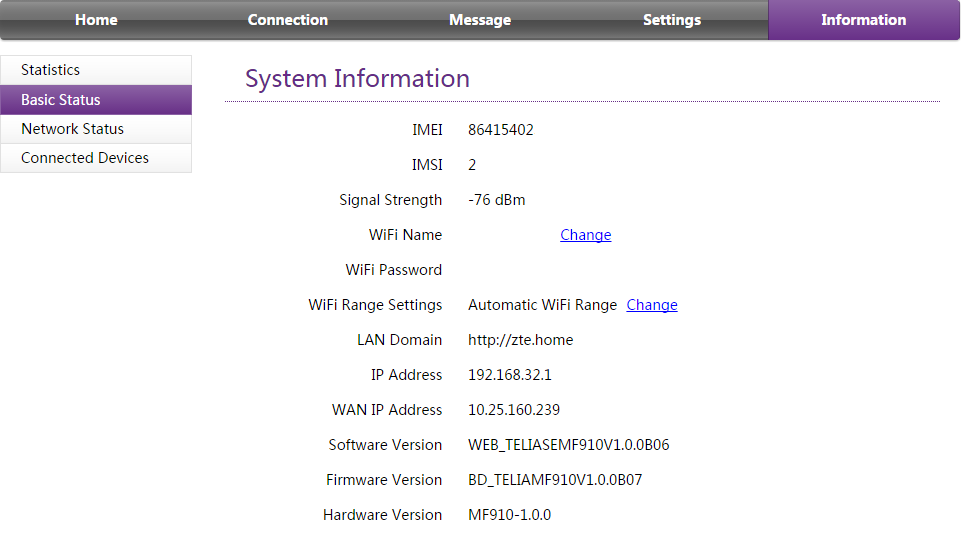
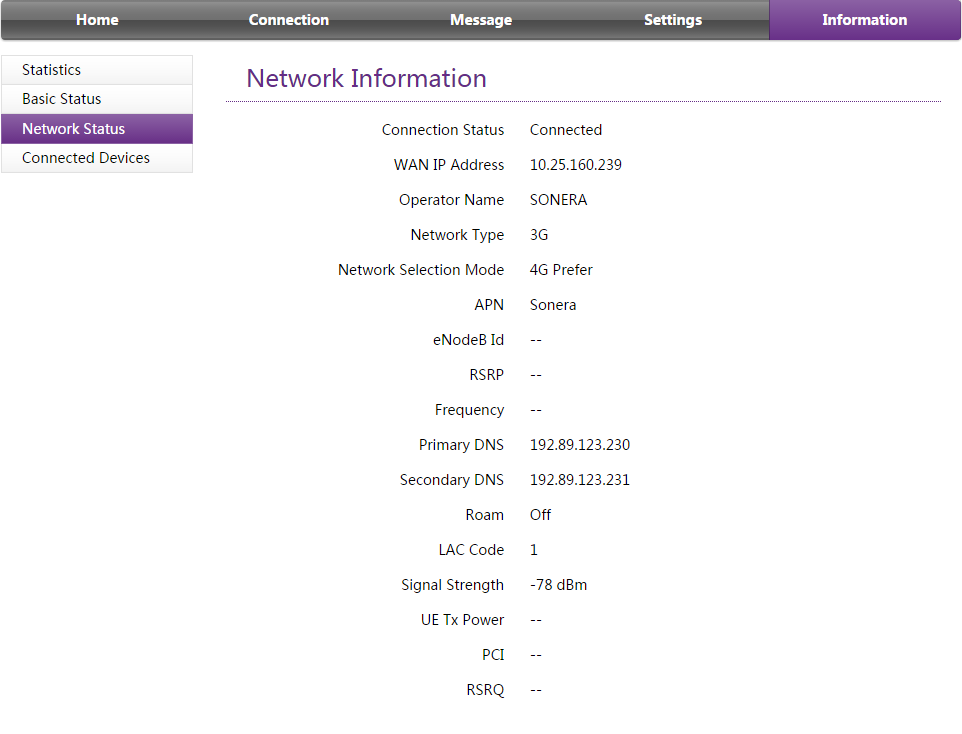
Lot of relevant information right at your screen! This is exactly what everybody else should be doing. Unfortunately the network status screen is optimized heavily for LTE-connections and on UMTS it won't tell much.
As a conclusion I have to recommend this cheaply built piece of plastic for any router needs. It certainly is worth the money and has just the right features in it. The only thing that worries me is the constant charging: will it survive future years? I don't care if the thing wouldn't run from the battery, but will the charger alone be enough to run it?
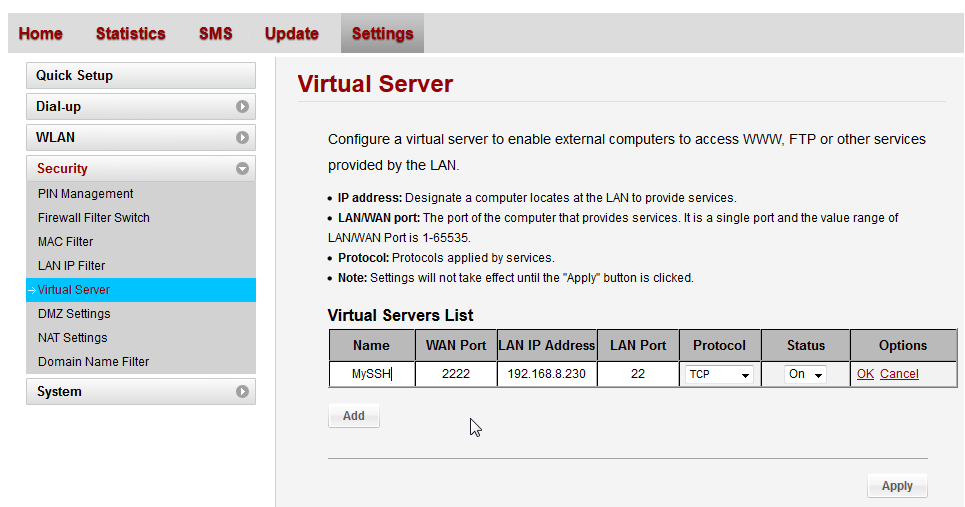
First B593 s-22 exploit: Setup FTP to get /var/sshusers.cfg
Monday, February 23. 2015
I have a new version of B593_exploit.pl published. See this article about previous info.
This version has s-22 FTP hack added to it. u-12 has the classic FTP USB-share flaw where it is possible to create a FTP share of the /. Unfortunately in this box Huawei guys made the web GUI a bit smarter, you cannot do such a nice share anymore. The fortunate part is, that the guys don't check for that at the save. If you manage to lure the ../.. past the GUI, you can do it. That's what the exploit is about.
Example run:
./B593_exploit.pl 192.168.1.1 admin --ftp-setup \
  ftpuser ftppassword
That command will share the first USB-device found at the filesystem root of the box. You have to have a physical USB-storage attached. It doesn't have to have anything on it and it won't be affected during the process. But setting a path will fail, if there is no USB-storage.
I had problems with the FTP-client, it kept complaining about FTP passive mode. I switched the client into NcFTP and that solved my problem.
When in the box the SSH passwords are at the classic /var/sshusers.cfg. If configuration is of interest to you, it can be found from /app/curcfg.xml. When the admin user's password is known, it is only a trivial task to SSH into the box and gain a shell access.
While looking around the box, I got carried away with the lteat-command. I managed to brick the box.  But that's an another story.)
iPhone (cell) Field Test mode
Saturday, February 21. 2015
A reader of this blog contacted me and wanted me to take a look at his Huawei E5186. During the meeting he showed the Field Test mode of his iPhone. I haven't done any iPhone hacks, and had never heard of such thing. In this mode you can see details of the cellular connection. It is completely limited to that, there is no "root"-mode, nor details about Wi-Fi connection, nor details of the phone itself. But if any of the SIM, GSM, UMTS or LTE details are of interest, this one is for you.
Every iPhone has this. Really! There are details of this Field Test mode in The Net from year 2009 (iPhone 3GS), maybe earlier if you'd really want to look close. My iPhone 6 has this, so I'm pretty sure your (whatever model) has it too.
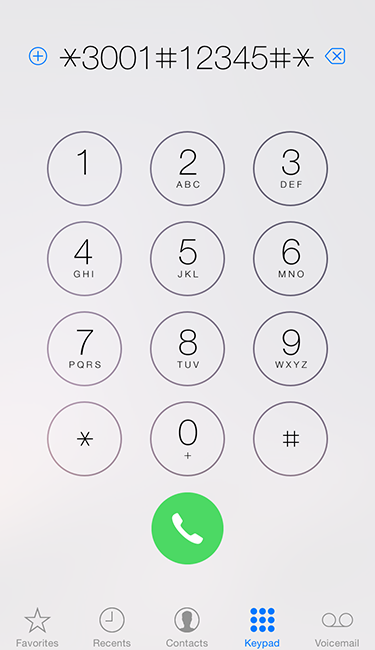
How to get there? Easy. Dial *3001 # 12345#*. Like this:
As a result you will see either the 2G/3G (GSM/UMTS) or 4G (LTE) Field Test menu:
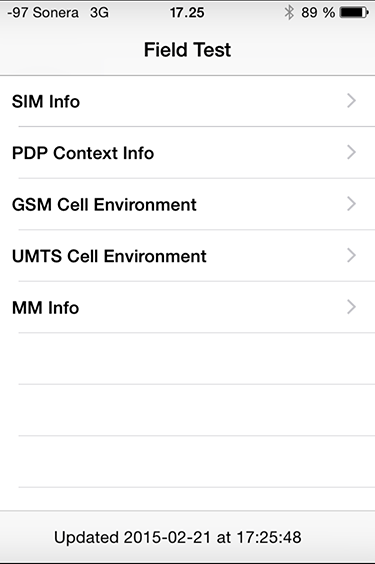
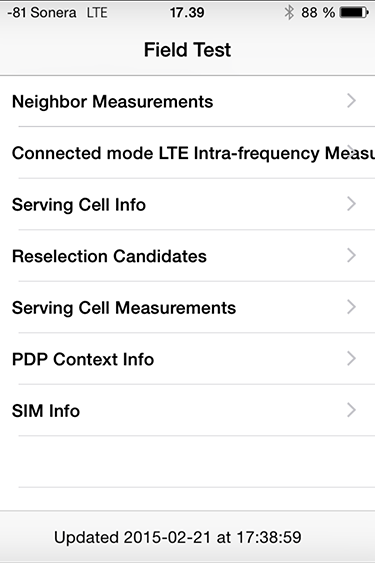
As you can see, the 2G/3G menu has more stuff in it. It is because this is the really old stuff back from the 90s. LTE menu is light, as it is the 2010s spec. Please remember, that it is a snapshot of the situation when menu was opened.
Also notice how there is no more bars on top of the screen, there is a number in dBm. The number will indicate RSSI (in 2G) or RSCP (in 3G) or RSRP (in 4G). See article Some GSM, UMTS and LTE Measurement Units for clarification of the units.
RSSI translation:
- -40 dBm - theorethical max., you won't get this even if you'd be right next to the cell tower
- -50 to -75 dBm - High
- -76 to -90 dBm - Medium
- -91 to -100 dBm - Low
- -101 to -120 dBm - Poor
RSRP translation:
- theorethical max. ? dBm
- -75 and -88 dBm - Very High
- -89 and -96 dBm - High
- -97 and -105 dBm - Medium
- -106 and -112 dBm - Low
- -113 and -125 dBm - Poor
As I didn't find much information about the actual contents of these menus, I'll try to gather here a comprehensive list. Not all of the items have a value in my phone, if there is a value recorded, but I don't know what it is for, there is a ?.
| Menu / Submenu | Description | ||||
|---|---|---|---|---|---|
| SIM Info | |||||
(sub level 1) |
EF-FPLMN | ||||
| EF-ICCID | |||||
| EF-OPLMNAcT | |||||
| EF-HPPLMN SEARCH PERIOD | |||||
| EF-MSISDN | |||||
| EF-3GPP MAIL BOX DIALING NUMBER | |||||
| EF-ACCESS CONTROL CLASS | |||||
| EF-OPERATOR PLMN LIST | |||||
| EF-ACTING HPLMN | |||||
| EF-ADMINISTRATIVE DATA | |||||
| EF-RAT MODE | |||||
| EF-LOCI | |||||
| EF-GPRS/PS-LOCI | |||||
| PDP Context Info | (List) Packet Data Protocol (PDP) Context (in GPRS), see http://developer.nokia.com/community/wiki/PDP for details of PDP | ||||
| APN | Access Point Name: Connection setting | ||||
| IPv4 | IPv4 address of the access point to connect to | ||||
| GSM Cell Environment | [UMTS only] 2G/2.5G information | ||||
| GSM RR Info | |||||
| DTX Used | ? | ||||
| RR State | |||||
| Rx Quality Sub | |||||
| RR Mode | |||||
| RR Sub State | |||||
| Serving Rx Level | |||||
| DRX used | |||||
| RR Status | |||||
| Rx Quality Full | |||||
| GSM Cell Info | |||||
| GSM Serving Cell | |||||
(sub level 3) |
C1 Value | ||||
| RSSI | |||||
| ARFCN | Absolute radio-frequency channel number | ||||
| Cell ID | http://en.wikipedia.org/wiki/Cell_ID Gather MCC, MNC, LAC and go http://opencellid.org/ to see where you are at |
||||
| Mobile Allocation | |||||
(sub level 4) |
ARFCNs | (List) | |||
| HSN | |||||
| C2 Value | |||||
| BSIC | ? bits | ||||
| MA Dedicated ARFCN | |||||
| Neighboring Cells | (List) | ||||
| GPRS Information | |||||
| Priority Access Threshold | ? | ||||
| SI13 Location | ? | ||||
| Ext Measurement Order | |||||
| Access Burst Type | ? | ||||
| DRX Timer Max | ? | ||||
| Network Operating Mode | ? | ||||
| PBCCH Present | |||||
| Count LR | |||||
| Packet PSI Status | |||||
| PFC Supported | ? | ||||
| Cell Reselect Hysteresis | |||||
| Count HR | |||||
| Packet SI Status | |||||
| Network Control Order | ? | ||||
| T3192 Timer | http://www.rfwireless-world.com/Terminology/GSM-timers.html [milliseconds] | ||||
| UMTS Cell Environment | [UMTS only] 3G information | ||||
| Neightbor Cells | |||||
| Active Set | (List) | ||||
| Detected Set | (List) | ||||
| Monitored Set | (List) | ||||
| UMTS Set | (List) The only one I have anything listed | ||||
| Scrambling Code | Your "identifier" in the cell. See UMTS Quick Reference - Scrambling Code for more info | ||||
| RSCP | Received signal code power: The number on top left of your screen. See UARFCN below. | ||||
| Energy Per Chip | EcNo: RSCP divided by RSSI. See Some GSM, UMTS and LTE Measurement Units for details about RCSP and EcNo. | ||||
| UARFCN | See UMTS RR Info below. In this set one of the cells has same scrambling code as UMTS RR Info has. That cell has the exact same RSCP what is displayed as your received signal strenght. | ||||
| Virtual Active Set | (List) | ||||
| GSM Set | (List) | ||||
| HSDPA Info | |||||
| Version | |||||
| Primary HARQ Process | |||||
| Sub Frames | |||||
| Secondary HARQ Process | |||||
| Carrier Info | |||||
| UMTS RR Info | Information of the Radio Relay (cell tower) who is serving you | ||||
| UARFCN | UTRA Absolute Radio Frequency Channel Number: The channel number you're currently at. Decimal number, see http://niviuk.free.fr/umts_band.php for listings of bands. | ||||
| BLER | Block Error Rate (my phone displays nothing here) | ||||
| Cell ID | http://en.wikipedia.org/wiki/Cell_ID Gather MCC, MNC, LAC and go http://opencellid.org/ to see where you are at |
||||
| RRC State | See UMTS RCC States (my phone displays nothing here) | ||||
| Downlink Frequency | (my phone displays nothing here) | ||||
| Scrambling Code | Your "identifier" in the cell. See UMTS Quick Reference - Scrambling Code for more info | ||||
| Uplink Frequency | (my phone displays nothing here) | ||||
| Ciphering | (my phone displays nothing here) | ||||
| Transmit Power | (my phone displays nothing here) | ||||
| MM Info | [UMTS only] | ||||
| Serving PLMN | Public land mobile network information | ||||
| Location Area Code | LAC (decimal): http://en.wikipedia.org/wiki/Location_area_identity | ||||
| Routing Area Code | ? | ||||
| PLMN Sel Mod | |||||
| Mobile Network Code | MNC (decimal): http://en.wikipedia.org/wiki/Mobile_country_code | ||||
| Mobile Country Code | MCC (decimal): http://en.wikipedia.org/wiki/Mobile_country_code | ||||
| Service Type | ? | ||||
| Process PS | |||||
| MM Sub State | |||||
| MM State | |||||
| MM Service State | |||||
| Attach Reject Cause | |||||
| Process CS | |||||
| MM Sub State | |||||
| MM State | |||||
| MM Service State | |||||
| LU Reject Cause | |||||
| Equivalent PLMN List | |||||
| Process CO | |||||
| MM State | |||||
| MM Service State | |||||
| Neighbor Measurements | [LTE only] | ||||
| E-ARFCN | |||||
| Version | |||||
| Neighbor Cells List | (List) | ||||
(sub level 2) |
Measured RSSI | ||||
| Ant 0 Sample Offset | |||||
| Physical Cell ID | |||||
| Ant 0 Frame Offset | |||||
| Average RSRP | |||||
| Average RSRQ | |||||
| Ant 1 Frame Offset | |||||
| Srxlev | |||||
| Ant 1 Sample Offset | |||||
| Measured RSRP | |||||
| Frequenct Offset | Typo? Frequency Offset | ||||
| Measured RSRQ | |||||
| Qrxlevmin | |||||
| Connected mode LTE Intra-frequency Measurement | [LTE only] | ||||
| Detected Cells | (List) | ||||
| Measured Neighbor Cells | (List) | ||||
| Serving Filtered RSRQ | |||||
| Serving Physical Cell ID | |||||
| Subframe Number | |||||
| Serving Filtered RSRP | |||||
| E-ARFCN | |||||
| Serving Cell Info | [LTE only] | ||||
| Download Bandwidth | |||||
| Freq Band Indicator |
The frequency band you're at. See UARFCN for exact frequency. See http://niviuk.free.fr/umts_band.php for listings of bands and frequencies. Short list:
|
||||
| Download Frequency | |||||
| Num Tx Antennas | |||||
| UARFCN | UTRA Absolute Radio Frequency Channel Number: The channel number you're currently at. Decimal number, see http://niviuk.free.fr/umts_band.php for listings of bands and frequencies. | ||||
| Tracking Area Code | TAC | ||||
| Cell Identity | LCID of the serving cell | ||||
| Physical Cell ID | http://en.wikipedia.org/wiki/Cell_ID MCC, MNC and TAC is the exact location where the serving cell is located. |
||||
| Upload Frequency | |||||
| Upload Bandwidth | |||||
| Reselection Candidates | [LTE only] | ||||
| Version | |||||
| Serving Cell ID | |||||
| Serving EARFCN | |||||
| Reselection Candidates List | (List) | ||||
| Serving Cell Measurements | [LTE only] | ||||
| Measured RSSI | |||||
| Qrxlevmin | |||||
| P_Max | |||||
| Max UE Tx Power | |||||
| Version | |||||
| S Non Intra Search | |||||
| Physical Cell ID | |||||
| Average RSRP | |||||
| Measurement Rules | |||||
| Average RSRQ | |||||
| Serving Layer Priority | |||||
| Srxlev | |||||
| Measured RSRP | |||||
| Num of Consecutive DRX Cycles of S < 0 | |||||
| Measurement Rules Updated | |||||
| Measured RSRQ | |||||
| E-ARFCN | |||||
| S Intra Search | |||||
Please help me complete this (at least all the good stuff). If you find something incorrect or missing, please drop me a comment.
Goodbye Maxthon
Thursday, February 19. 2015
I have a policy of running a lot of different browsers on my computers. The idea is to gain experience of what works and what won't. When doing web development, any run-of-the-mill developer gets a tunnel vision and starts spewing out the classic "it works for me!" -style answers, when there are issues with a site.
So, I'm fighting hard to defeat that by using a lot of different browsers. One of my tools has been Maxthon browser. It isn't anymore. Goodbye Maxthon!
I was reading an article about "Lenovo PCs ship with man-in-the-middle adware that breaks HTTPS connections" and went to https://filippo.io/Badfish/ to check my browser. Amazingly it showed YES:

Whaat!
If I download the https://badfish.filippo.io/yes.png directly, then there is a proper notification about the problem:
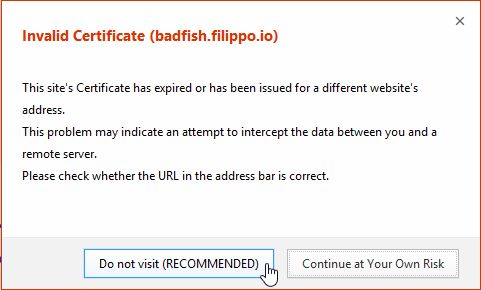
... but seeing the picture embedded nicely in a website means, that the browser won't bother checking while rendering a page. Anybody can display anything on a web page and I won't get any information about the dropped security. Not good.
There is no other way, than to uninstall. I absolutely won't recommend using anything that insecure!
Exporting a website certificate
Tuesday, February 10. 2015
This one was a tough one for me. Not technically, but mentally. I wrote about Java 1.7 update 51 breaking Cisco ASDM and how to fix it. Two separate users had the same problem, they didn't know how to get their hands on the Cisco certificate which is required.
My dilemma here is:
So, you're in charge of heavy machinery called a firewall, but you don't know how to get a certificate out of a website, huh!
This s a basic task for any security-minded admin, it's obvious that the skills required and skills available are pretty far from each other. Should I give instructions for this basic task, only to postpone the inevitable?
I guess I should.
Method 1: GnuTLS (the best option)
If you happen to have GnuTLS installed, it has an excellent command-line utility. This is mostly in Linux, but I have one running on Windows via Cygwin. Not all Linux distros have this one installed by default. It is easily available on all distros, though.
Example run (information has been omitted for brevity):
# gnutls-cli --print-cert blog.hqcodeshop.fi
Resolving 'blog.hqcodeshop.fi'...
Connecting to '81.22.252.148:443'...
- Certificate type: X.509
- Got a certificate list of 2 certificates.
- Certificate[0] info:
 - subject ..., SHA-1 fingerprint `c87f57f182cd10be0d16b52c5a41c4a915593e6b'
        Public Key Id:
                c6a1e7cd6139f2ec8872e0a198b2a15a26fe1461
        Public key's random art:
                +--[ RSA 2048]----+
                |                 |
                |                 |
                |   E    .        |
                |  . .  o . .     |
                |   .  . S =      |
                |    +  + B o     |
                |ooo+ o  . =      |
                |*=o o .. o       |
                |*o.. o. . .      |
                +-----------------+


-----BEGIN CERTIFICATE-----
MIIEqzCCA5OgAwIBAgIDAih/MA0GCSqGSIb3DQEBCwUAMEcxCzAJBgNVBAYTAlVT
...
nklApvqYviZIwv20nMLwHjtf71ycGZumzNNWQrECBgNWYhFuNyaNe3nzO5fym6o=
-----END CERTIFICATE-----

- Certificate[1] info:
 - subject ..., SHA-1 fingerprint `0e34141846e7423d37f20dc0ab06c9bbd843dc24'

-----BEGIN CERTIFICATE-----
MIIEJTCCAw2gAwIBAgIDAjp3MA0GCSqGSIb3DQEBCwUAMEIxCzAJBgNVBAYTAlVT
...
ZI3NjGFVkP46yl0lD/gdo0p0Vk8aVUBwdSWmMy66S6VdU5oNMOGNX2Esr8zvsJmh
gP8L8mJMcCaY
-----END CERTIFICATE-----

- Status: The certificate is trusted.
- Description: (TLS1.2-PKIX)-(ECDHE-RSA-SECP256R1)-(AES-128-CBC)-(SHA256)
- Ephemeral EC Diffie-Hellman parameters
 - Using curve: SECP256R1
 - Curve size: 256 bits
- Version: TLS1.2
- Key Exchange: ECDHE-RSA
- Server Signature: RSA-SHA1
- Cipher: AES-128-CBC
- MAC: SHA256
- Compression: NULL
- Handshake was completed

- Simple Client Mode:
Just hit ctrl-d or ctrl-c when the Simple Client Mode -prompt appears. You could actually talk HTTP to the server with that, but for getting the certificate it is not needed. The cert is already out there, just copy it and save it in a file. The 2nd cert is only intermediate CA certificate and it can be downloaded from web.
If you want to see the omitted information, just run the command. A public certificate is as public as anything in the net, there is no point in trying to hide it.
Method 2: OpenSSL (the popular option)
This method will work on any Linux or Mac OS X. There are couple of OpenSSL implementations for Windows, so most boxes should be able to run this one.
Why this isn't the best option is, because OpenSSL client doesn't do proper SNI. In the example below, it returns the wrong certificate. Not the one requested. If your site isn't sharing an IP-address, this will work for you.
Example:
# openssl s_client -connect blog.hqcodeshop.fi:443
CONNECTED(00000003)
depth=2 C = US, O = GeoTrust Inc., CN = GeoTrust Global CA
verify return:1
depth=1 C = US, O = GeoTrust Inc., CN = RapidSSL SHA256 CA - G3
verify return:1
depth=0 OU = GT61328546, ..., CN = *.hqsting.net
verify return:1
---
Certificate chain
 0 s:/OU=GT61328546/.../CN=*.hqsting.net
   i:/C=US/O=GeoTrust Inc./CN=RapidSSL SHA256 CA - G3
 1 s:/C=US/O=GeoTrust, Inc./CN=RapidSSL CA
   i:/C=US/O=GeoTrust Inc./CN=GeoTrust Global CA
---
Server certificate
-----BEGIN CERTIFICATE-----
MIIErjCCA5agAwIBAgIDAit7MA0GCSqGSIb3DQEBCwUAMEcxCzAJBgNVBAYTAlVT
...
TP3W1usGKSJ+fipYhc9ZTUFVs+g3FZ+m3Sltyfb/motM06EP6eq5heDxxPquEhaq
OsY=
-----END CERTIFICATE-----
subject=/OU=GT61328546/.../CN=*.hqsting.net
issuer=/C=US/O=GeoTrust Inc./CN=RapidSSL SHA256 CA - G3
---
No client certificate CA names sent
Server Temp Key: ECDH, prime256v1, 256 bits
---
SSL handshake has read 2921 bytes and written 415 bytes
---
New, TLSv1/SSLv3, Cipher is ECDHE-RSA-AES128-SHA256
Server public key is 2048 bit
Secure Renegotiation IS supported
Compression: NONE
Expansion: NONE
SSL-Session:
    Protocol  : TLSv1.2
    Cipher    : ECDHE-RSA-AES128-SHA256
    Session-ID-ctx:
    Key-Arg   : None
    Krb5 Principal: None
    PSK identity: None
    PSK identity hint: None
    TLS session ticket lifetime hint: 300 (seconds)
...
    Start Time: 1423326309
    Timeout   : 300 (sec)
    Verify return code: 0 (ok)
---
DONE
Just hit ctrl-d or ctrl-c at the prompt. Again, you're at the HTTP-mode now and could talk to the web-server. The certificate is waiting on the screen to be copied and saved to a file.
Method 3: Firefox (the easy option)
Exporting a certificate of a website is implemented in Firefox browser.
Click the lock-symbol:
 A small dialog will open. Select More information:

A big dialog with lot of information about the site will open up. One of the options is to View Certificate. Select it:

Step 4:
Select the bottom sertificate and export it. It will open a save as -dialog:
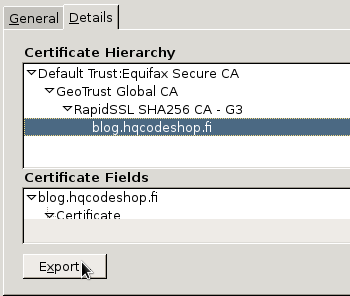
That's it! Now you have the certificate saved.
Blog upgrade to S9y 2.00 and HTTPS
Monday, February 9. 2015
My Weather Station setup
Monday, January 26. 2015
As you already know, I love all kinds of gadgets. When it comes to weather, simply having a reading of outside temperature isn't nearly enough for me. I've had a weather station running for a while, but now that I connected into the on-line world, its time to publish my setup.
The unit I'm running is a WS2357 from La Crosse Technology. They say its a "Pro family" product, but still is very affordable. I paid 150,- € for mine. On the link there's all the tech specs, but it is your basic unit having temperature, pressure, humidity measurements indoors and outdoors. Also for outdoors, there is a wind direction and speed meters and a rain gauge. It is mainly battery powered and data from outside to inside can be transmitted either wirelessly (that's how I do it) or with a wire. Apparently the max. length for the wire would be 20 meters, which exceeds my setup. But for a wireless transmission, the limit is 100 meters. It works well trough house walls.
This is what the outdoors temp, humidity, pressure unit looks like:
This is the "central unit" of outdoors. The size is surprisingly small, but it still holds 2 AA-sized batteries and RJ-11 connectors for wind, rain and indoors. When installed outdoors, it comes with a rain cover which also should insulate it from direct sunlight. This small box is battery powered, but as I never want to climb to my roof to change the batteries, I drilled a small hole for an electric cord, which I soldered into the battery contacts. On the other end of the cord I have a 3,3 VDC transformer acting a battery.
I'm not happy with the temperature measurement, it reacts too fast when sun starts to shine on it. A properly ventilated cover would do better job. In my previous unit this wasn't an issue.
The rain gauge looks like this: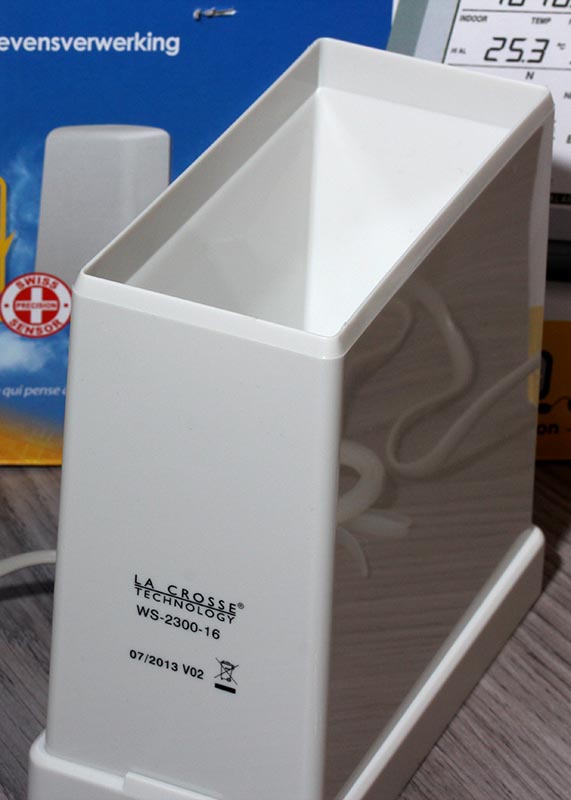
How this operates is very simple. At the bottom of the funnel, there is a small seesaw. When there is enough weight (in form of water) at the seesaw, it will tilt. This empties a cup on the other end and makes the seesaw tilt to the other direction. As it is known exactly how much weight is needed for the action to take place and the area of the unit's intake, it is possible to calculate the amount of water that has rained on that particular area and extrapolate that into WMO specs. On the minus side of the rain gauge, it had zero installation brackets. I ended up gluing it into a metal T-bar connected to my setup.
This is the wind gauge:
With this one I have no complaints. It is very sensitive and seems to give accurate enough readings. Once when weather turned from +2 into -4 it froze for a couple of days. As there was very little wind, the wind direction didn't change at all. Normally wind direction is a scattercloud, but in this instance wind direction was fixed. The problem was solved when wind picked up. So, it wasn't that bad.
This is how my entire setup looks like as installed: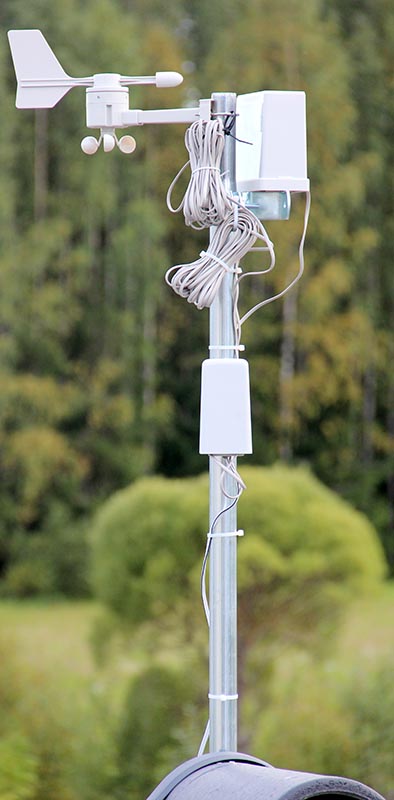
The temperature gauge could be couple of meters higher just to make sure, it wouldn't pick up any extra heat from the roofing on sunny days. I did do some measurements and that could give a boost to my outside temp readings if there is no wind at all.
To get the unit connected into on-line world, I created an account at Weather Underground. I'll transmit the readings from the unit there. To hook the unit up into my Linux-box, I had to a lengthy cable between the indoors unit and my computer. I lucked out with the protocol, as it is RS-232. I simply cut the cable at the D-9 -connector, and soldered an extension cord of 17 meters. The pin ordering is as follows: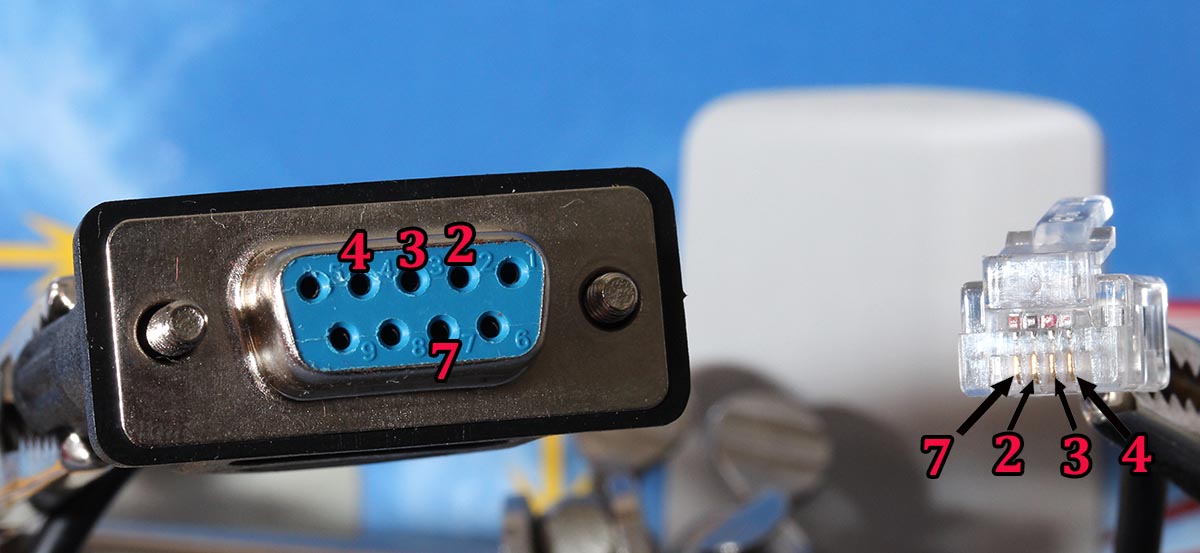
The rule-of-thumb max. length for 2400 bps data rate is 60 meters (according to this table), so my cabling worked out perfectly.
For the software at Linux-end I went for Open2300. It is an open-source set of tools to extract necessary information from my station and publish them to The Net. I'm using a simple cron-job for it:
# Weather Underground update
*/10 * * * * ~/Open2300/wu2300 ~/Open2300/lacrosse.conf
On the Wunderground-end I had major issues. First it didn't receive any of my transmissions. It kept insisting "INVALIDPASSWORDID|Password and/or id are incorrect", which wasn't true. I knew exactly what the password was. After couple of hours, it started working. I'm guessing their data receiving front-end gets the new accounts in a batches, and they are nowhere near real-time.
When my data started flowing, the web-front said:
... which was more than funny. If it wasn't getting any readings, why it says that the most recent one was received a minute ago.
After solving all these minor glitches I was real happy with this setup. Now my station participates in a community of 60k stations all over the world. Also I can check what's the weather like while still keeping my eyes on my precious computer.
Apple ID Scam: Part 2
Sunday, January 25. 2015
Asking for people's password seems to be a very lucrative business. See this clip from Jimmy Kimmel Live: What is Your Password? Of course it is a scripted show and nothing they make you believe happened for real didn't, but still: its very funny one and there is a lot of truth behind that one. People do give out their passwords way too easy.
A while back I wrote about a previous attempt to phish for Apple ID. Also this scam for Google passwords turned out to be a great success for the author of the scam.
Anyway, this time I got an email from Philippines saying:
Dear Apple Customer,
We just need to verify that this email address belongs to you. Simply click the link below and sign in using your Apple ID and password.
Verify Now >
Wondering why you got this email?
It's sent when someone adds or changes a contact email address for an Apple ID account. If you didn't do this, don't worry. Your email address cannot be used as a contact address for an Apple ID without your verification.
For more information, see our frequently asked questions.
Thanks,
Apple Customer Support
The mail looked like this: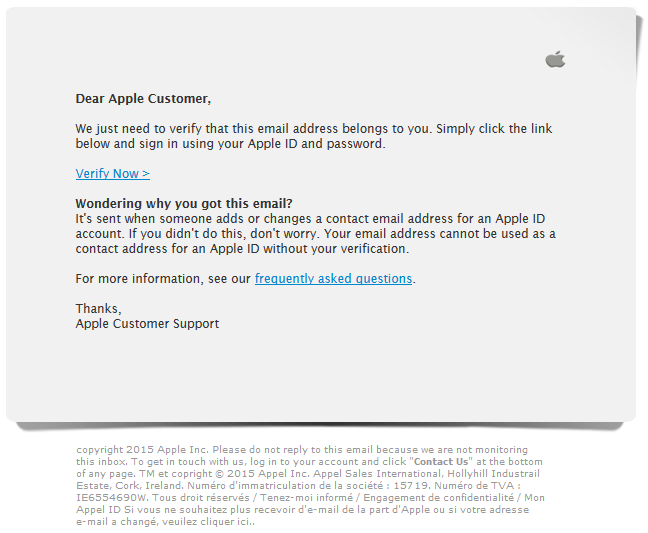
This wasn't an especially well executed scam. Scamsters had cracked some innocent (but incapable sysadmin) person's Joomla 2.5.27 installation and injected "bonus" content into it. This is how the site looked like: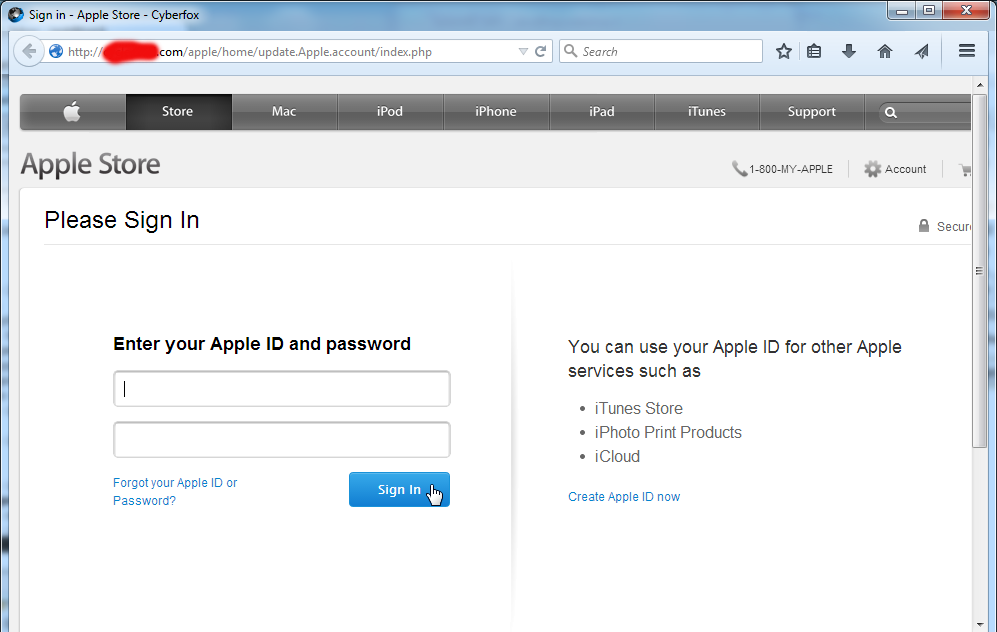
Convincing, but only if you keep your eyes out of the address-bar. This is a classic: no HTTPS, quite a weird path. Personally I don't understand how anybody could fall into this trap. Still many do, and get their iPhone contents spread all over the internet.
When discussing with non-security people about these recent account hijackings, I often get a reply of "I don't have anything to hide!". Still my standard reply to that is, "Well, gimme your password, then". They never do.

