Making USB-bootable PLD RescueCD from your Linux
Tuesday, December 31. 2013
PLD RescueCD is my new favorite Linux rescue CD. It has a ton of stuff in it, even the ipmitool from OpenIPMI-project. One of these days, it so happened that I lost my IPMI network access due to own mis-configuration. I just goofed up the conf and oops, there was no way of reaching management interface anymore. If the operating system on the box would have been ok, it might have been possible to do some fixing via that, but I chose not to. Instead I got a copy of PLD and started working.
The issue is, that PLD RescueCD comes as ISO-image only. Well, erhm... nobody really boots CDs or DVDs anymore. To get the thing booting from an USB-stick appeared to be a rather simple task.
Prerequisites
- A working Linux with enough root-access to do some work with USB-stick and ISO-image
- syslinux-utility installed, all distros have this, but not all of them install it automatically. Confirm that you have this or you won't get any results.
- GNU Parted -utility installed, all distros have this. If yours doesn't you'll have to adapt with the partitioning weapon of your choice.
- An USB-stick with capacity of 256 MiB or more, the rescue CD isn't very big for a Linux distro
- WARNING! During this process you will lose everything on that stick. Forever.
- Not all old USB-sticks can be used to boot all systems. Any reasonable modern ones do. If you are failing, please try again with a new stick.
- PLD RescueCD downloaded ISO-file, I had RCDx86_13_03_10.iso
- You'll need to know the exact location (as in directory) for the file
- The system you're about to rescue has a means of booting via USB. Any reasonable modern system does. With old ones that's debatable.
Assumptions used here:
- Linux sees the USB-stick as /dev/sde
- ISO-image is at /tmp/
- Mount location for the USB-stick is /mnt/usb/
- Mount location for the ISO-image is /mnt/iso/
- syslinux-package installs it's extra files into /usr/share/syslinux/
- You will be using the 32-bit version of PLD Rescue
On your system those will most likely be different or you can adjust those according to your own preferences.
Information about how to use syslinux can be found from SYSLINUX HowTos.
Steps to do it
- Insert the USB-stick into your Linux-machine
- Partition the USB-stick
- NOTE: Feel free to skip this if you already have a FAT32-partition on the stick
- Steps:
- Start GNU Parted:
parted /dev/sde - Create a MS-DOS partition table to the USB-stick:
mktable msdos - Create a new 256 MiB FAT32 partition to the USB-stick:
mkpart pri fat32 1 256M - Set the newly created partition as bootable:
set 1 boot on - End partitioning:
quit - Format the newly created partition:
mkfs.vfat -F 32 /dev/sde1 - Copy a syslinux-compatible MBR into the stick:
dd if=/usr/share/syslinux/mbr.bin of=/dev/sde conv=notrunc bs=440 count=1 - Install syslinux:
syslinux /dev/sde1 - Mount the USB-stick to be written into:
mount /dev/sde1 /mnt/usb/ - Mount the ISO-image to be read:
mount /tmp/RCDx86_13_03_10.iso /mnt/iso/ -o loop,ro - Copy the ISO-image contents to the USB-stick:
cp -r /mnt/iso/* /mnt/usb/ - Convert the CD-boot menu to work as USB-boot menu:
mv /mnt/usb/boot/isolinux /mnt/usb/syslinux - Take the 32-bit versions into use:
cp /mnt/usb/syslinux/isolinux.cfg.x86 /mnt/usb/syslinux/syslinux.cfg - Umount the USB-stick:
umount /mnt/usb - Umount the ISO-image:
umount /mnt/iso - Un-plug the USB-stick and test!
Result
Here is what a working boot menu will look like:
Like always, any comments or improvements are welcome. Thanks Arkadiusz for your efforts and for the great product you're willing to share with rest of us. Sharing is caring, after all! ![]()
Mac OS X Dolby Digital 5.1 with Mac Mini [solved]
Monday, December 30. 2013
This is my 2nd attempt of trying to clarify how to get Dolby Digital 5.1 output via HDMI. The previous attempt can be found here. All the information I can find on this subject shows that for some people multi-channel audio works fine, nothing special is required, but then again for some of us this is a pain and its almost impossible to get this working.
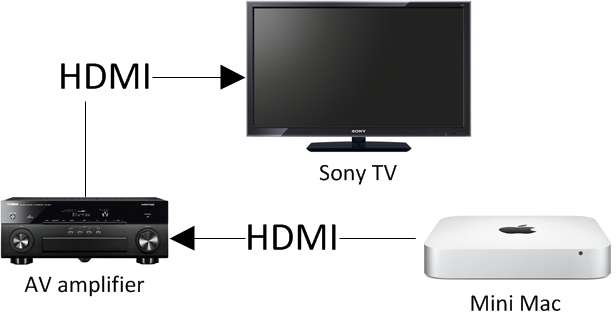
Here is my setup:
The problem, like presented earlier is depicted here:
The Audio MIDI setup clearly displays as Sony TV being the HDMI output device. The problem is, that it actually isn't. Here is another screen capture of Audio MIDI setup from my brother's computer:
Whoa! His Mac Mini displays his A/V amp as the HDMI destination. Totally different from what my Mac displays. The only explanation for this is, that my Yamaha takes the TV's spec from the HDMI and proxies it to the Mac and his Onkyo doesn't take anything, it simply presents itself as the destination. If you'd ask me, Onkyo's solution is much better than Yamaha's. Anyway, the amp has to pick up the audio signal to be sent to loudspeakers and do a stereo mixdown of a multi-channel signal to be sent for the TV. So there will be a lot of processing at the amp, why not declare itself as the destination for the Mac. It seems to be confusing.
The Solution
Here is what I did to get proper 5.1 channel sound working from my Mac Mini. The problem is, that I cannot get it back to the broken mode again, it simply stays fully functional no matter what I do. There must be something going on at the amp end and something else going on at the Mac end. For some reason they don't match or they do match and there is very little I can do to control it. But anyway, here are my steps with Audio MIDI Setup utility:
- In the Mac, set HDMI to Use this device for sound output and Play alerts and sound effects trough this device
- Confirm that the speaker setup is correct and click the speakers to confirm that test tone does not output as expected
- In the amp, make sure that the input HDMI is decoding multi-channel audio as expected
- Auto-detect or stereo won't work
- Previously my instructions stopped here
- In the Mac, at the HDMI, in Format set it as Encoded Digital Audio, the Hz setting is irrelevant

- This will effectively unset HDMI as output device and set Built-in Output as the output device. It also pretty much makes all sounds in the system non-functional.
- Again at the HDMI, in Format select 8ch-24bit Integer, it will reset the HDMI to Use this device for sound output and Play alerts and sound effects trough this device
- Re-confirm that speaker setup is correct. At this point the test tone should work from the speaker correctly.
- You're done!

This fix and pretty much everything about Mac Mini's HDMI audio output is bit fuzzy. Any real solution should be reproducible somehow. This isn't. But I can assure you, that now my multi-channel audio really works as expected.
Any feedback about this solution is welcome!
Update 1st Jan 2014:
The number of channels configured into Audio Setup does not reflect the actual number of speakers you have. That is done in Configure Speakers. I have 8ch (or 8 speakers) configured in the Audio Setup, but this is a screenshot of my speaker setup:
They have different number of speakers! It still works. That's how it is supposed to be.
Downgrading Internet Explorer 9 into 8 on Windows 7
Wednesday, December 18. 2013
That should be an easy task, right? You guessed it. If I'm writing about it, it isn't. Once in a while I still test with a real IE8. The IE10 and IE11 emulators should be good enough, but they aren't. Here are the stats from this blog:
People seem to run with IE8 a lot. They shouldn't but ... they do. ![]()
Here is what I did:
- List of Windows updates installed on the computer:

- Managed to find Internet Explorer 9 in it (on Windows 7, that's pretty normal):

- Un-install starts:

- Yep. It took a while and hung. Darn!
- I waited for 20 minutes and rebooted the hung piece of ...
- Reboot did some mopping up and here is the result. No IE anywhere:

- Guess who cannot re-install it. On a normal installation it is listed in Windows features, like this:

In my case, no:
No amount of reboots, running sfc.exe or anything I can think of will fix this. This is what I already tried:
- Attempt fix with Windows Resource Checker:
PS C:\Windows\system32> sfc /scannow
Beginning system scan. This process will take some time.
Beginning verification phase of system scan.
Verification 100% complete.
Windows Resource Protection did not find any integrity violations.
It simply fails to restore the files, because all the bookkeeping says, that IE8 shouldn't be there! - Let' just download the installation package and re-install manually. Download Center - Internet Explorer 8
- Ok, we're not going to do that, because the IE 8 installation package for Windows 7 does not exist. Reason is very simple. Win 7 came with IE8. It is an integral part of the OS. You simply cannot run the Windows 7 without some version of IE. No installation packages necessary, right? Internet Explorer 8 for Windows 7 is not available for download
- Right then. I took the Windows Vista package and ran the installation anyway. All the compatiblity modes and such yield the same result. Internet Explorer 8 is not supported on this operating system

- Re-installation instructions, part 1: Reinstalling IE8 on Windows 7. Not much of a help. The
- Re-installation instructions, part 2: How to Reinstall Internet Explorer in Windows 7 and Vista. No help there either.
- Registry tweaking into HKEY_LOCAL_MACHINE\SOFTWARE\Microsoft\Windows NT\CurrentVersion\Winlogon\GPExtensions to see if {7B849a69-220F-451E-B3FE-2CB811AF94AE} and {CF7639F3-ABA2-41DB-97F2-81E2C5DBFC5D} are still there as suggested by How to Uninstall IE8. Nope. No help with that either. That article mentions "European Windows 7". What could the difference be?
- Perhaps re-installing Service Pack 1 would help? But well... in Windows 7 SP1 cannot be re-installed like it was possible in Windows XP. That actually did fix a lot of operating systems gone bad at the XP-era.
The general consensus seems to be, that you simply cannot lose IE from Windows 7. Magically I did. ![]() Just based on the Wikipedia article about removing IE, it is possible.
Just based on the Wikipedia article about removing IE, it is possible.
Some of the symptoms I'm currently having is Windows Explorer Refuses to Open Folders In Same Window. Some of the necessary DLLs are not there and Windows Explorer behaves funnily.
I don't know what to attempt next.
Getting the worst of Windows 7 - Install updates automatically (recommended)
Friday, December 13. 2013
Why doesn't my setting of NOT installing important updates automatically stick? Every once in a while it seems to pop itself back to the stupid position and does all kinds of nasty things in the middle of the night. From now on I'll start a counter how many times I'll go there to reset the setting back to the one I as system administrator chose.
All this rant is for the simple reason: I've lost data and precious working time trying to recover it. This morning I woke up and while roaming in the house in a semi-conscious state attempting to regain a thought, I noticed couple of LEDs glimmering in a place there shouldn't be any. My desktop PC was on and it shouldn't be. On closer inspection at 3 am it chose to un-sleep for the sake of installing Windows updates. This is yet another stupid thing for a computer to be doing (see my post about OS X waking up).
The bottom line is that the good people (fucking idiots) at Microsoft don't respect my decisions. They choose to force feed me theirs based on the assumption that I accidentally chose not to do a trivial system administration taks automatically. I didn't. I don't want to lose my settings, windows, documents, the list goes on.
The only real option for me would be to set up a Windows Domain. In Active Directory there would be possibility of fixing the setting and making it un-changeable. I just don't want to do it for a couple of computers. Idiots!
Windows 8.1 upgrade and Media Center Pack
Wednesday, December 11. 2013
Earlier I wrote about upgrading my Windows 8 into Windows 8.1. At the time I didn't realize it, but the upgrade lost my Media Center Pack.
At the time I didn't realize that, but then I needed to play a DVD with the laptop and noticed, that the OS is not capable of doing that anymore. After Windows 8 was released it didn't have much media capabilities. To fix that, couple months after the release Microsoft distributed Media Center Pack keys for free to anybody who wanted to request one. I got a couple of the keys and installed one into my laptop.
Anyway, the 8.1 upgrade forgot to mention that it would downgrade the installation back to non-media capable. That should be an easy fix, right?
Wrong!
After the 8.1 upgrade was completed, I went to "Add Features to Windows", said that I already had a key, but Windows told me that nope, "Key won't work". Nice. ![]()
At the time I had plenty of other things to take care of and the media-issue was silently forgotten. Now that I needed the feature, again I went to add features, and hey presto! It said, that the key was ok. For a couple of minutes Windows did something magical and ended the installation with "Something went wrong" type of message. The option to add features was gone at that point, so I really didn't know what to do.
The natural thing to do next is to go googling. I found an article at the My Digital Life forums, where somebody complained having the same issue. The classic remedy for everything ever since Windows 1.0 has been a reboot. Windows sure likes to reboot. ![]() I did that and guess what, during shutdown there was an upgrade installing. The upgrade completed after the boot and there it was, the Windows 8.1 had Media Center Pack installed. Everything worked, and that was that, until ...
I did that and guess what, during shutdown there was an upgrade installing. The upgrade completed after the boot and there it was, the Windows 8.1 had Media Center Pack installed. Everything worked, and that was that, until ...
Then came the 2nd Tuesday, traditionally it is the day for Microsoft security updates. I installed them and a reboot was requested. My Windows 8.1 started disliking me after that. The first thing it did after a reboot, it complained about Windows not being activated! Aow come on! I punched in the Windows 8 key and it didn't work. Then I typed the Media Center Pack key and that helped. Nice. Luckily Windows 8 activation is in the stupid full-screen mode, so it is really easy to copy/paste a license key. NOT! ![]()
The bottom line is: Media Center Pack is really poorly handled. I'm pretty sure nobody at Microsoft's Windows 8 team ever installed the MCP. This is the typical case of end users doing all the testing. Darn!

