Samba 4 ldaps:// server functionality
Monday, June 10. 2013
My Fedora 19 project continues... An attempt to get Samba working. They upgraded into version 4 and obviously my version 3 smb.conf had issues. See my article about getting Samba to use LDAP as userbase backend.
The obvious problem was, that it didn't work. 
A log entry from the failue:
../source3/lib/smbldap.c:575(smbldap_start_tls)
Failed to issue the StartTLS instruction: Connect error
../source3/passdb/pdb_ldap.c:6531(pdb_ldapsam_init_common)
pdb_init_ldapsam: WARNING: Could not get domain info, nor add one to the domain. We cannot work reliably without it.
../source3/passdb/pdb_interface.c:177(make_pdb_method_name)
pdb backend ldapsam:ldap://my.server did not correctly init (error was NT_STATUS_CANT_ACCESS_DOMAIN_INFO)
I confirmed the existing settings:
passdb backend = ldapsam:ldap://my.server
ldap ssl = start tls
After a nice while of reading manual pages, an attempt to fix:
passdb backend = ldapsam:ldaps://my.server
ldap ssl = off
Yielded an improvement:
../source3/lib/smbldap.c:998(smbldap_connect_system)
failed to bind to server ldaps://my.server with dn="uid=root,ou=People,dc=my,dc=domain" Error: Can't contact LDAP server
TLS error -8179:Peer's Certificate issuer is not recognized.
../source3/passdb/pdb_ldap.c:6531(pdb_ldapsam_init_common)
pdb_init_ldapsam: WARNING: Could not get domain info, nor add one to the domain. We cannot work reliably without it.
../source3/passdb/pdb_interface.c:177(make_pdb_method_name)
pdb backend ldapsam:ldaps://my.server did not correctly init (error was NT_STATUS_CANT_ACCESS_DOMAIN_INFO)
This, however, was an easy fix. It was a simple SElinux issue:
To my amazement SElinux context does not change on a local unix-socket request. When Samba makes the request to get user information, the LDAPd certificate store needs to have proper SElinux type for the directory. OpenLDAP does not make such checks and works fully.semanage fcontext -a -t cert_t /etc/openldap/cacerts
restorecon -R -v /etc/openldap/cacerts
Also allowing requests to home directories too:
setsebool -P samba_enable_home_dirs 1
After all this, I was happy to get my Samba-shares working again. CUPS-printing does not. But I'll fix that on some day.
Migrating access control into Apache 2.4
Thursday, June 6. 2013
Proftpd setup on Fedora 19
Wednesday, June 5. 2013
Steam games installing DirectX on every start
Thursday, May 30. 2013
Parallels Plesk Panel 11 hangs on backup
Monday, May 27. 2013
For some unknown reason a customer's backup job hung. A ps axuww looked like this after a failed kill 3150 attempt:
3150 ? Z 0:00 [mysqldump] <defunct>
There was no other way of getting rid of that other than a reboot. It didn't help, though. It automatically re-started the backup job and did the same thing again.
All customer's services were disabled, there was Suspend domain until backup task is completed -setting enabled. At that point I was really screwed. The backup job turned undead and all customer's services were out of action. Nice going! The message that was given from Parallels Panel at control panel was: "The subscription is temporarily suspended until the backup or restore process is complete".
Parallels forums had an article about unsuspending a domain. I did the same thing for a subscription. Apparently at the time of writing in Plesk 9, there were no subscriptions. So I ran this:
/usr/local/psa/bin/subscription -u customer's domain name here.com -status enabled
It helped! It un-suspended the services. The backup is not working yet, but the services were running again. I need to further investigate the backup issue and get back about that.
Playstation 3 failing to load updates
Friday, May 24. 2013
Something really weird happened. My Playstation 3 refused to load updates. I retried at least 50 times, but it failed to load measly 24 MiB update from Sony.
A quick Google-search reveals, that plenty of people are suffering from this problem.
In my case the fix was to change wired connection into wireless. I have no idea what the difference is, but for some reason it did the trick.
Getting the updates into PS3 is rather complex as observed from the network traffic. An update is a HTTP-request and the load is split into 4 parallel loads. Example:
GET /tppkg/np/NPEB00874/NPEB00874_T8/0bbab4e7b137739f/EP4350-NPEB00874_00-NETFLIXRIGEL01EU-A0104-V0100-PE.pkg?product=0085&downloadId=be00b7cc&q=2058b9eb8ab5f2492012c6c5b5a73320d1bde7f004d5cb6734fa2ebf322b971e&serverIpAddr=87.248.207.254&downloadType=fm HTTP/1.1
Host: b0.ww.np.dl.playstation.net
Range: bytes=6126400-12252799
I don't understand why they do that. Obviously there is some sort of bug in the 4.41 firmware.
Update 4th July 2013:
Problem still exists in 4.46 firmware. I had major trouble updating, since my PS3 didn't get 100% of the firmware. The error message reads: "An error occurred during the download operation. A connection to the server cannot be established (80710723)".
![]()
Linux 3.9 SCSI working with Hyper-V
Thursday, May 23. 2013
Mac OS X encrypted Timemachine USB-drive
Wednesday, May 22. 2013
I got a new iMac and wanted to use an USB-drive as Time Machine backup destination for it. When it comes to easily movable backup-drives, my policy is to encrypt them. If a drive is lost/stolen/misplaced, other people don't get to access my data.
When OS X sees an empty USB-drive, and there is no Time Machin already set up, it asks if you'd like to use the newly found drive as Time Machine backup destination, which is nice and user friendly. During Time Machine setup, there is a checkbox "Encrypt drive". I checked it, but whatwhatwhat?! It refused to work. Error message:
![]()
There was an error preparing the Time Machine backup disk "TimeMachine" and an additional explanation: The given file system is not supported on Core Storage.
Well... that's strange. I have no idea what a Core Storage is, or why an Apple formatted HFS+ partition would not be a valid (encrypted) backup destination.
Here is what I did. My drive was already formatted when I got it:
$ diskutil list disk3
/dev/disk3
#: TYPE NAME SIZE IDENTIFIER
0: GUID_partition_scheme *1.0 TB disk3
1: EFI 209.7 MB disk3s1
2: Microsoft Basic Data WD Backup 1000.0 GB disk3s2
There is a 1 TiB Western Digital drive with a NTFS-partition on it. So I had to delete the partition and create a better suitable one:
$ diskutil partitionDisk disk3 1 GPT HFS+ TimeMachine 1T
Started partitioning on disk3
Unmounting disk
Creating the partition map
Waiting for the disks to reappear
Formatting disk3s2 as Mac OS Extended with name TimeMachine
Initialized /dev/rdisk3s2 as a 931 GB HFS Plus volume
Mounting disk
Finished partitioning on disk3
/dev/disk3
#: TYPE NAME SIZE IDENTIFIER
0: GUID_partition_scheme *1.0 TB disk3
1: EFI 209.7 MB disk3s1
2: Apple_HFS TimeMachine 999.9 GB disk3s2
This is the partition setup that refuses to work.
After couple of hours of Googling I found the solution:
$ diskutil enableJournal disk3s2
Journaling has been enabled for volume TimeMachine on disk3s2
I seem to have misplaced the links already. Sorry. Anyway, the problem was that I didn't enable journaling on the partition. I can understand why that is a requirement for Time Machine. Having a journaled partition adds robustness to write operations. The real questions are:
- Why creating a HFS+ partition does not enable journaling automatically?
- On Linux creating EXT2 or EXT3 partition does not enable journaling automatically
- On Linux creating EXT4 journaling is enabled by default
- Why doesn't Time Machine state the reason?
- Saying that Core Storage is not supported is a bit vague!
Mac OS X terminal UTF-8 over SSH
Tuesday, May 21. 2013
Something weird happens in OS X Terminal locale settings. Whenever I open an SSH-connection to one of my Linux-boxes, they refuse to properly set up an UTF-8 locale.
The session goes something like this. Checking locale settings on OS X terminal:
$ locale
LANG=
LC_COLLATE="C"
LC_CTYPE="UTF-8"
LC_MESSAGES="C"
LC_MONETARY="C"
LC_NUMERIC="C"
LC_TIME="C"
LC_ALL=
Open SSH-connection and check locale settings on Linux end:
~> locale
locale: Cannot set LC_CTYPE to default locale: No such file or directory
locale: Cannot set LC_ALL to default locale: No such file or directory
LANG=en_US.UTF-8
LC_CTYPE=UTF-8
LC_NUMERIC="en_US.UTF-8"
LC_TIME="en_US.UTF-8"
LC_COLLATE="en_US.UTF-8"
LC_MONETARY="en_US.UTF-8"
LC_MESSAGES="en_US.UTF-8"
LC_PAPER="en_US.UTF-8"
LC_NAME="en_US.UTF-8"
LC_ADDRESS="en_US.UTF-8"
LC_TELEPHONE="en_US.UTF-8"
LC_MEASUREMENT="en_US.UTF-8"
LC_IDENTIFICATION="en_US.UTF-8"
LC_ALL=
Aow come on! Something went wrong.
The fix on the OS X end is not to set the environment variables. In the Terminal settings, there is:
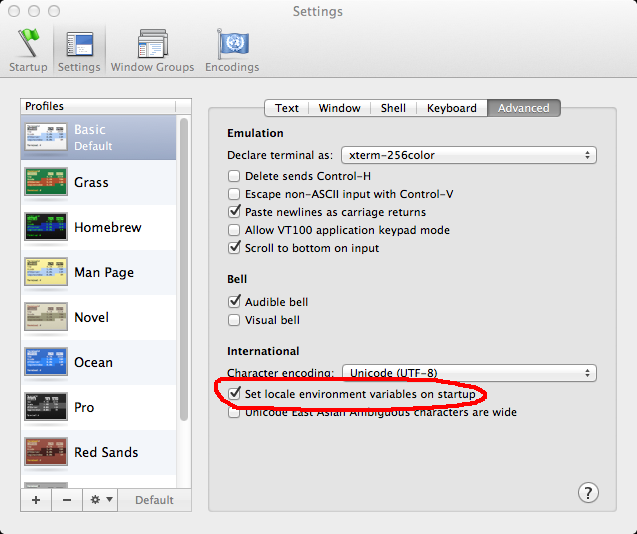
The setting Set locale environment variables on startup needs to be UNset. It is checked out-of-the-box. Then it yields:
$ locale
LANG=
LC_COLLATE="C"
LC_CTYPE="C"
LC_MESSAGES="C"
LC_MONETARY="C"
LC_NUMERIC="C"
LC_TIME="C"
LC_ALL=
The LC_CTYPE is not set. Over SSH-connection to Linux, it yields:
~> locale
LANG=en_US.UTF-8
LC_CTYPE="en_US.UTF-8"
LC_NUMERIC="en_US.UTF-8"
LC_TIME="en_US.UTF-8"
LC_COLLATE="en_US.UTF-8"
LC_MONETARY="en_US.UTF-8"
LC_MESSAGES="en_US.UTF-8"
LC_PAPER="en_US.UTF-8"
LC_NAME="en_US.UTF-8"
LC_ADDRESS="en_US.UTF-8"
LC_TELEPHONE="en_US.UTF-8"
LC_MEASUREMENT="en_US.UTF-8"
LC_IDENTIFICATION="en_US.UTF-8"
LC_ALL=
Now there are no error messages. The next thing to do is to try to find somebody responsible. Whose job it is to fix this.
Google doing the same thing as Skype
Friday, May 17. 2013
Upcoming: Proper Hyper-V guest support for Linux
Thursday, May 16. 2013
Dojo 1.8 / 1.9 on Zend Framework 1
Wednesday, May 15. 2013
Serendipity commenting with proxy
Tuesday, May 14. 2013
PDF creator MSCOMCTL.OCX fail
Tuesday, May 7. 2013
Limiting Time Machine backup size on NAS
Monday, May 6. 2013
Earlier I wrote about getting a Linux-based NAS-box to host Apple Time Machine backups.
I was reviewing my settings on the Mac and realized the text in the Time Machine: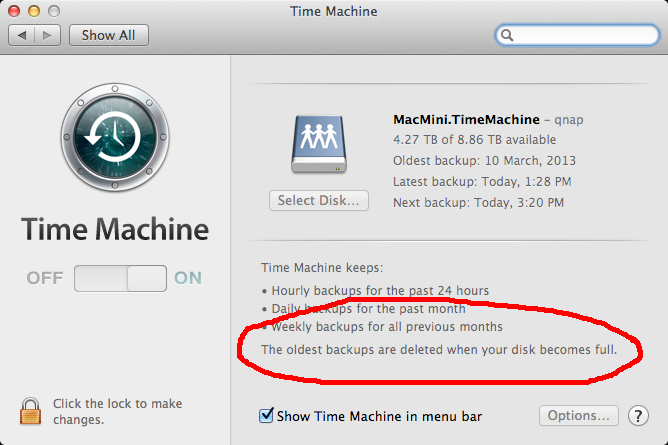
Well... I have lots of disk space there. Not all of it is can be taken by my Mac's backups, so ... Something needed to be done.
I mounted the AFP-share and confirmed the max size of my sparsebundle:
hdiutil imageinfo Mac\ mini.sparsebundle/
It said (unsurprisingly):
Size Information:
Total Bytes: 8855484092416
That is 8+ TiB!! Oh my! There is no way that I can afford to have that much of Apple backups. Luckily there is a way to reduce the size:
hdiutil resize -size 500g -shrinkonly Mac\ mini.sparsebundle/
Now checking the size will yield something reasonable (500 GiB):
Size Information:
Total Bytes: 537214885888
That is something, that I can easily accept.
The information came from:
- http://untoro.wordpress.com/2011/06/07/how-to-limit-space-used-by-time-machine/
- http://nikhilhaas.com/blog/limit-size-of-time-machine-backup-on-wd-my-book-live/
Also I did this to limit the size. I have no idea if it actually does anything.
defaults write /Library/Preferences/com.apple.TimeMachine MaxSize 405600
Perhaps somebody can comment this.

