- Homepage
- http://fi.linkedin.com/in/jariturkia/
- Country
- Finland
- Occupation
- ICT pro
- Hobbies
Let's Encrypt ISRG's Root - Fedora curl fix
Wednesday, August 7. 2019
Update 8th Aug 2019:
The information in this blog post is not the entire truth and less accurate, than I'd hope for. Updated information regarding certificate system in a Fedora linux can be found from this blog post.
Now that Let's Encrypt is issuing their certificates from ISRG Root X1 / Let's Encrypt Authority X3 certificate authority, my Fedora is failing to access sites with curl. I have addressed both of these earlier in articles Let's Encrypt Transitioning to ISRG's Root and Fixing curl with Go Daddy Secure Certificate Authority G2 CA root. However, the previous fixing instructions in modern curl won't work. This is because Fedora guys won't build curl with NSS anymore, but have fallen back to standard OpenSSL used by almost everything else in Linux. Since I'm writing about it, they're doing a bad job about it.
If you'll never use curl or anything built with libcurl, you'll never notice anything. Also, if you're running curl/libcurl but are never accessing any sites with Let's Encrypt certificates, again, you won't notice it. Most of us will notice. Curl will keep spewing errors like "curl: (60) SSL certificate problem: unable to get local issuer certificate" making everybody mad.
Unlike earlier, curl run with --verbose will announce following certificate locations:
* successfully set certificate verify locations:

*   CAfile: /etc/pki/tls/certs/ca-bundle.crt

  CApath: none
It so happens, the new intermediate certificate used by Let's Encrypt isn't in the precious ca-bundle.crt file, your connection attempts will fail on a trust issue. You can run the classic OpenSSL certificate fix -operation:
# cd /etc/pki/tls/certs

# wget https://letsencrypt.org/certs/letsencryptauthorityx3.pem.txt

# mv letsencryptauthorityx3.pem.txt letsencryptauthorityx3.pem

# openssl rehash
... which will fix a lot in your Fedora, but it won't fix curl. Remember: it will only look inside the /etc/pki/tls/certs/ca-bundle.crt, and you did not add it there.
To get the issue solved for realz, you need to delete the symlink pointing to the certificate bundle file, cook up a new & better one. Like this:
# cd /etc/pki/tls/certs

# rm -f ca-bundle.crt

# cat /etc/pki/ca-trust/extracted/pem/tls-ca-bundle.pem /tmp/letsencryptauthorityx3.pem > ca-bundle.crt
Now your curl will be tamed. But it won't stick. The first time you'll get an update to RPM-package ca-certificates, your changes are gone and you'll need to re-do them. Gee! Thanks for that.
Bug report is at Curl not using CA-path - custom certificates not used. Go add your comments there to let Fedora guys know how much you appreciate their work! 
Zebex Z-3151HS bar code reader - Windows 10 - Unknown USB, USB device not recognized
Thursday, July 11. 2019
Among the number of toys I have, are couple of Zebex bar code readers. Since forever (or 2013), I've had issues with Windows not detecting the newly attached USB-device correctly. See my previous article Windows 7 unable to detect a HID barcode scanner for details. That was on a Zebex Z-3000 to be exact.
During all these years, the problem has not solved itself and all my attempts to fix have been not-so-successful. The reader I've been most recently used is an improved one using a laser to read the data, a Z-3151HS (the HS stands for High Speed). The version query will return a single-line string containing following:
Model Z3151HS S01.01

Ver

01.27

Date

01-18-2019
On a plugin, the USB human-interface-device (or HID, or keyboard) does this:
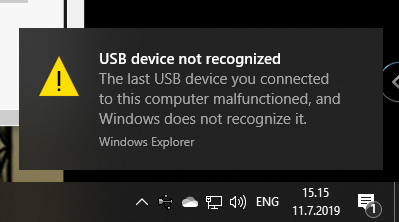
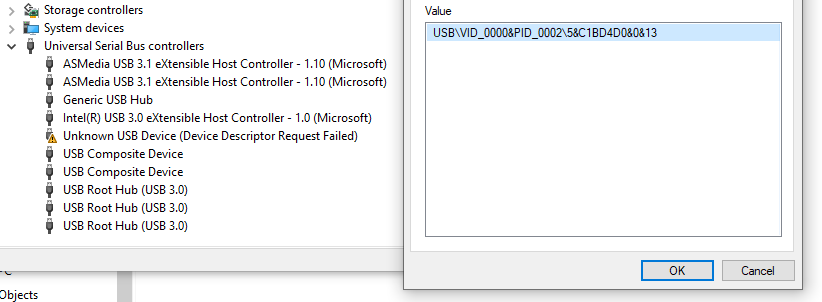
Nobody loves seeing an USB device not recognized -popup, or Device Descriptor Request Failed on device manager. That's a sign of a major malfunction.
Luckily, in this case without spending too much time, little bit of troubleshooting became fruitful and both problem reason and a fix were found. The bar code reader loves being in a wrong mode. This is an USB-device, but no matter what I try, on plugin the device will be in IBM PC/AT/PS/2 Keyboard emulation mode. That incorrect mode makes the newly plugged in USB-device not respond to a Windows intiated device query. As you might think, your Windows will be pissed about the failure and bark about it. Obviously, the device should be in USB-mode to handshake properly with Windows, that's a no-brainer.
Again, the mode can be changed easily by scanning some bar codes (these are actually in the manual too):

Enter configuration mode, switch to USB-mode and end configuration mode. Poof! Now Windows 10 sees the HID USB-thingie ok and it does work correctly. The obvious problem is, that you really do need to do it EVERY SINGLE TIME you plugin the device to your computer. Not cool! Numerous attempts to fix the mode-select have failed. If you have a suggestion, I'd be happy to try it.
Bonus: Firmware upgrade
My unit had a measly 1.03 firmware when I bought it. Obviously, I've been upgrading firmwares while hoping the problem would be solved somehow. No such joy yet.
New firmwares can be downloaded from Zebex website @ https://www.zebex.com/en/product/index/20/Z-3151HS with appropriate tooling to do the update. Since this is on a computer, nothing will ever work as smoothly as you'd like. On an attempt to run the firmware upgrade tool, this will happen:

In front of your eyes, a failure will occur and a message will state: Make sure the device work under USB-Boot mode. I'm not sure whose English grammar is better, mine or that person who wrote that sentence, but the problem stands. You need to get your device into USB-Boot -mode and you have zero clue on how to do that.
Tons of googling, reading forum posts and manuals will reveal, that such a sequence does exist. You need to scan following bar codes:
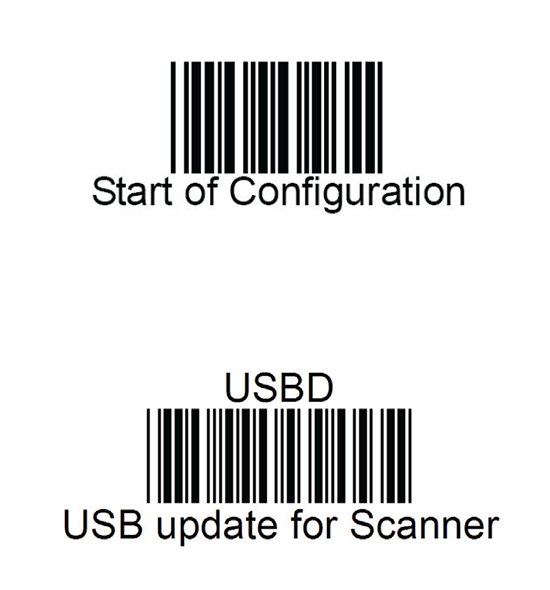
Yet again, go for configuration mode, and place the device into USB update -mode. After that, your firmware update will proceed to actual update.
I'll hope these tips will help some poor user trying to get his/hers reader working.
Enjoy scanning!
Weather Station destroyed in hailstorm
Wednesday, July 10. 2019
Over four years ago I wrote about my weather station setup. Well ... It doesn't exist anymore. There was a severe thunderstorm and my gadgets weren't properly fastened to the steel pipe and this happened:
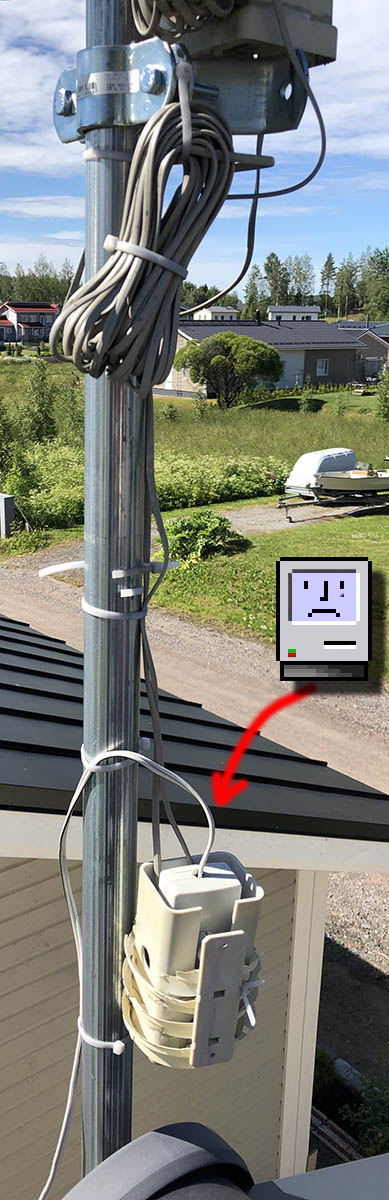
After weather cleared, I realized the lack of readings from my garage roof. The poor temperature unit / CPU was upside down, hanging from some wirings and FULL OF WATER! Ufff! Electronics and water won't mix. At least not well.
My zip-ties didn't like the ping pong -ball sized hail:
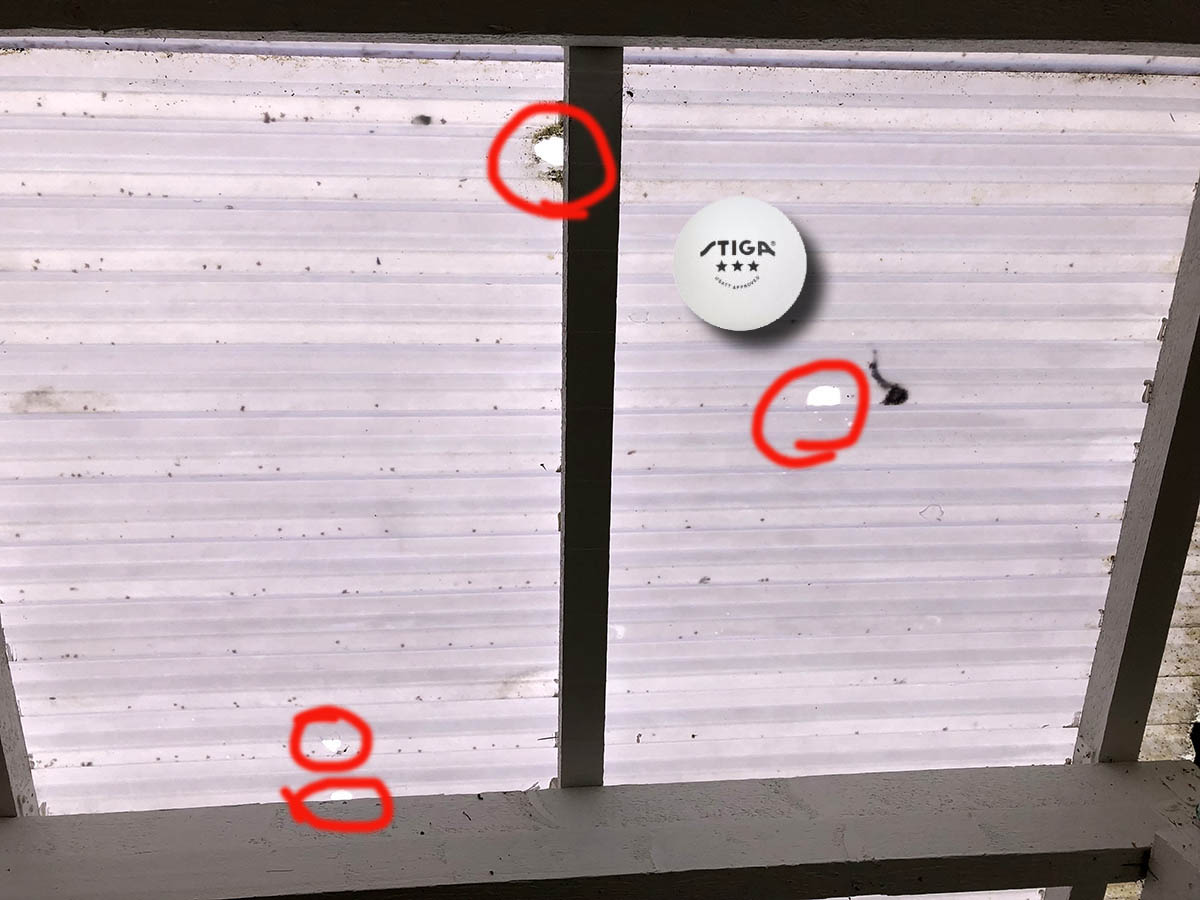
The picture from sunroofing is from my friend's place. He has some tinkering to do, to get this deck roofing fixed. That piece of plastic didn't survive chunks of ice plummeting from the sky.
To get my weather properly measured and data-logged, I already put a purchase order for a new unit. This time I'm going for a Davis Vantage Vue. Also, to save money this time I'm attaching it properly!
Weather Station destroyed in hailstorm
Wednesday, July 10. 2019
Over four years ago I wrote about my weather station setup. Well ... It doesn't exist anymore. There was a severe thunderstorm and my gadgets weren't properly fastened to the steel pipe and this happened:
After weather cleared, I realized the lack of readings from my garage roof. The poor temperature unit / CPU was upside down, hanging from some wirings and FULL OF WATER! Ufff! Electronics and water won't mix. At least not well.
My zip-ties didn't like the ping pong -ball sized hail:
The picture from sunroofing is from my friend's place. He has some tinkering to do, to get this deck roofing fixed. That piece of plastic didn't survive chunks of ice plummeting from the sky.
To get my weather properly measured and data-logged, I already put a purchase order for a new unit. This time I'm going for a Davis Vantage Vue. Also, to save money this time I'm attaching it properly using steel hose clamps!
Azure Developer Associate certification
Thursday, June 27. 2019
Yup.

Passed that one yesterday. For those intersted, it was a AZ-203: Developing Solutions for Microsoft Azure exam.
Previous one was 21 years ago:
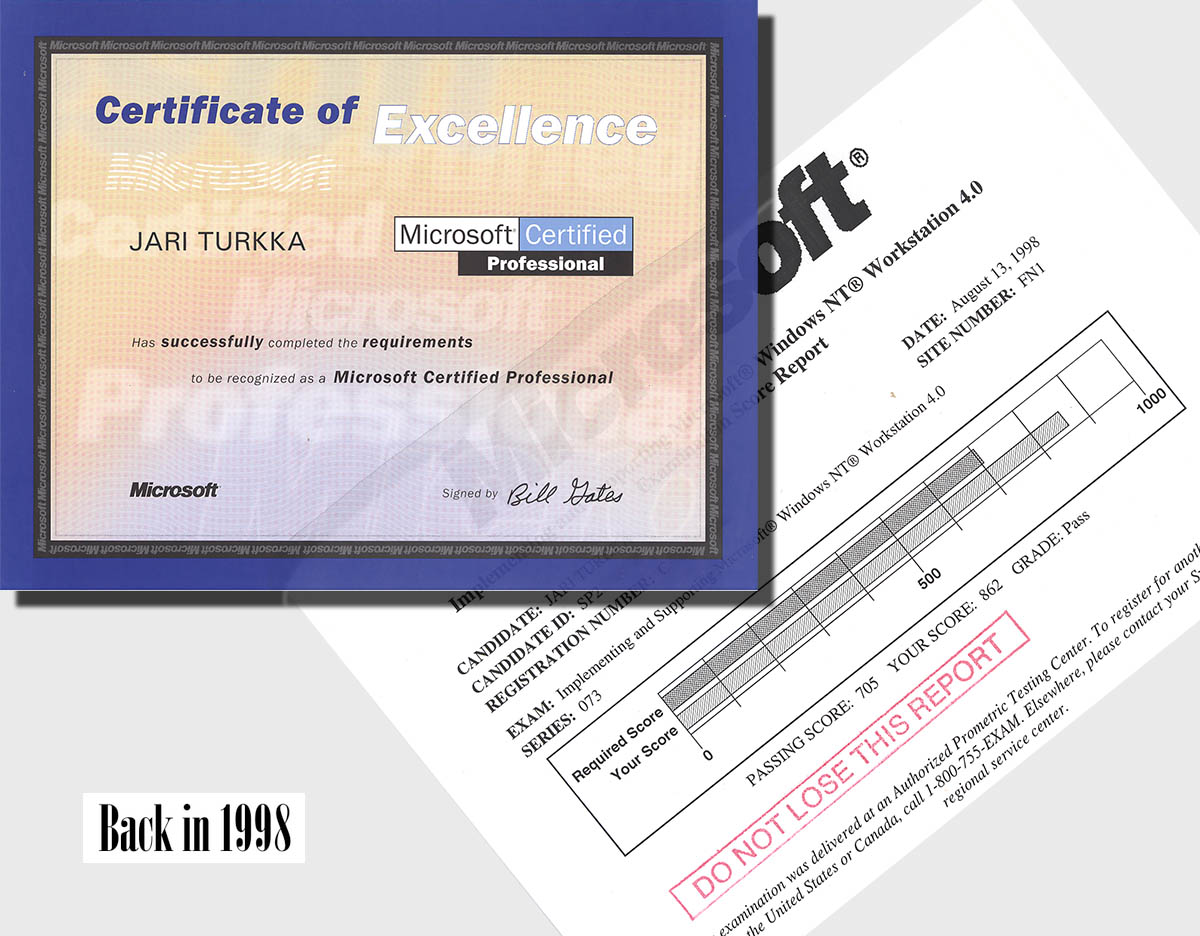
Notice how they misspelled my name. Argh!
I bet many of you haven't used Windows NT4.0 Workstation for a while (or ever).
Also notice how the certification was issued by Mr. Bill Gates himself! 
EBN European Business Number scam - Part 4 - Epic win!!
Tuesday, June 25. 2019
Couple weeks ago, a good friend of this blog, Mr. Gorila approached with his comment (available at https://blog.hqcodeshop.fi/archives/372-comments.html#c2786). He suggested, that our beloved friends at DAD Gmbh were in some sort of financial trouble. I did some digging of my own, but given the huge handicap of me not knowing any German language nor corporate laws or practices of Germany, I found nothing. Today, Mr. Gorila approached me again with proof.
EBN scammers are Bankrupt!
Its obvious, that the people behind the scam went nowhere. They're still there and are cooking up something while trying to maintain the scam from Cyprus. There are comments from people, who received letters from debt collectors operating from Cyprus. The "debt" in question is from EBN scam and is somehow transferred from DAD Gmbh to CLB Solutions Management.
Regardless of these events, my advice is unchanged: Keep your cool and
DO NOT PAY!
There seems to be increasing amounts of proof of malpractice by DAD Gmbh. Their "debts" are completely ficticious and there is no way they can win anybody in a court of law in Germany. They need to sue your ass in Germany court, and that's there they will lose. They already did that and will keep losing. Actually, "they" don't even manage the company anymore. The company is to be dissolved by court order and liquidation is handled by somebody else than the scammers.
Proof
For those wanting to see the proof, go to https://www.bundesanzeiger.de/ and make a search for "DAD Deutscher Adressdienst". You will receive search result page:
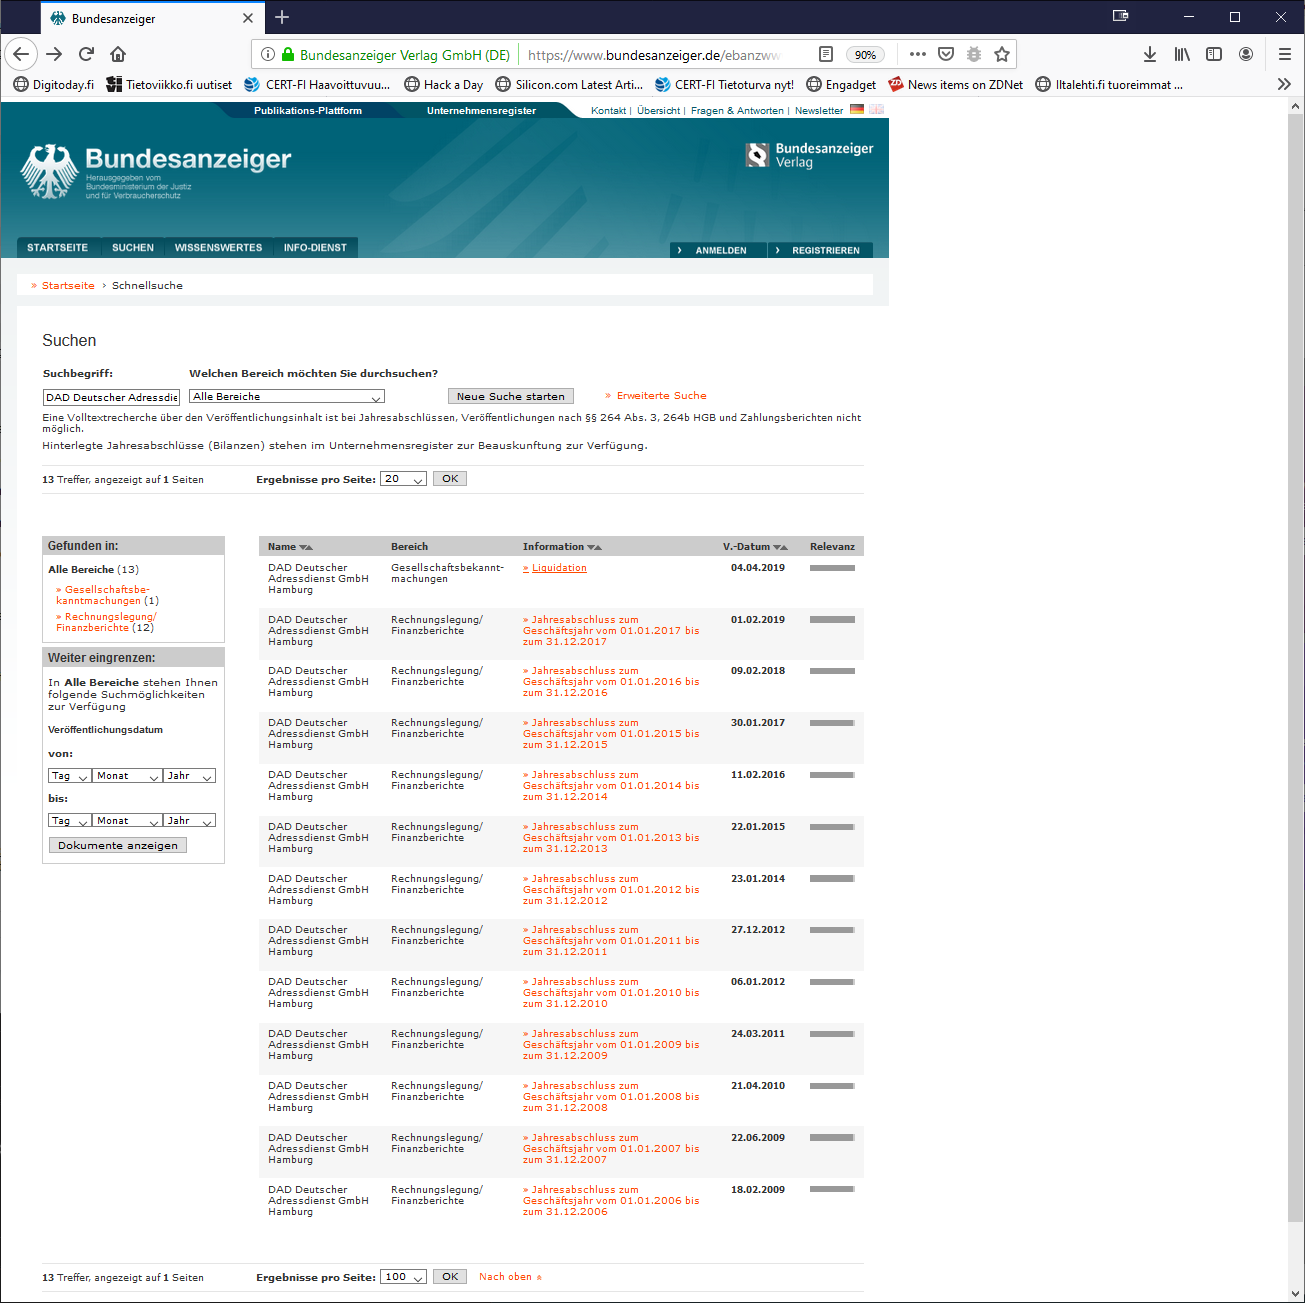
The first result will be the official notification of company liquidation. If you click the link, the text simply says the company will be dissolved and all creditors should contact the company.
More interesting is their balance sheet from year 2017 (printed into PDF by me DAD-scam-Bundesanzeiger-DAD-balance-sheet-2017.pdf). That piece of criminal history needs to stay available as long as there is Internet and human life on Earth.
My most important findings are:
- Scammers have almost 1 million € in accounts receivable. That's ficticious "debt" from marks they scammed.
- Its obvious, that majority of that "income" will never land at their bank accounts. DO NOT PAY!
- Company has nearly 250.000 € cash available
- Two options here: Their liquidation hit them as a surprise or they are really bad at crime.
- It makes no sense to leave any easy-to-move assets to the company.
- Besides the 25.000 € initial capital, that's the profit from their crime. I imagined more.
- Their accumulated operating loss is nearly 100.000 €
- I don't think they ever targeted for profit.
- In a company, it is very easy to avoid taxes by never making any profit out of the operation.
- Stated in balance sheet details: There are almost 400.000€ liabilities remaining
- Given the coarse nature of a balance sheet, I cannot deduce much from that besides they owe more money than they have.
- That kinda explains the liquidation.
Future
They're already running a new scam. It's called European Register of Commerence or ERC. The webpage looks like this:

Its simply a spin-off from EBN-scam with a GDPR-twist.
Participate!
Anybody of you can participate in fighting these scammers. I'm maintaining the Finnish Wikipedia page for EBN scam to have a reputable source of information available with a really good Google page rank. Page is at: https://fi.wikipedia.org/wiki/European_Business_Number
You can do the same in your language!
Keep people informed about these scams. That will make the work for those scammers harder and harder. Many readers have shared information in comments of my blog, please keep doing that! There are people including me, who will investigate your clues and raise awareness of these scams and what happens in the scam'osphere.
Thank you!
Trigger Azure CDN to update certificate to custom domain from Key Vault
Tuesday, June 18. 2019
systemd setting overrides
Monday, June 17. 2019
In couple past posts of mine, I've instructed people to do alter systemd service descriptions. Examples from Randomness in computers and Handling /run with systemd. As we all know, systemd is quite a beast. It just keeps on giving complexity as we stumble along trying to grasp all of it.
For example:
To add more command arguments to rngd.service, you can do what I instructed earlier. You can copy /usr/lib/systemd/system/rngd.service to /etc/systemd/system/, edit the file and do a systemctl daemon-reload to update the changes.
If you want to choose more systemd'ic (Python developers always say "pythonic") way, you can do a:
systemctl edit rngd
This command will open a text-editor. The editor is your default one from EDITOR environment variable, or if you haven't picked one, a default will be chosen for you by your favorite Linux distro vendor.
What you should make the text file contain, is following three (3) lines:
[Service]

ExecStart=

ExecStart=/sbin/rngd -f --rng-device=/dev/TrueRNG --fill-watermark=4000
Those lines will re-define service description. First by clearing out the previous value(s) and then defining a new one. On save, this setting will take automatically effect and you don't have to do anything else. Also, this setting is persisted in a file called /etc/systemd/system/rngd.service.d/override.conf. Of course, you can create that particular file yourself, but then the familiar systemctl daemon-reload is needed to make your changes stick.
Nice and easy!
New microphone
Monday, June 10. 2019
It's not that you'd be talking all the time, but quite often a good microphone is needed. It may be (video)conferencing to somebody or just to get your multiplayer game coordinated with the other people you're playing with. Lot of people are happy using the tiny mic in their headphones, but not me. I'd rather invest some real money to a proper piece of hardware to get my sound transmitted over crystal clear.
Since I didn't want to go for ridiculously expensive studio ones, I stayed below 300 € price range and went for a Røde NT-USB (details are at https://www.rode.com/microphones/nt-usb). The microphone would work as a self-standing desk mic, but adding a few options allows me to amp up the experience to a near-studio -quality.
This is what my rig looks like:
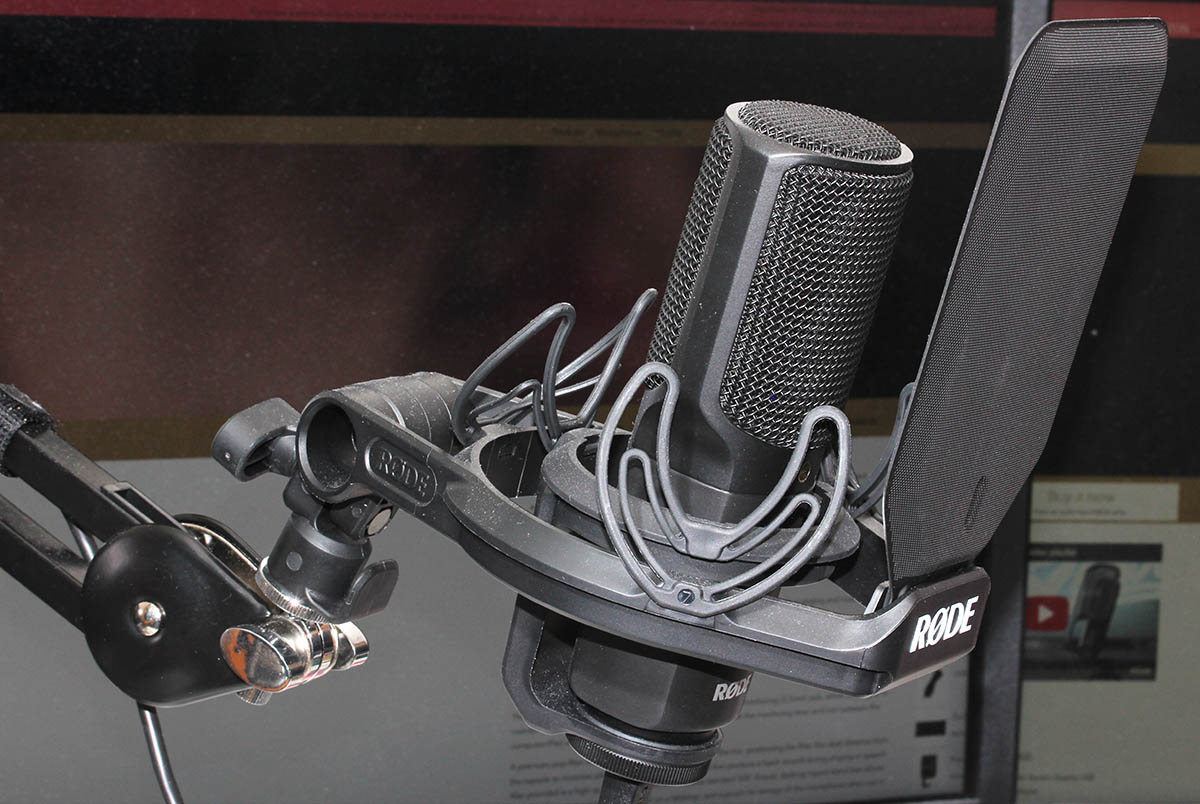
As you can see, there is a PSA1 boom arm and a SMR shock mount to keep the sound quality better when I bang the desk in rage.
Mic itself looks like this:


The metal ring used to fasten the microphone to a stand gives you indication of the quality of this product. No messing around here. No flimsy plastic screws. Steel!
Also the acronym USB gives you a hint about how you might connect this lump of metal to a computer, using USB 2.0 interface on the bottom of the microphone. If this would be professional-quality, instead of USB-B connector, you would use for example XLR-connector for cabling. This would leave you to do the analog-to-digital -conversion by yourself. I chose this particular unit for the reason it hooks up to your PC/Mac/Linux/whatever directly. Here no extra stuff needed, but the setup is limited by USB's 5 meter max. cable length. There is plenty of USB-cable in the box, so don't worry about running out.
Shock mount is for reducing any possible noise caused by accidental headbump into desk or microphone. As suggested, the mount absorbs most of the shock and not transmitting really weird noises over. This is how the "cradle" looks like:

There is a windshield reducing any air blowing from me towards the microphone. Again, reducing any weird noises sounding like I was hit by a hurricane to being transmitted over. The shock mount connects to the boom arm using a 5/8" (or 3/8") screw:

As you can see, there is an adapter there allowing you to use pretty much any mic boom of your choice. I chose to go full on with Røde.
Important thing is to note, that manufacturer does NOT recommend using SMR shock-mount with NT-USB microphone. Product details at https://www.rode.com/accessories/smr do NOT list NT-USB as being compatible or related product. The reason is not as dramatical as you might think. The products are compatible, but:
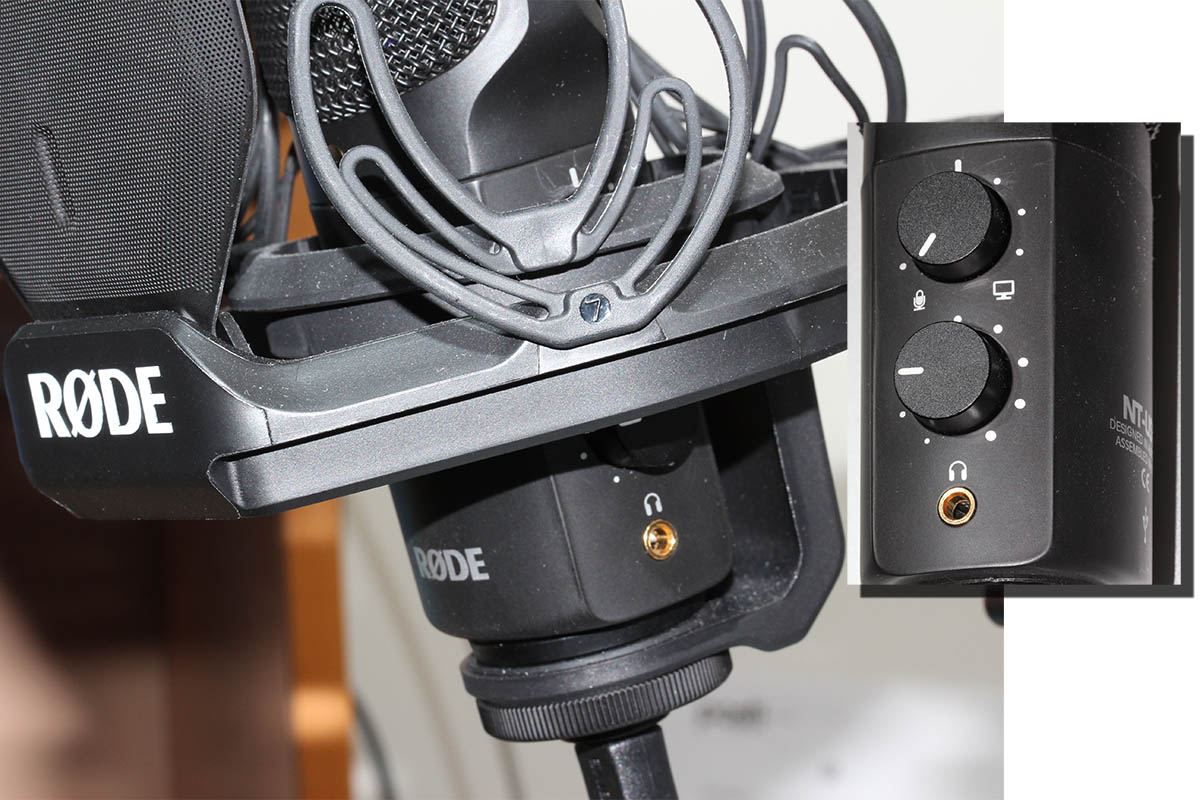
In a scenario, where you would use the USB to transmit sound back to your headphones via 3.5mm jack in the mic, it would be difficult for you to change the headphones volume as the volume knobs aren't that easy to access. You can access them, but not as well as manufacturer would love you to. So, they simply flag the products as "incompatible".
Ultimately, I've been really happy with the product. My sound is heard extremely well on the other side. Helping with this is the boom arm, which lets me place the microphone to almost any location of my choosing while doing my computing, whatever type of computing that might be. The best thing is the very high quality of the product. I don't think I'll be buying a new mic anytime soon.
Vim's comment line leaking fix! Part 3
Wednesday, June 5. 2019
Adding a source of randomness to a Linux
Monday, June 3. 2019
Randomness in computers
You don't need to know much about computers to understand, that computers cannot do random things. Yes, all programming languages and libraries do offer you a rand()-function to emulate randomness. However, the resulting output will follow the carefully crafted programming implementing this "randomness". The most trivial pseudo-random functions will merely provide a sequence of numbers appearing random, but this sequence can be reset to start from beginning making the "randomness" predicatable. That's not really very random, huh!
Improved randomness in computers
To be fair, there does exist improved pseudo-random algorithms which take their initial seed-values from something volatile (time is one such volatile parameter) making the quality of randomness better. Still, even high-quality pseudo-random algorithm is just complex sequence of operations, which will produce duplicate results on same input values. Sometimes its just very tricky to craft a situation where all of the input values would match.
If somebody is capable of doing that, your randomness changes into predictability. Read the story of Dual_EC_DRBG on Wikipedia https://en.wikipedia.org/wiki/Dual_EC_DRBG. When you're generating your precious private keys, you don't want anybody (including NSA) to be able to guess what you have there.
Random source in Linux
Since a proper random source is something every single user, developer and sysadmin would love to have, the problem has been approached on your Linux by authors of the operating system. An excellent description can be found from Wikipedia article https://en.wikipedia.org/wiki//dev/random#Linux. Briefly put, your Linux will collect environmental entropy from number of sources (including human interaction with keyboard and mouse) to a pool, which can then be used to produce naturally random numbers. It actually works very well, the quality of randomness is top-notch.
Obvious problem with this approach is, that you cannot pull too many random numbers out of this source without exhausting it. The fix is to keep typing something while moving your mouse (not a joke!) to generate entropy for the random source. This will eventually help fill the entropy pool and /dev/random will spit couple bytes more.
Those users who have exhausted their /dev/random on an idling rack server without a console keyboard, mouse and video know that it takes painfully long for the entropy pool to fill. A busy server doing something will be able to fill the pool much faster.
A real random source
If you need a real proper random source, which works without human intervention and can provide really good randomness as a stream, there are possibilities on hardware. I know of two good ones, Simtec Electronics Entropy Key and ubld.it TrueRNG Hardware Random Number Generator.
Note: if you consider getting one, get the TrueRNG version 3 (http://ubld.it/truerng_v3). Its just that I have the 1st gen version at hand and haven't found the reason to upgrade.
My TrueRNG looks like this:
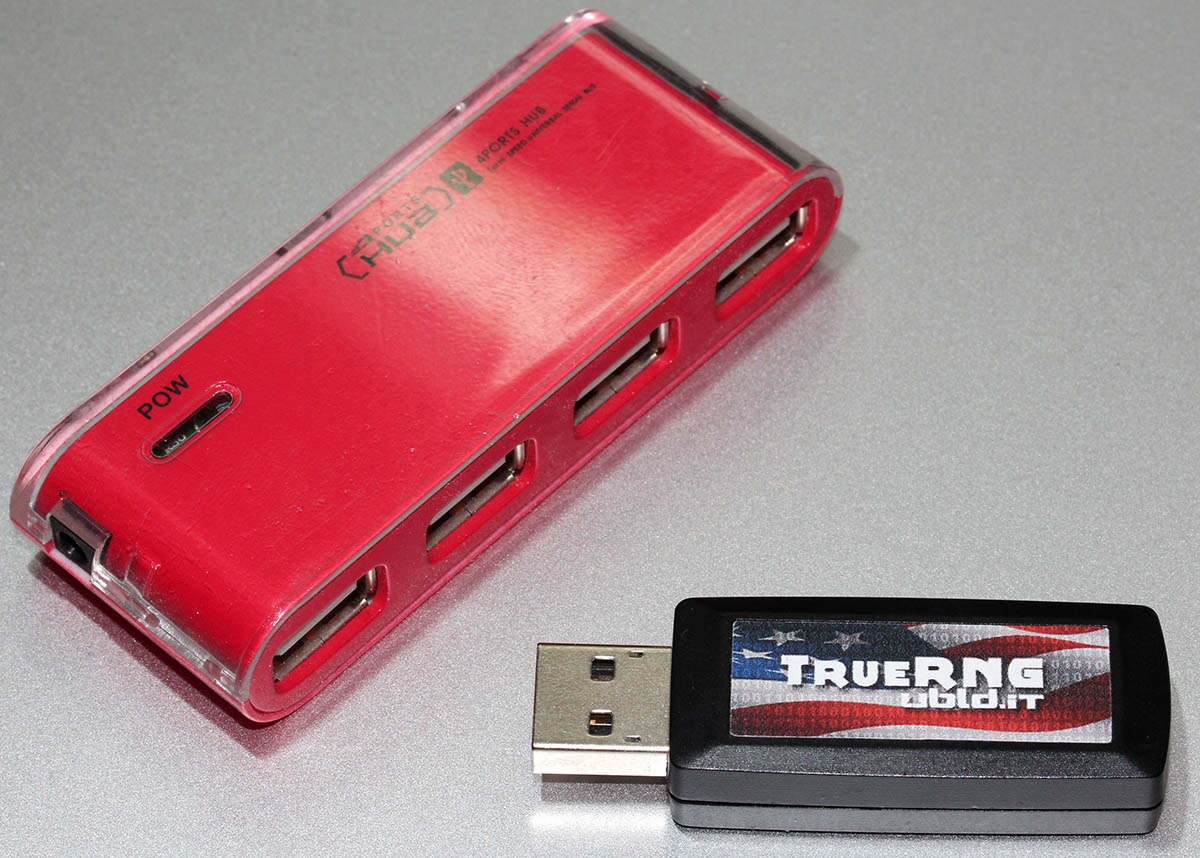
It is essentially an USB-stick.
Linux lsusb info essentially identifies it as a Microchip (vendor ID 0x04d8) manufactured USB-device (with ID 0xf5fe) providing RS-232 communications:
Bus 002 Device 009: ID 04d8:f5fe Microchip Technology, Inc.

Device Descriptor:

  bLength                18

  bDescriptorType         1

  bcdUSB               2.00

  bDeviceClass            2 Communications

  bDeviceSubClass         0

  bDeviceProtocol         0

  bMaxPacketSize0         8

  idVendor           0x04d8 Microchip Technology, Inc.

  idProduct          0xf5fe

  bcdDevice            1.00

  iManufacturer           1 ubld.it

  iProduct                2 TrueRNG

  iSerial                 0

  bNumConfigurations      1

  Configuration Descriptor:

    bLength                 9

    bDescriptorType         2

    wTotalLength       0x0043

    bNumInterfaces          2

    bConfigurationValue     1

    iConfiguration          0

    bmAttributes         0x80

      (Bus Powered)

    MaxPower              100mA

    Interface Descriptor:

      bLength                 9

      bDescriptorType         4

      bInterfaceNumber        0

      bAlternateSetting       0

      bNumEndpoints           1

      bInterfaceClass         2 Communications

      bInterfaceSubClass      2 Abstract (modem)

      bInterfaceProtocol      1 AT-commands (v.25ter)

      iInterface              0

      CDC Header:

        bcdCDC               1.10

      CDC ACM:

        bmCapabilities       0x02

          line coding and serial state

      CDC Union:

        bMasterInterface        0

        bSlaveInterface         1

      CDC Call Management:

        bmCapabilities       0x00

        bDataInterface          1

      Endpoint Descriptor:

        bLength                 7

        bDescriptorType         5

        bEndpointAddress     0x81  EP 1 IN

        bmAttributes            3

          Transfer Type            Interrupt

          Synch Type               None

          Usage Type               Data

        wMaxPacketSize     0x000a  1x 10 bytes

        bInterval               1

    Interface Descriptor:

      bLength                 9

      bDescriptorType         4

      bInterfaceNumber        1

      bAlternateSetting       0

      bNumEndpoints           2

      bInterfaceClass        10 CDC Data

      bInterfaceSubClass      0

      bInterfaceProtocol      0

      iInterface              0

      Endpoint Descriptor:

        bLength                 7

        bDescriptorType         5

        bEndpointAddress     0x02  EP 2 OUT

        bmAttributes            2

          Transfer Type            Bulk

          Synch Type               None

          Usage Type               Data

        wMaxPacketSize     0x0040  1x 64 bytes

        bInterval               0

      Endpoint Descriptor:

        bLength                 7

        bDescriptorType         5

        bEndpointAddress     0x82  EP 2 IN

        bmAttributes            2

          Transfer Type            Bulk

          Synch Type               None

          Usage Type               Data

        wMaxPacketSize     0x0040  1x 64 bytes

        bInterval               0

Device Status:     0x0001

  Self Powered
And by looking at /dev/, there is a /dev/ttyACM0. That's how udevd will populate a CDC-device when it sees one.
How is this a "true" random source?
Oh, that's easy. The device will produce a random 0 or 1 bit constantly when its on. Or to be precise, there is an internal algorithm producing those based on a constant flow of electrons on a transistor PN-surface. The exact phenomenon is called avalance effect or avalance breakdown. For those who can do electronics, there is a good explanation about this in Difference Between Avalanche Breakdown and Zener Breakdown (I borrowed the visualisation pic from above link).

To (over)simplify that, in a carefully constructed electronic circuit, inside a transistor an electron may or may not be emitted on the other side of a semiconducting surface. The occurrence is as random as it can be in nature. Other circuitry will detect this random flow of electrons (or lack of flow) to produce ones and zeros.
What makes this a really good for randomness, as it is well established that this avalance of electrons will happen. Also, it will happen often enough to produce a stream of events. It's just that we don't know exactly WHEN the avalance of electrons will happen. If you time-slice this to slots, a slot can be empty (no avalance) or full (electrons avalanching).
Linux tweaking:
udev
Anybody having multiple devices in their Linuxes knows, that you really cannot control which device name some specific device will get on reboot. To overcome that, udevd can be instructed to do things when it sees a device. My rules for TrueRNG include setting it to highest possible speed and creating a symlink-device so, that I can point to a known source of random. Also, I'm loosening access to that source of randomness to any users belonging to dialout-group. If I wouldn't do that, only root would have access to this fine random-source.
My /etc/udev/rules.d/99-TrueRNG.rules contains:
SUBSYSTEM=="tty", ATTRS{product}=="TrueRNG", SYMLINK+="TrueRNG", RUN+="/bin/stty raw -echo -ixoff -F /dev/%k speed 3000000"

ATTRS{idVendor}=="04d8", ATTRS{idProduct}=="f5fe", ENV{ID_MM_DEVICE_IGNORE}="1", GROUP="dialout", MODE="0664"
If you want to take your random-device for a spin, you can do something like:
dd if=/dev/TrueRNG of=random.bytes bs=64 count=1024
That would create a file of 64 KiB containing very very random bytes. In theory you can just cp data out of the character device, but since it has an infite flow, you'll need to cut it at one point.
rngd
Remember the part I said earlier about Linux using your keypresses and mouse movements as entropy source for randomness. Even with the USB-stick popped into a PC, that still remains the case. What needs to be done next is to offer a helping hand to the Linux kernel and make sure the entropy pool is always full.
My Fedora has package called rng-tools. It is packaged from Mr. Horman's https://github.com/nhorman/rng-tools. What's in there are the tools for pumping those precious truly random bits out of the USB-source to Linux kernel's entropy pool. As default, rngd will use /dev/hwrng as the source for randomness. Some Linuxes don't have that device at all, some Linuxes point that into CPU's random source. What's guaranteed, it will not point to your USB-stick! We need to change that.
Btw. you might be horrified by the fact, that something is fidding with your randomness. The exact bits transferred from USB to entropy pool won't be the actual bits getting out of /dev/random. Your keypresses and many other events are still a factor. Its still a good idea to not run randomness-monitoring malware or spyware in your Linux.
Systemd works so, that I did create a copy of /usr/lib/systemd/system/rngd.service into /etc/systemd/system/rngd.service. The contents of the copy in /etc/systemd/system/ can be freely modified and it has priority over the /usr/lib/systemd/system/ one. The only change I made was to have the ExecStart-line say as:
ExecStart=/sbin/rngd -f --rng-device=/dev/TrueRNG --fill-watermark=4000
When rngd-service would be started, it will use the USB-stick as source and make sure, there are at least 4000 bits of entropy in the pool.
Making sure rngd setup works
At any given point, you can query how many bits are available in the Linux entropy-pool:
cat /proc/sys/kernel/random/entropy_avail
Since my setup is working correctly, it will display a number greater than 4000 and smaller than 4096. The upper limit comes from /proc/sys/kernel/random/poolsize, which is a hard-coded number from Linux kernel source.
Hint: If you do the stupid thing like I did and set the /proc/sys/kernel/random/write_wakeup_threshold (using --fill-watermark) into 4096 (or above), your rngd will keep hogging CPU like there is no tomorrow. It is impossible for the pool to contain maximum number of bits at any given time. Give your system a break and set the threshold bit lower than max.
Finally
It's always nice to know for a fact, that random numbers are random. This fact can be verified and has been verified by number of other people.
Enjoy!
Bacula 9 vchanger: Tape count fix
Sunday, June 2. 2019
![]()
One of the first ever blog posts I've written here is about Bacula, the open-source backup software (more at https://www.bacula.org/). I published Fedora 17 binaries for the virtual tape changer running for Bacula 7. The post from year 2013 is here.
Running Bacula in Fedora Linux isn't much of a trick, ready-made binaries are available by the distro and configuring one is covered in Bacula's documentation. Then again, running Bacula with a NAS (see Wikipedia for Network-attached storage) as storage backend is where things get very very tricky. I've written about my Qnap NAS-device's support earlier, see the post about that.
Since its inception, Bacula is baked to require a tape drive (or drives) and a set of tapes (a single tape is supported also). Given modern day computing environment, actual physical tapes aren't used that much. Even I stopped using DLT (Wikipedia Digital Linear Tape) or LTO (Wikipedia Linear Tape-Open) tapes years ago and went for an easy, fast and inexpensive solution for storing my backups on a NAS. So, I really do need to have a concept of a "tape" somehow. That's where the virtual Bacula tape changer steps in. It is a piece of software attaching to Bacula autochanger API emulating a virtual "tape" drive and set of tapes with all the necessary operations, but doing all that on a filesystem. More details about autochangers can be found from Bacula Autochanger Resource page.
The obvious idea is to create a set of files to act as a set of "tapes". For system administration purposes, the tapes are just files in a subdirectory. Smart thing to do is to make that particular subdirectory located on a NAS to store the backups where there is plenty of external capacity outside your system. In my case, I'll access them over an iSCSI-mounted filesystem. More details about iSCSI on a Linux can be found from RedHat Enterprise Linux 7 manual pages at https://access.redhat.com/documentation/en-us/red_hat_enterprise_linux/7/html/storage_administration_guide/online-storage-management#osm-target-setup. For those planning something similar: I chose NOT to go with a NFS. A NFS-connection get stuck very easily and you will be rebooting your stuff a lot. See How-To: Release Stuck NFS Mounts without a Reboot @ Linux Journal for more about that.
When I went to Fedora 29, my Bacula setup got an automatic bump to version 9. My previous setup was for Bacula version 7 and quite soon I realized that I needed to alter my vchanger somehow to get it to support version 9. Bacula-guys did make changes to autochanger-API in their version-bump process. Luckily vchanger author was ahead of me and I got the code from http://sourceforge.net/projects/vchanger/. Soon realized that when I did a simple command of vchanger /etc/qnap.conf LIST, it displayed an extra tape which didn't exist in reality. I was puzzled. Old setup displayed the tape count correctly.
I did some C++ debugging and found out an obvious bug in the code. In src/diskchanger.cpp, DiskChanger-class InitializeVirtSlots()-method calculates the last changer slot numer incorrectly. It is guaranteed to be one-off. After fixing this, I contacted the vchanger author Mr. J. Fisher about my findings, and he agreed, there was a bug in his code.
Unfortunately, couple of months have passed and there is no 1.0.3 release yet, so the fix isn't in the SourceForge git-repo yet. For Fedora-users, my RPMs are available at http://opensource.hqcodeshop.com/Bacula/vchanger for B9/. Go get them there! I've been using those since last December, so I think my fix is correct and doesn't introduce any issues.
Apple iOS device reset - Dismantling an old phone to be sold
Thursday, May 30. 2019
Every one of use will eventually end up in a situation where old mobile device is upgraded to a new one. Most of us can manage getting the new one working without problems. There are backups somewhere in the cloud and the new device will have the intial setup done from the backup and everything in the out-of-the-box experience will go smoothly.
But what about the old one? You might want to sell or give or donate the perfectly functioning piece of hardware to somebody who wants it more. But not without your data, accounts and passwords!
Apple support has this HT201351 article What to do before you sell, give away, or trade in your iPhone, iPad, or iPod touch. It instructs you to do a full erase of the device, but doesn't go too much into the details.
Personally, I've struggled with this one a number of times. So, I decided to record the full sequence for me and anybody else needing it. Here goes!
Start with Settings, General. In the bottom of General-menu, there is Reset. That's your choice. For curious ones, you can go see the menus and choices without anything dangerous happening. You WILL get plenty of warning before all your precious data is gone.
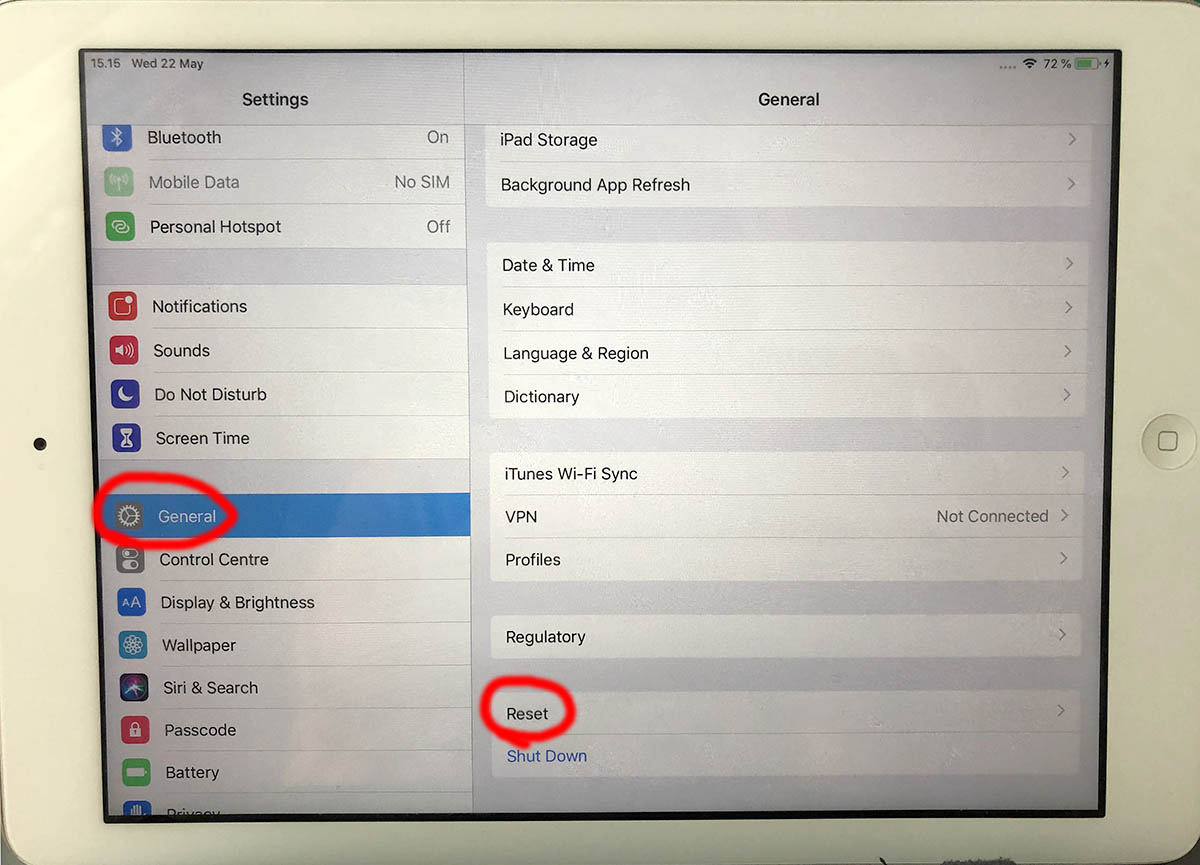
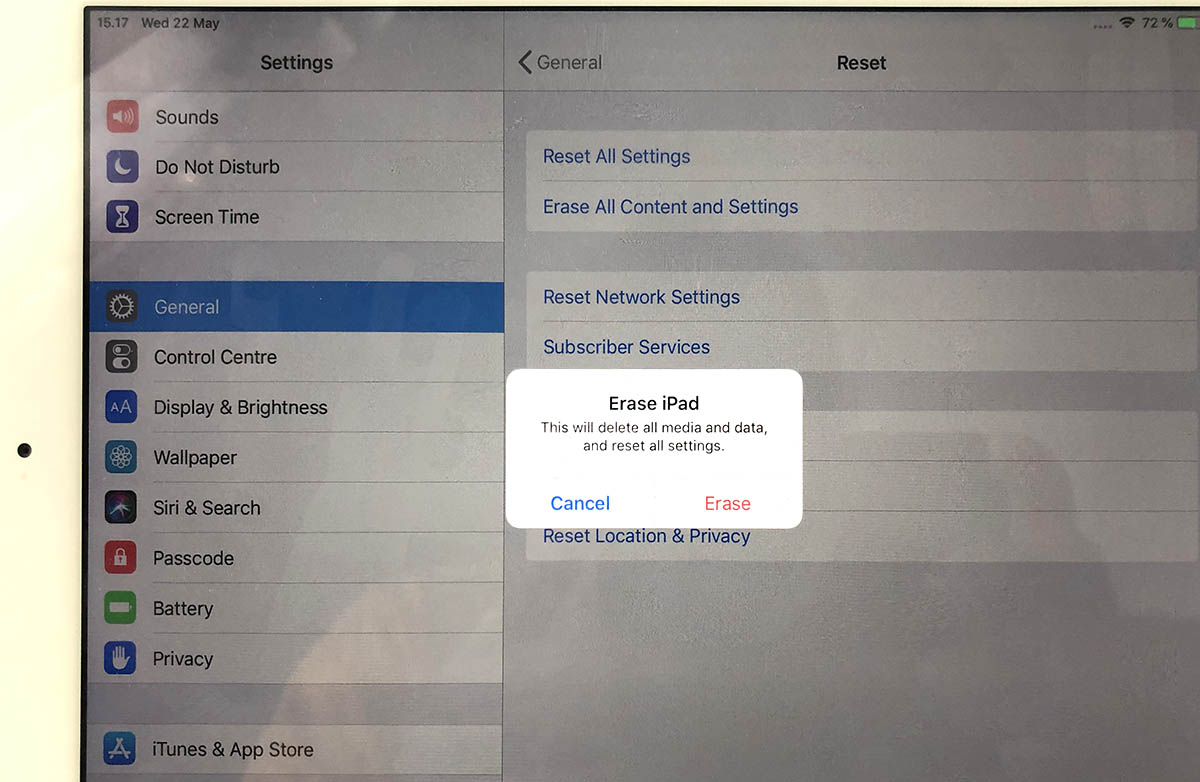
In Reset, there are number of levels of reseting to choose from. You want to go all the way. To erase every single bit of your personal data from the device. To get that, go for Erase All Content and Settings.

You will have two separate warnings about your intent to destroy your data. Even if you pass that gateway, there is more. Nothing will be erased until a final blow.

The final thing to do is to inform Apple, that this device won't be associated to your Apple ID anymore. For that, your password will be needed. This is the final call. When you successfully punch in your password, then the big ball starts rolling.

When you see this, you're past point-of-no-return.
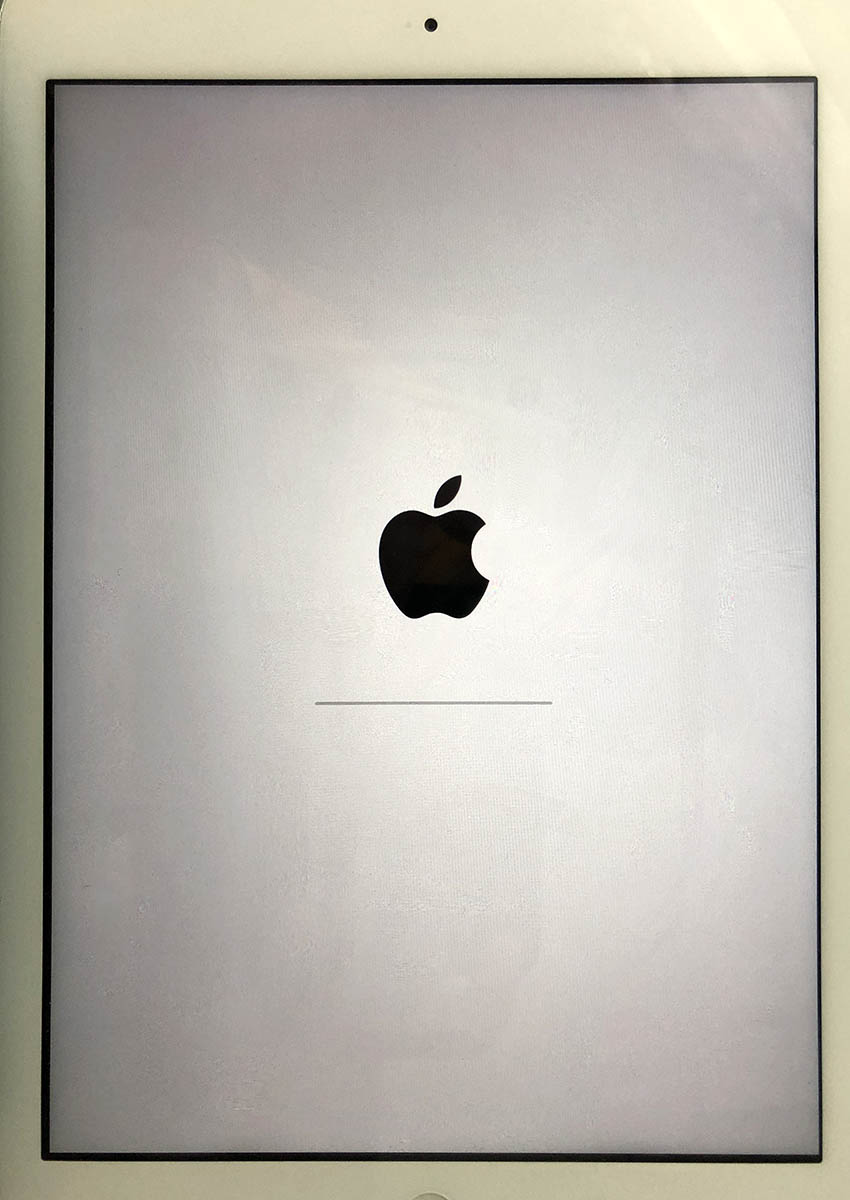
It takes a while to erase all data. Wait patiently.
When all the erasing is done, the device will restart and it will go for the out-of-the-box dialog. This is where new user needs to choose the user interface language, network and associate the device with their own Apple ID.
Steam stats
Wednesday, May 29. 2019
One day I was just browsing my Steam client (in case you're not a gamer, see https://store.steampowered.com/ for more). In my profile settings, I can choose what to display there. I seem to have a "achievement showcase" selected. It looks like this:

It seems, I have two perfect games having 100% of the achievements. Nice! Well ... which games are those?
That information is nowhere to be found. By googling some, I found Where can I see my perfect games in steam? in StackExchange. Somebody else had the same question.
As suggested in the answer, I checked out Steam-Zero - Steam achivements statistics script from GitHub. Again, no joy. It seems something in Steam API changed and no matter what domain I chose for my developer API-key, server wouldn't return a reasonable CORS-response making my browser refuse to continue executing the JavaScript-code any further. If you really want to study what a Cross-Origin Resource Sharing (CORS) is, go to https://developer.mozilla.org/en-US/docs/Web/HTTP/CORS. Warning: It is a tricky subject for non-developers.
As you might expect, I solved the problem by creating a fork of my own. It is at: https://github.com/HQJaTu/steamzero
With my code setup into an Apache-box, I can do a https://<my own web server here>/steamzero/?key=<my Steam API developer key here> to get something like this:


Ah, Walking Dead games have 100% achievements. Why couldn't I get that information directly out of Steam?! Lot of hassle to dig that out.
Note: Steam-Zero works only for public Steam-profiles. I had to change my privacy settings a bit to get all the stats out.
The trouble with a HPE Ethernet 10Gb 2-port 530T Adapter
Thursday, May 23. 2019
A while back I got my hands on a nice PCIe 2.0 network interface card.
The thing looks like this:
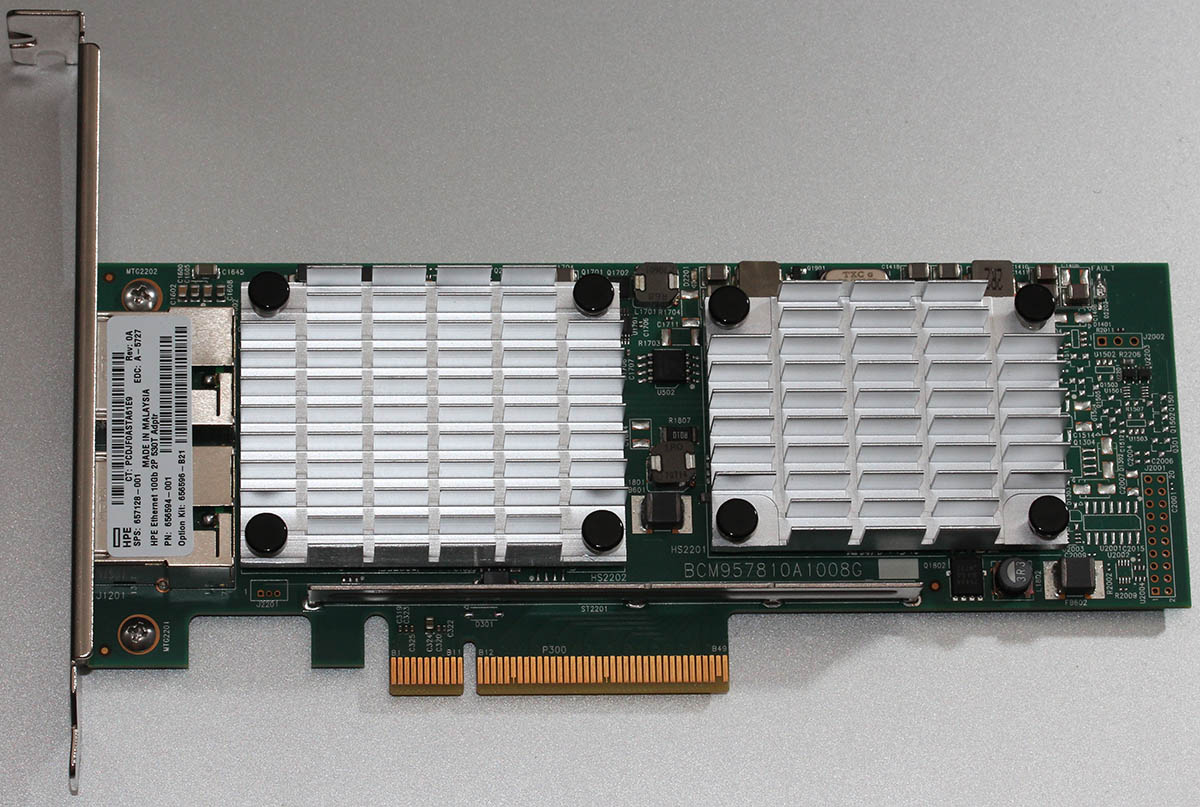
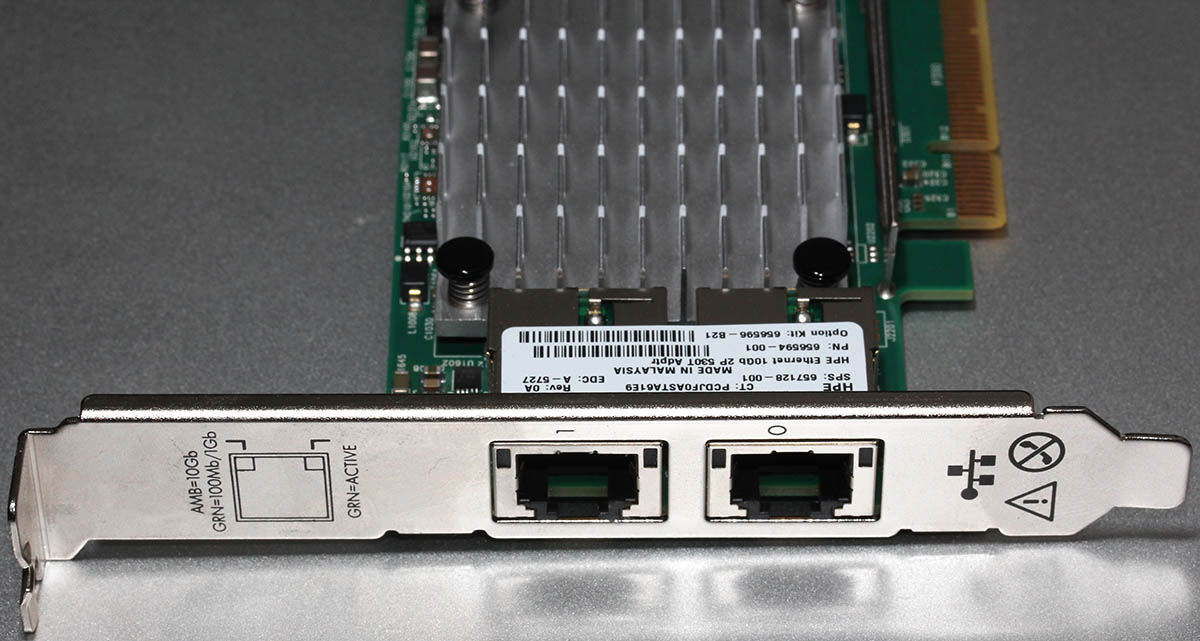
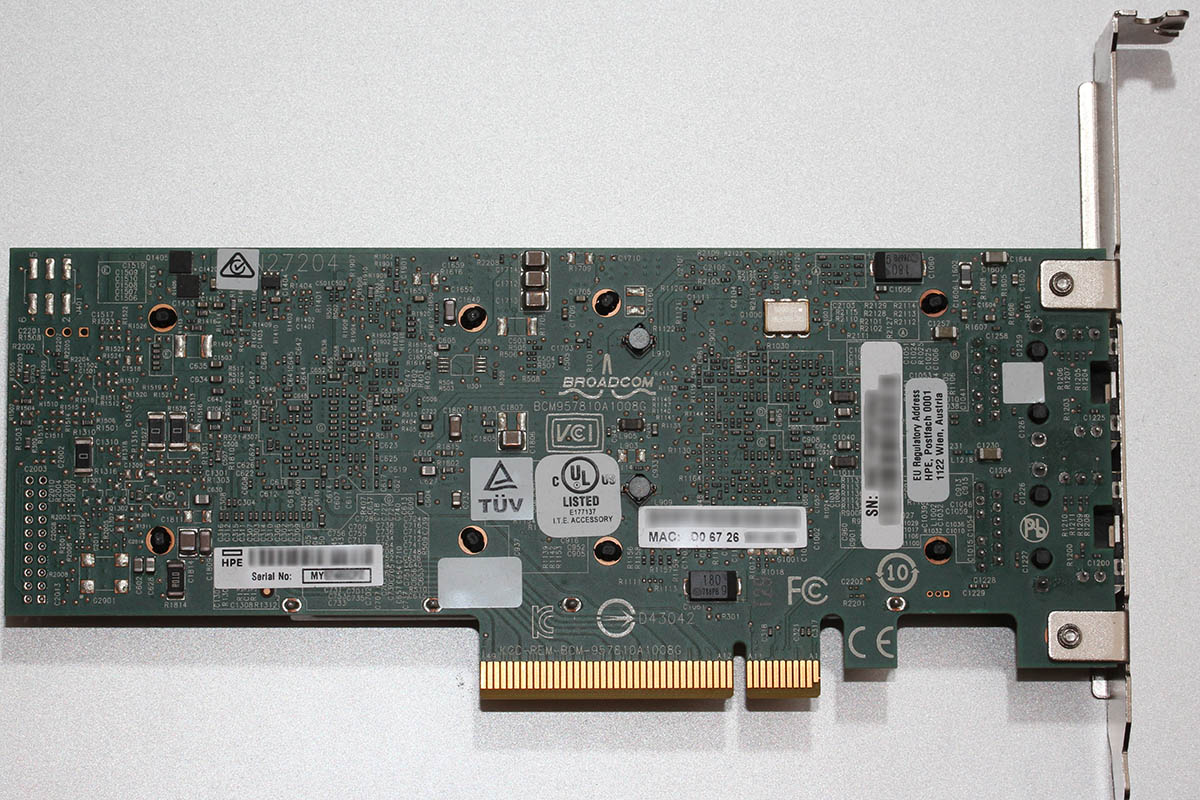
In theory, that's an extremely cool piece to run in one of my Linuxes. Two 10 gig ethernet ports! Whoa!
Emphasis on phrase "in theory". In practice it's just a piece of junk. That's not because it wouldn't work. It does kinda work. I have to scale down the DDR3 RAM speed into 800 MHz just to make the hardware boot. Doing that will get 12 GiB RAM out of 16 available. Something there eats my PCIe lanes and forces them to work at unacceptable low speeds.
This is a serious piece of hardware, for example in Amazon.com the going price for such item is $340 USD. Given the non-functional state of this, I got this with a fraction of it. Given my personal interest in such toys, I had to go for it. This time it didn't pan out.
Maybe HPE support site phrase for this at https://support.hpe.com/hpsc/doc/public/display?docId=emr_na-c03663929 explains it all: "PCIe 2.0 compliant form factor designed for HPE ProLiant servers". I'm not running it on a HP ProLiant.
On a Linux, it does work ok. Kernel driver bnx2x detects and runs the NIC instantly. Linux lspci info:
# lspci -s 02:00.0 -vv -n

02:00.0 0200: 14e4:168e (rev 10)

  Subsystem: 103c:18d3

  Control: I/O- Mem+ BusMaster+ SpecCycle- MemWINV- VGASnoop- ParErr- Stepping- SERR- FastB2B- DisINTx+

  Status: Cap+ 66MHz- UDF- FastB2B- ParErr- DEVSEL=fast >TAbort- SERR-   Latency: 0, Cache Line Size: 64 bytes

  Interrupt: pin A routed to IRQ 17

  Region 0: Memory at f4000000 (64-bit, prefetchable) [size=8M]

  Region 2: Memory at f3800000 (64-bit, prefetchable) [size=8M]

  Region 4: Memory at f4810000 (64-bit, prefetchable) [size=64K]

  Expansion ROM at f7580000 [disabled] [size=512K]

  Capabilities: [48] Power Management version 3

    Flags: PMEClk- DSI- D1- D2- AuxCurrent=0mA PME(D0+,D1-,D2-,D3hot+,D3cold-)

    Status: D0 NoSoftRst+ PME-Enable- DSel=0 DScale=1 PME-

  Capabilities: [50] Vital Product Data

    Product Name: HPE Ethernet 10Gb 2P 530T Adptr

    Read-only fields:

      [PN] Part number: 656594-001

      [EC] Engineering changes: A-5727

      [MN] Manufacture ID: 103C

      [V0] Vendor specific: 12W PCIeGen2

      [V1] Vendor specific: 7.15.16

      [V3] Vendor specific: 7.14.38

      [V5] Vendor specific: 0A

      [V6] Vendor specific: 7.14.10

      [V7] Vendor specific: 530T

      [V2] Vendor specific: 5748

      [V4] Vendor specific: D06726B36C98

      [SN] Serial number: MY12---456

      [RV] Reserved: checksum good, 197 byte(s) reserved

    End

  Capabilities: [a0] MSI-X: Enable+ Count=32 Masked-

    Vector table: BAR=4 offset=00000000

    PBA: BAR=4 offset=00001000

  Capabilities: [ac] Express (v2) Endpoint, MSI 00

    DevCap: MaxPayload 512 bytes, PhantFunc 0, Latency L0s <4us, L1 <64us

        ExtTag+ AttnBtn- AttnInd- PwrInd- RBE+ FLReset+ SlotPowerLimit 75.000W

    DevCtl: CorrErr+ NonFatalErr+ FatalErr+ UnsupReq+

        RlxdOrd- ExtTag+ PhantFunc- AuxPwr+ NoSnoop+ FLReset-

        MaxPayload 128 bytes, MaxReadReq 512 bytes

    DevSta: CorrErr+ NonFatalErr- FatalErr- UnsupReq+ AuxPwr- TransPend-

    LnkCap: Port #0, Speed 5GT/s, Width x8, ASPM L0s L1, Exit Latency L0s <1us, L1 <2us

        ClockPM+ Surprise- LLActRep- BwNot- ASPMOptComp+

    LnkCtl: ASPM Disabled; RCB 64 bytes Disabled- CommClk+

        ExtSynch- ClockPM- AutWidDis- BWInt- AutBWInt-

    LnkSta: Speed 5GT/s (ok), Width x8 (ok)

        TrErr- Train- SlotClk+ DLActive- BWMgmt- ABWMgmt-

    DevCap2: Completion Timeout: Range ABCD, TimeoutDis+, LTR-, OBFF Not Supported

         AtomicOpsCap: 32bit- 64bit- 128bitCAS-

    DevCtl2: Completion Timeout: 50us to 50ms, TimeoutDis-, LTR-, OBFF Disabled

         AtomicOpsCtl: ReqEn-

    LnkCtl2: Target Link Speed: 2.5GT/s, EnterCompliance- SpeedDis-

         Transmit Margin: Normal Operating Range, EnterModifiedCompliance- ComplianceSOS-

         Compliance De-emphasis: -6dB

    LnkSta2: Current De-emphasis Level: -3.5dB, EqualizationComplete-, EqualizationPhase1-

         EqualizationPhase2-, EqualizationPhase3-, LinkEqualizationRequest-

  Capabilities: [100 v1] Advanced Error Reporting

    UESta: DLP- SDES- TLP- FCP- CmpltTO- CmpltAbrt- UnxCmplt- RxOF- MalfTLP- ECRC- UnsupReq- ACSViol-

    UEMsk: DLP- SDES- TLP- FCP- CmpltTO- CmpltAbrt- UnxCmplt- RxOF- MalfTLP- ECRC- UnsupReq- ACSViol-

    UESvrt: DLP+ SDES+ TLP- FCP+ CmpltTO- CmpltAbrt- UnxCmplt- RxOF+ MalfTLP+ ECRC- UnsupReq- ACSViol-

    CESta: RxErr- BadTLP- BadDLLP- Rollover- Timeout- AdvNonFatalErr+

    CEMsk: RxErr- BadTLP+ BadDLLP+ Rollover+ Timeout+ AdvNonFatalErr+

    AERCap: First Error Pointer: 00, ECRCGenCap+ ECRCGenEn- ECRCChkCap+ ECRCChkEn-

        MultHdrRecCap- MultHdrRecEn- TLPPfxPres- HdrLogCap-

    HeaderLog: 00000000 00000000 00000000 00000000

  Capabilities: [13c v1] Device Serial Number d0-67-26---------------

  Capabilities: [150 v1] Power Budgeting

  Capabilities: [160 v1] Virtual Channel

    Caps: LPEVC=0 RefClk=100ns PATEntryBits=1

    Arb: Fixed- WRR32- WRR64- WRR128-

    Ctrl: ArbSelect=Fixed

    Status: InProgress-

    VC0: Caps: PATOffset=00 MaxTimeSlots=1 RejSnoopTrans-

        Arb: Fixed- WRR32- WRR64- WRR128- TWRR128- WRR256-

        Ctrl: Enable+ ID=0 ArbSelect=Fixed TC/VC=01

        Status: NegoPending- InProgress-

  Capabilities: [1b8 v1] Alternative Routing-ID Interpretation (ARI)

    ARICap: MFVC- ACS-, Next Function: 1

    ARICtl: MFVC- ACS-, Function Group: 0

  Capabilities: [1c0 v1] Single Root I/O Virtualization (SR-IOV)

    IOVCap: Migration-, Interrupt Message Number: 000

    IOVCtl: Enable- Migration- Interrupt- MSE- ARIHierarchy-

    IOVSta: Migration-

    Initial VFs: 16, Total VFs: 16, Number of VFs: 0, Function Dependency Link: 00

    VF offset: 8, stride: 1, Device ID: 16af

    Supported Page Size: 000005ff, System Page Size: 00000001

    Region 0: Memory at 00000000f4820000 (64-bit, prefetchable)

    Region 4: Memory at 00000000f48a0000 (64-bit, prefetchable)

    VF Migration: offset: 00000000, BIR: 0

  Capabilities: [220 v1] Resizable BAR

  Capabilities: [300 v1] Secondary PCI Express

  Kernel driver in use: bnx2x

  Kernel modules: bnx2x
If anybody has any suggestions/ideas what to try, I'll be happy to test any of them. Also, my suggestion for anybody planning to get one is to NOT pay any money for it.

