Decoding EU Digital COVID Certificate into human-readable format
Saturday, December 11. 2021
Databricks CentOS 8 containers
Wednesday, November 17. 2021
MySQL Java JDBC connector TLSv1 deprecation in CentOS 8
Friday, November 12. 2021
Yeah, a mouthful. Running CentOS 8 Linux, in Java (JRE) a connection to MySQL / MariaDB there seems to be trouble. I think this is a transient issue and eventually it will resolve itself. Right now the issue is real.
Here is the long story.
I was tinkering with Databricks. The nodes for my bricks were on CentOS 8 and I was going to a MariaDB in AWS RDS. with MySQL Connector/J. As you've figured out, it didn't work! Following errors were in exception backtrace:
com.mysql.cj.jdbc.exceptions.CommunicationsException: Communications link failure


The last packet sent successfully to the server was 0 milliseconds ago. The driver has not received any packets from the server.

com.mysql.cj.jdbc.exceptions.CommunicationsException: Communications link failure


Caused by: com.mysql.cj.exceptions.CJCommunicationsException: Communications link failure


javax.net.ssl.SSLHandshakeException: No appropriate protocol (protocol is disabled or cipher suites are inappropriate)
Weird.
Going to the database with a simple CLI-command of (test run on OpenSUSE):
$ mysql -h db-instance-here.rds.amazonaws.com -P 3306 \
-u USER-HERE -p \
  --ssl-ca=/var/lib/ca-certificates/ca-bundle.pem \

  --ssl-verify-server-cert
... works ok.
Note: This RDS-instance enforces encrypted connection (see AWS docs for details).
Note 2: Term used by AWS is SSL. However, SSL was deprecated decades ago and the protocol used is TLS.
Taking a look on the wire:
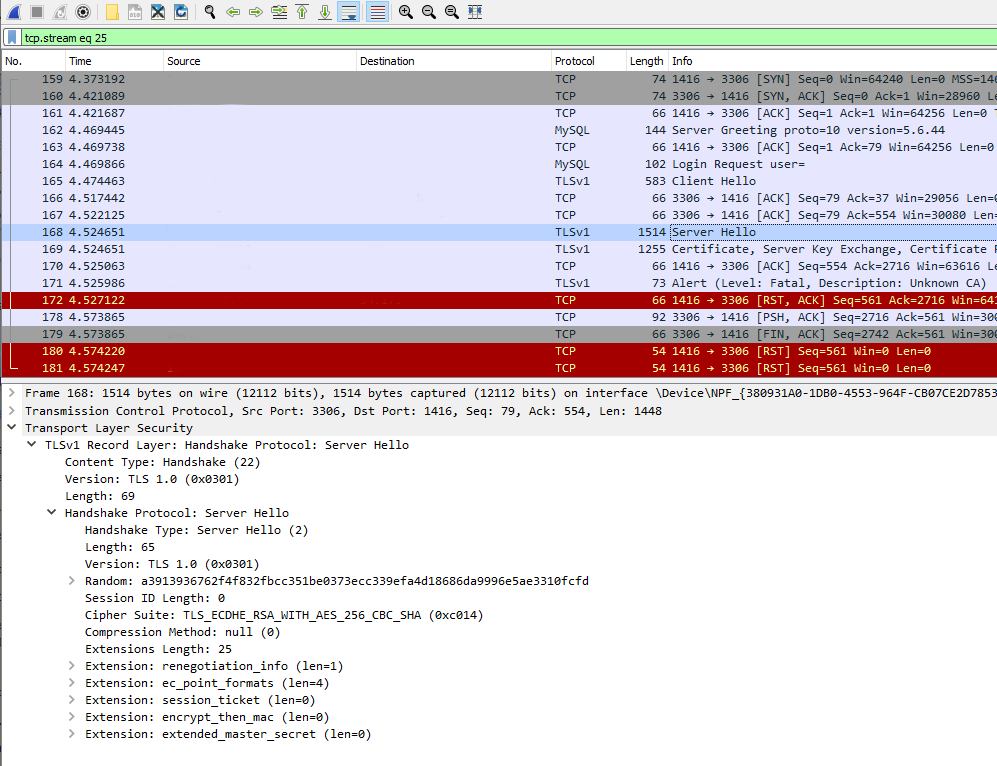
Two details popped out instantly: TLSv1 and TLS_ECDHE_RSA_WITH_AES_256_CBC_SHA cipher. Both deprecated. Both deemed highly insecure and potentially leaking your private information.
Why would anybody using those? Don't MySQL/MariaDB/AWS -people remove insecure stuff from their software? What! Why!
Troubleshooting started. First I found SSLHandShakeException No Appropriate Protocol on Stackoverflow. It contains a hint about JVM security settings. Then MySQL documentation 6.3.2 Encrypted Connection TLS Protocols and Ciphers, where they explicitly state "As of MySQL 5.7.35, the TLSv1 and TLSv1.1 connection protocols are deprecated and support for them is subject to removal in a future MySQL version." Well, fair enough, but the bad stuff was still there in AWS RDS. I even found Changes in MySQL 5.7.35 (2021-07-20, General Availability) which clearly states TLSv1 and TLSv1.1 removal to be quite soon.
No amount of tinkering with jdk.tls.disabledAlgorithms in file /etc/java/*/security/java.security helped. I even created a simple Java-tester to make my debugging easier:
import java.sql.*;


// Code from: https://www.javatpoint.com/example-to-connect-to-the-mysql-database

// 1) Compile: javac mysql-connect-test.java

// 2) Run: CLASSPATH=.:./mysql-connector-java-8.0.27.jar java MysqlCon

class MysqlCon {

  public static void main(String args[]) {

    try {

      Class.forName("com.mysql.cj.jdbc.Driver");

      Connection con = DriverManager.getConnection("jdbc:mysql://db.amazonaws.com:3306/db", "user", "password");

      Statement stmt = con.createStatement();

      ResultSet rs = stmt.executeQuery("select * from emp");

      while (rs.next())

        System.out.println(rs.getInt(1) + " " + rs.getString(2) + " " + rs.getString(3));

      con.close();

    } catch (Exception e) {

      System.out.println(e);

      e.printStackTrace(System.out);

    }

  }

}
Hours passed by, but no avail. Then I found command update-crypto-policies. RedHat documentation Chapter 8. Security, 8.1. Changes in core cryptographic components, 8.1.5. TLS 1.0 and TLS 1.1 are deprecated contains mention of command:
update-crypto-policies --set LEGACY
As it does the trick, I followed up on it. In CentOS / RedHat / Fedora there is /etc/crypto-policies/back-ends/java.config. A symlink pointing to file containing:
jdk.tls.ephemeralDHKeySize=2048

jdk.certpath.disabledAlgorithms=MD2, MD5, DSA, RSA keySize < 2048

jdk.tls.disabledAlgorithms=DH keySize < 2048, TLSv1.1, TLSv1, SSLv3, SSLv2, DHE_DSS, RSA_EXPORT, DHE_DSS_EXPORT, DHE_RSA_EXPORT, DH_DSS_EXPORT, DH_RSA_EXPORT, DH_anon, ECDH_anon, DH_RSA, DH_DSS, ECDH, 3DES_EDE_CBC, DES_CBC, RC4_40, RC4_128, DES40_CBC, RC2, HmacMD5

jdk.tls.legacyAlgorithms=
That's the culprit! It turns out any changes in java.security -file won't have any effect as the policy is loaded later. Running the policy change and set it into legacy-mode has the desired effect. However, running ENTIRE system with such a bad security policy is bad. I only want to connect to RDS, why cannot I lower the security on that only? Well, that's not how Java works.
Entire troubleshooting session was way too much work. People! Get the hint already, no insecure protocols!
Decoding EU Digital COVID Certificate
Friday, August 6. 2021
If you live in EU, you most definitely have heard of COVID Passport.
Practically speaking, it is a PDF-file A4-sized when printed and can be folded into A6-pocket size. In Finland a sample would look like this:
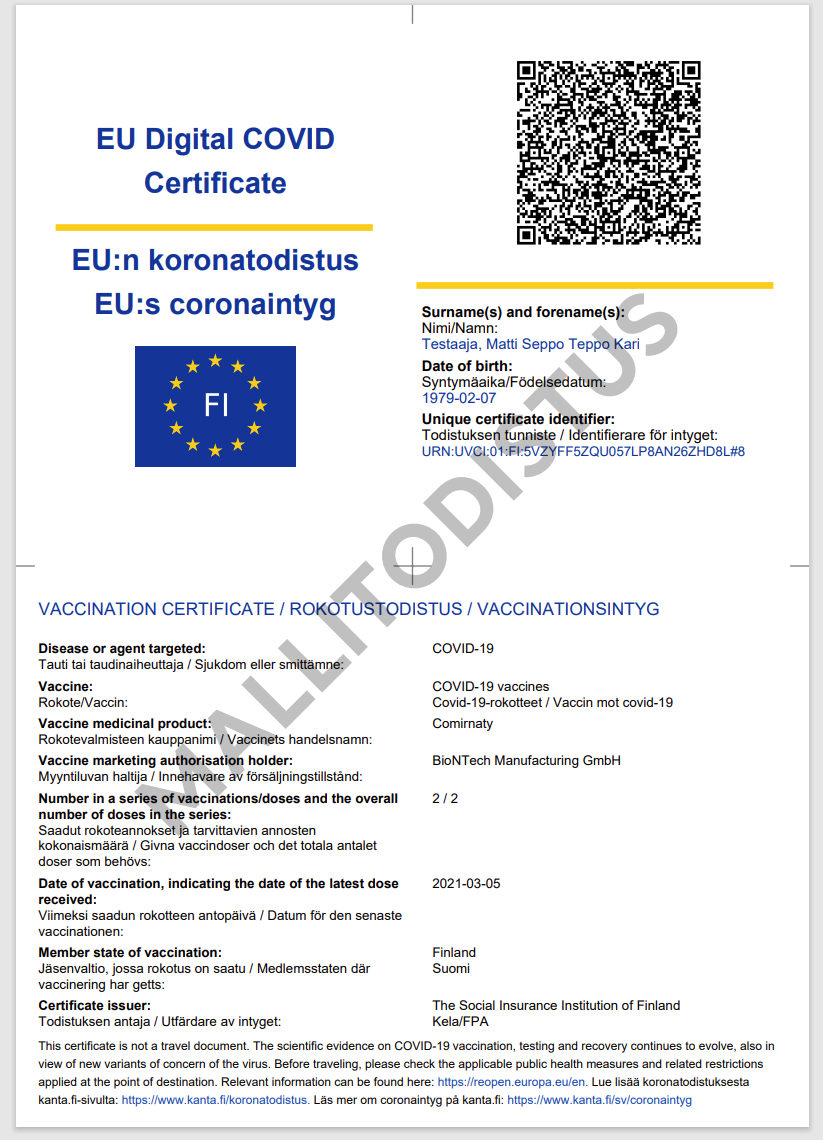
What's eye-catching is the QR-code in the top right corner. As I'm into all kinds of nerdy stuff, I took a peek what's in it.
After reading some specs and brochures (like https://www.kanta.fi/en/covid-19-certificate) I started to tear this apart and deduced following:
- An A4 or the QR-code in it can be easily copied / duplicated
- Payload can be easily forged
- There is a claim: "The certificate has a code for verifying the authenticity"
My only question was: How is this sane! Why do they think this mechanism they designed makes sense?
QR-code
Data in QR-code is wrapped multiple times:
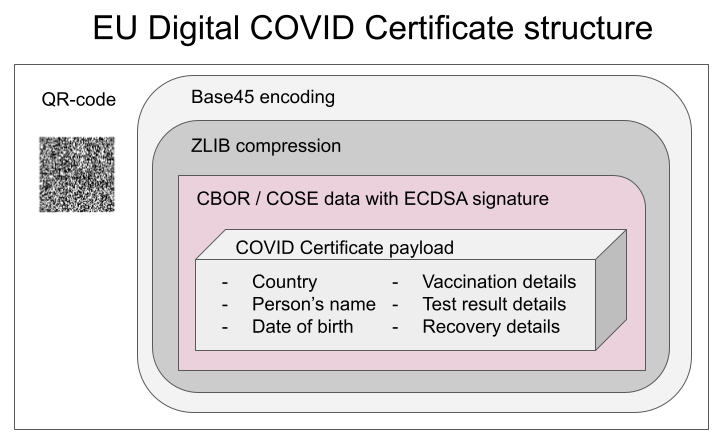
This CBOR Object Signing and Encryption (COSE) described in RFC 8152 was a new one for me.
Payload does contain very little of your personal information, but enough to be compared with your ID-card or passport. Also there is your vaccination, test and possible recovery from COVID statuses. Data structure can contain 1, 2 or 3 of those depending if you have been vaccinated or tested, or if you have recovered from the illness.
Python code
It's always about the details. So, I forked an existing git-repo and did some of my own tinkering. Results are at: https://github.com/HQJaTu/vacdec/tree/certificate-fetch
Original code by Mr. Hanno Böck could read QR-code and do some un-wrapping for it to reveal the payload. As I'm always interested in X.509, digital signatures and cryptography, I improved his code by incorporating the digital signature verification into it.
As CBOR/COSE was new for me, it took a while to get the thing working. In reality the most difficult part was to get my hands into the national public certificates to do some ECDSA signature verifying. It's really bizarre how that material is not made easily available.
Links:
- Swagger of DGC-gateway: https://eu-digital-green-certificates.github.io/dgc-gateway/
- This is just for display-purposes, this demo isn't connected to any of the national back-ends
- Sample data for testing verification: https://github.com/eu-digital-green-certificates/dgc-testdata
- All participating nations included
- QR-codes and raw-text ready-to-be-base45-decoded
- Payload JSON_schema: https://github.com/ehn-dcc-development/ehn-dcc-schema/
- Just to be clear, the payload is not JSON
- However, CBOR is effectively binary JSON
- List of all production signature certificates: https://dgcg.covidbevis.se/tp/
- Austrian back-end trust-list in JSON/CBOR: https://greencheck.gv.at/api/masterdata
- Swedish back-end trust-list in CBOR: https://dgcg.covidbevis.se/tp/trust-list
- The idea is for all national back-ends to contain everybody's signing certificate
Wallet
Mr. Philipp Trenz from Germany wrote a website to insert your QR-code into your Apple Wallet. Source is at https://github.com/philipptrenz/covidpass and the actual thing is at https://covidpass.eu/
Beautiful! Works perfectly.
Especially in Finland the government is having a vacation. After that they'll think about starting to make plans what to do next. Now thanks to Mr. Trenz every iOS user can have the COVID Certificate in their phones without government invovement.
Finally
Answers:
- Yes, duplication is possible, but not feasible in volume. You can get your hands into somebody else's certificate and can present a proof of vaccination, but verification will display the original name, not yours.
- Yes, there is even source code for creating the QR-code, so it's very easy to forge.
- Yes, the payload has a very strong elliptic curve signature in it. Any forged payloads won't verify.
Ultimately I was surprised how well designed the entire stack is. It's always nice to see my tax-money put into good use. I have nothing negative to say about the architecture or technologies used.
Bonus:
At very end of my project, I bumped into Mr. Mathias Panzenböck's code https://github.com/panzi/verify-ehc/. He has an excellent implementation of signature handling, much better than mine. Go check that out too.
DynDNS updates to your Cloud DNS - Updated
Monday, July 12. 2021
Python Windows: Pip requiring Build Tools for Visual Studio
Wednesday, January 13. 2021
Update 26th Feb 2023:
This information has been obsoleted during 2022. Information in this article regarding Python and Visual Studio Build Tools download location is inaccurate. For latest information, see my 2023 update.
Python, one of the most popular programming languages today. Every single even remotely useful language depends on extensions, libraries and stuff already written by somebody else you'll be needing to get your code to do its thing.
In Python these external dependencies are installed with command pip. Some of them are installed as eggs, some as wheels. About the latter, read What are wheels? for more information.
Then there is the third kind. The kind having cPython in them needing a C-compiler on your machine to build and subsequent install when the binaries are done. What if your machine doesn't have a C-compiler installed? Yup. Your pip install will fail. This story is about that.
Duh, it failed
I was tinkering some Python-code and with some googling found a suitable library I wanted to take for a spin. As I had a newly re-installed Windows 10, pip install failed on a dependency of the library I wanted:
building 'package.name.here' extension
error: Microsoft Visual C++ 14.0 is required. Get it with "Build Tools for Visual Studio": https://visualstudio.microsoft.com/downloads/
Yes, nasty error that. I recall seeing this before, but how did I solve it the last time? No recollection, nothing.
The link mentioned in the error message is obsoleted. There is absolutely nothing useful available by visiting it. I'm guessing back in the days, there used to be. Today, not so much.
What others have done to navigate around this
Jacky Tsang @ Medium: Day060 — fix “error: Microsoft Visual C++ 14.0 is required.” Nope. Fail.
Stackoverflow:
-
How to install Visual C++ Build tools? Nope. Fail.
-
Microsoft Visual C++ 14.0 is required (Unable to find vcvarsall.bat) Yesh!
This problem is spread far and wide! Lot of people suffering from the same. Lot of misleading answers spreading for multiple years back.
Visual Studio 2019 Build Tools
Page is at https://visualstudio.microsoft.com/visual-cpp-build-tools/
(The link is in the vast river of comments in the last Stackoverflow-question)
Click Download Build Tools, get your 2019 installer and ...
BANG! Nope, it won't work. Failure will indicate a missing include-file:
c:\program files\python38\include\pyconfig.h(205): fatal error C1083: Cannot open include file: 'basetsd.h': No such file or directory
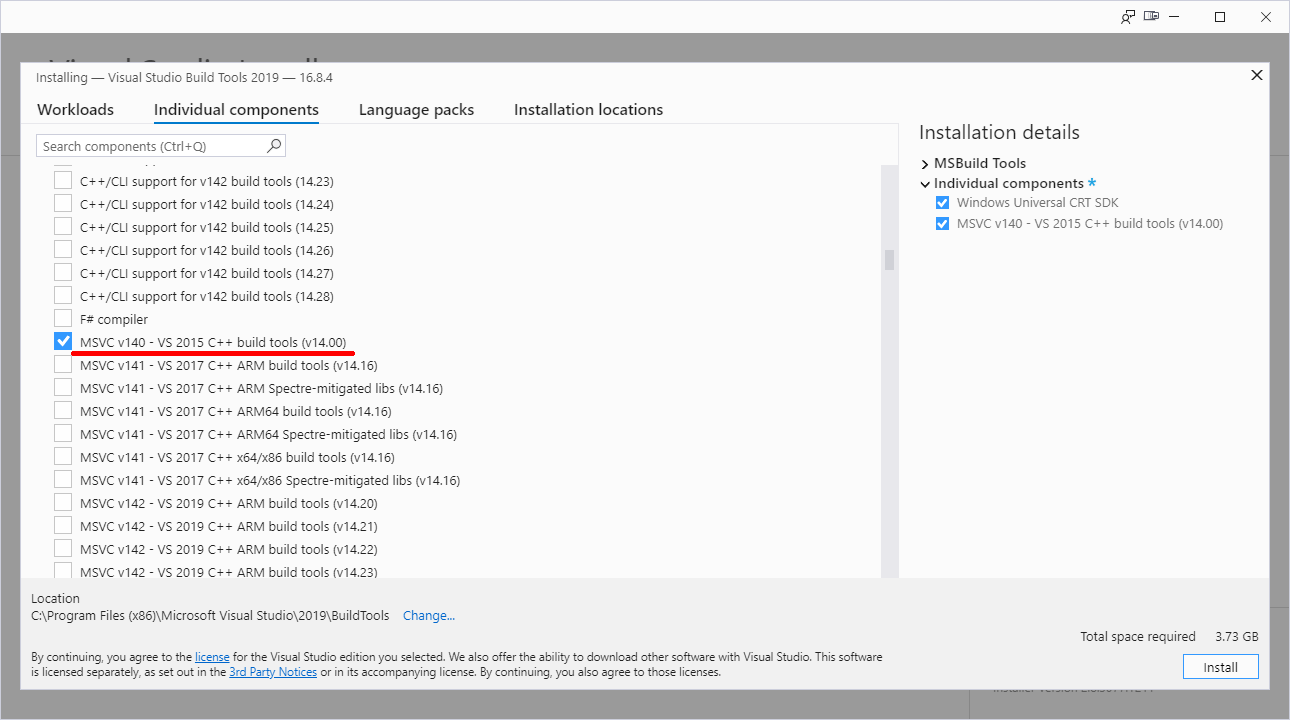
My solution with 2017 tools
Download link as given to you by Microsoft's website is https://visualstudio.microsoft.com/thank-you-downloading-visual-studio/?sku=BuildTools&rel=16 (2019). As it happens, 2019 will contain 2015 build tools, we can assume 2017 to do the same.
If you hand edit to contain release 15 (2017): https://visualstudio.microsoft.com/thank-you-downloading-visual-studio/?sku=BuildTools&rel=15
Running the 2017 installer:
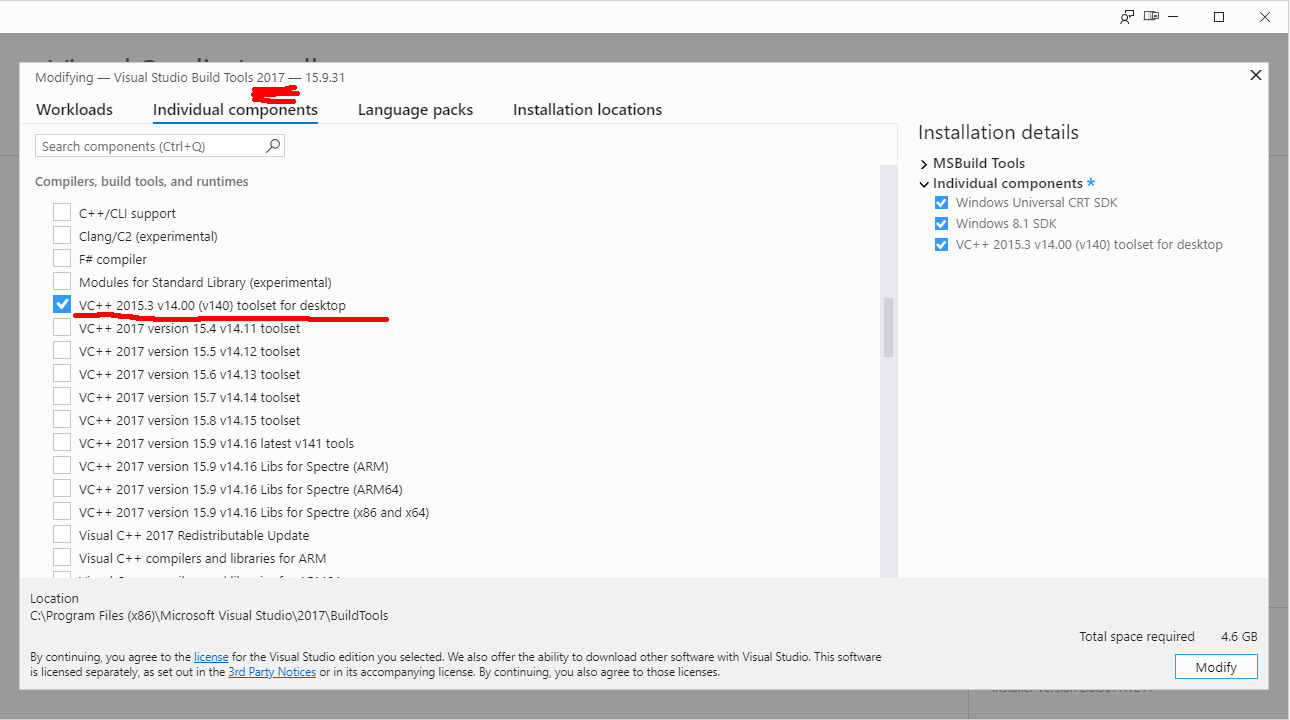
Yaaash! It works: pip will end with a Successfully installed -message.
Finally
Tricky subject, that. Looks like all the years have done so many changes nobody is able to keep a good track of all. What a mess! Uh.
Custom X.509 certificate in Windows 10 Remote Desktop Service
Wednesday, October 21. 2020
On a non-AD environment, this is what your average Windows 10 Remote Desktop client will emit on a connection:
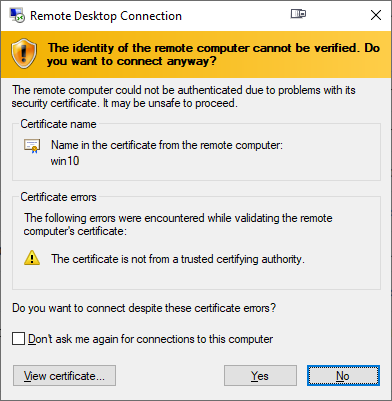
For those who are AD-domain admins, they may have seen this rarely. If an AD has Certification Authority installed, it is easy and typical to deploy certs from it to workstations and never see the above message. The Net is full of instructions like Replace RDP Default Self Sign Certificate.
Problem that needs to be solved
For anybody like me, not running an AD-domain, simply having couple of Windows 10 -boxes with occasional need to RDP into them, that popup becomes familiar.
Note: I'll NEVER EVER click on Don't ask me again -prompts. I need to know. I want to know. Suppressing such information is harmful. Getting to know and working on the problem is The WayⓇ.
Gathering information about solution
If this was easy, somebody had created simple instructions for updating RDP-certificates years ago. Decades even. But no. No proper and reasonable easy solution exists. Searching The Net far & wide results only in bits and pieces, but no real tangible turn-key(ish) solution.
While in quest for information, given existence of The Net, I find other people asking the same question. A good example is: How to provide a verified server certificate for Remote Desktop (RDP) connections to Windows 10.
As presented in the above StackExchange answer, the solution is a simple one (I think not!!). These five steps need to be done to complete the update:
- Purchase a genuine verified SSL-certificate
- Note: It's a TLS-certificate! The mentioned protocol has been deprecated for many years. Even TLS 1 and TLS 1.1 have been deprecated. So it's a X.509 TLS-certificate.
- Note 2: Ever heard of Let's Encrypt? ZeroSSL? Buypass? (and many others) They're giving away perfectly valid and trusted TLS-certificates for anybody who shows up and can prove they have control over a domain. No need to spend money on that.
- Wrap the precious certificate you obtained in step 1) into a PKCS#12-file. A
.pfxas Windows imports it.- Note: Oh, that's easy! I think PKCS#12 is the favorite file format of every Regular Joe computer user.
 Not!
Not!
- Note: Oh, that's easy! I think PKCS#12 is the favorite file format of every Regular Joe computer user.
- Install the PKCS#12 from step 2) into Windows computer account and make sure user NETWORK SERVICE has access to it.
- Note: Aow come on! Steps 1) and 2) were tedious and complex, but this is wayyyyyy too hard to even begin to comprehend! Actually doing it is beyond most users.
- Open a Registry Editor and add the SHA-1 fingerprint of the certificate into
HKEY_LOCAL_MACHINE\SYSTEM\CurrentControlSet\Control\Terminal Server\WinStations\RDP-Tcp\into a binary value calledSSLCertificateSHA1Hash.- Note: Oh really! Nobody knows what's a SHA-1 fingerprint nor how to extract that from a certificate in a format suitable to a registry binary value!
- Reboot the Windows!
- Note: As all Windows-operations, this requires a reboot.
- Note: As all Windows-operations, this requires a reboot.
Mission accomplished! Now the annoying message is gone. Do you want to guess what'll happen after 90 days passes? That's the allotted lifespan of a Let's Encrypt -certificate. Yup. You'll be doing the all of the above again. Every. Single. Painstaking. Step.
Problems needing to be solved
Let's break this down. As the phrase goes, an elephant is a mighty big creature and eating one is a big task. It needs to be done one bit at a time.
0: Which cert is being used currently?
If you simply want to get the SHA-1 hash of the currently installed RDP-certificate, a simple (or maybe not?) command of:
wmic /namespace:"\\root\cimv2\TerminalServices" PATH "Win32_TSGeneralSetting" get "SSLCertificateSHA1Hash"
... will do the trick. No admin-permissions needed or anything fancy.
To state the obvious problem: you'll be presented a hex-string but you have zero idea to where it points to and what to do with this information.
Hint:
You can to browse Windows Certificate Mchine Store. System certificates are not stored in your personal Certificate Store, so carefully point to a correct container. By default certificates are listed by subject, not SHA-1 hash. Luckily the self-signed RDP-cert is located in a folder "Remote Desktop" narrowing down the set.
To state the second obvious problem: WMI is a tricky beast. Poking around it from CLI isn't easy.
1: The certificate
Ok. With that you're on your own. If you cannot figure how Let's Encrypt works, doing this may not be your thing.
2: PKCS#12 wrapping
In most scenarios, a certificate is typically delivered in a PEM-formatted file or set of two files (one for public and second for private keys). PEM-format is native in *nix environment and all of tooling there can handle the data with ease. Converting the PEM-data into an interim (Microsoft created) format for Microsoft-world can be done, but is bit tricky in a *nix. Usage for this PKCS#12-formatted data is ephemeral, the certificate will stay in the file for only short while before being imported to Windows and there is no need for it anymore. A cert can be re-packaged if needed as long as the original PEM-formatted files exist. Also, the certificate data can be exported from Windows back to a file, if needed.
As PEM-format is native in *nix for certs, it is completely unsupported in Windows. A simple operation of "here is the PEM-file, import it to Windows" is literally impossible to accomplish! There is a reason why instructions have a rather complex spell with openssl-command to get the job done.
2.1: What others have done
When talking about PowerShell-scripting and PEM-format, I'll definitely have to credit people of PKISolutions. They publish a very nice library of PSPKI (source code is at https://github.com/PKISolutions/PSPKI) with PEM-import capability. As Windows Certificate Store is a complex beast, that code doesn't directly work as I'd need it to be for importing into Machine Store. Given existence of source code, the logic they wrote can be lifted, modified and re-used to do what is needed for RDP-cert installation process.
Among PKISolutions' excellent work is blog post by Accessing and using certificate private keys in .NET Framework/.NET Core. There he explains in detail dark/bright/weird ages about how Microsoft's libraries have approached the subject of PKI and how thing have evolved from undefined to well-behaving to current situation where everything is... well... weird.
Why I mention this is imperative for practical approach. PSPKI-library works perfectly in PowerShell 5.x, which is built on Microsoft .NET Framework 4.5. That particular framework version is bit old, and given its age, it falls into bright bracket of doing things.
However, not living in past, the relevant version of PowerShell is PowerShell Core. At the time of writing the LTS (or Long-Term-Support) version is 7.0. A version of 7.1 is in preview and version 6 is still actively used. Those versions run obviously on modern .Net Core, an open-source version of DotNet running in Windows, Linux and macOS. In transition of Microsoft .Net into open-source .Net Core, most operating system -dependant details have changed while bumping things from closed-source-Windows-only thingie. This most definitely include implementation and interface details of Public Key Infrastructure.
In short: PSPKI doesn't work anymore! It did in "bright ages" but not anymore in current "weird ages".
2.2: What I need to get done
Sticking with an obsoleted PowerShell-version is a no-go. I need to get stuff working with something I actually want to run.
In detail, this involves figuring out how .Net Core's System.Security.Cryptography.CngKey can import an existing key into Machine Store as an exportable one. That was bit tricky even in .Net Framework's System.Security.Cryptography.RSACryptoServiceProvider. Also note, that when I talk about PKI, I most definitely mean RSA and other practical algorithms like ECDSA, which is fully supported in Cryptography Next Generation (CNG). The biggest problem with CNG is, there is lack of usable documentation and practical examples.
Having elliptic curve support is important. RSA is absolutely not obsoleted and I don't see it being so in near future. It's the classic: having options. This is something I already addressed in a blog post this spring.
Most people are using only RSA and can get their job done using old libraries. I ran out of luck as I needed to do something complex. Using new libraries was the only way of getting forward. That meant lots of trial and error. Something R&D is about.
3: Import the PKCS#12-packaged certificate into a proper certificate store of a Windows-machine
When the very difficult part is done and a PKCS#12-file exists and contains a valid certificate and the private key of it, importing the information is surprisingly easy to accomplish with code.
On the other hand, this one is surprisingly complex to accomplish manually. Good thing I wasn't aiming for that.
4: Inform RDP-services which certificate to use
Getting a SHA-1 hash of a X.509 certificate is trivial. Stamping a well-known value into registry is easy. Having correct permissions set was nearly impossible, but ultimately it was doable.
5: Make sure RDP-services will use the certificate
For this, there are number of ways to do. Many of them will involve reboot or restarting the service with a PowerShell-spell of:
Restart-Service -DisplayName "Remote Desktop Services" -Force
Surprisingly, on a closer look there is a way to accomplish this steop without rebooting anything. It's just not well known nor well documented, but Windows Management Instrumentation (or wmic) can do that too! Assuming the SHA-1 thumbprint of the certificate was in variable $certThumbprint, running this single-line command will do the trick:
wmic /namespace:"\\root\cimv2\TerminalServices" PATH "Win32_TSGeneralSetting" Set "SSLCertificateSHA1Hash=$certThumbprint"
It will update registry to contain appropriate SHA-1 hash, confirm the access permissions and inform RDP-service about the change. All of which won't require a reboot nor an actual restart of the service. Imagine doing the cert update via RDP-session and restarting the service. Yup. You will get disconnected. Running this WMI-command won't kick you out. Nice!
Solution
Set of tools I wrote is published in GitHub: https://github.com/HQJaTu/RDP-cert-tools
As usual, this is something I'm using for my own systems, so I'll maintain the code and make sure it keeps working in this rapidly evolving world of ours.
Example run
On the target Windows 10 machine, this is how updating my cert would work (as an user with Administrator permissions):
PS C:\> .\update-RDP-cert.ps1 `

  -certPath 'wildcard.example.com.cer' `

  -keyPath 'wildcard.example.com.key'
Output will be:
Loaded certificate with thumbprint 1234567890833251DCCF992ACBD4E63929ABCDEF

Installing certificate 'CN=*.example.com' to Windows Certificate Store

All ok. RDP setup done.
That's it. You're done!
Example run with SSH
As I mentioned earlier, I'm using Let's Encrypt. There is a blog post about how I approach getting the certificates in my Linux wth Acme.sh. There is an obvious gap with getting certs from LE with a Linux and using the cert in Windows 10. Files in question need to be first transferred and then they can be used.
Realistic example command I'd run to first transfer the newly issued LE-cert from my Linux box to be used as RDP-cert would be:
PS C:\> .\get-RDP-cert.ps1 `
  -serverHost server.example.com `
  -serverUser joetheuser `
  -serverAuthPrivateKeyPath id_ecdsa-sha2-nistp521 `
  -remotePrivateKeyPath 'certs/*.example.com/*.example.com.key' `
  -remoteCertificatePath 'certs/*.example.com/*.example.com.cer'
The obvious benefit is a simple single command to get and install an RDP-certificate from Linux to Windows. All of the complexity will be taken out. My script will even clean the temporary files to not leave any private key files floating around.
Finally
Enjoy!
Admins/users: If you enjoy this tool, let me know. Drop me a comment.
Developers: If you love my CNG-import code, feel free to use it in your application. The more people know how it works, the better.
Memory lane: My C-64 source code from -87
Saturday, July 25. 2020
When I was a kid growing up with computers, there was one (1) definite medium for a Finnish nerd to read. MikroBitti.
Wikipedia describes MikroBitti as:
a Finnish computer magazine published in Helsinki, Finland
For any youngster it will be exteremely difficult to comprehend an era of computing without Internet. It did exist, I did live (and almost survive) through it.
Among the scarce resources was code. Magazines printed on paper published source code for platforms of that era. Regular people copied the code by typing (mostly incorrectly) in an attempt to obtain more working software. As we know, a single mis-typed character in a 10000 character code will crash the entire thing, at minimum produce unpredictable results. Then came modems and era of BBSes. Before that happened, I was sure to learn everything I could from those magazine-published codes. I did that even for platforms I didn't own nor have access to.
August 1987:
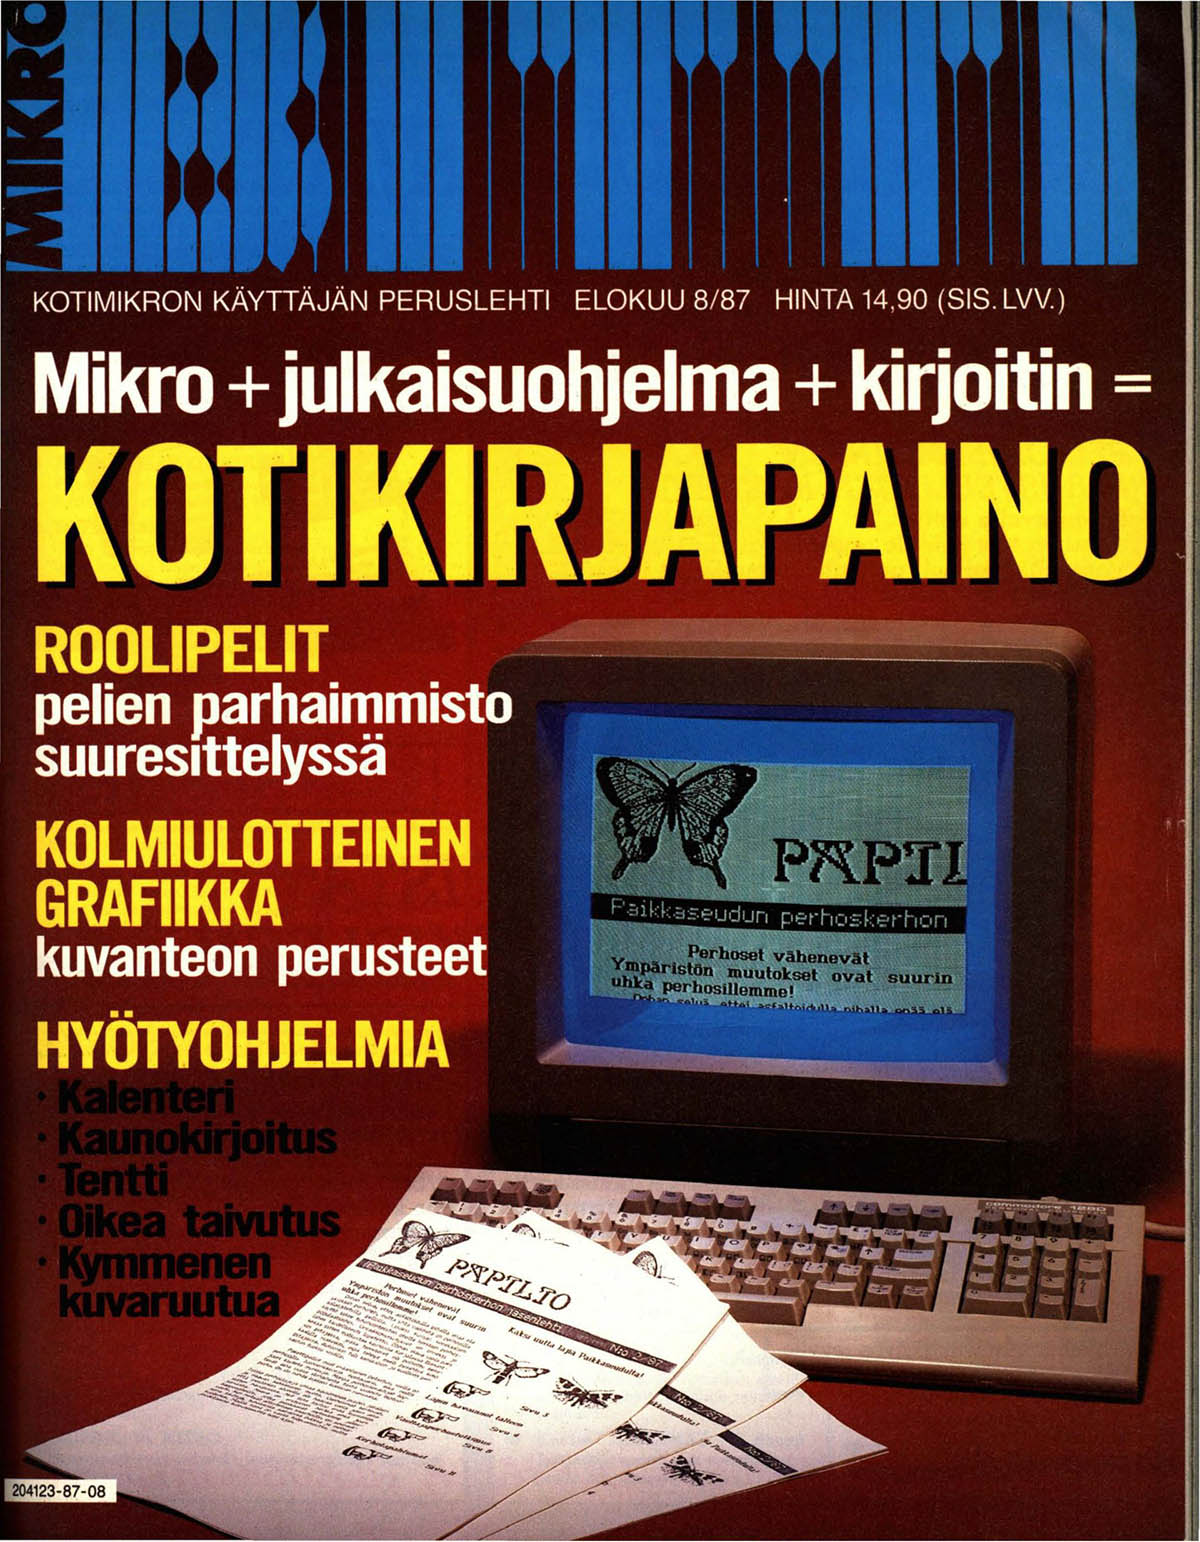
Cover and contents.
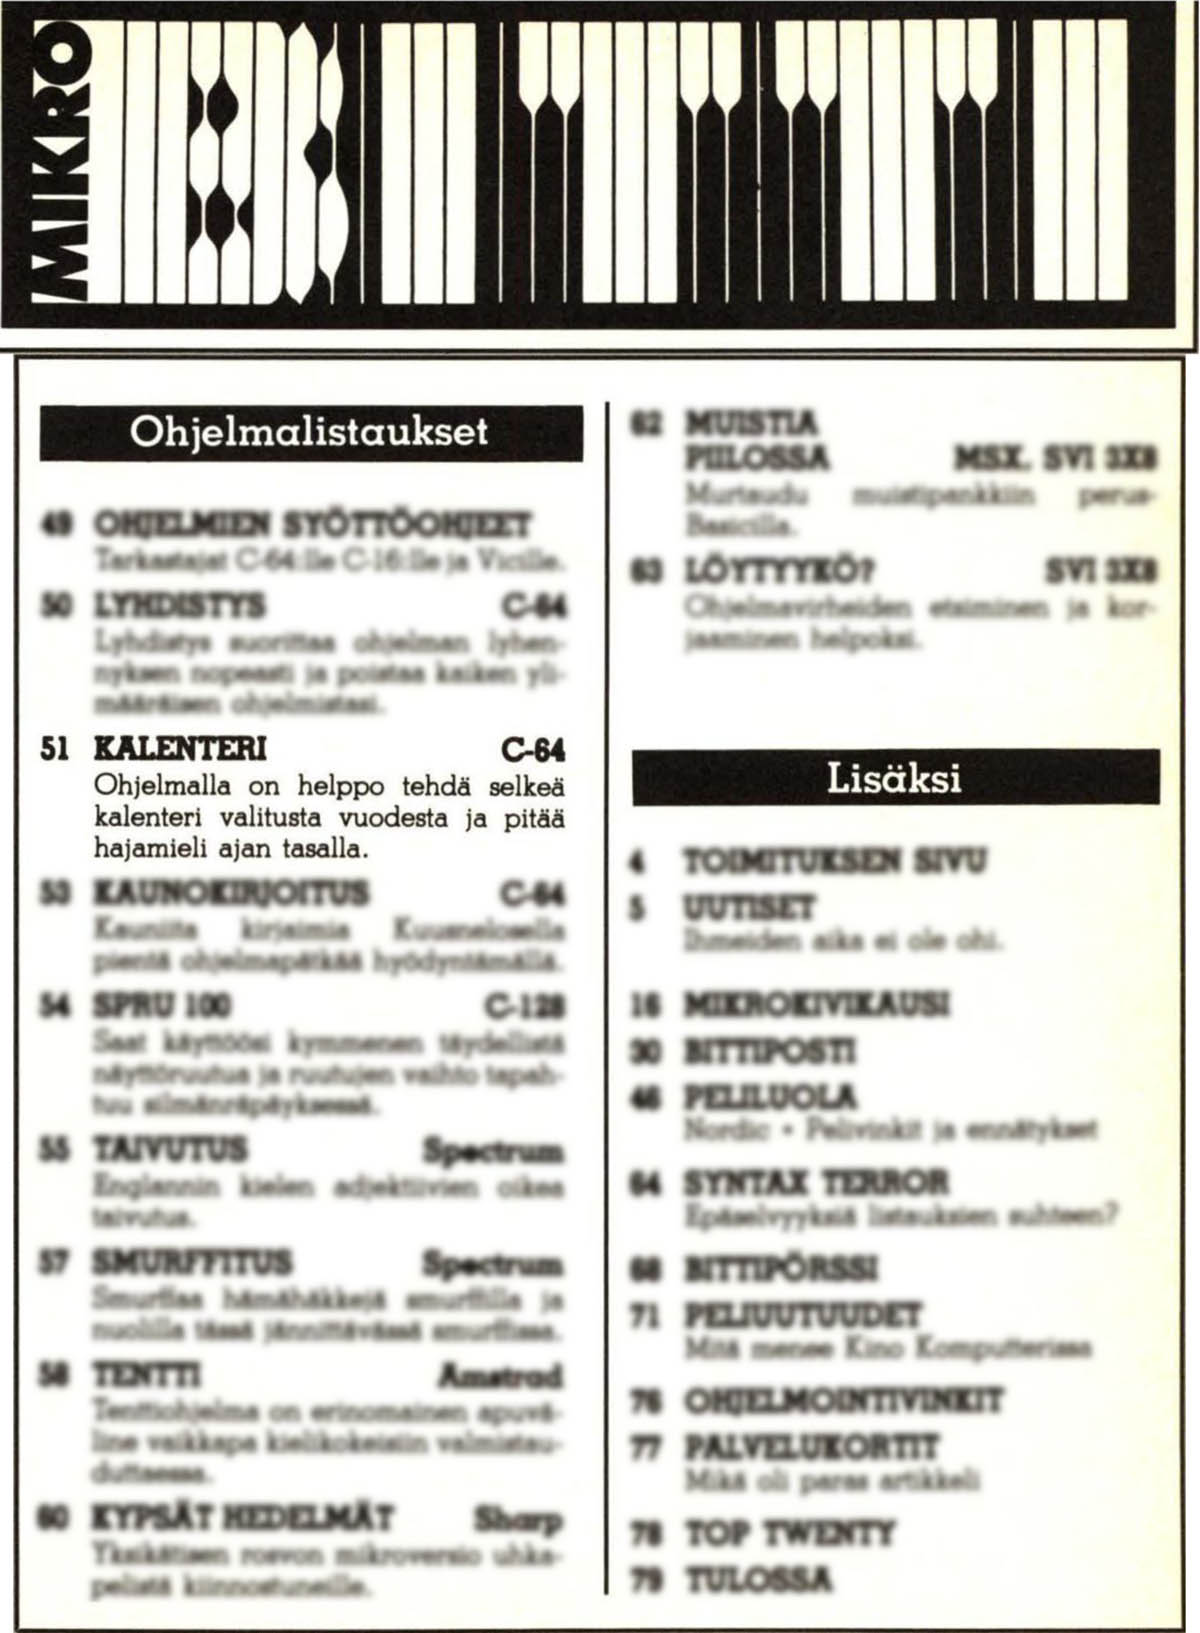
Pages 51 & 52:
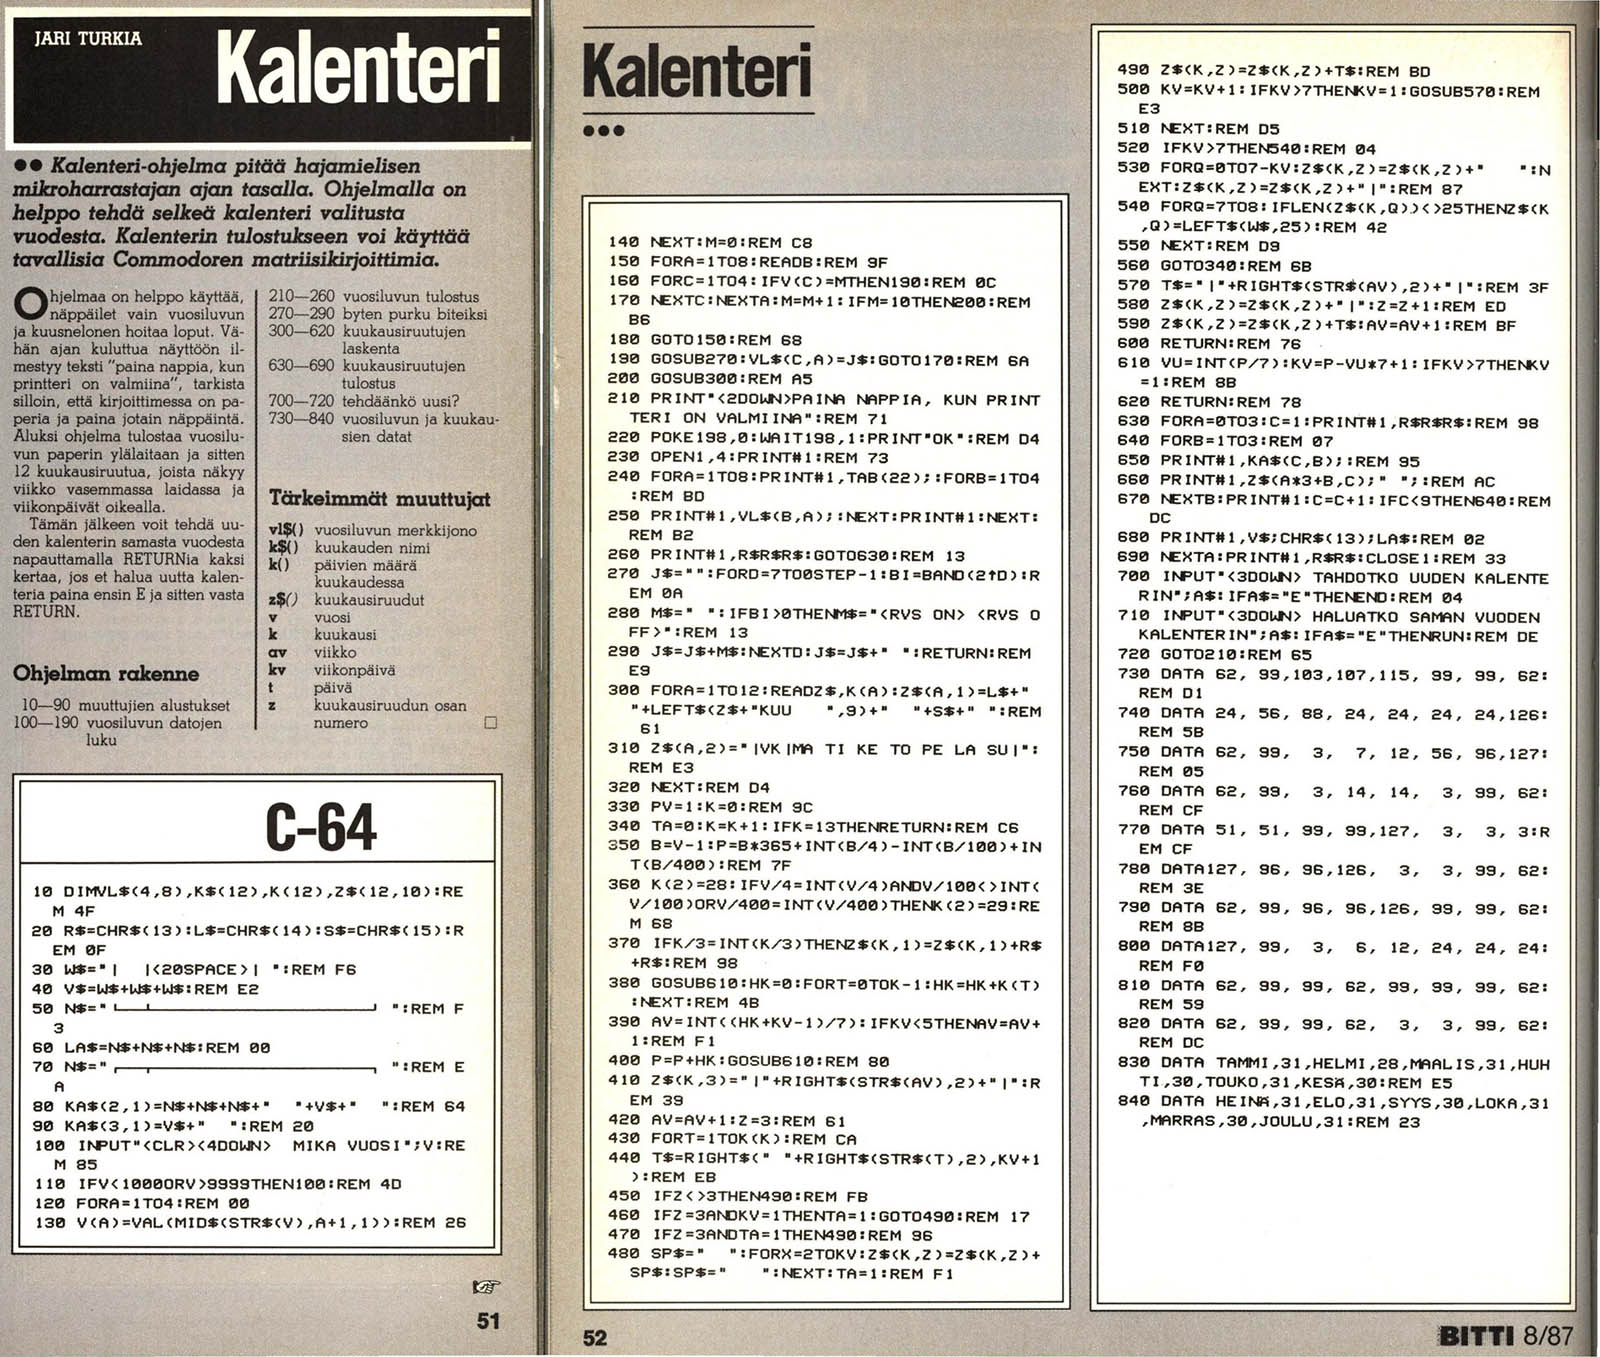
A trivial C-64 BASIC application by an unknown software engineer wanna-be producing a calendar for a given year. It even could print the calendar if you owned a printer.
Background info:
The code was written with a C-128 in C-64 mode. I was aiming for a larger audience C-64 had at the time. I don't remember the fee I received from this, but in my imagination it must have been something around 300 FIM. By using the Value of money converter @ stat.fi, 300 FIM in 1987 would equal to ~95 € in 2019. At the time, the low amount didn't matter! That was the first ever monetary compensation I received for doing something I was doing anyway. For all day, every day.
The brief intro for the calendar app was cut half by editor. What remains is a brief Finnish introduction about the purpose of the app and for other wanna-be software engineers a description what the variables in the code do.
Enjoy! If you find bugs, please report. 
Data Visualization - Emotet banking trojan
Monday, January 27. 2020
Emotet is a nasty piece of malware. It has been around The Net for number of years now and despite all the efforts, it is still stealing money from unsuspecting victims who log in into their online bank with their computers and suddenly lose all of their money to criminals.
Last month, I bumped into a "historical" Emotet-reference. A document contains the URLs for malicious distribution endpoints of documents and binaries used to spread the malware. It also contains IPv4-addresses for Command & Control servers. There are hundreds of endpoints listed, and every single one I tested was already taken down by ISPs or appropriate government officials. Surprisingly, only 20% of the URLs were for Wordpress. Given its popularity and all the security flaws, I kinda expected the percentage to match its market share, 35% of all the websites in the entire World run Wordpress. If you're reading this in the future, I'd assume the percentage to be higher.
As a coding exercise, I analysed the listed endpoints for all three variants (or Epochs as this malware's generations are called) of Emotet and created a heatmap of them. It would be really fun to get a list of all the infected computers and list of those computers where money was stolen from, but unfortunately for my curious mind, that data wasn't available.
So, no victims, only hijacked servers in this map:
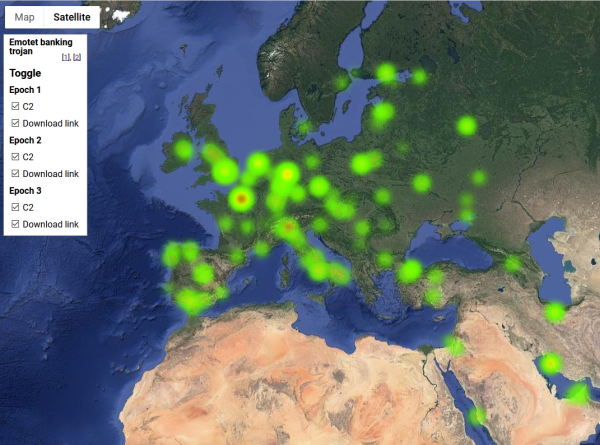
Actual Google Maps -application I wrote is at https://blog.hqcodeshop.fi/Emotet-map/map.html, go investigate it there.
This is a simple project, but if anybody want's do learn data visualization with Google Maps JavaScript API, my project is at https://github.com/HQJaTu/emotet-malware-mapper. Note: You will need an API-key from Google for your own projects. My API-key is publicly available, but restricted. It won't work for you.
As analysis of the hijacked distribution points and C2 -servers, there is lot of heat in obvious places, Europe and North America. But as you can see, there are lots of servers in use all around the globe. That should give everybody an idea why fighting cybercrime is so difficult.
Update 30th Jan 2020:
Emotet seems to be picking up speed, there is a US CISA warning about Increased Emotet Malware Activity. Apparently it is #1 malware currently in the world.
Running PHP from Plesk repo
Sunday, December 8. 2019
In 2013 I packaged PHP versions 5.4, 5.5 and 5.6 into RPMs suitable for installing and running in my Plesk-box. PHP is a programming language, more about that @ https://www.php.net/. Plesk is a web-hosting platform, more about that @ https://www.plesk.com/.
As I chose to distribute my work freely (see announcement https://talk.plesk.com/threads/centos-6-4-php-versions-5-4-and-5-5.294084/), because there wasn't that much innovation there. I just enabled multiple PHP versions to co-exist on a single server as I needed that feature myself. In 2015 Plesk decided to take my freely distributed packages and started distributing them as their own. They didn't even change the names! A sucker move, that.
However, I said it then and will say it now: that's just how open-source works. You take somebody else's hard work, bring something of your own and elevate it to the next level. Nothing wrong with that. However, a simple "Thanks!" would do it for me. Never got one from big greedy corporation.
In this case, the faceless corpo brought in stability, continuity and sustained support. Something I would never even dream of providing. I'm a single man, a hobbyist. What they have is teams of paid professionals. They completed the parts I never needed and fixed the wrinkles I made. Given the high quality of my and their work, ultimately all my boxes have been running PHP from their repo ever since.
This summer, something changed.
My /etc/yum.repos.d/plesk-php.repo had something like this for years:
baseurl=http://autoinstall.plesk.com/PHP_7.2/dist-rpm-CentOS-$releasever-$basearch/
I was stuck at PHP 7.2.19, something that was released in May 2019. Six months had passed and I had no updates. On investigation I bumped into https://docs.plesk.com/release-notes/obsidian/change-log/#php-191126. It states for 26th November 2019 for PHP 7.2.25 to be available for Plesk. That's like a big WHAAAAAAT!
More investigation was needed. I actually got a fresh VM, downloaded Plesk installer and started installing it to get the correct URL for PHP repo. It seems to be:
baseurl=http://autoinstall.plesk.com/PHP73_17/dist-rpm-CentOS-$releasever-$basearch/
Ta-daa! Now I had PHP 7.3.12:
# rpm -q -i plesk-php73-cli

Name : plesk-php73-cli

Epoch       : 1

Version     : 7.3.12

Release     : 1centos.8.191122.1343

Architecture: x86_64

Source RPM  : plesk-php73-cli-7.3.12-1centos.8.191122.1343.src.rpm

Build Date  : Fri 22 Nov 2019 01:43:45 AM EST

Build Host  : bcos8x64.plesk.ru

Packager    : Plesk <info@plesk.com>

Vendor      : Plesk

Summary     : Command-line interface for PHP

Description :

The php-cli package contains the command-line interface

executing PHP scripts, /usr/bin/php, and the CGI interface.
Actually PHP 7.4 is also available, just replace PHP73_17 with PHP74_17, to get the desired version.
PS.
Most of you are super-happy about your Apache/PHP -pair your distro vendor provides. If you're like me and ditched Apache, getting Nginx to run PHP requires some more effort. And if your requirements are to run a newer version of PHP than your vendor can provide, then you really short on options. Getting tailored PHP from Plesk's repo and pairing that with you Nginx takes one stresser out.
Python script for creating Linux iptables port forwarding rules based on an YAML-file
Saturday, September 14. 2019
Azure Developer Associate certification
Thursday, June 27. 2019
Yup.

Passed that one yesterday. For those intersted, it was a AZ-203: Developing Solutions for Microsoft Azure exam.
Previous one was 21 years ago:
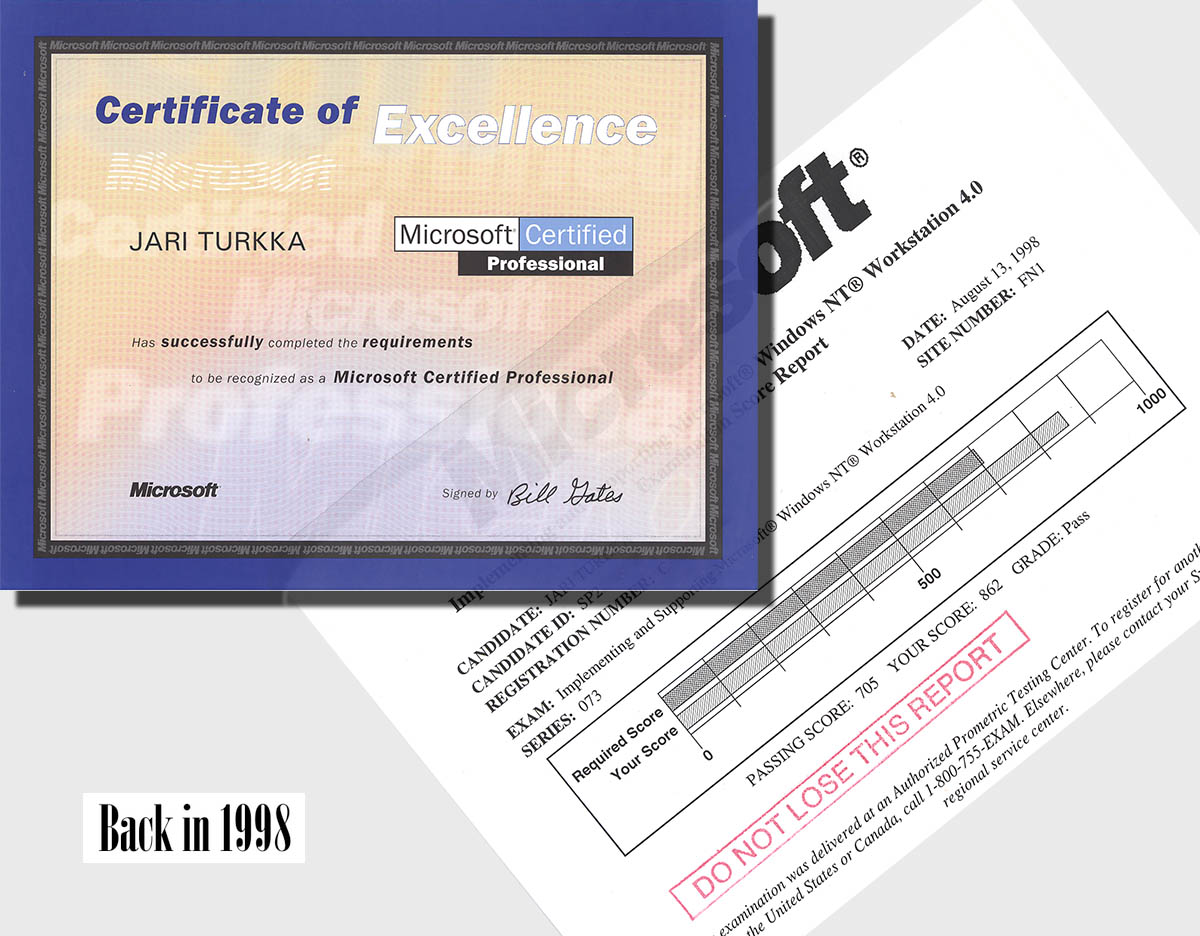
Notice how they misspelled my name. Argh!
I bet many of you haven't used Windows NT4.0 Workstation for a while (or ever).
Also notice how the certification was issued by Mr. Bill Gates himself!
Trigger Azure CDN to update certificate to custom domain from Key Vault
Tuesday, June 18. 2019
Steam stats
Wednesday, May 29. 2019
One day I was just browsing my Steam client (in case you're not a gamer, see https://store.steampowered.com/ for more). In my profile settings, I can choose what to display there. I seem to have a "achievement showcase" selected. It looks like this:
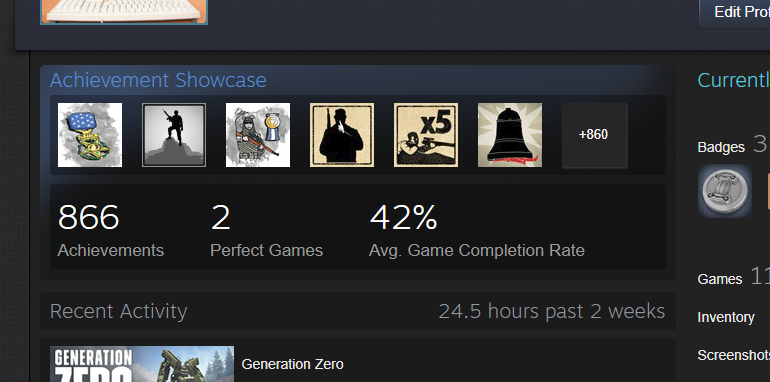
It seems, I have two perfect games having 100% of the achievements. Nice! Well ... which games are those?
That information is nowhere to be found. By googling some, I found Where can I see my perfect games in steam? in StackExchange. Somebody else had the same question.
As suggested in the answer, I checked out Steam-Zero - Steam achivements statistics script from GitHub. Again, no joy. It seems something in Steam API changed and no matter what domain I chose for my developer API-key, server wouldn't return a reasonable CORS-response making my browser refuse to continue executing the JavaScript-code any further. If you really want to study what a Cross-Origin Resource Sharing (CORS) is, go to https://developer.mozilla.org/en-US/docs/Web/HTTP/CORS. Warning: It is a tricky subject for non-developers.
As you might expect, I solved the problem by creating a fork of my own. It is at: https://github.com/HQJaTu/steamzero
With my code setup into an Apache-box, I can do a https://<my own web server here>/steamzero/?key=<my Steam API developer key here> to get something like this:
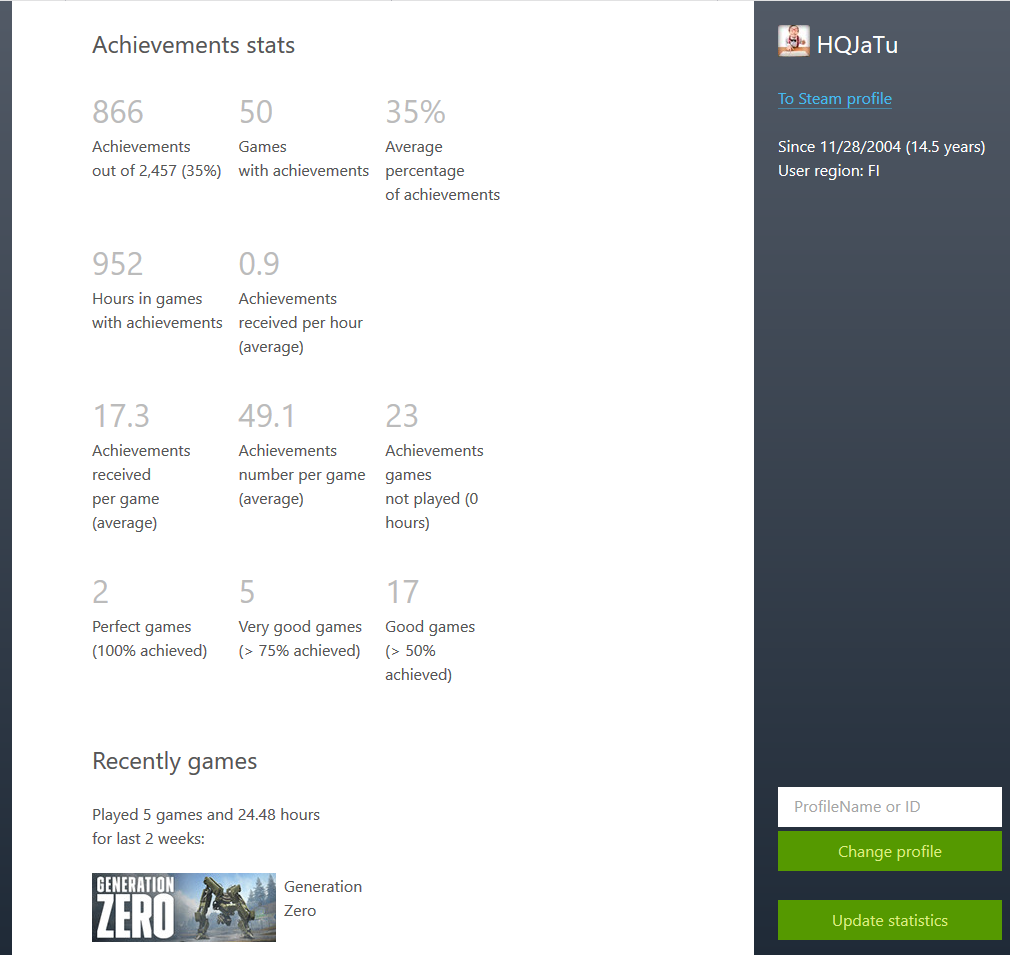

Ah, Walking Dead games have 100% achievements. Why couldn't I get that information directly out of Steam?! Lot of hassle to dig that out.
Note: Steam-Zero works only for public Steam-profiles. I had to change my privacy settings a bit to get all the stats out.
Setting up Azure AD Application from Azure DevOps pipeline Powershell task, Part 2 of 2: The scripts
Monday, May 6. 2019
This one is about Microsoft Azure Cloud platform. Specifically about Azure DevOps Services. And specifically about accessing Azure Active Directory with appropriate permissions and changing settings there. For anybody knowing their way around Azure and Azure AD, there is nothing special about it. Tinkering with AD and what it contains is more or less business-as-usual. Doing the same without a mouse and keyboard is an another story.
Given the complexity of this topic, this part is for technical DevOps personnel. The previous part of this blog post was mostly about getting a reader aligned what the heck I'm talking about.
Disclaimer: If you are reading this and you're thinking this is some kind of gibberish magic, don't worry. You're not alone. This is about a detail of a detail of a detail most people will never need to know about. Those who do, might think of this as something too difficult to even attempt.
Access problem
In order to setup an own application to authenticate against Azure AD, a pre-announcement with parameters specific to this application needs to be done to AD. As a result, AD will assign set of IDs to identify this particular application and its chosen method of authentication. The Azure AD terminology is "App Registration" and "Enterprise application", both of which are effectively the same thing, your application from AD's point-of-view. Also both entries can be found from Azure Portal, Azure Active Directory menu with those words. As mentioned in part 1, all this setup can be done with a mouse and keyboard from Azure Portal. However, this time we choose to do it in an automated way.
To access Azure AD from a random machine via PowerShell, first you user account needs to unsurprisingly authenticate with a suitable user having enough permissions to do the change. For auth, you can use Connect-AzureAD -cmdlet from AzureAD-module. Module information is at https://docs.microsoft.com/en-us/powershell/module/azuread/?view=azureadps-2.0, Connect-AzureAD -cmdlet documentation is at https://docs.microsoft.com/en-us/powershell/module/azuread/connect-azuread?view=azureadps-2.0.
Investigation reveals, that for Connect-AzureAD -call to succeed, it requires one of these:
-Credential-argument, that translates as username and password. However, service principal users used by Azure DevOps pipeline don't have an username to use. Service principals can have a password, but these accounts are not available for regular credential-based logins.-AccountId-argument having "documentation" of Specifies the ID of an account. You must specify the UPN of the user when authenticating with a user access token.-AadAccessToken-argument having "documentation" of Specifies a Azure Active Directory Graph access token.
The documentation is very vague at best. By testing we can learn, that a logged in user (DevOps service principal) running Azure PowerShell does have an Azure context. The context has the required Account ID, but not the required UPN, as it is not a regular user. When you login from a PowerShell prompt of your own workstation, a context can be used. Again, you're a human, not service principal.
Two out of three authentication options are gone. The last one of using an access token remains. Microsoft Graph API documents obtaining such an access token in https://docs.microsoft.com/en-us/azure/active-directory/develop/v1-protocols-openid-connect-code. A very short version of that can be found from my StackOverflow comment https://stackoverflow.com/a/54480804/1548275.
Briefly: On top of your Azure tenant ID, if you know your AD application's ID and client secret, getting the token can be done. The triplet in detail:
- Tenant ID: Azure Portal, Azure Active Directory, Properties, Directory ID.
- For an already logged in Azure user (
Login-AzureRmAccount, in PowerShell up to 5.x) - PowerShell up to 5.x using AzureRM-library:
Get-AzureRmSubscription
- For an already logged in Azure user (
- AD application ID: A service principal used for your Azure DevOps service connection.
- You can list all available service principals and their details. The trick is to figure out the name of your Azure DevOps service connection service principal.
- PowerShell up to 5.x using AzureRM-library:
Get-AzureRmADServicePrincipal - To get the actual Application ID, affix the command with a:
| Sort-Object -Property Displayname | Select-Object -Property Displayname,ApplicationId - Note: Below in this article, there is a separate chapter about getting your IDs, they are very critical in this operation.
- Client secret: The password of the service principal used for your Azure DevOps service connection.
Problem:
First two can be easily found. What the client secret is, nobody knows. If you created our service connection like I did from Azure DevOps, the wizard creates everything automatically. On Azure-side, all user credentials are hashed beyond recovery. On Azure DevOps-side user credentials are encrypted and available for pipeline extensions using Azure SDK in environment variables. An Azure PowerShell task is NOT an extension and doesn't enjoy the privilege of receving much of the required details as free handouts.
To be complete, it is entirely possible to use Azure DevOps service connection wizard to create the service principal automatically and let it generate a random password for it. What you can do is reset the password on Azure AD to something of your own choosing. Just go reset the password for service connection in Azure DevOps too, and you can write your scripts using the known secret from some secret place. What that secret stash would be is up to you. Warning: Having the password as plain text in your pipeline wouldn't be a good choice.
Links
See, what other people in The Net have been doing and talking about their doings to overcome the described problem:
- Create AD application with VSTS task (in an Azure PowerShell task)
- VSTS Build and PowerShell and AzureAD Authentication (in an Azure PowerShell task, or in an Azure DevOps extension)
- Use AzureAD PowerShell cmdlets on VSTS agent (in an Azure DevOps extension)
- Azure AD Application Management -extension in Azure Marketplace
What you can do with the Azure AD Application Management -extension
In a pipeline, you can create, update, delete or get the application. Whoa! That's exactly what I need to do!
To create a new AD application, you need to specify the Name and Sign-on URL. Nothing more. Also, there is the problem. Any realistic application need to setup bunch of other settings to manifest and/or authentication.
A get AD application -operation will return following pipeline variables:
-
ObjectId
-
ApplicationId
-
Name
-
AppIdUri
-
HomePageUrl
-
ServicePrincipalObjectId
My approach
When eyeballing the App registration from Azure AD -side, it would look something like this:
The password (or secret) is hashed and gone. But what's the second option there? A certificate!
Documentation for Microsoft identity platform access tokens is at https://docs.microsoft.com/en-us/azure/active-directory/develop/access-tokens. When combined with previous link of Graph API documentation of OpenID Connect and Certificate credentials for application authentication from https://docs.microsoft.com/en-us/azure/active-directory/develop/active-directory-certificate-credentials we have all required information how to make this happen.
What you need for this to work
- PowerShell 5.x prompt with AzureRM and AzureAD modules installed
- Azure account
- Azure DevOps account
- Azure user with lots of access, I'm using a Global Admin role for my setups
- Azure DevOps user with lots of access, I'm using an Organization Owner role for my setups
- Azure Key Vault service up & running
- Azure DevOps pipeline almost up & almost running
Create a certificate into your Azure Key Vault
X.509 certificate
In PowerShell 5.x there is PKIClient-module, and New-SelfSignedCertificate cmdlet. In PowerShell 6.x, that particular module hasn't been ported yet. A few very useful cmdlets are using Windows-specific tricks to get the thing done. Since PowerShell 6.x (or PowerShell Core), is a multi-platform thing, the most complex ones have not been ported to macOS and Linux, so no Windows-version is available. However, connecting into Azure AD is done with AzureAD-module, which doesn't work with PowerShell 6.x, sorry. As much you and me both would love to go with the latest one, using 5.x is kinda mandatory for this operation.
Also, if you would have a self-signed certificate, what then? How would you use it in Azure DevOps pipeline? You wouldn't, the problem remains: you need to be able to pass the certificate to the pipeline task. Same as a password would be.
There is a working solution for this: Azure Key Vault. It is an encrypted storage for shared secrets, where you as an Azure admin can control on a fine-grained level who can access and what.
Your Azure DevOps service principal
If you haven't already done so, make sure you have a logged-in user in your PowerShell 5.x prompt. Hint: Login-AzureRmAccount cmdlet with your personal credentials for Azure Portal will get you a long way.
Next, you need to connect your logged in Azure administrator to a specific Azure AD for administering it. Run following spell to achieve that:
$currentAzureContext = Get-AzureRmContext;

$tenantId = $currentAzureContext.Tenant.Id;

$accountId = $currentAzureContext.Account.Id;

Connect-AzureAD -TenantId $tenantId -AccountId $accountId;
Now your user is connected to its "home" Azure AD. This seems bit over-complex, but you can actually connect to other Azure ADs where you might have permission to log into, so this complexity is needed.
As everything in Azure revolves around IDs. Your service principal has two very important IDs, which will be needed in various operations while granting permissions. The required IDs can be read from your Azure AD Application registration pages. My preference is to work from a PowerShell-session, I will be writing my pipeline tasks in PowerShell, so I choose to habit that realm.
As suggested earlier, run something like:
Get-AzureRmADServicePrincipal | Sort-Object -Property Displayname | Select-Object -Property Displayname,ApplicationId
will get you rolling. Carefully choose your Azure DevOps service principal from the list and capture it into a variable:
$adApp = Get-AzureADApplication -Filter "AppId eq '-Your-DevOps-application-ID-GUID-here-'"
Key Vault Access Policy
Here, I'm assuming you already have an Azure Key Vault service setup done and running Get-AzureRMKeyVault would return something useful for you (in Powershell 5.x).
To allow your DevOps service principal access the Key Vault, run:
$kv = Get-AzureRMKeyVault -Name

Set-AzureRmKeyVaultAccessPolicy -VaultName $kv.VaultName `

  -ServicePrincipalName $adApp.AppId `

  -PermissionsToKeys Get `

  -PermissionsToSecrets Get,Set `

  -PermissionsToCertificates Get,Create
X.509 certificate in a Key Vault
Azure Key Vault can generate self-signed certificates for you. Unlike a certificate and private key generated by you on a command-line, this one can be accessed remotely. You can read the certificate, set it as authentication mechanism for your DevOps service principal, and here comes the kicker: on an Azure DevOps pipeline task, you don't need to know the actual value of the certificate, all you need is a method for accessing it, when needed.
Create a certificate renewal policy into Azure Key Vault with:
$devOpsSpnCertificateName = "My cool DevOps auth cert";
$policy = New-AzureKeyVaultCertificatePolicy -SubjectName "CN=My DevOps SPN cert" `$devOpsSpnCertificateName
-IssuerName "Self" `
-KeyType "RSA" `
-KeyUsage "DigitalSignature" `
-ValidityInMonths 12 `
-RenewAtNumberOfDaysBeforeExpiry 60 `
-KeyNotExportable:$False `
-ReuseKeyOnRenewal:$False
Add-AzureKeyVaultCertificate -VaultName $kv.VaultName `
-Name `
-CertificatePolicy $policy
This will instruct Key Vault to create a self-signed certificate by name My cool DevOps auth cert, and have it expire in 12 months. Also, it will auto-renew 60 days before expiry. At that point, it is advisable to set the new certificate into Azure AD App registration.
Now you have established a known source for certificates. You as an admin can access it, also your pipeline can access it.
Allow certificate authentication
To use this shiny new certificate for authentication, following spell needs to be run to first get the X.509 certificate, extract the required details out of it and allow using it as login credential:
$pfxSecret = Get-AzureKeyVaultSecret -VaultName $kv.VaultName `

  -Name $devOpsSpnCertificateName;

$pfxUnprotectedBytes = [Convert]::FromBase64String($pfxSecret.SecretValueText);

$pfx = New-Object Security.Cryptography.X509Certificates.X509Certificate2 -ArgumentList `

  $pfxUnprotectedBytes, $null,  `

  [Security.Cryptography.X509Certificates.X509KeyStorageFlags]::Exportable;


$validFrom = [datetime]::Parse($pfx.GetEffectiveDateString());

$validFrom = [System.TimeZoneInfo]::ConvertTimeBySystemTimeZoneId($validFrom, `

  [System.TimeZoneInfo]::Local.Id, 'GMT Standard Time');

$validTo = [datetime]::Parse($pfx.GetExpirationDateString());

$validTo = [System.TimeZoneInfo]::ConvertTimeBySystemTimeZoneId($validTo, `

  [System.TimeZoneInfo]::Local.Id, 'GMT Standard Time');


$base64Value = [System.Convert]::ToBase64String($pfx.GetRawCertData());

$base64Thumbprint = [System.Convert]::ToBase64String($pfx.GetCertHash());

$cred = New-AzureADApplicationKeyCredential -ObjectId $adApp.ObjectId `

  -CustomKeyIdentifier $base64Thumbprint `

  -Type AsymmetricX509Cert `

  -Usage Verify `

  -Value $base64Value `

  -StartDate $validFrom `

  -EndDate $validTo;
That's it! Now you're able to use the X.509 certificate from Azure Key Vault for logging in as Azure DevOps service principal.
Grant permissions to administer AD
The obvious final step is to allow the DevOps service principal to make changes in Azure AD. As default, it has no admin rights into Azure AD at all.
About level of access: I chose to go with Company Administrator, as I'm doing a setup for custom AD-domain. Without that requirement, an Application administrator would do the trick. Docs for different roles are at https://docs.microsoft.com/en-us/azure/active-directory/users-groups-roles/directory-assign-admin-roles.
So, the spell goes:
$roleName ='Company Administrator';

$role = Get-AzureADDirectoryRole | where-object {$_.DisplayName -eq $roleName};
Depending on your setup and what you've been doing in your AD before this, it is possible, that getting the role fails. Enable it with this one:
$roleTemplate = Get-AzureADDirectoryRoleTemplate | ? { $_.DisplayName -eq $roleName };

Enable-AzureADDirectoryRole -RoleTemplateId $roleTemplate.ObjectId;
Get the service principal, and grant the designated role for it:
$devOpsSpn = Get-AzureRmADServicePrincipal | `

  where-object {$_.ApplicationId -eq $adApp.AppId};

Add-AzureADDirectoryRoleMember -ObjectId $role.Objectid -RefObjectId $devOpsSpn.Id;
Now you're good to go.
What to do in a task
Lot of setup done already, now we're ready to go for the actual business.
Here is some code. First get the certificate from Key Vault, then connect the DevOps service principal into Azure AD:
$pfxSecret = Get-AzureKeyVaultSecret -VaultName $kv.VaultName `
-Name $devOpsSpnCertificateName;
$pfxUnprotectedBytes = [Convert]::FromBase64String($pfxSecret.SecretValueText);
$pfx = New-Object Security.Cryptography.X509Certificates.X509Certificate2 -ArgumentList ` $pfxUnprotectedBytes, $null, ` [Security.Cryptography.X509Certificates.X509KeyStorageFlags]::Exportable;
ConnectCurrentSessionToAzureAD $pfx;
function ConnectCurrentSessionToAzureAD($cert) {
$clientId = (Get-AzureRmContext).Account.Id;
$tenantId = (Get-AzureRmSubscription).TenantId;
$adTokenUrl = "https://login.microsoftonline.com/$tenantId/oauth2/token";
$resource = "https://graph.windows.net/";
$now = (Get-Date).ToUniversalTime();
$nowTimeStamp = [System.Math]::Truncate((Get-Date -Date $now -UFormat %s -Millisecond 0));
$thumbprint = [System.Convert]::ToBase64String($pfx.GetCertHash());
$headerJson = @{
alg = "RS256"
typ = "JWT"
x5t = $thumbprint
} | ConvertTo-Json;
$payloadJson = @{
aud = $adTokenUrl
nbf = $nowTimeStamp
exp = ($nowTimeStamp + 3600)
iss = $clientId
jti = [System.Guid]::NewGuid().ToString()
sub = $clientId
} | ConvertTo-Json;
$jwt = New-Jwt -Cert $cert -Header $headerJson -PayloadJson $payloadJson;
$body = @{
grant_type = "client_credentials"
client_id = $clientId
client_assertion_type = "urn:ietf:params:oauth:client-assertion-type:jwt-bearer"
client_assertion = $jwt
resource = $resource
}
$response = Invoke-RestMethod -Method 'Post' -Uri $adTokenUrl `
-ContentType "application/x-www-form-urlencoded" -Body $body;
$token = $response.access_token
Connect-AzureAD -AadAccessToken $token -AccountId $clientId -TenantId $tenantId | Out-Null

}
Now, you're good to go with cmdlets like New-AzureADApplication and Set-AzureADApplication, or whatever you wanted to do with your Azure AD. Suggestions can be found from docs at https://docs.microsoft.com/en-us/powershell/module/azuread/?view=azureadps-2.0.
About PowerShell-modules in a task
This won't be a surprise to you: not all the modules you'll be needing are there in an Azure DevOps agent running your tasks. As an example, AzureAD won't be there, also the required JWT-module won't be there. What I'm doing in my pipeline task, is to install the requirements like this:
Install-Module -Name JWT -Scope CurrentUser -Force
Now the task won't ask anything (-Force) and it won't require administrator privileges to do the installation to a system-wide location (-Scope CurrentUser).
Finally
Phew! That was a lot to chew on. But now my entire appication is maintained via Azure DevOps release pipeline. If something goes wrong, I can always run a deployment in my environment setup pipeline and it will guarantee all the settings are as they should.

