Fedora 20: Services failing to start on boot
Thursday, October 23. 2014
Something funny happened to my Fedora 20 installation. Stuff that used to work stopped doing so. I understand, that I'm dealing with "bleeding edge" Linux-distro, but it kind of starts to annoy me, when things don't get back like they were.
Here is one:
# systemctl status iscsi.service --all
iscsi.service - Login and scanning of iSCSI devices
Loaded: loaded (/usr/lib/systemd/system/iscsi.service; enabled)
Active: inactive (dead)
start condition failed at Thu 2014-07-17 12:23:18 EEST; 1min 24s ago
none of the trigger conditions were met
Docs: man:iscsid(8)
man:iscsiadm(8)
Jul 17 12:23:17 box systemd[1]: Started Login and scanning of iSCSI devices.
Jul 17 12:23:18 box systemd[1]: Started Login and scanning of iSCSI devices.
Aow come on! "none of the trigger conditions were met"!! I don't know what changed with the precious trigger conditions. Basic checks didn't reveal anything noteworthy:
# systemctl is-active iscsi.service
active
# systemctl list-dependencies iscsi.service
iscsi.service
There are some other people suffering from the same issue. Fedora 20 ypbind won’t start at boot. NIS logins unavailable immediately after boot (ypbind service NOT started). and Bug 1027114 - nfs mount fails during boot because network is not ready point me to the direction of service trying to start too early. There is a document explaining how to run services only after network is up (Running Services After the Network is up), but the point is: somebody goofed! This used to work.
I tried a classic off/on -trick:
# systemctl disable iscsi.service
# systemctl enable iscsi.service
... no avail. Still after a boot I have a list of failing services:
# systemctl --failed
UNIT LOAD ACTIVE SUB DESCRIPTION
arpwatch.service loaded failed failed Arpwatch daemon which keeps track of ether
dhcpd.service loaded failed failed DHCPv4 Server Daemon
iscsi.service loaded failed failed Login and scanning of iSCSI devices
LOAD = Reflects whether the unit definition was properly loaded.
ACTIVE = The high-level unit activation state, i.e. generalization of SUB.
SUB = The low-level unit activation state, values depend on unit type.
3 loaded units listed. Pass --all to see loaded but inactive units, too.
To show all installed unit files use 'systemctl list-unit-files'.
Finally I chose to add the After=network-online.target -line to my service description. First the service description needs to be copied from /usr/lib/systemd/system/ into /etc/systemd/system/. The rule is very simple: don't edit files under /usr/ and it applies also here. Systemd has a built in fall-back mechanism. If your own tailor made file doesn't exist in /etc/, it will take the default one. It is good to have that, but better if no such tinkering wasn't needed at all. What if there is an update to the service-description? I have to manually update my copied file. ![]()
So, I did a:
# cd /etc/systemd/system/
# cp /usr/lib/systemd/system/iscsi.service .
and edited the file. I added one line to Unit-description:
[Unit]
After=network-online.target
To be absolutely clear: I didn't touch the other lines.
Since systemd doesn't pick up the changes very easily, I did a:
# systemctl disable iscsi.service
# systemctl enable iscsi.service
after status informed, that my change was in place:
# systemctl status iscsi
iscsi.service - Login and scanning of iSCSI devices
Loaded: loaded (/etc/systemd/system/iscsi.service; enabled)
Notice how, the service description is now under /etc/.
Anyway, that did the trick for all of my failing services. Now they start nicely on bootup.
Unboxing iPhone 6
Tuesday, October 21. 2014
My iPhone 4S spent a while in the bottom of the lake. It worked under water and I got it out dried it, and it seems to work. Apparently something is short-circuiting as it doesn't stay turned off for more than a second. Mostly it does work, but I wanted a new one and went for a iPhone 6. It is impossible to get one without queueing for weeks. So, I put my order to Apple's on-line store and waited the weeks and then TNT-guy dropped the thing at my door. Nice! New toys! ![]()
The phone is wrapped into plastic and there is the Apple-tab at the end:
In the box there are also charger, Lightning USB-cable and ear-plugs/headphones (I don't much like them):
The first idea that comes to my mind, is that "darn it's light!". Because the phone is much lighter than 4S. It is much bigger phone, but still so light. Nice! Here's the comparison: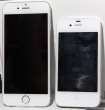
One thing I had to do was to drive to my telco's store and get my SIM-card changed. 4S eats micro-SIMs, but this one wants a nano-SIM. Darn! There is the traditional Apple SIM-slot in the side:
Finally I got the first smoke out of it:
I chose to go for iTunes, but it didn't like me:
![]()
Crap! That's really not encouraging to see that kind of message. My solution was to un-plug it and try again. It worked! I got to the point where it was possible to set up the phone from my previous backup:
![]()
Yet another cold shower. It really paid off to upgrade into iOS 8.1! ![]() NOT!
NOT!
The solution was to set the phone as a new and do an upgrade:
After iOS 8.1 was running, I did a full reset to the phone and tried the iTunes restore-thing again. This time everything was ok. The restore ran much faster then on 4S. I have over 10 gigs of stuff to restore. Finally:
Nice! The screen is much bigger, and restore did place my icons to their original locations. That sure looks funny on a much bigger screen! ![]()
Now that the phone was running, it was time to look some bonus things. I got a Vaja case for it:

That should protect the very expensive phone (unless dropped into a lake).
Plugging cords is not nice at office environment, so I normally sync and charge my stuff with a lighting-dock. It was visible in couple of earlier pics, but here are more:

My choice is Macally charge & sync dock Designed for Lightning iDevices and it works nicely on my iPad too:
They don't sell those in Europe for reason unknown to me. I guess it has something to do with electricity. As I ordered mine from US, it has an US transformer in it. Luckily a dock doesn't need electricity for anything, and charging fully works from my PC.
Ok, enough accessories, back to iPhone 6. It's a darn good one. It has to be the best iPhone so far! It does well on Carat battery statistics, they don't actually give out the results, but it was the best of iPhones in that. There are some results in Finnish newspaper article. On top of that, the screen (altough it is too big) is really good, camera is good and the thing runs apps very fast. I totally recommend gettin one!
Asus mobo BIOS upgrade loses Intel RAID-configuration
Monday, October 20. 2014
One of these days, I went to see if my motherboard has a newer BIOS. It had, and since I had not upgraded the BIOS after building my PC, I chose to go for upgrade.
This is one of the newer model PCs. You download the file, put it into a FAT-32 formatted USB-stick. Reboot the computer and enter UEFI-setup screens. One of them has an option to display the contents of the USB-stick and load the file, upgrade the BIOS and ... reset the settings and reboot. Wait a minute! Did I just say reset the settings. Yes.
Guess what happened to my Intel Rapid Storage Technology RAID-1 -setup. ![]()

Crapper! I didn't see that one coming. Now I remember again why I typically don't use motherboard "fake" RAIDs. Also, by the looks of it I wasn't alone with this: RAID1 changed to AHCI after BIOS update. Also, somebody with a Dell computer was experiencing something similar in the Intel's own discussion boards: Raid 1 rebuild with Rapid Storage Technology. I checked the manuals Intel® Rapid Storage Technology (Intel® RST) User guides, but didn't see anything that would help. Self-help seems always to be the best option anyway.
I turned the S-ATA mode back to RAID:
... but trying to re-create the RAID-1 volume seemed a bit dangerous:
The part where it says "Warning: All data on selected disks will be lost" kind of gets my attention. I didn't want to go that way.
Booting to Windows worked. Looks like drive(s) don't have any headers and if necessary, can act as a single drive:
Naturally when Windows sees two drives instead of one, it means that there is no RAID. To get this one fixed I started Interl Rapid Storage Technology user interface. It has the option to create RAID volume on RAID-ready drives:![]()
More importantly, it has the possibility of not erasing data on a single disc:
![]()
When accepted, the rebuild process starts. It will migrate data for hours: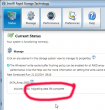
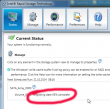
When it finishes, there will be only one drive left:

As the end result, the BIOS was upgraded, RAID-1 was rebuilt and I was happy again. All it took was 6 hours of rebuild time and a lot of stress! ![]()
New features to curcfg_tool [Failure]
Sunday, October 19. 2014
The original post about curcfg_tool.
So I decided to add couple of new features to my tool. However, neither of of them work. ![]()
Asiantuntijakaveri-blog introduced hack to run commands on boot: Persistent customizations to Huawei B593u with stock firmware. I added a feature to do that:
./curcfg_tool -rc "update-westerneurope.huaweidevice.com ; /upgflash/init.d/rc.local" -w
The flaw is in the httpupg-command startup. It takes the server address from curcfg.xml, but it doesn't escape it properly. This makes it possible to piggy-back any command on it. The thing is, that in my B593, the automatic firmware upgrade does not run automatically. I can go trigger it manually. At that point it runs my script I created at /upgflash/init.d/rc.local. My hope was, that system would run it automatically on bootup, but it doesn't.
Another thing I added was NTP-server change. I don't know where the list comes from, in my case it is completely ridiculous. However, the source for information is not from curcfg.xml. For example:
./curcfg_tool -ntp1 ntp.dnainternet.fi -ntp2 fi.pool.ntp.org -w
... doesn't change anything. The new servers don't appear at the list in GUI, nor the system doesn't update time from them.
Crap! Both attempts failed miserably. Please drop me a comment if you have anything to add to those ones.
OS X Yosemite upgrade from USB-stick
Saturday, October 18. 2014
Latest OS X version Yosemite or 10 is out. Funny thing, the operating system 10 has a version 10 released. ![]()
The thing is ... it's free, but it's big. The amount of downloading needed is easily 5+ GiB. When I downloaded mine, it said 6 hours of load time. On my 250 Mbit/s fiber! Argh. It downloaded a hour or so and choked completely. Argh, argh! When I resumed, it picked a better server and I got rest of the file in 10 minutes or so. Anyway, I absolutely, positively don't want to do that on all of my Macs. So, let's figure out something smarter on that.
The sources of my information are:
- How to Burn OS X Yosemite to a USB Flash Drive
- DISKUTIL(8) - BSD System Manager's Manual
- Disk Management From the Command-Line, Part 2
- Starting from an external USB storage device (Intel-based Macs)
Step 0: Prerequisites
USB-booting a Mac is trickier than a PC. The knowledge base article HT1948 states:
Intel-based Macs support starting from an external USB storage device's volume that:
- Has been formatted with a GUID partition type
- Contains an installation of Mac OS X 10.4.5 or later, or Mac OS X 10.5 or later, which is compatible with (or shipped with) the Mac that the USB device is connected to. Note: You should not use a version of Mac OS X that is earlier ("older") than the version your Mac shipped with.
So, if you just bought an USB-stick, the chances are, that it is MBR-partitioned FAT32. That's my experience of getting new ones. They are incompatible at their current state for USB-booting a Mac. Not to worry, that can be fixed!
Step 1: Go download
In your Apple menu (the top left apple-shaped thing at every program's menu), go for Software Update. Yosemite should be there as a free download from App Store. Select it and wait ... wait forever! ![]()
In the classic Commodore 64 game Impossible Mission the phrase was "Another visitor! Stay a while; stay forever!". [Actually the mission was possible. As the game was pretty good, I completed it a number of times.]
Step 2: Go USB
Now that you have the thing in your drive, don't proceed with the upgrade.
do not proceed! You can actually quit the installer, it won't delete the files from your drive.
Take at least a 8 GiB USB-storage. 4 won't do it, but any larger will. In my case, the USB-stick appeared as /dev/disk3. That may vary on your system. Also it is possible to use some GUI-tools on OS X to format your drives, but as a Linux-nerd I don't know about them.
To make sure, the stick is in a Mac-format (this needs to be run as root, that's what the sudo is for). This will partition and format the entire stick into Mac-use:
# sudo /bin/bash
root# diskutil partitionDisk /dev/disk3 1 GPT jhfs+ "OS X Yosemite" 0b
It will say something like this as a result:
Started partitioning on disk3
Unmounting disk
Creating the partition map
Waiting for the disks to reappear
Formatting disk3s2 as Mac OS Extended (Journaled) with name OS X Yosemite
Initialized /dev/rdisk3s2 as a 7 GB case-insensitive HFS Plus volume with a 8192k journal
Mounting disk
Finished partitioning on disk3
/dev/disk3
#: TYPE NAME SIZE IDENTIFIER
0: GUID_partition_scheme *8.0 GB disk3
1: EFI EFI 209.7 MB disk3s1
2: Apple_HFS OS X Yosemite 7.7 GB disk3s2
Next thing is to confirm, that the volume with given name will be mounted:
root# ls -l /Volumes/
total 40
lrwxr-xr-x 1 root admin 1 Oct 17 13:27 Macintosh HD -> /
drwxrwxr-x 7 root wheel 306 Oct 18 13:12 OS X Yosemite
If it does, you're ready to go. Copy the thing into it:
root# cd "/Applications/Install OS X Yosemite.app/Contents/Resources"
root# ./createinstallmedia --volume /Volumes/OS\ X\ Yosemite/ \
--applicationpath /Applications/Install\ OS\ X\ Yosemite.app \
--nointeraction
It will result in a lengthy process saying:
Erasing Disk: 0%... 10%... 20%... 30%...100%...
Copying installer files to disk...
Copy complete.
Making disk bootable...
Copying boot files...
Copy complete.
Done.
Step 3: Go update
Your stick is ready. This is the part you will be replicating to any of your Macs you want to upgrade.
Reboot the Mac and make sure to boot from the USB. This can be achieved by pressing down option-key during boot:

The official Apple instruction at knowlegebase article HT1948 states:
To start from a USB storage device that meets the above requirements:
- connect the device
- restart
- immediately press and hold the Option key to access Startup Manager
If you successfully followed the steps, you will end up in Mac boot manager: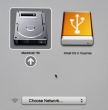
In that, you pretty much select the drive you want to boot from. In this particular case, making a choice for the recently prepared USB-stick will be a good one. The network selection is there to confuse you. Ignore it and double click the USB-drive.
Most steps in this upgrade will include lot of waiting. Make sure that you have reserved couple of hours for the upgrade. Screens like this will become familiar to you:
Most time estimates are wild guesses. A 9 minute wait in reality is something like 45 minutes. Eventually the USB-stick finishes booting, and you will end up in a screen saying "To set up the installation of OS X, click Continue". Most screens will refer your upgrade as an install. It is nerve-wrecking thing, because you don't know if it is going to wipe your settings and data, or do a nice upgrade what you'd be expecting. My experience is, that it will upgrade nicely, but it won't say it properly.
Then there is a license screen which you must agree to continue. Then land on OS X Utilities. One thing you can do with a bootable stick is to install/upgrade an OS X:
This is the most time-consuming part. A cup of coffee doesn't do it. You can easily cook and eat a meal with the coffee during this. My hardware isn't especially old or slow, but ... the upgrade is.
After a reboot, you will end up in the OOBE (or out-of-box experience). This will start with Apple ID login. Apple makes an effort to not allow stolen hardware to be used and they pretty much require you to login during install:
Since I have a 2-factor authentication enabled for my Apple ID, a 2FA-screen will appear during the process:
There are steps about sending your usage data to Apple, then yet another license screen:
Then you need to make the choice of upgrading iCloud into iCloud Drive, the new thing that came with iOS 8 and OS X Yosemite:
Then you're pretty much done. Finally your upgrade is ready!
Step 4: Done!
One of the first things I did, was eject my USB-stick (there were couple other Macs to be updated, too):
At this point, you can continue using your precious Mac.
Aftermath
Was it worth it? Not really, the change is mainly cosmetic. iCloud Drive isn't a reason for me to upgrade. Apple-menu doesn't have System Update anymore, they changed it into App Store. That's like running iOS.
I updated anyway, as a nerd I like the latest stuff running on my computers. I should yield less problems and there needs to be some progress. I find myself stating the same thing in couple of my blog posts, "it wasn't worth it, but I did it anyway". With computers, it never will result any good to stand still and ignore future.
Nero displaying ads on Windows
Thursday, October 2. 2014
When I first saw an ad popping from my Windows 7 system tray I was pretty convinced, that my computer had been hijacked, keylogger installed, all my files sent to a Chinese server and police knocking down my door, because my machine is serving cp-pics in a torrent network. Then I realized, that the advertisement is about Nero. A software, that I bought and installed voluntarily. See:

As you can see from the dates on the pictures, that I've been waiting for this to happen again. This time I was ready and could confirm, that the culprit was indeed Nero. It is totally unclear to me, if I agreed to this in end user license agreement, but that's what they are doing. Perhaps I also gave the birth rights of my first born son like F-Secure did in London (see: Londoners give up eldest children in public Wi-Fi security horror show). Anyway, I'm not exactly happy, that they choose to do this. Nobody knows what else are they doing.
By googling, I found out, that I'm no alone with this problem. Nero's own discussion forum has a thread with topic Why do you think it's acceptable to spam people's PCs?, and there is actually removal instructions.
There is an own folder for Nero and in it, there is a NeroInfo running at install time every 2 days. It most certainly does not display ads every time it runs, but there is the master of this botnet somewhere giving instructions on when to run and what to display. Just delete the task: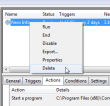
And finish it off by deleting the files also:![]()
Now it should stay off for a while! This is a fine specimen of paid software screwing you to the ass.


