Blog server upgrade to CentOS 8
Saturday, December 7. 2019
Since the inception of this blog back in January 2013, my weapon-of-choice has been CentOS Linux. When looking at the release chart @ https://en.wikipedia.org/wiki/CentOS#Latest_version_information it becomes obvious this is the 3rd major version of CentOS I'm running my blog on. In 2013 only version 6 was available, I must have upgraded into version 7 during 2014, and now 2019 I'm running on version 8. Given how RedHat and their organization(s) operate, the base Linux for my system is Fedora 28. See Fedora Project releases from https://fedoraproject.org/wiki/Releases.
The only motivation for me to upgrade is technology. RHEL/CentOS almost never upgrade their component versions. They do back-port any security patches even if authors of the original ones give up on their obsoleted stuff. RedHat does not. For people loving things how they are, that's a good thing. For people like me, its not that good.
Absolutely necessary things I had earlier, but lost and again have:
- HTTP/2
- For how and why this differs from HTTP/1.1 everybody else is still using, dive into Mr. Curl's book http2 explained. Its freely available @ https://http2-explained.haxx.se/content/en/
- TLS 1.3
- TLS versions 1 and 1.1 have been obsoleted. That leaves TLS 1.2 as the almost-only viable secure protocol.
- Obvious disclaimer for TLS 1.3: As of writing, it is still experimental. In reality not so much. Chrome and Firefox (among other platforms) support TLS 1.3 fully.
- Cloudflare's Head of Research Nick Sullivan is a known 1.3 enthusiast. Read his thoughts @ https://blog.cloudflare.com/rfc-8446-aka-tls-1-3/.
Other highlights:
- PHP 7.3
- My blog software runs on PHP. I upgraded 7.2, but am too scared to go for 7.4 yet.
- Native dual-stack IPv6/IPv4 networking. This is courtesy of my service provider.
- TLS 1.2 configured to not support any CBC-ciphers, for details see Why did TLS 1.3 drop AES-CBC? as an example
- Inspiration for this taken from Cipherli.st and Security/Server Side TLS on Mozilla wiki.
- Apologies for anybody using IE 11 on Windows Phone 8.1, or Safari versions 6-8 on iOS 6-9/OS X 10.9 or 10.10. You won't see this text as your devices/operating systems won't support my reasonably secure settings.
- For everybody else: Congratulations on having a decently secure device to do your Internet browsing with.
- tmux
- Terminal multiplexer, https://github.com/tmux/tmux/wiki
- Most of you just SSH into a server and be happy with it. I almost always run my sessions trough something that will keep my work safe if a disconnection occurs. To my surprise I keep bumping into sysadmins who don't either know about this or don't see this as a necessary approach.
- I've ran GNU Screen for over 25 years now. Not anymore. Uff!
- nftables (https://wiki.nftables.org/), courtesy of RHEL 8 / CentOS 8
- the new packet classification framework that replaces the existing {ip,ip6,arp,eb}_tables infrastructure
- I've ran IPchains / IPtables for 21 years now. Not anymore.
 Arf!
Arf!
Qualsys report on my blog now:
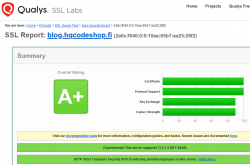
Nice!
Next up: CentOS Stream.
A new attempt to allow change of software versions. This will effectively detach CentOS from RHEL and gear it towards Fedora. This enables CentOS to get newer software as a rolling release Linux-distro, but keep the changes not-so-aggressive.
I won't run this yet on my blog server. This is so new at this point, but I'll have it running on a devel-box.
Schneier's Six Lessons/Truisms on Internet Security
Monday, November 11. 2019
Mr. Bruce Schneier is one of the influencers I tend to follow in The Net. He is a sought after keynote speaker and does that on regular basis. More on what he does on his site @ https://www.schneier.com/.
Quite few of his keynotes, speeches and presentations are made publicly available and I regularly tend to follow up on those. Past couple of years he has given a keynote having roughly the same content. Here is what he wants you, an average Joe Internet-user to know in form of lessons. To draw this with a crayon: Lessons are from Bruce Schneier, comments are mine.
These are things that are true and are likely to be true for a while now. They are not going to change anytime soon.
Truism 1: Most software is poorly written and insecure
The market doesn't want to pay for secure software.
Good / fast / cheap - pick any two! The maket has generally picked fast & cheap over good.
Poor software is full of bugs and some bugs are vulnerabilities. So, all software contains vulnerabilities. You know this is true because your computes are updated monthly with security patches.
Whoa! I'm a software engineer and don't write my software poorly and it's not insecure. Or ... that's what I claim. On a second thought, that's how I want my world to be, but is it? I don't know!
Truism 2: Internet was never designed with security in mind
That might seem odd 2019 saying that. But back in the 1970s, 80s and 90s it was conventional wisdom.
Two basic reasons: 1) Back then Internet wasn't being used for anything important, 2) There were organizational constraints about who could access the Internet. For those two reasons designers consciously made desicisions not to add security into the fabric of Internet.
Where still living with the effects of that decision. Whether its the domain name system (comment: DNS), the Internet routing system (comment: BGP), the security of Internet packets (comment: IP), security of email (comment: SMTP) and email addresses.
This truism I know from early days in The Net. We used completely insecure protocols like Telnet or FTP. Those were later replaced by SSH and HTTPS, but still the fabric of Internet is insecure. It's the applications taking care of the security. This is by design and cannot be changed.
Obviously there are known attempts to retrofit fixes in. DNS has extension called DNSSEC, IP has extensions called IPsec, mail transfer has a secure variant of SMTPS. Not a single one of those is fully in use. All of them are accepted, even widely used, but not every single user has them in their daily lives. We still have to support both the insecure and secure Net.
Truism 3: You cannot constrain the functionality of a computer
A computer is a general purpose device. This is a difference between computers and rest of the world.
No matter how hard is tried a (landline) telephone cannot be anything other than a telephone. (A mobile phone) is, of course, a computer that makes phone calls. It can do anything.
This has ramifications for us. The designers cannot anticipate every use condition, every function. It also means these devices can be upgraded with new functionality.
Malware is a functional upgrade. It's one you didn't want, it's one that you didn't ask for, it's one that you don't need, one given to you by somebody else.
Extensibility. That's a blessing and a curse at the same time. As an example, owners of Tesla electric cars get firmware upgrades like everything else in this world. Sometimes the car learns new tricks and things it can do, but it also can be crippled with malware like any other computer. Again, there are obvious attempts to do some level of control what a computer can do at the operating system level. However, that layer is too far from the actual hardware. The hardware still can run malware, regardless of what security measure are taken at higher levels of a computer.
Truism 4: Complexity is the worst enemy of security
Internet is the most complex machine mankind has ever built, by a lot.
The defender occupies the position of interior defending a system. And the more complex the system is, the more potential attack points there are. Attacker has to find one way in, defender has to defend all of them.
We're designing systems that are getting more complex faster than our ability to secure them.
Security is getting better, but complexity is getting faster faster and we're losing ground as we keep up.
Attack is easier than defense across the board. Security testing is very hard.
As a software engineer designing complex systems, I know that to be true. A classic programmer joke is "this cannot affect that!", but due to some miraculous chain, not ever designed by anyone, everything seems to depend on everything else. Dependencies and requirements in a modern distributed system are so complex, not even the best humans can ever fully comprehend them. We tend to keep some sort of 80:20-rule in place, it's enough to understand 80% of the system as it would take too much time to gain the rest. So, we don't understand our systems, we don't understand the security of our systems. Security is done by plugging all the holes and wishing anything wouldn't happen. Unfortunately.
Truism 5: There are new vulnerabilities in the interconnections
Vulnerabilities in one thing, affect the other things.
2016: The Mirai botnet. Vulnerabilities in DVRs and CCTV cameras allowed hackers to build a DDoS system that was raid against domain name server that dropped about 20 to 30% of popular websites.
2013: Target Corporation, an USA retailer, attacked by someone who stole the credentials of their HVAC contractor.
2017: A casino in Las Vegas was hacked through their Internet-connected fish tank.
Vulnerability in Pretty Good Privacy (PGP): It was not actually vulnerability in PGP, it was a vulnerability that arose because of the way PGP handled encryption and the way modern email programs handled embedded HTML. Those two together allowed an attacker to craft an email message to modify the existing email message that he couldn't read, in such a way that when it was delivered to the recipient (the victim in this case), a copy of the plaintext could be sent to the attacker's web server.
Such a thing happens quite often. Something is broken and its nobody's fault. No single party can be pinpointed as responsible or guilty, but the fact remains: stuff gets broken because an interconnection exists. Getting the broken stuff fixed is hard or impossible.
Truism 6: Attacks always get better
They always get easier. They always get faster. They always get more powerful.
What counts as a secure password is constantly changing as just the speed of password crackers get faster.
Attackers get smarter and adapt. When you have to engineer against a tornado, you don't have to worry about tornadoes adapting to whatever defensive measures you put in place, tornadoes don't get smarter. But attackers against ATM-machines, cars and everything else do.
An expertise flows downhill. Today's top-secret NSA programs become tomorrow's PhD thesis and next day's hacker tools.
Agreed. This phenomenon can be easily observed by everybody. Encryption always gets more bits just because today's cell phone is capable of cracking last decade's passwords.
If you want to see The Man himself talking, go see Keynote by Mr. Bruce Schneier - CyCon 2018 or IBM Nordic Security Summit - Bruce Schneier | 2018, Stockholm. Good stuff there!
New Weather Station - Davis Vantage Vue - Part 2 of 2: Linux installation
Tuesday, November 5. 2019
This is a part two out of two on my Davis Vantage Vue weather station installation story. Previous part was about hardware installation.
Datalogger expansion
The indoors console has a slot for expansion devices. I went for the RS-232 WeatherLink datalogger expansion:
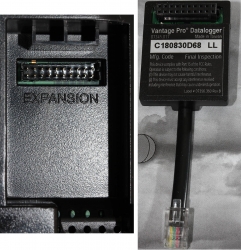
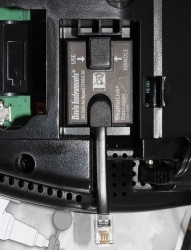
RS232 Cabling
The datalogger has a very short cable and a RJ-11 connector on the other end. The obvious good thing is the common availability of telephone extension cords to get past the 5 cm cable lenght of the datalogger. A regular landline telephone typically has such RJ-11 connectors in it and what I did was to get an inexpensive extension cord with suitable lenght.
For computer connectivity, with datalogger box has a blue RJ-11 to RS232 converter. The four connected pins of the converter are as follows:
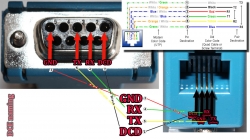
RS232 and Linux
Most computers today don't have a RS232-port in them. To overcome this, years ago I bought a quad-RS232-port USB-thingie:
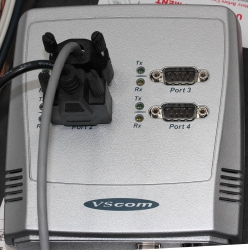
If you look closely, Port 1 of the unit has a DIY RS232-connector attached into it. That's my Vantage Vue cable connected to the indoors console. Also, note the lack of the blue RJ-11 to RS232 converter unit. I reverse engineered the pins and soldered my cable directly to a D-9 connector to get the same result.
Now the hardware parts is done. All the connectors are connected and attached to a PC.
Software
Half of the work is done. Next some software is needed to access the data in the data logger.
For Windows and macOS
Those not running Linux, there is WeatherLink software freely available at https://www.davisinstruments.com/product/weatherlink-computer-software/. It goes without saying, the software is useless without appropriate hardware it gets the inputs from. I never even installed the software, as using a non-Linux was never an option for me. So, I have no idea if the software is good or not.
For Linux
As you might expect, when going to Linux, there are no commercial software options available. However, number of open-source ones are. My personal choice is WeeWX, its available at http://www.weewx.com/ and source code at https://github.com/weewx/weewx.
Install WeeWX:
- Download software:
git clone https://github.com/weewx/weewx.git - In git-directory, create RPM-package:
make -f makefile rpm-package SIGN=0 - As root, install the newly created RPM-package:
rpm --install -h dist/weewx-3.9.2-1.rhel.noarch.rpm - That's it!
Configure WeeWX:
- (dependency) Python 2 is a requirement. Given Python version 2 deprecation (see https://pythonclock.org/ for details), at the time of writing, there is less than two months left of Python 2 lifetime, this project really should get an upgrade to 3. No such joy yet.
- (dependency) pyserial-package:
pip install pyserial - Run autoconfig:
wee_config --install --dist-config /etc/weewx/weewx.conf.dist --output /etc/weewx/weewx.conf- In the array of questions, when being asked to choose a driver, go for
Vantage (weewx.drivers.vantage)
- In the array of questions, when being asked to choose a driver, go for
- Inspect the resulting
/etc/weewx/weewx.confand edit if necessary:- Section
[Station]week_start = 0
- Section [StdReport]
HTML_ROOT = /var/www/html/weewx
- (optional for Weather Underground users), Section
[StdRESTful]- Subsection
[[Wunderground]] - Enter station name and password
enable = true
- Subsection
- Section
- Configuring done!
Now you're ready (as root) to start the thing with a systemctl start weewx.
On a working system, you should get LOOP-records out of weewxd instantly. After a little while of gathering data, you should start having set of HTML/CSS/PNG-files in /var/www/html/weewx. It's a good idea to set up a web server to publish those files for your own enjoyment. This is something you don't have to do, but I strongly advice to enable HTTP-endpoint to your results. I will immensly help determining if your system works or not.
One reason I love having a weather station around is to publish my data to The Net. I've been tagging along with Weather Underground for years. There has been good years and really bad years, when Wunderground's servers have been misbehaving a lot. Now that IBM owns the thing, there has been some improvements. The most important thing is there is somebody actually maintaining the system and making it run. Obviously, there has been some improvements in the service too.
Aggregation problem
When I got my system stable and running, I realized my wind data is flatline. In nature it is almost impossible for not to be windy for multiple days. I visually inspected the wind speed and direction gauges, they were working unobstructed. However, my console did not indicate any wind at all.
After multiple days of running, I was about to give up and RMA the thing back to Davis for replacement, the console started working! That was totally unexpected. Why: 1) the system did not work, 2) the system started working without any actions from me. That was the case for me. As the problem has not occurred since, it must have been some kind of newness.
What next
Now that everything is up, running and stays that way. There's always something to improve. What I'm planning is to do is pump the LOOP-records to Google BigQuery.
As a side note: when new information is available, it will be emitted by weewxd as LOOP: <the data here> into your system logs. However, that data isn't used. After a period of time, your Vantage Vue will aggregate all those records into a time-slot record. That will be used as your measurement. Since those LOOP-records are simply discarded I thought it might be a good idea to base some analytics on those. I happen to know Google BigQuery well from past projects, all that I need is to write a suitable subsystem into weewx to pump the data into a correct place. Then it would be possible to do some analytics of my own on those records.
New Weather Station - Davis Vantage Vue - Part 1 of 2: Hardware installation
Monday, November 4. 2019
Last July, there was a severe hailstorm in my area. At the time, I wrote a blog post about it, because the storm broke my weather station. Since fighting with nature is futile, I'm blaming myself for relying on La Crosse -approach of using zipties to attach the components to a steel pole. Given my latitude, 61° north, during summer it can be +30° C and during winter -30° C. The huge variation of temperature combined with all the sunlight directed to nylon straps will eventually make them weak. So, here is my mental note: Next time use steel straps!
I did that when I got my new weather station. This post is about the hardware and getting it fastened securely. The next part is about getting the device talking to my Linux and pumping the results to The Net.
Davis Vantage Vue
After careful consideration, I went for a Vantage Vue from Davis Instruments.

Since this is a serious piece of hardware, in their ranking this 500,- € piece is a "beginner" model. In Davis catalog, there are "real" models for enthusiasts costing thousands of $/€. I love my hardware, but not that much. ![]()
What's in the box
For any weather station from cheapest 10,- € junk to Davis, there's always an indoor unit and outdoor unit.
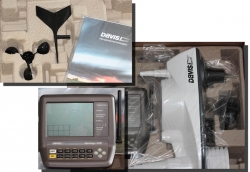
In the box, there is paper manuals, altough I went for the PDF from their site. Indoors unit is ready-to-go, but outdoors unit has number of sensors needing attaching. Even the necessary tools are included for those parts, which require them. Most parts just click into place.
The Vantage Vue console is really nice. There is plenty of buttons for button-lovers and a serious antenna for free placement of the indoor unit. The announced range between units is 300 meters. I didn't test the range, but the signal level I'm getting in my setup is never below 98%. Again, serious piece of hardware.
Installing sensors
Some assembly is required for the outdoors sensor unit. I begun my assembly by attaching the replaceable lithium-ion battery.

The Li-Ion battery is charged from a solar cell of the sensor unit. I have reports from Finland, that given our lack of sunshine during winter, the sensor unit does survive our long and dark winter ok. I have no idea how long the battery wil last, but I'm preparing to replace that after couple of years.
Next one, anemometer wind vane:

Gauge for wind direction requires fastening a hex screw, but the tool in included in the box. Wind speed gauge just snaps into place. Unlike wind vane, which is hanging from the bottom of the unit, speed gauge is at the top of the unit, so gravity will take care of most of the fastening.
On the bottom of the sensor unit, there is a slot for a bucket seesaw. When the bucket has enough weight in it, in form of rainwater, the seesaw will tilt and empty the bucket. Rain is measured on how many seesaw tilts will occur. Again, this is a real scientific measurement unit, there is an adjustment screw for rain gauge allowing you to calibrate the unit. On top of the rain gauge, there is a scoop. On the bottom of the scoop, you'll need to attach a plug keeping all the unwanted stuff out of the bucket:

Also note three details in the pic: the solar cell, transmitter antenna and a level bubble helping you during installation of the sensor unit.
Outdoors sensor unit done
This is how the final result looks like for me:

Idea during installation is to make sure the sensor unit has the solar cell directed to south (180°) allowing it to capture maximum sunlight on Northen Hemisphere. This also serves the base of direction for the wind vane. Obviously, you can adjust the deviation from the console if needed. People living in Southern Hemisphere definitely need to do that. Also, you may have something special in your install, the option is there. Remember, this is a serious piece of scientific measurement hardware.
Indoors unit
A running console looks like this:
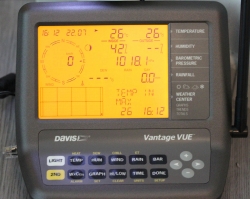
In the screen, the top half is always constant. The buttons "temp", "hum", "wind", "rain" and "bar" can be used to set the bottom half of the screen to display temperature, humidity, wind, rain or barometric pressure details.
As you can see, I took the picture on 22nd July (2019) at 16:12 (pm). It was a warm summer day +26° C both indoors and outdoors. Day was calm and there was no wind. The moon on 22nd July was a waxing cresent. Given my brand new installation, there were not yet measurements for outdoors humidity. The lack of humidity also results in lack of dew point.
People writing the console software have a sense of humor:
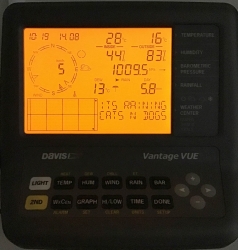
Console display indicates rain (an umbrella) and a text "Its raining cats'n'dogs". Hilarious!
As you can see, the indoors temperature is rather high, +28° C. In reality, that didn't reflect the truth. Later I realized, that keeping the light on will heat the console indoors sensor throwing it off by many degrees. Now I tend to keep the light off and press the "light"-button only when it is dark.
Powering indoor unit
Most people would get the required three C-cell batteries, whip them in and forget about it... until the batteries run out and need to be replaced.
Davis planned an option for that. What you can do is to ignore the battery change and plug the accompanying 5VDC 1A transformer into a wall socket and never need to change the batteries. I love quality hardware, you have options to choose from.
Datalogging
The primary purpose of me owning and running a weather station is to extract the measurements to a Linux PC. An el-cheapo weather stations offer no such option for computer connectivity. Mid-range units have a simple USB-connector (limited to max. cable lenght of 5 meters), some even RS-232 connectivity (max. cable lenght up to 100 meters). When going to these heavy-hitter -models from Davis Instruments, out-of-the-box there is nothing.
To be absolutely clear: Davis Vantage Vue can be attached to a computer, but it is an extra option that is not included in the box.
Here is a picture of USB datalogger expansion unit for Vantage Vue:

Optimal installation in my house requires the console in a place where it's easily visible and accessible. But its nowhere near a computer, so RS232 is the way I go.
I'll cover the details of datalogger expansion, cabling and Linux setup in the next post.
Deprecated SHA-1 hashing in TLS
Sunday, November 3. 2019
This blog post is about TLS-protocol. It is a constantly evolving beast. Mastering TLS is absolutely necessary, as it is one the most common and widely used components keeping our information secure in The Net.
December 2018: Lot of obsoleted TLS-stuff deprecated
Nearly an year ago, Google as the developer of Chrome browser deprecated SHA-1 hashes in TLS. In Chrome version 72 (December 2018) they actually did deprecate TLS 1 and TLS 1.1 among other things. See 72 release notes for all the details.
Making TLS 1.2 mandatory actually isn't too bad. Given Qualsys SSL Labs SSL Pulse stats:
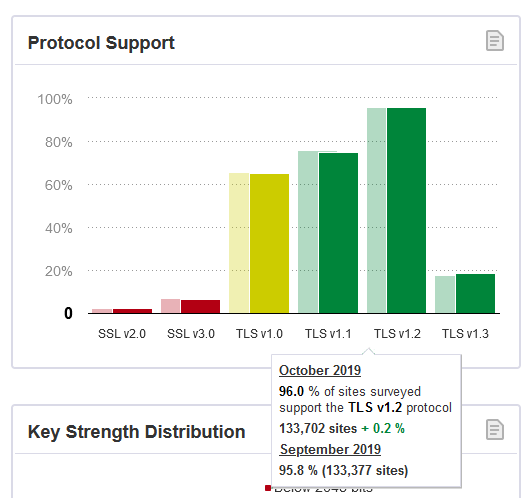
96,0% of the servers tested (n=130.000) in SSL Labs tester support TLS 1.2. So IMHO, with reasonable confidence we're at the point where the 4% rest can be ignored.
Transition
The change was properly announced early enough and a lot of servers did support TLS 1.2 at the time of this transition, so the actual deprection went well. Not many people complained in The Net. Funnily enough, people (like me) make noise when things don't go their way and (un)fortunately in The Net that noise gets carried far. The amount of noise typically doesn't correlate anything, but phrase where there is smoke - there's fire seems to be true. In this instance, deprecating old TLS-versions and SHA-1 hashing made no smoke.
Aftermath in Chrome
Now that we have been in post SHA-1 world for a while, funny stuff starts happening. On rare occasion, this happens in Chrome:
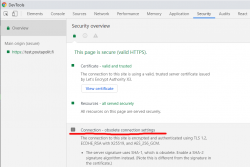
In Chrome developer tools Security-tab has a complaint: Connection - obsolete connection settings. The details state: The server signature users SHA-1, which is obsolete. (Note this is different from the signature in the certificate.)
Seeing that warning is uncommon, other than me have bumped into that one. An example: How to change signature algorithm to SHA-2 on IIS/Plesk
I think I'm well educated in the details of TLS, but this one baffled me and lots of people. Totally!
What's not a "server signature" hash in TLS?
I did reach out to number of people regarding this problem. 100% of them suggested to check my TLS cipher settings. In TLS, a cipher suite describes the algorithms and hashes used for encryption/decryption. The encrypted blocks are authenticated with a hash-function.
Here is an example of a cipher suite used in loading a web page:
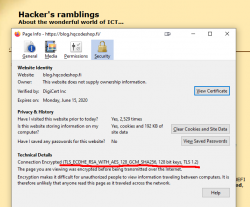
That cipher suite is code 0xC02F in TLS-protocol (aka. ECDHE-RSA-AES128-GCM-SHA256). Lists of all available cipher suites can be found for example from https://testssl.sh/openssl-iana.mapping.html.
But as I already said, the obsoletion error is not about SHA-1 hash in a cipher suite. There exists a number of cipher suites with SHA-1 hashes in them, but I wasn't using one.
Second clue is from the warning text. It gives you a hint: Note this is different from the signature in the certificate ... This error wasn't about X.509 certificate hashing either. A certificate signature looks like this:
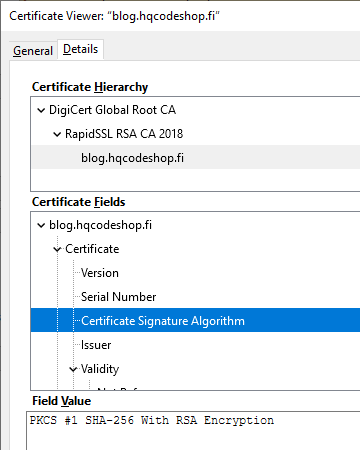
That is an example of the X.509 certificate used in this blog. It has a SHA-256 signature in it. Again: That is a certificate signature, not a server signature the complaint is about. SHA-1 hashes in certificates were obsoleted already in 2016, the SHA-1 obsoletion of 2018 is about rest of the TLS.
What is a "server signature" hash in TLS?
As I'm not alone with this, somebody else has asked this question in Stackexchange: What's the signature structure in TLS server key exchange message? That's the power of Stackexchange in action, some super-smart person has written a proper answer to the question. From the answer I learn, that apparently TLS 1 and TLS 1.1 used MD-5 and/or SHA-1 signatures. The algorithms where hard-coded in the protocol. In TLS 1.2 the great minds doing the protocol spec decided to soft-code the chosen server signature algorithm allowing secure future options to be added. Note: Later in 2019, IETF announced Deprecating MD5 and SHA-1 signature hashes in TLS 1.2 leaving the good ones still valid.
On the wire, TLS server signature would look like this, note how SHA-1 is used to trigger the warning in Chrome:
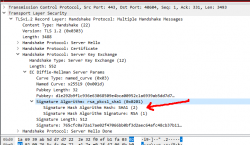
During TLS-connection handshake, Server Key Exchange -block specifies the signature algorithm used. That particular server I used loved signing with SHA-1 making Chrome complain about the chosen (obsoleted) hash algorithm. Hard work finally paid off, I managed to isolate the problem.
Fixing server signature hash
The short version is: It really cannot be done!
There is no long version. I looked long and hard. No implementation of Apache or Nginx on a Linux or IIS on Windows have setting for server signature algorithm. Since I'm heavily into cloud-computing and working with all kinds of load balancers doing TLS offloading, I bumped into this even harder. I can barely affect available TLS protocol versions and cipher suites, but changing the server signature is out-of-reach for everybody. After studying this, I still have no idea how the server signature algorithm is chosen in common web servers like Apache or Nginx.
So, you either have this working or not and there is nothing you can do to fix. Whoa!
macOS Catalina upgrade from USB-stick
Saturday, November 2. 2019
macOS 10.15 Catalina is a controversial one. It caused lot of commotion already before launch.
Changes in 10.15 from previous versions
64-bit Only
For those using legacy 32-bit apps Catalina brought bad news, no more 32-bit. Me, personally, didn't find any problems with that. I like my software fresh and updated. Some noisy persons in The Net found this problematic.
Breaking hardware
For some, the installation simply bricked their hardware, see Limited reports of Catalina installation bricking some Macs via EFI firmware for more details. This is bad. When UEFI upgrade does this kind of damage, that's obviously bad. The broken macs can be salvaged, but it's very tricky as they won't boot.
Installer size
For that past many years, I've had my OS X / macOS USB-stick. I own couple of macs, so you'll never know when OS installer will be needed. For catalina:
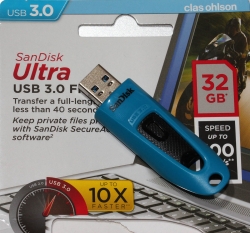
8 GiB wasn't enough! Whaaaaat? How big the installer has gone. So, I had to get a new one. Maybe it was about time. At the USB-stick shop I realized, that minimum size of a stick is 32 GiB. You can go to 128 or 256, but for example 8 isn't an option anymore.
Stupid alerts
The worst part in Catalina is the increased level of nagging:
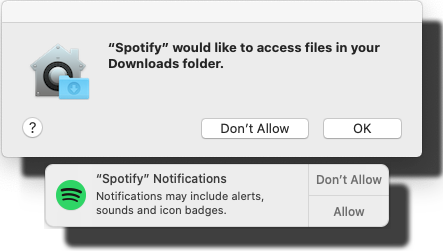
Every single app is asking me permission to do something. As usual, the questions are obscure at best. This same phenomenon is happening in Windows and Android. You're presented a question as a response to your action and the question has almost no relevance to anything you're trying to do. Yet the people designing these operating systems think it will vastly improve security to present user a Yes/No question without proper basis.
An example: For the above Spotify-question I chose to respond No. I have no idea why or for what reson Spotify needs to access any of the files in my Downloads-folder. That's so weird. Playing music doesn't mean you get to access my stuff. ![]()
Get macOS Catalina installer
The process has not changed. Go to App Store of your mac and choose macOS Catalina. It will take a while to download all of 8 GiB of it.
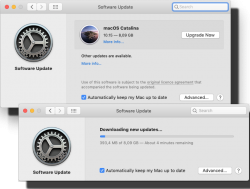
When the installer has downloaded and automatically starts, you need to quit the installer.
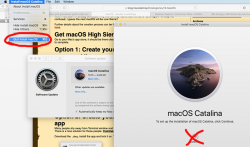
If you'd continue, the installer would upgrade your mac and at the final phase of upgrade, it would delete the precious macOS files. You need to create the USB-stick before upgrading. This is how couple past macOS versions save your disc space.
Create your USB-stick from command line
For reason I don't fully understand, DiskMaker X version 9 failed to create the stick for me. It did process the files and seemed to do something, but ultimately my USB-stick was empty, so I chose to do this the old fashioned way. Maybe there is a bug in the DiskMaker X and a new version has thata one fixed. Check it yourself @ https://diskmakerx.com.
Insert the USB-stick into the mac and from a command prompt, see what the physical USB-drive is:
diskutil list
My mac has the USB-stick as:
/dev/disk3 (external, physical)
The other drives are flagged either 'internal, physical', 'synthesized' or 'disk image'. None of them are suitable targets for creating Catalina installer stick.
Note:
Most of the commands below need root-access. So, either su - to a root-shell or prefix the commands with sudo.
Format the USB-stick. The obvious word of caution is: This will erase any data on the stick. Formatting doesn't wipe the sectors, but given a completely empty filesystem, your bits are quite lost there alone. Command is:
# diskutil partitionDisk /dev/disk3 1 GPT jhfs+ "macOS Catalina" 0b
The output is as follows:
Started partitioning on disk3

Unmounting disk

Creating the partition map

Waiting for partitions to activate

Formatting disk3s2 as Mac OS Extended (Journaled) with name macOS Catalina

Initialized /dev/rdisk3s2 as a 28 GB case-insensitive HFS Plus volume with a 8192k journal

Mounting disk

Finished partitioning on disk3

/dev/disk3 (external, physical):

   #:                    TYPE NAME                 SIZE       IDENTIFIER

   0:   GUID_partition_scheme                     *30.8 GB    disk3

   1:                     EFI EFI                  209.7 MB   disk3s1

   2:               Apple_HFS macOS Catalina       30.4 GB    disk3s2
Now your stick is ready, go transfer the macOS installer files to the stick. The newly formatted stick is already mounted (run command mount):
/dev/disk3s2 on /Volumes/macOS Catalina (hfs, local, nodev, nosuid, journaled, noowners)
Installer files are located at /Applications/Install\ macOS\ Catalina.app/Contents/Resources/:
cd /Applications/Install\ macOS\ Catalina.app/Contents/Resources/

./createinstallmedia \

  --volume /Volumes/macOS\ Catalina/ \

  --nointeraction
Output is as follows:
Erasing disk: 0%... 10%... 20%... 30%... 100%

Copying to disk: 0%... 10%... 20%... 30%... 40%... 50%... 60%... 70%... 80%... 90%... 100%

Making disk bootable...

Copying boot files...

Install media now available at "/Volumes/Install macOS Catalina"
Now your bootable USB-media is ready!
Upgrade
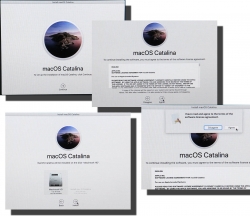
Boot your mac, press and hold your option-key pressed to access the boot-menu:
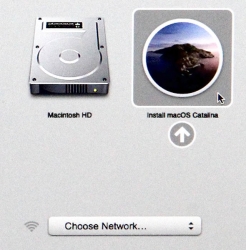
A menu will appear, select Install macOS to upgrade:
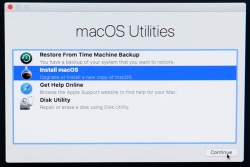
Only after those yes, I agree -clicks your upgrade kicks in. This is the part you can go grab a large cup of coffee, no user interaction is required for 30 to 60 minutes:
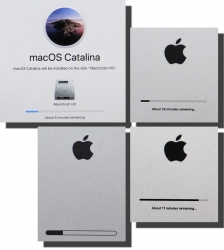
During the upgrade, there will be couple of reboots. My thinking is, that first the upgrade will do any hardware upgrades, then the actual macOS upgrade.
When you see the login-screen, your upgrade is done:

That's it! You're done. Enjoy your upgraded mac operating system.
IRS Malware Loader scam 2019
Thursday, October 3. 2019
IRS or Internal Revenue Service, the tax authority of United States of America seems to be an endless scapegoat of scams and malware. Couple days ago, I got an email from Germany stating, that I had received a tax refund from IRS. Nice! I thought, you need to pay your taxes to USA to be eligible for an IRS tax refund. After reading the mail, I knew this particular email was very important, it was sent from Germany after all. I instantly whipped up my credit card and redied myself for punching in the required numbers ... naah! That mail was an obvious scam. ![]() Actually, IRS is warning general public about such scams in their website. Again, this type of scam is nothing new, I had a look into finer details of such a scam back in 2016, see my blog post here about that.
Actually, IRS is warning general public about such scams in their website. Again, this type of scam is nothing new, I had a look into finer details of such a scam back in 2016, see my blog post here about that.
An interesting side note here is, the e-mail address the scammers sent the email to, was the one which got harvested from DocuSign leak of 2018. See my blog post about that here.
As 85% of such scams, the email I got has a link in it. That number comes from Proofpoint Q2 2019 Threat Report:
Malicious URLs made up 85% of global combined malicious URL and attachment message volume, a slight increase from May, but overall in-line with the trend for 2019.
What happens when you click the link, there is a login:

Username and password was in the email I received. Username was my DocuSign email and a not-too-long-or-complex random password accompanied it. I didn't hesitate, I was curious to see what the scammers cooked up this time:
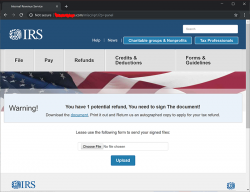
Yeah. A download. What could possibly go wrong with that! ![]()
To access the good bits, I moved away from web browser, to a Linux prompt and a curl. Initially, the copied link to download.php didn't respond. Wow! A security-minded scammer. That seems to be a trend nowadays. To get past that one, I took a peek into cookies in the web browser and added a session-cookie to the curl-request. Like this:
curl --verbose --header "Cookie: sid=-da-passwrod-" http://download.php
That did the trick, a document.zip landed on my lap. No funny business there, a regular Zip-file containing a single file:
Archive: document.zip

 Length   Method    Size  Cmpr    Date    Time   CRC-32   Name

--------  ------  ------- ---- ---------- ----- --------  ----

  228703  Defl:N    22214  90% 09-30-2019 13:05 68c60f7a  011239-23489234.doc
As usual, jumping too fast for conclusions: Ah, a macro-loader, I thought. To confirm:
$ file 011239-23489234.doc

011239-23489234.doc: Rich Text Format data, version 1, unknown character set
Ok. Interesting. RTF-documents don't have macros. However, I remember reading an article "Using RTF Files as a Delivery Vector for Malware" earlier. Taking a peek with hexdump:
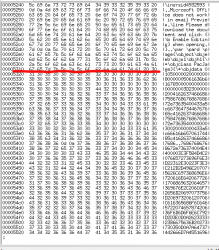
Confirmed! There is a binary-object embedded into RTF. I borrowed the idea from SANS diary "Getting the EXE out of the RTF" and wrote a single-liner Perl:
$ perl -ne 's/([0-9A-F]{2})/print chr(hex($1))/ge' 011239-23489234.rtf > scam.bin
This one will produce extra head and tail, but also the good bits will be in my new scam.bin. Cutting the extra stuff out:
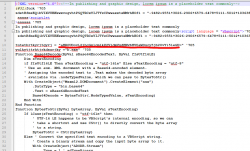
It's an XML containing a VBscript scriptlet. There is some obfuscation in it, but the Base-64 -encoded string is something, that caught my attention instantly. Decoding it resulted in the real payload URL ... which unfortunately didn't load as the website was shut down by authorities and/or vigilant sysadmin of the site. So, I never got to download my promised b.exe. Well. It most likely wouldn't contain much interesting parts in it. The binary simply messes up with your Windows and loads more "goodies" into it and poking a backdoor. No surprises, the usual.
Typically this type of scam targets the not-so-bright ones. Scammers do that intentionally, to weed out "difficult" customers. Neither the email nor IRS website-replica weren't especially elaborate work. Any self-respecting computer user should instantly recognize the scam. For scammers its always worth trying. One out of million recipients might fall into this.
"Hey! Let's be careful out there."
Windows 10 May 2019 update (1903) breaking sleep
Wednesday, October 2. 2019
This happens pretty much on every Windows 10 update. Last time I wrote about it was for Windows 10 Fall Creators Update (1709). The blog post is here.
Yes, again this absolutely ridiculous waking up begun. None of my previous fixes/hacks/duct tape/bubble gum patches worked. For weeks I either shut down my PC or just suffered on random power-ups.
When your Windows pops up from sleep, there is one very simple command to figure out why it happened. This is something that has worked for years in multiple Windows-versions: powercfg.exe /waketimers
(btw. you need to run that with Administrator permissions, regular user won't cut it.)
The result in each case was something I didn't expect to see:
Timer set by [PROCESS] \Device\HarddiskVolume6\Windows\SystemApps\Microsoft.Windows.StartMenuExperienceHost_cw5n1h2txyewy\StartMenuExperienceHost.exe expires at on .
What the hell is StartMenuExperienceHost.exe and why would I need it for anything? I have no clue. Also, why would I need that unknown piece of crap so badly it can wake my computer up? Again, no clue. Honestly, I would delete the darned file if it wasn't part of Windows system. Given the protected status of system files I really cannot rip the junk off. Unfortunately.
This harrasment kept going on for weeks as I was researching for a solution. Most of the suggested fixes are about Troubleshooter, Power or disabling Wake Timers or Automatic Maintenance's option Allow the scheduled maintenance to wake up the device at the set time. Neither of those really help.
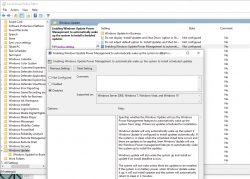
Finally I cracked it! While looking for things to try, I stumbled into Microsoft community discussion System keeps waking. ShellExperienceHost.exe. Build 17074. There one of the suggestions was to check the Local Group Policy. There is Computer Configuration > Administrative Templates > Windows Components > Windows Updates > Enabling Windows Update Power Management to automatically wake up the system to install scheduled updates. Setting it to Disabled makes the difference!
I have to agree with a comment in Reddit:
Microsoft needs to provide a simple, global switch to NEVER EVER under any circumstances wake the PC up from sleep/hibernation as if the PC was shutdown and unplugged from the wall.
Its really puzzling to try and understand why such an option doesn't exist.
Healthbuddy SMS scam / Subscription trap
Friday, September 27. 2019
Recently there as been an influx of SMS-messages informing that "your parcel has arrived". The message will contain a short URL bouncing you around the net couple times and landing you to a scam-site. Finnish CERT-FI actually released a warning about the scammers operation recently. You can read the announcement in Finnish here.
Scam
The fradaulent website did look like this:
![]()

I was in process of writing this blog post and POOOOOOOF! The domain went away.
Ultimately you will land on a form to enter your information into a subscription trap:

If there would be a honest scammer, these guys are. The fine print on the right hand corner explains how the scam will work. You won't be receiving your non-existent shipment, but you will be paying initial fee of a subscription. Nice! ![]()
As usual, I did some digging about the announced website and the company. The website is still running on a Hezner VM in Germany. Since these "honest" scammers are protecting your precious GDPR-covered PII, their website even has a valid TLS-certificate issued by Comodo. The obvious motivation for using encryption is the fact that most browsers will fight back for an user entering credit card information without encrypted traffic. So, a very elaborate scam, this.
Company
Since these scammers are honest, they inform the service "responsible" company being NMS Services Ltd. I doubt that much, given the company given seems to be some sort of blank shell. A company without any activity:
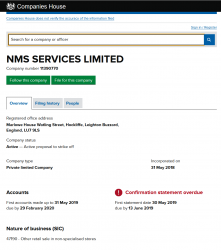
There is a good chance, the above ltd. has nothing to do with this scam.
Huge footprint
The "m.o." or modus operandi of these types of scams is to have a huge footprint. They have bunch of domains and companies as it's guaranteed their entire operation will be shut down by law enforcement as they scam along.
To get their traffic to the right place, the SMS has a very short URL in it. Something with gramkl.com in it. That's a jump-site operating at Google bouncing users to lilorole.com, which is a Cloudflare forwarder. The first form result is forwarded to t.viprsp.nl, a Cloudflare forwarder, which will ultimately land at end result healthybuddy.eu, the real harvesting website at Hezner.
What we have there in the above chain, is numer of top-level-domains and bunch of companies operating under different jurisdictions. Shutting all of them down is very very very difficult. If one is shut down, they'll just pull another rabbit out of their hat and go on scamming.
Alternates
In the TLS-certificate information I found following:
Subject: OU = Domain Control Validated, OU = PositiveSSL, CN = bestplayerwins.com

X509v3 extensions:

  X509v3 Subject Alternative Name:

    DNS:bestplayerwins.com, DNS:www.bestplayerwins.com
An alternate scam site running @ bestplayerwins.com is found. Again, this scam is a honest one, it will inform that they're bullshitting your with a subscription trap.

Just by investigating the site more, there are (unsurprisingly) other domains found:
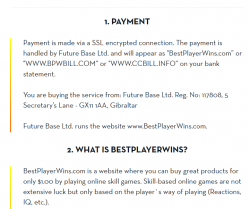
bpwbill.com and ccbill.info sites look exactly like the initial scam site:


Again they have distributed their operation to multiple domains and TLDs to make it extremely difficult to shut the entire operation down.
I did not check the details of Gibraltar-registered Future Base Ltd because of high cost of the records. Again, there is a very good chance they're not affiliated with this operation at all.
Finally
With the words of Sergeant Phil Esterhaus from Hill Street Blues:
Python script for creating Linux iptables port forwarding rules based on an YAML-file
Saturday, September 14. 2019
I was trying to get Wreckfest multiplayer working. Unlike many modern games, the studio/publisher of this game does not run multiplayer servers. Instead, you need to do this the old-fashioned-way. I haven't done this since ...90s(?) and my port forwarding setup skills were rubbish. I remembered having pretty solid skills for managing stuff like this, but not needing that for past 20 years does its damage.
Instead of doing a quick look at the manuals and information what others did and hacking a single-time setup, I chose to create a generic tool to generate the required commands to be run as a root. Running the tool doesn't require any elevated privileges, but running the result will. For example, generating Wreckfest rules:
./portforward-yaml-to-iptables.py Wreckfest.yaml 192.168.0.5 eth1
will result:
iptables -t nat -F wreckfest > /dev/null || iptables -t nat -N wreckfest
iptables -t nat -A PREROUTING -i eth1 -j wreckfest
iptables -t nat -A wreckfest -p tcp -m multiport --dports 27015:27030 -j DNAT --to-destination 192.168.0.5
iptables -t nat -A wreckfest -p tcp -m multiport --dports 27036:27037 -j DNAT --to-destination 192.168.0.5
iptables -t nat -A wreckfest -p udp -m udp --dport 4380 -j DNAT --to-destination 192.168.0.5
iptables -t nat -A wreckfest -p udp -m multiport --dports 27000:27031 -j DNAT --to-destination 192.168.0.5
iptables -t nat -A wreckfest -p udp -m udp --dport 27036 -j DNAT --to-destination 192.168.0.5
iptables -t nat -A wreckfest -p udp -m udp --dport 33540 -j DNAT --to-destination 192.168.0.5
That's plenty, but will do the trick. Also my design choice is to create a per-game chain of the rules, so cleaning up is easy. Just run iptables -F wreckfest and be gone with the forwarding.
GitHub project is at https://github.com/HQJaTu/iptables-portforwarding-rule-generator, go see it!
Update 15.9.2019:
I got comments from people: "Why do you need this? UPnP works fine. No hassle."
Well... It would take a million years for somebody to convince me to enable UPnP in my router. The entire concept has been designed from ground up to be insecure. The obvious goal was to create something that will create required port-forwardings into your router quickly and easily without asking you anything.
There is a lengthy discussion about UPnP security in multiple places of the Internet. My favorite one is at Is UPnP still insecure?. It will cover all the aspects of the issue.
The ultimate conclusion still remains: I do not want a random device/software to be able open access anything in my LAN from public Internet without me knowing about it. When such opening is required, I will open it for the duration needed and the appropriately close the access. UPnP doesn't tick any of the requirement boxes for me. That's why no. It won't be allowed in my systems.
Logitech G903 /w Powerplay - Best cordless mouse ever?
Friday, September 6. 2019
I love playing video games whenever I have the time to sink into such a non-productive past time. The primary function is to have some fun, but also to clear the head from anything work related.
This time I wanted to get a new gaming mouse. My G5 easily had at least 13 years of service and still going strong. But it's the same thing with living room couch or a car, the old one is still ok, but eventually you simply just want a new one. That's what happened to me. I simply wanted a new one (did somebody say "neophile"), so I got two boxes of new toys:
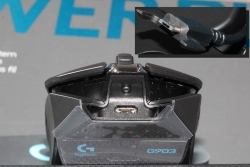
The top box contain a brand new mouse and an USB data/charging-cable for it. This is what the nose of a wireless G903 looks like:
As you can see, there is a micro-USB female connector. In the box, there is also a Logitech-specific cable, which is mechanically sound to convert this wireless mouse into a wired one. For people who want options, doing that is a perfectly good choice. You don't have to use the weird-looking Logitech USB-cable if you don't want to, but it will stick to your mouse a lot better than your average micro-USB cable.
Also on the options-for-a-demanding-rodent-owner, in the box there are lots of options for buttons:

Also, notice the USB-dongle, if you want to stick with wireless. I didn't want to use the dongle, so I went a bit further:

Yeah. I got me a Logitech mouse mat. This one isn't a regular one. Or... to be exact, in the Powerplay box, there are actually two mats. One regular, very slippery one for gaming and a charging mat, which goes under the slippery one:

All you have to do is pry the charging button off from the bottom of the G903. Btw. there are no screws or anything, just pretty strong magnets. The dud-of-a-button needs to be exchanged into one from the Powerplay box and your're rocking! This will convert your wireless mouse back into kinda-wired one. In reality the mouse is still wireless, but all communications and charging will happen simply buy using the mouse. No dongle needed. Notice how the Powerplay mat has exactly the same micro-USB -connector than the mouse has.
Finally, the pair will look something like this:

Also remember to install the Logitech Gaming Software to be able to configure your mouse and get all the stats out of it:

This setup is easily the best mouse I've ever had (so far). G903 is truly wireless, but when paired with the Powerpay, it works exactly as well as it would be wired. The only negative thing about Powerplay I have is its ability to mess up other wireless mouse traffic. The top mat is a high quality one, so I've been using that. The only thing I need to do is to remove the charging part to clear the signal jams.
Blog transferred to a Finnish VM
Sunday, August 25. 2019
Two years ago I was forced to move my blog out of my own co-located server due to hardware failure. At the time moving to Microsoft Azure cloud made all the sense. Today, I'm not running from Azure anymore.
At the point, I had been working closely with AWS for serveral years, so going there didn't make any sense from learning perspective. As I wanted to properly learn Azure, I went there with my hobby.
Regret is a strong word. I don't regret that decision, but almost do. For those two years I was struggling with performance. PostgreSQL DB was running as a service (Azure Database for PostgreSQL), so it didn't eat those precious resources from my virtual machine. My VM was a DS1 v2, so it was the obvious bottleneck. Going for a bigger one for a hobby in Azure didn't make any sense costwise.
Personally those years helped a lot. I've been working with Azure projects over the recent year and even gained certification for that. The previous experience gained from running my blog, obviously, was beneficial. All that being said, it's time to move on.
My new hosting provider is a small Finnish one providing affordable VMs packing reasonable punch for buck. I still have IPv6 and all the fancy stuff. At the time of writing, I don't have HTTP/2, but I'm working with that. The most important thing is: there is more power. The blog response times are much better now.
If you feel something is off, please drop me a comment!
Notes on running openSUSE on a MacBook Pro
Sunday, August 18. 2019
This one is related to a previous post of mine Installing openSUSE Leap 15.1 into a MacBook Pro with encrypted root drive.
kworker CPU-hog
Symptoms:
CPU-load is high. Top consumer is kworker:
top - 11:16:47 up 6 min,  4 users,  load average: 0.93, 0.70, 0.36

Tasks: 248 total,   2 running, 246 sleeping,   0 stopped,   0 zombie


  PID USER      PR  NI    VIRT    RES    SHR S  %CPU  %MEM     TIME+ COMMAND

   58 root      20   0       0      0      0 R 73.33 0.000   4:29.74 kworker/0:
What a kernel worker (or kworker) is, a sensible explanation can be found from Kworker, what is it and why is it hogging so much CPU?. In this case, high CPU on a kworker is a symptom, not the fault.
This same issue is faced by multiple users on different hardware, for example Kworker is at 100% - I think I've tried everything!. Also Fedora Linux users on MBP are suffering from the same Bug 1192856 - ACPI Interrupt storm causes high kworker CPU usage.
Checking some kernel performance counters (more about those, see perf: Linux profiling with performance counters), perf-report:
  Children    Self  Command     Shared Object     Symbol

+   50.51%   0.01%  swapper     [kernel.kallsyms] [k] cpu_startup_entry

+   41.67%   0.31%  swapper     [kernel.kallsyms] [k] acpi_hw_read_port

+   39.99%  39.99%  swapper     [kernel.kallsyms] [k] acpi_os_read_port

+   37.62%   0.00%  kworker/0:2 [kernel.kallsyms] [k] ret_from_fork
Something really fishy is going on with acpi_os_read_port. To get the amount of interrupts generated, most people run a simple grep . /sys/firmware/acpi/interrupts/*, but not me. My solution is to do a simple(?) Perl one-liner wrapped here on multiple lines for readability:
perl -ne 'next if (!/^\s*(\d+)\s+/);

 next if (!$1);

 $intrs{$ARGV}=$1;

 END {foreach (sort {$intrs{$b} <=> $intrs{$a}} keys(%intrs)) {

  printf("%s: %d\n", $_, $intrs{$_});

 };

}' /sys/firmware/acpi/interrupts/*
It will output interrupt counts. On my system, the counters are something like this:
/sys/firmware/acpi/interrupts/gpe_all: 4695534

/sys/firmware/acpi/interrupts/sci: 4694806

/sys/firmware/acpi/interrupts/gpe06: 4694582

/sys/firmware/acpi/interrupts/gpe17: 940
If you're really interested in what's happening inside ACPI and how General Purpose Events (GPE) work, read the document ACPI in LinuxArchitecture, Advances, and Challenges.
Anyway, it looks like ACPI event 06 is firing a lot. Way too lot keeping kworker busy handling the interrupts. This interrupt-handling on the other hand, takes a lot of CPU-power making your system run hotter than expected.
Fix:
As root, a simple echo disable > /sys/firmware/acpi/interrupts/gpe06 will do the trick. Resulting in CPU cooling down:
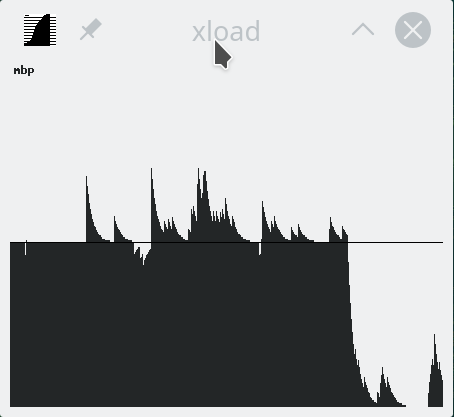
The effect is instantaneous and easy to notice. To persist this setting over reboots, things get bit more trickier. A lot of people suggest putting the above disable into crontab to be run on a @reboot. My opinion is clear: this is a system problem, system fix and needs to be addressed by system, not user. The @reboot-magic doesn't work in /etc/crontab, only on user's crontab-file.
A very good alternative is to go with acpi_mask_gpe-kernel parameter. It is documented in The kernel’s command-line parameters. And docs state "This facility can be used to prevent such uncontrolled GPE floodings". Nice! Exactly what I need. The tricky part is to edit /etc/default/grub and add acpi_mask_gpe=0x06 into GRUB_CMDLINE_LINUX-setting.
That's not all. Simply having the setting in a file won't change a anything yet. To make the new setting stick, on most Linuxes you would run update-grub. Some smart brain chose not to implement that helper into openSUSE, so that's not an option. To achieve the same, go for a: grub2-mkconfig -o /boot/grub2/grub.cfg
Now you're all set. Reboot and confirm. Of course you didn't fix the actual problem with ACPI, you simply made kernel ignore the interrupt-flood. You may want to settle for that at this point. I did file a bug report about this (Bug 1146023), but it seems the problem is limited to a specific set of MBPs and Fedora kernel guys are having hard time reproducing the issue. So, I'm not expecting SuSE guys to fix this anytime soon either.
Touchpad scroll direction
In 2011 when OS X 10.7 Lion was released, Apple made a drastic change on how touchpad (or how Apple calls it: Trackpad) scrolling works. Personally I totally understand this new logic, they wanted the scrolling user experience to be exactly the same and you would do on your phone's touch screen. You place your finger on the screen and pull the finger to the direction you want the screen to scroll. Before macOS 10.7 (note: the name change from OS X to macOS happened on 10.12 sierra) touchpad scrolling was targeted for the scrollbar, not to the actual content like on your touchscreen effectively reversing the direction.
So, as a macOS / iPad user, I want my scrolling to happen correctly, not the Windows way. To change, navigate to Touchpad settings and reverse the vertical scrolling:
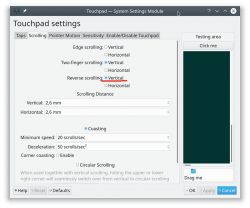
Reversing the reverse makes your head spin, but there is a logic there.
Touchpad gestures
On any typical use case, I would use a mouse. As in real external device, not the skin-on-my-fingertips damaging trackpad. For reasons unknown to me, it literally hurts to use those trackpads for too many hours. So, I normally steer away from them. It looks like I'm pretty alone with this one, but all I can do is to complain and use a mouse.
Typical this you may want to do:
- Right-click: On macOS, hold Ctrl and tap is a right click. This won't work on a Linux. You need to do the two-finger-tap for right-clicking.
- Scrolling: You can go with keyboard or keep dragging the scrollbars, that's ok. Doing a two-finger scroll with the touchpad, however, is much faster and less error prone.
- Zoom: Pinch won't work on a Linux, you need to use the actual zoom-control of whatever application you want to zoom
All the Apple's gestures are documented in HT204895 suppor article Use Multi-Touch gestures on your Mac, but as already mentioned, not all gestures are supported on a Linux.
Something else?
Nothing more pops into my mind. If you have anything to comment, please do so.
Installing openSUSE Leap 15.1 into a MacBook Pro with encrypted root drive
Thursday, August 15. 2019
I happen to have a spare 3rd generation 15" MBP. It is late 2013 model, used for years but recently just gathering dust. Back in the days, when the laptop was shiny and new, it was a serious piece of hardware and cost north of 2000 €. Even today, a fully working second hand 15" late 2013 would be priced around 25% of the original value. Couple years later Apple started manufacturing MBPs with faulty keyboards, faulty touch bar (the really weird top row) and faulty batteries. I'm in luck, as my unit pre-dates all of those. Yes, there are also some fatures missing which I'd love to have, fingerprint reader, USB-C -port and improved display to mention the most important ones.
Since the dust-gathering, I decided to see how a fresh Linux installation would go. Back in the days, I had a plastic MacBook running Linux. Given 32-bits and not-so-powerful CPU, I recycled it at the point I got tired of waiting for pages to load too long on Firefox. The amount of JavaScript modern web pages run is staggering. All that requires huge amounts of CPU to parse, process and run. Old low-end models simply won't cope making web browsing nearly impossible. So, I didn't have a Linux-Mac for couple years and now I wanted one.
Known facts
This I could figure out before doing any real installing:
- Installation can be done. openSUSE docs describe the process @ https://en.opensuse.org/SDB:Installation_on_a_Mac
- The built-in Broadcom WiFi isn't properly supported by most Linuxes, that includes openSUSE
- Debian Linux wiki @ https://wiki.debian.org/MacBook/Wireless states:
"MacBooks before the late 2008 models use Atheros chipsets, while late 2008 are now using Broadcom 4322 chipset." - StackExchange article @ https://unix.stackexchange.com/a/175813/241396:
"Broadcom 4360 actually comes with either of two distinct chips, 14E4:4360 and 14E4:43A0. There is no driver in Linux for the first one, while wl is an appropriate driver for the second one." - Arc Linux wiki @ https://wiki.archlinux.org/index.php/broadcom_wireless#broadcom-wl only states the fact wl-driver not being open-source.
- It is unclear which exact chipset is in the Mac, but it seems not to be properly supported in Linux.
- Debian Linux wiki @ https://wiki.debian.org/MacBook/Wireless states:
- My MBP doesn't have Ethernet RJ-45 port
- The existing USB-ports or Thunderbolt-ports could be used to host a network adapter, either wired or wireless, but I choose not to go down that path. Having an USB-dongle stick out of the Mac isn't something I'm willing to do.
- There is a good chance, that a Linux-driver for the built-in Broadcom WiFi exists. The existing driver can be downloaded from the net, but require some trickery to install during openSUSE installer.
- In macOS, drives are encrypted. In Windows using BitLocker is a good option to keep your data secure. Linux supports drive encryption as well.
Prerequisites
- A MacBook Pro with SSD full of data you don't care about. Also emptied SSD-drives will do.

- openSUSE Leap 15.1 ISO-image from https://www.opensuse.org/
- I personally will go for the full DVD, but it is not absolutely necessary. Small network installer will work as well.
- Skills to create a bootable USB-stick from the install image
- Your wireless network credentials and skills to connect a new device into it
- Two USB-sticks:
- One to boot openSUSE installer from. This stick will contain installation image and cannot be easily written into and must be attached to the Mac during installation.
- Second to transfer the WiFi-driver files
- Broadcom Linux wl-driver from http://download.opensuse.org/repositories/home:/Sauerland:/hardware/openSUSE_Leap_15.1/x86_64/
- Installer will need file
broadcom-wl-kmp-default-6.30.223.271_k4.12.14_lp151.27-lp151.121.1.x86_64.rpm. - Store the file into the second USB-stick.
- Installer will need file
- Since kernel-default -package has an update, the above RPMs needed for installer won't work in your installed openSUSE. To fix this, you will need also Broadcom Linux wl-driver from http://download.opensuse.org/repositories/home:/Sauerland:/hardware/openSUSE_Leap_15.1_Update/x86_64/
- Your installed openSUSE will need two files
broadcom-wl-6.30.223.271-lp151.121.4.x86_64.rpmandbroadcom-wl-kmp-default-6.30.223.271_k4.12.14_lp151.28.10-lp151.121.4.x86_64.rpm. - Store these files into the second USB-stick.
- Your installed openSUSE will need two files
- To make your life easier, having access to another computer while doing the install will help the process greatly. Especially, if you need to get a newer version of the Broadcom-drivers.
- That's it!
Disclaimer for RPM-files:
Those versions of files are valid at the time of writing. Both the install ISO and installed & updated openSUSE Linux are likely to eventually get updated and the versions of those files WILL change. Keep reading! There are instructions for you on how to compensate for updated versions. However, download locations will not change for openSUSE 15.1. The locations won't be valid for 15.2, but I'm sure you got that already.
Step 1: Prepare openSUSE 15.1 install
As instructed in https://en.opensuse.org/SDB:Installation_on_a_Mac, copy the installer ISO-file to the USB-stick. On macOS and Linux, figuring out the exact output drive can be bit tricky, so be careful with that. On Windows, the best utility for USB-drives is Rufus. You can get it from https://rufus.ie/.
While at it, download the required driver from above URLs pointing to Sauerland repository. Both versions are eventually needed, so just download them.
Note: for installer, only broadcom-wl-kmp-default -package is needed. We can safely ignore any RPM dependencies, as it is not possible to actually install the package. For installed Linux both files are needed, they have a dependency between packages. More about that when you're actually tinkering with the files.
Step 2: Boot the Mac into openSUSE installer
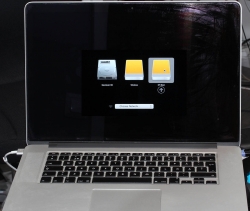
Plug in the installer USB (the other USB isn't needed yet). Power up the Mac. When you hear the boot-sound, press and hold the Alt/option-key. When you see the boot-menu, you can release the key. Displayed on your screen, there is a boot drive selection menu:
Go for the USB UEFI, that will start openSUSE installer.
Old geezers like me will remember the times when Macs required special bootloaders and tons of tinkering just to get the USB-boot to work. For past years, thanks to UEFI, USB-booting a Mac isn't any different than booting a PC.
Step 3: Establish facts
When the graphical installer launches, you'll see the license agreement screen:

On top-right corner of that screen is also keyboard map choice. This is your chance to make sure your keys will work correctly on the GUI. This won't affect the text-console.
Switch to text-mode console
There are two critical pieces of information needing to be confirmed to get the WiFi-driver working. Since the openSUSE installer is running in graphical mode, you need to switch to text-mode. In a Linux, the console can be chosen with Alt-<function key> -combo. When graphical interface is running, key combo is Ctrl-Alt-<function key>. To make things even trickier, in a Mac <function key>s require the actual Fn-key to be pressed, so ultimately you'll need to press and hold Fn-Ctrl-Alt and then tap F2-key to go for a text-console.
Confirm kernel version
On a bash-prompt, check the exact Linux kernel version with a:
cat /proc/version
As a result, my install image will display:
Linux version 4.12.14-lp151.27-default
In Linux, all device modules are stamped with the specific kernel version they'll work with, so it is imperative to get the Broadcom driver for that exact kernel version.
Confirm broadcom WiFi hardware
On a bash-prompt, get a listing for wireless network devices. List PCI-devices with class 280, that's for all network controllers (listing is at https://pci-ids.ucw.cz/read/PD/), as already established, there shouldn't be too many of those:
lspci -d '::280' -vv -n
On my Mac, the response is:
02:00.0 0280: 14e4:43a0 (rev 03)
Remember from above: "Broadcom 4360 actually comes with either of two distinct chips, 14E4:4360 and 14E4:43A0. There is no driver in Linux for the first one, while wl is an appropriate driver for the second one." So, this is the confirmation we needed. wl is the driver needed and we can move forward with installing the driver.
Step 4: Install the Broadcom driver
This screenshot depicts my process:
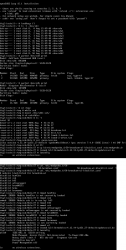
Now that you know the kernel version (4.12.14_lp151.27 in my installer) and copied the downloaded RPMs into the other USB-stick, plug it in. Remember: the installer USB is needed and cannot be removed.
Determine the correct device and mount it
In the above screenhot, the USB-stick having the drivers is /dev/sdb. First I checked out which storage devices Linux found. There are number of those for: Apple SSD, installer USB and driver USB. Since I knew, my driver USB is a Kingston Datatraveller, displaying the block-device partition table by running parted /dev/sdb print helped to identify the correct drive.
I mounted the USB-stick with a:
mkdir /tmp/usb

mount /dev/sdb1 /tmp/usb
Locate the files from the USB-stick.
Unpack the driver RPM
At this point, the Broadcom RPMs versioned for openSUSE installer kernel need to be popped open. The ones for your running Linux will install as-is, so no need to unpack them. It would be easy & smart to just install the RPM, but given Linux installer, it is not possible. Most of the mounted filesystems in an installer are SquashFS filesystems (more info from https://en.wikipedia.org/wiki/SquashFS) and are read-only. Well... you CAN alter a SquashFS, but it is more complicated than just running couple commands to extract the driver from RPM and injecting it into a running system.
To unpack an RPM, in a temporary directory run following (this is a single-liner, I just wrapped it into two lines for readability):
rpm2cpio broadcom-wl-kmp-default-6.30.223.271_k4.12.14_lp151.27-lp151.121.1.x86_64.rpm \

 | cpio -ivd
This will create any subdirectories and files into the current directory where cpio-command is run. That's why a temporary location is suggested.
Install wl-driver
As already established, Broadcom on Linux is a messy business. And this Broadcom chip in your MBP is especially messed up. So beware! Trickery ahead.
The other file you won't be needing during installation, but you will for your running openSUSE would contain a file etc/modprobe.d/50-broadcom-wl-blacklist.conf. This blacklisting mechanism exists in Linux to prevent device-modules from being loaded when a particular device is being used. Now, at the point you're running the commands on your Linux-installer its too late. Your installer already loaded bunch of device drivers you won't be needing. So, they must go. Contents of the file suggests what to remove:
# modules blacklisted for broadcom-wl

blacklist bcm43xx

blacklist ssb

blacklist b43

blacklist ndiswrapper

blacklist brcm80211

blacklist bcma

blacklist brcmsmac
You can run command rmmod for each of those, but I choose to go for a for-loop:
for module in bcm43xx ssb b43 ndiswrapper brcm80211 bcma brcmsmac; do

  rmmod $module

done
In my Mac, at least modules b43, ssb and bcma were loaded.
Warning: If you DON'T rmmod conflicting modules, your wl-module will NOT work.
Finally, it's time to go for the good driver. When you unpacked the driver RPM, it contains a subdirectory. My driver is at lib/modules/4.12.14-lp151.27-default/updates. Go there and run:
insmod wl.ko
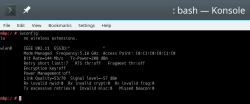
There is zero feedback for your command. To get an indication of success, run iwconfig. It will display something like:
wlan0     IEEE 802.11  ESSID:off/any

          Mode:Managed  Access Point: Not-Associated   Tx-Power=200 dBm

          Retry short limit:7   RTS thr:off   Fragment thr:off

          Encryption key:off

          Power Management:off
When you see an existing wlan0, you're golden! Now you're good to go forward with graphical installer.
Step 5: Install openSUSE Leap 15.1
First, go back to graphical installer. The key combination for that is:
Press and hold Fn-Alt and then tap F7-key
Add your Mac's Broadcom to Linux
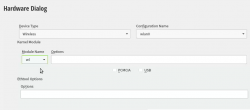
In the graphical installer, go Next from license screen and witness a blank Network Settings screen. The installer wasn't able to determine any operational network interfaces in your system. Not to worry, now that your Broadcom is on-line, you can add it. Click Add, and add a Wireless device using Kernel module wl:
Moving forward with Wireless Network Card Configuration, a screen to connect to your WiFi will appear:
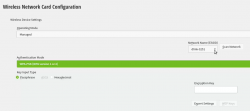
Scanning for any available networks will provide you a drop-list of found networks. Your own network needs to be in that list. Just add your authentication details to the dialog and you're good to go.
Instruct openSUSE installer to encrypt your root drive
(This is completely optional, you don't NEED to have an encrypted hard-drive. I just love doing stuff like this.) When your installer wizard will reach Suggested Partitioning, that's your cue. Going for encrypted root partition is actually surprisingly easy on openSUSE:
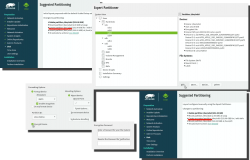
Go to Expert Partitioner using the suggested partition as a baseline for your custom partitioning. The only thing you need to change is to enable encryption on your root partition. Find mount point / and Edit it. Just click Encrypt Device and choose a wise password for your encryption. That's it. Then you can Accept the partition plan and move forward.
Add an user to new Linux
For security reasons, I'll always separate my administrators and regular users. What level of security you're targeting for is completely up to you. I, personally won't use Automatic Login and won't use same passwords for super-user and regular users. The Local Users dialog will look like this:
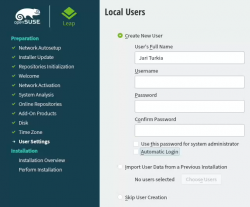
Hang tight, you're almost there.
Install!
When you reach the Installation Settings, you're about to start destroying any previous data on your Mac and start installing the Linux:
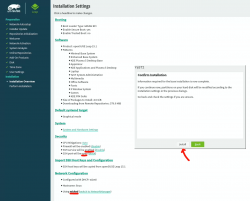
Enabling SSH and drilling a hole for it into firewall is up to you. Also, the choice of tooling for network management is up to you. I do dislike NetworkManager and obviously choose to drop it and go with wicked. If you want to learn more, go read wicked FAQ at https://github.com/openSUSE/wicked/wiki/FAQ.
When you click Install in the Confirm Installation -dialog, the ball starts rolling. If you missed the previous warning, before this point your data is still intact in the drive, after this point it won't be anymore. This is the part where you can go grab a cup of coffee:
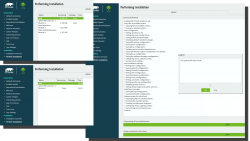
At the successful end, your system will automatically reboot. When the installer reboots the computer, you can remove the installer USB. It won't be needed anymore.
Step 6: Reboot into your newly installed Linux
If you went with encrypted partition, GRUB will require the password to decrypt the drive to load Linux kernel:
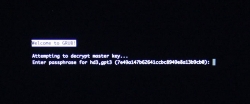
Hint: If you already didn't, just yank out the installer USB.
The "funny" thing about encrypted root partition is: when your kernel is loaded by GRUB, kernel will need the same password again!

Yes, punch in the same password again to reach login-screen.
Add your Mac's Broadcom to Linux - Again!
Once logged in all the hard work you did with the Broadcom-driver are lost. Your newly installed openSUSE will NOT have the Broadcom-driver installed. What! What! What?
But wait! This time installing is much easier. You actually CAN simply install the RPMs from the other USB-stick. On an installed Linux, the system can be written into.
Confirm the kernel version (again) and notice how it is different. My system has:
Linux version 4.12.14-lp151.28.10-default
Just like before, figure out which one the device is (with a great likelihood, it is not the same device anymore) and mount it. Once mounted, as root you can do something like:
rpm --install -h *.rpm
Installing the RPMs won't make your network operational. In a Linux, there are always ways to avoid rebooting, but in this instance I found it simply easier to go the Windows-way and reboot. You can do that at this point. Alternatively if you don't just yet need a network, you can also remove the second query for encryption password and then reboot to fix two problems on a single reboot.
Remove the 2nd password prompt
This is something I wouldn't do on a shared machine. Since I'm almost certain, nobody else will use my laptop, in this instance I'm willing to add ease of use with cost of potentially losing my security. If a logged-in user can access the encryption key-file, my encryption security is gone! Before allowing a second encryption key to be used, the plain-text password is not stored anywhere. To keep my system still secure, I need to make sure the permissions for the file are correctly set and also keep any malware or unwanted software from stealing my precious key-file.
Process for setting up encrypted root in openSUSE is described well in https://en.opensuse.org/SDB:Encrypted_root_file_system. As instructed there, create a keyfile, add the keyfile as a valid key into LUKS and secure the setup:
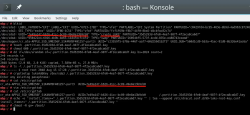
For relaxing my system's security, the general idea is to load some random bytes from /dev/urandom and create a random-content key-file. The docs are using 1024 bytes, I went double that for a 2048 byte keyfile. In my sequence, I first create an empty file, then lock all other users out of it and then populate the file with random bytes:
touch /.partition.35d5293d-6fe0-4eaf-987f-4f2eca8ca6d7.key

chmod 600 /.partition.35d5293d-6fe0-4eaf-987f-4f2eca8ca6d7.key

dd if=/dev/urandom \

  /.partition.35d5293d-6fe0-4eaf-987f-4f2eca8ca6d7.key \

  bs=1024 count=2
Then this newly created filename needs to be added into two places. First /etc/crypttab. After setup, there are only two columns. As instructed in the documentation, a third column needs to be added. Note: This single line having three columns is split into three lines here for readability. If you fail to have this as a single line, your system will fail to reboot:
cr_ata-APPLE_SSD_SM0256F_S1K4NYBF401257-part3

UUID=7e49a147-b626-41cc-bc89-49e8a13b9cb0

/.partition.35d5293d-6fe0-4eaf-987f-4f2eca8ca6d7.key
Second into initRD by creating a new Dracut configuration segment /etc/dracut.conf.d/99-root-key.conf:
echo -e 'install_items+=" /.partition.35d5293d-6fe0-4eaf-987f-4f2eca8ca6d7.key "' \
 | sudo tee --append /etc/dracut.conf.d/99-root-key.conf
Yet again, to keep your system secure, make sure nobody else can access your /boot-stuff:
chmod -R go= /boot/
To have this Dracut segment have any effect, you need to run mkinitrd as root. If you want more information about initRDs or Dracut, go to https://dracut.wiki.kernel.org/.
Now, you're ready to reboot the Linux. Both WiFi and password setups are done.
Step 7: Reboot and verify setup
You will need to enter the encryption password for GRUB, no change there. However, your Linux should go directly to login-screen. If it doesn't, you failed somewhere.
Also, after a login, your WiFi should work. To confirm, go to a prompt:
Since installer saved your wireless connection details, now you have network connectivity also in your installed Linux!
Step 8: Finalize
Remember the part where your installer used a different version of Linux kernel than your ready system? Kinda hard to not remember it, right. Now some additional work is needed to keep your system working:
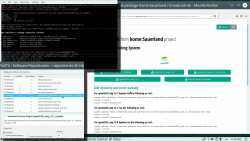
As root, run this in a bash-prompt (again, a single-liner):
zypper addrepo \

  https://download.opensuse.org/repositories/home:Sauerland/openSUSE_Leap_15.1_Update/home:Sauerland.repo
The setup information is available at https://software.opensuse.org/download.html?project=home%3ASauerland&package=broadcom-wl.
Finally: Go to YaST2 and use the GUI to inspect all the software repositories your system has. It must have Sauerland's repo enabled for the Broadcom driver to get updates as openSUSE's kernel-default -package does.
Step last: All done
 That's it. Now your Mac is successfully running an openSUSE 15.1 Leap Linux.
Enjoy! ![]()
Let's Encrypt ISRG's Root - Fedora curl fix, part 2 - Shared System Certificates
Thursday, August 8. 2019
Yesterday I stumbled on Let's Encrypt certificate on a Fedora linux. Read about my initial (failing?) approach from this blog post.
Given the ticket I filed regarding the problem, I got a pointer to study Using Shared System Certificates in Fedora. As you might think, I didn't know anything about that earlier. In a nutshell, ever since Fedora 19 was released in 2013, there has existed an unified storage for X.509 certificates with appropriate tooling to maintain certificates for OpenSSL, which is used by many components of the system, including curl. Besides the most common one, also a number of other certificate storages are included in the unified system, including NSS (for Firefox browser), GnuTLS and Java. Which is nice!
This subsystem has existed there a while, but marketing for it has been not-so-strong. Now that I know it exists, I'll offer the proper and correct way of adding the missing Let's Encrypt intermediate ISRG X3 certificate into your system.
To fix your curl, as regular user, download the X.509 certificate from Let's Encrypt website to /tmp/-folder.
$ wget https://letsencrypt.org/certs/letsencryptauthorityx3.pem.txt
As root, add the newly downloaded file as a trust anchor:
# trust anchor --store /tmp/letsencryptauthorityx3.pem.txt
That's it! No other commands to run. This sequence will update file /etc/pki/ca-trust/extracted/pem/tls-ca-bundle.pem with the current set of certificates to be trusted. That dynamically generated file will be used by curl ia symlink /etc/pki/tls/certs/ca-bundle.crt.
As an alternative, storing the letsencryptauthorityx3.pem.txt into directory /etc/pki/ca-trust/source/anchors/, and running update-ca-trust as root will do exactly the same thing.
Simple as pie! (if you know the pie exists)

