SIM cards
Friday, July 10. 2020
When I got a new Android-phone, it struck me that you can actually place an SD-card into the SIM-card -tray.
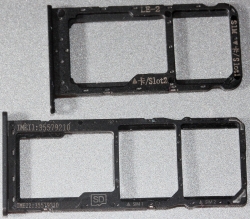
The upper tray is from a Huawei Honor phone, lower is from my new Nokia 5.3.
Huawei-approach is to place the SD-card into SIM2-slot making it either/or, but taking much less space from the guts of the phone. Nokia approach is to allow having all three cards in place at the same time. Funnily, Nokia has also both IMEI-codes in the tray. Not really sure why, but they are there.
I'm a known iPhone man, but Android has its benefits on the developer-side. Platform has much more open APIs for example to telecomms-side. Also when doing any web-development, running the new stuff from development workstation in an Android is easy via USB-cable. With a Mac, you can do the same with an iPhone. For proper testing, both need to be done.
While at it, I cleaned out my collection of various SIM-cards:
Not really needing expired and obsolete set of SIM-cards from USA, Australia, Finland, etc. To trash it goes.
Apparently this blog post was on a lighter side. No real message to convey, just couple of pics from SIM-cards. ![]()
Agree to disagree
Monday, June 29. 2020
Summer. Always lots of things to do. Building new deck to backyard. Finally got the motorcycle back to road. Some Snowrunner. Some coding. Lots of reading.
While reading, I bumped into something.
I'll second Mr. Hawkes' opinion. This is my message to all of us during these times of polarization. World leaders all over the Globe are boosting their own popularity by dividing nations to "us" and "them". Not cool. There is no us nor them, there is only we. Everybody needs to burst their own bubble and LISTEN to what others are saying. It's ok to disagree.

22nd June 2020 letters to Editor courtesy of The Times.
Credits to Annamari Sipilä for bringing this up in her column.
HyperDrive PRO 8-in-2 firmware upgrade
Tuesday, May 26. 2020
As mentioned in my USB-C article, I'm describing how I managed to upgrade my 8-in-2 firmware WITHOUT installing Boot Camp into my macOS.
Hyper has a support article Screen flickering with Pro? Please check this out. What they ultimately suggest, and what I instantly rejected is:
- Install Boot Camp
- Boot the Mac into Windows 10
- Run the app to do the Hyper 8-in-2 firmware upgrade
- Enjoy flicker-free life!
My mind was targeted to jump directly into step 3 and 4. I attempted a number of things and kept failing. So, I dug out my humility-hat and went to step 2. That one was a great success! For step 1 I would have never gone. That's for sure. I'm not going to taint this precious Mac with a dual-boot.
Constraints
This is the list of restrictions I painfully figured out:
- HyperDrive 8-in-2 has dual USB-C -connector, making it impossible to physically attach to anything else than a MacBook Pro.
- USB-C extension cords do exist. Purchase one (you don't need two) and lift the physical connectivity limitation.
- Provided application,
VmmUpdater.exeis a 32-bit Windows PE executable, more information can be found @ Hybrid Analysis - Firmware upgrade won't work on a random PC having USB-C -port.
VmmUpdater.exewon't detect the Synaptics chip without Apple AMD-drivers.- The driver won't install if your hardware doesn't have a suitable GPU.
- A Mac won't boot from an USB, unless allowed to do so
- A Mac will boot only to a 64-bit operating system, a 32-bit Windows 10 won't work
- A 64-bit Windows 10 installer doesn't have WoW64 in it to emulate a 32-bit Windows
- To actually upgrade the Synaptics chip's firmware, it needs to be in use
- Windows needs to understand the existence of the video-chip
- Windows needs to actually use the video-chip via HDMI to produce output. Any output will do. No picture --> no upgrade.
- Apple keyboard and touchpad will not work in a default Windows 10 installation
- Some of the Windows drivers used by a MBP can be downloaded from Internet automatically, IF you manage to get an internet connection into a Windows 10 running on a Mac.
- Some of the Windows drivers are not available
- macOS cannot write to a NTFS-partition, it can read the data ok
Requirements
- Hardware:
- A HyperDrive 8-in-2 (to state the obvious)
- A MacBook Pro (to state the nearly obvious), I used 2019 model
- A Windows 10 running in a PC (to state the not-so-obvious)
- USB-stick with at least 8 GiB of storage, capable of booting (I think all of them can)
- USB-keyboard, during tinkering your Mac's keyboard won't work at all times. Any USB-keyboard will do.
- HDMI-cable connected to an external monitor.
- Software:
- Synaptics tool and EEPROM-file provided by Hyper.
- Rufus
- Ability to:
- Download files from The Internet
- Execute Rufus on a platform of your choice to write into the USB-stick. I did this on a Windows 10 PC.
- Run Boot Camp Assistant on a macOS, I used macOS 10.15 Catalina.
- Write files into NTFS-formatted USB-stick. Any Windows 10 can do this.
Steps
1. Save a Windows 10 ISO-image into USB-stick as Windows to Go
Option: You can do this as a second thing.
Windows to Go, that's something not many have used nor ever heard. It's already obsoleted by Microsoft, but seems to work ok. The general idea is to create an USB-bootable Windows you can run at any computer.
That's definitely something I'd love to use for this kind of upgrade!
The easiest way of injecting a Windows 10 ISO-image into USB in a suitable format is Rufus. Go to https://rufus.ie/ and get it. It's free (as speech)!
GPT-partition table is a critical one make sure to choose it. These are the options I had:
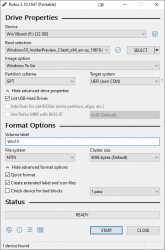
Warning: The process is slow. Writing image with Rufus will take a long time. Much longer than simply copying the bytes to USB.
2. Download Boot Camp support files
Option: You can do this first.
Recent macOS have limited Boot Camp Assistant features. Older ones could do much more, but modern versions can only Download Windows Support Software (it's in the Action-menu). Wait for the 1+ GiB download to complete.
3. Transfer files to USB-stick
Warning: The stick is formatted as NTFS. A Mac won't write into it. You need to first transfer the files into a Windows, and use the Windows to write the files into the USB.
Transfer the WindowsSupport\ folder downloaded by Boot Camp Assistant to the USB-stick prepared earlier. Subdirectory or not doesn't make a difference, I simply copied the directory into root of the USB-drive.
Also transfer the files from Hyper support article https://hypershop.zendesk.com/hc/en-us/articles/360038378871-Screen-flickering-with-Pro-Please-check-this-out-.
Note: Only the .exe and .eeprom are needed, I skipped the .docx as they're not needed during the upgrade.
After successful transfer, you won't need a Windows PC anymore. All the next steps are on a Mac.
4. Enable Mac USB-booting
Study Apple support article HT208198 About Startup Security Utility.
You need to shutdown your Mac. Then plant your fingers onto Command and r keys, put the power on and then wait. Apple logo will appear, then a white progress bar will appear. You can release the Command-r at that point. If you'll be using an encrypted hard drive like I, you'll need to know a valid user on that Mac and enter that user's password to be allowed into Startup Security Utility.
The choices you need to have are:
- Secure boot: No security
- External boot: Allow booting from external or removable media is enabled
This is how Parallels would depict the settings in their KB-article 124579 How to allow Mac to boot from external media:
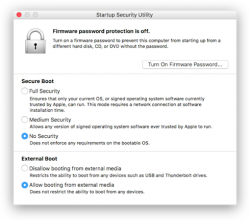
(Thanks Parallels for the pic!)
Note:
After you're done upgrading Synaptics firmware, you can go back to recovery, Startup Security Utility and put the settings back to higher security. For the one-shot upgrade the settings need to be at max. insecure settings.
5. Boot Windows 10 from USB
When you reboot a Mac, plant your finger on Option (some keyboards state Alt) key and wait. Pretty soon a boot menu will appear.
If you had the USB-stick already inserted, it will be displayed. If you didn't, this is your que to insert your Hyper 8-in-2. The Windows 10 USB can be inserted into the HyperDrive, your Mac will boot from there ok.
Your choice is to go for EFI Boot and wait for Windows 10 logo to appear.
Congrats! Now you're heading towards a Windows that won't respond to your keyboard nor touchpad.
6. Establish Windows to Go functionality
Make sure you have an USB keyboard available. This entire process can be done without Mac's own keyboard, it's just your own preference how you want to approach this. Getting the keyboard to work requires a keyboard, success is measured only on results. Make smart choices there!
If you can get the Windows 10 to connect to internet, that will solve some problems with missing drivers as they can be downloaded from a Microsoft driver repository. For Internet access, I used an USB-dongle to establish a Wi-Fi connection. Doing that requires selecting the correct Access Point and entering its password. On a machine without keyboard or mouse that WILL be difficult! Ultimately both the Apple keyboard and touchpad should start working and external keyboard won't be needed.
Note: The drivers for both are in WindowsSupport downloaded by Boot Camp Assistant. If you can point Windows Device Manager to load driver upgrades from there.
Warning!
Your Windows to Go will create a massive hiberfil.sys to enable hibernation. This can be a problem as typically the hibernate-file will be sized 75% of your RAM. This particular Mac has lots of RAM and the USB-stick would never be able to store such a file. So, eventually you're likely to run out of storage space. That is harmful, but can be easily remediated.
To fix, run command:
powercfg /hibernate off
Now the massive file is gone. Next, establish proper video. Your Windows Device Manager will look something like this:
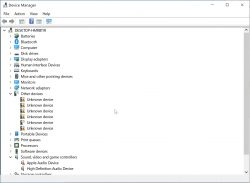
There are bunch of device drivers missing. The most critical one is for GPU. I tried running WindowsSupport\setup.exe, but it never progressed and I simply didn't do that at all. Instead, I executed WindowsSupport\BootCamp\Drivers\AMD\AMDGraphics\setup.exe which enabled proper video to be displayed.
7. Go upgrade Synaptics firmware
All the hard work only for this! Make sure your Hyper 8-in-2 has HDMI-cable connected and monitor will display Windows 10 in it. If you don't have that, when executing the VmmUpdater.exe an error will display:
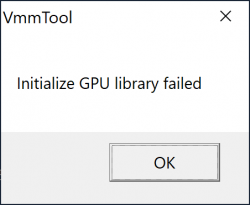
VmmTool: Initialize GPU library failed.
Also different VmmTool error variants can occur. If your Windows will detect the monitor and display video, then you're set!
When VmmTool will display current firmware information, you're golden!
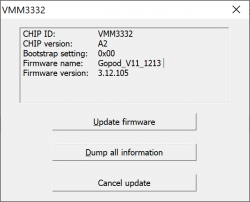
Initially my 8-in-2 had firmware version 3.12.105.
Select the .eeprom file and a progress bar will indicate:

Running the upgrade won't take long. Something like 30 seconds or so. When upgrade is done, it will be indicated:

At this point, yank the 8-in-2 out of Mac and make sure you don't have USB-C power connected to it. The general idea is to power-cycle the recently updated Synaptics chip. When done, put everything back and run VmmUpdater.exe again.
This time it will indicate the new firmware version:
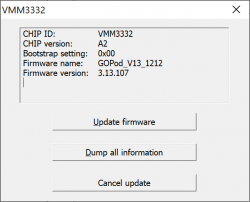
The version 3.12.105 got bumped into 3.13.107. Nice! Hopefully it will do the trick.
8. Boot into macOS and test
This is it. Will it work?
In my case it did. When my Mac wakes up, a single blink will happen in the external display, but no flickering or other types of annoyances.
Done! Mission accomplished!
(phew. that was a lot of work for a simple upgrade)
USB-C Video adapters for MacBook Pro
Monday, May 25. 2020
In professional life, I stopped being a Windows-guy and went back being a Mac-man. The tool-of-trade provided by me is a MacBook Pro 2019. Those new Macs are notorius for having not-so-many ports. My Mac has two (2). Both are USB-C. In my previous MBP (that was a 2014 model), there were ports all over the left side and a bonus USB on right side.
The problem remains: How to hook up my external monitor to increase my productivity by the macigal 30%? Actually, I believe any developer will benefit even more by having a lot of display real estate on his/hers desk.
So, new Mac, new toys needed for it. I had one USB-C to DVI -converter before, but for this Mac, I went on-line shopping to get the good stuff:
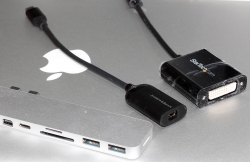
From left to right:
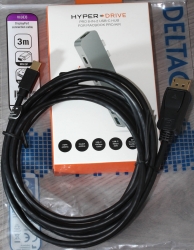
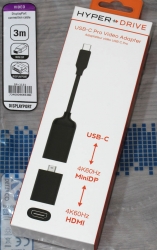
- HyperDrive PRO 8-in-2: A pricey alternative offering a lot of connectivity, disappointing initial quality.
- HyperDrive USB-C Pro Video: An already obsoleted product. Small and does the job. This is my recommendation!
- No-name StarTech.Com CDP2DVI: Cheap thing working perfectly on a Lenovo PC. Unusable with a Mac!
Obsoleted HyperDrive shop screenshot:

The pricey alternative looks like this (on top of a complimentary leather pouch):

Cheap no-name one won't even blink in a MBP. The simple HyperDrive works like a charm! Mac sees it and monitor auto-detects the signal. The expensive one blinks when connected to a Mac. It blinks a lot. All the other ports work perfectly, but HDMI and mini-DP not-so-much. Hyper has a support article about 8-in-2- flickering. Lots of discussion in StackExchange about Apple being picky about cables and converters, examples: Dual monitor flickering: the secondary monitor does the flicker and External monitor flicker / signal loss. With the HyperDrive fix, I'll write an another post about the suggested firmware upgrade, it's complicated enough to deserve an own topic.
For me, the expensive HyperDrive works as a tiny docking-station. I have the USB-C charger connected to it among monitor cable. When I want to roam free of cables, all I have to do is detach the dual-USB-C dongle and that's it! Done. Mobility solved.
Final words:
With a Mac, do a lot of research beforehand and choose carefully, or alternatively make sure you'll get a full refund for your doesn't-work-in-my-Mac adapter.
Going Elliptic on TLS-certificates
Monday, April 27. 2020
The TLS-certificate for this blog was up for expiration. As I'm always eager to investigate TLS and test things, I'm doing an experiment of my own and went for more modern stuff. Also I've been wanting to obsolete TLS versions 1 and 1.1, so I went for an Elliptic-Curve private key. If you can read this, you probably operate reasonable modern hardware, operating system and browser. If you for some reason stop to see my writings, then you're out of luck. I don't support your obsoleted stuff anymore!
Here are the old and new certs side-by-side:
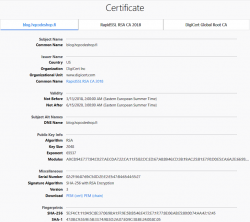
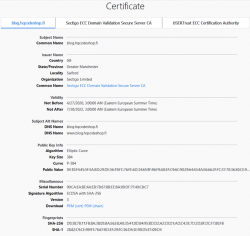
Obvious differences are:
- Expiry: 2+ years of lifetime left. Note: They sold the cert as a 5 year one, but I know about Apple's recent decision to shorten the lifetime of a TLS-cert. Read all about it from About upcoming limits on trusted certificates.
- Issuer: Sectigo ECC Domain Validation Secure Server CA, RapidSSL/DigiCert won't issue ECDSA on cheap certs
- Certificate chain: ECDSA and SHA-2 256-bits on certificate, intermediate-CA and root-CA
- Key-pair type: Now there is a 384-bit secp384r1 curve instead of plain-old-RSA
If you want, you can do almost the same with Let's Encrypt. Getting an ECDSA-cert out of Let's E used to be a tedious manual task, but I'm using acme.sh for my LEing. Its readme says:
Let's Encrypt can now issue ECDSA certificates.
And we support them too!
Just set the keylength parameter with a prefix ec-.
Example command to get a 384-bit ECDSA certificate from Let's Encrypt with acme.sh:
$ ./acme.sh --issue --dns dns_rackspace --keylength ec-384 -d example.com
That's no different than getting a RSA-certificate. The obvious difference in Let's Encrypt cert and my paid cert is in the certificate chain. In Let's E, chain's CA-types won't change from RSA, but your own cert will have elliptic-curve math in it.
Note:
Some people say ECDSA is more secure (example: ECC is faster and more secure than RSA. Here's where you (still) can't use it). ECDSA is modern and faster than RSA, that's for sure. But about security there is controversy. If you read Wikipedia article Elliptic-curve cryptography - Quantum computing attacks, there is note: "... suggesting that ECC is an easier target for quantum computers than RSA". There exists a theory, that a quantum computer might be able to crack your curve-math easier than your prime math. We don't know if that's true yet.
Practical Internet Bad Neighborhoods with Postfix SMTPd
Sunday, April 26. 2020
Bad what?
Neighbourhood. In The Internet. There is a chance you live in one. It is not likely, but entirely possible. Most ISPs offering services to you are NOT bad ones.
This idea of a "bad neighbourhood" comes from University of Twente. Back in 2013 Mr. Moura did his PhD thesis titled "Internet Bad Neighborhoods". Summary:
Of the 42,000 Internet Service Providers (ISPs) surveyed, just 20 were found to be responsible for nearly half of all the internet addresses that send spam. That just is one of the striking results of an extensive study that focused on “Bad Neighborhoods” on the internet (which sometimes correspond to certain geographical areas) that are the source of a great deal of spam, phishing or other undesirable activity.
In plain text for those allergic to scientific abstracts: Based on 2013 study, 0.05% of all Internet Service Providers are responsible for 50% of the trouble. (Some of you'll say 99% of all studies are crap, but this one falls into the 1%.)
How can you detect a "bad neighbourhood"?
Oh, that's easy! Somebody from such a neighbourhood will send you spam. They'll send you links to malware. They port-scan you. They try to guess your passwords in SMTPd, SSHd or whatever their scanning revealed about you.
The theory is: That person "lives" (not necessarily IRL live, but Internet live) near other such criminals and wanna-be-criminals. Such people will find safe harbour within ISPs or hosting providers with lax security and/or low morale. Offenders find other like-minded cohorts and commit their cyber crime from that "neighbourhood".
Ok, I know an IP-address of a spam sender, what next?
Today, most people are using their email from Google or Microsoft or whatever cloud service. Those companies hire smart people to design, develop and run software to attempt to separate bad emails from good emails. Since I run an email server of my own, I have the option (luxury!) of choosing what to accept. One acceptance criteria is the connecting client's IP-address.
Off-topic: Other accepting criteria I have is standards compliance. Any valid email from Google or Microsoft or other cloud service provider will meet bunch of standards, RFCs and de-facto practices. I can easily demand a connecting client to adhere those. A ton of spammers don't care and are surprised that I'll just kick them out for not meeting my criteria. Obviously it won't stop them, but it will keep my mailbox clean.
On a connection to my SMTPd I'll get the connecting client's IP-address. With that I do two things:
- Check if its already blacklisted by spam blockers
- I'm mostly using Zen by Spamhaus. Read https://www.spamhaus.org/zen/ for more.
- Check if its already blacklisted by me based on an earlier spam that passed standards criteria and blacklisting by spam blockers
For a passing spam a manual process is started. From connecting client's IP-address first I'll determine the AS-number (see: Autonomous system (Internet) @ Wikipedia). Second, from the AS-number I'll do a reverse listing of CIDRs covered by that ASN.
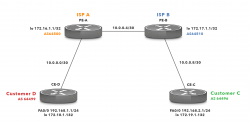
Example illustration:
Credit: Above picture is borrowed from https://www.noction.com/knowledge-base/border-gateway-protocol-as-migration.
In the above picture, I'm Customer C on green color. The CIDR assigned to me by my ISP B is 192.168.2.1/24. The spammer attempting to send me mail is at Customer D on red color. As an example, let's assume the sending mail server will have IP-address of 192.168.1.10. Doing an ASN-query with that IPv4 will result in AS 64499. Then I'll do a second ASN-query to query for all the networks assigned for AS 64499. That list will contain one entry: 192.168.1.1/24. Now I can block that entire CIDR as a "bad" one. Effectively I have found one "Internet Bad Neighborhood" to be added into my blocking list. In reality I don't know if all IP-addresses in that network are bad, but I can assume so and won't get punished by doing so.
The only real "punishment" for me is the cardinal sin of assuming. I do assume, that everybody in that neighbourhood are as evil as the one trying to spam me. Unfortunately for the "good ones" in that network, blocking the entire network so is very very effective. The level of trouble originating from that neighbourhood comes down really fast.
Practical approach with Postfix
Doing all the queries and going to different databases manually is obviously tedious, time-consuming and can be easily automated.
A tool I've used, developed an ran for many years is now polished enough and made publicly available: Spammer block or https://github.com/HQJaTu/spammer-block
In the README.md, I describe my Postfix configuration. I do add a file /etc/postfix/client_checks.cidr which I maintain with the list CIDRs of known spammers. The restriction goes into Postfix main.cf like this:
smtpd_client_restrictions =
        permit_mynetworks
        permit_sasl_authenticated
        check_client_access cidr:/etc/postfix/client_checks.cidr
An example output of running ./spammer-block.py -i 185.162.126.236 going into client_checks.cidr would be:
# Confirmed spam from IP: 185.162.126.236
# AS56378 has following nets:
31.133.100.0/24         554 Go away spammer!    # O.M.C.
31.133.103.0/24         554 Go away spammer!    # O.M.C.
103.89.140.0/24         554 Go away spammer!    # Nsof Networks Ltd (NSOFNETWORKSLTD-AP)
162.251.146.0/24        554 Go away spammer!    # Cloud Web Manage (CLOUDWEBMANAGE)
185.162.125.0/24        554 Go away spammer!    # O.M.C.
185.162.126.0/24        554 Go away spammer!    # O.M.C.
That's it. No need to map a CIDR-file. Just remember to reload the postfix after changing the CIDR-list to make sure the new list is in effect of Postfix listener.
Problem with ipwhois-library
This is the reason I didn't publish the Spammer block -project year ago. My Python-tool is using ipwhois-library for the heavy lifting (or querying). It is a well-written handy library doing just the thing I need in this project. However, (yes even this one has a however in it) ipwhois is using RADb (https://www.radb.net/) for source of information. My experience is, that when specifically talking about list of CIDRs contained in an AS-number, RADb is not perfect source of information. To fix this, I wrote an improvement of ipwhois adding ipinfo.io as an alternate ASN data source. A developer can make a choice and use the one source suiting the project.
There is a catch. ipinfo.io doesn't allow free users more than 5 ASN-queries / day / IP-address. By creating an account and paying for their API-usage that limitation can be lifted. Also, their information about CIDRs in AS-number is accurate. This is a prime example why I love having options available.
Unfortunately for me and most users requiring ASN-queries, the author of ipwhois didn't approve my improvement. You may need to install my version from https://github.com/HQJaTu/ipwhois instead. Obviously, this situation is not ideal. Having a single version would be much better for everybody.
Finally
That's it. If you receive spam from unknown source, run the script and add results to your own block-list. Do that couple weeks and your amount of spam will reduce. Drastically!
Beware! Sometimes even Google or Microsoft will send you spam. Don't block reliable providers.
I'm open for any of your comments or suggestions. Please, don't hesitate to send them.
An end is also a beginning, Part II
Thursday, April 9. 2020
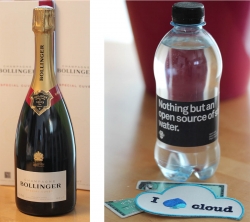
Today I'm celebrating. A number of reasons to pop the cork from a bottle of champagne.
- I cut my corporate AmEx half
- I'm having a sip from this "open source of water"
- I'm having number of sips from from the bubbly one and wait for next Tuesday!
Adobe Flash - Really?
Tuesday, March 31. 2020
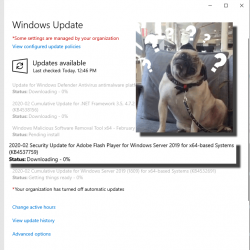
I was updating a Windows Server 2019
Adobe Flash!! In 2020!! Really?
Hey Microsoft: Get rid of flash player already. Make it optional. I won't be needing it anytime soon.
JA3 - TLS fingerprinting with Wireshark
Sunday, February 9. 2020
TLS-fingerprinting. Yes. Most of regular users don't even have a concept for it.
Any regular Jane User browsing around her favorite websites can be "easily" identified as a ... well ... regular user. That identification is done by number of factors:
- Announced User-Agent if HTTP-request
- JavaScript-code executed, what's announced and detected by running library code for available features
- Traffic patterns, how greedy the attempt to chomp a website is
- Behaviour, timing of interactions, machines tend to be faster than humans
When putting any regular user aside and concentrating on the malicious ones, things start to get tricky. A bot can be written to emulate human to pass the detection not to raise any concerns. The only known effective method is to place a CAPTCHA for the user and make them pass it. There are known cases, where human will guide the bot trough and pass control to bot for it to continue its mischief. Given that, there's always room for new options for identifing requests.
There are number of organizations and people (including Google, Edward Snowden and US Government) to encourage people to encrypt everything. An example of this would be The HTTPS-Only Standard by US Government. Early 2020 figures indicate, that the entire Internet is ~60% HTTPS, ~93% requests arriving to Google are using HTTPS instead of non-encrypted HTTP. We're getting there, about everything is encrypted.
Short history of TLS fingerprinting
The thing with TLS-encryption is, the way the encryption is implemented can be fingerprinted. This fingerprint can be added to list of factors used to determine if you are who you say you are. A really good presentation about history TLS/SSL fingerprinting can be found from DETECTION ENGINEERING: Passive TLS Fingerprinting Experience from adopting JA3, but to summarize it here:
- 2009: Apache module mod_sslhaf
- 2012: p0f, TCP/IP fingerprinting tool
- 2015: SquareLemon TLS fingerprinting
- and the good one from Salesforce:
2017: JA3 for clients - 2018: JA3S for servers
- a latecomer 2019: Cisco Joy
What's missing from the list is the techniques used by various government agencies and proprietary systems. It is obvious to me, they hire bunch of super-smart individuals and some of them MUST have found the fingerprinting and never telling us about it. Point here is, there has always been methods to fingerprint your encryption, you just didn't know about it.
In this blog post I'll be focusing on JA3 as it is gaining a lot of traction in the detecting Threat Actors -field of security. This post is not about dirty details of JA3, but if you want, you can study how it works. The source code is at https://github.com/salesforce/ja3 and a video of two out of three J.A.s presenting JA3 @ Shmoocon 2018 can be found at https://youtu.be/oprPu7UIEuk?t=407. Unlike source code (which has some prerequisites), the video alone should give most of you an idea how it works.
Theory of detecting Threat Actors (TAs)
Remember, this fingerprinting originates from intrusion detection. It can be used for other purposes, but a lot of the background is from IDS. So, when studying a system for Indicators of Compromise, the theory is as follows:
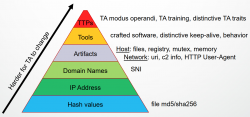
A Threat Actor to change various aspects of the attack. On the bottom of the pyramid-of-pain, there are things that are trivial to alter. You can change the hash of your attack tool (if running on a system trying to detect you), or approach the target from another IP-address or change your Command&Control server to a new domain. All of these changes would throw off any attempts to detect you. Food for thought: Typical OS-commands won't change, unless upgrades are being applied. If a tool changes constantly, it's a tell.
When placing TLS-fingerprinting on the same pyramid:
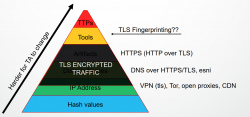
Looking into one's encrypted traffic obscures some of the handy points used to detect your activity. So, neeed to shift focus to the top of the pyramid. On top there are tools and attacker's ways of working. Really difficult to change those. That's exactly where TLS-fingerprinting steps in. What if your tools leave breadcrumbs? Enough for a vigilant detection-system to realize somebody is doing probing or already has compromised the system. At minimum there is weird traffic whose fingerprint doesn't look good warranting closer look by a human.
JA3 on Wireshark
My beef with JA3 has (so far) been the fact, that my favorite network analysis tool, Wireshark, doesn't support it. Now it does:
(I took a still frame from JA3 Shmoocon presentation video and pasted Wireshark logo on top of it)
There is a Wireshark dissector for JA3. It is written in LUA by an anonymous GitHub contributor who chose not to divulge any public details of him/herself and me. Original version didn't do JA3S, and I contributed that code to the project. The Wireshark plugin is available at https://github.com/fullylegit/ja3. To get it working in Wireshark my recommendation is to install the LUA-plugin into your personal plugins-folder. In my Windows, the folder is %APPDATA%\Wireshark\plugins. Note: The sub-folder plugins\ didn't exist on my system. I created it and then placed the required .lua-files into it.
In action a JA3-fingerprint would look like this:
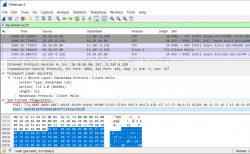
What we see on the Wireshark-capture is a TLS 1.2 client hello sent to a server. That particular client has JA3-hash of "66918128f1b9b03303d77c6f2eefd128". There is a public JA3-database at https://ja3er.com/, if you do any fingerprinting, go check your matches there. Based on JA3er, the previously captured hash typically identifies a Windows Chrome 79. Not suspicious, that one.
Trying to evade JA3 fingerprinting
Security is always a chase. As we already learned, lot of (bad?) people knew about this fingerprinting for many many years. They may be already ahead, we don't really know that yet.
A good primer on how to make your fingerprint match on demand is a post JA3/S Signatures and How to Avoid Them.
Let's try some manual tinkering! A simple
curl --tlsv1.2 https://ja3er.com/
Will indicate de4c3d0f370ff1dc78eccd89307bbb28 as the JA3-hash, that's a known curl/7.6x. For example a Windows Firefox 72 gets a JA3-hash of b20b44b18b853ef29ab773e921b03422, so it should be easy to mimic that, right?
Ignoring all other parts of JA3, Windows Firefox 72 will on TLS 1.2 use a 18 cipher set in prioritized order of:
- 0x1301/4865 TLS_AES_128_GCM_SHA256
- 0x1303/4867 TLS_CHACHA20_POLY1305_SHA256
- 0x1302/4866 TLS_AES_256_GCM_SHA384
- 0xc02b/49195 TLS_ECDHE_ECDSA_WITH_AES_128_GCM_SHA256
- 0xc02f/49199 TLS_ECDHE_RSA_WITH_AES_128_GCM_SHA256
- 0xcca9/52393 TLS_ECDHE_ECDSA_WITH_CHACHA20_POLY1305_SHA256
- 0xcca8/52392 TLS_ECDHE_RSA_WITH_CHACHA20_POLY1305_SHA256
- 0xc02c/49196 TLS_ECDHE_ECDSA_WITH_AES_256_GCM_SHA384
- 0xc030/49200 TLS_ECDHE_RSA_WITH_AES_256_GCM_SHA384
- 0xc00a/49162 TLS_ECDHE_ECDSA_WITH_AES_256_CBC_SHA
- 0xc009/49161 TLS_ECDHE_ECDSA_WITH_AES_128_CBC_SHA
- 0xc013/49171 TLS_ECDHE_RSA_WITH_AES_128_CBC_SHA
- 0xc014/49172 TLS_ECDHE_RSA_WITH_AES_256_CBC_SHA
- 0x0033/51 TLS_DHE_RSA_WITH_AES_128_CBC_SHA
- 0x0039/57 TLS_DHE_RSA_WITH_AES_256_CBC_SHA
- 0x002f/47 TLS_RSA_WITH_AES_128_CBC_SHA
- 0x0035/53 TLS_RSA_WITH_AES_256_CBC_SHA
- 0x000a/10 TLS_RSA_WITH_3DES_EDE_CBC_SHA
Info:
Full list of all TLS/SSL cipher suites is at IANA: https://www.iana.org/assignments/tls-parameters/tls-parameters.xhtml#tls-parameters-4 Beware! The list is a living thing and cipher suites are known to be deprecated for old TLS-versions. Also new ones might pop.
That 18 cipher list in OpenSSL-format used by curl is:
- TLS_AES_128_GCM_SHA256
- TLS_CHACHA20_POLY1305_SHA256
- TLS_AES_256_GCM_SHA384
- ECDHE-ECDSA-AES128-GCM-SHA256
- ECDHE-RSA-AES128-GCM-SHA256
- ECDHE-ECDSA-CHACHA20-POLY1305
- ECDHE-RSA-CHACHA20-POLY1305
- ECDHE-ECDSA-AES256-GCM-SHA384
- ECDHE-RSA-AES256-GCM-SHA384
- ECDHE-ECDSA-AES256-SHA
- ECDHE-ECDSA-AES128-SHA
- ECDHE-RSA-AES128-SHA
- ECDHE-RSA-AES256-SHA
- DHE-RSA-AES128-SHA
- DHE-RSA-AES256-SHA
- AES128-SHA
- AES256-SHA
- DES-CBC3-SHA
Info:
My Linux curl is built to use OpenSSL for TLS and OpenSSL has a different naming for ciphers than IANA and everybody else in the known universe.
Going for a curl with --cipher and listing all of the above ciphers colon (:) separated will rather surprisingly, NOT produce what we intended. We're expecting to get full JA3 starting with:
771,4865-4867-4866-49195-49199-52393-52392-49196-49200-49162-49161-49171-49172-51-57-47-53-10,
but are getting a:
771,4866-4867-4865-4868-49195-49199-52393-52392-49196-49200-49162-49161-49171-49172-51-57-47-53-10-255,
instead.
TLS-version of 771 matches, first three ciphers match, in WRONG order. Then curl appends a 4868 into the list. 4868, or 0x1304 is TLS_AES_128_CCM_SHA256. We didn't ask for it, but because OpenSSL knows better, it will append it to the list.
Miserable failure!
Going forward, getting all the 18 ciphers right with OpenSSL can be done. It's just too much work for me to even attempt. And I haven't got to extensions or elliptic curve parameters yet! Uff.... way too difficult to forge the fingerprint. I might have a go with that on a Python. If I have time.
Finally
This is fun stuff!
Understanding how TLS works and why it can be used as a very good indicator of your chosen tool is critical to your success. Your Tor-client WILL have a distinct fingerprint. It will be different than your Chrome, iOS Safari, Python 3 or PowerShell. Anybody having access to your encrypted traffic (like your ISP or the server you're surfing to) will be able to detect with what you're arriving.
Embrace that fact!
Wangiri Call Scam - Missed Call from International Number
Thursday, January 30. 2020
This is what happened to me:
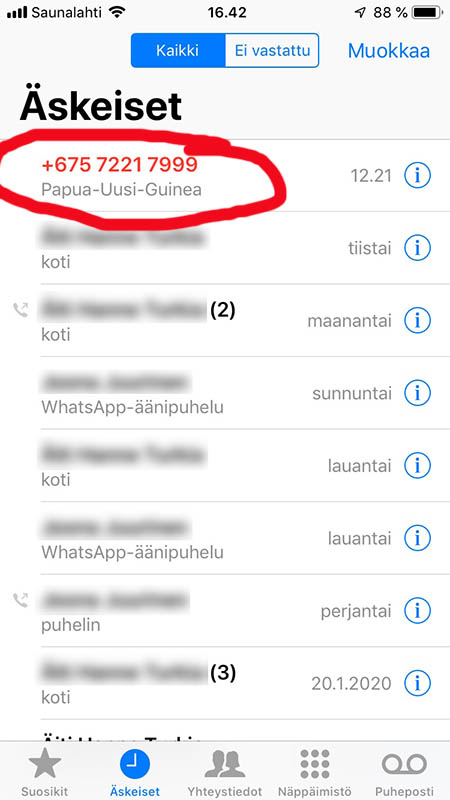
A missed call from Papua New-Guinea. Well... I don't know anybody there, so they shouldn't be calling me.
It doesn't take too much investigation to realize, IT'S A SCAM!
Example: Have you been getting unexpected overseas calls? from Australia
and How to identify and report Wangiri fraud to Vodafone from UK.
The Vodafone article says:
What’s Wangiri fraud?It’s receiving missed calls from international numbers you don’t recognise on either a mobile or a fixed-line phone.
The fraudsters generating the missed calls hope that their expensive international numbers will be called back
so that they can profit.
Looks like that scam has been going on for years. The reason is obvious, it's way too easy! Making automated calls and hanging up when the other side starts ringing doesn't cost you anything. The seriously expensive number unsuspecting victims will call back will apparently play you some music while making you wait as long as you like. Every minute the criminals will get a slice of your money.
How is this possible? How can you change the number you're calling from? Well, easy! You can do it too: https://www.spooftel.com/
"SpoofTel offers you the ability to spoof caller ID and send SMS messages. You can change what someone sees on their call display when they receive a phone call to anything you like!"
Entire world is using ancient telecommunications protocol SS#7. If you're really interested, read The Wikipedia article about it. There are number of flaws in it, as it is entirely based on the assumption only non-criminals have access to global telecommunications network. It used to hold true at the time it was created, but after that. Not so much. And that unchangeable thingie we have to thank for this and multiple other scams and security flaws.
Data Visualization - Emotet banking trojan
Monday, January 27. 2020
Emotet is a nasty piece of malware. It has been around The Net for number of years now and despite all the efforts, it is still stealing money from unsuspecting victims who log in into their online bank with their computers and suddenly lose all of their money to criminals.
Last month, I bumped into a "historical" Emotet-reference. A document contains the URLs for malicious distribution endpoints of documents and binaries used to spread the malware. It also contains IPv4-addresses for Command & Control servers. There are hundreds of endpoints listed, and every single one I tested was already taken down by ISPs or appropriate government officials. Surprisingly, only 20% of the URLs were for Wordpress. Given its popularity and all the security flaws, I kinda expected the percentage to match its market share, 35% of all the websites in the entire World run Wordpress. If you're reading this in the future, I'd assume the percentage to be higher.
As a coding exercise, I analysed the listed endpoints for all three variants (or Epochs as this malware's generations are called) of Emotet and created a heatmap of them. It would be really fun to get a list of all the infected computers and list of those computers where money was stolen from, but unfortunately for my curious mind, that data wasn't available.
So, no victims, only hijacked servers in this map:
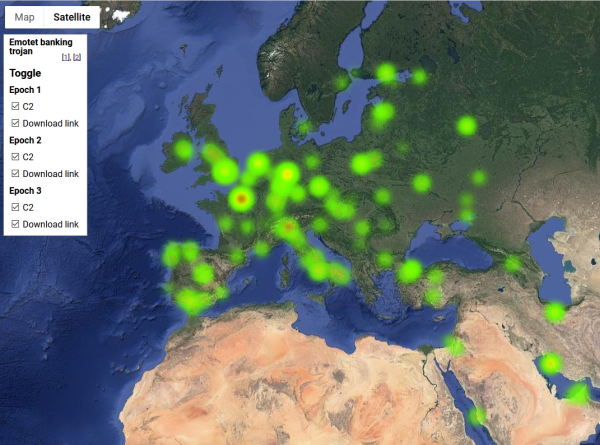
Actual Google Maps -application I wrote is at https://blog.hqcodeshop.fi/Emotet-map/map.html, go investigate it there.
This is a simple project, but if anybody want's do learn data visualization with Google Maps JavaScript API, my project is at https://github.com/HQJaTu/emotet-malware-mapper. Note: You will need an API-key from Google for your own projects. My API-key is publicly available, but restricted. It won't work for you.
As analysis of the hijacked distribution points and C2 -servers, there is lot of heat in obvious places, Europe and North America. But as you can see, there are lots of servers in use all around the globe. That should give everybody an idea why fighting cybercrime is so difficult.
Update 30th Jan 2020:
Emotet seems to be picking up speed, there is a US CISA warning about Increased Emotet Malware Activity. Apparently it is #1 malware currently in the world.
State of Ubisoft in 2020
Saturday, January 18. 2020
Is Ubisoft really going to pull a Nokia?
My obvious reference is to every Finn's favorite corporation Nokia. They ruled the mobile phone industry by having the best network equipment and best handhelds. Ultimately they managed (pun: unmanaged) to lose their status on both. For those who don't know all the dirty details, an excellent summary is for example Whatever Happened to Nokia? The Rise and Decline of a Giant.
Ubisoft's recent actions can be well summarized by what happened today (18th Jan 2020). I opened Uplay on my PC:

And started my recent favorite game, Ghost Recon Breakpoint:

Obviously, given how Ubisoft manages their business, I couldn't play it. ![]()
On Twitter, they're stating "We're aware of the issues affecting connectivity on multiple titles and the ability to access Cloud Save data on Uplay PC." Looks like that statement isn't entirely true. Other comments include "Its just not pc players, it's on the xbox too." Mine and other gamer's frustration can be summarized well on this tweet "When you finally get a Saturday to just play and grind it out there's an outage..AN OUTAGE ON A Saturday.... WTF!!!"
This isn't especially rare incident. They were down on Ghost Recon Breakpoint's launch day too. PCgamer has an article about that. A quote:
"Ghost Recon Breakpoint is out today, but unfortunately you may not be able to play it right now.
Users trying to connect to the game are experiencing a few different errors: The servers are not available at this time."
Not only they made a serious mess with the latest Ghost Recon by incorporating game mechanics from The Division. You will be looting constantly, most of your "precious" loot is pure junk. You won't need it, want it, but new unnecessary items will keep adding to your inventory. Unlike The Division (and Division 2), in Ghost Recon Breakpoint they don't offer you any tools or mechanism to maintain your ever-filling inventory. Also, they added a character level to the game. Completely not what Ghost Recon Wildlands had. To me that's blasphemy! Ghost Recon series isn't an role playing game!
When talking about other recent Ubisoft releases, Far Cry series has always been very high on my favorite games. Then came the Far Cry 5, and one of the worst ever episodes in the entire video gaming history. In comparison, I think ET in Atari2600 is a good game! In the Far Cry 5 game, there are three regions to free from oppressors (mostly by killing, destroying and blowing up their stuff). One of the regions is illegal drugs related. Gameplay in that region includes hours and hours of dream sequences, which you cannot bypass! To make it worse, some of the uttely stupid dream sequences are "interactive". You have to press forward for 15 minutes to make game progress. If you won't, nothing will happen (I tested and waited for an hour). What sane person designed that!!? What sane gamer would think that's fun?
Also I'm hugely annoyed by the fact, that in any of the three regions when story progresses, you will be kidnapped. The kidnapping will happen and you cannot prevent it. Oh, why!? The kidnapping will happen even if you're in the middle of flying of an aircraft. A person will come, while you're mid air and grab you! That kinda yanks you away from immersing into the game's universe. I know games aren't supposed to be realistic, but there has to be SOME rules and limits.
This string of mistakes and errors of Ubisoft didn't go unnoticed. A recent announcement of Ubisoft revamps editorial team to make its games more unique was issued. A quote: "However, following the disappointing sales performance of 2019 titles The Division 2 and Ghost Recon Breakpoint" Well, that's what you end up having. Bad games will result in bad sales. The Division 2 didn't offer anything new from The Division. Instead of roaming around New York's winter, you're in Washington DC during summer. That's it. Any gamers were seriously let down by the lack of new elements to the game. Ghost Recon Breakpoint, that one they seriously messed up. Again, a serious letdown, resulting in bad sales.
When talking about Ubisoft's "ability" to mismanage technical issues, they're world class in that! World class fuckups, that is. Given my expertise on managing application on arrays of servers, I personally know what can go wrong with a set of game servers. I been there, done it and even got the T-shirt about that. What's surprising here, is their ability to do the same mistakes over and over again. Their SRE (or Service Reliability Engineering) is utter crap. Heads should roll there and everybody incompetent should be fired.
In the above announcement to make things better, they do mention word "quality" couple of times. Ghost Recon Breakpoint is an excellent example of non-quality. I simply cannot comprehend what QA-people where thinking when they played the game in hard difficulty level. To increase difficulty, all bots, turrets and non-player characters gain ability to see trough smoke, dust, trees and foliage. That's really discouraging for a gamer like me. I'm a huge fan of Sniper Elite -series, where hiding is a huge part of the game. Here you'll revert back to Far Cry 2 game mode, where visual blocking simply won't happen. If material you're hiding behind allows bullets to pass, you're toast! Second really serious issue is ladders. I have no idea, why didn't they implement ladders the same way ALL the other Ubisoft titles do. In Breakpoint, it takes multiple attempts to use ladders, up or down. And this doesn't include the elevation bug introduced in November 2019 update. If you traverse to a high enough location, your game will crash. Every. Single. Time. Given, this game's map has mountains and some missions are on mountain peaks, it would make sense to fix the dreaded altitude bug fast. But nooooooooh! As of today (18th Jan 2020), the bug already celebrated it's two month birthday. No update on WHEN this will be fixed, no information, no fix, just crash.
Also I won't even begin to describe why my Uplay account doesn't have email address verified, apparently their vendor for emails cannot handle TLDs with more than three characrers. By contacting Ubisoft support, I got instruction to use a Google Mail account for Uplay. I did that, I got myself a .gaming -domain and registered that as my email. Doesn't work. They cannot send me any verification mails. As an example, I'd love to post this rant to Ubisoft Forums. I cannot, as my email address, where they can sell me games and send suggestion from support cannot be verified.
To conclude: I won't be sending any of my money to Ubisoft. Not anymore.
Far Cry series, for me, is finished. I won't be eyeballing any more ridiculously long and stupid dream sequences.
The Division, been there, done it. Adding difficulty to the game by introducing huge amounts of almost indestructible enemies really won't cut it for me.
Ghost Recon... well... I'll be playing Wildlands. That's the last good one in that series.
Watch Dogs, a remake of Far Cry 3 into modern urban world. Even the missions were same. Watch Dogs 2 wasn't that bad, but still. I think I've seen that universe not evolve anymore.
Ultimately, I won't be anticipating any of the upcoming Ubisoft releases. Ubisoft's ability to produce anything interesting has simply vanished.
Take my suggestion: Don't send any of your money to them either.
PS. Connectivity issues still persist. In three hours Ubisoft hasn't been able to fix the issue, nor provide any update on ETA.iPhone USB-C fast charging
Thursday, January 16. 2020
Now that EU is doing yet another round on Common charger for mobile radio equipment 2019/2983(RSP), it inspired me to take a closer look on USB-C or USB 3.1 cables.
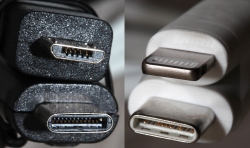
One USB-C cable is for micro-USB and another is for Apple's Lightning connector. More details about the Apple-cable can be found from support article About the Apple USB-C to Lightning Cable. They claim, that some iPads/iPhones would go up to 96W on a compatible charger. Qualcomm Quick Charge @ Wikipedia has more details on that.
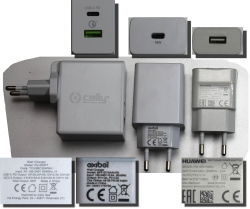
From left to right:
- Celly TCUSBC30WWH (30W)
- Exibel 38-9107 (18W), note: Exibel is a Clas Ohlson -brand
- A generic Huawei USB2.0 (10W)
To get a real slow rate of charging, an ancient 2.5W USB-charger could also be measured. As an impatient person, I don't think I own such a device anymore, so I couldn't measure it's slowness.
It wasn't completely drained. The thing with Li-Ion charging is to avoid the battery heating. Given the chemical reaction in a Li-Ion cell on charging, it is not possible to pump too much current to a cell while maintaining efficiency both on energy and time. A typical charging cycle follows a very careful formula charging the cell more when it's drained and less when it's reaching full capacity.
My testing was around 20% capacity. Here are the measurements:

Note: Obviously my measurements are from the wall socket. Not all the energy goes to the iPhone, as there will be some loss on the charger itself.
- Huawei 10W charger measured 9W, which is nice!
- Exibel 18W charger measured 14W, which is ~20% less than expected
- Celly 30W charger measured 18W, which is ~40 less than expected
Conclusions:
An iPhone 8 won't be using the Apple-mentioned 96W, no matter what. The measured 18W is a lot more than USB2.0 can do, meaning the actual charging will be LOT faster on an near-empty battery. Note: it is not possible drain Li-Ion cell completely, your phone will shut down before that happens. If I'm happy to get 80% capacity to my iPhone, charging for that will happen in half the time I can get with a regular 10W charger. During charging, as the capacity increases, the rate of charging will decline, a lot. For the remaining 20% I won't benefit from USB-C charger.
Additional note:
iPhone 8 won't sync data via USB-C. That's really weird. For data, an USB2.0 Lighting cable is required. On my iPad, an USB-C cable works for both charging and data.
HDMI Capture with AVerMedia Live Gamer Portable 2 Plus
Wednesday, January 8. 2020
HDMI or High-Definition Multimedia Interface is the de-facto connector and signaling for almost everything at your home having picture and sound. As the data in the pipe is digital, it is relatively easy to take some of it for your own needs. Typical such needs would include streaming your activities to The Net or extracting the data to your computer.
As the devices required are relatively inexpensive, I got one. Here it is, a AVerMedia Live Gamer Portable 2 Plus (or GC513 as AVerMedia people would call it):

It is a relatively small unit having couple of connectors in it:

The obvious ones are HDMI in and out. The micro-USB is for powering the unit and extracting the data out of it to a computer. If you want to do some live streaming of your fabulous gaming, there are 3.5mm jacks for headphones/mic. The last slot is for an SD-card if you want to make any recordings with the unit not connected to a computer.
Windows software is called RecCentral. A sample session with a Super NES Classic Edition (https://www.nintendo.com/super-nes-classic/) connected to it would look something like this:
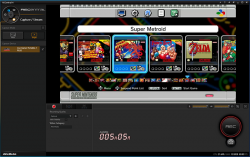
The software is capable of producing high-quality JPEG stills, but mostly people are interested in the unit's capability of producing AVC (aka. H.264, aka. MPEG-4) video from your precious HDMI input.
Just looking at the red triangle-shaped box isn't much fun, so I took the unit for a real-life test. I did some video/still capturing which resulted as footage of some Super Metroid gameplay. The actual game is from year 1994 and HDMI didn't exist at that time. But the modern SNES actually does have HDMI-output in it, making it an interesting target for this test.
With help of Adobe Premiere Pro (Audition, After Effects, Photoshop) software:

I edited a nice all-bosses video from the game. The resulting video has been uploaded into YouTube as Super Metroid - All bosses:

All artistic decisions seen on the video are made by my son, whose YouTube channel the video is at. In this video-project I merely acted as a video technician (obviously, my son's video and sound editing skills aren't quite there yet). Also, the actual gameplay on the video is by my son. IMHO his gameplay is excellent, given his age doesn't have two digits in it. Especially the last two bosses took a lot of practice, but he seems to master it now.
Finally:
I totally recommend the AVerKey Live Gamer Portable 2 Plus for your trivial H.264 capturing. It really won't cut it for any serious work but packs enough punch for the simple things.
Also, if you enjoy the YouTube-video we made, give it your thumbs up. My son will appreciate it!
Running PHP from Plesk repo
Sunday, December 8. 2019
In 2013 I packaged PHP versions 5.4, 5.5 and 5.6 into RPMs suitable for installing and running in my Plesk-box. PHP is a programming language, more about that @ https://www.php.net/. Plesk is a web-hosting platform, more about that @ https://www.plesk.com/.
As I chose to distribute my work freely (see announcement https://talk.plesk.com/threads/centos-6-4-php-versions-5-4-and-5-5.294084/), because there wasn't that much innovation there. I just enabled multiple PHP versions to co-exist on a single server as I needed that feature myself. In 2015 Plesk decided to take my freely distributed packages and started distributing them as their own. They didn't even change the names! ![]() A sucker move, that.
A sucker move, that.
However, I said it then and will say it now: that's just how open-source works. You take somebody else's hard work, bring something of your own and elevate it to the next level. Nothing wrong with that. However, a simple "Thanks!" would do it for me. Never got one from big greedy corporation.
In this case, the faceless corpo brought in stability, continuity and sustained support. Something I would never even dream of providing. I'm a single man, a hobbyist. What they have is teams of paid professionals. They completed the parts I never needed and fixed the wrinkles I made. Given the high quality of my and their work, ultimately all my boxes have been running PHP from their repo ever since.
This summer, something changed.
My /etc/yum.repos.d/plesk-php.repo had something like this for years:
baseurl=http://autoinstall.plesk.com/PHP_7.2/dist-rpm-CentOS-$releasever-$basearch/
I was stuck at PHP 7.2.19, something that was released in May 2019. Six months had passed and I had no updates. On investigation I bumped into https://docs.plesk.com/release-notes/obsidian/change-log/#php-191126. It states for 26th November 2019 for PHP 7.2.25 to be available for Plesk. That's like a big WHAAAAAAT!
More investigation was needed. I actually got a fresh VM, downloaded Plesk installer and started installing it to get the correct URL for PHP repo. It seems to be:
baseurl=http://autoinstall.plesk.com/PHP73_17/dist-rpm-CentOS-$releasever-$basearch/
Ta-daa! Now I had PHP 7.3.12:
# rpm -q -i plesk-php73-cli

Name : plesk-php73-cli

Epoch       : 1

Version     : 7.3.12

Release     : 1centos.8.191122.1343

Architecture: x86_64

Source RPM  : plesk-php73-cli-7.3.12-1centos.8.191122.1343.src.rpm

Build Date  : Fri 22 Nov 2019 01:43:45 AM EST

Build Host  : bcos8x64.plesk.ru

Packager    : Plesk <info@plesk.com>

Vendor      : Plesk

Summary     : Command-line interface for PHP

Description :

The php-cli package contains the command-line interface

executing PHP scripts, /usr/bin/php, and the CGI interface.
Actually PHP 7.4 is also available, just replace PHP73_17 with PHP74_17, to get the desired version.
PS.
Most of you are super-happy about your Apache/PHP -pair your distro vendor provides. If you're like me and ditched Apache, getting Nginx to run PHP requires some more effort. And if your requirements are to run a newer version of PHP than your vendor can provide, then you really short on options. Getting tailored PHP from Plesk's repo and pairing that with you Nginx takes one stresser out.
