OS X Yosemite upgrade from USB-stick
Saturday, October 18. 2014
Latest OS X version Yosemite or 10 is out. Funny thing, the operating system 10 has a version 10 released. 
The thing is ... it's free, but it's big. The amount of downloading needed is easily 5+ GiB. When I downloaded mine, it said 6 hours of load time. On my 250 Mbit/s fiber! Argh. It downloaded a hour or so and choked completely. Argh, argh! When I resumed, it picked a better server and I got rest of the file in 10 minutes or so. Anyway, I absolutely, positively don't want to do that on all of my Macs. So, let's figure out something smarter on that.
The sources of my information are:
- How to Burn OS X Yosemite to a USB Flash Drive
- DISKUTIL(8) - BSD System Manager's Manual
- Disk Management From the Command-Line, Part 2
- Starting from an external USB storage device (Intel-based Macs)
Step 0: Prerequisites
USB-booting a Mac is trickier than a PC. The knowledge base article HT1948 states:
Intel-based Macs support starting from an external USB storage device's volume that:
- Has been formatted with a GUID partition type
- Contains an installation of Mac OS X 10.4.5 or later, or Mac OS X 10.5 or later, which is compatible with (or shipped with) the Mac that the USB device is connected to. Note: You should not use a version of Mac OS X that is earlier ("older") than the version your Mac shipped with.
So, if you just bought an USB-stick, the chances are, that it is MBR-partitioned FAT32. That's my experience of getting new ones. They are incompatible at their current state for USB-booting a Mac. Not to worry, that can be fixed!
Step 1: Go download
In your Apple menu (the top left apple-shaped thing at every program's menu), go for Software Update. Yosemite should be there as a free download from App Store. Select it and wait ... wait forever!
In the classic Commodore 64 game Impossible Mission the phrase was "Another visitor! Stay a while; stay forever!". [Actually the mission was possible. As the game was pretty good, I completed it a number of times.]
Step 2: Go USB
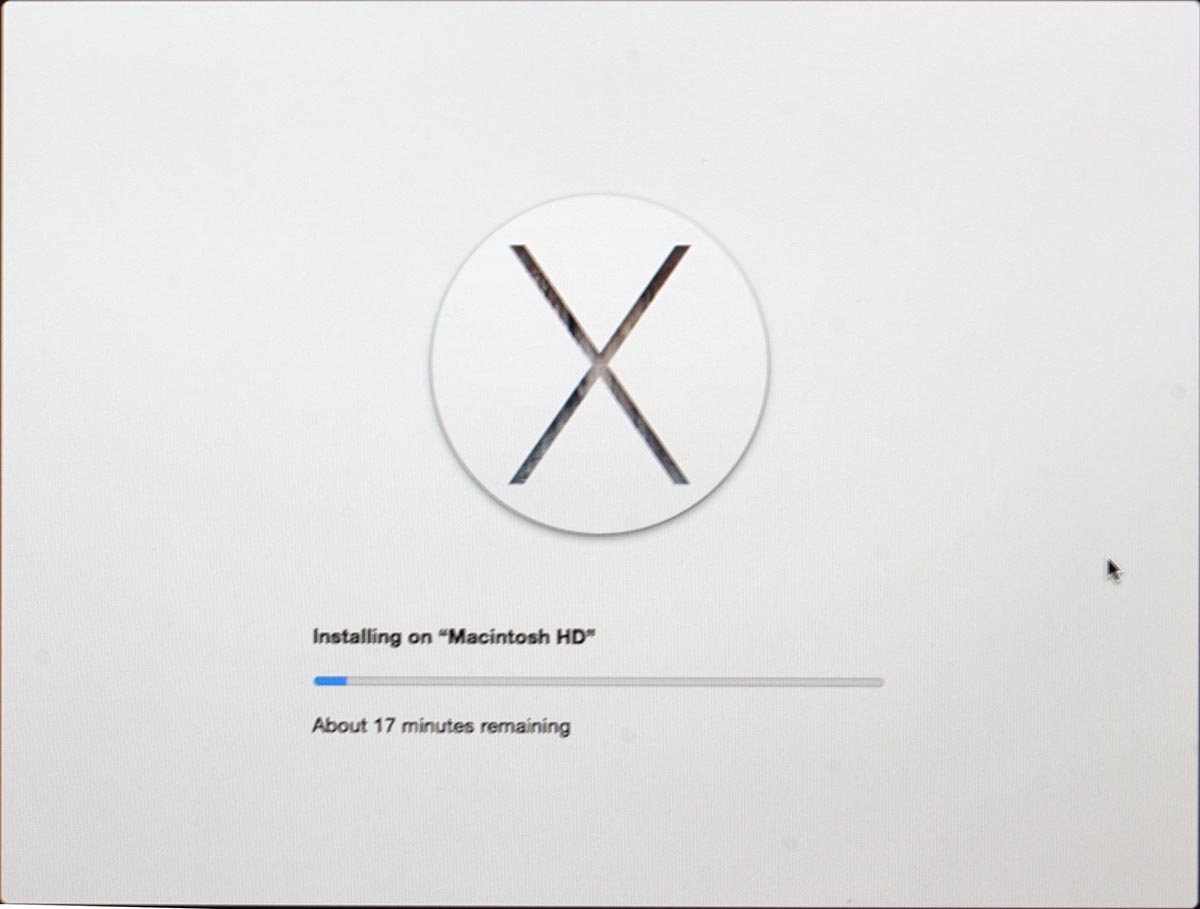
Now that you have the thing in your drive, don't proceed with the upgrade.
When you reach this screen: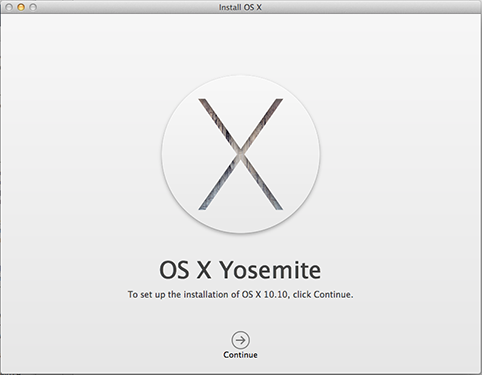
do not proceed! You can actually quit the installer, it won't delete the files from your drive.
Take at least a 8 GiB USB-storage. 4 won't do it, but any larger will. In my case, the USB-stick appeared as /dev/disk3. That may vary on your system. Also it is possible to use some GUI-tools on OS X to format your drives, but as a Linux-nerd I don't know about them.
To make sure, the stick is in a Mac-format (this needs to be run as root, that's what the sudo is for). This will partition and format the entire stick into Mac-use:
# sudo /bin/bash
root# diskutil partitionDisk /dev/disk3 1 GPT jhfs+ "OS X Yosemite" 0b
It will say something like this as a result:
Started partitioning on disk3
Unmounting disk
Creating the partition map
Waiting for the disks to reappear
Formatting disk3s2 as Mac OS Extended (Journaled) with name OS X Yosemite
Initialized /dev/rdisk3s2 as a 7 GB case-insensitive HFS Plus volume with a 8192k journal
Mounting disk
Finished partitioning on disk3
/dev/disk3
#: TYPE NAME SIZE IDENTIFIER
0: GUID_partition_scheme *8.0 GB disk3
1: EFI EFI 209.7 MB disk3s1
2: Apple_HFS OS X Yosemite 7.7 GB disk3s2
Next thing is to confirm, that the volume with given name will be mounted:
root# ls -l /Volumes/
total 40
lrwxr-xr-x 1 root admin 1 Oct 17 13:27 Macintosh HD -> /
drwxrwxr-x 7 root wheel 306 Oct 18 13:12 OS X Yosemite
If it does, you're ready to go. Copy the thing into it:
root# cd "/Applications/Install OS X Yosemite.app/Contents/Resources"
root# ./createinstallmedia --volume /Volumes/OS\ X\ Yosemite/ \
--applicationpath /Applications/Install\ OS\ X\ Yosemite.app \
--nointeraction
It will result in a lengthy process saying:
Erasing Disk: 0%... 10%... 20%... 30%...100%...
Copying installer files to disk...
Copy complete.
Making disk bootable...
Copying boot files...
Copy complete.
Done.
Step 3: Go update
Your stick is ready. This is the part you will be replicating to any of your Macs you want to upgrade.
Reboot the Mac and make sure to boot from the USB. This can be achieved by pressing down option-key during boot:

The official Apple instruction at knowlegebase article HT1948 states:
To start from a USB storage device that meets the above requirements:
- connect the device
- restart
- immediately press and hold the Option key to access Startup Manager
If you successfully followed the steps, you will end up in Mac boot manager: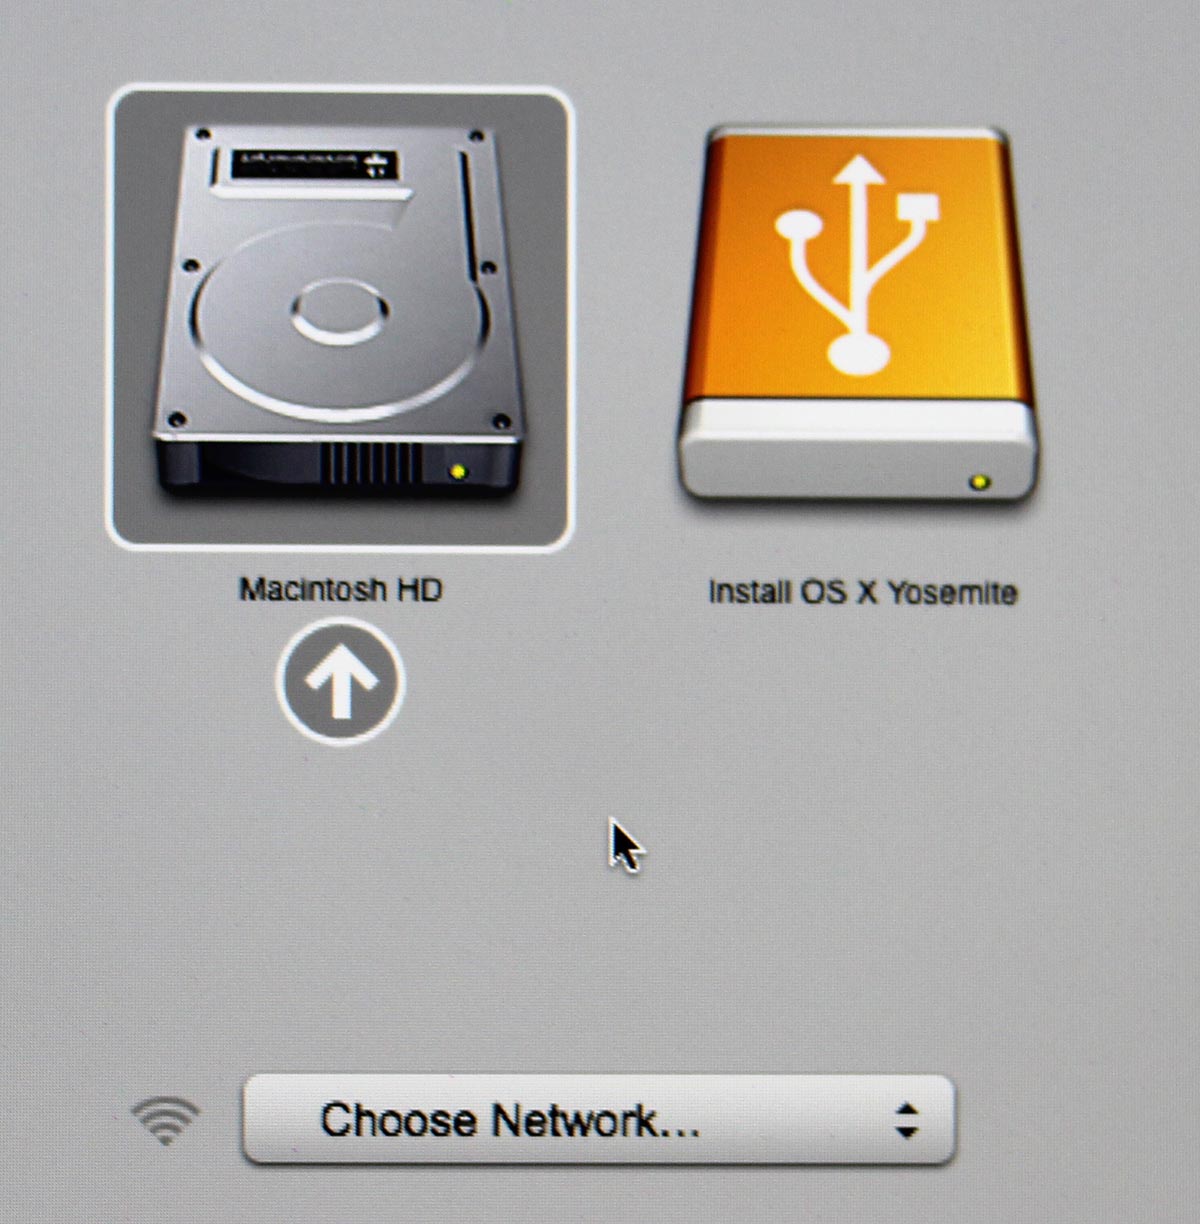
In that, you pretty much select the drive you want to boot from. In this particular case, making a choice for the recently prepared USB-stick will be a good one. The network selection is there to confuse you. Ignore it and double click the USB-drive.
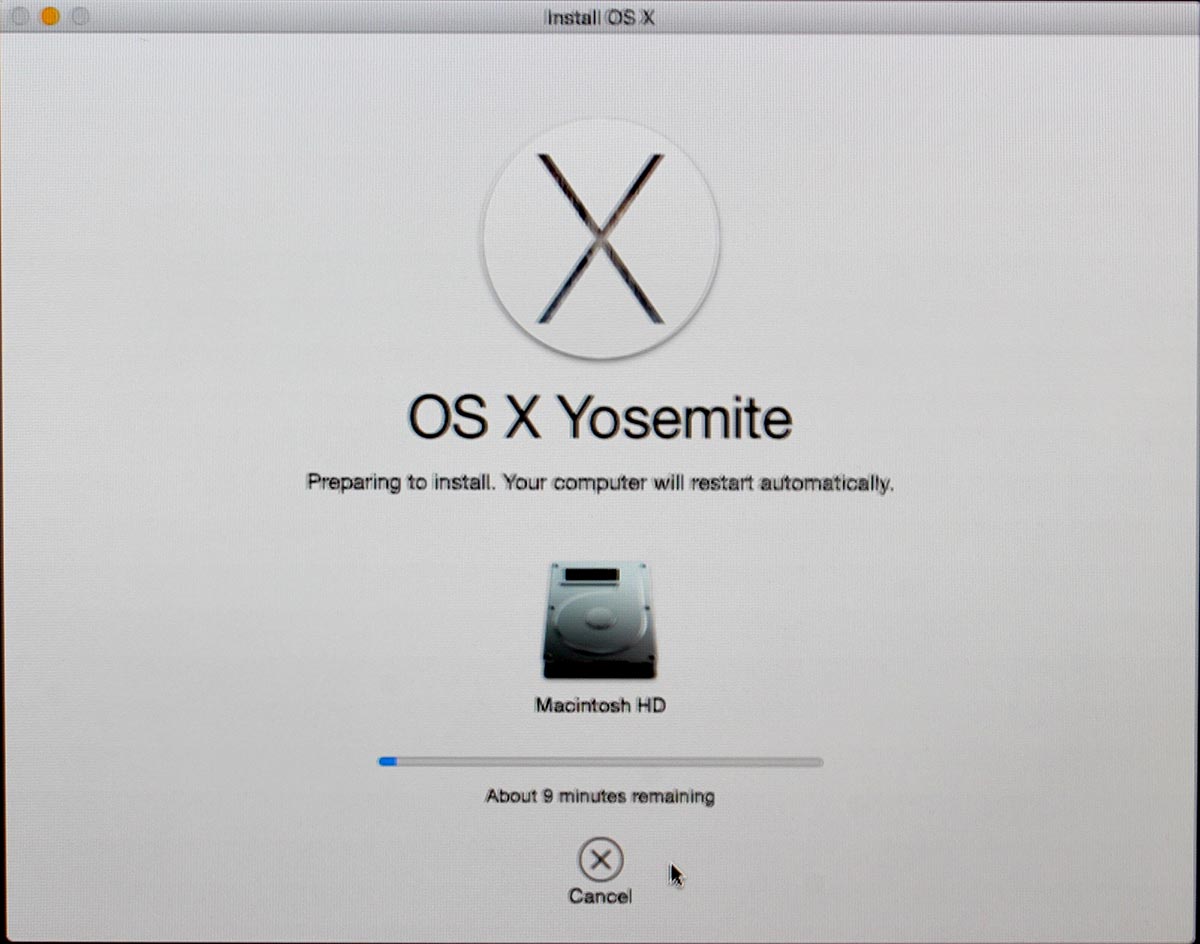
Most steps in this upgrade will include lot of waiting. Make sure that you have reserved couple of hours for the upgrade. Screens like this will become familiar to you:
Most time estimates are wild guesses. A 9 minute wait in reality is something like 45 minutes. Eventually the USB-stick finishes booting, and you will end up in a screen saying "To set up the installation of OS X, click Continue". Most screens will refer your upgrade as an install. It is nerve-wrecking thing, because you don't know if it is going to wipe your settings and data, or do a nice upgrade what you'd be expecting. My experience is, that it will upgrade nicely, but it won't say it properly.
Then there is a license screen which you must agree to continue. Then land on OS X Utilities. One thing you can do with a bootable stick is to install/upgrade an OS X:
This is the most time-consuming part. A cup of coffee doesn't do it. You can easily cook and eat a meal with the coffee during this. My hardware isn't especially old or slow, but ... the upgrade is.
After a reboot, you will end up in the OOBE (or out-of-box experience). This will start with Apple ID login. Apple makes an effort to not allow stolen hardware to be used and they pretty much require you to login during install: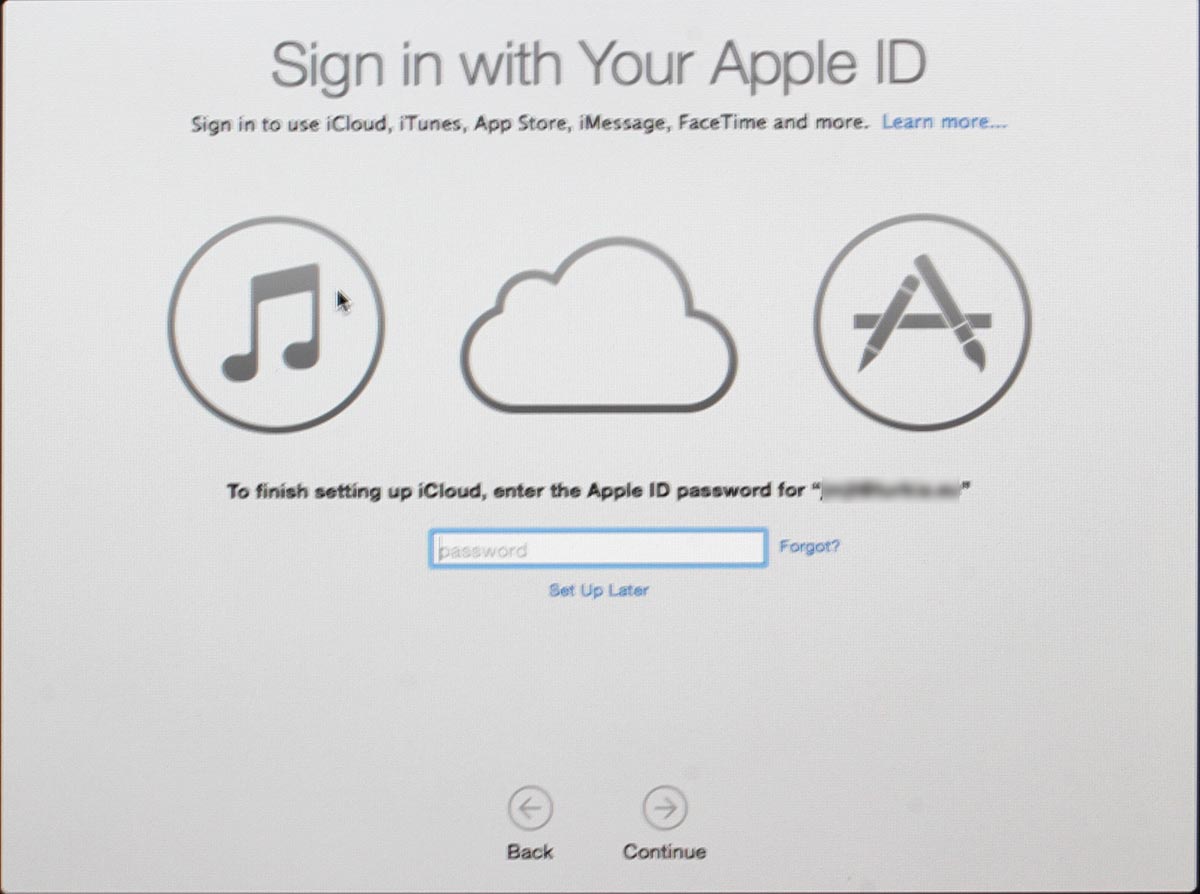
Since I have a 2-factor authentication enabled for my Apple ID, a 2FA-screen will appear during the process: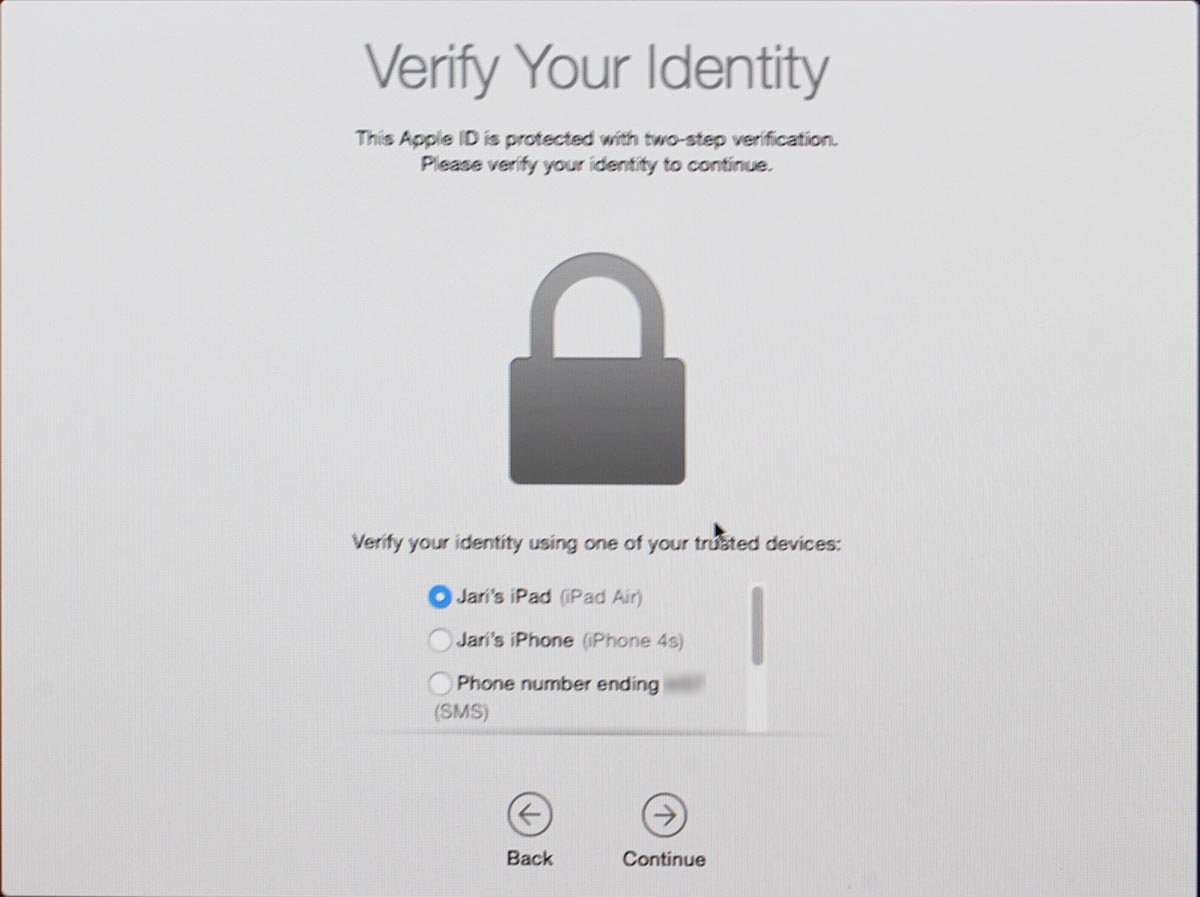
There are steps about sending your usage data to Apple, then yet another license screen: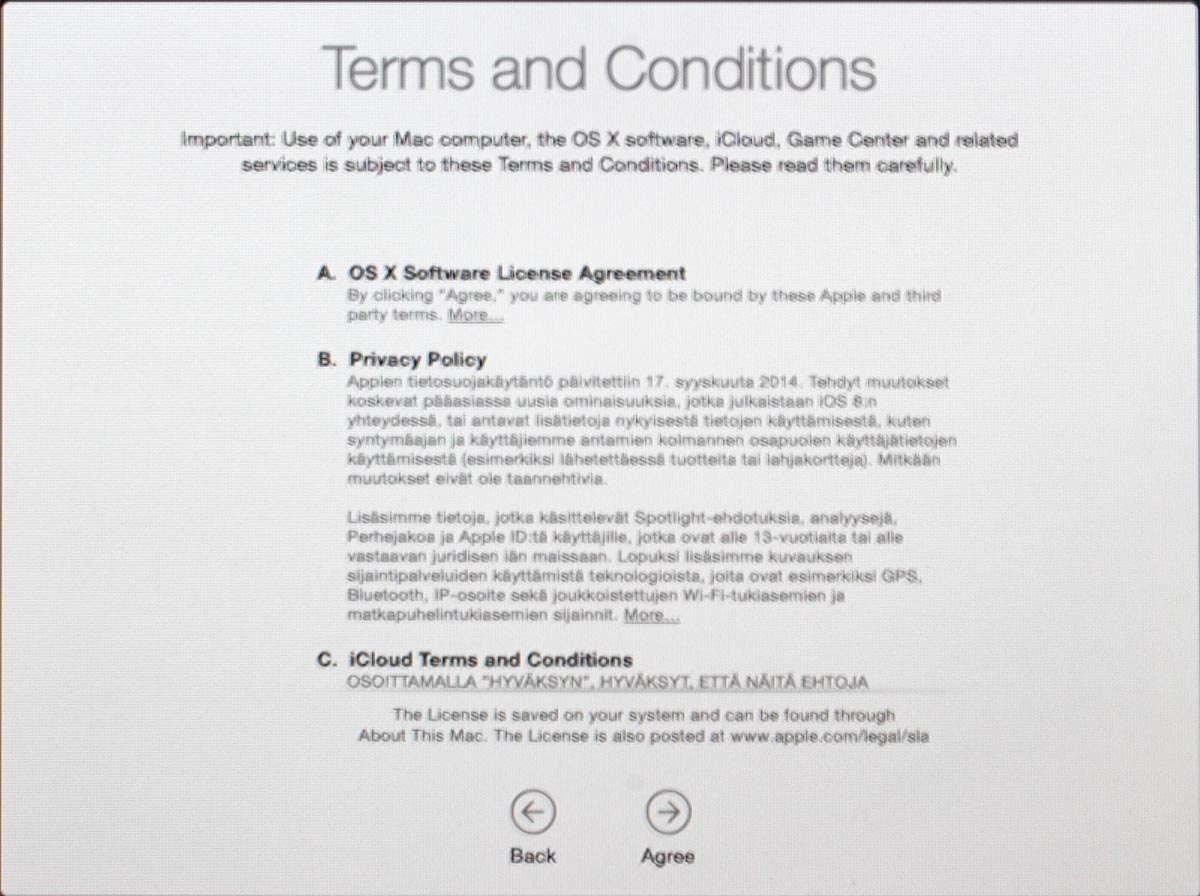
Then you need to make the choice of upgrading iCloud into iCloud Drive, the new thing that came with iOS 8 and OS X Yosemite: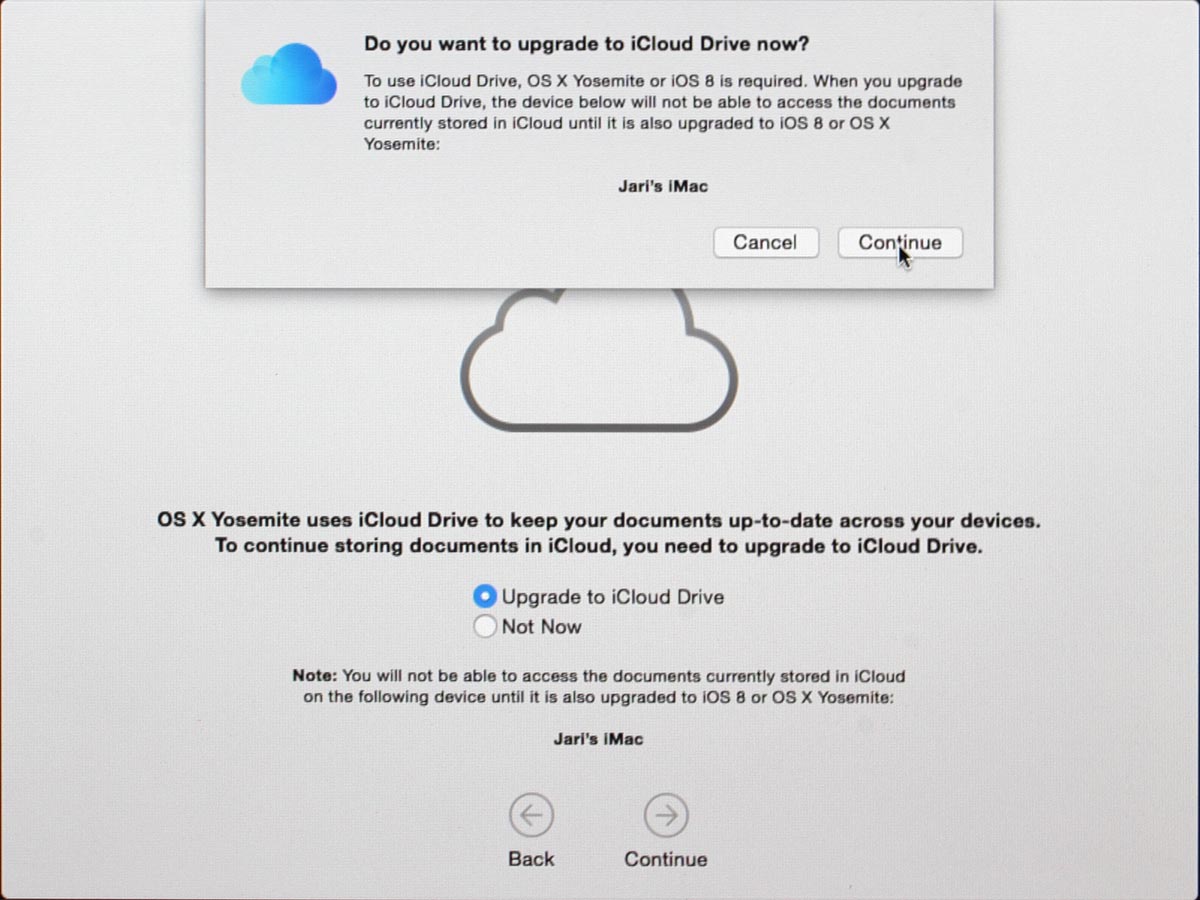
Then you're pretty much done. Finally your upgrade is ready!
Step 4: Done!
Login for the first time:
One of the first things I did, was eject my USB-stick (there were couple other Macs to be updated, too):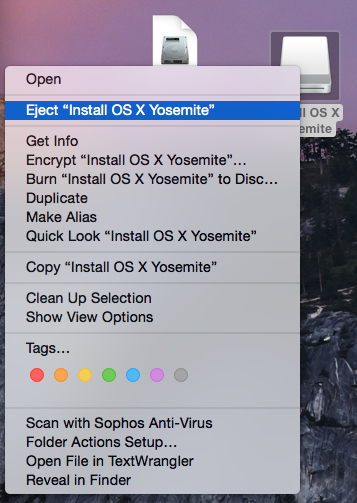
At this point, you can continue using your precious Mac.
Aftermath
Was it worth it? Not really, the change is mainly cosmetic. iCloud Drive isn't a reason for me to upgrade. Apple-menu doesn't have System Update anymore, they changed it into App Store. That's like running iOS.
I updated anyway, as a nerd I like the latest stuff running on my computers. I should yield less problems and there needs to be some progress. I find myself stating the same thing in couple of my blog posts, "it wasn't worth it, but I did it anyway". With computers, it never will result any good to stand still and ignore future.
Nero displaying ads on Windows
Thursday, October 2. 2014
When I first saw an ad popping from my Windows 7 system tray I was pretty convinced, that my computer had been hijacked, keylogger installed, all my files sent to a Chinese server and police knocking down my door, because my machine is serving cp-pics in a torrent network. Then I realized, that the advertisement is about Nero. A software, that I bought and installed voluntarily. See:

As you can see from the dates on the pictures, that I've been waiting for this to happen again. This time I was ready and could confirm, that the culprit was indeed Nero. It is totally unclear to me, if I agreed to this in end user license agreement, but that's what they are doing. Perhaps I also gave the birth rights of my first born son like F-Secure did in London (see: Londoners give up eldest children in public Wi-Fi security horror show). Anyway, I'm not exactly happy, that they choose to do this. Nobody knows what else are they doing.
By googling, I found out, that I'm no alone with this problem. Nero's own discussion forum has a thread with topic Why do you think it's acceptable to spam people's PCs?, and there is actually removal instructions.
First go to Task Scheduler: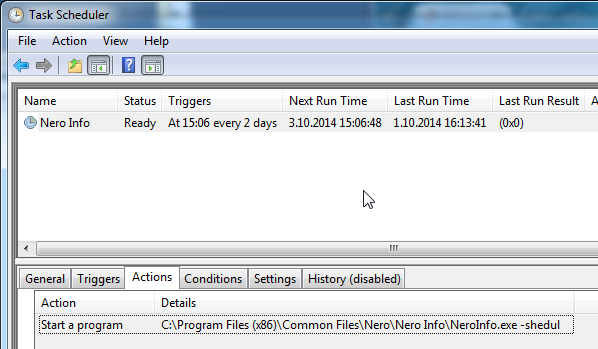
There is an own folder for Nero and in it, there is a NeroInfo running at install time every 2 days. It most certainly does not display ads every time it runs, but there is the master of this botnet somewhere giving instructions on when to run and what to display. Just delete the task:
And finish it off by deleting the files also:![]()
Now it should stay off for a while! This is a fine specimen of paid software screwing you to the ass.
Parallels Plesk Panel updated PHP versions 5.4.32, 5.5.16 and 5.6.0
Sunday, September 21. 2014
iOS 8 upgrade on iPhone 4S
Saturday, September 20. 2014
Being an old geezer, I typically upgrade my iPhone firmware via USB-cable. Wireless users need to wait for the upgrade to happen, USB-people simply plug the cable and go. Also it is a very robust method and less things will go wrong than doing it wireless. Yeah, right!
So I plugged my phone in. Made sure, that I had latest iTunes version running and that a recent backup was made. Then, DÄNG!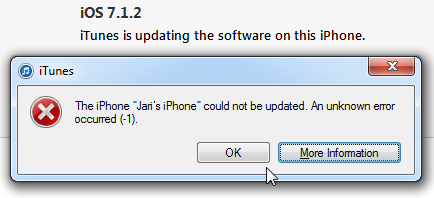
Yeah. Crap! The iPhone could not be updated. An unknown error occurred. Really? Is it possible to be more vague? Next to frustration, the next thought that goes through my mind is: "Did I brick it!!! Is it still salvageable?".
Quite soon I had a positive signal:![]()
Phew! iTunes announced, that the device is in recovery mode. Somewhere before it actually started the process, there was a question "Do you want to upgrade software and restore backup?" In reality it was a non-question, pretty much the only choice was "Ok". Looks like I didn't manage to get a screenshot of that.
The actual recovery process took a very long time. At the time I didn't realize, that it wasn't a "recovery" by definition. It was a simple iOS install. The next iTunes said was:![]()
I'm not sure if this is part of the iOS 8 kill-switch -procedure or is that a regular thing to gain Internet access via 3G, but the installation refused to continue before I had successfully entered the PIN-code for my SIM-card. Then iTunes was ready to start restoring my precious data to the device:![]()
At Apple there is a known reality distortion field, making a nice guestimate of 3 minutes for the restore time. After 15 minutes, the best guestimate was less than 1 minute. Nevertheless, I really had nothing else to but to wait for the restore to complete. Finally it said: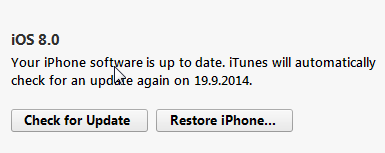
Oh yes!! I didn't brick it after all. I simply took the long route to the end.
It really wasn't worth the update. The only really noticeable thing is the voice button in messaging and the fact, that it drains my battery much faster than my previous iOS 7 did. But who would have guessed that would happen, or ... iOS 7.1 makes everything faster — including your battery drain @ 9to5mac.com. So, does that really happen every time they release an upgraded iOS-version?
Introducing curcfg_tool: Utility to make changes to your configuration
Tuesday, September 16. 2014
u-12 pre-SP100 exploits in a single tool
Monday, September 15. 2014
Is Apple iPhone screen size really too small?
Friday, August 29. 2014
The common consensus is that iPhone screen is too small. For example a Finnish journalist wrote (article is in Finnish), that "Soon iPhone will suit me too". As everybody is expecting a bigger screen iPhone to be released. I've had enough and will blog about that.
I'm saying, that the iPhone screen-size is pretty good and doesn't need to grow much bigger. I'm agreeing what Tim Cook says Apple struck on right screen size with iPhone 5. Currently 4S and 5S -sized phones fit into everybody's pocket. Example:
Image courtesy of iClothing.
Or in a Wired review Samsung Galaxy Note - Big Phone, Big Hassle:
Image courtesy of Wired
If that doesn't look ridiculous, then I don't know what does. That's the direction you want to go by crying "too small screen" all the time!
Let's study history a bit. In May 2014 Apple Insider had an article Before Apple's iPhone was too small, it was it was too "monstrously" big. Yeah, that's right! There is evidence, that the screen size was never just the right size. Still a number of studies show, that people are not happy with current screen sizes. Example:
In this article How would you feel if the iPhone 6 didn't have a bigger screen?
"I can say my iPhone usage has decreased over time because it's just too small for me now"
- Chris Parsons
Or example 2:
People want their next phone to have a big-a** screen, survey says
Or example 3, Sales of those ridiculously big phables are way up:
Phablets Will Outnumber Tablet Sales Three To One By 2018
So, pretty much everything is in line with people screaming to have bigger screens for their mobile appliance. How about a reality check. ZDnet has a review of best tablets (Top Android tablets (April 2014 edition)), their list is:
- Samsung Galaxy Tab PRO 10.1
- EVGA Tegra Note 7
- Amazon Kindle Fire HD
- Amazon Kindle Fire HDX
- The Google Nexus 7
Or Amazon Best Sellers in Tablets:
- Kindle Fire HD 7", HD
- Apple iPad Mini 16GB
- Apple iPad Mini 16GB
- Apple IPAD AIR WI-FI
- Cheapest Android KitKat
- Apple Silver IPAD AIR WI-FI
- Kindle Fire HD 7"
- Apple 7.9-inch iPad Mini Retina
- Apple IPAD AIR WI-FI 32GB
- Asus Google Nexus 7
Now there is a pattern. People want something that has 7" screen. In ZDnet top-5 has only one 10" tablet, in Amazon #4, #6 and #9 are all iPad Airs with 10" screen. Everything else is 7".
It looks like iPhone has too small screen, because it is not 7". Feel free to say I'm wrong, but I think general consensus has it wrong. They're expecting iPhone to be something that it isn't.
Network appliance and hard-coded passwords
Tuesday, August 26. 2014
Trend Micro reported that they found a backdoor from Netis/Netcore firmware. It is a quite serious one allowing remote code execution from the Internet side. Sure, the backdoor is "protected" by a password. As you may expect, the password is hard-coded, cannot be changed and is exactly same in each unit. Nice "security", huh!
Why doesn't this surprise me? Mr. Ronkainen, who is a really keen B593 hacker did find the Huawei internal documentation (available from the entire Internet, of course) Log_Capturing_Guide_of_LTE_CPE_B593_V1.2.docx. It describes following "Step 5 Enter admin after Login and press Enter. Then enter the password -removed- and press Enter". Actually, according to Mr. Ronkainen, the same password is the hard-coded password of serial-console. In reality, some soldering is required for serial console to work, but if you do ... there goes your security.
All B593 hacking always reveals hard-coded encryption keys and passwords. My conclusion: that poor security in these produced-as-cheaply-as-possible devices is by design, and it cannot be changed. Not too many samples in my "research", though. I don't mind having fixed default passwords, you can go and change them. These Chinese units, have fixed passwords, which is yet another story.
Again, I thank Mr. Ronkainen for sharing his findings. Even website https://www.sec-consult.com/ crredits him for his findings in SEC Consult Vulnerability Lab Security Advisory < 20140122-0 >.
Supermicro IPMI BIOS upgrade fail [Solved!]
Sunday, August 24. 2014
I tried to upgrade my Supermicro SuperServer 5015A-EHF-D525 IPMI BIOS to have the Heartbleed fixed in it. It failed on me.  Badly. When I run:
lUpdate -f SMT_316.bin -i kcs -r y
The not-so-friendly response is:
If the FW update fails,PLEASE TRY AGAIN
update part 0, the size is 0x800000 bytes
Transfer data ................
40K bytes 1%ERROR !! BMC did not in correct state
ERROR:SEND "ReceiveFWData" COMMAND TO BMC FAILED
It looks like Supermicro's Linux upgrade tool is the culprit. It enters BMC upgrade mode, starts pushing bits to FlashROM, and then segfaults. I tried couple of BIOS-versions, but to make things worse, I was going from version 2.x to 3.x and there was no downgrade possibility anymore. The BMC was semi-concious, but it really couldn't do much. For example, it didn't have a proper MAC-address, and its networking was effectively out of play.
The worst part of this failing upgrade is, that to get the BMC upgrade mode disabled, you need to pull the plug. If there is electricity connected to the machine, the BMC will stay on.
Update:
Also the ipmitool bmc reset cold helps.
Luckily, there are couple of options for accessing the BMC directly from OS-side. One of them is IPMItool, but it didn't yield any results. The BMC was stuck somehow. Same story with manufacturer's IPMICFG.
I was almost going to give on on this and was planning to RMA it to Supermicro support in Netherlands. Then a newer version of IPMI BIOS was released and I attempted to upgrade into it. Same story, Linux utility crashes badly causing havoc. As the last move, I USB-booted the hardware into DOS-mode. There is a flash-utility in their ZIP-file for DOS. IT WORKED!! How lucky was that!
The new BIOS-version was sane, it knew its own MAC-address and started operating properly. I was so happy!
Who would have thought, that DOS was abandoned almost 20 years ago, and it once more saves the day.
Helsinki Security Meetup: SElinux presentation
Wednesday, August 20. 2014
B593 u-12 /etc/ PEM-files explained
Monday, August 18. 2014
During the quest of hacking my u-12, Mr. Ronkainen from blog.asiantuntijakaveri.fi insisted, that the certificate files in /etc/ are actually used. My personal belief was, that the purpose of having those would be something not-so-important. It turned out, that I badly misjudged the situation.
My firmware has these files:
# cd /etc/
# ls -l *pem
-rwxrwxrwx 1 0 0 963 privkey.pem
-rwxrwxrwx 1 0 0 963 privkey.b593pem
-rwxrwxrwx 1 0 0 3700 cachain.pem
-rwxrwxrwx 1 0 0 1751 b593cpekey.pem
Please note, that the files are in a Read-Only -partition. They are not unique to my device! Your u-12 should have the exactly same files like I do. Also note, that pre-SP100 firmwares are using different encryptions and may not have those (I didn't bother to check).
The cachain.pem is the trivial one. It contains two CA-certificates issued by Huawei expiring 2040 or so. That is a very common PKI-procedure to have the public certificates in a device to make sure, that the actual certificate being used can be verified to a trusted root-CA. There is very little interesting about that file.
However, the remaining PEM-files are more interesting. The exact purpose of b593cpekey.pem is yet unknown. It is an 3-DES encrypted private key to something. If you want to take a peek into the file, the encryption password is CPE-B593-12 as Mr. Ronkainen dug out of the libraries. A command like this will tell us more:
# openssl rsa -in b593cpekey.pem -noout -text -passin pass:CPE-B593-12
Private-Key: (2048 bit)
...
It is a 2048-bit RSA key. If you know what the key is used for, please tell us.
The remaining files privkey.pem and privkey.b593pem are exactly the same. To me it looks like poor engineering. Libraries seem to be using the latter filename, but my guess is, that somebody is using the first one too. The password for this private key was also recovered by Mr. Ronkainen, it is lteb593. Basic information recovery:
# openssl rsa -in privkey.pem -noout -text -passin pass:lteb593
Private-Key: (1024 bit)
...
Hm. handy, but the really interesting part is where this file is actually used. This information was recovered by Mr. Ronkainen with looking at the GUI admin traffic via Wireshark.
If you go change the admin password at System -> Password change (the frame source would be http://-the-IP-here-/html/management/account.asp), you can see the HTML containing tags for loading a number of JavaScript files, the most interesting ones are /js/account.js and /js/rsa.js. The actual password change code from account.js is:
function AddSubmitParam(SubmitForm,type)
{
var cfgUsername = ADMIN_USER_NAME;
SubmitForm.addParameter('cfgUsername',cfgUsername);
SubmitForm.addParameter('Userpassword',MyRSAEncryptB64(getValue('id_cfmPassword')));
//SubmitForm.addParameter('Username',ADMIN_USER_NAME);
SubmitForm.addParameter('OldPassword',MyRSAEncryptB64(getValue('id_oldPassword')));
SubmitForm.setAction('chgacount.cgi?RequestFile=/html/management/account.asp');
It RSA-encrypts the value from form field with id id_cfmPassword! Wow! They really beefed up their security. The RSA-code is at /js/rsa.js and it contains:
// Return the PKCS#1 RSA encryption of "text" as a Base64-encoded string
function RSAEncryptB64(text) {
var h = this.encrypt(text);
if(h) return hex2b64(h); else return null;
}
...//my encrypt function, using fixed mudulus
var modulus = "BEB90F8AF5D8A7C7DA8CA74AC43E1EE8A48E6860C0D46A5D690BEA082E3A74E1"
+"571F2C58E94EE339862A49A811A31BB4A48F41B3BCDFD054C3443BB610B5418B"
+"3CBAFAE7936E1BE2AFD2E0DF865A6E59C2B8DF1E8D5702567D0A9650CB07A43D"
+"E39020969DF0997FCA587D9A8AE4627CF18477EC06765DF3AA8FB459DD4C9AF3";
var publicExponent = "10001";
function MyRSAEncryptB64(text)
{
var rsa = new RSAKey();
rsa.setPublic(modulus, publicExponent);
return rsa.encrypt_b64(text);
}
It surely is RSA PKCS#1 encryption implemented with JavaScript. That's really cool! A complete PKCS#1 library implemented with a completely wrong language. I didn't realize, that having a fully functional RSA-library with JavaScript was even possible, but there it is.
Next I took the public key modulo and exponent from the above JavaScript-code and used Per Olesen's tool from https://gist.github.com/polesen/2855098 to re-create an actual PEM-file from those ingredients. Mr. Olesen has a nice article Converting RSA public key Modulus and Exponent into PEM file about that.
The resulting PEM-file is:
-----BEGIN PUBLIC KEY-----
MIGeMA0GCSqGSIb3DQEBAQUAA4GMADCBiAKBgQC+uQ+K9dinx9qMp0rEPh7opI5o
YMDUal1pC+oILjp04VcfLFjpTuM5hipJqBGjG7Skj0GzvN/QVMNEO7YQtUGLPLr6
55NuG+Kv0uDfhlpuWcK43x6NVwJWfQqWUMsHpD3jkCCWnfCZf8pYfZqK5GJ88YR3
7AZ2XfOqj7RZ3Uya8wICJxE=
-----END PUBLIC KEY-----
and a simple verify run with OpenSSL for both the private and public keys confirm, that we have a pair:
# openssl rsa -pubin -in privkey.pub.pem -noout -modulus | md5sum
92e88d0b38fe93cd41a000b3c0b1928e -
# openssl rsa -in privkey.pem -noout -modulus -passin pass:lteb593 | md5sum
92e88d0b38fe93cd41a000b3c0b1928e -
Both keys have the same modulo in them, thus, they are the private and public parts of the same key. Excellent!
Credits go (as usual) to Mr. Ronkainen for his hard work in hacking the B593. Also Mr. Olesen deserves thanks for his ready-made tool (which btw. builds in my Linux easily) for putting the PEM-parts back together.
Final credits go to Huawei engineers, this time they took data encryption really seriously. However, when you're in a leaking boat, it really doesn't matter if you have the best motor or not, your boat still leaks. In this case the critical information (like encryption keys) are hard-coded, used in every device they manufacture and recoverable in plain-text format. It looks like Huawei is suffering from the weakest-link-in-your-security -syndrom. If your FTP is flakey, you store your SSH-passwords in plain-text format and let people in as they please, they are likely to find this stuff out!
... More to follow about SSH and web-GUI user password encryption. This was a very critical find in the path of full disclosure.
Password encryption
Sunday, August 17. 2014
A fellow B593 hacker Mr. Ronkainen from blog.asiantuntijakaveri.fi informed me about his findings regarding /var/curcfg.xml password encryption. This is something I did already spit-ball with him in comments, but this time he had something concrete to show.
This is for decrypting an FTP-password. Since you can set your own, you definitely know what the plaintext password is. His findings are:
exe->Data_DbDecrypt(nil, "llxYjYnY:\021\003\2324\275\241\233Wu\353$Vx;\333#", "", "" <unfinished ...>
exe->strncpy(0x7facddd8, "llxYjYnY", 8) = 0x7facddd8 (Data_DbDecrypt)
exe->strcpy(0x7facdaf8, "12345678") = 0x7facdaf8 (Data_getProductInfo)
exe->strncpy(0x7facdb01, "12345678", 9) = 0x7facdb01 (Data_getKey)
exe->strncat("12345678", "llxYjYnY") = "12345678llxYjYnY" (Data_getKey)
<... Data_DbDecrypt resumed> ) = nil
exe->strcpy(0x4ce009, "BBBB") = 0x4ce009
The first call is for the raw input data. It clearly contains 8 characters, a colon (:) and something encrypted after it. Then there is a surprising part, call to a function named Data_getProductInfo() returning hard-coded 12345678 every time. Based on the code, the "product info" is simply concatenated into the Base64-decoded 8 char prefix, forming a 16 byte encryption key.
I've already speculated, that they changed encryption in SP100+ from 3-DES to AES. Based on the function names in firmware libries, combine that with knowledge of block ciphers and give it a go with AES-128 ECB with the above keying. Hey presto! It works!
I wrote a public tool for doing password encryptions/decryptions: http://blog.hqcodeshop.fi/B593/password_recover.php The sources for my web-thing are also there, if you want to use that by yourself.
As you can see from the form, I cannot work with the previous 3-DES stuff. It's simply because I don't know what the key/IV are. There is also another thing with web-GUI and SSH-passwords. They are not using the above keying mechanism. My speculation is, that they are using AES-256 (possibly in ECB-mode) for those, but I have no details about the key.
If you want to test the password recovery, you'll need your /var/curcfg.xml at hand. Pick an encrypted password from that, for example:
<X_FTPServiceInstance InstanceID="1" Username="test" Password="bU50RkQ1T2o6UNkuA7Bdj40/TiNehA6fDw==" FtpUserEnable="1" Privilege="2" Path="usb2_1/../.."/>
or
<WEPKeyInstance InstanceID="4" WEPKey="bU50RkQ1T2o69goRBo2nWOh00YDVCHLGDw=="/>
Select web-form Target as FTP-user, copy/paste the value from XML Password-field into Base64-encoded and klick decrypt. It should give you "test" as Plain-text value. There is another example for Wi-Fi WPA-key, it says WEP in the XML-file, but we can ignore that.
I'll keep investigating the other passwords too. Mr. Ronkainen suggested, that something in the box could be encrypted with PKCS#1, but the block size is off, at least in passwords. Stay tuned for more updates.
Plesk Panel: Upgrading to version 12
Monday, July 28. 2014
All the nerds like me (escpecially me!) love new versions of software.
Backup
I got new toys for my Parallels Plesk Panel box and went for the automated upgrade. I attempted to do the mandatory full backup first:
/usr/local/psa/bin/pleskbackup server \
--output-file=/Backups/pre-12.0.18.backup.tar -v -v
... just to make sure, that I have something to roll back to if it hits the fan. But it kept failing on me. Any domains having PostgreSQL databases failed to backup properly. I got log entries like:
Failed to execute backup database
Failed to pack files backup_hqcs_blog_1407141359 in /dumps/domains/hqcodeshop.fi/databases/hqcs_blog [ 115057410048 bytes free of 158532106240 bytes total on mount point 0]
Totally puzzling. Didn't make any sense at all! Looking at the detailed XML-log of the backup revealed following:
<?xml version="1.0" encoding="UTF-8"?>
<object name="server" type="server">
<object name="hqcodeshop.fi" type="domain" uuid="domain#hqcodeshop.fi">
<object name="hqcs_blog" type="postgresql">
<message id="e6d718ef-5b52-49af-8c4f-4473393b30bd" severity="error" code="msgtext">
<description>Failed to execute backup database</description>
</message>
<message id="d5e6cfd1-fa94-45d4-89b6-a47a0627134a" severity="warning" code="msgtext">
<description>sh: AB12: command not found
sh: AB12: command not found
sh: AB12: command not found
sh: AB12: command not found
sh: AB12: command not found
sh: AB12: command not found
</description>
</message>
</object>
</object>
</object>
What command not found!? After a few puzzling moments later I realized it, that is the end of my panel admin's password! In the original form the password was [lot of characters here]>AB12. Somebody at the Parallels goofed! What would happen if your password has special characters. What if some of those characters were special in your command prompt? Not very solid backup code, huh!
The next thing was to change the password to one not containing any of these characters £$<>()&;"'`, they have special meaning on *nix command prompt. I always use randomly generated passwords and during my quests I regularily bump into systems that do not sanitize user input properly. I find that the ones from the number keys with shift are especially nasty. During registration process it is very easy to input a proper random passwod, but the system botches something and don't let me log in, or does something nasty like Parallels Plesk did.
Unfortunately changing the admin password didn't make the backup succeed! Apparently PostgreSQL password is stored somewhere else. I did do a:
/usr/local/psa/bin/admin --show-password
... to confirm, that system knows what the new password was. The thing is, that PostgreSQL password needs to be changed manually. I found the knowledge base article about that KB 120262 - How to update password for PostgreSQL admin user in Plesk? Running:
# plesk bin database-server --update-server localhost:5432 \
-type postgresql \
-passwd `/usr/local/psa/bin/admin --show-password`
SUCCESS: Server localhost:5432 is successfully updated.
... did solve it. Then I managed to get backups.
Upgrade
There were no issues during upgrade. The web-upgrader took a while and then it said everything was done. There really was nothing special about this part.
During my checkings I found a really good knowledge base article about system settings. This is something that Parallels didn't have for previous versions. This is really good stuff: Parallels Plesk Panel for Linux services logs and configuration files. I kept going back to that one a lot.
Testing
When the new version was running, I naturally wanted to see that all my services were running properly. Things I found to be broken were POP3 and IMAP SSL-certificates. Also the Presence Builder didn't upgrade properly.
The funny thing about Courier IMAP/POP3 was, that upgrade reset my certificate settings back to something really stupid. I went to /etc/courier-imap/ to check the imapd-ssl and pop3d-ssl. I changed both of them to contain:
TLS_PROTOCOL=TLS1
That was done to reflect the setting I have in my /etc/postfix/main.cf:
smtpd_tls_mandatory_protocols = !SSLv2, !SSLv3
My policy is, that if you're running something that does not support TLSv1, v1.1 nor v1.2 then you should use somebody else's services. It simply is insane to rely on SSL!
The Web Presence Builder said this on startup:
File: /usr/local/sb/include/Base/ORM/Object.php; Line: 249
Message: Undefined property "controlPanelLink" in object "SB_ORM_TokenAccess".; Code: 0
Luckily, that issue is covered by knowledge base article KB 119875: Cannot open a site in Web Presence Builder: "Undefined property "controlPanelLink" in object "SB_ORM_TokenAccess". A simple SQL-command:
ALTER TABLE `token_access` ADD `control_panel_link` VARCHAR( 255 ) NULL DEFAULT '' AFTER `skin_code`;
did do the fix.
Life after the upgrade
My system has been running as usual. There hasn't been any complaints from the users or I have not encountered anything else that didn't work.
Deactivating Arch Linux IPv6 Privacy Extensions
Thursday, July 24. 2014
Something funny happened to my Arch Linux, it changed the IPv6 address rather surprisingly. When I failed to SSH into it, I went to the console.
On none of my machines I have the RFC 4941 privacy extensions enabled. The first thing to do was to confirm, that the IP-address was not based on my Ethernet Address:
2: eth0: <BROADCAST,MULTICAST,UP,LOWER_UP> mtu 1500 qdisc pfifo_fast state UP group default qlen 1000
link/ether 52:54:00:cf:1c:36 brd ff:ff:ff:ff:ff:ff
inet6 2001::e2:349d:bcc6:c9fc/64 scope global noprefixroute dynamic
valid_lft 84267sec preferred_lft 12267sec
There is absolutely no reference to the MAC-address 52:54:00:cf:1c:36 of in the EUI-64 address 00e2:349d:bcc6:c9fc. Given the calculator result of 5054:00ff:fecf:1c36. Apparently something modifies the autoconfiguration address.
First culprit could be Linux kernel:
# cat /proc/sys/net/ipv6/conf/all/use_tempaddr
0
I even iterated all the configurations:
find /proc/sys/net/ipv6/conf/ -name use_tempaddr -print -exec cat {} \;
just to make sure, that privacy is off.
That was puzzling. What the heck is going on in the machine!! After all, it used to work ok before. What could be doing that?
Lot of googling around landed me on Arch Linux ArchWiki IPv6 page. It says: "dhcpcd includes in its default configuration file since version 6.4.0 the option slaac private, which enables "Stable Private IPv6 Addresses instead of hardware based ones", implementing RFC 7217". Hum? I've never heard of RFC 7217, nor "A Method for Generating Semantically Opaque Interface Identifiers with IPv6 Stateless Address Autoconfiguration (SLAAC)", but there it was.
I confirmed /etc/dhcpcd.conf and yes, it did contain a:
slaac private
in it. Why?! I didn't ask for it. I simply put a comment (#) in front of the line and did a:
systemctl restart dhcpcd@eth0.service
To refresh the situation. No change. A reboot. Yes change!
2: eth0: <BROADCAST,MULTICAST,UP,LOWER_UP> mtu 1500 qdisc pfifo_fast state UP group default qlen 1000
link/ether 52:54:00:cf:1c:36 brd ff:ff:ff:ff:ff:ff
inet6 2001::5054:ff:fecf:1c36/64 scope global noprefixroute dynamic
valid_lft 86399sec preferred_lft 14399sec
Now my IPv6-address was exactly what it used to be. Weird incident, though. There is a perfectly good mechanism for privatizing addressses, if wanted to. But now somebody had created another and some higher power made a choice for me to start using it. Really weird! Well, I'm hoping that my addresses won't change any more.
Google+ hijacked my company!
Wednesday, July 23. 2014
One day I got an e-mail from Google+ saying: "HQ Code Shop Oy hasn't shared anything on this page with you". I was more than puzzled. Sure I haven't shared anything with myself on Google+.
I clicked the link and got to the page. It had a Manage this page -button at the bottom: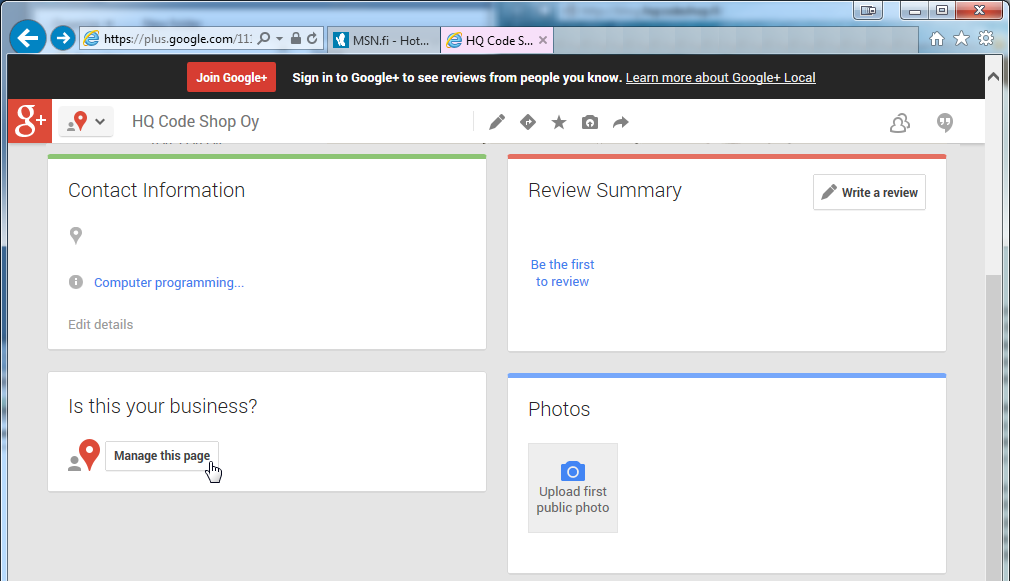
It didn't do much good:![]()
All it said was: "We are sorry, but you do not have access to this service. Please contact your domain administrator for access". Aow come on! Why did you have to create a page for something that you don't own and don't let the owner to control!
I went to my Google Apps administration console: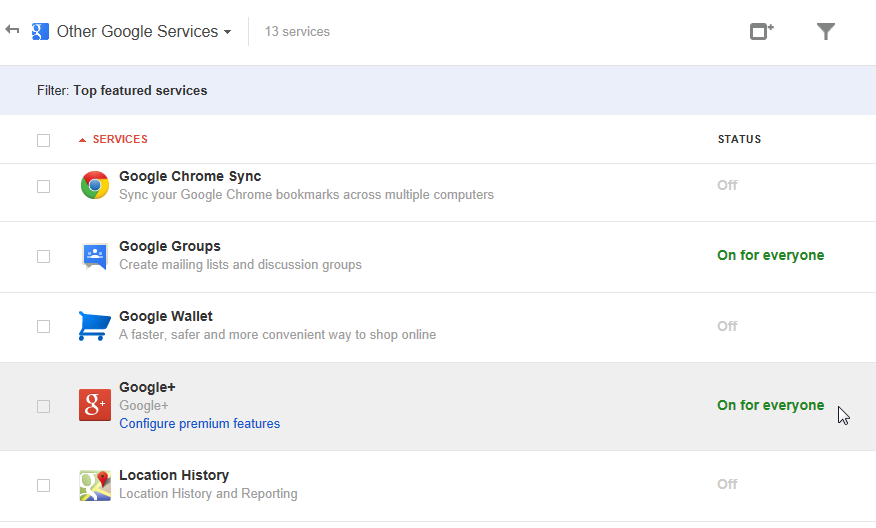
Yes, I have Google+ enabled for myself. However, that didn't change anything. I still was not able to manage my own company's page.
Many hours of surfing the web, reading many absurd attempts to fix the problem, and nothing. Then I went back to the Other Apps -section and started reading the descriptions:
It says "Add or edit your local business listing on Google Maps" next to Google Places -service, which I hadn't subscribed. I enabled that and hey presto! Suddenly I was able to manage the page. Naturally I had to pass the automated phone call test from Google, but I finally got control of my own property.
This is yet another shame-on-you-Google -thing they do while going towards world domination.

