Disabling non-disableable Internet Explorer add ons
Friday, March 21. 2014
One day my laptop shut itself down while I was getting a cup of coffee. No big deal, I thought. I'll just plug it into charger and things will be ok again. It took me by surprise to see, that the battery was 80% charged and the laptop had done a "crash landing". Apparently it chose to turn itself off. I'm guessing to avoid an over-heating situation.
Couple of weeks later I realized that a machine that does not do anything, chews about 25% CPU constantly. The natural guess would be a virus scanner, but it turned out to be a process called IEWebSiteLogon.exe:

I've never heard of such an application. Google didn't reveal anything useful, but the process properties revealed that the file was located at C:\Program Files\Lenovo Fingerprint Reader\x86\, so the conclusion is that my fingerprint reader's software is running a piece of software to eat up a lot of CPU-resources to do exactly nothing.
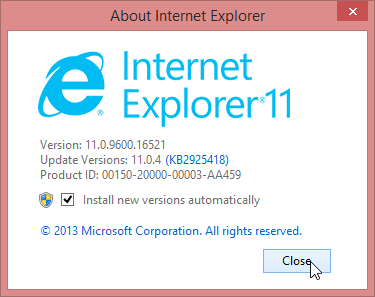
The file name gave me a hint, that it has something to do with Internet Explorer. I was running IE 11:
I opened the add ons manager:
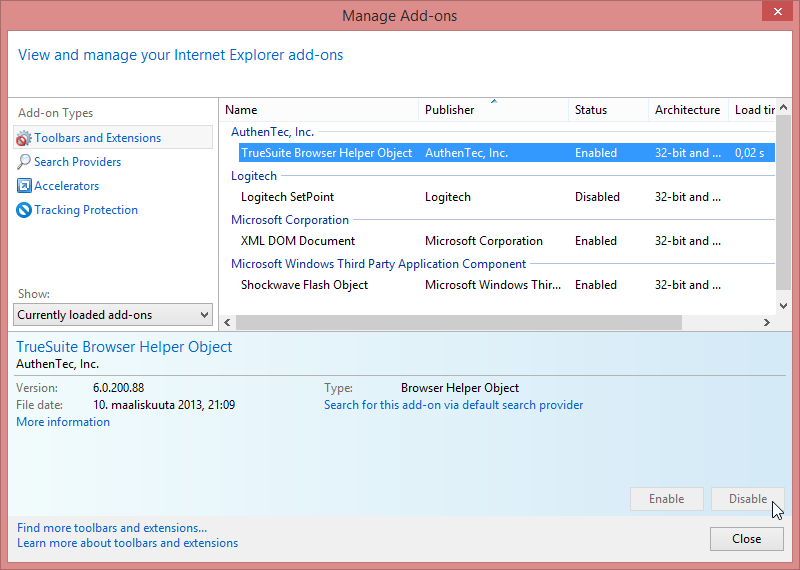
and there it was. My initial idea of disabling the stupid thing didn't pan out. The Disable-button is grayed out. Searching The Net revealed two interesting pieces of information: How to Remove Unneeded Plug-Ins in Internet Explorer By Andy Rathbone from Windows 8 For Dummies, which proved to be useless, it instructs to disable the add on. The second yielded results: Can't remove Internet Explorer Add-On. It described a way to track down the component by its class ID. Nice, but not nice enough. Somewhere there is a piece of code to attempt to load the missing component. Why not remove the requirement?
The details of the add on are:
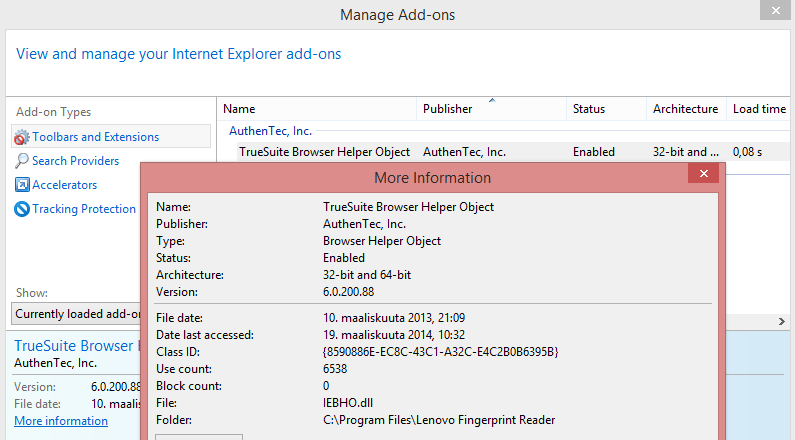
Now I had the class ID of {8590886E-EC8C-43C1-A32C-E4C2B0B6395B}. According to SystemLookup.com is a valid piece of software, they say: "This entry is classified as legitimate". That class ID can be found in my Windows system's registry from the following locations:
- HKEY_CLASSES_ROOT\CLSID\
- HKEY_CLASSES_ROOT\Wow6432Node\CLSID\
- HKEY_LOCAL_MACHINE\SOFTWARE\Classes\Wow6432Node\CLSID\
- HKEY_LOCAL_MACHINE\SOFTWARE\Microsoft\Windows\CurrentVersion\Explorer\Browser Helper Objects\
- HKEY_CURRENT_USER\Software\Microsoft\Internet Explorer\Approved Extensions
- HKEY_CURRENT_USER\Software\Microsoft\Windows\CurrentVersion\Ext\Settings\
The interesting ones are the system setting of Browser Helper Objects and user setting of Approved Extensions. Removing the helper object surely will disable the add on completely. Also it will be a good idea to make it a not-approved extension. And to un-register the component. All that should give the stupid add on a decisive blow and make it not waste my precious CPU-cycles.
The following PowerShell-commands run with administrator permissions will do the trick:
Remove-Item -path
"HKLM:\SOFTWARE\Microsoft\Windows\CurrentVersion\Explorer\Browser Helper Objects\{8590886E-EC8C-43C1-A32C-E4C2B0B6395B}"
Remove-Item -path
"HKCU:\Software\Microsoft\Windows\CurrentVersion\Ext\Settings\{8590886E-EC8C-43C1-A32C-E4C2B0B6395B}"
Remove-ItemProperty -path
"HKCU:\Software\Microsoft\Internet Explorer\Approved Extensions" -name "{8590886E-EC8C-43C1-A32C-E4C2B0B6395B}"
If you don't have admin-permissions, the commands will fail. Also please note that every time Internet Explorer is started, it will make sure that permissions in the registry HKEY_CURRENT_USER\Software\Microsoft\Internet Explorer\Approved Extensions are set so, that user is denied any modification access. See this:
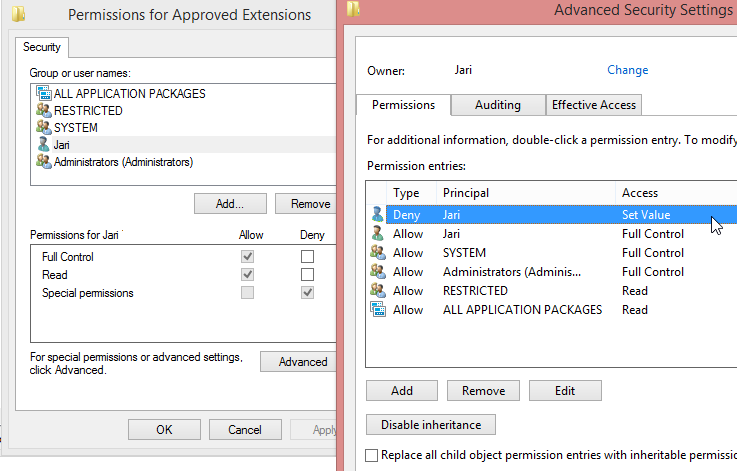
I tried to remove the deny ACL with PowerShell, but it seems to be impossible. The API is not mature enough.
After removing the deny ACL and running the PowerShell-commands and finally stopping and starting the Internet Explorer, the add on was gone. I managed to "disable" it completely.
PHP large file uploads
Thursday, March 20. 2014
Trivial mod_rewrite: Redirect to another file in the same directory
Wednesday, March 19. 2014
I found a funny quote at Htaccess Rewrites - Rewrite Tricks and Tips, it says:
``Despite the tons of examples and docs, mod_rewrite is voodoo. Damned cool voodoo, but still voodoo. ''
-- Brian Moore
bem@news.cmc.net
The quote is originally at http://httpd.apache.org/docs/2.0/rewrite/. Now obsoleted documentation for old Apache version.
I'll have to second Brian's opinion. I've touched the subject earlier at Advanced mod_rewrite: FastCGI Ruby on Rails /w HTTPS.
My YUM-repo definition RPM had a bug in it (see: CentOS 6 PHP 5.4 and 5.5 yum repository) and I had to release a new version of it. There exist already couple of links to the file. Why didn't I think of a situation where an update is released? Darn! So, let's keep the URL alive, even if a new version of the file with different name is released. That way everybody stays happy.
Attempt 1: Failure
An over enthusiastic "hey, that should be simple!" -type of naive solution. Create a .htaccess-file into the appropriate directory with content:
RedirectPermanent oldname.rpm newname.rpm
Well ... no. The result is a HTTP/500 and in the error log there was a:
/home/the/entire/path/here/.htaccess: Redirect to non-URL
Ok. It didn't work.
Attempt 2: Failure
Let's ramp this up. Forget the simple tools, hit it with mod_rewrite! Make .htaccess contain:
RewriteEngine on
RewriteRule ^oldname\.rpm$ newname.rpm [R=301]
Well ... no. The result is a HTTP/404, because the redirect goes really wrong. The result will be http://my.server.name/home/the/entire/path/here/newname.rpm, which is pretty far from being correct. There is a funny mix of URL and the actual filesystem storage.
The reason can be found from the Apache docs at RewriteRule PT-flag:
"The target (or substitution string) in a RewriteRule is assumed to be a file path, by default. The use of the [PT] flag causes it to be treated as a URI instead."
and
"Note that the PT flag is implied in per-directory contexts such as <Directory> sections or in .htaccess files."
That phrase can be translated as:
- Internally RewriteRule works with filesystem paths
- When using RewriteRule from a .htaccess-file it does not use filesystem paths, but URLs
- A .htaccess-file really messes things up
Something more elegant is obviously needed.
Attempt 3: Failure
I studied the Apache docs and found a perfect solution! What about if there was a way to discard the filesystem path entirely. Nice! Let's go that way, make .htaccess contain:
RewriteEngine on
RewriteRule ^oldname\.rpm$ newname.rpm [R=301,DPI]
Well ... no. I have the DiscardPathInfo-flag there, but it changes absolutely nothing. It is the same with or without the flag. It clearly says that "The DPI flag causes the PATH_INFO portion of the rewritten URI to be discarded" in the docs. Apparently the flag is used for completely different thing (which I'm having hard time to comprehend), but the thing is that I cannot use it to fix my redirect.
Attempt 4: Success!
After browsing the Apache-docs even more I struck gold. The docs for RewriteBase-directive say:
"This directive is required when you use a relative path in a substitution in per-directory (htaccess) context"
and
"This misconfiguration would normally cause the server to look for an "opt" directory under the document root."
That's exactly what I'm doing here. I have a relative path. I'm using a substitution in a .htaccess-file. It even mis-behaves precisely like in the example from the docs.
The solution is to make .htaccess contain:
RewriteEngine on
RewriteBase /path/here/
RewriteRule ^oldname\.rpm$ newname.rpm [R=301]
Now it works exactly as I want it to do! Nice! 
When a request is done for the old filename, Apache will do an external redirect and notify browser about the new version. wget fails to save the file with the new name (it will use the old name), but for example Firefox does that correctly.
Conclusion
Darn that voodoo is hard.
The mod_rewrite's complexity simply laughs at any system administrator. I consider myself to be one of the experienced ones, but still ... I find myself struggling with the subject.
Cisco ASA protected SSH-connection hangs - [Fixed]
Thursday, March 13. 2014
Using own SSL certificate in Cisco ASA
Tuesday, March 11. 2014
Yesterday I was mighty pissed about Oracle's Java breaking my stuff. Then it occurred to me: I shouldn't be using self-signed certificates in the first place! See my post about Certificate Authority setup: Doing it right with OpenSSL, where I wrote "My personal recommendation is to never use self-signed certificates for anything". And there I was! Darn. 
I figured, that there must be a way of stop the stupidity and install an own certificate to the network appliance. Then I bumped into ASA 8.x: Renew and Install the SSL Certificate with ASDM, a PDF-document from Cisco instructing how to achieve that. Nice! Exactly what I needed.
This is how to do it. Log into ASDM and go to Configuration -> Device Management -> Certificate Management -> Identify Certificates. It looks like this:
![]()
There you can find Add-button:
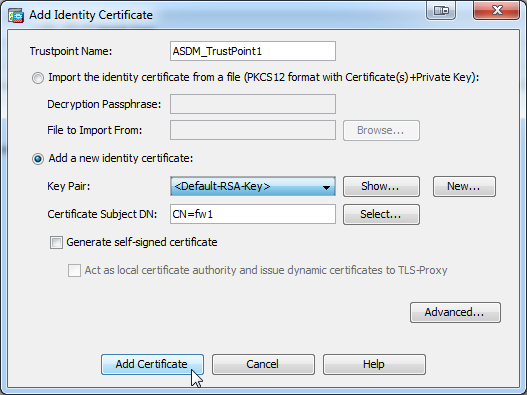
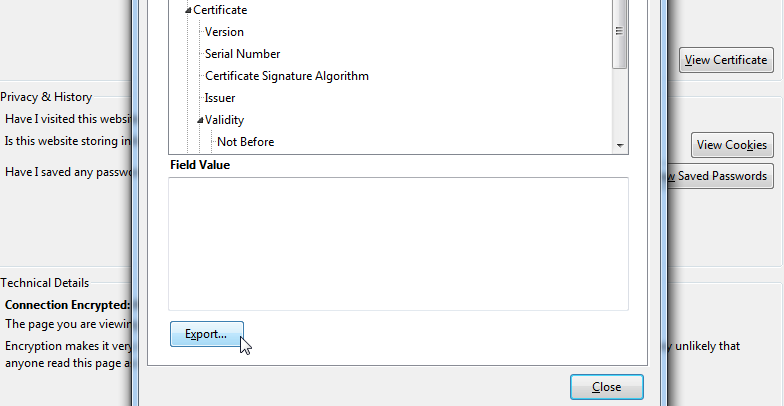
You should add a new identify certificate. I used the Default-RSA-Key, but Cisco's own documentation says to generate a new one. In case SSH-keys need to be regenerated, the SSL-certificate won't work anymore. In my case I can simply recreate the certificate also, so it is not an issue to me. After you click Add Certificate:
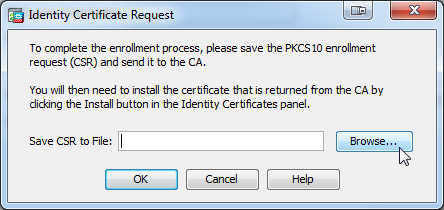
You will get a dialog to save the Certificate Signing Request (CSR) into a local drive to be sent to a Certification Authority (CA) to be processed.
After your CSR has gone trough and you have your certificate in PEM-format go back to ASDM and select Install this time. You will get a dialog:
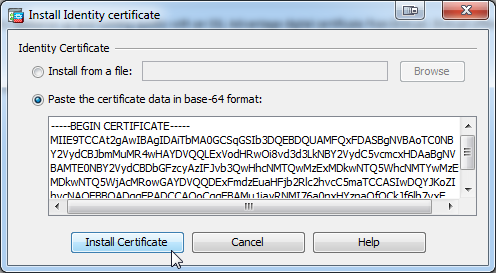
Upload or copy/paste the PEM certificate there and click Install Certificate. After that you'll have an identity:
![]()
Now the next thing to do is to start using the newly created identity. In Configuration -> Device Management -> Advanced -> SSL Settings there is an option to choose an identity to use when ASDM is being accessed via HTTPS or ASDM-IDM.

To get better results from Qualsys SSL Labs server test I did following changes:
- SSL-version is set to TLS V1 Only, that is TLS 1.0 only. 1.1 nor 1.2 is not available.
- For encryption I'm only using:
- 112-bit 3DES-SHA1
- 128-bit RC4-SHA1
- 128-bit RC4-MD5
- The AES-encryptions for 128-bit or 256-bit failed on my box for some reason. If you have them, please use those! The chosen 3 crypto algos provide reasonable security, but the AES-ones are better.
After an Apply the new certificate is in use. You can verify that via a web browser from HTTPS-interface or go to Control Panel's Java security settings and remove the self-signed certificate from secure site certificates -list. The ASDM-login will work again.
Java 1.7 update 51 breaking Cisco ASDM login
Monday, March 10. 2014
One day I needed to drill a hole to a Cisco firewall. I went to Adaptive Security Device Manager and could not log in. Whaat?!
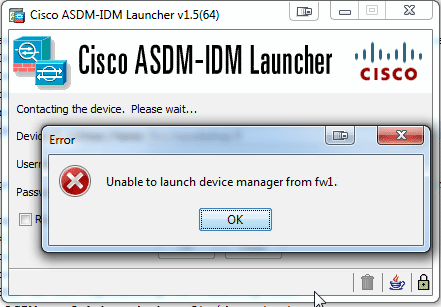
It did work before, but apparently something changed. Sneak peek with Wireshark revealed that SSL handshake failed. Java console has something like this in it:
java.lang.SecurityException: Missing required Permissions manifest attribute in main jar: https://dm-launcher.jar
at com.sun.deploy.security.DeployManifestChecker.verifyMainJar(Unknown Source)
at com.sun.deploy.security.DeployManifestChecker.verifyMainJar(Unknown Source)
at com.sun.javaws.Launcher.doLaunchApp(Unknown Source)
at com.sun.javaws.Launcher.run(Unknown Source)
at java.lang.Thread.run(Unknown Source)
and:
javax.net.ssl.SSLHandshakeException: java.security.cert.CertificateException: Java couldn't trust Server
at sun.security.ssl.Alerts.getSSLException(Unknown Source)
at sun.security.ssl.SSLSocketImpl.fatal(Unknown Source)
at sun.security.ssl.Handshaker.fatalSE(Unknown Source)
at sun.security.ssl.Handshaker.fatalSE(Unknown Source)
at sun.security.ssl.ClientHandshaker.serverCertificate(Unknown Source)
at sun.security.ssl.ClientHandshaker.processMessage(Unknown Source)
Little bit of googling revealed Issues Accessing ASDM at Cisco's learning network and Cisco ASDM blocked by Java? at spiceworks.com. So I wasn't alone with the problem. Oracle's release notes for update 51 revealed a number of changes to earlier versions. Java is still piece of shit, but they're trying to fix it. Too little, too late. It is very unfortunate that I have to have Java Runtime installed and use it for a number of important applications. Now Oracle is making radical changes to JRE to improve its flaky security and these customer companies like Cisco cannot keep up with the changes.
Anyway, enough rant, here is how to fix it. The idea is to take the self-signed certificate from the Cisco firewall and import it for Java. This is yet another nice feature of a Windows-computer. There needs to be separate a separate certificate store for operating system, browser and Java.
First go to web-interface of the Cisco appliance. Internet Explorer cannot export a certificate from a web site, so use a Firefox or Chrome or pretty much any other browser. Save the certificate to a file. Like this:
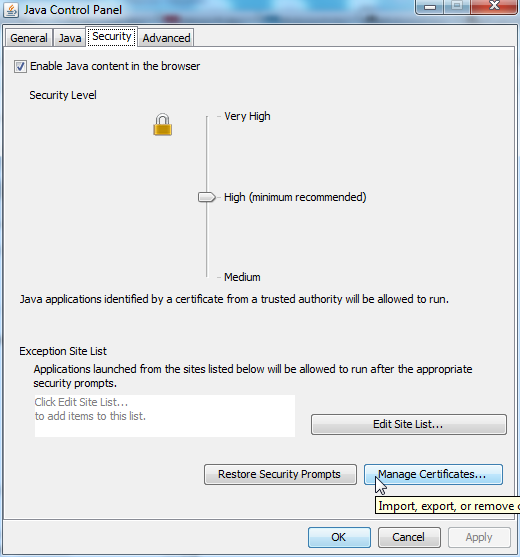
When you have the file, go to Control Panel on Windows:

![]()
Select Java and Security-tab:
From there you can find Manage Certificates. Import the certificate-file from there:
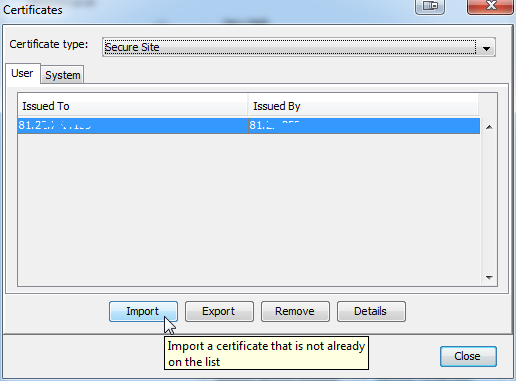
It is very, very important that you first select Certificate Type: Secure Site. Any other certificate type won't fix the problem.
On the security-tab there is an exception list for certificates. Adding an exception won't fix this, since the problem is with the fact that the certificate is self-signed.
Now login works again.
When I first encountered this issue, I asked help from couple of guys who are very familiar with Cisco IOS (not Apple iOS). The initial response was "What is ASDM?" Apparently the GUI is not the expert's way to go.
Firefox per dir save
Sunday, March 9. 2014
Once upon a time there was a Firefox version which remembered where something was saved from a website. I think the last download destination directory was stored per host. I clearly remember that when I downloaded something from SourceForge, it would remember the directory, but since there are number of projects I download from it didn't always be a correct one. But for websites, I use for only one piece of software, it was always correct.
Then something changed. My Firefox wouldn't remember my destinations anymore.
Now for some nostalgic reason I wanted the functionality back. My loyal/hated aide Google found me a solution for that. A Mozilla support forum discussion named Changing FF25 download location in Win7 - Browse will not get past /User folder. It clearly states that such a setting exists, but is now off by default. When I went to my about:config, it looked like this:
 Like the support forum promised, the configuration directive is hidden. They say hidden, but actually it is not created at all. Luckily you can add it by yourself by right clicking on the Firefox configuration:
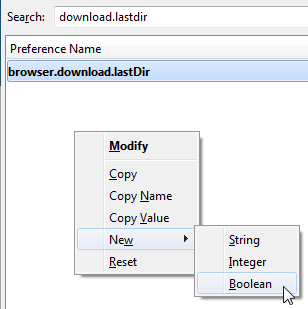
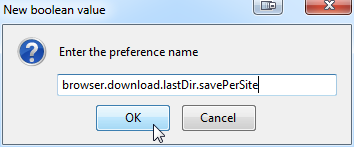
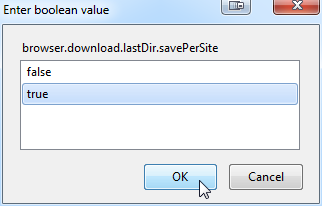
Just add a new boolean variable with name browser.download.lastDir.savePerSite and you're good to go. Remember to set the value into true. It is enabled immediately, no restarting or anything needed.
The last thing for me to do is keep wondering why it was enabled in a couple of versions when it was introduced and then turned off.
PHP bashing: fractal of bad design?
Wednesday, March 5. 2014
I was inspecting the already fallen Bitcoin exhange Mt. Gox's source code at PasteBin and found a nice discussion thread about it at Hacker News with the title of Alleged Mt.Gox code leaked on IRC node by Russian Hacker. To my great surprise, the Bitcoin exchange was written with PHP by Mark Karpeles (aka. MagicalTux), the CEO/owner of Mt. Gox. According to number of sources thinks he is some kind of PHP-deity. Based on his (alleged) work posted to Bitcoin, I'd say no.
Anyway, I got lost reading Mr. Alex Munroe's (aka. veekun) rant about PHP. It is so good stuff, I'll have to copy/paste his entire very long blog post here as-is just to make sure it is not lost in the digital world. To repeat: I did not write this. This does not reflect my opinions. It is just a comprehensive list of all the weird things that bug Mr. Munroe. All rights for this are his, not mine. And lot of thanks for gathering this huge list.
Here goes:
Preface
I’m cranky. I complain about a lot of things. There’s a lot in the world of technology I don’t like, and that’s really to be expected—programming is a hilariously young discipline, and none of us have the slightest clue what we’re doing. Combine with Sturgeon’s Law, and I have a lifetime’s worth of stuff to gripe about.
This is not the same. PHP is not merely awkward to use, or ill-suited for what I want, or suboptimal, or against my religion. I can tell you all manner of good things about languages I avoid, and all manner of bad things about languages I enjoy. Go on, ask! It makes for interesting conversation.
PHP is the lone exception. Virtually every feature in PHP is broken somehow. The language, the framework, the ecosystem, are all just bad. And I can’t even point out any single damning thing, because the damage is so systemic. Every time I try to compile a list of PHP gripes, I get stuck in this depth-first search discovering more and more appalling trivia. (Hence, fractal.)
PHP is an embarrassment, a blight upon my craft. It’s so broken, but so lauded by every empowered amateur who’s yet to learn anything else, as to be maddening. It has paltry few redeeming qualities and I would prefer to forget it exists at all.
But I’ve got to get this out of my system. So here goes, one last try.
An analogy
I just blurted this out to Mel to explain my frustration and she insisted that I reproduce it here.
I can’t even say what’s wrong with PHP, because— okay. Imagine you have uh, a toolbox. A set of tools. Looks okay, standard stuff in there.
You pull out a screwdriver, and you see it’s one of those weird tri-headed things. Okay, well, that’s not very useful to you, but you guess it comes in handy sometimes.
You pull out the hammer, but to your dismay, it has the claw part on both sides. Still serviceable though, I mean, you can hit nails with the middle of the head holding it sideways.
You pull out the pliers, but they don’t have those serrated surfaces; it’s flat and smooth. That’s less useful, but it still turns bolts well enough, so whatever.
And on you go. Everything in the box is kind of weird and quirky, but maybe not enough to make it completely worthless. And there’s no clear problem with the set as a whole; it still has all the tools.
Now imagine you meet millions of carpenters using this toolbox who tell you “well hey what’s the problem with these tools? They’re all I’ve ever used and they work fine!” And the carpenters show you the houses they’ve built, where every room is a pentagon and the roof is upside-down. And you knock on the front door and it just collapses inwards and they all yell at you for breaking their door.
That’s what’s wrong with PHP.
Stance
I assert that the following qualities are important for making a language productive and useful, and PHP violates them with wild abandon. If you can’t agree that these are crucial, well, I can’t imagine how we’ll ever agree on much.
- A language must be predictable. It’s a medium for expressing human ideas and having a computer execute them, so it’s critical that a human’s understanding of a program actually be correct.
- A language must be consistent. Similar things should look similar, different things different. Knowing part of the language should aid in learning and understanding the rest.
- A language must be concise. New languages exist to reduce the boilerplate inherent in old languages. (We could all write machine code.) A language must thus strive to avoid introducing new boilerplate of its own.
- A language must be reliable. Languages are tools for solving problems; they should minimize any new problems they introduce. Any “gotchas” are massive distractions.
- A language must be debuggable. When something goes wrong, the programmer has to fix it, and we need all the help we can get.
My position is thus:
- PHP is full of surprises:
mysql_real_escape_string,E_ALL - PHP is inconsistent:
strpos,str_rot13 - PHP requires boilerplate: error-checking around C API calls,
=== - PHP is flaky:
==,foreach ($foo as &$bar) - PHP is opaque: no stack traces by default or for fatals, complex error reporting
I can’t provide a paragraph of commentary for every single issue explaining why it falls into these categories, or this would be endless. I trust the reader to, like, think.
Don’t comment with these things
I’ve been in PHP arguments a lot. I hear a lot of very generic counter-arguments that are really only designed to halt the conversation immediately. Don’t pull these on me, please.
- Do not tell me that “good developers can write good code in any language”, or bad developers blah blah. That doesn’t mean anything. A good carpenter can drive in a nail with either a rock or a hammer, but how many carpenters do you see bashing stuff with rocks? Part of what makes a good developer is the ability to choose the tools that work best.
- Do not tell me that it’s the developer’s responsibility to memorize a thousand strange exceptions and surprising behaviors. Yes, this is necessary in any system, because computers suck. That doesn’t mean there’s no upper limit for how much zaniness is acceptable in a system. PHP is nothing but exceptions, and it is not okay when wrestling the language takes more effort than actually writing your program. My tools should not create net positive work for me to do.
- Do not tell me “that’s how the C API works”. What on Earth is the point of using a high-level language if all it provides are some string helpers and a ton of verbatim C wrappers? Just write C! Here, there’s even a CGI library for it.
- Do not tell me “that’s what you get for doing weird things”. If two features exist, someday, someone will find a reason to use them together. And again, this isn’t C; there’s no spec, there’s no need for “undefined behavior”.
- Do not tell me that Facebook and Wikipedia are built in PHP. I’m aware! They could also be written in Brainfuck, but as long as there are smart enough people wrangling the things, they can overcome problems with the platform. For all we know, development time could be halved or doubled if these products were written in some other language; this data point alone means nothing.
- Ideally, don’t tell me anything! This is my one big shot; if this list doesn’t hurt your opinion of PHP, nothing ever will, so stop arguing with some dude on the Internet and go make a cool website in record time to prove me wrong
Side observation: I loooove Python. I will also happily talk your ear off complaining about it, if you really want me to. I don’t claim it’s perfect; I’ve just weighed its benefits against its problems and concluded it’s the best fit for things I want to do.
And I have never met a PHP developer who can do the same with PHP. But I’ve bumped into plenty who are quick to apologize for anything and everything PHP does. That mindset is terrifying.
PHP
Core language
CPAN has been called the “standard library of Perl”. That doesn’t say much about Perl’s standard library, but it makes the point that a solid core can build great things.
Philosophy
- PHP was originally designed explicitly for non-programmers (and, reading between the lines, non-programs); it has not well escaped its roots. A choice quote from the PHP 2.0 documentation, regarding
+and friends doing type conversion:Once you start having separate operators for each type you start making the language much more complex. ie. you can’t use ‘==’ for stings [sic], you now would use ‘eq’. I don’t see the point, especially for something like PHP where most of the scripts will be rather simple and in most cases written by non-programmers who want a language with a basic logical syntax that doesn’t have too high a learning curve.
- PHP is built to keep chugging along at all costs. When faced with either doing something nonsensical or aborting with an error, it will do something nonsensical. Anything is better than nothing.
- There’s no clear design philosophy. Early PHP was inspired by Perl; the huge stdlib with “out” params is from C; the OO parts are designed like C++ and Java.
- PHP takes vast amounts of inspiration from other languages, yet still manages to be incomprehensible to anyone who knows those languages.
(int)looks like C, butintdoesn’t exist. Namespaces use\. The new array syntax results in[key => value], unique among every language with hash literals. - Weak typing (i.e., silent automatic conversion between strings/numbers/et al) is so complex that whatever minor programmer effort is saved is by no means worth it.
- Little new functionality is implemented as new syntax; most of it is done with functions or things that look like functions. Except for class support, which deserved a slew of new operators and keywords.
- Some of the problems listed on this page do have first-party solutions—if you’re willing to pay Zend for fixes to their open-source programming language.
- There is a whole lot of action at a distance. Consider this code, taken from the PHP docs somewhere.
What will it do?@fopen('http://example.com/not-existing-file', 'r');- If PHP was compiled with
--disable-url-fopen-wrapper, it won’t work. (Docs don’t say what “won’t work” means; returns null, throws exception?) Note that this flag was removed in PHP 5.2.5. - If
allow_url_fopenis disabled in php.ini, this still won’t work. (How? No idea.) - Because of the
@, the warning about the non-existent file won’t be printed. - But it will be printed if
scream.enabledis set in php.ini. - Or if
scream.enabledis set manually withini_set. - But not if the right
error_reportinglevel isn’t set. - If it is printed, exactly where it goes depends on
display_errors, again in php.ini. Orini_set.
- If PHP was compiled with
- The language is full of global and implicit state.
mbstringuses a global character set.func_get_argand friends look like regular functions, but operate on the currently-executing function. Error/exception handling have global defaults.register_tick_functionsets a global function to run every tick—what?! - There is no threading support whatsoever. (Not surprising, given the above.) Combined with the lack of built-in
fork(mentioned below), this makes parallel programming extremely difficult. - Parts of PHP are practically designed to produce buggy code.
json_decodereturns null for invalid input, even though null is also a perfectly valid object for JSON to decode to—this function is completely unreliable unless you also calljson_last_errorevery time you use it.array_search,strpos, and similar functions return0if they find the needle at position zero, but false if they don’t find it at all.
Let me expand on that last part a bit.
In C, functions like
strposreturn-1if the item isn’t found. If you don’t check for that case and try to use that as an index, you’ll hit junk memory and your program will blow up. (Probably. It’s C. Who the fuck knows. I’m sure there are tools for this, at least.)In, say, Python, the equivalent
.indexmethods will raise an exception if the item isn’t found. If you don’t check for that case, your program will blow up.In PHP, these functions return false. If you use
FALSEas an index, or do much of anything with it except compare with===, PHP will silently convert it to0for you. Your program will not blow up; it will, instead, do the wrong thing with no warning, unless you remember to include the right boilerplate around every place you usestrposand certain other functions.This is bad! Programming languages are tools; they’re supposed to work with me. Here, PHP has actively created a subtle trap for me to fall into, and I have to be vigilant even with such mundane things as string operations and equality comparison. PHP is a minefield.
I have heard a great many stories about the PHP interpreter and its developers from a great many places. These are from people who have worked on the PHP core, debugged PHP core, interacted with core developers. Not a single tale has been a compliment.
So I have to fit this in here, because it bears repeating: PHP is a community of amateurs. Very few people designing it, working on it, or writing code in it seem to know what they’re doing. (Oh, dear reader, you are of course a rare exception!) Those who do grow a clue tend to drift away to other platforms, reducing the average competence of the whole. This, right here, is the biggest problem with PHP: it is absolutely the blind leading the blind.
Okay, back to facts.
Operators
==is useless.- It’s not transitive.
"foo" == TRUE, and"foo" == 0… but, of course,TRUE != 0. ==converts to numbers when possible (123 == "123foo"… although"123" != "123foo"), which means it converts to floats when possible. So large hex strings (like, say, password hashes) may occasionally compare true when they’re not. Even JavaScript doesn’t do this.- For the same reason,
"6" == " 6","4.2" == "4.20", and"133" == "0133". But note that133 != 0133, because0133is octal. But"0x10" == "16"and"1e3" == "1000"! ===compares values and type… except with objects, where===is only true if both operands are actually the same object! For objects,==compares both value (of every attribute) and type, which is what===does for every other type. What.
- It’s not transitive.
- Comparison isn’t much better.
- It’s not even consistent:
NULL < -1, andNULL == 0. Sorting is thus nondeterministic; it depends on the order in which the sort algorithm happens to compare elements. - The comparison operators try to sort arrays, two different ways: first by length, then by elements. If they have the same number of elements but different sets of keys, though, they are uncomparable.
- Objects compare as greater than anything else… except other objects, which they are neither less than nor greater than.
- For a more type-safe
==, we have===. For a more type-safe<, we have… nothing."123" < "0124", always, no matter what you do. Casting doesn’t help, either.
- It’s not even consistent:
- Despite the craziness above, and the explicit rejection of Perl’s pairs of string and numeric operators, PHP does not overload
+.+is always addition, and.is always concatenation. - The
[]indexing operator can also be spelled{}. []can be used on any variable, not just strings and arrays. It returns null and issues no warning.[]cannot slice; it only retrieves individual elements.foo()[0]is a syntax error. (Fixed in PHP 5.4.)-
Unlike (literally!) every other language with a similar operator,
?:is left associative. So this:$arg = 'T'; $vehicle = ( ( $arg == 'B' ) ? 'bus' : ( $arg == 'A' ) ? 'airplane' : ( $arg == 'T' ) ? 'train' : ( $arg == 'C' ) ? 'car' : ( $arg == 'H' ) ? 'horse' : 'feet' ); echo $vehicle;prints
horse.
Variables
- There is no way to declare a variable. Variables that don’t exist are created with a null value when first used.
- Global variables need a
globaldeclaration before they can be used. This is a natural consequence of the above, so it would be perfectly reasonable, except that globals can’t even be read without an explicit declaration—PHP will quietly create a local with the same name, instead. I’m not aware of another language with similar scoping issues. - There are no references. What PHP calls references are really aliases; there’s nothing that’s a step back, like Perl’s references, and there’s no pass-by-object identity like in Python.
- “Referenceness” infects a variable unlike anything else in the language. PHP is dynamically-typed, so variables generally have no type… except references, which adorn function definitions, variable syntax, and assignment. Once a variable is made a reference (which can happen anywhere), it’s stuck as a reference. There’s no obvious way to detect this and un-referencing requires nuking the variable entirely.
- Okay, I lied. There are “SPL types” which also infect variables:
$x = new SplBool(true); $x = "foo";will fail. This is like static typing, you see. - A reference can be taken to a key that doesn’t exist within an undefined variable (which becomes an array). Using a non-existent array normally issues a notice, but this does not.
- Constants are defined by a function call taking a string; before that, they don’t exist. (This may actually be a copy of Perl’s
use constantbehavior.) - Variable names are case-sensitive. Function and class names are not. This includes method names, which makes camelCase a strange choice for naming.
Constructs
array()and a few dozen similar constructs are not functions.arrayon its own means nothing,$func = "array"; $func();doesn’t work.- Array unpacking can be done with the
list($a, $b) = ...operation.list()is function-like syntax just likearray. I don’t know why this wasn’t given real dedicated syntax, or why the name is so obviously confusing. (int)is obviously designed to look like C, but it’s a single token; there’s nothing calledintin the language. Try it: not only doesvar_dump(int)not work, it throws a parse error because the argument looks like the cast operator.(integer)is a synonym for(int). There’s also(bool)/(boolean)and(float)/(double)/(real).- There’s an
(array)operator for casting to array and an(object)for casting to object. That sounds nuts, but there’s almost a use: you can use(array)to have a function argument that’s either a single item or a list, and treat it identically. Except you can’t do that reliably, because if someone passes a single object, casting it to an array will actually produce an array containing that object’s attributes. (Casting to object performs the reverse operation.) include()and friends are basically C’s#include: they dump another source file into yours. There is no module system, even for PHP code.- There’s no such thing as a nested or locally-scoped function or class. They’re only global. Including a file dumps its variables into the current function’s scope (and gives the file access to your variables), but dumps functions and classes into global scope.
- Appending to an array is done with
$foo[] = $bar. echois a statement-y kind of thing, not a function.empty($var)is so extremely not-a-function that anything but a variable, e.g.empty($var || $var2), is a parse error. Why on Earth does the parser need to know aboutempty? (Fixed in 5.5.)- There’s redundant syntax for blocks:
if (...): ... endif;, etc.
Error handling
- PHP’s one unique operator is
@(actually borrowed from DOS), which silences errors. - PHP errors don’t provide stack traces. You have to install a handler to generate them. (But you can’t for fatal errors—see below.)
- PHP parse errors generally just spew the parse state and nothing more, making a forgotten quote terrible to debug.
- PHP’s parser refers to e.g.
::internally asT_PAAMAYIM_NEKUDOTAYIM, and the<<operator asT_SL. I say “internally”, but as above, this is what’s shown to the programmer when::or<<appears in the wrong place. - Most error handling is in the form of printing a line to a server log nobody reads and carrying on.
E_STRICTis a thing, but it doesn’t seem to actually prevent much and there’s no documentation on what it actually does.E_ALLincludes all error categories—exceptE_STRICT. (Fixed in 5.4.)-
Weirdly inconsistent about what’s allowed and what isn’t. I don’t know how
E_STRICTapplies here, but these things are okay:- Trying to access a non-existent object property, i.e.,
$foo->x. (warning) - Using a variable as a function name, or variable name, or class name. (silent)
- Trying to use an undefined constant. (notice)
- Trying to access a property of something that isn’t an object. (notice)
- Trying to use a variable name that doesn’t exist. (notice)
2 < "foo"(silent)foreach (2 as $foo);(warning)
And these things are not:
- Trying to access a non-existent class constant, i.e.,
$foo::x. (fatal error) - Using a constant string as a function name, or variable name, or class name. (parse error)
- Trying to call an undefined function. (fatal error)
- Leaving off a semicolon on the last statement in a block or file. (parse error)
- Using
listand various other quasi-builtins as method names. (parse error) - Subscripting the return value of a function, i.e.,
foo()[0]. (parse error; okay in 5.4, see above)
There are a good few examples of other weird parse errors elsewhere in this list.
- Trying to access a non-existent object property, i.e.,
- The
__toStringmethod can’t throw exceptions. If you try, PHP will… er, throw an exception. (Actually a fatal error, which would be passable, except…) - PHP errors and PHP exceptions are completely different beasts. They don’t seem to interact at all.
- PHP errors (internal ones, and calls to
trigger_error) cannot be caught withtry/catch. - Likewise, exceptions do not trigger error handlers installed by
set_error_handler. - Instead, there’s a separate
set_exception_handlerwhich handles uncaught exceptions, because wrapping your program’s entry point in atryblock is impossible in themod_phpmodel. - Fatal errors (e.g.,
new ClassDoesntExist()) can’t be caught by anything. A lot of fairly innocuous things throw fatal errors, forcibly ending your program for questionable reasons. Shutdown functions still run, but they can’t get a stack trace (they run at top-level), and they can’t easily tell if the program exited due to an error or running to completion. - Trying to
throwan object that isn’t anExceptionresults in… a fatal error, not an exception.
- PHP errors (internal ones, and calls to
- There is no
finallyconstruct, making wrapper code (set handler, run code, unset handler; monkeypatch, run a test, unmonkeypatch) tedious and difficult to write. Despite that OO and exceptions were largely copied from Java, this is deliberate, becausefinally“doesn’t make much sense in the context of PHP”. Huh? (Fixed in 5.5.)
Functions
- Function calls are apparently rather expensive.
- Some built-in functions interact with reference-returning functions in, er, a strange way.
- As mentioned elsewhere, a lot of things that look like functions or look like they should be functions are actually language constructs, so nothing that works with functions will work with them.
- Function arguments can have “type hints”, which are basically just static typing. But you can’t require that an argument be an
intorstringorobjector other “core” type, even though every builtin function uses this kind of typing, probably becauseintis not a thing in PHP. (See above about(int).) You also can’t use the special pseudo-type decorations used heavily by builtin functions:mixed,number, orcallback. (callableis allowed as of PHP 5.4.)- As a result, this:
produces the error:function foo(string $s) {} foo("hello world");PHP Catchable fatal error: Argument 1 passed to foo() must be an instance of string, string given, called in... - You may notice that the “type hint” given doesn’t actually have to exist; there is no
stringclass in this program. If you try to useReflectionParameter::getClass()to examine the type hint dynamically, then it will balk that the class doesn’t exist, making it impossible to actually retrieve the class name. - A function’s return value can’t be hinted.
- As a result, this:
- Passing the current function’s arguments to another function (dispatch, not uncommon) is done by
call_user_func_array('other_function', func_get_args()). Butfunc_get_argsthrows a fatal error at runtime, complaining that it can’t be a function parameter. How and why is this even a type of error? (Fixed in PHP 5.3.) - Closures require explicitly naming every variable to be closed-over. Why can’t the interpreter figure this out? Kind of hamstrings the whole feature. (Okay, it’s because using a variable ever, at all, creates it unless explicitly told otherwise.)
- Closed-over variables are “passed” by the same semantics as other function arguments. That is, arrays and strings etc. will be “passed” to the closure by value. Unless you use
&. - Because closed-over variables are effectively automatically-passed arguments and there are no nested scopes, a closure can’t refer to private methods, even if it’s defined inside a class. (Possibly fixed in 5.4? Unclear.)
- No named arguments to functions. Actually explicitly rejected by the devs because it “makes for messier code”.
- Function arguments with defaults can appear before function arguments without, even though the documentation points out that this is both weird and useless. (So why allow it?)
- Extra arguments to a function are ignored (except with builtin functions, which raise an error). Missing arguments are assumed null.
- “Variadic” functions require faffing about with
func_num_args,func_get_arg, andfunc_get_args. There’s no syntax for such a thing.
OO
- The procedural parts of PHP are designed like C, but the objectional (ho ho) parts are designed like Java. I cannot overemphasize how jarring this is. The class system is designed around the lower-level Java language which is naturally and deliberately more limited than PHP’s contemporaries, and I am baffled.
- I’ve yet to find a global function that even has a capital letter in its name, yet important built-in classes use camelCase method names and have
getFooJava-style accessors. - Perl, Python, and Ruby all have some concept of “property” access via code; PHP has only the clunky
__getand friends. (The documentation inexplicably refers to such special methods as “overloading”.) - Classes have something like variable declaration (
varandconst) for class attributes, whereas the procedural part of the language does not. - Despite the heavy influence from C++/Java, where objects are fairly opaque, PHP often treats objects like fancy hashes—for example, the default behavior of
foreach ($obj as $key => $value)is to iterate over every accessible attribute of the object.
- I’ve yet to find a global function that even has a capital letter in its name, yet important built-in classes use camelCase method names and have
- Classes are not objects. Any metaprogramming has to refer to them by string name, just like functions.
- Built-in types are not objects and (unlike Perl) can in no way be made to look like objects.
instanceofis an operator, despite that classes were a late addition and most of the language is built on functions and function-ish syntax. Java influence? Classes not first-class? (I don’t know if they are.)- But there is an
is_afunction. With an optional argument specifying whether to allow the object to actually be a string naming a class. get_classis a function; there’s notypeofoperator. Likewiseis_subclass_of.- This doesn’t work on builtin types, though (again,
intis not a thing). For that, you needis_intetc. - Also the right-hand side has to be a variable or literal string; it can’t be an expression. That causes… a parse error.
- But there is an
cloneis an operator?!- Object attributes are
$obj->foo, but class attributes areClass::$foo. ($obj::$foowill try to stringify$objand use it as a class name.) Class attributes can’t be accessed via objects; the namespaces are completely separate, making class attributes completely useless for polymorphism. Class methods, of course, are exempt from this rule and can be called like any other method. (I am told C++ also does this. C++ is not a good example of fine OO.) - Also, an instance method can still be called statically (
Class::method()). If done so from another method, this is treated like a regular method call on the current$this. I think. new,private,public,protected,static, etc. Trying to win over Java developers? I’m aware this is more personal taste, but I don’t know why this stuff is necessary in a dynamic language—in C++ most of it’s about compilation and compile-time name resolution.- PHP has first-class support for “abstract classes”, which are classes that cannot be instantiated. Code in similar languages achieves this by throwing an exception in the constructor.
- Subclasses cannot override private methods. Subclass overrides of public methods can’t even see, let alone call, the superclass’s private methods. Problematic for, say, test mocks.
- Methods cannot be named e.g. “list”, because
list()is special syntax (not a function) and the parser gets confused. There’s no reason this should be ambiguous, and monkeypatching the class works fine. ($foo->list()is not a syntax error.) - If an exception is thrown while evaluating a constructor’s arguments (e.g.,
new Foo(bar())andbar()throws), the constructor won’t be called, but the destructor will be. (This is fixed in PHP 5.3.) - Exceptions in
__autoloadand destructors cause fatal errors. (Fixed in PHP 5.3.6. So now a destructor might throw an exception literally anywhere, since it’s called the moment the refcount drops the zero. Hmm.) - There are no constructors or destructors.
__constructis an initializer, like Python’s__init__. There is no method you can call on a class to allocate memory and create an object. - There is no default initializer. Calling
parent::__construct()if the superclass doesn’t define its own__constructis a fatal error. - OO brings with it an iterator interface that parts of the language (e.g.,
for...as) respect, but nothing built-in (like arrays) actually implements the interface. If you want an array iterator, you have to wrap it in anArrayIterator. There are no built-in ways to chain or slice or otherwise work with iterators as first-class objects. - Interfaces like
Iteratorreserve a good few unprefixed method names. If you want your class to be iterable (without the default behavior of iterating all of its attributes), but want to use a common method name likekeyornextorcurrent, well, too bad. - Classes can overload how they convert to strings and how they act when called, but not how they convert to numbers or any other builtin type.
- Strings, numbers, and arrays all have a string conversion; the language relies heavily on this. Functions and classes are
strings. Yet trying to convert a built-in or user-defined object (even
a Closure) to a string causes an error if it doesn’t define
__toString. Evenechobecomes potentially error-prone. - There is no overloading for equality or ordering.
- Static variables inside instance methods are global; they share the same value across all instances of the class.
Standard library
Perl is “some assembly required”. Python is “batteries included”. PHP is “kitchen sink, but it’s from Canada and both faucets are labeled C”.
General
- There is no module system. You can compile PHP extensions, but which ones are loaded is specified by php.ini, and your options are for an extension to exist (and inject its contents into your global namespace) or not.
- As namespaces are a recent feature, the standard library isn’t broken up at all. There are thousands of functions in the global namespace.
- Chunks of the library are wildly inconsistent from one another.
- Underscore versus not:
strpos/str_rot13,php_uname/phpversion,base64_encode/urlencode,gettype/get_class - “to” versus 2:
ascii2ebcdic,bin2hex,deg2rad,strtolower,strtotime - Object+verb versus verb+object:
base64_decode,str_shuffle,var_dumpversuscreate_function,recode_string - Argument order:
array_filter($input, $callback)versusarray_map($callback, $input),strpos($haystack, $needle)versusarray_search($needle, $haystack) - Prefix confusion:
usleepversusmicrotime - Case insensitive functions vary on where the
igoes in the name. - About half the array functions actually start with
array_. The others do not. htmlentitiesandhtml_entity_decodeare inverses of each other, with completely different naming conventions.
- Underscore versus not:
- Kitchen sink. The libary includes:
- Bindings to ImageMagick, bindings to GraphicsMagick (which is a fork of ImageMagick), and a handful of functions for inspecting EXIF data (which ImageMagick can already do).
- Functions for parsing bbcode, a very specific kind of markup used by a handful of particular forum packages.
- Way too many XML packages.
DOM(OO),DOM XML(not),libxml,SimpleXML, “XML Parser”,XMLReader/XMLWriter, and half a dozen more acronyms I can’t identify. There’s surely some kind of difference between these things and you are free to go figure out what that is. - Bindings for two particular credit card processors, SPPLUS and MCVE. What?
- Three ways to access a MySQL database:
mysql,mysqli, and thePDOabstraction thing.
C influence
This deserves its own bullet point, because it’s so absurd yet permeates the language. PHP is a high-level, dynamically-typed programming language. Yet a massive portion of the standard library is still very thin wrappers around C APIs, with the following results:
- “Out” parameters, even though PHP can return ad-hoc hashes or multiple arguments with little effort.
- At least a dozen functions for getting the last error from a particular subsystem (see below), even though PHP has had exceptions for eight years.
- Warts like
mysql_real_escape_string, even though it has the same arguments as the brokenmysql_escape_string, just because it’s part of the MySQL C API. - Global behavior for non-global functionality (like MySQL). Using multiple MySQL connections apparently requires passing a connection handle on every function call.
- The wrappers are really, really, really thin. For example, calling
dba_nextkeywithout callingdba_firstkeywill segfault. - The wrappers are often platform-specific:
fopen(directory, "r")works on Linux but returns false and generates a warning on Windows. - There’s a set of
ctype_*functions (e.g.ctype_alnum) that map to the C character-class detection functions of similar names, rather than, say,isupper.
Genericism
There is none. If a function might need to do two slightly different things, PHP just has two functions.
How do you sort backwards? In Perl, you might do sort { $b <=> $a }. In Python, you might do .sort(reverse=True). In PHP, there’s a separate function called rsort().
- Functions that look up a C error:
curl_error,json_last_error,openssl_error_string,imap_errors,mysql_error,xml_get_error_code,bzerror,date_get_last_errors, others? - Functions that sort:
array_multisort,arsort,asort,ksort,krsort,natsort,natcasesort,sort,rsort,uasort,uksort,usort - Functions that find text:
ereg,eregi,mb_ereg,mb_eregi,preg_match,strstr,strchr,stristr,strrchr,strpos,stripos,strrpos,strripos,mb_strpos,mb_strrpos, plus the variations that do replacements - There are a lot of aliases as well, which certainly doesn’t help matters:
strstr/strchr,is_int/is_integer/is_long,is_float/is_double,pos/current,sizeof/count,chop/rtrim,implode/join,die/exit,trigger_error/user_error,diskfreespace/disk_free_space… scandirreturns a list of files within a given directory. Rather than (potentially usefully) return them in directory order, the function returns the files already sorted. And there’s an optional argument to get them in reverse alphabetical order. There were not, apparently, enough sort functions. (PHP 5.4 adds a third value for the sort-direction argument that will disable sorting.)str_splitbreaks a string into chunks of equal length.chunk_splitbreaks a string into chunks of equal length, then joins them together with a delimiter.- Reading archives requires a separate set of functions depending on the format. There are six separate groups of such functions, all with different APIs, for bzip2, LZF, phar, rar, zip, and gzip/zlib.
- Because calling a function with an array as its arguments is so awkward (
call_user_func_array), there are some pairings likeprintf/vprintfandsprintf/vsprintf. These do the same things, but one function takes arguments and the other takes an array of arguments.
Text
preg_replacewith the/e(eval) flag will do a string replace of the matches into the replacement string, then eval it.strtokis apparently designed after the equivalent C function, which is already a bad idea for various reasons. Nevermind that PHP can easily return an array (whereas this is awkward in C), or that the very hackstrtok(3)uses (modifying the string in-place) isn’t used here.parse_strparses a query string, with no indication of this in the name. Also it acts just likeregister_globalsand dumps the query into your local scope as variables, unless you pass it an array to populate. (It returns nothing, of course.)exploderefuses to split with an empty/missing delimiter. Every other string split implementation anywhere does some useful default in this case; PHP instead has a totally separate function, confusingly calledstr_splitand described as “converting a string to an array”.- For formatting dates, there’s
strftime, which acts like the C API and respects locale. There’s alsodate, which has a completely different syntax and only works with English. - ”
gzgetss— Get line from gz-file pointer and strip HTML tags.” I’m dying to know the series of circumstances that led to this function’s conception. mbstring- It’s all about “multi-byte”, when the problem is character sets.
- Still operates on regular strings. Has a single global “default” character set. Some functions allow specifying charset, but then it applies to all arguments and the return value.
- Provides
ereg_*functions, but those are deprecated.preg_*are out of luck, though they can understand UTF-8 by feeding them some PCRE-specific flag.
System and reflection
- There are, in general, a whole lot of functions that blur the line between text and variables.
compactandextractare just the tip of the iceberg. - There are several ways to actually be dynamic in PHP, and at a glance there are no obvious differences or relative benefits.
classkitcan modify user-defined classes;runkitsupersedes it and can modify user-defined anything; theReflection*classes can reflect on most parts of the language; there are a great many individual functions for reporting properties of functions and classes. Are these subsystems independent, related, redundant? get_class($obj)returns the object’s class name.get_class()returns the name of the class the function is being called in. Setting aside that this one function does two radically different things:get_class(null)… acts like the latter. So you can’t trust it on an arbitrary value. Surprise!- The
stream_*classes allow for implementing custom stream objects for use withfopenand other fileish builtins. “tell” cannot be implemented for internal reasons. (Also there are A LOT of functions involved with this system.) register_tick_functionwill accept a closure object.unregister_tick_functionwill not; instead it throws an error complaining that the closure couldn’t be converted to a string.php_unametells you about the current OS. Unless PHP can’t tell what it’s running on; then it tells you about the OS it was built on. It doesn’t tell you if this has happened.forkandexecare not built in. They come with the pcntl extension, but that isn’t included by default.popendoesn’t provide a pid.stat’s return value is cached.session_decodeis for reading an arbitrary PHP session string, but it only works if there’s an active session already. And it dumps the result into$_SESSION, rather than returning it.
Miscellany
curl_multi_execdoesn’t changecurl_errnoon error, but it does changecurl_error.mktime’s arguments are, in order: hour, minute, second, month, day, year.
Data manipulation
Programs are nothing more than big machines that chew up data and spit out more data. A great many languages are designed around the kinds of data they manipulate, from awk to Prolog to C. If a language can’t handle data, it can’t do anything.
Numbers
- Integers are signed and 32-bit on 32-bit platforms. Unlike all of PHP’s contemporaries, there is no automatic bigint promotion. So you can end up with surprises like negative file sizes, and your math might work differently based on CPU architecture. Your only option for larger integers is to use the GMP or BC wrapper functions. (The developers have proposed adding a new, separate, 64-bit type. This is crazy.)
- PHP supports octal syntax with a leading
0, so e.g.012will be the number ten. However,08becomes the number zero. The8(or9) and any following digits disappear.01cis a syntax error. 0x0+2produces 4. The parser considers the2as both part of the hex literal and a separate decimal literal, treating this as0x002 + 2.0x0+0x2displays the same problem. Strangely,0x0 +2is still 4, but0x0+ 2is correctly 2. (This is fixed in PHP 5.4. But it’s also re-broken in PHP 5.4, with the new0bliteral prefix:0b0+1produces 2.)piis a function. Or there’s a constant,M_PI.- There is no exponentiation operator, only the
powfunction.
Text
- No Unicode support. Only ASCII will work reliably, really. There’s the
mbstringextension, mentioned above, but it kinda blows. - Which means that using the builtin string functions on UTF-8 text risks corrupting it.
- Similarly, there’s no concept of e.g. case comparisons outside of ASCII. Despite the proliferation of case-insensitive versions of functions, not one of them will consider
éequal toÉ. - You can’t quote keys in variable interpolation, i.e.,
"$foo['key']"is a syntax error. You can unquote it (which would generate a warning anywhere else!), or use${...}/{$...}. "${foo[0]}"is okay."${foo[0][0]}"is a syntax error. Putting the$on the inside is fine with both. Bad copy of similar Perl syntax (with radically different semantics)?
Arrays
Oh, man.
- This one datatype acts as a list, ordered hash, ordered set, sparse list, and occasionally some strange combination of those. How does it perform? What kind of memory use will there be? Who knows? Not like I have other options, anyway.
=>isn’t an operator. It’s a special construct that only exists insidearray(...)and theforeachconstruct.- Negative indexing doesn’t work, since
-1is just as valid a key as0. - Despite that this is the language’s only data structure, there is no shortcut syntax for it;
array(...)is shortcut syntax. (PHP 5.4 is bringing “literals”,[...].) - Similarly baffling, arrays stringify to
Arraywith an E_NOTICE. - The
=>construct is based on Perl, which allowsfoo => 1without quoting. (That is, in fact, why it exists in Perl; otherwise it’s just a comma.) In PHP, you can’t do this without getting a warning; it’s the only language in its niche that has no vetted way to create a hash without quoting string keys. -
Array functions often have confusing or inconsistent behavior because they have to operate on lists, hashes, or maybe a combination of the two. Consider
array_diff, which “computers the difference of arrays”.$first = array("foo" => 123, "bar" => 456); $second = array("foo" => 456, "bar" => 123); echo var_dump(array_diff($first, $second));What will this code do? If
array_difftreats its arguments as hashes, then obviously these are different; the same keys have different values. If it treats them as lists, then they’re still different; the values are in the wrong order.In fact
array_diffconsiders these equal, because it treats them like sets: it compares only values, and ignores order. - In a similar vein,
array_randhas the strange behavior of selecting random keys, which is not that helpful for the most common case of needing to pick from a list of choices. -
Despite how heavily PHP code relies on preserving key order:
  array("foo", "bar") != array("bar", "foo")
  array("foo" => 1, "bar" => 2) == array("bar" => 2, "foo" => 1)
I leave it to the reader to figure out what happens if the arrays are mixed. (I don’t know.)
array_fillcannot create zero-length arrays; instead it will issue a warning and return false.- All of the (many…) sort functions operate in-place and return nothing. There is no way to create a new sorted copy; you have to copy the array yourself, then sort it, then use the array.
- But
array_reversereturns a new array. - A list of ordered things and some mapping of keys to values sounds kind of like a great way to handle function arguments, but no.
Not arrays
- The standard library includes “Quickhash”, an OO implementation of “specific strongly-typed classes” for implementing hashes. And, indeed, there are four classes, each dealing with a different combination of key and value types. It’s unclear why the builtin array implementation can’t optimize for these extremely common cases, or what the relative performance is.
- There’s an
ArrayObjectclass (which implements five different interfaces) that can wrap an array and have it act like an object. User classes can implement the same interfaces. But it only has a handful of methods, half of which don’t resemble built-in array functions, and built-in array functions don’t know how to operate on anArrayObjector other array-like class.
Functions
- Functions are not data. Closures are actually objects, but regular functions are not. You can’t even refer to them with their bare names;
var_dump(strstr)issues a warning and assumes you mean the literal string,"strstr". There is no way to discern between an arbitrary string and a function “reference”. create_functionis basically a wrapper aroundeval. It creates a function with a regular name and installs it globally (so it will never be garbage collected—don’t use in a loop!). It doesn’t actually know anything about the current scope, so it’s not a closure. The name contains a NUL byte so it can never conflict with a regular function (because PHP’s parser fails if there’s aNULin a file anywhere).- Declaring a function named
__lambda_funcwill breakcreate_function—the actual implementation is toeval-create the function named__lambda_func, then internally rename it to the broken name. If__lambda_funcalready exists, the first part will throw a fatal error.
Other
- Incrementing (
++) aNULLproduces1. Decrementing (--) aNULLproducesNULL. Decrementing a string likewise leaves it unchanged. - There are no generators. (Fixed in 5.5. Wow. They basically cloned the entire Python generator API, too. Impressive. Somehow, though,
$foo = yield $bar;is a syntax error; it has to be$foo = (yield $bar). Sigh.)
Web framework
Execution
- A single shared file,
php.ini, controls massive parts of PHP’s functionality and introduces complex rules regarding what overrides what and when. PHP software that expects to be deployed on arbitrary machines has to override settings anyway to normalize its environment, which largely defeats the use of a mechanism likephp.inianyway.- PHP looks for
php.iniin a variety of places, so it may (or may not…) be possible to override your host’s. Only one such file will ever be parsed, though, so you can’t just override a couple settings and call it a day.
- PHP looks for
- PHP basically runs as CGI. Every time a page is hit, PHP recompiles the whole thing before executing it. Even dev servers for Python toy frameworks don’t act like this. This has led to a whole market of “PHP accelerators” that just compile once, accelerating PHP all the way to any other language. Zend, the company behind PHP, has made this part of their business model.
- For quite a long time, PHP errors went to the client by default—I guess to help during development. I don’t think this is true any more, but I still see the occasional mysql error spew at the top of a page.
- PHP is full of strange “easter eggs” like producing the PHP logo with the right query argument. Not only is this completely irrelevant to building your
application, but it allows detecting whether you’re using PHP (and perhaps roughly guessing what version), regardless of how much
mod_rewrite, FastCGI, reverse proxying, orServer:configuration you’re doing. - Blank lines before or after the
<?php ... ?>tags, even in libraries, count as literal text and is interpolated into the response (or causes “headers already sent” errors). Your options are to either strictly avoid extra blank lines at the end of every file (the one after the?>doesn’t count) or to just leave off the?>closing token.
Deployment
Deployment is often cited as the biggest advantage of PHP: drop some files and you’re done. Indeed, that’s much easier than running a whole process as you may have to do with Python or Ruby or Perl. But PHP leaves plenty to be desired.
Across the board, I’m in favor of running Web applications as app servers and reverse-proxying to them. It takes minimal effort to set this up, and the benefits are plenty: you can manage your web server and app separately, you can run as many or few app processes on as many machines as you want without needing more web servers, you can run the app as a different user with zero effort, you can switch web servers, you can take down the app without touching the web server, you can do seamless deployment by just switching where a fifo points, etc. Welding your application to your web server is absurd and there’s no good reason to do it any more.
- PHP is naturally tied to Apache. Running it separately, or with any other webserver, requires just as much mucking around (possibly more) as deploying any other language.
php.iniapplies to every PHP application run anywhere. There is only onephp.inifile, and it applies globally; if you’re on a shared server and need to change it, or if you run two applications that need different settings, you’re out of luck; you have to apply the union of all necessary settings and pare them down from inside the apps themselves usingini_setor in Apache’s configuration file or in.htaccess. If you can. Also wow that is a lot of places you need to check to figure out how a setting is getting its value.- Similarly, there is no easy way to “insulate” a PHP application and its dependencies from the rest of a system. Running two applications that require different versions of a library, or even PHP itself? Start by building a second copy of Apache.
- The “bunch of files” approach, besides making routing a huge pain in the ass, also means you have to carefully whitelist or blacklist what stuff is actually available, because your URL hierarchy is also your entire code tree. Configuration files and other “partials” need C-like guards to prevent them from being loaded directly. Version control noise (e.g.,
.svn) needs protecting. Withmod_php, everything on your filesystem is a potential entry point; with an app server, there’s only one entry point, and only the URL controls whether it’s invoked. - You can’t seamlessly upgrade a bunch of files that run CGI-style, unless you want crashes and undefined behavior as users hit your site halfway through the upgrade.
-
Despite how “simple” it is to configure Apache to run PHP, there are some subtle traps even there. While the PHP docs suggest using
SetHandlerto make.phpfiles run as PHP,AddHandlerappears to work just as well, and in fact Google gives me twice as many results for it. Here’s the problem.When you use
AddHandler, you are telling Apache that “execute this as php” is one possible way to handle.phpfiles. But! Apache doesn’t have the same idea of file extensions that every human being on the planet does. It’s designed to support, say,index.html.enbeing recognized as both English and HTML. To Apache, a file can have any number of file extensions simultaneously.Imagine you have a file upload form that dumps files into some public directory. To make sure nobody uploads PHP files, you just check that they don’t have a
.phpextension. All an attacker has to do is upload a file namedfoo.php.txt; your uploader won’t see a problem, but Apache will recognize it as PHP, and it will happily execute.The problem here isn’t “using the original filename” or “not validating better”; the problem is that your web server is configured to run any old code it runs across—precisely the same property that makes PHP “easy to deploy”. CGI required
+x, which was something, but PHP doesn’t even do that. And this is no theoretical problem; I’ve found multiple live sites with this issue.
Missing features
I consider all of these to be varying levels of critical for building a Web application. It seems reasonable that PHP, with its major selling point being that it’s a “Web language”, ought to have some of them.
- No template system. There’s PHP itself, but nothing that acts as a big interpolator rather than a program.
- No XSS filter. No, “remember to use
htmlspecialchars” is not an XSS filter. This is. - No CSRF protection. You get to do it yourself.
- No generic standard database API. Stuff like PDO has to wrap every individual database’s API to abstract the differences away.
- No routing. Your website looks exactly like your filesystem. Many developers have been tricked into thinking
mod_rewrite(and.htaccessin general) is an acceptable substitute. - No authentication or authorization.
- No dev server. (“Fixed” in 5.4. Led to the
Content-Lengthvuln below. Also, you have to port all your rewrite rules to a PHP wrapper thing, because there’s no routing.) - No interactive debugging.
- No coherent deployment mechanism; only “copy all these files to the server”.
Security
Language boundaries
PHP’s poor security reputation is largely because it will take arbitrary data from one language and dump it into another. This is a bad idea. "<script>" may not mean anything in SQL, but it sure does in HTML.
Making this worse is the common cry for “sanitizing your inputs”. That’s completely wrong; you can’t wave a magic wand to make a chunk of data inherently “clean”. What you need to do is speak the language: use placeholders with SQL, use argument lists when spawning processes, etc.
- PHP outright encourages “sanitizing”: there’s an entire data filtering extension for doing it.
- All the
addslashes,stripslashes, and other slashes-related nonsense are red herrings that don’t help anything. - There is, as far as I can tell, no way to safely spawn a process. You can ONLY execute a string via the shell. Your options are to escape like crazy and hope the default shell uses the right escaping, or
pcntl_forkandpcntl_execmanually. - Both
escapeshellcmdandescapeshellargexist with roughly similar descriptions. Note that on Windows,escapeshellargdoes not work (because it assumes Bourne shell semantics), andescapeshellcmdjust replaces a bunch of punctuation with spaces because nobody can figure out Windows cmd escaping (which may silently wreck whatever you’re trying to do). - The original built-in MySQL bindings, still widely-used, have no way to create prepared statements.
To this day, the PHP documentation on SQL injection recommends batty practices like type-checking, using sprintf and is_numeric, manually using mysql_real_escape_string everywhere, or manually using addslashes
everywhere (which “may be useful”!). There is no mention of PDO or paramaterization, except in the user comments. I complained about this very specifically to a PHP dev at least two years ago, he was alarmed, and the page has never changed.
Insecure-by-default
register_globals. It’s been off by default for a while by now, and it’s gone in 5.4. I don’t care. This is an embarrassment.includeaccepting HTTP URLs. Likewise.- Magic quotes. So close to secure-by-default, and yet so far from understanding the concept at all. And, likewise.
- You can, say, probe a network using PHP’s XML support, by abusing its ubiquitous support for filenames-as-URLs. Only
libxml_disable_entity_loader()can fix this, and the problem is only mentioned in the manual comments.
(5.5 brings a just-do-it password hashing function, password_hash, which should hopefully cut down on hand-rolled crypto code.)
Core
The PHP interpreter itself has had some fascinating security problems.
- In 2007 the interpreter had an integer overflow vulnerability. The fix started with
if (size > INT_MAX) return NULL;and went downhill from there. (For those not down with the C:INT_MAXis the biggest integer that will fit in a variable, ever. I hope you can figure out the rest from there.) - More recently, PHP 5.3.7 managed to include a
crypt()function that would, in effect, let anyone log in with any password. - PHP 5.4’s dev server is vulnerable to a denial of service, because it takes the
Content-Lengthheader (which anyone can set to anything) and tries to allocate that much memory. This is a bad idea.
I could dig up more but the point isn’t that there are X many exploits—software has bugs, it happens, whatever. The nature of these is horrifying. And I didn’t seek these out; they just happened to land on my doorstep in the last few months.
Conclusion
Some commentary has rightfully pointed out that I don’t have a conclusion. And, well, I don’t have a conclusion. If you got all the way down here, I assumed you agreed with me before you started
If you only know PHP and you’re curious to learn something else, give the Python tutorial a whirl and try Flask for the web stuff. (I’m not a huge fan of its template language, but it does the job.) It breaks apart the pieces of your app, but they’re still the same pieces and should look familiar enough. I might write a real post about this later; a whirlwind introduction to an entire language and web stack doesn’t belong down here.
Later or for bigger projects you may want Pyramid, which is medium-level, or Django, which is a complex monstrosity that works well for building sites like Django’s.
If you’re not a developer at all but still read this for some reason, I will not be happy until everyone on the planet has gone through Learn Python The Hard Way so go do that.
There’s also Ruby with Rails and some competitors I’ve never used, and Perl is still alive and kicking with Catalyst. Read things, learn things, build things, go nuts.
Credits
Thanks to the following for inspiration:
- PHP turtles
- PHP sadness
- PHP WTF
- YourLanguageSucks
- PHP in contrast to Perl
- Pi’s dense, angry, inspirational rant
- PHP is not an acceptable COBOL
- the PHP documentation
- a ton of PHP fanatics and PHP counter-fanatics
- and, of course, Rasmus Lerdorf for his wild misunderstanding of most of Perl
Let me know if you have any additions, or if I’m (factually!) wrong about something.
Health-C-P scam: Danish Consumer Center officials gave a slap on the wrist
Friday, February 28. 2014
Last summer, in Facebook, the source of all nasty things, had ads published for Trimatol-, Corexin- and Life Detox products by really evil Danish company called Health-C-P. See my blog post about it.
Everybody knows, that government officials work really hard and do what they can, but it so happens that no matter what they do, their actions are really slow. Today we had news from Finnish Consumer Center, that Nordic countries joint their efforts and made Danish government to extend a harsh warning. The news about that is in Finnish-only, sorry. The original warning about their mis-guided marketing tactics can be found here in English.
There was no punishment by Danish government. They just instructed Health-C-P to correct their marketing. Total bullshit!
DNS testing tools
Thursday, February 27. 2014
Debugging PHP applications with PhpStorm
Friday, February 21. 2014
Anybody who has reached a certain level of skill in software development eventually will start thinking about how to make the job easier or be more productive during the day. With computers and programming, the tools you're using is a good starting point.
I've written code with a number of text editors (including vim and notepad), some of them really bad and some of them more suited to the task at hand. IMHO one of the best editors for a software developer is Microsoft's Visual Studio. Since many of my projects involve PHP, that is not the optimal editor for that. For years I used Notepad++, but then I got a recommendation for JetBrains PhpStorm. Since that it has become my weapon of choice for PHP.
For example, debugging the application is very simple operation. PhpStorm has all the client-stuff built into it, the only thing that is needed is Xdebug-extension to the server end. In my case, my web server is on a Linux and I typically work on a Windows 7. The debugging is done over my LAN. There is a very good article on PhpStorm author's web site with name Zero-configuration Web Application Debugging with Xdebug and PhpStorm. I don't think the zero-configuration part is true, but it is almost zero anyway.
On the server end I have a PHP-fpm running, it has
php_admin_flag[xdebug.remote_enable] = on
php_admin_value[xdebug.remote_host] = my_machine_name
php_admin_value[xdebug.remote_port] = 9000
In the worker configuration. That enables the server side to initiate a DBGP-connection to the given client (PhpStorm) and start sending data there. There reference for all the configuration directives can be found from Xdebug's docs.
On the PhpStorm end all you have to do, is enable the listener:
Also I had to drill a hole into my Windows 7 firewall, to allow my web server to connect into TCP/9000. If you're running a single machine setup, that won't be necessary.
Any settings for the setup can be found in the PhpStorm project: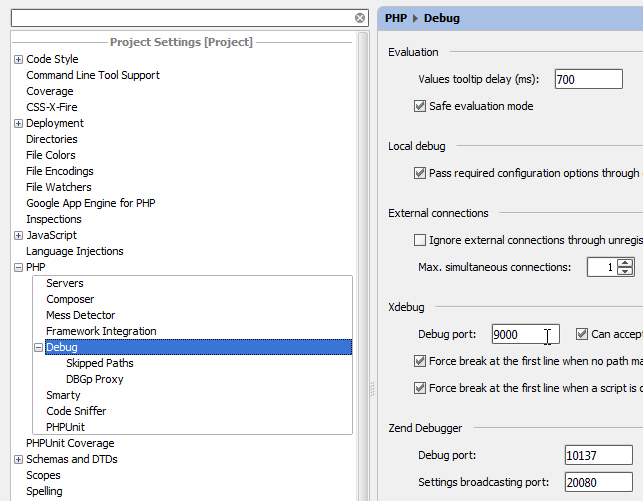
But I think they're ok as a default. At least I didn't change anything there. If your debugger does not work, you fumbled the settings or your listener is not enabled. On Windows, run this on command prompt to confirm:
PS J:\> netstat -ano
Active Connections
Proto Local Address Foreign Address State PID
TCP 0.0.0.0:9000 0.0.0.0:0 LISTENING ?
It will return a long list of things, but one of the entries must be similar to that.
To make the choice between debugging and not debugging can be made really easy. There are a number of ways of starting a debug session, but for Firefox users there is an excellent add-on The easiest Xdebug. It will add an icon to your add-on bar: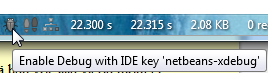
If the bug is green, it will send a special cookie to the server during a page load request:
Cookie: XDEBUG_SESSION=netbeans-xdebug
That will initiate the debugging session for you and PhpStorm will stop on a breakpoint if one is set.
Switching to PhpStorm vastly improved my productivity. I would imagaine, that it will do that for anybody.
GeoTrust service sucks!
Thursday, February 20. 2014
I was renewing a SSL-certificate for a customer. They had been using GeoTrust earlier, so I went there. It was the first and most likely the last time I do business with them.
The order process was pretty similar to the competition. A CSR was submitted and all the necessary information was given. After submission there was a thank you -page and they sent an automated e-mail with information that the order is pending, and will be processed after 5 to 7 business days.
After that, nothing. After waiting for 12 days out of with 8 were business days, my patience ran out. I contacted them and requested to expedite the process. Yet another business day passed, and then they called me after 7 in the night and informed, that there was a mistake in the information I had gave them. I corrected the info, got automated e-mail about it and went into yet another wait.
Two more days later they sent an e-mail that the verification call to customer failed. Their mail had the number in it and it was obvious, that they assumed that the customer was located in USA. Even though, the information stated Finland as the country. I got an e-mail about that too.
At the point, when they issued the new certificate, I was surprised. Against all the odds, they managed to verify the customer in less than three weeks. The real suprise was, that at that point their e-mail replies started pouring in. The lag in their e-mail processing was huge. Last of the replies came 6 days after the certificate was issued. It's beyond stupid, that none of the communication I had with them were actually recorded for the purchase process. Apparely all of them went to a distant support site, which has nothing to do with any of their other actions or operations.
Is it just me, or does GeoTrust's way of doing business suck?
CentOS 6 PHP 5.4 and 5.5 yum repository
Wednesday, February 19. 2014
Zend Framework 2: Abusing ZeDb to manage multiple connections
Tuesday, February 18. 2014
It's alive! Printer ran out of paper
Monday, February 17. 2014
This one really made me laugh. The entire situation was like from T-2: "Skynet begins to learn at a geometric rate. It becomes self-aware at 2:14 a.m."
My new printer ran out of paper and it sent me an e-mail about it.
Subject: [CLP-410 Series]Paper Empty
System Error: M1-5112 Tray 1 is empty. User intervention required to add paper to Tray 1. Printing can continue if the required media is available from other trays, all other machine services (if installed) are unaffected. .
The e-mail had all the information about the printer, its IP-address, serial number and printed page counts. If I would have 17 of those, it would be possible to differentiate which one is in trouble.
Looks like they just might be taking over after all. I tried looking my printer's Instagram, Facebook and Twitter accounts, but could not find them.


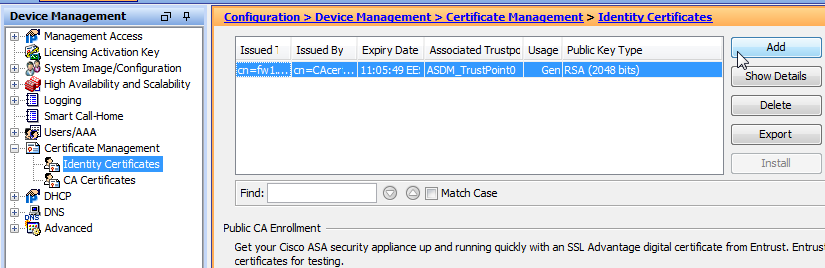