MacBook Pro - Fedora 36 sleep wake
Thursday, August 25. 2022
ArchLinux - Pacman - GnuPG - Signature trust fail
Wednesday, July 27. 2022
Fedora 35: Name resolver fail - Solved!
Monday, April 25. 2022
Databricks CentOS 8 stream containers
Monday, February 7. 2022
Last November I created CentOS 8 -based Databricks containers.
At the time of tinkering with them, I failed to realize my base was off. I simply used the CentOS 8.4 image available at Docker Hub. On later inspection that was a failure. Even for 8.4, the image was old and was going to be EOLd soon after. Now that 31st Dec -21 had passed I couldn't get any security patches into my system. To put it midly: that's bad!
What I was supposed to be using, was the CentOS 8 stream image from quay.io. Initially my reaction was: "What's a quay.io? Why would I want to use that?"
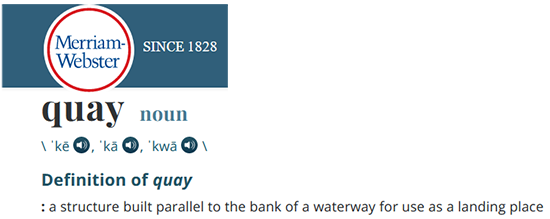
Thanks Merriam-Webster for that, but it doesn't help.
On a closer look, it looks like all RedHat container -stuff is not at docker.io, they're in quay.io.
Simple thing: update the base image, rebuild all Databricks-images and done, right? Yup. Nope. The images built from steam didn't work anymore. Uff! They failed working that bad, not even Apache Spark driver was available. No querying driver logs for errors. A major fail, that!
Well. Seeing why driver won't work should be easy, just SSH into the driver an take a peek, right? The operation is documented by Microsoft at SSH to the cluster driver node. Well, no! According to me and couple of people asking questions like How to login SSH on Azure Databricks cluster, it is NOT possible to SSH into Azure Databricks node.
Looking at Azure Databricks architecture overview gave no clues on how to see inside of a node. I started to think nobody had ever done it. Also enabling diagnostic logging required the premium (high-prized) edition of Databricks, which wasn't available to me.
At this point I was in a full whatta-hell-is-going-on!? -mode.
Digging into documentation, I found out, it was possible to run a Cluster node initialization scripts, then I knew what to do next. As I knew it was possible to make requests into the Internet from a job running in a node, I could write an intialization script which during execution would dig me a SSH-tunnel from the node being initialized into something I would fully control. Obiviously I chose one of my own servers and from that SSH-tunneled back into the node's SSH-server. Double SSH, yes, but then I was able to get an interactive session into the well-protected node. An interactive session is what all bad people would want into any of the machines they'll crack into. Tunneling-credit to other people: quite a lot of my implementation details came from How does reverse SSH tunneling work?
To implement my plan, I crafted following cluster initialization script:
LOG_FILE="/dbfs/cluster-logs/$DB_CLUSTER_ID-init-$(date +"%F-%H:%M").log"

exec >> "$LOG_FILE"


echo "$(date +"%F %H:%M:%S") Setup SSH-tunnel"

mkdir -p /root/.ssh

cat > /root/.ssh/authorized_keys <<EOT

ecdsa-sha2-nistp521 AAAAE2V0bV+TrsFVcsA==

EOT


echo "$(date +"%F %H:%M:%S") Install and setup SSH"

dnf install openssh-server openssh-clients -y

/usr/libexec/openssh/sshd-keygen ecdsa

/usr/libexec/openssh/sshd-keygen rsa

/usr/libexec/openssh/sshd-keygen ed25519

/sbin/sshd


echo "$(date +"%F %H:%M:%S") - Add p-key"


cat > /root/.ssh/nobody_id_ecdsa <<EOT

-----BEGIN OPENSSH PRIVATE KEY-----

b3BlbnNzaC1rZXktdjEAAAAABG5vbmUAAAAEbm9uZQAAAAAAAAABAAAA

1zaGEyLW5pc3RwNTIxAAAACG5pc3RwNTIxAAAAhQQA2I7t7xx9R02QO2

rsLeYmp3X6X5qyprAGiMWM7SQrA1oFr8jae+Cqx7Fvi3xPKL/SoW1+l6

Zzc2hkQHZtNC5ocWNvZGVzaG9wLmZpAQIDBA==

-----END OPENSSH PRIVATE KEY-----

EOT

chmod go= /root/.ssh/nobody_id_ecdsa

echo "$(date +"%F %H:%M:%S") - SSH dir content:"


echo "$(date +"%F %H:%M:%S") Open SSH-tunnel"

ssh -f -N -T \

  -R22222:localhost:22 \

  -i /root/.ssh/nobody_id_ecdsa \

  -o StrictHostKeyChecking=no \

  nobody@my.own.box.example.com -p 443
Note: Above ECDSA-keys have been heavily shortened making them invalid. Don't copy passwords or keys from public Internet, generate your own secrets. Always! And if you're wondering, the original keys have been removed.
Note 2: My init-script writes log into DBFS, see exec >> "$LOG_FILE" about that.
My plan succeeded. I got in, did the snooping around and then it took couple minutes when Azure/Databrics -plumbing realized driver was dead, killed the node and retried the startup-sequence. Couple minutes was plenty of time to eyeball /databricks/spark/logs/ and /databricks/driver/logs/ and deduce what was going on and what was failing.
Looking at simplified Databricks (Apache Spark) architecture diagram:
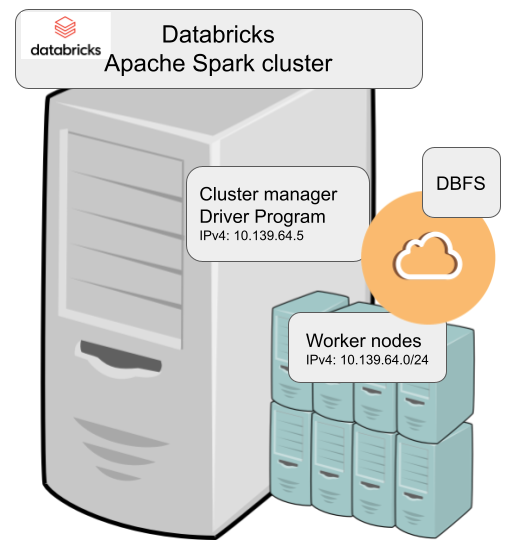
Spark driver failed to start because it couldn't connect into cluster manager. Subsequently, cluster manager failed to start as ps-command wasn't available. It was in good old CentOS, but in base stream it was removed. As I got progress, also ip-command was needed. I added both and got the desired result: a working CentOS 8 stream Spark-cluster.
Notice how I'm specifying HTTPS-port (TCP/443) in the outgoing SSH-command (see: -p 443). In my attempts to get a session into the node, I deduced following:
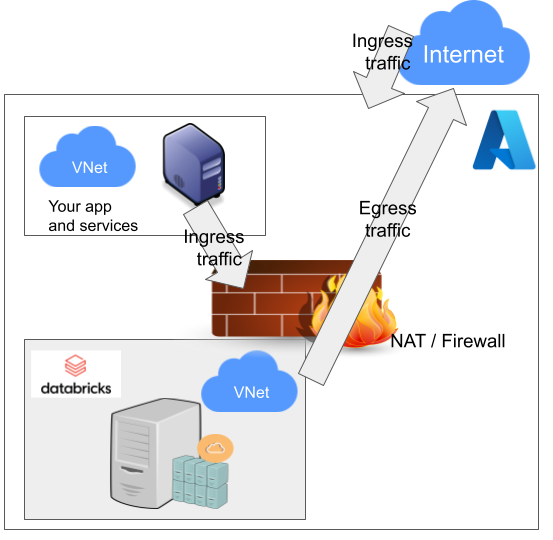
As Databricks runs in it's own sandbox, also outgoing traffic is heavily firewalled. Any attempts to access SSH (TCP/22) are blocked. Both HTTP and HTTPS are known to work as exit ports, so I spoofed my SSHd there.
There are a number of different containers. To clarify which one to choose, I drew this diagram:
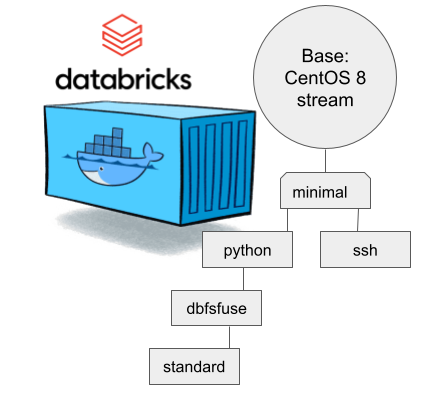
In my sparking, I'll need both Python and DBFS, so my choice is dbfsfuse. Most users would be happy with standard, but it only adds SSHd which is known not to work. ssh has the same exact problem. The reason for them to exist, is because in AWS SSHd does work. Among the changes from good old CentOS into stream is lacking FUSE. Old one had FUSE even in minimal, but not anymore. You can access DBFS only with dbfsfuse or standard from now on.
If you want to take my CentOS 8 brick-containers for a spin, they are still here: https://hub.docker.com/repository/docker/kingjatu/databricks, now they are maintained and get security patches too!
pkexec security flaw (CVE-2021-4034)
Wednesday, January 26. 2022
Databricks CentOS 8 containers
Wednesday, November 17. 2021
MySQL Java JDBC connector TLSv1 deprecation in CentOS 8
Friday, November 12. 2021
Yeah, a mouthful. Running CentOS 8 Linux, in Java (JRE) a connection to MySQL / MariaDB there seems to be trouble. I think this is a transient issue and eventually it will resolve itself. Right now the issue is real.
Here is the long story.
I was tinkering with Databricks. The nodes for my bricks were on CentOS 8 and I was going to a MariaDB in AWS RDS. with MySQL Connector/J. As you've figured out, it didn't work! Following errors were in exception backtrace:
com.mysql.cj.jdbc.exceptions.CommunicationsException: Communications link failure


The last packet sent successfully to the server was 0 milliseconds ago. The driver has not received any packets from the server.

com.mysql.cj.jdbc.exceptions.CommunicationsException: Communications link failure


Caused by: com.mysql.cj.exceptions.CJCommunicationsException: Communications link failure


javax.net.ssl.SSLHandshakeException: No appropriate protocol (protocol is disabled or cipher suites are inappropriate)
Weird.
Going to the database with a simple CLI-command of (test run on OpenSUSE):
$ mysql -h db-instance-here.rds.amazonaws.com -P 3306 \
-u USER-HERE -p \
  --ssl-ca=/var/lib/ca-certificates/ca-bundle.pem \

  --ssl-verify-server-cert
... works ok.
Note: This RDS-instance enforces encrypted connection (see AWS docs for details).
Note 2: Term used by AWS is SSL. However, SSL was deprecated decades ago and the protocol used is TLS.
Taking a look on the wire:
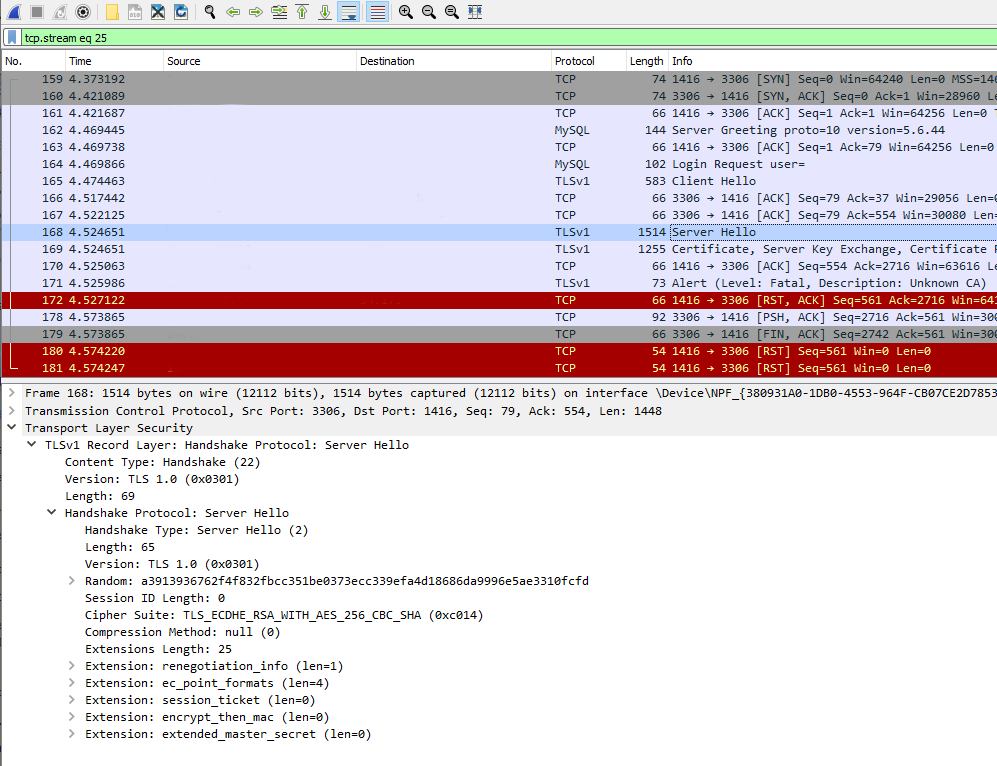
Two details popped out instantly: TLSv1 and TLS_ECDHE_RSA_WITH_AES_256_CBC_SHA cipher. Both deprecated. Both deemed highly insecure and potentially leaking your private information.
Why would anybody using those? Don't MySQL/MariaDB/AWS -people remove insecure stuff from their software? What! Why!
Troubleshooting started. First I found SSLHandShakeException No Appropriate Protocol on Stackoverflow. It contains a hint about JVM security settings. Then MySQL documentation 6.3.2 Encrypted Connection TLS Protocols and Ciphers, where they explicitly state "As of MySQL 5.7.35, the TLSv1 and TLSv1.1 connection protocols are deprecated and support for them is subject to removal in a future MySQL version." Well, fair enough, but the bad stuff was still there in AWS RDS. I even found Changes in MySQL 5.7.35 (2021-07-20, General Availability) which clearly states TLSv1 and TLSv1.1 removal to be quite soon.
No amount of tinkering with jdk.tls.disabledAlgorithms in file /etc/java/*/security/java.security helped. I even created a simple Java-tester to make my debugging easier:
import java.sql.*;


// Code from: https://www.javatpoint.com/example-to-connect-to-the-mysql-database

// 1) Compile: javac mysql-connect-test.java

// 2) Run: CLASSPATH=.:./mysql-connector-java-8.0.27.jar java MysqlCon

class MysqlCon {

  public static void main(String args[]) {

    try {

      Class.forName("com.mysql.cj.jdbc.Driver");

      Connection con = DriverManager.getConnection("jdbc:mysql://db.amazonaws.com:3306/db", "user", "password");

      Statement stmt = con.createStatement();

      ResultSet rs = stmt.executeQuery("select * from emp");

      while (rs.next())

        System.out.println(rs.getInt(1) + " " + rs.getString(2) + " " + rs.getString(3));

      con.close();

    } catch (Exception e) {

      System.out.println(e);

      e.printStackTrace(System.out);

    }

  }

}
Hours passed by, but no avail. Then I found command update-crypto-policies. RedHat documentation Chapter 8. Security, 8.1. Changes in core cryptographic components, 8.1.5. TLS 1.0 and TLS 1.1 are deprecated contains mention of command:
update-crypto-policies --set LEGACY
As it does the trick, I followed up on it. In CentOS / RedHat / Fedora there is /etc/crypto-policies/back-ends/java.config. A symlink pointing to file containing:
jdk.tls.ephemeralDHKeySize=2048

jdk.certpath.disabledAlgorithms=MD2, MD5, DSA, RSA keySize < 2048

jdk.tls.disabledAlgorithms=DH keySize < 2048, TLSv1.1, TLSv1, SSLv3, SSLv2, DHE_DSS, RSA_EXPORT, DHE_DSS_EXPORT, DHE_RSA_EXPORT, DH_DSS_EXPORT, DH_RSA_EXPORT, DH_anon, ECDH_anon, DH_RSA, DH_DSS, ECDH, 3DES_EDE_CBC, DES_CBC, RC4_40, RC4_128, DES40_CBC, RC2, HmacMD5

jdk.tls.legacyAlgorithms=
That's the culprit! It turns out any changes in java.security -file won't have any effect as the policy is loaded later. Running the policy change and set it into legacy-mode has the desired effect. However, running ENTIRE system with such a bad security policy is bad. I only want to connect to RDS, why cannot I lower the security on that only? Well, that's not how Java works.
Entire troubleshooting session was way too much work. People! Get the hint already, no insecure protocols!
Wi-Fi 6 - Part 2 of 2: Practical wireless LAN with Linksys E8450
Sunday, August 15. 2021
There is a previous post in this series about wireless technology.
Wi-Fi 6 hardware is available, but uncommon. Since its introduction three years ago, finally it is gaining popularity. A practial example of sometimes-difficult-to-obtain part is an USB-dongle. Those have existed at least 15 years now. There simply is none with Wi-Fi 6 capability.
Additional twist is thrown at me, a person living in EU-reagion. For some weird (to me) reason, manufacturers aren't getting their radio transmitters licensed in EU. Only in US/UK. This makes Wi-Fi 6 appliance even less common here.
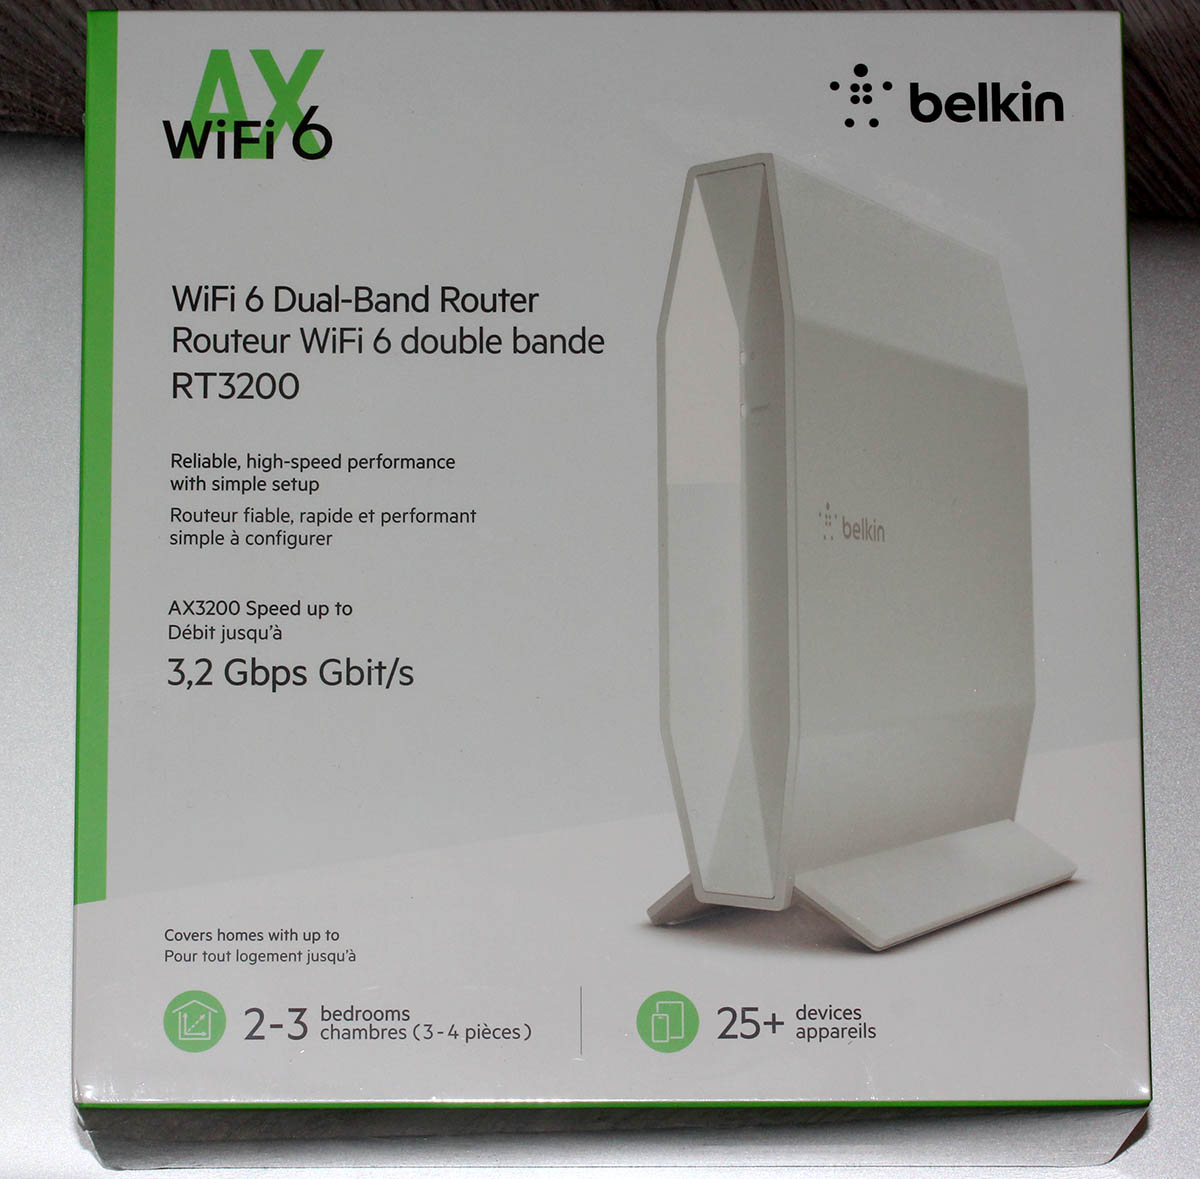
When I throw in my absolute non-negotiable requirement of running a reasonable firmware in my access point, I'll limit my options to almost nil. Almost! I found this in OpenWRT Table-of-Hardware: Linksys E8450 (aka. Belkin RT3200) It is an early build considered as beta, but hey! All of my requirements align there, so I went for it in Amazon UK:

Wi-Fi 6 Access Point: Belkin RT3200
Couple of days waiting for UPS delivery, and here goes:
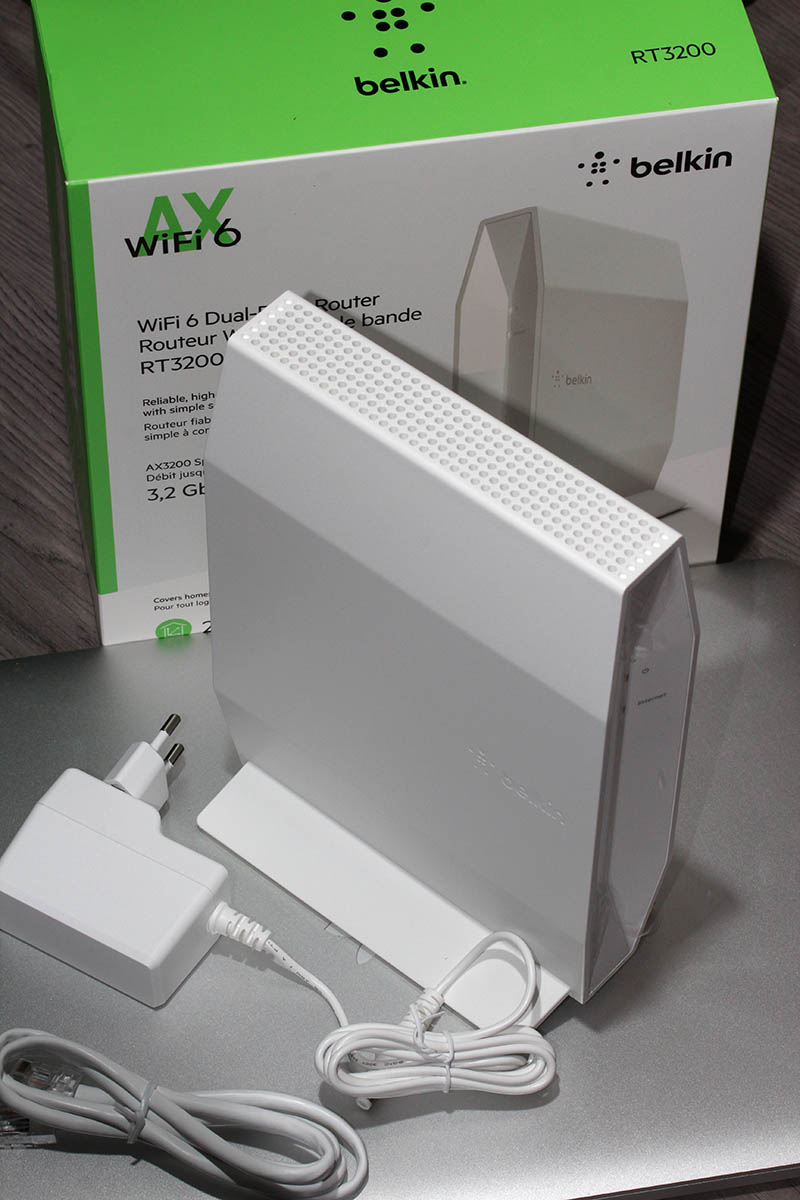
![]()
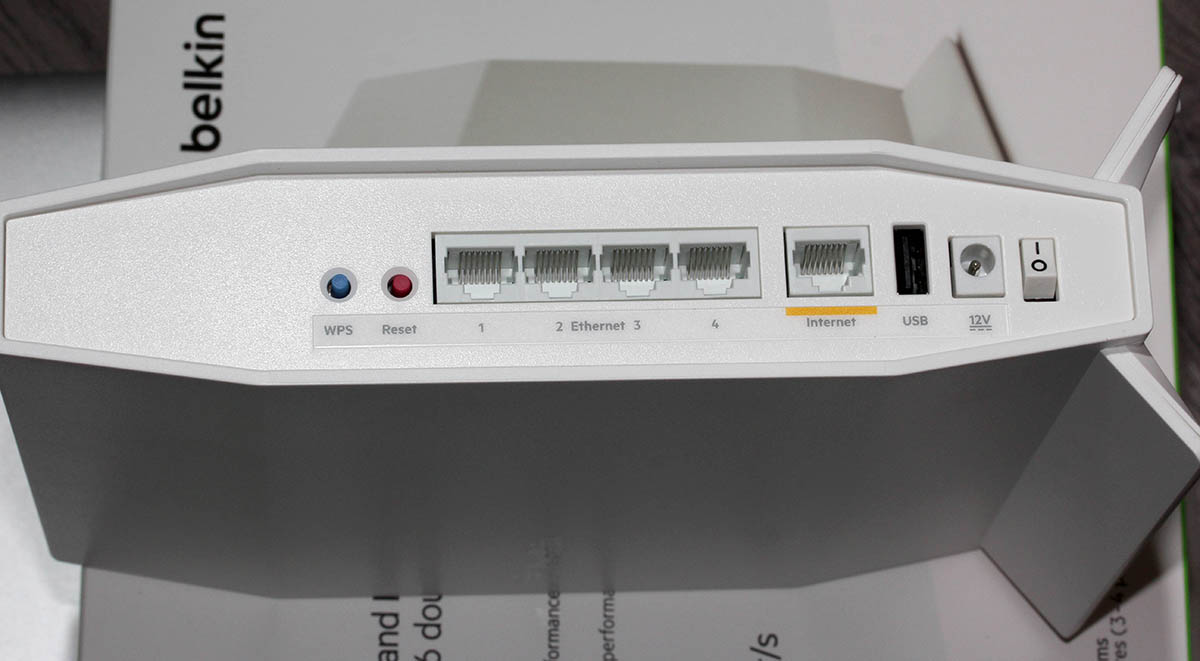
This is exactly what I wanted and needed! A four-port gigabit switch for wired LAN, incoming Internet gigabit connector. 12 VDC / 2 A barrel connector for transformer. Given UK power plugs are from 1870s they're widely incompatible with EU-ones. Luckily manufacturers are aware of this and this box contains both UK and EU plugs in an easily interchangeable form. Thanks for that!
Notice how this is a Belkin "manufactured" unit. In reality it is a relabled Linksys RT3200. Even the OpenWRT-firmware is exactly same. Me personally, I don't care what the cardobard box says as long as my Wi-Fi is 6, is fast and is secure.
Illustrated OpenWRT Installation Guide
The thing with moving away from vendor firmware to OpenWRT is that it can be tricky. It's almost never easy, so this procedure is not for everyone.
To achieve this, there are a few steps needed. Actual documentation is at https://openwrt.org/toh/linksys/e8450, but be warned: amount of handholding there is low, for newbie there is not much details. To elaborate the process of installation, I'm walking trough what I did to get me OpenWRT running in the box.
Step 0: Preparation
You will need:
- Linksys/Belkin RT3200 access point
- Wallsocket to power the thing
- A computer with Ethernet port
- Any Windows / Mac / Linux will do, no software needs to be installed, all that is required is a working web browser
- Ethernet cable with RJ-45 connectors to access the access point's admin panel via LAN
- OpenWRT firmware from https://github.com/dangowrt/linksys-e8450-openwrt-installer
- Download files into a laptop you'll be doing your setup from
- Linksys-compatible firmware is at at:https://github.com/dangowrt/linksys-e8450-openwrt-installer/releases, get
openwrt-mediatek-mt7622-linksys_e8450-ubi-initramfs-recovery-installer.itb - Also download optimized firmware
openwrt-mediatek-mt7622-linksys_e8450-ubi-squashfs-sysupgrade.itb
- Skills and rights to administer your workstation to have its Ethernet port a fixed IPv4-address from net 192.168.1.1/24
- Any other IPv4 address on that net will do, I used 192.168.1.10
- No DNS nor gateway will be needed for this temporary setup
Make sure not to connect the WAN / Internet into anything. The Big Net is scary and don't rush into that yet. You can do that later when all installing and setupping is done.
Mandatory caution:
If you just want to try OpenWrt and still plan to go back to the vendor firmware, use the non-UBI version of the firmware which can be flashed using the vendor's web interface.
Process described here is the UBI-version which does not allow falling back to vendor firmware.
Step 1: Un-box and replace Belkin firmware
After plugging the Access Point to a wall socket, flicking the I/O-switch on, attaching an Ethernet cable to one of the LAN-switch ports and other end directly to a laptop, going to http://192.168.1.1 with your browser will display you something like this:
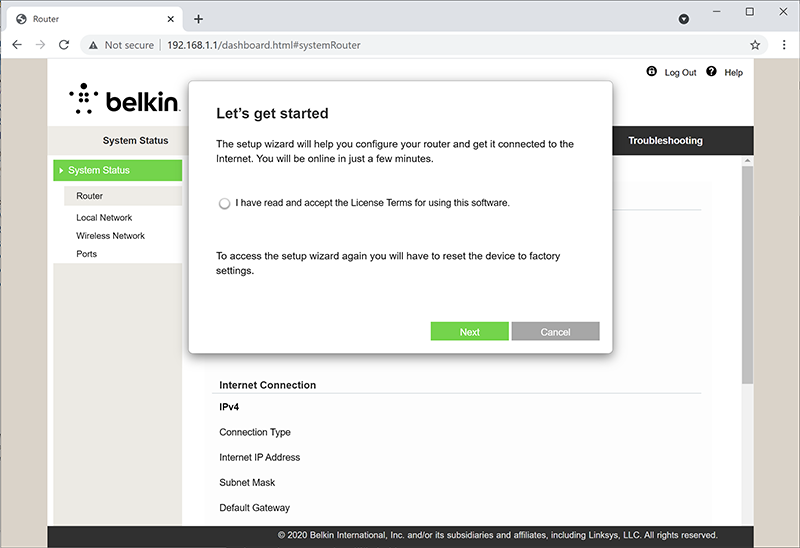
What you need to do is try to exit the out-of-box-experience setup wizard:


For the "Ethernet cable is not connected" you need to click Exit. When you think of the error message bit harder, if you get the message, your Ethernet IS connected. Ok, ok. It is for the WAN Ethernet, not LAN.
Notice how setup "did not complete succesfully". That is fully intentional. Click "Do not set up". Doing that will land you on a login:
This is your unconfigured admin / admin -scenario. Log into your Linksys ... erhm. Belkin.
Select Configuration / Administration / Firmware Upgrade. Choose File. Out of the two binaries you downloaded while preparing, go for the ubi-initramfs-recovery-installer.itb. That OpenWRT firmware file isn't from manufacturer, but the file is packaged in a way which makes it compatible to allow easy installation:
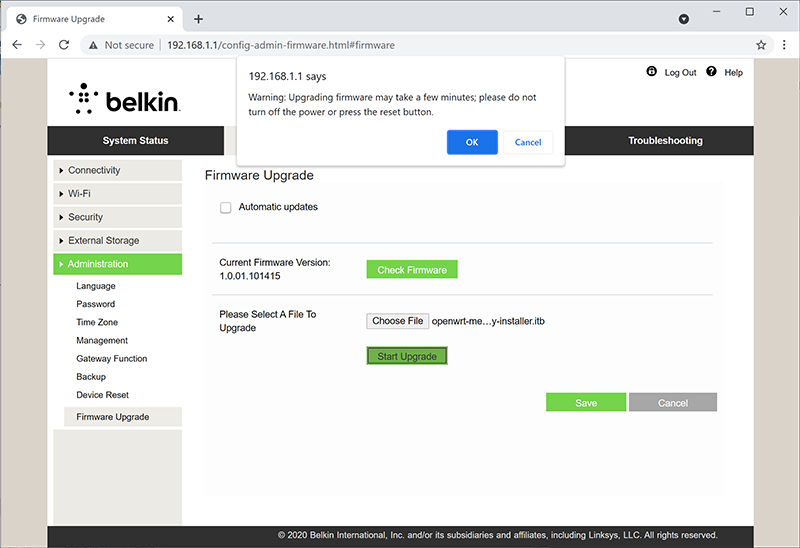
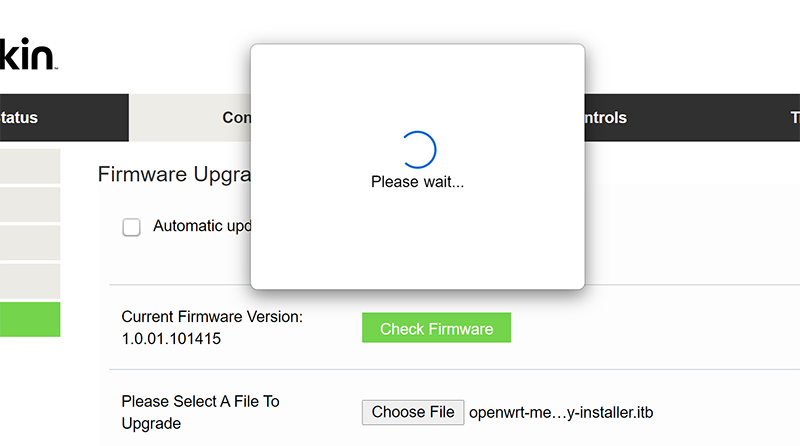
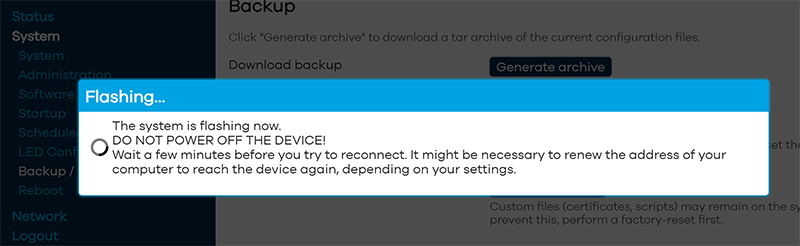
On "Start Upgrade" there will be a warning. Click "Ok" and wait patiently for couple minutes.
Step 2: Upgrade your OpenWRT recovery into a real OpenWRT
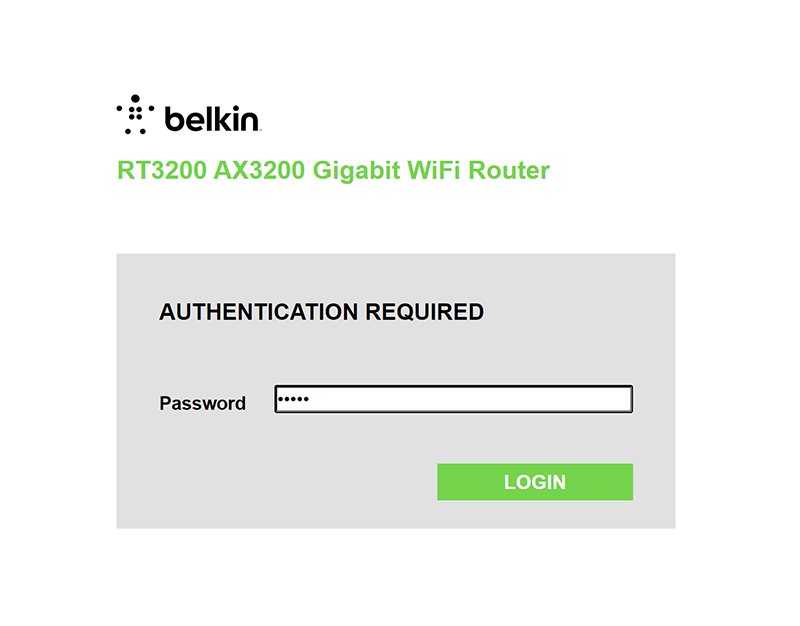
When all the firmware flashing is done, your factory firmware is gone:
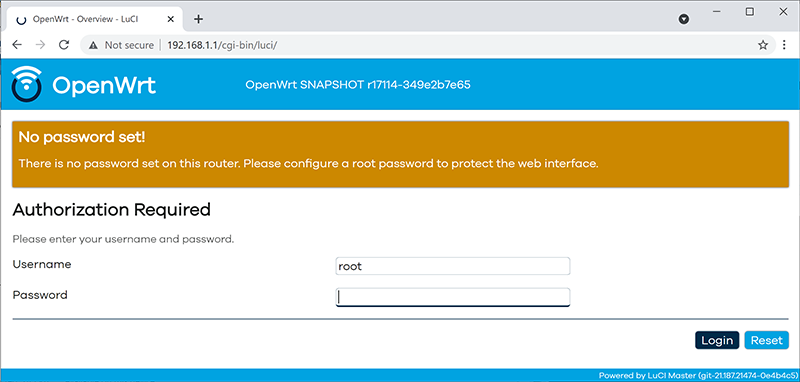
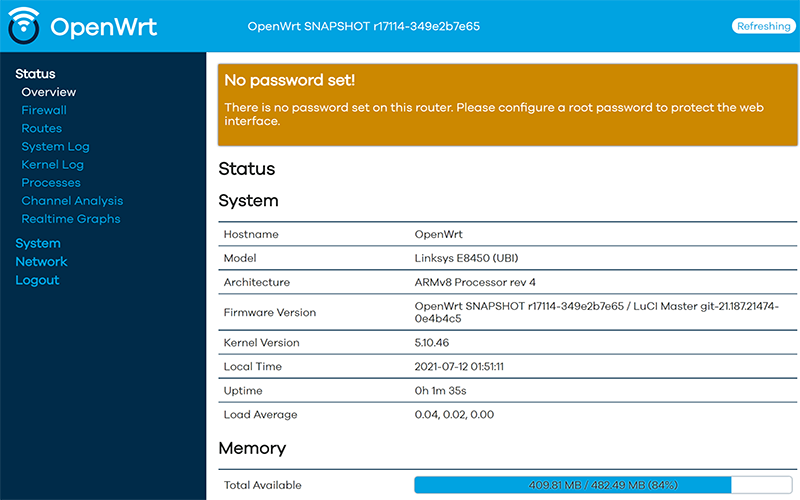
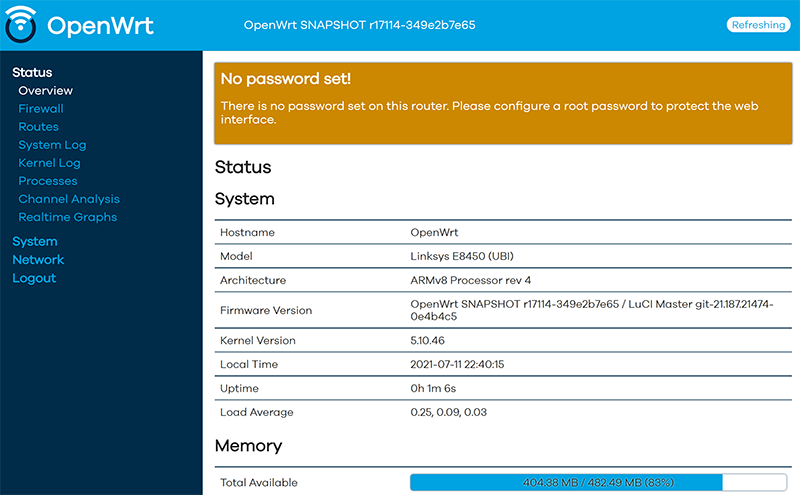
There is no password. Just "Login". An OpenWRT welcome screen will be shown:
Now that you're running OpenWRT, your next task is to go from recovery to real thing. I'm not sure if I'll ever want to go back, but as recommended by OpenWRT instructions, I did take backups of all four mtdblocks: bl2, fip, factory and ubi. This step is optinal:
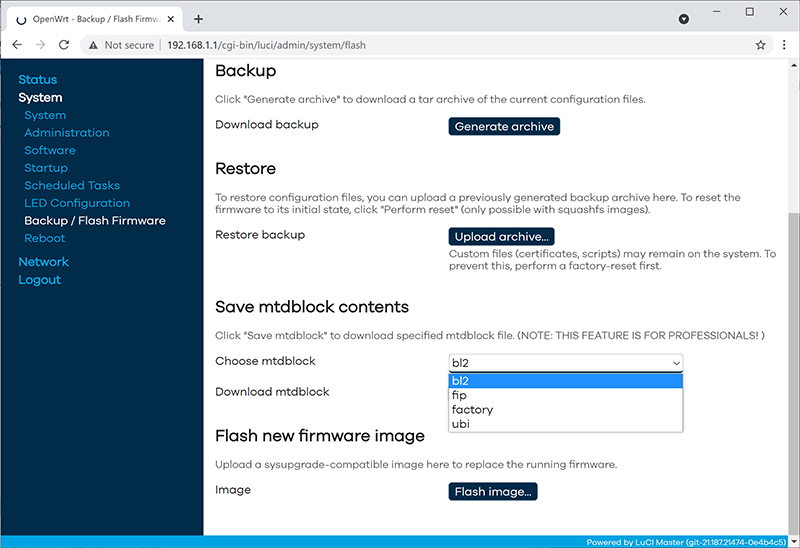
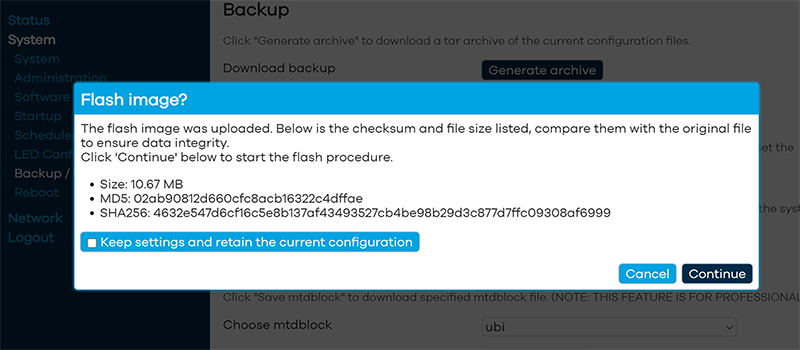
When you're ready, go for the firmware upgrade. This time select openwrt-mediatek-mt7622-linksys_e8450-ubi-squashfs-sysupgrade.itb:

To repeat the UBI / non-UBI firmware: This is the UBI-version. It is recommended as it has better optimization for layout and management of SPI flash, but it does not allow fallbacking to vendor firmware.
I unchecked the "Keep settings and retain the current configuration" to make sure I got a fresh start with OpenWRT. On "Continue", yet another round of waiting will occur:
Step 3: Setup your wireless AP
Déjà vu!
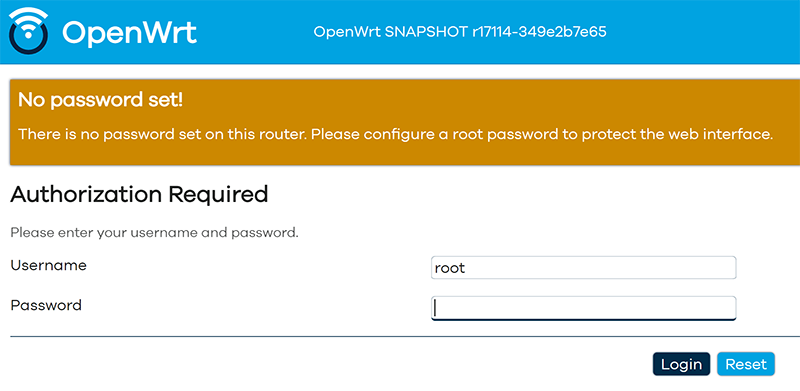
You have seen this exact screen before. Login (there is no password yet):
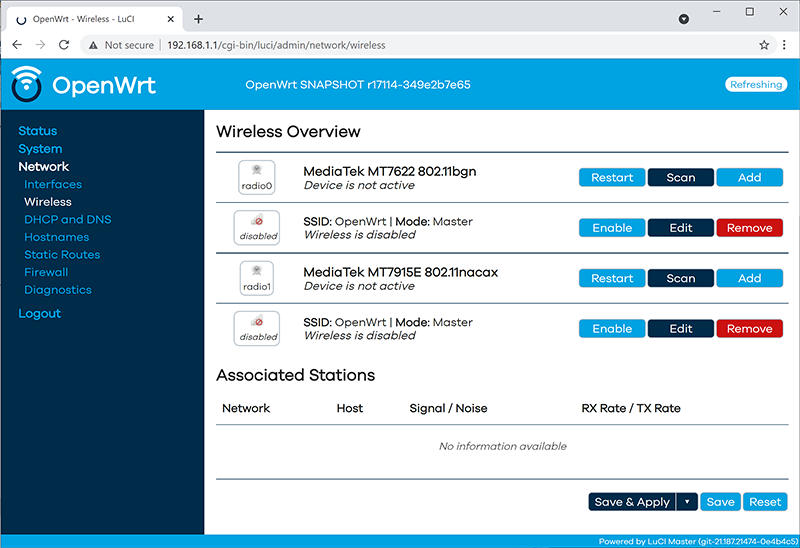
Second time, same screen but with this time there is a proper firmware in the AP. Go set the admin account properly to get rid of the "There is no password set on this router" -nag. Among all settings, go to wireless configuration to verify both 2.4 and 5 GHz radios are off:
Go fix that. Select "Edit" for the 5 GHz radio and you'll be greeted by a regular wireless access point configuration dialog. It will include section about wireless security:
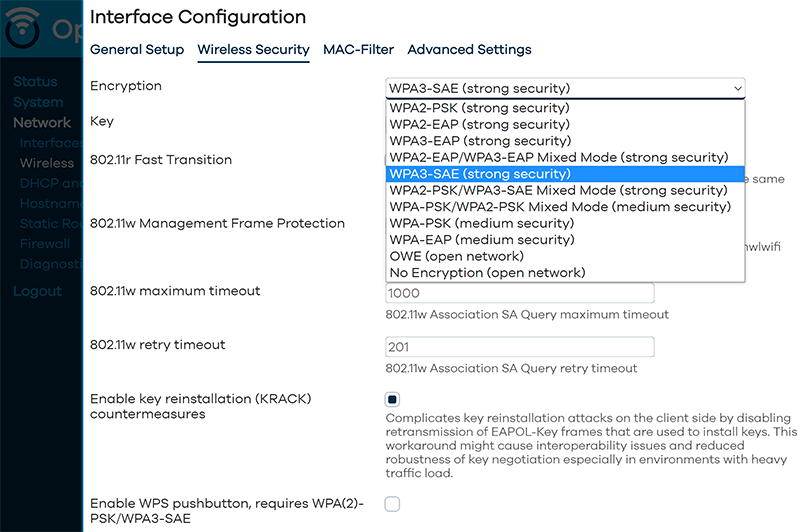
As I wanted to improve my WLAN security, I steer away from WPA2 and went for a WPA3-SAE security. Supporting both at the same time is possible, but securitywise it isn't wise. If your system allows wireless clients to associate with a weaker solution, they will.
Also for security, check KRACK attack countermeasures. For more details on KRACK, see: https://www.krackattacks.com/
When you've done, you should see radio enabled on a dialog like this:

Step 4: Done! Test.
That's it! Now you're running a proper firmware on our precious Wi-Fi 6 AP. But how fast it is?
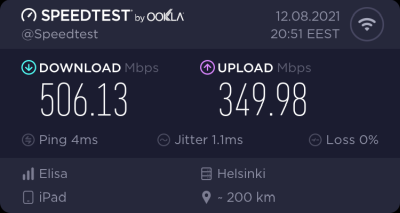
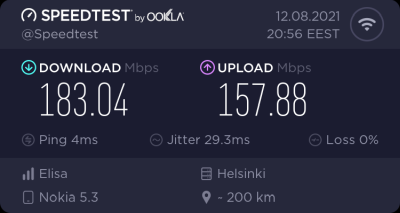
As I said, I don't have many Wi-Fi 6 clients to test with. On my 1 gig fiber, iPad seems to be pretty fast. Also my Android phone speed is ... well ... acceptable. 
For that speed test I didn't even go for the "one foot distance" which manufacturers love to do. As nobody uses their mobile devices right next to their AP, I tested this on a real life -scenario where both AP and I were located the way I would use Internet in my living room.
Final words
After three year wait Wi-Fi 6 is here! Improved security, improved speed, improved everything!
DynDNS updates to your Cloud DNS - Updated
Monday, July 12. 2021
Python 3.9 in RedHat Enterprise Linux 8.4
Tuesday, May 25. 2021
Behind the scenes: Reality of running a blog - Story of a failure
Monday, March 22. 2021
... or any (un)social media activity.
IMHO the mentioned "social" media isn't. There are statistics and research to establish the un-social aspect of it. Dopamin-loop in your brain keeps feeding regular doses to make person's behaviour addicted to an activity and keep the person leeching for more material. This very effectively disconnects people from the real world and makes the dive deeper into the rabbit hole of (un)social media.
What most of the dopamin-dosed viewer of any published material keep ignoring is the peak-of-an-iceberg -phenomenon. What I mean is a random visitor gets to see something amazingly cool. A video or picture depicting something that's very impressive and assume that person's life consists of a series of such events. Also humans tend to compare. What that random visitor does next is compares the amazing thing to his/hers own "dull" personal life, which does not consist of a such imaginary sequence of wonderful events. Imaginary, because reality is always harsh. As most of the time we don't know the real story, it is possible for 15 seconds of video footage to take months or preparation, numerous failures, reasonable amounts of money and a lot of effort to happen.
An example of harsh reality, the story of me trying to get a wonderful piece of tech-blogging published.
I started tinkering with a Raspberry Pi 4B. That's something I've planned for a while, ordered some parts and most probably will publish the actual story of the success later. Current status of the project is, well planned, underway, but nowhere near finished.
What happened was for the console output of the Linux to look like this:

That's "interesting" at best. Broken to say the least.
For debugging of this, I rebooted the Raspi into previous Linux kernel of 5.8 and ta-daa! Everything was working again. Most of you are running Raspian, which has Linux 5.4. As I have the energy to burn into hating all of those crappy debians and ubuntus, my obvious choice is a Fedora Linux Workstation AArch64-build.
To clarify the naming: ARM build of Fedora Linux is a community driven effort, it is not run by Red Hat, Inc. nor The Fedora Project.
Ok, enough name/org -talk, back to Raspi.
When in a Linux graphics go that wrong, I always disable the graphical boot in Plymouth splash-screen. Running plymouth-set-default-theme details --rebuild-initrd will do the trick of displaying all-text at the boot. However, it did not fix the problem on my display. Next I had a string of attempts doing all kinds of Kernel parameter tinkering, especially with deactivating Frame Buffer, learning all I could from KMS or Kernel Mode Setting, attempting to build Raspberry Pi's userland utilities to gain insight of EDID-information just to realize they'll never build on a 64-bit Linux, failing with nomodeset and vga=0 as Kernel Parameters to solve the problem. No matter what I told the kernel, display would fail. Every. Single. Time.
It hit me quite late in troubleshooting. While observing the sequence of boot-process, during early stages of boot everything worked and display was un-garbled. Then later when Feodra was starting system services everything fell. Obviously something funny happened with GPU-driver of Broadcom BCM2711 -chip of VideoCore 4, aka. vc4 in that particular Linux-build when the driver was loaded. Creating file /etc/modprobe.d/vc4-blacklist.conf with contents of blacklist vc4 to prevent VideoCore4 driver from ever loading did solve the issue! Yay! Finally found the problem.
All of this took several hours, I'd say 4-5 hours straight work. What happened next was surprising. Now that I had the problem isolated into GPU-driver, on IRC's #fedora-arm -channel, people said vc4 HDMI-output was a known problem and was already fixed in Linux 5.11. Dumbfounded by this answer, I insisted version 5.10 of being the latest and 5.11 lacking availability. They insisted back. Couple hours before me asking, 5.11 was deployed into mirrors sites for everybody to receive. This happened while I was investigating failing and investigating more.
dnf update, reboot and pooof. Problem was gone!
There is no real story here. In pursuit of getting the thing fixed, it fixed itself by time. All I had to do is wait (which obviously I did not do). Failure after failure, but no juicy story on how to fix the HDMI-output. On a typical scenario, this type of story would not get published. No sane person would shine any light on a failure and time wasted.
However, this is what most of us do with computers. Fail, retry and attempt to get results. No glory, just hard work.
podman - Running containers in Fedora 31+
Tuesday, November 10. 2020
openSUSE Leap 15.2 in-place upgrade
Sunday, July 12. 2020
Blog server upgrade to CentOS 8
Saturday, December 7. 2019
Since the inception of this blog back in January 2013, my weapon-of-choice has been CentOS Linux. When looking at the release chart @ https://en.wikipedia.org/wiki/CentOS#Latest_version_information it becomes obvious this is the 3rd major version of CentOS I'm running my blog on. In 2013 only version 6 was available, I must have upgraded into version 7 during 2014, and now 2019 I'm running on version 8. Given how RedHat and their organization(s) operate, the base Linux for my system is Fedora 28. See Fedora Project releases from https://fedoraproject.org/wiki/Releases.
The only motivation for me to upgrade is technology. RHEL/CentOS almost never upgrade their component versions. They do back-port any security patches even if authors of the original ones give up on their obsoleted stuff. RedHat does not. For people loving things how they are, that's a good thing. For people like me, its not that good.
Absolutely necessary things I had earlier, but lost and again have:
- HTTP/2
- For how and why this differs from HTTP/1.1 everybody else is still using, dive into Mr. Curl's book http2 explained. Its freely available @ https://http2-explained.haxx.se/content/en/
- TLS 1.3
- TLS versions 1 and 1.1 have been obsoleted. That leaves TLS 1.2 as the almost-only viable secure protocol.
- Obvious disclaimer for TLS 1.3: As of writing, it is still experimental. In reality not so much. Chrome and Firefox (among other platforms) support TLS 1.3 fully.
- Cloudflare's Head of Research Nick Sullivan is a known 1.3 enthusiast. Read his thoughts @ https://blog.cloudflare.com/rfc-8446-aka-tls-1-3/.
Other highlights:
- PHP 7.3
- My blog software runs on PHP. I upgraded 7.2, but am too scared to go for 7.4 yet.
- Native dual-stack IPv6/IPv4 networking. This is courtesy of my service provider.
- TLS 1.2 configured to not support any CBC-ciphers, for details see Why did TLS 1.3 drop AES-CBC? as an example
- Inspiration for this taken from Cipherli.st and Security/Server Side TLS on Mozilla wiki.
- Apologies for anybody using IE 11 on Windows Phone 8.1, or Safari versions 6-8 on iOS 6-9/OS X 10.9 or 10.10. You won't see this text as your devices/operating systems won't support my reasonably secure settings.
- For everybody else: Congratulations on having a decently secure device to do your Internet browsing with.
- tmux
- Terminal multiplexer, https://github.com/tmux/tmux/wiki
- Most of you just SSH into a server and be happy with it. I almost always run my sessions trough something that will keep my work safe if a disconnection occurs. To my surprise I keep bumping into sysadmins who don't either know about this or don't see this as a necessary approach.
- I've ran GNU Screen for over 25 years now. Not anymore. Uff!
- nftables (https://wiki.nftables.org/), courtesy of RHEL 8 / CentOS 8
- the new packet classification framework that replaces the existing {ip,ip6,arp,eb}_tables infrastructure
- I've ran IPchains / IPtables for 21 years now. Not anymore.
 Arf!
Arf!
Qualsys report on my blog now:
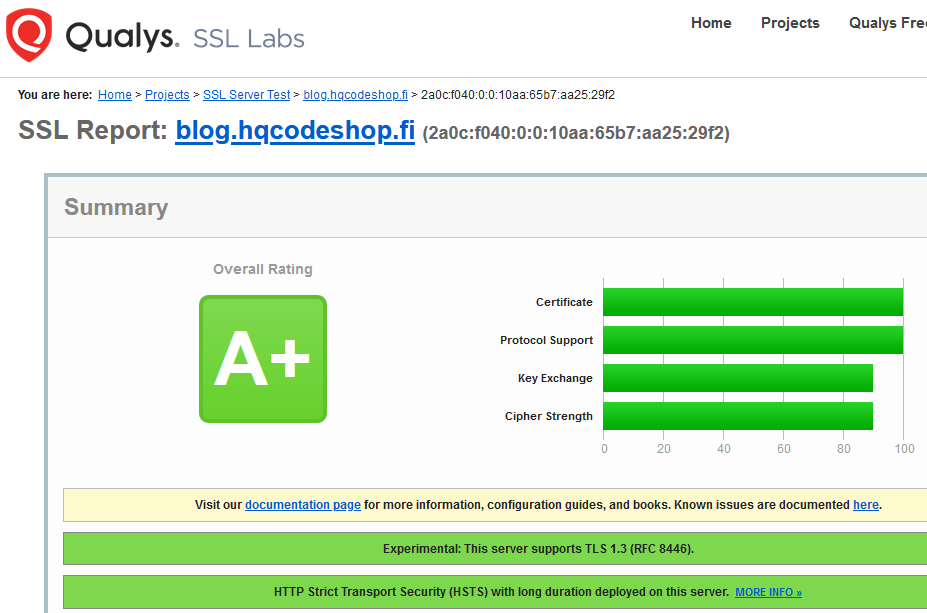
Nice!
Next up: CentOS Stream.
A new attempt to allow change of software versions. This will effectively detach CentOS from RHEL and gear it towards Fedora. This enables CentOS to get newer software as a rolling release Linux-distro, but keep the changes not-so-aggressive.
I won't run this yet on my blog server. This is so new at this point, but I'll have it running on a devel-box.
New Weather Station - Davis Vantage Vue - Part 2 of 2: Linux installation
Tuesday, November 5. 2019
This is a part two out of two on my Davis Vantage Vue weather station installation story. Previous part was about hardware installation.
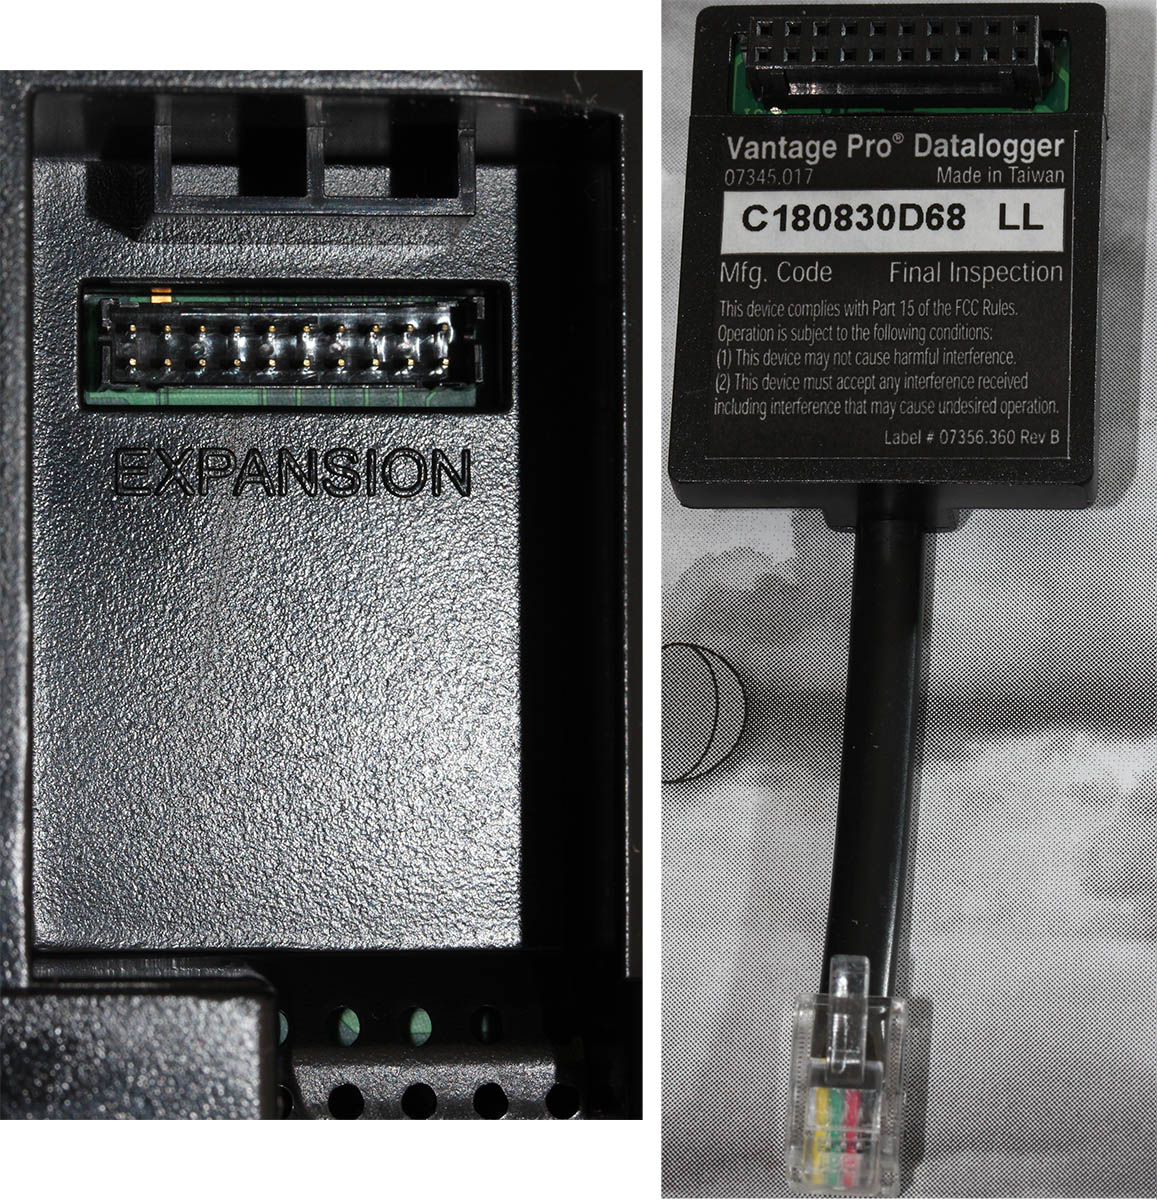
Datalogger expansion
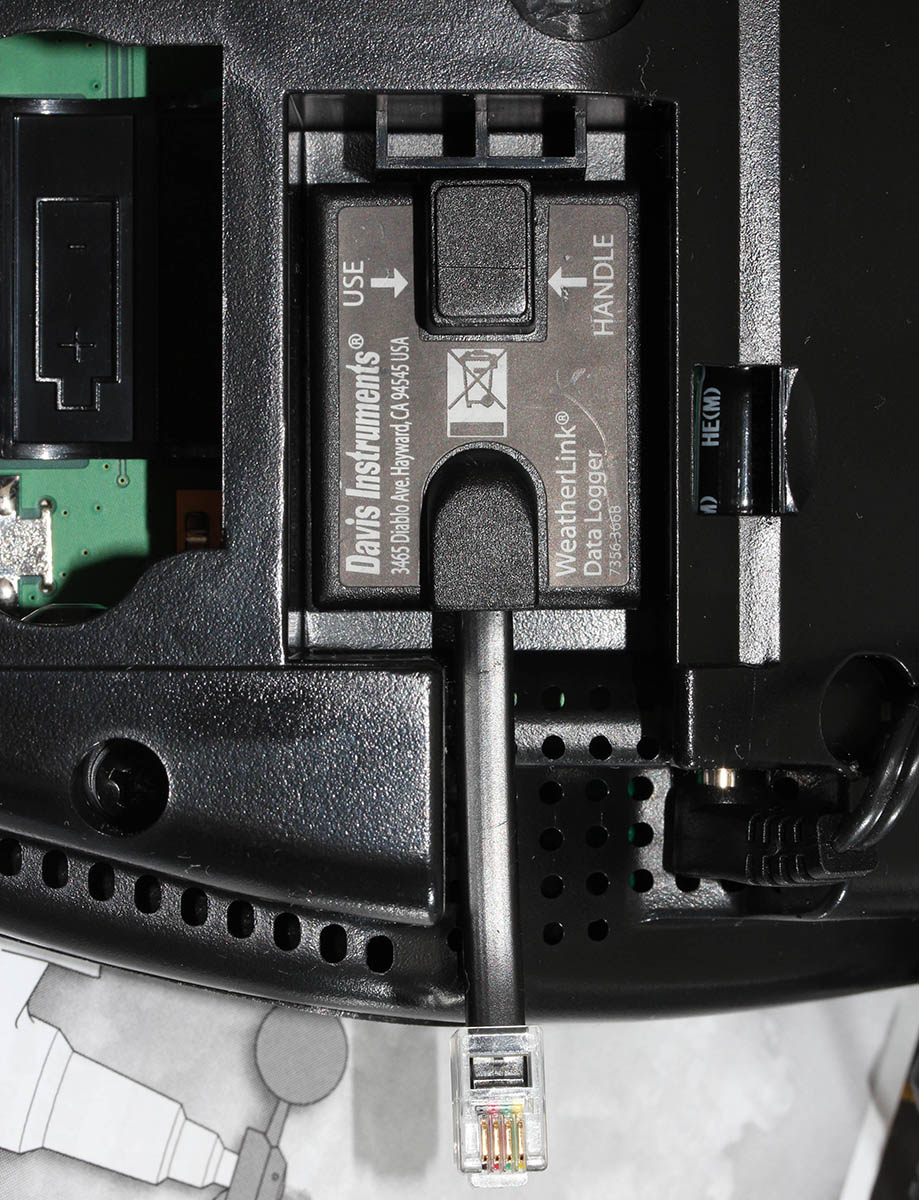
The indoors console has a slot for expansion devices. I went for the RS-232 WeatherLink datalogger expansion:
RS232 Cabling
The datalogger has a very short cable and a RJ-11 connector on the other end. The obvious good thing is the common availability of telephone extension cords to get past the 5 cm cable lenght of the datalogger. A regular landline telephone typically has such RJ-11 connectors in it and what I did was to get an inexpensive extension cord with suitable lenght.
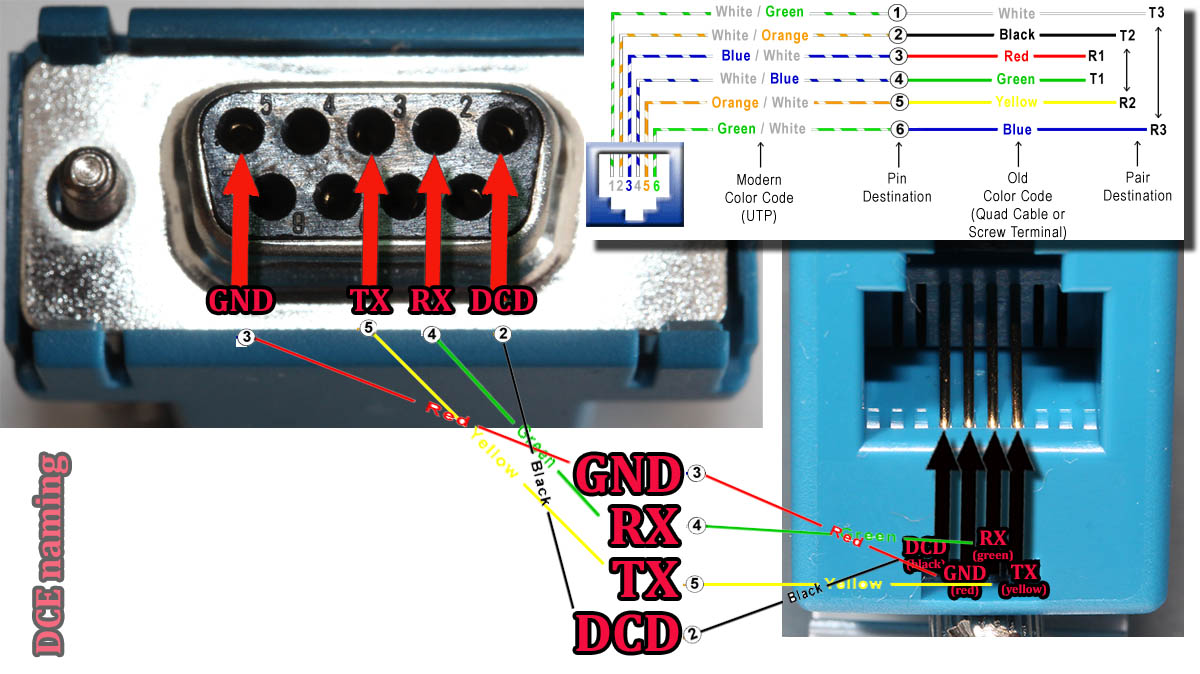
For computer connectivity, with datalogger box has a blue RJ-11 to RS232 converter. The four connected pins of the converter are as follows:
RS232 and Linux
Most computers today don't have a RS232-port in them. To overcome this, years ago I bought a quad-RS232-port USB-thingie:

If you look closely, Port 1 of the unit has a DIY RS232-connector attached into it. That's my Vantage Vue cable connected to the indoors console. Also, note the lack of the blue RJ-11 to RS232 converter unit. I reverse engineered the pins and soldered my cable directly to a D-9 connector to get the same result.
Now the hardware parts is done. All the connectors are connected and attached to a PC.
Software
Half of the work is done. Next some software is needed to access the data in the data logger.
For Windows and macOS
Those not running Linux, there is WeatherLink software freely available at https://www.davisinstruments.com/product/weatherlink-computer-software/. It goes without saying, the software is useless without appropriate hardware it gets the inputs from. I never even installed the software, as using a non-Linux was never an option for me. So, I have no idea if the software is good or not.
For Linux
As you might expect, when going to Linux, there are no commercial software options available. However, number of open-source ones are. My personal choice is WeeWX, its available at http://www.weewx.com/ and source code at https://github.com/weewx/weewx.
Install WeeWX:
- Download software:
git clone https://github.com/weewx/weewx.git - In git-directory, create RPM-package:
make -f makefile rpm-package SIGN=0 - As root, install the newly created RPM-package:
rpm --install -h dist/weewx-3.9.2-1.rhel.noarch.rpm - That's it!
Configure WeeWX:
- (dependency) Python 2 is a requirement. Given Python version 2 deprecation (see https://pythonclock.org/ for details), at the time of writing, there is less than two months left of Python 2 lifetime, this project really should get an upgrade to 3. No such joy yet.
- (dependency) pyserial-package:
pip install pyserial - Run autoconfig:
wee_config --install --dist-config /etc/weewx/weewx.conf.dist --output /etc/weewx/weewx.conf- In the array of questions, when being asked to choose a driver, go for
Vantage (weewx.drivers.vantage)
- In the array of questions, when being asked to choose a driver, go for
- Inspect the resulting
/etc/weewx/weewx.confand edit if necessary:- Section
[Station]week_start = 0
- Section [StdReport]
HTML_ROOT = /var/www/html/weewx
- (optional for Weather Underground users), Section
[StdRESTful]- Subsection
[[Wunderground]] - Enter station name and password
enable = true
- Subsection
- Section
- Configuring done!
Now you're ready (as root) to start the thing with a systemctl start weewx.
On a working system, you should get LOOP-records out of weewxd instantly. After a little while of gathering data, you should start having set of HTML/CSS/PNG-files in /var/www/html/weewx. It's a good idea to set up a web server to publish those files for your own enjoyment. This is something you don't have to do, but I strongly advice to enable HTTP-endpoint to your results. I will immensly help determining if your system works or not.
One reason I love having a weather station around is to publish my data to The Net. I've been tagging along with Weather Underground for years. There has been good years and really bad years, when Wunderground's servers have been misbehaving a lot. Now that IBM owns the thing, there has been some improvements. The most important thing is there is somebody actually maintaining the system and making it run. Obviously, there has been some improvements in the service too.
Aggregation problem
When I got my system stable and running, I realized my wind data is flatline. In nature it is almost impossible for not to be windy for multiple days. I visually inspected the wind speed and direction gauges, they were working unobstructed. However, my console did not indicate any wind at all.
After multiple days of running, I was about to give up and RMA the thing back to Davis for replacement, the console started working! That was totally unexpected. Why: 1) the system did not work, 2) the system started working without any actions from me. That was the case for me. As the problem has not occurred since, it must have been some kind of newness.
What next
Now that everything is up, running and stays that way. There's always something to improve. What I'm planning is to do is pump the LOOP-records to Google BigQuery.
As a side note: when new information is available, it will be emitted by weewxd as LOOP: <the data here> into your system logs. However, that data isn't used. After a period of time, your Vantage Vue will aggregate all those records into a time-slot record. That will be used as your measurement. Since those LOOP-records are simply discarded I thought it might be a good idea to base some analytics on those. I happen to know Google BigQuery well from past projects, all that I need is to write a suitable subsystem into weewx to pump the data into a correct place. Then it would be possible to do some analytics of my own on those records.

