Wrangling permissions on an enforcing SElinux setup
Saturday, March 22. 2014
Most people don't much care about their Linux-boxes' security. You install it, you run it, you use it and occasionally run some system updates into it. Not me. When I have a box running against the wild wild Net, I absolutely positively plan to make the life of anybody cracking into one of my boxes as difficult as possible (with some usability left for myself). See Mr. Tan's article about Security-Functionality-Usability Trade-Off.
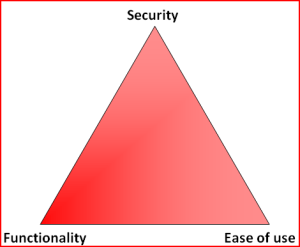
So, my choice is at the Functionality - Security -axis with less on the Ease-of-use. The rationale is that, a web application needs to run as safely as possible and can have the ease-of-use in it. The system administrator is a trained professional, he doesn't need the easy-part so much. However, there is a point, when things are set up too tight:

Image courtesy of Dilbert by Scott Adams
So, I voluntarily run software designed and implemented by NSA, SElinux. I even run it in the the Enforcing-mode which any even remotely normal system administrator thinks as being totally insane! Any small or even a tiny slip-up from the set security policy will render things completely useless. Mordac steps in and stuff simply does not work anymore.
On my Fedora-box there was a bug in BIND, the name server and an update was released to fix that. After running the update, the DNS was gone. As in, it didn't function, it didn't respond to any requests and the service didn't start. All it said was:
# systemctl status named-chroot.service --full
named-chroot.service - Berkeley Internet Name Domain (DNS)
Loaded: loaded (/usr/lib/systemd/system/named-chroot.service; enabled)
Active: failed (Result: timeout)
Any attempt to start the service resulted in a 60 second wait and a failure. dmesg-log had nothing about the issue, nor BIND's own log had nothing about the issue in it. So I started suspecting a SElinux-permission issue. My standard SElinux debugging always starts with a:
cat /var/log/audit/audit.log | audit2allow -m local
... to see if SElinux's audit logger is logging any permission-related audit faults. Indeed it did:
require {
type named_conf_t;
type named_t;
class dir write;
}
#============= named_t ==============
allow named_t named_conf_t:dir write;
That reads:
A process running in named_t security context is trying to access a directory with named_conf_t security context to gain a write access, but is denied while doing so.
It is obvious that the process in question must be the BIND name server. No other process has the named_t security context in it. When starting up, BIND name server was about to write into its own configuration directory, which is a big no no! When you write, you write only to designated directories, nowhere else (remember: running in enforcing-mode is insanity).
That is definitely a reason for a daemon not to start or to timeout while starting. Further investigation showed that also Fedora's SElinux policy had been updated a week ago: selinux-policy-3.12.1-74.19.fc19.
At this point I had all the pieces for the puzzle, it was simply a matter of putting it all together. The recently released SElinux policy has a bug in it, and nobody else was there to fix it for me.
The exact audit-log line is:
type=AVC msg=audit(1395481575.712:15239): avc:
denied { write } for
pid=4046 comm="named" name="named" dev="tmpfs" ino=14899
scontext=system_u:system_r:named_t:s0
tcontext=system_u:object_r:named_conf_t:s0 tclass=dir
So, my chrooted BIND-damon was trying to write into a tmpfs. There aren't that many of those in a system. I've even touched the tmpfs-subject earlier when I wrote a systemd-configuration into my own daemon. To find the tmpfs-usage, I ran:
# mount | fgrep tmpfs
tmpfs on /var/named/chroot/run/named type tmpfs
BIND's chroot-environment has one. That is very likely the culprit. That can be confirmed:
# ls -Z /var/named/chroot/run/
drwxrwx---. named named system_u:object_r:named_conf_t:s0 named
Yep! That's it. The directory has incorrect security context in it. To compare into system's non-chrooted one:
# ls -Zd /run/
drwxr-xr-x. root root system_u:object_r:var_run_t:s0 /run/
There is a difference between named_conf_t and var_run_t. You can write temporary files into latter, but not to the first one. The fix is very simple (assuming, that you speak fluent SElinux):
semanage fcontext -a -t var_run_t "/var/named/chroot/run(/.*)?"
restorecon -R -v named/
The two commands are:
First, re-declare a better security-context for the directory in question and then start using the new definition. Now my BIND started and was fully operational! Nice. 
My investigation ran further. I needed to report this to Fedora-people. I looked into the policy-file of /etc/selinux/targeted/contexts/files/file_contexts and found the faulty line in it:
/var/named/chroot/var/run/named.* system_u:object_r:named_var_run_t:s0
That line almost works. The directory in question has only two files in it. One of them even has a matching name. The problem, obviously, is that the another one does not:
# ls -l /var/named/chroot/run/named/
total 8
-rw-r--r--. 1 named named 5 Mar 22 12:02 named.pid
-rw-------. 1 named named 102 Mar 22 12:02 session.key
See Bug 1079636 at Red Hat Bugzilla for further developments with this issue.
Disabling non-disableable Internet Explorer add ons
Friday, March 21. 2014
One day my laptop shut itself down while I was getting a cup of coffee. No big deal, I thought. I'll just plug it into charger and things will be ok again. It took me by surprise to see, that the battery was 80% charged and the laptop had done a "crash landing". Apparently it chose to turn itself off. I'm guessing to avoid an over-heating situation.
Couple of weeks later I realized that a machine that does not do anything, chews about 25% CPU constantly. The natural guess would be a virus scanner, but it turned out to be a process called IEWebSiteLogon.exe:

I've never heard of such an application. Google didn't reveal anything useful, but the process properties revealed that the file was located at C:\Program Files\Lenovo Fingerprint Reader\x86\, so the conclusion is that my fingerprint reader's software is running a piece of software to eat up a lot of CPU-resources to do exactly nothing.
The file name gave me a hint, that it has something to do with Internet Explorer. I was running IE 11:
I opened the add ons manager:
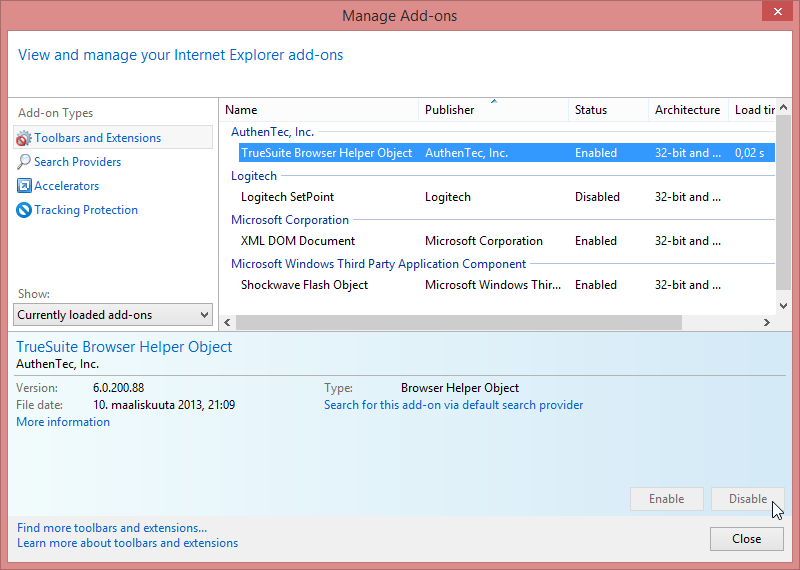
and there it was. My initial idea of disabling the stupid thing didn't pan out. The Disable-button is grayed out. Searching The Net revealed two interesting pieces of information: How to Remove Unneeded Plug-Ins in Internet Explorer By Andy Rathbone from Windows 8 For Dummies, which proved to be useless, it instructs to disable the add on. The second yielded results: Can't remove Internet Explorer Add-On. It described a way to track down the component by its class ID. Nice, but not nice enough. Somewhere there is a piece of code to attempt to load the missing component. Why not remove the requirement?
The details of the add on are:
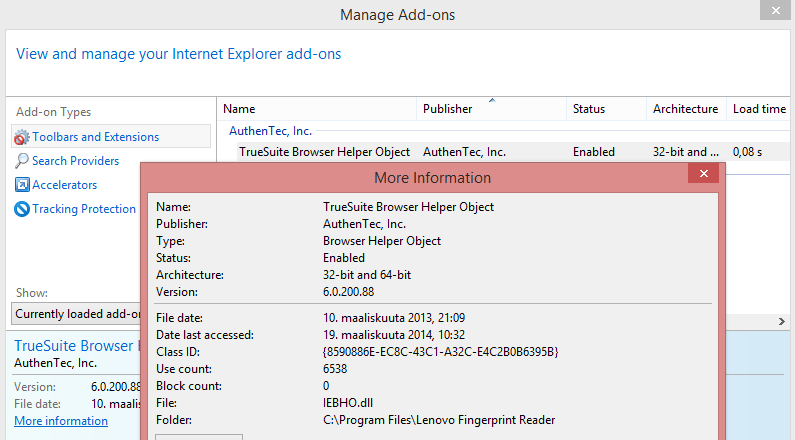
Now I had the class ID of {8590886E-EC8C-43C1-A32C-E4C2B0B6395B}. According to SystemLookup.com is a valid piece of software, they say: "This entry is classified as legitimate". That class ID can be found in my Windows system's registry from the following locations:
- HKEY_CLASSES_ROOT\CLSID\
- HKEY_CLASSES_ROOT\Wow6432Node\CLSID\
- HKEY_LOCAL_MACHINE\SOFTWARE\Classes\Wow6432Node\CLSID\
- HKEY_LOCAL_MACHINE\SOFTWARE\Microsoft\Windows\CurrentVersion\Explorer\Browser Helper Objects\
- HKEY_CURRENT_USER\Software\Microsoft\Internet Explorer\Approved Extensions
- HKEY_CURRENT_USER\Software\Microsoft\Windows\CurrentVersion\Ext\Settings\
The interesting ones are the system setting of Browser Helper Objects and user setting of Approved Extensions. Removing the helper object surely will disable the add on completely. Also it will be a good idea to make it a not-approved extension. And to un-register the component. All that should give the stupid add on a decisive blow and make it not waste my precious CPU-cycles.
The following PowerShell-commands run with administrator permissions will do the trick:
Remove-Item -path
"HKLM:\SOFTWARE\Microsoft\Windows\CurrentVersion\Explorer\Browser Helper Objects\{8590886E-EC8C-43C1-A32C-E4C2B0B6395B}"
Remove-Item -path
"HKCU:\Software\Microsoft\Windows\CurrentVersion\Ext\Settings\{8590886E-EC8C-43C1-A32C-E4C2B0B6395B}"
Remove-ItemProperty -path
"HKCU:\Software\Microsoft\Internet Explorer\Approved Extensions" -name "{8590886E-EC8C-43C1-A32C-E4C2B0B6395B}"
If you don't have admin-permissions, the commands will fail. Also please note that every time Internet Explorer is started, it will make sure that permissions in the registry HKEY_CURRENT_USER\Software\Microsoft\Internet Explorer\Approved Extensions are set so, that user is denied any modification access. See this:
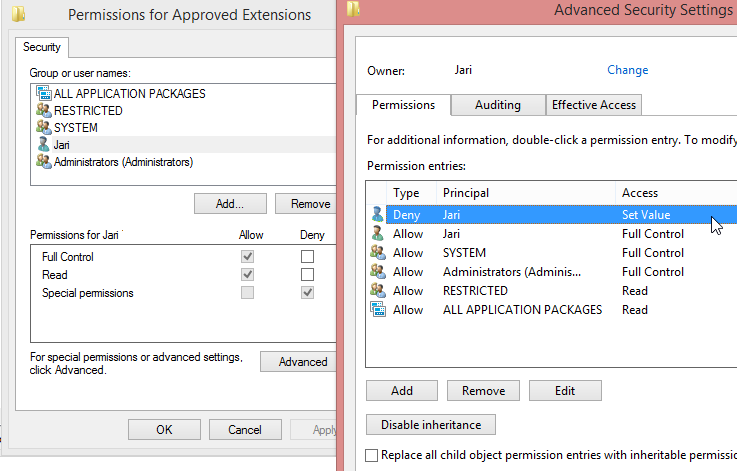
I tried to remove the deny ACL with PowerShell, but it seems to be impossible. The API is not mature enough.
After removing the deny ACL and running the PowerShell-commands and finally stopping and starting the Internet Explorer, the add on was gone. I managed to "disable" it completely.
Installing OpenSuse 13.1 into a MacBook
Monday, February 10. 2014
OpenSuse 13.1 was released November 2013. During Christmas holidays I started a project of upgrading my previous installation.
Since I'm running on a MacBook 1,1 it was obvious that I was looking for trouble. Previously I had rEFIt running just to get a GRUB 2 -prompt. This time I decided to start from a clean slate. Literally. I ran
dd if=/dev/zero of=/dev/sda
for the 10 first MiB of the drive to make sure, that it definitely has no trace of any of my previous settings. Since rEFIt has been abandoned years ago, I went for the replacement project rEFInd. I approached the author Mr. Roderick W. Smith and he was very helpful, but no matter what I did, I could not get rEFInd running on my very old 32-bit Mac. So, I had two options left: to go back to abandonware or see what would happen without a Boot Manager.
I failed on the installer settings-dialog, by trying to out-smart OpenSuse logic. My completed installation didn't boot. On 2nd try I simply went with the flow. As Mr. Smith instructed me, I didn't touch the most critical thing: MBR is not the way to go on a Mac! Here are my settings:

And guess what, it worked! OpenSuse 13.1 installer has enough logic to create a bootable Linux-installation to a completely blank hard drive. Nice!
The installer was pretty smart. Wi-Fi network was configured properly, it worked out-of-the-box. Apple-keys work: screen brightness, volume, etc. work as is. Also the typical trouble-makers sleep (on RAM) / hibernate (to disk), battery info, sound, and what not. There were only two minor issues: iSight does not work without the Apple proprietary firmware and the keyboard Apple-keys don't do anything usable.
To get the iSight camera working, see ift-extract -tool at Apple Built-in iSight Firmware Tools for Linux. It can dig the guts out of Mac OS X iSight-driver and equip your Linux with a functioning camera. The keyboard is a trivial one. Like previously, I just keyfuzz'ed the keys into something useful. See the OpenSuse 12.3 installation blog entry for details.
There is one thing you may want to check. If you enable SSHd, like I always do on all servers. As default /etc/sysconfig/SuSEfirewall2.d/services/sshd defines as TCP/22 to be open. That is the general idea, but apparently there is so much SSHd bombing going on, that I always tar pit my installations. For some strange reason Suse engineers chose not to allow that in a specific service definition file, but it has to be in the classic /etc/sysconfig/SuSEfirewall2 file, section FW_SERVICES_ACCEPT_EXT="0/0,tcp,22,,hitcount=3,blockseconds=60,recentname=ssh"
I urge everyone of you to rename the services/sshd into something else and add the above line. This makes bombing your SSH-port so much more difficult. And it does not affect your own login performance, unless you choose to bomb it yourself.
You may want to check OpenSuse's hardware compatibility list for details about Apple Laptops. The HCL has info about what works and what doesn't.
In general OpenSuse folks did a very good job with this one. There was a real improvement on ease installation. Thanks Roderick W. Smith for his help during my installation and thanks to Novell for giving this great distro for free!
Tar: resolve failed weirness
Tuesday, February 4. 2014
Installing own CA root certificate into openSUSE
Monday, February 3. 2014
Linux Integration Services for Hyper-V 3.5: Network status still degraded
Friday, January 24. 2014
Speedtest.net from Linux CLI
Monday, January 20. 2014
Speedtest.net has pretty much gained The-place-to-test-your-connection-speed -status. It's like Google for doing web searches. There simply is no real competition available.
Mr. Matt Martz (while throwing hot coals) did study their JavaScript-code enough to write their client-API with Python.
The installation into proper directory (recommended: /usr/local/bin/) with proper permissions is this simple:
wget -O speedtest-cli \
 https://raw.github.com/sivel/speedtest-cli/master/speedtest_cli.py
chmod +x speedtest-cli
The built-in automatic detection of nearest server does not work for me very well. Their recommended nearest server is not in the country I live (Finland), but on Russian side. The network connections over their border aren't that good and it simply does not yield reliable measurements. Not to worry, the CLI-version can do following:
speedtest_cli --list | fgrep Finland
864) Nebula Oy (Helsinki, Finland) [204.35 km]
Now that we know the server ID of a proper point, we can do:
speedtest_cli --server 864
It will yield:
Retrieving speedtest.net configuration...
Retrieving speedtest.net server list...
Testing from Finland Oyj (80.80.80.80)...
Hosted by Nebula Oy (Helsinki) [204.35 km]: 14.782 ms
Testing download speed........................................
Download: 92.69 Mbit/s
Testing upload speed..................................................
Upload: 4.32 Mbit/s
Nice!
Again, thanks Matt for sharing your work with all of us.
Making USB-bootable PLD RescueCD from your Linux
Tuesday, December 31. 2013
PLD RescueCD is my new favorite Linux rescue CD. It has a ton of stuff in it, even the ipmitool from OpenIPMI-project. One of these days, it so happened that I lost my IPMI network access due to own mis-configuration. I just goofed up the conf and oops, there was no way of reaching management interface anymore. If the operating system on the box would have been ok, it might have been possible to do some fixing via that, but I chose not to. Instead I got a copy of PLD and started working.
The issue is, that PLD RescueCD comes as ISO-image only. Well, erhm... nobody really boots CDs or DVDs anymore. To get the thing booting from an USB-stick appeared to be a rather simple task.
Prerequisites
- A working Linux with enough root-access to do some work with USB-stick and ISO-image
- syslinux-utility installed, all distros have this, but not all of them install it automatically. Confirm that you have this or you won't get any results.
- GNU Parted -utility installed, all distros have this. If yours doesn't you'll have to adapt with the partitioning weapon of your choice.
- An USB-stick with capacity of 256 MiB or more, the rescue CD isn't very big for a Linux distro
- WARNING! During this process you will lose everything on that stick. Forever.
- Not all old USB-sticks can be used to boot all systems. Any reasonable modern ones do. If you are failing, please try again with a new stick.
- PLD RescueCD downloaded ISO-file, I had RCDx86_13_03_10.iso
- You'll need to know the exact location (as in directory) for the file
- The system you're about to rescue has a means of booting via USB. Any reasonable modern system does. With old ones that's debatable.
Assumptions used here:
- Linux sees the USB-stick as /dev/sde
- ISO-image is at /tmp/
- Mount location for the USB-stick is /mnt/usb/
- Mount location for the ISO-image is /mnt/iso/
- syslinux-package installs it's extra files into /usr/share/syslinux/
- You will be using the 32-bit version of PLD Rescue
On your system those will most likely be different or you can adjust those according to your own preferences.
Information about how to use syslinux can be found from SYSLINUX HowTos.
Steps to do it
- Insert the USB-stick into your Linux-machine
- Partition the USB-stick
- NOTE: Feel free to skip this if you already have a FAT32-partition on the stick
- Steps:
- Start GNU Parted:
parted /dev/sde - Create a MS-DOS partition table to the USB-stick:
mktable msdos - Create a new 256 MiB FAT32 partition to the USB-stick:
mkpart pri fat32 1 256M - Set the newly created partition as bootable:
set 1 boot on - End partitioning:
quit - Format the newly created partition:
mkfs.vfat -F 32 /dev/sde1 - Copy a syslinux-compatible MBR into the stick:
dd if=/usr/share/syslinux/mbr.bin of=/dev/sde conv=notrunc bs=440 count=1 - Install syslinux:
syslinux /dev/sde1 - Mount the USB-stick to be written into:
mount /dev/sde1 /mnt/usb/ - Mount the ISO-image to be read:
mount /tmp/RCDx86_13_03_10.iso /mnt/iso/ -o loop,ro - Copy the ISO-image contents to the USB-stick:
cp -r /mnt/iso/* /mnt/usb/ - Convert the CD-boot menu to work as USB-boot menu:
mv /mnt/usb/boot/isolinux /mnt/usb/syslinux - Take the 32-bit versions into use:
cp /mnt/usb/syslinux/isolinux.cfg.x86 /mnt/usb/syslinux/syslinux.cfg - Umount the USB-stick:
umount /mnt/usb - Umount the ISO-image:
umount /mnt/iso - Un-plug the USB-stick and test!
Result
Here is what a working boot menu will look like: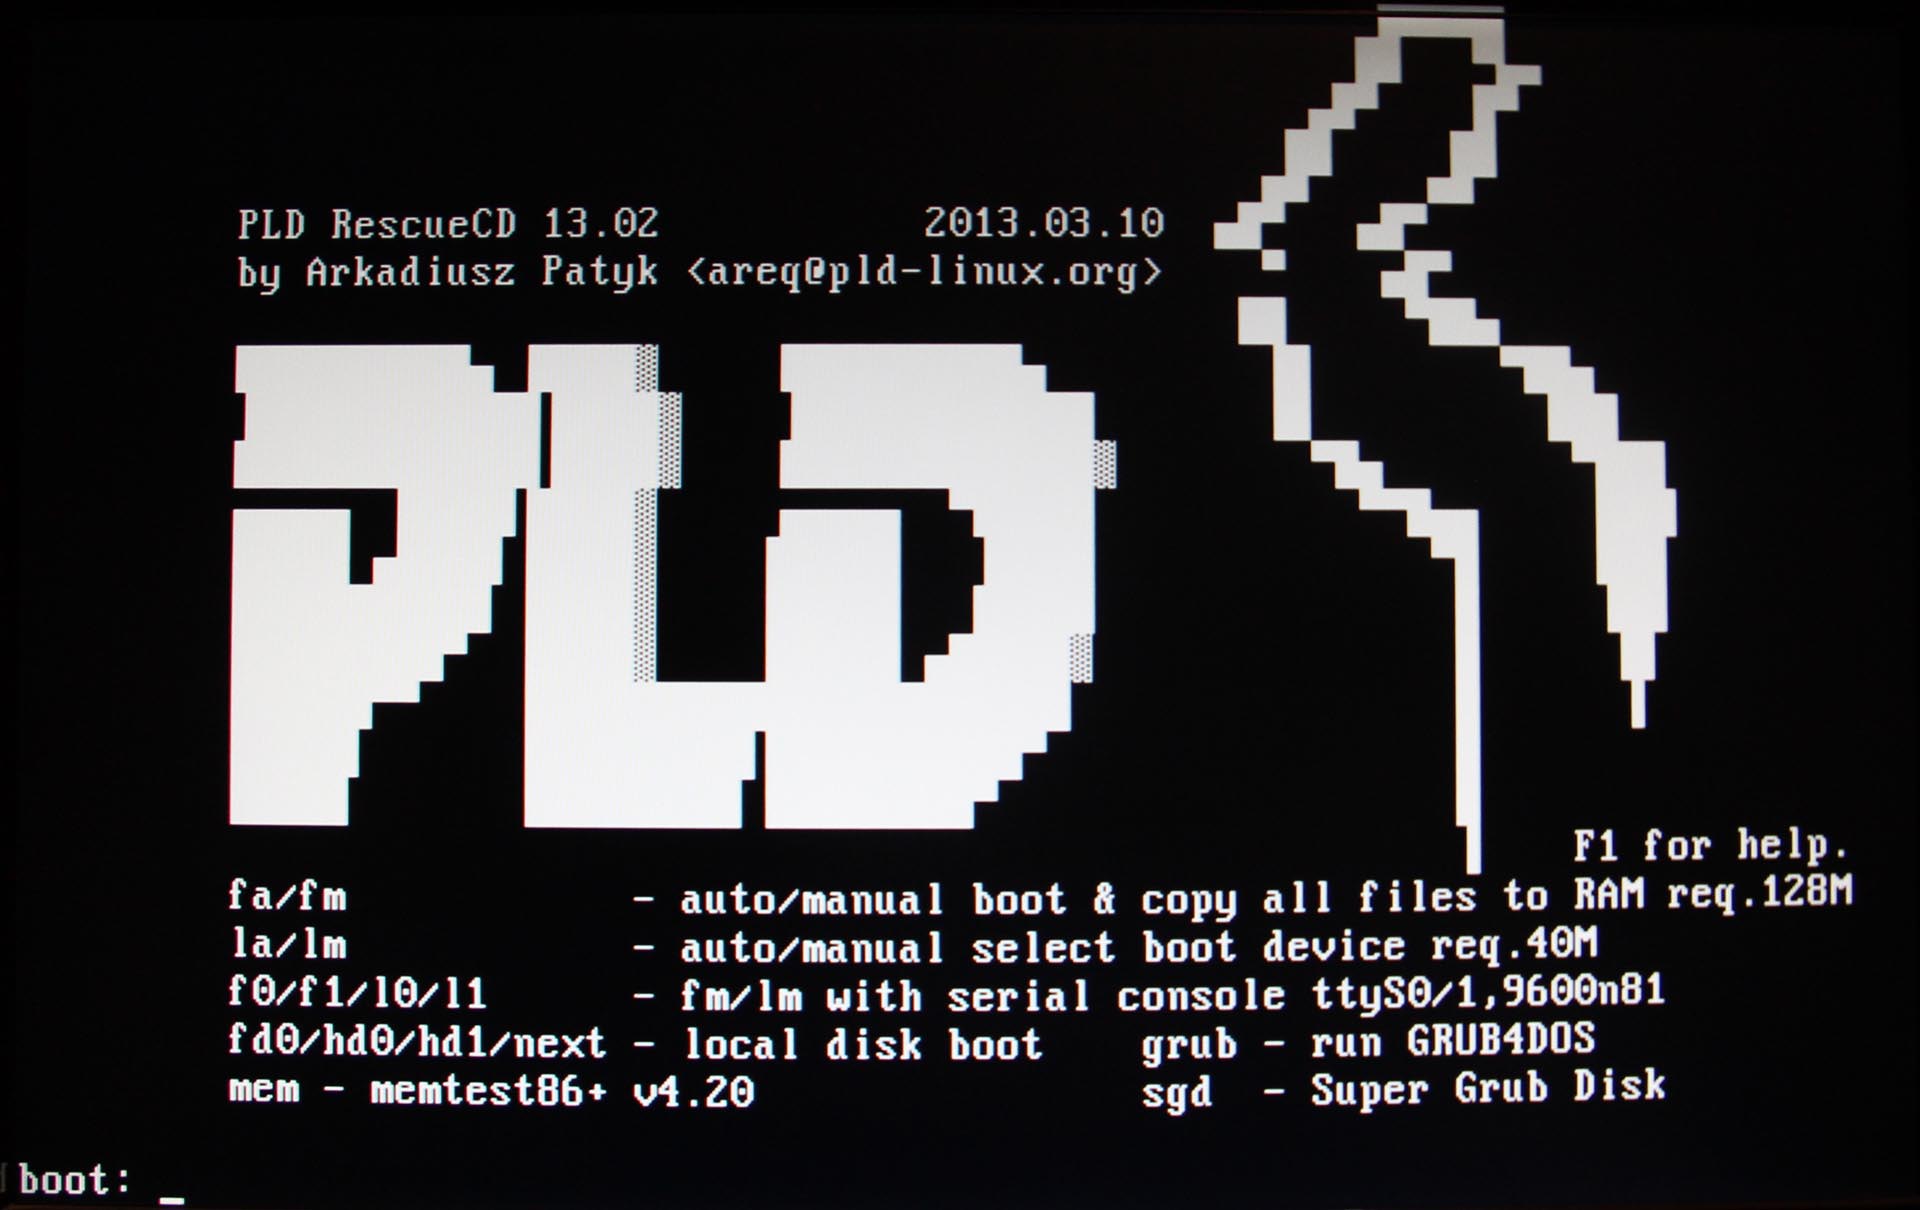
Like always, any comments or improvements are welcome. Thanks Arkadiusz for your efforts and for the great product you're willing to share with rest of us. Sharing is caring, after all!
Mac OS X Dolby Digital 5.1 with Mac Mini [solved]
Monday, December 30. 2013
This is my 2nd attempt of trying to clarify how to get Dolby Digital 5.1 output via HDMI. The previous attempt can be found here. All the information I can find on this subject shows that for some people multi-channel audio works fine, nothing special is required, but then again for some of us this is a pain and its almost impossible to get this working.
Here is my setup:
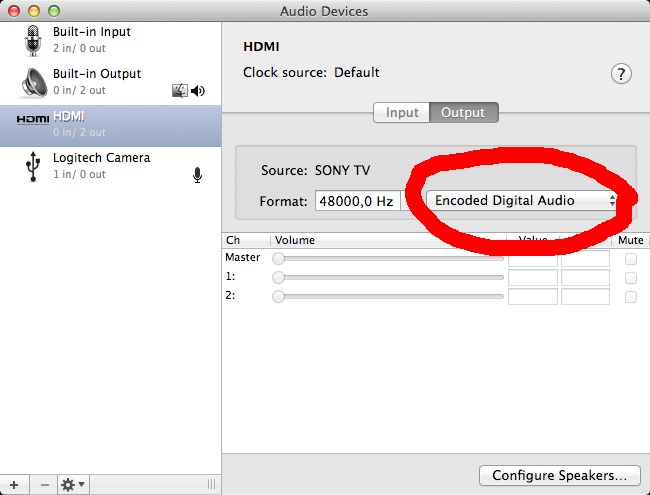
The problem, like presented earlier is depicted here: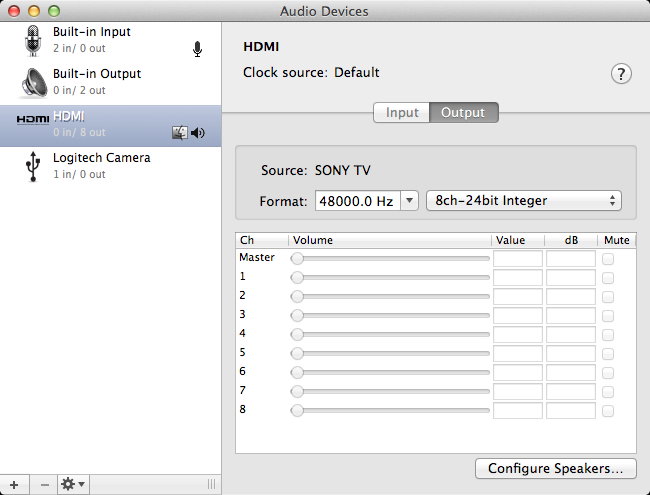
The Audio MIDI setup clearly displays as Sony TV being the HDMI output device. The problem is, that it actually isn't. Here is another screen capture of Audio MIDI setup from my brother's computer: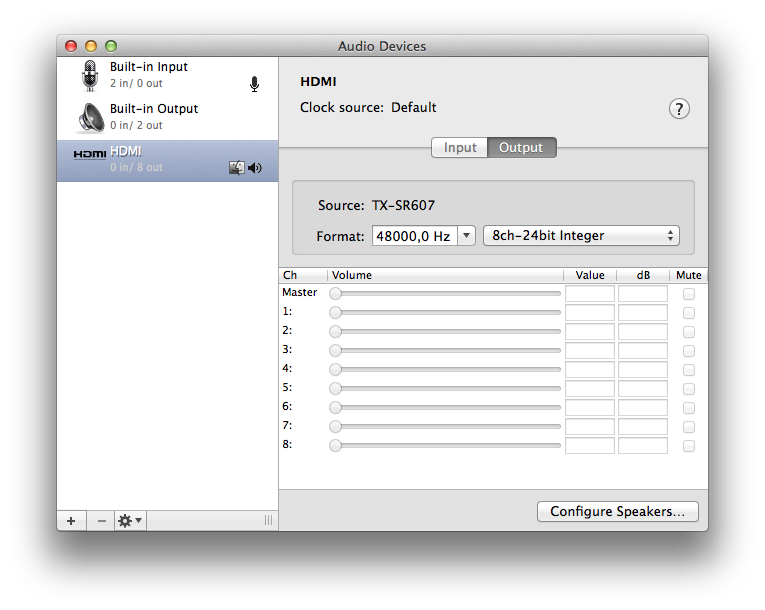
Whoa! His Mac Mini displays his A/V amp as the HDMI destination. Totally different from what my Mac displays. The only explanation for this is, that my Yamaha takes the TV's spec from the HDMI and proxies it to the Mac and his Onkyo doesn't take anything, it simply presents itself as the destination. If you'd ask me, Onkyo's solution is much better than Yamaha's. Anyway, the amp has to pick up the audio signal to be sent to loudspeakers and do a stereo mixdown of a multi-channel signal to be sent for the TV. So there will be a lot of processing at the amp, why not declare itself as the destination for the Mac. It seems to be confusing.
The Solution
Here is what I did to get proper 5.1 channel sound working from my Mac Mini. The problem is, that I cannot get it back to the broken mode again, it simply stays fully functional no matter what I do. There must be something going on at the amp end and something else going on at the Mac end. For some reason they don't match or they do match and there is very little I can do to control it. But anyway, here are my steps with Audio MIDI Setup utility:
- In the Mac, set HDMI to Use this device for sound output and Play alerts and sound effects trough this device
- Confirm that the speaker setup is correct and click the speakers to confirm that test tone does not output as expected
- In the amp, make sure that the input HDMI is decoding multi-channel audio as expected
- Auto-detect or stereo won't work
- Previously my instructions stopped here
- In the Mac, at the HDMI, in Format set it as Encoded Digital Audio, the Hz setting is irrelevant

- This will effectively unset HDMI as output device and set Built-in Output as the output device. It also pretty much makes all sounds in the system non-functional.
- Again at the HDMI, in Format select 8ch-24bit Integer, it will reset the HDMI to Use this device for sound output and Play alerts and sound effects trough this device
- Re-confirm that speaker setup is correct. At this point the test tone should work from the speaker correctly.
- You're done!
This fix and pretty much everything about Mac Mini's HDMI audio output is bit fuzzy. Any real solution should be reproducible somehow. This isn't. But I can assure you, that now my multi-channel audio really works as expected.
Any feedback about this solution is welcome!
Update 1st Jan 2014:
The number of channels configured into Audio Setup does not reflect the actual number of speakers you have. That is done in Configure Speakers. I have 8ch (or 8 speakers) configured in the Audio Setup, but this is a screenshot of my speaker setup: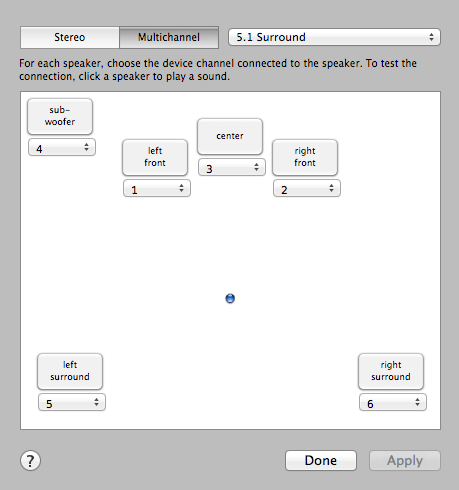
They have different number of speakers! It still works. That's how it is supposed to be.
Downgrading Internet Explorer 9 into 8 on Windows 7
Wednesday, December 18. 2013
That should be an easy task, right? You guessed it. If I'm writing about it, it isn't. Once in a while I still test with a real IE8. The IE10 and IE11 emulators should be good enough, but they aren't. Here are the stats from this blog:
People seem to run with IE8 a lot. They shouldn't but ... they do. 
Here is what I did:
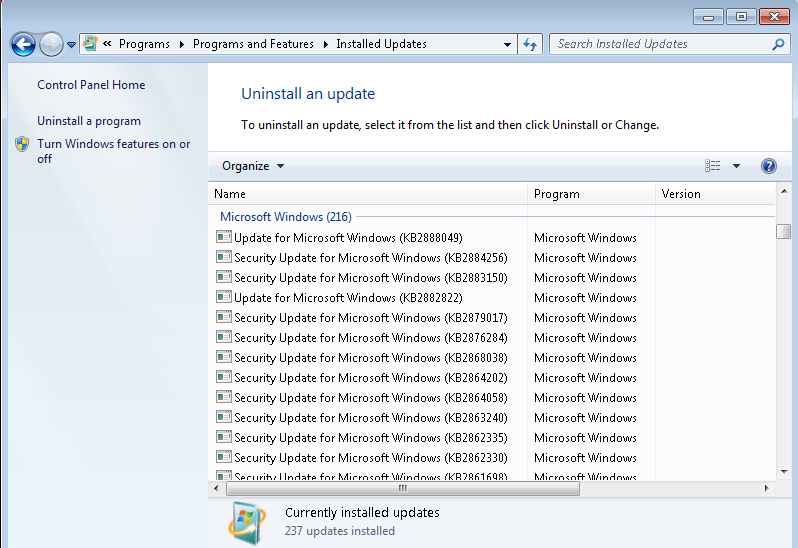
- List of Windows updates installed on the computer:
- Managed to find Internet Explorer 9 in it (on Windows 7, that's pretty normal):

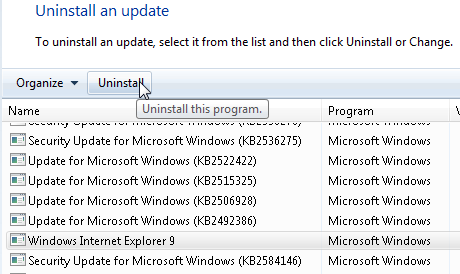
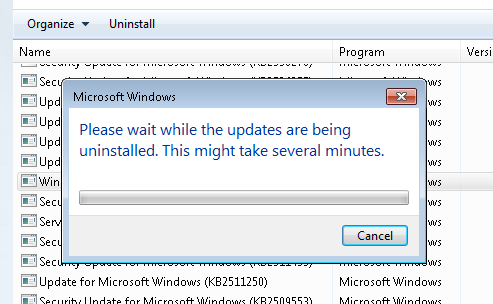
- Un-install starts:
- Yep. It took a while and hung. Darn!
- I waited for 20 minutes and rebooted the hung piece of ...
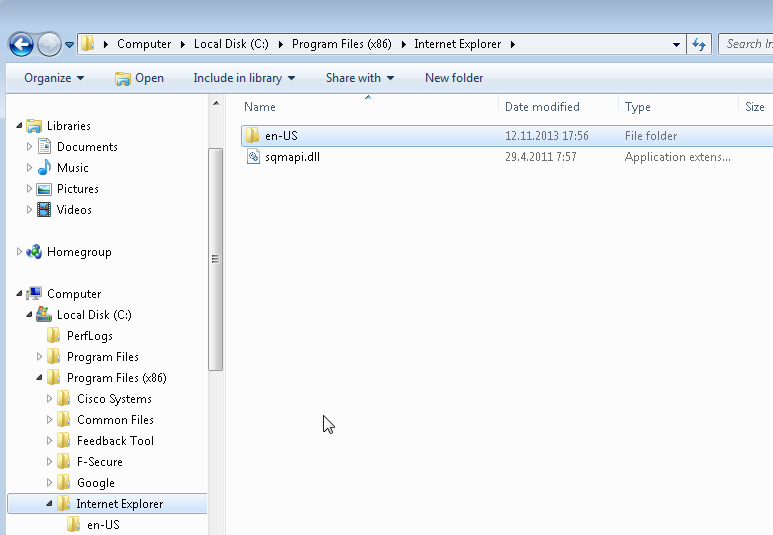
- Reboot did some mopping up and here is the result. No IE anywhere:

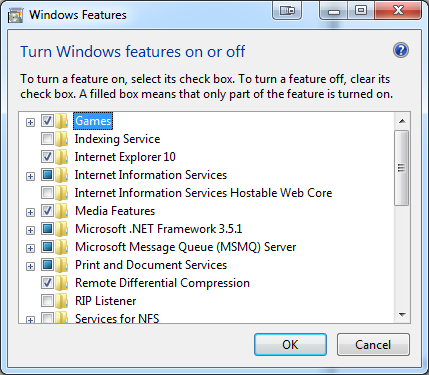
- Guess who cannot re-install it. On a normal installation it is listed in Windows features, like this:
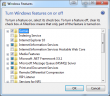
In my case, no: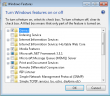

No amount of reboots, running sfc.exe or anything I can think of will fix this. This is what I already tried:
- Attempt fix with Windows Resource Checker:
PS C:\Windows\system32> sfc /scannow
Beginning system scan. This process will take some time.
Beginning verification phase of system scan.
Verification 100% complete.
Windows Resource Protection did not find any integrity violations.
It simply fails to restore the files, because all the bookkeeping says, that IE8 shouldn't be there! - Let' just download the installation package and re-install manually. Download Center - Internet Explorer 8
- Ok, we're not going to do that, because the IE 8 installation package for Windows 7 does not exist. Reason is very simple. Win 7 came with IE8. It is an integral part of the OS. You simply cannot run the Windows 7 without some version of IE. No installation packages necessary, right? Internet Explorer 8 for Windows 7 is not available for download
- Right then. I took the Windows Vista package and ran the installation anyway. All the compatiblity modes and such yield the same result. Internet Explorer 8 is not supported on this operating system
- Re-installation instructions, part 1: Reinstalling IE8 on Windows 7. Not much of a help. The
- Re-installation instructions, part 2: How to Reinstall Internet Explorer in Windows 7 and Vista. No help there either.
- Registry tweaking into HKEY_LOCAL_MACHINE\SOFTWARE\Microsoft\Windows NT\CurrentVersion\Winlogon\GPExtensions to see if {7B849a69-220F-451E-B3FE-2CB811AF94AE} and {CF7639F3-ABA2-41DB-97F2-81E2C5DBFC5D} are still there as suggested by How to Uninstall IE8. Nope. No help with that either. That article mentions "European Windows 7". What could the difference be?
- Perhaps re-installing Service Pack 1 would help? But well... in Windows 7 SP1 cannot be re-installed like it was possible in Windows XP. That actually did fix a lot of operating systems gone bad at the XP-era.
The general consensus seems to be, that you simply cannot lose IE from Windows 7. Magically I did. Just based on the Wikipedia article about removing IE, it is possible.
Some of the symptoms I'm currently having is Windows Explorer Refuses to Open Folders In Same Window. Some of the necessary DLLs are not there and Windows Explorer behaves funnily.
I don't know what to attempt next.
Getting the worst of Windows 7 - Install updates automatically (recommended)
Friday, December 13. 2013
Windows 8.1 upgrade and Media Center Pack
Wednesday, December 11. 2013
Earlier I wrote about upgrading my Windows 8 into Windows 8.1. At the time I didn't realize it, but the upgrade lost my Media Center Pack.
At the time I didn't realize that, but then I needed to play a DVD with the laptop and noticed, that the OS is not capable of doing that anymore. After Windows 8 was released it didn't have much media capabilities. To fix that, couple months after the release Microsoft distributed Media Center Pack keys for free to anybody who wanted to request one. I got a couple of the keys and installed one into my laptop.
Anyway, the 8.1 upgrade forgot to mention that it would downgrade the installation back to non-media capable. That should be an easy fix, right?
Wrong!
After the 8.1 upgrade was completed, I went to "Add Features to Windows", said that I already had a key, but Windows told me that nope, "Key won't work". Nice.
At the time I had plenty of other things to take care of and the media-issue was silently forgotten. Now that I needed the feature, again I went to add features, and hey presto! It said, that the key was ok. For a couple of minutes Windows did something magical and ended the installation with "Something went wrong" type of message. The option to add features was gone at that point, so I really didn't know what to do.
The natural thing to do next is to go googling. I found an article at the My Digital Life forums, where somebody complained having the same issue. The classic remedy for everything ever since Windows 1.0 has been a reboot. Windows sure likes to reboot. I did that and guess what, during shutdown there was an upgrade installing. The upgrade completed after the boot and there it was, the Windows 8.1 had Media Center Pack installed. Everything worked, and that was that, until ...
Then came the 2nd Tuesday, traditionally it is the day for Microsoft security updates. I installed them and a reboot was requested. My Windows 8.1 started disliking me after that. The first thing it did after a reboot, it complained about Windows not being activated! Aow come on! I punched in the Windows 8 key and it didn't work. Then I typed the Media Center Pack key and that helped. Nice. Luckily Windows 8 activation is in the stupid full-screen mode, so it is really easy to copy/paste a license key. NOT!
The bottom line is: Media Center Pack is really poorly handled. I'm pretty sure nobody at Microsoft's Windows 8 team ever installed the MCP. This is the typical case of end users doing all the testing. Darn!
OS X Time Machine waking up from sleep to do a backup
Tuesday, November 26. 2013
 I was pretty amazed to notice that my Mac actually wakes up for the sole
purpose of running a scheduled backup and goes back to sleep. Oh, but
why?
I was pretty amazed to notice that my Mac actually wakes up for the sole
purpose of running a scheduled backup and goes back to sleep. Oh, but
why?
Going to web with the issue helped, I found Apple support community discussion with topic "time machine wake up unwanted". I don't think my pre 10.9 did that. Anyway I can confirm that 10.9 does this rather stupid thing.
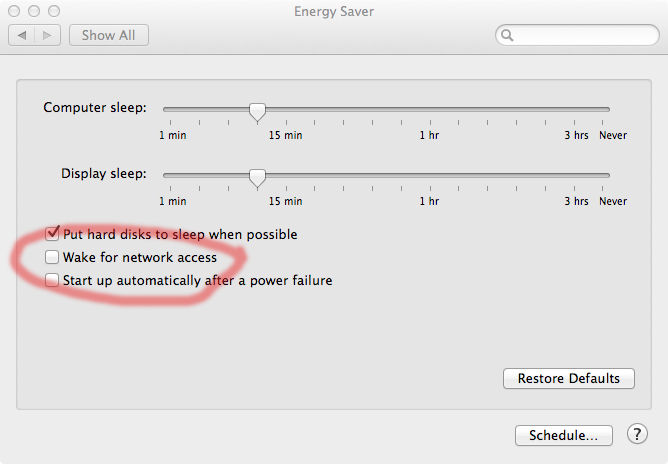
Luckily the discussion thread also offers the fix: "Time Machine won't wake up a Mac, unless another Mac is backing-up to a shared drive on it via your network, and the Wake for network access box is checked in System Preferences > Energy Saver". Definitely something for me to try.
It helped! I can confirm, that there are no backups for the time my Mac was asleep. Pretty soon I woke it up, it started a TM-backup and completed it.
Thanks Pondini in Florida, USA!

