Mac OS X 10.9 Mavericks .ISO image
Wednesday, October 23. 2013
Bug in Linux 3.11: Netfilter MASQUERADE-target does not work anymore
Wednesday, October 9. 2013
iOS 7 experiences
Thursday, September 19. 2013
Is it just me, or is Apple's new iOS 7 just bunch of hot air?
I got the released version immediately to my iPhone and iPad. My initial reaction: the new colors are disgusting. Perhaps person using the new user interface needs to be drunk or on drugs to like them.
After half an hour of browsing archived 1995 black and white webpages, I was able to start using the painter's color sheet ... erhm... iOS 7. There was nothing improved there. Calendar had been made worse, month view didn't display entries anymore. The top left "bar" indicator had been turned into weird dots. Now it's not possible to ask "how many bars do you have?".
In the spirit of trying to be positive I found a single thing I liked. iCloud supports notes now. That I've been really waiting for. Hopefully they finally fixed the iPad's losing APN-settings bug. I have to admit, that the new swipe-screen looks good, much better than the classic old one. But something funny happens when you swipe, too many colors burn trough my eyes. 
The official list of new features is here, but I still cannot find anything with a "wow"-factor in it.
Changing network location on Windows 8 and 2012
Saturday, August 31. 2013
Is it just me, or has somebody at Microsoft really dropped the ball on network location setting? When a Windows computer detects a new network, which it has not be attached into earlier, it pops you the question and asks about how to profile the security in that particular case. If everything goes ok, there is no need to change anything. However, when you install your computer, you don't get to answer that. Also, there is commonly known that people make mistakes. What if you simply fumbled the question and clicked wrong.
In Windows 7 the setting is simple:
![]()
You go there, click the value and select a better one. In Windows 8, Windows 8.1, Windows Server 2012 and Windows Server 2012 R2 that is not the case. The setting cannot be changed. Period. Wtf?
![]()
There is a way to change the setting. I found this article with Google: How do I set my wireless network to be private instead of public? The "Easiest" and "Most direct" are crap, IMHO. The part with Local Security Policy seems to work:
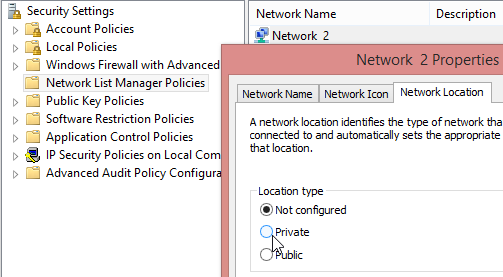
That seems to be working from Windows 7 onwards. Whose bright idea it was to make the change that difficult?
IPv6 through WLAN access point revisited
Wednesday, August 28. 2013
This is a follow-up for my previous article about running IPv6 and WLAN access point. There I said "This was actually very easy to do into DD-WRT" and now I'd like to take that back. 
It seemed to be easy, but ... Here are my settings in detail. Btw. I'm running DD-WRT v24-sp2 big
Release: 07/24/13 (SVN revision: 22118)
1. disable the autoconfiguration from the WLAN access-point and manually define a static IPv6-address
This is the part which I struggled the most. Sure it is easy to remove the manually assigned IPv6-address from an interface, just run:
ip -6 addr delete 2001::-da-IP-here-/64 dev br0
on a shell. It will drop the autoconfigured address and it will stay away. For a while. It surely won't survive a reboot.
To make this stick, go to web GUI Administration --> Commands and add a startup command:
echo 1 > /proc/sys/net/ipv6/conf/all/forwarding
echo 0 > /proc/sys/net/ipv6/conf/all/autoconf
echo 0 > /proc/sys/net/ipv6/conf/all/accept_ra
echo 0 > /proc/sys/net/ipv6/conf/all/accept_ra_pinfo
/usr/sbin/ip -6 addr add 2001:-da-IP-here-/64 dev br0
That makes the settings stick. Autoconfiguration will be gone and a static address will be assigned instead. I attempted at least 20 different combinations while looking the sysctl-settings list, but that was the 1st one I found to be actually functional for deactivating the autoconfig.
2. use a static default route from the WLAN access-point and confirm that it has proper IPv6-connectivity
4. make sure, that any incoming traffic from the mobile clients is
properly routed to the real IPv6-router, and confirm that traffic flows
both ways
Yet again, go to web GUI Administration --> Commands and add a startup command:
/usr/sbin/ip -6 route add default via 2001:-da-router-IP-here-::1 metric 1
That creates a static route which will work and fulfill the 2). To achieve 4) make sure to have the metric 1 at the end.
3. run router advertisement daemon (RADVD) to advertise the WLAN access-point as a proper router for any wireless clients
In the DD-WRT IPv6 article it said that RADVD configuration should be like this:
interface br0 {
AdvSendAdvert on;
prefix 0:0:0:1::/64 {
AdvOnLink on;
AdvAutonomous off;
};
};
Don't do that! DON'T! It will royally fuck up your LAN. Nothing in IPv6-land will work if you literally copy/paste that like they suggest. The problem is with the prefix of 0:0:0:1::/64, it will assume that your network has that /64-prefix and assign route and IP-address for any IPv6-host with that prefix. I can bet you $1.000.000 dollars, that it will not be your IPv6-prefix. ... and win.
Just put the exactly same prefix your real IPv6-router has. The WLAN access point's RADVD should be configured pretty much exactly alike. For the configuration directives see radvd.conf manual-page. It literally says:
- AdvSendAdvert: do send advertisements, default is off
- AdvOnLink: use the prefix for link determination (meaning: yes you can get to The Net via this), it is on by default, you really don't need this line at all
- AdvAutonomous: do distribute new the IP-addresses from this RADVD to your wireless (and wired) clients, yet again it is on by default and you really don't need this
With these settings I succeeded a reboot and still had my wireless and wired clients working using either of the two IPv6-routers. On Windows the setup will display two default routes, like this:
PS C:\Windows\system32> netsh interface ipv6 show route
Publish Type Met Prefix Idx Gatewa
------- -------- --- ------------------------ --- ------
No Manual 256 ::/0 18 fe80::
No Manual 256 ::/0 18 fe80::
On Linux:
# ip -6 route show | fgrep default
default via fe80:: dev eth0 metric 1024 expires 0sec mtu 1280 hoplimit 64
default via fe80:: dev eth0 metric 1024 expires 0sec mtu 1280 hoplimit 64
That's ok. IPv6 will support that ok. Just be aware, that your traffic may route either way.
Windows IPv6 connection starting to "rot" over time [Solved!]
Tuesday, August 27. 2013
I've been using IPv6 on my own LAN for years. Most of the things I use on daily basis have IPv6 and it seems to work. For example a Sony television or iPhone 4S does not use IPv6, but iPad does.
On my router there is a Router Advertisement Damon to do stateless auto-configuration. On Windows 7 and 8 they have really weird things running out-of-the-box, but I'm in a habit of running (as admin):
netsh interface ipv6 set privacy state=disabled store=active
netsh interface ipv6 set privacy state=disabled store=persistent
netsh interface ipv6 set global randomizeidentifiers=disabled store=active
netsh interface ipv6 set global randomizeidentifiers=disabled store=persistent
netsh interface teredo set state disabled
That way I'm using fixed IPv6-addresses and disable the unnecessary Teredo-tunnel.
I don't exactly know why or how, but on one of my computers (running Windows 7), the IPv6-sockects started to not work properly. The symptoms include lot of reconnections and for example in SSH-client, the connection would simply drop. I did everything I knew, but nothing helped. A failing SSH-connection would look like this on the wire:
![]()
After 31 seconds of connection, there is a sporadic retransmission. That is not dangrous and it happens sometimes. My Windows 7 would respond with a duplicate ACK into it, waits 3 seconds and goes ballistic. It simply starts re-transmitting the already transmitted data with 1, 3 and 5 second intervals before determining that the connection has died. WTF?! The connection is not bad! It works on all other computers. The issue can be easily repeated and it works the same way every time. Windows thinks it needs to start a burst of re-transmissions and disconnects when they seem to fail.
During one of the Google-session for the fix, I found netsh interface ipv6 reset command. I tried it:
PS C:\Windows\system32> .\netsh.exe interface ipv6 reset
Reseting Global, OK!
Reseting Interface, OK!
Reseting Subinterface, OK!
Restart the computer to complete this action.
Did the Windows restart, ran the above commands to disable privacy, randomization and teredo-tunnel. Everything started to work! Whooo-hoo! Now my SSH-connections don't drop anymore. How cool is that!
The fix is very microsoft-ish. Some counter ticked into illegal value and in their mind the correct fix is to reset everything to the post-installation state. On *nix-world network-stack -code would be of much better quality and the entire issue would never happen!
NTPd vs. Chrony
Monday, August 19. 2013
In my Fedora 19 I've been wondering why my NTPd does not start on boot. It used to do so couple of Fedora installations ago. This is not a big deal, so I've been mostly ignoring it. Today I dug up some energy to investigate.
The reason was much simpler than I tought. On my very short checklist were:
- Confirm that systemd has ntpd.service enabled, it was.
- Confirm that ntpd.service has a dependency to start the service after network interfaces are up, it was chained to do a single ntpdate update and start the daemon after it.
- Needed interfaces have not been blocked and/or needed interfaces have been enabled in config, everything was out-of-the-box: all network interfaces allowed.
The daemon even had the panic-threshold disabled in the config, so it wouldn't choke on startup if time was badly off for some reason. I found no reason for the daemon to start.
However, doing a search for ntpd in /usr/lib/systemd/system revealed what was going on. chronyd.service has Conflicts=ntpd.service in the service description. WTF?! What the hell is chronyd?
According to http://chrony.tuxfamily.org/ it is "a pair of programs which are used to maintain the accuracy of the system clock on a computer". Sounds like a NTPd to me. Running netstat confirmed the fact:
# netstat -nap | fgrep :123
udp 0 0 0.0.0.0:123 0.0.0.0:* 666/chronyd
udp6 0 0 :::123 :::* 666/chronyd
The daemon does bind to NTP-ports. To get chronyd running properly, all I had to do was add proper time source and allowed updates from my LAN with allow-directives.
That's it!
Linux failing to mount iSCSI on boot
Thursday, August 15. 2013
My Fedora 19 failed to boot if I had an entry for an iSCSI-mount in /etc/fstab. During boot the system just fell to emergency mode. To get the box to boot, I simply did a "stupd man's solution", and commented the line out. This is what happens if I have the standard line in fstab:
![]()
My fstab line is:
/dev/qnap /mnt/qnap ext4 defaults 1 0
It took me a while to get back to the issue and investigate, it was that bad. This is the clue I found on Fedora project's documentation about iSCSI. They said, that any iSCSI-volumes should be mounted with a special flag _netdev. I changed to that, and hey presto! During bootup, it first does something and then mounts the iSCSI-drive. I merged those two occurrences into a single photo:
![]()
It works! I'm so happy about this. For clarity, the fstab-line is:
/dev/qnap /mnt/qnap ext4 _netdev 0 0
Own RPM package: Make symlink survive update/freshen
Friday, August 9. 2013
During my ventures in the Linux-land, I constantly package and re-package RPMs. Sometimes to introduce new functionality to existing package or to simply get a newer version that distro vendor is prepared to offer. Number of times I've created packaging to software that is not in the distro at all.
Another thing I love using are symlinks. I can have newer and older package of a software and can simply switch with updating the symlink into correct version. When I combined those two, it bit me in the ass.
I had quite simple script-blocks to handle the symlink:
%post
cd /my/package/directory/
%{__rm} -f my.cool.symlink-name
ln -s package/library/my.cool my.cool.symlink-name
%preun
%{__rm} -f /my/package/directory/my.cool.symlink-name
On install, that worked, but on update/freshen there was no symlink left. I was puzzled, why is that? Little bit of googling revealed two pieces of information: RPM spec-file documentation about scripts, especially the Install/Erase-time Scripts -part and 2nd the Fedora Project's packaging information, especially the scriptlet ordering. I'll abbreviate the Fedora's ordering here omitting the non-interesting parts:
- %pre of new package
This is the part where my script confirms that the symlink exists. - (package install)
- %post of new package
- %preun of old package
During update/freshen, this is the part where my script removes the symlink created in 1.)
Crap! - (removal of old package)
- %postun of old package
Further reading of RPM spec-docs said "the argument passed to version 1.0's scripts is 1". Ok, nice to how, but now what? How can I utilize the information? What is the exact syntax for the script? The only usable information I found was in the Fedora packaging instructions, there was an example:
%preun
if [ $1 = 0 ] ; then
/sbin/install-info --delete %{_infodir}/%{name}.info %{_infodir}/dir || :
fi
So this was the thing I had to try. My solution is to change the %preun-block:
%preun
if [ $1 -lt 1 ] ; then
# This is really an un-install, not deleting previous version on update
%{__rm} -f /my/package/directory/my.cool.symlink-name
fi
I did that and upgraded the package. Poooof! The symlink was gone like there was no change at all. WHY? I upgraded the revision number of the package and upgraded again. NOW it worked! Nice.
There is a simple explanation what happened. It says in the Fedora project's order-list that "%preun of old package". OLD package! It works starting from the next update, but not on the first one.
Anyway I was delighted to get that one sorted.
Handling /var/run with systemd
Tuesday, August 6. 2013
Internet Explorer 11 adventures
Wednesday, July 31. 2013
I've been using a Windows 8.1 preview for a while and being a web developer, I stumbled into couple of noteworthy issues with IE 11. See my previous entry about Win 8.1.
User-Agent string
There are pretty much 2 variants:
Mozilla/4.0 (compatible; MSIE 7.0; Windows NT 6.3; WOW64; Trident/7.0; .NET4.0E; .NET4.0C)
or:
Mozilla/5.0 (Windows NT 6.3; WOW64; Trident/7.0; rv:11.0) like Gecko
The only way I could get the "like Gecko" -mode enabled on a XHTML 1.0 -site, was from developers tools in the Edge-mode. My site also has a <meta http-equiv="X-UA-Compatible" content="IE=9" /> in it, but removing or adding the tag does not seem to have any effect. I'm guessing, that Edge-mode works out-of-the-box only in HTML 5. The important thing to not here is, that IE 11 declares itself as a IE 7.0, but unlike a "real" IE 7, this has Trident rendering engine 7.0. Also there is declaration of a "real-version" or rv:11.0.
Emulating previous browser versions
Gone. The good thing is that F12 developers tools have been completely re-written, but it is impossible to get the classic standards selection. I found two discussions about that. First is from superuser.com and second from stackoverflow.com.
Microsoft's idea is to go to http://www.modern.ie/en-us/virtualization-tools and use their virtualization service / tools to use a proper old browser. My advice would be: just ignore anybody using the ancient crap. I'd draw the line on IE 9, it still is pretty popular browser, but on my statistics anything older than IE 8 are totally gone.
Getting Zend Framework 1 to detect IE 11 properly
On my projects I have the ZF 1 running. I've been using Browser Capabilies Project's browscap.ini on PHP. It has solid integration into ZF 1. The bad thing is that BCP is not well maintained anymore due to key persons losing interest into maintaining one. Anyway, here is my patch into 5020:
--- php_browscap.ini.orig 2013-07-31 16:20:08.749140271 +0300
+++ php_browscap.ini 2013-07-31 16:24:14.563058655 +0300
@@ -31179,6 +31192,64 @@
Platform="WinNT"
Platform_Version=3.1
+;;;;;;;;;;;;;;;;;;;;;;;;;;;;;;;;;;;;;;;; IE 11.0
+
+[IE 11.0]
+Parent=DefaultProperties
+Comment="IE 11.0"
+Browser="IE"
+Version=11.0
+MajorVer=11
+MinorVer=0
+Beta=true
+Win32=true
+Frames=true
+IFrames=true
+Tables=true
+Cookies=true
+BackgroundSounds=true
+JavaScript=true
+VBScript=true
+JavaApplets=true
+ActiveXControls=true
+CssVersion=3
+
+[Mozilla/*(Windows NT 6.1*64*Trident/7.0; rv:11.0*)]
+Parent=IE 11.0
+Platform="Win7"
+Platform_Version=6.1
+Win32=false
+Win64=true
+
+[Mozilla/*(Windows NT 6.1*Trident/7.0; rv:11.0*)]
+Parent=IE 11.0
+Platform="Win7"
+Platform_Version=6.1
+
+[Mozilla/*(Windows NT 6.2*Trident/7.0; rv:11.0*)]
+Parent=IE 11.0
+Platform="Win8"
+Platform_Version=6.2
+
+[Mozilla/*(Windows NT 6.3*Trident/7.0; rv:11.0*)]
+Parent=IE 11.0
+Platform="Win8.1"
+Platform_Version=6.3
+
+[Mozilla/*(Windows NT 6.3; WOW64*Trident/7.0; rv:11.0*)]
+Parent=IE 11.0
+Platform="Win8.1"
+Platform_Version=6.3
+Win32=false
+Win64=true
+
+[Mozilla/*(Windows NT 6.3; Win64*Trident/7.0; rv:11.0*)]
+Parent=IE 11.0
+Platform="Win8.1"
+Platform_Version=6.3
+Win32=false
+Win64=true
+
;;;;;;;;;;;;;;;;;;;;;;;;;;;;;;;;;;;;;;;; IE 10.0
[IE 10.0]
The 2nd glitch is that ZF 1 heavily relies on seeing string "MSIE" in the UserAgent identification to determine, that we're talking about Internet Explorer. IE 11 doesn't state that anymore. It want's to be like Mozilla's Gecko-engine, and happily says so. My patch for ZF 1:
--- library/Zend/Http/UserAgent/AbstractDevice.php.orig 2012-11-16 17:23:41.000000000 +0200
+++ library/Zend/Http/UserAgent/AbstractDevice.php 2013-07-31 13:58:15.422657840 +0300
@@ -512,6 +512,19 @@
} elseif ($product == 'mozilla' && $result['browser_version'] < 5.0) {
// handles the real Mozilla (or old Netscape if version < 5.0)
$result['browser_name'] = 'Netscape';
+ } elseif ($product == 'mozilla' && isset($result['comment']['full']) &&
+ preg_match('#^([^;]+);.+Trident/(.+);\s+rv:(.+)#', $result['comment']['full'], $real)) {
+ // MSIE 10+ in native mode.
+ // In emulation mode, will match MSIE 7.0
+ $result['browser_name'] = "MSIE";
+ $result['browser_engine'] = "MSIE";
+ $result['browser_version'] = $real[3];
+ $result['browser_token'] = 'MSIE ' . $real[3];
+ if (isset($result['others']['full'])) {
+ $result['compatibility_flag'] = $result['others']['full'];
+ unset($result['others']);
+ }
+ $result['device_os_token'] = $real[1];
}
/** windows */
@@ -523,6 +536,8 @@
if (strpos($result['device_os_token'], 'Win') !== false) {
$windows = array(
+ 'Windows NT 6.3' => 'Windows 8.1',
+ 'Windows NT 6.2' => 'Windows 8',
'Windows NT 6.1' => 'Windows 7',
'Windows NT 6.0' => 'Windows Vista',
'Windows NT 5.2' => 'Windows Server 2003',
That makes ZF 1 react alike for IE 11 and all other versions before that. I did test that on IE 8, IE 9, IE 10 and IE 11. Also I confirmed that to function with IE 10 and IE 11 in IE 7 emulator mode.
64-bit process
Normally I run only 64-bit browsers. Google's crappy Chrome won't do that, so I try to stay away from it. Firefox has excellent spin-off project of CyberFox, most IE versions have 64-bit counterparts, Opera has 64-bit version. The thing with 64-bit browsers is that there are a number of exploits for browsers which are tailored to run on 32-bit processes.
Anyway, the story is that on Windows 8 and Windows 8.1 the tile-mode IE is always 64-bit, but desktop-mode is always 32-bit. Ghacks.net has a story about getting IE 10 in Windows 8 to run 64-bit in desktop-mode, but I fail to confirm the results.
On IE 11 I found a setting of "Enable 64-bit processes for Enhanced Protected Mode":
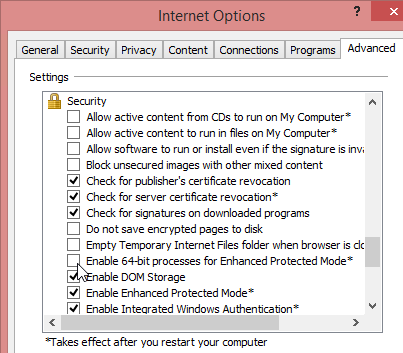
... I don't know how it should affect the browser behaviour. I'm still getting:
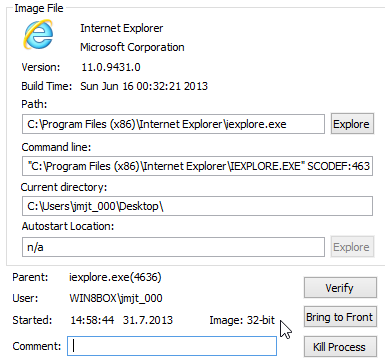
The root-process of IE seems to be 64-bit, but anything with a real web-page in it, is always 32-bit on desktop side. Tile-mode looks like this:
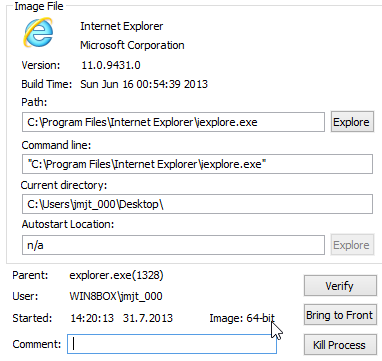
So, no avail for me. Any ideas are welcome.
Hyper-V
Wednesday, July 17. 2013
I was fiddling with a virtual machine and eventually messed it up. My fail made the Linux un-bootable and after a swift assessment I decided to extract the application data and re-install the OS. During my re-install I wanted an expanding virtual disk. As a default Hyper-V Manager creates fixed-size disks, but as my machine is not disk-I/O -dependant, I wanted to consume disk space to make my transfers easier.
Discarding the previous disk and creating a new dynamically expanding one wasn't the hard part. After I attempted to boot my machine for install I got into trouble. The darn thing wouldn't boot! The error text said: "Microsoft Emulated IDE Controller (Instance ID -blah-blarh-blaa-): Failed to Power on with Error 'General access denied error'. IDE/ATAPI Account does not have sufficient privilege to open attachment."
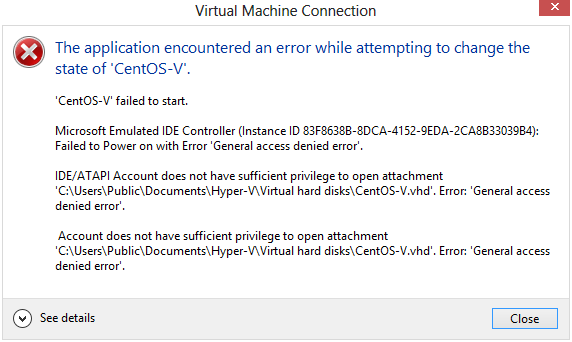
This type of error is widely documented. For example in Microsoft Support Knowledge base Article ID: 2249906. However, they fail to mention how to extract the virtual machine ID. Petri IT Knowledgebase has an article how to get that Get Hyper-V Virtual Machine Process ID and GUID. However, that fails to mention where the virtual machine description files are located at.
After all this research I still didn't have much to go on. Based on the petri.co.il-article, I made a search for files on my computer and deduced the path to be C:\ProgramData\Microsoft\Windows\Hyper-V\Virtual Machines.
Now that I had the virtual machine ID, I made an observation about the file's permissions. In the Microsoft KB-article they instruct you to grant full access -permission for the virtual machine. On my computer the other virtual drives have only read and write access. See this pic:

Full access sounds like an overkill anyway, I think R/W should do the trick in this case. This is what I ended up doing in PowerShell:
C:\Windows\System32\icacls.exe `
"C:\Users\Public\Documents\Hyper-V\Virtual hard disks\CentOS-V.vhd" `
/grant "NT VIRTUAL MACHINE\90DBD878-001C-412B-A668-D5BC8311C12E:(R,W)"
Now my machine boots into install.
Windows 8.1 preview
Monday, July 8. 2013
Where in my keyboard is the € (euro) -character?
Thursday, July 4. 2013
I don't know who stole my €-char. It is supposed to be on AltGr-e, but my keyboard doesn't do it. There is a discussion about the same problem. On the thread on French keyboard layout the problem is not solved.
On my Finnish keyboard layout even Windows On-Screen Keyboard -application displays AltGr-e as the soure, but to my great amazement adds a 2nd source for the €-char, AltGr-5. WTF?! It works! See pic below:
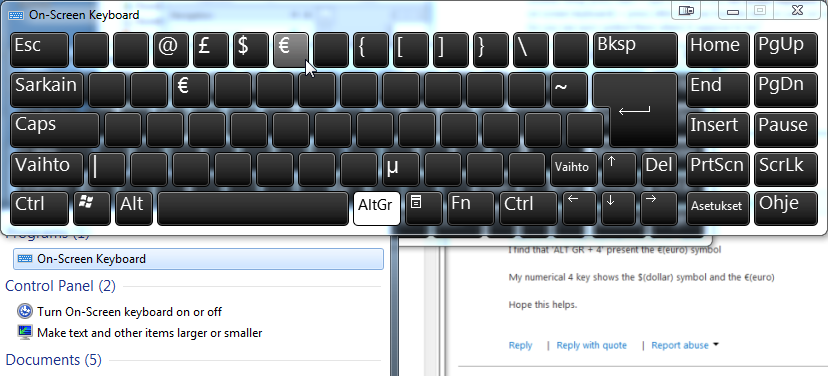
Hope this helps somebody. Unfortunately I could not determine who stole it/where my original euro-key went.

