Wi-Fi access point - TRENDnet TEW-818DRU - Part 2: Software
Monday, May 8. 2017
In my previous post, I un-boxed my new Wi-Fi access point. This is the part for running something in it.
For this to happen, the obvious prerequisite is DD-WRT binary image built specifically for TEW-818DRU. DD-WRT supported devices -list doesn't say much. Little bit of poking around results in build 23720 back in the 2014 for this one. It is at: https://www.dd-wrt.com/site/support/other-downloads?path=betas%2F2014%2F03-13-2014-r23720%2Ftrendnet-818DRU%2F. As I wanted something newer, I went for November 2016 build 30880 at: ftp://ftp.dd-wrt.com/betas/2016/11-14-2016-r30880/trendnet-818DRU/.
My typical approach for flashing new firmware is to stay connected with a wire. In practice that means, that I'll hook up an ethernet cable to my laptop and the other end to the access point's LAN-switch. Then I'll configure a static IP-address at the laptop's operating system. This makes sure, that I'm 100% connected whenever the box is running. Doing this over wireless connection and/or using dynamicly assigned IP-address may or may not work. As these boxes are expensive enough, I didn't push my luck. The downside of this approach is, that I'll need to know what the actual management IP-address will be.
Ok, let's start!
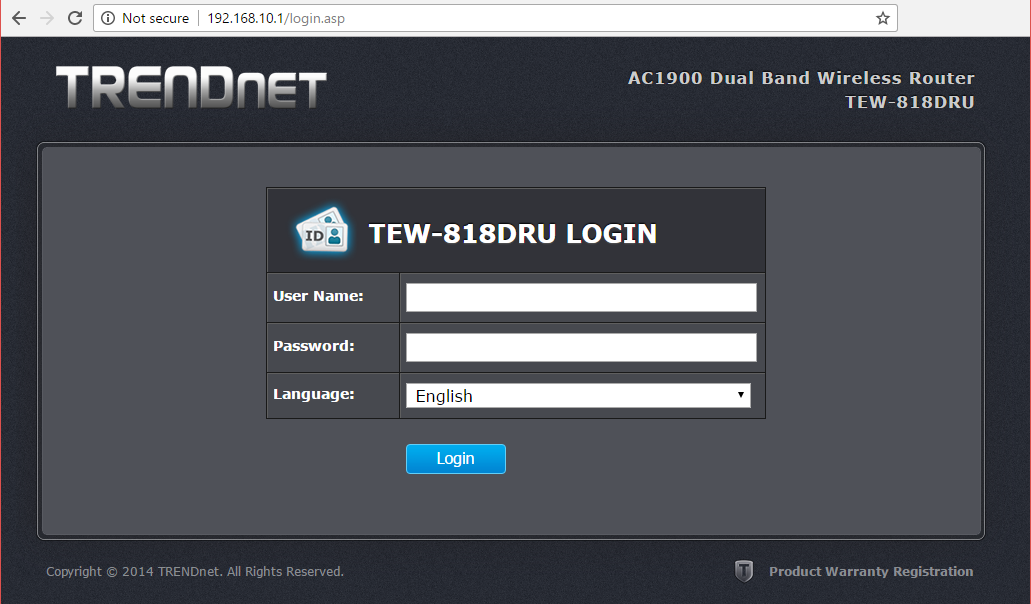
On out-of-box-experience the web GUI is at 192.168.10.1:
After login, there is a nice setup-wizard. Which of course, we'll just skip by acknowleding the alert:
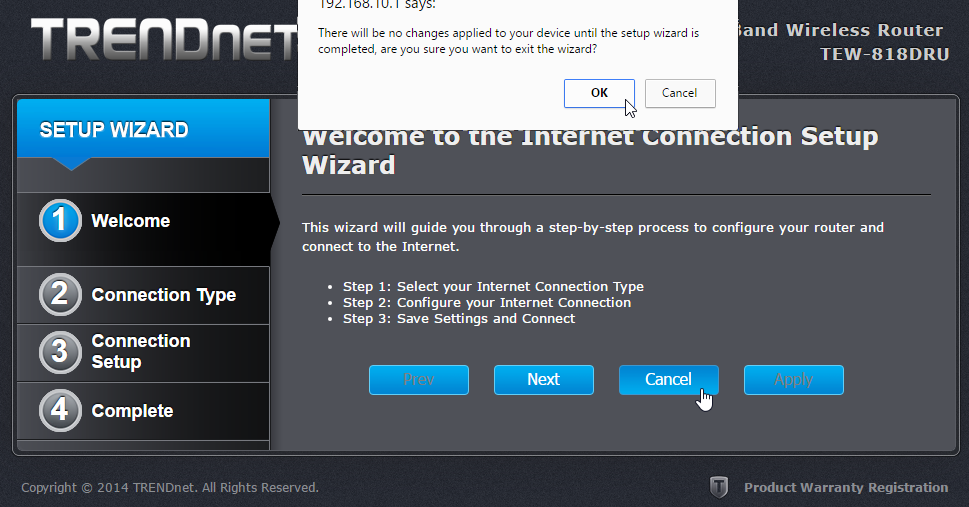
Now we're at the normal administrator environment:

For me, the word "advanced" is like honey to a grizzly bear  . I'll always home towards it, I know that all the goodies are stored there:

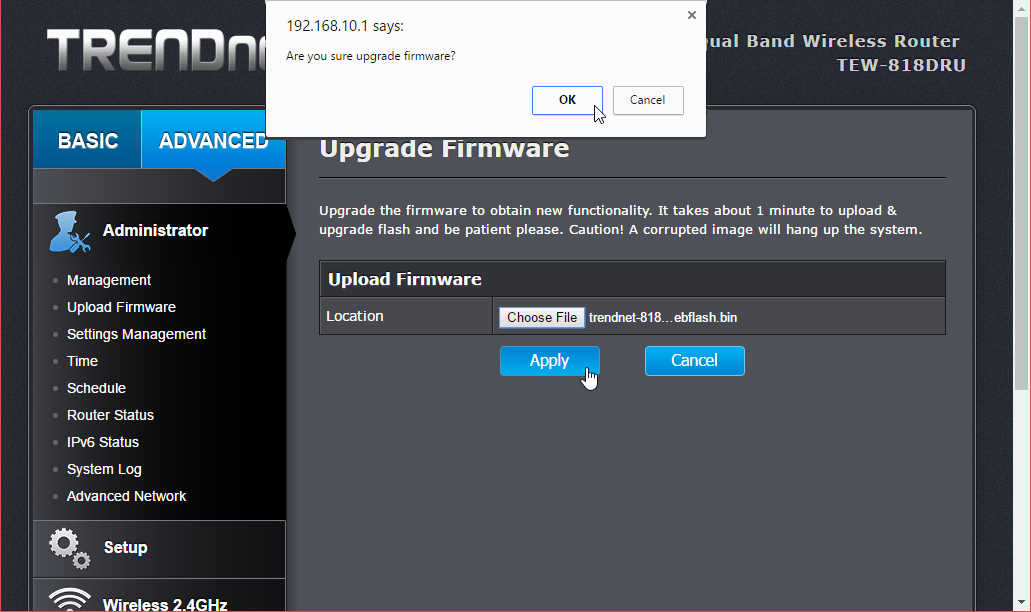
And also this time I was right, firmware upload/upgrade has its own menu item. Its clear, that this device is 100% designed by engineers, they cannot even seem to be able to agree on a single terminology. Menu has "upload", page title has "upgrade". Any self-respecting user experience designer would yell "You're confusing the user with that!", but I guess this stuff is for nerds only, and they don't care.
After selecting the trendnet-818dru-webflash.bin file to be uploaded, there is yet again a nice warning:
It will take couple minutes for the flashing to complete:
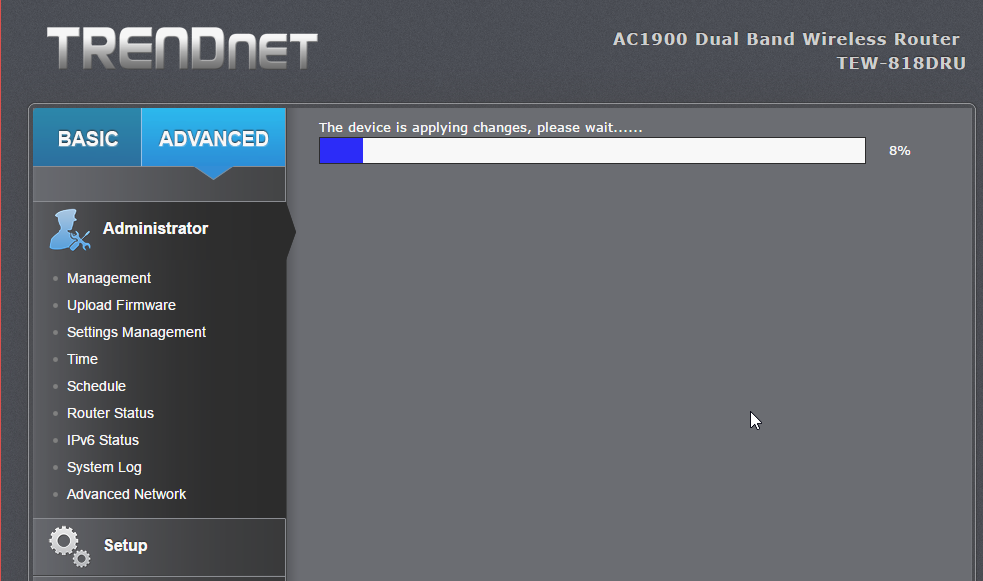
There is very little indication, that the process completed. I didn't notice any lights blinking or something like that. It just completed, rebooted and stayed silent.
Now the IP-addess will change. DD-WRT is 192.168.1.1 at out-of-box-experience:
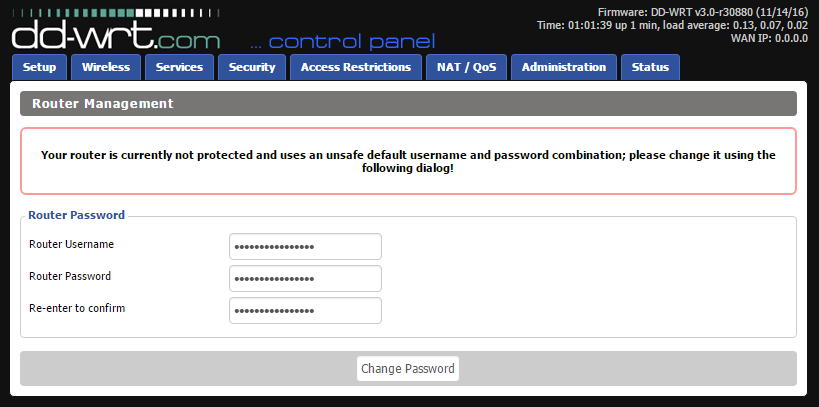
And that's pretty much it for firmware upgrade. At this point I did my wireless access point -setup including:
- Admin username and password
- AP's LAN IP-address, my LAN isnt' at 192.168.1/24
- Enable SSH-service
- Enable GUI-access for HTTPS and SSH
- Wireless network setup for 2.4 GHz and 5 GHz, WPA2 Personal with pre-shared key as security
DD-WRT is for knowledgeable administrators, no setup wizards or mumbo-jumbo. Just the settings.
Btw. configuration docs can be found at: https://www.dd-wrt.com/wiki/index.php/Configuration_HOWTOs
Wi-Fi access point - TRENDnet TEW-818DRU - Part 1: Hardware
Sunday, May 7. 2017
As I mentioned in my post about Swedish ISP, that I like to run Linux on my stuff. My weapon of choice for wireless networking has been DD-WRT for many years (I'm not sure how many exactly, 15+ or so). Any appliance I purchase must be supported by that.
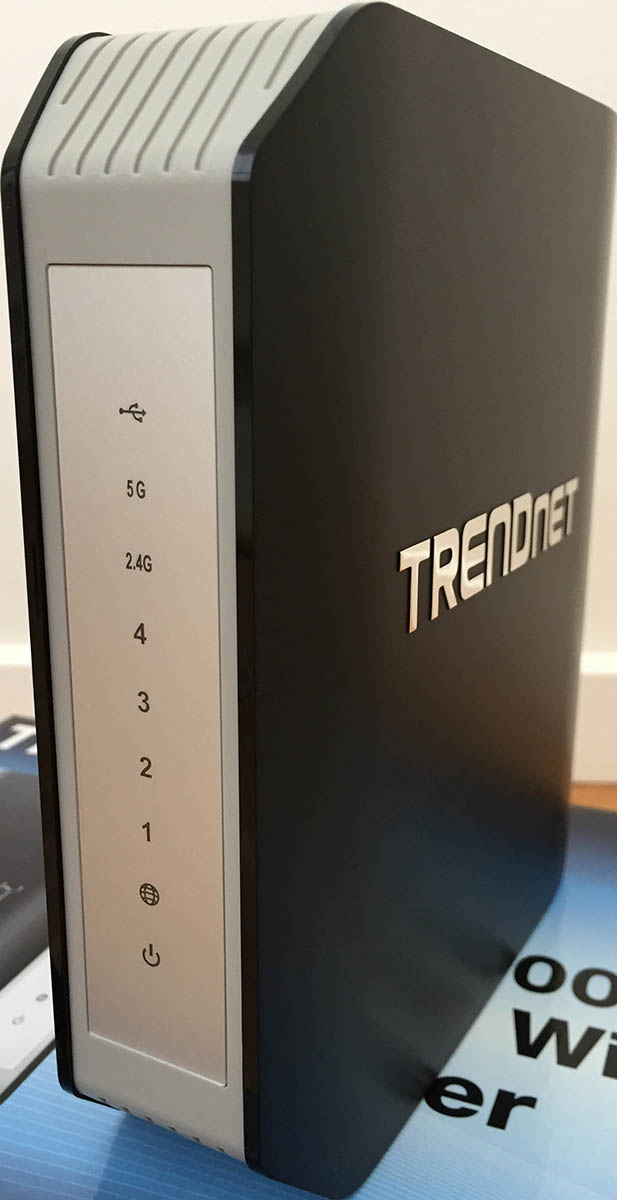
I've been running a lot of Linksys in the past, but this time I chose to go with a Taiwanese TRENDnet TEW-818DRU. The spec is huge and it contains really good 802.11 radios, USB3-port, decent CPU and enough RAM to run it all. And finally: The manufacturer is really keen on supporting Linux.
This is what it looks like. It won't win any design awards, as obviously some software engineer designed the plastic case:
Linux /proc/cpuinfo for Cortex-A17:
model name : ARMv7 Processor rev 0 (v7l)

processor : 0

BogoMIPS : 1594.16

Features : half fastmult edsp tls

CPU implementer : 0x41

CPU architecture: 7

CPU variant : 0x3

CPU part : 0xc09

CPU revision : 0
Memory, physical is 128 MiB, but some is needed for hardware:
             total   used    free shared  buffers  cached

Mem:        124536  38296   86240      0   4108     12212

-/+ buffers/cache:  21976  102560
Ports at the back:

- USB3
- USB2
- WPS-button for those who don't care much for security
- 4 x RJ-45 for LAN
- RJ-45 for WAN
- O/I for power
- Barrel connector for 12 VDC, 2 amps power input
Bottom:
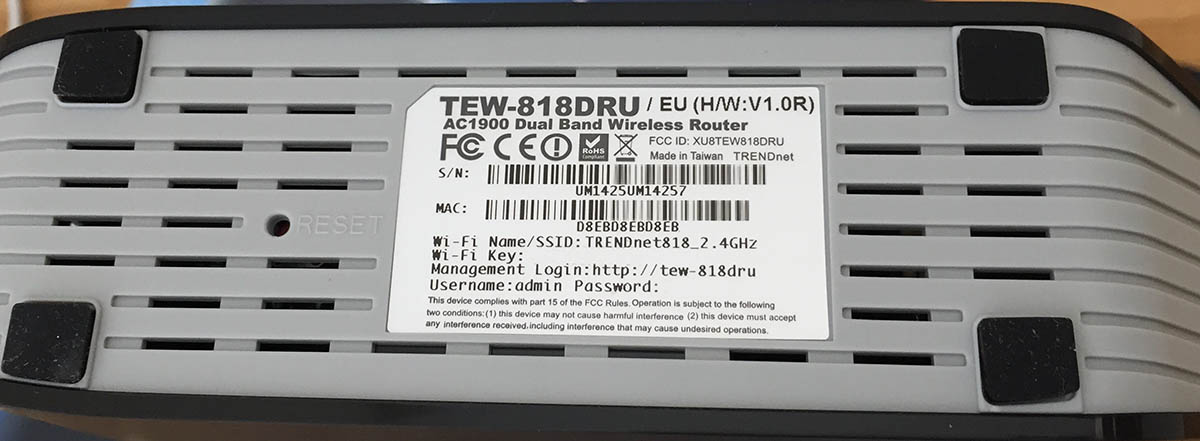
It really doesn't get much simpler than that, which is perfect for engineering type persons. Like me!
You'll get a reliable box with ton on features and possibility of tweaking it to do whatever you need.
In next part I'll put a DD-WRT into it.
Swedish ISP reviewed - Comhem
Saturday, May 6. 2017
It took a lot of time and effort to rent an apartment, Sweden (especially Stockholm are) is notoriously difficult with that. And the first thing any new apartment needs is an Internet-connection. Mobile data in Sweden sucks royally, its expensive and horribly capped with transfer limits. So, something with a wire for me thanks. In this apartment, the options for wired net were highly limited. It's either Comhem or nothing. I chose Comhem.
Back in the 90s, Swedish government subsidied building optical fiber connections to literally every house. They ended up paying roughly 50% of the building costs of proper connections to entire country. Not a bad investment, I have to say. Some businessmen threw rest of the required money and as the result of that, Swedes even today enjoy faster Internet connections than nobody else.
The wall box
Here in Stockholm area this is a very common thing to see:
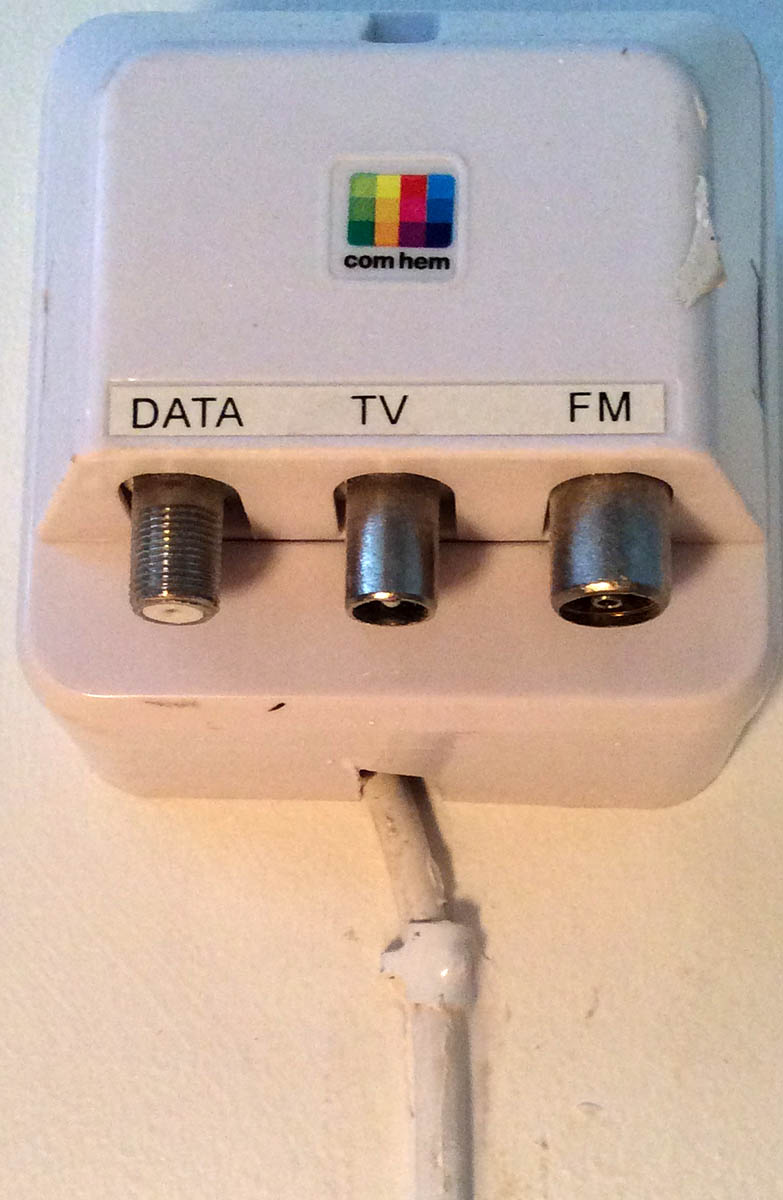
There is something coming into the box from a hole in a wall. I don't know what that could be, possibly fiber, or possibly something with copper in it. If you know, drop a comment! The output is FM-radio, cable-TV and Internet. Radio and TV are regular 75Ω RF-connectors, something you'd generally expect. Data is an F-connector, also very typical for cable-TV Internet connectivity.
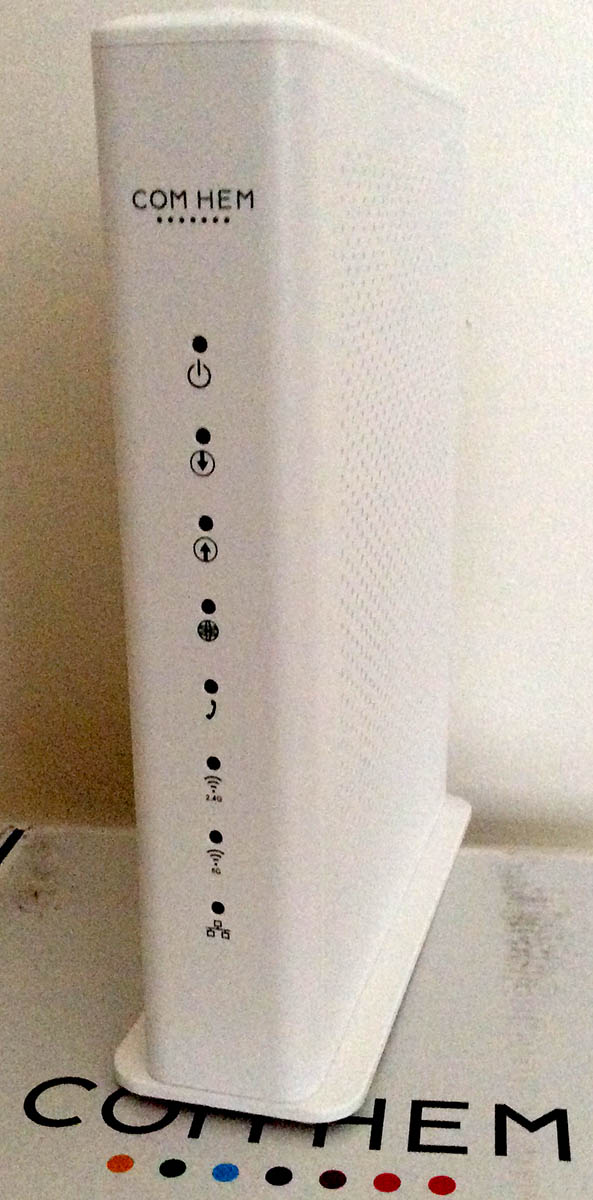
The router
Sorry, the pics are really crappy. I don't have my proper camera here in Sweden, so I have to use whatever mobile junk happens to be at hand. The router looks like this:
In the back there are your expected set of connectors:

- RJ-11: no idea what this is for, my guess is for a landline phone connection (who needs that!?)
- 4 x RJ-45: Your standard 1 Gbit/s ethernet switch
- Reset pin: do a factory reset with a small pointy thingie
- F-connector: for incoming cable-TV signal
- O/I switch: For on-off needs
- Barrel jack: for 12 VDC power connector, 2,5 amps
- (bonus): 2,4 GHz / 5 GHz Wi-Fi router
Bottom:
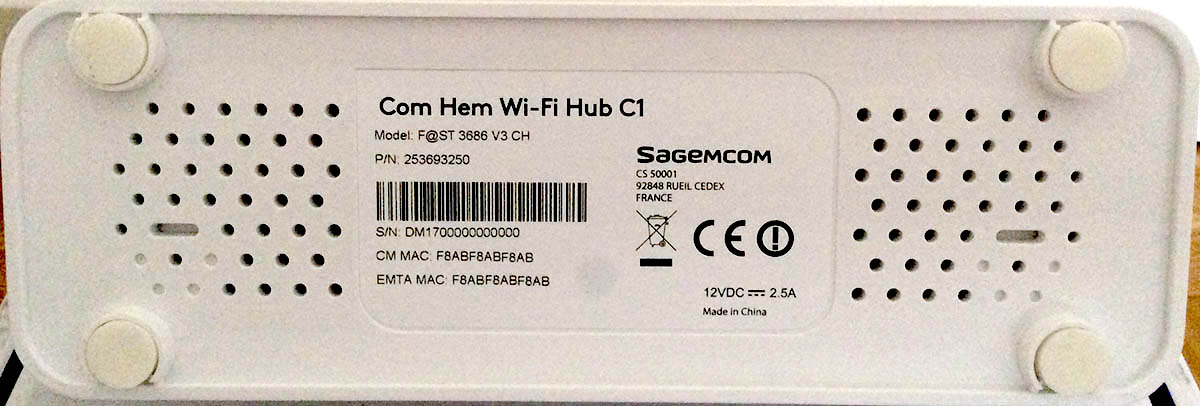
Yes, this is one of those French-made Sagemcom boxes. Spec is at: F@ST 3686 AC. Sagemcom is quite big in manufacturing consumer boxes for TV/IPTV/cable internet.
There is nothing special nor surprising there in the router. It's your basic free giveaway box the ISPs throw at you when you sign a subscription. Most people love the fact that this one packs a modern Wi-Fi access point. Personally, I hate integrated crap and want to tinker with my access point more than these integrated things allow me to do.
The admin
As you could expect, there is a web-based GUI admin interface at 192.168.0.1:
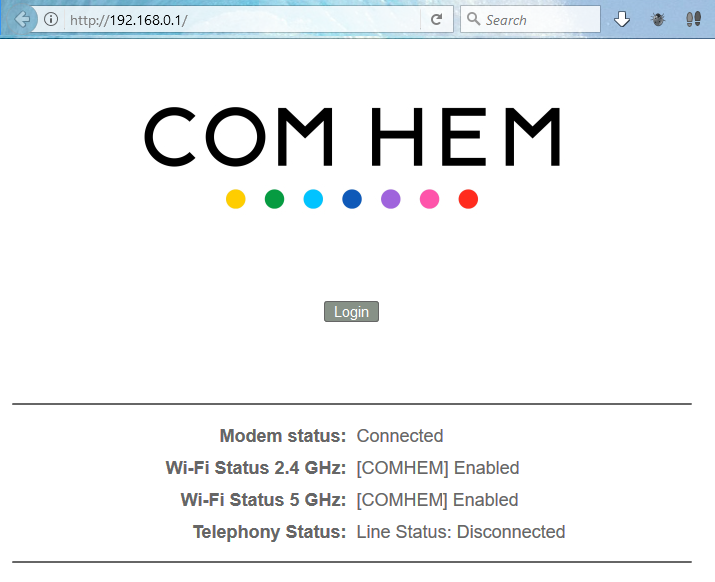
Logging in gives you more details for the router status:
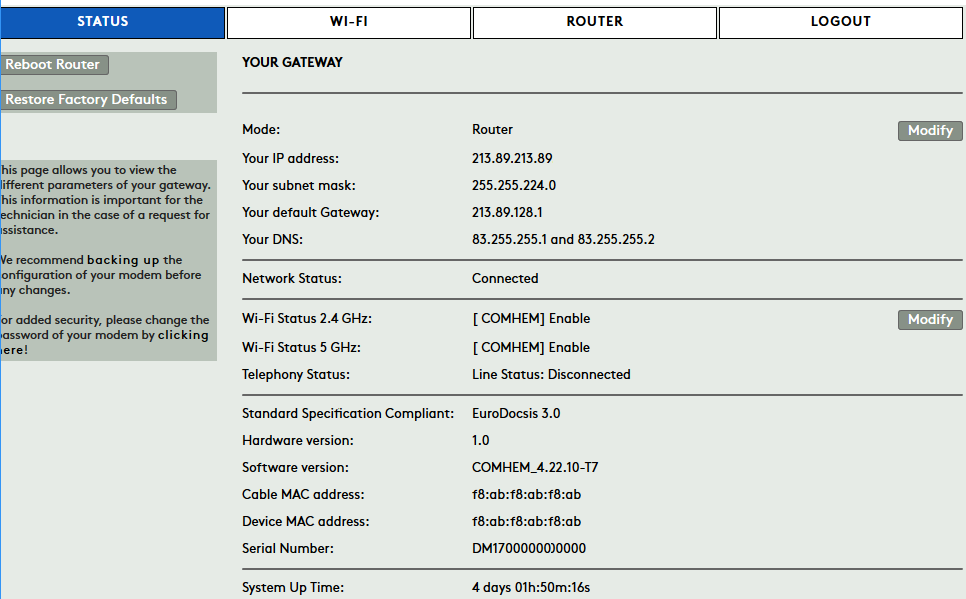
Wi-Fi settings:
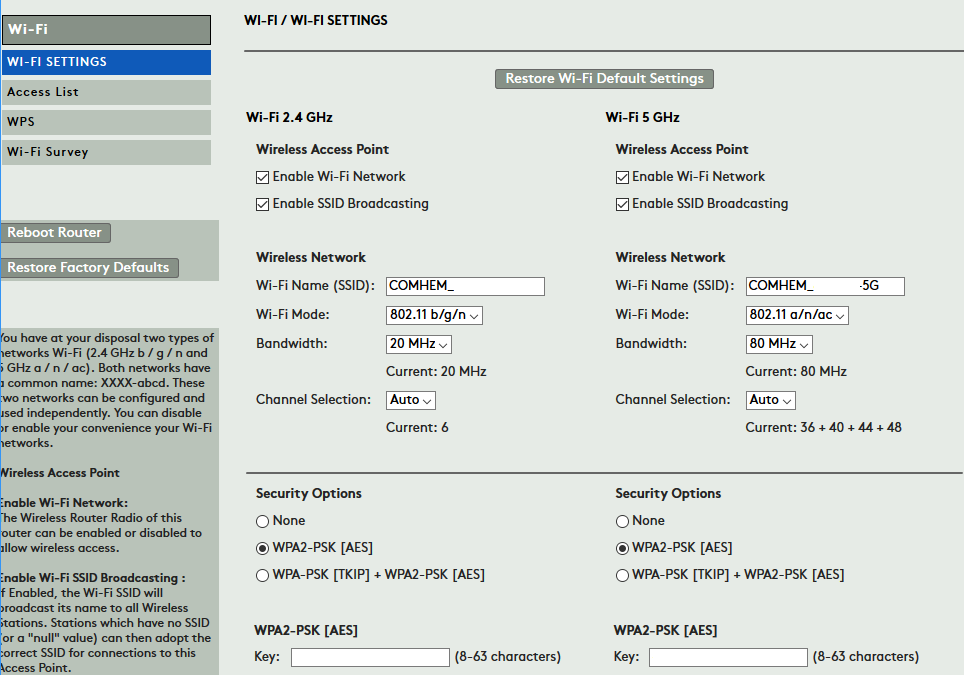
My IP-address, Wi-Fi SSIDs and serial numbers have been redacted, so those of you with evil plans, note that you'll be targeting somebody else.
The speed
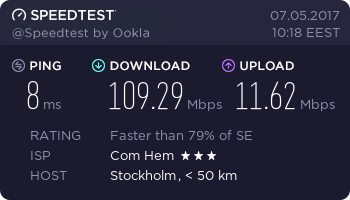
I'm subscribing to a Bredband100. The promise is 100 Mbit/s download (actually they say 50-100) and 10 Mbit/s up (range 7-10).
Speedtest, ethernet cable, 1 Gbit/s:
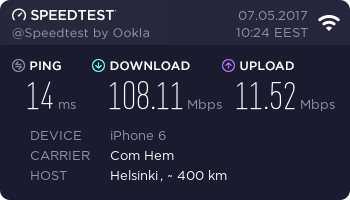
Speedtest, iPhone 6, 802.11ac, 5 GHz:
Speedtest, Asus Nexus 7, 802.11n, 2.4 GHz:
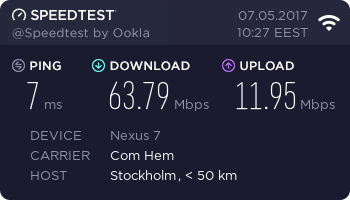
Not bad! They keep the promise.
If you stumble on the Wi-Fi specs, check the article about Wireless N & Wireless G @ Flashrouters blog about those.
The nominal speed of 802.11n is much higher than 63 Mbit/s, but 2.4 GHz is always very saturated. I haven't counted how many wireless access points are visible here to my apartment, but its easily 50+. Also the throughput of a 2.4 GHz Wi-Fi will drop, if any of my neighbours are using a microwave. Cisco claims, that microwave oven interference can reach 25 feet / 7.5 meters, see the article about that. Unfortunately all my toys will support 5 GHz, so I'll have to run both for the time being.
The result
Generally people love hating big corporations, especially ISPs and telcos. I know I do. A good example of that is: Comhem stumbled on my router delivery as their logistics partner started bouncing the shipment back and forth in the same terminal. Eventually I got the router, plugged it in and it worked. Their customer support is good, I called them at least 4 times to get a subscription and for the delivery issues.
After running this box for a week, I have to say it does the job. On a negative side, the router in router/NAT-mode, the router drops your TCP-connections super fast. This mostly affect SSH and as a remedy I have this in my .ssh/config:
Host *

  ServerAliveInterval 25
25 seconds is very fast. Never seen anything like that before. My obvious plan is not disable the wireless AP and switch this baby into a bridge mode and build a real Linux-router to do the NAT. But I'll have to post about that someday.
Ultimately I'm quite happy with this ISP and the router they provided. Out-of-the box it works enough for all people, but provides enough flexibility for me to do some advanced network stuff.
Back to blogging - from Sweden
Saturday, April 1. 2017
CAcert Root Certificate, SHA-2 hashed
Sunday, January 8. 2017
CAcert is my favorite source of certificates. It has been that for years. The buggy Let's Encrypt I loathe, their poorly tinkered Python-scripts won't work and after couple hours of unnecessary fixing of their bugs, the scripts decide to write to my configurations. So, those guys really don't have a clue what they're doing.
However, CAcert isn't doing much better. Their root certificate is still MD5-signed. Argh! 
CAcert's claim is, that "Severe weaknesses have been found in MD5, but at present they do not open vulnerabilities for X.509 certificates". But nobody else is buying that. It's just that this international non-profit organization is light on resources and they want to get his one done right. They just don't seem to be able to squeeze a re-signed root certificate out.
Update 20th Apr 2018: There is a follow-up post about installing this into iOS-device.
Briefly on certificate hashes
A X.509 certificate needs to be signed to make sure it originated from the Certification Authority announced in the certificate. Since the root certificates are typically self-signed, they are at the end of the certification chain, there is no other authority to validate them. That's why the hash of the signature is published at the CA's website. In case the hash doesn't match, it is possible to notice that somebody modified the signature.
What others are doing: Expiring MD5 and SHA-1 hash algorithms
Apple iOS, Oct 13, 2011, About the security content of iOS 5 Software Update
CVE-ID: CVE-2011-3427
Description:
Certificates signed using the MD5 hash algorithm were accepted by iOS. This algorithm has known cryptographic weaknesses. Further research or a misconfigured certificate authority could have allowed the creation of X.509 certificates with attacker controlled values that would have been trusted by the system. This would have exposed X.509 based protocols to spoofing, man in the middle attacks, and information disclosure. This update disables support for an X.509 certificate with an MD5 hash for any use other than as a trusted root certificate.
Microsoft, Aug 13, 2013, Update for deprecation of MD5 hashing algorithm for Microsoft root certificate program
On affected releases of Microsoft Windows, security update 2862973 requires that certificates no longer use the MD5 hashing algorithm. Microsoft products or third-party products that call into the CertGetCertificateChain function will no longer trust certificates that have MD5 hashes.
Microsoft, Nov 4 2015, SHA-1 Deprecation Update
We announced that Windows will block SHA-1 signed TLS certificates starting on January 1, 2017. In light of recent advances in attacks on the SHA-1 algorithm, we are now considering an accelerated timeline to deprecate SHA-1 signed TLS certificates as early as June 2016.
Google, Dec 31 2015, SHA-1 Deprecation: No Browser Left Behind
After December 31, 2015, SSL certificates that use the SHA-1 hash algorithm for their signature will be declared technology non grata on the modern Internet. .. over the course of 2016, will begin issuing warnings and eventually completely distrust connections to sites using SHA-1 signed certs.
Apple, Sep 20 2016, MacOS & Safari SHA-1 deprecation policy
Apple hasn't made any specific announcements here. The nearest we've come is a general warning in WWDC 2016 Session 706 What’s New in Security:
-
SSLv3 cryptographic protocol and the RC4 symmetric cipher suite are no longer supported, starting at the end of 2016. It's recommended that you stop using the SHA-1 and 3DES cryptographic algorithms as soon as possible.
CAcert SHA-256 re-sign project
Altough CAcert guys think that there is no security flaw in MD5-signed certificates, they chose to do something about this. They managed to get the existing root certificate re-signed with SHA-2 on number of occasions. The most recent one is: root certificate re-signed. This was executed successfully on 2016-03-12
The result is kinda published, it's not publicly available, but if you're willing to go the SHA-256 project's SVN repository at http://svn.cacert.org/CAcert/SystemAdministration/signer/re-sign-2016/outputs/, the result is available.
Go there! Get it! Use it!
Installation instructions
Should I install the intermediate certificate too?
No.
The idea with web server certificates is, that you establish trust to root certificate. All certificates are issued from intermediate-CA, which certificate can be revoked at any given time. That's why the intermediate certificate needs to be deployed with the server certificate. This is something many system admins keep misunderstanding.
Which keychain / store the CAcert root certificate should be installed?
My preference is always to install new root certs into system-wide keychain / store. That way any human users (me and possibly others) or system/daemon users get the new cert at once.
macOS
For this to work, you'll need
- root access to your Mac
- old MD5 signed root cert
- new SHA-2 signed root cert
First disable trust to the old cert:
security remove-trusted-cert -d CAcert-root.crt
Remove the old cert by it's signature:
security delete-certificate \

 -Z 135CEC36F49CB8E93B1AB270CD80884676CE8F33 \

 /Library/Keychains/System.keychain
Add and trust the new cert:
security add-trusted-cert -d -r trustRoot \

 -k /Library/Keychains/System.keychain \

 root_256.crt
The important point in macOS is to remember, that adding a root certificate to keychain doesn't make it trusted. You'll need to implicitly tell an added certificate, that you trust it too. That's kinda weird, but ... some smart guy at Apple designed that so.
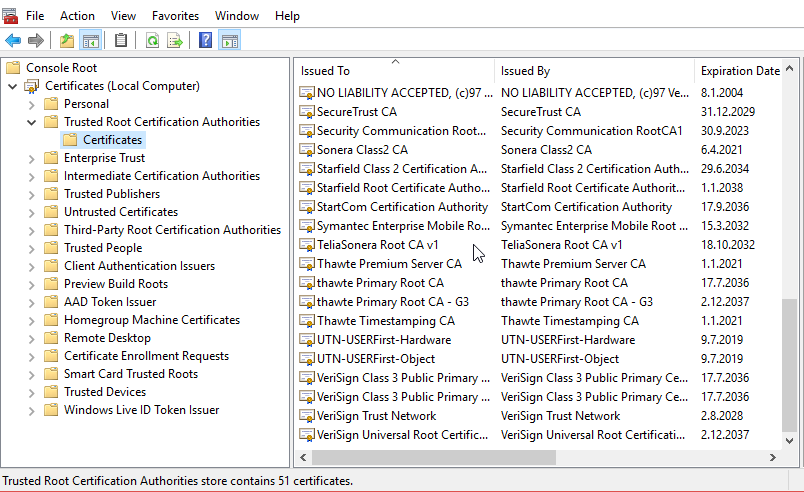
Windows
For this to work, you'll need
- administrator access to your Windows
- new SHA-2 signed root cert
Remove MD5-signed:
certutil -delstore Root 135CEC36F49CB8E93B1AB270CD80884676CE8F33
Add and trust the new cert:
certutil -addstore Root root_256.crt
Linux
Ah, there are too many distros out there.
Any typical approach would be to place the file into /etc/pki/tls/certs/ and symlink the certificate's OpenSSL hash 99d0fa06.0 into it.
iOS
... This one I'll get back in a later post.
EBN European Business Number scam
Thursday, December 8. 2016
Update 2nd December 2017:
After receiving comments to this blog post, I started doing more digging and there is a new blog post about EBN scam.
Today I got yet another snail mail scam as a printed letter. It looks like this:
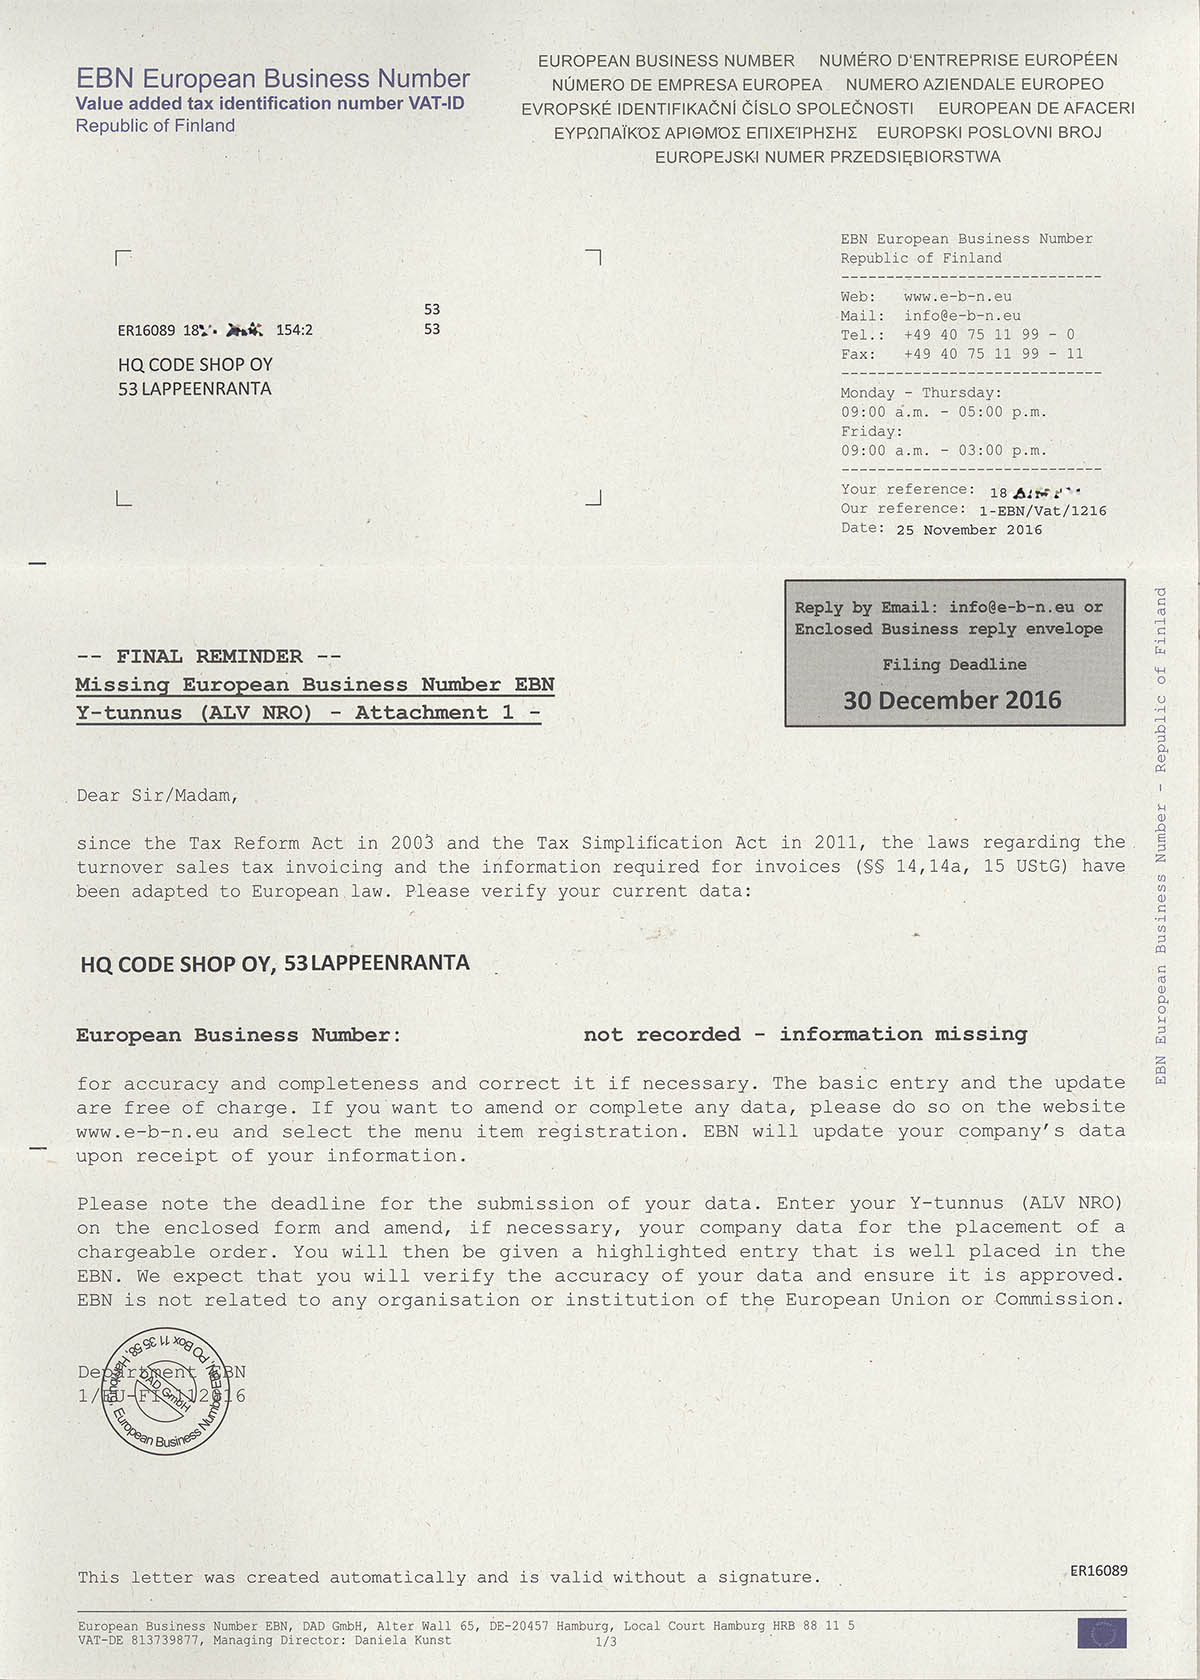
The scammers are claiming, that they are missing my corporate VAT ID. Hm. That's strange. All the other information they got from Finnish Business Registry (ytj.fi). But as they are missing my valuable VAT-number, I'll need to fill it into a pre-filled form and add a binding signature. I'm not exactly sure, what exactly should I do with this form after signing it, but such a form was sent to me.
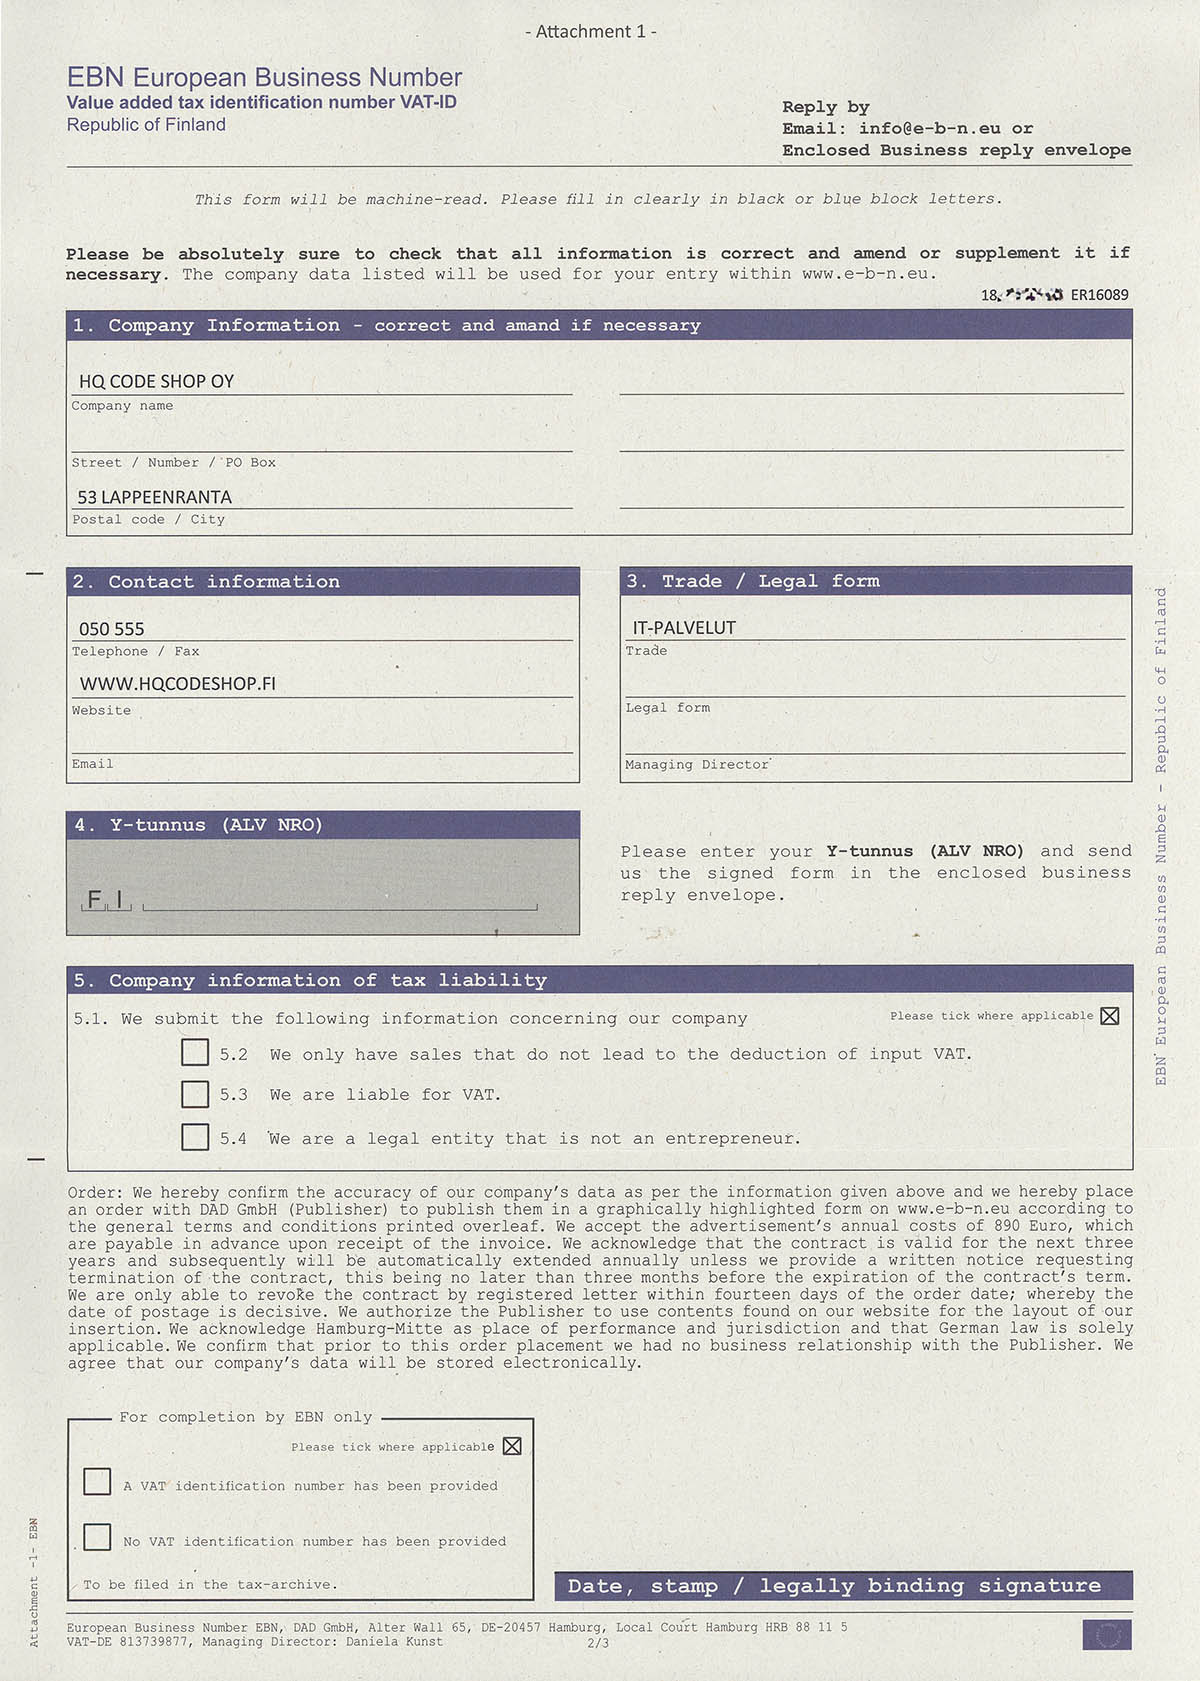
Caution! Scam here is in the monotype-font part (see above page 2):
Order: We hereby confirm the accuracy of our company' s data as per the information given above and we hereby place an order with DAD GmbH (Publisher) to publish them in a graphically highlighted form on www.e-b-n.eu according to the general terms and conditions printed overleaf.
We accept the advertisement' s annual costs of 890 Euro, which are payable in advance upon receipt of the invoice. We acknowledge that the contract is valid for the next three years and subsequently will be automatically extended annually unless we provide a written notice requesting termination of the contract, this being no later than three months before the expiration of the contract's term.
We are only able to revoke the contract by registered letter within fourteen days of the order date; whereby the date of postage is decisive. We authorize the Publisher to use contents found on our website for the layout of our insertion.
We acknowledge Hamburg-Mitte as place of performance and jurisdiction and that German law is solely applicable. We confirm that prior to this order placement we had no business relationship with the Publisher. We agree that our company's data will be stored electronically.
Whoa! That's a long and difficult to read. All that easier to miss the part with "We accept the advertisement' s annual costs of 890 Euro, which are payable in advance upon receipt of the invoice". Oh! I thought this was some kind of "final reminder", not an order nor invoice.
There is an actual website http://e-b-n.eu/ with all collected publicly available business information in it.

To make this scam more believable, scammers added actual addresses and phone numbers in Hamburg, Germany. I don't know if neither of them are legit. I do know, that German business registry doesn't have Commercial Register, Companies' Section, Hamburg Local Court, Record No. 88115 with name of European Business Register. Actually, that record number belongs to somebody completely innocent. Also the German VAT ID of 813739877 seems to belong to somebody, but I don't know how to do a lookup on German VAT IDs, so I don't know whose VAT ID it is.
By googling the VAT ID, I found pretty much the same letter sent to Italian doctors "Registro Italiano Medici: attenzione alla modulistica". There is a scanned PDF of the letter. Funnily, it has the same German VAT ID, and Mrs. Daniela Kunst as the managing director of EuroMedi (http://euromedi.eu/). The price is bit cheaper, only 877 €. Also the website is hosted in the exactly same IP-address in Köln, Germany. Also, there is Deutsche Internet Kartei and Internet Register Österreich with same VAT ID and managing director, but on a different server.
Based on a report by (Caution: European Central Register of VAT Registration Numbers is a scam) German law firm, this scam has been going on since 2013. So, looks like their business is lucrative and nobody seems to be able to stop them.
Advent calendar 2016
Thursday, December 1. 2016
Unlike last year, I didn't manage to get me an advent calendar this year. Unfortunately for me, Central European on-line stores won't do deliveries to Finland anymore.
This year I had to go for a much less elegant solution:

That's one for each of the 24 days.
Personally I'd prefer the real ones I had for the past couple years, but this will have to do.
What's wrong with HTTPS: Part 3 - Certificate governance
Wednesday, November 30. 2016
In the previous part we established that any certificate authority can issue a certificate to any website, even if the website admin doesn't want them to do that. This post is about technical measures attempting to monitor certificate authorities' actions.
Details that need to be addressed somehow
A certificate lifecycle is very simple. One is issued by a CA, it is used by a server and eventually it expires. When things go sideways, the server administrator may want to revoke an otherwise valid and good certificate, so there needs to be a mechanism to handle a single special case. So, two actions: issuance and revocation. Everything else is handled by itself.
To monitor certificate issuance and revocation, following requirements apply:
- Monitor when somebody issues a certificate for your website
- Preferably everybody in the entire Internet needs to know about this instantly. You decide if the issuance is good or bad thing.
- Man-in-the-middle using a fake certificate
- When a subset of users is being targeted, clients need to know that the certificate being offered doesn't belong to the server the certificate supposedly is for.
- No trusted parties
- This is something we learned from X-Files (the TV-show), trust no one! Any possible parties needed in verification must be assumed to be offering false information, or alternatively it needs to be digitally tamper-proof.
- Instant deployment of a new certificate
- When you setup a server and a certificate to it, how do you notify everybody about that? Preferably no notification is needed.
- No need to modify servers
- How is the actual server setup done. What parts you need to add there. Preferably none.
- No additional requests during connection
- When a client requests data from your server, which additional requests to another parties are needed? Preferably none. Remember, that this type of additional request need to succeed in a split-second to make the decision wheter to open a connection to a requested server or not.
(This list is actually "borrowed" from certificate transparency tech comparison. Its just so comprehensive, so I had no other option than to use it.)
Certificate revoke list, aka. CRL
This is what we have since dawn of SSL. The idea is to go request the issuing CA and see if an already issued valid certificate is revoked. This information is published in a revocation list. The obvious problem is that revocation information doesn't happen instantly, and actually most browsers don't ever check a CRL.
To distribute the CRL-information, an issued certificate is supposed to have an URL to CRL (typically they do) and a client is supposed to be downloading that data periodically (typically they don't). In reality that doesn't work, as nobody wants to spend their precious time and bandwidth for downloading a ever-growing list of bad certs. To address that, there is a modern approach, Online Certificate Status Protocol or OCSP. It is supposed to be much faster operation with minimal bandwidth usage.
Neither of these really work well because of the need for an additional request. Also OCSP has a major fault, that a reply can be stored and "played back" on a query, so the reliability is more than questionable.
Certificate Transparency
This is the newest one and it has a good chance of becoming the commonly accepted method for tracking certificate issuers' actions. There is an RFC 6962 defining Certificate Transparency and the source code is distributed as open-source allowing anybody to see how it works and do their own audit on it. Originally the project is initiated by Google, but number of CAs already accepted the technology including Symantec, Digicert. and Globalsign. One reason for wide adoption is, that Google (the author of Chrome browser), made an ultimatum, that the seriously expensive Extended Validation certificates need to have CT signature in them for Chrome to accept them as valid.
Internally CT works with a Merkle hash tree, something that BitCoin uses internally. So, it is safe to say, that this technolocy is a blockchain. Blockchain as a tech is quite new, but robust and reliable. The good thing about Certificate Transparency is, that this tech supports all requirements from above list. All a browser needs to do is periodically load the CT logs and during a connection, read the CT-signature from server's certificate, and based on that a browser can instantly verify or decline the server's certificate.
As mentioned, Certificate Transparency needs to be supported by your browser. Being a Google project, of course Chrome does support CT since version 35. Mozilla Firefox has announced support for CT, but at the time of writing there is no implementation yet. Microsoft doesn't support CT and they announced that that they're doing something of their own for IE11, naturally their new Edge browser doesn't support CT either. So that pretty much lands Chrome being the only browser really supporting this. The good thing is, that there exists many server-to-server monitors, for example Certificate Transparency Monitor.
Not accounting for poor browser support, another weakness CT has is that every certification authority has to include CT-signature in their issued certificates and publish their CT logs to general public.
DANE
DNS-based Authentication of Named Entities, or DANE is the first serious attempt to enforce certificate's ownership. The tech is described in RFC 6698 and multiple accompanying RFCs to clarify details of it's implementation. However, DANE hasn't received much public acceptance.
This is how Wikipedia defines DANE: "DANE enables the administrator of a domain name to certify the keys used in that domain's TLS clients or servers by storing them in the Domain Name System (DNS). DANE needs the DNS records to be signed with DNSSEC for its security model to work."
As the above definition says, for DANE to work, a prerequisite is functioning DNSSEC. Nobody has that! Some stats at http://rick.eng.br/dnssecstat/ show that the situation is horrible. So, no DNSSEC, no DANE. Also DANE fails on two other things: additional requests are needed to DNS during connection and you need to trust the DNS-server response. DNS data can be forged or poisoned, so there's that.
Pinning
Certificate pinning, or HTTP Public Key Pinning is an extension header of a HTTP-response. This is yet another Google-project, but its not widely adopoted. The idea for the web server to send public key information on every response, then the web browser is supposed to locally store the information for specified time. Then any subsequent responses from that same server are supposed to have the same information in them what was cached before. Weakness is that, the initial request needs to go to the real server. If your traffic was "man-in-the-middled" already at that point, you won't get any warnings.
Pinning is supported in Chrome and Firefox, but as Microsoft nor Apple support this, it is missing from IE, Edge and Safari. There is a funny mistake in Microsoft Edge's feature list as it states Firefox not supporting pinning, but Firefox was one of the early browsers supporting this feature.
Weaknesses here are, that it requires changes both on server and client sides. Also, when the certificate is legitimately changed, there really isn't a sensible mechanism to inform about that.
Collecting every web server certificate, aka that thing Google is doing
As you may remember from part 2 of this series, most of the rogue certificates issued are for Google services. So, they're fighting this by collecting all the certificates they see. They have a massive army of bots crawling web servers all the time. Google is also publishing their findings in a Certificate Transparency log for any interested parties to see. As mentioned before, there are publicly available non-Google services monitoring the CT-logs for abnormal changes.
This is very simple idea, if you see your certificate listed there, the certificate was issued by your request or somebody else's. It should be rather simple task to determine which one was it.
Anybody can use the human interface at Google Transparency Report site.
The future?
None of these technologies is really either useful, or widely adopted by major vendors. Fact remains: due to number of past incidents Certificate Authorities need to be monitored, supervised and publicly scrutineered. The best thing to attempt is to add some transparency to their actions. Which technology that would be is yet to be seend. What worries me is Apple's and Microsoft's total ignorance for this matter. I guess they'll need to be targeted first to wake up from their deep sleep.
This is the last part of my HTTPS-series. First part was about basics of trusted certificates and second part part was about misappropriation of trust.
What's wrong with HTTPS: Part 2 - Untrustworthy Certificate Authorities
Sunday, November 27. 2016
In the previous part we established the fact, that for HTTPS to work as intended, you as a web browser user need to trust your browser vendor's decision to trust the certificate authorities issuing the certificates to web server maintainers. This post is about when things go wrong, the chain-of-trust is broken and organization's actions are deemed not so trustworthy.
Known CA security incidents in chronological order:
- 2010 (multiple incidents): Key Internet operator VeriSign hit by hackers
- There isn't much information available on this, but they disclosed this on their quarterly report.
- "Are we finally ready to accept that the certificate system is completely broken?"
- Bruce Schneier, on his blog
- March 2011: Hackers target Google, Skype with rogue SSL certificates
- Comodo was cracked, and certificates for orgs like Google were issued without them knowing about it.
- August 2011: Hackers stole Google SSL certificate, Dutch firm admits
- DigiNotar was cracked and Google certificates were created. Later DigiNotar went bankcrupt as they reputation was gone.
- December 2013: French Government ANSSI responsible of a MITM against Google SSL-TLS
- French CA issuing Google certificates
- July 2014: Indian government agency issues fake Google certificates
- This is really bad! A government agency in India issuing Google certificates. I'd understand a company doing that, but government... no.
- December 2014: Turkish Certificate Authority screwup leads to attempted Google impersonation
- Turkish CA issuing Google certificates
- March 2015: Google to drop China’s CNNIC Root Certificate Authority after trust breach
- A Chinese CA issuing Google certificates.
- September 2015: Symantec employees fired for issuing rogue HTTPS certificate for Google
- Inside job at Symantec, guys wanted to issue Google certificates
- October 2016: Distrusting New WoSign and StartCom Certificates (on Mozilla and on Google)
- WoSign issued certificate for GitHub, yet another inside job.
As you already figured out the pattern. Anybody can issue any certificate for anybody. This many-to-many pattern isn't very trustworthy. Also, there seems to be more activity during the past two years or so, there is clearly more interest in gaining access to somebody's certificate.
In part 1 of my HTTPS-series it was established, that a X.509 certificate cannot identify the server. Now that cert-business sells certificates with a claim, that they have "verified" the request and the owner is who they claim to be, the above list tells another story. Nasty things happen when there is no verification, no real customer, but a malicious act of issuing a certificate for own cracking purposes.
Other acts of mistrust:
- January 2015: Gogo Inflight Internet serves up 'man-in-the-middle' with fake SSL
- Inflight service provider goes man-in-the-middle on purpose. Of course all bad deeds can be wrapped into good intentions, they wanted to "protect the bandwidth usage".
- February 2015: Lenovo PCs ship with man-in-the-middle adware that breaks HTTPS connections
- Lenovo laptops were pre-installed with a certificate used for snooping your HTTPS-traffic. The thing is: if anybody can inject a trusted root certificate to your computer, you won't notice that somebody is reading your encrypted traffic.
- November 2015: Dell does a Superfish, ships PCs with easily cloneable root certificates
- Yet another pre-installed certificate making man-in-the-middle. Every computer had same PKI installed making anybody able to eavesdrop your carefully encrypted traffic.
These acts are as evil, altough different by nature, but target the same thing: to gain access to your encypted data.
Ok, what's the risk here?
In practice, what is the threat here? What are those "nasty things" that can happen?
The incidents where new computers had a pre-installed trusted certificate, or your traffic was forced via man-in-the-middle -proxy are easier to address. Without you realizing it, all your encrypted traffic is directed to a party faking to be your intended target. Man-in-the-middle just de-crypts your passwords and credit card numbers and passes the traffic forward to the real target server acting as you. So, there is an obvious direct risk, that your traffic isn't secure at all.
Somebody issuing a trusted rogue Google certificate is bit more complex. A certificate itself isn't too dangerous, but in a scenario where the outgoing traffic from your computer is re-directed to a rogue server having the certificate you won't be able to tell the difference. How somebody's traffic can be redirected can be done locally, by changing your DNS-settings or remotely attacking the DNS-server your're using. Both cases are seen in real life. Nevertheless, it is almost impossible to know that such a change has been made and you go to a fake "google" server, enter your password without realizing, that somebody else is in possession of your login credentials. These cases haven't been publicly reported, but if anybody manages to pull that one off, it would be really really bad. Ultimately, there is only indirect risk, that you may lose your secure data.
Ok, this insecurity is horrible, isn't there anything we can do?
Yes.
There are a number of technical innovations trying to govern the certificates. However, none of them are widespread nor commonly accepted. This leaves everybody at the mercy of certificate authorities and their actions.
I'll address those technical measures in my final part of this HTTPS-series.
This is the second part of a three part series addressing HTTPS and it's (in)security. Previous part was about basics of trusted certificates. Next part is about (failed) attempts to supervise if the trust is there or not.
What's wrong with HTTPS: Part 1 - Trust issues
Friday, November 25. 2016
Three years ago I was inspired by Scofield (or Mr. Harri Hursti) when he claimed that SSL is broken and it cannot be fixed. See the post for details. In reality tech can be fixed, my previous HTTPS-post is about shortcomings and fixes of TLS-encryption. This time I'm writing about another type of HTTPS-shortcoming, trust. This is between humans and is much much harder to fix.
Ok, most users don't see the difference between HTTP and HTTPS. They simply don't pay any attemtion if their address-bar has the lock in it or not. Those rare who do make the distinction between encrypted and non-encrypted web sites are blissfully ignorant about the inner workings of HTTPS. They don't understand the concept of a X.509 certificate nor the need for one. A certificate is needed to (I'm quoting Wikipedia article here) certify the ownership of a public key by the named subject of the certificate. The ownership of a key is important, it is used to make sure the communication parties are the same who initiated the connection. Without that, the security could be easily breached with a man-in-the-middle -attack.
What the certificate isn't designed is to identify nor verify the certificate holder. Technically, the certificate has a suitable field name subject. In HTTPS-certificate, it contains the hostname (or domainname in a wildcard certificate) of the server a secured connection is initiated to. If a certificate is used on a different server, the hostname used for connection and issued in the certificate won't match, and the lock won't "lock" or "go green" depending on your choice of a web browser.
The part where trust comes into play, is because the system is built so, that somebody issues the certificate. There is a chain of certificates to follow up to a root certificate to somebody who has authority to issue them. Any newly generated certificate is untrusted by your browser by default, unless the issuer root certificate is pre-added to your browser. That's where the certificate business (read: money) is. A certificate issuer has gone trough the hard work of pre-installing their certificate to all commonly used web browsers so that some website owner can come in and purchase a certificate from them and it will work and be trusted by any website visitors. What happens here is, you as the website visitor implicitly trust the website you are visiting, because somebody you don't know said they're who they announce themselves to be and they promised to be ok when asked about it. Of course browser and operating system companies play along with this, they do their due diligence and accept requests to distribute those root certificates to establish trust between the issuer and a website.
That's a bold request! Why should I trust somebody whose name is Verisign or Thawte or TeliaSonera, whom I know nothing about! No reason. But that's how security in Internet works.
This is the first part of a three part series addressing HTTPS and it's (in)security. Next part is about misappropriation of trust. Third part is about (failed) attempts to supervise trusted authorities.
Removing old Skype-login and going for Microsoft Account
Monday, November 21. 2016
This is a solution to my request #3 to Microsoft which I made in my post about Skype hack. Doing this will vastly improve your security for Skype-logins as the old Skype account and password cannot be used to login anymore.
Step 1: Merge Skype-account and Microsoft Account
For this sequence to work I have an existing Microsoft Account which is linked to my old Skype account. Also to state the obvious, I have different random password for every single service I ever use.
Go to https://account.microsoft.com/.
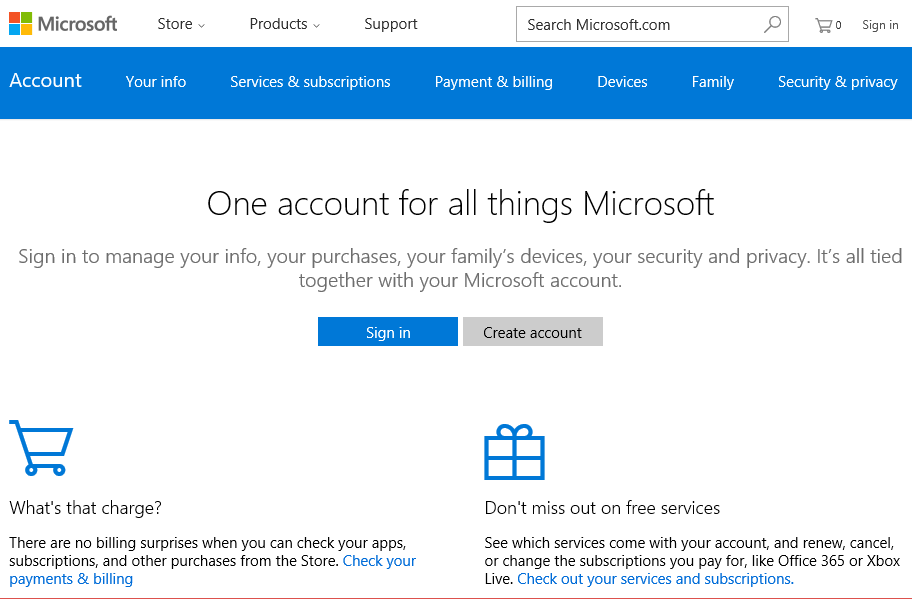
Login there with your Skype-account.
This is important! You need to use the old Skype-account for logging in.

Merge the accounts:
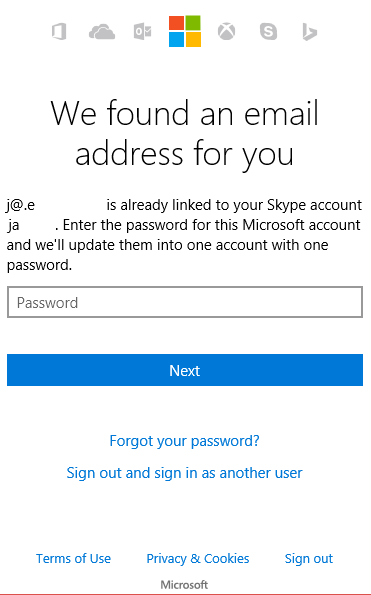
Yes! Single password login:

Testing:
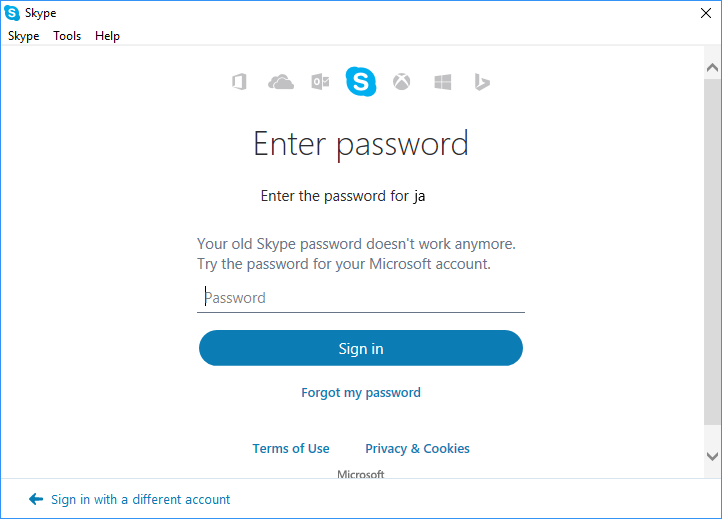
The message clearly states "Your old Skype password doesn't work anymore". A login with Microsoft Account password does work.
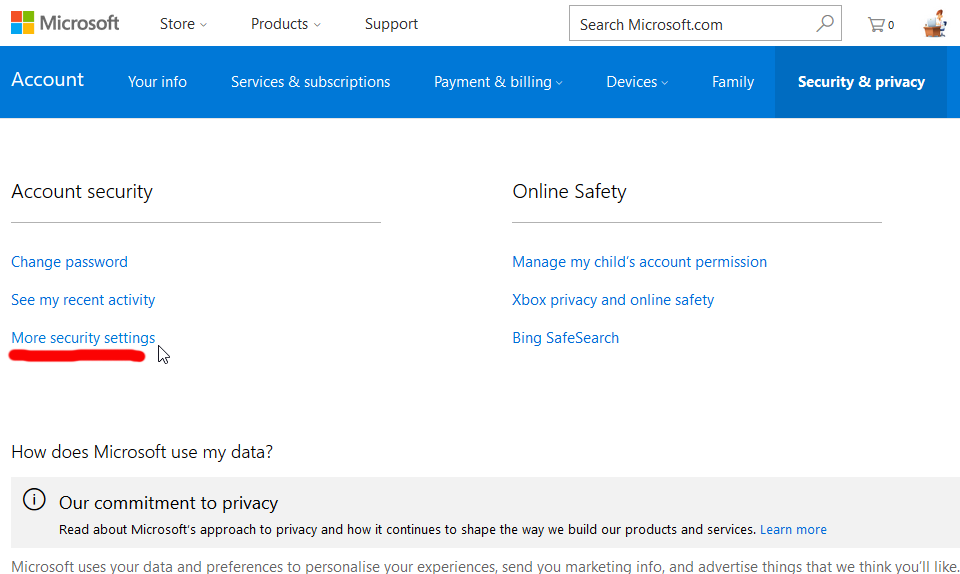
Step 2: Limit allowed login accounts
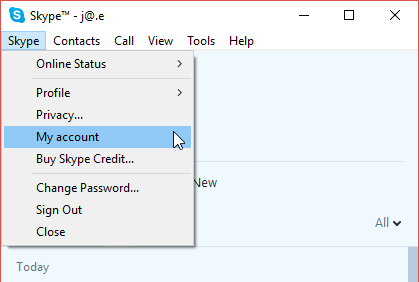
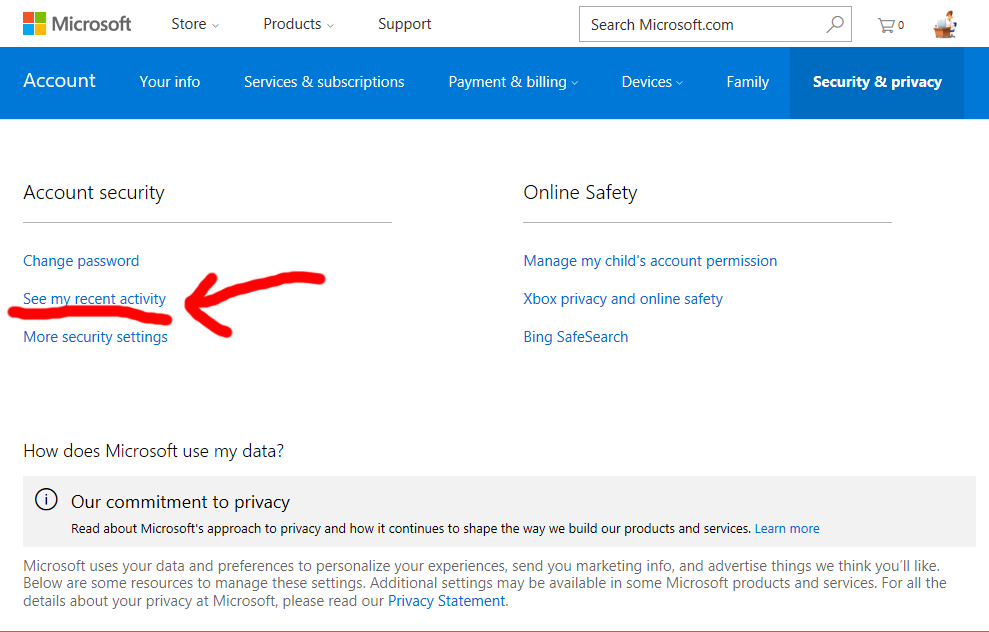
Yet again, go to your Microsoft Account. See More security settings:
In there, you'll find Change sign-in preferences:

Now you see a list of possible logins to use:
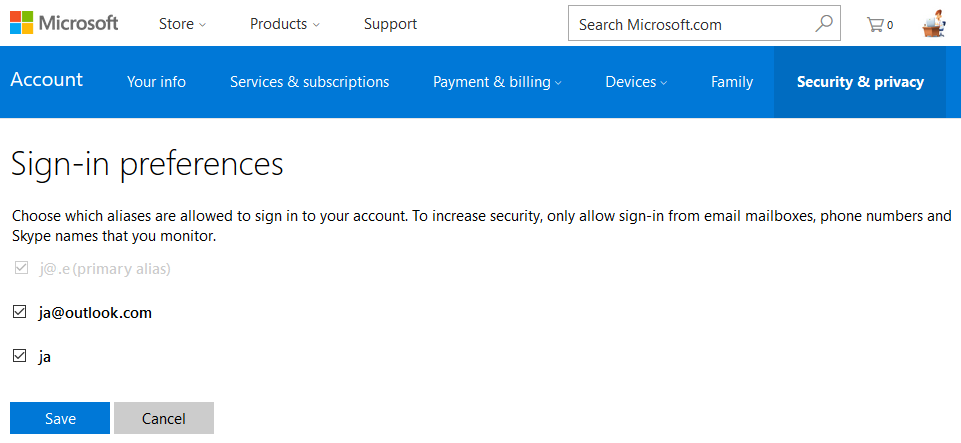
Un-check / check the ones to suit your login needs. I went for a single one, of course.
That's it. Done!
Now your Skype login security is vastly improved.
Skype protocol hacked, part 3
Saturday, November 19. 2016
This one won't fade away, so I'm taking a third swing at the subject. Previous posts are here and here. I've been actively following the conversation in Sype community's Security, Privacy, Trust and Safety board's discussion thread "Link to "baidu" website sent to all of my contacts".
Recap, what happened so far
Tons of fake links are being sent to people via Skype as chat messages. The chat is originating from somebody you already know and who is in your Skype's contact list.
Microsoft has stated "Some Skype customers have reported their accounts being used to send spam" when asked about it. That is true, people have been their Skype-accounts hacked by automated attacks based on leaked passwords and those accounts have been used to send crap to their contacts. However, this beef isn't about that. This beef is about the fact, that people whose Skype-accounts HAVE NOT been hacked, are sending crap to their contacts.
Microsoft went the classic way: "change your password". People did that. The same people are STILL sending crap to their contacts. For that, there is no official statement besides to (this is so ridiculous, I have to quote this verbatum) "Delete UNKNOWN Entry from HKEY_CURRENT_USER\Software\Microsoft\Windows\CurrentVersion\Run and Delete all UNKNOWN files under %appdata%\Roaming". Link to the exact instructions is here. So, I consider myself to be well educated about finer details what's inside Windows registry or Windows user profile. Because there are thousands of entries there, I don't know all of them, it is impossible to tell which of them are unknown and which are not. How would somebody with almost no experience be able to do that! Actually the magnitude of Microsoft support blunder is so huge, they wiped off the chat log from the discussion board and Box.com.
What people have also established, that there are two ways to login to a Skype session on any Skype-client. There is the old fashioned Skype-way and Microsoft Account. You can set a two-factor authentication into Microsoft Account, but not for Skype. Now that there are two ways to login, also please, remember that Skype can be run on multitude of mobile devices, Windows, Mac or directly from https://web.skype.com/. So, huge amount of attack surface exists there. What people have also established, that un-installing Skype from your device-of-choice doesn't make the problem go away, you'll still keep sending links to your contacts. So, reducing your personal attack-surface doesn't do it for you.
Obviously lots of people are royally pissed about this. Also Microsoft playing down their damage and offering completely useless support doesn't help.
The client devices are not compromized
When this kind of weird occurrence happens, any layman will immediately freak out and their mind there is with 100% certainity a single thought: my computer/phone has a virus!
In this case, no it does not.
People are "sending" these fake links after they un-installed Skype (two years ago). What exists, is the Skype-account. This is the hard part, which not-so-much-software-engineers don't grasp: your stuff in The Cloud can be cracked too, it doesn't have to be via your personal device. I don't know how to make this absolutely clear to a regular person.
The thing is: this issue is bothering many many people, and has been doing that since August 2016. All security flaw scenarios are possible, even cracked computers and mobile phones. However, that's not what interests me. My focus is on people whose computers have NOT been cracked, but are sending junk via Skype.
What's still happening
So, what's happened recenty is, that people are still receiving the links. Apparently (I haven't got any yet), the link has been changed from Baidu.com-based redirection to Vk.com, a Russian equivalent of Facebook. As I haven't received any of those, I cannot confirm the new link.
There are people, who have confirmed, that their Microsoft-account has been logged into from really weird geographic location. But that one can be easily fixed, change password and enable two factor auth they won't be doing that again. How the hack is actually done, we don't know. There was a theory about advertisement API, but personally I don't see that as a viable option. It would mean, that people actually would be using their Skype clients, but there are tons of people who haven't done that for couple years and are still spewing crap around.
Do something about it: Check that your account isn't cracked
There is no login-history, device list or anything that would resemble modern tools to audit your own account in the traditional Skype. This is what you can see:

What I'd like to see is what newly created Skype-accounts have and make the original Skype-account be gone. As in merge/delete/drop. I don't need two separate logins for my Skype. Especially as there is no 2-FA, or login device history for it.
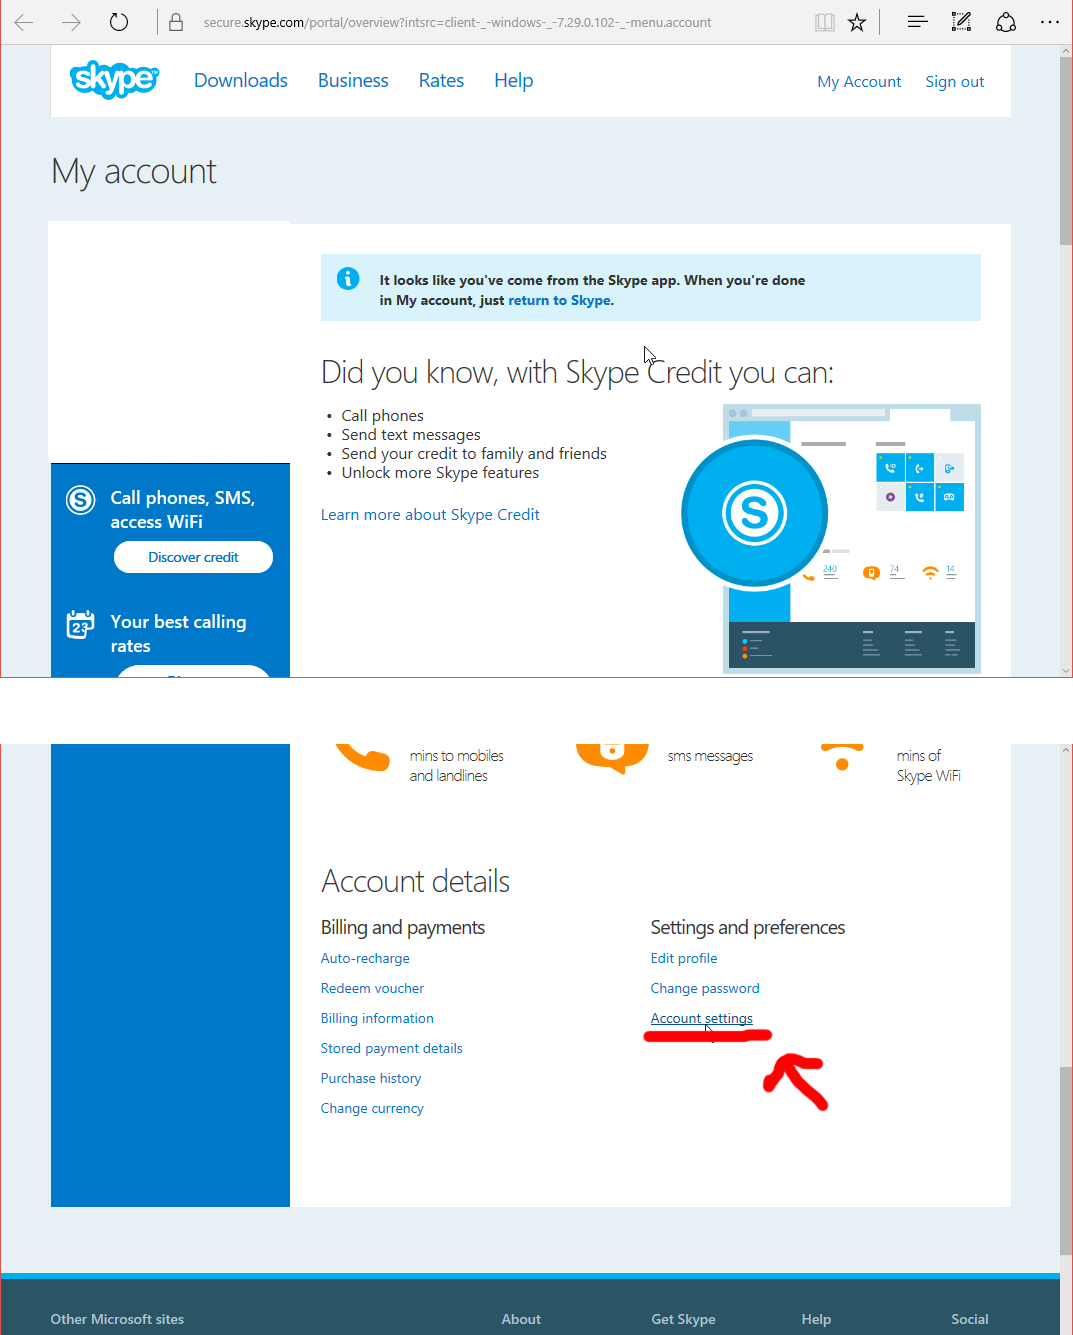
This is what you can do is make sure your Microsoft Account is secure. Login to https://account.microsoft.com/.
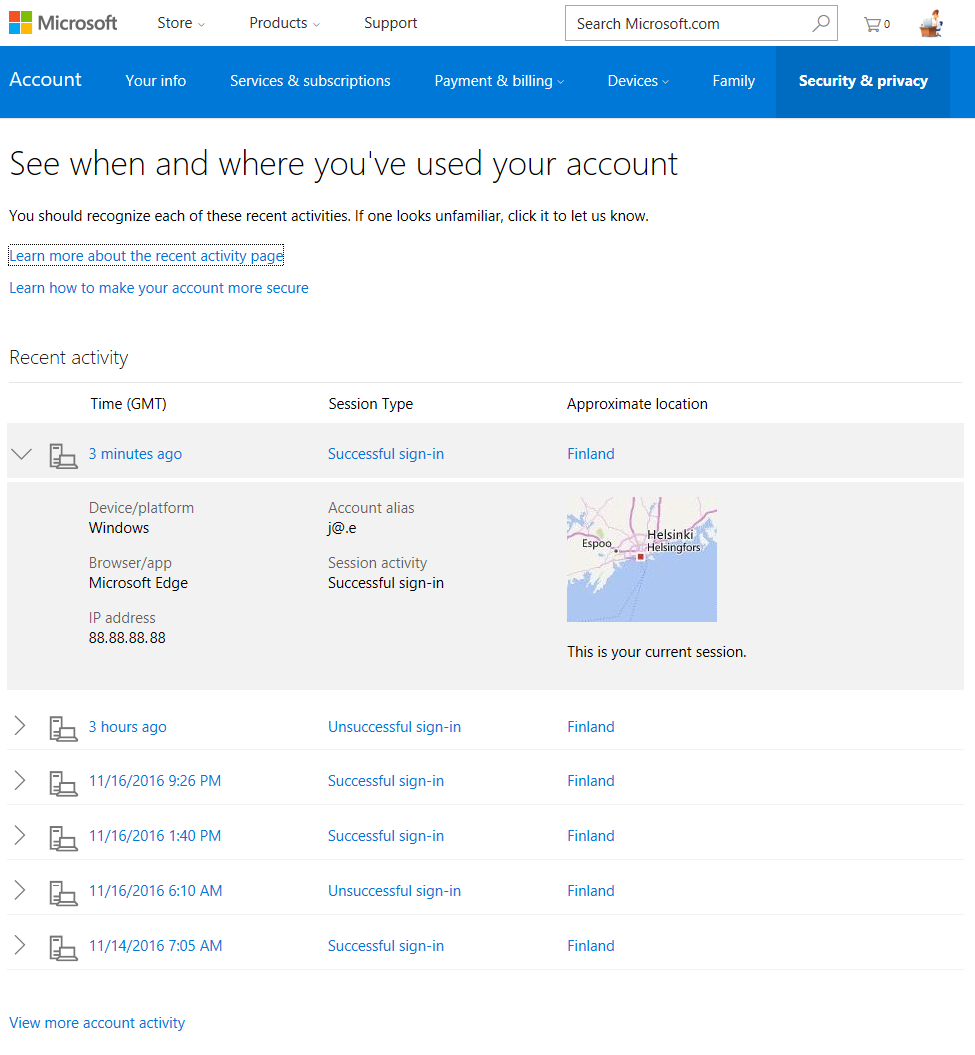
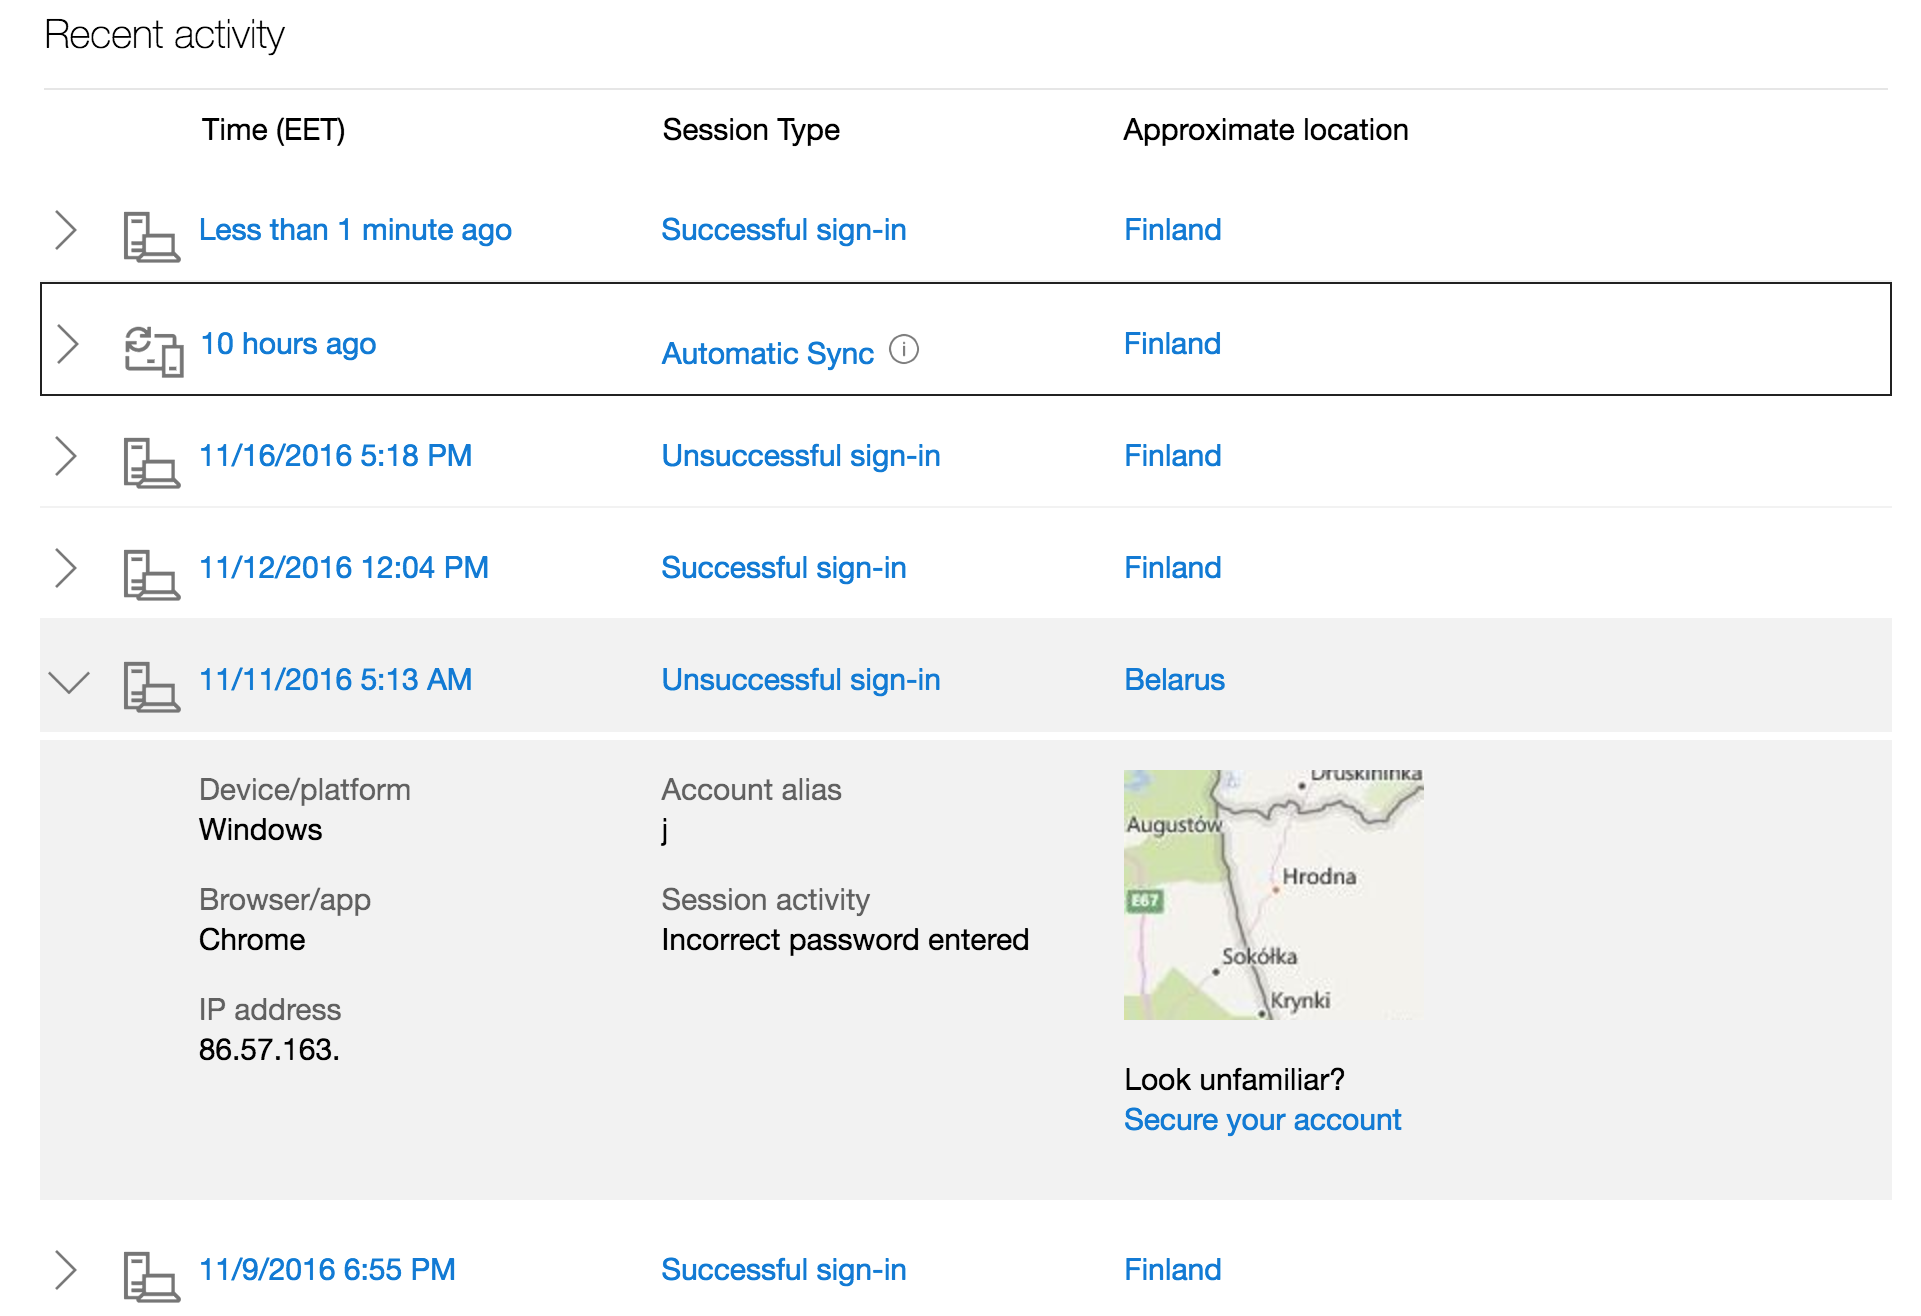
So, nothing wrong with my account. Here is an account having more-than-dubious history entry in it:

I've redacted the IP-address from Belarus. It's most likely some poor bastard's machine, which is cracked and used as a springboard forward.
What I'd like to see happen
Firstly Microsoft, the owners of Skype need to step forward and confirm that accounts with proper passwords are being used to send crap. They need to admit, that their systems are not recognizing any accepted password logins, but chat messages are still being sent by innocent people.
Secondly, they need to fix the issue. Whichever is broken there they need to address it. The worst case scenario is, that somebody can actually inject new chat messages out of thin air, without the sender being logged in.
Third, the old skype account login needs to be secured. That's the easiest one here to achieve. As newly created Skype-accounts are only via Microsoft Account, that shouldn't be much problem. Also I'd like to get rid of that login method. Update: Instructions for doing this are in my next post.
So, Microsoft, we're waiting for you.
Skype protocol hacked, part 2
Monday, November 14. 2016
Windows 10 update KB3200970 stuck
Thursday, November 10. 2016
Hands down KB3200970 is the worst update I've seen for Windows 10!
In general I hate Windows 10 TiWorker-process. It sucks CPU like there is no tomorrow. I cannot comprehend how difficult it is to determine if an update is needed or not. If you compare to any Linux .deb or .rpm packaging, a simple update check in Windows 10 is way too heavy. I find this kind weird. When Microsoft announced simplifying servicing models for Windows 7 and Windows 8.1, the reasons were to reduce scan times and finding right patches easier. It certainly doesn't feel like it to me.
So, there is Cumulative update for Windows 10 Version 1607 and Windows Server 2016, released November 8, 2016. This is also known as KB3200970 and boy, do people have trouble installing it!
This is what happened to me:
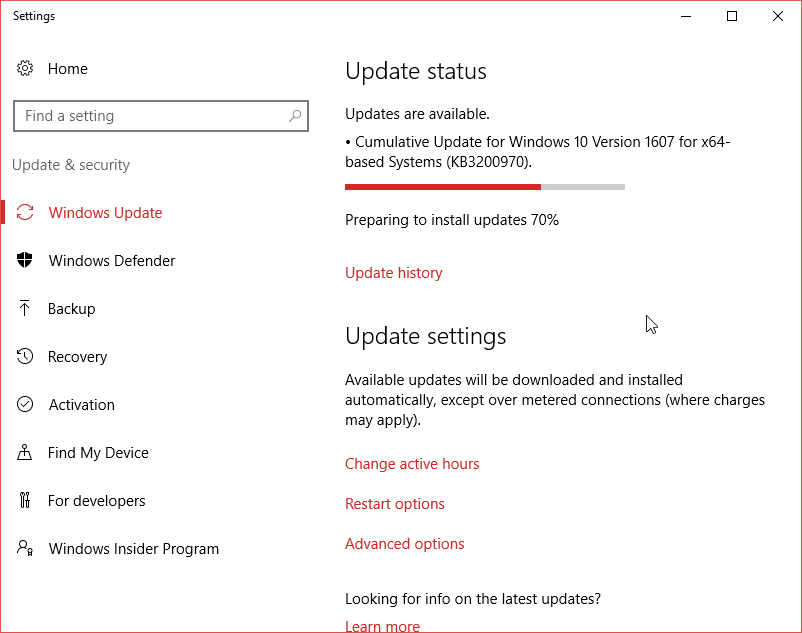
For about 8 hours it was stuck there in the preparing phase. While doing absolutely nothing, this was my CPU-load:

Well done idiots!
Net is full of stories like mine: How to fix Windows Update in Windows 10 if it becomes stuck, Windows 10 KB3200970 issues: install fails, high CPU usage, battery drain and more and Cumulative Update for Windows 10 Version 1607 for x64-based Systems(KB3200970).
The Reddit-article had a link to KB971058, How do I reset Windows Update components? which helped some. I gave it a try and it did help.
First some services needed stopping. This is what you would run as an administrator cmd.exe:
net stop bits

net stop wuauserv

net stop appidsvc

net stop cryptsvc
In my case the wuauserv didn't stop, I had to find the process id for it and kill it manually. After all that, I attempted renaming:
Ren %systemroot%\SoftwareDistribution SoftwareDistribution.bak

Ren %systemroot%\system32\catroot2 catroot2.bak
First one failed, so I don't know what the impact was. Then I ran the entire list:
cd /d %windir%\system32


regsvr32.exe atl.dll

regsvr32.exe urlmon.dll

regsvr32.exe mshtml.dll

regsvr32.exe shdocvw.dll

regsvr32.exe browseui.dll

regsvr32.exe jscript.dll

regsvr32.exe vbscript.dll

regsvr32.exe scrrun.dll

regsvr32.exe msxml.dll

regsvr32.exe msxml3.dll

regsvr32.exe msxml6.dll

regsvr32.exe actxprxy.dll

regsvr32.exe softpub.dll

regsvr32.exe wintrust.dll

regsvr32.exe dssenh.dll

regsvr32.exe rsaenh.dll

regsvr32.exe gpkcsp.dll

regsvr32.exe sccbase.dll

regsvr32.exe slbcsp.dll

regsvr32.exe cryptdlg.dll

regsvr32.exe oleaut32.dll

regsvr32.exe ole32.dll

regsvr32.exe shell32.dll

regsvr32.exe initpki.dll

regsvr32.exe wuapi.dll

regsvr32.exe wuaueng.dll

regsvr32.exe wuaueng1.dll

regsvr32.exe wucltui.dll

regsvr32.exe wups.dll

regsvr32.exe wups2.dll

regsvr32.exe wuweb.dll

regsvr32.exe qmgr.dll

regsvr32.exe qmgrprxy.dll

regsvr32.exe wucltux.dll

regsvr32.exe muweb.dll

regsvr32.exe wuwebv.dll
Lot of them failed, but that's what the KB971058 told to do. Then starting the services:
net start bits

net start wuauserv

net start appidsvc

net start cryptsvc
Still this update tested my patience. It ran couple hours preparing after it announced, it's ready to go install. The installation took yet another couple hours. After the installation was completed and the obligatory reboot was done, Windows still reported that a reboot is required. This update really sucks ass!
Ultimately my laptop spent more than 50 hours to install all this. There were number of retrys and times than I didn't care to look to closely what's going on, so the machine had to wait for user interaction. Still the process was paintakingly long.
Skype protocol hacked
Wednesday, November 9. 2016
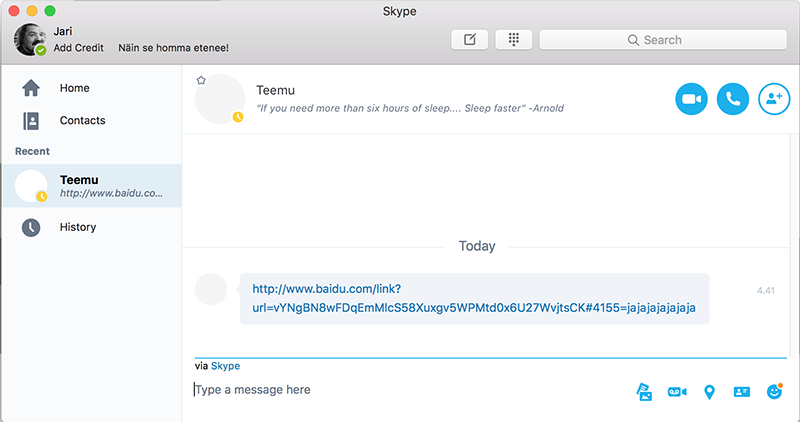
For the past couple of days, I've been getting weird Baidu links via Skype chat. The sender is somebody I actually know and is my contact. The messages do not stay in the message history for that person, nor they never received the reply I sent back when the link was received. It's really weird to receive such links to a Chinese search engine in the first place, but the elusive chat history is the definite clue: somebody hacked Skype's protocol. Also, I find it strange, that the link contains my Skype-handle in it (obfuscated in below pic).
The message looks like this:
I'm not alone with this phenomenon: Link to "baidu" website sent to all of my contacts.
As the messages I got are from actual contacts, I followed up on them. Both persons deny sending me such links, and their message history doesn't display the link either. So, I don't think that the personal accounts are cracked, it's the Skype servers that are being exploited. Hopefully Microsoft-guys figure this out and plug the hole.
Update:
Couple hours after posting this, somebody posted a link to Why are Skype accounts getting hacked so easily? into Skype's community discussion. The article makes a claim that Skype's 2-factor authentication can be circumvented easily by using the old Skype credentials. Looks like you can still log in with Microsoft-account (pretty secure) or the credentials used before Microsoft acquired Skype. The old credentials cannot have 2-FA set up into it and most likely you already forgot it even exists. That seems to be the way how nasty people make their way in.
Update 10th Nov 2016:
Recent buzz is about a similar incident last year, when users' Skype accounts were used to send spam. So, nobody has come forward with any proof that the protocol would be compromised. It is gearing towards to the fact that users didn't realize there are two separate passwords to their Skype account, and the non Microsoft-account had a weak password which was used to gain access to contact lists.
Update 14th Nov 2016:
Confirmed, that this is not a case of using leaked passwords, my second post about this is here.

