Wifi-6 USB on a Linux - Working!
Sunday, January 26. 2025
Last summer I wrote about an attempt to get 802.11ax / Wifi 6 to work on a Linux. Spoiler: It didn't.
A week ago, the author of many Realtek-drivers, Nick Morrow contacted me to inform of a new driver version for RTL8832BU and RTL8852BU Chipsets.
After ./install-driver.sh, the kernel module 8852bu is installed. Dmesg will still display product as 802.11ac WLAN Adapter, however incorrect information that will be. After couple of retries, I managed to get WPA3 authentication working.
Ah joy. The USB-stick works! Performs quite fast also.
Very quirky driver, still. I can't seem to get the thing working on every plugin. Need to try multiple times. Typical failure is "No secrets were provided" -error with "state change: need-auth -> failed (reason 'no-secrets', managed-type: 'full')" in message log. I have absolutely no idea why this is happening, the built-in Realtek works every time.
Confessions of a Server Hugger - Fixing a RAID Array
Sunday, January 12. 2025
I have to confess: I'm a server hugger. Everything is in cloud or going there. My work is 100% in the clouds, my home pretty much is not.
There are drawbacks.
5.58am, fast asleep, there is a faint beeping waking you. It's relentless and won't go way. Not loud one to alarm you on fire, but not silent one to convince you to go back to sleep. Yup. RAID-controller.
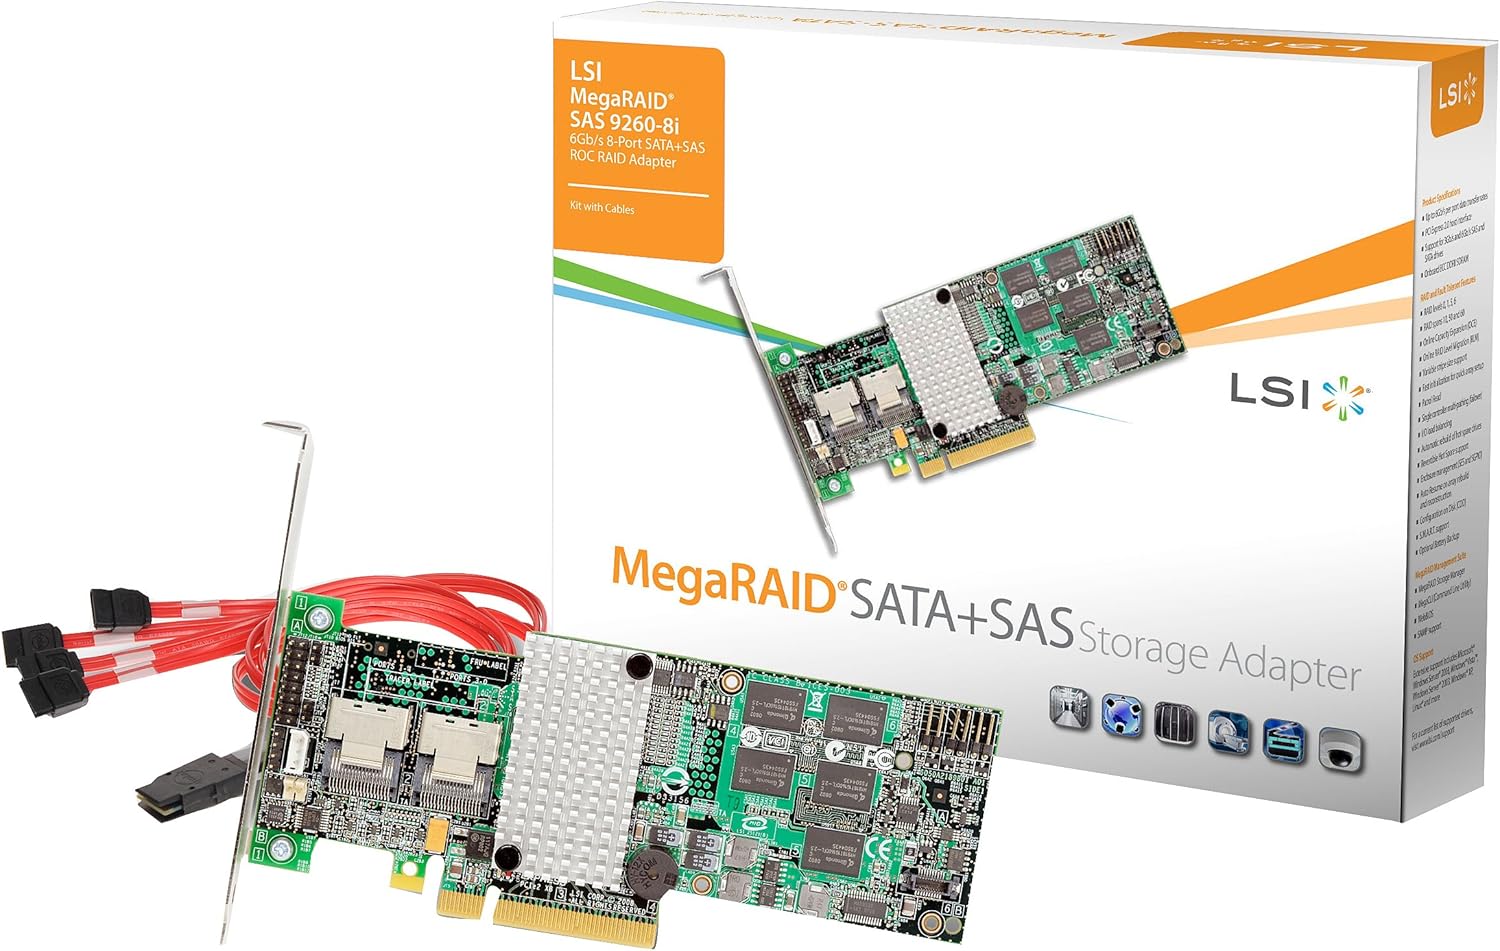
What I have is a LSI MegaRAID SAS 9260-4i. The controller is from 2013. Year later LSI ceased to exist by aquisition. Also the product is rather extinct, Broadcom isn't known for their end user support. As there is proper Linux-driver and tooling after 11 years, I'm still running the thing.
A trivial MegaCli64 -AdpSetProp -AlarmSilence -aALL makes the annoying beep go silent. Next, status of the volume: MegaCli64 -LDInfo -Lall -aALL reveals the source for alarm:
Adapter 0 -- Virtual Drive Information:
Virtual Drive: 0 (Target Id: 0)
Name                :
RAID Level          : Primary-1, Secondary-0, RAID Level Qualifier-0
Size                : 7.276 TB
Sector Size         : 512
Mirror Data         : 7.276 TB
State               : Degraded
Strip Size          : 64 KB
Number Of Drives    : 2
Darn! Degraded. Uh/oh. One out of two drives in a RAID-1 mirror is gone.
In detail, drive list MegaCli64 -PDList -a0 (for clarity, I'm omitting a LOT of details here):
Adapter #0

Enclosure Device ID: 252
Slot Number: 0
Drive's position: DiskGroup: 0, Span: 0, Arm: 1
Device Id: 7
PD Type: SATA

Raw Size: 7.277 TB [0x3a3812ab0 Sectors]
Firmware state: Online, Spun Up
Connected Port Number: 1(path0)
Inquiry Data:             ZR14F8DXST8000DM004-2U9188                      0001
Port status: Active
Port's Linkspeed: 6.0Gb/s
Drive has flagged a S.M.A.R.T alert : No


Enclosure Device ID: 252
Slot Number: 1
Drive's position: DiskGroup: 0, Span: 0, Arm: 0
Device Id: 6
PD Type: SATA

Raw Size: 7.277 TB [0x3a3812ab0 Sectors]
Firmware state: Failed
Connected Port Number: 0(path0)
Inquiry Data:             ZR14F8PSST8000DM004-2U9188                      0001
Port's Linkspeed: 6.0Gb/s
Drive has flagged a S.M.A.R.T alert : No
For slots 0-3, the one connected to cable #1 is off-line. I've never go the idea why ports have different numbering to slots. When doing the mechanical installation with physical devices, it is easy to verify cables matching the slot numbers, not port numbers.
From this point on, everything became clear. Need to replace the 8 TB Seagate BarraCudas with a fresh pair of drives. Time was of the essence, and 6 TB WD Reds were instantly available.
To recovery!
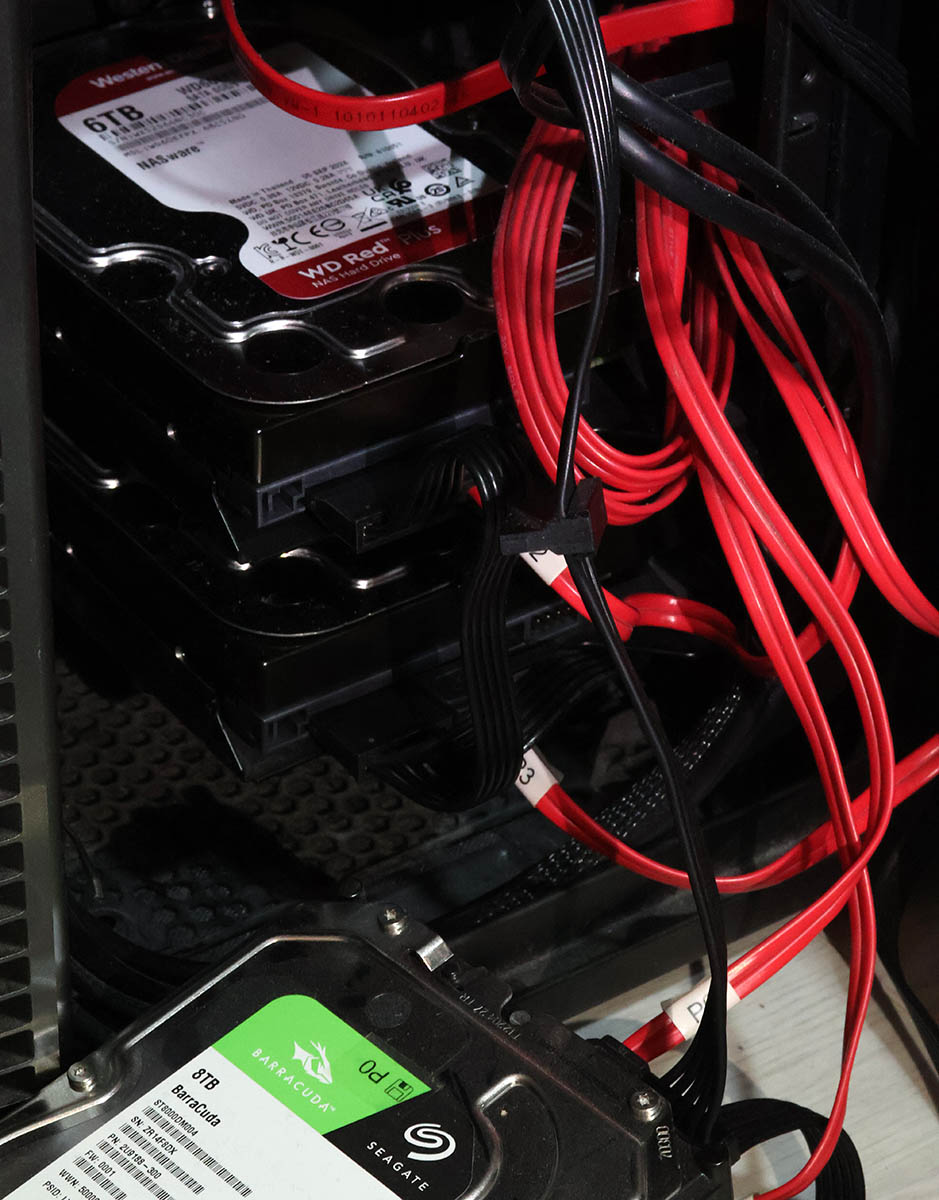
New Reds where in their allotted trays. BarraCudas where on my floor hanging from the cables.
Btw. for those interested, case is Fractal Define R6. Rack servers are NOISY! and I really cannot have them inside the house.
Creating a new array: MegaCli64 -CfgLdAdd -r1 [252:2,252:3] WT RA Direct NoCachedBadBBU -a0. Verify the result: MegaCli64 -LDInfo -L1 -a0
Virtual Drive: 1 (Target Id: 1)
Name                :
RAID Level          : Primary-1, Secondary-0, RAID Level Qualifier-0
Size                : 5.457 TB
Sector Size         : 512
Mirror Data         : 5.457 TB
State               : Optimal
Strip Size          : 64 KB
Number Of Drives    : 2
Span Depth          : 1
Default Cache Policy: WriteThrough, ReadAhead, Direct, No Write Cache if Bad BBU
Current Cache Policy: WriteThrough, ReadAhead, Direct, No Write Cache if Bad BBU
Default Access Policy: Read/Write
Current Access Policy: Read/Write
Disk Cache Policy   : Disk's Default
Encryption Type     : None
Is VD Cached: No
To my surprise, the RAID-volume hot-plugged into Linux also! ls -l /dev/sdd resulted in a happy:
brw-rw----. 1 root disk 8, 48 Jan 5 09:32 /dev/sdd
Hot-plug was also visible in dmesg:
kernel: scsi 6:2:1:0: Direct-Access     LSI      MR9260-4i        2.13 PQ: 0 ANSI: 5
kernel: sd 6:2:1:0: [sdd] 11719933952 512-byte logical blocks: (6.00 TB/5.46 TiB)
kernel: sd 6:2:1:0: Attached scsi generic sg4 type 0
kernel: sd 6:2:1:0: [sdd] Write Protect is off
kernel: sd 6:2:1:0: [sdd] Write cache: disabled, read cache: enabled, supports DPO and FUA
kernel: sd 6:2:1:0: [sdd] Attached SCSI disk
Next up: Onboarding the new capacity while transferring data out of the old one. With Linux's Logical Volume Manager, or LVM, this is surprisingly easy. Solaris/BSD people are screaming: "It's sooooo much easier with ZFS!" and they would be right. Its capabilities are 2nd to none. However, what I have is Linux, a Fedora Linux, so LVM it is.
Creating LVM partition: parted /dev/sdd
GNU Parted 3.6
Using /dev/sdd
Welcome to GNU Parted! Type 'help' to view a list of commands.
(parted) mktable gpt

(parted) mkpart LVM 0% 100%
(parted) set 1 lvm on
(parted) p
Model: LSI MR9260-4i (scsi)
Disk /dev/sdd: 6001GB
Sector size (logical/physical): 512B/512B
Partition Table: gpt
Disk Flags:

Number  Start   End     Size    File system  Name  Flags
 1      1049kB  6001GB  6001GB               LVM   lvm

(parted) q
With LVM, inform of a new physical volume: pvcreate /dev/sdd1
  Physical volume "/dev/sdd1" successfully created.
  Not creating system devices file due to existing VGs.
Extend the LVM volume group to the new physical volume: vgextend My_Precious_vg0 /dev/sdd1
Finally, inform LVM to vacate all data from degraded RAID-mirror. As VG has two PVs in it, this effectively copies all the data. On-the-fly. With no downtime. System running all the time. Command is: pvmove /dev/sdb1 /dev/sdd1
Such moving isn't fast. With time, the measured wallclock-time for command execution was 360 minutes. That's 6 hours! Doing more math with lvs -o +seg_pe_ranges,vg_extent_size, indicates PV extent size to be 32 MiB. On the PV, 108480 extents were allocated to VGs. That's 3471360 MiB in total. For 6 hour transfer, that's 161 MiB/s on average. To set that value into real World, my NVMe SSD benchmarks 5X faster on write. To repeat the good side: my system was running all the time, services were on-line without noticeable performance issues.
Before tearing down the hardware, final thing with LVM is to vacate broken array from VG: vgreduce My_Precious_vg0 /dev/sdb1 followed by pvremove /dev/sdb1.
Now that LVM was in The Desired State®, final command to run was to remove degraded volume from LSI: MegaCli64 -CfgLdDel -L0 -a0
To conclude this entire shit-show, it was time to shutdown system, remove BarraCudas and put case back together. After booting the system, annoying beep was gone.
Dust having settled, it was time to take a quick looksie on the old drives. Popping BarraCudas to a USB3.0 S-ATA -bridge revealed both drives being functional. Drives weren't that old, 2+ years of 24/7 runtime on them. Still today, I don't know exactly what happened. I only know LSI stopped loving one of the drives for good.
Stiga.com hack
Saturday, January 11. 2025
Old Computers and Hardware @ Museum of Technology, Finland
Friday, January 10. 2025
For a couple months, there is an exhibition of "operators and automated data processing designers" in Museum of Technology.
I visited the exhibit as tons of old hardware was shipped from Computer Museum of Finland, Jyväskylä. As there were so many interesting pieces of hardware, I'm presenting a few pictures here. On any typical blog post, I'd blanket my text with links. Here, on purpose, I'm omitting them. "Do your own research" as conspiracy lunatics say!
Funet Cisco AGS+
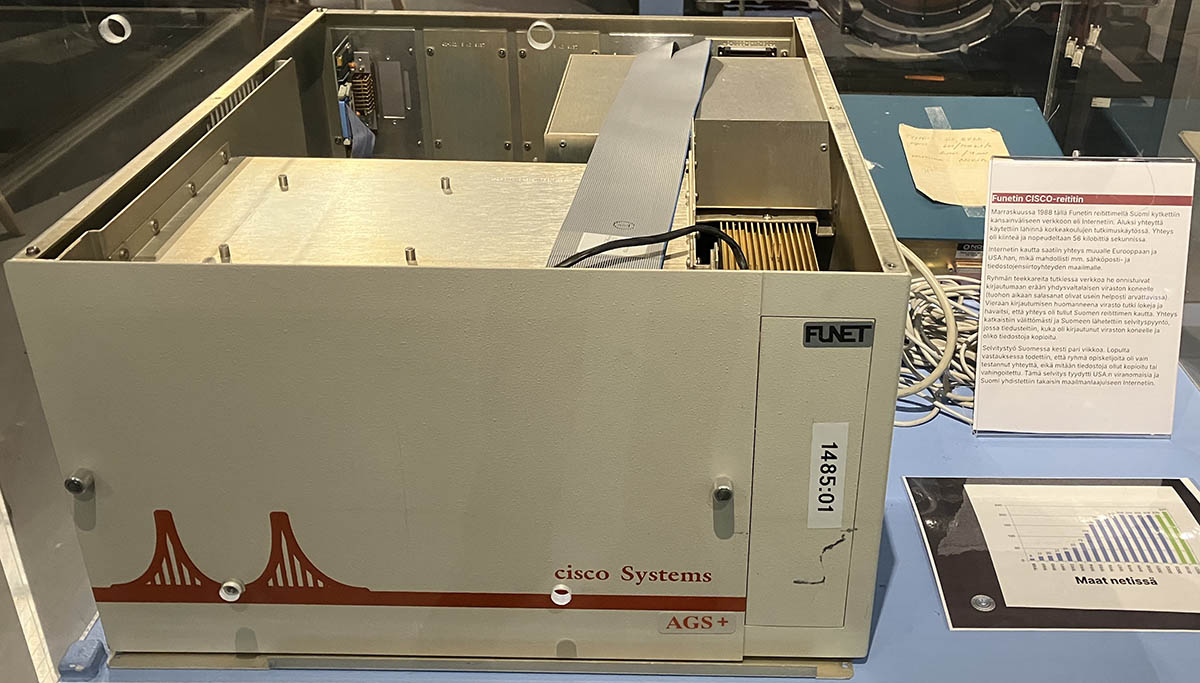
Back in the day, in 1988, when you visited ftp.funet.fi, your traffic when through this exact router. It was the first ever router manufactured by Cisco Systems.
Psion Revo
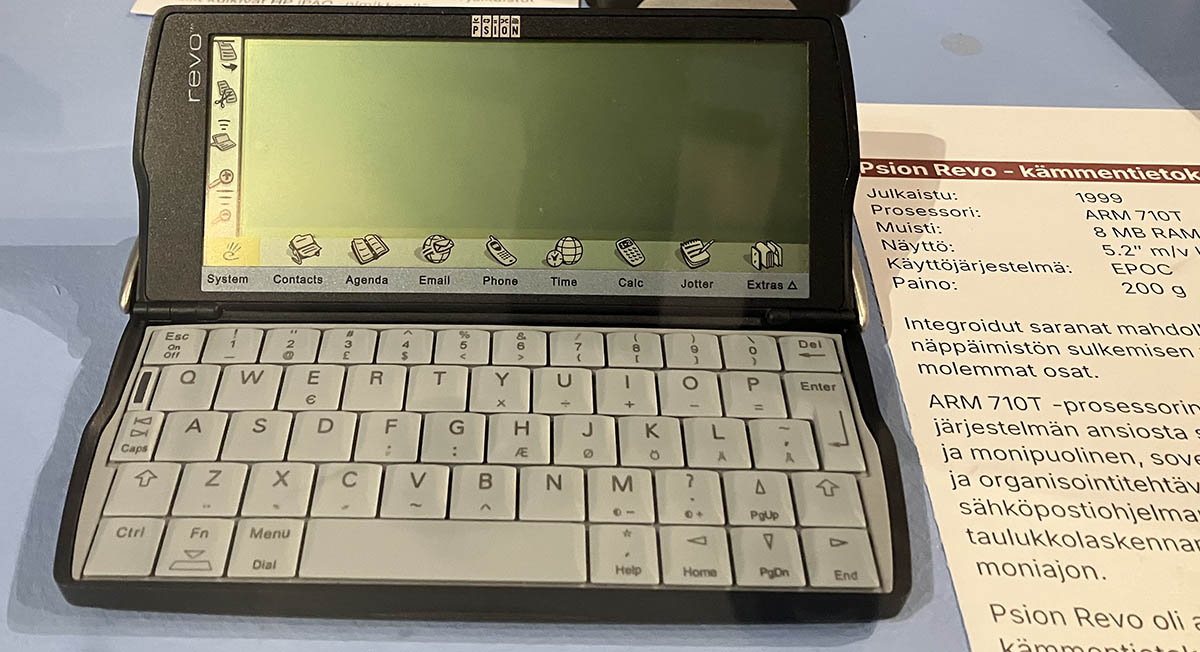
I owned one. It was a magnificant piece of pocket-size computing power! As a minus, any kind of transfer required the thing to be plugged into a PC. This minor drawback didn't slow me. Neither did the black&white screen.
Later Nokia purchased Epoc and made it Symbian.
Nokia Communicator 9210
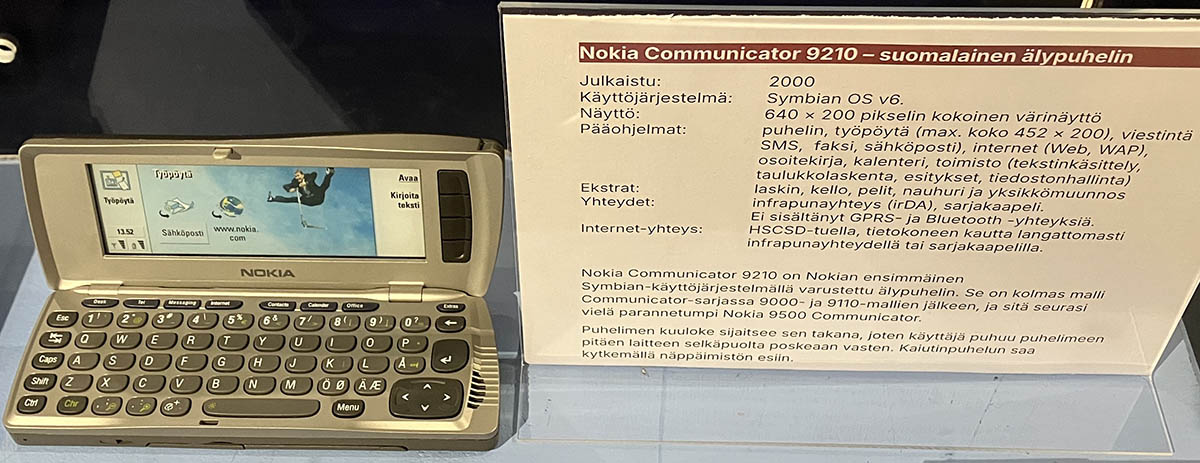
While this wasn't the first ever communicator by Nokia, it was the best one. Proper screen, good keyboard, Symbian 5, ah.
Back-in-the-days, I was poached to a company to write Symbian C++ code for this device. Fun times!
IBM PC
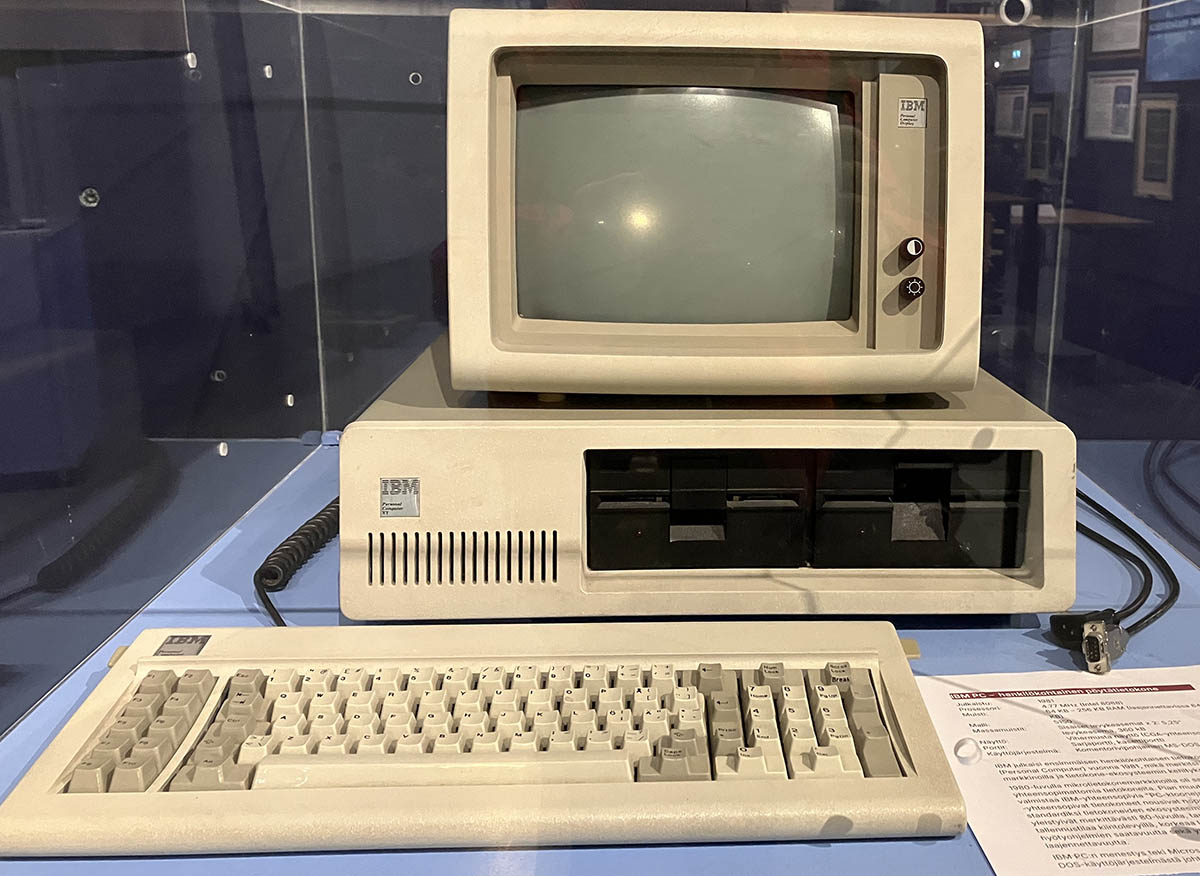
As in - the first one. Ever! From 1981.
For this invention everybody on this globe owes a lot. If IBM had kept the system closed, there wouldn't be no ecosystem for hardware manufacturers nor software crafters. This ecosystem made all the next rounds of evolution possible landing us where we are today.
Ancient: IBM 3380 HDD
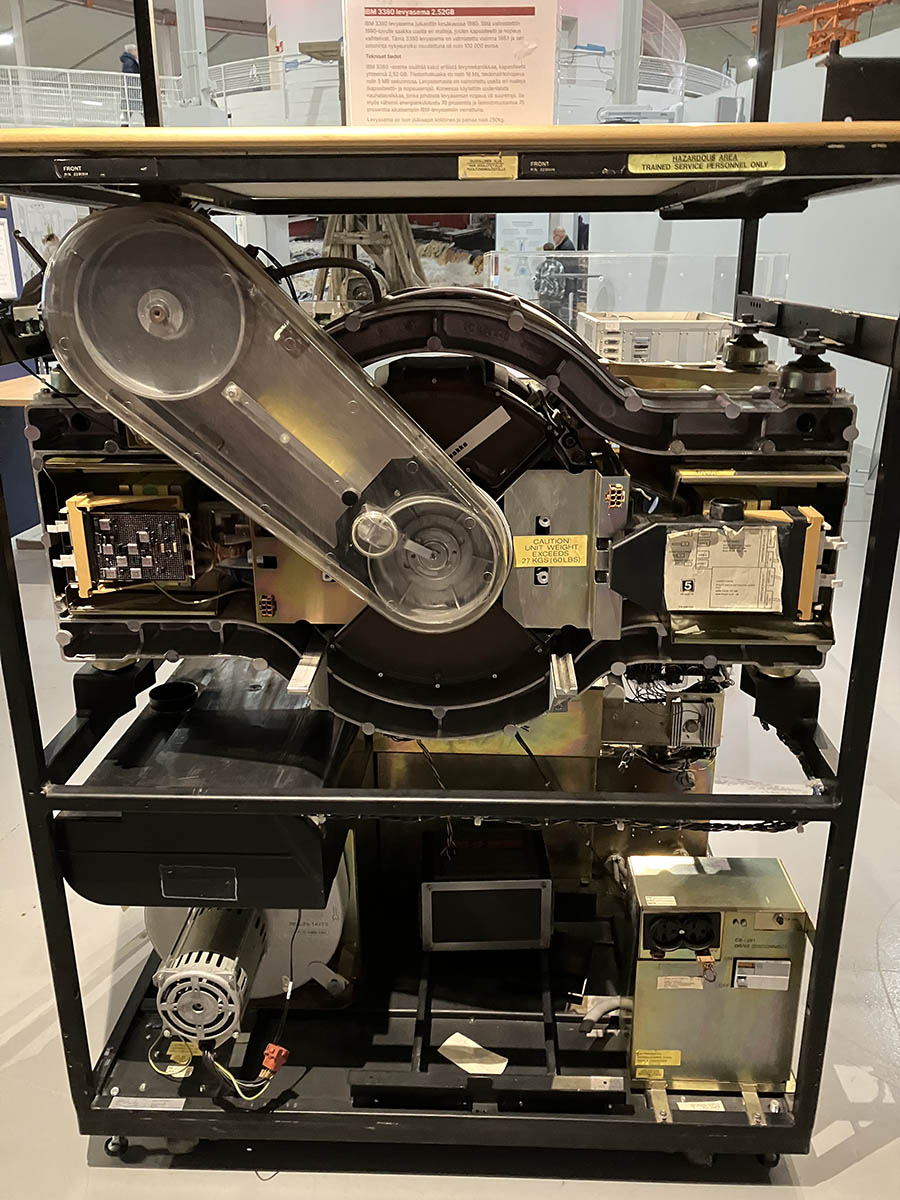
Moving to antics. Back in 60s this refridgerator-sized thing was one of the early HDDs invented by IBM. Capacity was 2,5 gigabytes. During that era RAM was in kilobytes, floppy disks barely reached megabyte.
Ancient: PDP-11
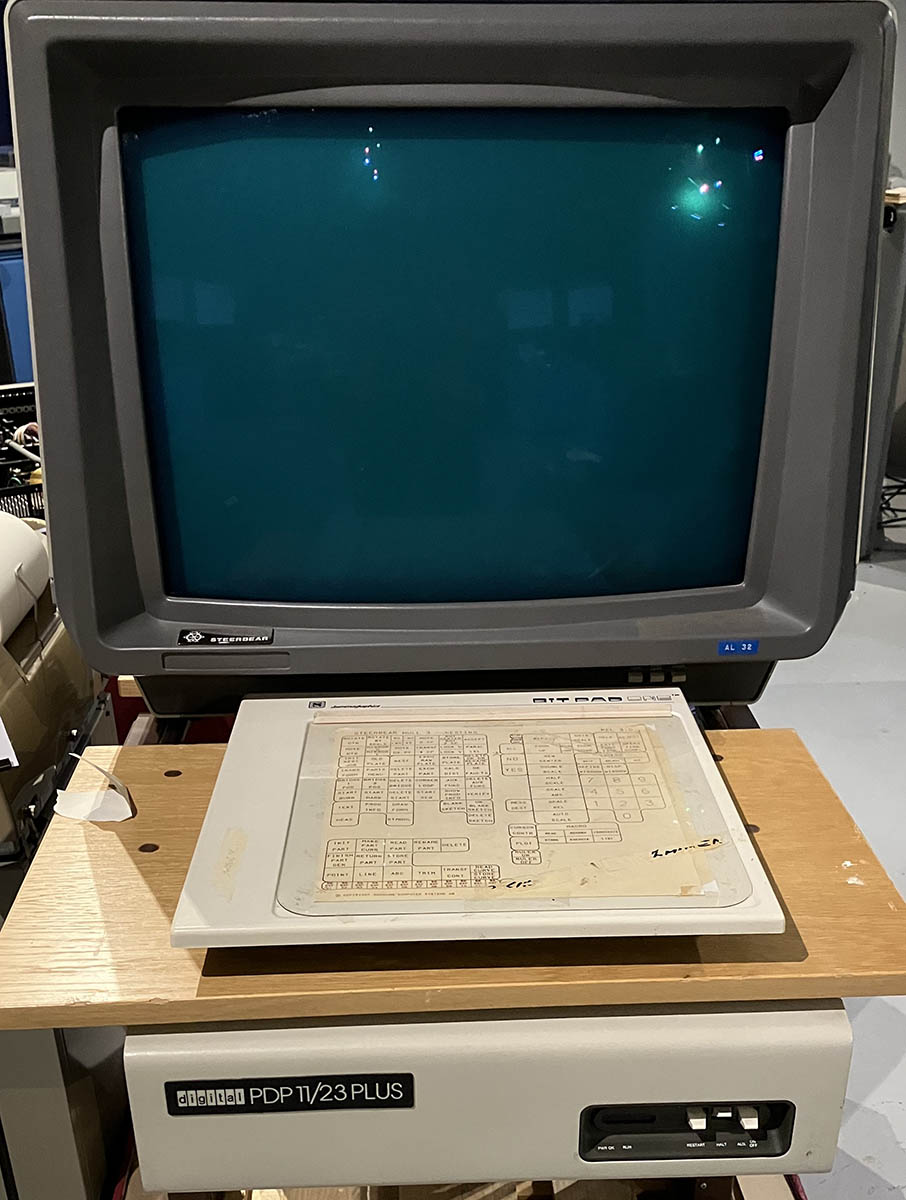
This DEC thing pre-dates me. Those things from 60s were so rare, I'm sure not many ever landed shores of Finland. The screen size is something from 2020s. However, the display is 1m x 1m x 1m and has to weigh a ton!
Ancient: DEC VT102 Terminal for the PDP-11
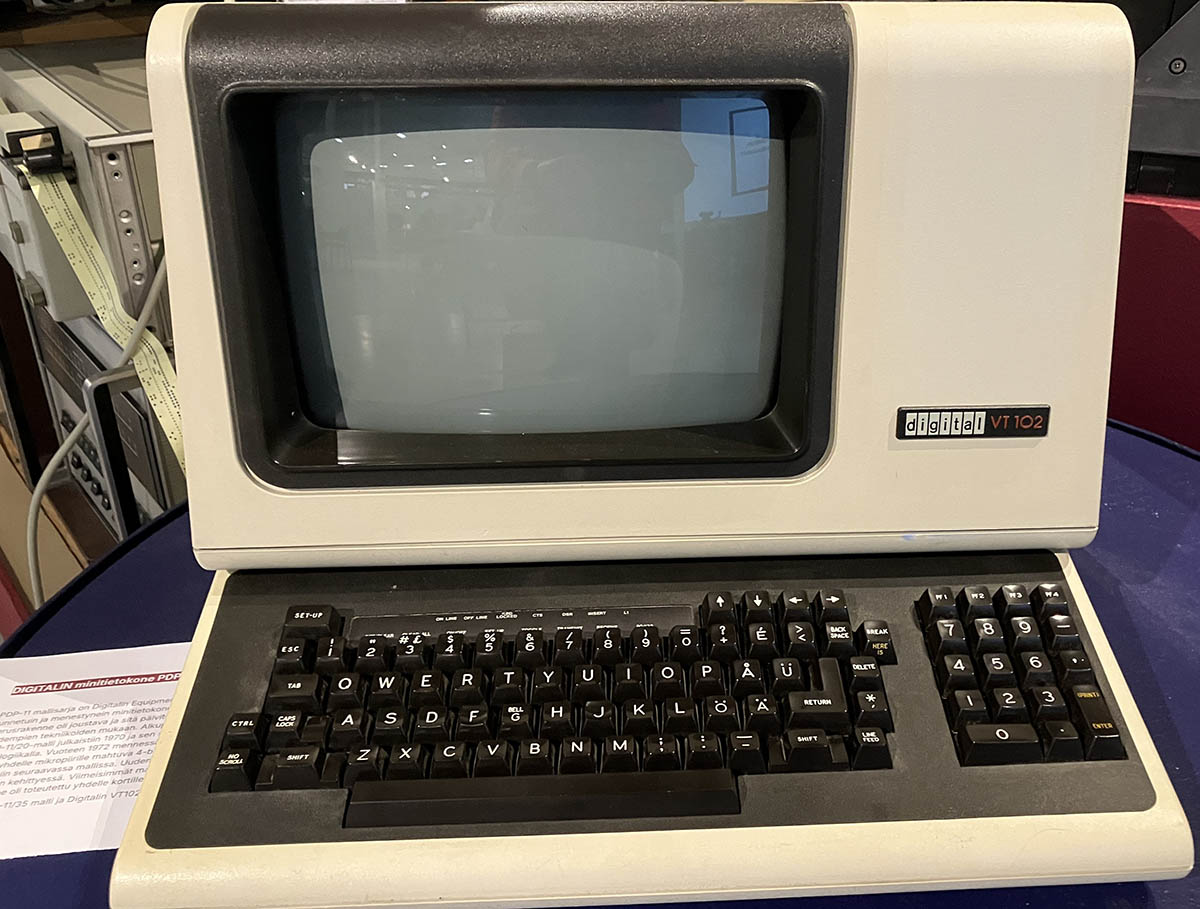
When you open a "terminal" in OS of your choice, it's a software version of that. Funny thing is, VT102 is still a common terminal type to emulate.
Ancient: IBM System/360 Control Panel
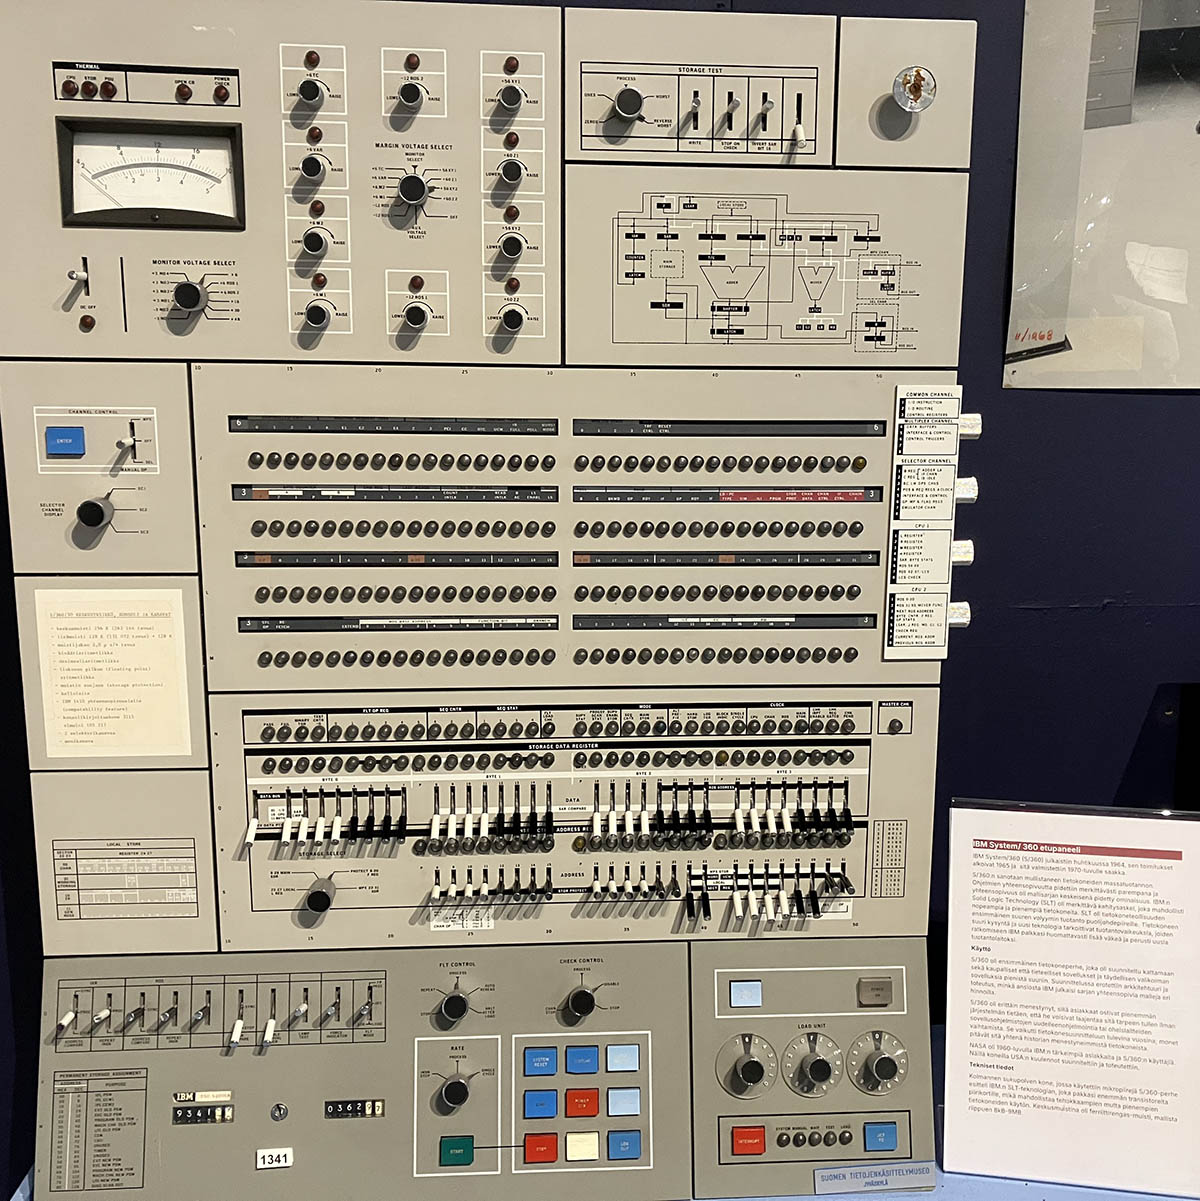
Your Windows 7 had a Control Panel. This is the same thing, but for IBM S/360. That's how you'd manage your computer's settings back in the 60s.
Merry Christmas and Happy New Year 2025!
Tuesday, December 24. 2024

With this Nightcafe-created image of Santa Claus' "cloud service" I'd like to wish you all Merry Christmas!
It seems AI took the cloud-part very literally. Totally understandable. How would one draw such an abstract concept.
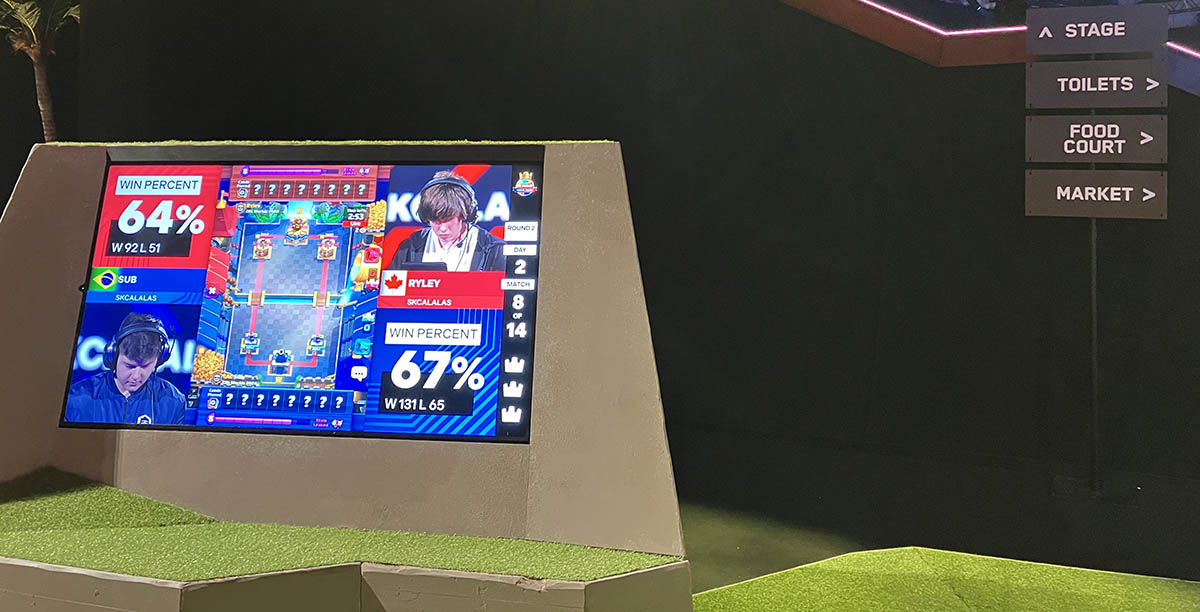
eSports - Superfest 2024
Monday, November 4. 2024
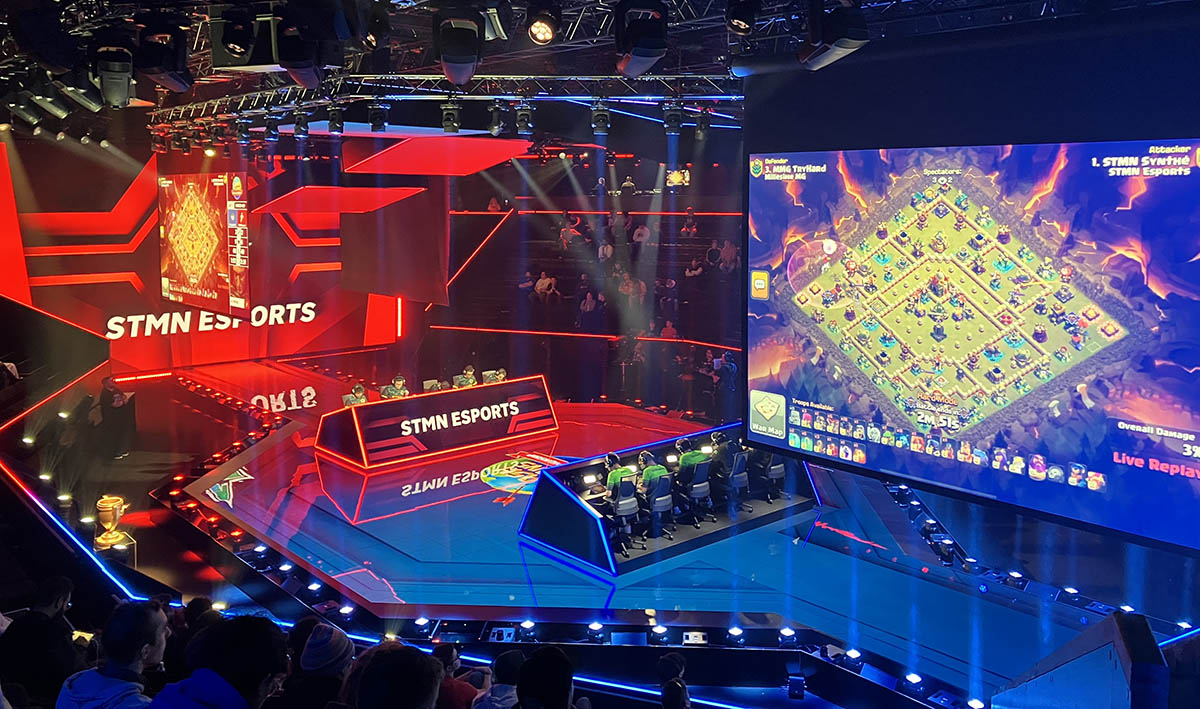
![]() Last weekend, I had the chance of visiting Superfest 2024. It's an eSports event organized by Supercell. Championship of three games were played:
Last weekend, I had the chance of visiting Superfest 2024. It's an eSports event organized by Supercell. Championship of three games were played:
- Clash of Clans World Championship Finals
- Clash Royale Leagure World Finals
- Brawl Stars World Finals
When entering the event, lounge:

Sunday finals schedule poster:

Saturday game of Clash of Clans. STMN players Darkstar, Fluxxy, Ninj, Synthé and VAD Hawk playing against Millesime MG players KingsMan, Natchoa, Teemper, TryHard and Max:

Sunday game of Clash Royale from lounge, two players from SKCalalas Sub vs Ryley. Ryley became 2nd:
Brawl Stars champions HMBLE players Symantec, BosS and Lukii after their victory:

Well organized event. I wish I would have understood the games bit better. Those games are pretty unknown to me.
Still: GG!
Fedora 41 Upgrade - Gone bad
Thursday, October 31. 2024
As scheduled to end of October 2024: Announcing Fedora 41 from Red Hat.![]()
Such distro has mechanism to do in-place upgrade: Upgrading Fedora Linux Using DNF System Plugin. It is based on DNF System Upgrade.
Priciple is to run dnf system-upgrade download --releasever=41, tap Yes couple times and then dnf system-upgrade reboot. It works (mostly) and I have used such in-place upgrade many times on a VM running in Hetzner.
If you haven't read between the lines yet, let's state the obvious: I'm posting this in a scenario where everyhing didn't go as planned.
Imagine a virtual machine running in a data center far far away. There is interaction via SSH or if needed, a browser-based console can be used for dire needs. A failed update was indeed such.
41 Upgrade Begins - And Fails
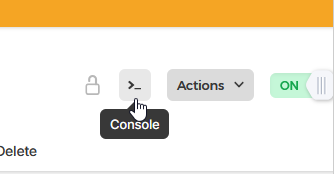 Simultaneously with
 dnf system-upgrade reboot, I start sending ICMP echo requests to my VM to see the point in time when it begins pinging me back. This is a clear indication of upgrade being finished. I waited roughly 20 minutes without a response. Such a long time is an obvious indicator of a problem. Subsequently I logged in Hetzner's portal to pop open a console. Console showed me an upgraded system in the middle of a reboot-cycle. Stuck doing nothing.
That being unexpected, I chose to go for a Ctrl-Alt-Del. My wish came trough, a request to reboot nicely recycled the stuck system and a login-prompt greeted me on the console. Still, ping didn't. On the console, the only single keyboard layout made available is hard-coded ANSI US. On hardware, all my keyboards have layout ISO Finnish. That makes those elusive often used characters like dash (-), slash (/), pipe (|) or colon (:) be in very very different places slowing the entire process.
On the Console - Missing Package
Poking around the system on console indicated an upgraded VM. Everything else on the system was nice & peachy besides networking. There was no IP-addresses assigned. Actually entire NetworkManager was missing from the system. It did not exist. At all! Also every single bit of configuration at /etc/NetworkManager/ was absent.
Transferrring the muich-needed RPM-package NetworkManager-1.50.0-1.fc41 by eyeballing a rather dumb virtual console is fruitless. A quick analysis of the thing ended with a harsh one: it doesn't support any sensible means of transmitting files. Receiving any sent data with copy/paste or any other low-level means was absent. Something else was needed.
The Fix - Scraping
I opted to fix the network by hand. ip-command was installed in the system and it worked perfectly. That's all I needed. Or, almost all.
In my infinite wisdom, I didn't have any of the IP-details at hand. I reasoned to myself the system upgrade having worked flawlessly multiple times before this. I didn't NEED to save IPv4 or IPv6 -addresses, their routing setup or DNS-resolvers. I knew from tinkering with these boxes that on x86-64 architecture Hetzner VMs all those details are static, manually set to Hetzner-assigned values. Their modern setup on Arm v8 does utilize DHCP for IPv4. My box was on a traditional rack and I couldn't count on automation to assist on this one.
Scraping all the bits and pieces of information was surprisingly easy. My own DNS-records helped. After the fact, I realized a shortcoming, if I would have looked at the bottom of the web-console, those IP-addresses would have been shown there. At the time I didn't. Routing defaults can be found from documentation such as Static IP configuration.
Now I knew what to set for the values.
The Fix - Manual Labor
Now the "fun" begun. I need to setup IPv4 address complete with routing to restore functionality of dnf-command. This would make it possible to install NetworkManager to get nmcli-command back.
Sequence is as follows:
ip addr add 192.0.2.1/32 dev eth0
ip route add 172.31.1.1 dev eth0 src 192.0.2.1
ip route add default via 173.31.1.1 src 192.0.2.1
Btw. see RFC5737 for IPv4-addresses and RFC3849 for IPv6-addresses reserved for documentation. I'm not going to post my box's coordinates here.
Fedora DNS-setup is via systemd-resolved, checking file /etc/systemd/resolved.conf. File had survived the update intact. It still had the content of:
DNS=185.12.64.1 185.12.64.2 2a01:4ff:ff00::add:1
A perfect & valid solution.
The Fix - Managing Network
Ta-daaa! Ping worked. dnf worked! Everything worked! The joy!
At this point running dnf install NetworkManager wasn't much. Trying to figure out what was wrong proved to be a headache.
On initial glance nmcli conn show:
NAME  UUID                                  TYPE      DEVICE
eth0  12345678-1234-1234-1234-123456789abc  ethernet  --
What!? Why isn't my eth0-connection associated with a device! No amount of attempts, tinkering, cursing nor yelling helped. I could not associate a device with the connection. My only option was to drop the hammer on the thing: nmcli conn del eth0
Now my eth0 didn't work as it didn't exist. A delete made sure of it. Next, getting it back:
nmcli conn add type ethernet ifname eth0 con-name eth0 ipv4.method manual ipv4.addr 192.0.2.1
nmcli conn modify eth0 ipv4.gateway 172.31.1.1
nmcli conn modify eth0 ipv6.addr 2001:db8::1/64
nmcli conn modify eth0 ipv6.gateway fe80::1
Final twist was to make those changes effective: nmcli device reapply eth0
IPv6 begun operating, IPv4 was unchanged. Everything was where it should have been after the upgrade.
That was it for NetworkManager, moving on.
Outcome
The only true measure of a possible success is a system reboot. If my tinkering survived a normal cycle, then all was good. Nothing special to report on that. Everything stuck and survived a rinse-cycle. File eth0.nmconnection stored NetworkManager configs as expected.
Why this thing exploded remains unknown. Missing any critical pieces of a system is always a disaster. Surviving this one with very little damage was lucky. I may need to increase my odds and re-image the VM. My guess is, this box survives only so-and-so many upgrades. I may have used all of the lives it has.
Azure and Friends Tampere #T07
Friday, October 18. 2024
My employer opted to host a meetup. As they needed somebody to give a presentation there, obviously, I stepped up.

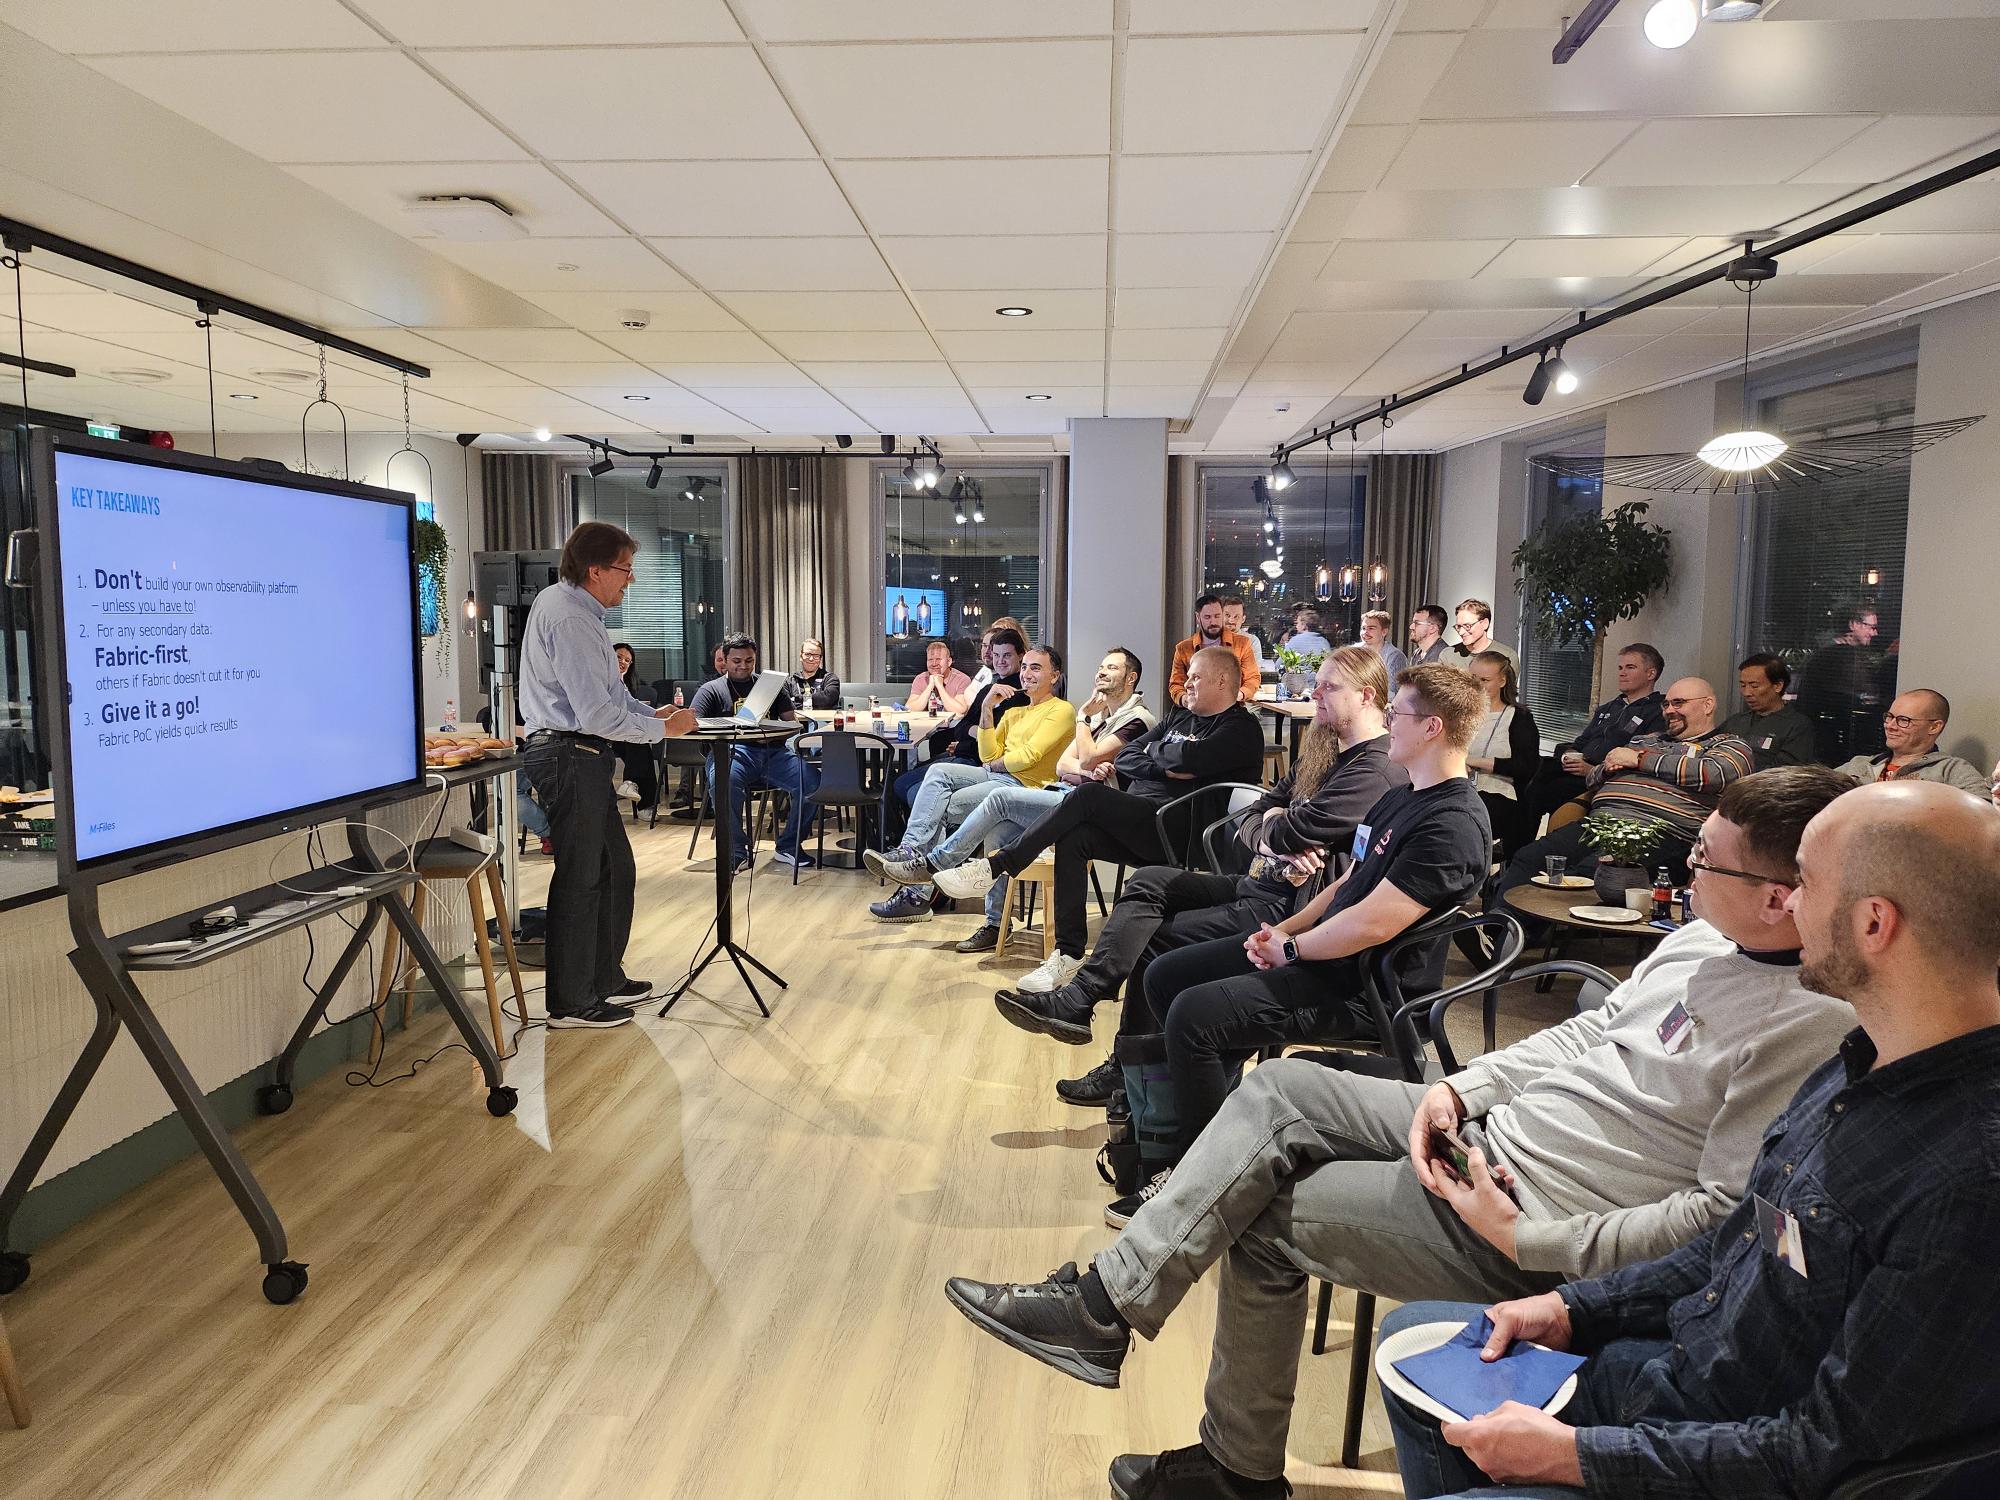
Thanks for all the participants!
For those interested, my presentation on Microsoft Fabric Real-Time Intelligence.
PostgreSQL 17 upgraded into Blog
Monday, October 14. 2024
On 26th of September, PostgreSQL Global Development Group announced the release of version 17.
Here is an easy one: Can you guess at which point I made the upgrade?

The slope is a maintenance break. Datadog wasn't measuring HTTP-performance while I was tinkering to make the actual upgrade.
What worries me is the performance being itsy-bitsy worse with version 17. Graph is smooth as silk. However, crunching the numbers to smooth the zig-zag, 16 seems to have better performance on average. Difference isn't big, but it is there. Maybe I'm missing a new setting to improve cache performance or something?
iPhone iOS 18 Password manager
Thursday, September 12. 2024
It took "couple" iterations on Apple to realize they'll must add a password manager to their mobile operating system.
Next Monday, iOS 18 will be released with one. It's called "Passwords":
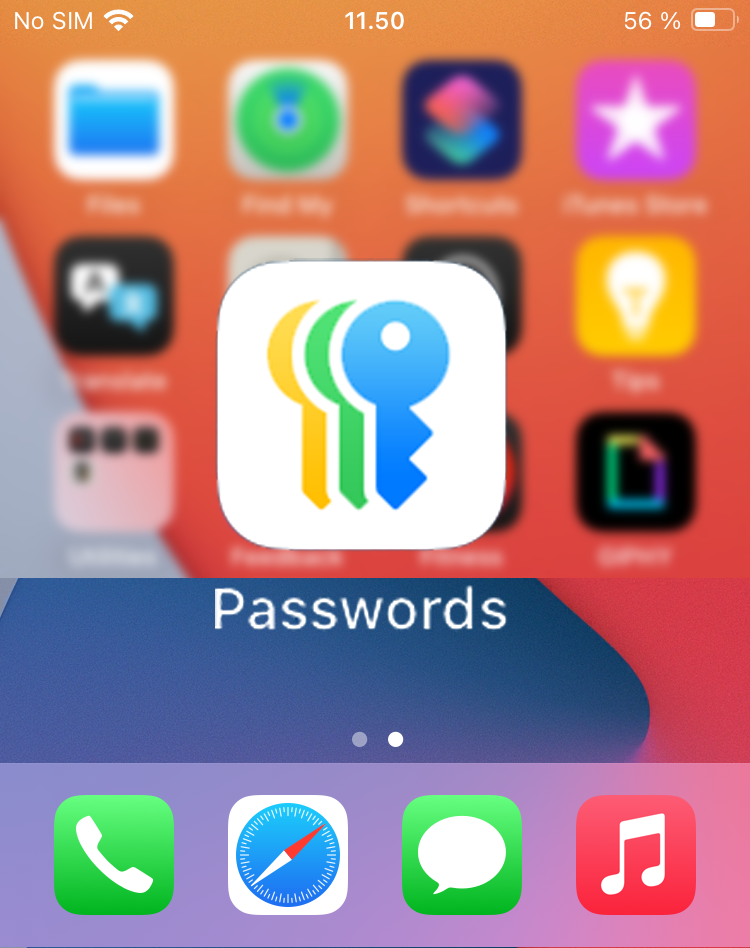
As I already have a password manager, this isn't a big deal. However, this new password-thingie extends functionality beyond passwords and has something The World has never seen: Possibility to edit Passkeys. (Anti-climatic, huh!)
Taking a closer look, this is what the password-app contains:

Further dill-down on (the never-seen-before) Passkeys:
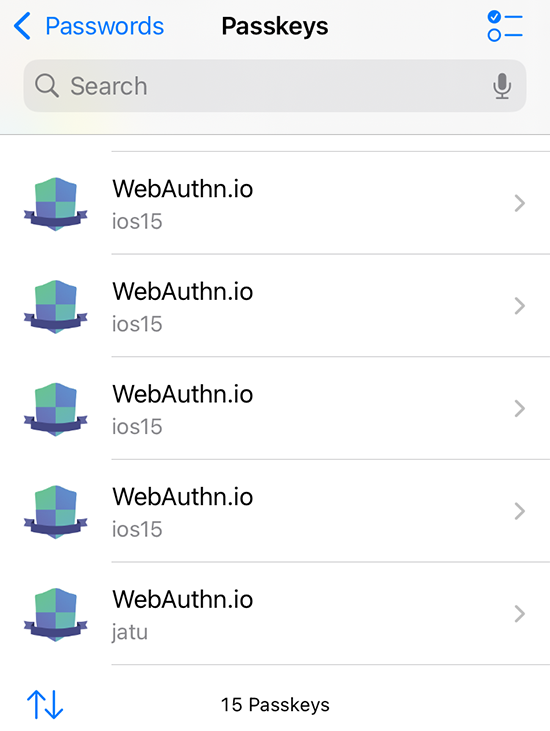
See how many dupes I have for https://webauthn.io/!
Three years back, I wrote a piece about Passkeys and it required a lot of research, testing and snooping around. Toying around throw-away Passkeys resulted in lot of junk, it seems.
While muttering "my precious", Yubico declared all information on existing passkeys a state secret. After the first one's example all other major Passkeys-providers like Appe and Google followed suit. They hid Passkeys well out of your reach.
I really never got the logic behind that. Why is it not allowed to see your own passkeys? Maybe if your security device is lost, also the criminals can see the list of your passkeys? Puzzling.
Finally I can get rid of all test junk. It took unbelievebly long to get this feature. However, I love the fact it is there.
Wifi-6 USB on a Linux - BrosTrend AX1
Thursday, August 29. 2024
My previous post was about 10+ year old laptops. At that time Broadcom ruled the chipset Wifi chipset market.
Since those days balance has shifted. Today, most common chipset for Wifi is Realtek. I also have couple Mediatek Wi-Fi chips working perfectly with Linux. To repeat what I said previously: These guys have their Linux support via open-source drivers. Broadcom doesn't. Hm. I dunno, maybe that's what made them decline and the other guy thrive? Most certainly, I wish it was their open-source support. 😁
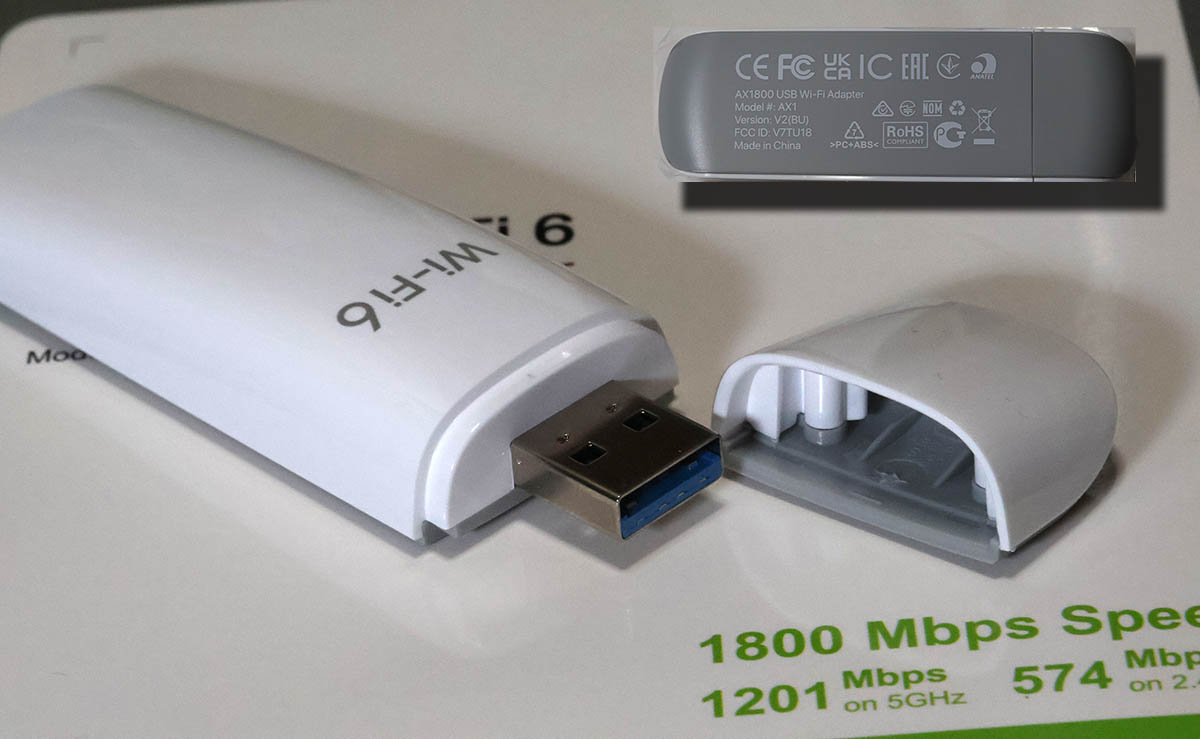
So, my old laptop lost wireless connectivity and I needed SOMETHING to get the thing going to The Internet. I happened to have a brand new USB-stick on a test drive. As there aren't many Linux-supported chipsets, most USB-sticks won't work with 802.11ax / Wi-Fi 6 and you have to settle for slower speeds combined with less security. This product is supposed to beat competition on that.
Spoiler: I doesn't! (yet)
The product is BrosTrend AX1. The speed rating is AX1800 and it's supposed to be WiFi 6 Linux Compatible WiFi Adapter:
lsusb information:
Bus 001 Device 013: ID 0bda:b832 Realtek Semiconductor Corp. 802.11ac WLAN Adapter
Device Descriptor:
  bLength                18
  bDescriptorType         1
  bcdUSB               2.00
  bDeviceClass            0 [unknown]
  bDeviceSubClass         0 [unknown]
  bDeviceProtocol         0
  bMaxPacketSize0        64
  idVendor           0x0bda Realtek Semiconductor Corp.
  idProduct          0xb832 802.11ac WLAN Adapter
  bcdDevice            0.00
  iManufacturer           1 Realtek
  iProduct                2 802.11ac WLAN Adapter
Btw. See how USB-identification is for 802.11ac. Confusing, that.
At this point, there is no pre-baked Linux kernel module. You can build one in a jiffy. Source code is at https://github.com/morrownr/rtl8852bu. Getting that C-code to work in your favor, after git clone, you need to run ./install-driver.sh. This script does a lot for you. At end, the script even stealthily copies the kernel module into proper directory to make loading the driver very easy. This is confusing and not all module builds do the install without asking.
When I modprobe 8852bu on Fedora 40, module does little bit of whining, but comes up. For the crash I sent some information to author: https://github.com/morrownr/rtl8852bu/issues/38
On my laptop, connection to 802.11ac / Wi-Fi 5 works ok. I suspect, there is something off with WPA3 as connections to 802.11ax / Wi-Fi 6 simply keep asking for network password in a forever loop. But hey! It worked. I got to The Net and was able to fix things. The thought of 802.11ax support is left unanswered. If USB-information doesn't state 802.11ax either, does the stick really support it or not? I dunno.
I'm hoping, WPA3-issue would be fixed one day, so that I'd be able to join any network of my choosing, not the one the device is capable of going.
Update - 20th January 2025: There is an updated driver with full 802.11ax -support in Linux.
Broadcom Wi-Fi in a Linux - Fedora 40 case
Tuesday, August 27. 2024
Is that combo really impossible?![]()
I've been running Linux in multiple old/oldish laptops. Broadcom is such a popular chip vendor, it is the most typical choice regardless of the laptop manufacturer. As Broadcom is full of idiots, their device drivers are proprietary. In their infinte wisdom, they pre-build Linux binaries and hand them out. This, obviously, is much better than not having the closed-source driver package at all. However, they really don't care. Every once in a while something happens in Linux kernel and their driver becomes less-than-operational.
Also, by lack of one official source, there are number of packages made out of the binary distribution. Key naming convention will include letters W and L in them, so you as an end user have to know wl stands for Broadcom BCM4311, BCM4312, BCM4313, BCM4321, BCM4322, BCM43224, BCM43225, BCM43227, BCM43228, BCM43142, BCM4331, BCM4352, BCM4360 devices. Simple! (No, not simple)
As an example: Fedora doesn't support Broadcom at all (as default), Arch Linux has packages brcm80211, b43 and broadcom-wl, Debian has broadcom-wl as non-free package.
Recently my Fedora 40 refused to find a working Wifi. It all started on from 6.9.10 up to 6.10.5. Oh, I forgot to mention, altough Fedora doesn't have the support, there exist number of alternative RPM-repos for Fedora carrying Broadcom. An example, RPM Fusion., non-free package of broadcom-wl. To make this mess even messier, RPM Fusion also has kmod-wl and akmod-wl.
Ok, many packages, back to the problem: my laptop lost Wifi and I really struggled to figure out why, which kernel module caused the problem and for what reason. At the time both broadcom-wl and kmod-wl were installed.
This is VERY confusing! You have to be super-smart to understand much of my less-than-coherent story above. Unfortunately, that is the reality. Everything gets convoluted, confusing and chaos.
In RPM Fusion Bugzilla, there is a bug #6991 Kernel hangs due to broadcom wifi driver. This bug report is specifically for akmod-wl, which was not installed in my laptop. Using an USB-dongle, uninstalling both broadcom-wl and kmod-wl, followed by installing akmod-wl did not solve the problem either. Unlike with original packages, with akmod-wl there was no kernel crash on modprobe. With this package NetworkManager didn't work either. Weird.
When I wrote comments to bug report and Mr. Vieville, author of akmod-wl, replied with a suggestion. There existed an unreleased version of 6.30.223.271-53. Little bit of dnf installing and testing ... it works! Now my laptop had native Wifi-connectivity and I could un-plug the USB-dongle.
This incident left me really confused and happy.
Completed: Gray Zone Warfare
Wednesday, August 21. 2024
I love gaming. I've played all kinds of video games nearly my entire life.
Recently, I've been playing Gray Zone Warfare.

After 200+ hours, final mission is finally completed!
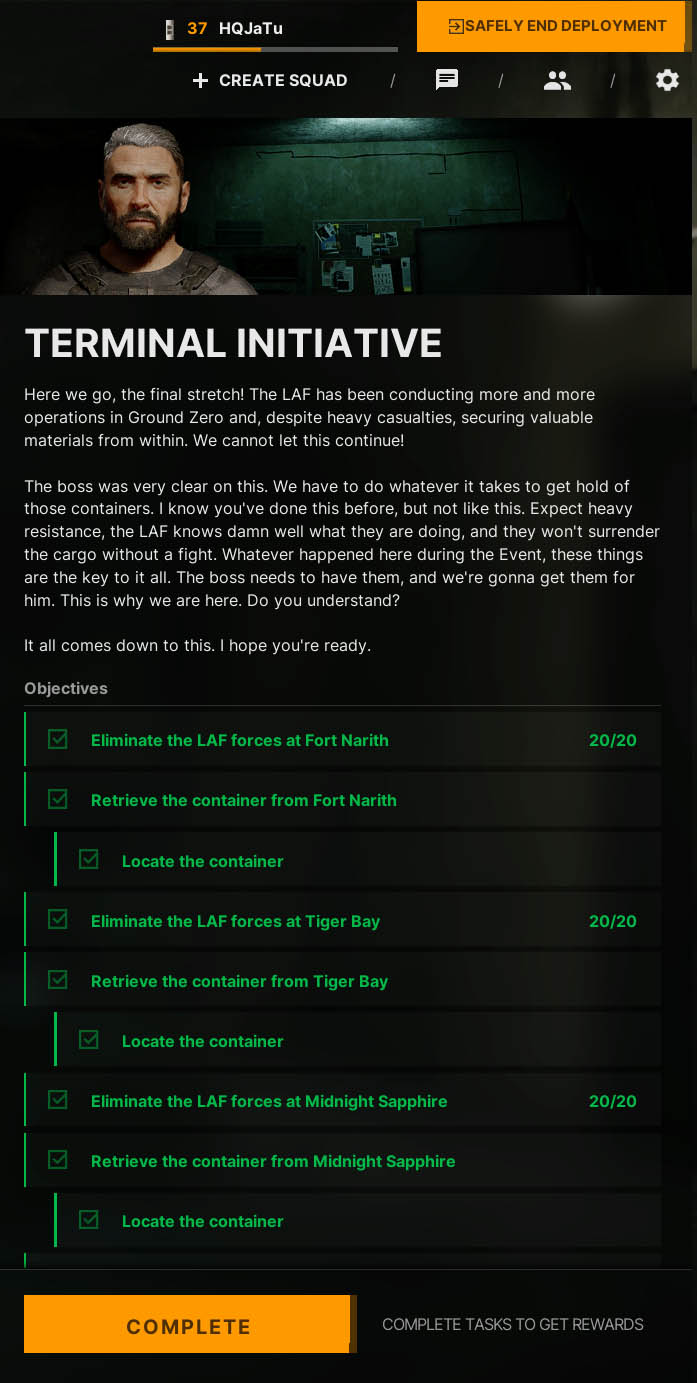
The last mission is brutal. The mission is to go to three worst possible places, locate and bring back mission items in each. To make things even more difficult, you don't simply sneak in/out, there is a minimum kill count that has to be completed at the worst possible locations. Brutal!
This immensly difficult and realistic game is a Escape from Tarkov -clone. In this game there are three factions of PMC and the idea is not to "escape". Your faction's home base is safe, base cannot be raided by other players. According to game studio, the idea is geared towards co-op, leave base to complete a mission -style rather than player vs. player. Both game modes exist. You absolutely can play a lone wolf game too, but given the punishing nature of this game where a single shot by enemy can kill you on the spot, having more eyes to spot enemies and more firepower to kill enemies makes avoiding death so much easier.
One last noteworthy thing is: There's going to be ~6 month cycle in the game. Everything will be wiped clean. All players are back to level 1 with not much gear in their lockers. At the time of writing, first (public) wipe is about to happen soon. That way those experienced players who have been playing this early-access game as it was made publicly available @ Steam won't necessarily benefit against newer players.
I cannot wait for the next version! We'll get day/night cycle and more missions and ... oh yes!
SD Case - Storing the cards
Wednesday, August 14. 2024
Few years ago I got interested in hieroglyphs ... erhm. SD-card markings. My piece about them is here.
Now that we have established the fact that I have too many SD-cards, where do I store them? Well. I didn't. They where around equipment, desk and shelves all around the clutter. There was a point in time, I decided to do something about it.
This is my recent storage solution:
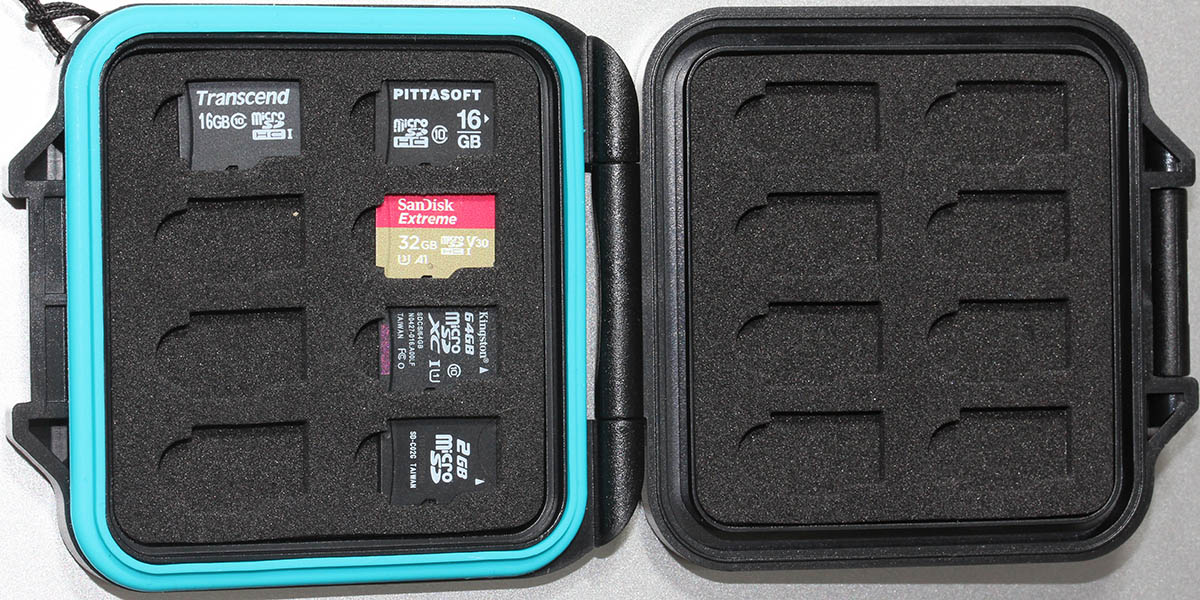
This type of case isn't available easily. It took me a while to hunt down such an item from a Chinese on-line shop. I wanted one with enough capacity for the future. Also, I wanted one that won't break or get lost easily.

This one meets the spec. Also, I went further and pimped it with appropriate labels:
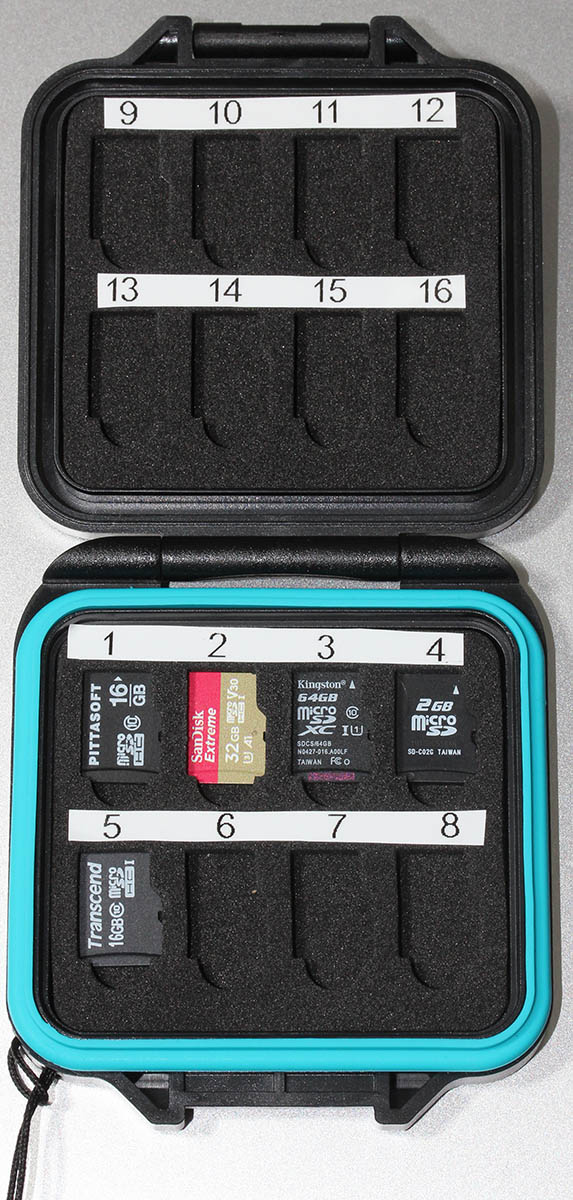
There is a tiny piece of paper to translate the numbers into real-life meanings. It's simply omitted from the pic.
Now I know where my RasPi OS-images and photos are. No need to go finding the cards anymore!
DLMS part 2 - Reading data from an utility meter via HAN/P1 port
Monday, July 29. 2024
Remember this one?
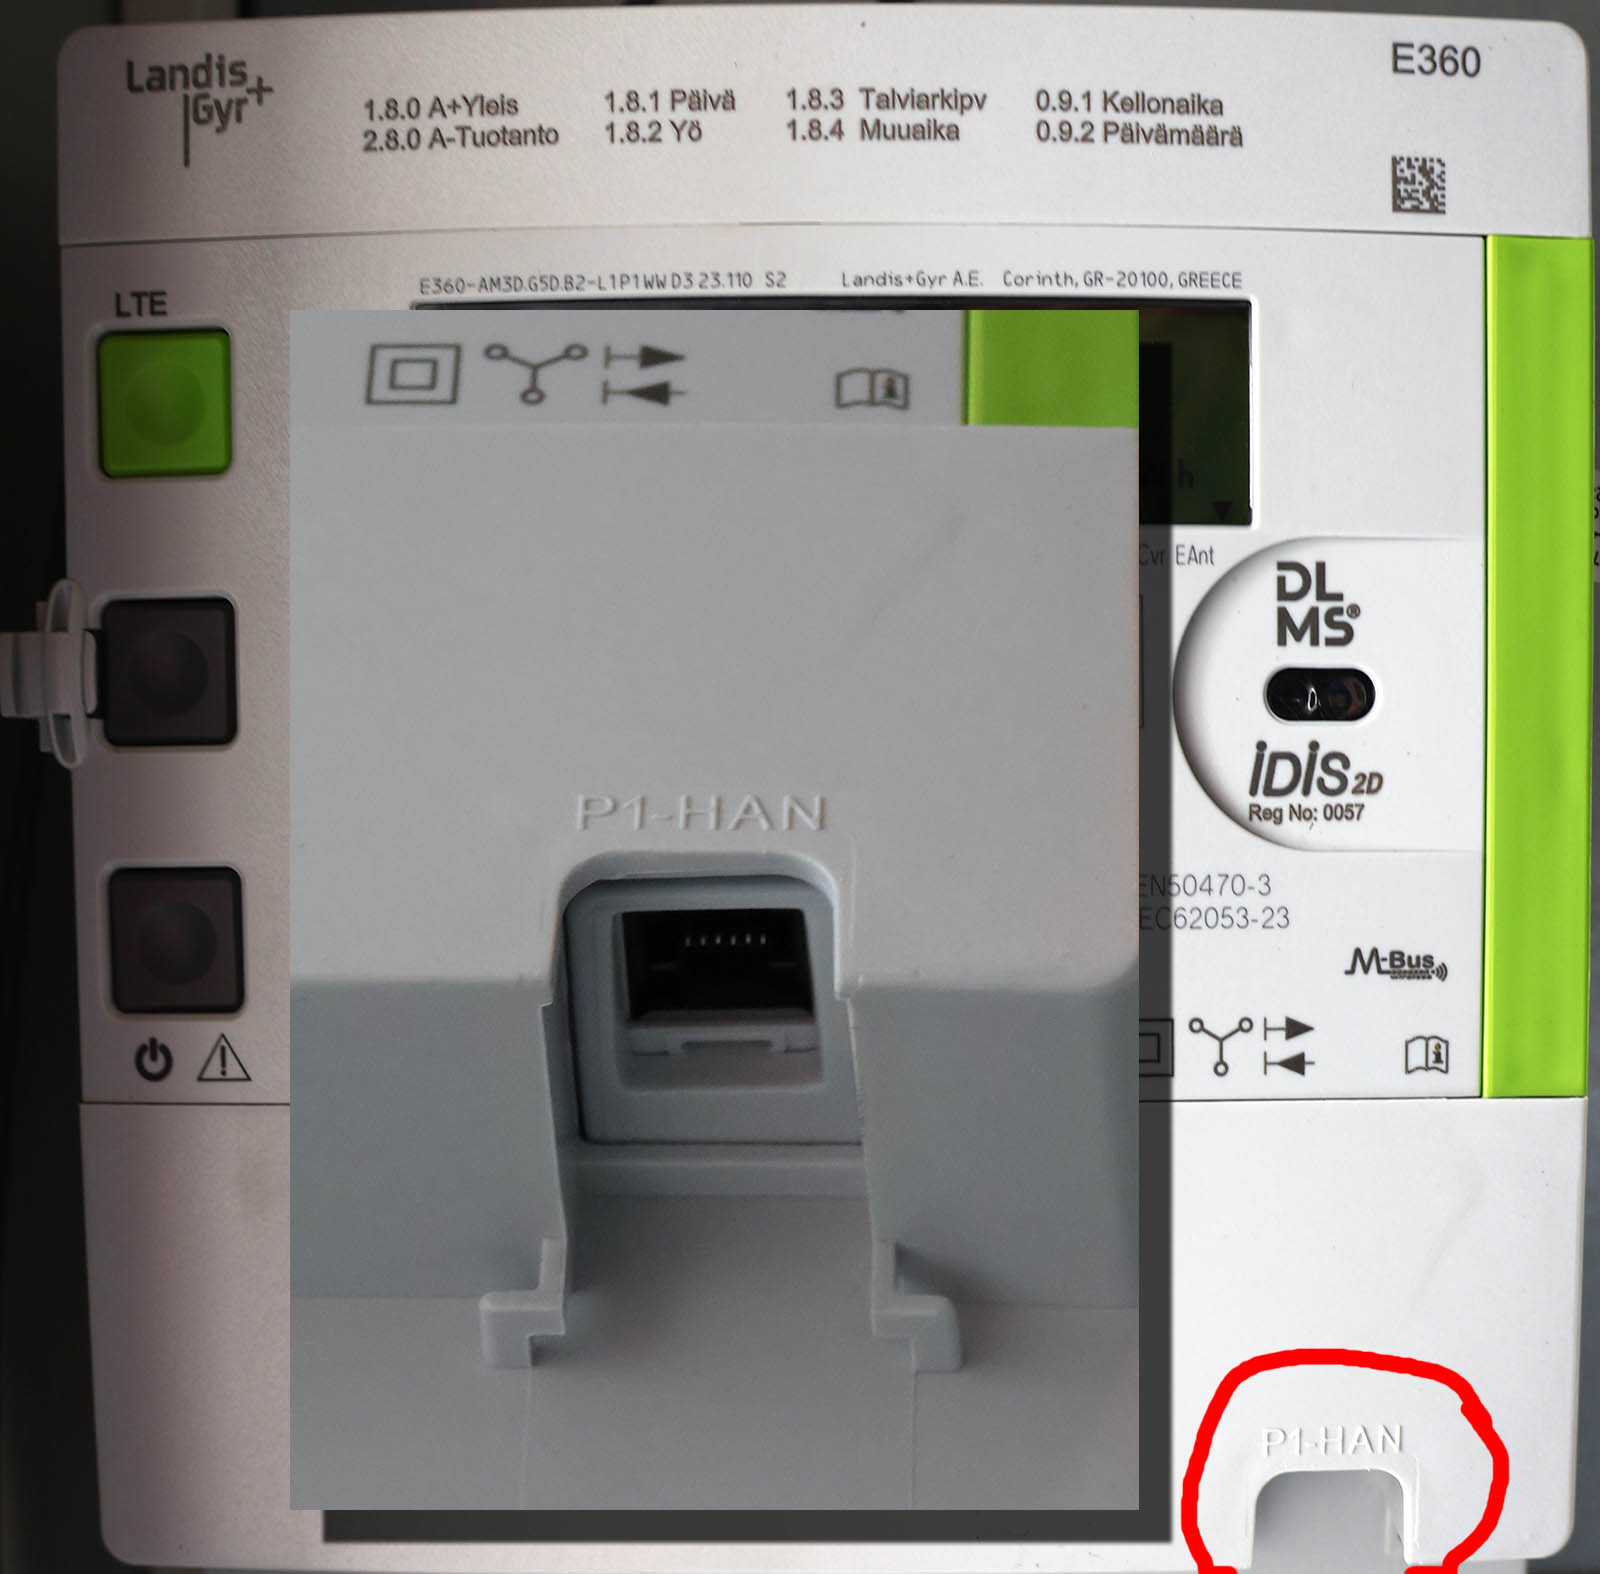
My new utility meter has an RJ-12 in the bottom of the unit. Naming of this port is really weird as it is called HAN, P1, HAN/P1 or P1/HAN. In Norway the port is RJ-45 and they call it HAN, for Home Area Network. Original RJ-12 from Netherlands was called P1, which is short for ... P1? I dunno! Just to be safe, manufacturers combine those two. In reality they just add to confusion.
Assuming, one wanted to see in detail how much energy is created by solar panels on the roof and combine that information with data from electricity utility meter, it would be possible to see how much money is being saved with the panels. Having detailed information on how regular household utilized electricity is a nice side effect of that.
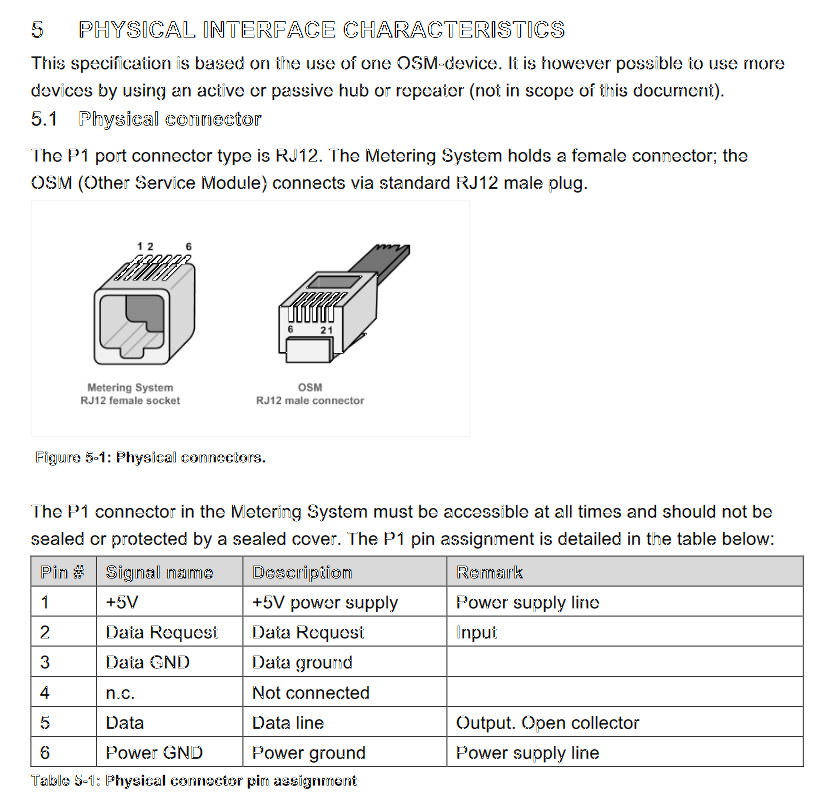
Now that we're in Finland (not Norway, not Netherlands), the regulation is from SESKO and in section 4.6 Physical Interface is as follows:
The RJ12 connector (6P6C connector) is used as the physical interface and the interface meets the requirements of "P1 Companion Standard".
Further, the mentioned document is from Netherlands and describes the physical interface:
Now two things need to happen:
- Utility company needs to enable the P1/HAN -port. The port is disabled by default. Utility company needs to pay license money for each open port to Landis+Gyr.
- Data pouring from the port needs to be read with a suitable piece of hardware. Protocol is M-Bus, a TTL signal.
Given Internet has tons of possibilities, a suitable open-source reader exists: P1IB. All the necessary data is freely available at https://github.com/remne/p1ib. Software, hardware and 3D-printer models for the case. Obviously, there is an option to go buy one pre-built.
After tinkering with hardware, enabling a MQTT data-pump on both solar panels and utility meter. Setting up a MQTT-broker to receive the published data and a Home Assistant software to have a cherry on top. Final result looks like this:
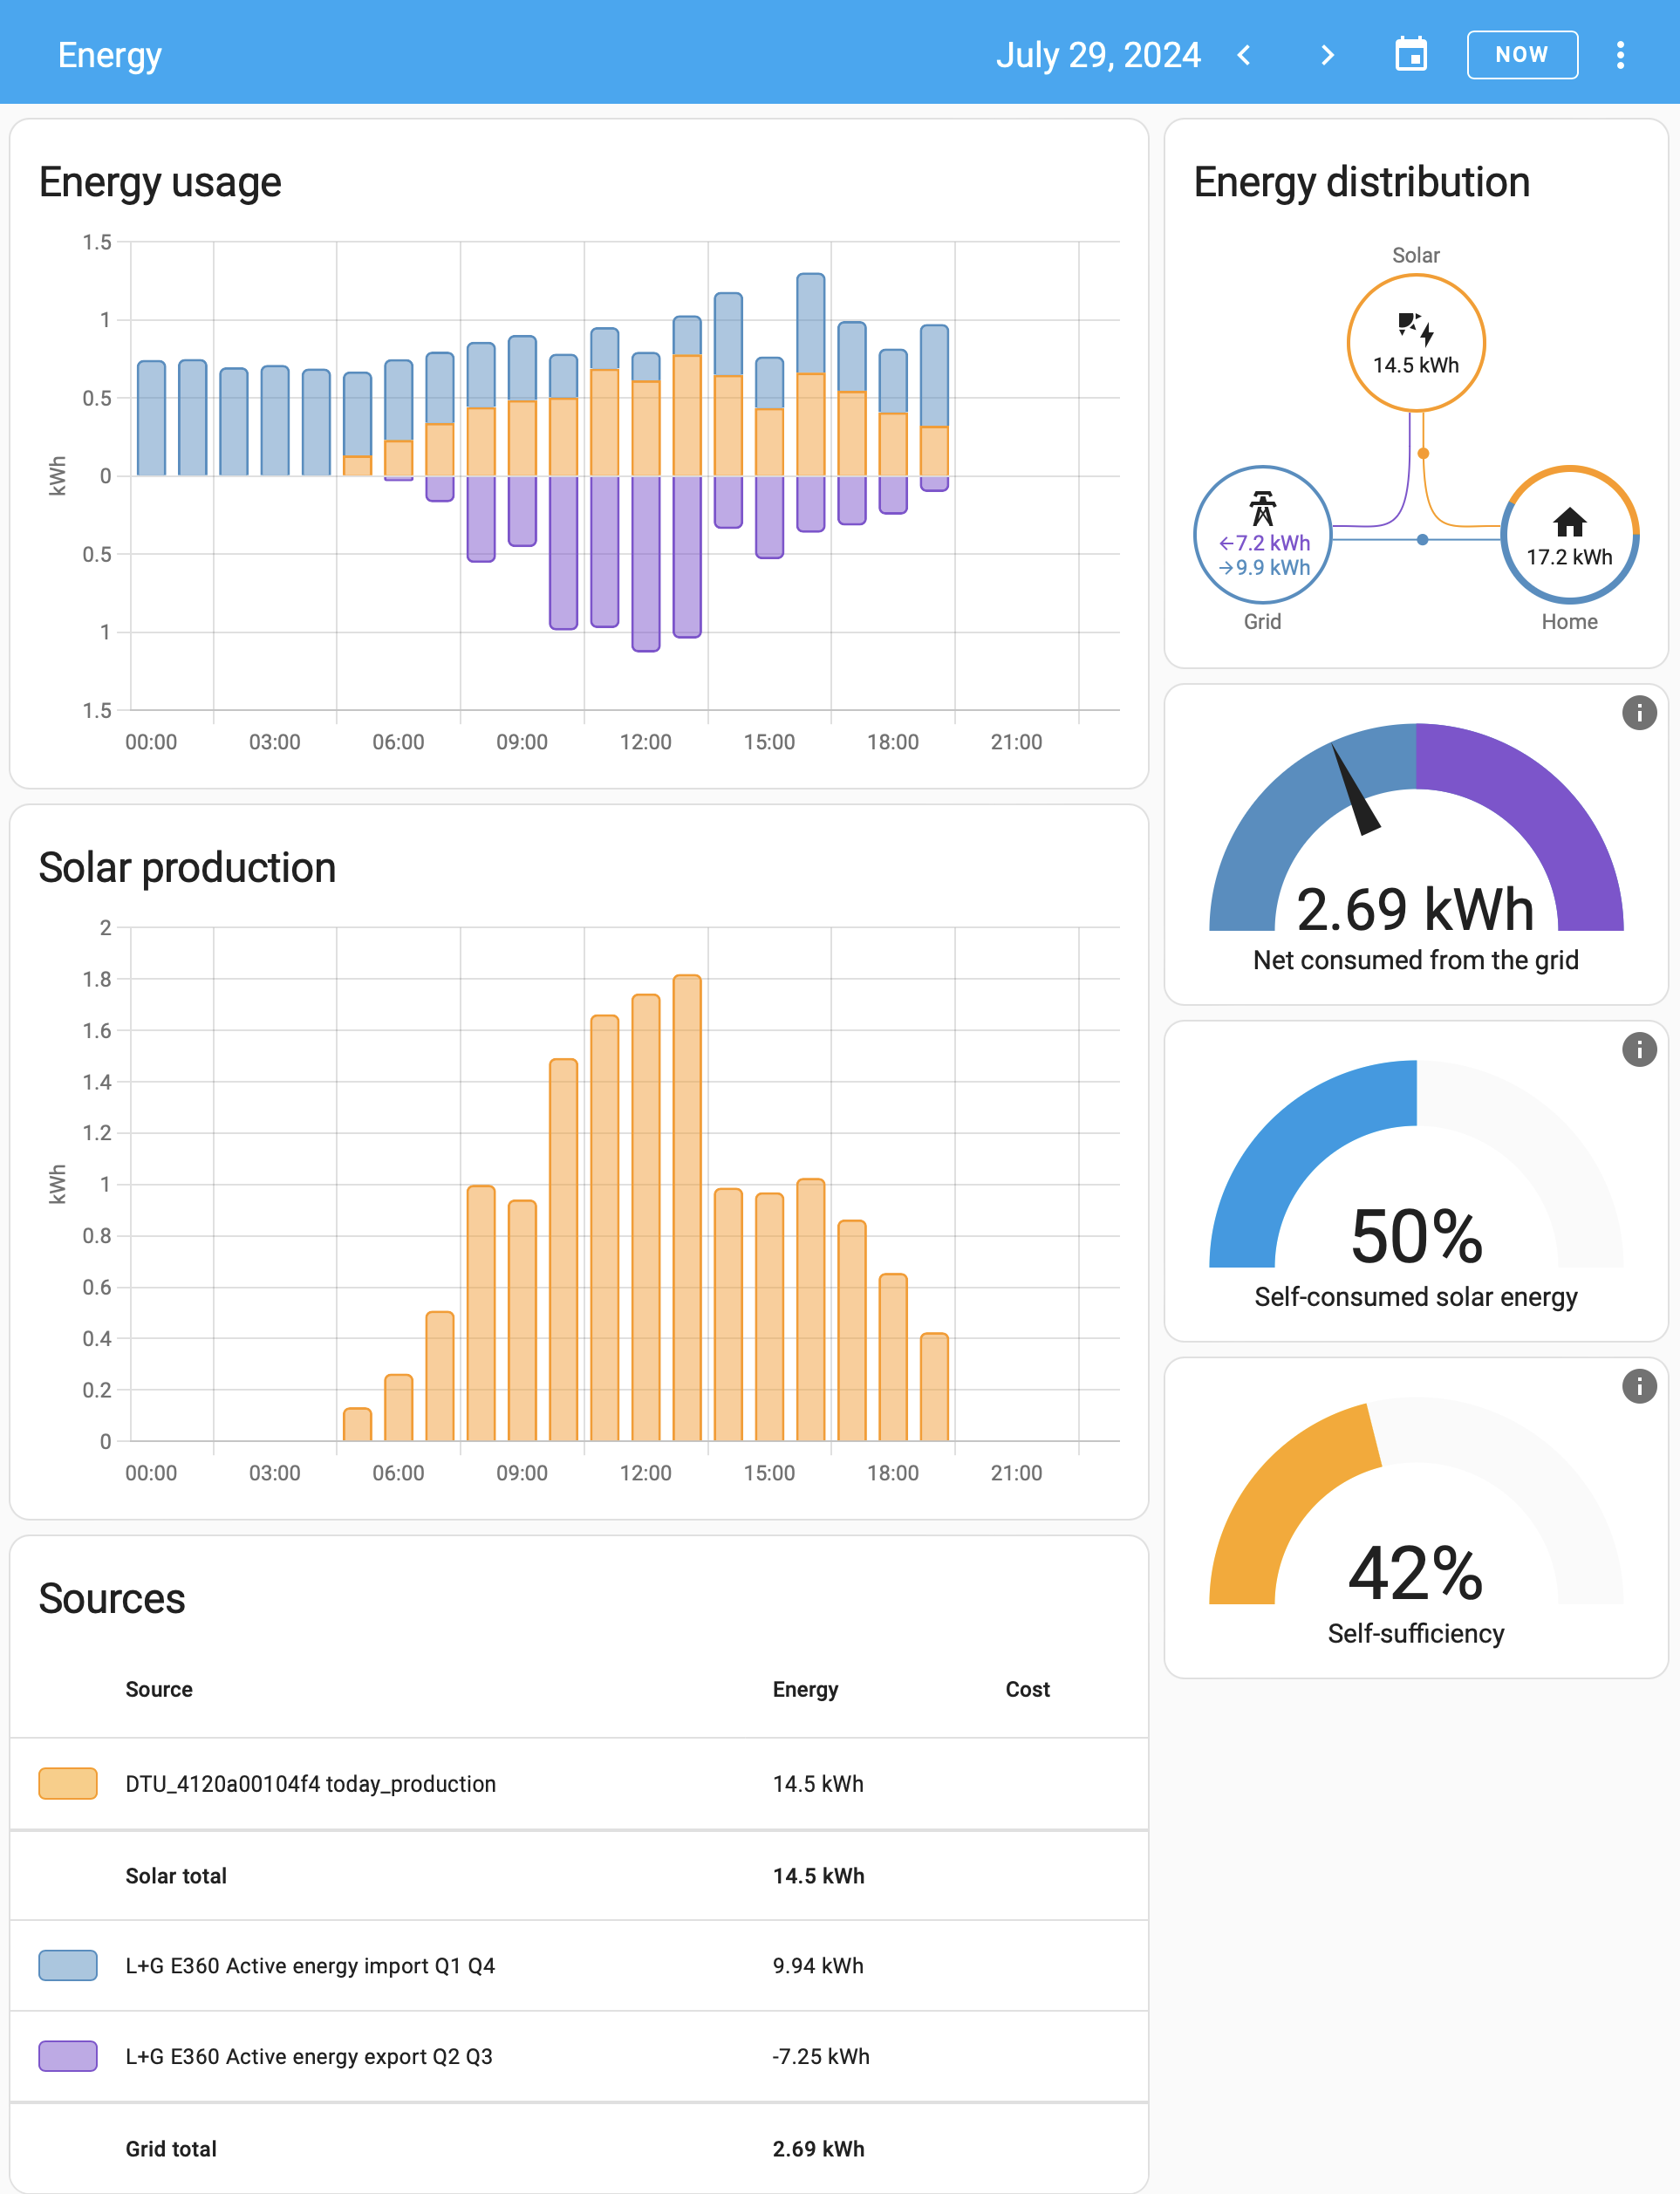
In Energy-section of Home Assistant, there are number of data visualizations. Top-left bar diagram indicates how much electricity is being consumed by the household. Blue is electricity purhcase from grid with money. Yellow is electricity produced by solar panels. Bottom side, purple, is electricity sold to utility company's grid from solar panels.
Bracket with time 12:00 has hours 11, 12 and 13 in it. As an example, during hour 12 house consumed 0.8 kWh of electricity. Of that 0.61 kWh was solar power (yay! free!) and 0.18 kWh was purchased from utility company (uff! €). However, during that hour solar production was 1,74 kWh, of which 1,13 kWh was returned back to grid. Funny how averages work, there must have been clouds or spike in consumption for the need to purchase more. On the other hand, there were plenty of times where excess energy was available. In theory, I'll get some money out of that excess. Practically: I don't. Transfer in and out costs money to me and all my potential proceeds go to transfer.
Looking at other parts of the visualizations: Obviously, the good thing is I do consume 50% of my own production, making it 42% of all my consumption. What happened after taking the screenshot was the obvious sunset. My solar panels are unable to produce anything, so all my consumed electricyt was from the grid. As a daily record, after sunset hours did increase daily net consumption by couple kWh.
Next up: Now that we know what electricity costs and the rate it flows in and out, it is easy to apply money on top of all this. It should be possible to estimate correctness of initial payback time of solar panel investment.

