Playstation 5
Monday, December 27. 2021
With bit of a lucky strike, I got a possibility of purchasing one. Ok, lots of luck happened. Bottom line: now I own one of the most coveted gaming consoles. For anybody reading this in 2023 (or after) this entire lack of Playstations will be mostly ignored.
Some unboxing pics:

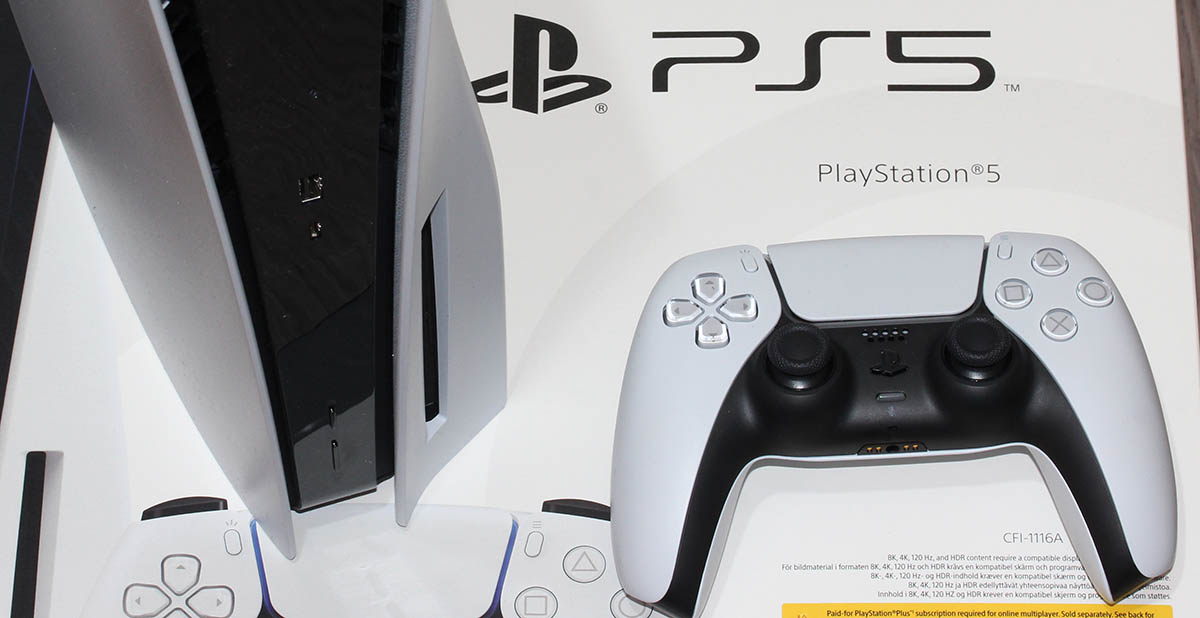
Notice the power button is the at the bottom of the PS5 unit. From top to down there are two ports USB-A and USB-C. Then there are two buttons, eject and power. The glare from plastic makes taking pictures of the buttons very difficult, so the power button is not that well visible.
Back of the unit:
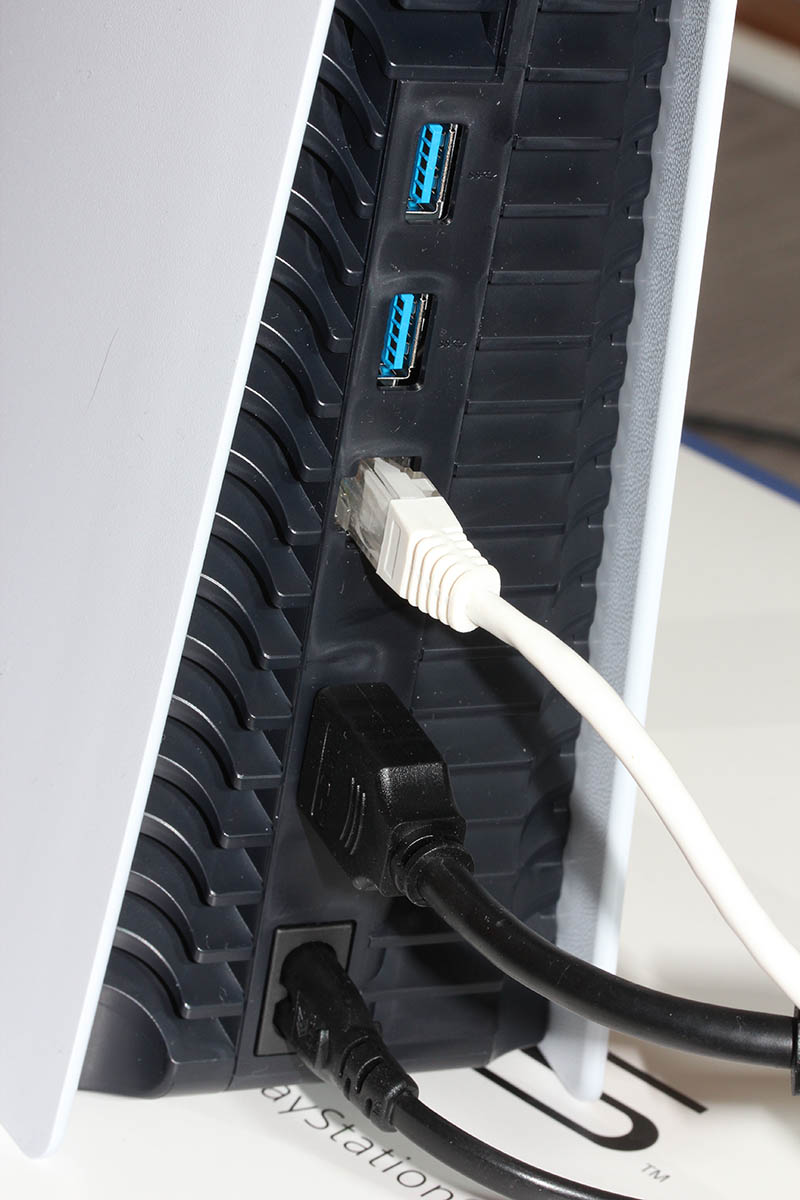
Two USB-A 3.0 ports, gigabit Ethernet, HDMI and power IEC C7/C8 -connector.
Controller charger port has chaged, again:
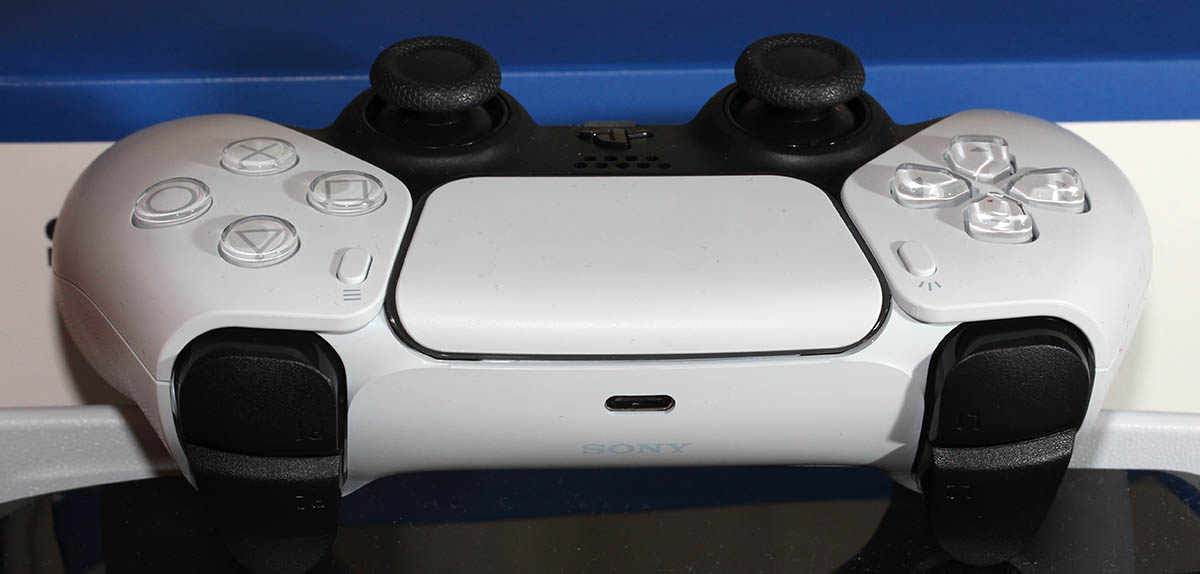
In PS3, there was mini-USB, PS4 had micro-USB and now there is USB-C. For an owner of all three mentioned consoles, I just "love" finding the correct cable for charging.
The good thing is, this controller is fully supported in Windows via DS4Windows to enable X-box controller emulation:

The bad thing about DS4Windows is for the software author Mr. Nickles (aka. Ryochan7) got pissed about the issues posted to the project's GitHub page https://github.com/Ryochan7/DS4Windows, so he decided to cease working on it. Luckily there are fans of the software, hence fork https://github.com/shazzaam7/DS4Windows. It is still uknown if this software will be supported and if yes, for how long.
After getting the thing running, the lack of content hit me. Pretty much everything I tried was from my PS4. For example Gran Turismo Sport (the PS4-version) works ok. And on March 4th I will get more native-PS4 content in form of Gran Turismo 7. But until then, it's just a super-fast PS4 for me.
Update:
I did pre-order Gran Turismo 7 which is to be released in beginning of March 2022.
macOS Monterey upgrade
Monday, November 1. 2021
macOS 12, that one I had been waiting. Reason in my case was WebAuthN. More about that is in my article about iOS 15.
The process is as you can expect. Simple.
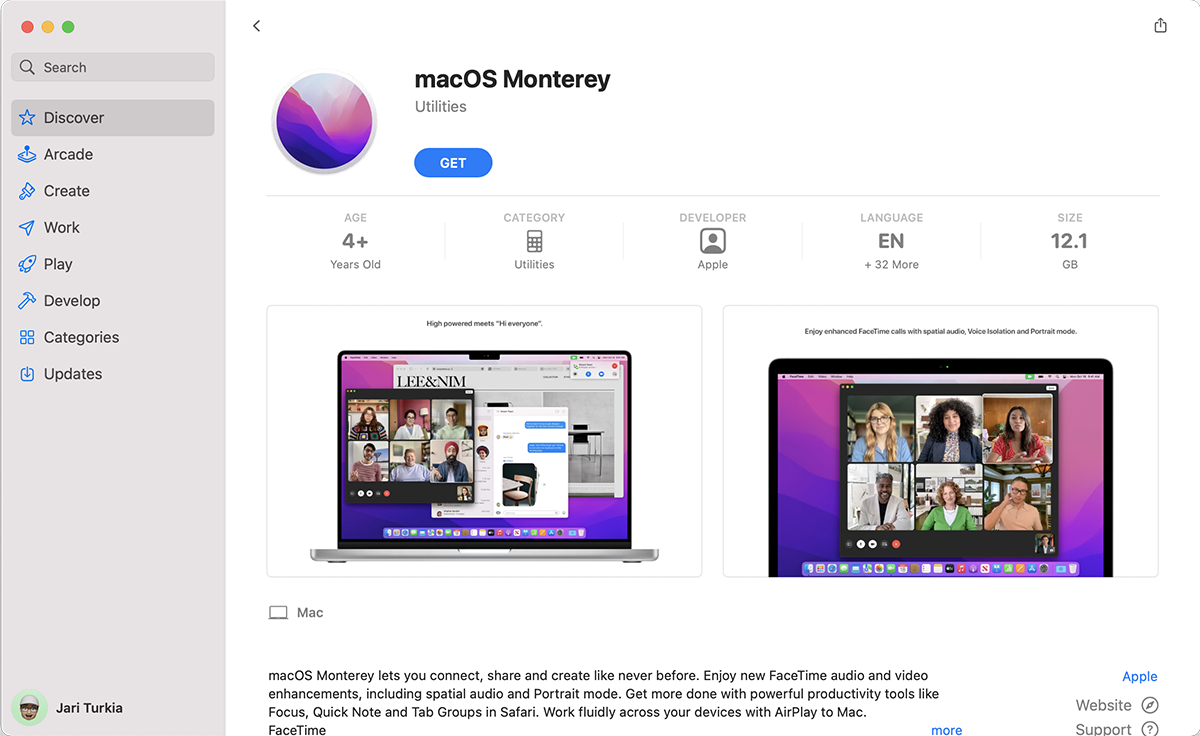
Download is big-ish, over 12 gigabytes:
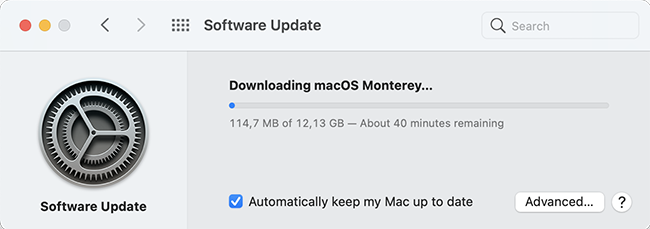
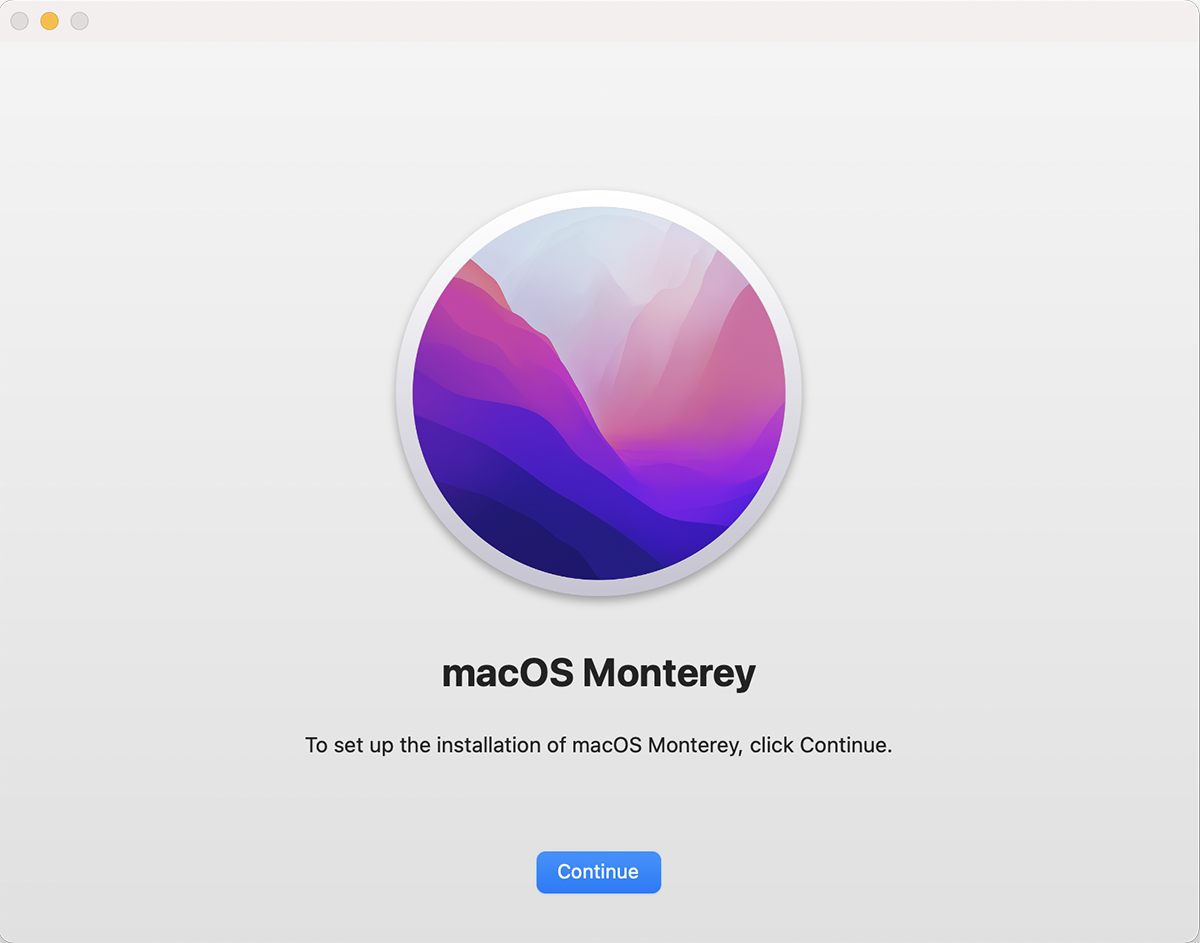
After the wait, an install will launch. At this point I'll typically quit to create the USB-stick. This way I'll avoid downloading the same thing into all of my Macs.
To create the installer, I'll erase an inserted stick with typical command of:
diskutil partitionDisk /dev/disk2 1 GPT jhfs+ "macOS Monterey" 0b
Then change into /Applications/Install macOS Monterey.app/Contents/Resources and run command:
./createinstallmedia \

  --volume /Volumes/macOS\ Monterey/ \

  --nointeraction
It will output the customary erasing, making bootable, copying and done as all other macOSes before this:
Erasing disk: 0%... 10%... 20%... 30%... 100%

Making disk bootable...

Copying to disk: 0%... 10%... 20%... 30%... 40%... 50%... 60%... 70%... 80%... 90%... 100%

Install media now available at "/Volumes/Install macOS Monterey"
Now stick is ready. Either boot from it, or re-run the Monterey installed from App Store.
When all the I's have been dotted and T's have been crossed, you'll be able to log into your newly upgraded macOS and verify the result:
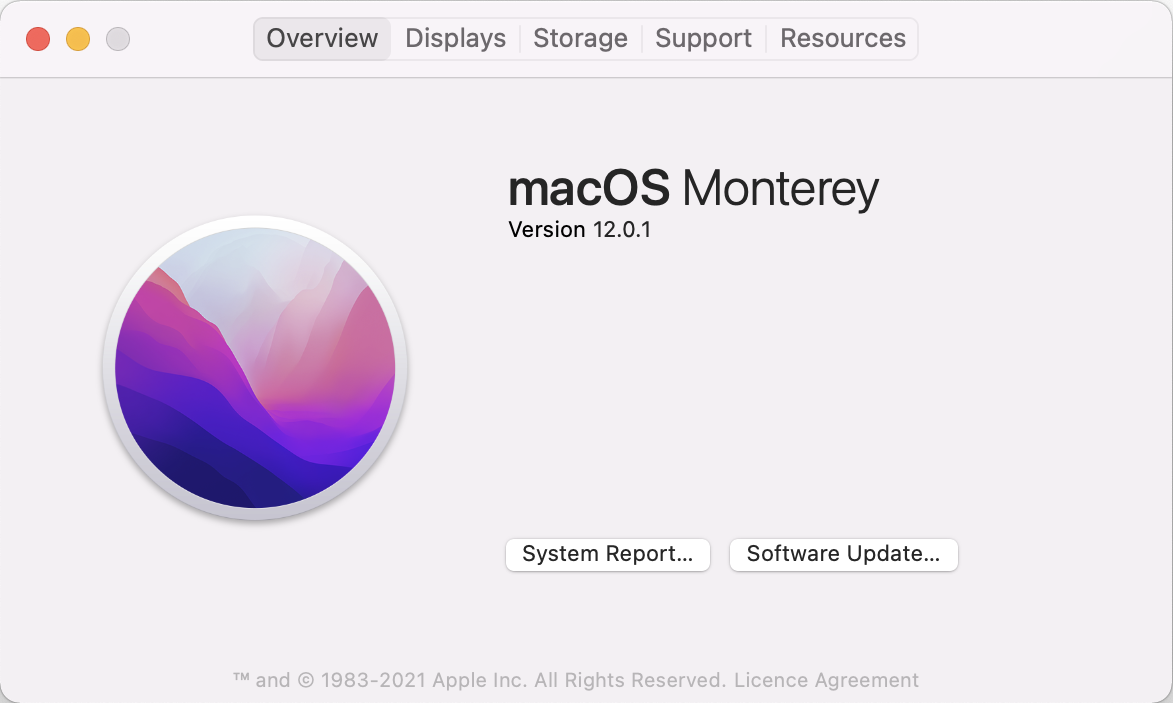
At this point disappointment hit me. The feature I was looking for, WebAuthN or Syncing Platform Authenticator as Apple calls it wasn't available in Safari. To get it working, follow instructions in Apple Developer article Supporting Passkeys. First enable Developer-menu for your Safari (if you haven't already) and secondly, in it:
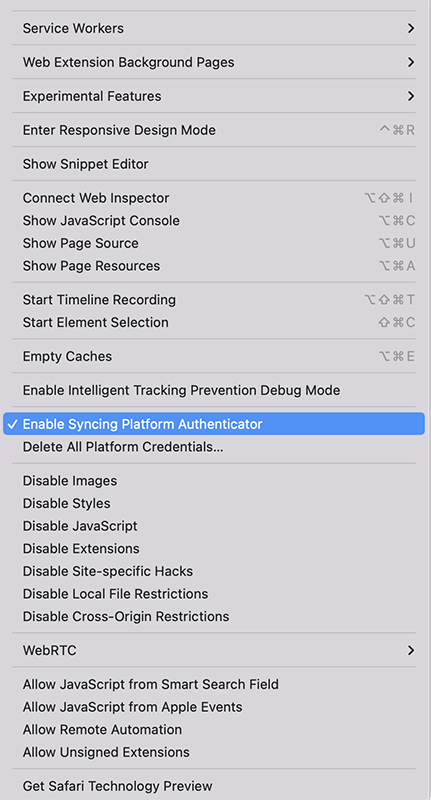
Tick the box on Enable Syncing Platform Authenticator. Done! Ready to go.
Now I went to https://webauthn.io/, registered and account with the Mac's Safari, logged in with WebAuthN to confirm it works on the Mac's Safari. Then I took my development iPhone with iOS 15.2 beta and with iOS Safari went to the same site and logged in using the same username. Not using a password! Nice. 
Maybe in near future WebAuthN will be enabled by default for all of us. Now unfortunate tinkering is required. Anyway, this is a really good demo how authentication should work, cross-platform, without using any of the insecure passwords.
WebAuthN Practically - iOS 15
Monday, September 20. 2021
As Apple has recently released iOS 15, and iPadOS 15 and macOS 12 will be released quite soon. Why that is important is for Apple's native support for WebAuthN. In my WebAuthN introduction -post there is the release date for the spec: W3C Recommendation, 8 April 2021. Given the finalization of the standard, Apple was the first major player to step forward and start supporting proper passwordless authentication in it's operating systems. For more details, see The Verge article iOS 15 and macOS 12 take a small but significant step towards a password-less future.
For traditional approach with USB-cased Yubikey authenticator, see my previous post.
Registration
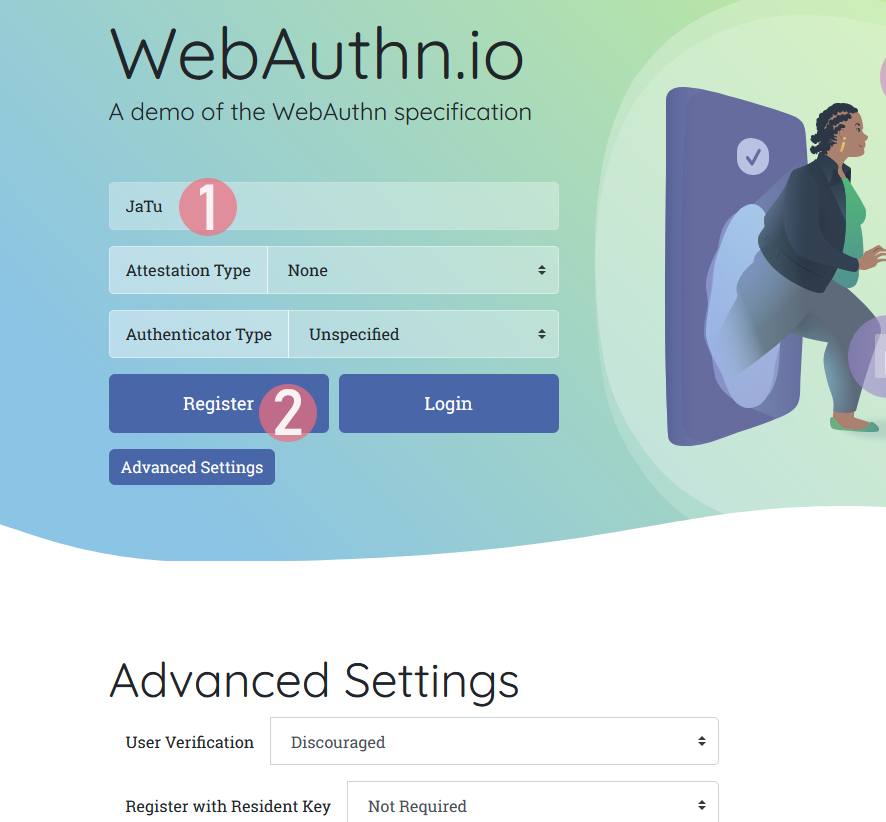
Step 1: Enter the username you'd like to register as.
Step 2: Go for Register
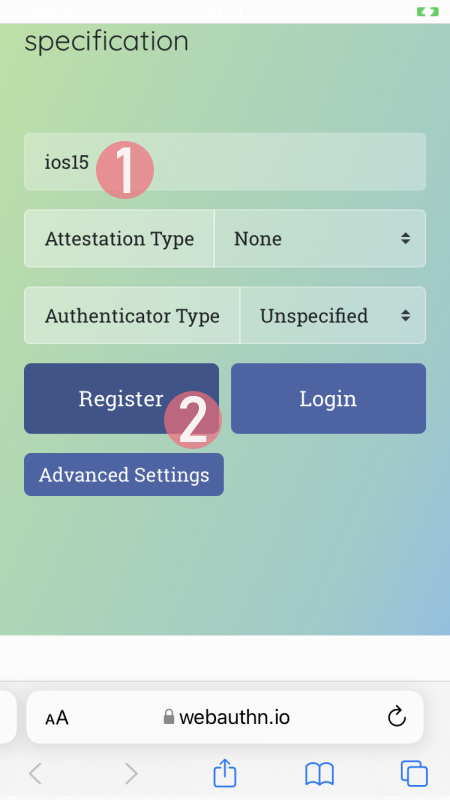
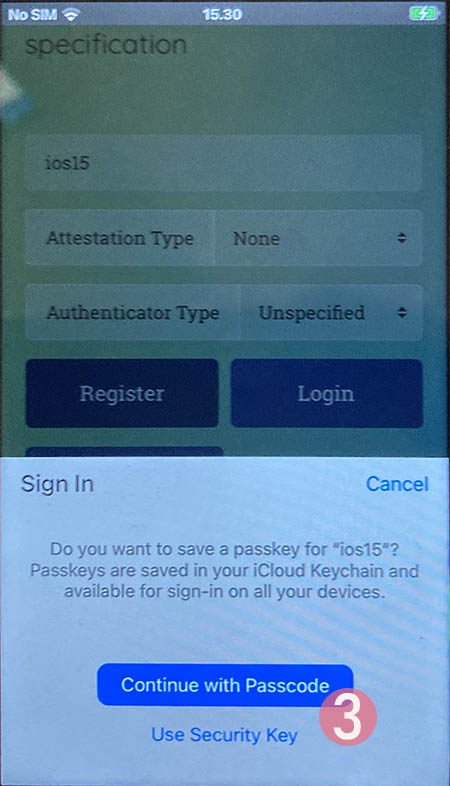
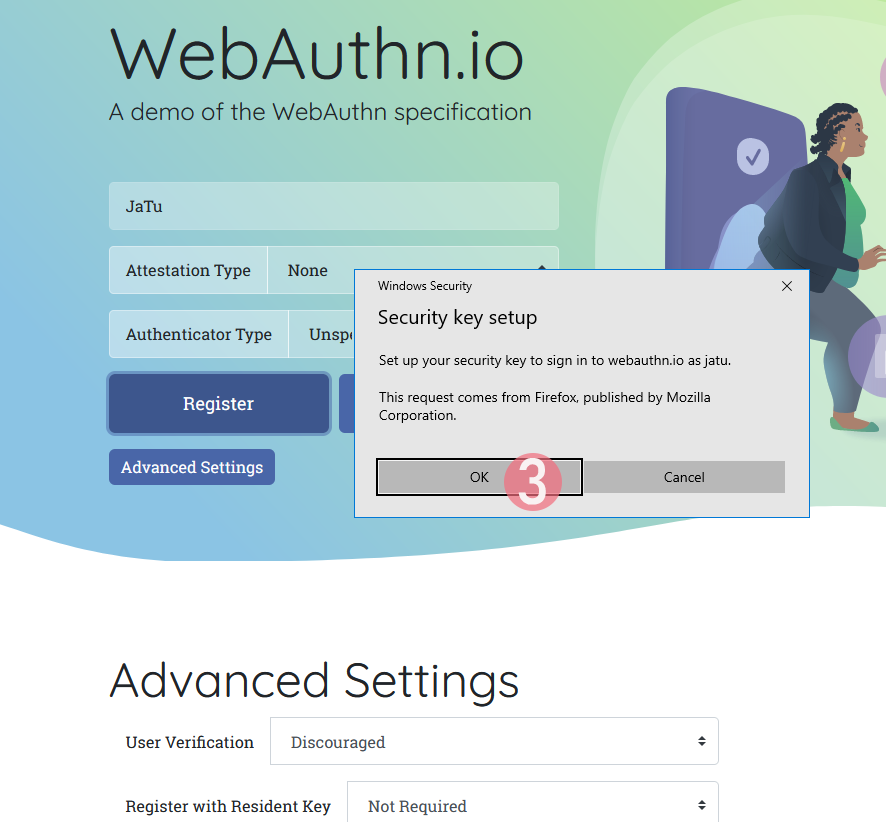
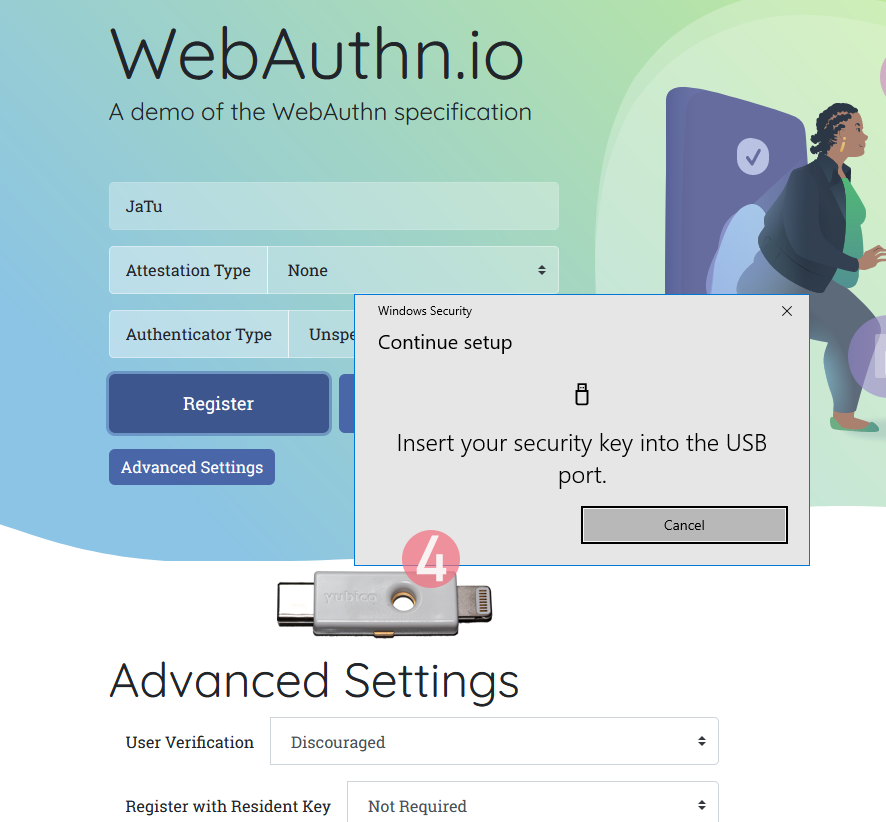
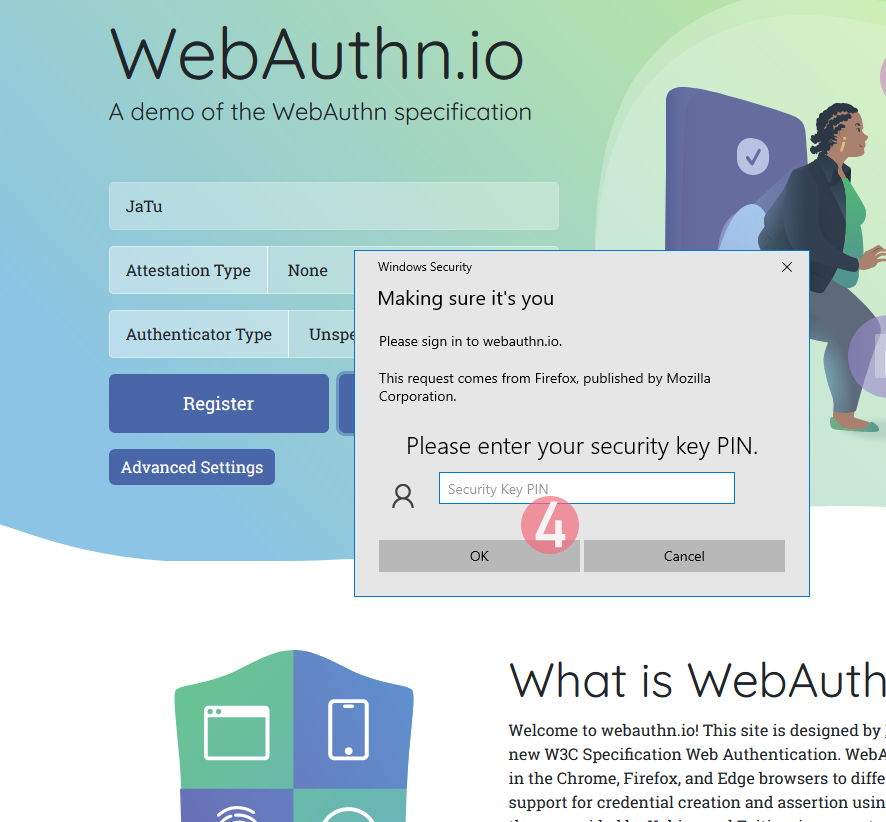
Step 3: Your browser will need a confirmation for proceeding with registration.
In Apple's ecosystem, the private key is stored into Apple's cloud (what!?). To allow access to your cloud-based secerts-storage, you must enter your device's PIN-code and before doing that, your permission to proceed is required.
Note: The option for "Use Security Key" is for using the Yubikey in Lightning-port. Both are supported. It is entirely possible to login using the same authenticator with a USB-C in my PC or Mac and Lightning with my iPhone or iPad.
Step 4: Enter your device PIN-code

Step 5: You're done! Now you have successfully registered.
Best part: No passwords! Private key is stored into Syncing Platform Authenticator. Btw. weird name that for WebAuthN in Apple-lingo. Ok, to be honest, WebAuthN is a mouthful too.

This was couple steps simpler than with Yubikey. Also there is the benefit (and danger) of cloud. Now your credential can be accessed from your other devices too.
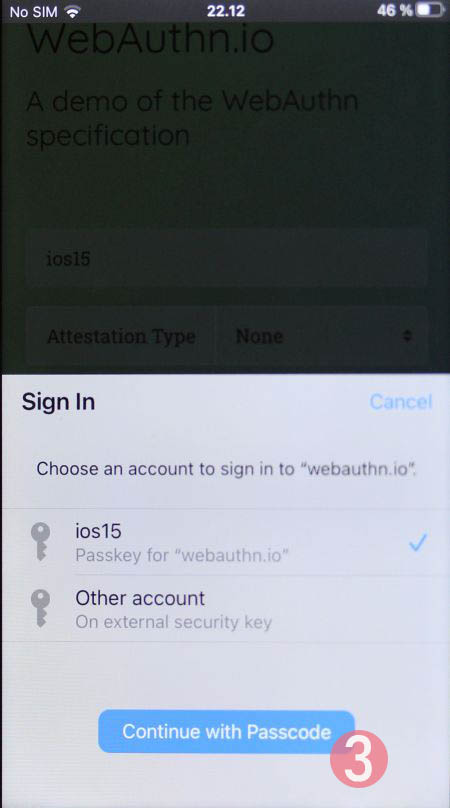
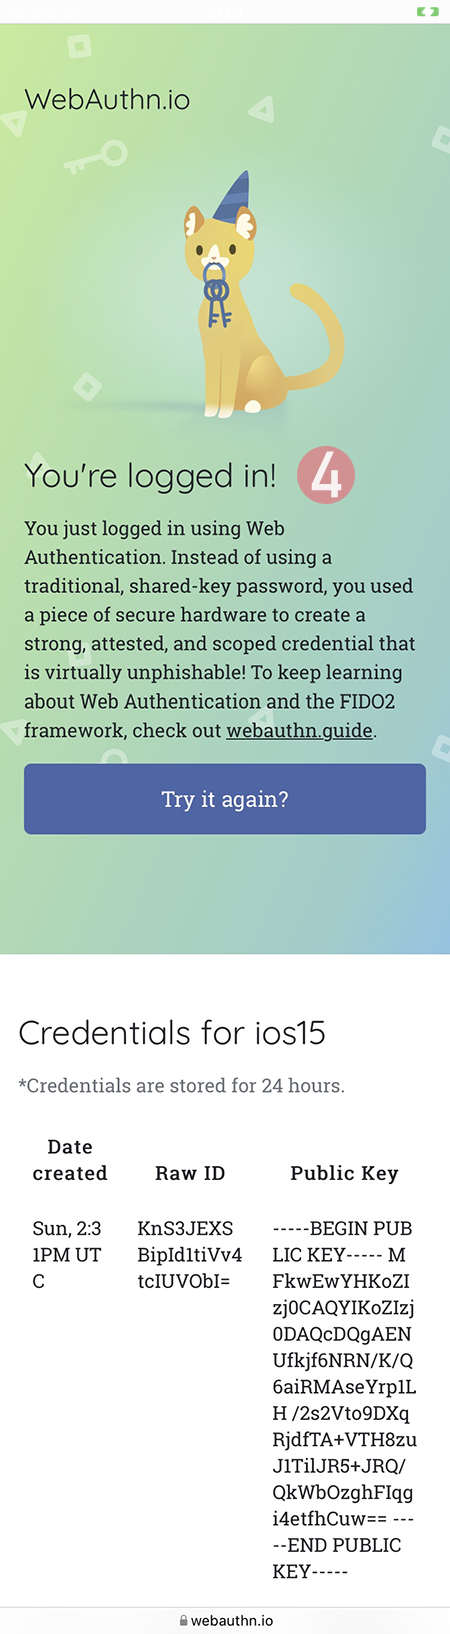
Login
Step 1: Enter the username you'd like to log in as.
Step 2: Go for Login

Step 3: Your browser will need a confirmation for proceeding with login. A list of known keys and associated user names will be shown.
Step 4: Enter your device PIN-code
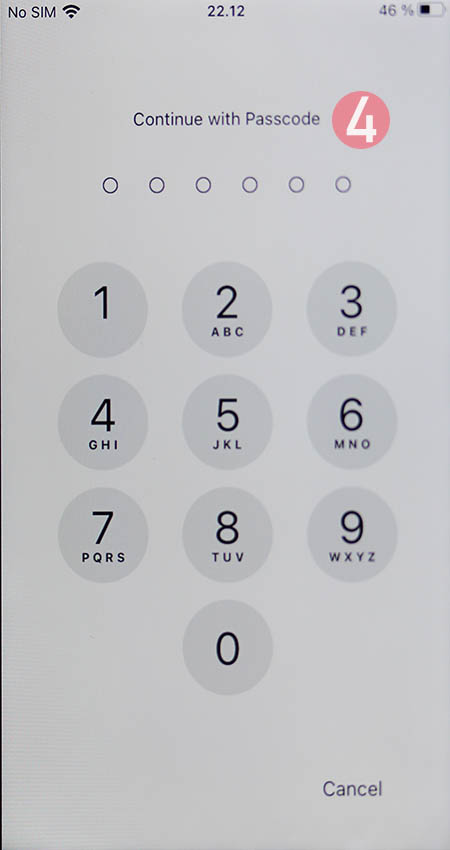
Step 5: You're done! Now you have successfully logged in.
Best part: No passwords!
That's it. Really.
Finally
I don't think there is much more to add into it.
In comparison to Yubikey, any of your Apple-devices are authenticators and can share the private key. Obviously, you'll need iOS 15 or macOS 12 for that support.
WebAuthN Practically - Yubikey
Sunday, September 19. 2021
Basics of WebAuthN have been covered in a previous post. Go see it first.
As established earlier, WebAuthN is about specific hardware, an authenticator device. Here are some that I use:
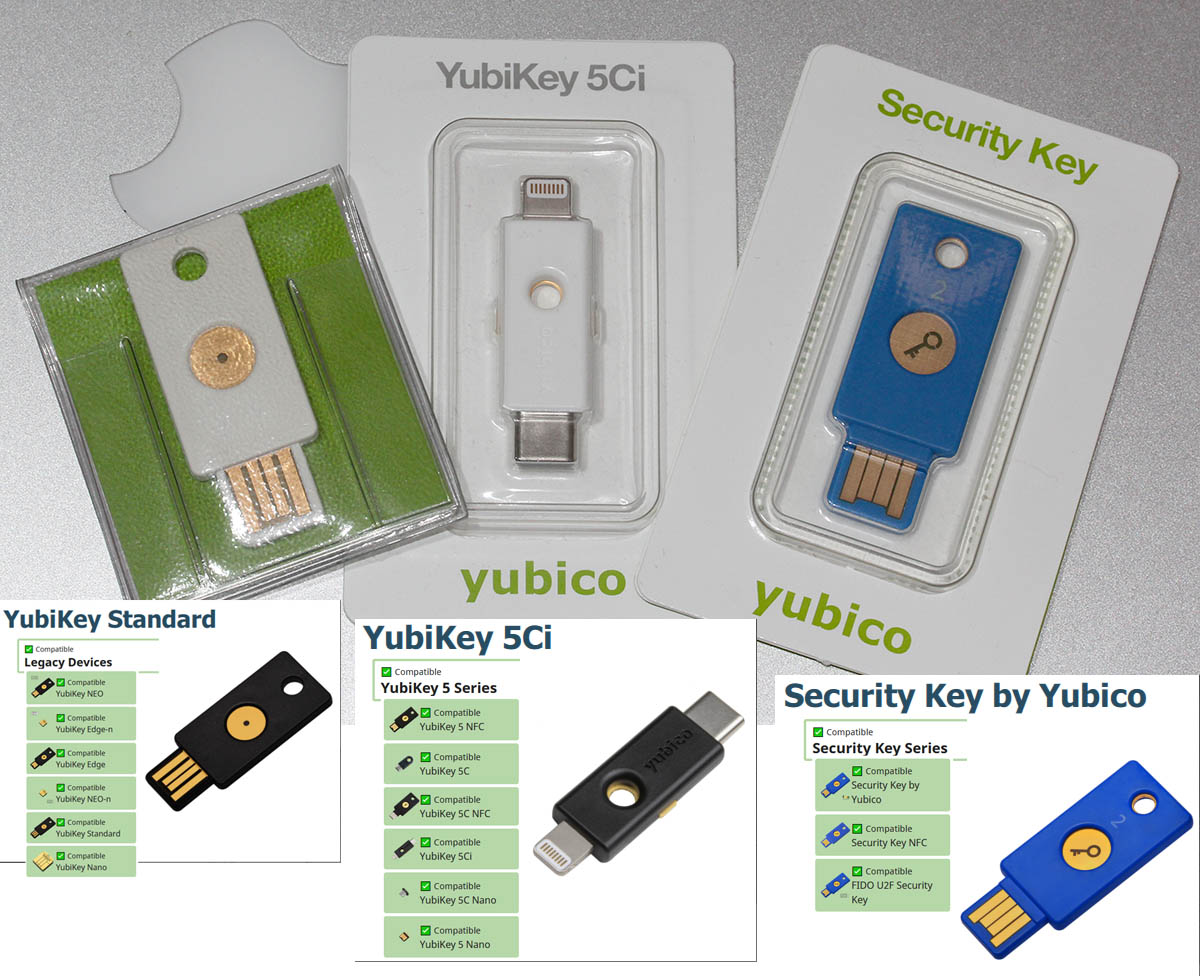
These USB-A / USB-C / Apple Lightning -connectibe Yubikey devices are manufactured by Yubico. More info about Yubikeys can be found from https://www.yubico.com/products/.
To take a WebAuthN authenticator for a test-drive is very easy. There is a demo site run by Yubico at https://demo.yubico.com/ containing WebAuthN site. However, as a personal preference I like Duo Security's demo site better. This Cisco Systems, Inc. subsidiary specializes on multi-factor authentication and are doing a great job running a WebAuthN demo site at https://webauthn.io/.
Registration
This illustrated guide is run using a Firefox in Windows 10. I've done this same thing with Chrome, Edge (the chromium one) and macOS Safari. It really doesn't differ that much from each other.
In every website, a one-time user registration needs to be done. This is how WebAuthN would handle the process.
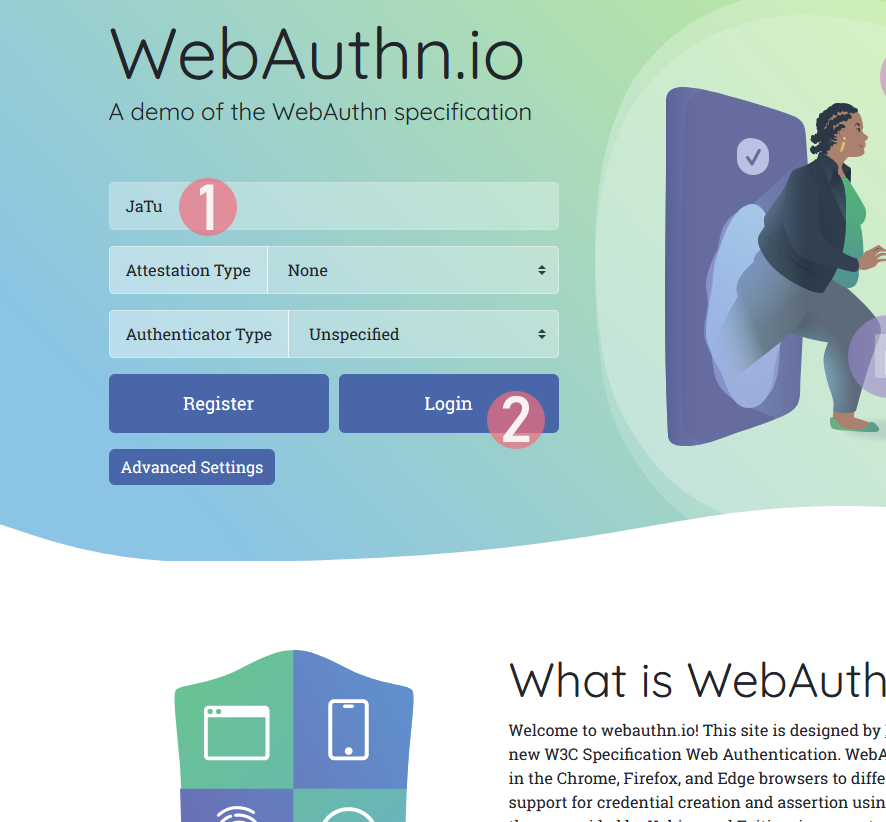
Step 1: Enter the username you'd like to register as.
Step 2: Go for Register
Step 3: Your browser will need a confirmation for proceeding with registration.
The main reason for doing this is to make you, as the user, aware that this is not a login. Also the authenticator devices typically have limited space for authentication keys available. For example: Yubikeys have space for 25 keys in them. The bad thing about limited space is because of high level of security yielding low level of usability. You cannot list nor manage the keys stored. What you can do is erase all of them clean.
Step 4: Insert your authenticator into your computing device (PC / Mac / mobile).
If authenticator is already there, this step will not be displayed.
Step 5: Enter your authenticator PIN-code.
If you have not enabled the second factor, this step won't be displayed.
To state the obvious caveat here, anybody gaining access to your authenticator will be able to log in as you. You really should enable the PIN-code for increased security.

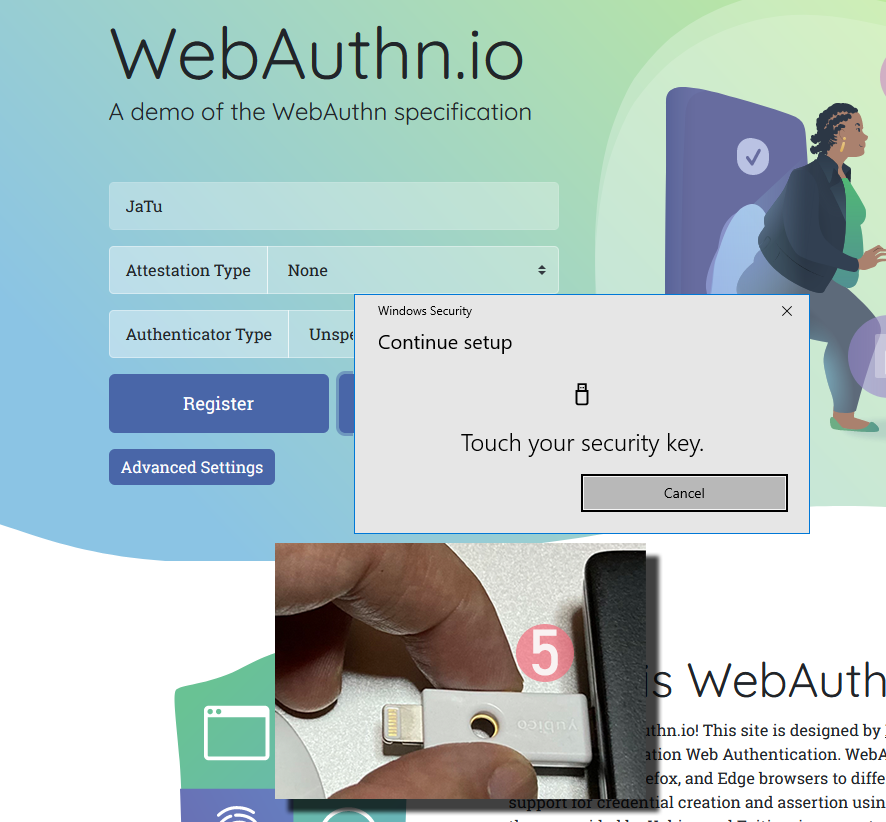
Step 6: Touch the authenticator.
The physical act of tringgering the registration is a vital part of WebAuthN. A computer, possibly run by a malicious cracker, won't be able to use your credentials without human interaction.

Step 7: You're done! Now you have successfully registered.
Best part: No passwords!
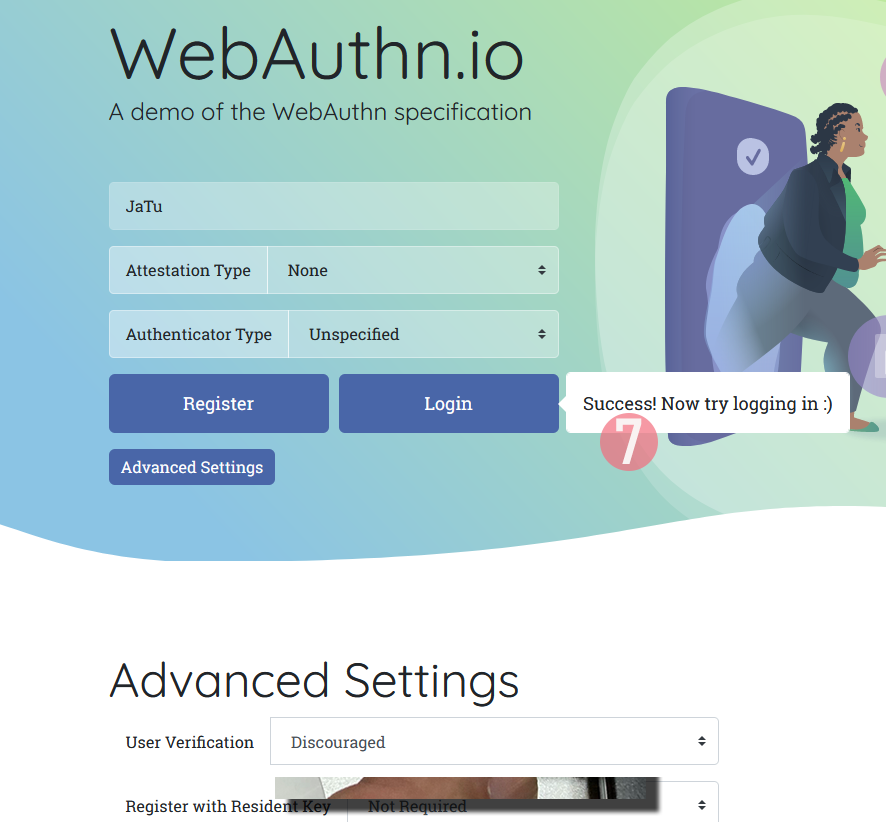
In this Duo Security test site, the sandbox will be raked on daily basis. Natually on a real non-demo site your information will be persisted much longer. Also note how your contact information like, E-mail address, mobile number or such wasn't asked. A real site would obviously query more of your personal details. Secondly, WebAuthN best practice is to have multiple authenticators associated with your user account. If you happen to misplace the device used initially for registration, having a backup(s) is advisable.
Next, let's see how this newly created user account works in a practical login -scenario.
Login
Step 1: Enter the username you'd like to log in as.
Step 2: Go for Login
Step 3: Insert your authenticator into your computing device (PC / Mac / mobile).
If authenticator is already there, this step will not be displayed.
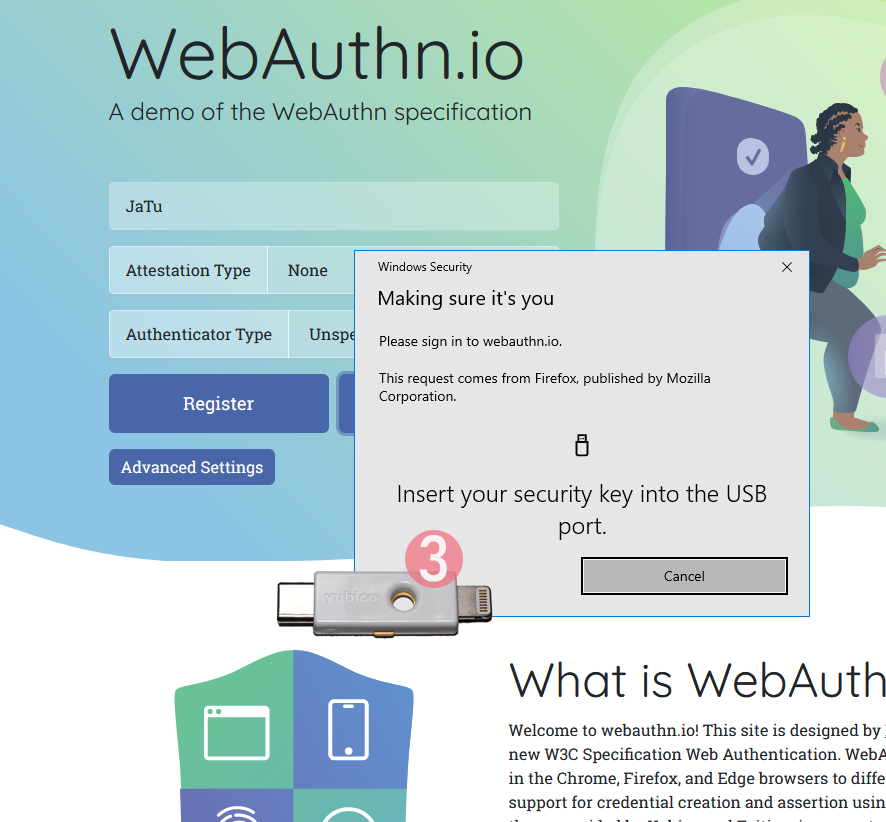
Step 4: Enter your authenticator PIN-code.
If you have not enabled the second factor, this step won't be displayed.
Step 5: Touch the authenticator.
Again, human is needed here to confirm the act of authentication.
Step 6: You're done! Now you have successfully logged in.
Best part: No passwords!
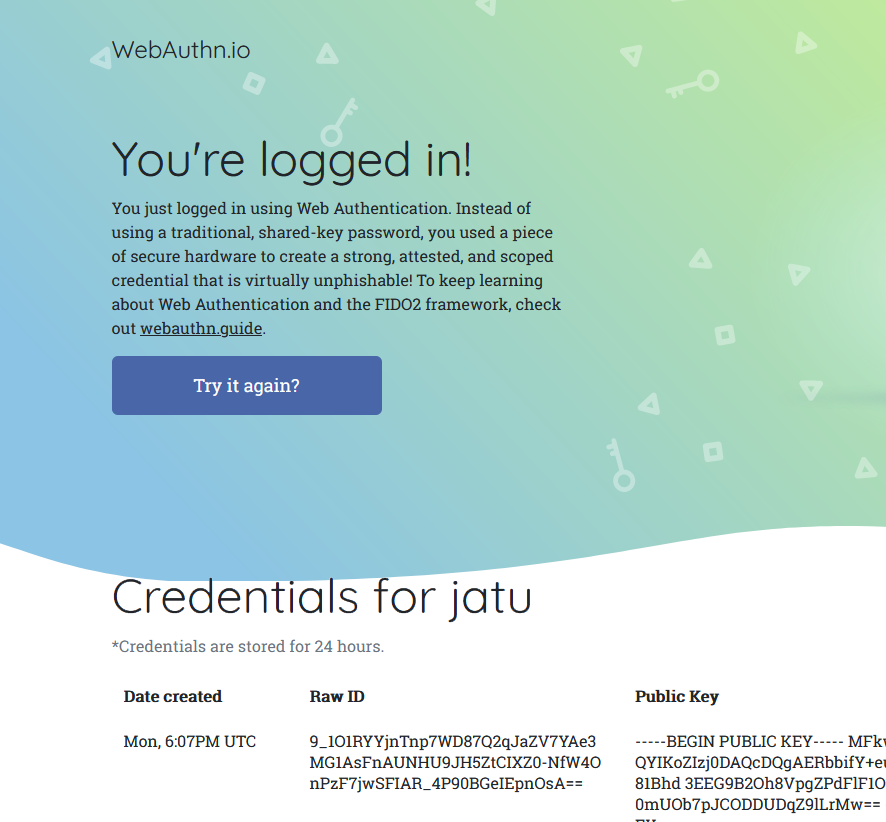
Note how the public key can be made, well... public. It really doesn't make a difference if somebody else gets a handle of my public key.
Closer look into The Public Key
As established in the previous post, you can not access the private key. Even you, the owner of the authenticator device, can not access that information. Nobody can lift the private key, possibly without you knowing about it. Just don't lose the Yubikey.
Public-part of the key is known and can be viewed. The key generated by my Yubikey in PEM-format is as follows:
-----BEGIN PUBLIC KEY-----

MFkwEwYHKoZIzj0CAQYIKoZIzj0DAQcDQgAERbbifY+euxnszcMis99CsnH81Bhd

3EEG9B2Oh8VpgZPdFlF1OQ8FEbfuSxbbAK+l0mUOb7pJCODDUDqZ9lLrMw==

-----END PUBLIC KEY-----
Popping the ASN.1 cork with a openssl ec -pubin -noout -text -in webauthn-pem.key will result:
read EC key

Public-Key: (256 bit)

pub:

    04:45:b6:e2:7d:8f:9e:bb:19:ec:cd:c3:22:b3:df:

    42:b2:71:fc:d4:18:5d:dc:41:06:f4:1d:8e:87:c5:

    69:81:93:dd:16:51:75:39:0f:05:11:b7:ee:4b:16:

    db:00:af:a5:d2:65:0e:6f:ba:49:08:e0:c3:50:3a:

    99:f6:52:eb:33

ASN1 OID: prime256v1

NIST CURVE: P-256
From that we learn, the key-pair generated is an ECDSA 256-bit. Known aliases for that are secp256r1, NIST P-256 and prime256v1. That weird naming means elliptic curves, aka. named curves.
For those into math, the actual arithmetic equation of secp256r1 -named curve can be viewed in an open-source book by Svetlin Nakov, PhD at https://cryptobook.nakov.com/. All the source code in this freely available book are at https://github.com/nakov/practical-cryptography-for-developers-book. The mathemathical theory how WebAuthN signs the messages is described in detail at https://cryptobook.nakov.com/digital-signatures/ecdsa-sign-verify-messages.
Back to those "pub"-bytes. Reading RFC5480 indicates out of those 65 bytes, the first one, valued 04, indicates this data being for an uncompressed key. With that information, we know rest of the bytes are the actual key values. What remains is a simple act of splitting the remaining 64 bytes into X and Y, resulting two 32-byte integers in hex:
X: 45b6e27d8f9ebb19eccdc322b3df42b271fcd4185ddc4106f41d8e87c5698193
Y: dd165175390f0511b7ee4b16db00afa5d2650e6fba4908e0c3503a99f652eb33
A simple conversion with bc will result in decimal:
X: 31532715897827710605755558209082448985317854901772299252353894644783958819219
Y: 100000572374103825791155746008338130915128983826116118509861921470022744730419
Yes, that's 77 and 78 decimal numbers in them. Feel free to go after the prime number with that public information!
Finally
The mantra is: No passwords.
With WebAuthN, you'll get hugely improved security with multiple authentication factors built into it. What we need is this to spread and go into popular use!
Wi-Fi 6 - Part 2 of 2: Practical wireless LAN with Linksys E8450
Sunday, August 15. 2021
There is a previous post in this series about wireless technology.
Wi-Fi 6 hardware is available, but uncommon. Since its introduction three years ago, finally it is gaining popularity. A practial example of sometimes-difficult-to-obtain part is an USB-dongle. Those have existed at least 15 years now. There simply is none with Wi-Fi 6 capability.
Additional twist is thrown at me, a person living in EU-reagion. For some weird (to me) reason, manufacturers aren't getting their radio transmitters licensed in EU. Only in US/UK. This makes Wi-Fi 6 appliance even less common here.
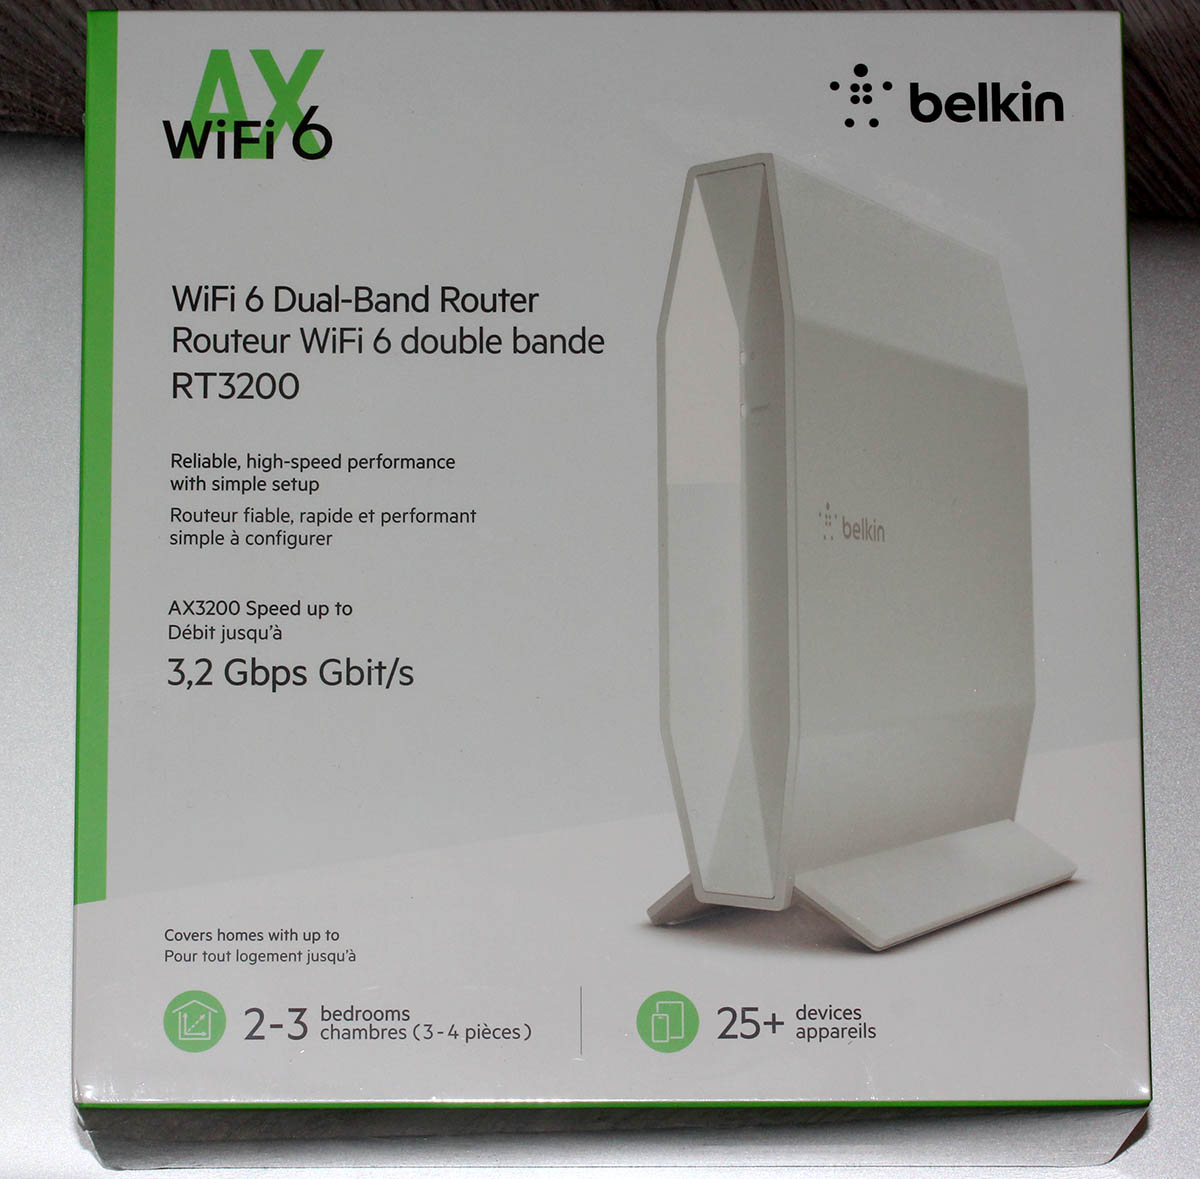
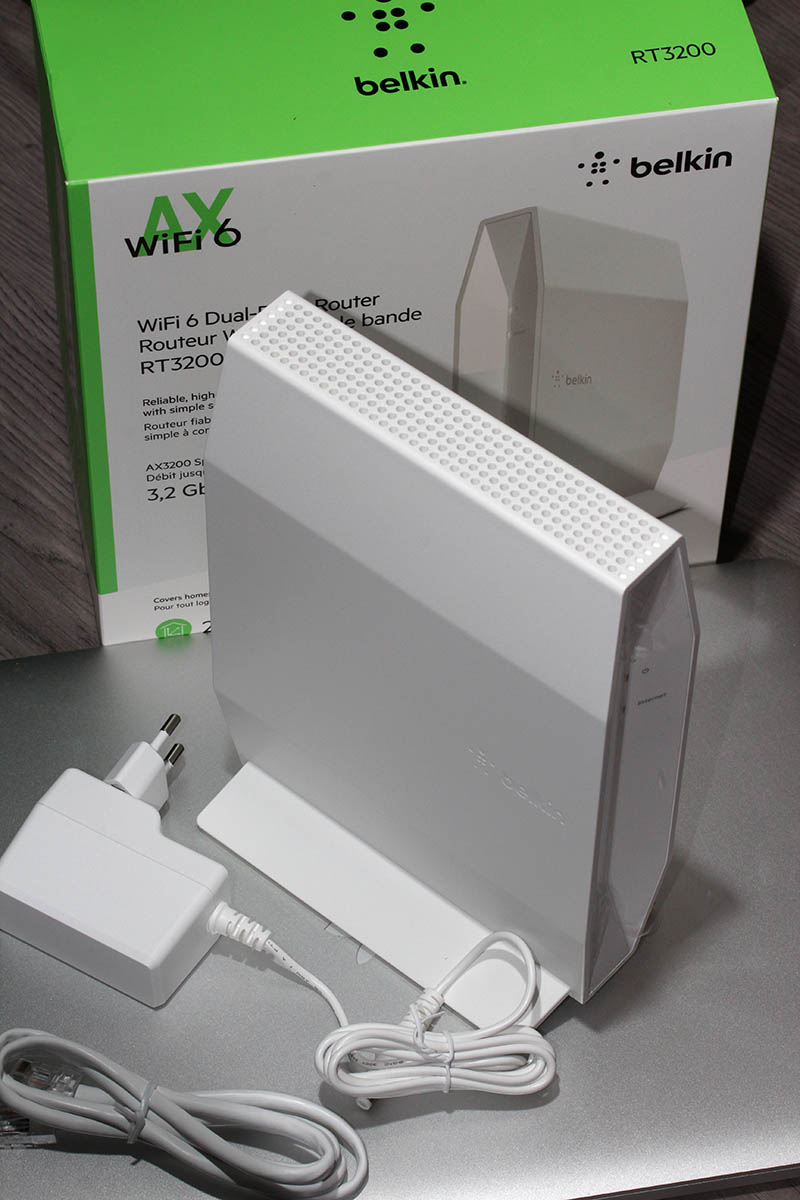
When I throw in my absolute non-negotiable requirement of running a reasonable firmware in my access point, I'll limit my options to almost nil. Almost! I found this in OpenWRT Table-of-Hardware: Linksys E8450 (aka. Belkin RT3200) It is an early build considered as beta, but hey! All of my requirements align there, so I went for it in Amazon UK:

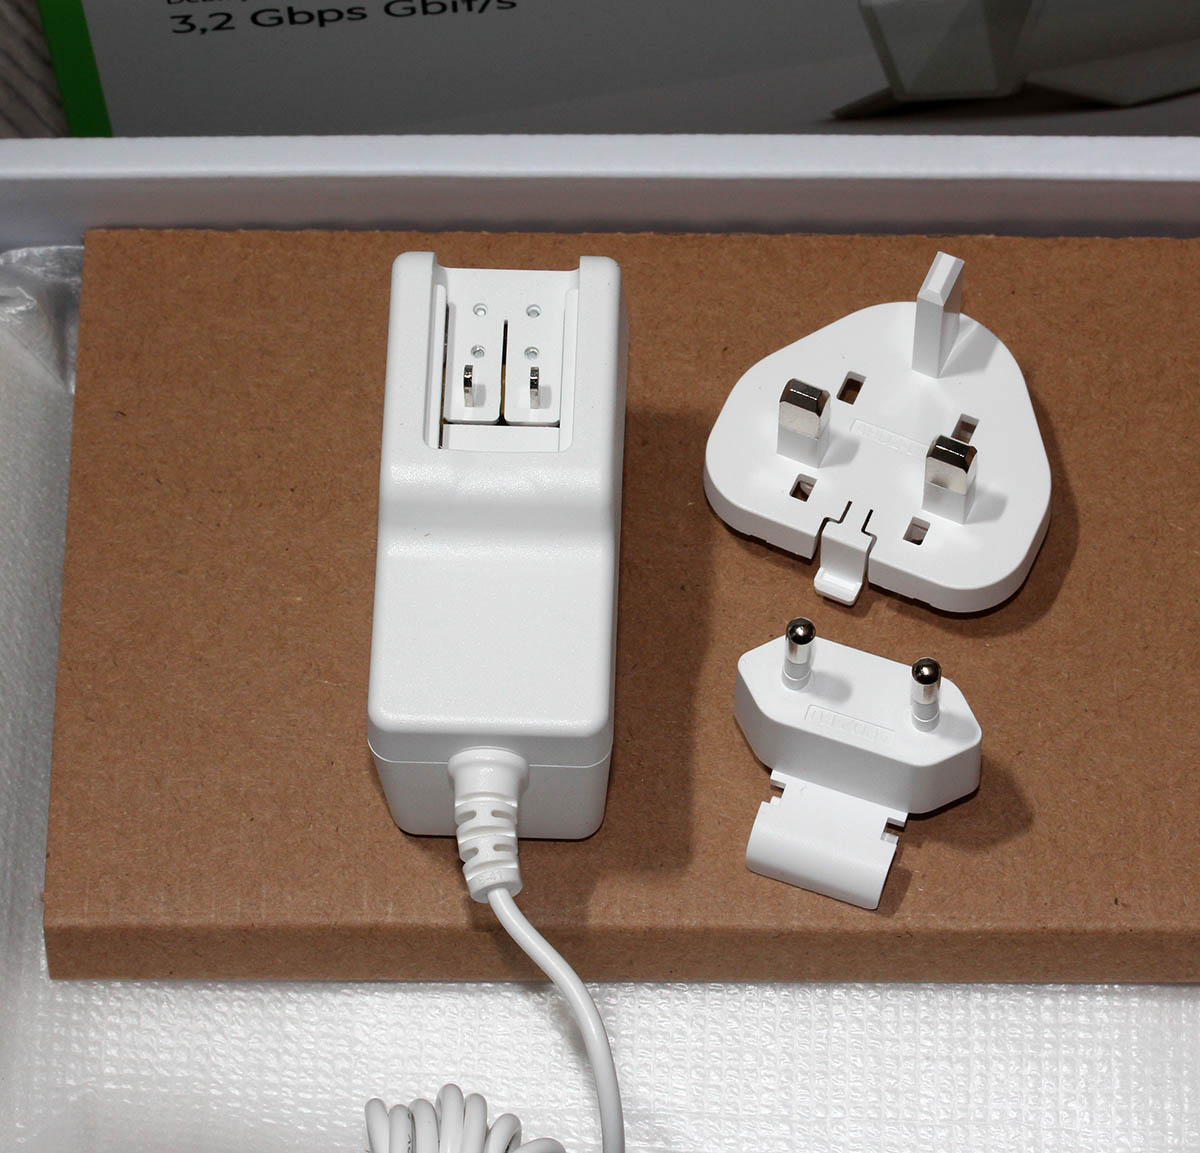
Wi-Fi 6 Access Point: Belkin RT3200
Couple of days waiting for UPS delivery, and here goes:
![]()
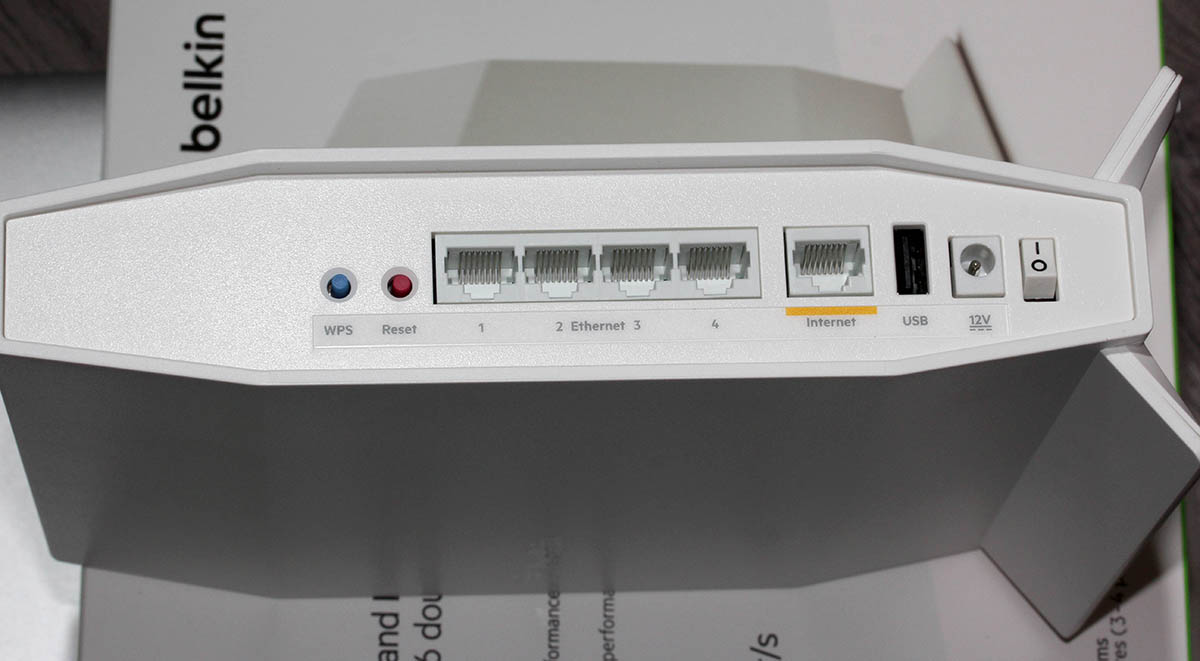
This is exactly what I wanted and needed! A four-port gigabit switch for wired LAN, incoming Internet gigabit connector. 12 VDC / 2 A barrel connector for transformer. Given UK power plugs are from 1870s they're widely incompatible with EU-ones. Luckily manufacturers are aware of this and this box contains both UK and EU plugs in an easily interchangeable form. Thanks for that!
Notice how this is a Belkin "manufactured" unit. In reality it is a relabled Linksys RT3200. Even the OpenWRT-firmware is exactly same. Me personally, I don't care what the cardobard box says as long as my Wi-Fi is 6, is fast and is secure.
Illustrated OpenWRT Installation Guide
The thing with moving away from vendor firmware to OpenWRT is that it can be tricky. It's almost never easy, so this procedure is not for everyone.
To achieve this, there are a few steps needed. Actual documentation is at https://openwrt.org/toh/linksys/e8450, but be warned: amount of handholding there is low, for newbie there is not much details. To elaborate the process of installation, I'm walking trough what I did to get me OpenWRT running in the box.
Step 0: Preparation
You will need:
- Linksys/Belkin RT3200 access point
- Wallsocket to power the thing
- A computer with Ethernet port
- Any Windows / Mac / Linux will do, no software needs to be installed, all that is required is a working web browser
- Ethernet cable with RJ-45 connectors to access the access point's admin panel via LAN
- OpenWRT firmware from https://github.com/dangowrt/linksys-e8450-openwrt-installer
- Download files into a laptop you'll be doing your setup from
- Linksys-compatible firmware is at at:https://github.com/dangowrt/linksys-e8450-openwrt-installer/releases, get
openwrt-mediatek-mt7622-linksys_e8450-ubi-initramfs-recovery-installer.itb - Also download optimized firmware
openwrt-mediatek-mt7622-linksys_e8450-ubi-squashfs-sysupgrade.itb
- Skills and rights to administer your workstation to have its Ethernet port a fixed IPv4-address from net 192.168.1.1/24
- Any other IPv4 address on that net will do, I used 192.168.1.10
- No DNS nor gateway will be needed for this temporary setup
Make sure not to connect the WAN / Internet into anything. The Big Net is scary and don't rush into that yet. You can do that later when all installing and setupping is done.
Mandatory caution:
If you just want to try OpenWrt and still plan to go back to the vendor firmware, use the non-UBI version of the firmware which can be flashed using the vendor's web interface.
Process described here is the UBI-version which does not allow falling back to vendor firmware.
Step 1: Un-box and replace Belkin firmware
After plugging the Access Point to a wall socket, flicking the I/O-switch on, attaching an Ethernet cable to one of the LAN-switch ports and other end directly to a laptop, going to http://192.168.1.1 with your browser will display you something like this:
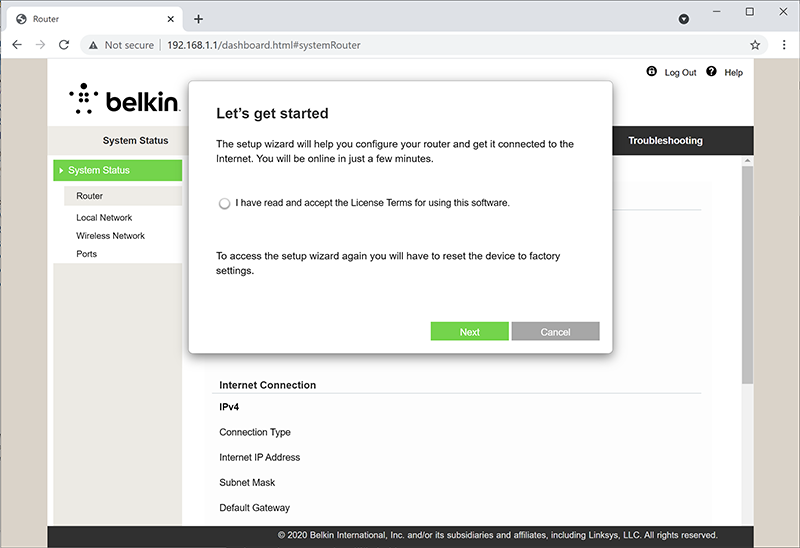
What you need to do is try to exit the out-of-box-experience setup wizard:


For the "Ethernet cable is not connected" you need to click Exit. When you think of the error message bit harder, if you get the message, your Ethernet IS connected. Ok, ok. It is for the WAN Ethernet, not LAN.
Notice how setup "did not complete succesfully". That is fully intentional. Click "Do not set up". Doing that will land you on a login:
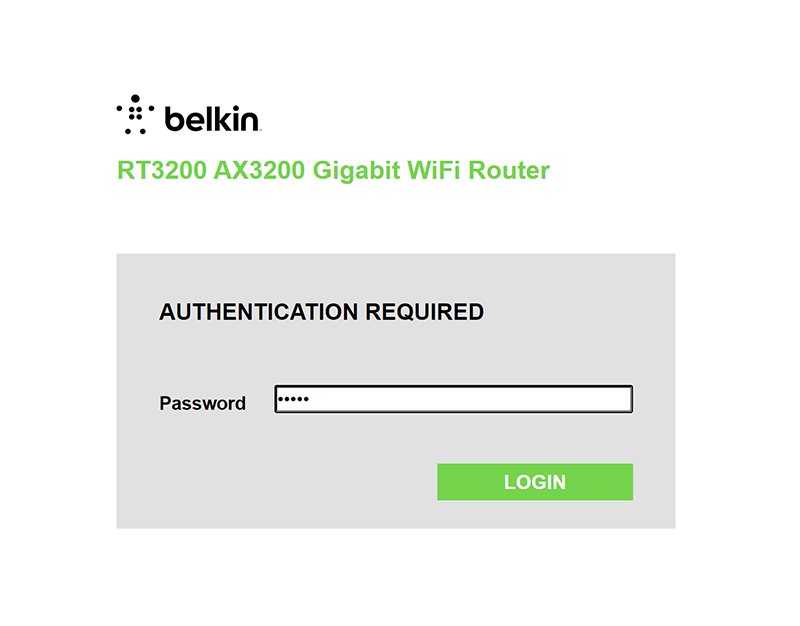
This is your unconfigured admin / admin -scenario. Log into your Linksys ... erhm. Belkin.
Select Configuration / Administration / Firmware Upgrade. Choose File. Out of the two binaries you downloaded while preparing, go for the ubi-initramfs-recovery-installer.itb. That OpenWRT firmware file isn't from manufacturer, but the file is packaged in a way which makes it compatible to allow easy installation:
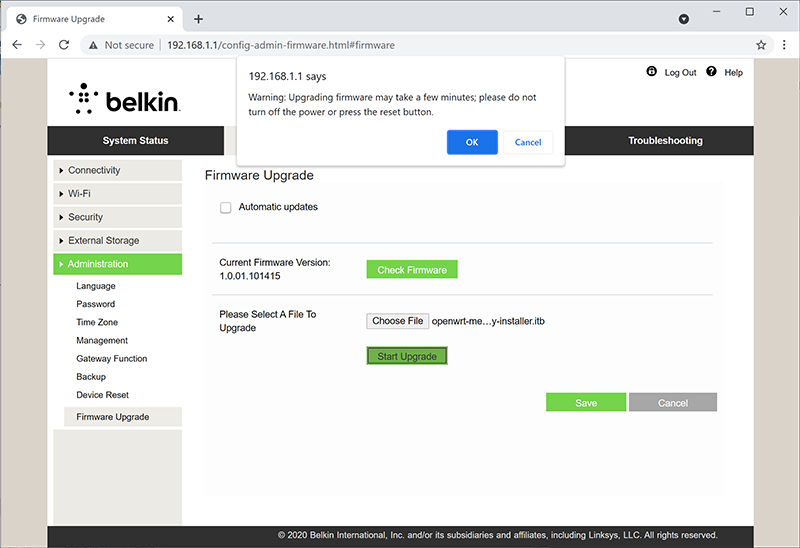
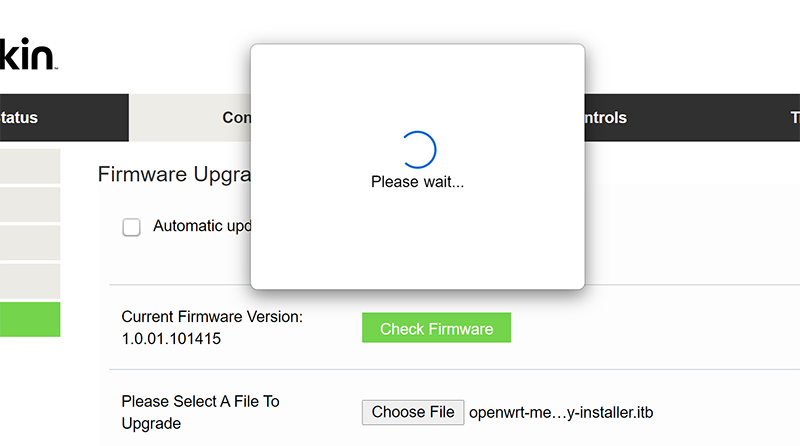
On "Start Upgrade" there will be a warning. Click "Ok" and wait patiently for couple minutes.
Step 2: Upgrade your OpenWRT recovery into a real OpenWRT
When all the firmware flashing is done, your factory firmware is gone:
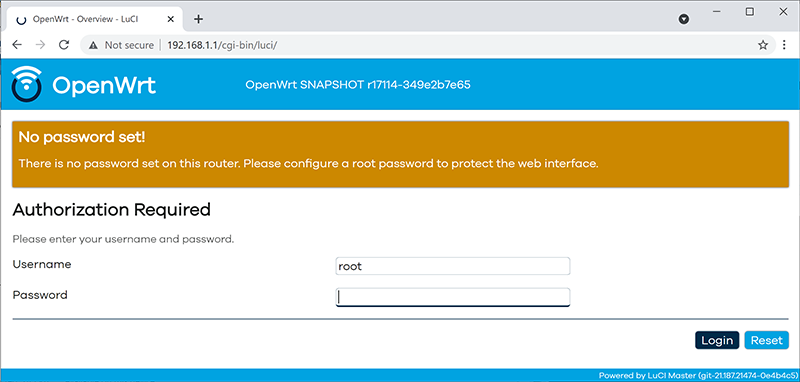
There is no password. Just "Login". An OpenWRT welcome screen will be shown:
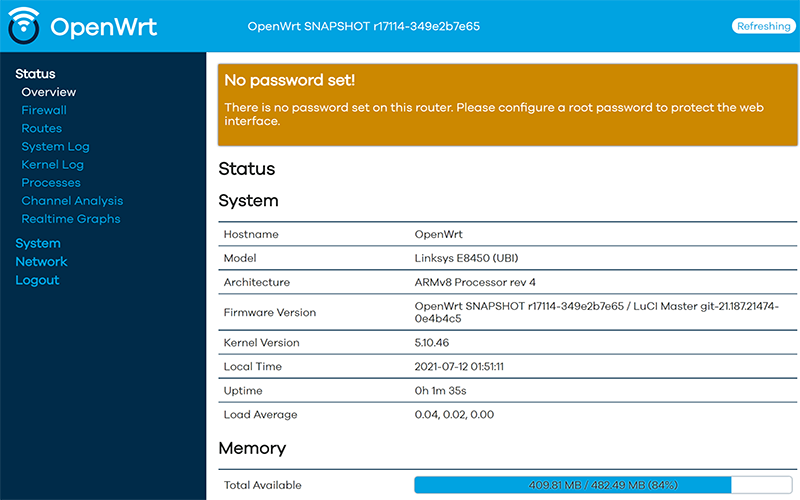
Now that you're running OpenWRT, your next task is to go from recovery to real thing. I'm not sure if I'll ever want to go back, but as recommended by OpenWRT instructions, I did take backups of all four mtdblocks: bl2, fip, factory and ubi. This step is optinal:
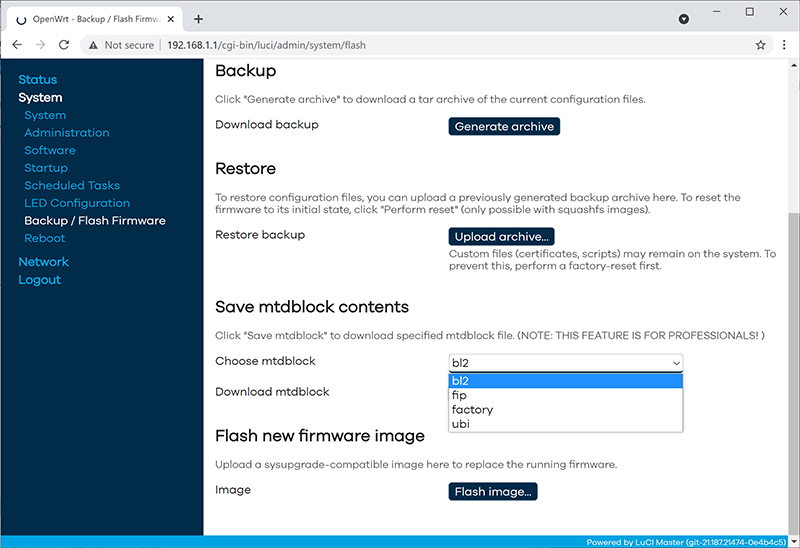
When you're ready, go for the firmware upgrade. This time select openwrt-mediatek-mt7622-linksys_e8450-ubi-squashfs-sysupgrade.itb:

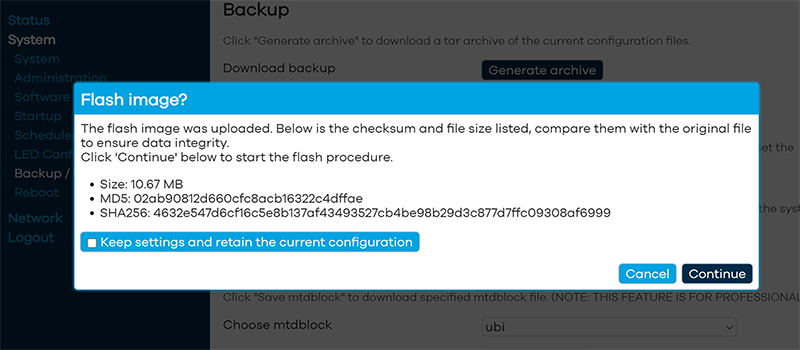
To repeat the UBI / non-UBI firmware: This is the UBI-version. It is recommended as it has better optimization for layout and management of SPI flash, but it does not allow fallbacking to vendor firmware.
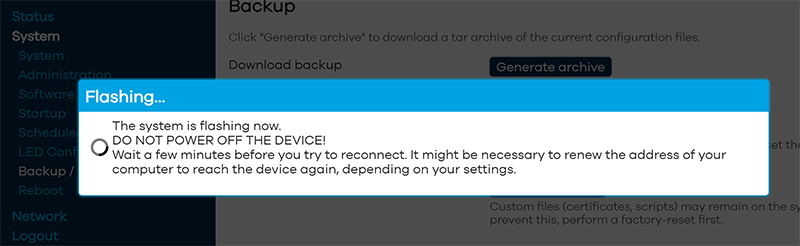
I unchecked the "Keep settings and retain the current configuration" to make sure I got a fresh start with OpenWRT. On "Continue", yet another round of waiting will occur:
Step 3: Setup your wireless AP
Déjà vu!
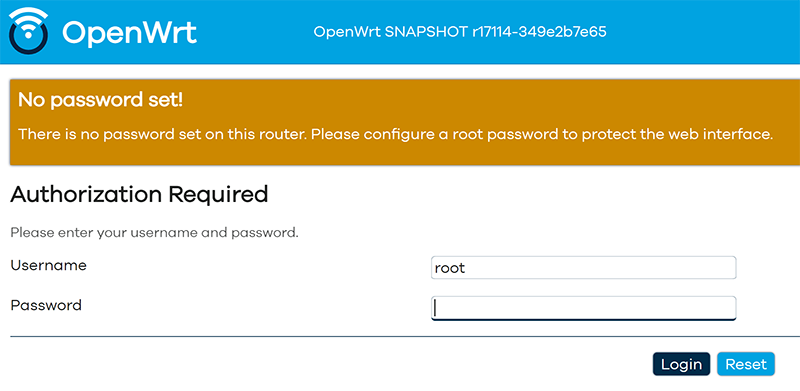
You have seen this exact screen before. Login (there is no password yet):
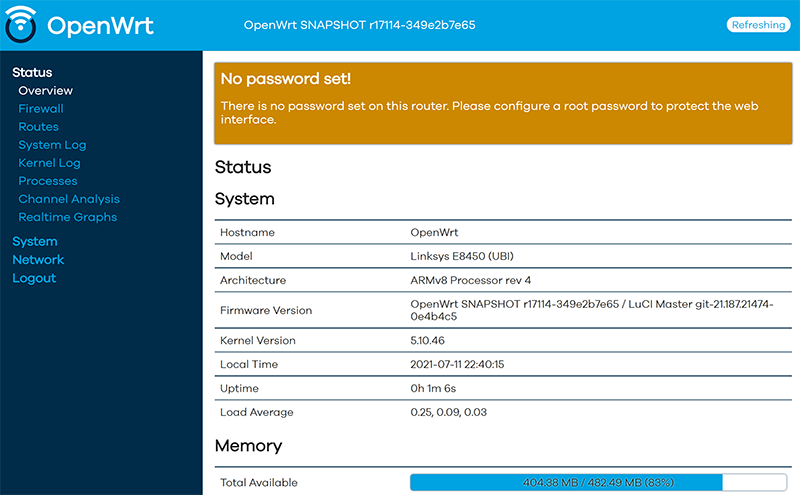
Second time, same screen but with this time there is a proper firmware in the AP. Go set the admin account properly to get rid of the "There is no password set on this router" -nag. Among all settings, go to wireless configuration to verify both 2.4 and 5 GHz radios are off:
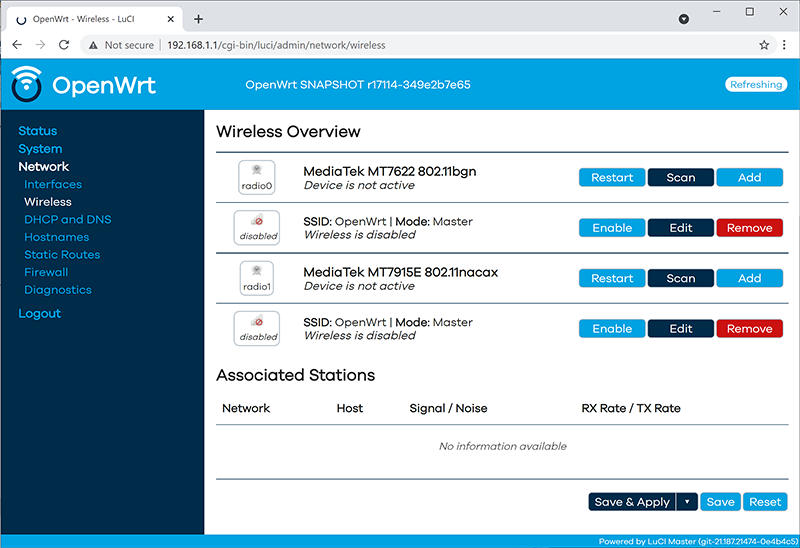
Go fix that. Select "Edit" for the 5 GHz radio and you'll be greeted by a regular wireless access point configuration dialog. It will include section about wireless security:
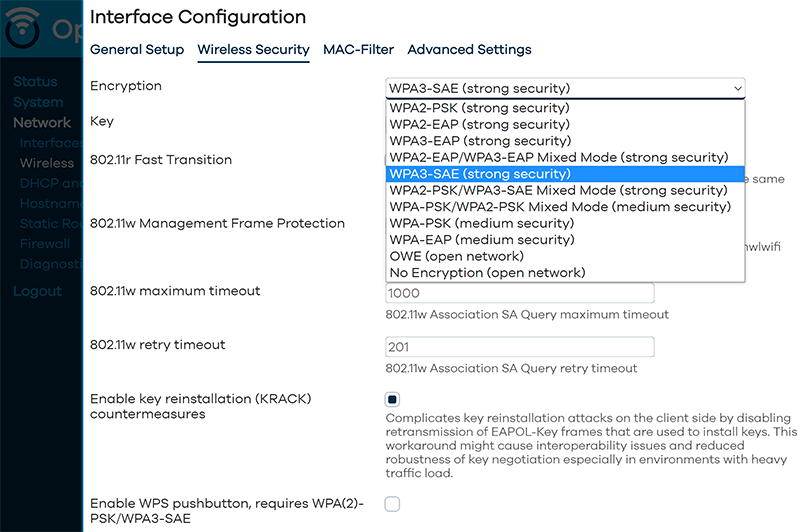
As I wanted to improve my WLAN security, I steer away from WPA2 and went for a WPA3-SAE security. Supporting both at the same time is possible, but securitywise it isn't wise. If your system allows wireless clients to associate with a weaker solution, they will.
Also for security, check KRACK attack countermeasures. For more details on KRACK, see: https://www.krackattacks.com/
When you've done, you should see radio enabled on a dialog like this:

Step 4: Done! Test.
That's it! Now you're running a proper firmware on our precious Wi-Fi 6 AP. But how fast it is?
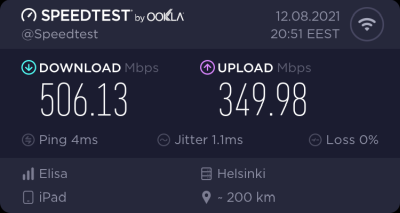
As I said, I don't have many Wi-Fi 6 clients to test with. On my 1 gig fiber, iPad seems to be pretty fast. Also my Android phone speed is ... well ... acceptable.
For that speed test I didn't even go for the "one foot distance" which manufacturers love to do. As nobody uses their mobile devices right next to their AP, I tested this on a real life -scenario where both AP and I were located the way I would use Internet in my living room.
Final words
After three year wait Wi-Fi 6 is here! Improved security, improved speed, improved everything!
Wi-Fi 6 - Part 1 of 2: Brief primer on wireless LAN
Friday, August 13. 2021
Wi-Fi. Wireless LAN / WLAN. Nobody wants to use their computing appliance with cords. Yeah, you need to charge them regularily (with a cord or wireless charger). To access The Internet, we all love, is less on wires. The technologies for going wire-less are either mobile data (UMTS / LTE / 5G) or Wi-Fi. Funny how 20 years ago there was no real option, but thanks to advances in technology we're at the point where all you need in life is a working Wi-Fi connection.
Wi-Fi Symbols
Back in 2018 Wi-Fi Alliance® came up wiith this new naming scheme and baptized their latest (sixth) generation as Wi-Fi 6. At the same time, they retro-actively baptized their previous technologies as 5, 4, and so on (3rd gen. or older isn't really used anymore). In their website https://www.wi-fi.org/discover-wi-fi they depict Wi-Fi generations as follows:

Most typically, you're running on Wi-Fi 5. That's with an 802.11ac transmitter. If you never left 2.4 GHz band there is a likelihood you're still stuck on Wi-Fi 4 with ~10 years old access point. There is wery low chance you're still on Wi-Fi 3, that hardware is nearly 20 years old. Not many consumer-grade electronics last that long.
A practical example on how operating system might use the Wi-Fi symbols from Android. This is what my phone used to look like until some random product owner at Google decided that those symbols are too confusing, dropped them in an OS upgrade and now my Nokia 5.3 won't display the numbers anymore:

Android / Nokia devs: Please, put those numbers back!
Apple devs: Please, put Wi-Fi generation numbers into wireless networks.
Wi-Fi 5+ Radio Bandwidth
Anyway, the 2.4 GHz band is pretty much dead. Don't miss the fact there are no advances happening on lower Wi-Fi -band. All the new stuff like Wi-Fi 6 is only on 5 GHz band. This will only affect people trying to use and old phone or laptop and realize it won't connect.
Reason why 2.4 GHz has been abandoned is obvious: your next door neighbour's microwave oven, nearby babymonitors, all Bluetooth stuff and the guy parking his car blipping the keyfob to lock the doors on the street are using that exact same band. Ok ok, a microwave oven shouldn't emit any signal outside, but still the fact reamains, it uses the same band. As an example of 2.4 GHz band traffic, I've personally been in an apartment building with 50+ wireless networks, when counting also nearby buildings, 100+ networks were visible on Wi-Fi search. With an iPhone, if using a proper antenna a search would yield 200-300 networks. All that on a 100-200 meter radius. Yes, that's crowded.
That much traffic on a narrow band results in nobody getting a proper Internet connection. Unless.... you're at 5 GHz band which can take the hit, won't have babymonitors nor microwave owens.
So, for Wi-Fi 5/6: bye bye 2.4, 5 GHz it is.
Wi-Fi 5 and 6 Speeds
There is an excellent article at Duckware titled Wi-Fi 4/5/6/6E (802.11 n/ac/ax). I'm borrowing two tables from it:
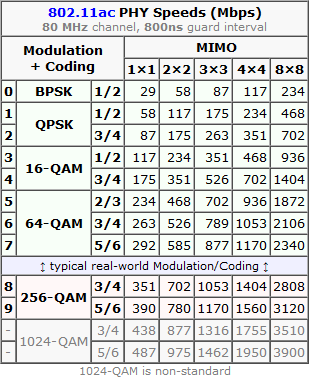
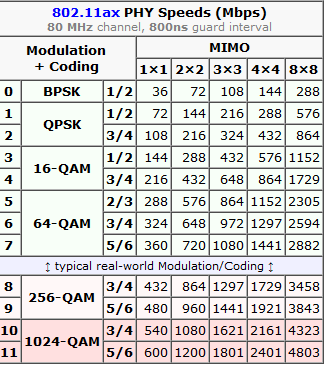
These tables depict the theoretical maximum speeds available at various multiple in/out transmissions (MIMO) aka. simultaneous radios. What a "radio" means in this context is the number of radios/antennas used by the access point and your client. Wi-Fi 4 is intentionally not in this comparison. It was the first generation to be able to utilize MIMO, but it lacked the modern modulation, had less subcarriers and used larger guard interval. Maximum transmission speed for 4-radio 5 GHz Wi-Fi 4 was 600 Mbit/s (1000 for non-standard), much less for 2.4 GHz. By looking at the table Wi-Fi 6 can reach that using a single radio, Wi-Fi 5 with two. So, not reallly a fair comparison.
How many simultaneous radios are you currently using depends. Your current Wi-Fi -connection may be using 1, 2, 3 or 4 radios/antennas, but it depends on how many exist in your access point and phone/laptop. The more expensive hardware you have, number of radios used increases.
Advanced topic: If you really really want to study why Wi-Fi 5 and Wi-Fi 6 speeds differ, there is a really good explanation on how OFDM and OFDMA modulations differ. Most people wouldn't care, but I majored in that stuff back-in-the-university-days.
Wi-Fi 5+ Dynamic Rate Selection
Besides hardware/radios/modulation Wi-Fi 5 introduced CWAP or Dynamic Rate Selection. Read more about that in this article. To state the obvious, also Wi-Fi 6 (and upcoming 7) will be using this.
Dynamic rate selection improves total bandwidth utilization in access point as clients need to declare the amount needed. If you'lre leeching warez via Wi-Fi, your client-radio will announce to access point: "Hey AP! This guy will be leeching warez, gimme a lot of bandwidth." Then access point will allocate you a bigger slice of the pie. When you leeching is done, your radio will announce: "I'm done downloading, won't be needing much bandwidth anymore." Then somebody else at the same access point can get much more. This type of throttling/negotiation vastly improves the actual bandwidth usage when multiple clients are associated with the same wireless network. Please note: "a client" is any Wi-Fi -connected device including your phone, laptop, fridge and bot-vacuum.
Practical example from Windows 10:
On an idle computer, running netsh wlan show interfaces resulted:
There is 1 interface on the system:


    Name                   : WiFi

    Description            : Intel(R) Dual Band Wireless-AC 8265

    State                  : connected

    Network type           : Infrastructure

    Radio type             : 802.11ac

    Authentication         : WPA2-Personal

    Cipher                 : CCMP

    Connection mode        : Profile

    Channel                : 60

    Receive rate (Mbps)    : 1.5

    Transmit rate (Mbps)   : 1.5

    Signal                 : 92%
Then while downloading couple gigabytes of Apple iOS upgrade:
There is 1 interface on the system:


    Name                   : WiFi

    Description            : Intel(R) Dual Band Wireless-AC 8265

    State                  : connected

    Network type           : Infrastructure

    Radio type             : 802.11ac

    Authentication         : WPA2-Personal

    Cipher                 : CCMP

    Connection mode        : Profile

    Channel                : 60

    Receive rate (Mbps)    : 400

    Transmit rate (Mbps)   : 400

    Signal                 : 94%
Notes:
Using Wi-Fi 5, radio type is 802.11ac. This article is about Wi-Fi 6!
Receive / transmit rate varies from 1.5 Mbit/s to 400 Mbit/s depending on the need.
How dynamic rate allocation can be determined in Linux or macOS, I have no idea. If you do, please, drop a comment.
Wi-Fi 6 Security
When looking wifi security today, WPA/WPA2 is broken. WPA2 was introduced in 2004 with Pre-Shared Key (PSK). Later in 2010 WPA Enterprise Authentication Protocol (EAP) was introduced and it is still considered secure. For a home user like you and me, EAP is very difficult to setup and maintain. Hint: the word "enterprise" says it all. As bottom line, nobody is running it at home, all enterprises are at the office.
Around 2017/2018 number of cracks were introduced to erode security of WPA2 PSK making it effectively crackable, not completely insecure, but with some effort insecure. One example out of many: Capturing WPA/WPA2 Handshake [MIC/Hash Cracking Process]
To fix this insecurity, carefully designing the new Wi-Fi security model for 14 years Wi-Fi Alliance introduced WPA3. The un-cracable version. EAP is still there in WPA3. Insecure PSK has been obsoleted and replaced by Simultaneous Authentication of Equals (SAE) which is claimed to be cracking resistant even for poor passwords.
WPA3 is not bound to radio technology used, but given consumer electronics manufactures, they're not going to add a completely new security feature to old hardware. So, practically we're speaking Wi-Fi 5 or newer. If you're at Wi-Fi 6, you'll definitely get WPA3. Update: Any WAP3 hardware manufactured after 1st July 2020 will have mandatory WPA3, before that it was optional.
Practical Wi-Fi 6
Enough theory. Now we know 802.11ax is secure and pretty fast. Now we need to see how fast (security is really difficult to measure). There is one practical obstacle, though, Wi-Fi 6 hardware at the time of writing this is well ... uncommon. Such access points and clients exist and are even generally available. Me being me, I wouldn't buy a random access point, oh no! My AP will run DD-WRT or OpenWrt. That's the hurdle.
More about that in my next post.
SD-Cards - Deciphering the Hieroglyphs
Monday, April 5. 2021
Luckily xkcd #927 isn't all true. When talking about memory cards used in cameras and other appliance, SD has taken the market and become The Standard to rule all standards.
In my junk-pile I have all kinds of CF, MMC and Memory Sticks all of which have became completely obsoleted. Last usable one was the Memory Stick into my PSP (Playstation Portable). For some reason the stick became rotten and I'm hesitant go get a "new" one. That Sony-specific standard has been obsoleted waaay too long. Not to mention anything about 2012 obsoletion of PSP.
So, SD-cards. There is an association managing the standard, SD Association. Major patents are owned by Panasonic, SanDisk and Toshiba, but they've learned the lesson fom Sony's failures (with Betamax and Memory Stick). Competition can get the SD-license with relax-enough terms and make the ecosystem thrive keeping all of us consumers happy.
SDA defines their existence as follows:
SD Association is a global ecosystem of companies setting industry-leading memory card standards that simplify the use and extend the life of consumer electronics, including mobile phones, for millions of people every day.
Well said!
That's exactly what countering Xkcd #927 will need. An undisputed leader with good enough product for us consumers to accept and use.
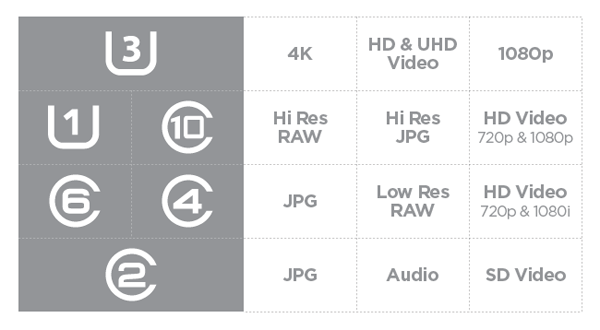
SD Standards
SD-cards have existed for a while now and given progress in accessing bits in silicon, the speeds have changed a lot. This is how SDA defines their standards for consumers:
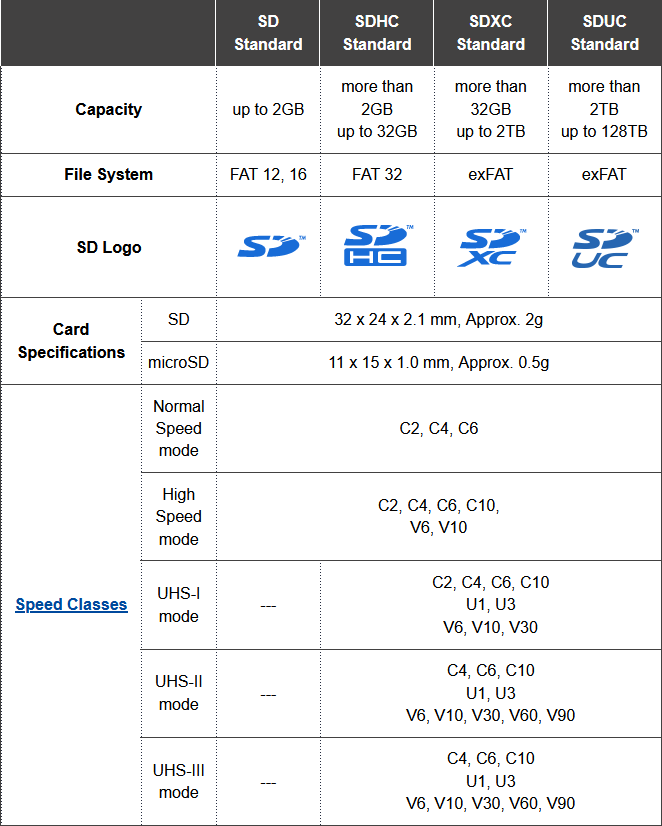
There are four different standards reaching the most recent SDUC. Those four can have five different classifications of speed having multiple speed modes in them. Above table is bit confusing, but when you look at it bit closer, you'll realize the duplicates. As an example, speed modes C4 and C6 exist in all of the 5 speed classes spanning from early ones to most recent.
If you go shopping, the old SD-standard cards aren't available anymore. SDHC and SDXC are the ones being sold actively. The newcomer SDUC is still rare as of 2021.
As the access for all of the standards require different approach from the appliance, be really careful to go for a compatible card. Personally I've seen some relatively new GPS devices require SDHC with max. filesystem size of 32 GiB. Obviously the design and components in those devices are from past.
SD Speeds
Why is this all important?
Well, it isn't unless the thing you're using your SD-card with has some requirements. Ultimately there will be requirements depending on what you do.
Examples of requirements might be:
- Storing still images from a camera, for that pretty much all of the cards work, any U-class card will do the trick
- Storing video from a camera, for that see V-class, U-class might choke on big data streams
- Reading and writing data with your Raspberry Pi, for that see A-class, U-class will work ok, but might lack the random-access performance of the A-class
Symbols indicating speed would be:
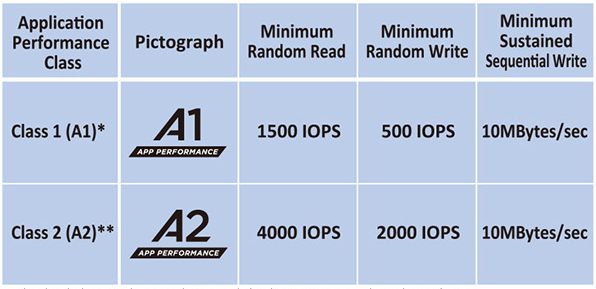
Examples
To make this practical, let's see some real-world readers and cards to see if any of the above symbols can be found in them.
Readers
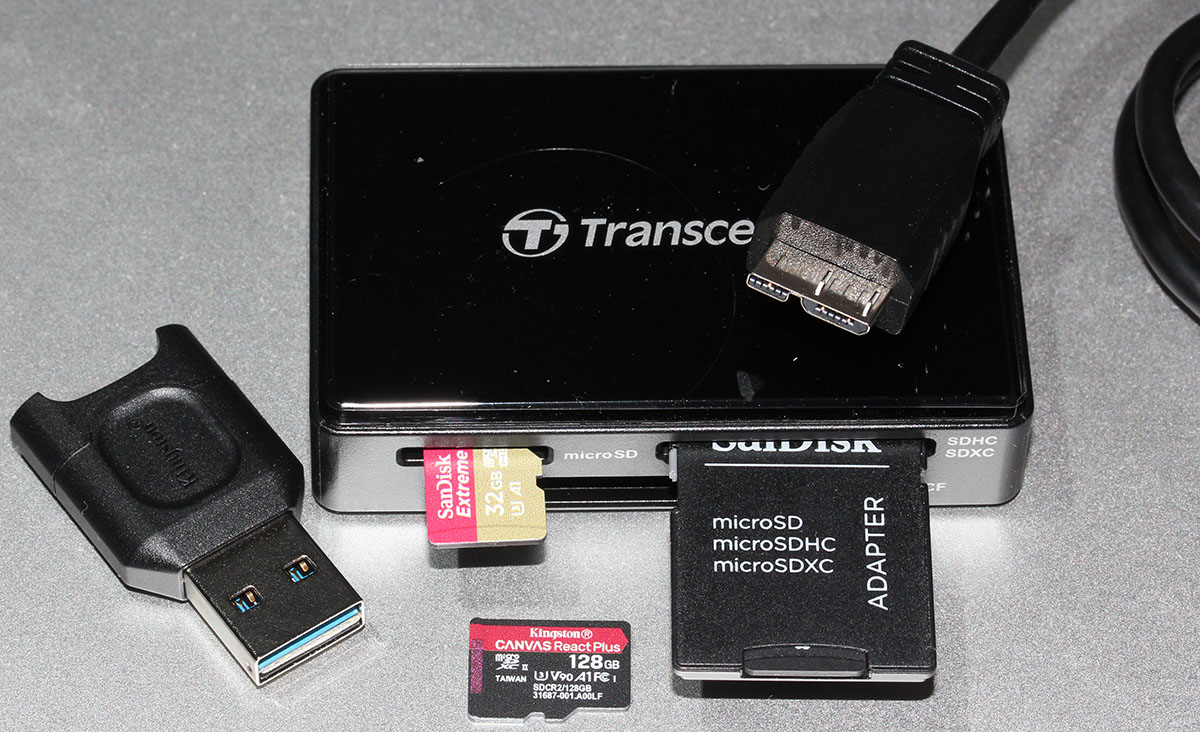
In above pic are couple reader/writer units I own. Both are USB 3.0, but the leftmost one is a very simple micro-SD -reader. For "regular" size SD-cards I use the bigger box, which can access multiple cards at the same time.
Readers (writers) won't have a speed class in them. They will have the SD-standard mentioned. Please be aware of USB 2.0 speed limitations if using any of the old tech. Any reasonably new SD-card will be much faster than the USB-bus. When transferring your already recorded moments, speed is not an issue. When working with large video files or tons of pics, make sure to have a fast reader.
Card, 128 GB

Here is a micro-SD from my GoPro. Following symbols can be seen on the card:
- Manufacturer: Kingston
- Form factor. Micro SD
- Standard: SDXC, II is for UHS-II speed
- Capacity: 128 GB, ~119 GiB
- Speed classification: U3, V90 and A1
- Comment: An action camera will produce a steady stream of 4K H.265 video, that's what the UHS-II V90 is for. A card with this kind of classification is on the expensive side, well over 100€.
Card, 32 GB
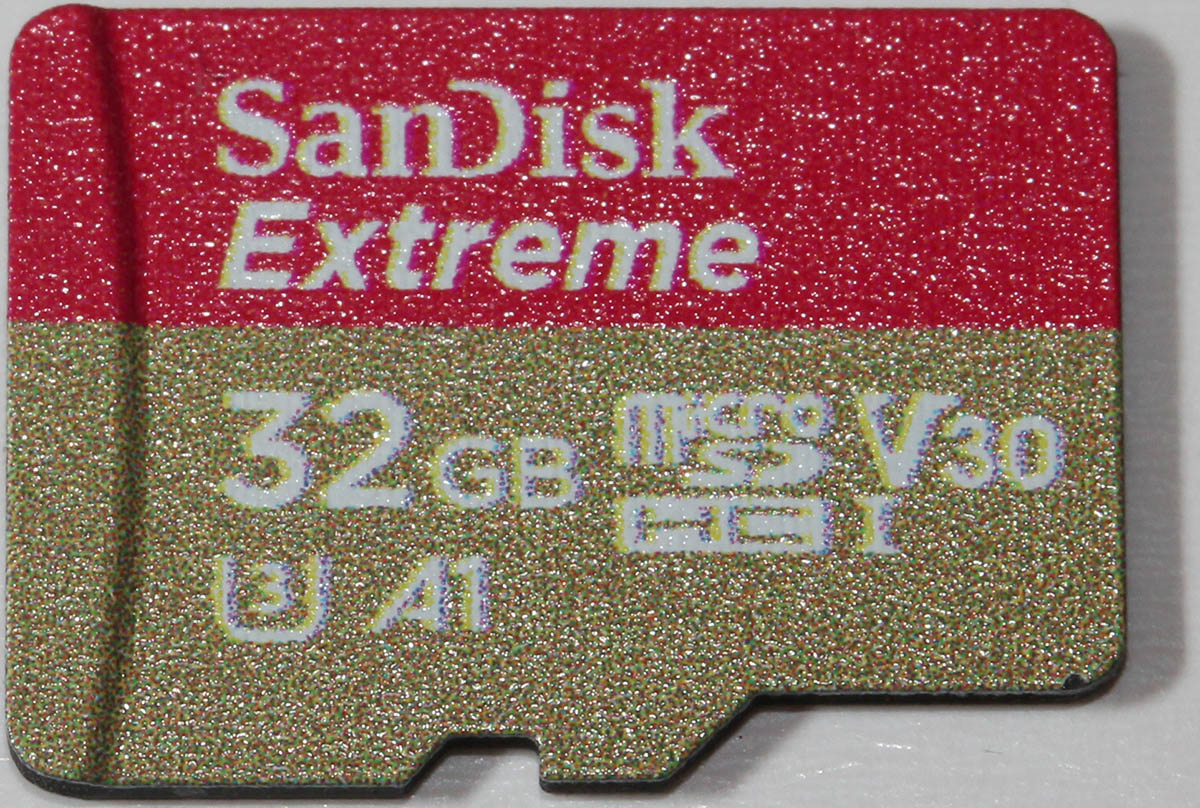
Here is a micro-SD from my Garmin GPS. Following symbols can be seen on the card:
- Manufacturer: SanDisk
- Capacity: 32 GB, ~30 GiB
- Form factor. Micro SD
- Standard: SDHC, I is for UHS-I speed
- Speed classification: U3, V30 and A1
- Comment: I'm using this for a dual-purpose, it serves as map data storage (A1) and dash cam video recorder (V30) for HD H.264 video stream. UHS-I will suit this purpose fine as the video stream is very reasonable.
Card, 16 GB
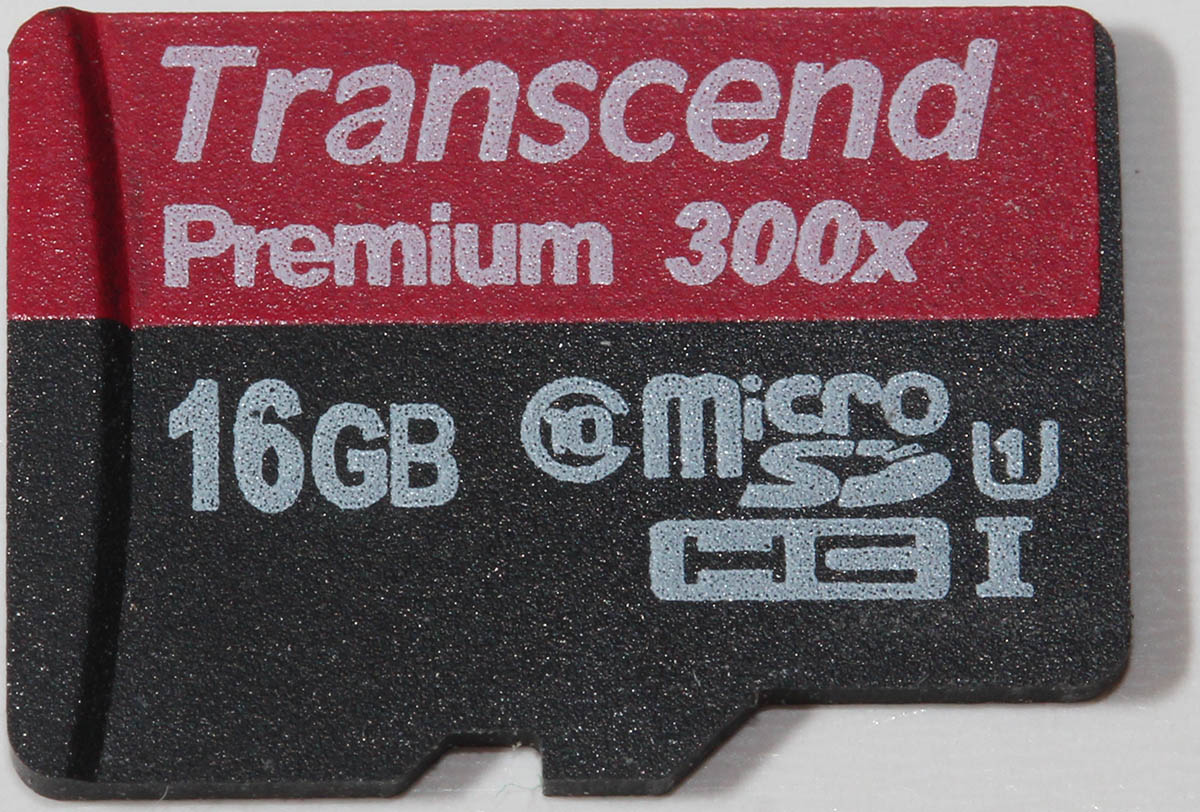
Here is a micro-SD from my Raspberry Pi. Following symbols can be seen on the card:
- Manufacturer: Transcend
- Capacity: 16 GB, ~15 GiB
- Speed classification: 10
- Form factor. Micro SD
- Speed classification: U1
- Standard: SDHC, I is for UHS-I speed
- Comment: Running an application-heavy Raspi might benefit for having an A-class card, instead of U-class which is better suited for streaming data. This one is an old one from a still camera which it suited well.
Card, 8 GB
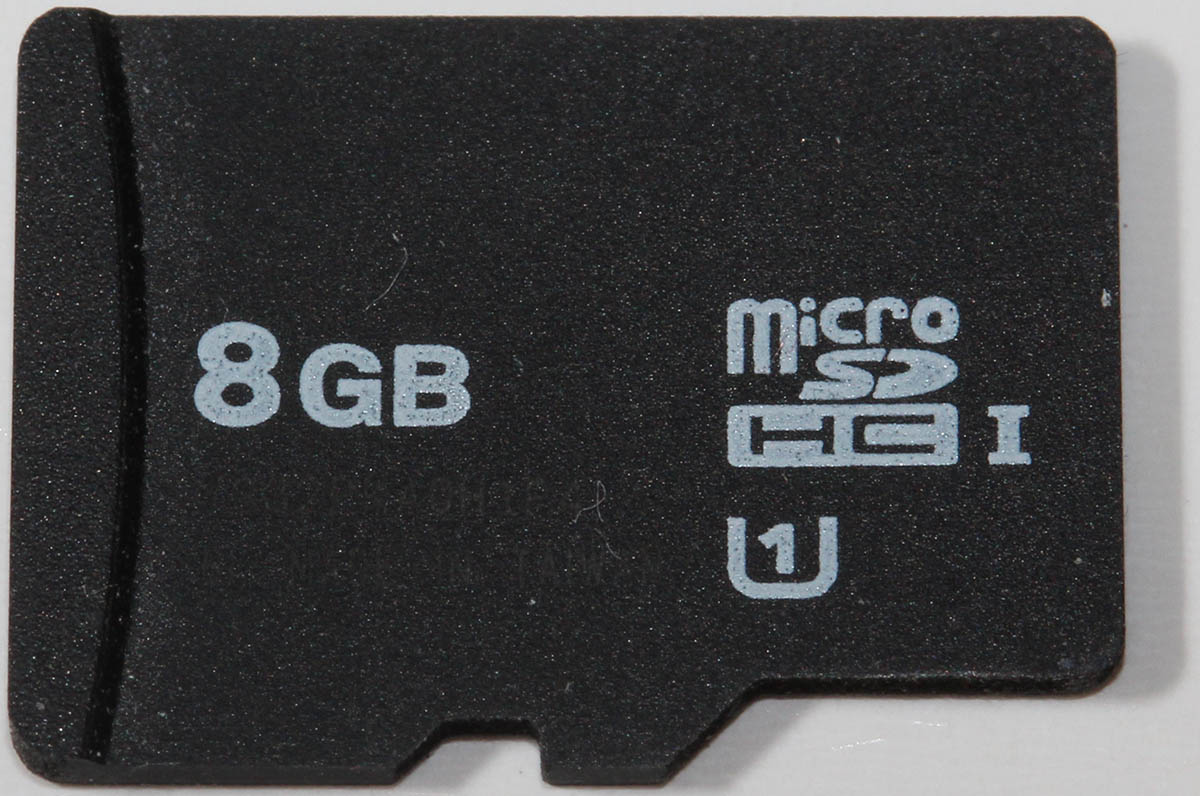
Here is a micro-SD which I'm not actively using anymore. Following symbols can be seen on the card:
- Capacity: 8 GB, ~7.4 GiB
- Form factor. Micro SD
- Standard: SDHC, I is for UHS-I speed
- Speed classification: U1
- Comment: An obvious old card lacking both A and V speed classes
Additional info
For further info, see:
- SD Association - Speed Class
- Picking the Right SD Card: What Do the Numbers Mean?
Rotting bits - Cell charge leak
Storage fragmentation. It is a real physical phenomenon in NAND storage causing a stored bit to "rot". This exact type of failure exists both in SD cards and SSD (Solid-State Drive). If the same exact storage location is written constantly, eventually it will cause the cell charge to leak causing data loss. As manufacturers/vendors are aware of this, there are countermeasures.
Typically you as an end-user don't need to worry about this. Older cards and SSDs would start losing your precious stored data, but given technological advances it is less and less an issue. Even if you would create a piece of software for the purpose of stressing out an exact location of storage, modern hardware wouldn't be bothered. You may hear and read stories of data loss caused by this. I see no reason not to believe any such stories, but bear in mind any new hardware is less and less prone of this kind of failure.
Finally
While shopping for storage capacity, I'll always go big (unless there is a clear reason not to). Bigger ones tend to have modern design, be able to handle faster access and have really good resistance to data loss.
My suggestion for anybody would be to do the same.
Camera tripod-connector thread
Sunday, January 31. 2021
I'm sure everybody who has ever held a camera knows there is a thread for tripod somewhere bottomside of the camera. This is what my Canon EOS would look like from the belly-side:

Why all cameras have that specific threading is because manufacturers want to be ISO 1222:2010 -compliant. Reading Wikipedia article Tripod (photography), Screw thread, reveals the spec having a 1/4-20 UNC or 3/8-16 UNC thread. There is also a phrase "Most consumer cameras are fitted with 1/4-20 UNC threads."
UNC? Quarter inch?

According to mandatory Pulp Fiction reference, in Europe we have the metric system. Personally I have no idea what is a 1/4 inch Whitworth UNC thread mentioned in Stackexchange article Why aren't tripod mounts metric? Following up on the history, to my surprise, that particular camera thread can be traced at least to year 1901. There seems to be suggestions to circa 1870 and name T. A. Edison being mentioned, but none of that can be corroborated.
Time warping back to today.
My work has been remote for many many years. Given the global pandemic, everybody else is also doing the same. As every meeting is done over the net, I've made choices to run with some serious hardware. If you're interested, there is a blog post about microphone upgrade from 2019.
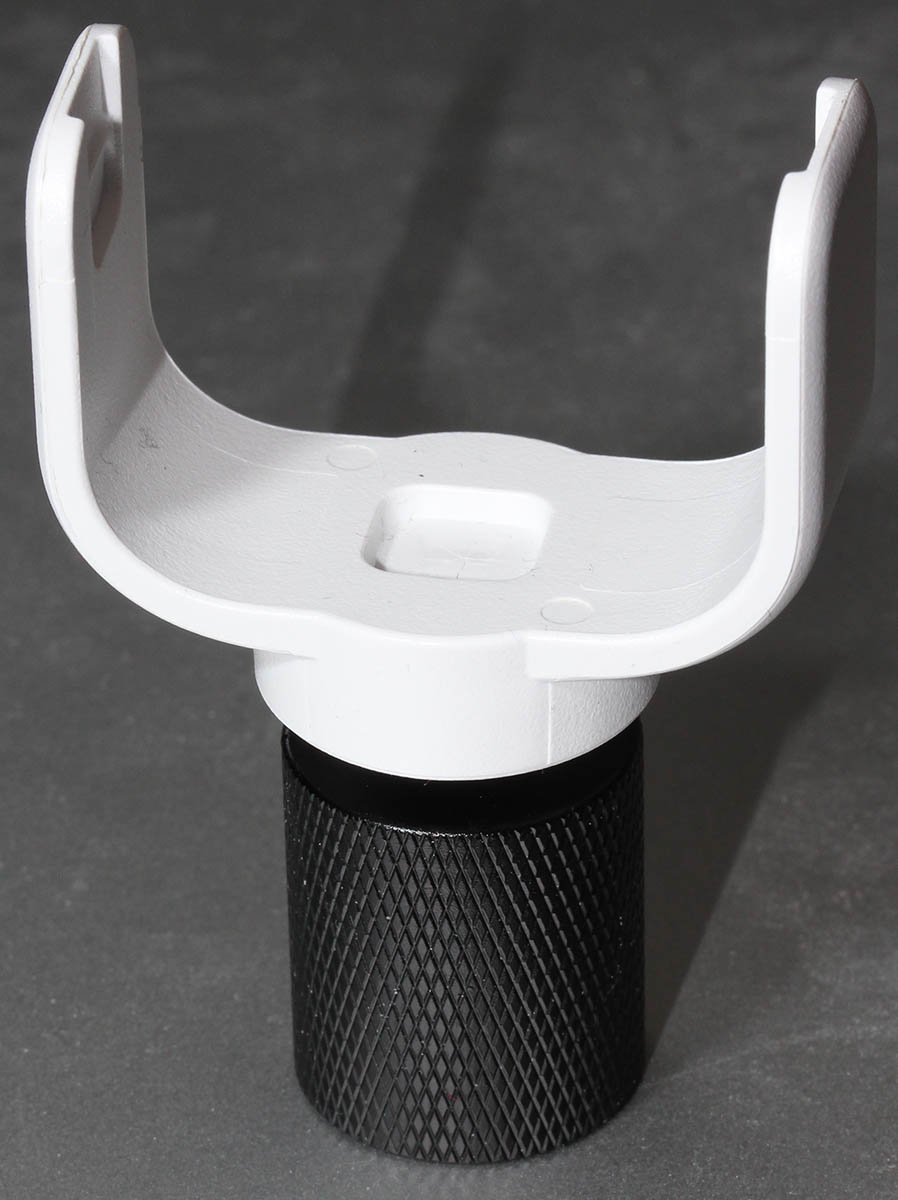
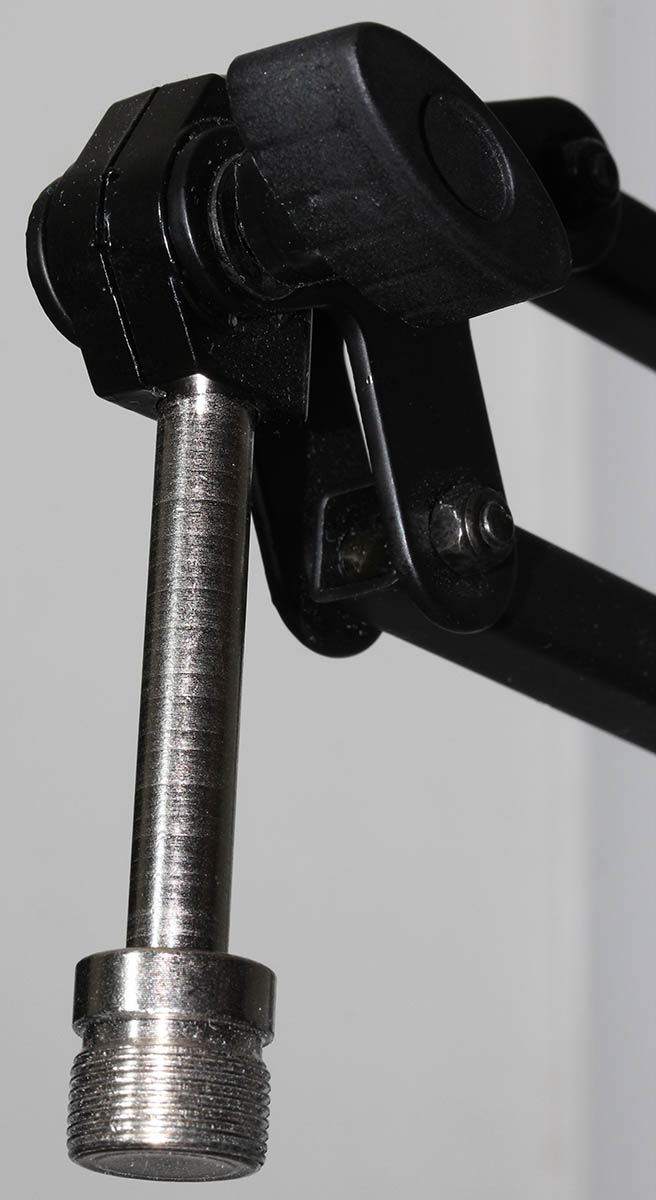
This is my new webcam setup:

The camera is a Logitech StreamCam. What I rigged it into is the cheapest mirophone table stand I could order online. The one I have is a Millenium MA-2040 from Thomann. The price is extremely cheap 20,- €. However, cheap it may be, but it does the job well.
It doesn't require much thinking to realize, the ISO-standard thread in StreamCam is 1/4", but a microphone stand will have 3/8" or 5/8" making the fitting require an adapter. Thomann page states "With 5/8" threaded connector for recording studios and multimedia workstations". Logitech provides options in their package for camera setup. The typical use would be to have monitor/laptop-bracket which makes the camera sit on top of your display. Second option is the 1/4" setup. To state the obvious: for that you'll need some sort of tripod/stand/thingie.
Here are pics from my solution:
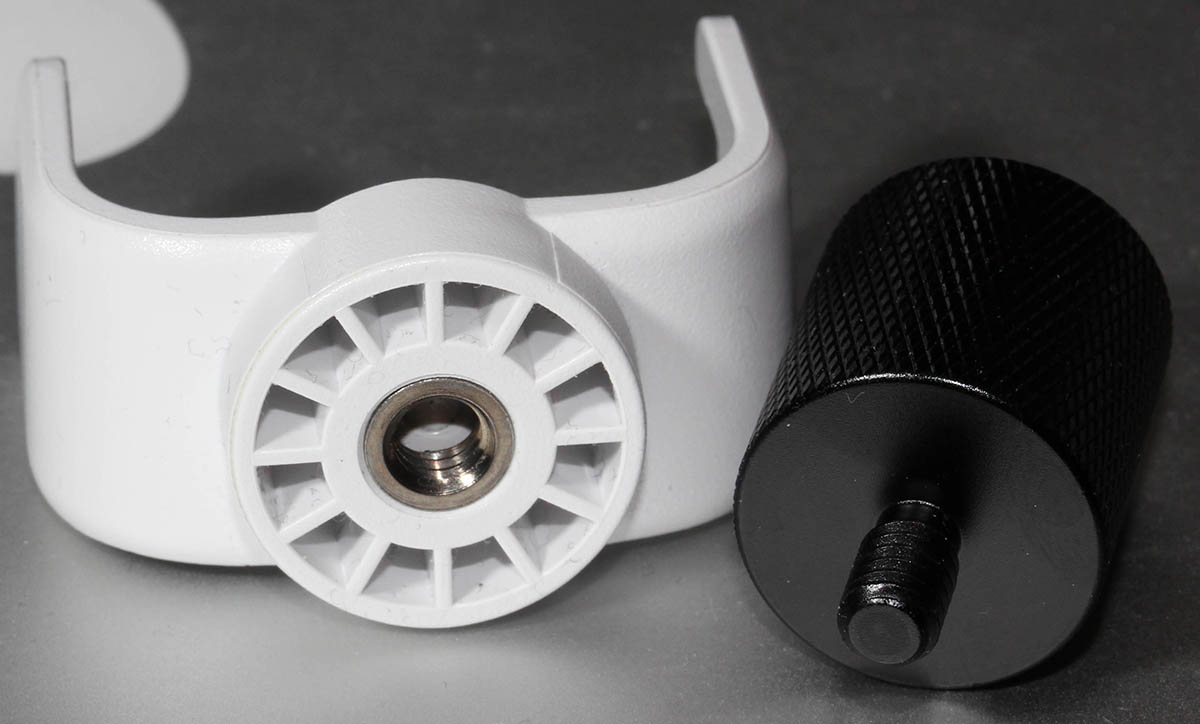
When you go shopping for such adapter, don't do it like I did:
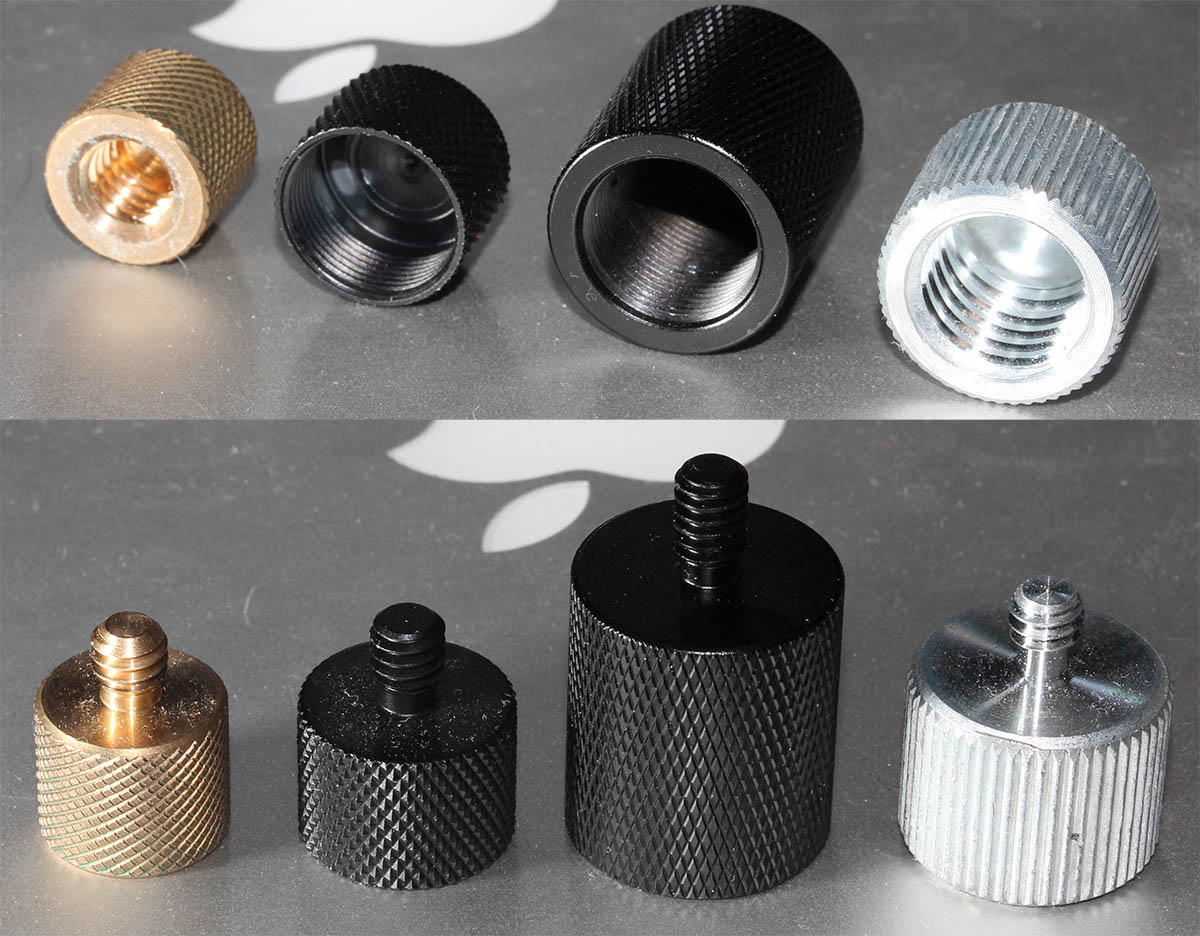
Above pic is proof, that I seriously suck at non-metric threads. From left to right:
- female 1/2" to male 1/4" adapter (bronze), not working for my setup
- female 3/8" to male 1/4" adapter (black, short), not working for my setup
- female 5/8" to male 1/4" adapter (black, long), yes! the one I needed
- female 5/8" to male 1/4" adapter /w non-UNC thread (silver), not working for my setup
For those wondering:
Yes. I did order 4 different adapters from four different stores until I managed to find the correct one.
Also, there is nothing wrong with my laptop's camera. I simply want to position the camera bit higher than regular laptop camera will be.
New SSD for gaming PC - Samsung EVO 970 Plus
Tuesday, January 12. 2021
My gaming PC Windows 10 started acting out, it wouldn't successfully run any updates. I tried couple of tricks, but even data-preserving re-install wouldn't fix the problem. It was time to sort the problem, for good. The obvious sequence would be to re-install everything and get the system up and working properly again.
Doing such a radical thing wouldn't make any sense if I'd lose all of my precious data while doing it. So, I chose to put my hand to the wallet and go shopping for a new SSD. That way I could copy the files from old drive without losing anything.
This is what I got:
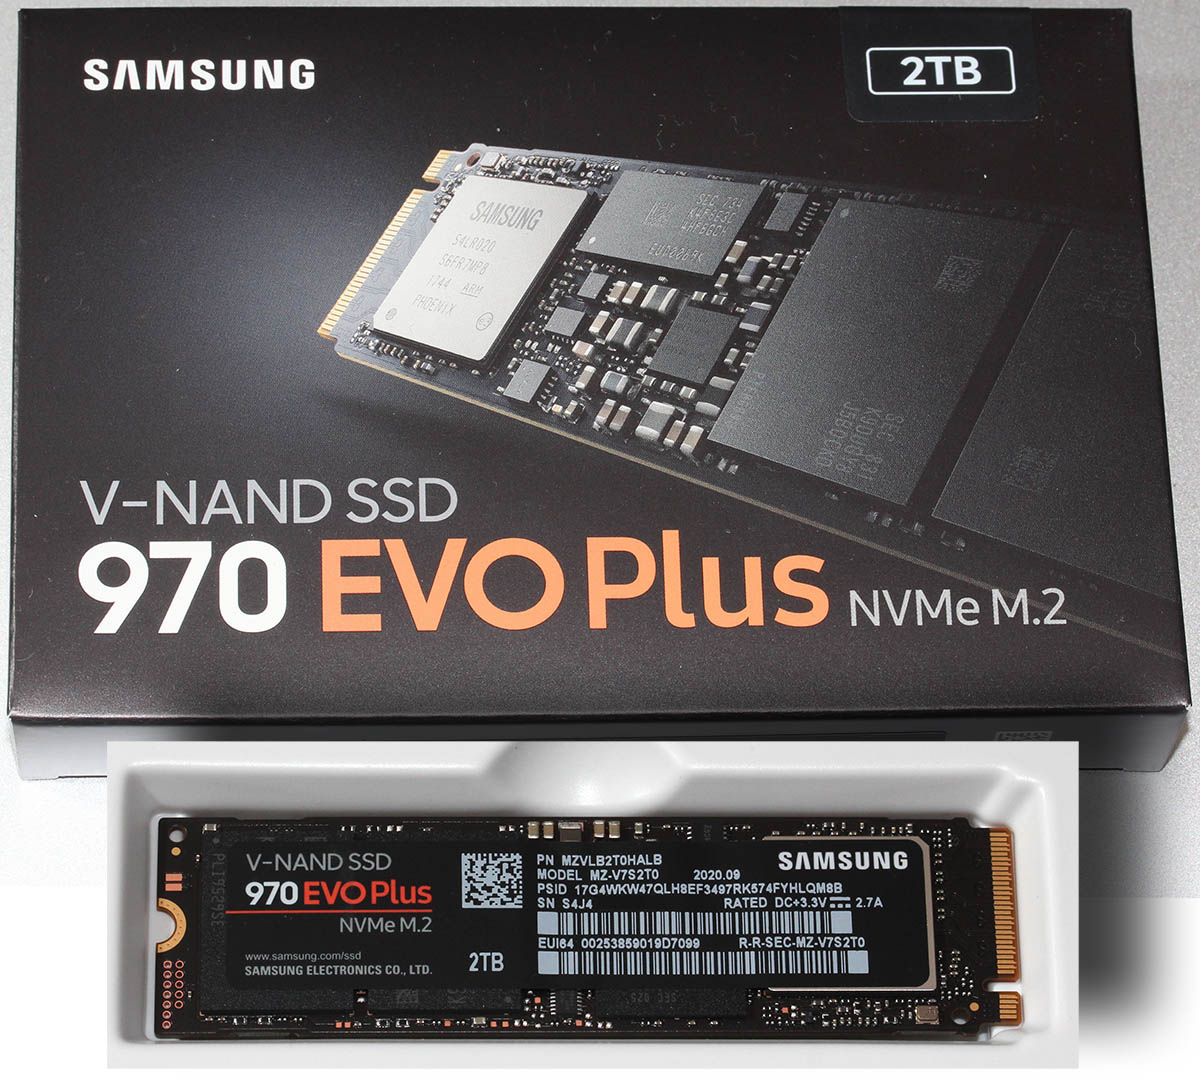
A Samsung 970 EVO Plus SSD. It was supposed to be much faster than my old one, which was pretty fast already.
Installation into Asus motherboard:
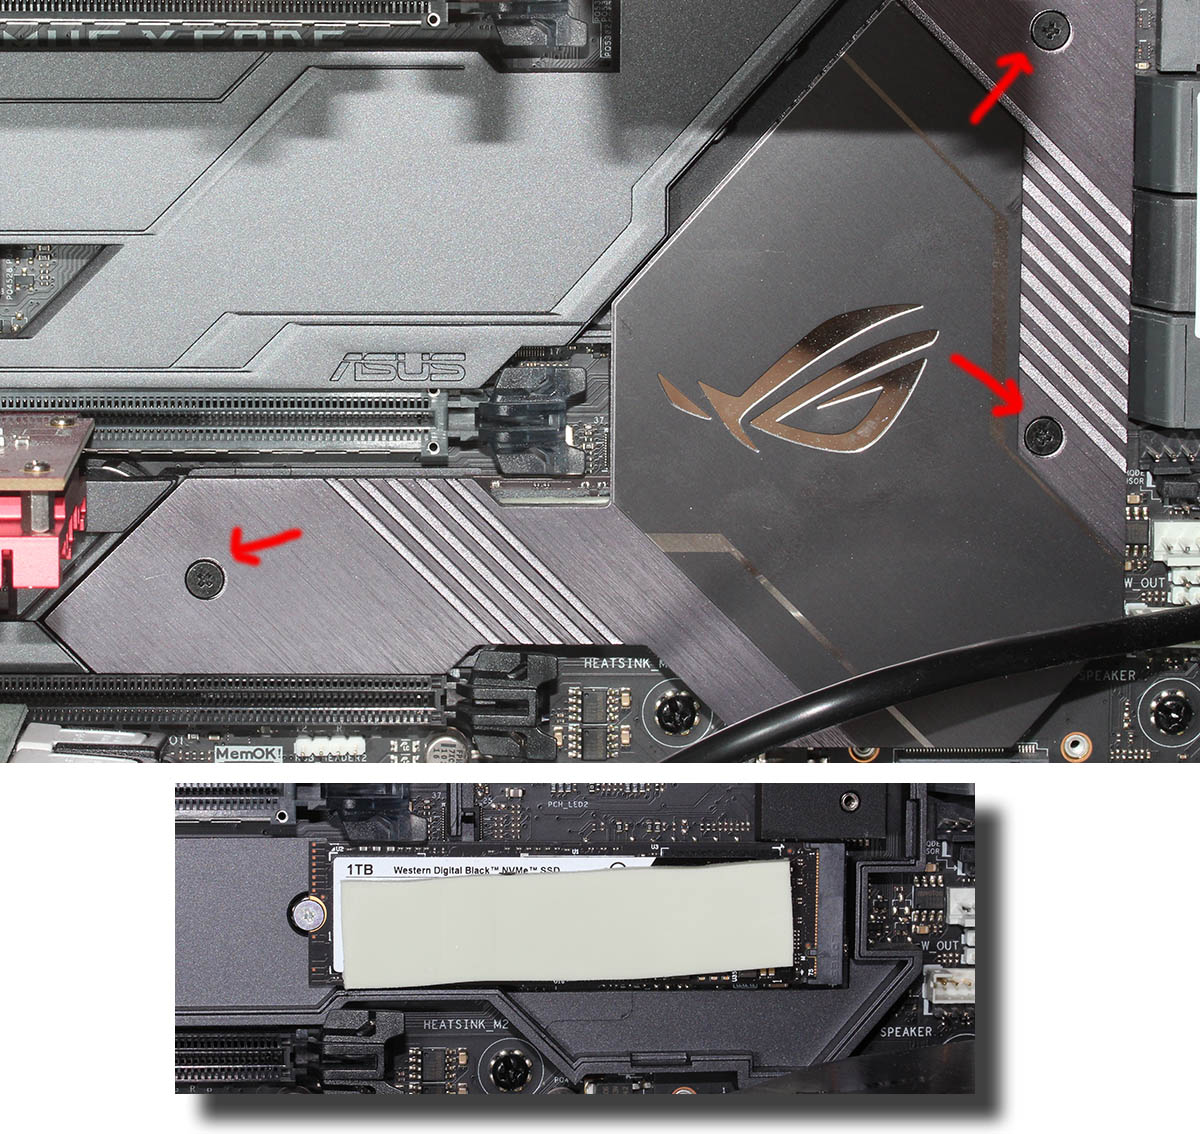
The M.2-slot is behind a block of aluminium acting as a heat sink. All cards, including the GPU needed to be yanked off first, then three screws undone before getting a glipse of the old 1 TiB M.2 SSD.
Note: In my MoBo, there is a second, non-heatsink, slot for what I was about to do. Transfer data from old drive to new one. I think it is meant to be used as a temporary thing as the drive is sticking out and isn't properly fastened.
Putting it all together, installing Windows 10 20H2 and running a benchmark:
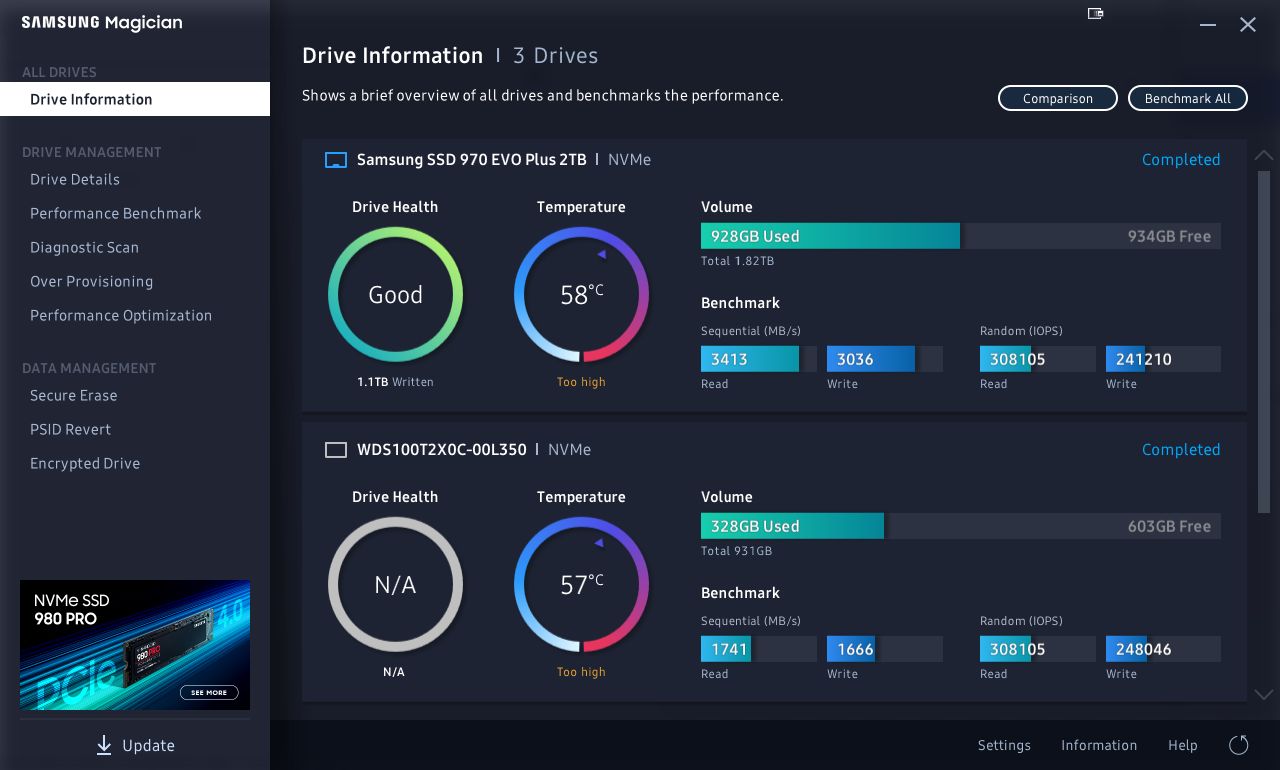
Twice the performance! Every time you can boost your PC into 2X of anything, you'll be sure to notice it. And yup! Booting, starting applications or games. Oh, the speed.
Note: In a few years, the above benchmark numbers will seem very slow and obsolete. Before that happens, I'll be sure to enjoy the doubled speed.
SIM cards
Friday, July 10. 2020
When I got a new Android-phone, it struck me that you can actually place an SD-card into the SIM-card -tray.
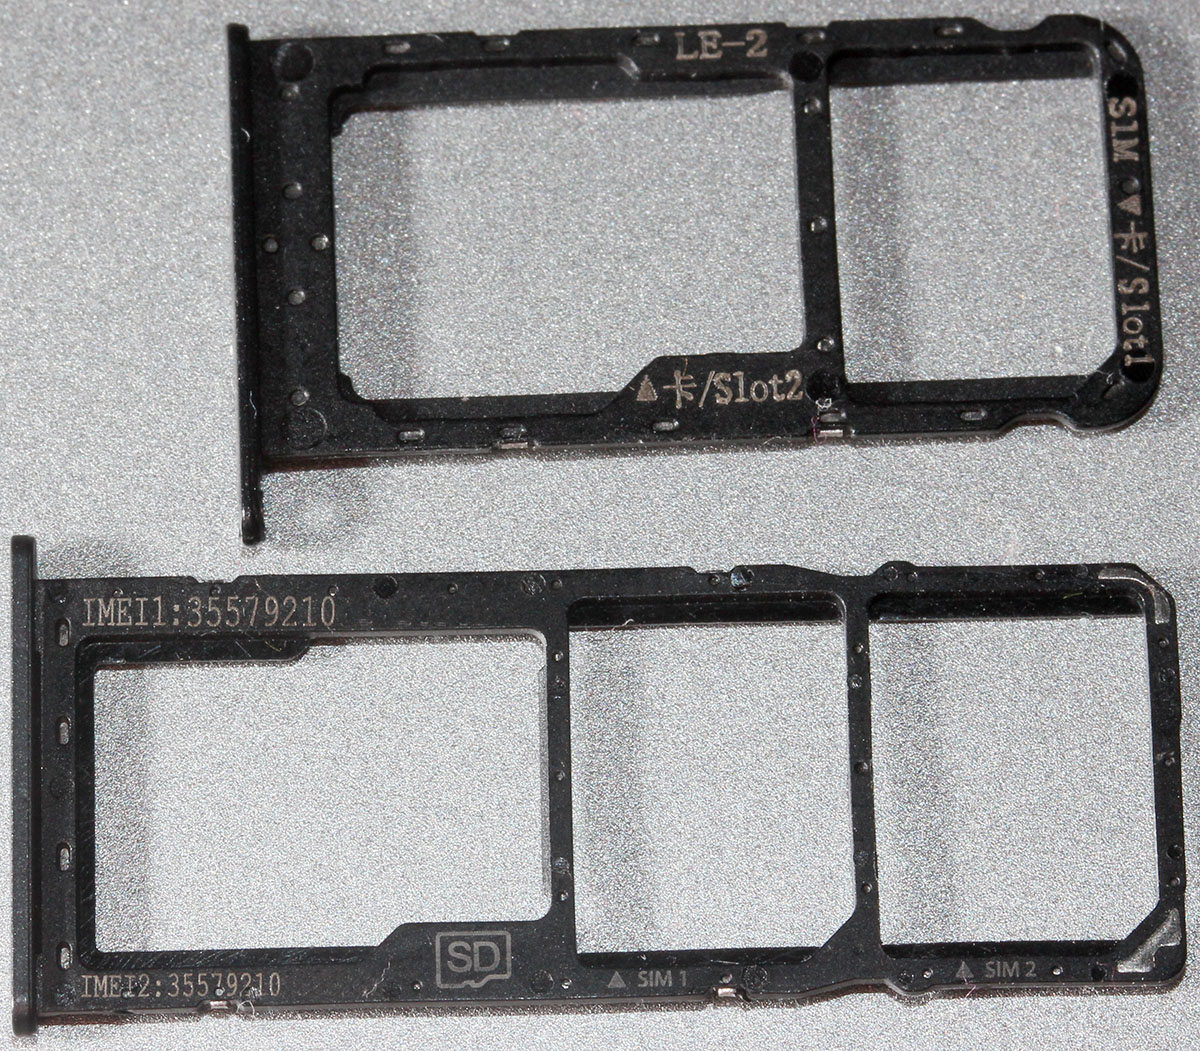
The upper tray is from a Huawei Honor phone, lower is from my new Nokia 5.3.
Huawei-approach is to place the SD-card into SIM2-slot making it either/or, but taking much less space from the guts of the phone. Nokia approach is to allow having all three cards in place at the same time. Funnily, Nokia has also both IMEI-codes in the tray. Not really sure why, but they are there.
I'm a known iPhone man, but Android has its benefits on the developer-side. Platform has much more open APIs for example to telecomms-side. Also when doing any web-development, running the new stuff from development workstation in an Android is easy via USB-cable. With a Mac, you can do the same with an iPhone. For proper testing, both need to be done.
While at it, I cleaned out my collection of various SIM-cards:

Not really needing expired and obsolete set of SIM-cards from USA, Australia, Finland, etc. To trash it goes.
Apparently this blog post was on a lighter side. No real message to convey, just couple of pics from SIM-cards.
HyperDrive PRO 8-in-2 firmware upgrade
Tuesday, May 26. 2020
As mentioned in my USB-C article, I'm describing how I managed to upgrade my 8-in-2 firmware WITHOUT installing Boot Camp into my macOS.
Hyper has a support article Screen flickering with Pro? Please check this out. What they ultimately suggest, and what I instantly rejected is:
- Install Boot Camp
- Boot the Mac into Windows 10
- Run the app to do the Hyper 8-in-2 firmware upgrade
- Enjoy flicker-free life!
My mind was targeted to jump directly into step 3 and 4. I attempted a number of things and kept failing. So, I dug out my humility-hat and went to step 2. That one was a great success! For step 1 I would have never gone. That's for sure. I'm not going to taint this precious Mac with a dual-boot.
Constraints
This is the list of restrictions I painfully figured out:
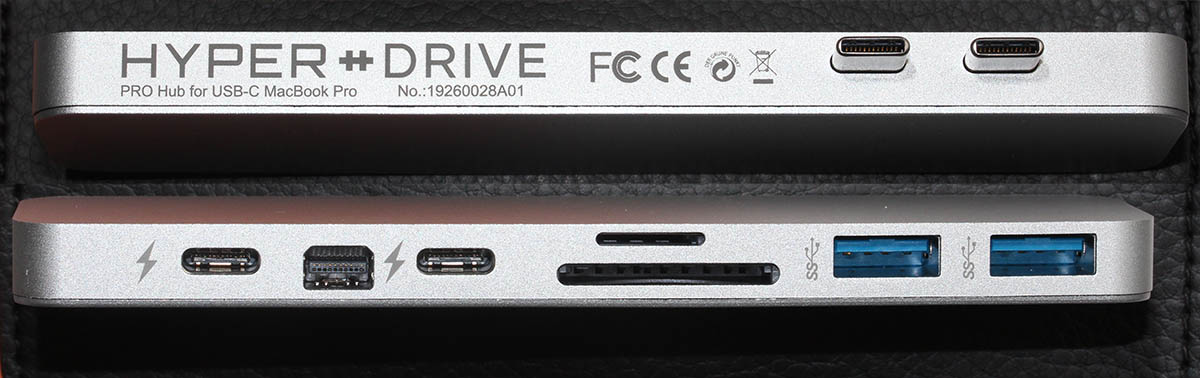
- HyperDrive 8-in-2 has dual USB-C -connector, making it impossible to physically attach to anything else than a MacBook Pro.
- USB-C extension cords do exist. Purchase one (you don't need two) and lift the physical connectivity limitation.
- Provided application,
VmmUpdater.exeis a 32-bit Windows PE executable, more information can be found @ Hybrid Analysis - Firmware upgrade won't work on a random PC having USB-C -port.
VmmUpdater.exewon't detect the Synaptics chip without Apple AMD-drivers.- The driver won't install if your hardware doesn't have a suitable GPU.
- A Mac won't boot from an USB, unless allowed to do so
- A Mac will boot only to a 64-bit operating system, a 32-bit Windows 10 won't work
- A 64-bit Windows 10 installer doesn't have WoW64 in it to emulate a 32-bit Windows
- To actually upgrade the Synaptics chip's firmware, it needs to be in use
- Windows needs to understand the existence of the video-chip
- Windows needs to actually use the video-chip via HDMI to produce output. Any output will do. No picture --> no upgrade.
- Apple keyboard and touchpad will not work in a default Windows 10 installation
- Some of the Windows drivers used by a MBP can be downloaded from Internet automatically, IF you manage to get an internet connection into a Windows 10 running on a Mac.
- Some of the Windows drivers are not available
- macOS cannot write to a NTFS-partition, it can read the data ok
Requirements
- Hardware:
- A HyperDrive 8-in-2 (to state the obvious)
- A MacBook Pro (to state the nearly obvious), I used 2019 model
- A Windows 10 running in a PC (to state the not-so-obvious)
- USB-stick with at least 8 GiB of storage, capable of booting (I think all of them can)
- USB-keyboard, during tinkering your Mac's keyboard won't work at all times. Any USB-keyboard will do.
- HDMI-cable connected to an external monitor.
- Software:
- Synaptics tool and EEPROM-file provided by Hyper.
- Rufus
- Ability to:
- Download files from The Internet
- Execute Rufus on a platform of your choice to write into the USB-stick. I did this on a Windows 10 PC.
- Run Boot Camp Assistant on a macOS, I used macOS 10.15 Catalina.
- Write files into NTFS-formatted USB-stick. Any Windows 10 can do this.
Steps
1. Save a Windows 10 ISO-image into USB-stick as Windows to Go
Option: You can do this as a second thing.
Windows to Go, that's something not many have used nor ever heard. It's already obsoleted by Microsoft, but seems to work ok. The general idea is to create an USB-bootable Windows you can run at any computer.
That's definitely something I'd love to use for this kind of upgrade!
The easiest way of injecting a Windows 10 ISO-image into USB in a suitable format is Rufus. Go to https://rufus.ie/ and get it. It's free (as speech)!
GPT-partition table is a critical one make sure to choose it. These are the options I had:
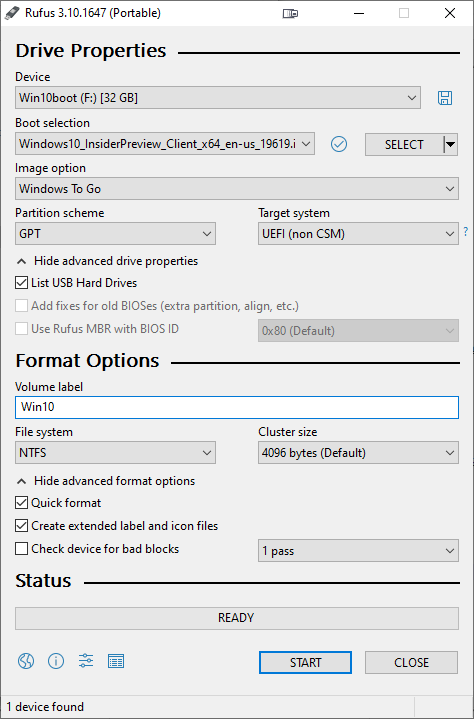
Warning: The process is slow. Writing image with Rufus will take a long time. Much longer than simply copying the bytes to USB.
2. Download Boot Camp support files
Option: You can do this first.
Recent macOS have limited Boot Camp Assistant features. Older ones could do much more, but modern versions can only Download Windows Support Software (it's in the Action-menu). Wait for the 1+ GiB download to complete.
3. Transfer files to USB-stick
Warning: The stick is formatted as NTFS. A Mac won't write into it. You need to first transfer the files into a Windows, and use the Windows to write the files into the USB.
Transfer the WindowsSupport\ folder downloaded by Boot Camp Assistant to the USB-stick prepared earlier. Subdirectory or not doesn't make a difference, I simply copied the directory into root of the USB-drive.
Also transfer the files from Hyper support article https://hypershop.zendesk.com/hc/en-us/articles/360038378871-Screen-flickering-with-Pro-Please-check-this-out-.
Note: Only the .exe and .eeprom are needed, I skipped the .docx as they're not needed during the upgrade.
After successful transfer, you won't need a Windows PC anymore. All the next steps are on a Mac.
4. Enable Mac USB-booting
Study Apple support article HT208198 About Startup Security Utility.
You need to shutdown your Mac. Then plant your fingers onto Command and r keys, put the power on and then wait. Apple logo will appear, then a white progress bar will appear. You can release the Command-r at that point. If you'll be using an encrypted hard drive like I, you'll need to know a valid user on that Mac and enter that user's password to be allowed into Startup Security Utility.
The choices you need to have are:
- Secure boot: No security
- External boot: Allow booting from external or removable media is enabled
This is how Parallels would depict the settings in their KB-article 124579 How to allow Mac to boot from external media:
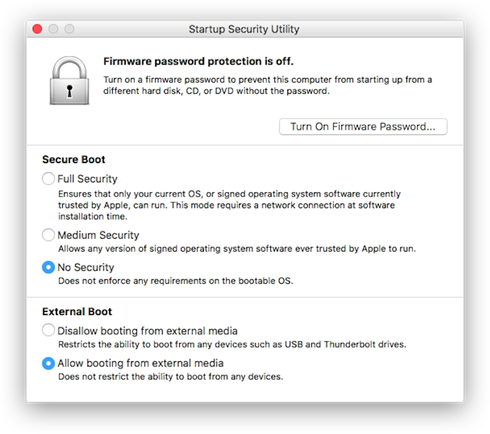
(Thanks Parallels for the pic!)
Note:
After you're done upgrading Synaptics firmware, you can go back to recovery, Startup Security Utility and put the settings back to higher security. For the one-shot upgrade the settings need to be at max. insecure settings.
5. Boot Windows 10 from USB
When you reboot a Mac, plant your finger on Option (some keyboards state Alt) key and wait. Pretty soon a boot menu will appear.
If you had the USB-stick already inserted, it will be displayed. If you didn't, this is your que to insert your Hyper 8-in-2. The Windows 10 USB can be inserted into the HyperDrive, your Mac will boot from there ok.
Your choice is to go for EFI Boot and wait for Windows 10 logo to appear.
Congrats! Now you're heading towards a Windows that won't respond to your keyboard nor touchpad.
6. Establish Windows to Go functionality
Make sure you have an USB keyboard available. This entire process can be done without Mac's own keyboard, it's just your own preference how you want to approach this. Getting the keyboard to work requires a keyboard, success is measured only on results. Make smart choices there!
If you can get the Windows 10 to connect to internet, that will solve some problems with missing drivers as they can be downloaded from a Microsoft driver repository. For Internet access, I used an USB-dongle to establish a Wi-Fi connection. Doing that requires selecting the correct Access Point and entering its password. On a machine without keyboard or mouse that WILL be difficult! Ultimately both the Apple keyboard and touchpad should start working and external keyboard won't be needed.
Note: The drivers for both are in WindowsSupport downloaded by Boot Camp Assistant. If you can point Windows Device Manager to load driver upgrades from there.
Warning!
Your Windows to Go will create a massive hiberfil.sys to enable hibernation. This can be a problem as typically the hibernate-file will be sized 75% of your RAM. This particular Mac has lots of RAM and the USB-stick would never be able to store such a file. So, eventually you're likely to run out of storage space. That is harmful, but can be easily remediated.
To fix, run command:
powercfg /hibernate off
Now the massive file is gone. Next, establish proper video. Your Windows Device Manager will look something like this:
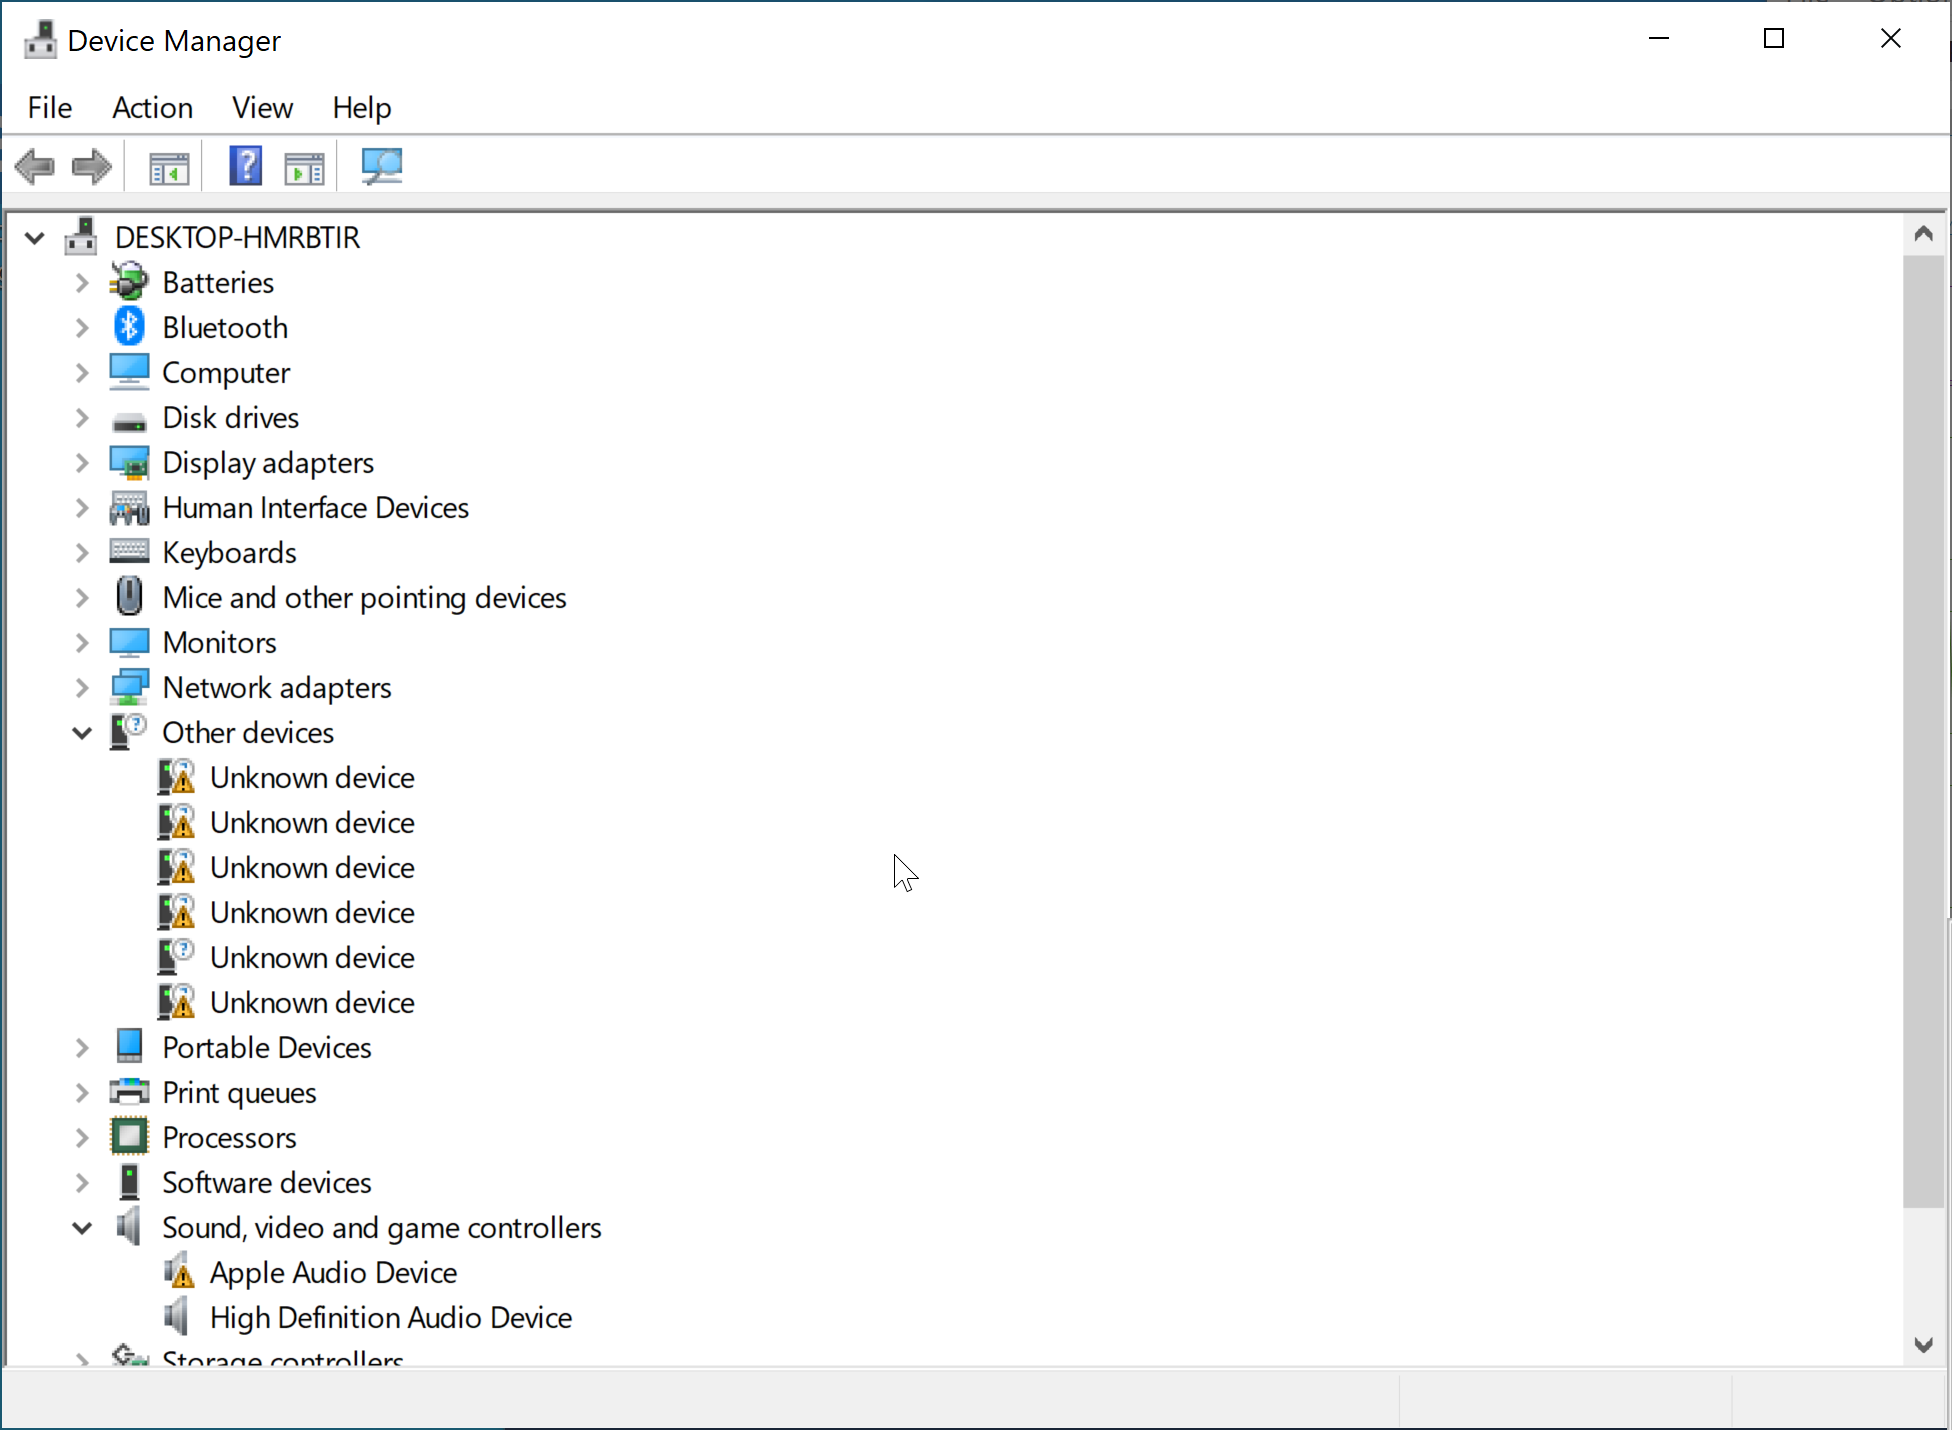
There are bunch of device drivers missing. The most critical one is for GPU. I tried running WindowsSupport\setup.exe, but it never progressed and I simply didn't do that at all. Instead, I executed WindowsSupport\BootCamp\Drivers\AMD\AMDGraphics\setup.exe which enabled proper video to be displayed.
7. Go upgrade Synaptics firmware
All the hard work only for this! Make sure your Hyper 8-in-2 has HDMI-cable connected and monitor will display Windows 10 in it. If you don't have that, when executing the VmmUpdater.exe an error will display:
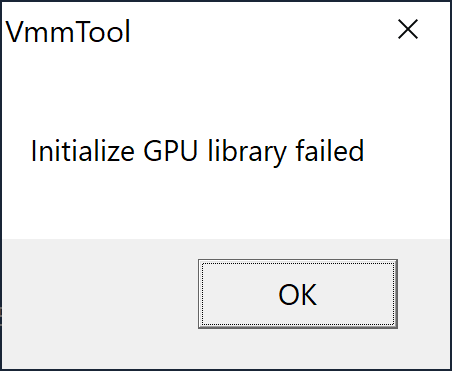
VmmTool: Initialize GPU library failed.
Also different VmmTool error variants can occur. If your Windows will detect the monitor and display video, then you're set!
When VmmTool will display current firmware information, you're golden!

Initially my 8-in-2 had firmware version 3.12.105.
Select the .eeprom file and a progress bar will indicate:
![]()
Running the upgrade won't take long. Something like 30 seconds or so. When upgrade is done, it will be indicated:
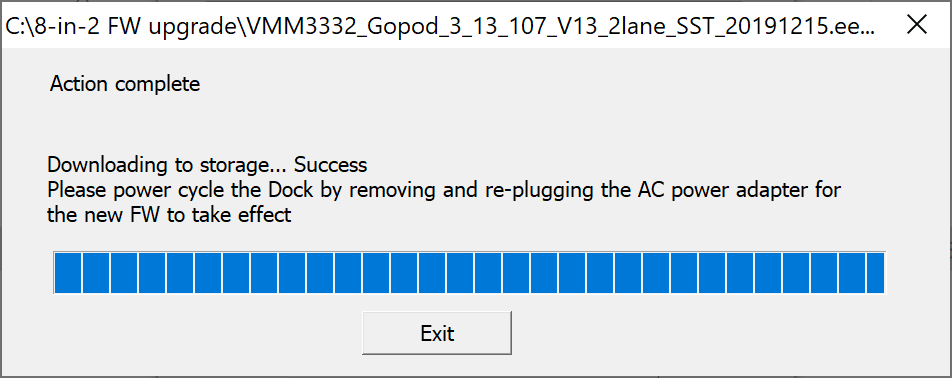
At this point, yank the 8-in-2 out of Mac and make sure you don't have USB-C power connected to it. The general idea is to power-cycle the recently updated Synaptics chip. When done, put everything back and run VmmUpdater.exe again.
This time it will indicate the new firmware version:
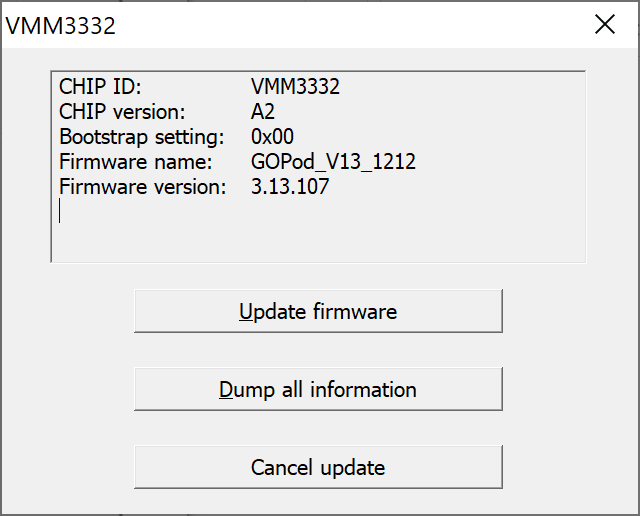
The version 3.12.105 got bumped into 3.13.107. Nice! Hopefully it will do the trick.
8. Boot into macOS and test
This is it. Will it work?
In my case it did. When my Mac wakes up, a single blink will happen in the external display, but no flickering or other types of annoyances.
Done! Mission accomplished!
(phew. that was a lot of work for a simple upgrade)
USB-C Video adapters for MacBook Pro
Monday, May 25. 2020
In professional life, I stopped being a Windows-guy and went back being a Mac-man. The tool-of-trade provided by me is a MacBook Pro 2019. Those new Macs are notorius for having not-so-many ports. My Mac has two (2). Both are USB-C. In my previous MBP (that was a 2014 model), there were ports all over the left side and a bonus USB on right side.
The problem remains: How to hook up my external monitor to increase my productivity by the macigal 30%? Actually, I believe any developer will benefit even more by having a lot of display real estate on his/hers desk.
So, new Mac, new toys needed for it. I had one USB-C to DVI -converter before, but for this Mac, I went on-line shopping to get the good stuff:
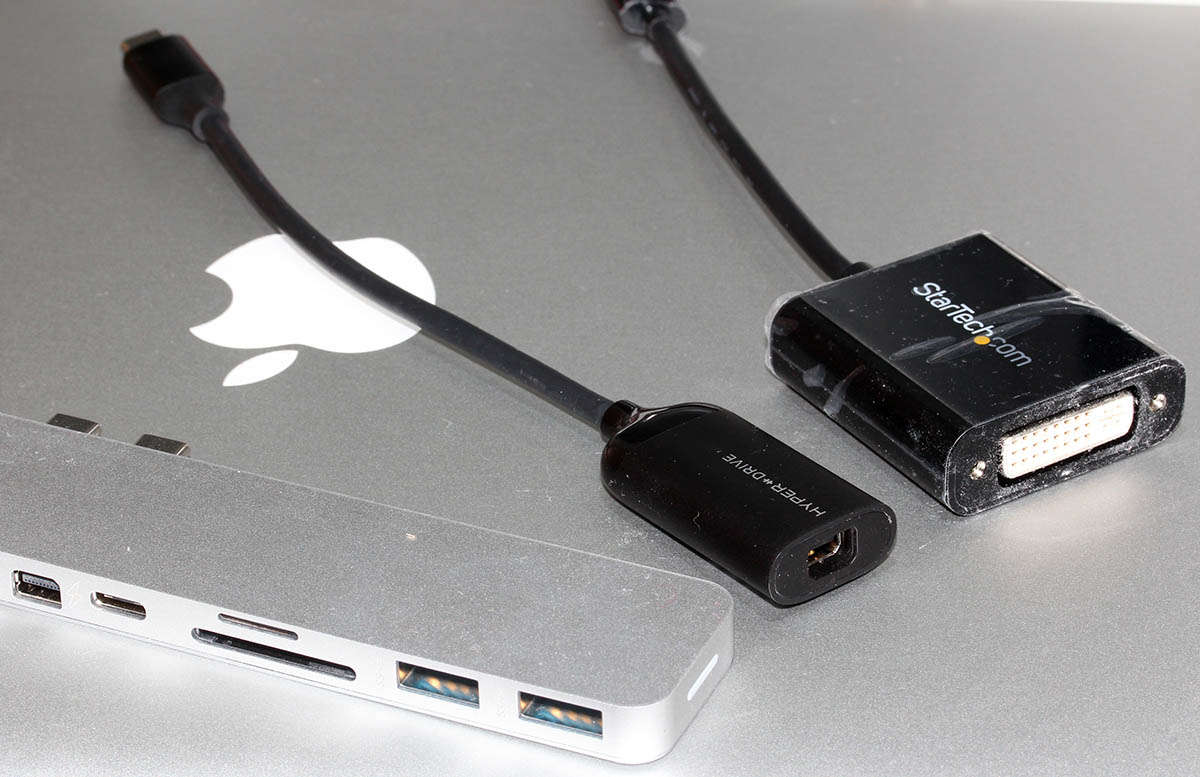
From left to right:
- HyperDrive PRO 8-in-2: A pricey alternative offering a lot of connectivity, disappointing initial quality.
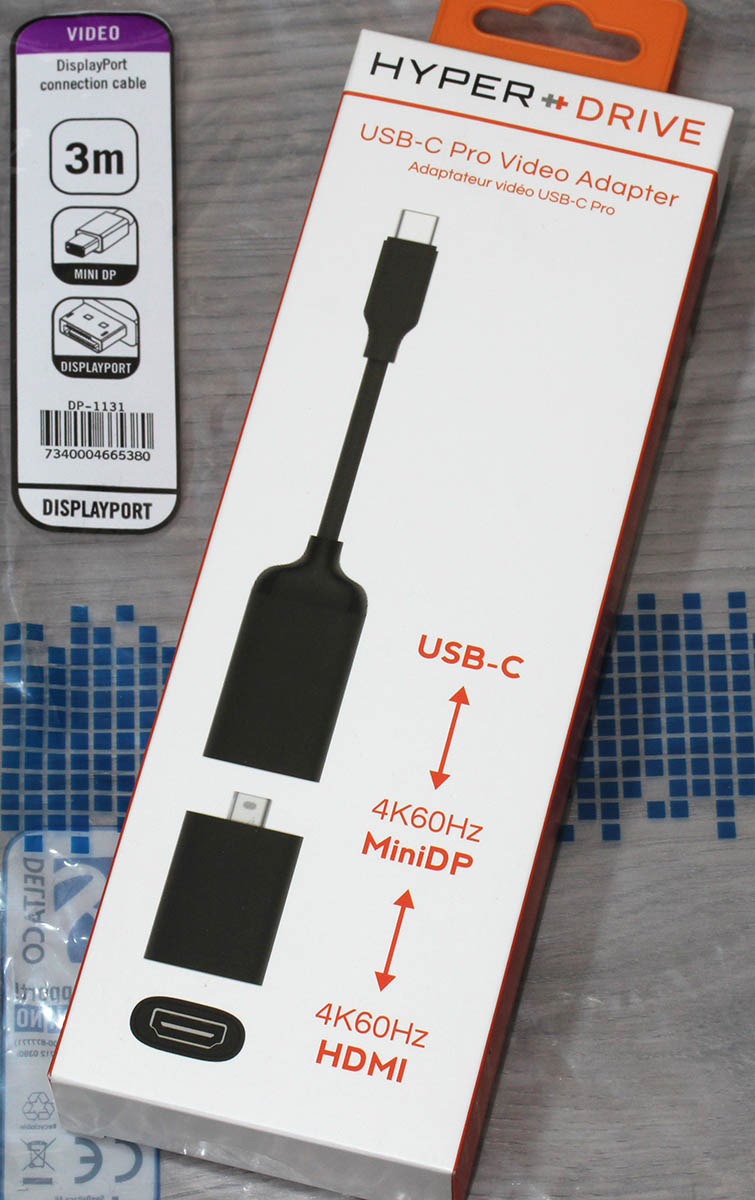
- HyperDrive USB-C Pro Video: An already obsoleted product. Small and does the job. This is my recommendation!
- No-name StarTech.Com CDP2DVI: Cheap thing working perfectly on a Lenovo PC. Unusable with a Mac!
HyperDrives:
Obsoleted HyperDrive shop screenshot:

The pricey alternative looks like this (on top of a complimentary leather pouch):
Cheap no-name one won't even blink in a MBP. The simple HyperDrive works like a charm! Mac sees it and monitor auto-detects the signal. The expensive one blinks when connected to a Mac. It blinks a lot. All the other ports work perfectly, but HDMI and mini-DP not-so-much. Hyper has a support article about 8-in-2- flickering. Lots of discussion in StackExchange about Apple being picky about cables and converters, examples: Dual monitor flickering: the secondary monitor does the flicker and External monitor flicker / signal loss. With the HyperDrive fix, I'll write an another post about the suggested firmware upgrade, it's complicated enough to deserve an own topic.
For me, the expensive HyperDrive works as a tiny docking-station. I have the USB-C charger connected to it among monitor cable. When I want to roam free of cables, all I have to do is detach the dual-USB-C dongle and that's it! Done. Mobility solved.
Final words:
With a Mac, do a lot of research beforehand and choose carefully, or alternatively make sure you'll get a full refund for your doesn't-work-in-my-Mac adapter.
iPhone USB-C fast charging
Thursday, January 16. 2020
Now that EU is doing yet another round on Common charger for mobile radio equipment 2019/2983(RSP), it inspired me to take a closer look on USB-C or USB 3.1 cables.
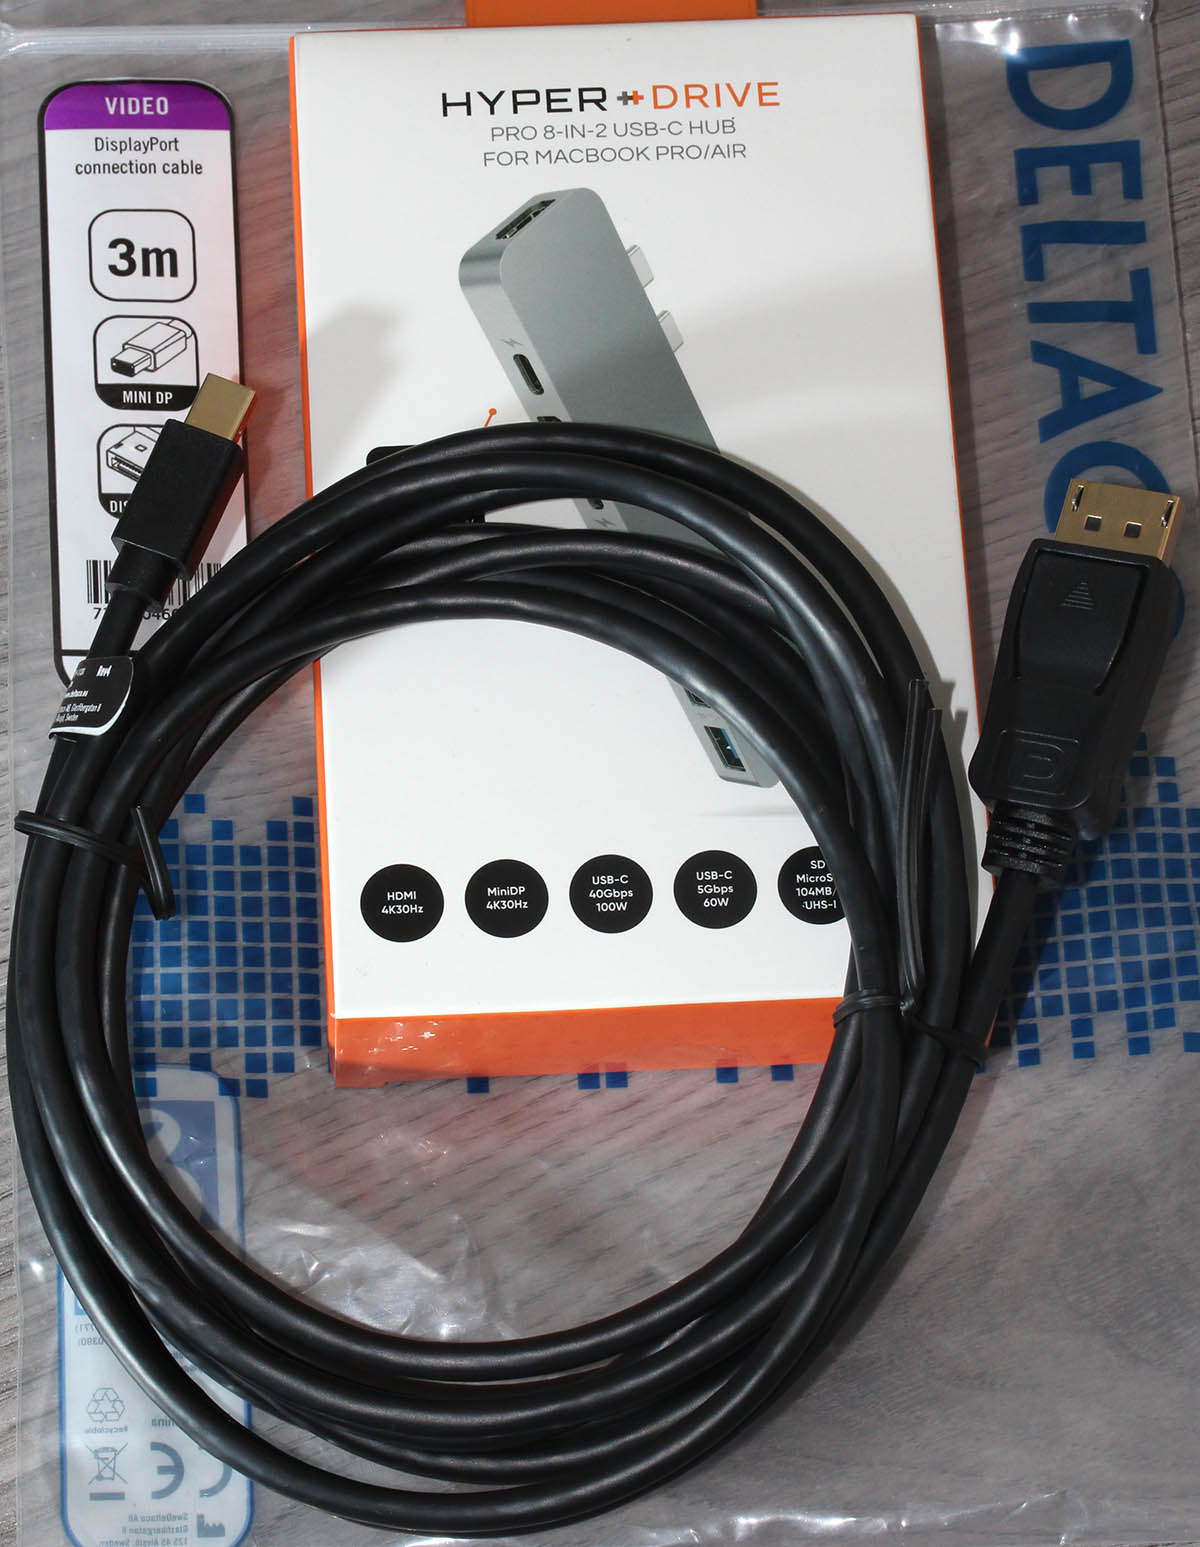
I got me a couple of cables:
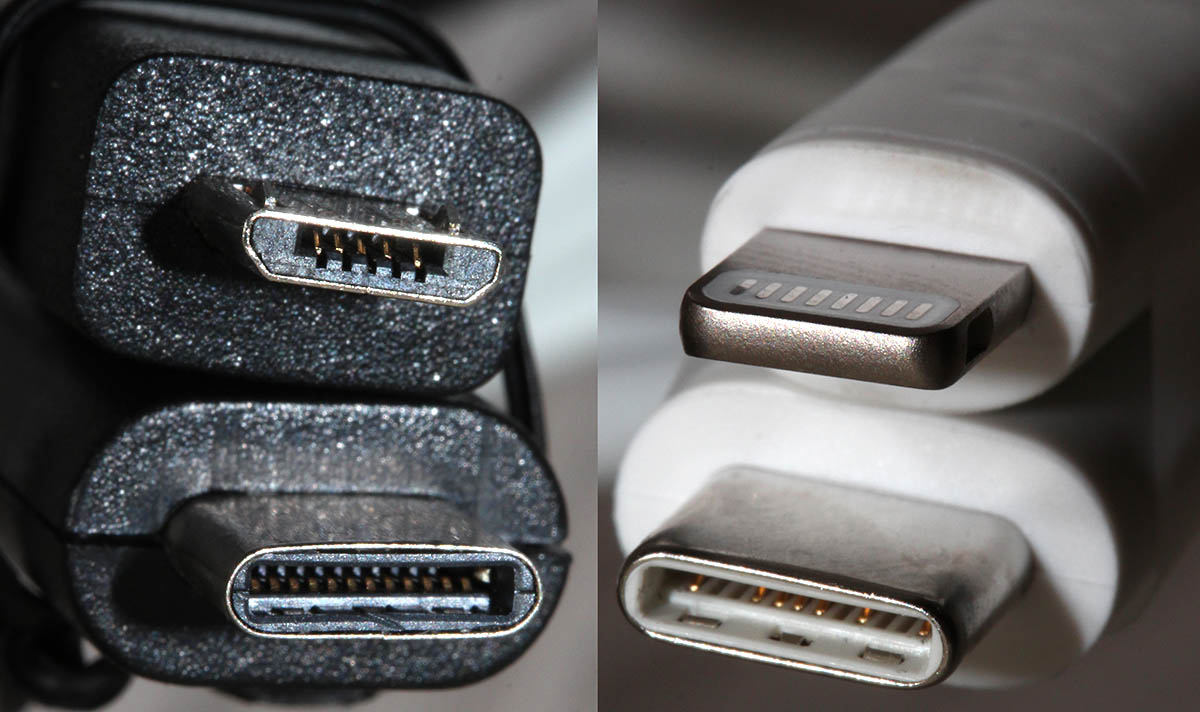
One USB-C cable is for micro-USB and another is for Apple's Lightning connector. More details about the Apple-cable can be found from support article About the Apple USB-C to Lightning Cable. They claim, that some iPads/iPhones would go up to 96W on a compatible charger. Qualcomm Quick Charge @ Wikipedia has more details on that.
This is my test set:

From left to right:
- Celly TCUSBC30WWH (30W)
- Exibel 38-9107 (18W), note: Exibel is a Clas Ohlson -brand
- A generic Huawei USB2.0 (10W)
To get a real slow rate of charging, an ancient 2.5W USB-charger could also be measured. As an impatient person, I don't think I own such a device anymore, so I couldn't measure it's slowness.
Then I took my iPhone 8:
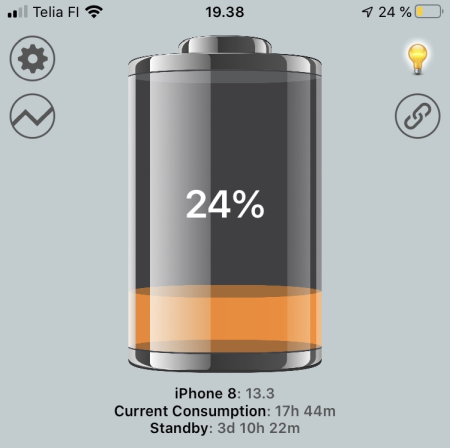
It wasn't completely drained. The thing with Li-Ion charging is to avoid the battery heating. Given the chemical reaction in a Li-Ion cell on charging, it is not possible to pump too much current to a cell while maintaining efficiency both on energy and time. A typical charging cycle follows a very careful formula charging the cell more when it's drained and less when it's reaching full capacity.
My testing was around 20% capacity. Here are the measurements:

Note: Obviously my measurements are from the wall socket. Not all the energy goes to the iPhone, as there will be some loss on the charger itself.
- Huawei 10W charger measured 9W, which is nice!
- Exibel 18W charger measured 14W, which is ~20% less than expected
- Celly 30W charger measured 18W, which is ~40 less than expected
Conclusions:
An iPhone 8 won't be using the Apple-mentioned 96W, no matter what. The measured 18W is a lot more than USB2.0 can do, meaning the actual charging will be LOT faster on an near-empty battery. Note: it is not possible drain Li-Ion cell completely, your phone will shut down before that happens. If I'm happy to get 80% capacity to my iPhone, charging for that will happen in half the time I can get with a regular 10W charger. During charging, as the capacity increases, the rate of charging will decline, a lot. For the remaining 20% I won't benefit from USB-C charger.
Additional note:
iPhone 8 won't sync data via USB-C. That's really weird. For data, an USB2.0 Lighting cable is required. On my iPad, an USB-C cable works for both charging and data.
HDMI Capture with AVerMedia Live Gamer Portable 2 Plus
Wednesday, January 8. 2020
HDMI or High-Definition Multimedia Interface is the de-facto connector and signaling for almost everything at your home having picture and sound. As the data in the pipe is digital, it is relatively easy to take some of it for your own needs. Typical such needs would include streaming your activities to The Net or extracting the data to your computer.
As the devices required are relatively inexpensive, I got one. Here it is, a AVerMedia Live Gamer Portable 2 Plus (or GC513 as AVerMedia people would call it):
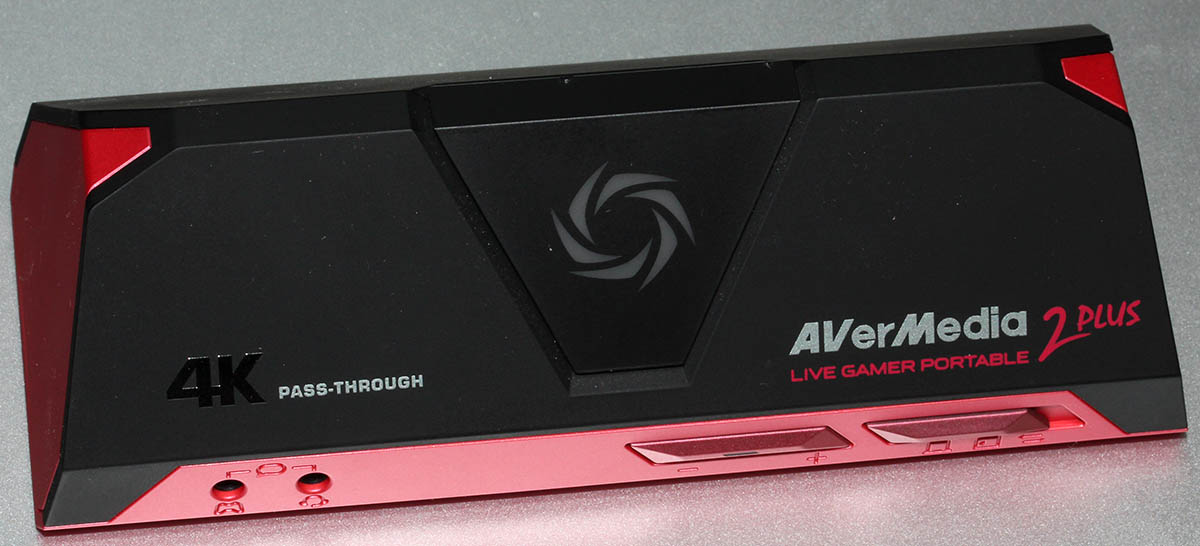
It is a relatively small unit having couple of connectors in it:
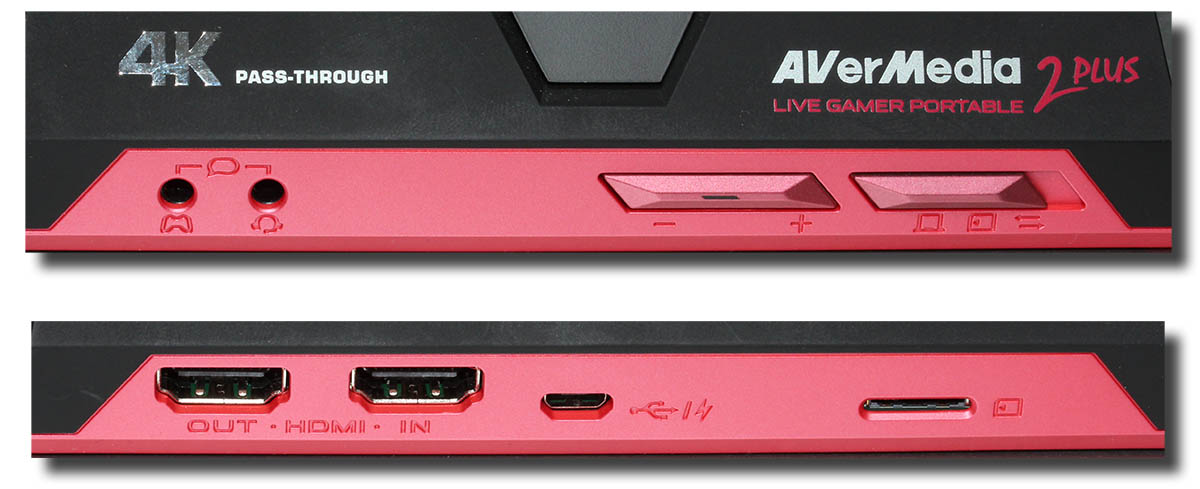
The obvious ones are HDMI in and out. The micro-USB is for powering the unit and extracting the data out of it to a computer. If you want to do some live streaming of your fabulous gaming, there are 3.5mm jacks for headphones/mic. The last slot is for an SD-card if you want to make any recordings with the unit not connected to a computer.
Windows software is called RecCentral. A sample session with a Super NES Classic Edition (https://www.nintendo.com/super-nes-classic/) connected to it would look something like this:
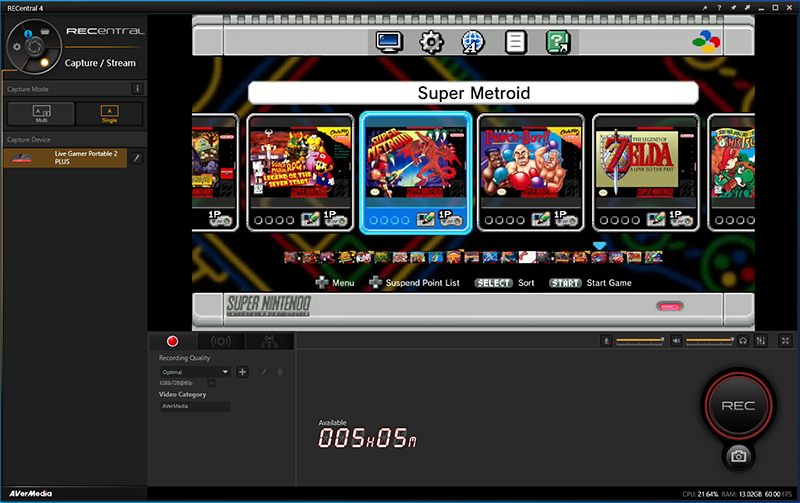
The software is capable of producing high-quality JPEG stills, but mostly people are interested in the unit's capability of producing AVC (aka. H.264, aka. MPEG-4) video from your precious HDMI input.
Just looking at the red triangle-shaped box isn't much fun, so I took the unit for a real-life test. I did some video/still capturing which resulted as footage of some Super Metroid gameplay. The actual game is from year 1994 and HDMI didn't exist at that time. But the modern SNES actually does have HDMI-output in it, making it an interesting target for this test.
With help of Adobe Premiere Pro (Audition, After Effects, Photoshop) software:

I edited a nice all-bosses video from the game. The resulting video has been uploaded into YouTube as Super Metroid - All bosses:

All artistic decisions seen on the video are made by my son, whose YouTube channel the video is at. In this video-project I merely acted as a video technician (obviously, my son's video and sound editing skills aren't quite there yet). Also, the actual gameplay on the video is by my son. IMHO his gameplay is excellent, given his age doesn't have two digits in it. Especially the last two bosses took a lot of practice, but he seems to master it now.
Finally:
I totally recommend the AVerKey Live Gamer Portable 2 Plus for your trivial H.264 capturing. It really won't cut it for any serious work but packs enough punch for the simple things.
Also, if you enjoy the YouTube-video we made, give it your thumbs up. My son will appreciate it!
New Weather Station - Davis Vantage Vue - Part 2 of 2: Linux installation
Tuesday, November 5. 2019
This is a part two out of two on my Davis Vantage Vue weather station installation story. Previous part was about hardware installation.
Datalogger expansion
The indoors console has a slot for expansion devices. I went for the RS-232 WeatherLink datalogger expansion:
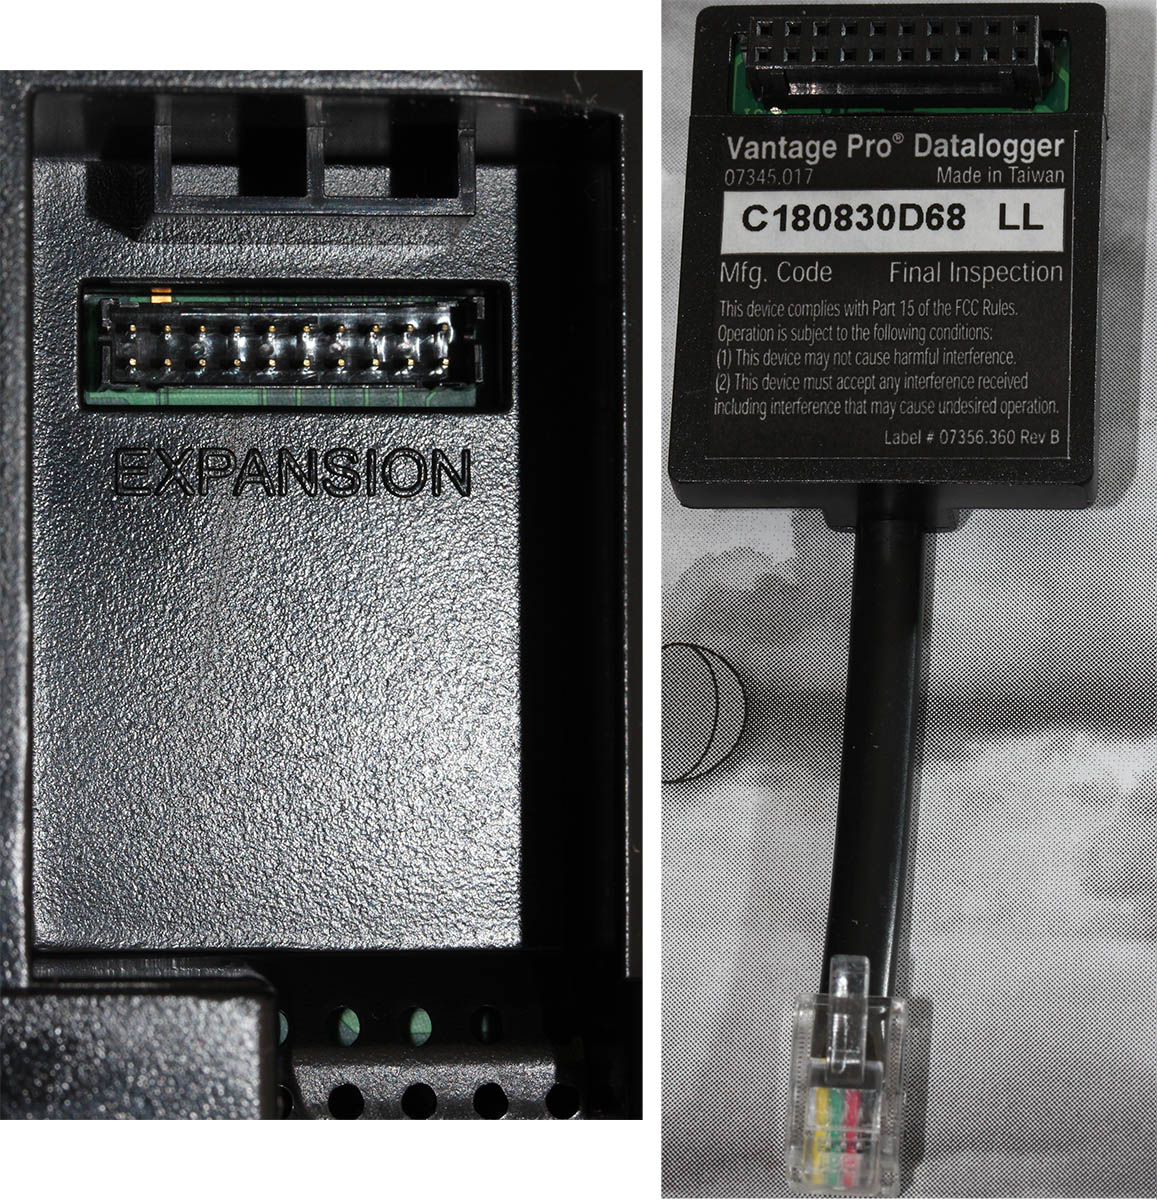
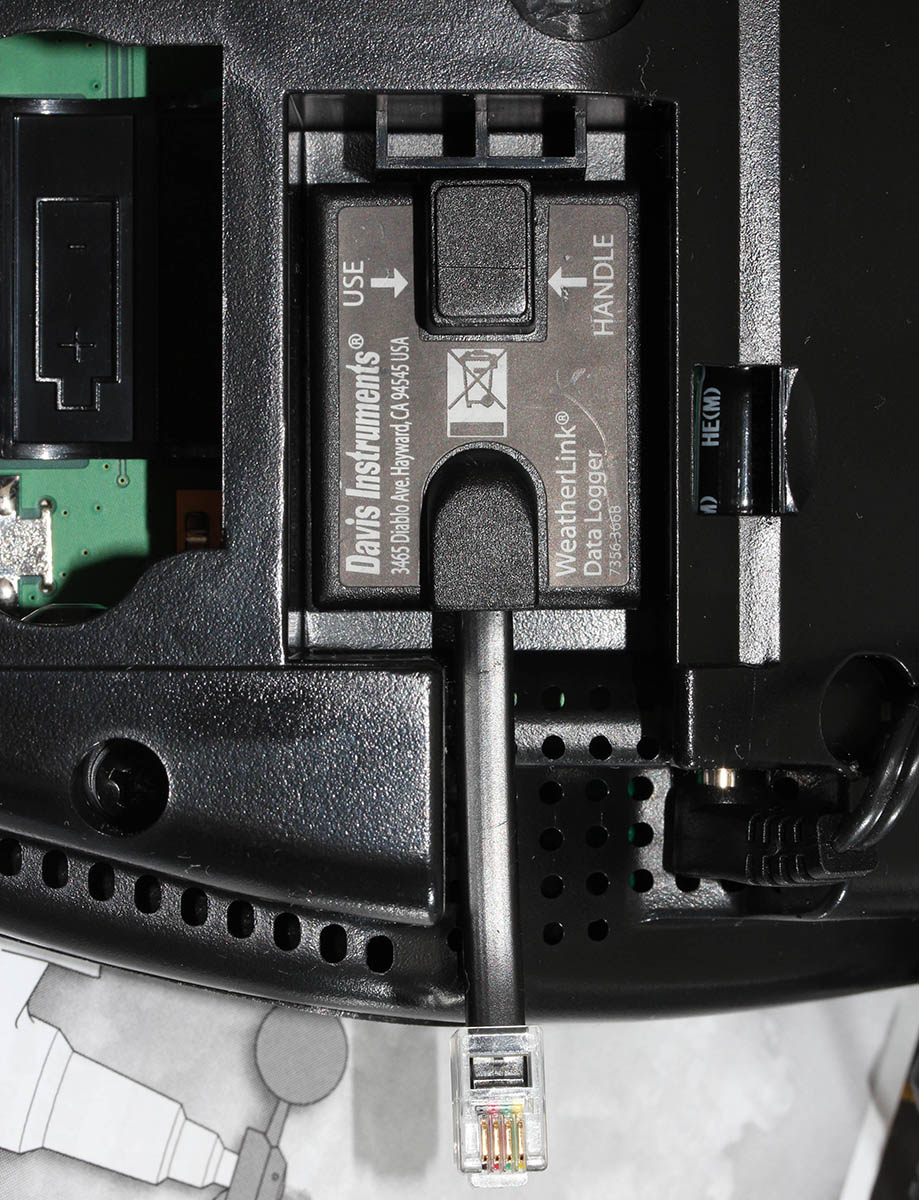
RS232 Cabling
The datalogger has a very short cable and a RJ-11 connector on the other end. The obvious good thing is the common availability of telephone extension cords to get past the 5 cm cable lenght of the datalogger. A regular landline telephone typically has such RJ-11 connectors in it and what I did was to get an inexpensive extension cord with suitable lenght.
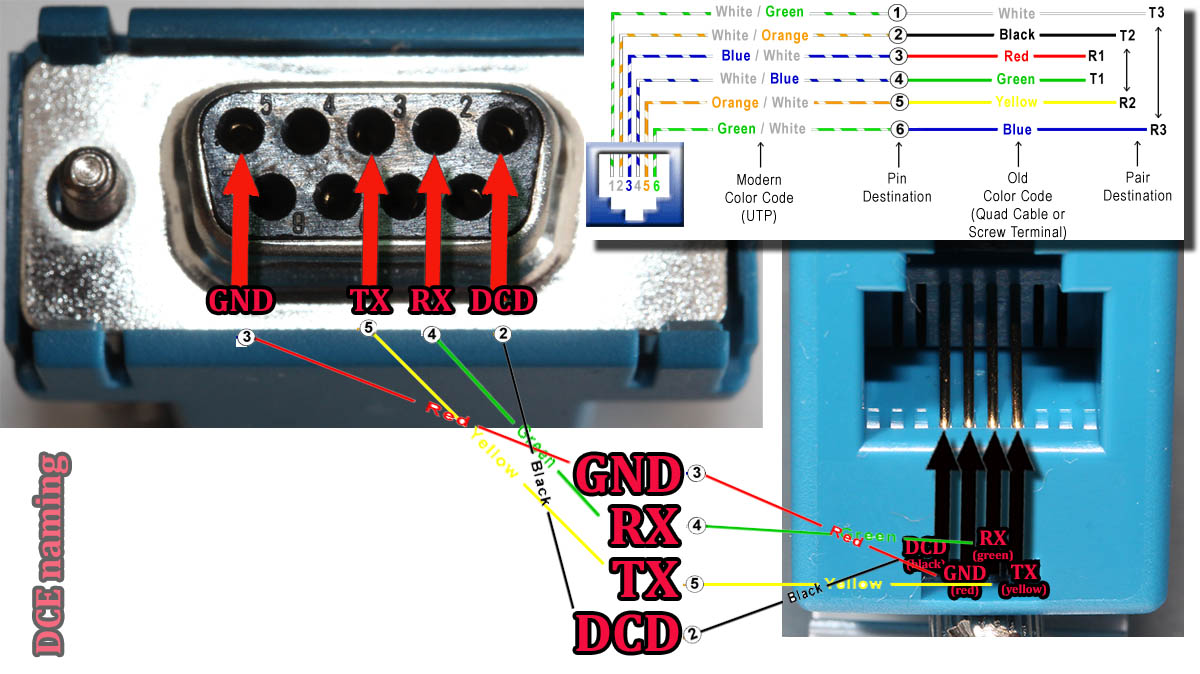
For computer connectivity, with datalogger box has a blue RJ-11 to RS232 converter. The four connected pins of the converter are as follows:
RS232 and Linux
Most computers today don't have a RS232-port in them. To overcome this, years ago I bought a quad-RS232-port USB-thingie:

If you look closely, Port 1 of the unit has a DIY RS232-connector attached into it. That's my Vantage Vue cable connected to the indoors console. Also, note the lack of the blue RJ-11 to RS232 converter unit. I reverse engineered the pins and soldered my cable directly to a D-9 connector to get the same result.
Now the hardware parts is done. All the connectors are connected and attached to a PC.
Software
Half of the work is done. Next some software is needed to access the data in the data logger.
For Windows and macOS
Those not running Linux, there is WeatherLink software freely available at https://www.davisinstruments.com/product/weatherlink-computer-software/. It goes without saying, the software is useless without appropriate hardware it gets the inputs from. I never even installed the software, as using a non-Linux was never an option for me. So, I have no idea if the software is good or not.
For Linux
As you might expect, when going to Linux, there are no commercial software options available. However, number of open-source ones are. My personal choice is WeeWX, its available at http://www.weewx.com/ and source code at https://github.com/weewx/weewx.
Install WeeWX:
- Download software:
git clone https://github.com/weewx/weewx.git - In git-directory, create RPM-package:
make -f makefile rpm-package SIGN=0 - As root, install the newly created RPM-package:
rpm --install -h dist/weewx-3.9.2-1.rhel.noarch.rpm - That's it!
Configure WeeWX:
- (dependency) Python 2 is a requirement. Given Python version 2 deprecation (see https://pythonclock.org/ for details), at the time of writing, there is less than two months left of Python 2 lifetime, this project really should get an upgrade to 3. No such joy yet.
- (dependency) pyserial-package:
pip install pyserial - Run autoconfig:
wee_config --install --dist-config /etc/weewx/weewx.conf.dist --output /etc/weewx/weewx.conf- In the array of questions, when being asked to choose a driver, go for
Vantage (weewx.drivers.vantage)
- In the array of questions, when being asked to choose a driver, go for
- Inspect the resulting
/etc/weewx/weewx.confand edit if necessary:- Section
[Station]week_start = 0
- Section [StdReport]
HTML_ROOT = /var/www/html/weewx
- (optional for Weather Underground users), Section
[StdRESTful]- Subsection
[[Wunderground]] - Enter station name and password
enable = true
- Subsection
- Section
- Configuring done!
Now you're ready (as root) to start the thing with a systemctl start weewx.
On a working system, you should get LOOP-records out of weewxd instantly. After a little while of gathering data, you should start having set of HTML/CSS/PNG-files in /var/www/html/weewx. It's a good idea to set up a web server to publish those files for your own enjoyment. This is something you don't have to do, but I strongly advice to enable HTTP-endpoint to your results. I will immensly help determining if your system works or not.
One reason I love having a weather station around is to publish my data to The Net. I've been tagging along with Weather Underground for years. There has been good years and really bad years, when Wunderground's servers have been misbehaving a lot. Now that IBM owns the thing, there has been some improvements. The most important thing is there is somebody actually maintaining the system and making it run. Obviously, there has been some improvements in the service too.
Aggregation problem
When I got my system stable and running, I realized my wind data is flatline. In nature it is almost impossible for not to be windy for multiple days. I visually inspected the wind speed and direction gauges, they were working unobstructed. However, my console did not indicate any wind at all.
After multiple days of running, I was about to give up and RMA the thing back to Davis for replacement, the console started working! That was totally unexpected. Why: 1) the system did not work, 2) the system started working without any actions from me. That was the case for me. As the problem has not occurred since, it must have been some kind of newness.
What next
Now that everything is up, running and stays that way. There's always something to improve. What I'm planning is to do is pump the LOOP-records to Google BigQuery.
As a side note: when new information is available, it will be emitted by weewxd as LOOP: <the data here> into your system logs. However, that data isn't used. After a period of time, your Vantage Vue will aggregate all those records into a time-slot record. That will be used as your measurement. Since those LOOP-records are simply discarded I thought it might be a good idea to base some analytics on those. I happen to know Google BigQuery well from past projects, all that I need is to write a suitable subsystem into weewx to pump the data into a correct place. Then it would be possible to do some analytics of my own on those records.

