New Weather Station - Davis Vantage Vue - Part 1 of 2: Hardware installation
Monday, November 4. 2019
Last July, there was a severe hailstorm in my area. At the time, I wrote a blog post about it, because the storm broke my weather station. Since fighting with nature is futile, I'm blaming myself for relying on La Crosse -approach of using zipties to attach the components to a steel pole. Given my latitude, 61° north, during summer it can be +30° C and during winter -30° C. The huge variation of temperature combined with all the sunlight directed to nylon straps will eventually make them weak. So, here is my mental note: Next time use steel straps!
I did that when I got my new weather station. This post is about the hardware and getting it fastened securely. The next part is about getting the device talking to my Linux and pumping the results to The Net.
Davis Vantage Vue
After careful consideration, I went for a Vantage Vue from Davis Instruments.
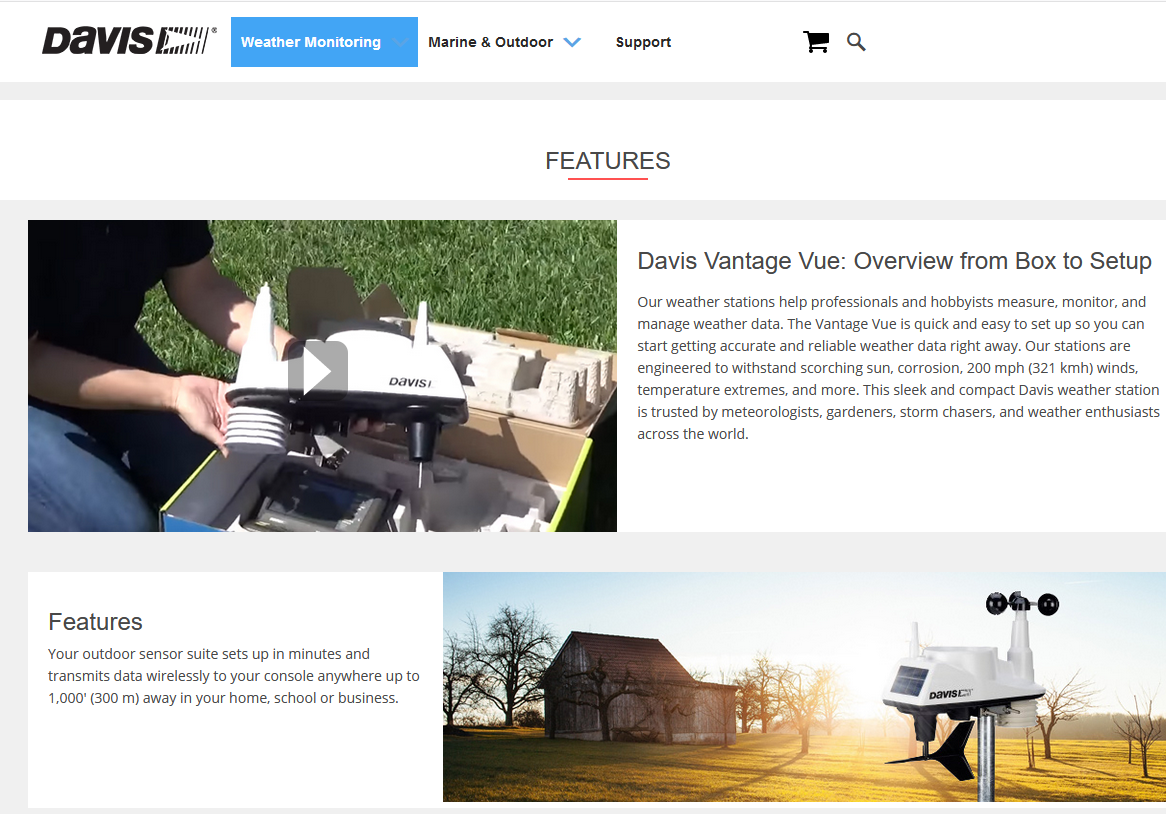
Since this is a serious piece of hardware, in their ranking this 500,- € piece is a "beginner" model. In Davis catalog, there are "real" models for enthusiasts costing thousands of $/€. I love my hardware, but not that much. 
What's in the box
For any weather station from cheapest 10,- € junk to Davis, there's always an indoor unit and outdoor unit.
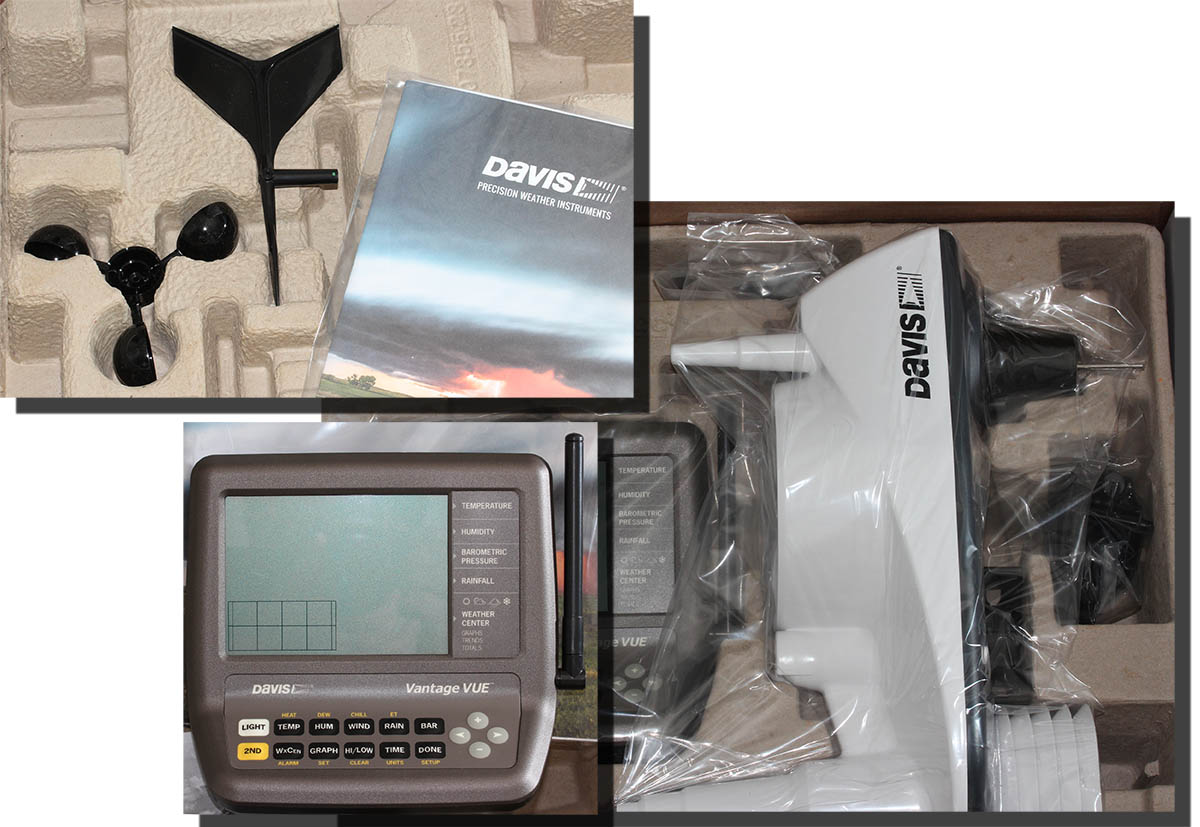
In the box, there is paper manuals, altough I went for the PDF from their site. Indoors unit is ready-to-go, but outdoors unit has number of sensors needing attaching. Even the necessary tools are included for those parts, which require them. Most parts just click into place.
The Vantage Vue console is really nice. There is plenty of buttons for button-lovers and a serious antenna for free placement of the indoor unit. The announced range between units is 300 meters. I didn't test the range, but the signal level I'm getting in my setup is never below 98%. Again, serious piece of hardware.
Installing sensors
Some assembly is required for the outdoors sensor unit. I begun my assembly by attaching the replaceable lithium-ion battery.

The Li-Ion battery is charged from a solar cell of the sensor unit. I have reports from Finland, that given our lack of sunshine during winter, the sensor unit does survive our long and dark winter ok. I have no idea how long the battery wil last, but I'm preparing to replace that after couple of years.
Next one, anemometer wind vane:
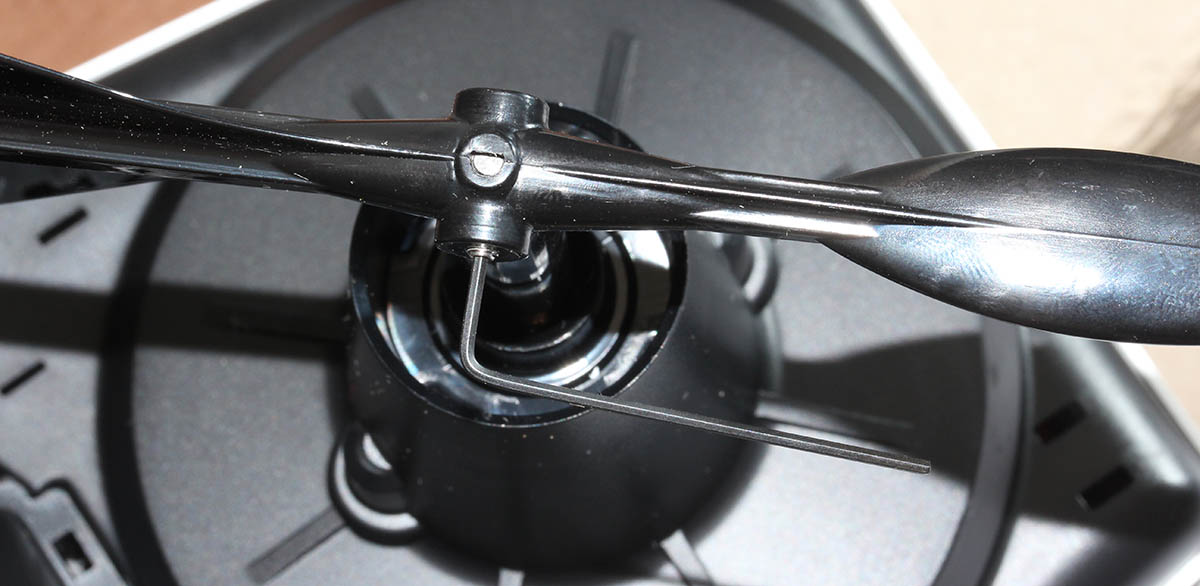
Gauge for wind direction requires fastening a hex screw, but the tool in included in the box. Wind speed gauge just snaps into place. Unlike wind vane, which is hanging from the bottom of the unit, speed gauge is at the top of the unit, so gravity will take care of most of the fastening.
Next one, rain gauge:
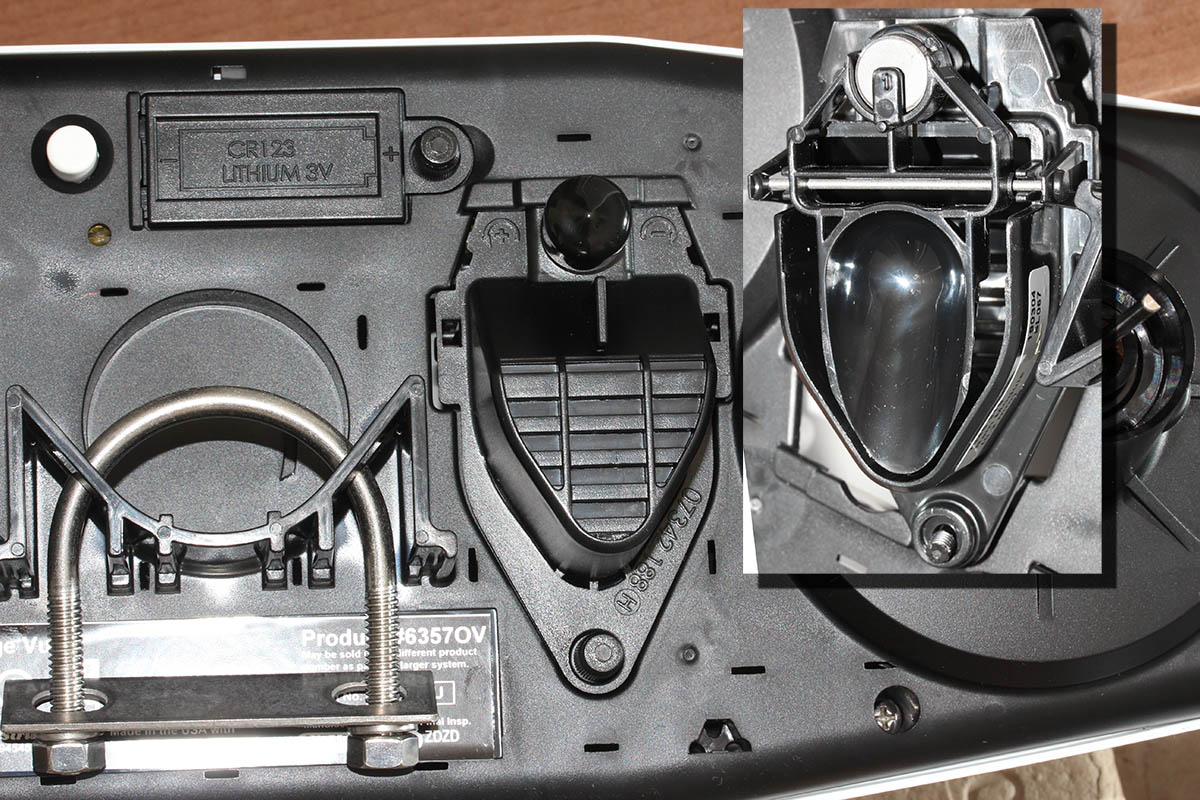
On the bottom of the sensor unit, there is a slot for a bucket seesaw. When the bucket has enough weight in it, in form of rainwater, the seesaw will tilt and empty the bucket. Rain is measured on how many seesaw tilts will occur. Again, this is a real scientific measurement unit, there is an adjustment screw for rain gauge allowing you to calibrate the unit. On top of the rain gauge, there is a scoop. On the bottom of the scoop, you'll need to attach a plug keeping all the unwanted stuff out of the bucket:
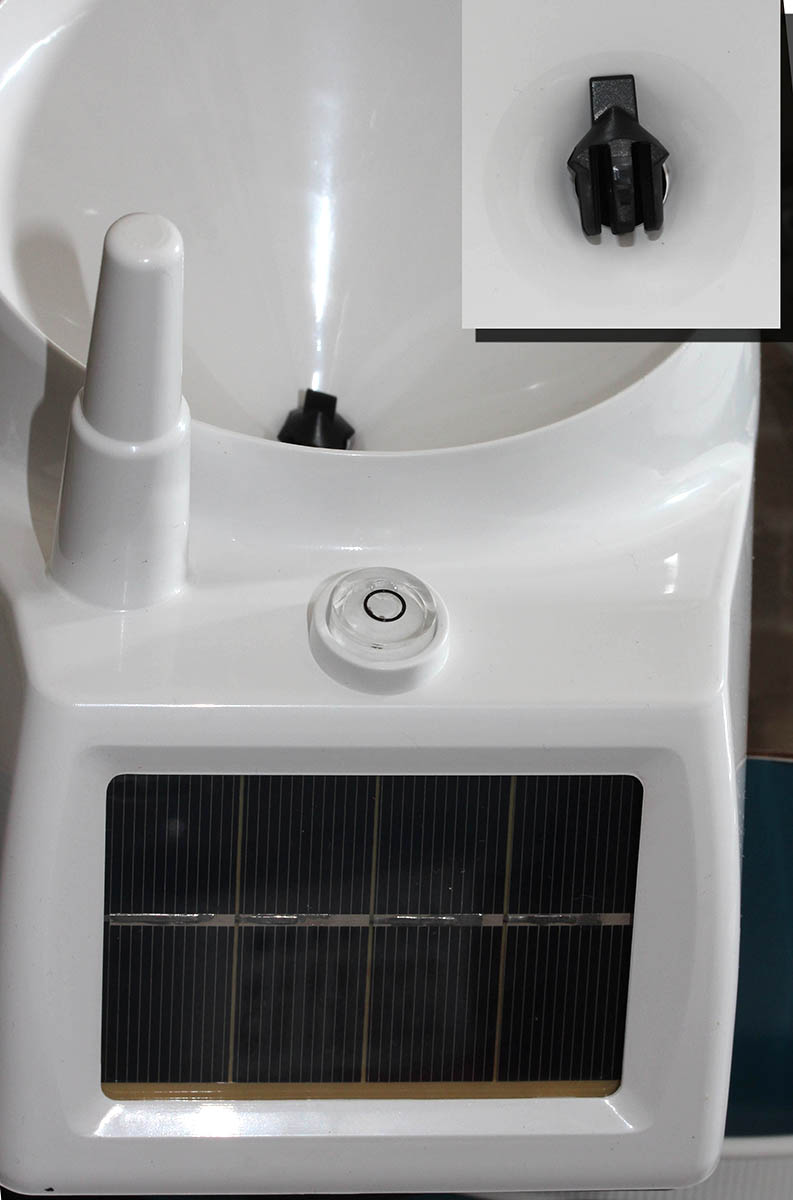
Also note three details in the pic: the solar cell, transmitter antenna and a level bubble helping you during installation of the sensor unit.
Outdoors sensor unit done
This is how the final result looks like for me:

Idea during installation is to make sure the sensor unit has the solar cell directed to south (180°) allowing it to capture maximum sunlight on Northen Hemisphere. This also serves the base of direction for the wind vane. Obviously, you can adjust the deviation from the console if needed. People living in Southern Hemisphere definitely need to do that. Also, you may have something special in your install, the option is there. Remember, this is a serious piece of scientific measurement hardware.
Indoors unit
A running console looks like this:

In the screen, the top half is always constant. The buttons "temp", "hum", "wind", "rain" and "bar" can be used to set the bottom half of the screen to display temperature, humidity, wind, rain or barometric pressure details.
As you can see, I took the picture on 22nd July (2019) at 16:12 (pm). It was a warm summer day +26° C both indoors and outdoors. Day was calm and there was no wind. The moon on 22nd July was a waxing cresent. Given my brand new installation, there were not yet measurements for outdoors humidity. The lack of humidity also results in lack of dew point.
People writing the console software have a sense of humor:
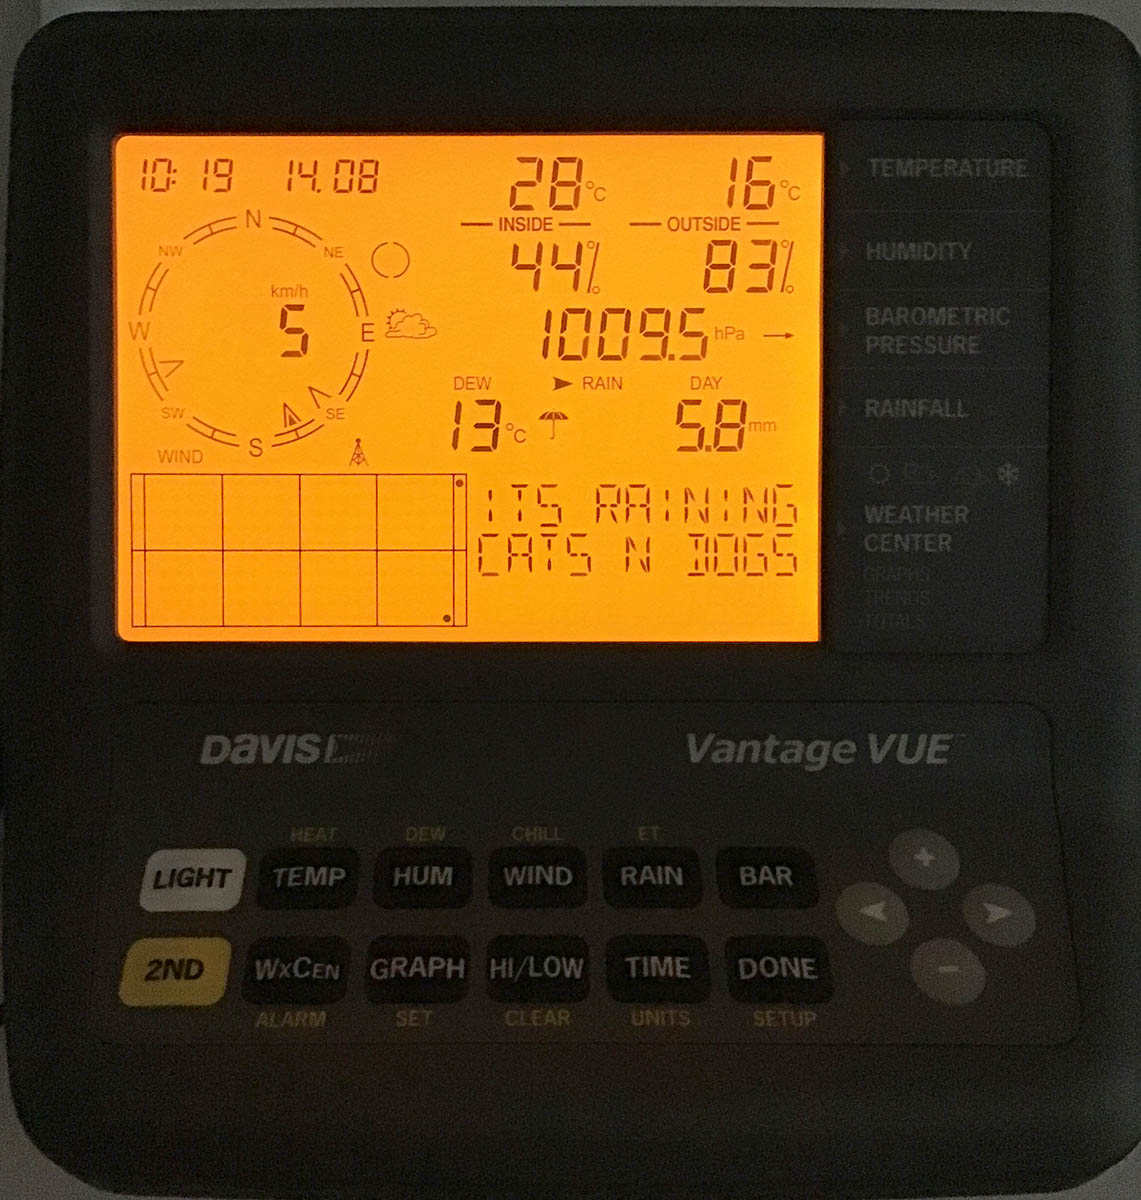
Console display indicates rain (an umbrella) and a text "Its raining cats'n'dogs". Hilarious!
As you can see, the indoors temperature is rather high, +28° C. In reality, that didn't reflect the truth. Later I realized, that keeping the light on will heat the console indoors sensor throwing it off by many degrees. Now I tend to keep the light off and press the "light"-button only when it is dark.
Powering indoor unit
Most people would get the required three C-cell batteries, whip them in and forget about it... until the batteries run out and need to be replaced.
Davis planned an option for that. What you can do is to ignore the battery change and plug the accompanying 5VDC 1A transformer into a wall socket and never need to change the batteries. I love quality hardware, you have options to choose from.
Datalogging
The primary purpose of me owning and running a weather station is to extract the measurements to a Linux PC. An el-cheapo weather stations offer no such option for computer connectivity. Mid-range units have a simple USB-connector (limited to max. cable lenght of 5 meters), some even RS-232 connectivity (max. cable lenght up to 100 meters). When going to these heavy-hitter -models from Davis Instruments, out-of-the-box there is nothing.
To be absolutely clear: Davis Vantage Vue can be attached to a computer, but it is an extra option that is not included in the box.
Here is a picture of USB datalogger expansion unit for Vantage Vue:
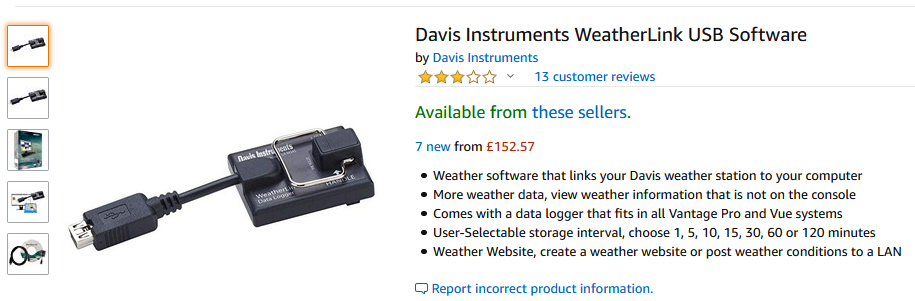
Optimal installation in my house requires the console in a place where it's easily visible and accessible. But its nowhere near a computer, so RS232 is the way I go.
I'll cover the details of datalogger expansion, cabling and Linux setup in the next post.
Logitech G903 /w Powerplay - Best cordless mouse ever?
Friday, September 6. 2019
I love playing video games whenever I have the time to sink into such a non-productive past time. The primary function is to have some fun, but also to clear the head from anything work related.
This time I wanted to get a new gaming mouse. My G5 easily had at least 13 years of service and still going strong. But it's the same thing with living room couch or a car, the old one is still ok, but eventually you simply just want a new one. That's what happened to me. I simply wanted a new one (did somebody say "neophile"), so I got two boxes of new toys:
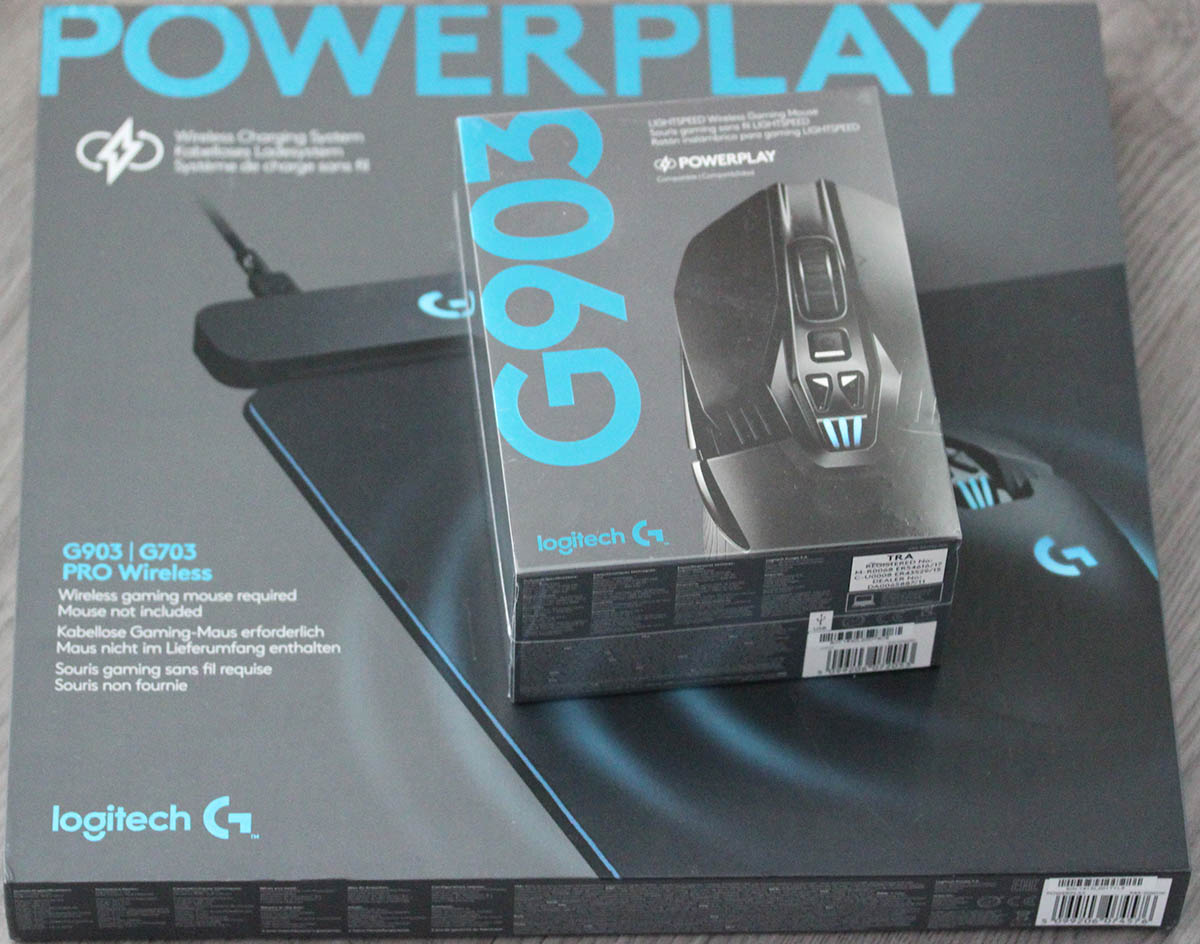
The top box contain a brand new mouse and an USB data/charging-cable for it. This is what the nose of a wireless G903 looks like:
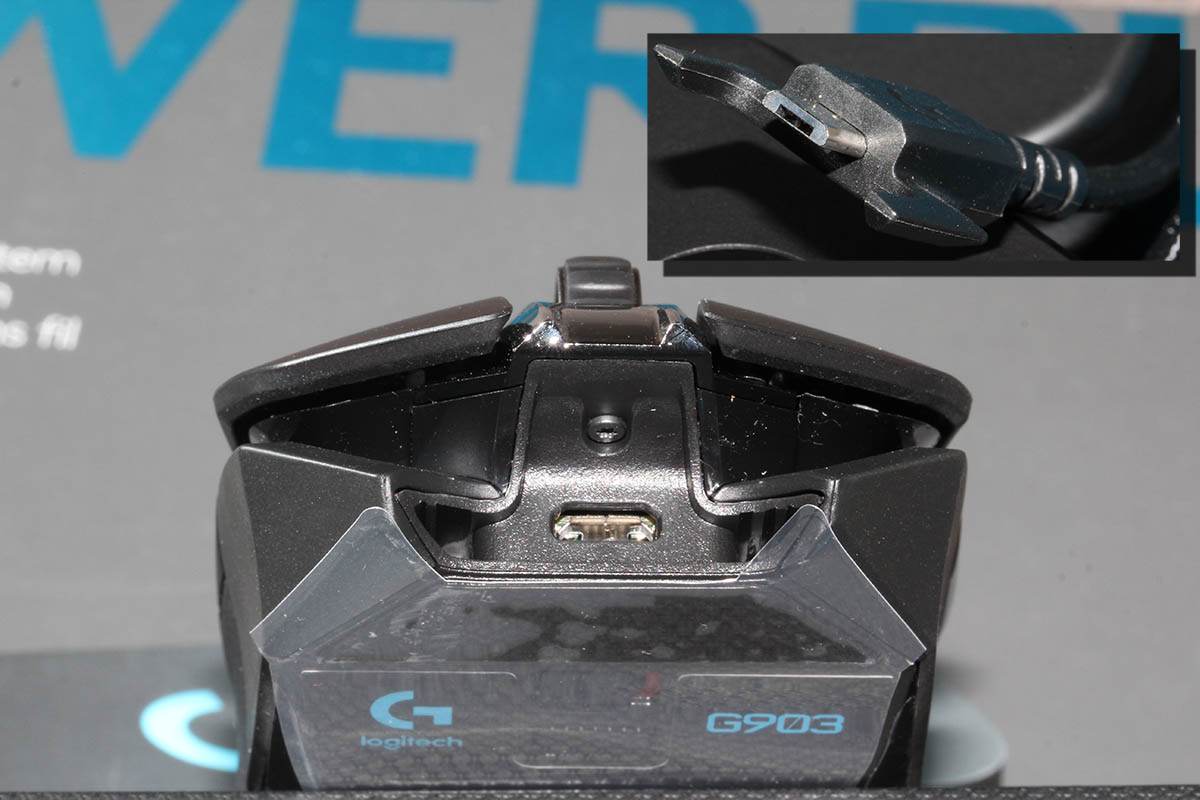
As you can see, there is a micro-USB female connector. In the box, there is also a Logitech-specific cable, which is mechanically sound to convert this wireless mouse into a wired one. For people who want options, doing that is a perfectly good choice. You don't have to use the weird-looking Logitech USB-cable if you don't want to, but it will stick to your mouse a lot better than your average micro-USB cable.
Also on the options-for-a-demanding-rodent-owner, in the box there are lots of options for buttons:

Also, notice the USB-dongle, if you want to stick with wireless. I didn't want to use the dongle, so I went a bit further:
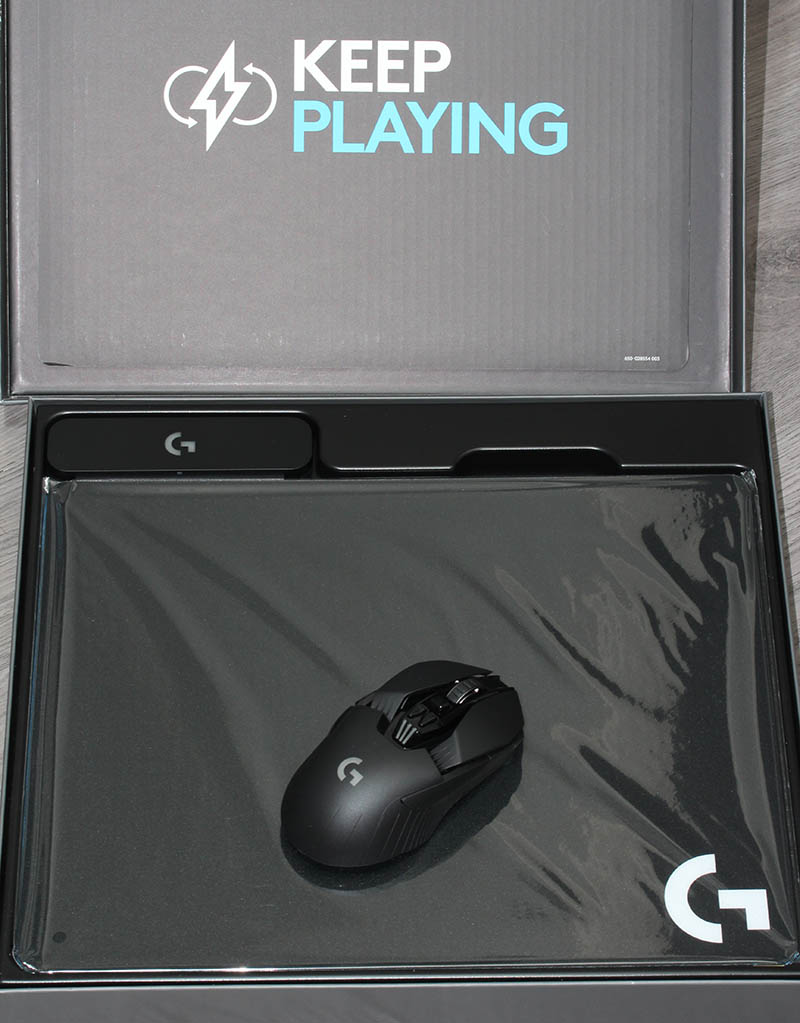
Yeah. I got me a Logitech mouse mat. This one isn't a regular one. Or... to be exact, in the Powerplay box, there are actually two mats. One regular, very slippery one for gaming and a charging mat, which goes under the slippery one:
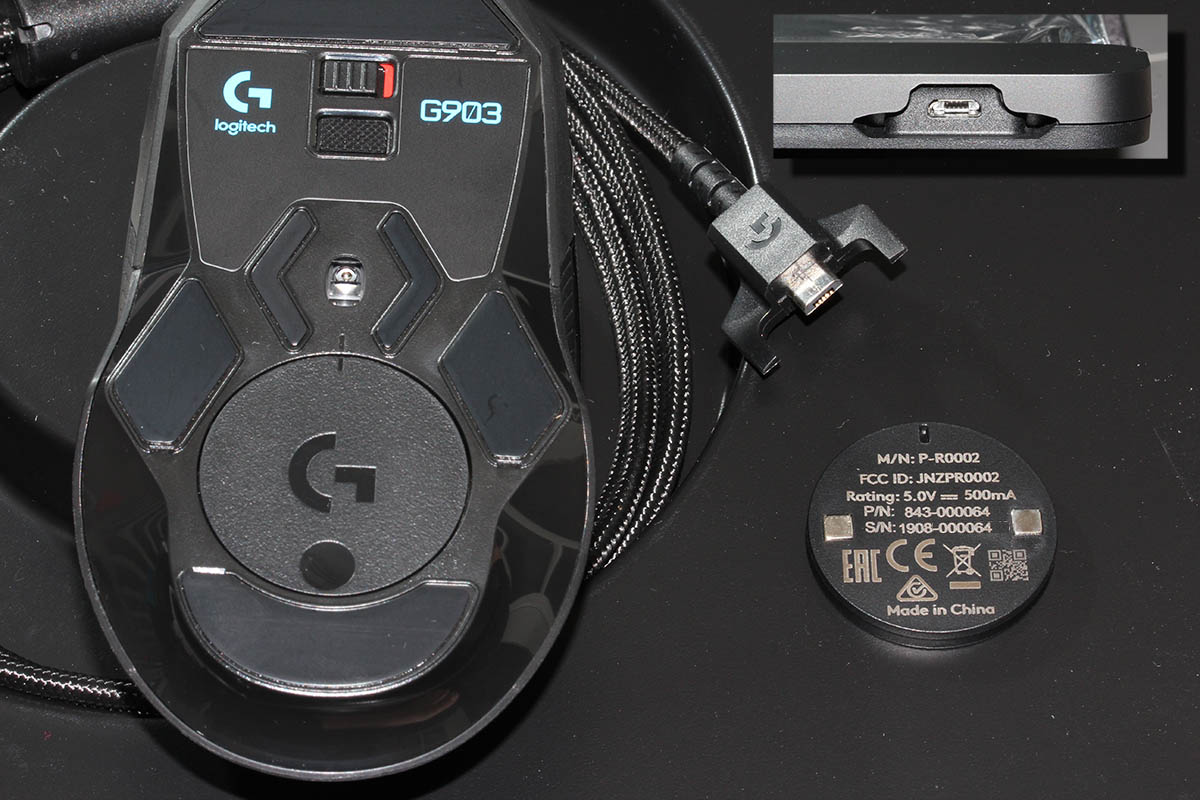
All you have to do is pry the charging button off from the bottom of the G903. Btw. there are no screws or anything, just pretty strong magnets. The dud-of-a-button needs to be exchanged into one from the Powerplay box and your're rocking! This will convert your wireless mouse back into kinda-wired one. In reality the mouse is still wireless, but all communications and charging will happen simply buy using the mouse. No dongle needed. Notice how the Powerplay mat has exactly the same micro-USB -connector than the mouse has.
Finally, the pair will look something like this:

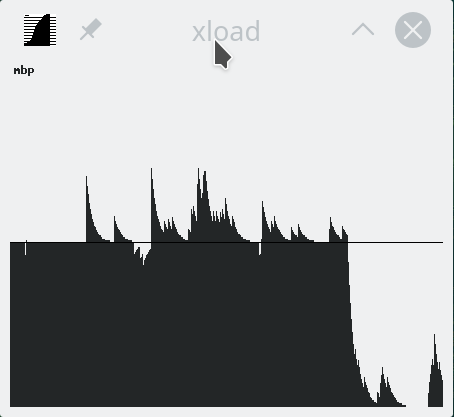
Also remember to install the Logitech Gaming Software to be able to configure your mouse and get all the stats out of it:

This setup is easily the best mouse I've ever had (so far). G903 is truly wireless, but when paired with the Powerpay, it works exactly as well as it would be wired. The only negative thing about Powerplay I have is its ability to mess up other wireless mouse traffic. The top mat is a high quality one, so I've been using that. The only thing I need to do is to remove the charging part to clear the signal jams.
Notes on running openSUSE on a MacBook Pro
Sunday, August 18. 2019
This one is related to a previous post of mine Installing openSUSE Leap 15.1 into a MacBook Pro with encrypted root drive.
kworker CPU-hog
Symptoms:
CPU-load is high. Top consumer is kworker:
top - 11:16:47 up 6 min,  4 users,  load average: 0.93, 0.70, 0.36

Tasks: 248 total,   2 running, 246 sleeping,   0 stopped,   0 zombie


  PID USER      PR  NI    VIRT    RES    SHR S  %CPU  %MEM     TIME+ COMMAND

   58 root      20   0       0      0      0 R 73.33 0.000   4:29.74 kworker/0:
What a kernel worker (or kworker) is, a sensible explanation can be found from Kworker, what is it and why is it hogging so much CPU?. In this case, high CPU on a kworker is a symptom, not the fault.
This same issue is faced by multiple users on different hardware, for example Kworker is at 100% - I think I've tried everything!. Also Fedora Linux users on MBP are suffering from the same Bug 1192856 - ACPI Interrupt storm causes high kworker CPU usage.
Checking some kernel performance counters (more about those, see perf: Linux profiling with performance counters), perf-report:
  Children    Self  Command     Shared Object     Symbol

+   50.51%   0.01%  swapper     [kernel.kallsyms] [k] cpu_startup_entry

+   41.67%   0.31%  swapper     [kernel.kallsyms] [k] acpi_hw_read_port

+   39.99%  39.99%  swapper     [kernel.kallsyms] [k] acpi_os_read_port

+   37.62%   0.00%  kworker/0:2 [kernel.kallsyms] [k] ret_from_fork
Something really fishy is going on with acpi_os_read_port. To get the amount of interrupts generated, most people run a simple grep . /sys/firmware/acpi/interrupts/*, but not me. My solution is to do a simple(?) Perl one-liner wrapped here on multiple lines for readability:
perl -ne 'next if (!/^\s*(\d+)\s+/);

 next if (!$1);

 $intrs{$ARGV}=$1;

 END {foreach (sort {$intrs{$b} <=> $intrs{$a}} keys(%intrs)) {

  printf("%s: %d\n", $_, $intrs{$_});

 };

}' /sys/firmware/acpi/interrupts/*
It will output interrupt counts. On my system, the counters are something like this:
/sys/firmware/acpi/interrupts/gpe_all: 4695534

/sys/firmware/acpi/interrupts/sci: 4694806

/sys/firmware/acpi/interrupts/gpe06: 4694582

/sys/firmware/acpi/interrupts/gpe17: 940
If you're really interested in what's happening inside ACPI and how General Purpose Events (GPE) work, read the document ACPI in LinuxArchitecture, Advances, and Challenges.
Anyway, it looks like ACPI event 06 is firing a lot. Way too lot keeping kworker busy handling the interrupts. This interrupt-handling on the other hand, takes a lot of CPU-power making your system run hotter than expected.
Fix:
As root, a simple echo disable > /sys/firmware/acpi/interrupts/gpe06 will do the trick. Resulting in CPU cooling down:
The effect is instantaneous and easy to notice. To persist this setting over reboots, things get bit more trickier. A lot of people suggest putting the above disable into crontab to be run on a @reboot. My opinion is clear: this is a system problem, system fix and needs to be addressed by system, not user. The @reboot-magic doesn't work in /etc/crontab, only on user's crontab-file.
A very good alternative is to go with acpi_mask_gpe-kernel parameter. It is documented in The kernel’s command-line parameters. And docs state "This facility can be used to prevent such uncontrolled GPE floodings". Nice! Exactly what I need. The tricky part is to edit /etc/default/grub and add acpi_mask_gpe=0x06 into GRUB_CMDLINE_LINUX-setting.
That's not all. Simply having the setting in a file won't change a anything yet. To make the new setting stick, on most Linuxes you would run update-grub. Some smart brain chose not to implement that helper into openSUSE, so that's not an option. To achieve the same, go for a: grub2-mkconfig -o /boot/grub2/grub.cfg
Now you're all set. Reboot and confirm. Of course you didn't fix the actual problem with ACPI, you simply made kernel ignore the interrupt-flood. You may want to settle for that at this point. I did file a bug report about this (Bug 1146023), but it seems the problem is limited to a specific set of MBPs and Fedora kernel guys are having hard time reproducing the issue. So, I'm not expecting SuSE guys to fix this anytime soon either.
Touchpad scroll direction
In 2011 when OS X 10.7 Lion was released, Apple made a drastic change on how touchpad (or how Apple calls it: Trackpad) scrolling works. Personally I totally understand this new logic, they wanted the scrolling user experience to be exactly the same and you would do on your phone's touch screen. You place your finger on the screen and pull the finger to the direction you want the screen to scroll. Before macOS 10.7 (note: the name change from OS X to macOS happened on 10.12 sierra) touchpad scrolling was targeted for the scrollbar, not to the actual content like on your touchscreen effectively reversing the direction.
So, as a macOS / iPad user, I want my scrolling to happen correctly, not the Windows way. To change, navigate to Touchpad settings and reverse the vertical scrolling:
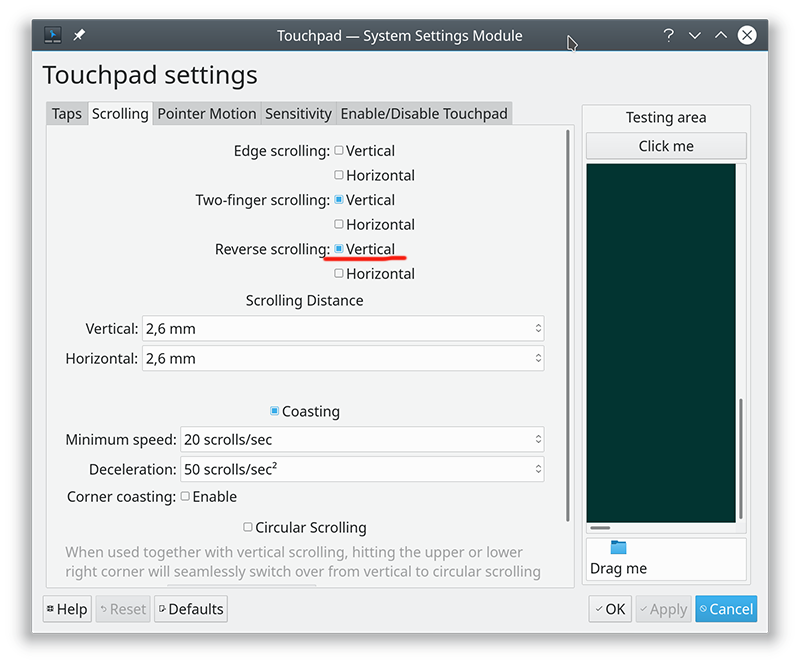
Reversing the reverse makes your head spin, but there is a logic there.
Touchpad gestures
On any typical use case, I would use a mouse. As in real external device, not the skin-on-my-fingertips damaging trackpad. For reasons unknown to me, it literally hurts to use those trackpads for too many hours. So, I normally steer away from them. It looks like I'm pretty alone with this one, but all I can do is to complain and use a mouse.
Typical this you may want to do:
- Right-click: On macOS, hold Ctrl and tap is a right click. This won't work on a Linux. You need to do the two-finger-tap for right-clicking.
- Scrolling: You can go with keyboard or keep dragging the scrollbars, that's ok. Doing a two-finger scroll with the touchpad, however, is much faster and less error prone.
- Zoom: Pinch won't work on a Linux, you need to use the actual zoom-control of whatever application you want to zoom
All the Apple's gestures are documented in HT204895 suppor article Use Multi-Touch gestures on your Mac, but as already mentioned, not all gestures are supported on a Linux.
Something else?
Nothing more pops into my mind. If you have anything to comment, please do so.
Installing openSUSE Leap 15.1 into a MacBook Pro with encrypted root drive
Thursday, August 15. 2019
I happen to have a spare 3rd generation 15" MBP. It is late 2013 model, used for years but recently just gathering dust. Back in the days, when the laptop was shiny and new, it was a serious piece of hardware and cost north of 2000 €. Even today, a fully working second hand 15" late 2013 would be priced around 25% of the original value. Couple years later Apple started manufacturing MBPs with faulty keyboards, faulty touch bar (the really weird top row) and faulty batteries. I'm in luck, as my unit pre-dates all of those. Yes, there are also some fatures missing which I'd love to have, fingerprint reader, USB-C -port and improved display to mention the most important ones.
Since the dust-gathering, I decided to see how a fresh Linux installation would go. Back in the days, I had a plastic MacBook running Linux. Given 32-bits and not-so-powerful CPU, I recycled it at the point I got tired of waiting for pages to load too long on Firefox. The amount of JavaScript modern web pages run is staggering. All that requires huge amounts of CPU to parse, process and run. Old low-end models simply won't cope making web browsing nearly impossible. So, I didn't have a Linux-Mac for couple years and now I wanted one.
Known facts
This I could figure out before doing any real installing:
- Installation can be done. openSUSE docs describe the process @ https://en.opensuse.org/SDB:Installation_on_a_Mac
- The built-in Broadcom WiFi isn't properly supported by most Linuxes, that includes openSUSE
- Debian Linux wiki @ https://wiki.debian.org/MacBook/Wireless states:
"MacBooks before the late 2008 models use Atheros chipsets, while late 2008 are now using Broadcom 4322 chipset." - StackExchange article @ https://unix.stackexchange.com/a/175813/241396:
"Broadcom 4360 actually comes with either of two distinct chips, 14E4:4360 and 14E4:43A0. There is no driver in Linux for the first one, while wl is an appropriate driver for the second one." - Arc Linux wiki @ https://wiki.archlinux.org/index.php/broadcom_wireless#broadcom-wl only states the fact wl-driver not being open-source.
- It is unclear which exact chipset is in the Mac, but it seems not to be properly supported in Linux.
- Debian Linux wiki @ https://wiki.debian.org/MacBook/Wireless states:
- My MBP doesn't have Ethernet RJ-45 port
- The existing USB-ports or Thunderbolt-ports could be used to host a network adapter, either wired or wireless, but I choose not to go down that path. Having an USB-dongle stick out of the Mac isn't something I'm willing to do.
- There is a good chance, that a Linux-driver for the built-in Broadcom WiFi exists. The existing driver can be downloaded from the net, but require some trickery to install during openSUSE installer.
- In macOS, drives are encrypted. In Windows using BitLocker is a good option to keep your data secure. Linux supports drive encryption as well.
Prerequisites
- A MacBook Pro with SSD full of data you don't care about. Also emptied SSD-drives will do.
- openSUSE Leap 15.1 ISO-image from https://www.opensuse.org/
- I personally will go for the full DVD, but it is not absolutely necessary. Small network installer will work as well.
- Skills to create a bootable USB-stick from the install image
- Your wireless network credentials and skills to connect a new device into it
- Two USB-sticks:
- One to boot openSUSE installer from. This stick will contain installation image and cannot be easily written into and must be attached to the Mac during installation.
- Second to transfer the WiFi-driver files
- Broadcom Linux wl-driver from http://download.opensuse.org/repositories/home:/Sauerland:/hardware/openSUSE_Leap_15.1/x86_64/
- Installer will need file
broadcom-wl-kmp-default-6.30.223.271_k4.12.14_lp151.27-lp151.121.1.x86_64.rpm. - Store the file into the second USB-stick.
- Installer will need file
- Since kernel-default -package has an update, the above RPMs needed for installer won't work in your installed openSUSE. To fix this, you will need also Broadcom Linux wl-driver from http://download.opensuse.org/repositories/home:/Sauerland:/hardware/openSUSE_Leap_15.1_Update/x86_64/
- Your installed openSUSE will need two files
broadcom-wl-6.30.223.271-lp151.121.4.x86_64.rpmandbroadcom-wl-kmp-default-6.30.223.271_k4.12.14_lp151.28.10-lp151.121.4.x86_64.rpm. - Store these files into the second USB-stick.
- Your installed openSUSE will need two files
- To make your life easier, having access to another computer while doing the install will help the process greatly. Especially, if you need to get a newer version of the Broadcom-drivers.
- That's it!
Disclaimer for RPM-files:
Those versions of files are valid at the time of writing. Both the install ISO and installed & updated openSUSE Linux are likely to eventually get updated and the versions of those files WILL change. Keep reading! There are instructions for you on how to compensate for updated versions. However, download locations will not change for openSUSE 15.1. The locations won't be valid for 15.2, but I'm sure you got that already.
Step 1: Prepare openSUSE 15.1 install
As instructed in https://en.opensuse.org/SDB:Installation_on_a_Mac, copy the installer ISO-file to the USB-stick. On macOS and Linux, figuring out the exact output drive can be bit tricky, so be careful with that. On Windows, the best utility for USB-drives is Rufus. You can get it from https://rufus.ie/.
While at it, download the required driver from above URLs pointing to Sauerland repository. Both versions are eventually needed, so just download them.
Note: for installer, only broadcom-wl-kmp-default -package is needed. We can safely ignore any RPM dependencies, as it is not possible to actually install the package. For installed Linux both files are needed, they have a dependency between packages. More about that when you're actually tinkering with the files.
Step 2: Boot the Mac into openSUSE installer
Plug in the installer USB (the other USB isn't needed yet). Power up the Mac. When you hear the boot-sound, press and hold the Alt/option-key. When you see the boot-menu, you can release the key. Displayed on your screen, there is a boot drive selection menu:

Go for the USB UEFI, that will start openSUSE installer.
Old geezers like me will remember the times when Macs required special bootloaders and tons of tinkering just to get the USB-boot to work. For past years, thanks to UEFI, USB-booting a Mac isn't any different than booting a PC.
Step 3: Establish facts
When the graphical installer launches, you'll see the license agreement screen:
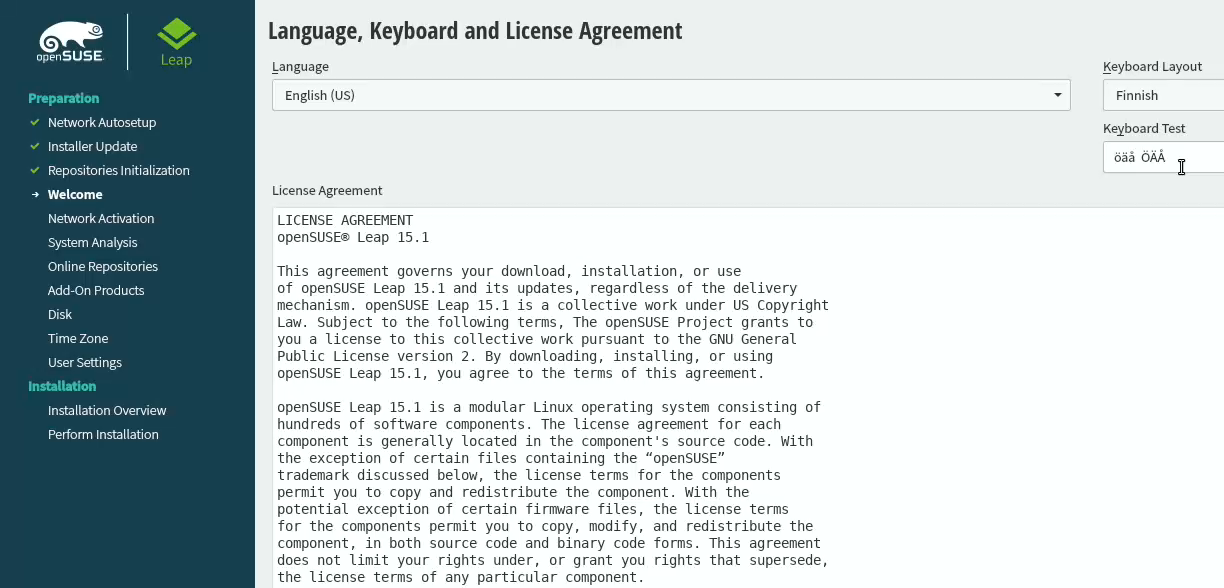
On top-right corner of that screen is also keyboard map choice. This is your chance to make sure your keys will work correctly on the GUI. This won't affect the text-console.
Switch to text-mode console
There are two critical pieces of information needing to be confirmed to get the WiFi-driver working. Since the openSUSE installer is running in graphical mode, you need to switch to text-mode. In a Linux, the console can be chosen with Alt-<function key> -combo. When graphical interface is running, key combo is Ctrl-Alt-<function key>. To make things even trickier, in a Mac <function key>s require the actual Fn-key to be pressed, so ultimately you'll need to press and hold Fn-Ctrl-Alt and then tap F2-key to go for a text-console.
Confirm kernel version
On a bash-prompt, check the exact Linux kernel version with a:
cat /proc/version
As a result, my install image will display:
Linux version 4.12.14-lp151.27-default
In Linux, all device modules are stamped with the specific kernel version they'll work with, so it is imperative to get the Broadcom driver for that exact kernel version.
Confirm broadcom WiFi hardware
On a bash-prompt, get a listing for wireless network devices. List PCI-devices with class 280, that's for all network controllers (listing is at https://pci-ids.ucw.cz/read/PD/), as already established, there shouldn't be too many of those:
lspci -d '::280' -vv -n
On my Mac, the response is:
02:00.0 0280: 14e4:43a0 (rev 03)
Remember from above: "Broadcom 4360 actually comes with either of two distinct chips, 14E4:4360 and 14E4:43A0. There is no driver in Linux for the first one, while wl is an appropriate driver for the second one." So, this is the confirmation we needed. wl is the driver needed and we can move forward with installing the driver.
Step 4: Install the Broadcom driver
This screenshot depicts my process:
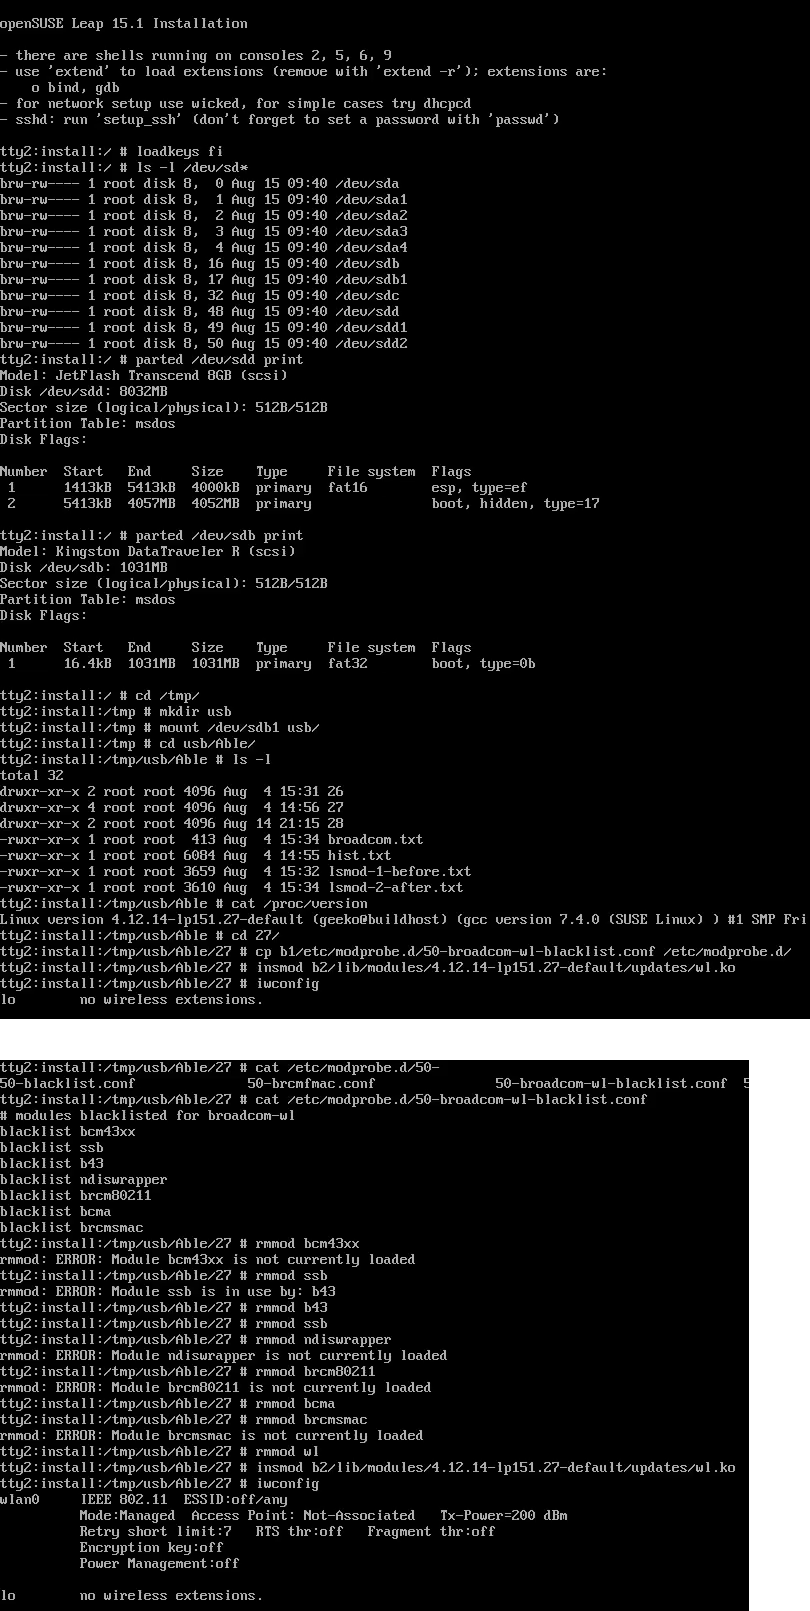
Now that you know the kernel version (4.12.14_lp151.27 in my installer) and copied the downloaded RPMs into the other USB-stick, plug it in. Remember: the installer USB is needed and cannot be removed.
Determine the correct device and mount it
In the above screenhot, the USB-stick having the drivers is /dev/sdb. First I checked out which storage devices Linux found. There are number of those for: Apple SSD, installer USB and driver USB. Since I knew, my driver USB is a Kingston Datatraveller, displaying the block-device partition table by running parted /dev/sdb print helped to identify the correct drive.
I mounted the USB-stick with a:
mkdir /tmp/usb

mount /dev/sdb1 /tmp/usb
Locate the files from the USB-stick.
Unpack the driver RPM
At this point, the Broadcom RPMs versioned for openSUSE installer kernel need to be popped open. The ones for your running Linux will install as-is, so no need to unpack them. It would be easy & smart to just install the RPM, but given Linux installer, it is not possible. Most of the mounted filesystems in an installer are SquashFS filesystems (more info from https://en.wikipedia.org/wiki/SquashFS) and are read-only. Well... you CAN alter a SquashFS, but it is more complicated than just running couple commands to extract the driver from RPM and injecting it into a running system.
To unpack an RPM, in a temporary directory run following (this is a single-liner, I just wrapped it into two lines for readability):
rpm2cpio broadcom-wl-kmp-default-6.30.223.271_k4.12.14_lp151.27-lp151.121.1.x86_64.rpm \

 | cpio -ivd
This will create any subdirectories and files into the current directory where cpio-command is run. That's why a temporary location is suggested.
Install wl-driver
As already established, Broadcom on Linux is a messy business. And this Broadcom chip in your MBP is especially messed up. So beware! Trickery ahead.
The other file you won't be needing during installation, but you will for your running openSUSE would contain a file etc/modprobe.d/50-broadcom-wl-blacklist.conf. This blacklisting mechanism exists in Linux to prevent device-modules from being loaded when a particular device is being used. Now, at the point you're running the commands on your Linux-installer its too late. Your installer already loaded bunch of device drivers you won't be needing. So, they must go. Contents of the file suggests what to remove:
# modules blacklisted for broadcom-wl

blacklist bcm43xx

blacklist ssb

blacklist b43

blacklist ndiswrapper

blacklist brcm80211

blacklist bcma

blacklist brcmsmac
You can run command rmmod for each of those, but I choose to go for a for-loop:
for module in bcm43xx ssb b43 ndiswrapper brcm80211 bcma brcmsmac; do

  rmmod $module

done
In my Mac, at least modules b43, ssb and bcma were loaded.
Warning: If you DON'T rmmod conflicting modules, your wl-module will NOT work.
Finally, it's time to go for the good driver. When you unpacked the driver RPM, it contains a subdirectory. My driver is at lib/modules/4.12.14-lp151.27-default/updates. Go there and run:
insmod wl.ko
There is zero feedback for your command. To get an indication of success, run iwconfig. It will display something like:
wlan0     IEEE 802.11  ESSID:off/any

          Mode:Managed  Access Point: Not-Associated   Tx-Power=200 dBm

          Retry short limit:7   RTS thr:off   Fragment thr:off

          Encryption key:off

          Power Management:off
When you see an existing wlan0, you're golden! Now you're good to go forward with graphical installer.
Step 5: Install openSUSE Leap 15.1
First, go back to graphical installer. The key combination for that is:
Press and hold Fn-Alt and then tap F7-key
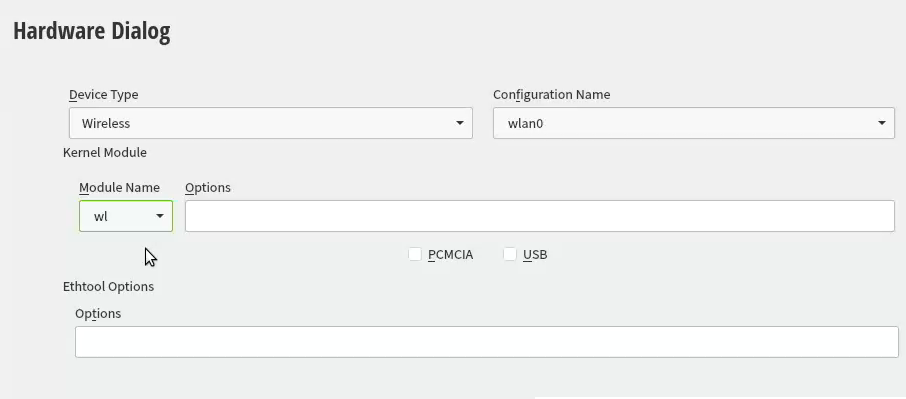
Add your Mac's Broadcom to Linux
In the graphical installer, go Next from license screen and witness a blank Network Settings screen. The installer wasn't able to determine any operational network interfaces in your system. Not to worry, now that your Broadcom is on-line, you can add it. Click Add, and add a Wireless device using Kernel module wl:
Moving forward with Wireless Network Card Configuration, a screen to connect to your WiFi will appear:
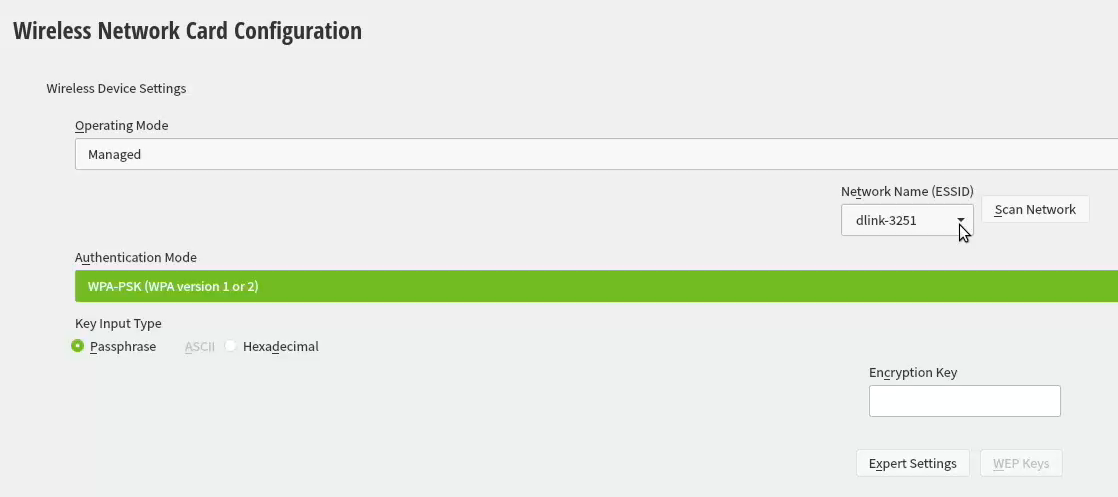
Scanning for any available networks will provide you a drop-list of found networks. Your own network needs to be in that list. Just add your authentication details to the dialog and you're good to go.
Instruct openSUSE installer to encrypt your root drive
(This is completely optional, you don't NEED to have an encrypted hard-drive. I just love doing stuff like this.) When your installer wizard will reach Suggested Partitioning, that's your cue. Going for encrypted root partition is actually surprisingly easy on openSUSE:
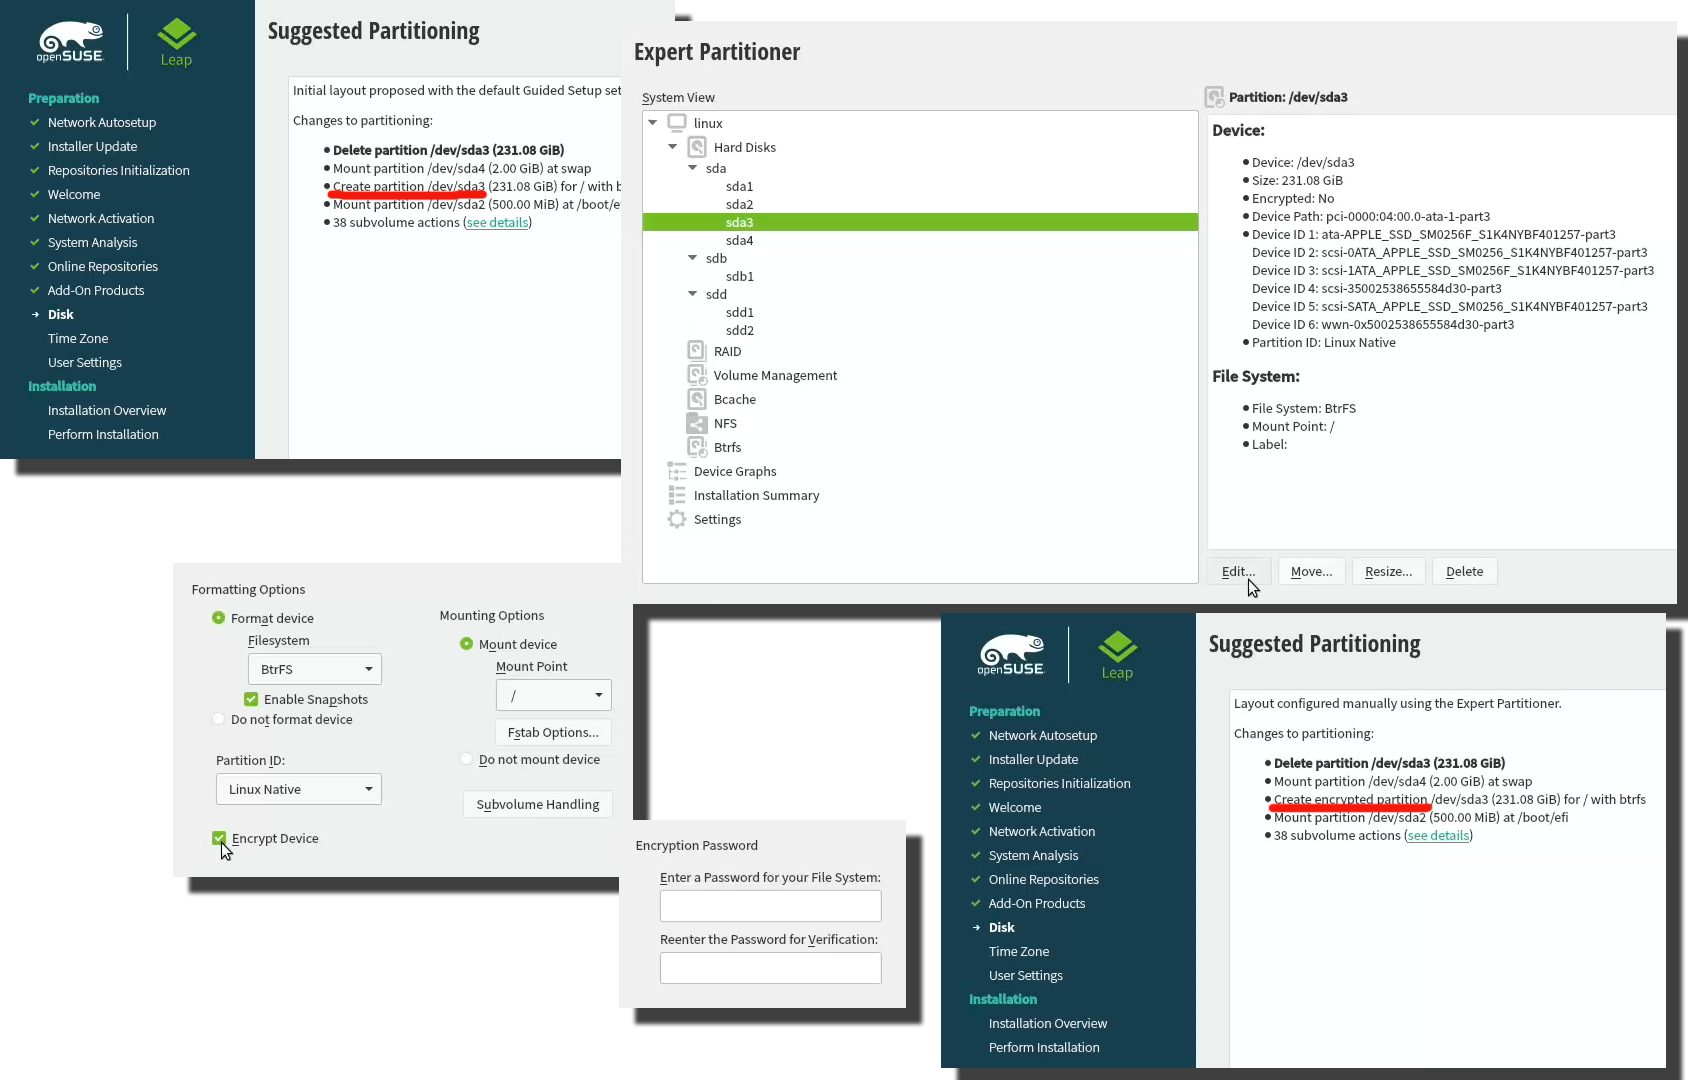
Go to Expert Partitioner using the suggested partition as a baseline for your custom partitioning. The only thing you need to change is to enable encryption on your root partition. Find mount point / and Edit it. Just click Encrypt Device and choose a wise password for your encryption. That's it. Then you can Accept the partition plan and move forward.
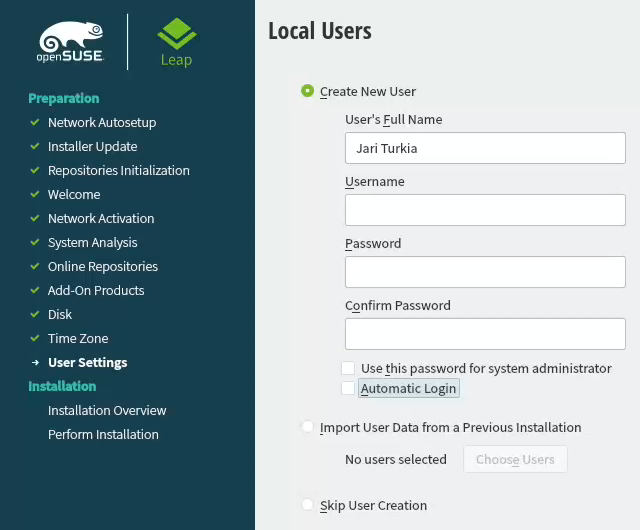
Add an user to new Linux
For security reasons, I'll always separate my administrators and regular users. What level of security you're targeting for is completely up to you. I, personally won't use Automatic Login and won't use same passwords for super-user and regular users. The Local Users dialog will look like this:
Hang tight, you're almost there.
Install!
When you reach the Installation Settings, you're about to start destroying any previous data on your Mac and start installing the Linux:
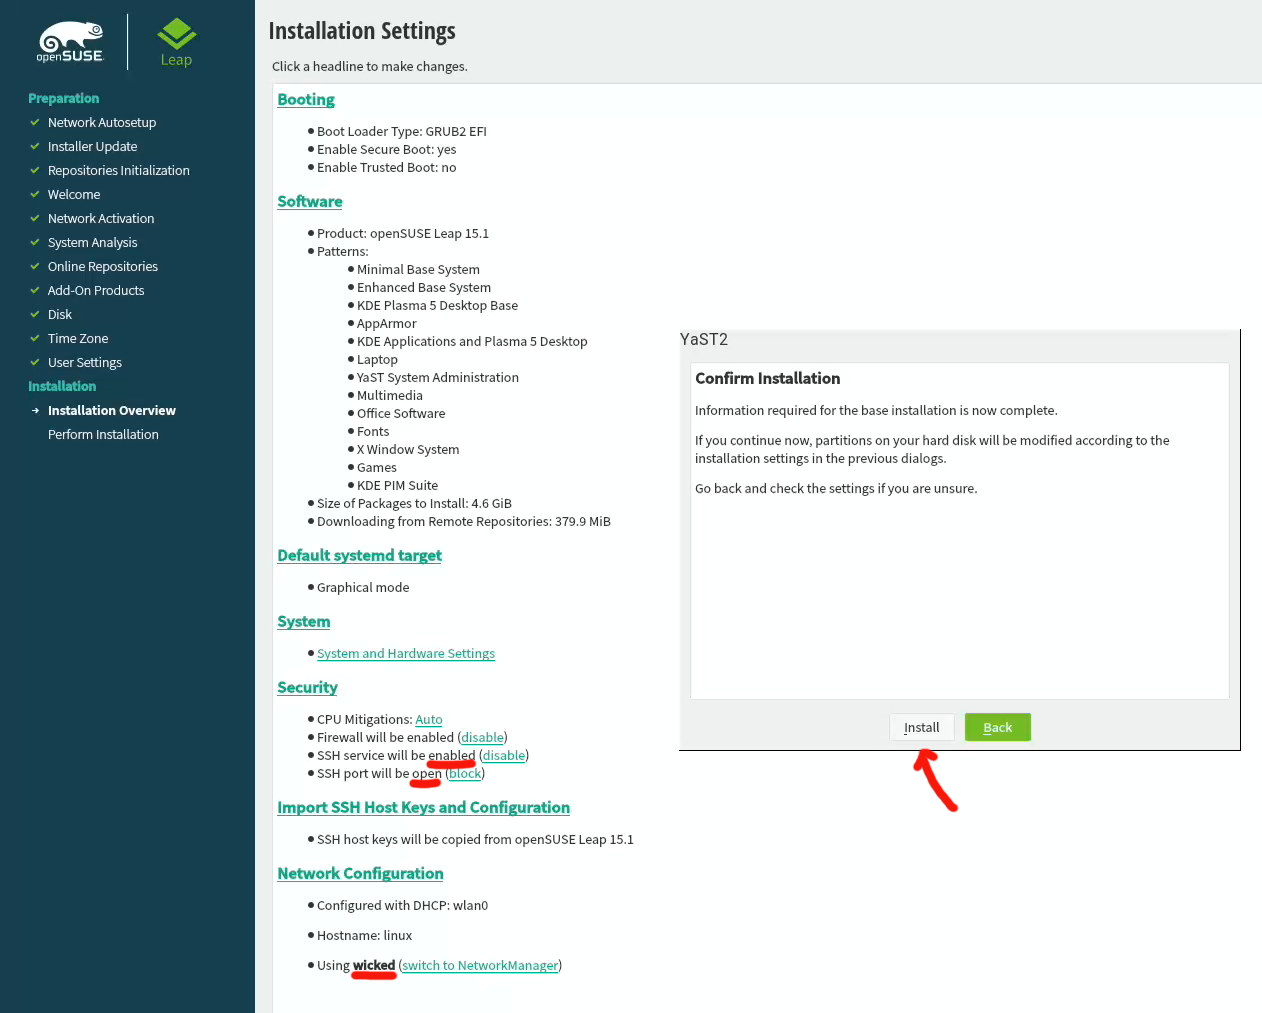
Enabling SSH and drilling a hole for it into firewall is up to you. Also, the choice of tooling for network management is up to you. I do dislike NetworkManager and obviously choose to drop it and go with wicked. If you want to learn more, go read wicked FAQ at https://github.com/openSUSE/wicked/wiki/FAQ.
When you click Install in the Confirm Installation -dialog, the ball starts rolling. If you missed the previous warning, before this point your data is still intact in the drive, after this point it won't be anymore. This is the part where you can go grab a cup of coffee:
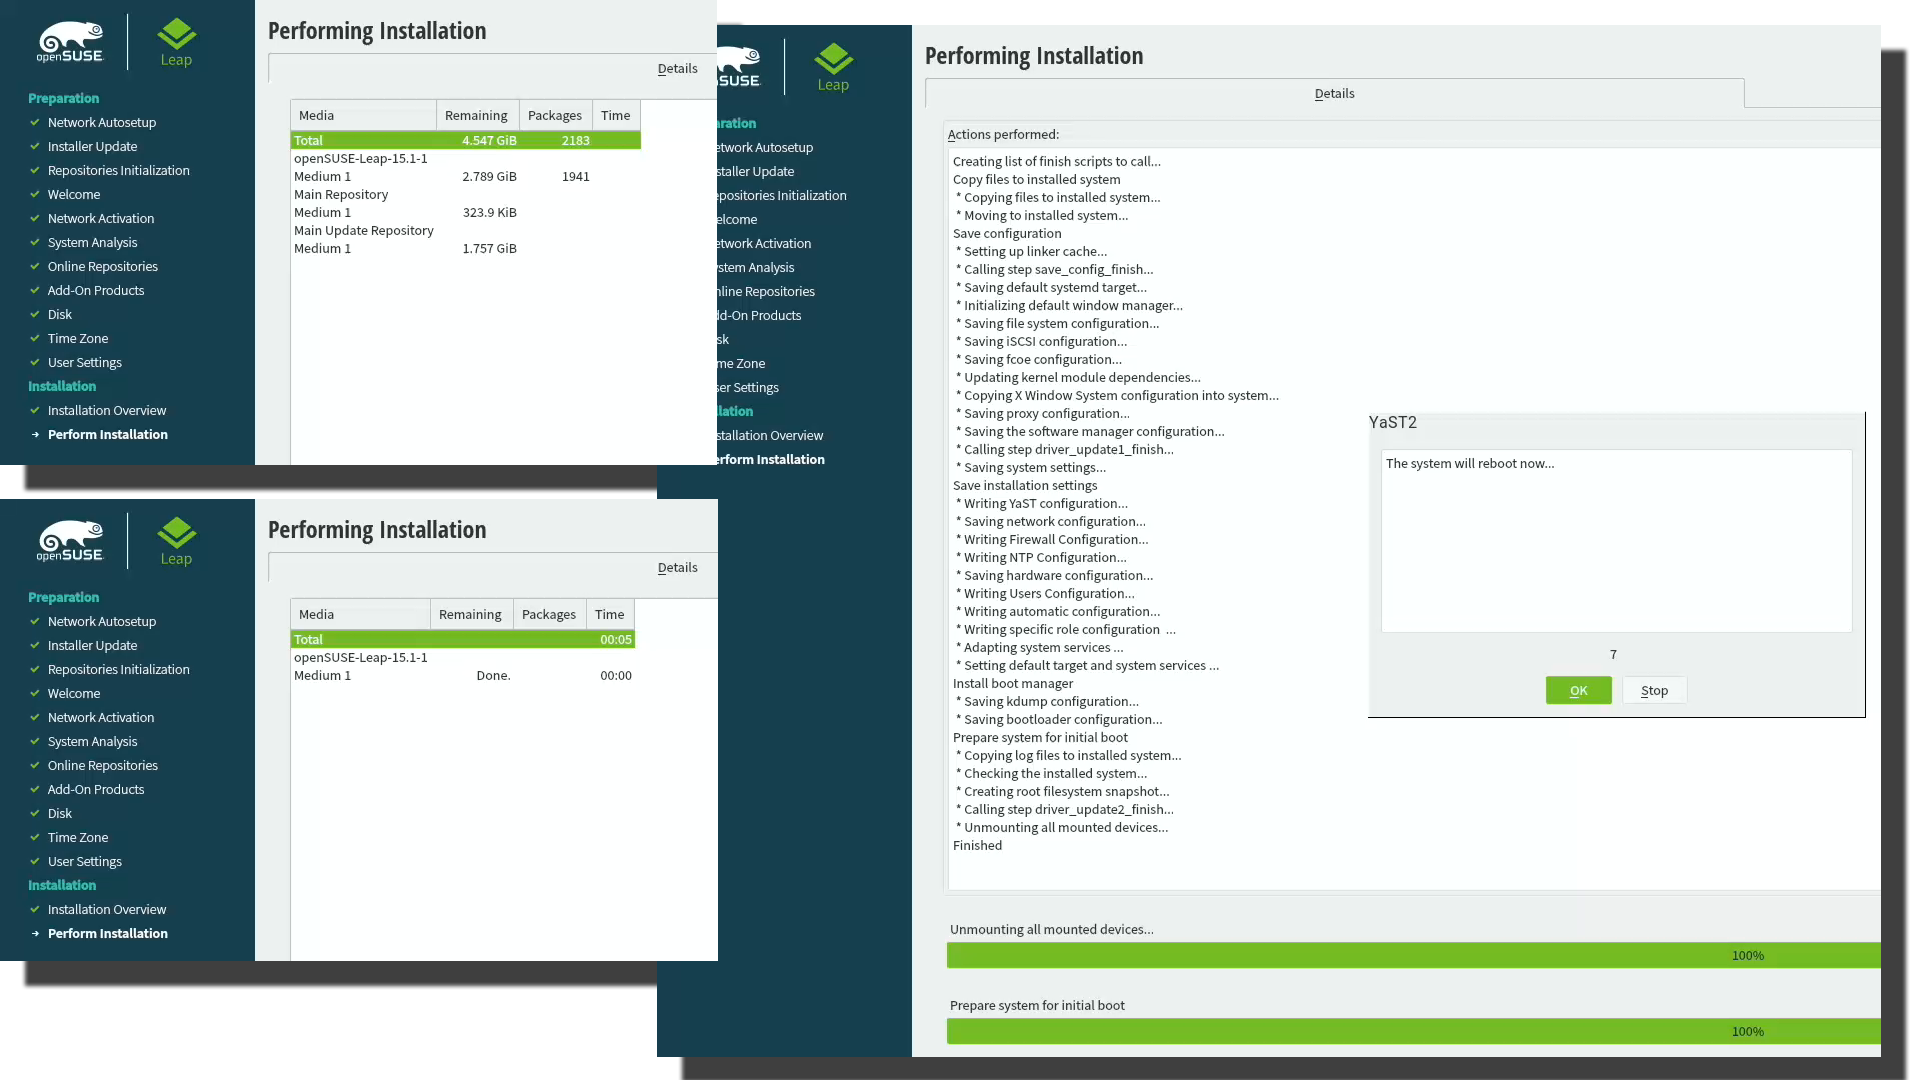
At the successful end, your system will automatically reboot. When the installer reboots the computer, you can remove the installer USB. It won't be needed anymore.
Step 6: Reboot into your newly installed Linux
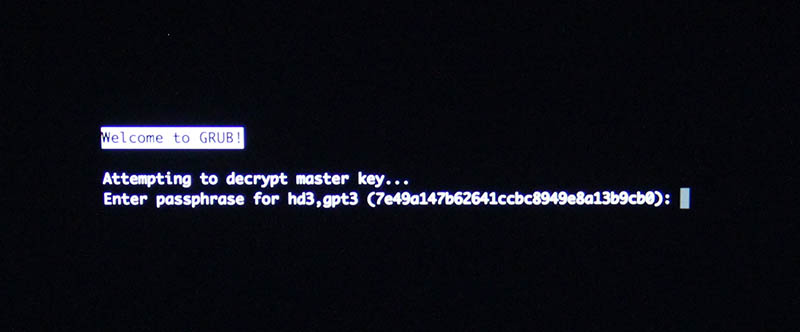
If you went with encrypted partition, GRUB will require the password to decrypt the drive to load Linux kernel:
Hint: If you already didn't, just yank out the installer USB.
The "funny" thing about encrypted root partition is: when your kernel is loaded by GRUB, kernel will need the same password again!

Yes, punch in the same password again to reach login-screen.
Add your Mac's Broadcom to Linux - Again!
Once logged in all the hard work you did with the Broadcom-driver are lost. Your newly installed openSUSE will NOT have the Broadcom-driver installed. What! What! What?
But wait! This time installing is much easier. You actually CAN simply install the RPMs from the other USB-stick. On an installed Linux, the system can be written into.

Confirm the kernel version (again) and notice how it is different. My system has:
Linux version 4.12.14-lp151.28.10-default
Just like before, figure out which one the device is (with a great likelihood, it is not the same device anymore) and mount it. Once mounted, as root you can do something like:
rpm --install -h *.rpm
Installing the RPMs won't make your network operational. In a Linux, there are always ways to avoid rebooting, but in this instance I found it simply easier to go the Windows-way and reboot. You can do that at this point. Alternatively if you don't just yet need a network, you can also remove the second query for encryption password and then reboot to fix two problems on a single reboot.
Remove the 2nd password prompt
This is something I wouldn't do on a shared machine. Since I'm almost certain, nobody else will use my laptop, in this instance I'm willing to add ease of use with cost of potentially losing my security. If a logged-in user can access the encryption key-file, my encryption security is gone! Before allowing a second encryption key to be used, the plain-text password is not stored anywhere. To keep my system still secure, I need to make sure the permissions for the file are correctly set and also keep any malware or unwanted software from stealing my precious key-file.
Process for setting up encrypted root in openSUSE is described well in https://en.opensuse.org/SDB:Encrypted_root_file_system. As instructed there, create a keyfile, add the keyfile as a valid key into LUKS and secure the setup:
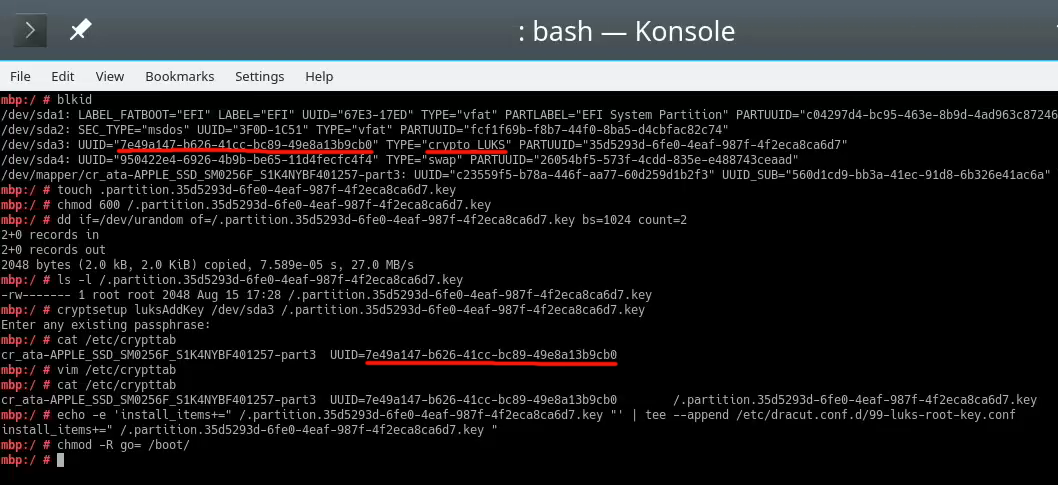
For relaxing my system's security, the general idea is to load some random bytes from /dev/urandom and create a random-content key-file. The docs are using 1024 bytes, I went double that for a 2048 byte keyfile. In my sequence, I first create an empty file, then lock all other users out of it and then populate the file with random bytes:
touch /.partition.35d5293d-6fe0-4eaf-987f-4f2eca8ca6d7.key

chmod 600 /.partition.35d5293d-6fe0-4eaf-987f-4f2eca8ca6d7.key

dd if=/dev/urandom \

  /.partition.35d5293d-6fe0-4eaf-987f-4f2eca8ca6d7.key \

  bs=1024 count=2
Then this newly created filename needs to be added into two places. First /etc/crypttab. After setup, there are only two columns. As instructed in the documentation, a third column needs to be added. Note: This single line having three columns is split into three lines here for readability. If you fail to have this as a single line, your system will fail to reboot:
cr_ata-APPLE_SSD_SM0256F_S1K4NYBF401257-part3

UUID=7e49a147-b626-41cc-bc89-49e8a13b9cb0

/.partition.35d5293d-6fe0-4eaf-987f-4f2eca8ca6d7.key
Second into initRD by creating a new Dracut configuration segment /etc/dracut.conf.d/99-root-key.conf:
echo -e 'install_items+=" /.partition.35d5293d-6fe0-4eaf-987f-4f2eca8ca6d7.key "' \
 | sudo tee --append /etc/dracut.conf.d/99-root-key.conf
Yet again, to keep your system secure, make sure nobody else can access your /boot-stuff:
chmod -R go= /boot/
To have this Dracut segment have any effect, you need to run mkinitrd as root. If you want more information about initRDs or Dracut, go to https://dracut.wiki.kernel.org/.
Now, you're ready to reboot the Linux. Both WiFi and password setups are done.
Step 7: Reboot and verify setup
You will need to enter the encryption password for GRUB, no change there. However, your Linux should go directly to login-screen. If it doesn't, you failed somewhere.
Also, after a login, your WiFi should work. To confirm, go to a prompt:

Since installer saved your wireless connection details, now you have network connectivity also in your installed Linux!
Step 8: Finalize
Remember the part where your installer used a different version of Linux kernel than your ready system? Kinda hard to not remember it, right. Now some additional work is needed to keep your system working:
As root, run this in a bash-prompt (again, a single-liner):
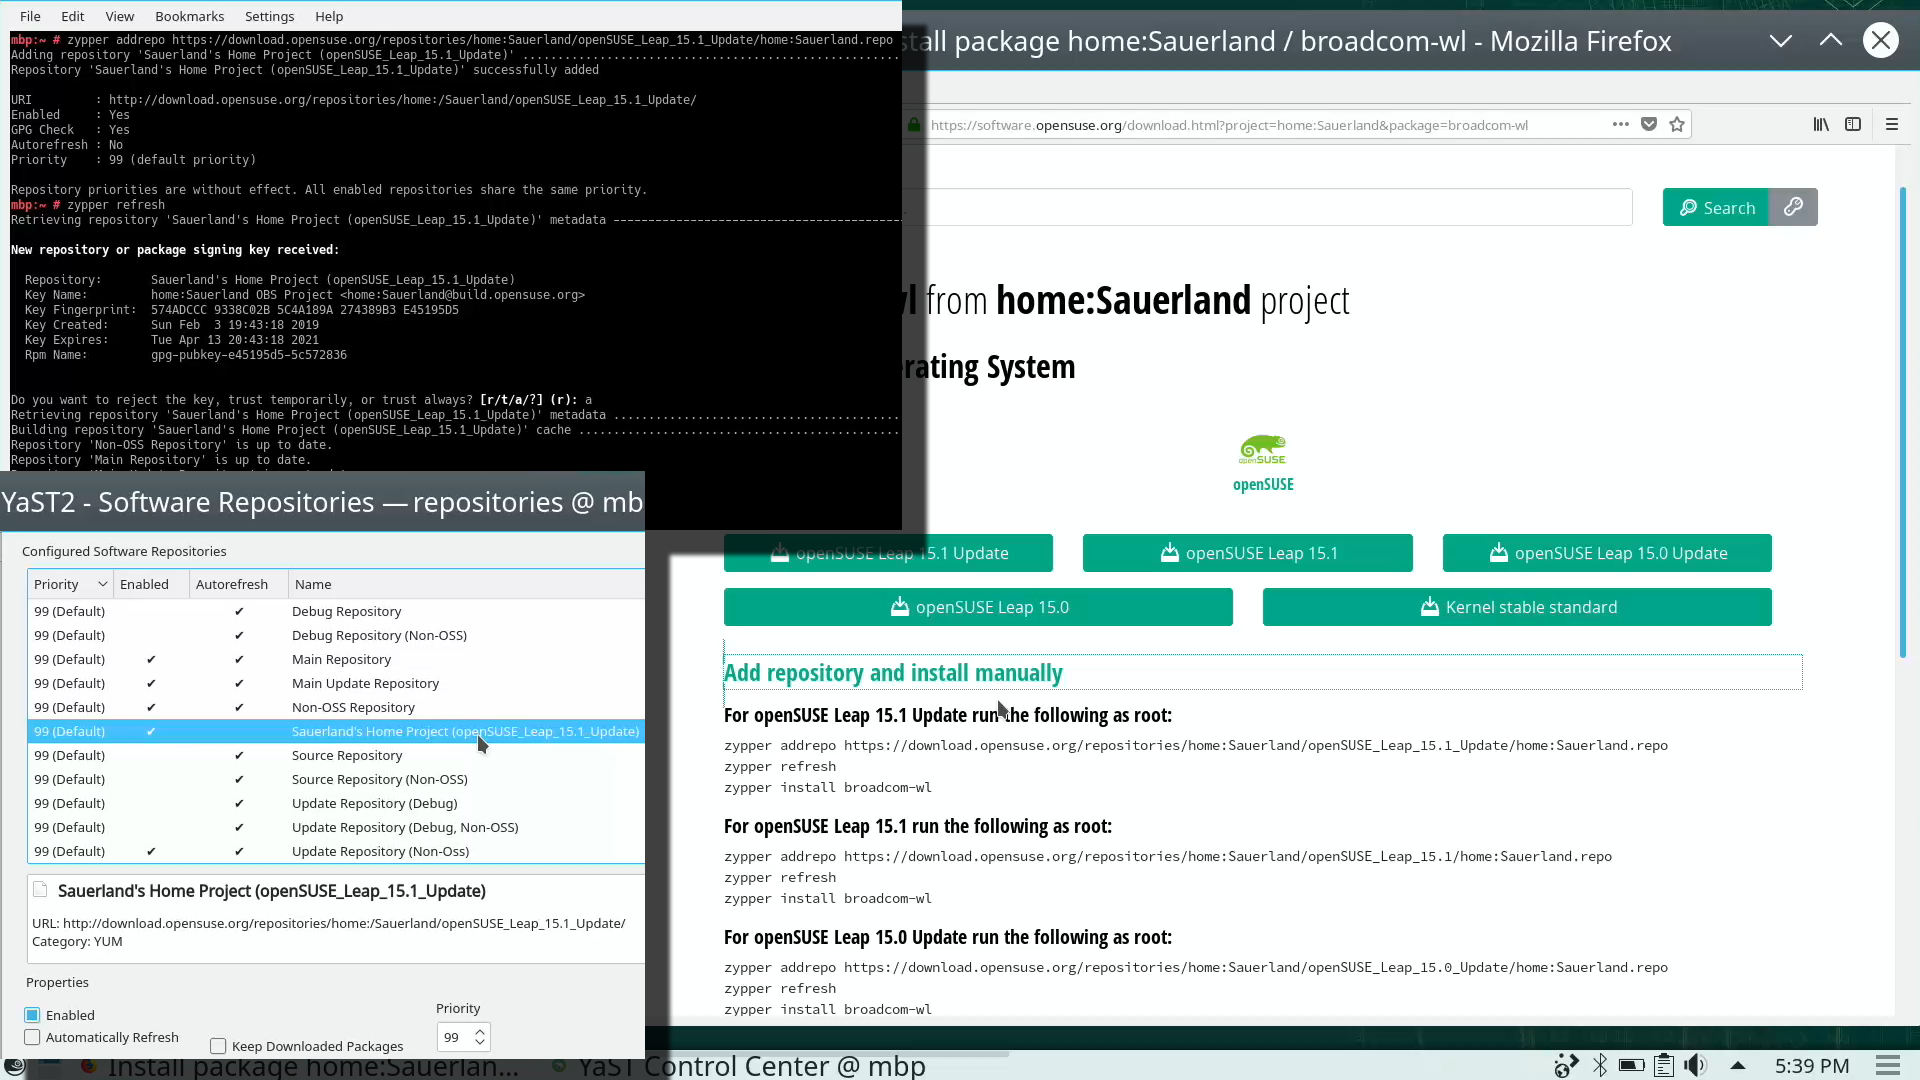
zypper addrepo \

  https://download.opensuse.org/repositories/home:Sauerland/openSUSE_Leap_15.1_Update/home:Sauerland.repo
The setup information is available at https://software.opensuse.org/download.html?project=home%3ASauerland&package=broadcom-wl.
Finally: Go to YaST2 and use the GUI to inspect all the software repositories your system has. It must have Sauerland's repo enabled for the Broadcom driver to get updates as openSUSE's kernel-default -package does.
Step last: All done
 That's it. Now your Mac is successfully running an openSUSE 15.1 Leap Linux.
Enjoy!
Zebex Z-3151HS bar code reader - Windows 10 - Unknown USB, USB device not recognized
Thursday, July 11. 2019
Among the number of toys I have, are couple of Zebex bar code readers. Since forever (or 2013), I've had issues with Windows not detecting the newly attached USB-device correctly. See my previous article Windows 7 unable to detect a HID barcode scanner for details. That was on a Zebex Z-3000 to be exact.
During all these years, the problem has not solved itself and all my attempts to fix have been not-so-successful. The reader I've been most recently used is an improved one using a laser to read the data, a Z-3151HS (the HS stands for High Speed). The version query will return a single-line string containing following:
Model Z3151HS S01.01

Ver

01.27

Date

01-18-2019
On a plugin, the USB human-interface-device (or HID, or keyboard) does this:
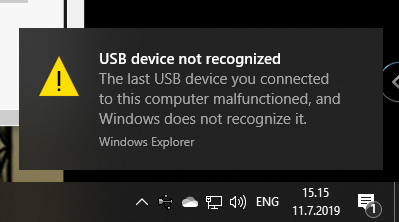
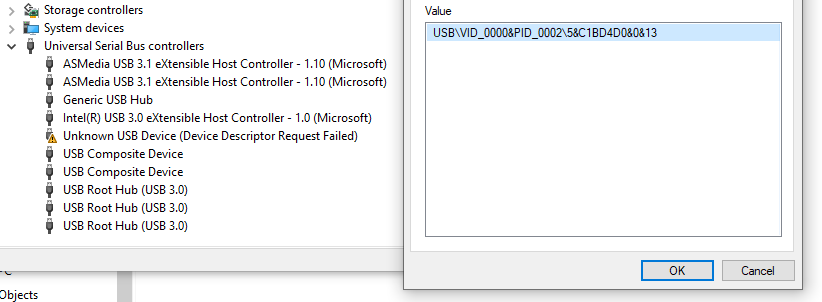
Nobody loves seeing an USB device not recognized -popup, or Device Descriptor Request Failed on device manager. That's a sign of a major malfunction.
Luckily, in this case without spending too much time, little bit of troubleshooting became fruitful and both problem reason and a fix were found. The bar code reader loves being in a wrong mode. This is an USB-device, but no matter what I try, on plugin the device will be in IBM PC/AT/PS/2 Keyboard emulation mode. That incorrect mode makes the newly plugged in USB-device not respond to a Windows intiated device query. As you might think, your Windows will be pissed about the failure and bark about it. Obviously, the device should be in USB-mode to handshake properly with Windows, that's a no-brainer.
Again, the mode can be changed easily by scanning some bar codes (these are actually in the manual too):

Enter configuration mode, switch to USB-mode and end configuration mode. Poof! Now Windows 10 sees the HID USB-thingie ok and it does work correctly. The obvious problem is, that you really do need to do it EVERY SINGLE TIME you plugin the device to your computer. Not cool! Numerous attempts to fix the mode-select have failed. If you have a suggestion, I'd be happy to try it.
Bonus: Firmware upgrade
My unit had a measly 1.03 firmware when I bought it. Obviously, I've been upgrading firmwares while hoping the problem would be solved somehow. No such joy yet.
New firmwares can be downloaded from Zebex website @ https://www.zebex.com/en/product/index/20/Z-3151HS with appropriate tooling to do the update. Since this is on a computer, nothing will ever work as smoothly as you'd like. On an attempt to run the firmware upgrade tool, this will happen:

In front of your eyes, a failure will occur and a message will state: Make sure the device work under USB-Boot mode. I'm not sure whose English grammar is better, mine or that person who wrote that sentence, but the problem stands. You need to get your device into USB-Boot -mode and you have zero clue on how to do that.
Tons of googling, reading forum posts and manuals will reveal, that such a sequence does exist. You need to scan following bar codes:
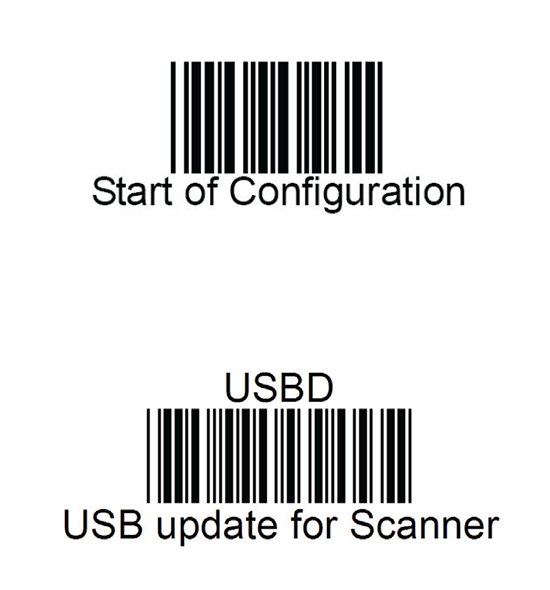
Yet again, go for configuration mode, and place the device into USB update -mode. After that, your firmware update will proceed to actual update.
I'll hope these tips will help some poor user trying to get his/hers reader working.
Enjoy scanning!
Weather Station destroyed in hailstorm
Wednesday, July 10. 2019
Over four years ago I wrote about my weather station setup. Well ... It doesn't exist anymore. There was a severe thunderstorm and my gadgets weren't properly fastened to the steel pipe and this happened:
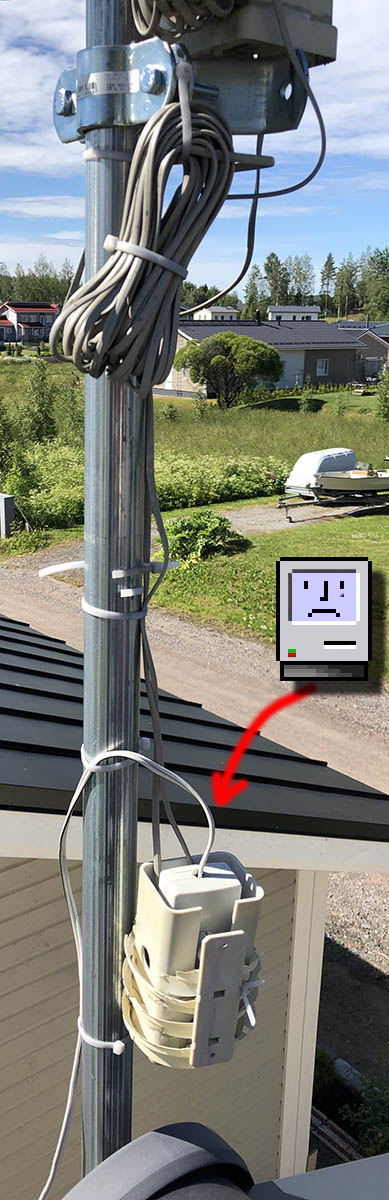
After weather cleared, I realized the lack of readings from my garage roof. The poor temperature unit / CPU was upside down, hanging from some wirings and FULL OF WATER! Ufff! Electronics and water won't mix. At least not well.
My zip-ties didn't like the ping pong -ball sized hail:
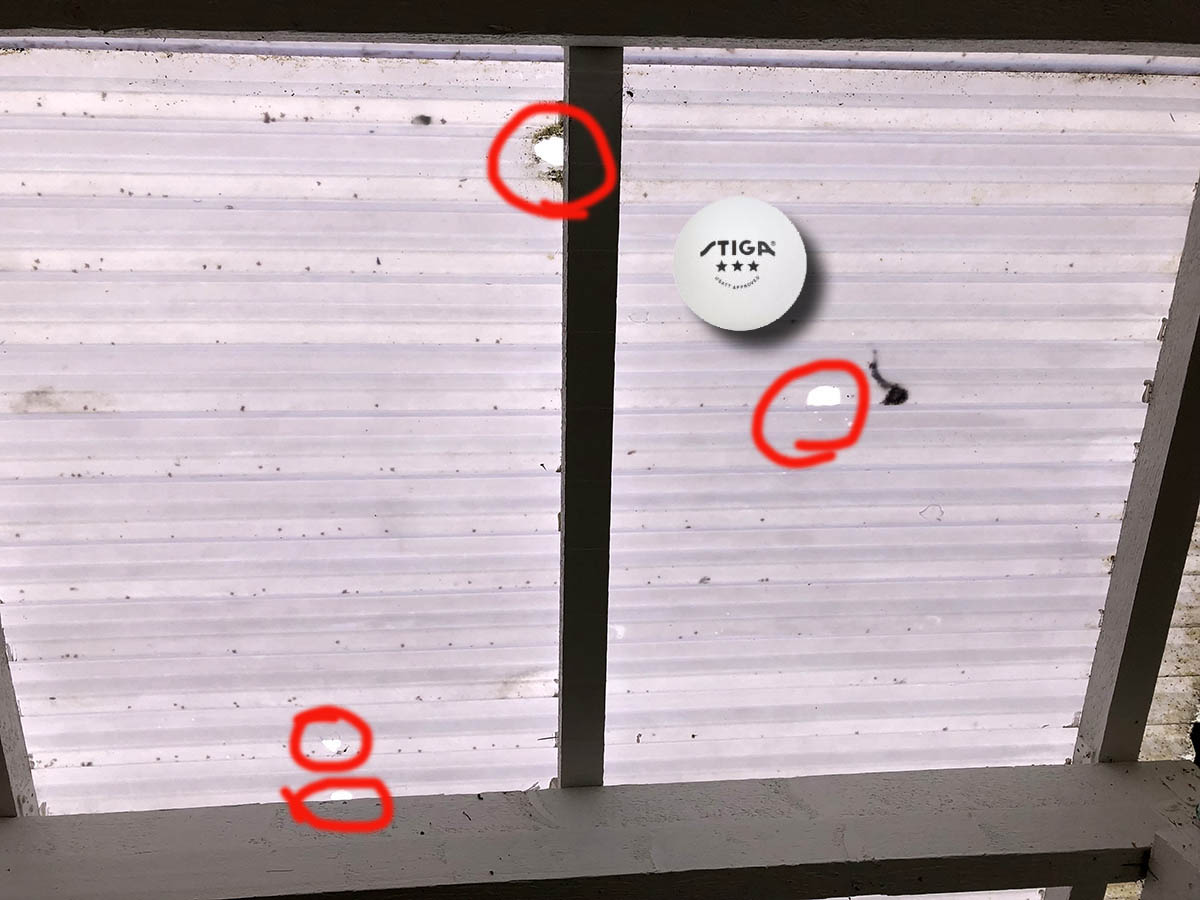
The picture from sunroofing is from my friend's place. He has some tinkering to do, to get this deck roofing fixed. That piece of plastic didn't survive chunks of ice plummeting from the sky.
To get my weather properly measured and data-logged, I already put a purchase order for a new unit. This time I'm going for a Davis Vantage Vue. Also, to save money this time I'm attaching it properly!
Weather Station destroyed in hailstorm
Wednesday, July 10. 2019
Over four years ago I wrote about my weather station setup. Well ... It doesn't exist anymore. There was a severe thunderstorm and my gadgets weren't properly fastened to the steel pipe and this happened:
After weather cleared, I realized the lack of readings from my garage roof. The poor temperature unit / CPU was upside down, hanging from some wirings and FULL OF WATER! Ufff! Electronics and water won't mix. At least not well.
My zip-ties didn't like the ping pong -ball sized hail:
The picture from sunroofing is from my friend's place. He has some tinkering to do, to get this deck roofing fixed. That piece of plastic didn't survive chunks of ice plummeting from the sky.
To get my weather properly measured and data-logged, I already put a purchase order for a new unit. This time I'm going for a Davis Vantage Vue. Also, to save money this time I'm attaching it properly using steel hose clamps!
New microphone
Monday, June 10. 2019
It's not that you'd be talking all the time, but quite often a good microphone is needed. It may be (video)conferencing to somebody or just to get your multiplayer game coordinated with the other people you're playing with. Lot of people are happy using the tiny mic in their headphones, but not me. I'd rather invest some real money to a proper piece of hardware to get my sound transmitted over crystal clear.
Since I didn't want to go for ridiculously expensive studio ones, I stayed below 300 € price range and went for a Røde NT-USB (details are at https://www.rode.com/microphones/nt-usb). The microphone would work as a self-standing desk mic, but adding a few options allows me to amp up the experience to a near-studio -quality.
This is what my rig looks like:
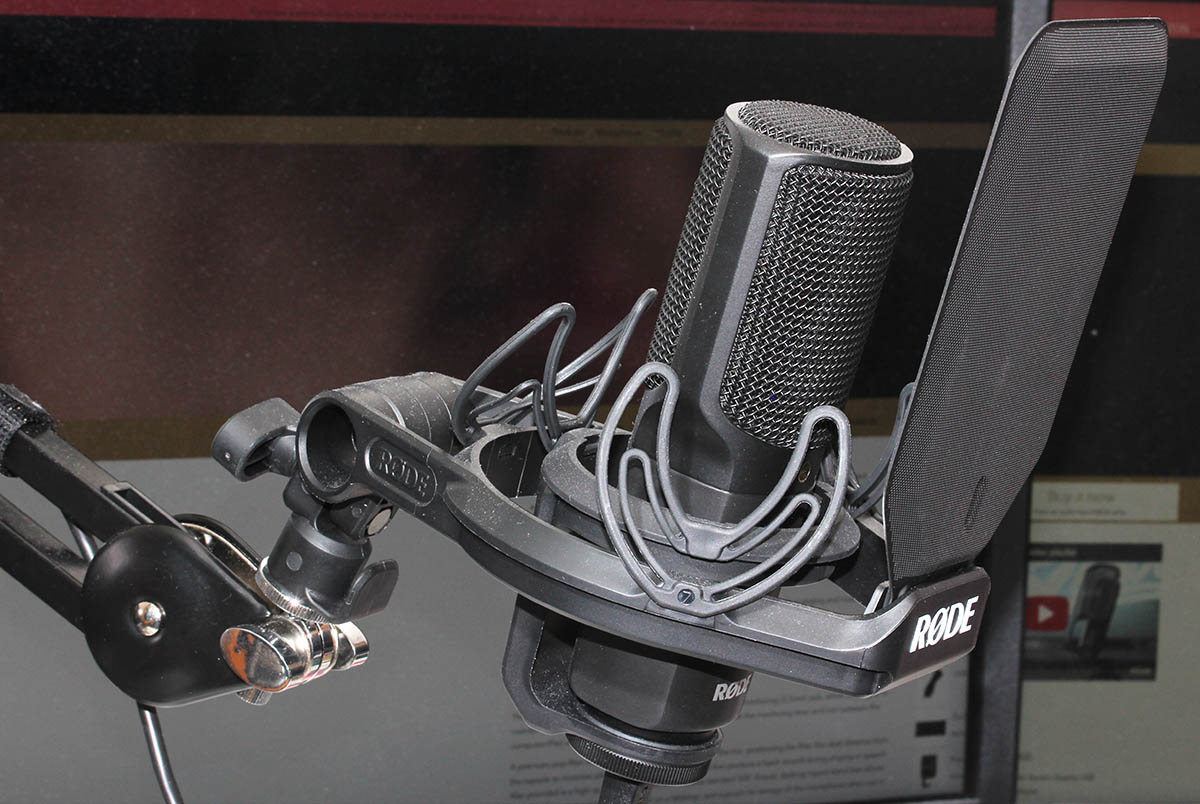
As you can see, there is a PSA1 boom arm and a SMR shock mount to keep the sound quality better when I bang the desk in rage.
Mic itself looks like this:


The metal ring used to fasten the microphone to a stand gives you indication of the quality of this product. No messing around here. No flimsy plastic screws. Steel!
Also the acronym USB gives you a hint about how you might connect this lump of metal to a computer, using USB 2.0 interface on the bottom of the microphone. If this would be professional-quality, instead of USB-B connector, you would use for example XLR-connector for cabling. This would leave you to do the analog-to-digital -conversion by yourself. I chose this particular unit for the reason it hooks up to your PC/Mac/Linux/whatever directly. Here no extra stuff needed, but the setup is limited by USB's 5 meter max. cable length. There is plenty of USB-cable in the box, so don't worry about running out.
Shock mount is for reducing any possible noise caused by accidental headbump into desk or microphone. As suggested, the mount absorbs most of the shock and not transmitting really weird noises over. This is how the "cradle" looks like:

There is a windshield reducing any air blowing from me towards the microphone. Again, reducing any weird noises sounding like I was hit by a hurricane to being transmitted over. The shock mount connects to the boom arm using a 5/8" (or 3/8") screw:

As you can see, there is an adapter there allowing you to use pretty much any mic boom of your choice. I chose to go full on with Røde.
Important thing is to note, that manufacturer does NOT recommend using SMR shock-mount with NT-USB microphone. Product details at https://www.rode.com/accessories/smr do NOT list NT-USB as being compatible or related product. The reason is not as dramatical as you might think. The products are compatible, but:
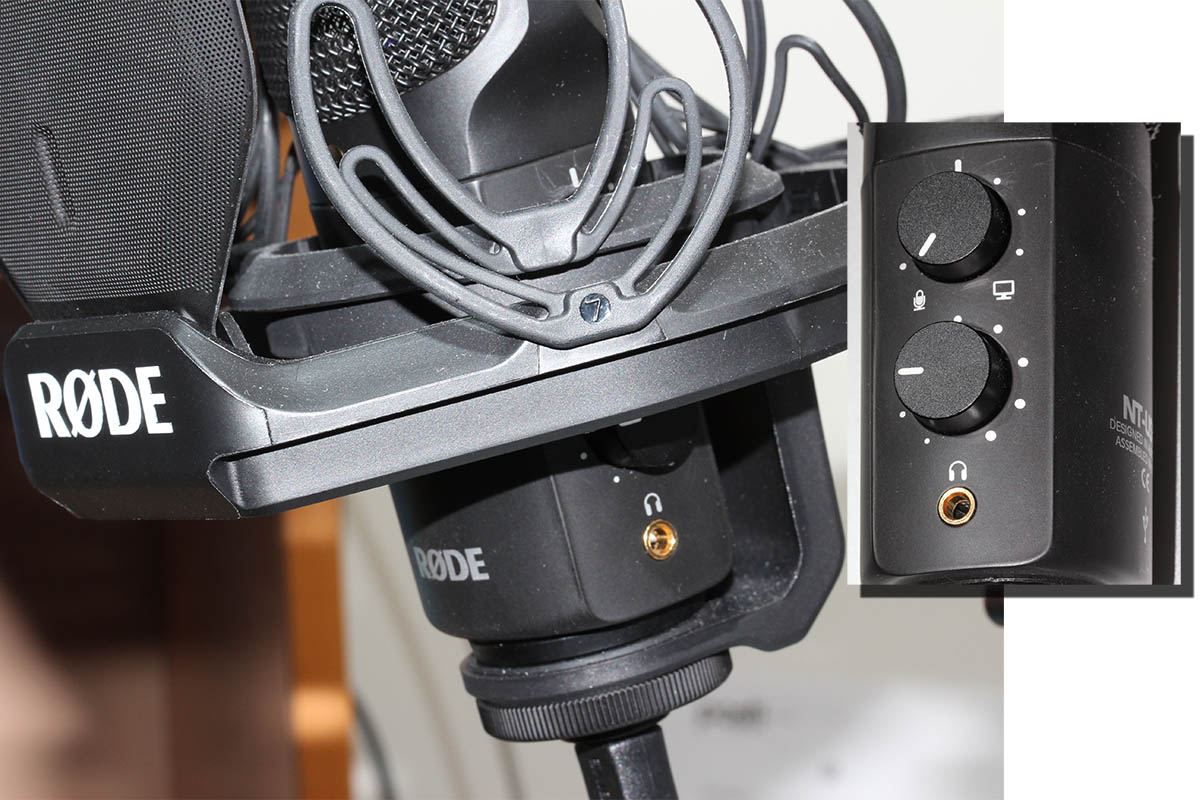
In a scenario, where you would use the USB to transmit sound back to your headphones via 3.5mm jack in the mic, it would be difficult for you to change the headphones volume as the volume knobs aren't that easy to access. You can access them, but not as well as manufacturer would love you to. So, they simply flag the products as "incompatible".
Ultimately, I've been really happy with the product. My sound is heard extremely well on the other side. Helping with this is the boom arm, which lets me place the microphone to almost any location of my choosing while doing my computing, whatever type of computing that might be. The best thing is the very high quality of the product. I don't think I'll be buying a new mic anytime soon.
Adding a source of randomness to a Linux
Monday, June 3. 2019
Randomness in computers
You don't need to know much about computers to understand, that computers cannot do random things. Yes, all programming languages and libraries do offer you a rand()-function to emulate randomness. However, the resulting output will follow the carefully crafted programming implementing this "randomness". The most trivial pseudo-random functions will merely provide a sequence of numbers appearing random, but this sequence can be reset to start from beginning making the "randomness" predicatable. That's not really very random, huh!
Improved randomness in computers
To be fair, there does exist improved pseudo-random algorithms which take their initial seed-values from something volatile (time is one such volatile parameter) making the quality of randomness better. Still, even high-quality pseudo-random algorithm is just complex sequence of operations, which will produce duplicate results on same input values. Sometimes its just very tricky to craft a situation where all of the input values would match.
If somebody is capable of doing that, your randomness changes into predictability. Read the story of Dual_EC_DRBG on Wikipedia https://en.wikipedia.org/wiki/Dual_EC_DRBG. When you're generating your precious private keys, you don't want anybody (including NSA) to be able to guess what you have there.
Random source in Linux
Since a proper random source is something every single user, developer and sysadmin would love to have, the problem has been approached on your Linux by authors of the operating system. An excellent description can be found from Wikipedia article https://en.wikipedia.org/wiki//dev/random#Linux. Briefly put, your Linux will collect environmental entropy from number of sources (including human interaction with keyboard and mouse) to a pool, which can then be used to produce naturally random numbers. It actually works very well, the quality of randomness is top-notch.
Obvious problem with this approach is, that you cannot pull too many random numbers out of this source without exhausting it. The fix is to keep typing something while moving your mouse (not a joke!) to generate entropy for the random source. This will eventually help fill the entropy pool and /dev/random will spit couple bytes more.
Those users who have exhausted their /dev/random on an idling rack server without a console keyboard, mouse and video know that it takes painfully long for the entropy pool to fill. A busy server doing something will be able to fill the pool much faster.
A real random source
If you need a real proper random source, which works without human intervention and can provide really good randomness as a stream, there are possibilities on hardware. I know of two good ones, Simtec Electronics Entropy Key and ubld.it TrueRNG Hardware Random Number Generator.
Note: if you consider getting one, get the TrueRNG version 3 (http://ubld.it/truerng_v3). Its just that I have the 1st gen version at hand and haven't found the reason to upgrade.
My TrueRNG looks like this:
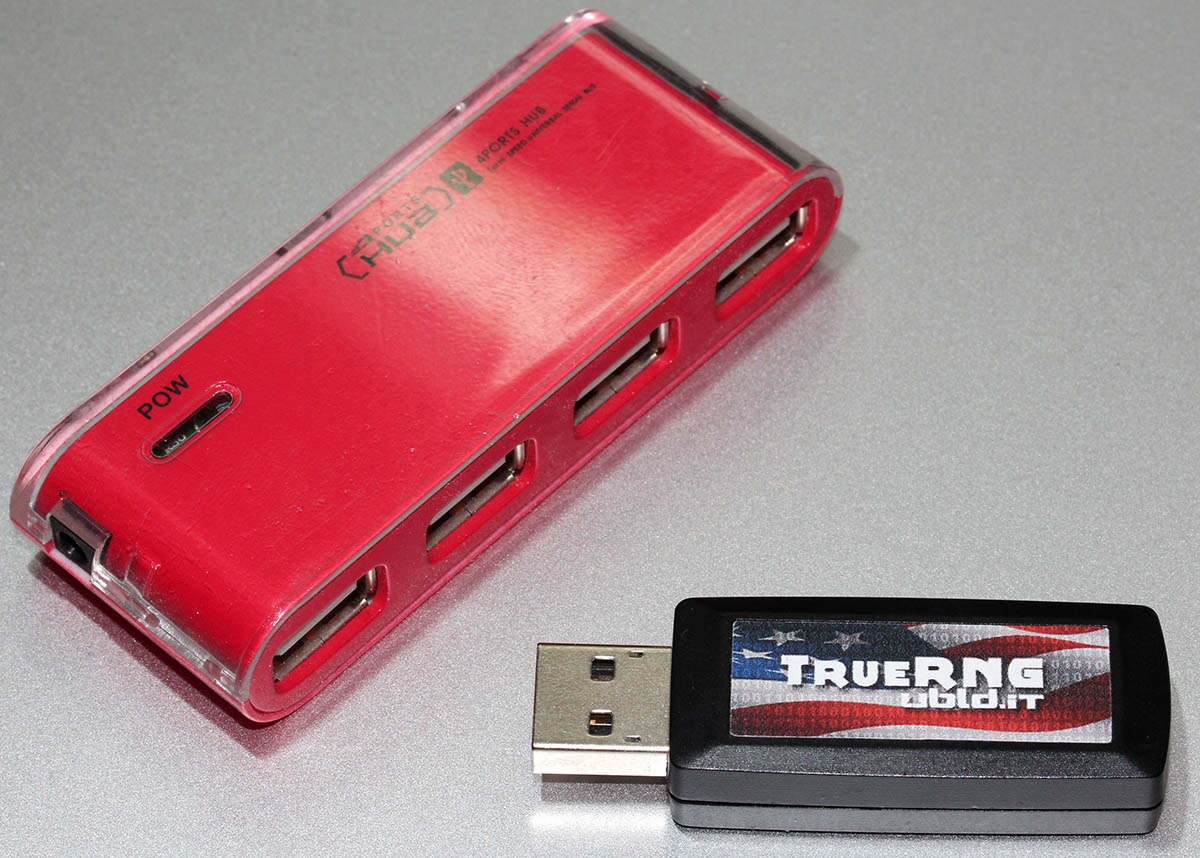
It is essentially an USB-stick.
Linux lsusb info essentially identifies it as a Microchip (vendor ID 0x04d8) manufactured USB-device (with ID 0xf5fe) providing RS-232 communications:
Bus 002 Device 009: ID 04d8:f5fe Microchip Technology, Inc.

Device Descriptor:

  bLength                18

  bDescriptorType         1

  bcdUSB               2.00

  bDeviceClass            2 Communications

  bDeviceSubClass         0

  bDeviceProtocol         0

  bMaxPacketSize0         8

  idVendor           0x04d8 Microchip Technology, Inc.

  idProduct          0xf5fe

  bcdDevice            1.00

  iManufacturer           1 ubld.it

  iProduct                2 TrueRNG

  iSerial                 0

  bNumConfigurations      1

  Configuration Descriptor:

    bLength                 9

    bDescriptorType         2

    wTotalLength       0x0043

    bNumInterfaces          2

    bConfigurationValue     1

    iConfiguration          0

    bmAttributes         0x80

      (Bus Powered)

    MaxPower              100mA

    Interface Descriptor:

      bLength                 9

      bDescriptorType         4

      bInterfaceNumber        0

      bAlternateSetting       0

      bNumEndpoints           1

      bInterfaceClass         2 Communications

      bInterfaceSubClass      2 Abstract (modem)

      bInterfaceProtocol      1 AT-commands (v.25ter)

      iInterface              0

      CDC Header:

        bcdCDC               1.10

      CDC ACM:

        bmCapabilities       0x02

          line coding and serial state

      CDC Union:

        bMasterInterface        0

        bSlaveInterface         1

      CDC Call Management:

        bmCapabilities       0x00

        bDataInterface          1

      Endpoint Descriptor:

        bLength                 7

        bDescriptorType         5

        bEndpointAddress     0x81  EP 1 IN

        bmAttributes            3

          Transfer Type            Interrupt

          Synch Type               None

          Usage Type               Data

        wMaxPacketSize     0x000a  1x 10 bytes

        bInterval               1

    Interface Descriptor:

      bLength                 9

      bDescriptorType         4

      bInterfaceNumber        1

      bAlternateSetting       0

      bNumEndpoints           2

      bInterfaceClass        10 CDC Data

      bInterfaceSubClass      0

      bInterfaceProtocol      0

      iInterface              0

      Endpoint Descriptor:

        bLength                 7

        bDescriptorType         5

        bEndpointAddress     0x02  EP 2 OUT

        bmAttributes            2

          Transfer Type            Bulk

          Synch Type               None

          Usage Type               Data

        wMaxPacketSize     0x0040  1x 64 bytes

        bInterval               0

      Endpoint Descriptor:

        bLength                 7

        bDescriptorType         5

        bEndpointAddress     0x82  EP 2 IN

        bmAttributes            2

          Transfer Type            Bulk

          Synch Type               None

          Usage Type               Data

        wMaxPacketSize     0x0040  1x 64 bytes

        bInterval               0

Device Status:     0x0001

  Self Powered
And by looking at /dev/, there is a /dev/ttyACM0. That's how udevd will populate a CDC-device when it sees one.
How is this a "true" random source?
Oh, that's easy. The device will produce a random 0 or 1 bit constantly when its on. Or to be precise, there is an internal algorithm producing those based on a constant flow of electrons on a transistor PN-surface. The exact phenomenon is called avalance effect or avalance breakdown. For those who can do electronics, there is a good explanation about this in Difference Between Avalanche Breakdown and Zener Breakdown (I borrowed the visualisation pic from above link).

To (over)simplify that, in a carefully constructed electronic circuit, inside a transistor an electron may or may not be emitted on the other side of a semiconducting surface. The occurrence is as random as it can be in nature. Other circuitry will detect this random flow of electrons (or lack of flow) to produce ones and zeros.
What makes this a really good for randomness, as it is well established that this avalance of electrons will happen. Also, it will happen often enough to produce a stream of events. It's just that we don't know exactly WHEN the avalance of electrons will happen. If you time-slice this to slots, a slot can be empty (no avalance) or full (electrons avalanching).
Linux tweaking:
udev
Anybody having multiple devices in their Linuxes knows, that you really cannot control which device name some specific device will get on reboot. To overcome that, udevd can be instructed to do things when it sees a device. My rules for TrueRNG include setting it to highest possible speed and creating a symlink-device so, that I can point to a known source of random. Also, I'm loosening access to that source of randomness to any users belonging to dialout-group. If I wouldn't do that, only root would have access to this fine random-source.
My /etc/udev/rules.d/99-TrueRNG.rules contains:
SUBSYSTEM=="tty", ATTRS{product}=="TrueRNG", SYMLINK+="TrueRNG", RUN+="/bin/stty raw -echo -ixoff -F /dev/%k speed 3000000"

ATTRS{idVendor}=="04d8", ATTRS{idProduct}=="f5fe", ENV{ID_MM_DEVICE_IGNORE}="1", GROUP="dialout", MODE="0664"
If you want to take your random-device for a spin, you can do something like:
dd if=/dev/TrueRNG of=random.bytes bs=64 count=1024
That would create a file of 64 KiB containing very very random bytes. In theory you can just cp data out of the character device, but since it has an infite flow, you'll need to cut it at one point.
rngd
Remember the part I said earlier about Linux using your keypresses and mouse movements as entropy source for randomness. Even with the USB-stick popped into a PC, that still remains the case. What needs to be done next is to offer a helping hand to the Linux kernel and make sure the entropy pool is always full.
My Fedora has package called rng-tools. It is packaged from Mr. Horman's https://github.com/nhorman/rng-tools. What's in there are the tools for pumping those precious truly random bits out of the USB-source to Linux kernel's entropy pool. As default, rngd will use /dev/hwrng as the source for randomness. Some Linuxes don't have that device at all, some Linuxes point that into CPU's random source. What's guaranteed, it will not point to your USB-stick! We need to change that.
Btw. you might be horrified by the fact, that something is fidding with your randomness. The exact bits transferred from USB to entropy pool won't be the actual bits getting out of /dev/random. Your keypresses and many other events are still a factor. Its still a good idea to not run randomness-monitoring malware or spyware in your Linux.
Systemd works so, that I did create a copy of /usr/lib/systemd/system/rngd.service into /etc/systemd/system/rngd.service. The contents of the copy in /etc/systemd/system/ can be freely modified and it has priority over the /usr/lib/systemd/system/ one. The only change I made was to have the ExecStart-line say as:
ExecStart=/sbin/rngd -f --rng-device=/dev/TrueRNG --fill-watermark=4000
When rngd-service would be started, it will use the USB-stick as source and make sure, there are at least 4000 bits of entropy in the pool.
Making sure rngd setup works
At any given point, you can query how many bits are available in the Linux entropy-pool:
cat /proc/sys/kernel/random/entropy_avail
Since my setup is working correctly, it will display a number greater than 4000 and smaller than 4096. The upper limit comes from /proc/sys/kernel/random/poolsize, which is a hard-coded number from Linux kernel source.
Hint: If you do the stupid thing like I did and set the /proc/sys/kernel/random/write_wakeup_threshold (using --fill-watermark) into 4096 (or above), your rngd will keep hogging CPU like there is no tomorrow. It is impossible for the pool to contain maximum number of bits at any given time. Give your system a break and set the threshold bit lower than max.
Finally
It's always nice to know for a fact, that random numbers are random. This fact can be verified and has been verified by number of other people.
Enjoy!
Apple iOS device reset - Dismantling an old phone to be sold
Thursday, May 30. 2019
Every one of use will eventually end up in a situation where old mobile device is upgraded to a new one. Most of us can manage getting the new one working without problems. There are backups somewhere in the cloud and the new device will have the intial setup done from the backup and everything in the out-of-the-box experience will go smoothly.
But what about the old one? You might want to sell or give or donate the perfectly functioning piece of hardware to somebody who wants it more. But not without your data, accounts and passwords!
Apple support has this HT201351 article What to do before you sell, give away, or trade in your iPhone, iPad, or iPod touch. It instructs you to do a full erase of the device, but doesn't go too much into the details.
Personally, I've struggled with this one a number of times. So, I decided to record the full sequence for me and anybody else needing it. Here goes!
Start with Settings, General. In the bottom of General-menu, there is Reset. That's your choice. For curious ones, you can go see the menus and choices without anything dangerous happening. You WILL get plenty of warning before all your precious data is gone.
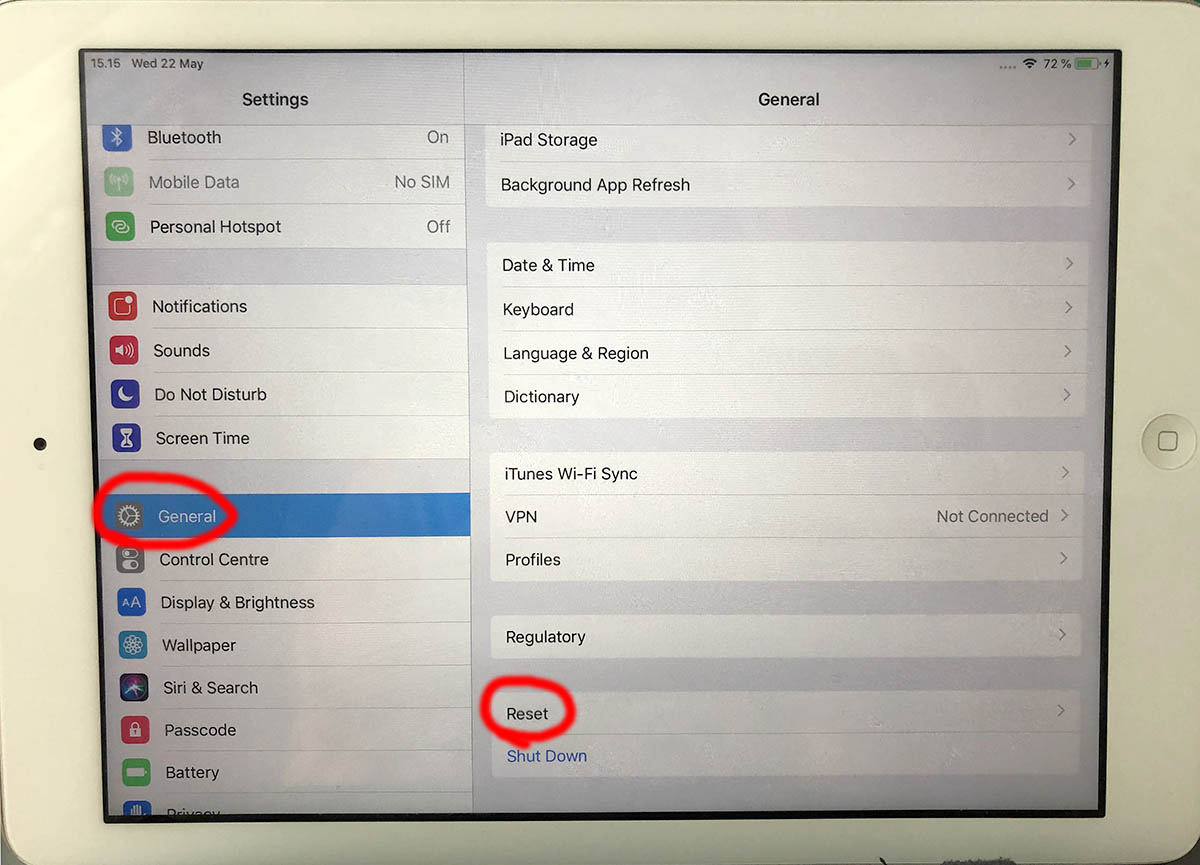
In Reset, there are number of levels of reseting to choose from. You want to go all the way. To erase every single bit of your personal data from the device. To get that, go for Erase All Content and Settings.

You will have two separate warnings about your intent to destroy your data. Even if you pass that gateway, there is more. Nothing will be erased until a final blow.
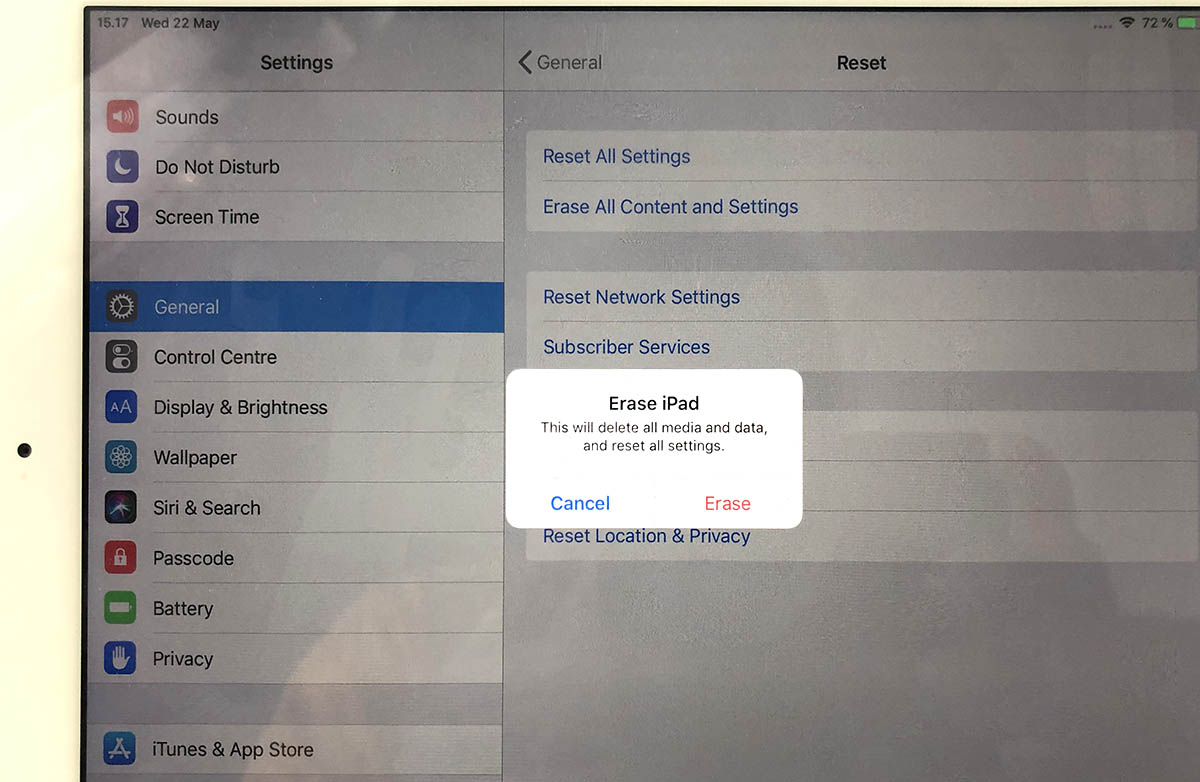

The final thing to do is to inform Apple, that this device won't be associated to your Apple ID anymore. For that, your password will be needed. This is the final call. When you successfully punch in your password, then the big ball starts rolling.

When you see this, you're past point-of-no-return.
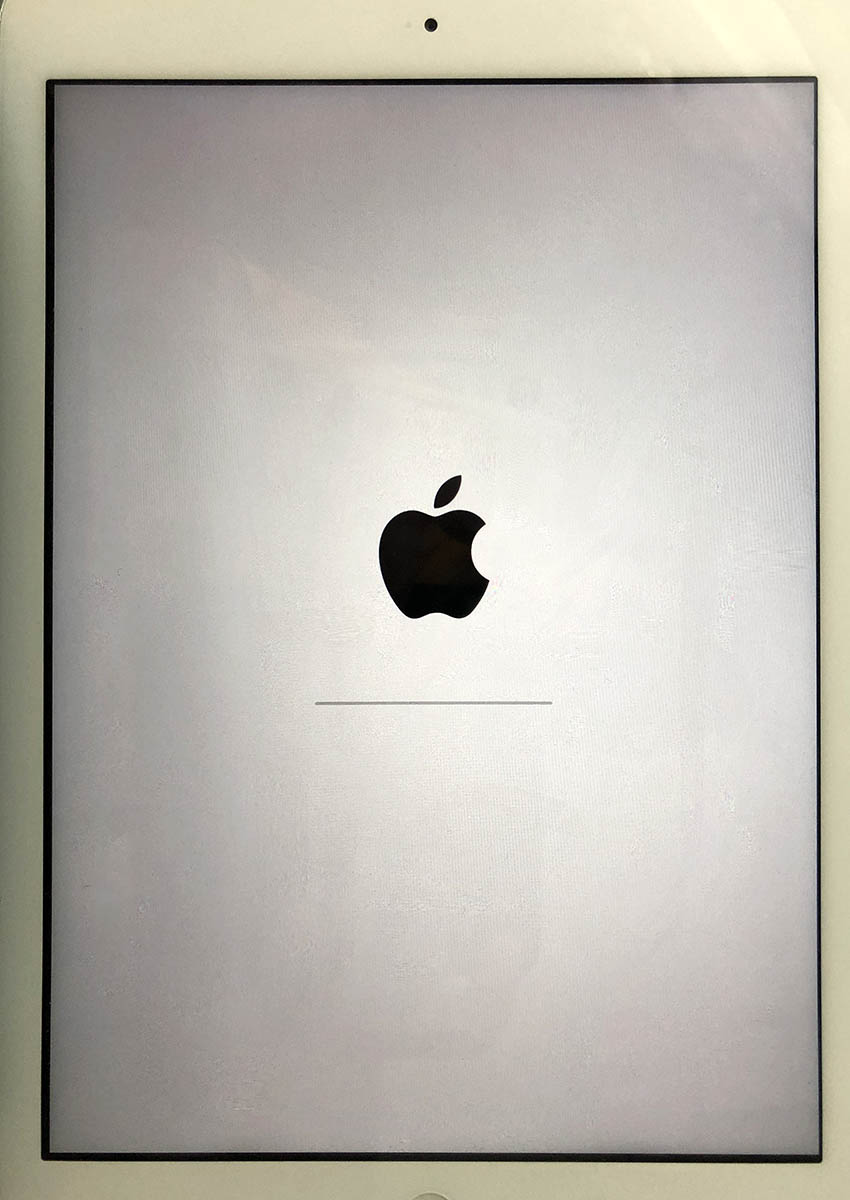
It takes a while to erase all data. Wait patiently.
When all the erasing is done, the device will restart and it will go for the out-of-the-box dialog. This is where new user needs to choose the user interface language, network and associate the device with their own Apple ID.
The trouble with a HPE Ethernet 10Gb 2-port 530T Adapter
Thursday, May 23. 2019
A while back I got my hands on a nice PCIe 2.0 network interface card.
The thing looks like this:
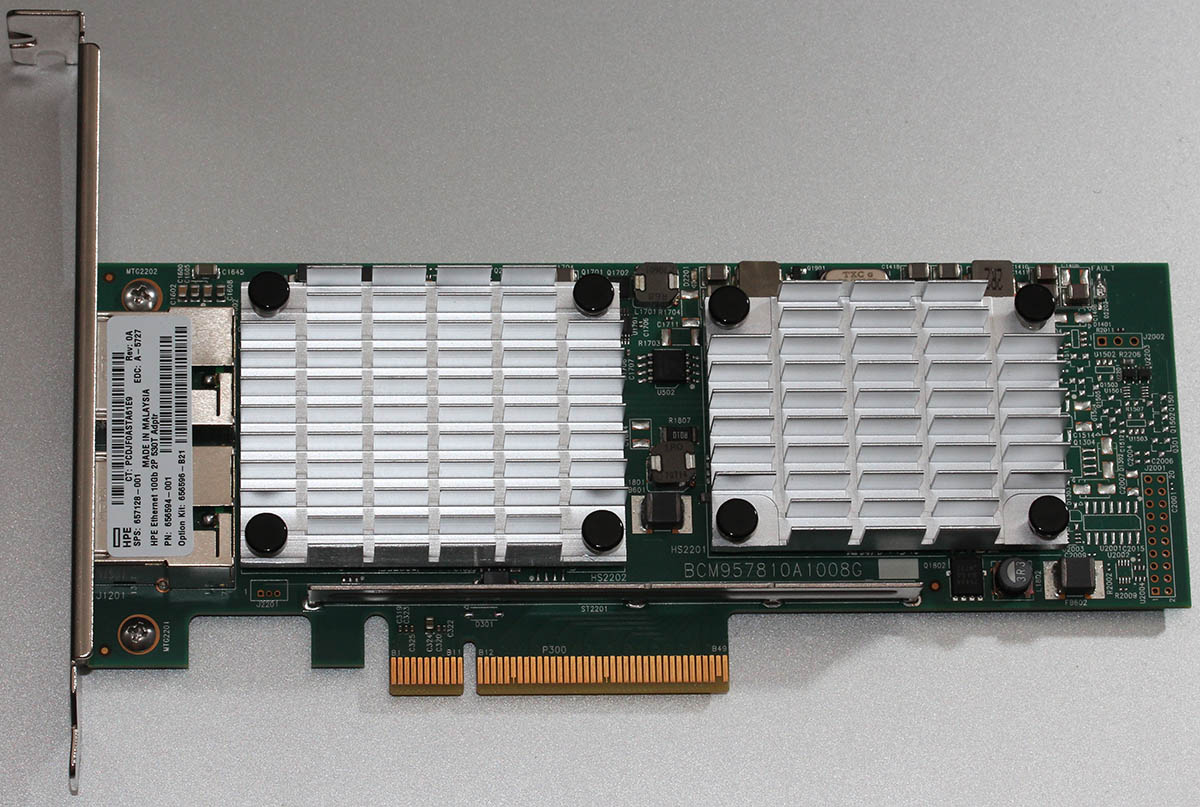
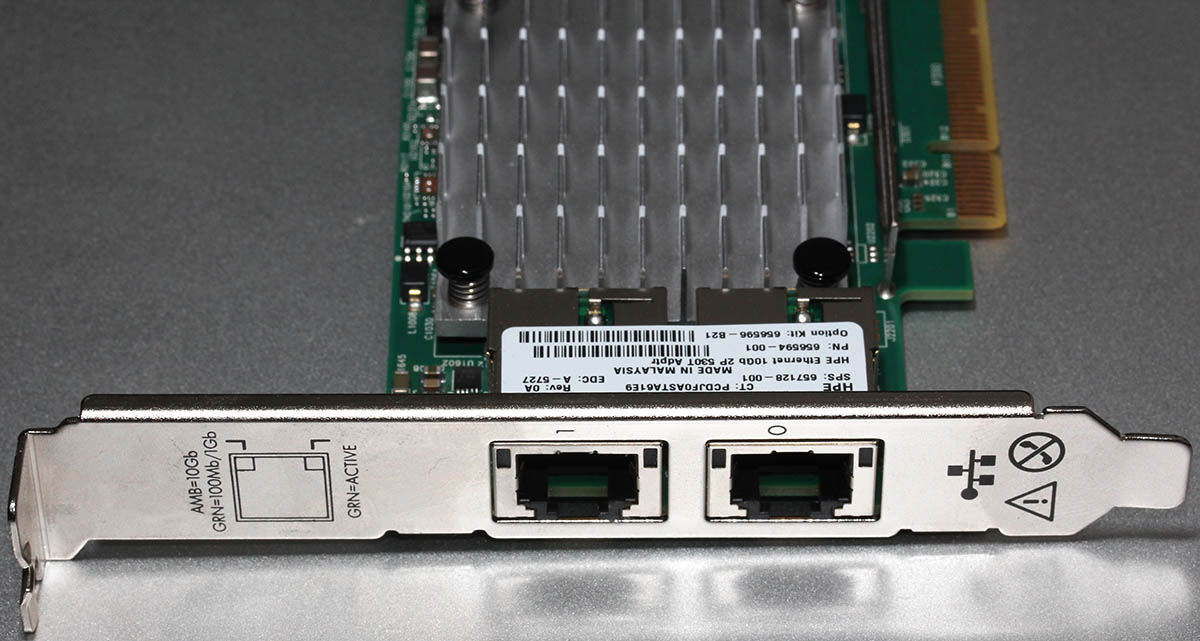
In theory, that's an extremely cool piece to run in one of my Linuxes. Two 10 gig ethernet ports! Whoa!
Emphasis on phrase "in theory". In practice it's just a piece of junk. That's not because it wouldn't work. It does kinda work. I have to scale down the DDR3 RAM speed into 800 MHz just to make the hardware boot. Doing that will get 12 GiB RAM out of 16 available. Something there eats my PCIe lanes and forces them to work at unacceptable low speeds.
This is a serious piece of hardware, for example in Amazon.com the going price for such item is $340 USD. Given the non-functional state of this, I got this with a fraction of it. Given my personal interest in such toys, I had to go for it. This time it didn't pan out.
Maybe HPE support site phrase for this at https://support.hpe.com/hpsc/doc/public/display?docId=emr_na-c03663929 explains it all: "PCIe 2.0 compliant form factor designed for HPE ProLiant servers". I'm not running it on a HP ProLiant. 
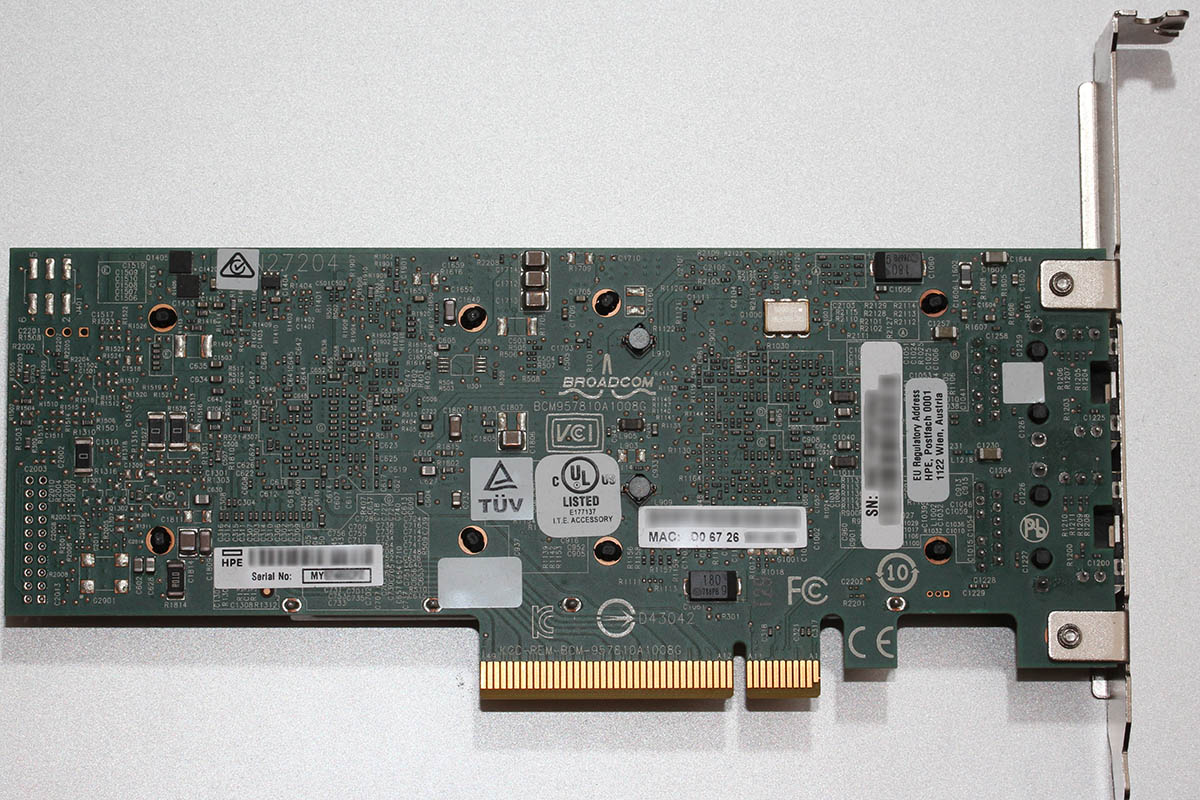
On a Linux, it does work ok. Kernel driver bnx2x detects and runs the NIC instantly. Linux lspci info:
# lspci -s 02:00.0 -vv -n

02:00.0 0200: 14e4:168e (rev 10)

  Subsystem: 103c:18d3

  Control: I/O- Mem+ BusMaster+ SpecCycle- MemWINV- VGASnoop- ParErr- Stepping- SERR- FastB2B- DisINTx+

  Status: Cap+ 66MHz- UDF- FastB2B- ParErr- DEVSEL=fast >TAbort- SERR-   Latency: 0, Cache Line Size: 64 bytes

  Interrupt: pin A routed to IRQ 17

  Region 0: Memory at f4000000 (64-bit, prefetchable) [size=8M]

  Region 2: Memory at f3800000 (64-bit, prefetchable) [size=8M]

  Region 4: Memory at f4810000 (64-bit, prefetchable) [size=64K]

  Expansion ROM at f7580000 [disabled] [size=512K]

  Capabilities: [48] Power Management version 3

    Flags: PMEClk- DSI- D1- D2- AuxCurrent=0mA PME(D0+,D1-,D2-,D3hot+,D3cold-)

    Status: D0 NoSoftRst+ PME-Enable- DSel=0 DScale=1 PME-

  Capabilities: [50] Vital Product Data

    Product Name: HPE Ethernet 10Gb 2P 530T Adptr

    Read-only fields:

      [PN] Part number: 656594-001

      [EC] Engineering changes: A-5727

      [MN] Manufacture ID: 103C

      [V0] Vendor specific: 12W PCIeGen2

      [V1] Vendor specific: 7.15.16

      [V3] Vendor specific: 7.14.38

      [V5] Vendor specific: 0A

      [V6] Vendor specific: 7.14.10

      [V7] Vendor specific: 530T

      [V2] Vendor specific: 5748

      [V4] Vendor specific: D06726B36C98

      [SN] Serial number: MY12---456

      [RV] Reserved: checksum good, 197 byte(s) reserved

    End

  Capabilities: [a0] MSI-X: Enable+ Count=32 Masked-

    Vector table: BAR=4 offset=00000000

    PBA: BAR=4 offset=00001000

  Capabilities: [ac] Express (v2) Endpoint, MSI 00

    DevCap: MaxPayload 512 bytes, PhantFunc 0, Latency L0s <4us, L1 <64us

        ExtTag+ AttnBtn- AttnInd- PwrInd- RBE+ FLReset+ SlotPowerLimit 75.000W

    DevCtl: CorrErr+ NonFatalErr+ FatalErr+ UnsupReq+

        RlxdOrd- ExtTag+ PhantFunc- AuxPwr+ NoSnoop+ FLReset-

        MaxPayload 128 bytes, MaxReadReq 512 bytes

    DevSta: CorrErr+ NonFatalErr- FatalErr- UnsupReq+ AuxPwr- TransPend-

    LnkCap: Port #0, Speed 5GT/s, Width x8, ASPM L0s L1, Exit Latency L0s <1us, L1 <2us

        ClockPM+ Surprise- LLActRep- BwNot- ASPMOptComp+

    LnkCtl: ASPM Disabled; RCB 64 bytes Disabled- CommClk+

        ExtSynch- ClockPM- AutWidDis- BWInt- AutBWInt-

    LnkSta: Speed 5GT/s (ok), Width x8 (ok)

        TrErr- Train- SlotClk+ DLActive- BWMgmt- ABWMgmt-

    DevCap2: Completion Timeout: Range ABCD, TimeoutDis+, LTR-, OBFF Not Supported

         AtomicOpsCap: 32bit- 64bit- 128bitCAS-

    DevCtl2: Completion Timeout: 50us to 50ms, TimeoutDis-, LTR-, OBFF Disabled

         AtomicOpsCtl: ReqEn-

    LnkCtl2: Target Link Speed: 2.5GT/s, EnterCompliance- SpeedDis-

         Transmit Margin: Normal Operating Range, EnterModifiedCompliance- ComplianceSOS-

         Compliance De-emphasis: -6dB

    LnkSta2: Current De-emphasis Level: -3.5dB, EqualizationComplete-, EqualizationPhase1-

         EqualizationPhase2-, EqualizationPhase3-, LinkEqualizationRequest-

  Capabilities: [100 v1] Advanced Error Reporting

    UESta: DLP- SDES- TLP- FCP- CmpltTO- CmpltAbrt- UnxCmplt- RxOF- MalfTLP- ECRC- UnsupReq- ACSViol-

    UEMsk: DLP- SDES- TLP- FCP- CmpltTO- CmpltAbrt- UnxCmplt- RxOF- MalfTLP- ECRC- UnsupReq- ACSViol-

    UESvrt: DLP+ SDES+ TLP- FCP+ CmpltTO- CmpltAbrt- UnxCmplt- RxOF+ MalfTLP+ ECRC- UnsupReq- ACSViol-

    CESta: RxErr- BadTLP- BadDLLP- Rollover- Timeout- AdvNonFatalErr+

    CEMsk: RxErr- BadTLP+ BadDLLP+ Rollover+ Timeout+ AdvNonFatalErr+

    AERCap: First Error Pointer: 00, ECRCGenCap+ ECRCGenEn- ECRCChkCap+ ECRCChkEn-

        MultHdrRecCap- MultHdrRecEn- TLPPfxPres- HdrLogCap-

    HeaderLog: 00000000 00000000 00000000 00000000

  Capabilities: [13c v1] Device Serial Number d0-67-26---------------

  Capabilities: [150 v1] Power Budgeting

  Capabilities: [160 v1] Virtual Channel

    Caps: LPEVC=0 RefClk=100ns PATEntryBits=1

    Arb: Fixed- WRR32- WRR64- WRR128-

    Ctrl: ArbSelect=Fixed

    Status: InProgress-

    VC0: Caps: PATOffset=00 MaxTimeSlots=1 RejSnoopTrans-

        Arb: Fixed- WRR32- WRR64- WRR128- TWRR128- WRR256-

        Ctrl: Enable+ ID=0 ArbSelect=Fixed TC/VC=01

        Status: NegoPending- InProgress-

  Capabilities: [1b8 v1] Alternative Routing-ID Interpretation (ARI)

    ARICap: MFVC- ACS-, Next Function: 1

    ARICtl: MFVC- ACS-, Function Group: 0

  Capabilities: [1c0 v1] Single Root I/O Virtualization (SR-IOV)

    IOVCap: Migration-, Interrupt Message Number: 000

    IOVCtl: Enable- Migration- Interrupt- MSE- ARIHierarchy-

    IOVSta: Migration-

    Initial VFs: 16, Total VFs: 16, Number of VFs: 0, Function Dependency Link: 00

    VF offset: 8, stride: 1, Device ID: 16af

    Supported Page Size: 000005ff, System Page Size: 00000001

    Region 0: Memory at 00000000f4820000 (64-bit, prefetchable)

    Region 4: Memory at 00000000f48a0000 (64-bit, prefetchable)

    VF Migration: offset: 00000000, BIR: 0

  Capabilities: [220 v1] Resizable BAR

  Capabilities: [300 v1] Secondary PCI Express

  Kernel driver in use: bnx2x

  Kernel modules: bnx2x
If anybody has any suggestions/ideas what to try, I'll be happy to test any of them. Also, my suggestion for anybody planning to get one is to NOT pay any money for it.
What's inside a credit card
Friday, May 3. 2019
Most of us have a credit card (or debit) for payment purposes. As I love tech, technically speaking, it is laminated polyvinyl chloride acetate (PVCA) piece of plastic conforming to ISO/IEC 7810 ID-1.
What's in a card is:
- The standard-compliant plastic frame
- ISO/IEC 7816 smart card with 8-pin connector
- ISO/IEC 14443 RFID chip and antenna for contactless payments
- (optional, deprected as insecure) ISO/IEC 7811, 7812 and 7813 compliant magnetic strip
The reason I got interested about this begun when I got a new debit card. Anybody having one of these cards know, that they do expire eventually. My bank sends me new one roughly one month before expiry, at which point I tend to destroy the old one into very small pieces to avoid some garbage digging person to be able to exploit my information.
This time, I took couple of pictures of it first (then I destroyed it) to publish in the Internet.
Waitaminute!
You're not supposed to post an image of your credit card! See https://cheezburger.com/8193250816 for a my-new-credit-card fail.
No, I'm not going to do that, instead:

Notice how couple years of usage made the card crack and laminated back and top parts of the card started peeling off. The lamination process failed somehow. Maybe the superglue wasn't super enough, or something similar. I've never seen such a thing happen before.
Here goes: I publicly posted pictures of my old debit card! Obviously, before doing that, I redacted my card number. Also, I'm not going to publish image of the back side having the CVC validation number and my signature. For those curious why I din't redact all 16 digits, the first four are not that important, because its kinda obvious the card is a Visa (first digit 4) and in Finland all Visa cards are issued by Nets Oy (formerly Luottokunta). For card numbers, see https://stevemorse.org/ssn/List_of_Bank_Identification_Numbers.html, a page rejected by Wikipedia, but resurrected from Archive.org
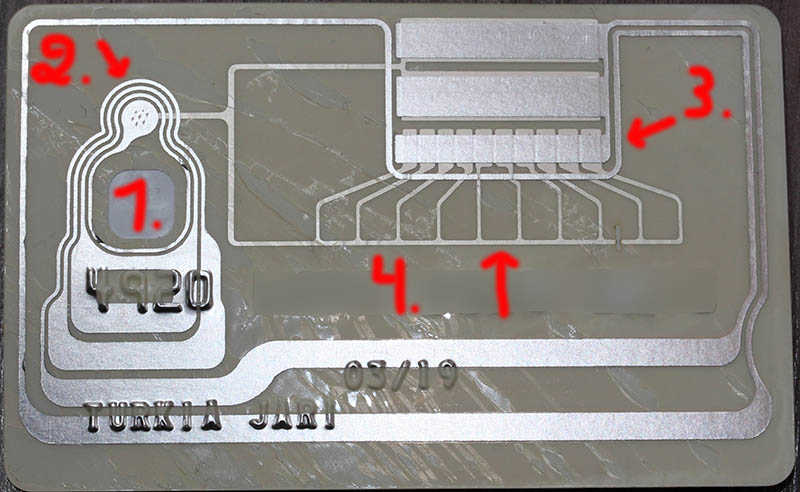
Points of interest in card images:
- ISO/IEC 7816 smart card
- All of the chip in the top slice of the card.
- The chip is bit thicker then the top slice of the card. There is a shallow dent in the back slice to make room for the smart card chip.
- RFID antenna for contactless payment.
- It's EVERYWHERE! I never realized how much antenna is required to power the RFID chip.
- If you would follow the silver antenna, it would make a very long track around the card. It will never cross. This is required to form a long loop. For those not familiar with physics and electricity, it forms a solenoid which will produce current when moving in a magnetic field (payment reader).
- There is antenna both sides of the back-slice. Sides are connected in two points, 2 and 3.
- Most of the antenna is around the 7816 smart card chip. That's why people are instructed to put the smart card into contactless payment terminal.
- I think (please correct me, if I think wrong) the RFID-chip is very near the smart card chip.
- I think (please correct me, if I think wrong) there are ten capacitors to first absorb electric current from the payment terminal magnetic field via solenoid and store it into the capacitors for the chip to do it's magic of EMV-payment. The transaction will last less then a second, so not much is needed.
- The back-side antenna
- Connected to front-side antenna in 2.
Bonus
If you really, really want to, you can tear your card apart and make a ring out of it:
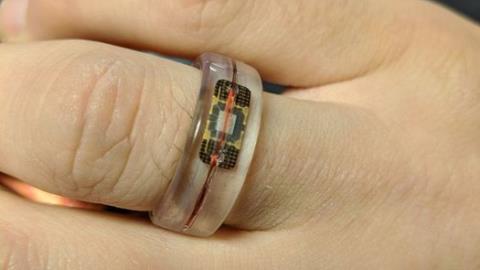
Read all about that Man dissolves credit card to make contactless ring.
Going beyond recovery on a hard drive
Monday, April 15. 2019
This is where an angle grinder meets aluminium.
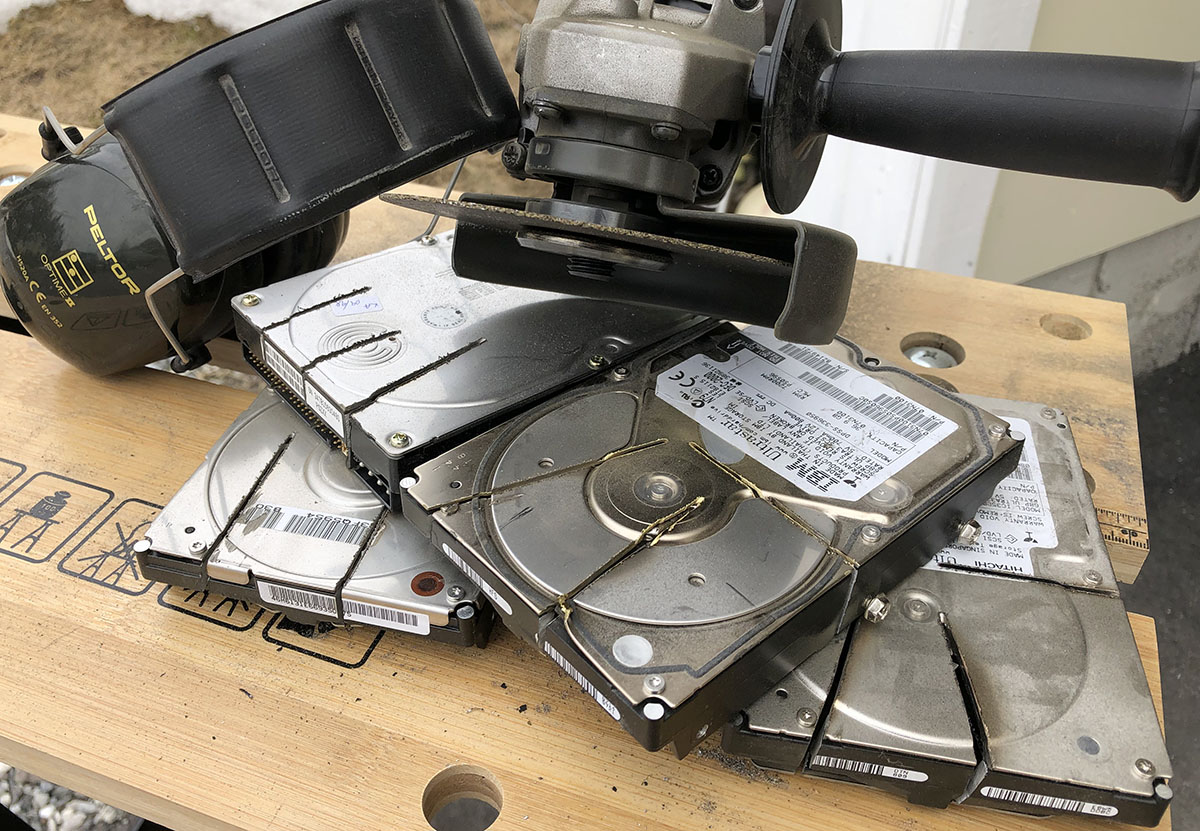
Angle grinding through a 3.5" hard drive case, spinning platter and controller electronic circuitry will produce enough heat and metal scraps to produce an absolutely unrecoverable hard drive. The magnetic coating containing the actual data doesn't like any kind of dirt, metal chips nor rapid heating.
Funny thing: One of the IBM drives was from era of glass platters. I had no idea about that at the time. Ear protection and noise made sure of that. Afterwards the glass platter was shattered into small pieces making the hard drive sound like a jingle bell. There was a small time slot when glass was used in drives to improve data density. Later manufacturers learned to smooth the aluminum platters beyond glass ones and abandoned the brittle materials.
Electronic equipment recycling - expect me to show up with couple pieces of dismantled electronics.
GRID 2 Logitech G29 support
Sunday, March 17. 2019
PS4 controller in a PC
Wednesday, November 14. 2018
Lately, I've been playing Mudrunner: Spintires a lot. That's a really weird game about logging machinery and mud. For some strange reason I find hauling logs from a lake through mud really entertaining. Why logs are located a "lake" is beyond me.
During the gameplay, player needs to operate number of different heavy machinery. This involves driving a skidder, a heavy truck or operating a crane to get the logs loaded. I tried doing that with a traditional mouse and keyboard config. I kinda managed to do it, but anybody who has driven a real car or truck or flown an airplane using only a keyboard knows, it's very tricky. Then I got a hint, that a Playstation 4 controller is really good with that game.
A-haa! All I need to do is hook up my PS4-controller into my PC using ... well... dunno. As Google search engine is a good friend, I found a project DS4Windows from Github https://github.com/Ryochan7/DS4Windows. It will convert a PS4-controller into an Xbox controller, which will work perfectly with most games.
Just hokk up an USB-cable to the controller, run the software, and:
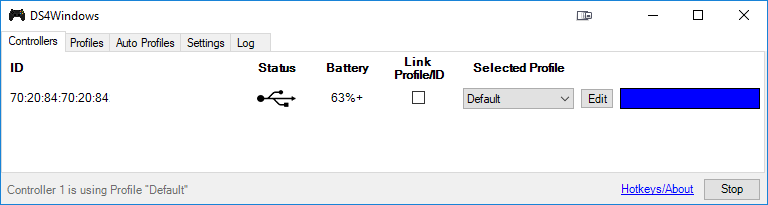
You're done! It really is that simple. Now spinning tires in mud is much much more enjoyable!

