Cleaning out old PCs
Sunday, October 14. 2018
Now that my new PC is done (see my previoius post and Larpdog's Twitch https://www.twitch.tv/videos/319110553):


It's finally time to make some space to my old junk storage. I found two of my previus PCs there, which finally need to go to SER.
When reading this, please understand that I do own other PCs too. Also, I have owned more PCs than I currently run and these two heading out, its just that I don't have those ones anymore to write a blog post about.
New PC - 2018 - Reference
Just to get the difference, I'll post couple bad still images from my new PC:
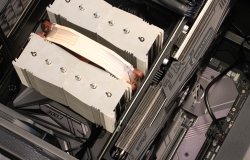
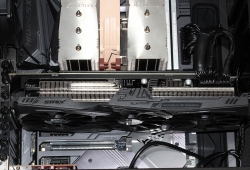
Both pictures are actually crappy for a number of reasons. First, a Noctua NH-D15 CPU-cooler is huge. It weighs 1.3 kg and is 16 cm tall measured from top of CPU to top of Noctua's fans. It takes 16 x 15 x 15 cm space from the PC case, just to make sure there is proper air flow for the heatpipes coming from the CPU. For photography, it means everything else is hidden by it. Ufffff!
Then Asus motherboard has an aluminium shielding covering everything. That's most likely for EMC protection and heat management. In a properly cooled PC-case, black aluminium transfers heat out of the motherboard faster. Also, a Fractal Design PC-case is pitch black. What I have here is a black picture of blackess on black.
Finally, also the graphics card is quite a beast. It takes 30 cm in lenght and is over 5 cm thick. Yet again covering everything inside the PC, that would be worth looking at. So, this 2018 PC is visually quite boring. Maybe that's why people love having some sort of light show inside their transparent case. Ufffff! My case doesn't have any transparent parts in it, no PC-disco for me, thanks.
PC 1 - Pentium 4 from years 2002-2008
This one I used in couple of hardware configurations for many many years. Mostly with Windows XP.
After serving me well, I decommissioned this around end of year 2008. There are changed files in early 2009, but it looks like I haven't used this PC since. It has been mostly gathering dust in storage.
CPU
Spec:
-
Intel® Pentium® 4 Processor 2.40 GHz, 512K Cache, 533 MHz FSB
-
Launch: 2002/Q1
-
Cores: 1
-
512KiB Cache
-
2.4 GHz
- 533 MHz FSB
- Socket 478
Details are at Ark Intel.com https://ark.intel.com/products/27438/Intel-Pentium-4-Processor-2-40-GHz-512K-Cache-533-MHz-FSB
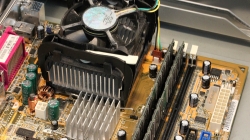
It was my last PC not running 64-bit AMD64-instruction set at the end of 32-bit era Mighty powerful at the time, still less powerful than my iPhone 8 today. It looks like this with Intel's boxed CPU-cooler:
Board
The motherboard for this project is an Asus P4PE:
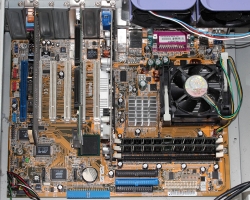
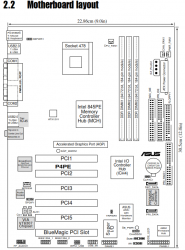
More details are at Asus' website: https://www.asus.com/supportonly/P4PE-XTE/HelpDesk_Manual/
Graphics card
Given the fact, that I never like putting enormous amounts of money into GPU's, so this one has a Club-3D Radeon 9800 PRO 128MB DDR GDDR:
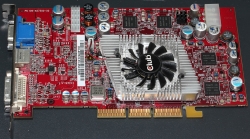
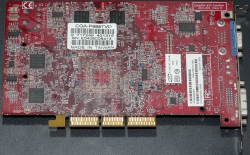

The manufacturer's fan on top of the GPU was a piece of junk. I had to replace it in a year or so. Also, note the S-Video output between standard VGA D15 and DVI-D. Before HDMI, hooking up a PC to an everyday TV was tricky. S-Video was one of the supported connectors in TVs having multiple SCART-connectors.
Also looking at the pics of the CPU-cooler and the graphics card make me laugh. There is almost no cooling at all in neither. Also the simpliness of graphics card is something that really sticks out. Modern cooling, especially in graphics cards, looks HUGE!
One notable thing to mention, is that this graphics card connected to the MoBo via AGP or Accelerated Graphics Port and having DirectX 9.0 hardware acceleration making it pretty fast (at the time). If you've never heard of AGP, don't worry, it was just an attempt to make GPUs connect to CPU/RAM-package faster. It was little bit faster than PCI, but not much. Obviously, it wasn't such a great invention and was quickly surpassed by PCIe, which seems to stand the test of time. For curious ones, I googled up some specs for the card: https://icecat.biz/en-in/p/club3d/cga-p988tvd/graphics-cards-RADEON+9800+PRO+128MB+DDR-113233.html
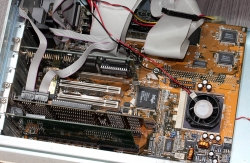
PC 2 - Pentium from years 1994-1998
Ok, this baby is an old one! To make it really ancient, it even runs IBM OS/2 as operating system. Those padawans who don't know what an OS/2 is, just hit to Wikipedia for https://en.wikipedia.org/wiki/OS/2. During the active years in servie, I recall upgrading the CPU once, doubling the RAM once and swapping the GPU-card to a faster one. This is the oldest hardware I have, and didn't create any records at the time. For anything newer, I have proper records of the history in my wiki.
CPU
Spec:
- Intel® Pentium® Processor 150 MHz, 60 MHz FSB
- Launch: 1996/01
- Cores: 1
- 8 + 8 KiB Cache
- 150 MHz
- 60 MHz FSB
- Socket 7
Details are at Ark Intel.com https://ark.intel.com/products/49958/Intel-Pentium-Processor-150-MHz-60-MHz-FSB
This old puppy has one distinguishing feature: it is Spectre/Meltdown-proof! As it doesn't have any kind of prediction or jump analysis in it, it cannot be fooled. ![]() Actually, there is nothing in it to make it run faster. It is a product of an era when everything was made faster by adding megaherz (note: not gigaherz) to base frequency.
Actually, there is nothing in it to make it run faster. It is a product of an era when everything was made faster by adding megaherz (note: not gigaherz) to base frequency.
The installed CPU with Intel's boxed cooler looks like this:
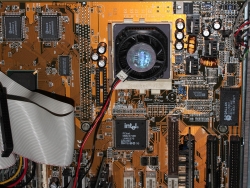
Please, notice how a heatsink and a fan on top of it are almost 20 mm high! ![]()
Also, don't confuse this Pentium to any of the modern day CPUs Intel calls Pentium. This one was really one of the first ever manufactured Pentiums. Initially this had a slower Pentium in it (I think 90 MHz), just getting an upgrade was inexpensive at the time.
Board
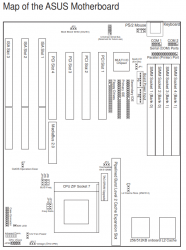
Motherboard is a Asus P/I-P55T2P4. Some specs of it can be found from: https://www.asus.com/supportonly/PI-P55T2P4/HelpDesk_CPU
Note how this is clearly a PCI-era board, but it still has three ISA-slots in it. And please, don't confuse PCI for a modern PCI-express. That's probably why, the word "conventional" is used in Wikipedia article of PCI: https://en.wikipedia.org/wiki/Conventional_PCI
GPU-card
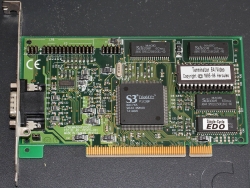
Oh, this is a trip to memory lane. Card is a S3 Trio64V+. Some information about this relic is at https://en.wikipedia.org/wiki/S3_Trio and http://www.vgamuseum.info/index.php/cpu/item/359-s3-trio64v.
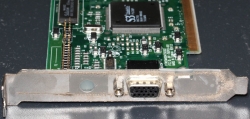
Note how I have Scotch Tape on two holes of the mounting bracket. Reason is simple, back in the 1990s we didn't know how air in a PC case should flow and we had it wrong. Sucking air trough graphics cards (or any other necessary components) is not smart and that's why its done differently today.
This particular card first appeared in 1995 and I've been using it for couple of years around that time. S3 was a really successful graphics company and their products were really good at the time. Also, at the time companies did design and manufacture their own cards. Today manufacturers just release specs and reference designs for the actual manufacturers to do the heavy lifting. Also, for old geezers like me, it is soooo weird to see a graphics card to be running just-the-regular PCI.
For brief history of GPUs in the 90s, read something like From Voodoo to GeForce: The Awesome History of 3D Graphics @ PC Gamer. Just like CPUs, also GPUs have gone giant leaps during past 20 years.
If you've never heard of company called S3 Graphics, go educate your self at https://en.wikipedia.org/wiki/S3_Graphics. Brief highlights are January 1989, founding of the company, November 2000 at point where S3 had officially been outran by competition, they changed their name to SONICBlue. And finally March 2003, when filed for Chapter 11 bankruptcy. They had their moment, but given the fierce competition by Nvidia and Ati and Matrox and many others, they just couldn't keep up with the technological advances fast enough to be able to offer interesting products to customers. Today, what remains of S3 is part of HTC, the Chinese cellphone manufacturer.
Ok, the junk's gone - What then?
Yes, it cleaing up doesn't end here. I still have ~1000 floppy discs in storage. Now that PCs having a 5.25" or 3.5" drive are gone, I'll keep cleaning some more. Maybe I should take a peek into some of those floppies to see if there is anything valuable in them.
Also, I have the images of the OS/2 hard drives. Next I need to figure how to read them.
QNAP Stopping Maintenance of TS-419P II (again)
Saturday, August 25. 2018
This is a weird one. Beginning of this year Qnap made a choice to EOL my NAS-box. I posted about that at the time. Well, that happens. Its just that my current box works for me and all, I don't necessarily need a new one.
Without announcing anything, I got a firmware upgrade for it! Actually, I got two. Initially I assumed to be hallucinating or something. On a 2nd time I had to confirm my original blog post, that EOL really did happen.
Today on their EOL-page (or Product Support Status) https://www.qnap.com/en/product/eol.php they state:
Model: TS-419U II
Hardware Repair or Replacement: Full
OS and Firmware Updates and Maintenance: 2017-12 (QTS 4.3.3)
Technical Support and Security Updates: 2020-12
What the ... happened? Now they're announcing (or NOT announcing, informing) to provide full support until end of year 2020. Well, maybe I should go purchase a new one anyway.
Automating IPMI 2.0 management Let's Encrypt certificate update
Thursday, July 12. 2018
Today, I'm combining to previous post into a new one. I've written earlier about going fully Let's Encrypt and the problems I have with them. Now that I'm using them, and those certs have ridiculously short life-span, I need to keep automating all possible updates. That would include the IPMI 2.0 interface on my Supermicro SuperServer.
Since Aten, the manufacturer of the IPMI-chip chose not to make the upload of a new certificate automateable (is that a word?), I had to improvise something. I chose to emulate web browser in a simple Python-script doing first the user login via HTTP-interface, and then upload the new X.509 certificate and the appropriate private key for it. Finally the IPMI BMC will be rebooted. Now its automated!
So, the resulting script is at https://gist.github.com/HQJaTu/963db9af49d789d074ab63f52061a951. Go get it!
Refurbishing APC Replacement Battery Cartridge #7
Sunday, May 20. 2018
Roughly 4 years ago, I blogged about a battery change to my UPS. The post is at APC Smart-UPS battery change. My unit eats APC Replacement Battery Cartridge #7 as replacment, and they are generally available in the net. The price point is there, such a replacement costs 250,- € easily. Much more, if you're not careful.
Couple years after publication Mr. Oliver commented my post (https://blog.hqcodeshop.fi/archives/195-APC-Smart-UPS-battery-change.html#c2000) about getting a pair of Yasa NP7-12 batteries. In his comment, he posted a PDF-spec http://www.yuasabatteries.com/pdfs/NP_7_12_DataSheet.pdf. Just by eyeballing the details, it became obvious, that there is no way in freezing hell, to be able to use that particular battery unit as replacment.
While I dismissed the suggestion quickly, Mr. Oliver succesfully incepted the idea (if somebody hasn't seen Inception, you missed my point there). In life, there are situations where the plan is a crappy one to begin with. On the other hand, sometimes the plan is rock solid, but implementation falls short. For best results, a good plan and good implementation is needed. So, I decided to investigate this battery replacement thingie and come up with a good plan. Initially it was more like a wish, I had no way of knowing how my chips would fall out.
The Investigation
So, when yanked out of the UPS, a APC Replacement Battery Cartridge #7 looks like this:
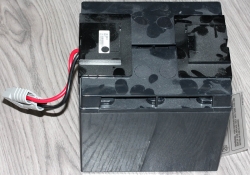
During the 4 years of running, it gathered some amount of dust. If I would care, I would have cleaned the worn out unit before taking the pics, but ... naah. And if you want to know how to actually yank it out, see my previous post.
In a glance, the #7 doesn't have any moving parts in it. There is nothing to remove, nothing to un-screw. But a closer inspection reveals some plastic covers just attached to the battery with a two-sided tape:
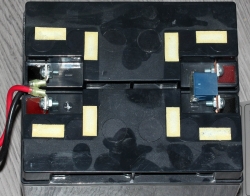
Yes! I'm, getting somewhere here. A close-up on the battery connectors:
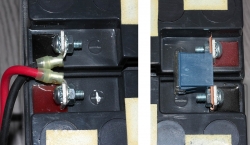
The battery connectors have holes in them and there is a M6-screw running trough them. A 10mm wrench and a PH2 screwdriver will do magic there.
Finally I had all the parts separated:
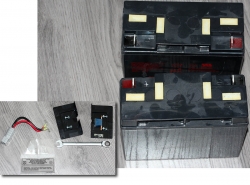
There was some adhesive tape to make the two batteries stick together. As all the connector bits were removed, I just applied brute force to separate the lead acid batteries from each other.
The Plan
A Hitachi Chemical Energy Technology Co. Ltd, GP12170. Spec is at: http://www.csb-battery.com/english/01_product/02_detail.php?fid=5&pid=13
My simple plan was to:
- Find out if a suitable replacement battery was available. Mr. Oliver suggested that the price range would be £30,-
- Get the replacement batteries
- Apply some adhesive tape and screw the APC-connector bits and their plastic covers back
- Plug the refurbished unit back to my UPS and admire the results (success of failure)
The Implementation
Finding and getting the replacment units
Nope. Just by googling, I didn't find that particular GP 12170 battery anywhere where the shipping costs wouldn't kill me. Lead acid batteries are heavy, as in expensive to ship, remember, the lead-part there.
- Since asking doesn't hurt, I just popped by my local battery-guy at Akku-Arkka Oy.
- His first question was: "Which lawnmower did your take that from?"

- I was in luck! He had suitable units in stock. For some reason, they are sold as a twin-box:
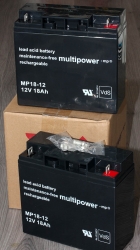
- Obviously, a twin-box is exactly what I needed for this purpose!
Assembly
At this point, my plan was coming together.
- I just got some two-sided tape, stuck some of that on the side of the battery and stuck the other battery to the tape to form a single unit.
- I screwed the APC-bits back to the connectors. Even the holes were precisely the same size.
- More two-sided tape to the top and battery connectors were nicely covered.
I didn't bother taking any pics of this. My final result looked un-surprisingly like the original APC-unit.
Plugging it in & testing
Since these quality UPS-things have hot-swappable batteries, the UPS-unit was running my computers all the time since the batteries failed, I removed the old battery-pack and finally was about to test the new battery-pack. The obvious risk at this point was if I made a mistake and my UPS would completely fry because of that.
But no, it didn't happen. Everything worked perfectly! My APC utilities on Linux indicated following:
# apcaccess

APC      : 001,043,1009

DATE     : 2018-05-20 13:03:11 +0300

VERSION  : 3.14.14 (31 May 2016) redhat

CABLE    : USB Cable

DRIVER   : USB UPS Driver

UPSMODE  : Stand Alone

STARTTIME: 2018-05-20 13:03:07 +0300

MODEL    : Smart-UPS 1500

STATUS   : ONLINE

LINEV    : 234.7 Volts

LOADPCT  : 13.6 Percent

BCHARGE  : 100.0 Percent

TIMELEFT : 91.0 Minutes
Finally
Looks like all the lead-acid batteries in world come from Vietnam. See article Is Vietnam the new China for lead-acid battery manufacturers? about that.
I saved ~150,- € by doing this instead of going for the official unit. Nice!
New toys: iPhone 8
Wednesday, April 25. 2018
Whenever there are new toys, I'm excited! Now that I have new iPhone 8, there is no other way to phrase it: it IS same as 7, which was same as 6. The observation Woz pointed out when X and 8 came out:
I’m happy with my iPhone 8 — which is the same as the iPhone 7, which is the same as the iPhone 6, to me.
Last year around this time, I wasn't especially impressed when I got my 7. See and/or read it at /archives/345-New-toys-iPhone-7.html. This year, I'm kinda hoping to still have my 6. The good part is, that I won't have to pay for these toys myself. If I would, I would be really really disappointed.
Xyloband - What's inside one
Sunday, March 18. 2018
If you're lucky enough to get to go to a really cool event, it may be handing out a Xyloband to everybody attending it.
For those who've never heard of a Xyloband, go see their website at http://xylobands.com/. It has some sample videos, which this screenshot was taken from:

See those colourful dots in the above pic? Every dot is a person having a Xyloband in their wrist.
As you can see, mine is from King's Kingfomarket, Barcelona 2017. There is an YouTube video from the event, including some clips from the party at https://youtu.be/lnp6KjMRKW4. In the video, for example at 5:18, there is our CEO having the Xyloband in his right wrist and 5:20 one of my female colleagues with a flashing Xyloband. Because the thing in your wrist can be somehow remote controlled, it will create an extremely cool effect to have it flashing to the beat of music, or creating colourful effects in the crowd. So, ultimately you get to participate in the lighting of the venue.
After the party, nobody wanted those bands back, so of course I wanted to pop the cork of one. I had never even heard of such a thing and definitely wanted to see what makes it tick. Back of a Xyloband has bunch of phillips-head screws:
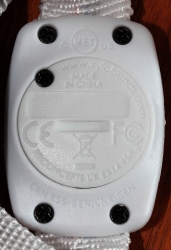
Given the size of the circular bottom, a guess that there would be a CR2032 battery in it is correct:
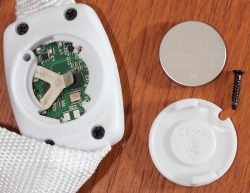
After removing the remaining 4 screws, I found two more CR2016 batteries:
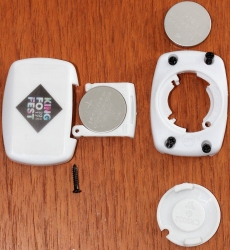
The pic has only two batteries visible, but the white tray indeed has two cells in it. Given the spec of a button cell (https://en.wikipedia.org/wiki/Button_cell), for a CR-battery it says: diameter 20 mm, height 3.2 mm. So, if you need 6 VDC voltage instead of the 3 VDC a single cell can produce, just put two CR2016 instead of one CR2032. They will take exactly the same space than a CR2032, but will provide double the voltage. Handy, huh! My thinking is, that 9 VDC is bit high for a such a system. But having a part with 6 volts and another part with 3 volts would make more sense to me.
Plastic cover removed, the board of a Xyloband will look like this:
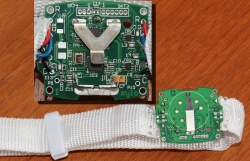
Nylon wristband removed, there is a flexing 4-wire cable having 8 RBG LEDs in it:
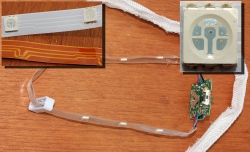
The circuits driving the thing are:
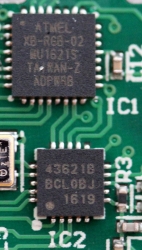
Upper one is an Atmel PLCC-32 chip with text Atmel XB-RBG-02 in it. If I read the last line correctly, it says ADPW8B. Very likely a 8-bit Microcontroller Atmel tailored for Xylobands to drive RBG-leds.
The radiochip at the bottom is a Silicon Labs Si4362. The spec is at https://www.silabs.com/documents/public/data-sheets/Si4362.pdf. A quote from the spec says:
Silicon Labs Si4362 devices are high-performance, low-current receivers covering the sub-GHz frequency bands from 142 to 1050 MHz. The radios are part of the EZRadioPRO® family, which includes a complete line of transmitters, receivers, and transceivers covering a wide range of applications.
Given this, they're just using Silicon Labs off-the-shelf RF-modules to transmit data to individual devices. This data can be fed into the Microcontroller making the RBG LEDs work how DJ of the party wants them to be lit.
While investigating this, I found a YouTube video by Mr. Breukink. It is at https://youtu.be/DdGHo7BWIvo?t=1m33s. He manages to "reactivate" a different model of Xylobands in his video. Of course he doesn't hack the RF-protocol (which would be very very cool, btw.), but he makes the LEDs lit with a color of your choosing. Of course on a real life situation when driven by the Atmel chip, the RBG leds can produce any color. Still, nice hack.
Replacing MacBook Air SSD
Saturday, February 10. 2018
I've never disassembled an Apple laptop. A while back I got a chance to peek into one, as I was summoned to add more SSD-capacity into an Air. As you can see from the spec, it is a rather early model of Air. But hey, Apple hardware is quite robust and the value you get for your money is huge. So, after 7 years of usage, it is still worth replacing the SSD with a bigger one.
The instructions for this can be found from EveryMac.com, but I'll describe my experiences here. Also having video instructions only is not something I'd like to see. A high quality picture has its value too.
Prepare job
- Make sure there is a restorable Time Machine backup of the laptop.
- If you don't care for the data on the machine, this is not necessary.
- Make sure you can boot the device from an USB-stick:
- You can restore entire SSD content from Time Machine.
- You can do a fresh install to the new SSD
Part job
A new SSD is needed. Given the availability and low price, a Transcend 240GB JetDrive 500 SATAIII 6Gb/s Solid State Drive Upgrade Kit for Select MacBook Air Models (TS240GJDM500) was selected.
Getting one from Amazon.de was a painless and fast operation. Initially, I was wondering why would be selling an "external" replacement part, because the SSD I wanted to replace is surely inside the Mac. It surely has to do something with making an Apple spare part available. Normally parts are not available for general public.
To pop open an MacBook Air, you will need a pentalobe TS4 screwdriver, and to disconnect the SSD from the motherboard, a Torx T5 screwdriver is needed. Both of which are known to hardware hackers, but not commonly owned by general public. Luckily somebody knows this, and in the box with the new SSD both are there:
Replacement job
Popping the hood of a mac is almost a no-operation. There are 10 pentalobes there, remove them and the lid will open easily. After all the years of usage, there was some dust in the CPU-fan, so I carefully removed all that before proceeding.
When the guts are seen, first task is to remove the battery connector. This ensures, that the motherboard and SSD are shut down during the operation. The connector can be disconnected quite easily without any tools:
Target-of-the-day, SSD, can be located right next to CPU:
The arrow points to the Torx T5. That is the only screw holding the SSD in place. Since I had a cool aluminium external case for the SSD, of course I placed the old SSD there:
The new Transcent SSD looks like this. Exactly what the original Samsung:
After that it's just to flip the lid back on and tighten 10 pentalobes.
Entire hardware job was completed in 15 minutes. That part was designed to be replaced!
macOS job
Now we have a laptop with a completely blank SSD in it. Of course I had to test it, but it really doesn't do much on boot. The only real option was to insert an USB-stick and press the Option-key to get the boot menu, select the USB-stick and then get to the Install/Upgrade -menu. Select Disk Utility from that:
As expected, the new drive is unitialized and you cannot select a device with that status as macOS install destination.
Since Apple engineers are quite smart, to convert an uninitialized drive to an intialized one, the operation needed is to erase it. WHAT! Yes. To repeat, the operation is to erase the drive. ![]() The drive is completely empty, it does not have a partition table, file system or data in it, but in their infinite wisdom Apple engineers have decided, the only way I can initialize the new SSD is by making double-sure there is nothing on it.
The drive is completely empty, it does not have a partition table, file system or data in it, but in their infinite wisdom Apple engineers have decided, the only way I can initialize the new SSD is by making double-sure there is nothing on it.
The erase will take a lot of time. Most if it, the installer tries to do something erase-related to it, but keeps failing miserably mainly due to lack of partition table. After the erase completes, there is a file system and regular macOS install can proceed. I chose to restore the machine from a TM-backup:
That really took couple hours and I didn't want to eyeball that through.
Job well done!
First boot from newly installed SSD, from restored machine image was success. First login indicated no changes at all. It was just like this machine was running as-is.
Ultimately a great success (like Borat would say)!
QNAP Stopping Maintenance of TS-419P II
Tuesday, January 2. 2018
As usual, I got an e-mail from my NAS-box stating, that it has a new firmware upgrade QTS 4.3.3.0404 build 20171213.
It had the usual release notes telling the changes. What really caught my attention was:
QTS 4.3.3 is the final available firmware update for the following models: TS-419U II
WHAAT! Just out of the blue, my model was obsoleted piece of junk! ![]()
The actual full list of models is: TS-112P, TS-212P, TS-212-E, HS-210, TS-112, TS-212, TS-121, TS-221, TS-421 TS-120, TS-220, TS-420, TS-420U, TS-421U TS-412, TS-412U, TS-419U, TS-419U+, TS-419U II, TS-119P II, TS-219P II, TS-419P II, TS-119P+, TS-219P+, TS-419P+, TS-119P, TS-219P, TS-419P, TS-119, TS-219, TS-419
So, only the recent QNAP boxes were maintained from this point on. Darn! My take on their decision to stop maintaining all the old models is, that initially they barely maintained them at all. In fact, QNAP got burned seriously on not acting: 0-day: QNAP NAS Devices suffer of heap overflow. In less than two years they managed to get that one fixed. They received information on 1st Feb 2016, stalled on the fix and after 12 months somebody else stumbled into the same flaw and after QNAP failed to receive the information about it, he released into public. QNAP managed to the fix out at 14th Feb 2017.
To me that action (read: lack of it) means, that they did not have a protocol in place for a situation where a security flaw would be found in one of (read: all of) their main products sold to general public. While spewing out unfounded allegations here, I'm pretty confident, that it wouldn't have made any difference if the security flaw was in their internal systems. Also, I'm sure, they did not act on the initial report as the author was well-behaving and extended his grace period on QNAP's request. Unfortunately to QNAP, their security reporting system wasn't maintained and it didn't work at the time of second finding, so the information leaked quite soon.
After all this commotion, they chose to create processes, assign personnel to it and start maintaining their products, they suddenly realized, that IT'S HARD WORK! ![]() Oh really! Rest of the world knows it already. But that's what you need to do when you are in device manufacturing business. World is full of non-maintained IoT-junk, as this Twitter-feed points out.
Oh really! Rest of the world knows it already. But that's what you need to do when you are in device manufacturing business. World is full of non-maintained IoT-junk, as this Twitter-feed points out.
Ok, enough rant. Now I have a decision to make. What to do with a perfectly good NAS-box. Suggestions are welcome.
Mini Arcade Machine
Saturday, December 30. 2017
Looks like I've been nice, as Santa Claus brought me a nice present. A Mini Arcade Machine!


By the looks of it, it must be some sort of Android device placed into an arcade cabinet.
There are 240 games to play, but none of them are well-known titles. Obviously, they didn't want to pay any royalties for using the names. However, all the games are classic ones which I've played couple decades ago.
What I was expecting to see is a HDMI-output, but there is none. All the gaming needs to be done on a tiny screen.
Twitch'ing with Larpdog - Assembly and donation of a gaming PC
Sunday, August 6. 2017
Today I was helping a friend with his Twitch-stream. Apologies for non-Finnish readers, the stream and accompanying information is in Finnish.

Mr. Larpdog has a pretty cool Twitch-studio:


I've never seen an Elgato Stream Deck before. But having witnessed it being used in a live stream, it sure makes management so much easier.
So, the idea of this particular stream was to assemble a PC and donate it to a follower of the stream. The money (I think 988 €) for the PC parts was donated by other followers.
Entire stream is at https://www.twitch.tv/videos/164849338, and I make brief apperance there in the beginning.
Mini-PC for a router
Tuesday, May 23. 2017
In my network setup, it's almost done: we have 1) an Internet-connection, 2) a wireless access-point to pass some mobile device traffic trought it, but something is missing: a router to tie it all together. In my post about my Swedish ISP, it became evident, that running a router they threw at me for free wasn't an option. Second completely viable option would be to run my new Wi-Fi AP with DD-WRT as a router. Totally doable. It has all the suitable ports, DD-WRT is fully equipped to act as an internet router and all that.
Me being a total nerd, of course I wanted to build a real router. The suitable hardware for it would be something tiny having enough ports and packing suitable CPU/RAM/SSD to run a real Linux in it. So, my choice for this is:
Qotom Barebone Mini PC Linux Ubuntu Wintel Nano ITX Celeron j1800/1900 Mini Computer Desktop PC Fanless x86 pc Industrial PC Computer. The marketing people at Qotom chose an appropriate name for their product, huh! ![]() If I'd choose the name, I'd go anthing with less than 19 words, removed "Ubuntu", "Wintel", double "mini", double "PC" and then start cutting the words into something like: Barebone Fanless Mini ITX PC j1800/1900, or so. But that's only me.
If I'd choose the name, I'd go anthing with less than 19 words, removed "Ubuntu", "Wintel", double "mini", double "PC" and then start cutting the words into something like: Barebone Fanless Mini ITX PC j1800/1900, or so. But that's only me.
So, at Aliexpress.com it looks like this:
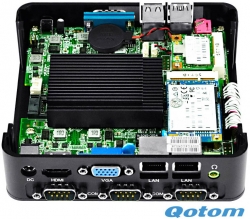
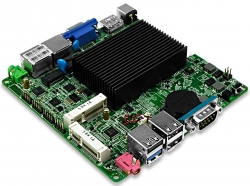
As said, the form-factor is mini-ITX making it a tiny box on the desk. In real life, it looks the same than above marketing material (sorry, pics aren't too good, no DSLR available):
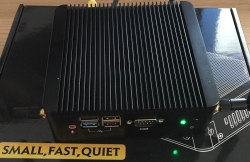
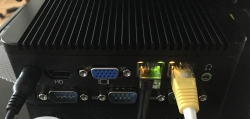
I have no idea who would need 3 x D9 RS-232 -ports, but there they are. My own spec was only to have at least two RJ-45 for Ethernet. This puppy has them with 1Gbit/s speed, adding HDMI and USB-3 on top of that, which are really handy.
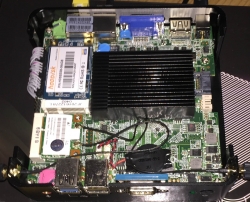
As you can see, there isn't much space around the 17x17 cm mini-ITX -board. The biggest one in the pic is the black cooling block on top of Celeron® J1900 CPU. Close up from the internals:
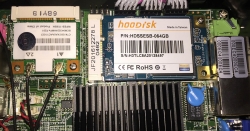
From left to right:
- Broadcom BCM943224HMP Wi-Fi adapter
- 64 GiB Hoodisk mSATA SSD
- Realtek RTL8168evl dual Ethernet connectors
There is some airspace for cooling inside the box:

For PSU there is an external transformer pushing in 12 VDC at 3 amps:
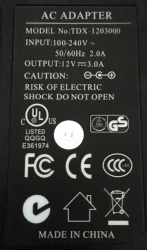
There is a commonly used IEC C13 on the other end of the transformer to make it easier to plug the thing into your country's choice of wallsocket.
I've been running the box for almost a month now, and I'm very pleased with it. The green power-on LED is way too bright. On a dark room, it illuminates everything with green, but other than that I got the perfect box for a router. As these low-budget boxes are easily available, it's mostly about choosing the most suitable one. Apart from having more than one Ethernet RJ-45, one of my selection criteria for this one was, that the manufacturer didn't take any second guesses about the CPU-cooling. It's easily the biggest block I could find among the competition. On top of that, the manufacturer did deliver the unit from UK-storage quite rapidly. What I missed from seller's page was the fact, that deliveries were made from tax-free -zone. I had to pay Swedish VAT for DHL on top of the purchase price.
New toys: iPhone 7
Monday, May 22. 2017
My employer was kind enough to issue me new toys. Any proper nerd loves new toys, I know I do!
So, I got an upgrade for my old(ish) iPhone 6. To a rather big surprise, they're exactly the same thing. Here is a quiz for you iPhone-fans. Tell me which one is 6 and which one is 7:


For the first three pics, I honestly don't know which one is which. The fourth one is an easy one, in iPhone 6 there is a white line right below the camera lens, also the lens is bigger on 7. Fifth one is a no-brainer, no 3.5 mm headphone jack exists in the new one.
Other than the missing jack, there isn't much to tell. Upgrade is almost a no-upgrade. Everything is the same, except I had to spend couple hours of restoring the backup. Actually, there was a quirk, my new phone had latest iOS, but the un-boxed one didn't, so I first had to go through the out-of-box-experience and then upgrade it to latest firmware. Then it was possible to do the restore and after restore the thing could start installing my apps.
List of things that didn't transfer:
- Touch ID fingerprints
- Apple support HT204136 says that it should, but ...
- Apps from my employer's app store
- Keyboard dictionary
- Ringtone selections
- I have a dozen or so own-made ringtones for incoming callers.
- The ringtones did transfer ok, but the selection of which one is used didn't survive the transfer.
- Google Authenticator keys
- Read the article "Is there an easy way to transfer Google Authenticator codes to a new device?" for reasoning.
- ... maybe something else I forgot to mention here
Ultimately I have to say, this wasn't worth it. I got the same phone without headphone jack, and I had to spend couple hours of work to get a 32 GiB thing to the point I started with a 64 GiB one. It's a shame there is no 64 GiB iPhone 7. They didn't let me get the 128 GiB, because it's too expensive. The new A10 CPU should be more energy efficient, but in reality it doesn't show. Only after upgrading to iOS 10.3.2, there was some improvement on battery usage. Before that, I had to charge the phone more often that my old one.
The only positive thing is, that now I have a fresh battery to my iPhone. I guess I should find some positive things with the new and improved "best ever" camera, but I simply cannot.
Wi-Fi access point - TRENDnet TEW-818DRU - Part 1: Hardware
Sunday, May 7. 2017
As I mentioned in my post about Swedish ISP, that I like to run Linux on my stuff. My weapon of choice for wireless networking has been DD-WRT for many years (I'm not sure how many exactly, 15+ or so). Any appliance I purchase must be supported by that.
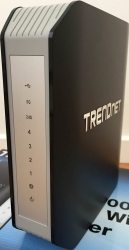
I've been running a lot of Linksys in the past, but this time I chose to go with a Taiwanese TRENDnet TEW-818DRU. The spec is huge and it contains really good 802.11 radios, USB3-port, decent CPU and enough RAM to run it all. And finally: The manufacturer is really keen on supporting Linux.
This is what it looks like. It won't win any design awards, as obviously some software engineer designed the plastic case:
Linux /proc/cpuinfo for Cortex-A17:
model name : ARMv7 Processor rev 0 (v7l)

processor : 0

BogoMIPS : 1594.16

Features : half fastmult edsp tls

CPU implementer : 0x41

CPU architecture: 7

CPU variant : 0x3

CPU part : 0xc09

CPU revision : 0
Memory, physical is 128 MiB, but some is needed for hardware:
             total   used    free shared  buffers  cached

Mem:        124536  38296   86240      0   4108     12212

-/+ buffers/cache:  21976  102560
- USB3
- USB2
- WPS-button for those who don't care much for security
- 4 x RJ-45 for LAN
- RJ-45 for WAN
- O/I for power
- Barrel connector for 12 VDC, 2 amps power input
It really doesn't get much simpler than that, which is perfect for engineering type persons. Like me! ![]()
You'll get a reliable box with ton on features and possibility of tweaking it to do whatever you need.
In next part I'll put a DD-WRT into it.
Swedish ISP reviewed - Comhem
Saturday, May 6. 2017
It took a lot of time and effort to rent an apartment, Sweden (especially Stockholm are) is notoriously difficult with that. And the first thing any new apartment needs is an Internet-connection. Mobile data in Sweden sucks royally, its expensive and horribly capped with transfer limits. So, something with a wire for me thanks. In this apartment, the options for wired net were highly limited. It's either Comhem or nothing. I chose Comhem.
Back in the 90s, Swedish government subsidied building optical fiber connections to literally every house. They ended up paying roughly 50% of the building costs of proper connections to entire country. Not a bad investment, I have to say. Some businessmen threw rest of the required money and as the result of that, Swedes even today enjoy faster Internet connections than nobody else.
The wall box
Here in Stockholm area this is a very common thing to see:
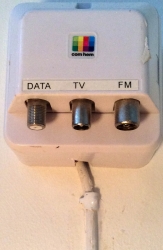
There is something coming into the box from a hole in a wall. I don't know what that could be, possibly fiber, or possibly something with copper in it. If you know, drop a comment! The output is FM-radio, cable-TV and Internet. Radio and TV are regular 75Ω RF-connectors, something you'd generally expect. Data is an F-connector, also very typical for cable-TV Internet connectivity.
The router
Sorry, the pics are really crappy. I don't have my proper camera here in Sweden, so I have to use whatever mobile junk happens to be at hand. The router looks like this:
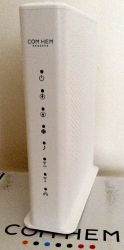
In the back there are your expected set of connectors:

- RJ-11: no idea what this is for, my guess is for a landline phone connection (who needs that!?)
- 4 x RJ-45: Your standard 1 Gbit/s ethernet switch
- Reset pin: do a factory reset with a small pointy thingie
- F-connector: for incoming cable-TV signal
- O/I switch: For on-off needs
- Barrel jack: for 12 VDC power connector, 2,5 amps
- (bonus): 2,4 GHz / 5 GHz Wi-Fi router
Yes, this is one of those French-made Sagemcom boxes. Spec is at: F@ST 3686 AC. Sagemcom is quite big in manufacturing consumer boxes for TV/IPTV/cable internet.
There is nothing special nor surprising there in the router. It's your basic free giveaway box the ISPs throw at you when you sign a subscription. Most people love the fact that this one packs a modern Wi-Fi access point. Personally, I hate integrated crap and want to tinker with my access point more than these integrated things allow me to do.
The admin
As you could expect, there is a web-based GUI admin interface at 192.168.0.1:
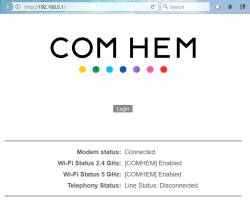
Logging in gives you more details for the router status:
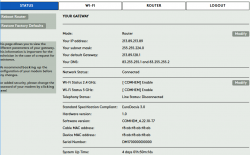
My IP-address, Wi-Fi SSIDs and serial numbers have been redacted, so those of you with evil plans, note that you'll be targeting somebody else.
The speed
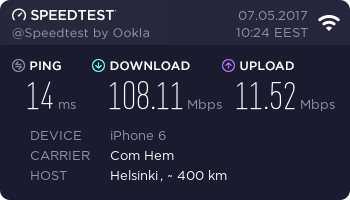
I'm subscribing to a Bredband100. The promise is 100 Mbit/s download (actually they say 50-100) and 10 Mbit/s up (range 7-10).
Speedtest, ethernet cable, 1 Gbit/s:

Speedtest, iPhone 6, 802.11ac, 5 GHz:
Speedtest, Asus Nexus 7, 802.11n, 2.4 GHz:
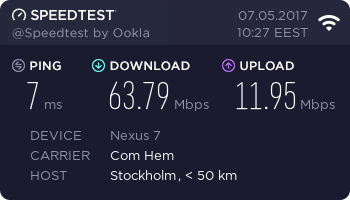
Not bad! They keep the promise. ![]()
If you stumble on the Wi-Fi specs, check the article about Wireless N & Wireless G @ Flashrouters blog about those.
The nominal speed of 802.11n is much higher than 63 Mbit/s, but 2.4 GHz is always very saturated. I haven't counted how many wireless access points are visible here to my apartment, but its easily 50+. Also the throughput of a 2.4 GHz Wi-Fi will drop, if any of my neighbours are using a microwave. Cisco claims, that microwave oven interference can reach 25 feet / 7.5 meters, see the article about that. Unfortunately all my toys will support 5 GHz, so I'll have to run both for the time being.
The result
Generally people love hating big corporations, especially ISPs and telcos. I know I do. A good example of that is: Comhem stumbled on my router delivery as their logistics partner started bouncing the shipment back and forth in the same terminal. Eventually I got the router, plugged it in and it worked. Their customer support is good, I called them at least 4 times to get a subscription and for the delivery issues.
After running this box for a week, I have to say it does the job. On a negative side, the router in router/NAT-mode, the router drops your TCP-connections super fast. This mostly affect SSH and as a remedy I have this in my .ssh/config:
Host *

  ServerAliveInterval 25
25 seconds is very fast. Never seen anything like that before. My obvious plan is not disable the wireless AP and switch this baby into a bridge mode and build a real Linux-router to do the NAT. But I'll have to post about that someday.
Ultimately I'm quite happy with this ISP and the router they provided. Out-of-the box it works enough for all people, but provides enough flexibility for me to do some advanced network stuff.
De-bricking a B593-s22
Tuesday, May 17. 2016
I finally did it!
The unit has been non-functional for over a year now. See details in my previous post. But I got it back.
First, I'd like to clarify the myth of "equipment mode". Yes, that does exist. You'll know that your box is bricked and the reason for that is because you're in equipment mode, as your RS-232 -console output will say following during boot-up:
now in wifi mfg

g_Equip_Mode_value = 1
What needs to be done, is getting that Equip_Mode flag off. On "normal" mode bootup, two distinct differences appear at the output:
now in wifi release

normal mode, no need to load RF wifi
and
g_Equip_Mode_value = 0
My sincere thanks goes to Mr. Jevgenij for telling me a magical NVRAM-location to look at.
The brick
My bricked B592 s-22 (in equipment mode) looked like this on a boot sequence:

(Sorry about the signal LED glowing, that was my failure when lighting the box for video. I didn't realize that on my footage it looks like being lit, while in reality it isn't. A bricked box won't show any signal there.)
At power-on, the Power-LED gets lit all the others are off. Then the boot-sequence handles lot of hardware and gets a Linux to boot. They call it the "early init". There are no differences between modes at that point.
Next, what happens is the Linux-side taking control and starting to spin up services. One of the first things it does is kicking all the LEDs lit. When enough services are on, and Linux wants to fiddle with LTE-side all the LEDs go off. Now that the device is configured not to offer all hardware services to Linux-side, rest of the boot sequence goes haywire. There is no Wi-Fi, there is no Ethernet-bridge and lot of stuff fail during boot. Your best clue about this dreaded equipment mode is the Tel LED blinking on/off forever. Actually the box is not doing much at that point. It has given up all hope on getting a handle of the LTE-side or the Ethernet bridge.
Luckily, the box is sane enough to allow a SSH-login. In equipment mode, it will bypass the ATP Cli completely and land at the BusyBox-prompt. There your friend is lteat-command. Go back to my older stuff, for details about that.
The fix
The prerequisite for the fix is, that you are logged into your B593 s-22 via SSH and are able to run lteat and get sensible response out of it. Example (the blank lines happen on my SSH, I don't know why):
# lteat

AT>ati


i


Model: B593s-22


Revision: V200R001B180D20SP05C260


IMEI: 860091028600910


+GCAP: +CGSM,+DS,+ES


OK

AT>
Then you're good to go.
First confirm, that you are in the equipment mode:
AT>at ^nvrd=52110

^NVRD: 12,31 00 00 00 00 00 00 00 00 00 00 00

OK
That's a ReaD-command for NVRAM address location 52110. To change the mode back to normal, a WRite needs to be issued:
AT>at ^nvwr=52110,1,0

OK
Confirm the result:
AT>at ^nvrd=52110

^NVRD: 12,00 00 00 00 00 00 00 00 00 00 00 00

OK
Notice how the hex value 0x31 is changed to 0x00. Btw. if you look at the ASCII-table, you may notice, that 0x31 stands for number 1. That's would be similar to the (1) in g_Equip_Mode_value = 1.
Now all you have to do is power-off your box and kick it back on.
Finally
I don't have a clue why/how/when my box went into this "stupidity"-mode. I was fiddling with the LTE-side at lteat-prompt when it happened. I did try dozens of different commands, any of those may have caused that.
Also, if you're unable to SSH into your box, you may need to read my or somebody else's articles. It's all explained there.
