Fedora Linux 39 - Upgrade
Sunday, November 12. 2023
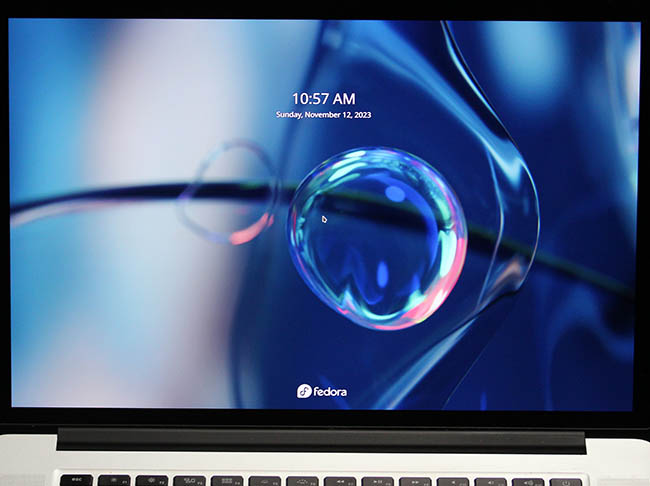
Twenty years with Fedora Linux. Release 39 is out!
I've ran Red Hat since 90s. Version 3.0.3 was released in 1996 and ever since I've had something from them running. As they scrapped Red Hat Linux in 2003 and went for Fedora Core / RHEL, I've had something from those two running. For the record: I hate those semi-working everything-done-only-half-way Debian/Ubuntu crap. When I want to toy around with something that doesn't quite fit, I choose Arch Linux.
To get your Fedora in-place-upgraded, process is rather simple. Docs are in article Performing system upgrade.
First you make sure existing system is upgraded to all latest stuff with a dnf --refresh upgrade. Then make sure upgrade tooling is installed: dnf install dnf-plugin-system-upgrade. Now you're good to go for download all the new packages with a: dnf system-upgrade download --releasever=39
Note: This workflow has existed for a long time. It is likely to work also in future. Next time all you have to do is replace the release vesion with the one you want to upgrade into.
Now all prep is done and you're good to go for the actual upgrade. To state the obvious: this is the dangerous part. Everything before this has been a warm-up run.
dnf system-upgrade reboot
If you have a console, you'll see the progress.
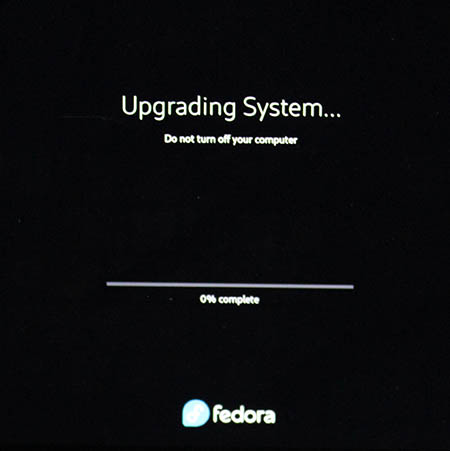
Installing the packages and rebooting into the new release shouldn't take too many minutes.
When back in, verify: cat /etc/fedora-release ; cat /proc/version
This resulted in my case:
Fedora release 39 (Thirty Nine)

Linux version 6.5.11-300.fc39.x86_64 (mockbuild@d23353abed4340e492bce6e111e27898) (gcc (GCC) 13.2.1 20231011 (Red Hat 13.2.1-4), GNU ld version 2.40-13.fc39) #1 SMP PREEMPT_DYNAMIC Wed Nov 8 22:37:57 UTC 2023
Finally, you can do optional clean-up: dnf system-upgrade clean && dnf clean packages
That's it! You're done for at least for next 6 months.
Bare Bones Software - BBEdit - Indent with tab
Saturday, October 28. 2023
As a software developer I've pretty much used all text editors there is. Bold statement. Fact remains there aren't that many of them commonly used.
On Linux, I definitely use Vim, rarely Emacs, almost never Nano (any editor requiring Ctrl-s over SSH is crap!).
On Windows, mostly Notepad++ rarely Windows' own Notepad. Both use Ctrl-s, but won't work over SSH-session.
On Mac, mostly BBEdit.
Then there is the long list of IDEs available on many platforms I've used or am still using to work with multiple programming languages and file formats. Short list with typical ones would be: IntelliJ and Visual Studio.
Note: VScode is utter crap! People who designed VScode were high on drugs or plain old-fashioned idiots. They have no clue what a developer needs. That vastly overrated waste-of-disc-space a last resort editor for me.
BBEdit 14 homepage states:
It doesn’t suck.®
Oh, but it does! It can be made less sucky, though.
Here is an example:
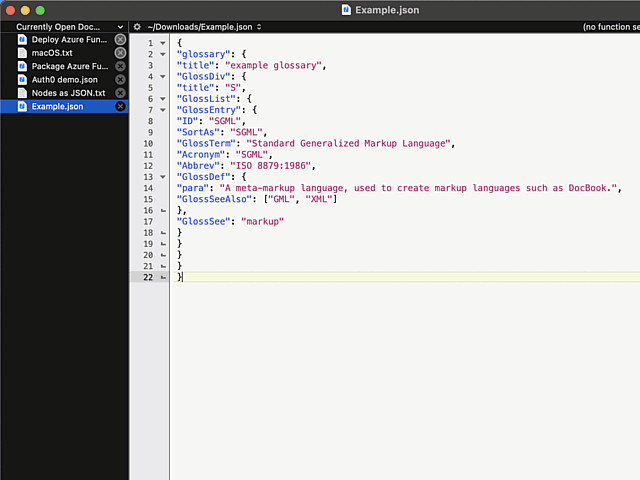
In above example, I'm editing a JSON-file. It happens to be in a rather unreadable state and sprinkling bit of indent on top of it should make the content easily readable.
Remember, earlier I mentioned a long list of editors. Virtually every single one of those has functionality to highlight a section of text and indent selection by pressing Tab. Not BBEdit! It simply replaces entire selection with a tab-character. Insanity!
Remember the statement on not sucking? There is a well-hidden option:
The secret option is called Allow Tab key to indent text blocks and it was introduced in version 13.1.2. Why this isn't default ... correction: Why this wasn't default behaviour from get-go is a mystery.
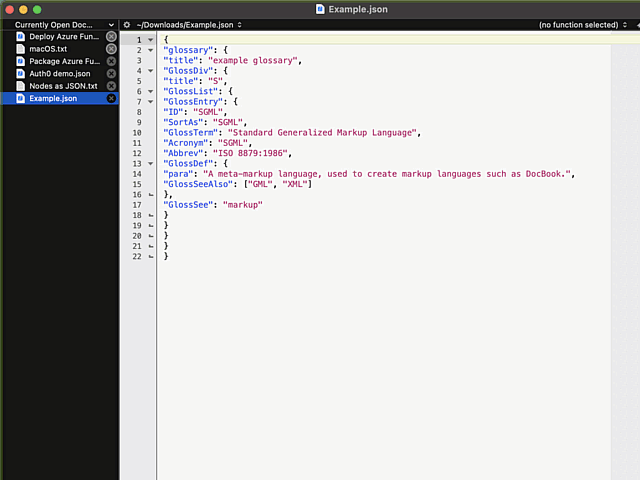
Now the indention works as expected:

What puzzles me is the difficulty of finding the option for indenting with a Tab. I googled wide & far. No avail. Those technical writers @ Barebones really should put some effort on making this option better known.
Nuvoton NCT6793D lm_sensors output
Monday, July 3. 2023
LM-Sensors is set of libraries and tools for accessing your Linux server's motheboard sensors. See more @ https://github.com/lm-sensors/lm-sensors.
If you're ever wondered why in Windows it is tricky to get readings from your CPU-fan rotation speed or core temperatures from you fancy GPU without manufacturer utilities. Obviously vendors do provide all the possible readings in their utilities, but people who would want to read, record and store the data for their own purposes, things get hairy. Nothing generic exists and for unknown reason, such API isn't even planned.
In Linux, The One toolkit to use is LM-Sensors. On kernel side, there exists The Linux Hardware Monitoring kernel API. For this stack to work, you also need a kernel module specific to your motherboard providing the requested sensor information via this beautiful API. It's also worth noting, your PC's hardware will have multiple sensors data providers. An incomplete list would include: motherboard, CPU, GPU, SSD, PSU, etc.
Now that sensors-detect found all your sensors, confirm sensors will output what you'd expect it to. In my case there was a major malfunction. On a boot, following thing happened when system started sensord (in case you didn't know, kernel-stuff can be read via dmesg):
systemd[1]: Starting lm_sensors.service - Hardware Monitoring Sensors...

kernel: nct6775: Enabling hardware monitor logical device mappings.

kernel: nct6775: Found NCT6793D or compatible chip at 0x2e:0x290

kernel: ACPI Warning: SystemIO range 0x0000000000000295-0x0000000000000296 conflicts with OpRegion 0x0000000000000290-0x0000000000000299 (_GPE.HWM) (20221020/utaddress-204)

kernel: ACPI: OSL: Resource conflict; ACPI support missing from driver?

systemd[1]: Finished lm_sensors.service - Hardware Monitoring Sensors.
This conflict resulted in no available mobo readings! NVMe, GPU and CPU-cores were ok, the part I was mostly looking for was fan RPMs and mobo temps just to verify my system health. No such joy.  Uff.
Uff.
It seems, this particular Linux kernel module has issues. Or another way to state it: mobo manufacturers have trouble implementing Nuvoton chip into their mobos. On Gentoo forums, there is a helpful thread: [solved] nct6775 monitoring driver conflicts with ACPI
Disclaimer: For ROG Maximus X Code -mobo adding acpi_enforce_resources=no into kernel parameters is the correct solution. Results will vary depending on what mobo you have.
Such ACPI-setting can be permanently enforced by first querying about the Linux kernel version being used (I run a Fedora): grubby --info=$(grubby --default-index). The resulting kernel version can be updated by: grubby --args="acpi_enforce_resources=no" --update-kernel DEFAULT. A reboot shows fix in effect, ACPI Warning is gone and mobo sensor data can be seen.
As a next step you'll need userland tooling to interpret the raw data into human-readable information with semantics. A new years back, I wrote about Improving Nuvoton NCT6776 lm_sensors output. It's mainly about bridging the flow of zeros and ones into something having meaning to humans. This is my LM-Sensors configuration for ROG Maximus X Code:
chip "nct6793-isa-0290"


    # 1. voltages

    ignore in0

    ignore in1

    ignore in2

    ignore in3

    ignore in4

    ignore in5

    ignore in6

    ignore in7

    ignore in8

    ignore in9

    ignore in10

    ignore in11


    label in12 "Cold Bug Killer"

    set in12_min 0.936

    set in12_max 2.613

    set in12_beep 1


    label in13 "DMI"

    set in13_min 0.550

    set in13_max 2.016

    set in13_beep 1


    ignore in14


    # 2. fans

    label fan1 "Chassis fan1"

    label fan2 "CPU fan"

    ignore fan3

    ignore fan4

    label fan5 "Ext fan?"


    # 3. temperatures

    label temp1 "MoBo"


    label temp2 "CPU"

    set temp2_max 90

    set temp2_beep 1


    ignore temp3

    ignore temp5

    ignore temp6

    ignore temp9

    ignore temp10

    ignore temp13

    ignore temp14

    ignore temp15

    ignore temp16

    ignore temp17

    ignore temp18


    # 4. other

    set beep_enable 1

    ignore intrusion0

    ignore intrusion1
I'd like to credit Mr. Peter Sulyok on his work about ASRock Z390 Taichi. This mobo happens to use the same Nuvoton NCT6793D -chip for LPC/eSPI SI/O (I have no idea what those acronyms are for, I just copy/pasted them from the chip data sheet). The configuration is in GitHub for everybody to see: https://github.com/petersulyok/asrock_z390_taichi
Also, I''d like to state my ignorance. After reading less than 500 pages of the NCT6793D data sheet, I have no idea what is:
- Cold Bug Killer voltage
- DMI voltage
- AUXTIN1 is or exactly what temperature measurement it serves
- PECI Agent 0 temperature
- PECI Agent 0 Calibration temperature
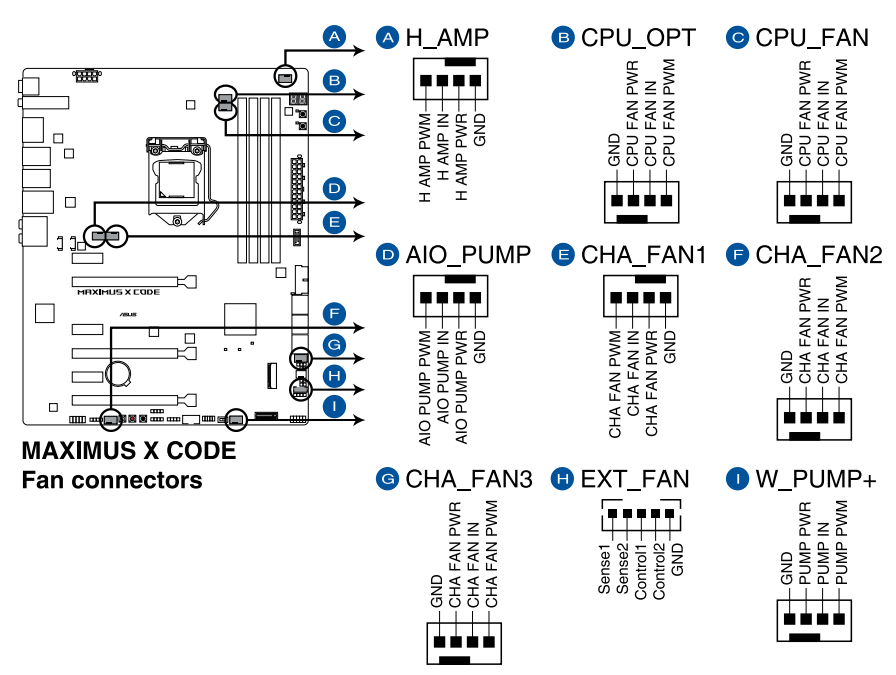
Remember, I did mention semantics. From sensors-command output I can read a reading, what it translates into, no idea! Luckily there are some of the readings seen are easy to understand and interpret. As an example, fan RPMs are really easy to measure by removing the fan from its connector. Here is an excerpt from my mobo manual to explain fan-connectors:
As data quality is taken care of and output is meaningful, next step is to start recording data. In LM-Sensors, there is sensord for that. It is a system service taking a snapshot (you can define the frequency) and storing it for later use. I'll enrich the stored data points with system load averages, this enables me to estimate a relation with high temperatures and/or fan RPMs with how much my system is working.
Finally, all data gathered into a RRDtool database can be easily visualized with rrdcgi into HTML + set of PNG-images to present a web page like this:
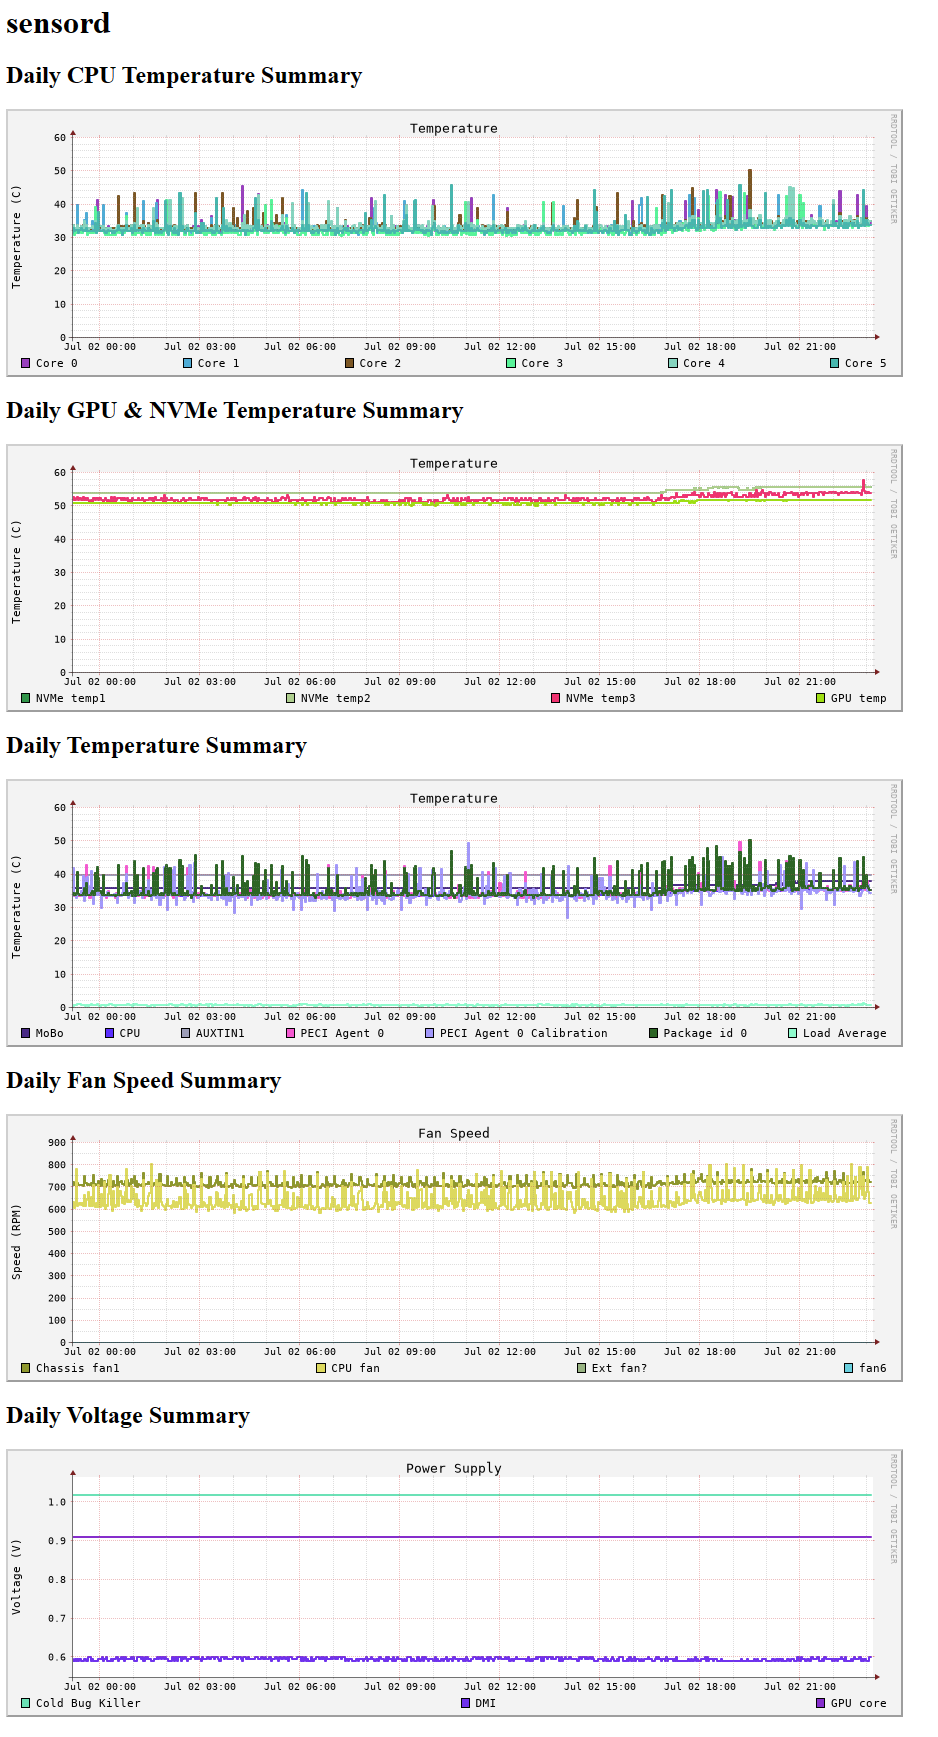
Nice!
AMD Software: Adrenalin Edition - Error 202
Saturday, April 29. 2023
GPU drivers are updated often. The surprise comes from the fact, the update fails. What! Why! How is this possible?
Error 202 – AMD Software Installer Cannot Proceed as a Windows Update Is Currently in Progress
Making sure, this isn't a fluke. I did retry. A few times, actually. Nope. Didn't help.
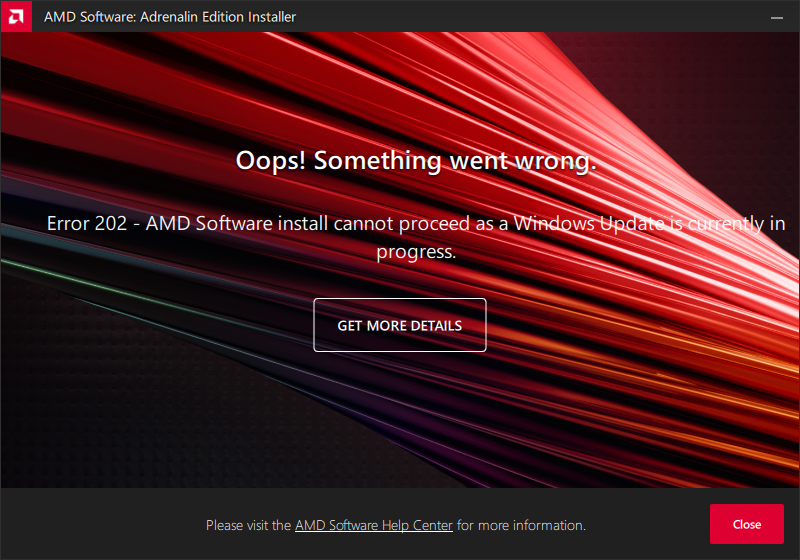
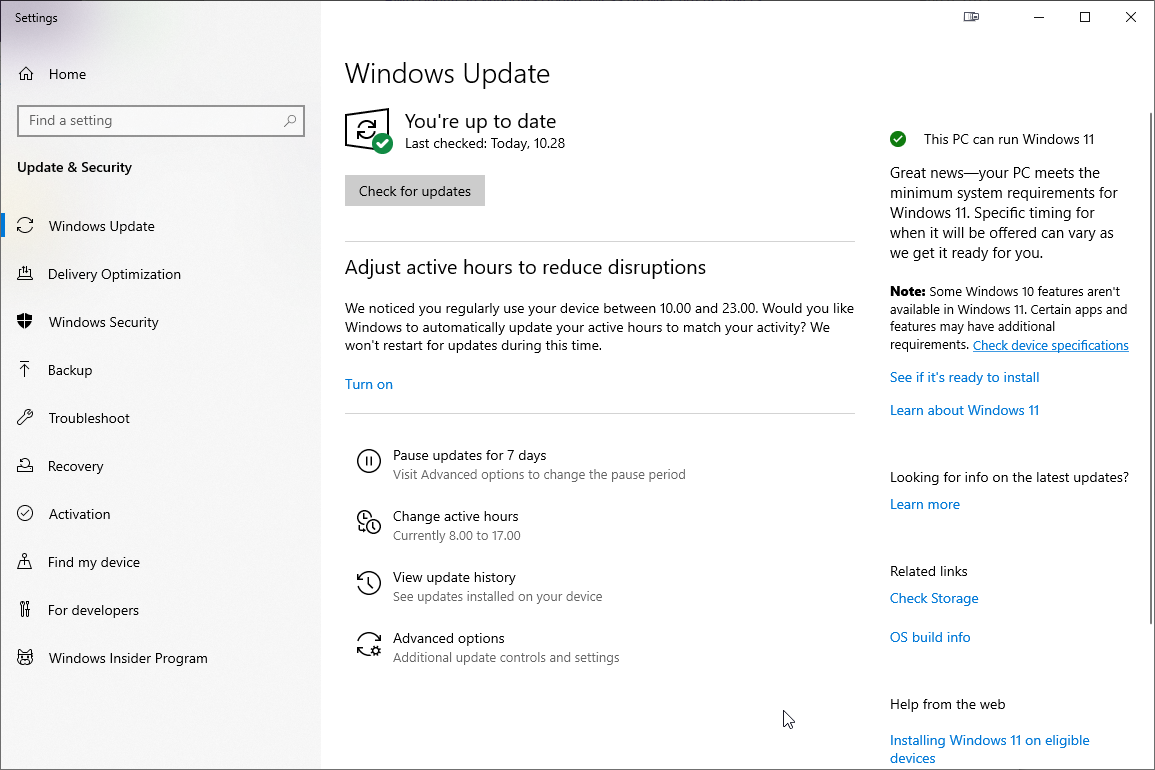
I'm not alone with this. In AMD community, there is a thread Error 202 but there's no pending Windows Update. Also, on my Windows, there was nothing pending:
As this was the first time I had a hiccup, I realized I knew nothing about the installer. Always on Windows, it pays off to run setup.exe with switch /?. This is what will be displayed:

Haa! Options. Going for: .\Setup.exe -install -boot -log inst.log
After, the expected failure, log reveals:
InstallMan::isDisplayDriverEligibleToInstall :6090 Display driver Eligible to Install

isWindowsServiceStopped :4102 Queried Windows Update Status: 4

pauseWindowsUpdate :5244 drvInst.exe is currently running

InstallMan::performMyState :5177 ERROR --- InstallMan -> Caught an AMD Exception. Error code to display to user: 202. Debug hint: "drvInst.exe is currently running"
No idea where the claim of drvInst.exe is currently running comes from. It isn't! Obviously something is reading Windows Update status wrong. Let's see what'll happen if I'll bring the Windows Update service down with a simple PowerShell-command: Stop-Service -Name wuauserv
Ta-daa! It works! Now installation will complete.
File 'repomd.xml' from repository is unsigned
Thursday, March 23. 2023
For all those years I've been running SUSE-Linux, I've never bumped into this one while running a trivial zypper update:
Warning: File 'repomd.xml' from repository 'Update repository with updates from SUSE Linux Enterprise 15' is unsigned.
Note: Signing data enables the recipient to verify that no modifications occurred
after the data were signed. Accepting data with no, wrong or unknown signature can
lead to a corrupted system and in extreme cases even to a system compromise.
Note: File 'repomd.xml' is the repositories master index file. It ensures the
integrity of the whole repo.
Warning: We can't verify that no one meddled with this file, so it might not be
trustworthy anymore! You should not continue unless you know it's safe.
continue? [yes/no] (no):
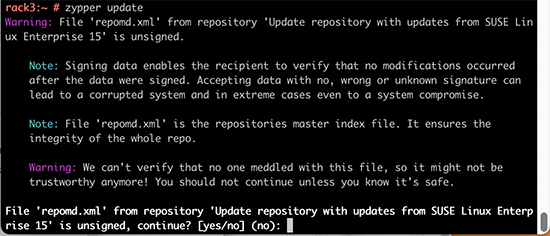
This error slash warning being weird and potentially dangerous, my obvious reaction was to hit ctrl-c and go investigate. First, my package verification mechanism should be intact and be able to verify if updates downloaded are unaltered or not. Second, there should have not been any breaking changes into my system, at least I didn't make any. As my system didn't seem to breached, I assumed a system malfunction and went investigating.
Quite soon, I learned this is less than rare event. It has happeded multiple times for other people. According to article Signature verification failed for file ‘repomd.xml’ from repository ‘openSUSE-Leap-42.2-Update’ there exists a simple fix.
By running two command zypper clean --all and zypper ref, the problem should dissolve.
Yes, that is the case. After a simple wash/clean/rinse -cycle zypper update worked again.
It was just weird to bump into that for the first time I'd assume this would have occurred some time earlier.
Writing a secure Systemd daemon with Python
Sunday, March 5. 2023
ChromeOS Flex test drive
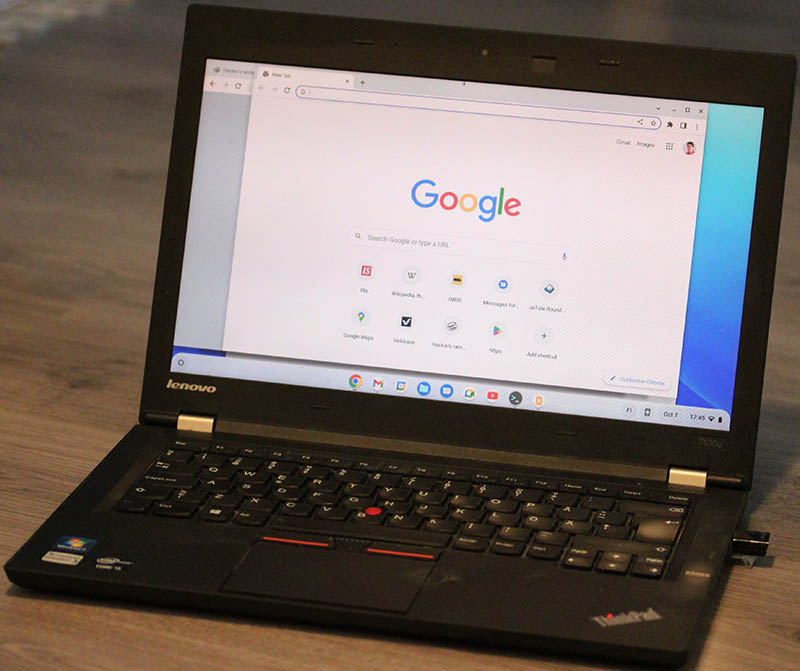
Monday, October 10. 2022
Would you like to run an operating system which ships as-is, no changes allowed after installation? Can you imagine your mobile phone without apps of your own choosing? Your Windows10 PC? Your macOS Monterey? Most of us cannot.
As a computer enthusiast, of course I had to try such a feat!
Prerequisites
How to get your ball rolling, check out Chrome OS Flex installation guide @ Google. What you'll need is a supported hardware. In the installation guide, there is a certified models list and it will contain a LOT of supported PC and Mac models. My own victim/subject/target was 12 year old Lenovo and even that is in the certified list! WARNING: The hard drive of the victim computer will be erased beyond data recovery.
The second thing you'll need is an USB-stick to boot your destination ChromeOS. Any capacity will do. I had a 32 GiB stick and it used 128 MiB of it. That's less than 1% of the capacity. So, any booting stick will do the trick for you. Also, you won't be needing the stick after install, requirement is to just briefly slip an installer into it, boot and be done.
Third and final thing you'll be needing is a Google Chrome browser and ChromeOS recovery media extension into it:
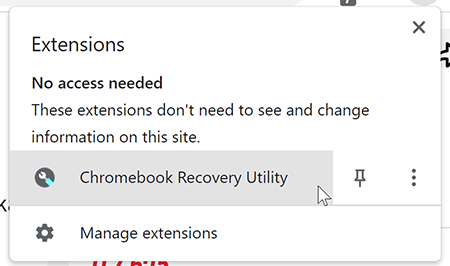
To clarify, let's repeat that:
Your initial installation into your USB-stick will be done from Google Chrome browser using a specific extension in it.
Yes. It sounds bit unorthodox or different than other OS does. Given Google's reach on web browser users, that seemed like the best idea. This extension will work in any OS.
To log into your ChromeOS, you will need a Google Account. Most people on this planet do have one, so most likely you're covered. On the other hand, if your religious beliefs are strongly anti-Google, the likelihood of you running an opearting system made by Google is low. You rare person won't be able to log in, but everybody else will.
Creating installation media
Running the extension:

That's it. As there won't be much data on the stick, the creation flys by fast!
Installing ChromeOS Flex
If media creation was fast, this will be even faster.
Just boot the newly crated stick and that's pretty much it. The installer won't store much information to the drive, so you will be done in a jiffy.
Running ChromeOS Flex
Log into the machine with your Google Account. Remenber: This OS won't work without a network connection. You really really will need active network connection to use this one.
All you have is set of Google's own apps: Chrome, Gmail, YouTube and such. By looking at the list in Find apps for your Chromebook, you'd initially think all is good and you can have our favorite apps in it. To make your (mis)belief stronger, even Google Play is there for you to run and search apps. Harsh reality sets in quite fast: you can not install anything via Google Play. All the apps in Google Play are for Android or real ChromeOS, not for Flex. Reason is obvious: your platform is running AMD-64 CPU and all the apps are for ARM. This may change in the future, but at the time of writing it is what it is.
You lose a lot, but there is something good in this trade-off. As you literally can not install anything, not even malware can be installed. ChromeOS Flex has to be the safest OS ever made! Most systems in the world are manufactured from ground up to be generic and be able to run anything. This puppy isn't.
SSH
After initial investigation, without apps, without password manager, without anything, I was about to throw the laptop back to its original dust gathering duty. What good is a PC which runs a Chrome browser and nothing else? Then I found the terminal. It won't let you to actually enter the shell of our ChromeOS laptop. It will let you SSH to somewhere else.
On my own boxes, I'll always deactivate plaintext passwords, so I bumped into a problem. From where do I get the private key for SSH-session? Obvious answer is either via Google Drive (<shivers>) or via USB-stick. You can import a key to the laptop and not worry about that anymore.
Word of caution: Think very carefully if you want to store your private keys in a system managed for you by Google.
Biggest drawbacks
For this system to be actually usable, I'd need:
- Proper Wi-Fi. This 12 year old laptop had only Wi-Fi 4 (802.11n)
- This I managed to solve by using an Asus USB-AC51 -dongle to get Wi-Fi 5.
- lsusb:
ID 0b05:17d1 ASUSTek Computer, Inc. AC51 802.11a/b/g/n/ac Wireless Adapter [Mediatek MT7610U] - This won't solve my home network's need for Wi-Fi 6, but gets me to The Net.
- There is no list of supported USB-devices. I have bunch of 802.11ac USB-sticks and this is the only one to work in ChromeOS Flex.
- My password manager and passwords in it
- No apps means: no apps, not even password manager
- What good is a browser when you cannot log into anything. All my passwords are random and ridiculously complex. They were not designed to be remembered nor typed.
- In The world's BEST password advice, Mr. Horowitz said: "The most secure Operating System most people have access to is a Chromebook running in Guest Mode."
Nuisances
Installer won't let you change keyboard layout. If you have US keyboard, fine. If you don't, it sucks for you.
Partitions
As this is a PC, the partition table has EFI boot. Is running EXT-4 and EXT-2 partitions. Contains encrypted home drive. It's basically a hybrid between an Android phone and a Linux laptop.
My 240 GiB SSD installed as follows:
Partition Table: gpt

Disk Flags:


Number  Start   End     Size    File system  Name        Flags

11      32.8kB  33.3kB  512B                 RWFW

 6      33.3kB  33.8kB  512B                 KERN-C      chromeos_kernel

 7      33.8kB  34.3kB  512B                 ROOT-C

 9      34.3kB  34.8kB  512B                 reserved

10      34.8kB  35.3kB  512B                 reserved

 2      35.3kB  16.8MB  16.8MB               KERN-A      chromeos_kernel

 4      16.8MB  33.6MB  16.8MB               KERN-B      chromeos_kernel

 8      35.7MB  52.4MB  16.8MB  ext4         OEM

12      52.4MB  120MB   67.1MB  fat16        EFI-SYSTEM  boot, legacy_boot, esp

 5      120MB   4415MB  4295MB  ext2         ROOT-B

 3      4415MB  8709MB  4295MB  ext2         ROOT-A

 1      8709MB  240GB   231GB   ext4         STATE
Finally
This is either for explorers who want to try stuff out or alternatively for people whose needs are extremely limited. If all you do is surf the web or YouTube then this might be for you. Anything special --> forget about it.
The best part with this is the price. I had the old laptop already, so cost was $0.
MacBook Pro - Fedora 36 sleep wake - part 2
Friday, September 30. 2022
MacBook Pro - Fedora 36 sleep wake
Thursday, August 25. 2022
ArchLinux - Pacman - GnuPG - Signature trust fail
Wednesday, July 27. 2022
Post-passwords life: Biometrics for your PC
Monday, July 4. 2022
Last year I did a few posts about passwords, example. The topic is getting worn out as we have established the fact about passwords being a poor means of authentiaction, how easily passwords leak from unsuspecting user to bad people and how you really should be using super-complex passwords which are stored in a vault. Personally I don't think there are many interesting password avenues left to explore.
This year my sights are set into life after passwords: how are we going to authenticate ourselves and what we need to do to get there.
Biometrics. A "password" everybody of us carries everywhere and is readily available to be used. Do the implementation wrong, leak that "password" and that human will be in big trouble. Biometric "password" isn't so easy to change. Impossible even (in James Bond movies, maybe). Given all the potential downsides, biometrics still beats traditional password in one crucial point: physical distance. To authenticate with biometrics you absolutely, positively need to be near the device you're about to use. A malicious cracker from other side of the world won't be able to brute-force their way trough authentication unless they have your precious device at their hand. Even attempting any hacks remotely is impossible.
While eyeballing some of the devices and computers I have at hand:


The pics are from iPhone 7, MacBook Pro and Lenovo T570. Hardware that I use regularily, but enter password rarely. There obviously exists other types of biometrics and password replacements, but I think you'll catch the general idea of life after passwords.
Then, looking at the keyboard of my gaming PC:

Something I use on daily basis, but it really puzzles me why Logitech G-513 doesn't have the fingerprint reader like most reasonable computer appliance does. Or generally speaking, if not on keyboard could my self assembled PC have a biometric reader most devices do. Why must I suffer from lack of simple, fast and reliable method of authentication? Uh??
Back-in-the-days fingerprint readers were expensive, bulky devices weren't that accurate and OS-support was mostly missing and injected via modifying operating system files. Improvements on this area is something I'd credit Apple for. They made biometric authentication commonly available for their users, when it became popular and sensor prices dropped, others followed suit.
So, I went looking for a suitable product. This is the one I ended up with:
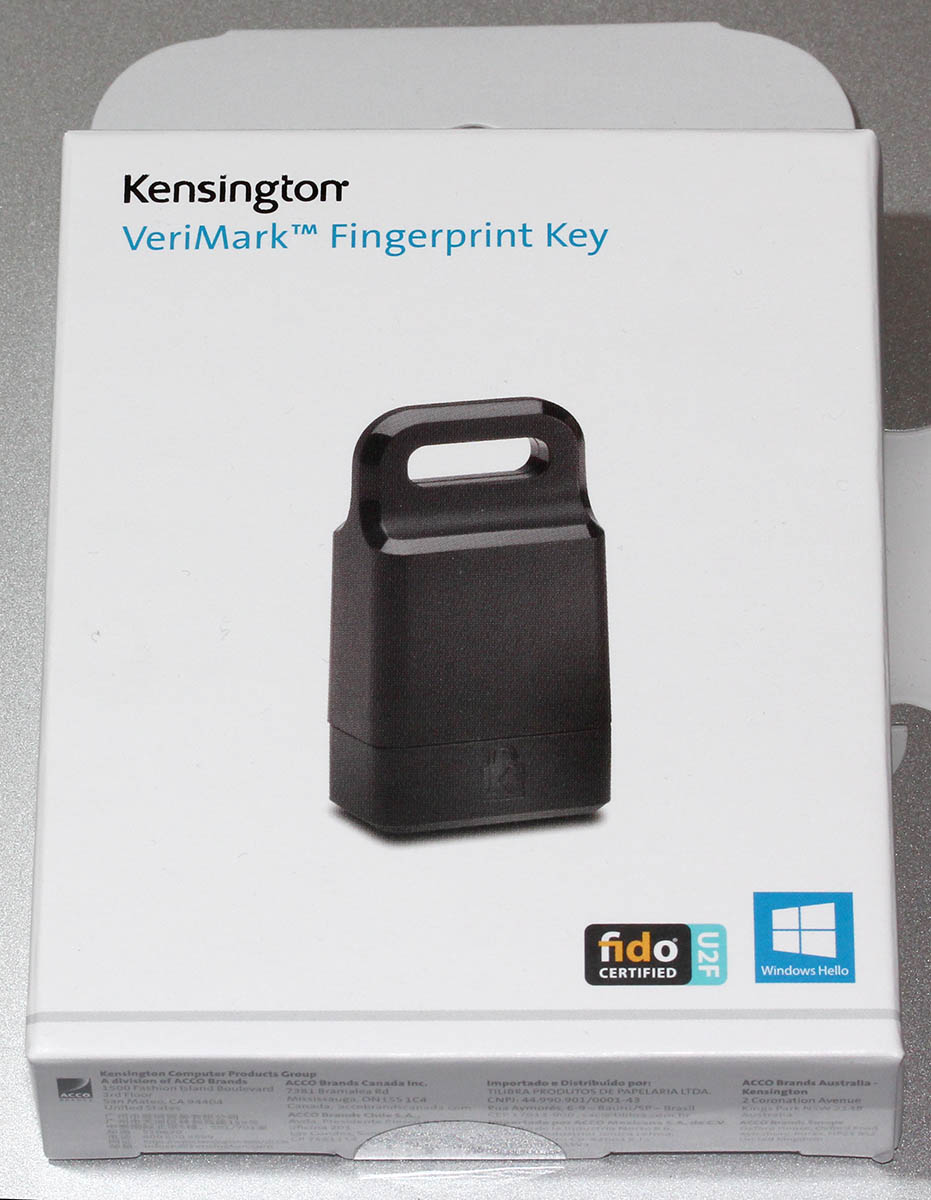
A note: I do love their "brief" product naming! 
It is a Kensington® VeriMark™ Fingerprint Key supporting Windows Hello™ and FIDO U2F for universal 2nd-factor authentication. Pricing for one is reasonable, I paid 50€ for it. As I do own other types of USB/Bluetooth security devices, what they're asking for one is on par with market. I personally wouldn't want a security device which would be "cheapest on the market". I'd definitely go for a higher price range. My thinking is, this would be the appropriate price range for these devices.
Second note: Yes, I ended up buying a security device from company whose principal market on mechanical locks.
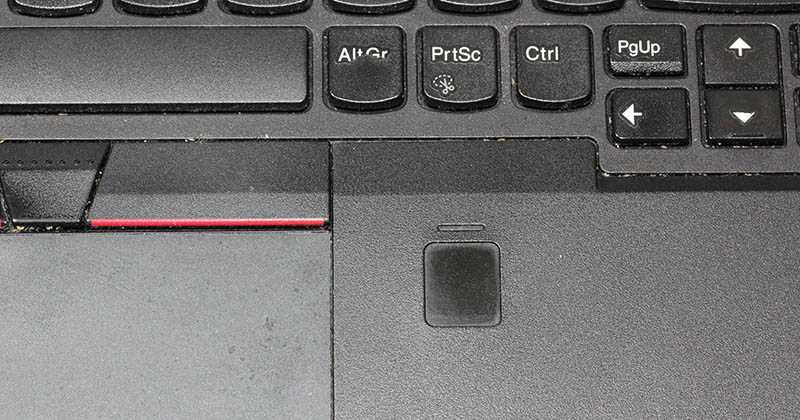
Here is one of those lock slots on the corner of my T570:

From left to right, there is a HDMI-port, Ethernet RJ-45 and a Kensington lock slot. You could bolt the laptop into a suitable physical object making the theft of the device really hard. Disclaimer: Any security measure can be defeated, given enough time.
Back to the product. Here is what's in the box:


That would be a very tiny USB-device. Similar sized items would be your Logitech mouse receiver or smallest WiFi dongles.
With a Linux running lsusb, following information can be retrieved:
Bus 001 Device 006: ID 06cb:0088 Synaptics, Inc.
Doing the verbose version lsusb -s 1:6 -vv, tons more is made available:
Bus 001 Device 006: ID 06cb:0088 Synaptics, Inc.

Device Descriptor:

  bLength                18

  bDescriptorType         1

  bcdUSB               2.00

  bDeviceClass          255 Vendor Specific Class

  bDeviceSubClass        16

  bDeviceProtocol       255

  bMaxPacketSize0         8

  idVendor           0x06cb Synaptics, Inc.

  idProduct          0x0088

  bcdDevice            1.54

  iManufacturer           0

  iProduct                0

  iSerial                 1 -redacted-

  bNumConfigurations      1

  Configuration Descriptor:

    bLength                 9

    bDescriptorType         2

    wTotalLength       0x0035

    bNumInterfaces          1

    bConfigurationValue     1

    iConfiguration          0

    bmAttributes         0xa0

      (Bus Powered)

      Remote Wakeup

    MaxPower              100mA

    Interface Descriptor:

      bLength                 9

      bDescriptorType         4

      bInterfaceNumber        0

      bAlternateSetting       0

      bNumEndpoints           5

      bInterfaceClass       255 Vendor Specific Class

      bInterfaceSubClass      0

      bInterfaceProtocol      0

      iInterface              0

      Endpoint Descriptor:

        bLength                 7

        bDescriptorType         5

        bEndpointAddress     0x01  EP 1 OUT

        bmAttributes            2

          Transfer Type            Bulk

          Synch Type               None

          Usage Type               Data

        wMaxPacketSize     0x0040  1x 64 bytes

        bInterval               0

      Endpoint Descriptor:

        bLength                 7

        bDescriptorType         5

        bEndpointAddress     0x81  EP 1 IN

        bmAttributes            2

          Transfer Type            Bulk

          Synch Type               None

          Usage Type               Data

        wMaxPacketSize     0x0040  1x 64 bytes

        bInterval               0

      Endpoint Descriptor:

        bLength                 7

        bDescriptorType         5

        bEndpointAddress     0x82  EP 2 IN

        bmAttributes            2

          Transfer Type            Bulk

          Synch Type               None

          Usage Type               Data

        wMaxPacketSize     0x0040  1x 64 bytes

        bInterval               0

      Endpoint Descriptor:

        bLength                 7

        bDescriptorType         5

        bEndpointAddress     0x83  EP 3 IN

        bmAttributes            3

          Transfer Type            Interrupt

          Synch Type               None

          Usage Type               Data

        wMaxPacketSize     0x0008  1x 8 bytes

        bInterval               4

      Endpoint Descriptor:

        bLength                 7

        bDescriptorType         5

        bEndpointAddress     0x84  EP 4 IN

        bmAttributes            3

          Transfer Type            Interrupt

          Synch Type               None

          Usage Type               Data

        wMaxPacketSize     0x0010  1x 16 bytes

        bInterval              10

Device Status:     0x0000

  (Bus Powered)
So, this "Kensington" device is ultimately something Synaptics made. Synaptics have a solid track-record with biometrics and haptic input, so I should be safe with the product of my choice here.
For non-Windows users, the critical thing worth mentioning here is: There is no Linux support. There is no macOS support. This is only for Windows. Apparently you can go back to Windows 7 even, but sticking with 10 or 11 should be fine. A natural implication for being Windows-only leads us to following: Windows Hello is mandatory (I think you should get the hint from the product name already).
Without biometrics, I kinda catch the idea with Windows Hello. You can define a 123456-style PIN to log into your device, something very simple for anybody to remember. It's about physical proximity, you need to enter the PIN into the device, won't work over network. So, that's kinda ok(ish), but with biometrics Windows Hello kicks into a high gear. What I typically do, is define a rather complex alphanumeric PIN to my Windows and never use it again. Once you go biometrics, you won't be needing the password. Simple!
Back to the product. As these Kensington-people aren't really software-people, for installation they'll go with the absolutely bare minimum. There is no setup.exe or something any half-good Windows developer would be able to whip up. A setup which would execute pnputil -i -a synaWudfBioUsbKens.inf with free-of-charge tools like WiX would be rather trivial to do. But noooo. Nothing that fancy! They'll just provide a Zip-file of Synaptics drivers and instruct you to right click on the .inf-file:
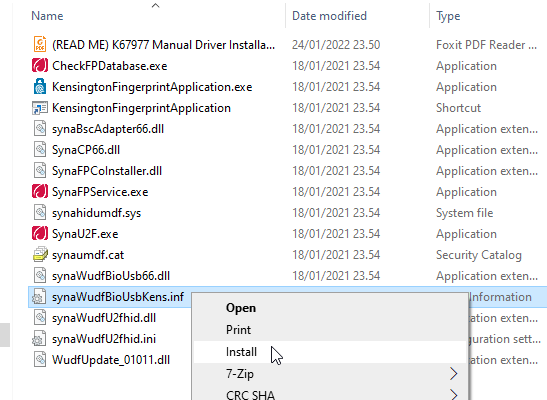
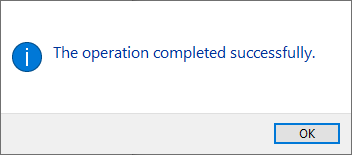
To Windows users not accustomed to installing device drivers like that, it is a fast no-questions-asked -style process resulting in a popup:
When taking a peek into Device Manager:
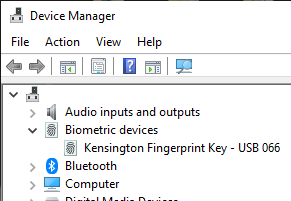
My gaming PC has a biometric device in it! Whoo!
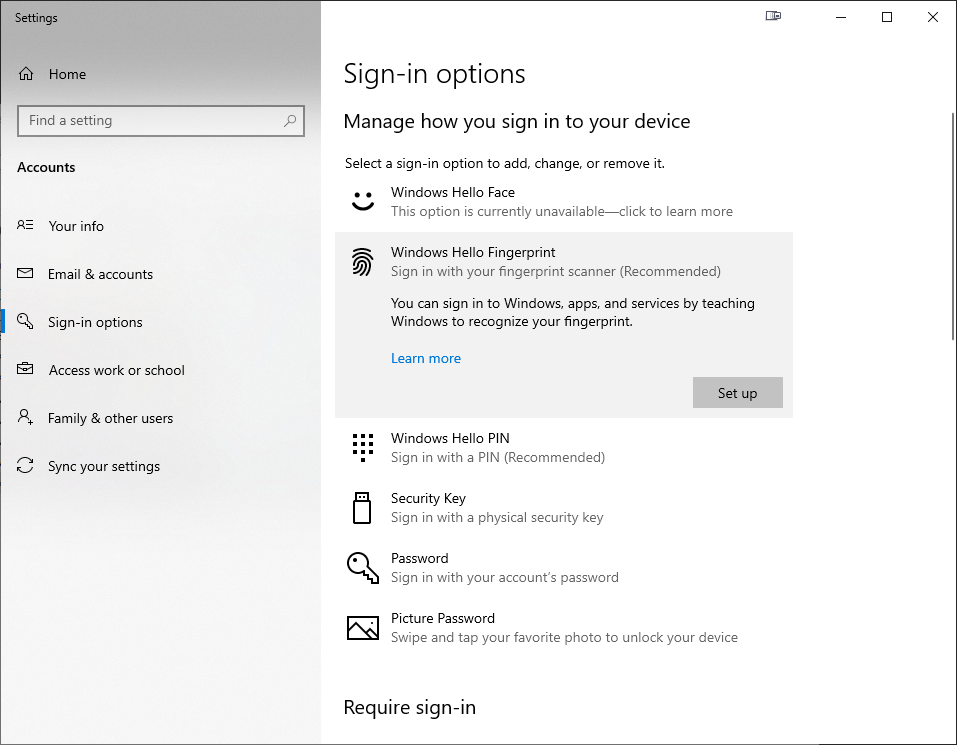
Obviously this isn't enough. Half of the job is done now. Next half is to train some of my fingers to the reader. Again, this isn't Apple, so user experience (aka. UX) is poor. There seems not to be a way to list trained fingers or remove/update them. I don't really understand the reasoning for this sucky approach by Microsoft. To move forward with this, go to Windows Settings and enable Windows Hello:
During the setup-flow of Windows Hello, you'll land at the crucial PIN-question:
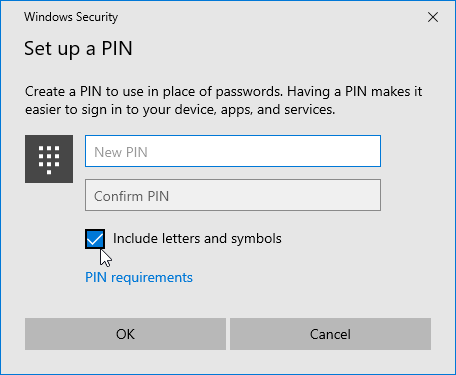
Remeber to Include letters and symbols. You don't have to stick with just numbers! Of course, if that suits your needs, you can.
After that you're set! Just go hit ⊞ Win+L to lock your computer. Test how easy it is to log back in. Now, when looking at my G-513 it has the required feature my iPhone 7, MBP and Lenovo has:

Nicely done!
Fedora 35: Name resolver fail - Solved!
Monday, April 25. 2022
Databricks CentOS 8 stream containers
Monday, February 7. 2022
Last November I created CentOS 8 -based Databricks containers.
At the time of tinkering with them, I failed to realize my base was off. I simply used the CentOS 8.4 image available at Docker Hub. On later inspection that was a failure. Even for 8.4, the image was old and was going to be EOLd soon after. Now that 31st Dec -21 had passed I couldn't get any security patches into my system. To put it midly: that's bad!
What I was supposed to be using, was the CentOS 8 stream image from quay.io. Initially my reaction was: "What's a quay.io? Why would I want to use that?"

Thanks Merriam-Webster for that, but it doesn't help.
On a closer look, it looks like all RedHat container -stuff is not at docker.io, they're in quay.io.
Simple thing: update the base image, rebuild all Databricks-images and done, right? Yup. Nope. The images built from steam didn't work anymore. Uff! They failed working that bad, not even Apache Spark driver was available. No querying driver logs for errors. A major fail, that!
Well. Seeing why driver won't work should be easy, just SSH into the driver an take a peek, right? The operation is documented by Microsoft at SSH to the cluster driver node. Well, no! According to me and couple of people asking questions like How to login SSH on Azure Databricks cluster, it is NOT possible to SSH into Azure Databricks node.
Looking at Azure Databricks architecture overview gave no clues on how to see inside of a node. I started to think nobody had ever done it. Also enabling diagnostic logging required the premium (high-prized) edition of Databricks, which wasn't available to me.
At this point I was in a full whatta-hell-is-going-on!? -mode.
Digging into documentation, I found out, it was possible to run a Cluster node initialization scripts, then I knew what to do next. As I knew it was possible to make requests into the Internet from a job running in a node, I could write an intialization script which during execution would dig me a SSH-tunnel from the node being initialized into something I would fully control. Obiviously I chose one of my own servers and from that SSH-tunneled back into the node's SSH-server. Double SSH, yes, but then I was able to get an interactive session into the well-protected node. An interactive session is what all bad people would want into any of the machines they'll crack into. Tunneling-credit to other people: quite a lot of my implementation details came from How does reverse SSH tunneling work?
To implement my plan, I crafted following cluster initialization script:
LOG_FILE="/dbfs/cluster-logs/$DB_CLUSTER_ID-init-$(date +"%F-%H:%M").log"

exec >> "$LOG_FILE"


echo "$(date +"%F %H:%M:%S") Setup SSH-tunnel"

mkdir -p /root/.ssh

cat > /root/.ssh/authorized_keys <<EOT

ecdsa-sha2-nistp521 AAAAE2V0bV+TrsFVcsA==

EOT


echo "$(date +"%F %H:%M:%S") Install and setup SSH"

dnf install openssh-server openssh-clients -y

/usr/libexec/openssh/sshd-keygen ecdsa

/usr/libexec/openssh/sshd-keygen rsa

/usr/libexec/openssh/sshd-keygen ed25519

/sbin/sshd


echo "$(date +"%F %H:%M:%S") - Add p-key"


cat > /root/.ssh/nobody_id_ecdsa <<EOT

-----BEGIN OPENSSH PRIVATE KEY-----

b3BlbnNzaC1rZXktdjEAAAAABG5vbmUAAAAEbm9uZQAAAAAAAAABAAAA

1zaGEyLW5pc3RwNTIxAAAACG5pc3RwNTIxAAAAhQQA2I7t7xx9R02QO2

rsLeYmp3X6X5qyprAGiMWM7SQrA1oFr8jae+Cqx7Fvi3xPKL/SoW1+l6

Zzc2hkQHZtNC5ocWNvZGVzaG9wLmZpAQIDBA==

-----END OPENSSH PRIVATE KEY-----

EOT

chmod go= /root/.ssh/nobody_id_ecdsa

echo "$(date +"%F %H:%M:%S") - SSH dir content:"


echo "$(date +"%F %H:%M:%S") Open SSH-tunnel"

ssh -f -N -T \

  -R22222:localhost:22 \

  -i /root/.ssh/nobody_id_ecdsa \

  -o StrictHostKeyChecking=no \

  nobody@my.own.box.example.com -p 443
Note: Above ECDSA-keys have been heavily shortened making them invalid. Don't copy passwords or keys from public Internet, generate your own secrets. Always! And if you're wondering, the original keys have been removed.
Note 2: My init-script writes log into DBFS, see exec >> "$LOG_FILE" about that.
My plan succeeded. I got in, did the snooping around and then it took couple minutes when Azure/Databrics -plumbing realized driver was dead, killed the node and retried the startup-sequence. Couple minutes was plenty of time to eyeball /databricks/spark/logs/ and /databricks/driver/logs/ and deduce what was going on and what was failing.
Looking at simplified Databricks (Apache Spark) architecture diagram:
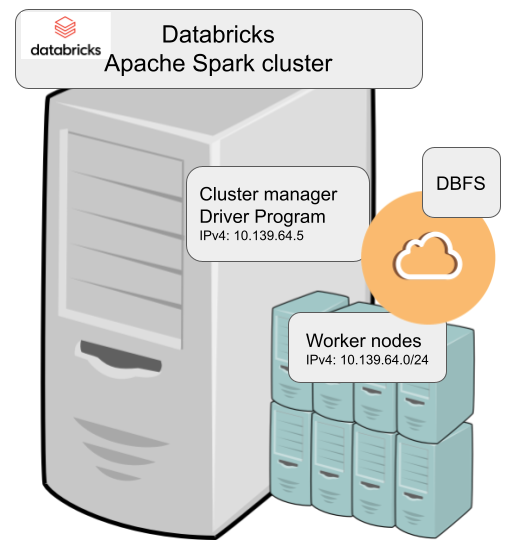
Spark driver failed to start because it couldn't connect into cluster manager. Subsequently, cluster manager failed to start as ps-command wasn't available. It was in good old CentOS, but in base stream it was removed. As I got progress, also ip-command was needed. I added both and got the desired result: a working CentOS 8 stream Spark-cluster.
Notice how I'm specifying HTTPS-port (TCP/443) in the outgoing SSH-command (see: -p 443). In my attempts to get a session into the node, I deduced following:
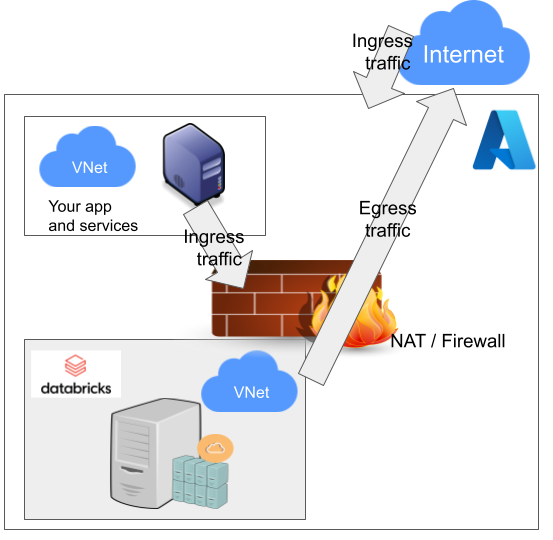
As Databricks runs in it's own sandbox, also outgoing traffic is heavily firewalled. Any attempts to access SSH (TCP/22) are blocked. Both HTTP and HTTPS are known to work as exit ports, so I spoofed my SSHd there.
There are a number of different containers. To clarify which one to choose, I drew this diagram:
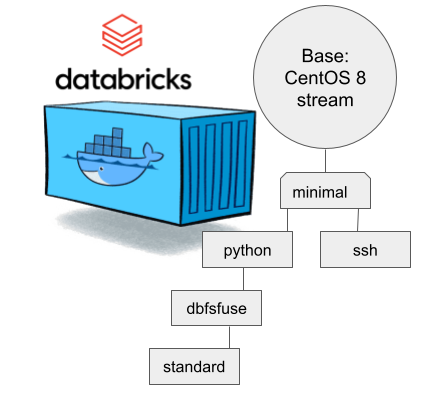
In my sparking, I'll need both Python and DBFS, so my choice is dbfsfuse. Most users would be happy with standard, but it only adds SSHd which is known not to work. ssh has the same exact problem. The reason for them to exist, is because in AWS SSHd does work. Among the changes from good old CentOS into stream is lacking FUSE. Old one had FUSE even in minimal, but not anymore. You can access DBFS only with dbfsfuse or standard from now on.
If you want to take my CentOS 8 brick-containers for a spin, they are still here: https://hub.docker.com/repository/docker/kingjatu/databricks, now they are maintained and get security patches too!

