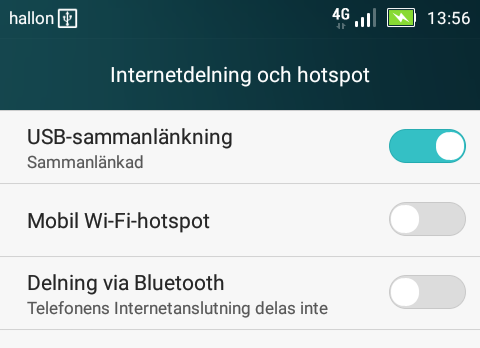
PS4 controller in a PC
Wednesday, November 14. 2018
Lately, I've been playing Mudrunner: Spintires a lot. That's a really weird game about logging machinery and mud. For some strange reason I find hauling logs from a lake through mud really entertaining. Why logs are located a "lake" is beyond me.
During the gameplay, player needs to operate number of different heavy machinery. This involves driving a skidder, a heavy truck or operating a crane to get the logs loaded. I tried doing that with a traditional mouse and keyboard config. I kinda managed to do it, but anybody who has driven a real car or truck or flown an airplane using only a keyboard knows, it's very tricky. Then I got a hint, that a Playstation 4 controller is really good with that game.
A-haa! All I need to do is hook up my PS4-controller into my PC using ... well... dunno. As Google search engine is a good friend, I found a project DS4Windows from Github https://github.com/Ryochan7/DS4Windows. It will convert a PS4-controller into an Xbox controller, which will work perfectly with most games.
Just hokk up an USB-cable to the controller, run the software, and:
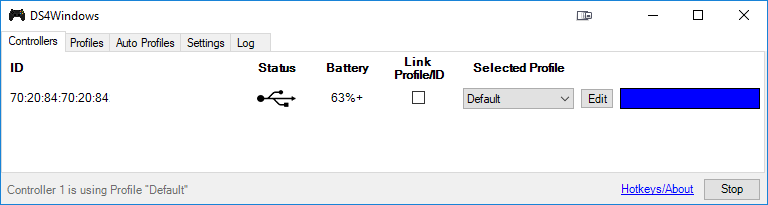
You're done! It really is that simple. Now spinning tires in mud is much much more enjoyable!
Arch Linux failing to start network interface, part 2
Saturday, March 17. 2018
I genuinely love my Arch Linux. It is a constant source of mischief. In a positive sense. There is always something changing making the entire setup explode. The joy I get, is when I need to get the pieces back together. 
In the Wikipedia article of Arch Linux, there is a phrase:
... and expects the user to be willing to make some effort to understand the system's operation
The is precisely what I use my Arch Linux for. I want the practical experience and understanding on the system. And given it's rolling release approaches, it explodes plenty.
Back in 2014, Arch Linux impemented Consistent Network Device Naming. At that time the regular network interface names changed. For example my eth0 become ens3. My transition was not smooth. See my blog post about that.
Now it happened again! Whaat?
Symptoms:
- Failure to access the Linux-box via SSH
- Boot taking very long time
- Error message about service
sys-subsystem-net-devices-ens3.devicefailing on startup
Failure:
Like previous time, the fix is about DHCP-client failing.
You vanilla query for DHCP-client status:
systemctl status dhcpcd@*
... resulted as nothingness. A more specific query for the failing interface:
systemctl status dhcpcd@ens3
... results:
* dhcpcd@ens3.service - dhcpcd on ens3

  Loaded: loaded (/usr/lib/systemd/system/dhcpcd@.service; enabled; vendor pre>

  Active: inactive (dead)
Yup. DHCP failure. Like previously, running ip addr show revealed the network interface name change:
2: enp0s3: mtu 1500 qdisc fq_codel state UP group default qlen 1000 link/ether 52:54:52:54:52:54 brd ff:ff:ff:ff:ff:ff
There is no more ens3, it is enp0s3 now. Ok.
Fix:
A simple disable for the non-existent interface's DHCP, and enable for the new one:
systemctl disable dhcpcd@ens3

systemctl enable dhcpcd@enp0s3
To test that, I rebooted the box. Yup. Working again!
Optional fix 2, for the syslog:
Debugging this wasn't as easy as I expected. dmesg had nothing on DHCP-clients and there was no kernel messages log at all! Whoa! Who ate that? I know, that default installation of Arch does not have syslog. I did have it running (I think) and now it was gone. Weird.
Documentation is at https://wiki.archlinux.org/index.php/Syslog-ng, but I simply did a:
pacman -S syslog-ng
systemctl enable syslog-ng@default

systemctl start syslog-ng@default
... and a 2nd reboot to confim, that the syslog existed and contained boot information. Done again!
What:
The subject of Consistent Network Device Naming is described in more detail here: https://access.redhat.com/documentation/en-us/red_hat_enterprise_linux/7/html/networking_guide/ch-consistent_network_device_naming
Apparently, there are five different approaches on how to actually implement the CNDN. And given the old ens-device, which is according to PCI hotplug slot (enS for slot) index number (Scheme 2), the new naming scheme was chosen to be physical location (enP for physical) of the connector (Scheme 3).
The information of when/what/why the naming scheme change was made eludes me. I tried searching Arch discussion forums at https://bbs.archlinux.org/, but nothing there that I could find. But anyway, I got the pieces back together. Again!
Update 30th March 2018:
Yup. The interface naming rolled back. Now ens3 is the interface used again. Darnnation this naming flapping!
Destiny 2 Nightingale error [Solved!]
Thursday, February 22. 2018
As an employee of (a subsidiary of) Activision/Blizzard, last year those who wanted, got keys for Destiny 2.

It never worked! I never go to play it. 
On game launch:


... and BANG! The dreaded Nightingale error:

For past couple of months, that's how much I saw Destiny 2. That isn't much. Darn!
Actually, there is an Internet full of people having the same problem. There are various solutions to, which have worked for some people and for some, not so much.
After doing all the possible things, including throwing dried chicken bones to a magical sand circle, I ran out of options. I had to escalate the problem to Blizzard Support. Since this wasn't a paid game, obviously it didn't reach their highest priority queue. But ultimately the cogs of bureaucracy aligned and I got the required attention to my problem. But ... it was unsovalvable. Or it seemed to be one.
Today, after escalating the problem back to Bungie, they pointed out the problem. My computer didn't manage to reach their CDN, so the game got angry and spat the Nightingale on my face. They also hinted me about what my computer did instead and ...
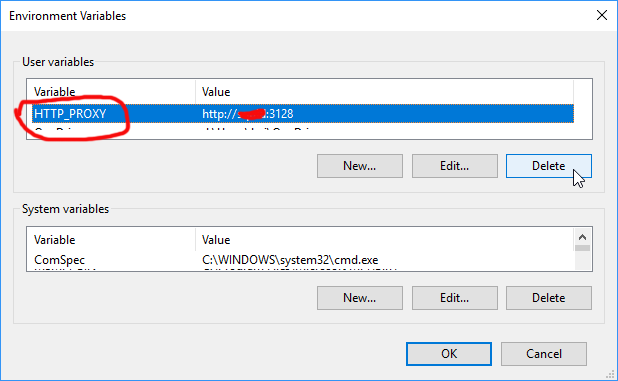
Somewhere in the guts of the Destiny 2, there is a component reading the value of environment variable HTTP_PROXY. I had that set on the PC because of ... something I did for software development years ago.
After deleting the variable, the game started. WHOA!
So, it wasn't my router, DNS, firewall, or ... whatever I attempted before. Problem solved!
Arch Linux failing to update man-db
Friday, January 26. 2018
This week seems to be especially hard on my Linuxes. Doing a regular pacman -Syu started spitting crap on me:
error: failed to commit transaction (conflicting files)

man-db: /usr/bin/accessdb exists in filesystem

man-db: /usr/bin/apropos exists in filesystem

man-db: /usr/bin/catman exists in filesystem

man-db: /usr/bin/convert-mans exists in filesystem

man-db: /usr/bin/lexgrog exists in filesystem

man-db: /usr/bin/man exists in filesystem

man-db: /usr/bin/mandb exists in filesystem

man-db: /usr/bin/manpath exists in filesystem

man-db: /usr/bin/whatis exists in filesystem

man-db: /usr/lib/man-db/globbing exists in filesystem

man-db: /usr/lib/man-db/libman-2.7.6.1.so exists in filesystem

man-db: /usr/lib/man-db/libman.so exists in filesystem

man-db: /usr/lib/man-db/libmandb-2.7.6.1.so exists in filesystem

...
A simple query for what's wrong:
# pacman -Qkk man-db

man-db: 363 total files, 0 altered files
So, nothing wrong with it. It just loves busting my balls!
Using a bigger hammer:
# pacman -S --force man-db

...

:: Processing package changes...

(1/1) upgrading man-db      [######################] 100%

New optional dependencies for man-db

    gzip [installed]

:: Running post-transaction hooks...

(1/2) Creating temporary files...

(2/2) Arming ConditionNeedsUpdate...
Now my pacman -Syu works. Weird case, that.
Open Management Infrastructure in Azure gone wild
Thursday, January 25. 2018
I opened my mail, and I had 730 new e-mails there! Whaat!
One of my Azure boxes has (for reason unknown to me), following crontab-entry on root's crontab:
* * * * * [ \( ! -f /etc/opt/omi/creds/omi.keytab \) -o

   \( /etc/krb5.keytab -nt /etc/opt/omi/creds/omi.keytab \) ] &&

   /opt/omi/bin/support/ktstrip /etc/krb5.keytab /etc/opt/omi/creds/omi.keytab
/opt/omi/bin/support/ktstrip keeps failing, because /etc/krb5.keytab is missing. And that command is run every single minute on my machine. So, every single minute I get a new information about the failure. Nice!
The sequence of events is totally unclear to me. I haven't touched anything, but this morning an influx of e-mails stated pouring in.
OMI, or Open Management Infrastructure is something Linux-images in Azure have, so it shouldn't be anything dangerous.
The obvious fix as to remove that stupid line.
HOWTO: Configuring a router on a Mini-PC with CentOS
Thursday, January 18. 2018
Over half an year later, I realized, that I never published my article about operating system and software setup of my Mini-PC router. This is a follow-up post about the Qotom-hardware I wrote earlier. So, its probably about time to do that!
To get the ball rolling on new CentOS installation, a good start is to download it, Rufus it into an USB-stick and install the minimal setup into router-PC. The CentOS installation is so well documented and trivial process, I won't go into any details of it. Read something like Installing Red Hat Enterprise Linux 7.4 on all architectures for details of that.
Goal
Every project needs a goal. In any kind of engineering there is a specification and criteria, that the goal has been met.
The goal of this project is to create a Linux-server capable of securing a local network from the Internet and allow traffic to pass from the LAN to the wild-wild-net.
Spec:
- There is a working CentOS Linux running on the MiniPC
- ISP's cable modem is configured as bridge, no double NATting done
- MiniPC gets a public IP-address from ISP
- MiniPC can be accessed from the Net via the IP-address
- Configurations persist a reboot on the MiniPC
- MiniPC issues dynamic IP-addresses to LAN-clients
- MiniPC acts as a caching nameserver to LAN-clients
- Any requests from the Net are not served
- Wireless access point is configured not do do any routing, aka. it is in access point mode
- The setup is secure with attack surface minimized
- LAN IP-address range is 192.168.1.0/24
Definition of done:
- Internet works!
- MiniPC can connect to net
- MiniPC can be connected from net and LAN via SSH
- Wired clients can connect to net via Ethernet cable without any manual configuration
- Wireless clients can connec to the net via Wi-Fi without any manual configuration
Step 1: Packages
After minimal installation, the set of tools and packages required includes:
net-tools bind-utils screen tcpdump policycoreutils-python setools
- net-tools: mostly for netstat, using
routeorifconfigis deprecated - bind-utils: for dig and nslookup
- screen: for full-screen window manager
- tcpdump: taking a look into Ethernet and TCP/IP-packages, when something goes wrong, getting detailed view is very important
- policycoreutils-python setools: for managing SELinux
Step 2: Remove NetworkManager
Packages to install: -none needed-
Why a server would have GNOME NetworkManager installed on a server is beyond me. I simply cannot comprehend what CentOS-people are thinking, when they as default treat my server as a laptop. But the main thing is, that this piece of shit needs to go! The quicker, the better!
DANGER!
When you actually run the yum-command to remove NetworkManager, your system will lose all network connectivity. So, please, do run this at a console, not via SSH-connection.
DANGER!
Run command as root on console:
yum erase NetworkManager
Now your system's networking is royally messed up.
Step 3: Setup NICs
Packages to install: -none needed-
Check that NetworkManager created and left ifcfg-files into /etc/sysconfig/network-scripts/. If the appropriate ifcfg-files (one for each interface) are gone, you need to start learning how to write one fast. A good starting point on that would be RedHat Enterprise Linux 7 product documentation, Networking Guide, section 2.2 Editing Network Configuration Files.
LAN interface
Out of the two Ethernet-interfaces, 50/50 coin-flip ended as enp3s0 LAN and enp1s0 WAN. For any practical purposes, it really doesn't matter which one is which, but I'm describing here my setup. If you're using some other hardware, your interface names won't match those.
For any sensible use of your LAN-side, this interface should be connected to a network switch, so that your local network can be shared by your PC, Playstation, TV, Wi-Fi access point or whatever you have there running. Of course you can run it with only one host connected directly to the router.
This is critical: Your LAN-interface MUST have a static IP-address for it. It really cannot act as LAN-side of a router without one.
I chose my LAN to be private IP-range 192.168.1.0/24, so I edited /etc/sysconfig/network-scripts/ifcfg-enp3s0 to contain:
TYPE=Ethernet

BOOTPROTO=none

DEFROUTE=yes

IPV6INIT=yes

NAME=enp3s0

UUID=-don't-touch-this-

DEVICE=enp3s0

ONBOOT=yes


NETWORK=192.168.1.0

BROADCAST=193.168.1.255

USERCTL=no


IPADDR=192.168.1.1

PREFIX=24

IPV4_FAILURE_FATAL=no

IPV6_AUTOCONF=yes

IPV6_DEFROUTE=yes

IPV6_PEERDNS=yes

IPV6_PEERROUTES=yes

IPV6_FAILURE_FATAL=no
WAN interface
For WAN, there is no need to touch enp1s0 setup (much). When your WAN-interface (enp1s0) starts, it will obtain an IP-address from your ISP. With that, it will also get your ISP's DNS-address an overwrite your precious manual changes in /etc/resolv.conf. You don't want that to happen. So, prevent that and edit /etc/sysconfig/network-scripts/ifcfg-enp1s0 and add:
PEERDNS="no"
Well, that was easy!
IP-forwarding
For routing to work, it requires Linux kernel to have IP-forwarding enabled. It will allow network packets to travel between interfaces.
Enable IP-forwarding immediately:
sysctl -w net.ipv4.ip_forward=1
Enable IP-forwarding on boot:
sysctl net.ipv4.ip_forward > /etc/sysctl.d/1_ip_forward.conf
Finalize network setup
When your network interface configurations are ok, restart everything by running following as root:
systemctl enable network
systemctl restart network
Now your system:
- has both interfaces on-line
- is reachable from a machine on your wired-LAN using a static IP-address other than 192.168.1.1.
Note: your router doesn'ht have DHCPd running yet, so you need to figure out how to configure a static IP-address to your device - still gets an IP-address from your ISP from your external interface
- can reach IP-addresses via both external and internal interfaces
If these criteria are not met, there is simply no point in proceeding. Your system won't work as a router without those prerequisites.
Finally, make sure that your IPtables-rules have effect. Your box is connected to Internet and it can be accessed/bombarded from there, so run following to secure your setup:
systemctl restart firewalld
Now your system is ready to become a router.
Step 4: Firewalld
Packages to install: -none needed-
Zones
Out-of-box CentOS has firewalld enabled. It has only one zone defined for public wild-wild-net, also TCP/22 SSH is open for the world. This needs to be run as root. First split off LAN into own zone home:
# firewall-cmd --zone home --change-interface enp3s0 --permanent
Check the zones and their assigned interfaces:
# firewall-cmd --get-active-zones

home

  interfaces: enp3s0

public

  interfaces: enp1s0
Setup network address translation (NAT) and allow traffic to flow from your LAN to outside world. Any relevant traffic is allowed to flow in from Internet back to your LAN. Commands to run:
# firewall-cmd --permanent --direct --add-rule ipv4 nat POSTROUTING 0 -o enp1s0 -j MASQUERADE

# firewall-cmd --permanent --direct --add-rule ipv4 filter FWDI_home_allow 0 -o enp1s0 -j ACCEPT

# firewall-cmd --permanent --direct --add-rule ipv4 filter FWDI_public_allow 0 -o enp3s0 -m state --state RELATED,ESTABLISHED -j ACCEPT
Enable the DNS-server we'll setup later, also disable any outgoing DNS-queries from your LAN (a security measure):
# firewall-cmd --permanent --zone home --add-service dns

# firewall-cmd --permanent --direct --add-rule ipv4 filter FWDI_home_deny 0 -p udp -m udp --dport 53 -j REJECT
At this point do a reload:
# firewall-cmd --reload
... and test your firewall setup from router:
- You still must be able to access Internet from your router
- Your LAN does work at this point. A client with a static IP must be able to access Internet.
Step 5: Named
Packages to install: bind-chroot
You can continue to use your ISP's nameserver, but I never do that. It makes much more sense to have a caching nameserver running at your own router. This allows your box to go directly to Internet root servers and do all the name queries for you. In many countries ISPs intentionally drop some domains out or are forced by government to do that. Running your own resolver makes sure that you get all the records as is and in case of changes you can flush caches whenever you want and don't have to wait for a record to expire.Out-of-box the BIND 9.9.4 does not server anybody else than localhost. To fix this, find following two lines in /etc/named.conf:
listen-on port 53 { 127.0.0.1; };

allow-query     { localhost; };
Edit them to contain:
listen-on port 53 { 127.0.0.1; 192.168.1.1; };
allow-query { localhost; 192.168.1.0/24; };
Finally, change your system's default name resolver by editing /etc/resolv.conf to contain a single line:
nameserver 127.0.0.1
Start the server and enable it to start on boot:
systemctl start named-chroot
systemctl enable named-chroot
Now you're ready to test the setup. Just host www.google.com or your favorite site. Successful reply will include IP-address(es) for your query.
Step 6: DHCP
Packages to install: dhcp
Edit/etc/dhcp/dhcpd.conf and have it contain:
ddns-update-style interim;

ignore client-updates;

authoritative;

default-lease-time 14400;

max-lease-time 86400;

option subnet-mask 255.255.255.0;

option broadcast-address 192.168.1.255;

option routers 192.168.1.1;

option domain-name "my.own.lan";

option domain-name-servers 192.168.1.1;

subnet 192.168.1.0 netmask 255.255.255.0 {

        range 192.168.1.50 192.168.1.99;

}
That piece of configuration will use your router as DNS for the clients and issue them addresses from range .50 - .99.
Start the server and enable it to start on boot:
systemctl start dhcpd
systemctl enable dhcpd
At this point, configure your client to use DHCP for IP-addressing. You must get an IP from the above range, also DNS-resolve and NAT should work, but that's the next step to do. Test it all.
Step 7: Testing it
Make sure:
- A client in your LAN gets an IP-address from DHCP
- A client in your LAN can ping your router at 192.168.1.1
- A client in your LAN can ping something in the Internet, like Google's name server at 8.8.8.8
- A client in your LAN resolves names, for example:
nslookup www.google.comreturns IP-addresses - A client in your LAN can access https://www.google.com/ via a web-browser
That's it! What else would you need?
Done!
Congratulations on your new router!
What I did next was set up my own DNS-zone so that my hosts had FQDNs. But that's beyond this blog post. Read something like How To Configure BIND as a Private Network DNS Server on CentOS 7 by DigitalOcean for that.
Windows 10 Fall Creators Update breaking sleep
Monday, December 18. 2017
Problem
My gaming PC got the fall update quite late and after that it wouldn't stay in sleep. Something got broken in the update and I had to shut it down every single time I didn't want to use it. Annoying!
Debugging - The Reason
The reason it popped back on wasn't big of a mystery. There is a simple command to query the wake reason:
PS C:\WINDOWS\system32> .\powercfg.exe /waketimers

Timer set by [SERVICE] \Device\HarddiskVolume4\Windows\System32\svchost.exe (SystemEventsBroker) expires at 21:46:29 on 15.12.2017.

Reason: Windows will execute 'NT TASK\Microsoft\Windows\UpdateOrchestrator\Reboot' scheduled task that requested waking the computer.
There are number of articles about How to disable wake timers?, but it doesn't fix this.
A peek into Windows Task Scheduler reveals the ugly fact:
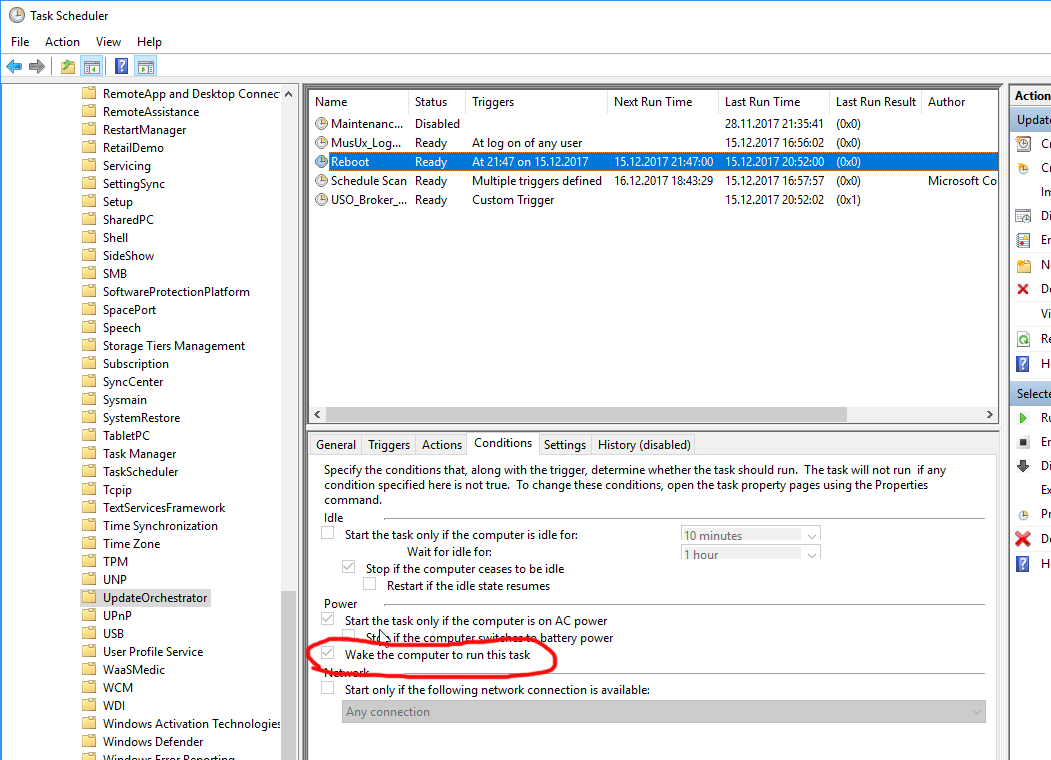
There is a hourly scheduled task, that indeed does run every hour and every goddamn hour it will wake my computer from the sleep to see if it needs to reboot it! Who having half a brain made that engineering decision at Microsoft?!
Attempt 1 - Disable the task - FAIL!
Ok, easy thing, let's disable the task. Or ... let's not. It is impossible! The permissions prevent regular human beings from doing that.
After a while, I bumped into somebody else having this same particular problem. Computer is waking up and: Can't modify task “Reboot” in win10 home. Basically, the idea is to go get Sysinternals PStools. It contains a tool called PSexec, which can do the modification for you.
Like this:
First run a cmd.exe with the PSexec 64-bit version:
PS D:\Users\Downloads> .\PsExec64.exe /s cmd.exe
Now, that permission-barrier is fixed, then:
C:\WINDOWS\system32>schtasks /change /tn "\Microsoft\Windows\UpdateOrchestrator\Reboot" /disable

SUCCESS: The parameters of scheduled task "\Microsoft\Windows\UpdateOrchestrator\Reboot" have been changed.
Now the stupid scheduled task is running hourly as expected, but NOT when your computer is sleeping. But ... guess what! Yes! There is something in Windows 10 internals, that keeps that particular task enabled. It will stay disabled for half an hour or so, but ultimately just using the computer makes the task enabled again, and the problem persists.
Attempt 2 - Remove the allow wake setting - FAIL!
By using the PsExec64.exe-trick, it is possible to get an XML-representation of the task, by running:
schtasks /tn "\Microsoft\Windows\UpdateOrchestrator\Reboot" /xml
in the XML-data there is:
<WakeToRun>true</WakeToRun>
... but I don't know how to change a task from XML-file. You can create a new one, but changing seems impossible.
So, ultimately I had to find something else
Attempt 3 - Powershell - FAIL!
Instead of spawning a new cmd.exe, going for PowerShell has benefits - it can actually edit an existing task. There is a built-in applet Get-ScheduledTask, with appropriate counterpart for setting the properties.
Spawn a nice PowerShell-session with appropriate permissions:
.\PsExec64.exe /s powershell.exe
The shell is kinda dead, for example output is garbled and input editing has issues, but if you know what to run, it will do it given the correct permissions.
As suggested in use powershell to find scheduled tasks set to wake the computer, now it is possible to get a list of Scheduled Tasks which have permission to wake the computer:
PS C:\WINDOWS\system32> Get-ScheduledTask | where {$_.settings.waketorun}
My computer will output a list like:
TaskPath                               TaskName

--------                               --------

\Microsoft\Windows\.NET Framework\     .NET Framework NGEN v4.0.3031...

\Microsoft\Windows\.NET Framework\     .NET Framework NGEN v4.0.3031...

\Microsoft\Windows\SharedPC\           Account Cleanup

\Microsoft\Windows\UpdateOrchestrator\ Reboot
A simple(?) one-liner will edit the task (backtick is the word-wrap operator):
Get-ScheduledTask `

  -TaskPath \Microsoft\Windows\UpdateOrchestrator\ `

  -TaskName Reboot |

  %{ $_.Settings.WakeToRun = $false ; `

  Set-ScheduledTask -TaskName $_.TaskName -TaskPath $_.TaskPath -Settings $_.Settings }
Yes, now the task is enabled, but has the appropriate condition setting for allow wake the computer from sleep disabled.
... aaaand it doesn't work. The same thing altering the enabled-state also resets this setting. Darn!
Attempt 4 - Revoke permissions - Success!
This was driving me mad!
It worked perfectly before the stupid update!
Finally, I found an article from Reddit: Is there ANY way to stop UpdateOrchestrator for turning 'wake the computer to run this task' back on after every cumulative update?
That guy suggested to revoke all permissions from the file. Now the automator which keeps resetting the settings fails to touch the file.
The command I ran in PowerShell is:
icacls $env:windir"\System32\Tasks\Microsoft\Windows\UpdateOrchestrator\Reboot" `

  /inheritance:r `

  /deny "Everyone:F" `

  /deny "SYSTEM:F" `

  /deny "Local Service:F" `

  /deny "Administrators:F"
That simply puts everybody and everything into deny-list for the file-access. AND IT WORKS!
So, looks like ultimately whatever the mechanism is restoring the setting, somebody loves writing to the file, but it doesn't know how to reset the permissions. Which is nice!
I chose to keep the task enabled, but unset the allow wake -setting. So, when my computer is running, the task is ran every hour as expected, but when my computer is sleeping, my computer is sleeping and doesn't wake for nobody.
Microsoft:
Suggestion, eat your own dog food! If anybody at the Windows-team doing power management/task scheduler would run this at home they would know the annoyance instantly.
Saving the day - Android tethering with Linux
Sunday, December 3. 2017
The fail
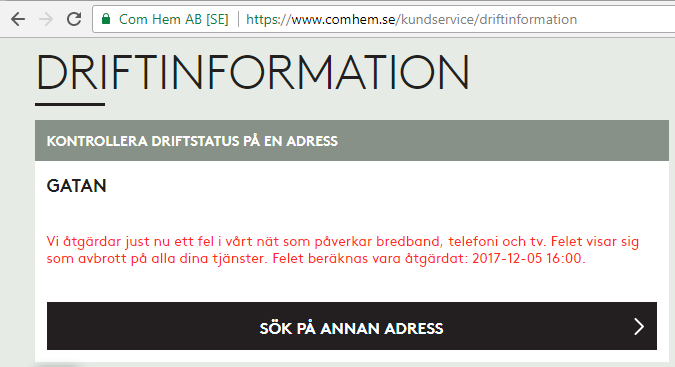
On a peaceful Sunday, I was just minding my own business and BOOM! Internet connection was gone. After a quick debugging session, restarting the router and eyeballing the LEDs, it was evident: something with my ISP Com Hem was down:
Ok, ISP down, what next?
I whipped up the iPhone and went for any possible service announcements. And yes, the above announcement was placed on my user account information. I was stunned by this, it was so cool to have:
- confirmation, that something was down with ISP: Yup, it's broken.
- that information tailored with the geographical location of my subscription: Yup, that fail affects you.
No Finnish ISP or telco has that. I was very impressed with such detail (and still am).
The fix
There is no way I'm sitting on my thumbs on such an event. I was just about to start playing Need for Speed and now Origin wouldn't even log me in, so, no Internet, no gaming.
I have an el-cheapo Huawei Android lying around somewhere, with a Swedish SIM-card in it. My dirt cheap subscription has couple of gigs data transfer per month in it, which I never use. I came up with a plan to temporarily use the cell phone as an Internet connection. The idea would be to hook it up into my Linux router with an USB-cable, make sure the Android pops up as a network interface and then configure the Linux to use that network interface as primary connection.
Thethering
I found tons of information about Android-tethering from Arch Linux wiki. It basically says:
- Make sure your Android is newer than 2.2
- Connect the phone to a Linux
- Enable USB-tethering from the phone's connection sharing -menu
- Confirm the new network interface's existence on the Linux end
On my phone, there was two settings for personal hotspot. Wifi/Bluetooth and USB:
Connection
New phones have USB-C, but its such a new connector type, that anything older than couple years, has most likely micro-USB -connector:

Hooking it up to a Linux will output tons of dmesg and and ultimately result in a brand new network interface:
# ip addr show

5: enp0s20u4u3:

    link/ether 82:49:a8:b4:96:c9 brd ff:ff:ff:ff:f

    inet 192.168.42.90/24 brd 192.168.42.255 scope

       valid_lft 3595sec preferred_lft 3595sec

    inet6 fe80::7762:e1a9:9fa:69f5/64 scope link

       valid_lft forever preferred_lft forever
Routing configuration
Now that there was a new connection, I tried pinging something in the wild world:
ping -I enp0s20u4u3 193.166.3.2
Nope. Didn't work.
I confirmed, that the default network gateway was still set up into the broken link:
# ip route show

default via 192.168.100.1 dev enp1s0 proto static metric 100
That needs to go to enable some functionality. But what to replace the bad gateway with?
Since the connection had IP-address from Telco DHCP, there is a lease-file with all the necessary information:
# cat /var/lib/NetworkManager/dhclient-*-enp0s20u4u3.lease

lease {

  interface "enp0s20u4u3";

  fixed-address 192.168.42.90;

  option subnet-mask 255.255.255.0;

  option routers 192.168.42.129;
The fixed-address in the file matches the above ip addr show -information. Required information was gathered, and the idea was to ditch the original gateway and replace it with a one from the Android phone's telco:
# ip route del default via 192.168.100.1

# ip route add default via 192.168.42.129 dev enp0s20u4u3

# ip route show

default via 192.168.42.129 dev enp0s20u4u3 proto static metric 101
Now it started cooking:
# ping -c 5 ftp.funet.fi

PING ftp.funet.fi (193.166.3.2) 56(84) bytes of data.

64 bytes from ftp.funet.fi (193.166.3.2): icmp_seq=1 ttl=242 time=35.6 ms

64 bytes from ftp.funet.fi (193.166.3.2): icmp_seq=2 ttl=242 time=31.7 ms
To finalize the access from my LAN, I ran following firewall-cmd --direct commands:
 --remove-rule ipv4 nat POSTROUTING 0 -o enp1s0 -j MASQUERADE

 --add-rule ipv4 nat POSTROUTING 0 -o enp0s20u4u3 -j MASQUERADE

 --add-rule ipv4 filter FORWARD 0 -i enp3s0 -o enp0s20u4u3 -j ACCEPT

 --add-rule ipv4 filter FORWARD 0 -i enp0s20u4u3 -o enp3s0 \

    -m state --state RELATED,ESTABLISHED -j ACCEPT
There is no firewall-cmd --permanent on purpose. I don't intend those to stick too long. I just wanted to play the darn game!
Done!
Now my gaming PC would connect to The Big Net. I could suft the web, read mail and even Origin logged me in.
That's it! Day saved!
F-Secure Ultralight Anti-Virus
Sunday, November 5. 2017
Which anti-virus software to use on a Windows 10?
There are a number of software to choose from. Some are free, some are really good at detecting malware, some are award winning, industry recognized pieces of software and there is even one that comes with your Windows 10 installation.
For couple decades, my personal preference has been a product from F-Secure. For those of you expecting me to hand out a recommedation out of numerous F-Secure products, given the multiple computers I operate on daily basis, just picking a single specific product is not possible. Also, I'm a member of their Beta Program and run couple pieces of their software which are not flagged as production-quality.
Here is the part with a recommendation:
When (for Windows) gets released, that's the one I definitely urge you to try out. The user interface is an oddball, simple, but odd:
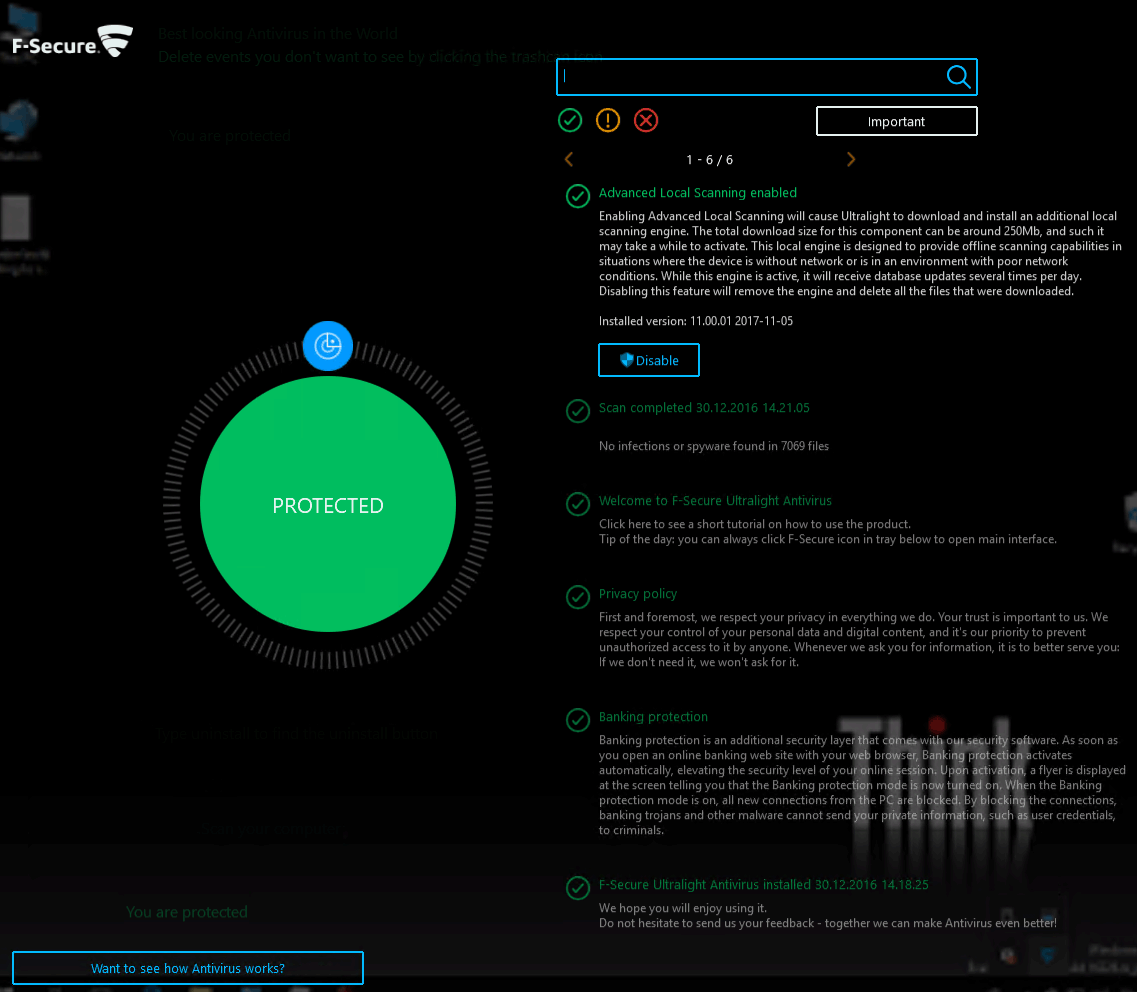
On an initial glance, the first question I had was: "Ok, Where are the settings? Where IS the user interface?!" But that's the beauty of the product, it has no more settings than the above screenshot contains. That's wildly out-of-the-box. Functional, yes. But something completely different. Naturally it's a F-Secure product, and they don't make any compromises with ability to detect malware. It has no firewall or plugins to your browser or anything unnecessary.
When/If the product is ever released, go check it out!
Cygwin X11 with window manager
Saturday, November 4. 2017
macOS High Sierra upgrade from USB-stick
Sunday, October 15. 2017
Somebody at Apple really knows how to confuse users. I'm looking at Wikipedia article List of Apple operating systems:
- OS X Yosemite - 10.10
- OS X El Capitan - 10.11
- macOS Sierra - 10.12
- macOS High Sierra (Not to be confused with Sierra) - 10.13
Well ... too late! I'm already confused. Why the hell they had to use the same name again. To keep me confused, I guess the next macOS will be Low Sierra?
Further details about the creation process can be found from my previous blog post about macOS Sierra, here.
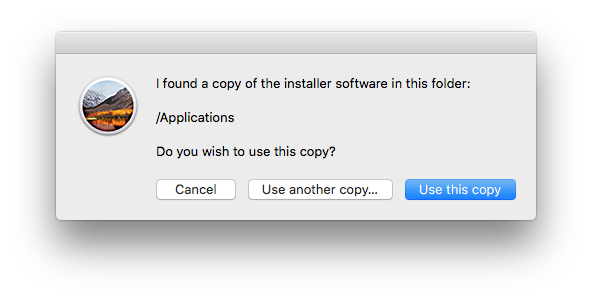
Get macOS High Sierra installer
Go to your Mac's app store, it should be there clearly visible. Start the installation and wait for the download to complete.
Option 1: Create your USB-stick from command line
You can always create your USB-stick from Terminal, as I've descibed in my previous posts:
Prepare USB-stick:
$ sudo diskutil partitionDisk /dev/disk9 1 GPT jhfs+ "macOS High Sierra" 0b

...

/dev/disk9 (external, physical):

  #:                  TYPE NAME               SIZE     IDENTIFIER

  0: GUID_partition_scheme                   *30.8 GB  disk9

  1:                   EFI EFI                209.7 MB disk9s1

  2:             Apple_HFS macOS High Sierra  30.4 GB  disk9s2
Create installation media:
$ cd /Applications/Install\ macOS\ High\ Sierra.app/Contents/Resources/

$ sudo ./createinstallmedia \

  --volume /Volumes/macOS\ High\ Sierra/ \

  --applicationpath /Applications/Install\ macOS\ High\ Sierra.app/ \

  --nointeraction
Option 2: Create your USB-stick with GUI app
Many people shy away from Terminal window and think the above (simple) commands are too complex. There is a nice solution for those people: DiskMaker X 7.
Download the .dmg, install the app and kick it on. You should see something like this:
Next question is about type of disk to create (choose USB) and which USB to use:
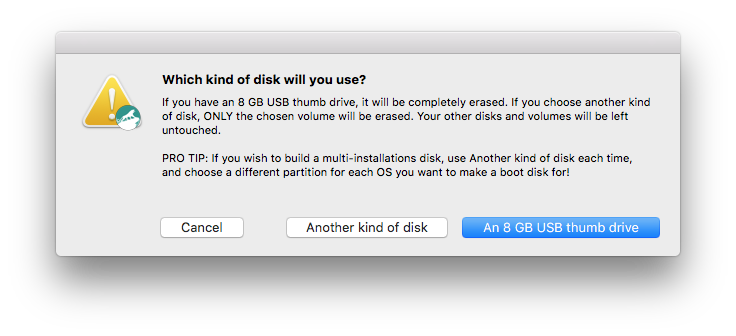
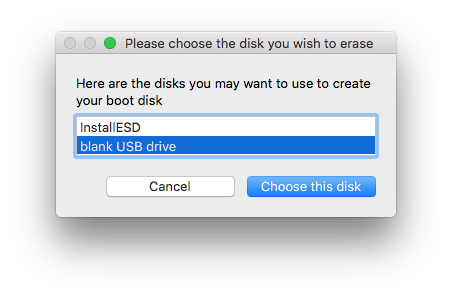
Then get past couple of warnings. Yes, you are about to destroy all data on the USB-stick:

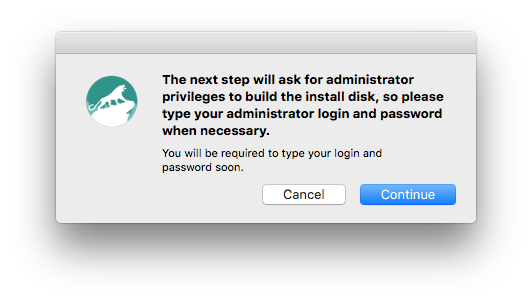
The actual process will take a while and during the creation, plenty of notifications will flash on your sccreen:

At this point, you're done:
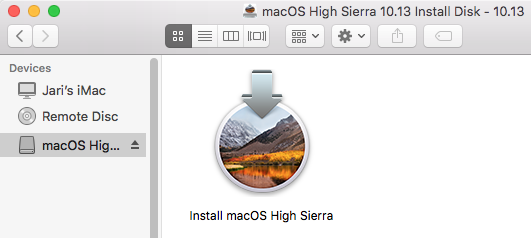
After the long wait is over, your USB-stick is ready to go!
Go upgrade your macs
With your fresh USB-stick, you can continue the installation to any of your Macs.
Meanwhile, check What's new in High Sierra @ Apple.
Troubleshooting
I lost the High Sierra installation files, where can I get them?
Yup, that happened to me too. I had my Macs upgraded, but was requested to do a favor. Obviously my USB-stick was already overwritten with a Linux-image and I had to re-do the process. But whattahell!? The image files were gone! Only old OS X files were remaining. So, looks like after a successful upgrade, this one cleans up its own mess.
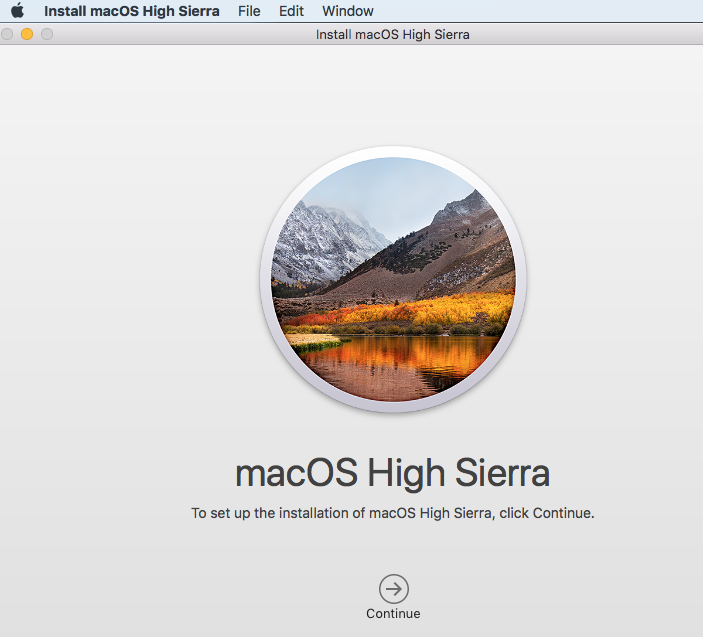
To re-load the installation, go to app store, search for "macos high sierra":

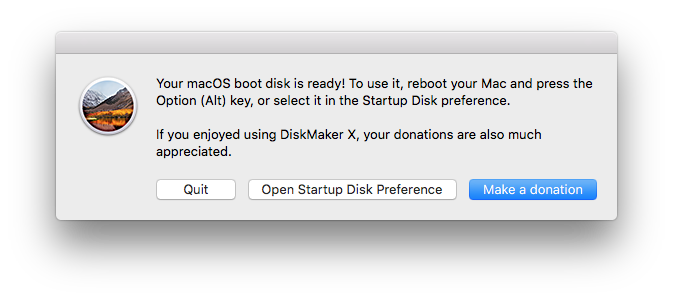
After the lenghty (re-)download, the installed will kick on:
Like always, that's your que to quit the installer:
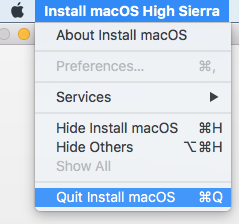
Done!
Finally
As the pre-released information from Apple indicated, the "upgrade" is kind of letdown. It really doesn't provide much important stuff. The most critical update is the new APFS filesystem. This is a no-brainer, as HFS+ is nearing its 20 year mark. Like ext2 filesystem on Linux (ext3, ext4), HFS+ had its upgrades, but now its simply time to break free into something completely different.
After upgrade, I took a look at the partitions.
MacBook Pro, SSD, encrypted:
$ diskutil list

/dev/disk0 (internal, physical):

   #:                  TYPE NAME             SIZE       IDENTIFIER

   0: GUID_partition_scheme                 *251.0 GB   disk0

   1:                   EFI EFI              209.7 MB   disk0s1

   2:            Apple_APFS Container disk1  250.1 GB   disk0s2


/dev/disk1 (synthesized):

   #:                  TYPE NAME             SIZE       IDENTIFIER

   0: APFS Container Scheme -               +250.1 GB   disk1

                            Physical Store disk0s2

   1:           APFS Volume Macintosh HD     156.0 GB   disk1s1

   2:           APFS Volume Preboot          20.6 MB    disk1s2

   3:           APFS Volume Recovery         520.0 MB   disk1s3

   4:           APFS Volume VM               2.1 GB     disk1s4
On the pysical disk note the APFS container. On the synthesized disk, note how all macOS partitions have APFS type in them.
iMac, fusion drive, no encryption:
$ diskutil list

/dev/disk0 (internal, physical):

 #:                  TYPE NAME          SIZE     IDENTIFIER

 0: GUID_partition_scheme              *121.3 GB disk0

 1:                   EFI EFI           209.7 MB disk0s1

 2:     Apple_CoreStorage Macintosh HD  121.0 GB disk0s2

 3:            Apple_Boot Boot OS X     134.2 MB disk0s3


/dev/disk1 (internal, physical):

 #:                  TYPE NAME          SIZE     IDENTIFIER

 0: GUID_partition_scheme              *1.0 TB   disk1

 1:                   EFI EFI           209.7 MB disk1s1

 2:     Apple_CoreStorage Macintosh HD  999.3 GB disk1s2

 3:            Apple_Boot Recovery HD   650.1 MB disk1s3


/dev/disk2 (internal, virtual):

 #:                  TYPE NAME          SIZE     IDENTIFIER

 0:             Apple_HFS Macintosh HD +1.1 TB   disk2

                          Logical Volume on disk0s2, disk1s2

                               Unencrypted Fusion Drive
As announced, fusion drives won't have APFS yet. In the partition info, SSD and spinning platter are nicely displayed separately, forming a virtual drive.
Worthless update or not, now its done. Like a true apple-biter, I have my gadgets running the latest stuff!
Fedora 26: SElinux-policy failing on StrongSWAN IPsec-tunnel
Monday, September 4. 2017
Handling /run with systemd, Part II
Sunday, June 4. 2017
It took me less than 4 years to finally revisit this subject. I'd like to thank all the people who commented the original blog post. It looks like for those years SystemD (am I writing it wrong?) was in constant evolution and new features were added.
This is what I'm running in production. Containing System and omitting Unit and Install -parts as they are unchanged:
[Service]

Type=forking

PrivateTmp=yes

User=nobody

Group=nobody


RuntimeDirectory=dhis

RuntimeDirectoryMode=0750


ExecStart=/usr/sbin/dhid -P /run/dhis/dhid.pid

PIDFile=/run/dhis/dhid.pid
This also makes my RPM spec-file simpler, I got to remove stuff there, because temporary directory creation is taken care. Finally, I think that this one is done and ready!
If you want to download my source RPM-package, go here.
If you want to know more about RPM-specs, read Maximum RPM - Taking the RPM Package Manager to the Limit.
Wi-Fi access point - TRENDnet TEW-818DRU - Part 2: Software
Monday, May 8. 2017
In my previous post, I un-boxed my new Wi-Fi access point. This is the part for running something in it.
For this to happen, the obvious prerequisite is DD-WRT binary image built specifically for TEW-818DRU. DD-WRT supported devices -list doesn't say much. Little bit of poking around results in build 23720 back in the 2014 for this one. It is at: https://www.dd-wrt.com/site/support/other-downloads?path=betas%2F2014%2F03-13-2014-r23720%2Ftrendnet-818DRU%2F. As I wanted something newer, I went for November 2016 build 30880 at: ftp://ftp.dd-wrt.com/betas/2016/11-14-2016-r30880/trendnet-818DRU/.
My typical approach for flashing new firmware is to stay connected with a wire. In practice that means, that I'll hook up an ethernet cable to my laptop and the other end to the access point's LAN-switch. Then I'll configure a static IP-address at the laptop's operating system. This makes sure, that I'm 100% connected whenever the box is running. Doing this over wireless connection and/or using dynamicly assigned IP-address may or may not work. As these boxes are expensive enough, I didn't push my luck. The downside of this approach is, that I'll need to know what the actual management IP-address will be.
Ok, let's start!
On out-of-box-experience the web GUI is at 192.168.10.1:
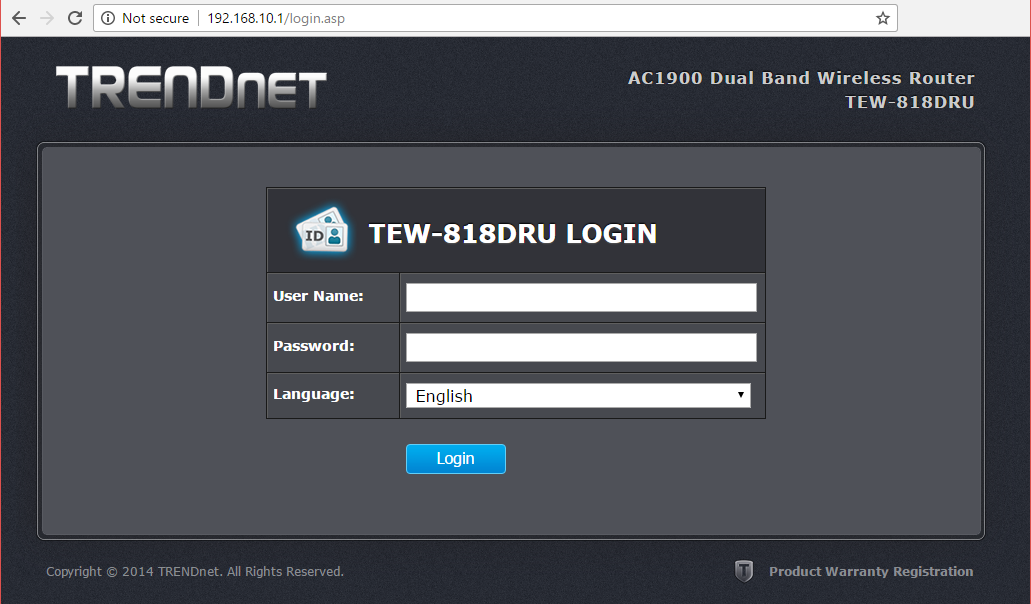
After login, there is a nice setup-wizard. Which of course, we'll just skip by acknowleding the alert:
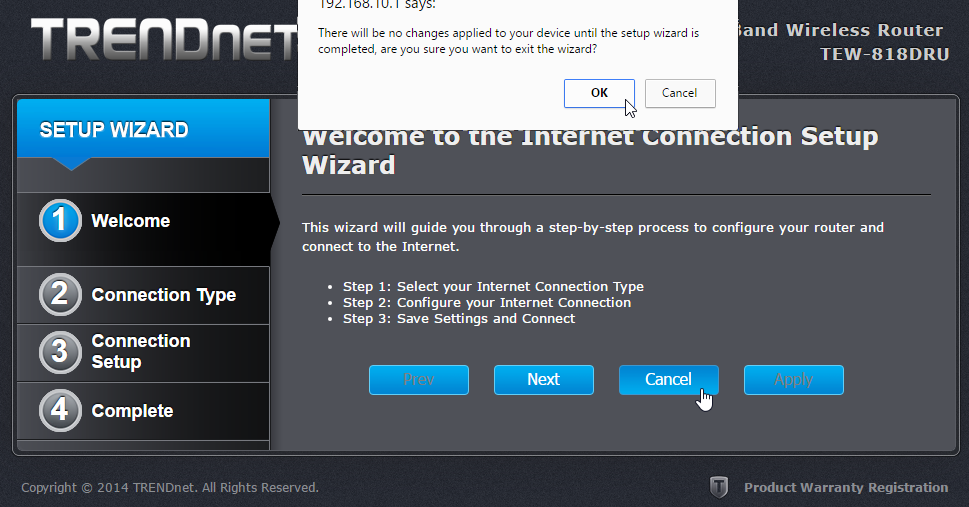
Now we're at the normal administrator environment:

For me, the word "advanced" is like honey to a grizzly bear . I'll always home towards it, I know that all the goodies are stored there:

And also this time I was right, firmware upload/upgrade has its own menu item. Its clear, that this device is 100% designed by engineers, they cannot even seem to be able to agree on a single terminology. Menu has "upload", page title has "upgrade". Any self-respecting user experience designer would yell "You're confusing the user with that!", but I guess this stuff is for nerds only, and they don't care.
After selecting the trendnet-818dru-webflash.bin file to be uploaded, there is yet again a nice warning:
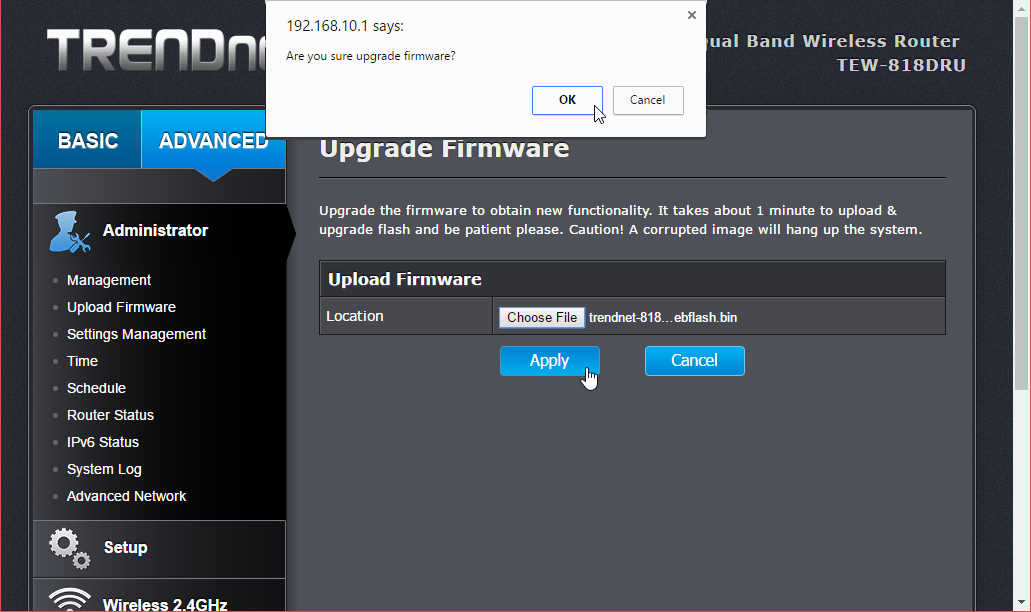
It will take couple minutes for the flashing to complete:
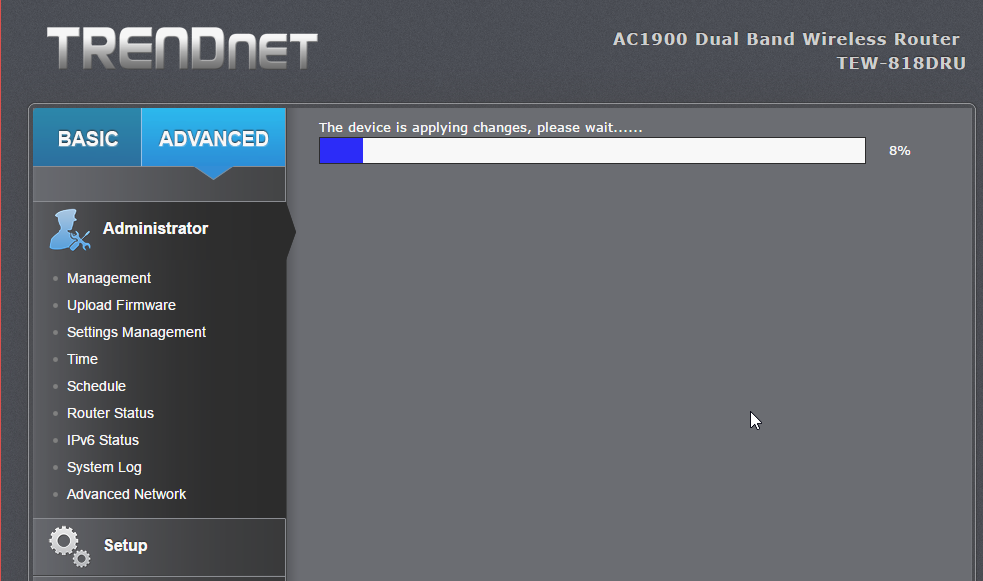
There is very little indication, that the process completed. I didn't notice any lights blinking or something like that. It just completed, rebooted and stayed silent.
Now the IP-addess will change. DD-WRT is 192.168.1.1 at out-of-box-experience:
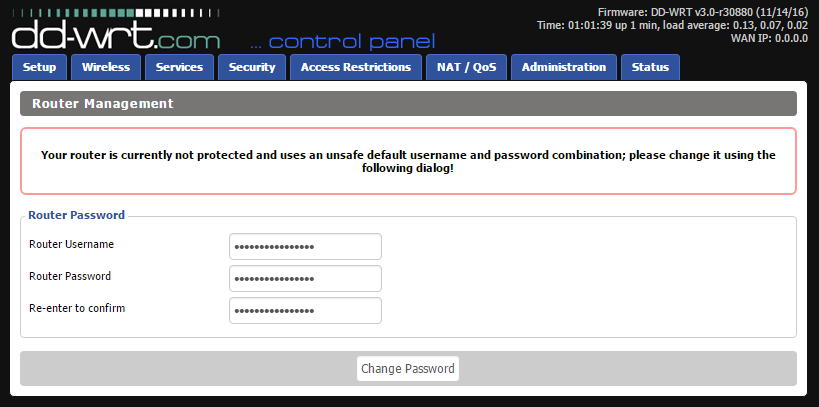
And that's pretty much it for firmware upgrade. At this point I did my wireless access point -setup including:
- Admin username and password
- AP's LAN IP-address, my LAN isnt' at 192.168.1/24
- Enable SSH-service
- Enable GUI-access for HTTPS and SSH
- Wireless network setup for 2.4 GHz and 5 GHz, WPA2 Personal with pre-shared key as security
DD-WRT is for knowledgeable administrators, no setup wizards or mumbo-jumbo. Just the settings.
Btw. configuration docs can be found at: https://www.dd-wrt.com/wiki/index.php/Configuration_HOWTOs
Windows 10 update KB3200970 stuck
Thursday, November 10. 2016
Hands down KB3200970 is the worst update I've seen for Windows 10!
In general I hate Windows 10 TiWorker-process. It sucks CPU like there is no tomorrow. I cannot comprehend how difficult it is to determine if an update is needed or not. If you compare to any Linux .deb or .rpm packaging, a simple update check in Windows 10 is way too heavy. I find this kind weird. When Microsoft announced simplifying servicing models for Windows 7 and Windows 8.1, the reasons were to reduce scan times and finding right patches easier. It certainly doesn't feel like it to me.
So, there is Cumulative update for Windows 10 Version 1607 and Windows Server 2016, released November 8, 2016. This is also known as KB3200970 and boy, do people have trouble installing it!
This is what happened to me:
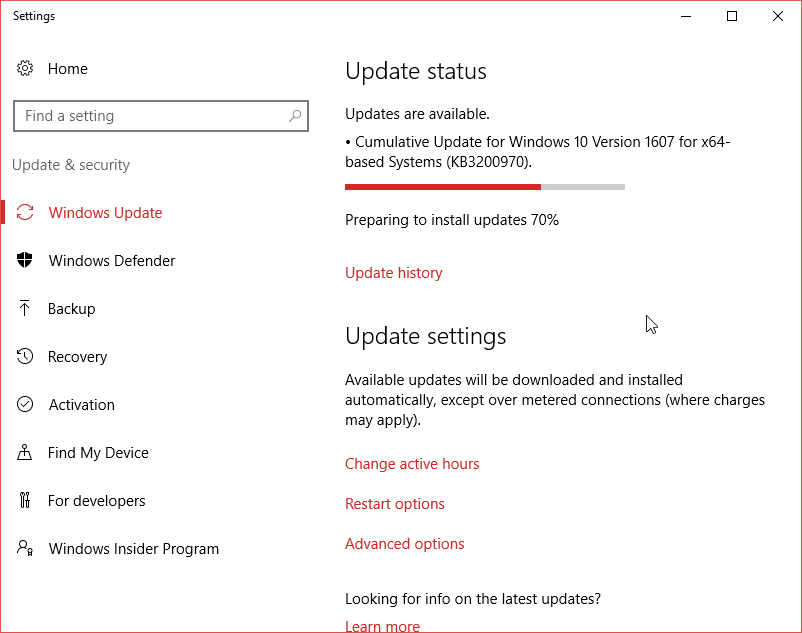
For about 8 hours it was stuck there in the preparing phase. While doing absolutely nothing, this was my CPU-load:

Well done idiots!
Net is full of stories like mine: How to fix Windows Update in Windows 10 if it becomes stuck, Windows 10 KB3200970 issues: install fails, high CPU usage, battery drain and more and Cumulative Update for Windows 10 Version 1607 for x64-based Systems(KB3200970).
The Reddit-article had a link to KB971058, How do I reset Windows Update components? which helped some. I gave it a try and it did help.
First some services needed stopping. This is what you would run as an administrator cmd.exe:
net stop bits

net stop wuauserv

net stop appidsvc

net stop cryptsvc
In my case the wuauserv didn't stop, I had to find the process id for it and kill it manually. After all that, I attempted renaming:
Ren %systemroot%\SoftwareDistribution SoftwareDistribution.bak

Ren %systemroot%\system32\catroot2 catroot2.bak
First one failed, so I don't know what the impact was. Then I ran the entire list:
cd /d %windir%\system32


regsvr32.exe atl.dll

regsvr32.exe urlmon.dll

regsvr32.exe mshtml.dll

regsvr32.exe shdocvw.dll

regsvr32.exe browseui.dll

regsvr32.exe jscript.dll

regsvr32.exe vbscript.dll

regsvr32.exe scrrun.dll

regsvr32.exe msxml.dll

regsvr32.exe msxml3.dll

regsvr32.exe msxml6.dll

regsvr32.exe actxprxy.dll

regsvr32.exe softpub.dll

regsvr32.exe wintrust.dll

regsvr32.exe dssenh.dll

regsvr32.exe rsaenh.dll

regsvr32.exe gpkcsp.dll

regsvr32.exe sccbase.dll

regsvr32.exe slbcsp.dll

regsvr32.exe cryptdlg.dll

regsvr32.exe oleaut32.dll

regsvr32.exe ole32.dll

regsvr32.exe shell32.dll

regsvr32.exe initpki.dll

regsvr32.exe wuapi.dll

regsvr32.exe wuaueng.dll

regsvr32.exe wuaueng1.dll

regsvr32.exe wucltui.dll

regsvr32.exe wups.dll

regsvr32.exe wups2.dll

regsvr32.exe wuweb.dll

regsvr32.exe qmgr.dll

regsvr32.exe qmgrprxy.dll

regsvr32.exe wucltux.dll

regsvr32.exe muweb.dll

regsvr32.exe wuwebv.dll
Lot of them failed, but that's what the KB971058 told to do. Then starting the services:
net start bits

net start wuauserv

net start appidsvc

net start cryptsvc
Still this update tested my patience. It ran couple hours preparing after it announced, it's ready to go install. The installation took yet another couple hours. After the installation was completed and the obligatory reboot was done, Windows still reported that a reboot is required. This update really sucks ass!
Ultimately my laptop spent more than 50 hours to install all this. There were number of retrys and times than I didn't care to look to closely what's going on, so the machine had to wait for user interaction. Still the process was paintakingly long.

