Windows 10 upgrade weeks: Done
Saturday, July 30. 2016
I wrote couple of posts about Windows 10 upgrades, but there are no more free upgrades. See:
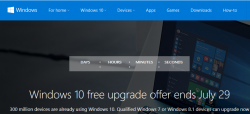
From now on, you'll just have to pay for it.
There are couple of issues I bumped into while upgrading about dozen PCs last month alone and I'll be blogging about those later. There is no rush, as the free upgrade window closed (pun intended). ![]()
Windows 10 weeks: Upgrading Windows 10 with a clean install
Tuesday, July 19. 2016
Before release of Windows 10 build 10565 in October 2015, it was pretty much impossible to do a clean install for upgrading Windows 7 or 8 without first running the upgrade on the target machine. The announcement said:
Device activation improvements: Microsoft has received a lot of feedback from Insiders on making it easier to activate Windows 10 on devices that take advantage of the free upgrade offer to genuine Windows by using existing Windows 7, Windows 8 or Windows 8.1 product keys. If you install this build of the Windows 10 Insider Preview on a PC and it doesn’t automatically activate, you can enter the product key from a qualifying Windows 7, Windows 8 or Windows 8.1 used to activate the prior Windows version on the same device to activate Windows 10 by going to Settings > Update & security > Activation and selecting Change Product Key.
In short: You can whip up your install USB and do a clean install on a machine. If its not an OEM-machine, just enter your Windows 7 or Windows 8 key at install, and the thing should activate. Nice an easy.
And to clarify the exact build number situation your box is running, go to Settings, System, About. It should have something like this:
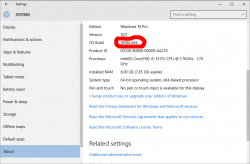
As suggested by Ilpo in a comment he left in my blog, there is an alternative method described by article How to Directly Clean Install Windows 10 without having to Upgrade First. Of course I had to try that! And thanks Ilpo, for the suggestion.
What you need is a Windows 10 install USB-stick. Go create one with your favorite method, and if you don't have a favorite, just go for Media creation tool, it can download an install image and store it to your USB-stick for later booting.
When your install-stick is ready, go find <your USB-stick drive>:\support\gatherosstate.exe into the target machine to be upgraded. Do NOT run in at the USB-stick, COPY it. I just dragged the file into my desktop. When ran, the application will create a XML-file containing a fingerprint from the machine ran. That fingerprint can be used to active the upgraded Windows 10 installation later. Needless to say, this type of activation will work only for valid upgrade paths. You cannot upgrade Windows 8.1 with Bing into Windows 10 Pro (I tried).
Second important thing: Run the gatherosstate.exe as an Administrator. I tried to validate the run-as-Admin -requirement after the upgrade was done, but it was too late. The file generated will differ. My thinking is, that it is not necessary to run as Admin, but that's what the original instructions said.
Take a copy of the generated GenuineTicket.xml-file. You will need that later. At this point you're good to go with a clean install. Replace hard drives or just re-partition the original one, whatever your install plan is. I'm guessing you wouldn't be doing the upgrade this way if it wasn't absolutely necessary. ![]()
During Windows 10 installation do NOT enter a license key. It is possible to "skip this" and "do this later" and ultimately when the install ends run a perfectly good non-activated Windows 10.
Now its time to go activate the newly installed Windows 10. You need to locate your saved GenuineTicket.xml-file and copy it to directory %ProgramData%\Microsoft\Windows\ClipSVC\GenuineTicket. Like this:
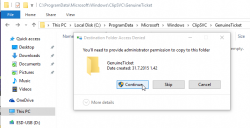
Now the activation is only a reboot away. Go ahead and boot the thing, and confirm:
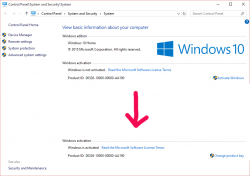
Done! Simple as pie.
Fedora 21 DHCP client failing to get an IP-address from Elisa [Solved!]
Monday, July 18. 2016
One of my own boxes runs a Fedora Linux. A while back my upgrade failed miserably due to Fedora installer not getting an IP-address from my ISP, Elisa. I had a minor skirmish for an hour or so with the installer, but no avail, Fedora installer beat me on that one. As I love to have that box up and running, I gave up and decided to investigate that later. Now that day came and I'm victorious! ![]()
Basics
DHCP is what pretty much everybody has for getting an IPv4 address in 2016. Mobile connections have something different, but everything else including Wi-Fi hotspots, ADSL-routers, Fiber-to-the-Home -connections, etc. etc. issue an IP-address (mostly IPv4, sometimes IPv6) to any well-behaving customer of theirs. Today, the de-facto is that the IP-address is allocated out of a well known broadband address range, or pool. Lists of those are generally available, so that home customers can be differentiated from data centers and companies.
To put DHCP simply, it is a mechanism for allocating an unique address for your Internet connection. The Wikipedia definition for Dynamic Host Configuration Protocol uses more words and isn't as concise as mine, but you'll get the idea.
Details of the problem
In case of mis-use or unpaid internet bill, they'd naturally decline any DHCP-requests for an IP-address. Since everything I tested, including various Windowses, OS Xes and Linuxes worked it wasn't about that. The connection was ok, the DHCP server issued a valid DHCP-lease as it had been doing for couple years, but not for my Fedora installer. Duh? ![]()
At this point I went to google for the symptoms and quite soon I landed into RedHat Bugzilla. It contains bug 1154200 which is titled as "not getting a dhcp address assigned". Mr. Krovich reports that his Fedora 21 installer won't get an IP-address from ISP. I pulled up a Fedora 20 installer for the previous version. It worked ok! Yep, they changed something into Fedora 21. The change affects Fedora 22, 23 and the latest 24. It does not affect RedHat nor CentOS (yet).
Fix (aka. trial and error)
In the comments of bug 1154200 they're talking about Option 61 commit which was introduced for Fedora 21 release. A possible fix would be to use DHCP-configuration: send dhcp-client-identifier = hardware;
I downloaded Fedora 24 installer and tested it out. It didn't help any. After a lot of wiresharking the traffic, I isolated this:
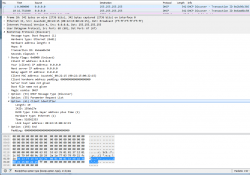 In the DHCP Discover -packet, there was an Option 61 present.
More poking for man 5 dhclient-options revealed that it was possible to specify a fixed string for identifier. So, again I edited /etc/dhcp/dhclient.conf (btw. the file didn't exist to begin with, I had to create one) to contain:
send dhcp-client-identifier = "";
That did the trick! Now even Fedora 24 installer got a a valid IP-address and it was possible to install.
Specs
In the early days, all IP-addresses were assigned manually. Everybody was given an IP-address and they punched all the details manually. That was frustrating and error-prone, so somebody invented BOOTP to automate the entire setup. Quite soon, that evolved into DHCP, defined by RFC 1531. When DHCP gained traction and more and more vendors joined the dynamically allocated -game, couple of clarifying iterations later, we're at RFC 2131 for current breed of DHCPing. It is basically the original BOOTP, but with most wrinkles ironed out.
The options are defined at RFC 1533 for DHCP Options and BOOTP Vendor Extensions. Looks like nobody supported Option 61 for a long time. Windowses don't, Apple doesn't, most Linux Distros don't, but RFC 4361 for Node-specific Client Identifiers for Dynamic Host Configuration Protocol Version Four (DHCPv4) must have done it for Fedora-guys. They chose to implement request 560361 (Dhclient doesn't use client-identifier; may cause issues in certain bridged environments) and make sure everybody uses it, with assumption that all ISPs that won't support Client Identifiers will merrily ignore the option. Nice! ![]()
Afterwards
I'll target equal blame to my ISP. The Option 61 is well-defined and it should be possible to ignore it. Looks like they're running Alcatel-Lucent hardware there and for some reason it is configured to spit on Option 61 requests.
Naturally I reported the error to my ISP, but you can assume how well that goes. Any regular customer facing clerk won't know DHCP or what it does, nor any options of it. So all I got back is the classic "we'll investigate" -style response. I'm not keeping my hopes up. I have more hope on my own Bugzilla request 1357469 to have an option to enable or disable usage of Option 61 on Fedora. They might even implement that one day.
Anyway, I'm hoping that this post will help somebody strugging to install their Fedora.
Windows 10 weeks: Getting an activated Windows 10 Pro for free
Sunday, July 17. 2016
I'd like to be clear on this: I did not figure this one out myself, I just bumped into Philip Yip's page about this. All the credit should go to him, I just tested this and confirmed it to be working.
One of the upgrades I did earlier this month was for a Windows Vista. Computer geeks point out two things immediately: 1) Vista! Really? Who would use that voluntarily? 2) well, it cannot be upgraded into Windows 10. Both very true. It just so happened, that there was an OEM Vista running on a computer. Vista will cease to have security upgrades on 10th April 2017, so I suggested to upgrade the thing into a 10 while I did some other work on the thing. Obviously the person owning the poor computer didn't want to pay for the upgrade, so I chose to go with Mr. Yip's method on it.
Prerequisites
For this to happen you will need:
- An USB-stick, minimum size 4 GiB
- This will be used to host the Windows 10 installation image
- I went to a supermarket and got a brand new 16 GiB USB3 stick for the speed improvements
- Ability to boot the target computer from the above USB-stick
- Most computers I've worked with can do this
- Windows 10 ISO, build 10130
- Ok, this one is harder one to come by, but it is generally available in the Big Net. I'm talking about software piracy here.
- You will need this specific build. Older or newer ones won't do the trick.
- A piece of software to write this ISO-file into the above USB-stick and make it bootable.
- My favorite thing for doing that is Rufus. It is a solid piece of software to write images into USB-sticks.
- Windows 10 media creation tool
- You can get one from Microsoft's website
- Possibility to disable internet connection from the target machine and enable it when needed
- Finally: Possiblity to change the BIOS/UEFI date on the target computer.
- This trick solely relies on the fact, that you can pretend the date to be in the history.
Also please note, that there is NO UPGRADE possibility here. This is effectively a fresh install. If you choose to re-install on top of your existing Vista installation, please take care no to lose any precious data. I installed a bigger hard drive to the computer, so I made sure that the old drive was intact during this process.
Steps
This is how the entire process goes:
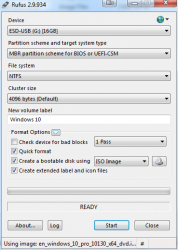
- Use Rufus to create Windows 10 build 10130 USB-stick
- Boot into BIOS/UEFI setup, set date to anything around September 2015. I just bumped back the year and did my installation in "July 2015".
- Make sure, there is no Internet connection during the installation. THIS IS IMPORTANT!
- Boot from Windows 10 build 10130 USB. Make sure there is no Internet connectivity on the machine, so that it is impossible for it to update date via NTP or talk to Microsoft.
- Create a recent Windows 10 install USB
- I had my own computer for media creation and didn't have to use the target computer for this. This can be a parallel process.
- When asked about the edition, choose Win 10 Pro
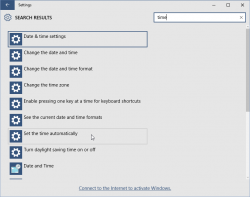
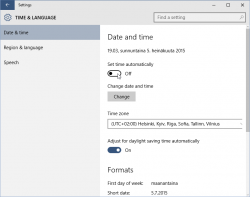
- Turn off internet time when install done. I found that one to be little tricky, but the setting is there.
- Set a specific license key. For this you'll need to open
CMD.exeas Administrator. If you attempt this as a regular user, ie. not right clicking thecmd.exeand selecting "run as administrator", you'll notice that soon. The command to execute is:
slmgr /ipk 6P99N-YF42M-TPGBG-9VMJP-YKHCF
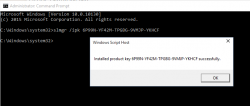
- Connect to internet. THIS is the first time the install machine is allowed to get there. If your box did connect to The Net before this, you have failed.
- Activate Windows (remember: Admin prompt):
slmgr /ato
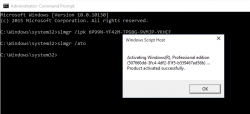
- Now you have an activated Windows 10 running. You can go to My Computer and Properties to confirm.
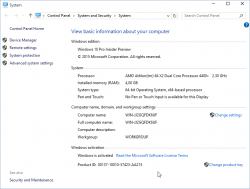
However, it's an old edition and you don't want to keep that. The important thing is, that now your computer's fingerprint has been stored into Microsoft's server and any subsequent Windows 10 installations will proceed without entering any license key. - Just insert the USB install stick with the newer Windows 10 installer (the one you created on step 5) and run
setup.exeon that. There is no need for reboot or anything, just run the installer. - Install it again! This is your second installation.
- I choose to keep nothing. This just makes sure, that all the old garbage will be gone after you're done.
- Please note, that when asked for license key, don't enter any. Always select "Do this later" or "Skip". This is not needed and your newly installed Windows 10 will be activated at the end.
- Wait 15 minutes
- You're done!
 Your Windows is ready to be used.
 - Remove the first installation stored into
C:\Windows.old, you don't need to keep any of that. However, the files are protected by operating system and deleting the entire directory prooved to be little tricky. I ended up booting from the USB-installation stick into rescue-mode and chose thecmd.exefrom that. On prompt I entered two commands:
del /S /F /Q c:\Windows.old

	rd /S /Q c:\Windows.old
Finally
This process worked for me on 5th July 2016. I don't think this has anything to do with July 29 free upgrade -limitation.
Also I'm sure guys at Microsoft keep track of their installations. They'll know exactly how many licenses they gave out using this method. My thinking is, that they simply don't care. Pretty much all of the competition is giving out operating systems for free and they cannot for some strange reason. Anybody choosing this method needs to be aware, that in an unfortunate scenario they would deactivate all licenses distributed this way.
Happy installing! I know I created one ex-Vista user very happy with this.
Windows 10 upgrade weeks
Friday, July 15. 2016
Recently I've been doing a lot of Windows 10 upgrades. The free upgrade offer is about to end in less than 15 days:
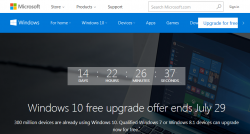
There is a counter in Windows.com.
My own adoption to Win10 is pretty high, only one box left to upgrade. I'll have to resort to virtual machines for things, that I really, really need Windows 7 for.
The real-time Windows 10 adoption gauge @ gosquared.com shows one third:
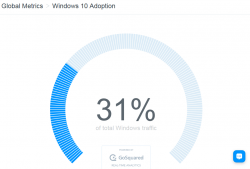
That's pretty good, but not the number Microsoft guys are aiming for.
I regularily follow Mr. Gordon Kelly, a writer who publishes @ forbes.com. In December 2015 he wrote a piece with a title 'Free' Windows 10 Has An Expensive Secret. There he pretty much speculates, that Microsoft really wants to get to one billion (1.000.000.000) Windows 10 installations as fast as possible. Not giving away free upgrades to pretty much everybody wouldn't help in that. However, his post after Microsoft's May 2016 press release (Three Reasons Microsoft Stopped Free Windows 10 Upgrades) indicates, that even he gave up hope on prolonged free upgrades being available. I guess, they didn't want to get to one billion that bad. ![]() That's something Mr. Richard Hay @ winsupersite.com predicted last December.
That's something Mr. Richard Hay @ winsupersite.com predicted last December.
It seems that it is possible to prolong your free upgrade offer by enabled assistive technologies. See Microsoft's blog post about that. But unless you do that, it's time to act on it or do some trickery after July 29th.
For my Windows 10 weeks, I'll be posting couple of articles what I did earlier this month with my various upgrades.
