Apple iOS device reset - Dismantling an old phone to be sold
Thursday, May 30. 2019
Every one of use will eventually end up in a situation where old mobile device is upgraded to a new one. Most of us can manage getting the new one working without problems. There are backups somewhere in the cloud and the new device will have the intial setup done from the backup and everything in the out-of-the-box experience will go smoothly.
But what about the old one? You might want to sell or give or donate the perfectly functioning piece of hardware to somebody who wants it more. But not without your data, accounts and passwords!
Apple support has this HT201351 article What to do before you sell, give away, or trade in your iPhone, iPad, or iPod touch. It instructs you to do a full erase of the device, but doesn't go too much into the details.
Personally, I've struggled with this one a number of times. So, I decided to record the full sequence for me and anybody else needing it. Here goes!
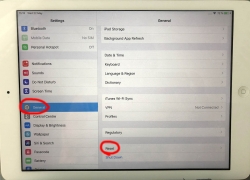
Start with Settings, General. In the bottom of General-menu, there is Reset. That's your choice. For curious ones, you can go see the menus and choices without anything dangerous happening. You WILL get plenty of warning before all your precious data is gone.
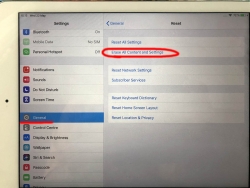
In Reset, there are number of levels of reseting to choose from. You want to go all the way. To erase every single bit of your personal data from the device. To get that, go for Erase All Content and Settings.
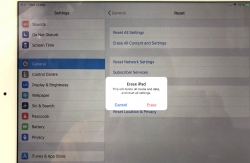
You will have two separate warnings about your intent to destroy your data. Even if you pass that gateway, there is more. Nothing will be erased until a final blow.
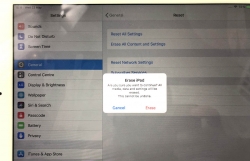
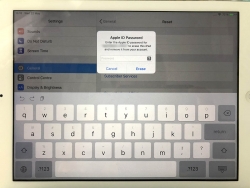
The final thing to do is to inform Apple, that this device won't be associated to your Apple ID anymore. For that, your password will be needed. This is the final call. When you successfully punch in your password, then the big ball starts rolling.
When you see this, you're past point-of-no-return.
It takes a while to erase all data. Wait patiently.
When all the erasing is done, the device will restart and it will go for the out-of-the-box dialog. This is where new user needs to choose the user interface language, network and associate the device with their own Apple ID.
Steam stats
Wednesday, May 29. 2019
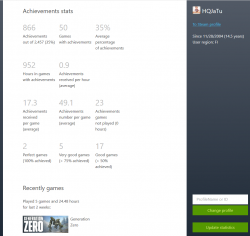
One day I was just browsing my Steam client (in case you're not a gamer, see https://store.steampowered.com/ for more). In my profile settings, I can choose what to display there. I seem to have a "achievement showcase" selected. It looks like this:
It seems, I have two perfect games having 100% of the achievements. Nice! Well ... which games are those?
That information is nowhere to be found. By googling some, I found Where can I see my perfect games in steam? in StackExchange. Somebody else had the same question.
As suggested in the answer, I checked out Steam-Zero - Steam achivements statistics script from GitHub. Again, no joy. It seems something in Steam API changed and no matter what domain I chose for my developer API-key, server wouldn't return a reasonable CORS-response making my browser refuse to continue executing the JavaScript-code any further. If you really want to study what a Cross-Origin Resource Sharing (CORS) is, go to https://developer.mozilla.org/en-US/docs/Web/HTTP/CORS. Warning: It is a tricky subject for non-developers.
As you might expect, I solved the problem by creating a fork of my own. It is at: https://github.com/HQJaTu/steamzero
With my code setup into an Apache-box, I can do a https://<my own web server here>/steamzero/?key=<my Steam API developer key here> to get something like this:
Ah, Walking Dead games have 100% achievements. Why couldn't I get that information directly out of Steam?! Lot of hassle to dig that out.
Note: Steam-Zero works only for public Steam-profiles. I had to change my privacy settings a bit to get all the stats out.
The trouble with a HPE Ethernet 10Gb 2-port 530T Adapter
Thursday, May 23. 2019
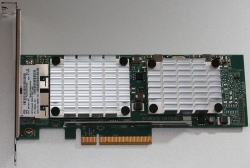
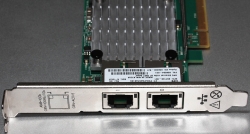
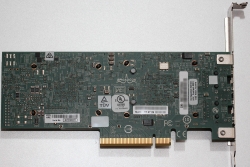
A while back I got my hands on a nice PCIe 2.0 network interface card.
In theory, that's an extremely cool piece to run in one of my Linuxes. Two 10 gig ethernet ports! Whoa!
Emphasis on phrase "in theory". In practice it's just a piece of junk. That's not because it wouldn't work. It does kinda work. I have to scale down the DDR3 RAM speed into 800 MHz just to make the hardware boot. Doing that will get 12 GiB RAM out of 16 available. Something there eats my PCIe lanes and forces them to work at unacceptable low speeds.
This is a serious piece of hardware, for example in Amazon.com the going price for such item is $340 USD. Given the non-functional state of this, I got this with a fraction of it. Given my personal interest in such toys, I had to go for it. This time it didn't pan out.
Maybe HPE support site phrase for this at https://support.hpe.com/hpsc/doc/public/display?docId=emr_na-c03663929 explains it all: "PCIe 2.0 compliant form factor designed for HPE ProLiant servers". I'm not running it on a HP ProLiant. ![]()
On a Linux, it does work ok. Kernel driver bnx2x detects and runs the NIC instantly. Linux lspci info:
# lspci -s 02:00.0 -vv -n

02:00.0 0200: 14e4:168e (rev 10)

  Subsystem: 103c:18d3

  Control: I/O- Mem+ BusMaster+ SpecCycle- MemWINV- VGASnoop- ParErr- Stepping- SERR- FastB2B- DisINTx+

  Status: Cap+ 66MHz- UDF- FastB2B- ParErr- DEVSEL=fast >TAbort- SERR-   Latency: 0, Cache Line Size: 64 bytes

  Interrupt: pin A routed to IRQ 17

  Region 0: Memory at f4000000 (64-bit, prefetchable) [size=8M]

  Region 2: Memory at f3800000 (64-bit, prefetchable) [size=8M]

  Region 4: Memory at f4810000 (64-bit, prefetchable) [size=64K]

  Expansion ROM at f7580000 [disabled] [size=512K]

  Capabilities: [48] Power Management version 3

    Flags: PMEClk- DSI- D1- D2- AuxCurrent=0mA PME(D0+,D1-,D2-,D3hot+,D3cold-)

    Status: D0 NoSoftRst+ PME-Enable- DSel=0 DScale=1 PME-

  Capabilities: [50] Vital Product Data

    Product Name: HPE Ethernet 10Gb 2P 530T Adptr

    Read-only fields:

      [PN] Part number: 656594-001

      [EC] Engineering changes: A-5727

      [MN] Manufacture ID: 103C

      [V0] Vendor specific: 12W PCIeGen2

      [V1] Vendor specific: 7.15.16

      [V3] Vendor specific: 7.14.38

      [V5] Vendor specific: 0A

      [V6] Vendor specific: 7.14.10

      [V7] Vendor specific: 530T

      [V2] Vendor specific: 5748

      [V4] Vendor specific: D06726B36C98

      [SN] Serial number: MY12---456

      [RV] Reserved: checksum good, 197 byte(s) reserved

    End

  Capabilities: [a0] MSI-X: Enable+ Count=32 Masked-

    Vector table: BAR=4 offset=00000000

    PBA: BAR=4 offset=00001000

  Capabilities: [ac] Express (v2) Endpoint, MSI 00

    DevCap: MaxPayload 512 bytes, PhantFunc 0, Latency L0s <4us, L1 <64us

        ExtTag+ AttnBtn- AttnInd- PwrInd- RBE+ FLReset+ SlotPowerLimit 75.000W

    DevCtl: CorrErr+ NonFatalErr+ FatalErr+ UnsupReq+

        RlxdOrd- ExtTag+ PhantFunc- AuxPwr+ NoSnoop+ FLReset-

        MaxPayload 128 bytes, MaxReadReq 512 bytes

    DevSta: CorrErr+ NonFatalErr- FatalErr- UnsupReq+ AuxPwr- TransPend-

    LnkCap: Port #0, Speed 5GT/s, Width x8, ASPM L0s L1, Exit Latency L0s <1us, L1 <2us

        ClockPM+ Surprise- LLActRep- BwNot- ASPMOptComp+

    LnkCtl: ASPM Disabled; RCB 64 bytes Disabled- CommClk+

        ExtSynch- ClockPM- AutWidDis- BWInt- AutBWInt-

    LnkSta: Speed 5GT/s (ok), Width x8 (ok)

        TrErr- Train- SlotClk+ DLActive- BWMgmt- ABWMgmt-

    DevCap2: Completion Timeout: Range ABCD, TimeoutDis+, LTR-, OBFF Not Supported

         AtomicOpsCap: 32bit- 64bit- 128bitCAS-

    DevCtl2: Completion Timeout: 50us to 50ms, TimeoutDis-, LTR-, OBFF Disabled

         AtomicOpsCtl: ReqEn-

    LnkCtl2: Target Link Speed: 2.5GT/s, EnterCompliance- SpeedDis-

         Transmit Margin: Normal Operating Range, EnterModifiedCompliance- ComplianceSOS-

         Compliance De-emphasis: -6dB

    LnkSta2: Current De-emphasis Level: -3.5dB, EqualizationComplete-, EqualizationPhase1-

         EqualizationPhase2-, EqualizationPhase3-, LinkEqualizationRequest-

  Capabilities: [100 v1] Advanced Error Reporting

    UESta: DLP- SDES- TLP- FCP- CmpltTO- CmpltAbrt- UnxCmplt- RxOF- MalfTLP- ECRC- UnsupReq- ACSViol-

    UEMsk: DLP- SDES- TLP- FCP- CmpltTO- CmpltAbrt- UnxCmplt- RxOF- MalfTLP- ECRC- UnsupReq- ACSViol-

    UESvrt: DLP+ SDES+ TLP- FCP+ CmpltTO- CmpltAbrt- UnxCmplt- RxOF+ MalfTLP+ ECRC- UnsupReq- ACSViol-

    CESta: RxErr- BadTLP- BadDLLP- Rollover- Timeout- AdvNonFatalErr+

    CEMsk: RxErr- BadTLP+ BadDLLP+ Rollover+ Timeout+ AdvNonFatalErr+

    AERCap: First Error Pointer: 00, ECRCGenCap+ ECRCGenEn- ECRCChkCap+ ECRCChkEn-

        MultHdrRecCap- MultHdrRecEn- TLPPfxPres- HdrLogCap-

    HeaderLog: 00000000 00000000 00000000 00000000

  Capabilities: [13c v1] Device Serial Number d0-67-26---------------

  Capabilities: [150 v1] Power Budgeting

  Capabilities: [160 v1] Virtual Channel

    Caps: LPEVC=0 RefClk=100ns PATEntryBits=1

    Arb: Fixed- WRR32- WRR64- WRR128-

    Ctrl: ArbSelect=Fixed

    Status: InProgress-

    VC0: Caps: PATOffset=00 MaxTimeSlots=1 RejSnoopTrans-

        Arb: Fixed- WRR32- WRR64- WRR128- TWRR128- WRR256-

        Ctrl: Enable+ ID=0 ArbSelect=Fixed TC/VC=01

        Status: NegoPending- InProgress-

  Capabilities: [1b8 v1] Alternative Routing-ID Interpretation (ARI)

    ARICap: MFVC- ACS-, Next Function: 1

    ARICtl: MFVC- ACS-, Function Group: 0

  Capabilities: [1c0 v1] Single Root I/O Virtualization (SR-IOV)

    IOVCap: Migration-, Interrupt Message Number: 000

    IOVCtl: Enable- Migration- Interrupt- MSE- ARIHierarchy-

    IOVSta: Migration-

    Initial VFs: 16, Total VFs: 16, Number of VFs: 0, Function Dependency Link: 00

    VF offset: 8, stride: 1, Device ID: 16af

    Supported Page Size: 000005ff, System Page Size: 00000001

    Region 0: Memory at 00000000f4820000 (64-bit, prefetchable)

    Region 4: Memory at 00000000f48a0000 (64-bit, prefetchable)

    VF Migration: offset: 00000000, BIR: 0

  Capabilities: [220 v1] Resizable BAR

  Capabilities: [300 v1] Secondary PCI Express

  Kernel driver in use: bnx2x

  Kernel modules: bnx2x
If anybody has any suggestions/ideas what to try, I'll be happy to test any of them. Also, my suggestion for anybody planning to get one is to NOT pay any money for it.
Setting up Azure AD Application from Azure DevOps pipeline Powershell task, Part 2 of 2: The scripts
Monday, May 6. 2019
This one is about Microsoft Azure Cloud platform. Specifically about Azure DevOps Services. And specifically about accessing Azure Active Directory with appropriate permissions and changing settings there. For anybody knowing their way around Azure and Azure AD, there is nothing special about it. Tinkering with AD and what it contains is more or less business-as-usual. Doing the same without a mouse and keyboard is an another story.
Given the complexity of this topic, this part is for technical DevOps personnel. The previous part of this blog post was mostly about getting a reader aligned what the heck I'm talking about.
Disclaimer: If you are reading this and you're thinking this is some kind of gibberish magic, don't worry. You're not alone. This is about a detail of a detail of a detail most people will never need to know about. Those who do, might think of this as something too difficult to even attempt.
Access problem
In order to setup an own application to authenticate against Azure AD, a pre-announcement with parameters specific to this application needs to be done to AD. As a result, AD will assign set of IDs to identify this particular application and its chosen method of authentication. The Azure AD terminology is "App Registration" and "Enterprise application", both of which are effectively the same thing, your application from AD's point-of-view. Also both entries can be found from Azure Portal, Azure Active Directory menu with those words. As mentioned in part 1, all this setup can be done with a mouse and keyboard from Azure Portal. However, this time we choose to do it in an automated way.
To access Azure AD from a random machine via PowerShell, first you user account needs to unsurprisingly authenticate with a suitable user having enough permissions to do the change. For auth, you can use Connect-AzureAD -cmdlet from AzureAD-module. Module information is at https://docs.microsoft.com/en-us/powershell/module/azuread/?view=azureadps-2.0, Connect-AzureAD -cmdlet documentation is at https://docs.microsoft.com/en-us/powershell/module/azuread/connect-azuread?view=azureadps-2.0.
Investigation reveals, that for Connect-AzureAD -call to succeed, it requires one of these:
-Credential-argument, that translates as username and password. However, service principal users used by Azure DevOps pipeline don't have an username to use. Service principals can have a password, but these accounts are not available for regular credential-based logins.-AccountId-argument having "documentation" of Specifies the ID of an account. You must specify the UPN of the user when authenticating with a user access token.-AadAccessToken-argument having "documentation" of Specifies a Azure Active Directory Graph access token.
The documentation is very vague at best. By testing we can learn, that a logged in user (DevOps service principal) running Azure PowerShell does have an Azure context. The context has the required Account ID, but not the required UPN, as it is not a regular user. When you login from a PowerShell prompt of your own workstation, a context can be used. Again, you're a human, not service principal.
Two out of three authentication options are gone. The last one of using an access token remains. Microsoft Graph API documents obtaining such an access token in https://docs.microsoft.com/en-us/azure/active-directory/develop/v1-protocols-openid-connect-code. A very short version of that can be found from my StackOverflow comment https://stackoverflow.com/a/54480804/1548275.
Briefly: On top of your Azure tenant ID, if you know your AD application's ID and client secret, getting the token can be done. The triplet in detail:
- Tenant ID: Azure Portal, Azure Active Directory, Properties, Directory ID.
- For an already logged in Azure user (
Login-AzureRmAccount, in PowerShell up to 5.x) - PowerShell up to 5.x using AzureRM-library:
Get-AzureRmSubscription
- For an already logged in Azure user (
- AD application ID: A service principal used for your Azure DevOps service connection.
- You can list all available service principals and their details. The trick is to figure out the name of your Azure DevOps service connection service principal.
- PowerShell up to 5.x using AzureRM-library:
Get-AzureRmADServicePrincipal - To get the actual Application ID, affix the command with a:
| Sort-Object -Property Displayname | Select-Object -Property Displayname,ApplicationId - Note: Below in this article, there is a separate chapter about getting your IDs, they are very critical in this operation.
- Client secret: The password of the service principal used for your Azure DevOps service connection.
Problem:
First two can be easily found. What the client secret is, nobody knows. If you created our service connection like I did from Azure DevOps, the wizard creates everything automatically. On Azure-side, all user credentials are hashed beyond recovery. On Azure DevOps-side user credentials are encrypted and available for pipeline extensions using Azure SDK in environment variables. An Azure PowerShell task is NOT an extension and doesn't enjoy the privilege of receving much of the required details as free handouts.
To be complete, it is entirely possible to use Azure DevOps service connection wizard to create the service principal automatically and let it generate a random password for it. What you can do is reset the password on Azure AD to something of your own choosing. Just go reset the password for service connection in Azure DevOps too, and you can write your scripts using the known secret from some secret place. What that secret stash would be is up to you. Warning: Having the password as plain text in your pipeline wouldn't be a good choice.
Links
See, what other people in The Net have been doing and talking about their doings to overcome the described problem:
- Create AD application with VSTS task (in an Azure PowerShell task)
- VSTS Build and PowerShell and AzureAD Authentication (in an Azure PowerShell task, or in an Azure DevOps extension)
- Use AzureAD PowerShell cmdlets on VSTS agent (in an Azure DevOps extension)
- Azure AD Application Management -extension in Azure Marketplace
What you can do with the Azure AD Application Management -extension
In a pipeline, you can create, update, delete or get the application. Whoa! That's exactly what I need to do!
To create a new AD application, you need to specify the Name and Sign-on URL. Nothing more. Also, there is the problem. Any realistic application need to setup bunch of other settings to manifest and/or authentication.
A get AD application -operation will return following pipeline variables:
-
ObjectId
-
ApplicationId
-
Name
-
AppIdUri
-
HomePageUrl
-
ServicePrincipalObjectId
My approach
When eyeballing the App registration from Azure AD -side, it would look something like this:
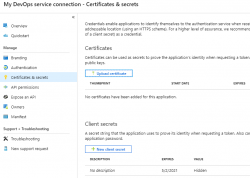
The password (or secret) is hashed and gone. But what's the second option there? A certificate!
Documentation for Microsoft identity platform access tokens is at https://docs.microsoft.com/en-us/azure/active-directory/develop/access-tokens. When combined with previous link of Graph API documentation of OpenID Connect and Certificate credentials for application authentication from https://docs.microsoft.com/en-us/azure/active-directory/develop/active-directory-certificate-credentials we have all required information how to make this happen.
What you need for this to work
- PowerShell 5.x prompt with AzureRM and AzureAD modules installed
- Azure account
- Azure DevOps account
- Azure user with lots of access, I'm using a Global Admin role for my setups
- Azure DevOps user with lots of access, I'm using an Organization Owner role for my setups
- Azure Key Vault service up & running
- Azure DevOps pipeline almost up & almost running
Create a certificate into your Azure Key Vault
X.509 certificate
In PowerShell 5.x there is PKIClient-module, and New-SelfSignedCertificate cmdlet. In PowerShell 6.x, that particular module hasn't been ported yet. A few very useful cmdlets are using Windows-specific tricks to get the thing done. Since PowerShell 6.x (or PowerShell Core), is a multi-platform thing, the most complex ones have not been ported to macOS and Linux, so no Windows-version is available. However, connecting into Azure AD is done with AzureAD-module, which doesn't work with PowerShell 6.x, sorry. As much you and me both would love to go with the latest one, using 5.x is kinda mandatory for this operation.
Also, if you would have a self-signed certificate, what then? How would you use it in Azure DevOps pipeline? You wouldn't, the problem remains: you need to be able to pass the certificate to the pipeline task. Same as a password would be.
There is a working solution for this: Azure Key Vault. It is an encrypted storage for shared secrets, where you as an Azure admin can control on a fine-grained level who can access and what.
Your Azure DevOps service principal
If you haven't already done so, make sure you have a logged-in user in your PowerShell 5.x prompt. Hint: Login-AzureRmAccount cmdlet with your personal credentials for Azure Portal will get you a long way.
Next, you need to connect your logged in Azure administrator to a specific Azure AD for administering it. Run following spell to achieve that:
$currentAzureContext = Get-AzureRmContext;

$tenantId = $currentAzureContext.Tenant.Id;

$accountId = $currentAzureContext.Account.Id;

Connect-AzureAD -TenantId $tenantId -AccountId $accountId;
Now your user is connected to its "home" Azure AD. This seems bit over-complex, but you can actually connect to other Azure ADs where you might have permission to log into, so this complexity is needed.
As everything in Azure revolves around IDs. Your service principal has two very important IDs, which will be needed in various operations while granting permissions. The required IDs can be read from your Azure AD Application registration pages. My preference is to work from a PowerShell-session, I will be writing my pipeline tasks in PowerShell, so I choose to habit that realm.
As suggested earlier, run something like:
Get-AzureRmADServicePrincipal | Sort-Object -Property Displayname | Select-Object -Property Displayname,ApplicationId
will get you rolling. Carefully choose your Azure DevOps service principal from the list and capture it into a variable:
$adApp = Get-AzureADApplication -Filter "AppId eq '-Your-DevOps-application-ID-GUID-here-'"
Key Vault Access Policy
Here, I'm assuming you already have an Azure Key Vault service setup done and running Get-AzureRMKeyVault would return something useful for you (in Powershell 5.x).
To allow your DevOps service principal access the Key Vault, run:
$kv = Get-AzureRMKeyVault -Name

Set-AzureRmKeyVaultAccessPolicy -VaultName $kv.VaultName `

  -ServicePrincipalName $adApp.AppId `

  -PermissionsToKeys Get `

  -PermissionsToSecrets Get,Set `

  -PermissionsToCertificates Get,Create
X.509 certificate in a Key Vault
Azure Key Vault can generate self-signed certificates for you. Unlike a certificate and private key generated by you on a command-line, this one can be accessed remotely. You can read the certificate, set it as authentication mechanism for your DevOps service principal, and here comes the kicker: on an Azure DevOps pipeline task, you don't need to know the actual value of the certificate, all you need is a method for accessing it, when needed.
Create a certificate renewal policy into Azure Key Vault with:
$devOpsSpnCertificateName = "My cool DevOps auth cert";
$policy = New-AzureKeyVaultCertificatePolicy -SubjectName "CN=My DevOps SPN cert" `$devOpsSpnCertificateName
-IssuerName "Self" `
-KeyType "RSA" `
-KeyUsage "DigitalSignature" `
-ValidityInMonths 12 `
-RenewAtNumberOfDaysBeforeExpiry 60 `
-KeyNotExportable:$False `
-ReuseKeyOnRenewal:$False
Add-AzureKeyVaultCertificate -VaultName $kv.VaultName `
-Name `
-CertificatePolicy $policy
This will instruct Key Vault to create a self-signed certificate by name My cool DevOps auth cert, and have it expire in 12 months. Also, it will auto-renew 60 days before expiry. At that point, it is advisable to set the new certificate into Azure AD App registration.
Now you have established a known source for certificates. You as an admin can access it, also your pipeline can access it.
Allow certificate authentication
To use this shiny new certificate for authentication, following spell needs to be run to first get the X.509 certificate, extract the required details out of it and allow using it as login credential:
$pfxSecret = Get-AzureKeyVaultSecret -VaultName $kv.VaultName `

  -Name $devOpsSpnCertificateName;

$pfxUnprotectedBytes = [Convert]::FromBase64String($pfxSecret.SecretValueText);

$pfx = New-Object Security.Cryptography.X509Certificates.X509Certificate2 -ArgumentList `

  $pfxUnprotectedBytes, $null,  `

  [Security.Cryptography.X509Certificates.X509KeyStorageFlags]::Exportable;


$validFrom = [datetime]::Parse($pfx.GetEffectiveDateString());

$validFrom = [System.TimeZoneInfo]::ConvertTimeBySystemTimeZoneId($validFrom, `

  [System.TimeZoneInfo]::Local.Id, 'GMT Standard Time');

$validTo = [datetime]::Parse($pfx.GetExpirationDateString());

$validTo = [System.TimeZoneInfo]::ConvertTimeBySystemTimeZoneId($validTo, `

  [System.TimeZoneInfo]::Local.Id, 'GMT Standard Time');


$base64Value = [System.Convert]::ToBase64String($pfx.GetRawCertData());

$base64Thumbprint = [System.Convert]::ToBase64String($pfx.GetCertHash());

$cred = New-AzureADApplicationKeyCredential -ObjectId $adApp.ObjectId `

  -CustomKeyIdentifier $base64Thumbprint `

  -Type AsymmetricX509Cert `

  -Usage Verify `

  -Value $base64Value `

  -StartDate $validFrom `

  -EndDate $validTo;
That's it! Now you're able to use the X.509 certificate from Azure Key Vault for logging in as Azure DevOps service principal.
Grant permissions to administer AD
The obvious final step is to allow the DevOps service principal to make changes in Azure AD. As default, it has no admin rights into Azure AD at all.
About level of access: I chose to go with Company Administrator, as I'm doing a setup for custom AD-domain. Without that requirement, an Application administrator would do the trick. Docs for different roles are at https://docs.microsoft.com/en-us/azure/active-directory/users-groups-roles/directory-assign-admin-roles.
So, the spell goes:
$roleName ='Company Administrator';

$role = Get-AzureADDirectoryRole | where-object {$_.DisplayName -eq $roleName};
Depending on your setup and what you've been doing in your AD before this, it is possible, that getting the role fails. Enable it with this one:
$roleTemplate = Get-AzureADDirectoryRoleTemplate | ? { $_.DisplayName -eq $roleName };

Enable-AzureADDirectoryRole -RoleTemplateId $roleTemplate.ObjectId;
Get the service principal, and grant the designated role for it:
$devOpsSpn = Get-AzureRmADServicePrincipal | `

  where-object {$_.ApplicationId -eq $adApp.AppId};

Add-AzureADDirectoryRoleMember -ObjectId $role.Objectid -RefObjectId $devOpsSpn.Id;
Now you're good to go.
What to do in a task
Lot of setup done already, now we're ready to go for the actual business.
Here is some code. First get the certificate from Key Vault, then connect the DevOps service principal into Azure AD:
$pfxSecret = Get-AzureKeyVaultSecret -VaultName $kv.VaultName `
-Name $devOpsSpnCertificateName;
$pfxUnprotectedBytes = [Convert]::FromBase64String($pfxSecret.SecretValueText);
$pfx = New-Object Security.Cryptography.X509Certificates.X509Certificate2 -ArgumentList ` $pfxUnprotectedBytes, $null, ` [Security.Cryptography.X509Certificates.X509KeyStorageFlags]::Exportable;
ConnectCurrentSessionToAzureAD $pfx;
function ConnectCurrentSessionToAzureAD($cert) {
$clientId = (Get-AzureRmContext).Account.Id;
$tenantId = (Get-AzureRmSubscription).TenantId;
$adTokenUrl = "https://login.microsoftonline.com/$tenantId/oauth2/token";
$resource = "https://graph.windows.net/";
$now = (Get-Date).ToUniversalTime();
$nowTimeStamp = [System.Math]::Truncate((Get-Date -Date $now -UFormat %s -Millisecond 0));
$thumbprint = [System.Convert]::ToBase64String($pfx.GetCertHash());
$headerJson = @{
alg = "RS256"
typ = "JWT"
x5t = $thumbprint
} | ConvertTo-Json;
$payloadJson = @{
aud = $adTokenUrl
nbf = $nowTimeStamp
exp = ($nowTimeStamp + 3600)
iss = $clientId
jti = [System.Guid]::NewGuid().ToString()
sub = $clientId
} | ConvertTo-Json;
$jwt = New-Jwt -Cert $cert -Header $headerJson -PayloadJson $payloadJson;
$body = @{
grant_type = "client_credentials"
client_id = $clientId
client_assertion_type = "urn:ietf:params:oauth:client-assertion-type:jwt-bearer"
client_assertion = $jwt
resource = $resource
}
$response = Invoke-RestMethod -Method 'Post' -Uri $adTokenUrl `
-ContentType "application/x-www-form-urlencoded" -Body $body;
$token = $response.access_token
Connect-AzureAD -AadAccessToken $token -AccountId $clientId -TenantId $tenantId | Out-Null

}
Now, you're good to go with cmdlets like New-AzureADApplication and Set-AzureADApplication, or whatever you wanted to do with your Azure AD. Suggestions can be found from docs at https://docs.microsoft.com/en-us/powershell/module/azuread/?view=azureadps-2.0.
About PowerShell-modules in a task
This won't be a surprise to you: not all the modules you'll be needing are there in an Azure DevOps agent running your tasks. As an example, AzureAD won't be there, also the required JWT-module won't be there. What I'm doing in my pipeline task, is to install the requirements like this:
Install-Module -Name JWT -Scope CurrentUser -Force
Now the task won't ask anything (-Force) and it won't require administrator privileges to do the installation to a system-wide location (-Scope CurrentUser).
Finally
Phew! That was a lot to chew on. But now my entire appication is maintained via Azure DevOps release pipeline. If something goes wrong, I can always run a deployment in my environment setup pipeline and it will guarantee all the settings are as they should.
Setting up Azure AD Application from Azure DevOps pipeline Powershell task, Part 1 of 2: The theory
Monday, May 6. 2019
This one is about Microsoft Azure Cloud platform. Specifically about Azure DevOps Services. And specifically about accessing Azure Active Directory with appropriate permissions and changing settings there. For anybody knowing their way around Azure and Azure AD, there is nothing special about it. Tinkering with AD and what it contains is more or less business-as-usual. Doing the same without a mouse and keyboard is an another story.
Given the complexity of this topic, this part is mostly about getting a reader aligned what the heck I'm talking about. Next part is for a techical person to enjoy all the dirty details and code.
Disclaimer: If you are reading this and you're thinking this is some kind of gibberish magic, don't worry. You're not alone. This is about a detail of a detail of a detail most people will never need to know about. Those who do, might think of this as something too difficult to even attempt.
DevOps primer
When talking about DevOps (see Microsoft's definition from What is DevOps?) there is an implied usage of automation in any operation. In Azure DevOps (analogous with most other systems), there is a concept of "pipeline". It's the way-of-working and achieving results in automated way. There are inputs going to the pipe, then steps to actually do "the stuff" resulting in desired output. Nothing fancy, just your basic computing. Computers are designed and built for such tasks, eating input and spitting out output.
Going even further into the dirty details: What if what you desire is to automate the setup of an entire system. In any reasonable cloud system there are: computing to do the processing, pieces of assorted storage to persist your precious stuff, entry-points to allow access to your system and what not. As an example, your cloud system might consist of a: web server, SQL-database, Redis cache and load balancer. That's four different services to get your stuff running. Somebody, or in DevOps, someTHING needs to set all that up. 100% of all the services, 100% of all the settings in a service need to be setup and that needs to be done AUTOmatically. Any knowledgeable human can go to Azure Portal and start clicking to build the required setup.
Doing the same thing automated is couple difficulty settings harder. The obvious difference between a human clicking buttons and a script running is, that the script is a DOCUMENTATION about how the system is built. "I document my work!" some annoyed people yell from the back rows. Yes, you may even document your work really well, but code is code. It doesn't forget or omit anything. Also, you can run the same script any number of times to setup new environments or change the script to maintain existing ones.
Azure Active Directory, or AD
Most applications with or without web will never use AD. Then there are software developers like me, who want to store users into such an active location. Lots of other developers abandon that as too-complex-to-do and build their own user management and user vaults themselves with services of their own choosing. That's totally doable. No complaints from here. However, using ready-built authentication mechanisms by fine Azure devs at Microsoft make a lot of sense to me. You're very likely to simply "get it right" by reading couple of manuals and calling the designated APIs from your application. You might even get to be GDPR-compliant without even trying (much).
So, that's my motivation. Be compliant. Be secure. Be all that by design.
Azure AD Application
Most people can grasp the concept of Active Directory easily. When expanded to AD applications, things get very abstract very fast and the typical reaction of a Joe Regular is to steer away from the topic. If you want to use AD authentication for an application you wrote yourself, or somebody else wrote, this is the way it needs to be done. Not possible to avoid any longer.
So, now my application is compliant and secure and all those fancy words. The obvious cost is, that I need to understand very complex mechanisms, setup my services and carefully write code into my application to talk to those services I set up earlier. All this needs to be done correctly while nothing here is trivial. Couple dozen of parameters need to align precisely right. The good part in all that is: if you make a itsy bitsy tiny mistake, your mistake doesn't go unnoticed. Your entire house of cards collapses and your application doesn't work. No user can use the system. So, ultimately somebody notices your mistake! ![]()
Since nobody loves making mistakes, that sure sounds something most people like to AUTOmate. I need to be sure, that with a click of a button all my settings are AUTOmatically correct both in Azure AD and in my own application.
Azure DevOps pipeline
To automate any setup in Azure cloud computing environment, the obvious choice is to use Azure DevOps. As always, there are number of options you can go with, but the fact remains: the most natural choice is to stick with something you already have, doesn't cost anything extra and is very similar to something you'll be using anyway. So, you choose to go with Azure DevOps, or Visual Studio Online or Team Foundation Services on-line or whatever it used to be called earlier. Today, they call it Azure DevOps Services.
In a release pipeline you can do anything. There are tons of different types of tasks available in out-of-the-box experience of Azure DevOps and you can install tons more from 3rd-party extensions.
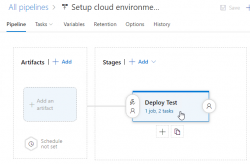
What I have in the above image is a screenshot from my Azure DevOps release pipeline. As you can see, it is a mockup, there is no source artifact it could consume. I was lazy and didn't do a build pipeline to create something there. But for the sake of this blog post, please imagine there being an imaginary artifact for this release pipeline to be able to function properly.
Anyway, there is a single stage called "Deploy Test" to simulate setup/maintenance of my Testing environment. There could be any number of stages before and after this one, but again, I was lazy and didn't do a very complex setup. As the image depicts, there is 1 job in the stage containing 2 tasks. A "task" in a pipeline is the basic building block. Defining a pipeline is just grouping tasks into jobs and grouping jobs into stages forming up the actual process, or pipeline of doing whatever the desired end goal requires. All this can be done in YAML, but feel free to wave your mouse and keyboard the do the same.
Azure DevOps pipeline task of a job of a stage
On the single stage this pipeline has, there is one job containing two tasks. The job looks like this:
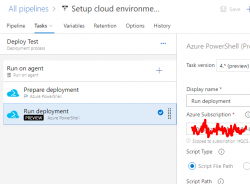
An Azure PowerShell task (read all about them from https://docs.microsoft.com/en-us/azure/devops/pipelines/tasks/deploy/azure-powershell) is a piece of PowerShell script run in a deployment host with a suitable Azure Service Principal (for some reason they call them Service Connections in Azure DevOps) having a set of assigned permissions in the destination Azure tenant/subscription/resource group. This is a very typical approach to get something deployed in a single task. Very easy to setup, very easy to control what permissions are assigned. The hard part is to decide the actual lines of PowerShell code to be run to get the deployment done.
Luckily PowerShell in Azure DevOps comes with tons of really handy modules already installed. Also, it is very easy to extend the functionaly by installing modules from a PowerShell repository of your own choosing on-the-fly in a task. More about that later.
Azure DevOps pipeline task doing Azure AD setup
That's the topic of part 2 in this series. Theory part concludes here and the really complex stuff begins.
Let's Encrypt Transitioning to ISRG's Root
Sunday, May 5. 2019
Over an year ago, I posted a piece regarding Let's Encrypt and specifically me starting to use their TLS certificates. This certificate operation they're running is bit weird, but since their price for a X.509 cert is right (they're free-of-charge), they're very popular (yes, very very popular) I chose to jump into their wagon.
In my previous post I had this flowchart depicting their (weird) chain of trust:
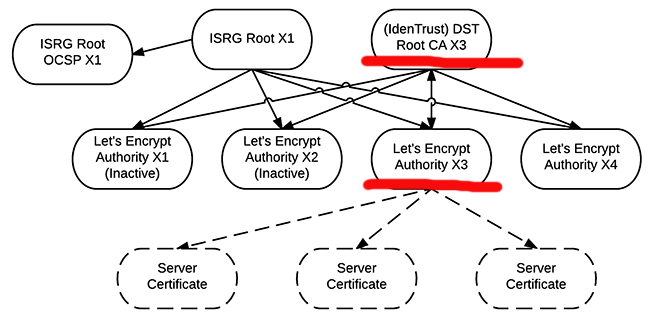
I'm not going to repeat the stuff here, just go read the post. It is simply weird to see a CHAIN of trust not being a chain. Technically a X.509 certificate can be issued by only one issuer, not by two.
Last month they announced, they're going this way:
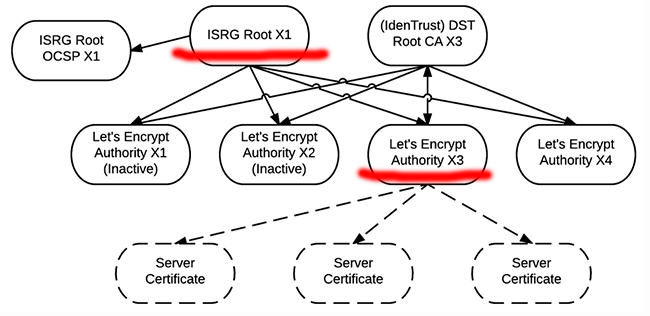
What is this change and how will it affect me?
Read the announcement at https://letsencrypt.org/2019/04/15/transitioning-to-isrg-root.html. There is a very good chance, it will not affect you. Its more like a change in internal operation of the system. The change WILL take place on 8th of July this year and any certificates issued by users like me and you will originate from a new intermediate CA using a certificate issued by ISRG's own CA. So, the change won't take place instantly. What will happen is, for the period of 90 days (the standard lifetime of a Let's Encrypt certificate) after 8th July, sites will eventually transition to these new certificates.
The part where it might have an impact to you is with legacy devices, browsers, operating systems, etc. Especially, if you're one of the unhappy legacy Android mobile users, it WILL affect you. Lot of concerned people are discussing this change at https://community.letsencrypt.org/t/please-reconsider-defaulting-to-the-isrg-root-its-unsupported-by-more-than-50-of-android-phones/91485. If you're smart enough to avoid those crappy and insecure 'droids not having any security patches by a mobile vendor who doesn't care about your security, then this will not affect you.
Testing - A peek into the future
The way Let's Encrypt does their business is weird. I have stated that opinion a number of times. However, as they are weird, they are not incompetent. A test site has existed for a long time at https://valid-isrgrootx1.letsencrypt.org/, where you can see what will happen after July 8th 2019.
On any browser, platform or device I did my testing: everything worked without problems. List of tested browsers, platforms and devices will include:
- Anything regular you might have on your devices
- Safari on multiple Apple iOS 12 mobile devices
- Chrome on Huawei Honor P9 running Android 8
- Microsoft Edge Insider (the Chrome-based browser)
- Safari Technology Preview (macOS Safari early release branch)
- Firefox 66 on Linux
- Curl 7.61 on Linux
An attempt to explain the flowchart
Yes, any topic addressing certificates, cryptography and their applications is always on the complex side of things. Most likely this explanation of mine won't clarify anything, but give me some credit for trying. ![]()
In an attempt to de-chiper the flowchart and put some sense to a chain-not-being-a-chain-but-a-net, let's take a look into the certificate chain details. Some things there are exactly the same, some things there are completely different.
Chain for an old certificate, issued before 8th July
Command: openssl s_client -showcerts -connect letsencrypt.org:443
Will output:
CONNECTED(00000003)

---

Certificate chain

 0 s:CN = www.letsencrypt.org

   i:C = US, O = Let's Encrypt, CN = Let's Encrypt Authority X3

-----BEGIN CERTIFICATE-----

MIIHMjCCBhqgAwIBAgISA2YsTPFE5kGjwkzWw/oSohXVMA0GCSqGSIb3DQEBCwUA
...
gRNK7nhFsbBSxaKqLaSCVPak8siUFg==

-----END CERTIFICATE-----

 1 s:C = US, O = Let's Encrypt, CN = Let's Encrypt Authority X3

   i:O = Digital Signature Trust Co., CN = DST Root CA X3

-----BEGIN CERTIFICATE-----

MIIEkjCCA3qgAwIBAgIQCgFBQgAAAVOFc2oLheynCDANBgkqhkiG9w0BAQsFADA/
...
KOqkqm57TH2H3eDJAkSnh6/DNFu0Qg==

-----END CERTIFICATE-----

---

Server certificate

subject=CN = www.letsencrypt.org


issuer=C = US, O = Let's Encrypt, CN = Let's Encrypt Authority X3
...
Chain for a new certificate, issued after 8th July
Command: openssl s_client -showcerts -connect valid-isrgrootx1.letsencrypt.org:443
Will output:
CONNECTED(00000003)

---

Certificate chain

 0 s:CN = valid-isrgrootx1.letsencrypt.org

   i:C = US, O = Let's Encrypt, CN = Let's Encrypt Authority X3

-----BEGIN CERTIFICATE-----

MIIFdjCCBF6gAwIBAgISA9d+OzySGokxL64OccKNS948MA0GCSqGSIb3DQEBCwUA
...
yEnNbd5O8Iz2Nw==

-----END CERTIFICATE-----

 1 s:C = US, O = Let's Encrypt, CN = Let's Encrypt Authority X3

   i:C = US, O = Internet Security Research Group, CN = ISRG Root X1

-----BEGIN CERTIFICATE-----

MIIFjTCCA3WgAwIBAgIRANOxciY0IzLc9AUoUSrsnGowDQYJKoZIhvcNAQELBQAw
...
rUCGwbCUDI0mxadJ3Bz4WxR6fyNpBK2yAinWEsikxqEt

-----END CERTIFICATE-----

---

Server certificate

subject=CN = valid-isrgrootx1.letsencrypt.org


issuer=C = US, O = Let's Encrypt, CN = Let's Encrypt Authority X3
...
But look the same!
Not really, looks can be deceiving. It's always in the details. The important difference is in level 1 certificate, having different issuer. Given cryptographny, the actual bytes transmitted on the wire are of course different as any minor change in a cert details will result in a completely different result.
As a not-so-important fact, the level 0 certificates are complately different, because they are for different web site.
Then again the level 1 certs are the same, both do have the same private key. There is no difference in the 2048-bit RSA modulus:
Certificate:

  Data:

    Issuer: C = US, O = Internet Security Research Group, CN = ISRG Root X1

    Subject: C = US, O = Let's Encrypt, CN = Let's Encrypt Authority X3

    Subject Public Key Info:

      Public Key Algorithm: rsaEncryption

        RSA Public-Key: (2048 bit)

        Modulus:

          00:9c:d3:0c:f0:5a:e5:2e:47:b7:72:5d:37:83:b3:

          68:63:30:ea:d7:35:26:19:25:e1:bd:be:35:f1:70:

          92:2f:b7:b8:4b:41:05:ab:a9:9e:35:08:58:ec:b1:

          2a:c4:68:87:0b:a3:e3:75:e4:e6:f3:a7:62:71:ba:

          79:81:60:1f:d7:91:9a:9f:f3:d0:78:67:71:c8:69:

          0e:95:91:cf:fe:e6:99:e9:60:3c:48:cc:7e:ca:4d:

          77:12:24:9d:47:1b:5a:eb:b9:ec:1e:37:00:1c:9c:

          ac:7b:a7:05:ea:ce:4a:eb:bd:41:e5:36:98:b9:cb:

          fd:6d:3c:96:68:df:23:2a:42:90:0c:86:74:67:c8:

          7f:a5:9a:b8:52:61:14:13:3f:65:e9:82:87:cb:db:

          fa:0e:56:f6:86:89:f3:85:3f:97:86:af:b0:dc:1a:

          ef:6b:0d:95:16:7d:c4:2b:a0:65:b2:99:04:36:75:

          80:6b:ac:4a:f3:1b:90:49:78:2f:a2:96:4f:2a:20:

          25:29:04:c6:74:c0:d0:31:cd:8f:31:38:95:16:ba:

          a8:33:b8:43:f1:b1:1f:c3:30:7f:a2:79:31:13:3d:

          2d:36:f8:e3:fc:f2:33:6a:b9:39:31:c5:af:c4:8d:

          0d:1d:64:16:33:aa:fa:84:29:b6:d4:0b:c0:d8:7d:

          c3:93
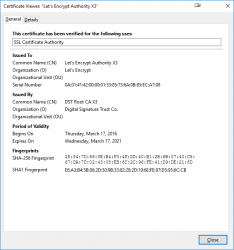
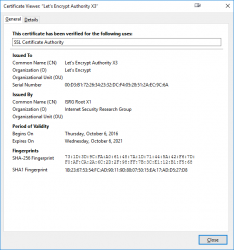
New certificate from a GUI
Obviously, the same thing can be observed from your favorite browser. Not everybody loves doing most of the really important things from a command-line-interface.
Completely different. Same, but different.
Confusion - Bug in Firefox
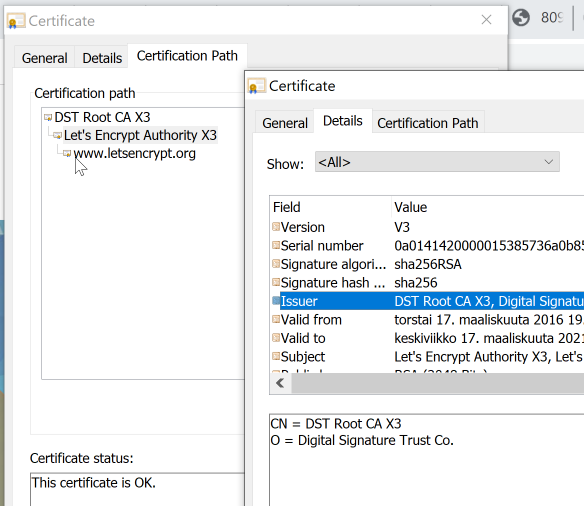
Chrome, correctly displaying DST-root for www.letsencypt.org:
Firefox failing to follow the certificate chain correctly for the same site:
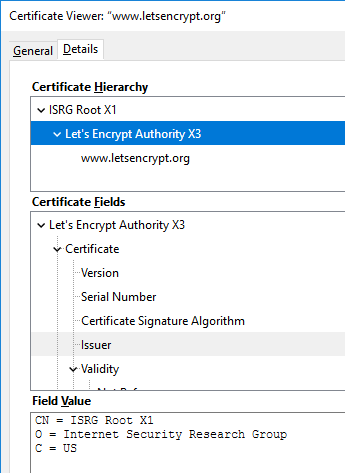
This is the stuff where everybody (including me) gets confused. Firefox fails to display the correct issuer information! For some reason, it already displays the new intermediate and root information for https://letsencrypt.org/.
Most likely this happens because both of the intermediate CA certificates are using the same private key. I don't know this for sure, but it is entirely possible, that Mozilla TLS-stack is storing information per private key and something is lost during processing. Another explanation might be, that lot of Mozilla guys do work closely with Let's Encrypt and they have hard-coded the chain into Firefox.
Finally
Confused?
Naah. Just ignore this change. This is Internet! There is constantly something changing. ![]()
What's inside a credit card
Friday, May 3. 2019
Most of us have a credit card (or debit) for payment purposes. As I love tech, technically speaking, it is laminated polyvinyl chloride acetate (PVCA) piece of plastic conforming to ISO/IEC 7810 ID-1.
What's in a card is:
- The standard-compliant plastic frame
- ISO/IEC 7816 smart card with 8-pin connector
- ISO/IEC 14443 RFID chip and antenna for contactless payments
- (optional, deprected as insecure) ISO/IEC 7811, 7812 and 7813 compliant magnetic strip
The reason I got interested about this begun when I got a new debit card. Anybody having one of these cards know, that they do expire eventually. My bank sends me new one roughly one month before expiry, at which point I tend to destroy the old one into very small pieces to avoid some garbage digging person to be able to exploit my information.
This time, I took couple of pictures of it first (then I destroyed it) to publish in the Internet.
Waitaminute!
You're not supposed to post an image of your credit card! See https://cheezburger.com/8193250816 for a my-new-credit-card fail.
No, I'm not going to do that, instead:
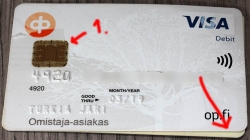
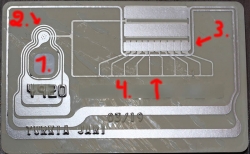
Notice how couple years of usage made the card crack and laminated back and top parts of the card started peeling off. The lamination process failed somehow. Maybe the superglue wasn't super enough, or something similar. I've never seen such a thing happen before.
Here goes: I publicly posted pictures of my old debit card! Obviously, before doing that, I redacted my card number. Also, I'm not going to publish image of the back side having the CVC validation number and my signature. For those curious why I din't redact all 16 digits, the first four are not that important, because its kinda obvious the card is a Visa (first digit 4) and in Finland all Visa cards are issued by Nets Oy (formerly Luottokunta). For card numbers, see https://stevemorse.org/ssn/List_of_Bank_Identification_Numbers.html, a page rejected by Wikipedia, but resurrected from Archive.org
Points of interest in card images:
- ISO/IEC 7816 smart card
- All of the chip in the top slice of the card.
- The chip is bit thicker then the top slice of the card. There is a shallow dent in the back slice to make room for the smart card chip.
- RFID antenna for contactless payment.
- It's EVERYWHERE! I never realized how much antenna is required to power the RFID chip.
- If you would follow the silver antenna, it would make a very long track around the card. It will never cross. This is required to form a long loop. For those not familiar with physics and electricity, it forms a solenoid which will produce current when moving in a magnetic field (payment reader).
- There is antenna both sides of the back-slice. Sides are connected in two points, 2 and 3.
- Most of the antenna is around the 7816 smart card chip. That's why people are instructed to put the smart card into contactless payment terminal.
- I think (please correct me, if I think wrong) the RFID-chip is very near the smart card chip.
- I think (please correct me, if I think wrong) there are ten capacitors to first absorb electric current from the payment terminal magnetic field via solenoid and store it into the capacitors for the chip to do it's magic of EMV-payment. The transaction will last less then a second, so not much is needed.
- The back-side antenna
- Connected to front-side antenna in 2.
Bonus
If you really, really want to, you can tear your card apart and make a ring out of it:

Read all about that Man dissolves credit card to make contactless ring.
Ransom email scam - How to mass extort bitcoins via spam campaign
Thursday, May 2. 2019
I've been receiving couple of these already:
Hello!
This is important information for you!
Some months ago I hacked your OS and got full access to your account one-of-my-emails@redacted
On day of hack your account one-of-my-emails@redacted has password: m7wgwpr7
So, you can change the password, yes.. Or already changed... But my malware intercepts it every time.
How I made it:
In the software of the router, through which you went online, was a vulnerability. I used it...
If you interested you can read about it: CVE-2019-1663 - a vulnerability in the web-based management interface of the Cisco routers. I just hacked this router and placed my malicious code on it. When you went online, my trojan was installed on the OS of your device.
After that, I made a full backup of your disk (I have all your address book, history of viewing sites, all files, phone numbers and addresses of all your contacts).
A month ago, I wanted to lock your device and ask for a not big amount of btc to unlock. But I looked at the sites that you regularly visit, and I was shocked by what I saw!!! I'm talk you about sites for adults.
I want to say - you are a BIG pervert. Your fantasy is shifted far away from the normal course!
And I got an idea.... I made a screenshot of the adult sites where you have fun (do you understand what it is about, huh?). After that, I made a screenshot of your joys (using the camera of your device) and glued them together. Turned out amazing! You are so spectacular!
I'm know that you would not like to show these screenshots to your friends, relatives or colleagues.
I think $748 is a very, very small amount for my silence. Besides, I have been spying on you for so long, having spent a lot of time!
Pay ONLY in Bitcoins!
Note: That is only the beginning of long rambling to make me convinced this is for real.
The good thing is, that I finally found my lost password. As stated in the scam mail, it is: m7wgwpr7
Wait a minute! Nobody should post their passwords publicly! No worries, I'll post all of mine. You can find them from https://github.com/danielmiessler/SecLists/blob/master/Passwords/Common-Credentials/10-million-password-list-top-1000000.txt As a careful Internet user, I only use passwords from that one million -list.
Also, thank you for informing me about a security flaw allowing remote code execution in my Cisco RV110W Wireless-N VPN Firewall, Cisco RV130W Wireless-N Multifunction VPN Router or Cisco RV215W Wireless-N VPN Router. I don't know exactly which one of those I have. I may need to re-read CVE-2019-1663 Detail again for details.
Good thing you mentioned, that you are capable of intercepting my attempts of changing my account password. I'm too scared to use Internet anywhere else than through my Cisco <whatever the model was> router. I'll never use my cell phone, office network or any public Wi-Fi for Internet access.
Nice job on finding the camera in one of my desktop PCs. I personally haven't found any in them yet!
Also I'm happy to know, that now somebody has backups of all my Windowses, Macs and Linuxes I use on regular basis. Including my NAS, that's nearly 20 terabytes of data! Transferring all that out of my Internet connections without me noticing anything is really a feat. Congrats on that one!
PS. Are you for real! ![]()
