Google Analytics 4 migration
Monday, June 20. 2022
For number of reasons, instead of migration, I should write migraine. First is about moving from an old system into a new one. Latter is about medical condition causing severe headaches. In this case, there seems to be not much of a difference.
Google's own Make the switch to Google Analytics 4 -migration guide has 12 steps. Given complexity, the time I have to invest on this and lack of really diving into this, I probably missed most of them.
Going into GA4-console, I have this:

Clicking on Get Tagging Instructions, I'll get further information:
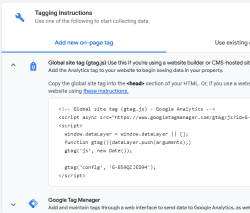
There is a snippet of JavaScript, which I can inject into this site.
<script async="" src="https://www.googletagmanager.com/gtag/js?id=G-859QZJED94"></script>

<script>

  window.dataLayer = window.dataLayer || [];

  function gtag(){dataLayer.push(arguments);}

  gtag('js', new Date());

  gtag('config', 'G-859QZJED94');

</script>
Note: My GA4-stream ID is G-859QZJED94. Make sure to use yours, not mine. As the stream ID cannot be a secret, it's ok to publish it here. The same ID can be found from HTML-code of this page.
To verify installation success, I went to GA4 portal, chose Reports and Realtime. It didn't take long, less than a minute, for that report to indicate user activity. Many other places keep saying "No data received from your website yet", "No data received in past 48 hours" or "Data collection isn’t active for your website". IMHO all of those are incorrect, as I do have stats. We'll see if I managed to do that right.
Megazoning (or Laser Tagging) part 2, Year 2022 edition
Sunday, May 22. 2022
Quite close six years ago, I posted about my visit in Megazone. Now I got to go there again. This time there were more of us and we had a private game for the company.
Round 1
This was me getting the look and feel how this game worked.
Oh boy our team sucked! (Sorry my colleagues, not sorry.)
Obviously I was the best in our green team, but I ranked 11th out of 30. Looking at the scores, red team was way too good for us and blue team had couple guys better than me.
Round 2
I'm not exactly sure, but somehow this turned into a base defense. Other teams were convinced they had to rape our base and me and another member of my red team were almost constantly defending our base.
This turn of events ended me being 4th out of 32 players. Actually, not missing the 2nd position by too much.
Round 3
This round was full-on base defense 100% of the time. There were 5 or 6 players of our team doing base defense to our blue team. Way too many players on other teams were keen on getting their 2000 pts on our base.
Btw, I'm pretty sure we fended them on each attack wave.
Mentally I'd love to do more freeroaming than doing area defense. I didn't enjoy this kind of game that much so I simply gave up. I wasn't moving nearly as much as reasonable Laser Tag tactics dictates. Being stationary will result in a below medium score and position 18th out of 30.
Overall
I still can get my kick out of round 2 while zapping attackers on left and right. That was fun!
However, I'll be waiting for the release of Sniper Elite 5 next week, I know I will enjoy video gaming more than IRL gaming.
Diverse spam
Thursday, May 5. 2022
It seems detecting and blocking email spam is easy. That's something I stated in my blog post back in 2020.
Here I'm introducing three types of spam I'm getting.
Spam from free email accounts
But wait! That's not new. We've seen email originating from Yahoo for many years.
What is new, the fact that increasing number of spammers are creating tons of accounts into Gmail or Outlook.com. As both free-of-charge services limit the amount of email one can send during 24 hours into 500, quite a lot of accounts are needed. As example, see Gmail's Limits for sending & getting mail.
The reason those two services are used for spamming is the good reputation and both are well accepted among postmasters. As an example I won't block neither of them and consider both being as reliable. As end result, majority of spam I receive is from either of those. To weed of bad ones from good ones, traditional spam-filtering will do the trick.
What's good is both Microsoft and Google are really good in detecting ill behaviour and stopping the activity. However, criminals are really good in spending their 500 mails effectively to make their behaviour as "natural" as possible. Neither service provider isn't fast/good enough to detect and stop the activity. Unfortunately.
SMS / iMessage spam
Getting spam via SMS isn't new, but getting junk from Apple iMessage is. Here is a sample:

For non-Finnish readers, the spam says I've been selected for a part time job. Daily salary range is from 10 to 200 euros.
It seems this weird scam is active all over Europe. See iPhone users lament for spam messages via iMessage. Unlike Android, iPhone doesn't have any mechanisms for detecting SMS-spam. Maybe it should?
Probably those spammers didn't even break anything (much). It is likely they've automated something to be able to send crap to everybody. I don't think iMessage protocol isn't broken nor Apple's authentication. All those jerks did was automate the thing to the hilt.
GPG spam
When spam arrives in a heavily encrypted email, then you'll know it must be very important! Here is one I got encrypted with my GPG-key:
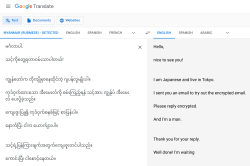
What's weird is the choice of language. That sample is in Burmese, but I got one in Hindi and Telugu. All of which point heavily to Asia and specifically to Indian region. I have no idea why I got those as I definitely need Google Translate to decipher those. ![]()
I have no idea how my address leaked, but the one I'm using is from https://keyserver.pgp.com/, a directory where I choose to publish my PGP / GPG public key. Maybe somebody hacked that? Or just iterated all possible keys. I dunno.
Wrap-up
I see all this as a beginning. Email generally is losing emphasis and Discord / Teams / Slack are gaining on that. Spammers are getting really creative and I'm sure criminals will diversify more. Back-in-the-days Skype spam was a a real thing, see my article from 2016 on that.
Fedora 35: Name resolver fail - Solved!
Monday, April 25. 2022
One of my boxes started failing after working pretty ok for years. On dnf update it simply said:
Curl error (6): Couldn't resolve host name for https://mirrors.fedoraproject.org/metalink?repo=fedora-35&arch=x86_64 [Could not resolve host: mirrors.fedoraproject.org]
Whoa! Where did that come from?
This is one of my test / devel / not-so-important boxes, so it might have been broken for a while. I simply haven't realized it ever happening.
Troubleshooting
Step 1: Making sure DNS works
Test: dig mirrors.fedoraproject.org
Result:
;; ANSWER SECTION:

mirrors.fedoraproject.org. 106 IN CNAME wildcard.fedoraproject.org.

wildcard.fedoraproject.org. 44 IN A 185.141.165.254

wildcard.fedoraproject.org. 44 IN A 152.19.134.142

wildcard.fedoraproject.org. 44 IN A 18.192.40.85

wildcard.fedoraproject.org. 44 IN A 152.19.134.198

wildcard.fedoraproject.org. 44 IN A 38.145.60.21

wildcard.fedoraproject.org. 44 IN A 18.133.140.134

wildcard.fedoraproject.org. 44 IN A 209.132.190.2

wildcard.fedoraproject.org. 44 IN A 18.159.254.57

wildcard.fedoraproject.org. 44 IN A 38.145.60.20

wildcard.fedoraproject.org. 44 IN A 85.236.55.6
Conclusion: Network works (obviously, I just SSHd into the box) and capability of doing DNS-requests works ok.
Step 2: What's in /etc/resolv.conf?
Test: cat /etc/resolv.conf
Result:
options edns0 trust-ad

; generated by /usr/sbin/dhclient-script

nameserver 185.12.64.1

nameserver 185.12.64.2
Test 2: ls -l /etc/resolv.conf
Result:
lrwxrwxrwx. 1 root root 39 Apr 25 20:31 /etc/resolv.conf -> ../run/systemd/resolve/stub-resolv.conf
Conclusion: Well, well. dhclient isn't supposed to overwrite /etc/resolv.conf if systemd-resolver is used. But is it?
Step 3: Is /etc/nsswitch.conf ok?
Previous one gave hint something was not ok. Just to cover all the bases, need to verify NS switch order.
Test: cat /etc/nsswitch.conf
Result:
# Generated by authselect on Wed Apr 29 05:44:18 2020

# Do not modify this file manually.


# If you want to make changes to nsswitch.conf please modify

# /etc/authselect/user-nsswitch.conf and run 'authselect apply-changes'.
d...
# In order of likelihood of use to accelerate lookup.

hosts:      files myhostname resolve [!UNAVAIL=return] dns
Conclusion: No issues there, all ok.
Step 4: Is systemd-resolved running?
Test: systemctl status systemd-resolved
Result:
● systemd-resolved.service - Network Name Resolution

     Loaded: loaded (/usr/lib/systemd/system/systemd-resolved.service; enabled; vendor pr>

     Active: active (running) since Mon 2022-04-25 20:15:59 CEST; 7min ago

       Docs: man:systemd-resolved.service(8)

             man:org.freedesktop.resolve1(5)

             https://www.freedesktop.org/wiki/Software/systemd/writing-network-configurat>

             https://www.freedesktop.org/wiki/Software/systemd/writing-resolver-clients

   Main PID: 6329 (systemd-resolve)

     Status: "Processing requests..."

      Tasks: 1 (limit: 2258)

     Memory: 8.5M

        CPU: 91ms

     CGroup: /system.slice/systemd-resolved.service

             └─6329 /usr/lib/systemd/systemd-resolved
Conclusion: No issues there, all ok.
Step 5: If DNS resolution is there, can systemd-resolved do any resolving?
Test: systemd-resolve --status
Result:
Global

       Protocols: LLMNR=resolve -mDNS -DNSOverTLS DNSSEC=no/unsupported

resolv.conf mode: stub
Link 2 (eth0)

Current Scopes: LLMNR/IPv4 LLMNR/IPv6

     Protocols: -DefaultRoute +LLMNR -mDNS -DNSOverTLS DNSSEC=no/unsupported
Test 2: resolvectl query mirrors.fedoraproject.org
Result:
mirrors.fedoraproject.org: resolve call failed: No appropriate name servers or networks for name found
Conclusion: Problem found! systemd-resolved and dhclient are disconnected.
Fix
Edit file /etc/systemd/resolved.conf, have it contain Hetzner recursive resolvers in a line:
DNS=185.12.64.1 185.12.64.2
Make changes effective: systemctl restart systemd-resolved
Test: resolvectl query mirrors.fedoraproject.org
As everything worked and correct result was returned, verify systemd-resolverd status: systemd-resolve --status
Result now:
Global

         Protocols: LLMNR=resolve -mDNS -DNSOverTLS DNSSEC=no/unsupported

  resolv.conf mode: stub

Current DNS Server: 185.12.64.1

       DNS Servers: 185.12.64.1 185.12.64.2
Link 2 (eth0)

Current Scopes: LLMNR/IPv4 LLMNR/IPv6

     Protocols: -DefaultRoute +LLMNR -mDNS -DNSOverTLS DNSSEC=no/unsupported
Success!
Why it broke? No idea.
I just hate these modern Linuxes where every single thing gets more layers of garbage added between the actual system and admin. Ufff.
Gran Turismo 7
Thursday, March 31. 2022
I've taken a pause from blogging, lots of things happening on the other side of the blog. Been doing tons of coding and maintaining my systems. Aaaand playing GT7:

I've played Gran Turismo since version 1 on PSX, so I wasn't about to skip this one on my PS5. Actually, the point where I bought PS2, PS3 and PS4 were when a new GT was released.
Quite many of my projects are in a much more stable position and I think there is now more time to tell them about here. Let's see.
Sanuli-Konuli RPA-edition
Sunday, February 13. 2022
Previously I wrote a Wordle-solver, Sanuli-Konuli. The command-line -based user-interface isn't especially useful for non-programmers, so I took the solver a bit further and automated the heck out of it.

There is a sample Youtube-video (13+ minutes) of the solver solving 247 puzzles in-a-row. Go watch it here: https://youtu.be/Q-L946fLBgU
If you want to run this automated solver on your own computer against Sanuli, some Python-assembly is required. Process the dictionary and make sure you can run Selenium from your development environment. Solver-script is at https://github.com/HQJaTu/sanuli-konuli/blob/master/cli-utils/sanuli-solver.py
The logic I wrote earlier is rather straightforward and too naive. I added some Selenium-magic to solver to write a screenshot of every win (overwriting previous one) and every failure (timestamped). A quick analysis of 5-6 failures revealed the flaw in my logic. As above screenshot depicts, applying improved logic in a scenario where four out of five letters were known and two guesses were still left, changing only one letter may or may not work, but depends on luck before running out of guesses. In improved approach would be to write detect code and when this scenario is detected, doing a completely different kind of "guess" throwing away those four known letters, determining a set of potential letters from set of words and finding a word from dictionary containg most of the unknown letters which would fit would be much smarter approach. Then one letter should be green and rest not, then doing a last guess with that letter should solve the puzzle. So, my logic is good until a point where one letter is missing and then its fully luck-based one.
In above game, guess #4 was "liima" with M as not being correct. At that point of the puzzle, potentially matching words "liiga, liina, liira" would result in potential letters G, N and R, then guess #5 woud be "rangi" (found in dictionary). Making such a guess would reveal letter N as the correct missing letter making guess #6 succeed with "liina".
As I said, this logic has not been implemented and I don't think improving the guessing algorithm any further is beneficial. I may take a new project to work with.
Standard disclaimer applies: If you have any comments or feedback, please drop me a line.
Databricks CentOS 8 stream containers
Monday, February 7. 2022
Last November I created CentOS 8 -based Databricks containers.
At the time of tinkering with them, I failed to realize my base was off. I simply used the CentOS 8.4 image available at Docker Hub. On later inspection that was a failure. Even for 8.4, the image was old and was going to be EOLd soon after. Now that 31st Dec -21 had passed I couldn't get any security patches into my system. To put it midly: that's bad!
What I was supposed to be using, was the CentOS 8 stream image from quay.io. Initially my reaction was: "What's a quay.io? Why would I want to use that?"
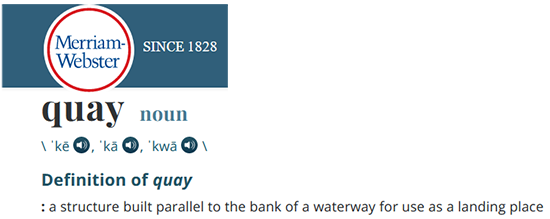
Thanks Merriam-Webster for that, but it doesn't help.
On a closer look, it looks like all RedHat container -stuff is not at docker.io, they're in quay.io.
Simple thing: update the base image, rebuild all Databricks-images and done, right? Yup. Nope. The images built from steam didn't work anymore. Uff! They failed working that bad, not even Apache Spark driver was available. No querying driver logs for errors. A major fail, that!
Well. Seeing why driver won't work should be easy, just SSH into the driver an take a peek, right? The operation is documented by Microsoft at SSH to the cluster driver node. Well, no! According to me and couple of people asking questions like How to login SSH on Azure Databricks cluster, it is NOT possible to SSH into Azure Databricks node.
Looking at Azure Databricks architecture overview gave no clues on how to see inside of a node. I started to think nobody had ever done it. Also enabling diagnostic logging required the premium (high-prized) edition of Databricks, which wasn't available to me.
At this point I was in a full whatta-hell-is-going-on!? -mode.
Digging into documentation, I found out, it was possible to run a Cluster node initialization scripts, then I knew what to do next. As I knew it was possible to make requests into the Internet from a job running in a node, I could write an intialization script which during execution would dig me a SSH-tunnel from the node being initialized into something I would fully control. Obiviously I chose one of my own servers and from that SSH-tunneled back into the node's SSH-server. Double SSH, yes, but then I was able to get an interactive session into the well-protected node. An interactive session is what all bad people would want into any of the machines they'll crack into. Tunneling-credit to other people: quite a lot of my implementation details came from How does reverse SSH tunneling work?
To implement my plan, I crafted following cluster initialization script:
LOG_FILE="/dbfs/cluster-logs/$DB_CLUSTER_ID-init-$(date +"%F-%H:%M").log"

exec >> "$LOG_FILE"


echo "$(date +"%F %H:%M:%S") Setup SSH-tunnel"

mkdir -p /root/.ssh

cat > /root/.ssh/authorized_keys <<EOT

ecdsa-sha2-nistp521 AAAAE2V0bV+TrsFVcsA==

EOT


echo "$(date +"%F %H:%M:%S") Install and setup SSH"

dnf install openssh-server openssh-clients -y

/usr/libexec/openssh/sshd-keygen ecdsa

/usr/libexec/openssh/sshd-keygen rsa

/usr/libexec/openssh/sshd-keygen ed25519

/sbin/sshd


echo "$(date +"%F %H:%M:%S") - Add p-key"


cat > /root/.ssh/nobody_id_ecdsa <<EOT

-----BEGIN OPENSSH PRIVATE KEY-----

b3BlbnNzaC1rZXktdjEAAAAABG5vbmUAAAAEbm9uZQAAAAAAAAABAAAA

1zaGEyLW5pc3RwNTIxAAAACG5pc3RwNTIxAAAAhQQA2I7t7xx9R02QO2

rsLeYmp3X6X5qyprAGiMWM7SQrA1oFr8jae+Cqx7Fvi3xPKL/SoW1+l6

Zzc2hkQHZtNC5ocWNvZGVzaG9wLmZpAQIDBA==

-----END OPENSSH PRIVATE KEY-----

EOT

chmod go= /root/.ssh/nobody_id_ecdsa

echo "$(date +"%F %H:%M:%S") - SSH dir content:"


echo "$(date +"%F %H:%M:%S") Open SSH-tunnel"

ssh -f -N -T \

  -R22222:localhost:22 \

  -i /root/.ssh/nobody_id_ecdsa \

  -o StrictHostKeyChecking=no \

  nobody@my.own.box.example.com -p 443
Note: Above ECDSA-keys have been heavily shortened making them invalid. Don't copy passwords or keys from public Internet, generate your own secrets. Always! And if you're wondering, the original keys have been removed.
Note 2: My init-script writes log into DBFS, see exec >> "$LOG_FILE" about that.
My plan succeeded. I got in, did the snooping around and then it took couple minutes when Azure/Databrics -plumbing realized driver was dead, killed the node and retried the startup-sequence. Couple minutes was plenty of time to eyeball /databricks/spark/logs/ and /databricks/driver/logs/ and deduce what was going on and what was failing.
Looking at simplified Databricks (Apache Spark) architecture diagram:
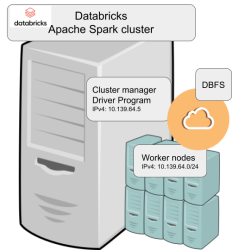
Spark driver failed to start because it couldn't connect into cluster manager. Subsequently, cluster manager failed to start as ps-command wasn't available. It was in good old CentOS, but in base stream it was removed. As I got progress, also ip-command was needed. I added both and got the desired result: a working CentOS 8 stream Spark-cluster.
Notice how I'm specifying HTTPS-port (TCP/443) in the outgoing SSH-command (see: -p 443). In my attempts to get a session into the node, I deduced following:
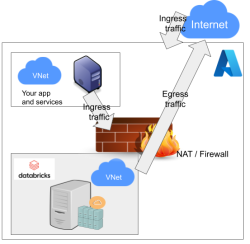
As Databricks runs in it's own sandbox, also outgoing traffic is heavily firewalled. Any attempts to access SSH (TCP/22) are blocked. Both HTTP and HTTPS are known to work as exit ports, so I spoofed my SSHd there.
There are a number of different containers. To clarify which one to choose, I drew this diagram:
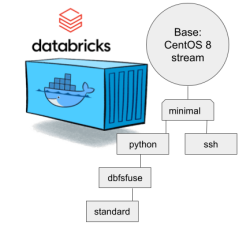
In my sparking, I'll need both Python and DBFS, so my choice is dbfsfuse. Most users would be happy with standard, but it only adds SSHd which is known not to work. ssh has the same exact problem. The reason for them to exist, is because in AWS SSHd does work. Among the changes from good old CentOS into stream is lacking FUSE. Old one had FUSE even in minimal, but not anymore. You can access DBFS only with dbfsfuse or standard from now on.
If you want to take my CentOS 8 brick-containers for a spin, they are still here: https://hub.docker.com/repository/docker/kingjatu/databricks, now they are maintained and get security patches too!
Sanuli-konuli - Wordle solver
Sunday, February 6. 2022
Wordle is a popular word game. In just a couple months the popularity rose so fast New York Times bought the whole thing from Josh Wardle, the original author.
As always, a popular game gets the cloners moving. Also another thing about Worlde is the English language. What if somebody (like me) isn't a native speaker. It is very difficult in the middle of a game to come up with a word like "skirl". There is an obvious need for localized versions. In Finland, such a clone is Sanuli. A word-game, a clone of Wordle, but with Finnish words.
From software engineering point-of-view, this is a simple enough problem to solve. Get a dictionary of words, filter out all 5-letter words, store them to a list for filtering by game criteria. And that's exactly what I did in my "word machine", https://github.com/HQJaTu/sanuli-konuli/.
The code is generic to support any language and any dictionary.
Example Wordle game

Attempt #1
To get the initial word, I ran:
./cli-utils/get-initial-word.py words/nltk-wordnet2021-5-words_v1.dat.
Command's output was a randomly selected word "mucor".
As seen above, that resulted all gray tiles. No matches.
Attempt #2
Second attempt with excluded lettes:
get-initial-word.py words/nltk-wordnet2021-5-words_v1.dat "mucor".
Command's output was a randomly selected word "slake".
This time game started boucing my way! First letter 'S' is on green and two yellow ones for 'L' and 'K'.
Attempt #3
Third attempt wasn't for initial word, this time I had clues to narrow down the word. A command to do this with above clues would be:
find-matching-word.py words/nltk-wordnet2021-5-words_v1.dat "s...." "ae" ".l.k."
Out of multiple possible options, a randomly selected word matching criteria was: "skirl"
Nice result there! Four green ones.
Note: Later, when writing this blog post, I realized the command has an obvious flaw. I should have excluded all known gray letters "mucore". Should my command have been:
find-matching-word.py words/nltk-wordnet2021-5-words_v1.dat "s...." "mucorae" ".l.k."
The ONLY matching word would have been "skill" at this point.
Attempt #4 - Win!
Applying all the green letters, the command to run would be:
find-matching-word.py words/nltk-wordnet2021-5-words_v1.dat "ski.l" "ar" "....."
This results in a single word: "skill" which will win the game!
Finally
I've been told this brute-force approach of mine takes tons of joy out of the word-game. You have to forgive me, my hacker brain is wired to instantly think of a software solution to a problem not needing one. ![]()
pkexec security flaw (CVE-2021-4034)
Wednesday, January 26. 2022
This is something Qualsys found: PwnKit: Local Privilege Escalation Vulnerability Discovered in polkit’s pkexec (CVE-2021-4034)
In your Linux there is sudo and su, but many won't realize you also have pkexec which does pretty much the same. More details about the vulnerability can be found at Vuldb.
I downloaded the proof-of-concept by BLASTY, but found it not working in any of my systems. I simply could not convert a nobody into a root.
Another one, https://github.com/arthepsy/CVE-2021-4034, states "verified on Debian 10 and CentOS 7."
Various errors I could get include a simple non-functionality:
[~] compile helper..

[~] maybe get shell now?

The value for environment variable XAUTHORITY contains suscipious content


This incident has been reported.
Or one which would stop to ask for root password:
[~] compile helper..

[~] maybe get shell now?

==== AUTHENTICATING FOR org.freedesktop.policykit.exec ====

Authentication is needed to run `GCONV_PATH=./lol' as the super user

Authenticating as: root
By hitting enter to the password-prompt following will happen:
Password:

polkit-agent-helper-1: pam_authenticate failed: Authentication failure

==== AUTHENTICATION FAILED ====

Error executing command as another user: Not authorized


This incident has been reported.
Or one which simply doesn't get the thing right:
[~] compile helper..

[~] maybe get shell now?

pkexec --version |

       --help |

       --disable-internal-agent |

       [--user username] [PROGRAM] [ARGUMENTS...]


See the pkexec manual page for more details.


Report bugs to: http://lists.freedesktop.org/mailman/listinfo/polkit-devel

polkit home page: <http://www.freedesktop.org/wiki/Software/polkit>
Maybe there is a PoC which would actually compromise one of the systems I have to test with. Or maybe not. Still, I'm disappointed.
EU Digital COVID Certificate usage in the World
Saturday, January 22. 2022
In my previous post, I gave some statistics about which countries have issued how many X.509 certificates for signing the COVID Certificates. Also, I realized how adoption of this open-source system in non-EU -countries is wide. Actually in the list of countries using the system, there are more non-EU -countries than EU-countries.
As I wanted to learn how to progammatically alter SVG-files (they are essentially XML), I decided to write some code. Here is the result:
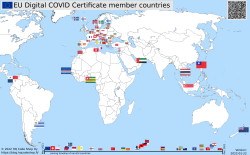
Updated map is available at https://blog.hqcodeshop.fi/vacdec-map/, also in SVG-format. Source code of how all this is created is at: https://github.com/HQJaTu/vacdec-map
The process begins with importing maps of the World from Wikipedia page Gallery of sovereign state flags (using Wikipedia API, of course). There is one shortcoming, Faroe Islands map isn't in the list as it is not a sovereign state. It is downloaded separately.
Then the flags are mapped against ISO-3166 country list. Again, some manual helping is needed, list of flags doesn't use all of the exact country names from ISO-standard. Good thing about this is, the need to do this only once. Flags and countries don't change that often.
Fetching the X.509 certificates for signing is something my code has successfully done since August -21. So, a list of known COVID Certificate signing certificates is fetched. A simple iteration is done to those X.509 certificates to find out the oldest date of any country. That date is assumed to be the system adoption date. In reality it is not, but for this coarse visualisation that accuracy will do.
Now there is a repository of all the flags with their appropriate ISO-3166-2 codes and all COVID signing certificates with their issuing dates. Then all country flags are placed on top of a World map, which has a second part in the bottom, a timeline for adoption date for non-EU -countries. Drawing EU-countries there is non-interesting as they pretty much did it all at the same time. The map SVG comes from Wikimedia Commons Carte du monde vierge (Allemagnes séparées).svg.
For optional PNG-rendering, I'm using Inkscape. There are failing attempts to do SVG-rendering with CairoSVG, PyVips and Html2Image. First two failed on accuracy, the rendering result was missing parts, had incorrect scales on various parts and was generally of low quality. Html2Image kinda worked, but wasn't applicable to be run on a server.
EU Digital COVID Certificate trust-lists
Sunday, January 9. 2022
It seems vacdec is one of my most popular public projects. I'm getting pull requests, comments and questions from number of people.
Thank you for all your input! Keep it coming. All pull requests, bug fixes and such are appreciated.
Briefly, this is about decoding EU digital COVID certificate QR-codes. For more details, see my blog post from August -21 or the Python source-code at https://github.com/HQJaTu/vacdec.
Quote from my original post: "the most difficult part was to get my hands into the national public certificates to do some ECDSA signature verifying".
My original code has tool called fetch-signing-certificates.py to do the heavy lifting. It fetches a list of X.509 certificates which are used in signing the QR-code's payload. That list is stored into your hard drive. When you do any COVID certificate decoding, that list is iterated with purpose of finding the key used when the QR-code was generated. If the trust-list contains the cert, signature will be verified and a result from that will be given.
To state the obvious: That precious trust list will contain all signature certificates from all countries using the same EU COVID certificate QR-code system. The list of countries is long and includes all 27 EU-countries. Among participating non-EU countries are: Andorra, United Arab Emirates, Swizerland, Georgia, Iceland, Liechtenstein, Morocco, Norway, Singapore, San Marino, Ukraine, Vatican. Looking at the country-list, it is easy to see how EU COVID passport is a triumph of open-source!
On the flipside, getting signing certificates from all those countries requires some effort. A participating country first needs to generate and secure (emphasis: SECURE the private key) required number of ECDSA public/private key -pairs to all organizations/parties doing the COVID certificate issuing. Of those key-pairs COVID certificate signing X.509 certificates can be created and public certificate will be added to the common trust-list.
As an example, in my home country of Finland up until recently there used to be one (1 as in single) X.509 cert for entire nation of 5,6 million people, now there is two. Ultimately, pretty much everybody gets their COVID certs signed from a single cert. This is because in Finland issuing the certs is centralized. On the other hand bigger countries need to have multiple X.509 certs as their government organization may be different and less centralized. A good example is Germany, the most populous countru in Europe and a federal state consisting of 17 constituent states. Having single cert would not make sense in their government.
Moving on. Countries deliver their public certificates into some EU "central repository". It is not known how and where this is, but I'm assuming one has to exist. From this repository the participating countries are allowed the retrieve the trust-list for their verification needs. Subsequently the list is distributed by the country to those organizations and people needing to do COVID certificate verification. Remember "get my hands into the national public certificates"? Not all countries do the distributing very easily nor publicly. Some do, and that's where I get my data from.
Now that there is access of trust-lists, factor in time. That little devil is always messing everything up! ![]()
In August, when I first download the Austrian list, the entire list had 150+ valid signing certs. Early December -21 there was 192. Early January -22 there was already 236. Today, the Austrian list contains 281 signing certificates. However, Swedish list has only 267. Argh! I'd really really need access to that EU endpoint for trust lists.
As the Austrian list is larger, here are the per-country statistics of 9th January 2022, expect this to change almost daily:
| Country ISO 3166-2 code | Count signing certs | EU member country name | Participating country name | Test data exists |
|---|---|---|---|---|
| DE | 57 | Germany | x | |
| FR | 50 | France | x | |
| ES | 23 | Spain | x | |
| NL | 21 | Netherlands | x | |
| CH | 13 | Switzerland | x | |
| MT | 12 | Malta | x | |
| LU | 8 | Luxembourg | x | |
| GB | 6 | UK | ||
| LI | 6 | Liechtenstein | x | |
| NO | 6 | Norway | x | |
| IT | 4 | Italy | x | |
| NZ | 4 | New Zealand | ||
| LT | 3 | Lithuania | x | |
| LV | 3 | Latvia | x | |
| MC | 3 | Monaco | ||
| PL | 3 | Poland | x | |
| AL | 2 | Albania | ||
| AT | 2 | Austria | x | |
| BE | 2 | Belgium | x | |
| BG | 2 | Bulgaria | x | |
| CZ | 2 | Czech Republic | x | |
| DK | 2 | Denmark | x | |
| EE | 2 | Estonia | x | |
| FI | 2 | Finland | x | |
| FO | 2 | Faroe Islands | ||
| GE | 2 | Georgia | x | |
| HR | 2 | Croatia | x | |
| IE | 2 | Ireland | x | |
| IS | 2 | Iceland | x | |
| MK | 2 | North Macedonia | ||
| SE | 2 | Sweden | x | |
| SG | 2 | Singapore | x | |
| AD | 1 | Andorra | x | |
| AE | 1 | United Arab Emirates | x | |
| AM | 1 | Armenia | ||
| CV | 1 | Cabo Verde | ||
| CY | 1 | Cyprus | x | |
| GR | 1 | Greece | x | |
| HU | 1 | Hungary | ||
| IL | 1 | Israel | ||
| LB | 1 | Lebanon | ||
| MA | 1 | Morocco | x | |
| MD | 1 | Moldova | ||
| ME | 1 | Montenegro | ||
| PA | 1 | Panama | ||
| PT | 1 | Portugal | x | |
| RO | 1 | Romania | x | |
| RS | 1 | Serbia | ||
| SI | 1 | Slovenia | x | |
| SK | 1 | Slovakia | x | |
| SM | 1 | San Marino | x | |
| TG | 1 | Togo | ||
| TH | 1 | Thailand | ||
| TN | 1 | Tunisia | ||
| TR | 1 | Turkey | ||
| TW | 1 | Taiwan | ||
| UA | 1 | Ukraine | x | |
| UY | 1 | Uruguay | ||
| VA | 1 | Vatican | x | |
| 281 | 27 | 32 | 38 |
Any test data provided by participating country is at: https://github.com/eu-digital-green-certificates/dgc-testdata
Things to note from above table:
- Countries have their government arranged with lot of different variations.
- More certificates --> more things to secure --> more things to be worried about.
- In Germany somebody got access to a cert and issued QR-codes not belonging to actual persons.
- Lot of countries outside EU chose to use this open-source the system.
- Assume more countries to join. No need for everybody to invent this system.
- Lack of test data
- In EU, it is easy to make test data mandatory. Outside EU not so much.
- Way too many countries have not provided any sample certificates.
- Faroe Islands have 50k people, two certs.
- Okokok. It makes sense to have already issued two. If one cert leaks or gets "burned" for any reason, it is fast to re-issue the COVID certificates by using the other good cert.
- Country stats:
- Liechtenstein has 40k people, 6 certs! Whooo!
- Malta and Cabo Verde have 500k people. Maltese need 12 certs for all the signing! In Cabo Verde they have to do with only one.
- Vatican is the smallest country in the entire World. Single cert needed for those 800+ persons living there.
- Italy has 60M people, they manage their passes with only 4 certs. Nice!
- In total 59 countries participating this common system. Adoption is wide, system is well designed.
Also note how "EU" COVID passport has more participating countries outside EU. ![]()
True testament of open-source, indeed!
Playstation 5
Monday, December 27. 2021
With bit of a lucky strike, I got a possibility of purchasing one. Ok, lots of luck happened. Bottom line: now I own one of the most coveted gaming consoles. For anybody reading this in 2023 (or after) this entire lack of Playstations will be mostly ignored.
Notice the power button is the at the bottom of the PS5 unit. From top to down there are two ports USB-A and USB-C. Then there are two buttons, eject and power. The glare from plastic makes taking pictures of the buttons very difficult, so the power button is not that well visible.
Two USB-A 3.0 ports, gigabit Ethernet, HDMI and power IEC C7/C8 -connector.
Controller charger port has chaged, again:

In PS3, there was mini-USB, PS4 had micro-USB and now there is USB-C. For an owner of all three mentioned consoles, I just "love" finding the correct cable for charging.
The good thing is, this controller is fully supported in Windows via DS4Windows to enable X-box controller emulation:

The bad thing about DS4Windows is for the software author Mr. Nickles (aka. Ryochan7) got pissed about the issues posted to the project's GitHub page https://github.com/Ryochan7/DS4Windows, so he decided to cease working on it. Luckily there are fans of the software, hence fork https://github.com/shazzaam7/DS4Windows. It is still uknown if this software will be supported and if yes, for how long.
After getting the thing running, the lack of content hit me. Pretty much everything I tried was from my PS4. For example Gran Turismo Sport (the PS4-version) works ok. And on March 4th I will get more native-PS4 content in form of Gran Turismo 7. But until then, it's just a super-fast PS4 for me.
Update:
I did pre-order Gran Turismo 7 which is to be released in beginning of March 2022.
Write Clean Code — or else …
Monday, December 13. 2021
Anybody who has written any significant amount of code into a software project will (painfully) eventually learn how the code should have been written in its early days.This phenomenon has happened to all of us and will keep happening as long as any code is being maintained.
Experienced developers know how to fight this code "rot", or debt. Here is a really good diagram on how to maintain code quality.
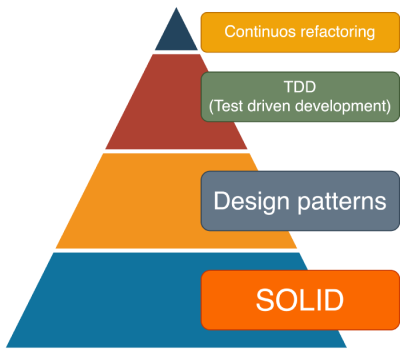
Credit: Artem Diashkin, 2020, https://medium.com/litslink/solid-software-design-principles-ac5be34a6cd5
So, four things:
- You must work with you code all the time to improve it. Preferably not the same exact code, but your codebase in general.
- Without automated tests, you'll be lost. Getting 100% coverage isn't easy and not the actual target even. Have SOME coverage at minimum.
- Implement sensible design patterns, have the factory factory if its applicable for what you're doing. Avoid over-kill, you don't need a factory for everything as it makes your #2 difficult requiring more #1.
- S.O.L.I.D.
- Single Responsibility Principle
- Open Closed Principle
- Liskov Substitution Principle
- Interface Segregation Principle
- Dependency Inversion Principle
Especially #4 is very difficult. Nevertheless, you need to aim towards it.
As reality bites, what happens if you don't do all of the above. Well ... shit will hit the fan. A really good example of things going wrong is Log4Shell.
Christine Dodrill in her post "Open Source" is Broken or: Why I Don't Write Useful Software Unless You Pay Me explains how huge corporations use work of non--paid volunteers while failing to direct any money towards them. When things go wrong or seriously wrong, everybody will blame those non-paid people for not doing their jobs properly. Note how I write "jobs". It was never their job, it was their hobby, something they do in their spare time.
Whatever code you work on, eventually your end result will look as this XKCD #2347 depicts:
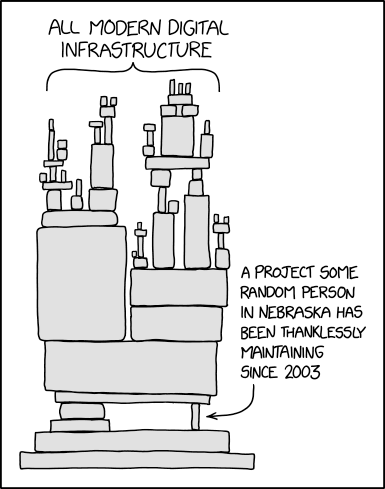
When that tiny piece crumbles, the poor Nebraskan will get the blame. Nobody offered to help before it happened, though. We had a taste of that in 2016, How one programmer broke the internet by deleting a tiny piece of code. Last month it happened again.
Everybody wanted to use Apache Log4j, nobody wanted to pay for it (actually, three users did). What these non-paid volunteers maintaining the code didn't do was have the discipline. Pyramid of clean code wasn't applied, or wasn't properly applied. They didn't bother, entire project was simply something they did on their free time. With lack of discipline, legacy version's and what not, the worst was not applying S.O.L.I.D.'s S. The same piece of code that should write the requested log entry to a log destination also does parsing of the message. That's two responsibilities, not single.
From proof-of-concept Java-code:
log.info("This is what we got:{}", someData);
Whatever the variable someData contains, by Single Responsibility Principle, no parsing must be done and any input, for example ${jndi:ldap://127.0.0.1/a}, must be taken as literal. Because of test code coverage, lack of refactoring, not using design patterns properly and lack of S.O.L.I.D. design all hell broke loose.
Internet burst into flames!
Next time you, as a software architect, designed, developer, whatever plan on adding an implicit functionality to your existing code, make sure everybody who will ever use your new toy knows of this dual-responsbility. Inform all of this implicit functionaly and how it will effect. Don't hide a parser somewhere where there should be no parser, have it a separate operation even if it will break prople's legacy applications. Doing this will keep your days boring and Internet not bursting into flames. The bad thing, obviously, is your notoriety will reamain low as nobody will ever know of your really cool feature.
My advice is:
Have it that way rather than being the underpaid guy whose code broke everything. Really, broke everything.
Decoding EU Digital COVID Certificate into human-readable format
Saturday, December 11. 2021
Since I started working with vacdec, something has been bugging me. I quite couldn't put my finger on it at first. As a reader asked me to decode some unix timestamps from CBOR payload into human-readable format, it hit me. The output needs to be easily understandable!
Now there exists a version with that capability (see: https://github.com/HQJaTu/vacdec for details).
Using Finnish government provided test data, this is the raw CBOR/JSON data:
{

  "1": "FI",

  "4": 1655413199,

  "6": 1623833669,

  "-260": {

    "1": {

      "v": [

        {

          "ci": "URN:UVCI:01:FI:DZYOJVJ6Y8MQKNEI95WBTOEIM#X",

          "co": "FI",

          "dn": 1,

          "dt": "2021-03-05",

          "is": "The Social Insurance Institution of Finland",

          "ma": "ORG-100001417",

          "mp": "EU/1/20/1525",

          "sd": 1,

          "tg": "840539006",

          "vp": "J07BX03"

        }

      ],

      "dob": "1967-02-01",

      "nam": {

        "fn": "Testaaja",

        "gn": "Matti Kari Yrjänä",

        "fnt": "TESTAAJA",

        "gnt": "MATTI<KARI<YRJAENAE"

      },

      "ver": "1.0.0"

    }

  }

}
Exactly the same with improved version for vacdec:
{

  "issuer": "Finland",

  "expiry:": "2022-06-16 20:59:59",

  "issued:": "2021-06-16 08:54:29",

  "Health certificate": {

    "1": {

      "Vaccination": [

        {

          "Unique Certificate Identifier: UVCI": "URN:UVCI:01:FI:DZYOJVJ6Y8MQKNEI95WBTOEIM#X",

          "Country of Vaccination": "Finland",

          "Dose Number": 1,

          "Date of Vaccination": "2021-03-05",

          "Certificate Issuer": "The Social Insurance Institution of Finland",

          "Marketing Authorization Holder / Manufacturer": "Janssen-Cilag International",

          "Medicinal product": "EU/1/20/1525: COVID-19 Vaccine Janssen",

          "Total Series of Doses": 1,

          "Targeted disease or agent": "COVID-19",

          "Vaccine or prophylaxis": "COVID-19 vaccines"

        }

      ],

      "Date of birth": "1967-02-01",

      "Name": {

        "Surname": "Testaaja",

        "Forename": "Matti Kari Yrjänä",

        "ICAO 9303 standardised surname": "TESTAAJA",

        "ICAO 9303 standardised forename": "MATTI<KARI<YRJAENAE"

      },
      "Version": "1.0.0"

    }

  }

}
Much easier on the eye. Raw data can still be displayed, but is not the default. Use switch --output-raw to get original result.
There are comments in my Python-code, but for those wanting to eyeball the specs themselves, go see https://github.com/ehn-dcc-development/ehn-dcc-schema and https://ec.europa.eu/health/sites/default/files/ehealth/docs/digital-green-certificates_v1_en.pdf for exact details of CBOR header and payload fields. The certificate JSON-schema describes all used value-sets.
Note: Especially JSON-schema is a living thing. If you read this in the future, something might have changed.
Please, drop me a line when that happens.
Passwords, December 2021 Follow up
Monday, December 6. 2021
This year, I've done quite a few posts about passwords. There are still couple days left before 2022 begins, so another piece about passwords is needed.
Most commonly used passwords
For reason not really known to me, at the end of each year there is a reccurring topic: Lists of most commonly used passwords. Here is one example, a Techspot article from November 2021 The most common passwords of 2021 are outright embarrassing. In the article, they're referring to another article by Nordpass Top 200 most common passwords. Nordpass seems to be the password manager software by NordVPN.
In the Nordpass-article, you can select a list to look at. In their back-end the front-app loads the data as JSON from per-country lists. Example: All countries list has URL of https://nordpass.com/json-data/top-worst-passwords/findings/all.json. The one I, as a Finn, was most interested in was the Finnish most used passwords from https://nordpass.com/json-data/top-worst-passwords/findings/fi.json.
Bit of processing with jq to extract top-30 list with use frequency:
jq -r '.[] | "\(.Rank): \(.Password) [\(.User_count)]"' all.json | head -30
Resulting:
 1: 123456      [103170552]

 2: 123456789   [ 46027530]

 3: 12345       [ 32955431]

 4: qwerty      [ 22317280]

 5: password    [ 20958297]

 6: 12345678    [ 14745771]

 7: 111111      [ 13354149]

 8: 123123      [ 10244398]

 9: 1234567890  [  9646621]

10: 1234567     [  9396813]

11: qwerty123   [  8933334]

12: 000000      [  8377094]

13: 1q2w3e      [  8204700]

14: aa12345678  [  8098805]

15: abc123      [  7184645]

16: password1   [  5771586]

17: 1234        [  5544971]

18: qwertyuiop  [  5197596]

19: 123321      [  5168171]

20: password123 [  4681010]

21: 1q2w3e4r5t  [  4624323]

22: iloveyou    [  4387925]

23: 654321      [  4384762]

24: 666666      [  4329996]

25: 987654321   [  4239959]

26: 123         [  3606937]

27: 123456a     [  3493177]

28: qwe123      [  3284938]

29: 1q2w3e4r    [  3197899]

30: 7777777     [  3112046]
Ok. Now we learn using 123456 is really common. Nordpass has recorded 103 million times that password being used.
Q: Where does this password data come from?
Yeah, I know the above list contains really commonly used passwords.Or does it?
From which data do we know the above list to contain top-30 most commonly used passwords? Isn't it kinda suspicious for a password vault company to publish this kind of information? Do they know what passwords do you use? How do they know that 123456 is being used over 100 million times?
There is no answer to the set of questions. Nordpass don't say, so I need to speculate and guess.
Harvesting the passwords people do use
According to John Wetzel of Recorded Future passwords are leaked constantly:
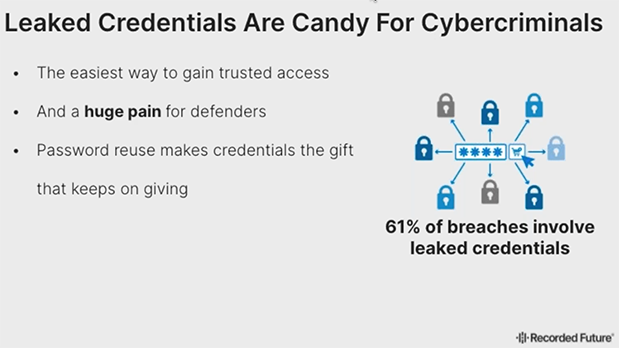

Actually, dumps with leaked passwords are easily available in the net. Even I have millions of passwords from various leaks. That could be one source to measure bad passwords, see which ones are leaked the most.
Q: What if only bad passwords leak?
Either Nordpass cheats and they do know which passwords their customers use, OR there is a case of survivorship bias. The bad password ended up being hijacked, put to a database, leaked and picked up by number of people wanting to see what passwords are being used just because it was poor one to begin with. Back-in-the-days there were cases where users' passwords
I don't know if that's the case. Not disclosing the source makes me wonder if Nordpass's ethics is bad or if their password manger is bad allowing them to see what the password is.
Life after passwords
A lot of systems being used allow users to change password and while doing it put a super simple one. Also a big problem are lists of default passwords of devices sold making the password easily guessable or non-existent as they're commonly known.
In UK they're fighting against passwords hard time: Ban on default passwords in new UK law. Nice! As a lot of device manufacturers choose to go the cheapest way, some legislation will be needed to smack some sense to them. If a device has simple default password, they won't allow selling it. We definitely should have that ruling in effect in the EU-side too!
One mechanism to rid passwords is WebAuthN. As it doesn't seem to get the traction, yet one initiative was launched Decentralized Identity Foundation (DIF). What they're proposing is to kinda reverse the authentication problem and let you control your own data allowing you to define which service will verify you're you to a website you're logging into. That would solve bunch of problems if being commonly used. However, DIF is such a new proposal, we don't know yet if that's going to fly or not.


