PS4 controller in a PC
Wednesday, November 14. 2018
Lately, I've been playing Mudrunner: Spintires a lot. That's a really weird game about logging machinery and mud. For some strange reason I find hauling logs from a lake through mud really entertaining. Why logs are located a "lake" is beyond me.
During the gameplay, player needs to operate number of different heavy machinery. This involves driving a skidder, a heavy truck or operating a crane to get the logs loaded. I tried doing that with a traditional mouse and keyboard config. I kinda managed to do it, but anybody who has driven a real car or truck or flown an airplane using only a keyboard knows, it's very tricky. Then I got a hint, that a Playstation 4 controller is really good with that game.
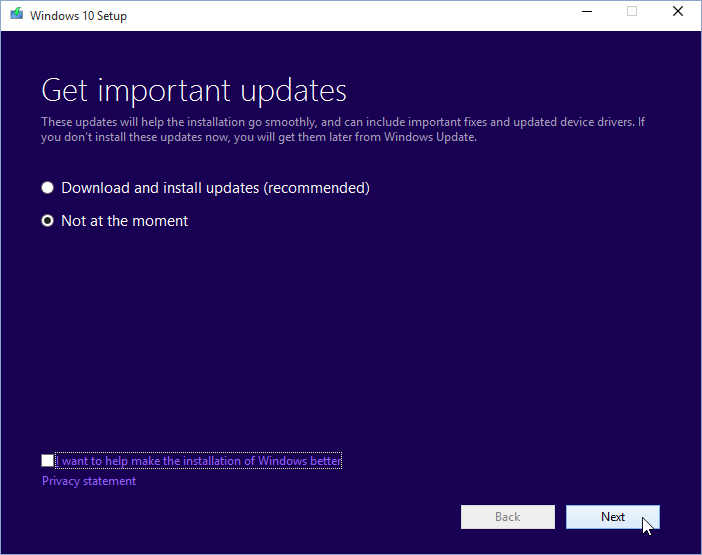
A-haa! All I need to do is hook up my PS4-controller into my PC using ... well... dunno. As Google search engine is a good friend, I found a project DS4Windows from Github https://github.com/Ryochan7/DS4Windows. It will convert a PS4-controller into an Xbox controller, which will work perfectly with most games.
Just hokk up an USB-cable to the controller, run the software, and:
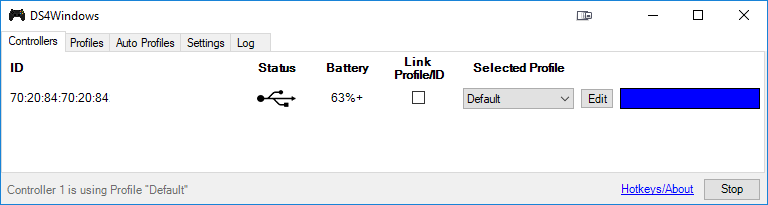
You're done! It really is that simple. Now spinning tires in mud is much much more enjoyable!
Destiny 2 Nightingale error [Solved!]
Thursday, February 22. 2018
As an employee of (a subsidiary of) Activision/Blizzard, last year those who wanted, got keys for Destiny 2.

It never worked! I never go to play it. 
On game launch:


... and BANG! The dreaded Nightingale error:

For past couple of months, that's how much I saw Destiny 2. That isn't much. Darn!
Actually, there is an Internet full of people having the same problem. There are various solutions to, which have worked for some people and for some, not so much.
After doing all the possible things, including throwing dried chicken bones to a magical sand circle, I ran out of options. I had to escalate the problem to Blizzard Support. Since this wasn't a paid game, obviously it didn't reach their highest priority queue. But ultimately the cogs of bureaucracy aligned and I got the required attention to my problem. But ... it was unsovalvable. Or it seemed to be one.
Today, after escalating the problem back to Bungie, they pointed out the problem. My computer didn't manage to reach their CDN, so the game got angry and spat the Nightingale on my face. They also hinted me about what my computer did instead and ...
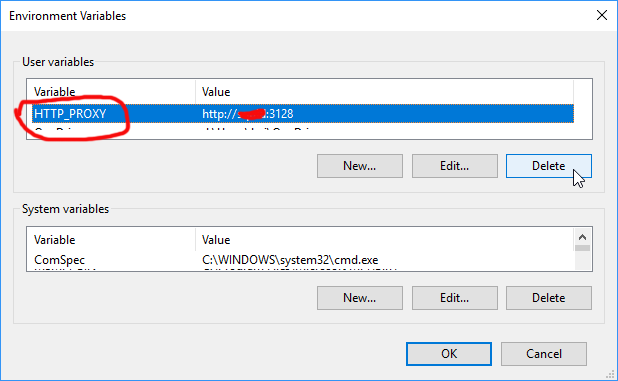
Somewhere in the guts of the Destiny 2, there is a component reading the value of environment variable HTTP_PROXY. I had that set on the PC because of ... something I did for software development years ago.
After deleting the variable, the game started. WHOA!
So, it wasn't my router, DNS, firewall, or ... whatever I attempted before. Problem solved! 
Windows 10 Fall Creators Update breaking sleep
Monday, December 18. 2017
Problem
My gaming PC got the fall update quite late and after that it wouldn't stay in sleep. Something got broken in the update and I had to shut it down every single time I didn't want to use it. Annoying!
Debugging - The Reason
The reason it popped back on wasn't big of a mystery. There is a simple command to query the wake reason:
PS C:\WINDOWS\system32> .\powercfg.exe /waketimers

Timer set by [SERVICE] \Device\HarddiskVolume4\Windows\System32\svchost.exe (SystemEventsBroker) expires at 21:46:29 on 15.12.2017.

Reason: Windows will execute 'NT TASK\Microsoft\Windows\UpdateOrchestrator\Reboot' scheduled task that requested waking the computer.
There are number of articles about How to disable wake timers?, but it doesn't fix this.
A peek into Windows Task Scheduler reveals the ugly fact:
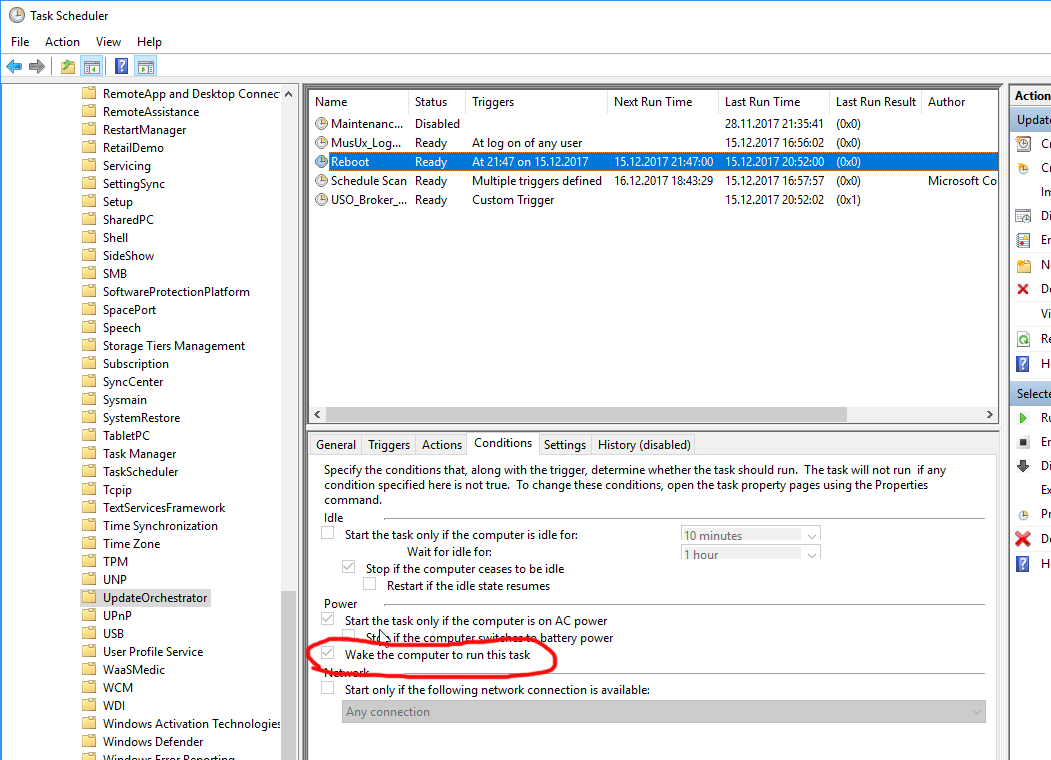
There is a hourly scheduled task, that indeed does run every hour and every goddamn hour it will wake my computer from the sleep to see if it needs to reboot it! Who having half a brain made that engineering decision at Microsoft?!
Attempt 1 - Disable the task - FAIL!
Ok, easy thing, let's disable the task. Or ... let's not. It is impossible! The permissions prevent regular human beings from doing that.
After a while, I bumped into somebody else having this same particular problem. Computer is waking up and: Can't modify task “Reboot” in win10 home. Basically, the idea is to go get Sysinternals PStools. It contains a tool called PSexec, which can do the modification for you.
Like this:
First run a cmd.exe with the PSexec 64-bit version:
PS D:\Users\Downloads> .\PsExec64.exe /s cmd.exe
Now, that permission-barrier is fixed, then:
C:\WINDOWS\system32>schtasks /change /tn "\Microsoft\Windows\UpdateOrchestrator\Reboot" /disable

SUCCESS: The parameters of scheduled task "\Microsoft\Windows\UpdateOrchestrator\Reboot" have been changed.
Now the stupid scheduled task is running hourly as expected, but NOT when your computer is sleeping. But ... guess what! Yes! There is something in Windows 10 internals, that keeps that particular task enabled. It will stay disabled for half an hour or so, but ultimately just using the computer makes the task enabled again, and the problem persists.
Attempt 2 - Remove the allow wake setting - FAIL!
By using the PsExec64.exe-trick, it is possible to get an XML-representation of the task, by running:
schtasks /tn "\Microsoft\Windows\UpdateOrchestrator\Reboot" /xml
in the XML-data there is:
<WakeToRun>true</WakeToRun>
... but I don't know how to change a task from XML-file. You can create a new one, but changing seems impossible.
So, ultimately I had to find something else
Attempt 3 - Powershell - FAIL!
Instead of spawning a new cmd.exe, going for PowerShell has benefits - it can actually edit an existing task. There is a built-in applet Get-ScheduledTask, with appropriate counterpart for setting the properties.
Spawn a nice PowerShell-session with appropriate permissions:
.\PsExec64.exe /s powershell.exe
The shell is kinda dead, for example output is garbled and input editing has issues, but if you know what to run, it will do it given the correct permissions.
As suggested in use powershell to find scheduled tasks set to wake the computer, now it is possible to get a list of Scheduled Tasks which have permission to wake the computer:
PS C:\WINDOWS\system32> Get-ScheduledTask | where {$_.settings.waketorun}
My computer will output a list like:
TaskPath                               TaskName

--------                               --------

\Microsoft\Windows\.NET Framework\     .NET Framework NGEN v4.0.3031...

\Microsoft\Windows\.NET Framework\     .NET Framework NGEN v4.0.3031...

\Microsoft\Windows\SharedPC\           Account Cleanup

\Microsoft\Windows\UpdateOrchestrator\ Reboot
A simple(?) one-liner will edit the task (backtick is the word-wrap operator):
Get-ScheduledTask `

  -TaskPath \Microsoft\Windows\UpdateOrchestrator\ `

  -TaskName Reboot |

  %{ $_.Settings.WakeToRun = $false ; `

  Set-ScheduledTask -TaskName $_.TaskName -TaskPath $_.TaskPath -Settings $_.Settings }
Yes, now the task is enabled, but has the appropriate condition setting for allow wake the computer from sleep disabled.
... aaaand it doesn't work. The same thing altering the enabled-state also resets this setting. Darn!
Attempt 4 - Revoke permissions - Success!
This was driving me mad!
It worked perfectly before the stupid update!
Finally, I found an article from Reddit: Is there ANY way to stop UpdateOrchestrator for turning 'wake the computer to run this task' back on after every cumulative update?
That guy suggested to revoke all permissions from the file. Now the automator which keeps resetting the settings fails to touch the file.
The command I ran in PowerShell is:
icacls $env:windir"\System32\Tasks\Microsoft\Windows\UpdateOrchestrator\Reboot" `

  /inheritance:r `

  /deny "Everyone:F" `

  /deny "SYSTEM:F" `

  /deny "Local Service:F" `

  /deny "Administrators:F"
That simply puts everybody and everything into deny-list for the file-access. AND IT WORKS!
So, looks like ultimately whatever the mechanism is restoring the setting, somebody loves writing to the file, but it doesn't know how to reset the permissions. Which is nice!
I chose to keep the task enabled, but unset the allow wake -setting. So, when my computer is running, the task is ran every hour as expected, but when my computer is sleeping, my computer is sleeping and doesn't wake for nobody.
Microsoft:
Suggestion, eat your own dog food! If anybody at the Windows-team doing power management/task scheduler would run this at home they would know the annoyance instantly.
F-Secure Ultralight Anti-Virus
Sunday, November 5. 2017
Which anti-virus software to use on a Windows 10?
There are a number of software to choose from. Some are free, some are really good at detecting malware, some are award winning, industry recognized pieces of software and there is even one that comes with your Windows 10 installation.
For couple decades, my personal preference has been a product from F-Secure. For those of you expecting me to hand out a recommedation out of numerous F-Secure products, given the multiple computers I operate on daily basis, just picking a single specific product is not possible. Also, I'm a member of their Beta Program and run couple pieces of their software which are not flagged as production-quality.
Here is the part with a recommendation:
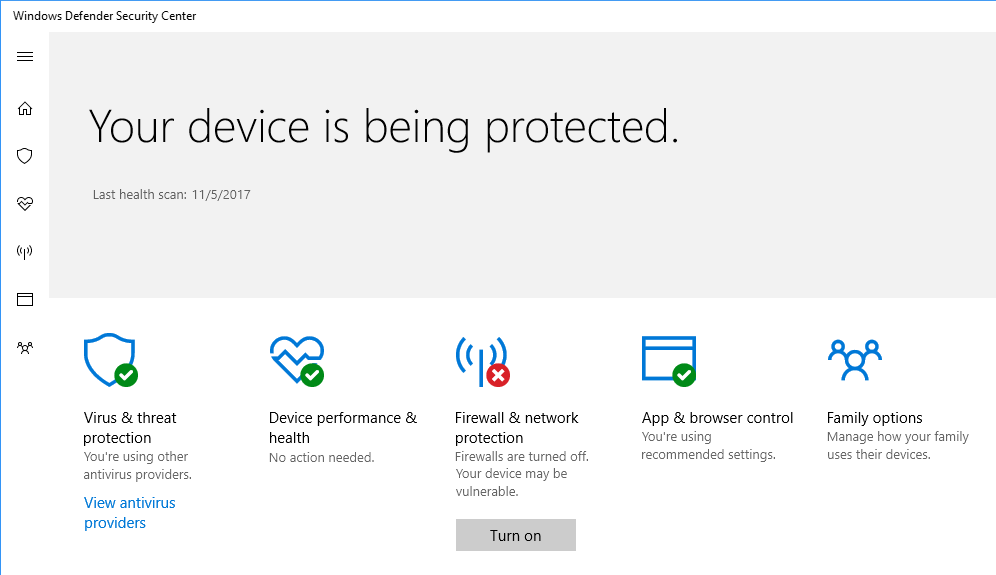
When (for Windows) gets released, that's the one I definitely urge you to try out. The user interface is an oddball, simple, but odd:
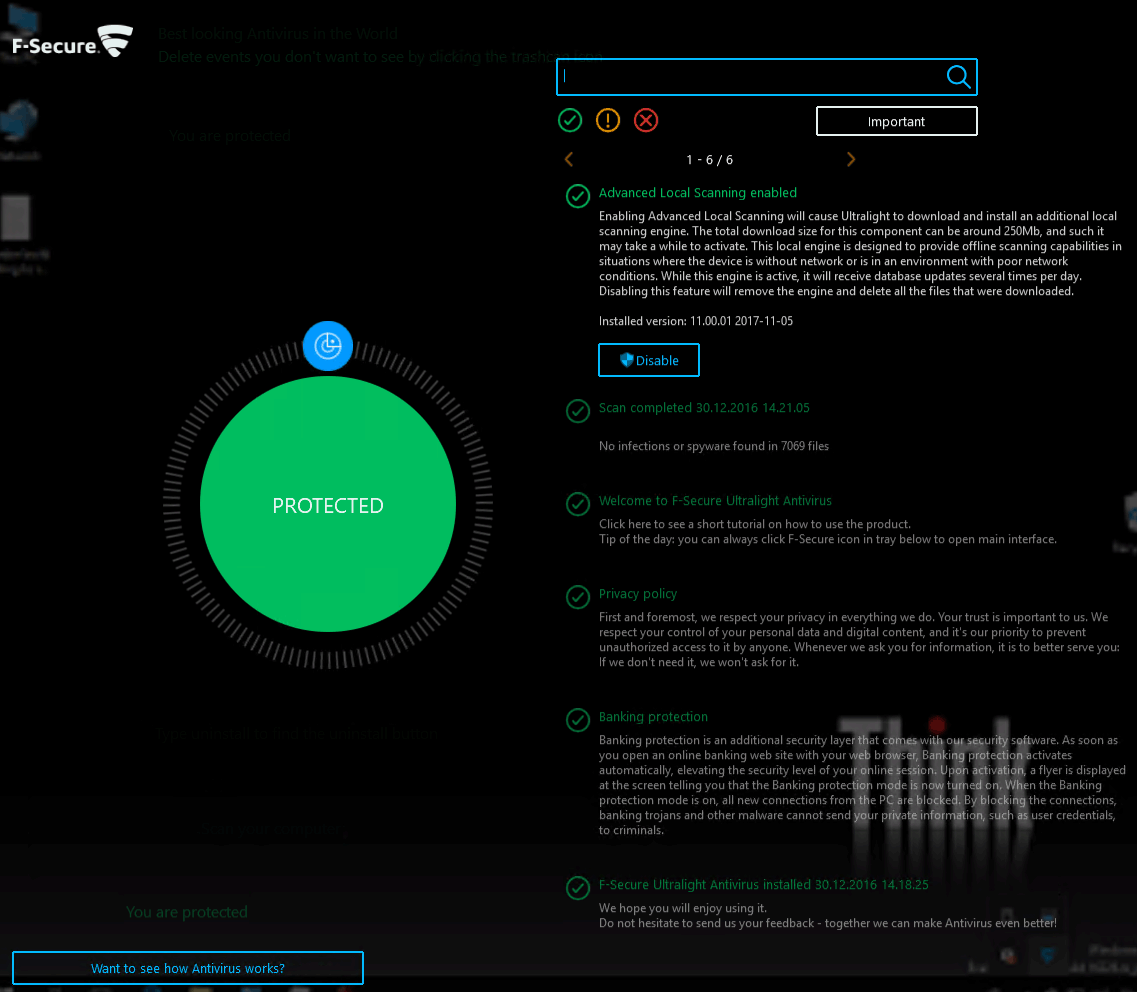
On an initial glance, the first question I had was: "Ok, Where are the settings? Where IS the user interface?!" But that's the beauty of the product, it has no more settings than the above screenshot contains. That's wildly out-of-the-box. Functional, yes. But something completely different. Naturally it's a F-Secure product, and they don't make any compromises with ability to detect malware. It has no firewall or plugins to your browser or anything unnecessary.
When/If the product is ever released, go check it out!
Cygwin X11 with window manager
Saturday, November 4. 2017
Windows 10 update KB3200970 stuck
Thursday, November 10. 2016
Hands down KB3200970 is the worst update I've seen for Windows 10!
In general I hate Windows 10 TiWorker-process. It sucks CPU like there is no tomorrow. I cannot comprehend how difficult it is to determine if an update is needed or not. If you compare to any Linux .deb or .rpm packaging, a simple update check in Windows 10 is way too heavy. I find this kind weird. When Microsoft announced simplifying servicing models for Windows 7 and Windows 8.1, the reasons were to reduce scan times and finding right patches easier. It certainly doesn't feel like it to me.
So, there is Cumulative update for Windows 10 Version 1607 and Windows Server 2016, released November 8, 2016. This is also known as KB3200970 and boy, do people have trouble installing it!
This is what happened to me:
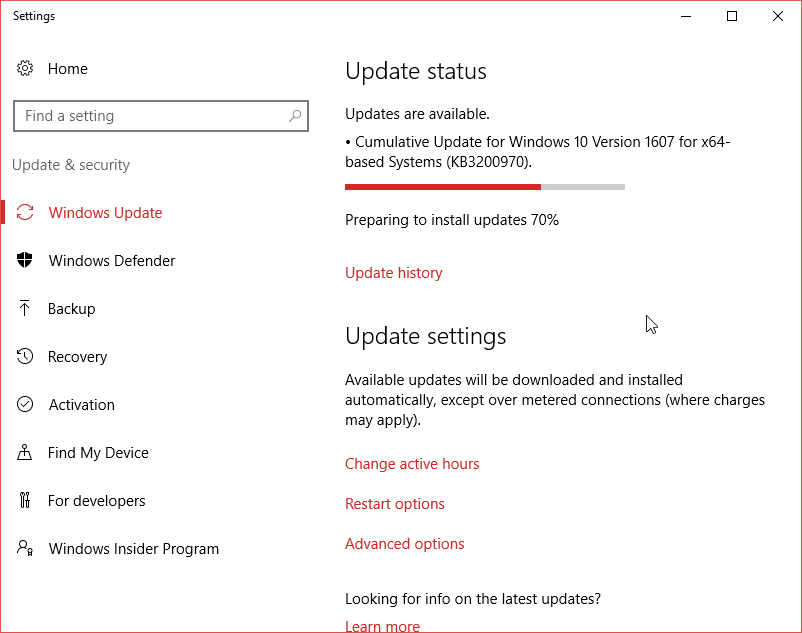
For about 8 hours it was stuck there in the preparing phase. While doing absolutely nothing, this was my CPU-load:

Well done idiots!
Net is full of stories like mine: How to fix Windows Update in Windows 10 if it becomes stuck, Windows 10 KB3200970 issues: install fails, high CPU usage, battery drain and more and Cumulative Update for Windows 10 Version 1607 for x64-based Systems(KB3200970).
The Reddit-article had a link to KB971058, How do I reset Windows Update components? which helped some. I gave it a try and it did help.
First some services needed stopping. This is what you would run as an administrator cmd.exe:
net stop bits

net stop wuauserv

net stop appidsvc

net stop cryptsvc
In my case the wuauserv didn't stop, I had to find the process id for it and kill it manually. After all that, I attempted renaming:
Ren %systemroot%\SoftwareDistribution SoftwareDistribution.bak

Ren %systemroot%\system32\catroot2 catroot2.bak
First one failed, so I don't know what the impact was. Then I ran the entire list:
cd /d %windir%\system32


regsvr32.exe atl.dll

regsvr32.exe urlmon.dll

regsvr32.exe mshtml.dll

regsvr32.exe shdocvw.dll

regsvr32.exe browseui.dll

regsvr32.exe jscript.dll

regsvr32.exe vbscript.dll

regsvr32.exe scrrun.dll

regsvr32.exe msxml.dll

regsvr32.exe msxml3.dll

regsvr32.exe msxml6.dll

regsvr32.exe actxprxy.dll

regsvr32.exe softpub.dll

regsvr32.exe wintrust.dll

regsvr32.exe dssenh.dll

regsvr32.exe rsaenh.dll

regsvr32.exe gpkcsp.dll

regsvr32.exe sccbase.dll

regsvr32.exe slbcsp.dll

regsvr32.exe cryptdlg.dll

regsvr32.exe oleaut32.dll

regsvr32.exe ole32.dll

regsvr32.exe shell32.dll

regsvr32.exe initpki.dll

regsvr32.exe wuapi.dll

regsvr32.exe wuaueng.dll

regsvr32.exe wuaueng1.dll

regsvr32.exe wucltui.dll

regsvr32.exe wups.dll

regsvr32.exe wups2.dll

regsvr32.exe wuweb.dll

regsvr32.exe qmgr.dll

regsvr32.exe qmgrprxy.dll

regsvr32.exe wucltux.dll

regsvr32.exe muweb.dll

regsvr32.exe wuwebv.dll
Lot of them failed, but that's what the KB971058 told to do. Then starting the services:
net start bits

net start wuauserv

net start appidsvc

net start cryptsvc
Still this update tested my patience. It ran couple hours preparing after it announced, it's ready to go install. The installation took yet another couple hours. After the installation was completed and the obligatory reboot was done, Windows still reported that a reboot is required. This update really sucks ass!
Ultimately my laptop spent more than 50 hours to install all this. There were number of retrys and times than I didn't care to look to closely what's going on, so the machine had to wait for user interaction. Still the process was paintakingly long.
Windows 10 upgrade weeks: Done
Saturday, July 30. 2016
I wrote couple of posts about Windows 10 upgrades, but there are no more free upgrades. See:
From now on, you'll just have to pay for it.
There are couple of issues I bumped into while upgrading about dozen PCs last month alone and I'll be blogging about those later. There is no rush, as the free upgrade window closed (pun intended).
Windows 10 weeks: Upgrading Windows 10 with a clean install
Tuesday, July 19. 2016
Before release of Windows 10 build 10565 in October 2015, it was pretty much impossible to do a clean install for upgrading Windows 7 or 8 without first running the upgrade on the target machine. The announcement said:
Device activation improvements: Microsoft has received a lot of feedback from Insiders on making it easier to activate Windows 10 on devices that take advantage of the free upgrade offer to genuine Windows by using existing Windows 7, Windows 8 or Windows 8.1 product keys. If you install this build of the Windows 10 Insider Preview on a PC and it doesn’t automatically activate, you can enter the product key from a qualifying Windows 7, Windows 8 or Windows 8.1 used to activate the prior Windows version on the same device to activate Windows 10 by going to Settings > Update & security > Activation and selecting Change Product Key.
In short: You can whip up your install USB and do a clean install on a machine. If its not an OEM-machine, just enter your Windows 7 or Windows 8 key at install, and the thing should activate. Nice an easy.
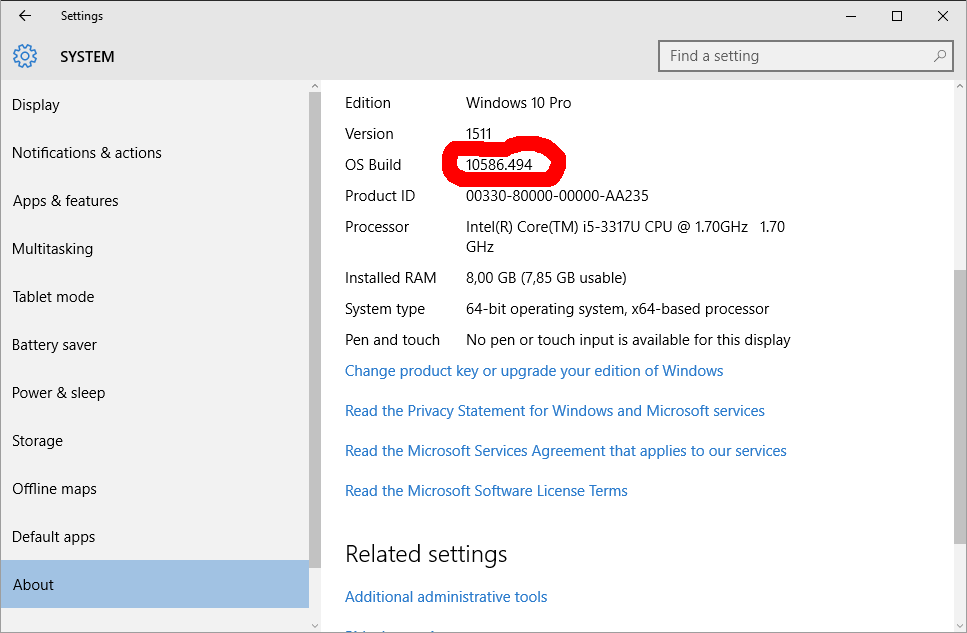
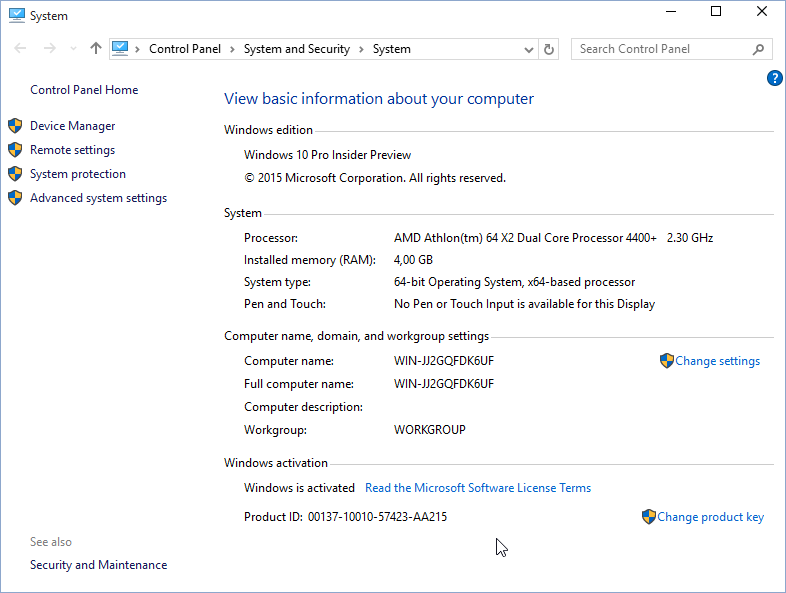
And to clarify the exact build number situation your box is running, go to Settings, System, About. It should have something like this:
As suggested by Ilpo in a comment he left in my blog, there is an alternative method described by article How to Directly Clean Install Windows 10 without having to Upgrade First. Of course I had to try that! And thanks Ilpo, for the suggestion.
What you need is a Windows 10 install USB-stick. Go create one with your favorite method, and if you don't have a favorite, just go for Media creation tool, it can download an install image and store it to your USB-stick for later booting.
When your install-stick is ready, go find <your USB-stick drive>:\support\gatherosstate.exe into the target machine to be upgraded. Do NOT run in at the USB-stick, COPY it. I just dragged the file into my desktop. When ran, the application will create a XML-file containing a fingerprint from the machine ran. That fingerprint can be used to active the upgraded Windows 10 installation later. Needless to say, this type of activation will work only for valid upgrade paths. You cannot upgrade Windows 8.1 with Bing into Windows 10 Pro (I tried).
Second important thing: Run the gatherosstate.exe as an Administrator. I tried to validate the run-as-Admin -requirement after the upgrade was done, but it was too late. The file generated will differ. My thinking is, that it is not necessary to run as Admin, but that's what the original instructions said.
Take a copy of the generated GenuineTicket.xml-file. You will need that later. At this point you're good to go with a clean install. Replace hard drives or just re-partition the original one, whatever your install plan is. I'm guessing you wouldn't be doing the upgrade this way if it wasn't absolutely necessary.
During Windows 10 installation do NOT enter a license key. It is possible to "skip this" and "do this later" and ultimately when the install ends run a perfectly good non-activated Windows 10.
Now its time to go activate the newly installed Windows 10. You need to locate your saved GenuineTicket.xml-file and copy it to directory %ProgramData%\Microsoft\Windows\ClipSVC\GenuineTicket. Like this:

Now the activation is only a reboot away. Go ahead and boot the thing, and confirm:

Done! Simple as pie.
Windows 10 weeks: Getting an activated Windows 10 Pro for free
Sunday, July 17. 2016
I'd like to be clear on this: I did not figure this one out myself, I just bumped into Philip Yip's page about this. All the credit should go to him, I just tested this and confirmed it to be working.
One of the upgrades I did earlier this month was for a Windows Vista. Computer geeks point out two things immediately: 1) Vista! Really? Who would use that voluntarily? 2) well, it cannot be upgraded into Windows 10. Both very true. It just so happened, that there was an OEM Vista running on a computer. Vista will cease to have security upgrades on 10th April 2017, so I suggested to upgrade the thing into a 10 while I did some other work on the thing. Obviously the person owning the poor computer didn't want to pay for the upgrade, so I chose to go with Mr. Yip's method on it.
Prerequisites
For this to happen you will need:
- An USB-stick, minimum size 4 GiB
- This will be used to host the Windows 10 installation image
- I went to a supermarket and got a brand new 16 GiB USB3 stick for the speed improvements
- Ability to boot the target computer from the above USB-stick
- Most computers I've worked with can do this
- Windows 10 ISO, build 10130
- Ok, this one is harder one to come by, but it is generally available in the Big Net. I'm talking about software piracy here.
- You will need this specific build. Older or newer ones won't do the trick.
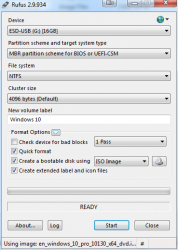
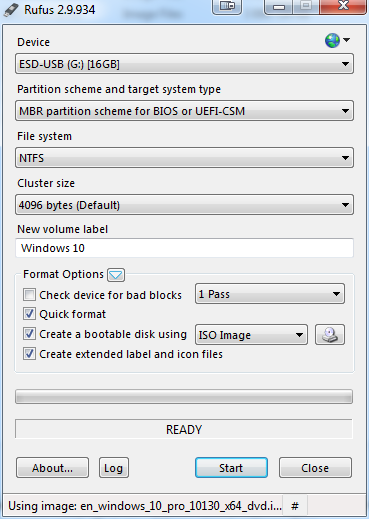
- A piece of software to write this ISO-file into the above USB-stick and make it bootable.
- My favorite thing for doing that is Rufus. It is a solid piece of software to write images into USB-sticks.
- Windows 10 media creation tool
- You can get one from Microsoft's website
- Possibility to disable internet connection from the target machine and enable it when needed
- Finally: Possiblity to change the BIOS/UEFI date on the target computer.
- This trick solely relies on the fact, that you can pretend the date to be in the history.
Also please note, that there is NO UPGRADE possibility here. This is effectively a fresh install. If you choose to re-install on top of your existing Vista installation, please take care no to lose any precious data. I installed a bigger hard drive to the computer, so I made sure that the old drive was intact during this process.
Steps
This is how the entire process goes:
- Use Rufus to create Windows 10 build 10130 USB-stick
- Boot into BIOS/UEFI setup, set date to anything around September 2015. I just bumped back the year and did my installation in "July 2015".
- Make sure, there is no Internet connection during the installation. THIS IS IMPORTANT!
- Boot from Windows 10 build 10130 USB. Make sure there is no Internet connectivity on the machine, so that it is impossible for it to update date via NTP or talk to Microsoft.
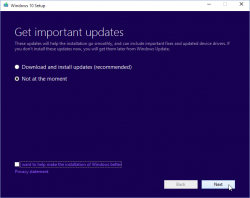
- Run Windows 10 install (for the first time)
- During installation, don't bother installing any security upgrades, you will re-install entire Windows 10 after this one completes.
- Wait couple of hours. This depends on your hardware speed.
- Remove the USB
- Create a recent Windows 10 install USB
- I had my own computer for media creation and didn't have to use the target computer for this. This can be a parallel process.
- When asked about the edition, choose Win 10 Pro
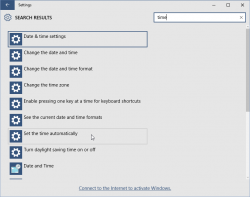
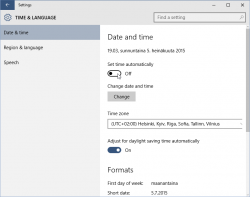
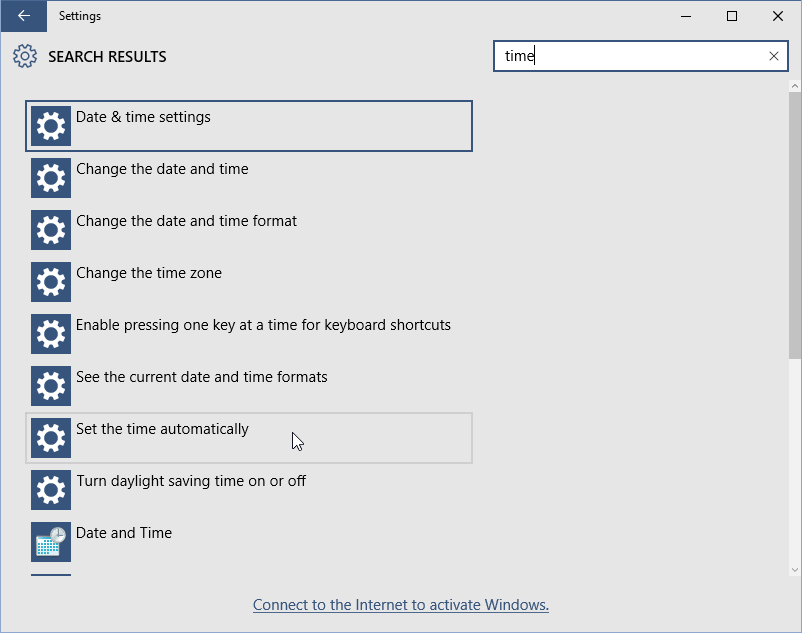
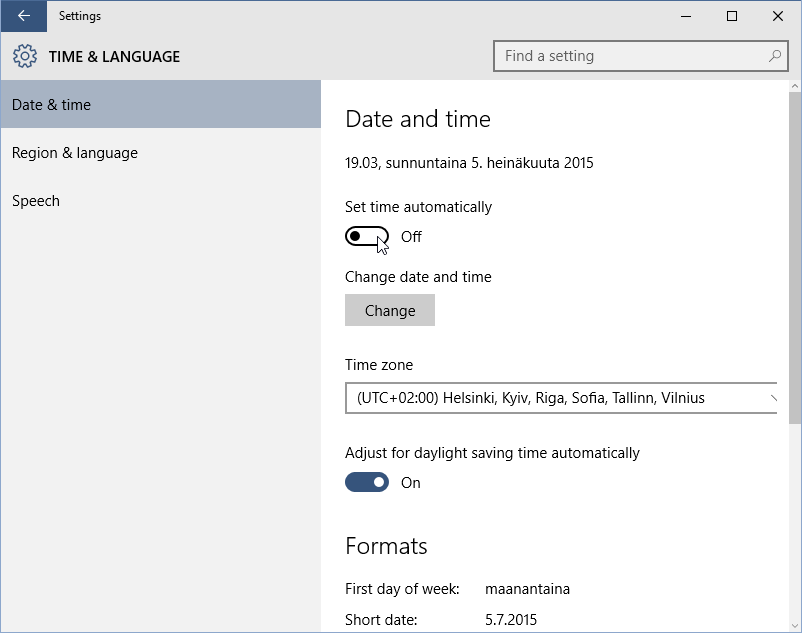
- Turn off internet time when install done. I found that one to be little tricky, but the setting is there.
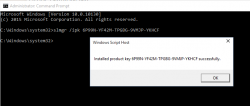
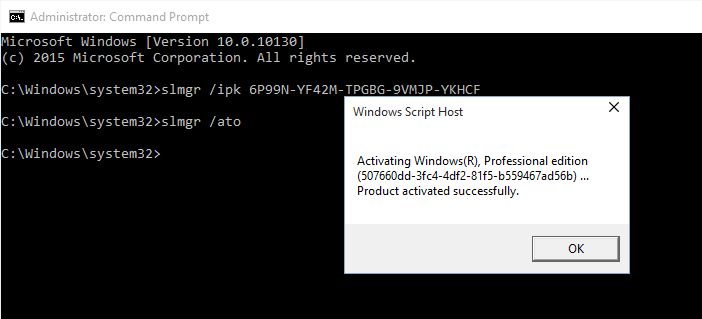
- Set a specific license key. For this you'll need to open
CMD.exeas Administrator. If you attempt this as a regular user, ie. not right clicking thecmd.exeand selecting "run as administrator", you'll notice that soon. The command to execute is:
slmgr /ipk 6P99N-YF42M-TPGBG-9VMJP-YKHCF
- Connect to internet. THIS is the first time the install machine is allowed to get there. If your box did connect to The Net before this, you have failed.
- Activate Windows (remember: Admin prompt):
slmgr /ato
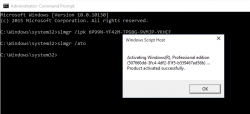
- Now you have an activated Windows 10 running. You can go to My Computer and Properties to confirm.
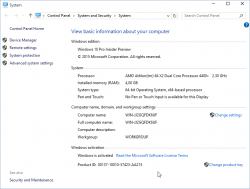
However, it's an old edition and you don't want to keep that. The important thing is, that now your computer's fingerprint has been stored into Microsoft's server and any subsequent Windows 10 installations will proceed without entering any license key. - Just insert the USB install stick with the newer Windows 10 installer (the one you created on step 5) and run
setup.exeon that. There is no need for reboot or anything, just run the installer. - Install it again! This is your second installation.
- I choose to keep nothing. This just makes sure, that all the old garbage will be gone after you're done.
- Please note, that when asked for license key, don't enter any. Always select "Do this later" or "Skip". This is not needed and your newly installed Windows 10 will be activated at the end.
- Wait 15 minutes
- You're done! Your Windows is ready to be used.
- Remove the first installation stored into
C:\Windows.old, you don't need to keep any of that. However, the files are protected by operating system and deleting the entire directory prooved to be little tricky. I ended up booting from the USB-installation stick into rescue-mode and chose thecmd.exefrom that. On prompt I entered two commands:
del /S /F /Q c:\Windows.old

	rd /S /Q c:\Windows.old

Finally
This process worked for me on 5th July 2016. I don't think this has anything to do with July 29 free upgrade -limitation.
Also I'm sure guys at Microsoft keep track of their installations. They'll know exactly how many licenses they gave out using this method. My thinking is, that they simply don't care. Pretty much all of the competition is giving out operating systems for free and they cannot for some strange reason. Anybody choosing this method needs to be aware, that in an unfortunate scenario they would deactivate all licenses distributed this way.
Happy installing! I know I created one ex-Vista user very happy with this.
Windows 10 upgrade weeks
Friday, July 15. 2016
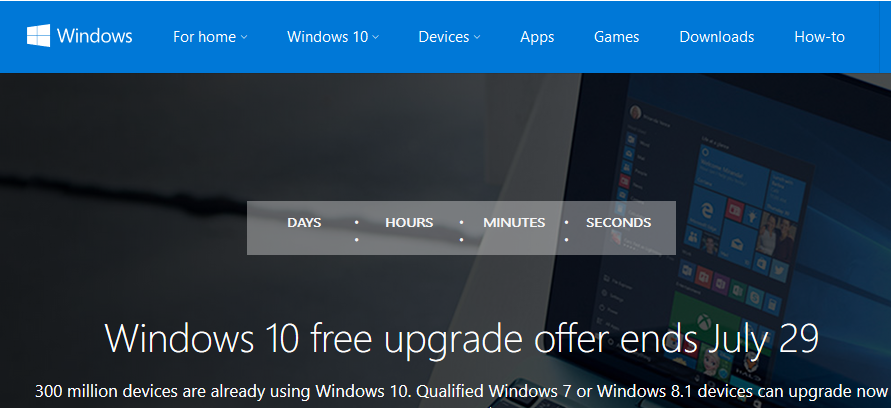
Recently I've been doing a lot of Windows 10 upgrades. The free upgrade offer is about to end in less than 15 days:
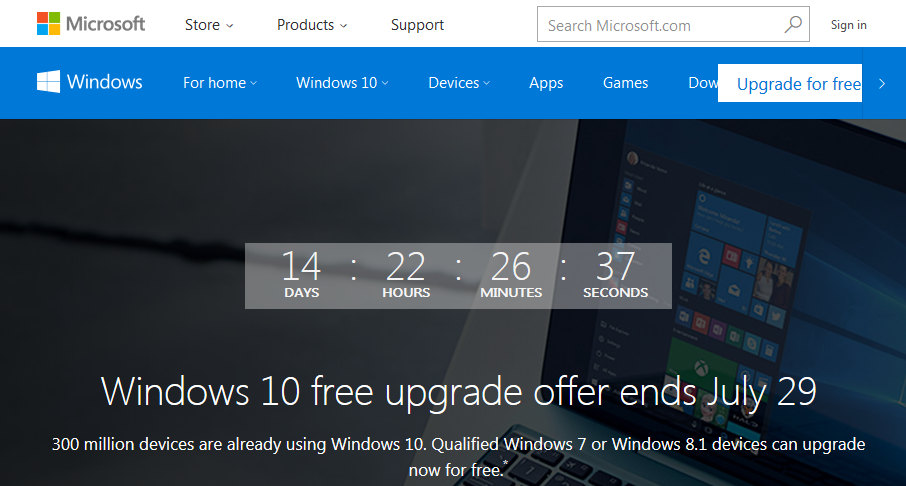
There is a counter in Windows.com.
My own adoption to Win10 is pretty high, only one box left to upgrade. I'll have to resort to virtual machines for things, that I really, really need Windows 7 for.
The real-time Windows 10 adoption gauge @ gosquared.com shows one third:
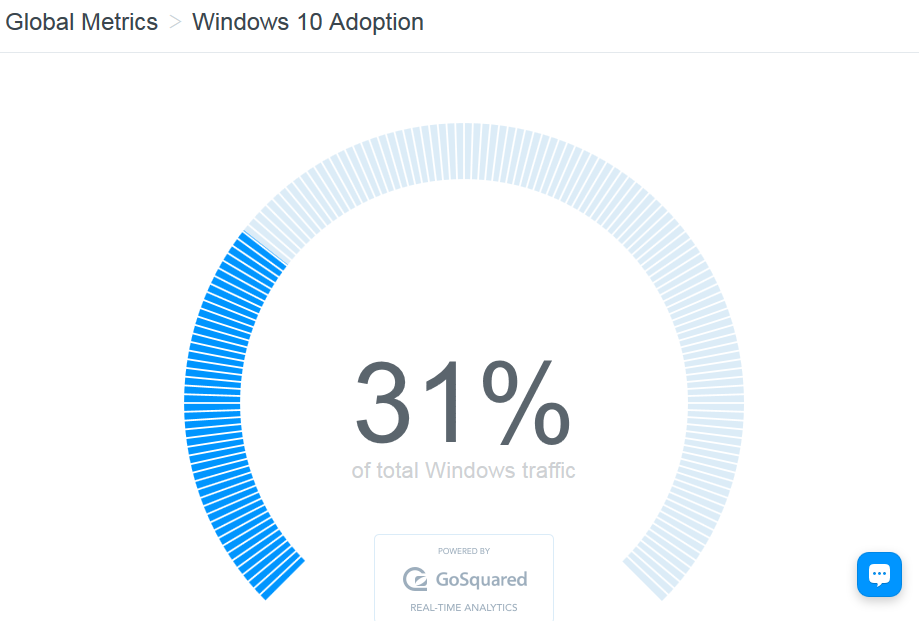
That's pretty good, but not the number Microsoft guys are aiming for.
I regularily follow Mr. Gordon Kelly, a writer who publishes @ forbes.com. In December 2015 he wrote a piece with a title 'Free' Windows 10 Has An Expensive Secret. There he pretty much speculates, that Microsoft really wants to get to one billion (1.000.000.000) Windows 10 installations as fast as possible. Not giving away free upgrades to pretty much everybody wouldn't help in that. However, his post after Microsoft's May 2016 press release (Three Reasons Microsoft Stopped Free Windows 10 Upgrades) indicates, that even he gave up hope on prolonged free upgrades being available. I guess, they didn't want to get to one billion that bad. That's something Mr. Richard Hay @ winsupersite.com predicted last December.
It seems that it is possible to prolong your free upgrade offer by enabled assistive technologies. See Microsoft's blog post about that. But unless you do that, it's time to act on it or do some trickery after July 29th.
For my Windows 10 weeks, I'll be posting couple of articles what I did earlier this month with my various upgrades.
Upgrading Windows 10 into a Windows 7 machine after deflecting Microsoft's upgrade
Sunday, May 29. 2016
Microsoft's policy to annoy every Windows 7 and 8.1 user to the point every single one of them will be crazy is something I've addressed earlier. My previous posts are here and here.
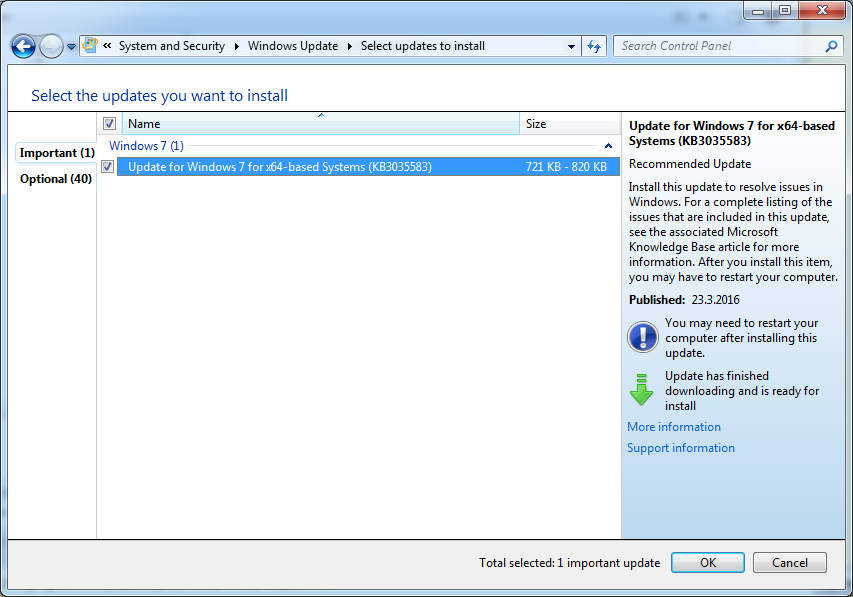
Couple days ago I decided to go and upgrade one of my existing Windows 7 boxes. It's roughtly 2 months time left for me to get my free upgrade, also I had been staring enough the re-releases of Update for Windows 7 for x64-based Systems (KB3035583), which every single time I see the upgrade being offered makes me laugh out loud. As you can see:
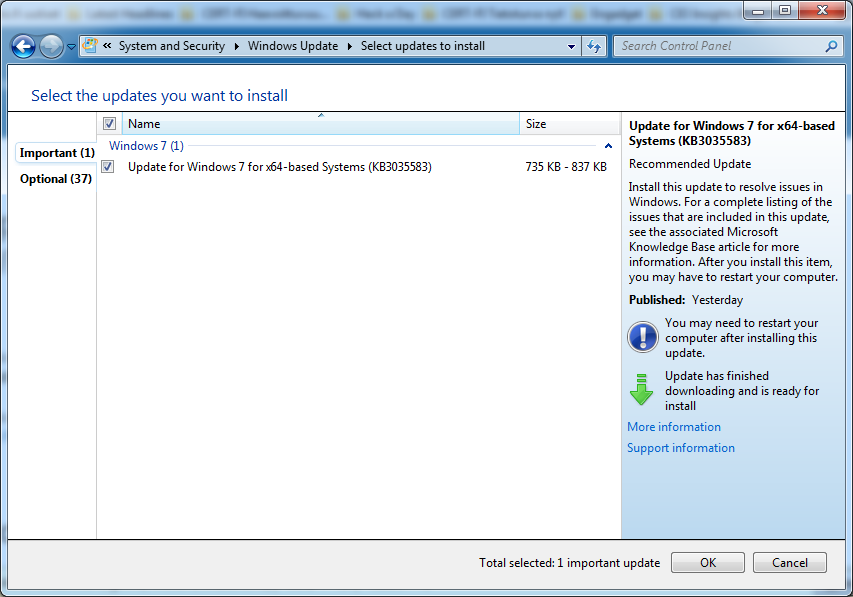
It reads:
Recommended update
Install this update to resolve issues in Windows. For a complete listing of the issues that are included in this update, see the associated Microsoft KnowledgeBase article for more information. After you install this item, you may have to restart your computer.
Ok. I chose to "resolve issues" in my Windows. In reality that's just crap that forces me to look at Windows 10 being forced down my throat. That one causes more issues than it resolves. That's a complete lie!
I carefully made sure I have backups and all necessary information and decided that I'm good to go for upgrade. But quite soon I realized, that ... there is no easy way for me to upgrade. As I wrote in my previous blog posts, I've taken drastic measures to deflect any/every possible Microsoft attempt to inject anything related to the upgrade, upgrade widgets, upgrade tools or upgrade pre-loaded files.
So, I decided to go google "windows 10 upgrade", landed at page https://www.microsoft.com/en-us/windows/windows-10-upgrade which very helpfully offers to download a tool called GetWindows10-Web_Default_Attr.exe. Downloading and runnin that does absolutely nothing! I took a peek what it does and it simply runs GWX.exe. Which of course, as a result of my deflector shields again does absolutely nothing. It just fails quietly and exits.
A new plan was needed.
Then I landed on another Microsoft page: https://www.microsoft.com/en-us/software-download/windows10. That one prooved to be much more useful. On that page, there is a download for Windows10Upgrade9252.exe which actually could upgrade my Windows.
The upgrade went fine, I didn't lose too many applications and my user profile survived the upgrade well too. The only thing I had to do was to disable IPv6 privacy randomization. This is my recipe which I run on every one of my Windowses:
netsh interface ipv6 set privacy state=disabled store=active
netsh interface ipv6 set privacy state=disabled store=persistent
netsh interface ipv6 set global randomizeidentifiers=disabled store=active
netsh interface ipv6 set global randomizeidentifiers=disabled store=persistent
Other than that I didn't do much else. And as a result I get to see forced advertisements for Office365. Crap!
How to stop Windows 10 upgrade bullying - part 2
Tuesday, March 29. 2016
Those pushhy bastards at Microsoft really, really want to upgrade every Windows 7, 8 and 9 into a 10. (Yes, Windows 9 doesn't exist.) They even re-released KB3035583 to make sure that any previous blocking since March 2015 wouldn't be affected anymore. This is what my Windows 7 started doing:
This wasn't supposed to be happening. See details of Part 1. I downloaded latest version of GWX Control Panel, I think it is 1.7.3, but it showed nothing special:
There were some deleted Windows 10 files and a single process running, but I re-zapped them with GWX CP. That didn't make the KB3035583 disappear from the updates list.
A solution to make it gone was simpler than I originally thought:
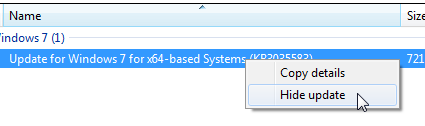
Just selecting Hide update will make it stay gone. I guess MS-guys will be re-re-releasing it eventually, but for the time being, I'm happy with the result.
How to stop Windows 10 upgrade bullying
Sunday, February 7. 2016
The problem
Ok. Microsoft has amped up their "upgrade now" campaign to a ridiculous level.
First Microsoft Marketing chief Chris Capossela "warned" about Windows 7 being insecure. Warned in quotes because my initial reaction was: "Oh really!? Is it really possible, that a Windows can not be secure operating system."
While this machine is eligble for a free Win 10 upg, I just don't want to do that yet. I will upgrade eventually, but at the time I choose, not some ignorant corporate chose for me. So, Mr. Capossela explained that users who choose Windows 7 do so “at your own risk, at your own peril” and he revealed Microsoft has concerns about its future software and hardware compatibility, security and more.
Now the latest development is, that Windows 10 upg is a recommended update as they're now aggressively pushing Windows 10 upgrades. Meaning, that have to actively dodge it every time I'll upgrade this box of mine.
Further details about KB2952664 a Compatibility update for upgrading Windows 7 patch @ Softpedia article.
The information
The annoyance looks like this:
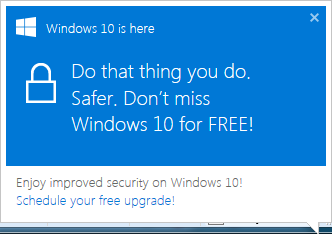
In the process list of the victim machine, there is a GWXUX.exe producing that. Actually there are other GWX-prefixed processes capturing your machine, but for the sake of this blog post I'm ignoring that crap.
Ages ago Microsoft release KB article ID 3080351, How to manage Windows 10 notification and upgrade options. It contains all kinds of useless information about modifying registry entries like HKLM\Software\Microsoft\Windows\CurrentVersion\WindowsUpdate\OSUpgrade value ReservationsAllowed.
What the article doesn't mention is, that it also hijacks your disk space at C:\$Windows.~BT and C:\$Windows.~WS. I got a tip from an article and found 5 GiB of crap already loaded to my computer. I ran cmd.exe (with administrator credentials) to free up my SSD-space:
C:\Windows\system32>attrib -h "C:\$Windows.~BT"

C:\Windows\system32>attrib -h "C:\$Windows.~WS"


C:\Windows\system32>cd "C:\$Windows.~BT"

C:\$Windows.~BT>takeown /f . /R /D Y

C:\$Windows.~BT>icacls . /grant Administrators:(OI)(CI)F /T


C:\Windows\system32>cd "C:\$Windows.~WS"

C:\$Windows.~WS>takeown /f . /R /D Y

C:\$Windows.~WS>icacls . /grant Administrators:(OI)(CI)F /T
After doing all that, reading all the information, changing all the registry values and removing pre-loaded waste... It didn't work. What the article doesn't mention, that one of the GWX-processes runs in background and snoops those registry values and changes them back! Yes. You read it right. The fuckers go to your computer and make better choices for your registery. Their flawed reasoning is, that you obviously have to be some sort of moron not to go for their ultimate product right now, or preferably yesterday. And as you (the moron), the owner of your computer running a lesser "insecure" OS, need Microsoft's help to make better decisions.
OH, COME ON! Not cool.
I'm NOT upgrading to Windows 10 yet, because I (as in me) am in control here. Not Microsoft (as in them).
The solution
After spending countless hours and experiencing a number of setbacks, when the timers kicked on I stumbled into somebody having exactly the same problem as I do. He also had a solution for it. Here is the article Using GWX Control Panel to Permanently Remove the 'Get Windows 10' Icon.
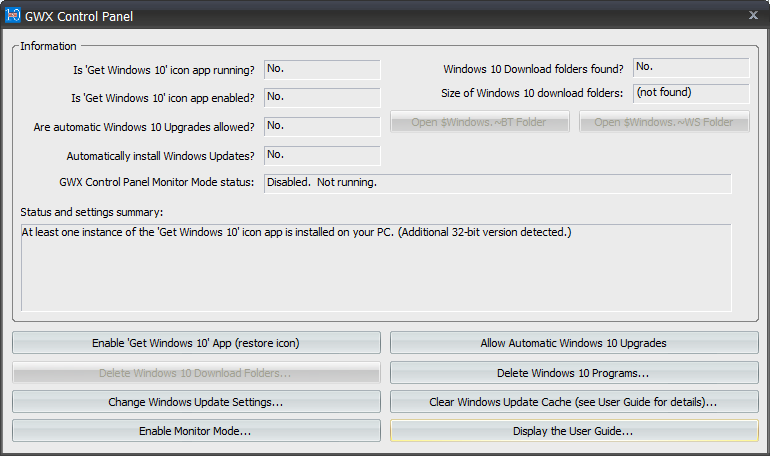
GWX Control Panel looks like this:
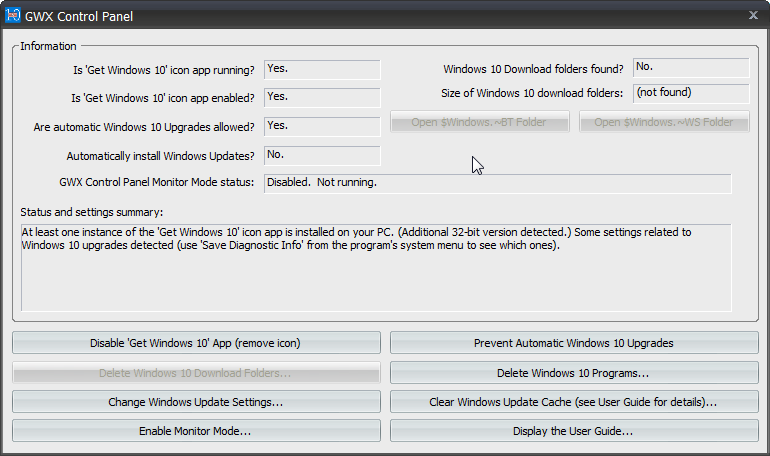
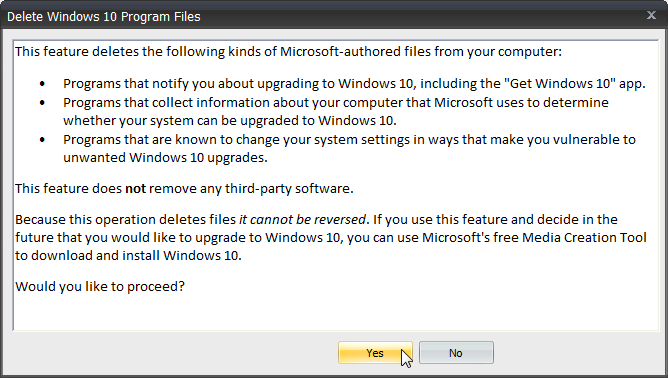
With this application, no need to game of Whack-a-Mole anymore. The not wanted and not needed crap will just fly out with a click of a button. Example of getting rid of pre-loaded Windows 10 installation files:
Ultimately the cleaned up machine will report:
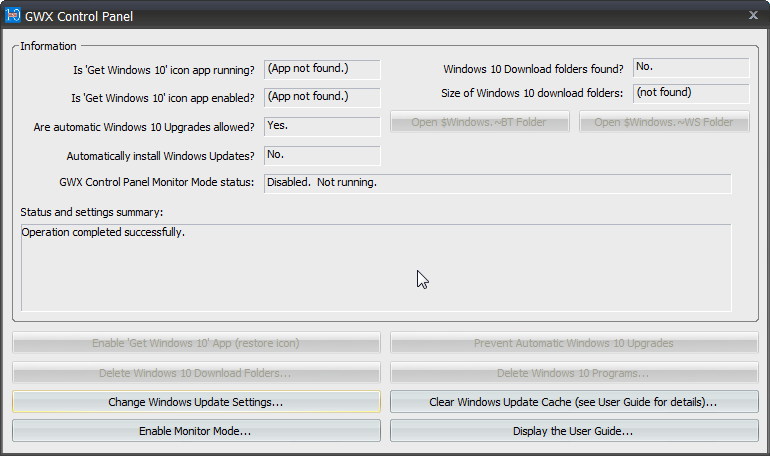
List of goodies include:
- Is 'Get Windows 10' icon app running? App not found
- Is 'Get Windows 10' icon app enabled? App not found
- Windows 10 Download folders found? No
Oh yes!
The application has an option to stay as a background process to keep monitoring, that evil Microsoft processes stay gone. I didn't test that, as just kicking all the crap out of my computer did the trick. Now I was back on the drivers' seat. Now I can decide when to do the upgrade.
Recovering Windows 7 OEM License Key
Saturday, January 2. 2016
In my hugely popular article about Transferring Windows 7 OEM license to a new hard drive, I kept insisting, that you absolutely positively need to know your SLP-key before processing. Couple days ago I was working on a recovery of a failed hard drive and realized, that it's not completely true.
As the troubled drive had already been replaced with a brand new SSD, I had the HDD in an USB-dock for investigation purposes:
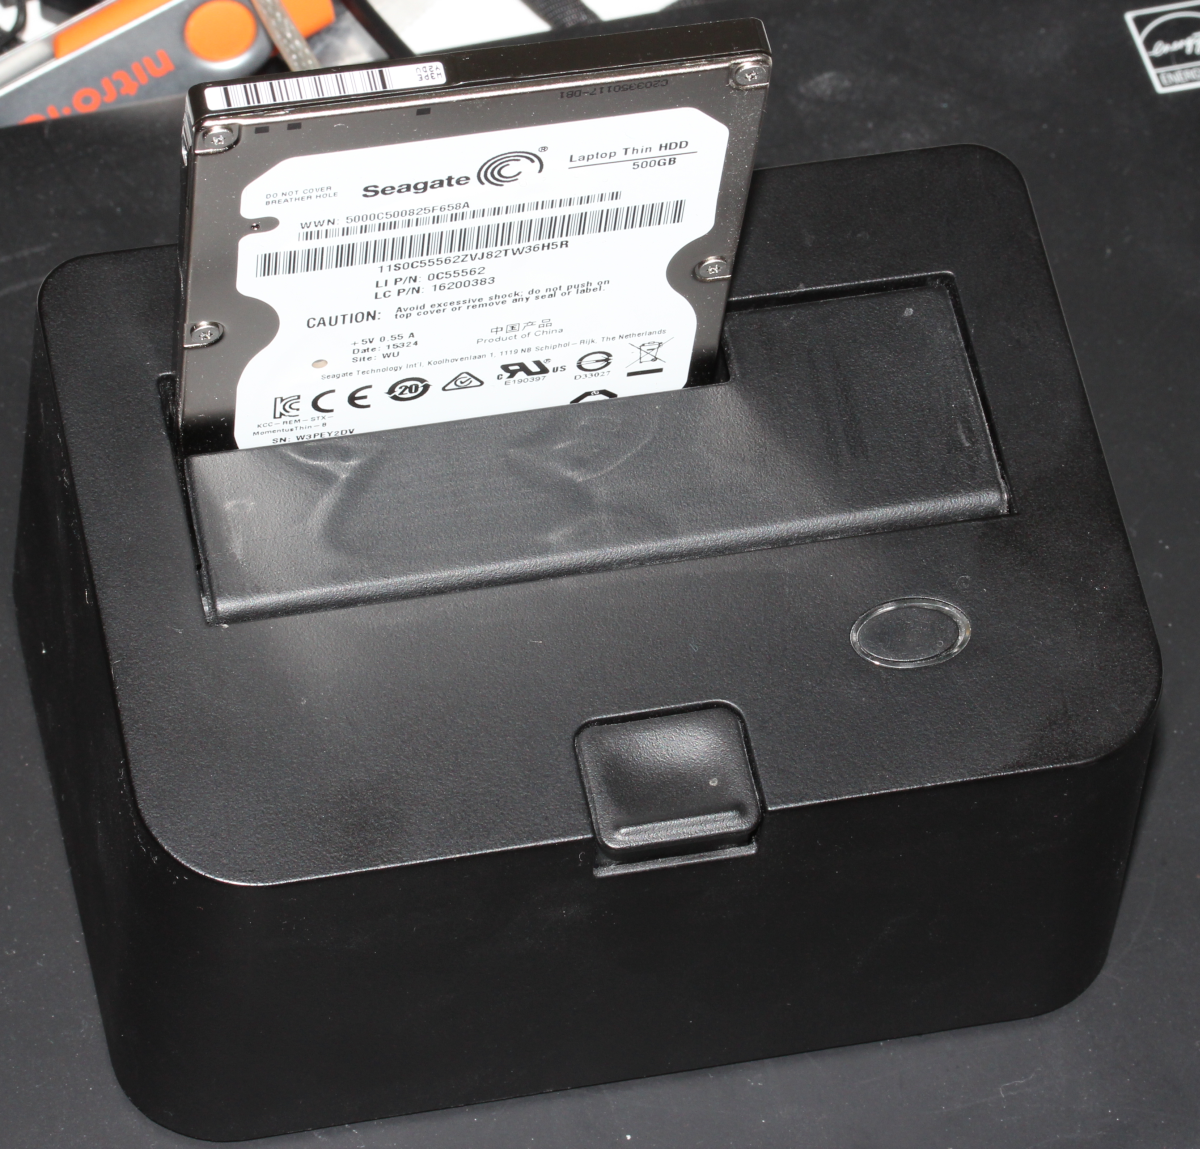
The new Windows 7 OEM had already been installed, but not activated. As I didn't know the SLP-key I was planning to do the phone activation with COA-key. At that point I realized, that it was possible to use the Magical Jelly Bean Keyfinder from another drive:
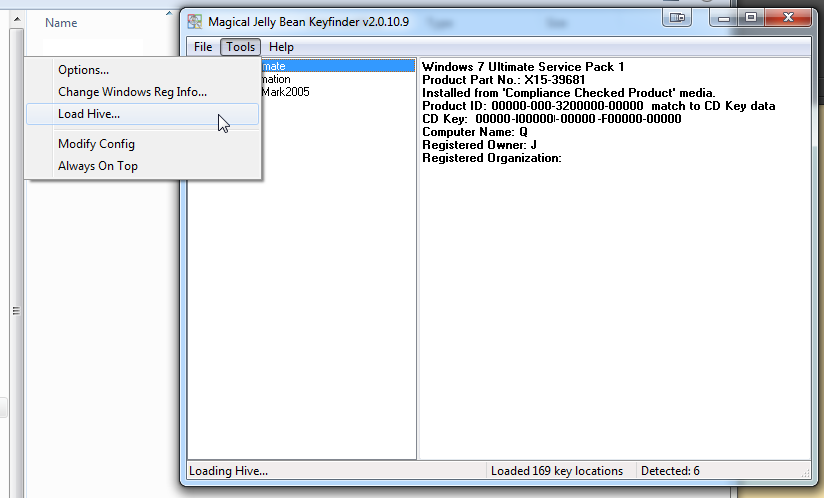
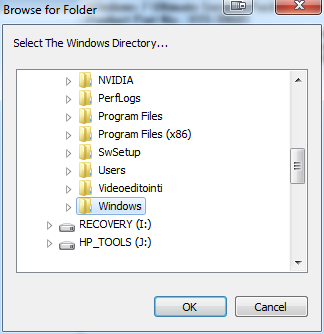

It wasn't much simpler than that! A simple copy/paste -operation to get the key in and Windows activated.
The requirement seems to be to point to a %windir% and system32\config\ is assumed on top of that.
Windows 10 preview - My experiences
Wednesday, November 26. 2014
Windows 10 Technical Preview has been out for two months now on Windows Insider Program. I installed it pretty much when it was released into a virtual machine and has been running a number of different software, that I'd use anyway on it.
The install process is pretty much the same than it has been since Windows 7. I created a virtual 20 GiB drive (which later turned out to be not enough) and chose to install on the non-initialized drive. No surprises there. This is what runs as out-of-box-experience:
It looks very much like Windows 8.1. Notice how the window border is quite thin. This is something Microsoft hasn't done in their operating systems ever before. Internet Explorer is still version 11 as in Windows 8.1 and the reported user-agent string is: Mozilla/5.0 (Windows NT 6.4; WOW64; Trident/7.0; rv:11.0) like Gecko.
It sees the virtual CPU incorrectly as a Xeon, however the physical CPU is of Sandy Bridge microarchitecture: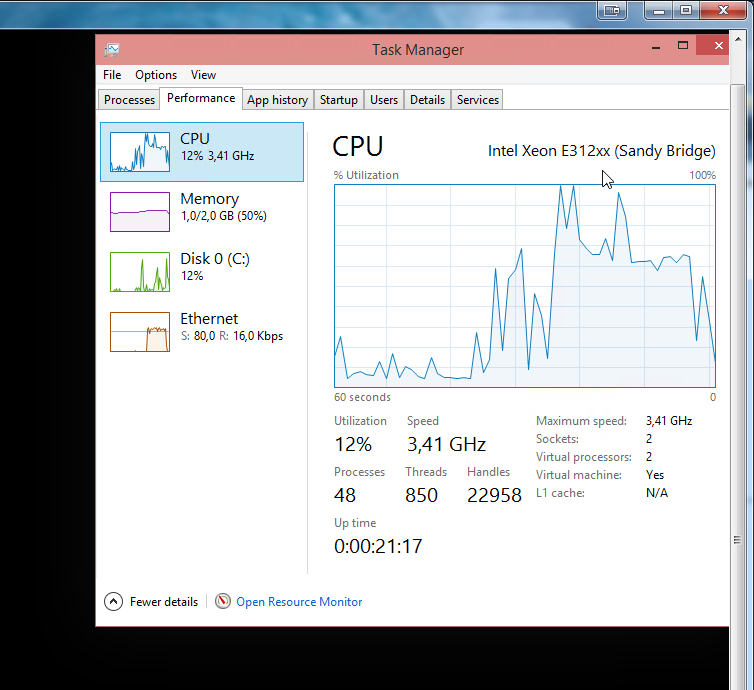
![]()
Finally the start menu is something, that I would like to use. Microsoft had a decent start menu on Windows 7, they dropped it for Windows 8 and restored a crappy version for Windows 8.1. This time it works and the stupid full-screen-apps -mode is gone. The start menu will contain both the classic and tile-based apps at the same time:
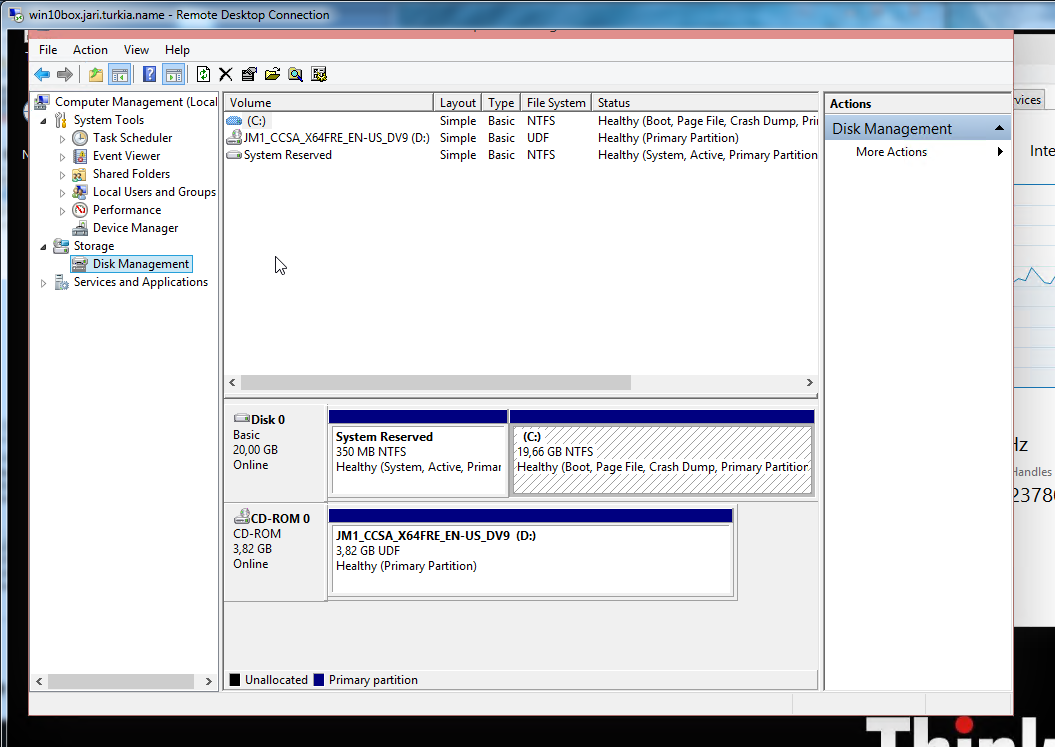
This is what computer properties and disc management look like. Pretty much the same than in Windows 7:
Also control panel is unchanged: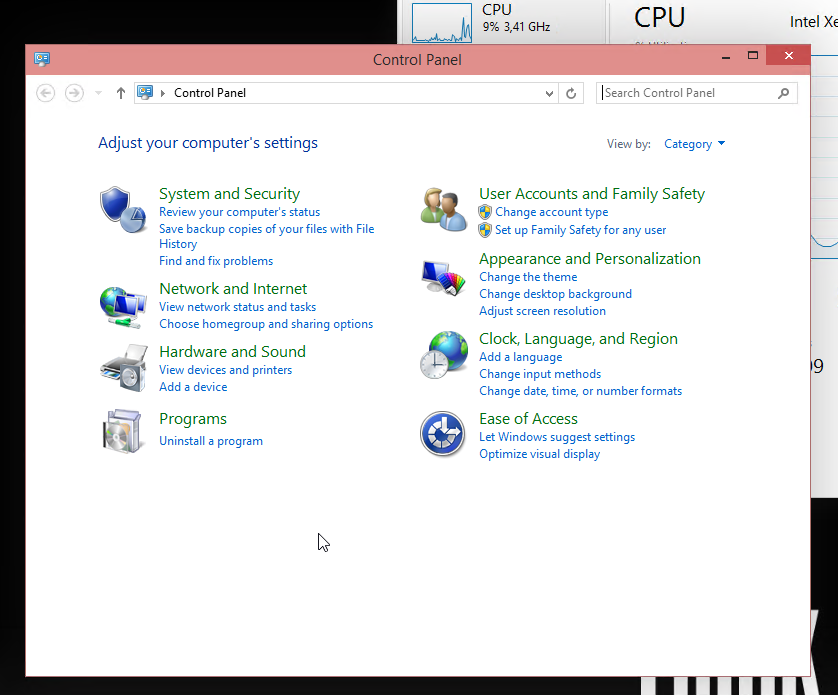
The version is displayed as Windows NT 6.4, but apparently it is going to change and the version number will be 10. Also IPv6 works as expected: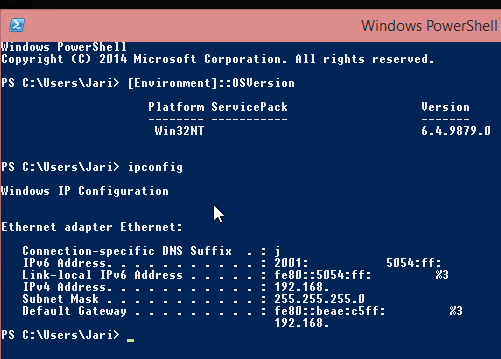
I don't know what the idea with forcing automatic updates on, but luckily there is a way to change that. The GUI won't let you touch it, but a direct registry hack to change it: How to disable Automatic Updates in windows 10 Tech Preview. I changed the HKEY_LOCAL_MACHINE\SOFTWARE\Microsoft\Windows\CurrentVersion\WindowsUpdate\Auto Update value AUOptions into 3 (Automatically download and notify of installation). This is a change for previous Windowses, which are using a different registry key. See Article ID 328010 - How to configure automatic updates by using Group Policy or registry settings about it. Anyway, this is how it looks like: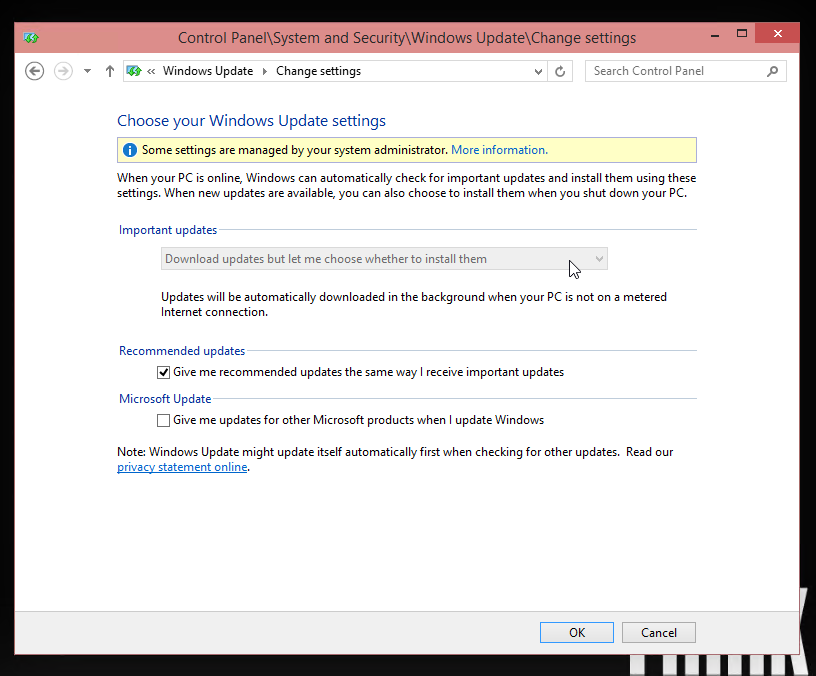
One other thing I also changed, was to speed up the preview image process. As a default, new installations are on a slow track, but I wanted to get the new versions a bit faster. This is a bit funny thing, the only way to change it is to go for a new-style full-screen settings (luckily this runs in a window). There doesn't seem to be a control panel -setting for this. For details see: How to Stay Up to Date and Get the Latest Windows 10 Technical Preview Builds. This is how I changed the setting:![]()
To upgrade into a newer build (9860 in this case) it goes something like this. I found the process quite amusing:


When the slow process completes, the bottom right corner will state the new version:![]()
During the testing I haven't had many issues, but here is one:![]()
For some reason system interrupts started hogging lot of CPU-resources. That is something I've never seen on any Windows. After a nice reboot, the problem disappeared. That's what you get from running beta operating system.
Also, my original 20 GiB of disc space ran out after couple of new build upgrades. This is what happened:![]()
There wasn't much else to do, except to shut down the Windows 10 instance. Go to virtualization host (Linux) and add 10 GiB of space into the virtual drive:
qemu-img resize Windows\ 10.qcow2 +10G
As no Windows version is capable of actually expanding the partition and file system on a grown drive, I mounted an ISO-image of GParted and booted the virtual machine from that. It could expand the system partition in a couple of seconds (it is a really good partition manager software). After having 30 GiB of space, the latest build upgraded without problems.
My thanks goes to F-Secure. I've been running their new FS Protection (still on beta) on my Windows 10 and it works really well.

