De-bricking a B593-s22
Tuesday, May 17. 2016
I finally did it!
The unit has been non-functional for over a year now. See details in my previous post. But I got it back.
First, I'd like to clarify the myth of "equipment mode". Yes, that does exist. You'll know that your box is bricked and the reason for that is because you're in equipment mode, as your RS-232 -console output will say following during boot-up:
now in wifi mfg

g_Equip_Mode_value = 1
What needs to be done, is getting that Equip_Mode flag off. On "normal" mode bootup, two distinct differences appear at the output:
now in wifi release

normal mode, no need to load RF wifi
and
g_Equip_Mode_value = 0
My sincere thanks goes to Mr. Jevgenij for telling me a magical NVRAM-location to look at.
The brick
My bricked B592 s-22 (in equipment mode) looked like this on a boot sequence:

(Sorry about the signal LED glowing, that was my failure when lighting the box for video. I didn't realize that on my footage it looks like being lit, while in reality it isn't. A bricked box won't show any signal there.)
At power-on, the Power-LED gets lit all the others are off. Then the boot-sequence handles lot of hardware and gets a Linux to boot. They call it the "early init". There are no differences between modes at that point.
Next, what happens is the Linux-side taking control and starting to spin up services. One of the first things it does is kicking all the LEDs lit. When enough services are on, and Linux wants to fiddle with LTE-side all the LEDs go off. Now that the device is configured not to offer all hardware services to Linux-side, rest of the boot sequence goes haywire. There is no Wi-Fi, there is no Ethernet-bridge and lot of stuff fail during boot. Your best clue about this dreaded equipment mode is the Tel LED blinking on/off forever. Actually the box is not doing much at that point. It has given up all hope on getting a handle of the LTE-side or the Ethernet bridge.
Luckily, the box is sane enough to allow a SSH-login. In equipment mode, it will bypass the ATP Cli completely and land at the BusyBox-prompt. There your friend is lteat-command. Go back to my older stuff, for details about that.
The fix
The prerequisite for the fix is, that you are logged into your B593 s-22 via SSH and are able to run lteat and get sensible response out of it. Example (the blank lines happen on my SSH, I don't know why):
# lteat

AT>ati


i


Model: B593s-22


Revision: V200R001B180D20SP05C260


IMEI: 860091028600910


+GCAP: +CGSM,+DS,+ES


OK

AT>
Then you're good to go.
First confirm, that you are in the equipment mode:
AT>at ^nvrd=52110

^NVRD: 12,31 00 00 00 00 00 00 00 00 00 00 00

OK
That's a ReaD-command for NVRAM address location 52110. To change the mode back to normal, a WRite needs to be issued:
AT>at ^nvwr=52110,1,0

OK
Confirm the result:
AT>at ^nvrd=52110

^NVRD: 12,00 00 00 00 00 00 00 00 00 00 00 00

OK
Notice how the hex value 0x31 is changed to 0x00. Btw. if you look at the ASCII-table, you may notice, that 0x31 stands for number 1. That's would be similar to the (1) in g_Equip_Mode_value = 1.
Now all you have to do is power-off your box and kick it back on.
Finally
I don't have a clue why/how/when my box went into this "stupidity"-mode. I was fiddling with the LTE-side at lteat-prompt when it happened. I did try dozens of different commands, any of those may have caused that.
Also, if you're unable to SSH into your box, you may need to read my or somebody else's articles. It's all explained there.
Cisco Systems security upgrades - Breaking the paywall
Monday, April 4. 2016
I own an operate a Cisco ASA firewall. I have written about it couple of times, here and here to list two of them.
The unit I have is a second hand one, which I got out of an auction. At the time I got it, a list price with that lincense type and RAM was around 900 €. Today you can get one with less than $500 from Amazon.com. Today, the model has been EoLd by manufacturer. The price and unit size makes it's intended to be used by small businesses and satellite offices, so you don't expect much to begin with.
However, Cisco doesn't see it that way. They see it as big deal. Literally. To get any software/firmware upgrades, you'll need a Smartnet service contract. I don't know what else one will cover, but with a valid service contract it is possible to download latest software. That's flat out stupid and annoying. Not to mention the fact, that it really sucks having an unit for the purpose of providing security, but without security upgrades. Without any further rocket surgery, that's beyond stupid. But there I am. I don't have a security contract and I am running one.
A while back I was reading security advisory cisco-sa-20160210-asa-ike and I realized this:
Customers Without Service Contracts
Customers who purchase directly from Cisco but do not hold a Cisco service contract and customers who make purchases through third-party vendors but are unsuccessful in obtaining fixed software through their point of sale should obtain upgrades by contacting the Cisco Technical Assistance Center (TAC):
http://www.cisco.com/en/US/support/tsd_cisco_worldwide_contacts.html
Customers should have the product serial number available and be prepared to provide the URL of this advisory as evidence of entitlement to a free upgrade.
Sure thing, I had to try. I sent an e-mail to Cisco TAC (that's short for Technical Assistance Center), explained the above case and asked for a firmware upgrade. After careful consideration and few follow-up questions later my Cisco account was awarded a right to download latest IOS and ASDM files. I installed them and rebooted. That's it.
There were couple of bonus hoops. Cisco's license for strong encryption software images is mighty good stuff. It's allowed to download such images only to Austria, Australia, Belgium, Canada, Cyprus, Czech Republic, Denmark, Estonia, Finland, France, Germany, Greece, Hungary, Ireland, Italy, Japan, Latvia, Lithuania, Luxembourg, Malta, Netherlands, New Zealand, Norway, Poland, Portugal, Slovakia, Slovenia, Spain, Sweden, Switzerland, United Kingdom and United States. Not a long list, that. Also, any person downloading the software must not be in any of the following lists: U.S. Department of Commerce's Table of Denial Orders, U.S. Department of Treasury, Office of Foreign Assets Controls (OFAC)'s Specially Designated Nationals List nor U.S. Department of State's Debarred List. I had to check, I'm not on any of those. 
As final words: Cisco seems to have some level of responsibility going on there. Their primary approach is to squeeze money for security upgrades. That's pretty much what Microsoft does for Windows XP. What I cannot comprehend is why a company doing 48.000.000.000 USD in revenue and having over 100.000.000.000 USD in assets according to their Annual Report 2014 needs to charge me money for basic security updates. If somebody manufactures any software equipment that's for Internet access, there needs to be a simple and swift process of keeping the stuff secure. They even acquired IronPort, the company running SpamCop, my favorite and really effective way of blocking spam. Now they're asking donations to run SpamCop. Why don't they make it a paid service or just shut it down. Asking for people's donations is humiliating for a multi billion dollar corporation.
What Cisco is doing, that's just greed! Not cool. 
Logitech MX Anywhere 2 - Best mouse ever?
Sunday, February 14. 2016
Normally I wouldn't bother posting about a mouse, but this time I felt I had to. My previous laptop mouse broke. It was attached to one of the machines I use on daily basis and I worked perefectly for years. I don't know why the old Logitech simply refused to function no more. I did every trick I knew, but still no avail. I guess some cheap capacitor run out of its life there. So I had to go purhcase a new one.
In gaming (I do lot of FPS games), there is no substitute for a wired connection. But on a just surfin' or chatting lazily in the IRC, a wireless mouse does the trick more conveniently.
For those readers who are "whaaat! mouse? why would I want to use a mouse! so 90s!": I simply don't want to plough my finger on a plastic surface for hour every day. Not only my fingertips won't like it, but I find it just stupid. I've tried doing it, but trackpads aren't my thing. In fact I typically disable them, as me and many other touch typists like to rest my wrists exactly there where you other people love ploughing trough to simulate mouse movement. When I do that, mouse cursor starts wandering around when I'm typing. Not cool. So, no trackpads, but a real mouse. Actually, a pointing stick wedged between G, H and B -keys will work for me, but for example Apple doesn't do those for me.
There really aren't too many known manufcaturers in the mouse market anymore. Razer is in gaming business, and I already said, I wasn't going for a game mouse this time. You can make a choice between Logitech or somebody else whose name you either don't know or cannot pronounce. Logitech would like to move away from mouse business, but they are such a big player and making profit there, so I guess they really cannot do any sudden changes.
For a everyday use, Logitech has soooo many different models out there. Literally dozens and dozens. To narrow down my choices, I went immediately to the top-shelf material. Once I saw a wired USB-mouse being sold with 7,- € in a store. I had to get it, just for giggles. It was as much of a 7 euro mouse you can imagine. The worst part is the ridicouls leds making the thing glowing like a chrismas tree. So, no more el-cheapo crap.
When I realized, that there actually exists a rechargeable mouse, I had to go for it. The press release even had superlatives like "Logitech Introduces its Most Advanced Portable Mouse". Ok, they're boasting the thing is good, so they kinda reeled me in. I had to check how advanced or how super the mouse is. The price is around 80,- €, which was in my budget.
It looks like this:
On the outside, it looks like your regular Logitech mouse. I wasn't that impressed with that.
This is the part, that locked down the sale:
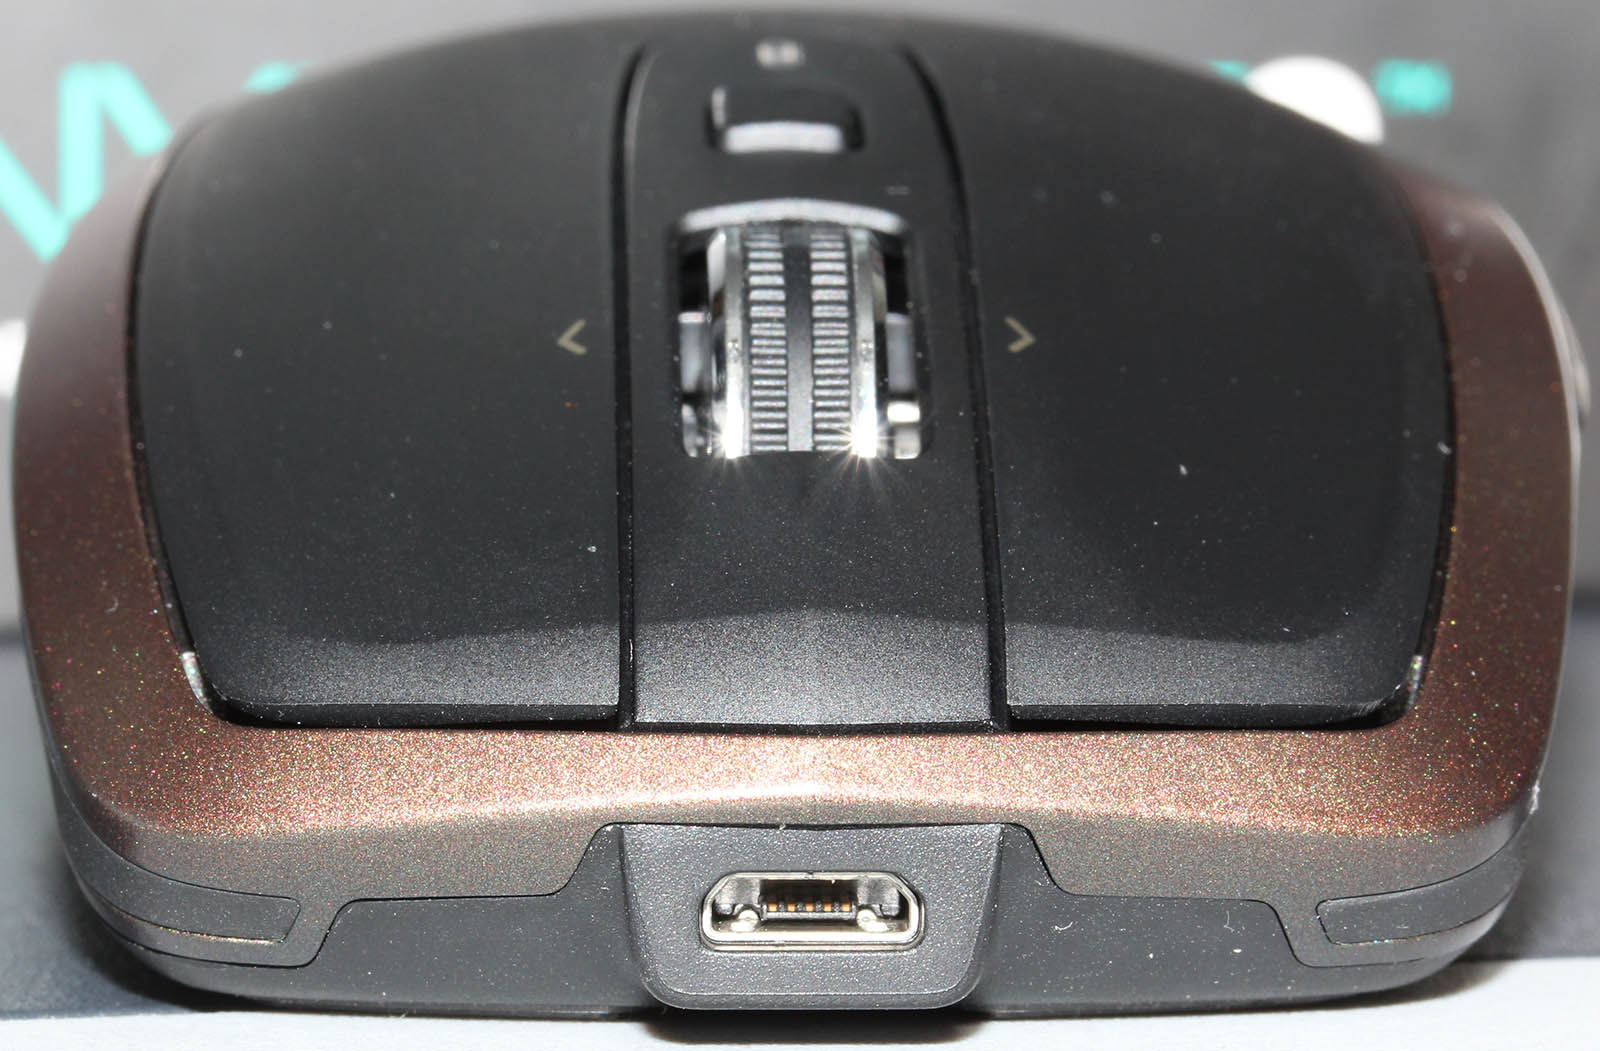
It is your regular Micro-A USB connector. Very popular in today's USB-things.
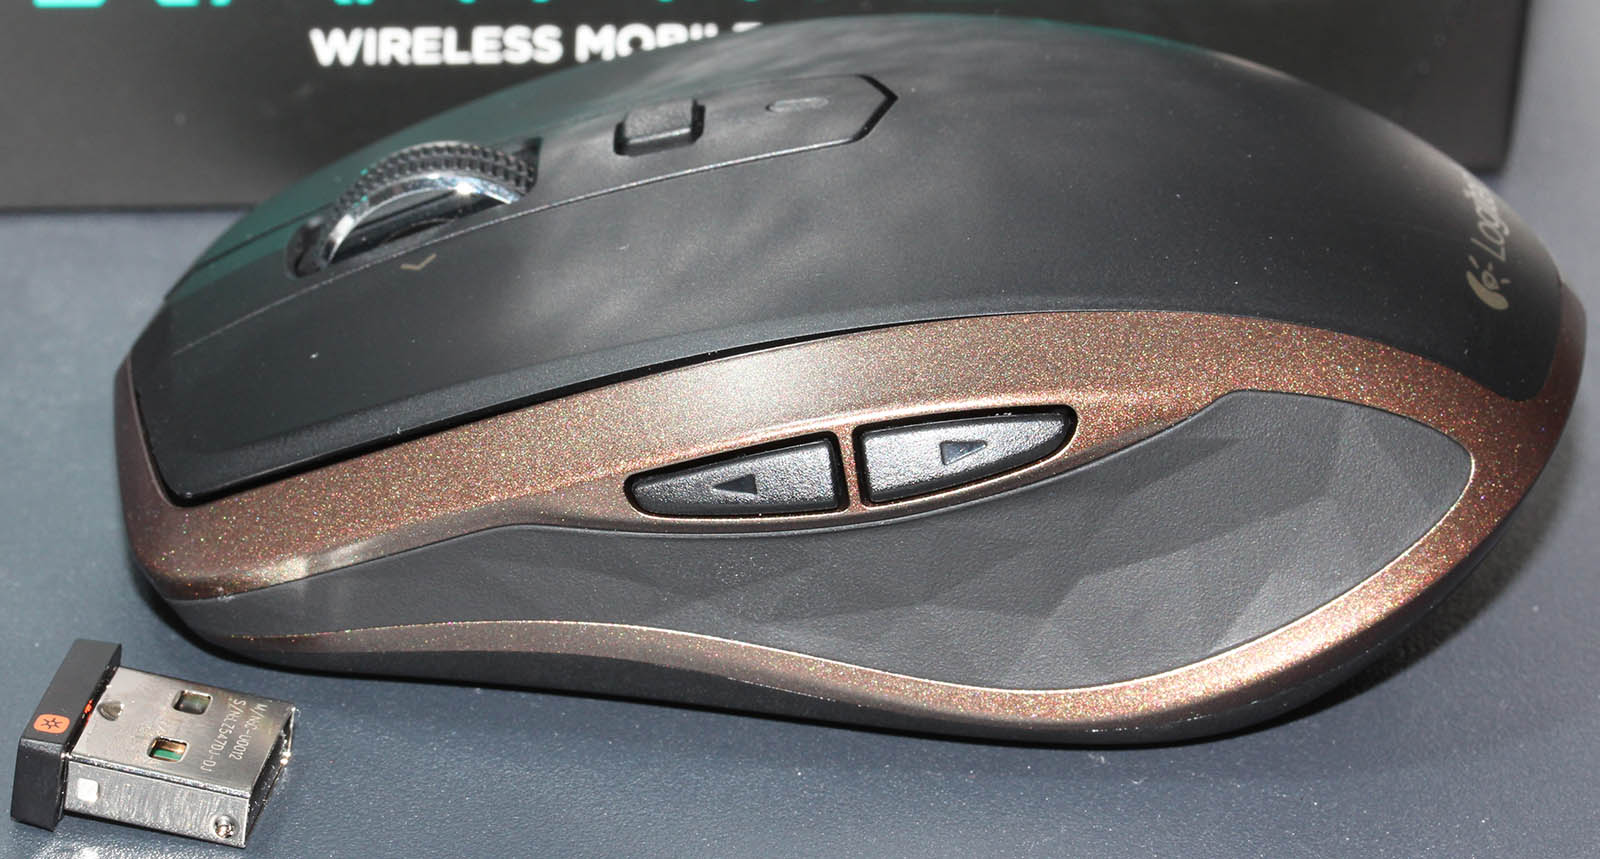
When flipping the rodent over, there are couple of new things, I haven't seen earlier in mice:
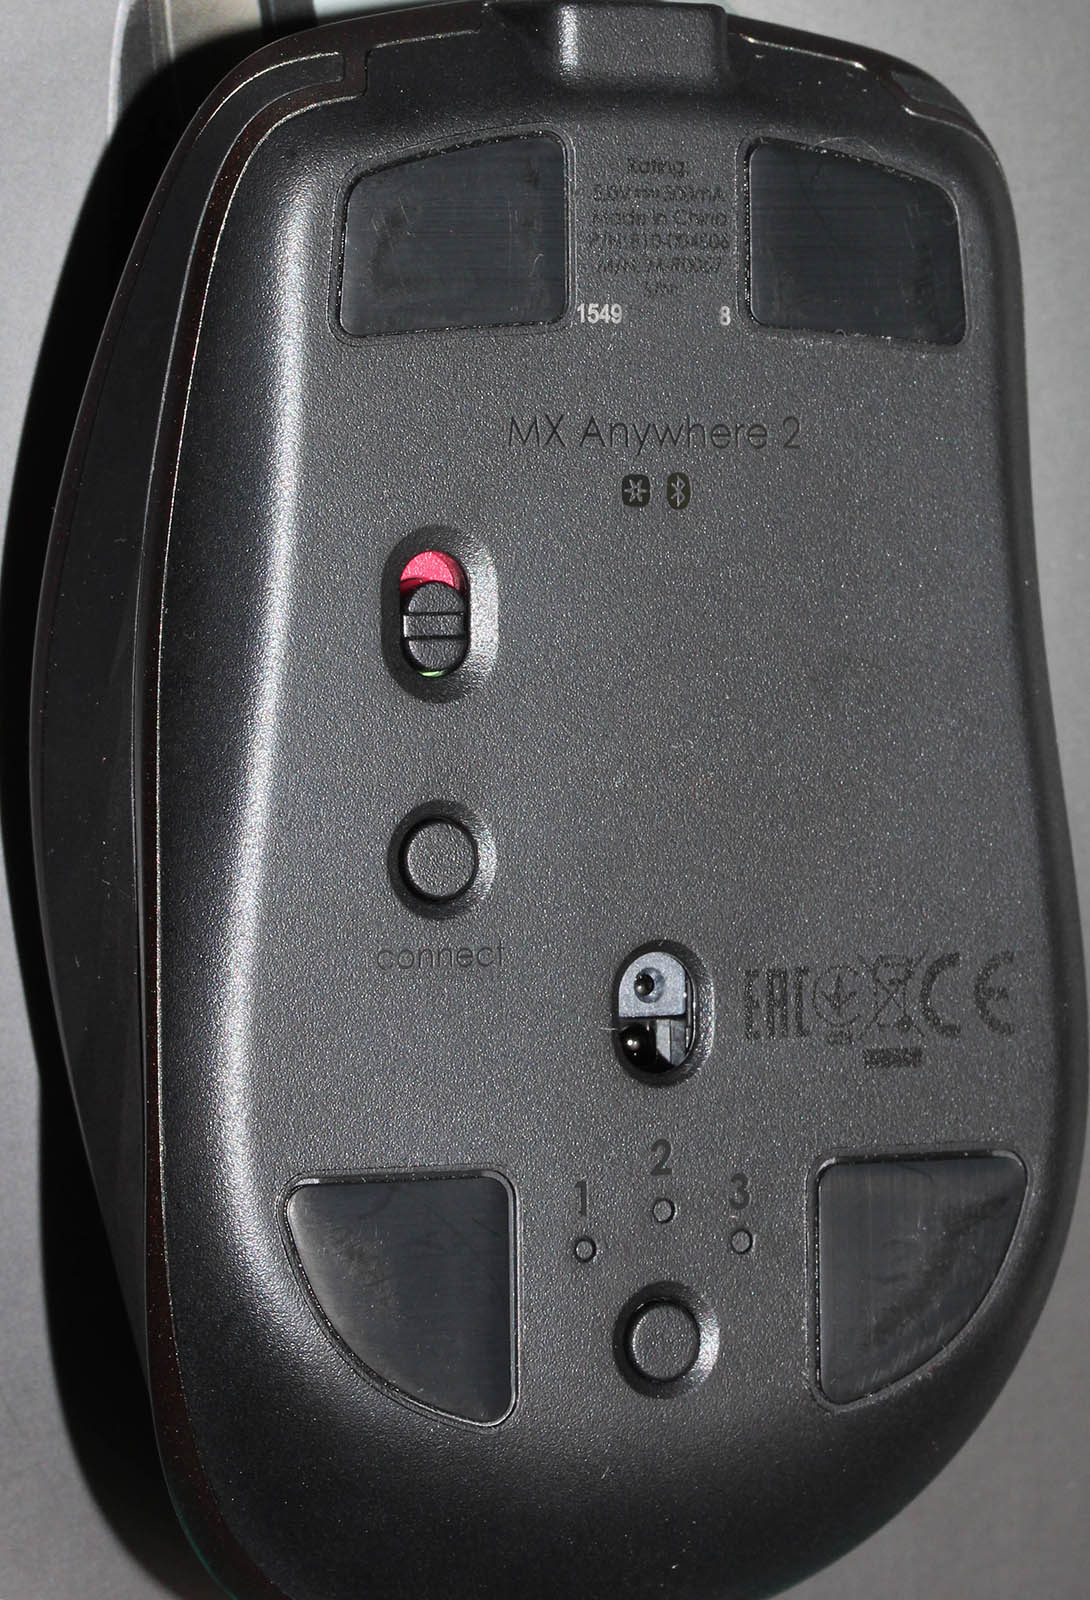
There is your O/I switch, a connect-button when your mouse needs a hint, that it should try harder making the connection. My experience about that is, that it does absolutely nothing. Then there is the "darkfield" sensor, which should work on any surface. And finally the new thing: a selector button. Since this beast can do both Bluetooth and Logitech's own wireless signals, you can choose between 3 devices which this thing can control. Actually, I would love to use that feature, but in my daily usage I need to switch between computers fast. Fast, as in, not wanting to flip my mouse over and keep clicking a button to make a choice between the computer I want to start using. On another type of usage scenario, that may be useful.
The pico-sensor is pretty much the same we've seen for many years already:
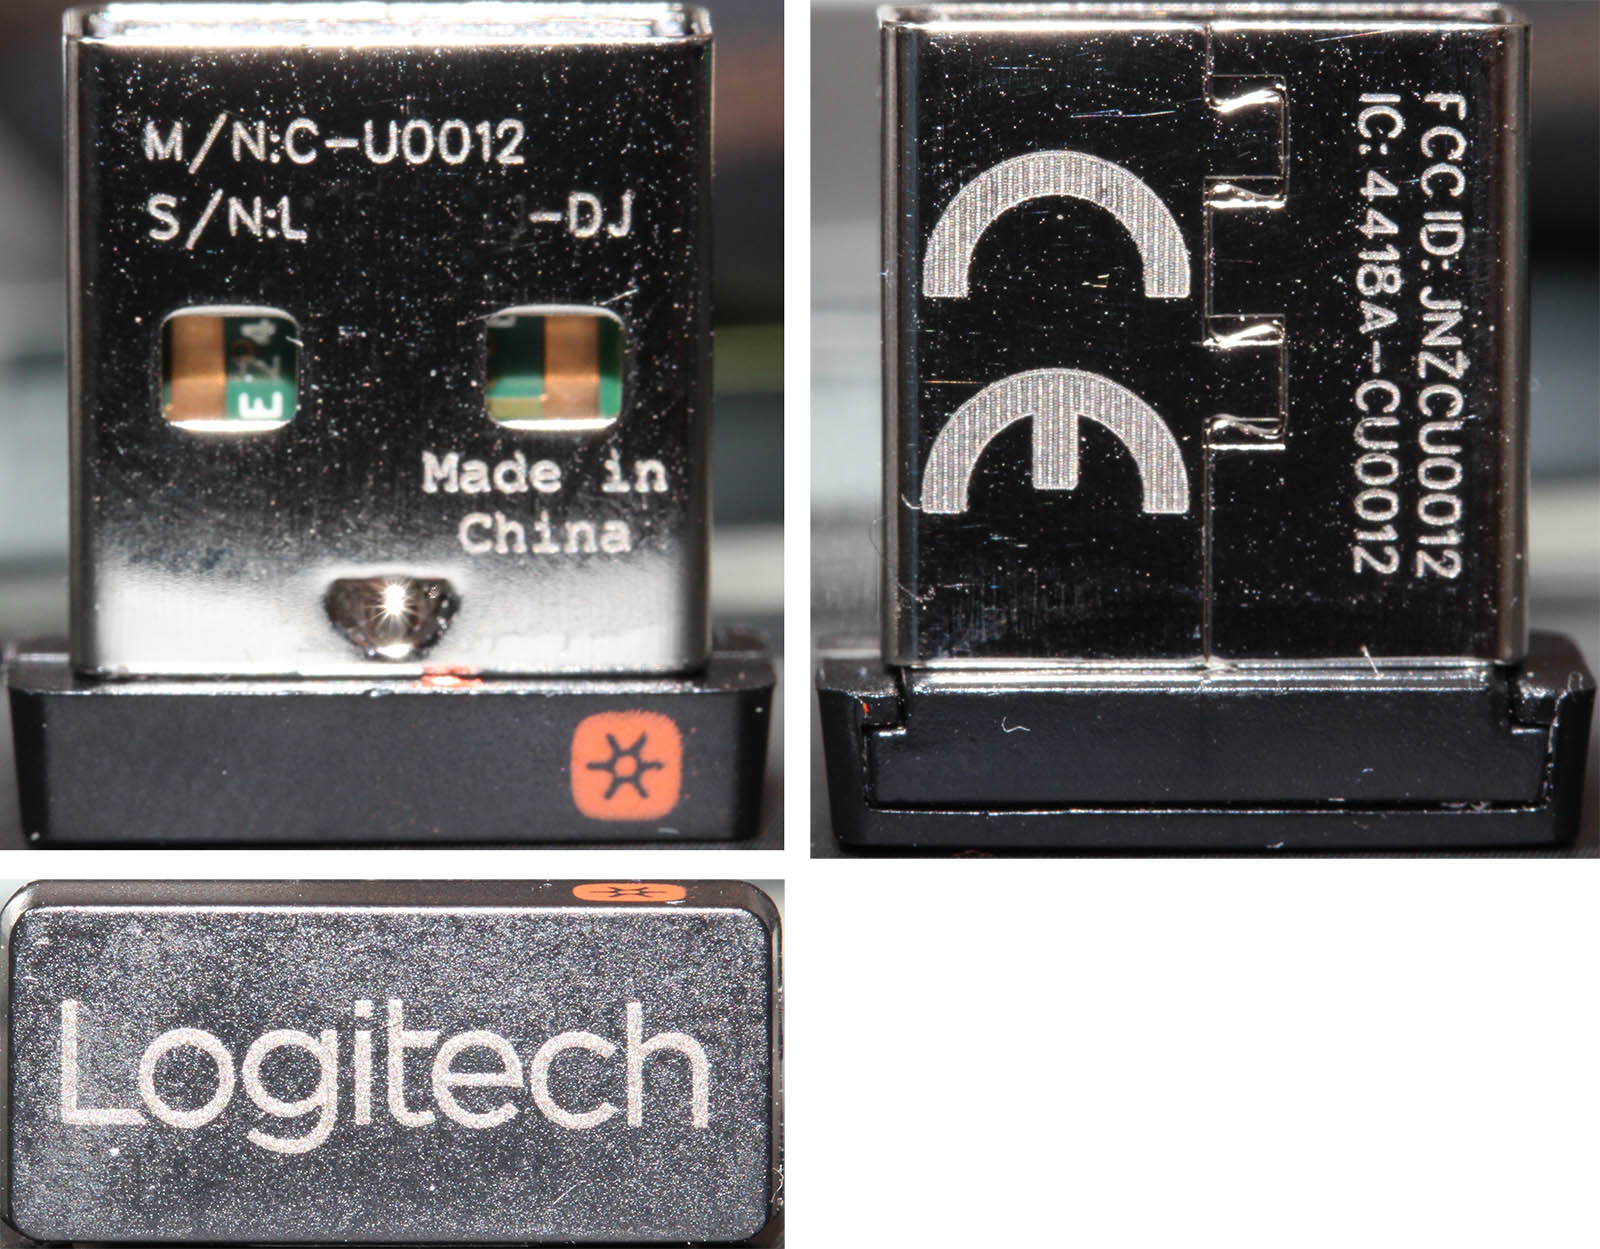
As I said, you don't necessarily need to use that. The mouse has bi-functionality in it, your Bluetooth connection will do fine.
My experience about this thing is: Wow! Amazing!
Yes, it is that good. The accuracy is there, ergonomic is there, the new Darklight sensor does exellent job on my desk. The thing is so slippery at the bottom, I didn't want to use my mouse mat anymore. Obviously, on the minus side, the thing is so slippery at the bottom it will just slip over the edge of my laptop when carrying it from a room to another. (I guess couple of drops later it will stop functioning, just like my previous one did.) The scroll roll has dual functionality, with friction or frictionless, which is cool. We've seen that in many mice before this. In general, the implementation of this excellent plan is just there. The general look and feel is so good, I might even get a second one.
I went to the support site and got some software for OS X:
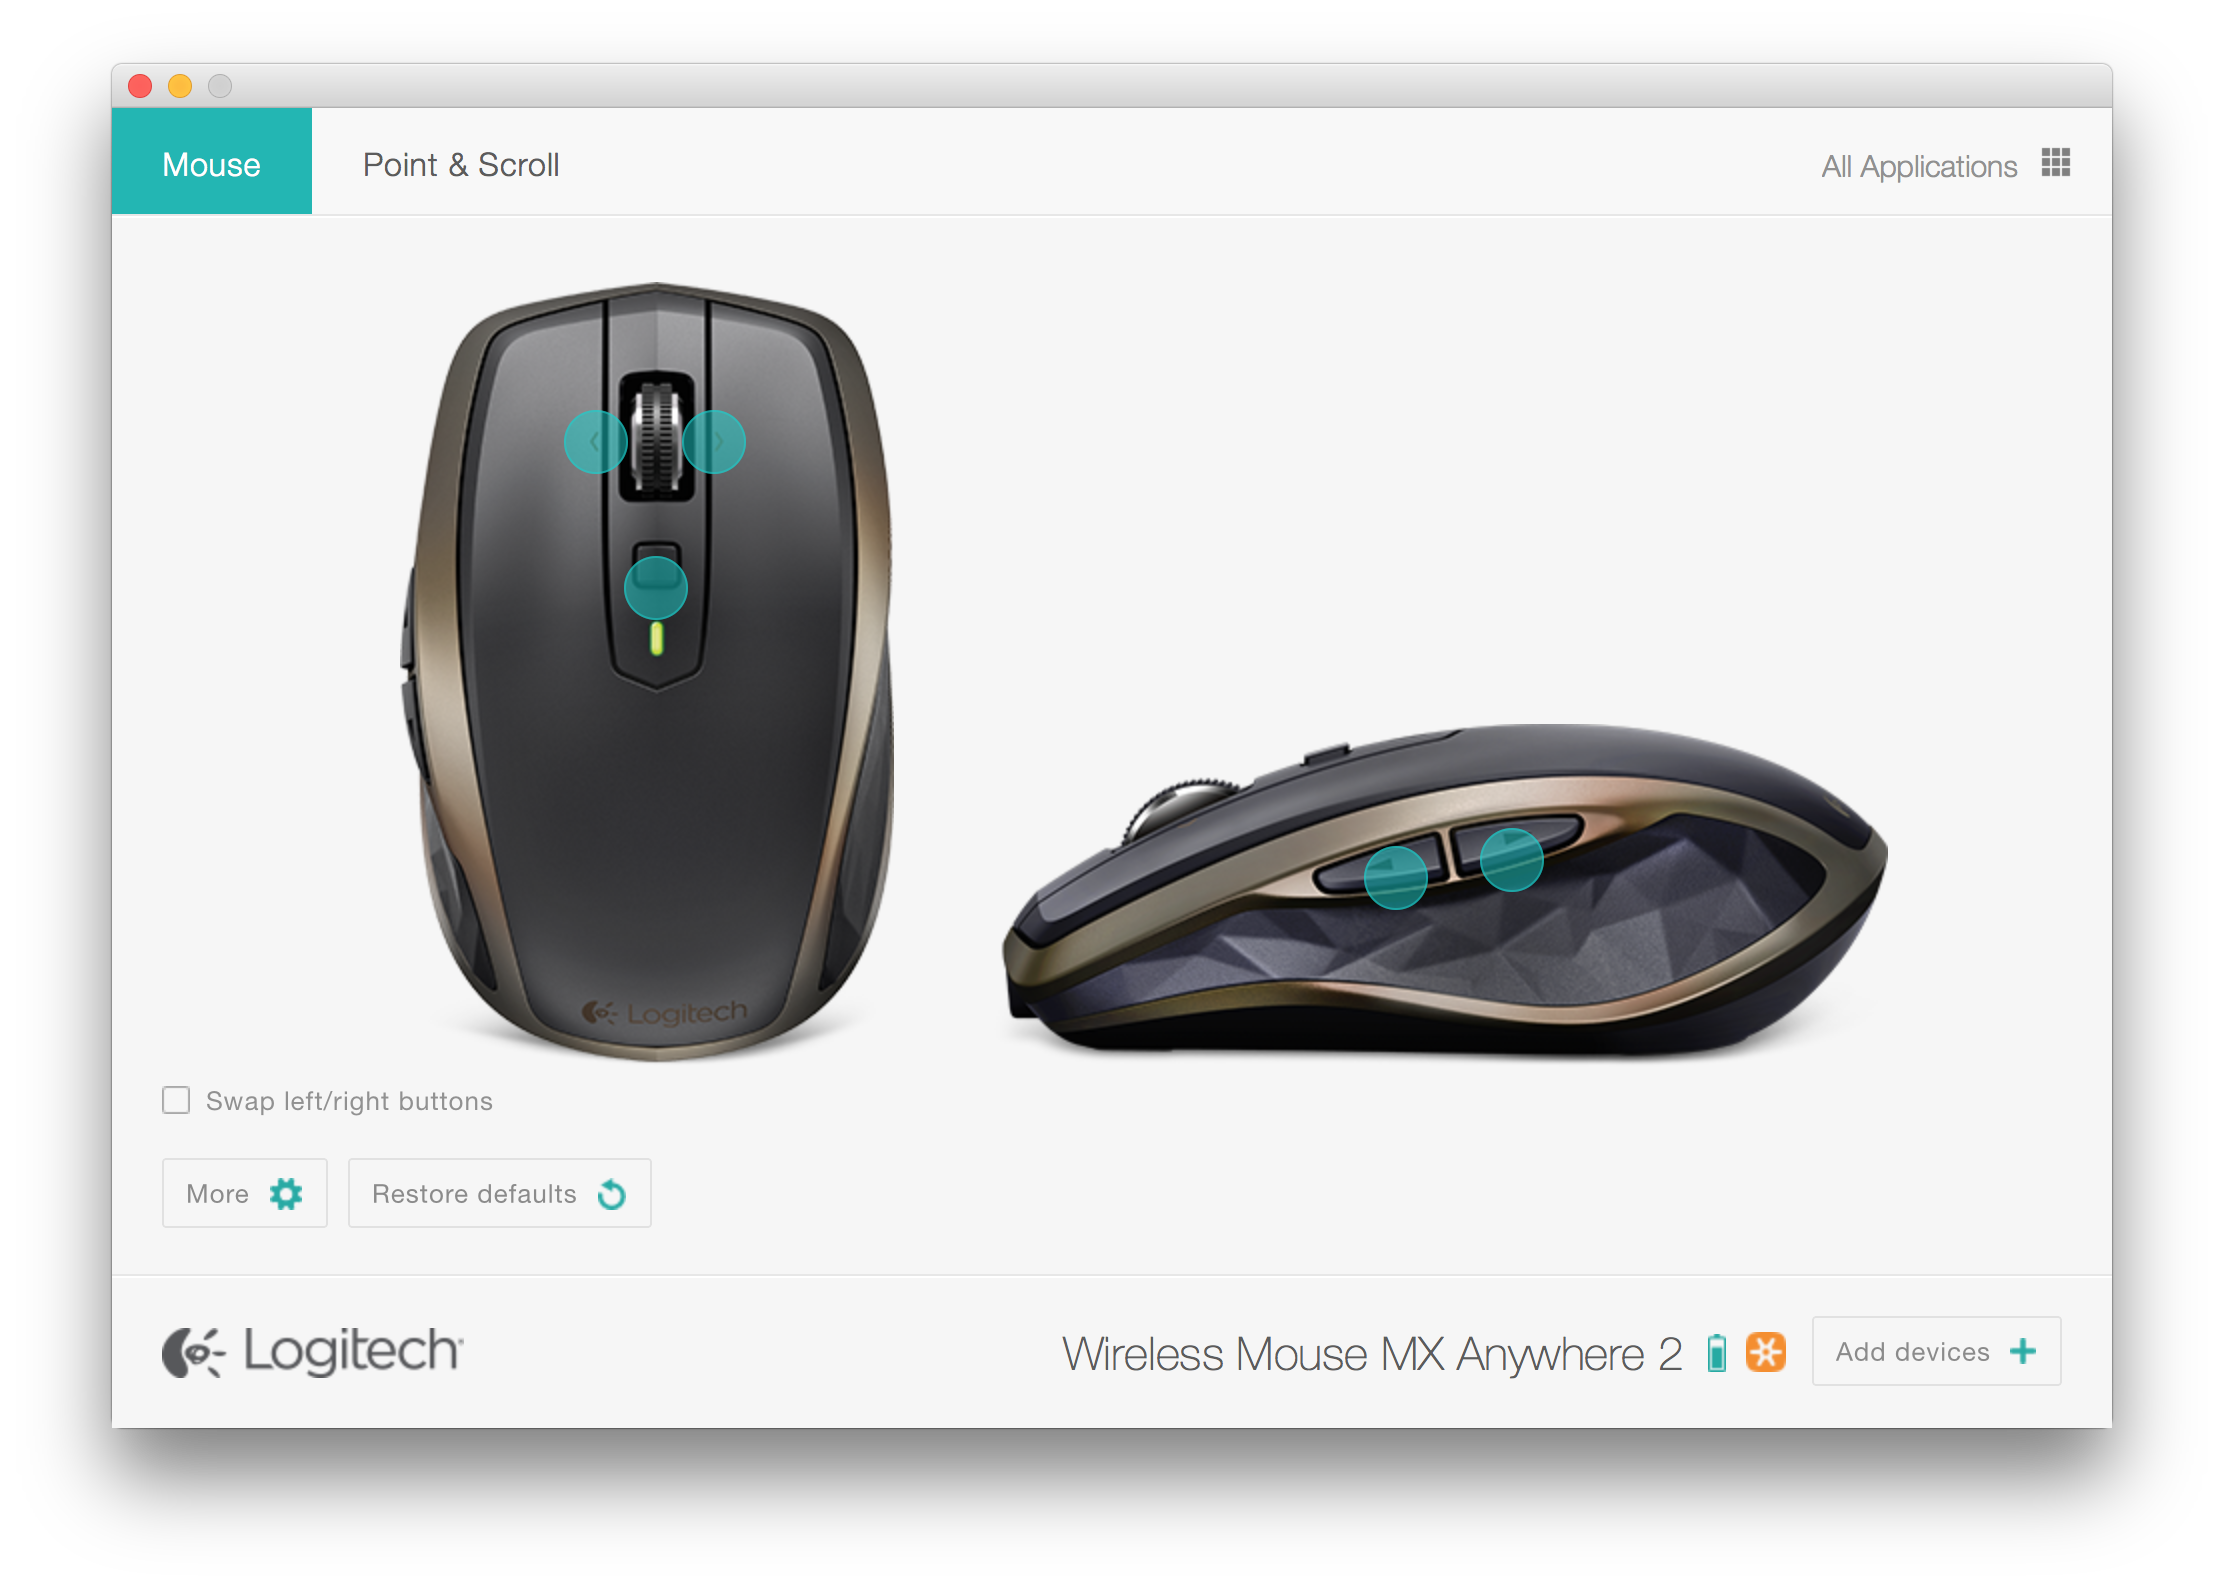

You get to see the 500 mAh Li-po charge state and change all kinds of settings. No frills, plain functionality there.
In conclusion: They get this right. It is the best mouse I've seen this far!
Huawei E5577 quick test
Saturday, February 13. 2016
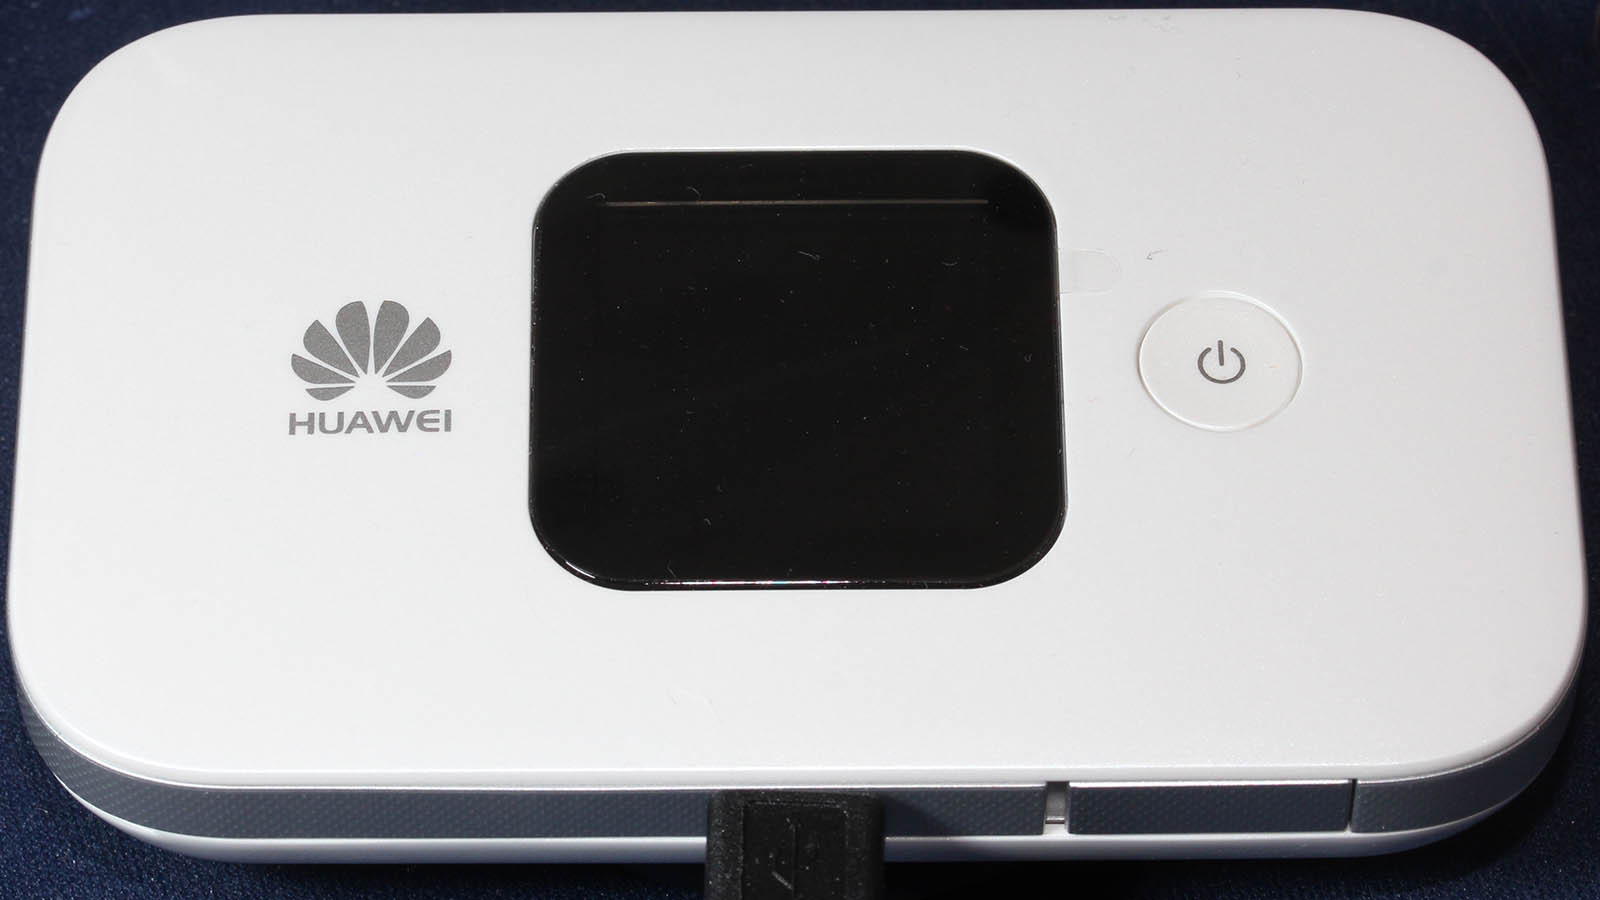
I had a chance to see what an E5577 is about. I don't own this, so I didn't break it apart. A Huawei E5577 is your run-of-the-mill Android-based 4G/3G/2G to Wi-Fi router. It even looks like a cell phone:
Huawei E5577 Specifications
Threre are some specs:
- LTE Category 4 Mobile Hotspot
- Freqencies supported:
- LTE: 2600/ 1800/ 800 MHz
- DC-HSPA+/ HSPA+/ UMTS: 2100/ 900 MHz
- GSM/ GPRS/ EDGE: 1900/ 1800/ 900/ 850 MHz
- Maximum transfer rates supported (DL = download, UL = upload):
- 4G LTE:
DL: 150 Mbit/s
UL: 50 Mbit/s - 3G Dual Carrier:
DL: 42 Mbit/s
UL: 5,76 Mbit/s - 3G HSDPA:
DL: 14,4 Mbit/s
UL: 5,76 Mbit/s
- 4G LTE:
- Standard 6-pin SIM card interface
- Format: Mini SIM
- Display: 1.45'' TFT LCD
- Startup time: 5s
- Dimensions: 96.8 mm x 58.0 mm x 17.3 mm
- Weight: 110g
- Micro SD Card slot
- Support external antenna: TS9 external antenna
- WiFi IEEE 802.11b/g/n
- Up to 10 users
IMEI info @ imei.info has:
- Model: E5577CS-321
- Brand: HUAWEI
- IMEI: TAC: 867262 FAC: 02
On the outside
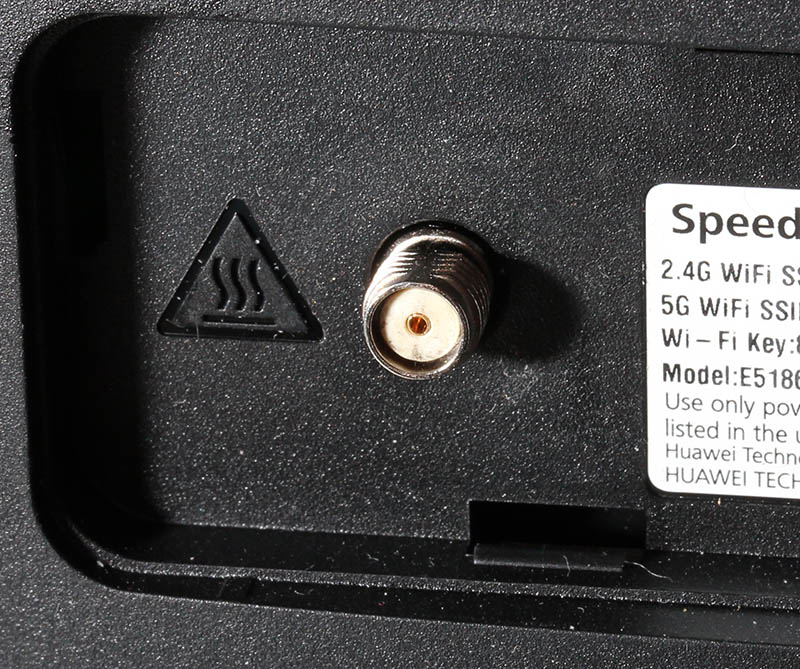
Enough specs, let's look at the thing a bit closer. On the front, there is a small LCD-screen and a power button. On the bottom edge, there are couple of connectors:
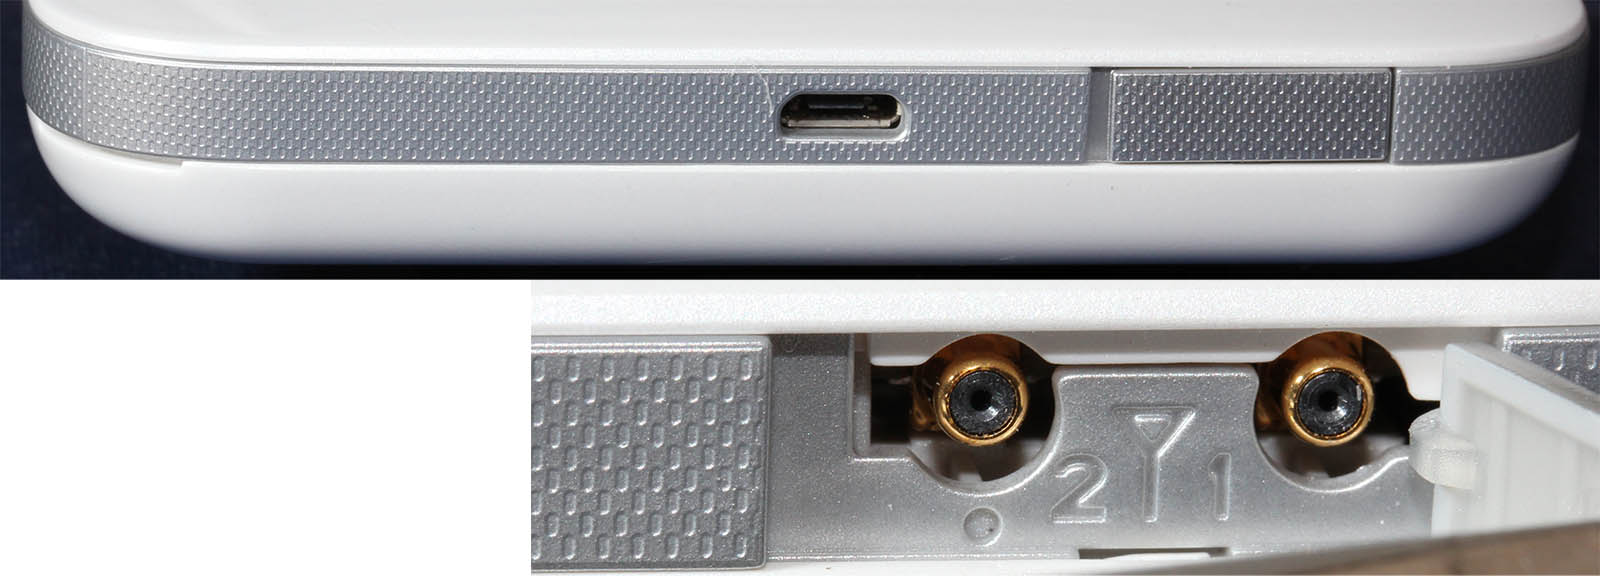
Charger is (per Chinese standard) an USB-connector. Micro-a to be specific. Under the flip-cover, there are two TS9-connectors for optional external antennas. Two, as LTE MIMO requires.
On the top side of the router, there is a button:

That button is used with power-button (when power is already on), to navigate the screen menu:
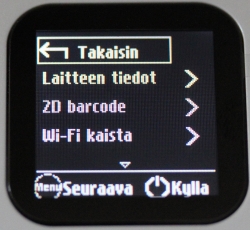
Doing an even remote usable UI with two buttons only is ... stupid? impossible? ... erhm... difficult. But the obvious benefit is, that you can do at least some settings and see some information without logging into the thing. For non-Finnish readers, the menu says: Back (Takaisin), Device information (Laitteen tiedot) and Wi-Fi bandwidth (Wi-Fi kaista).
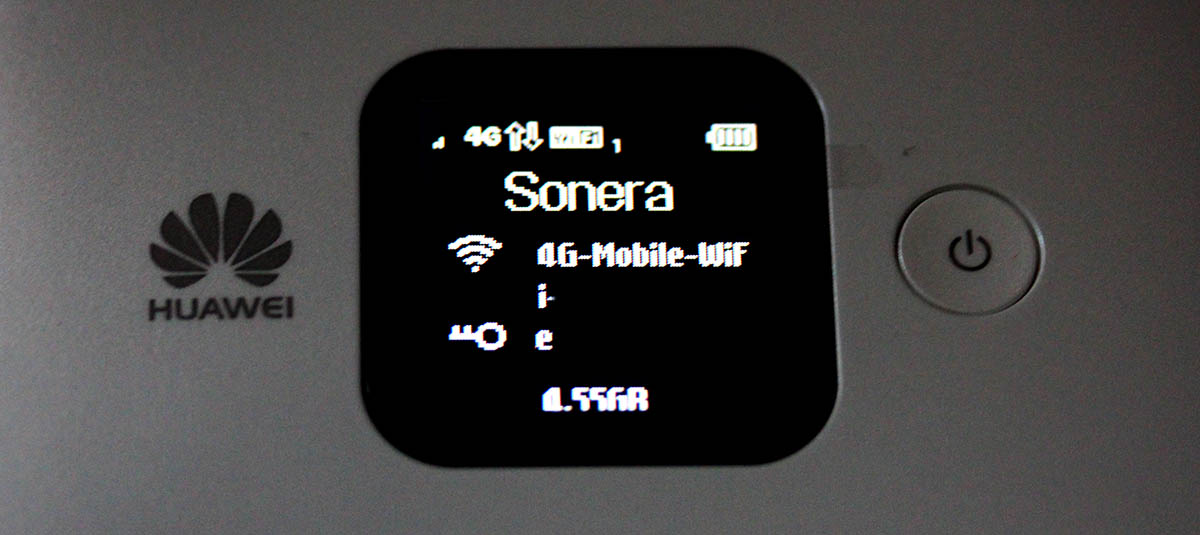
Normally, the screen has following status information:
In the inside
When back cover is popped, the thing looks like this under the hood:
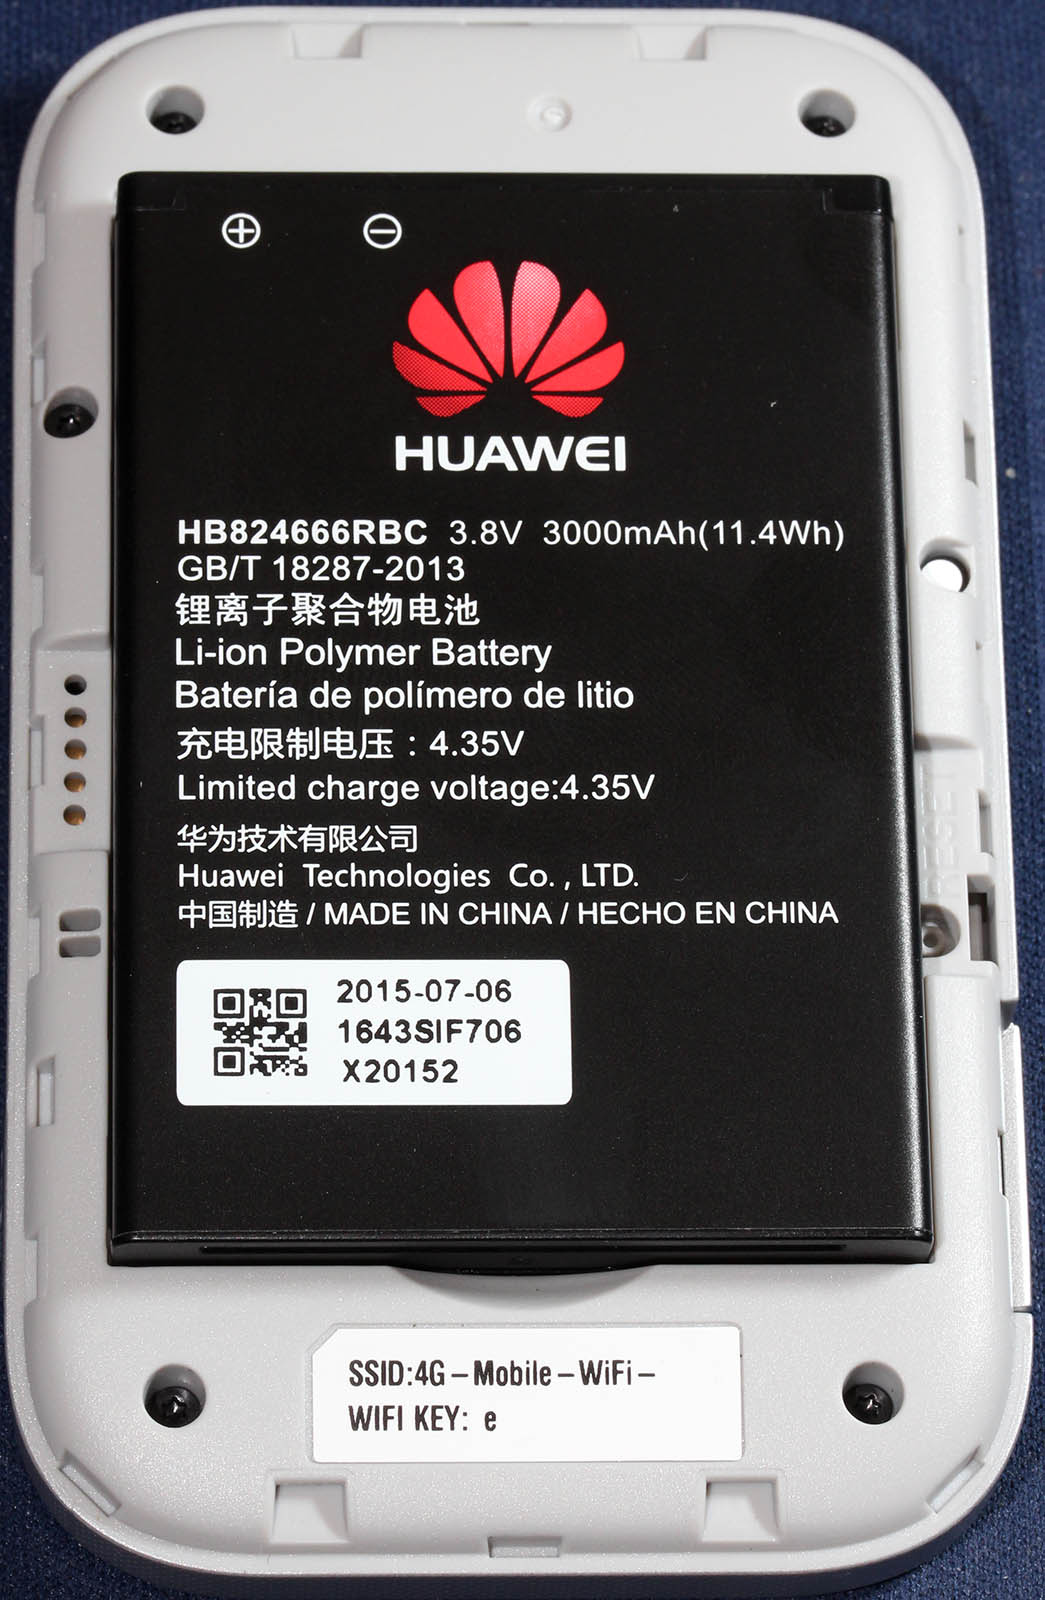
The battery-pack is taking most of the space there. That's smart to put a 3 Ah Li-po battery for maximal usage time. When the battery is lifted, all the good stuff is visible:
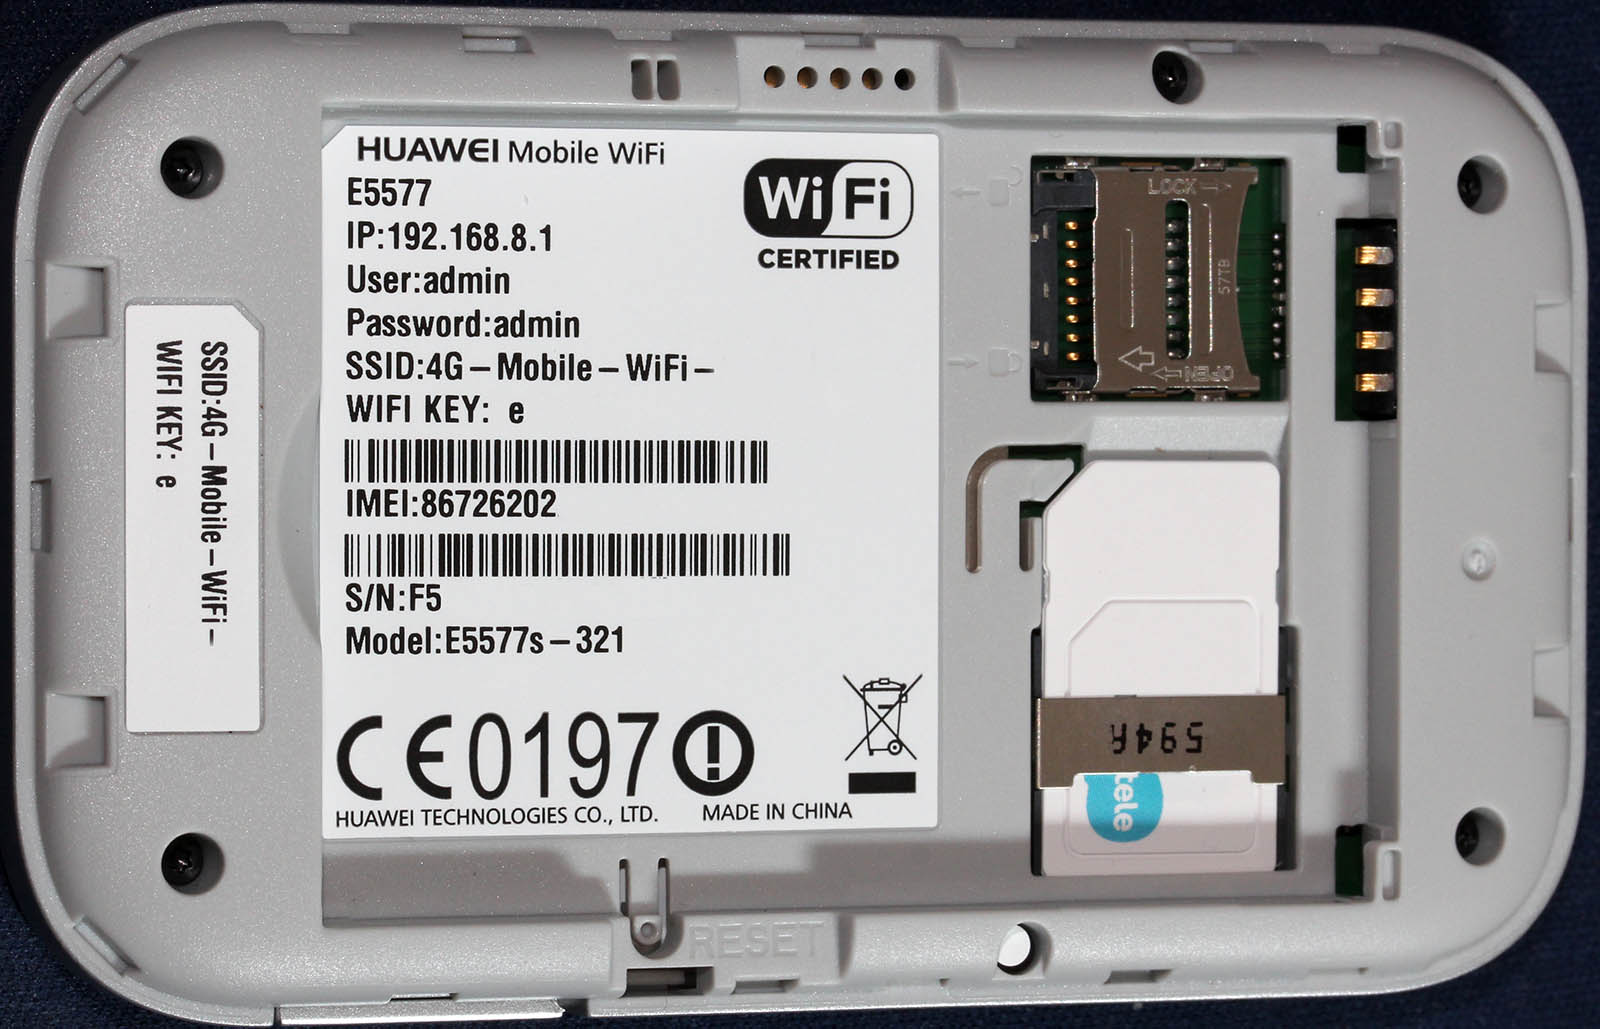
On the top right corner, right next to the 4 battery pins, there is the SD-card slot. On an initial glance, it looks a lot like 2nd SIM-slot, but as you can see, there are 8 pins in a nice row. So, that's for SD-card. Below the empty SD-card slot, there is the 6-pin SIM -slot. It is already populated, as I was studying a router, which as actively used.
Web UI
Admin-interface is a Huawei classic http://192.168.8.1/
Since the WPA-password was clearly visible on the status screen, and this router is very easy to install to your home. Sales clerk had installed the SIM-card in the store, and at home you just kick the power on, and plug in the charger. That's very much a fire-and-forget thing. On my first login, I was greeted by:
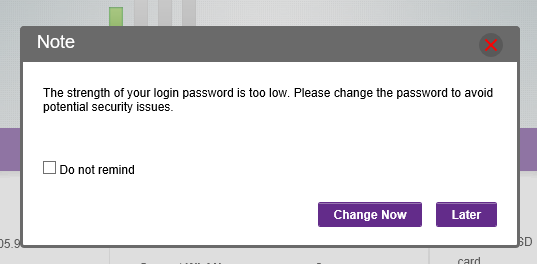
Yes, the Huawei admin / admin -pair was in use there. Since, this wasn't mine, I didn't go change the password. Also the admin-console is only accessible from LAN-side, so it isn't that much of a security hole there.
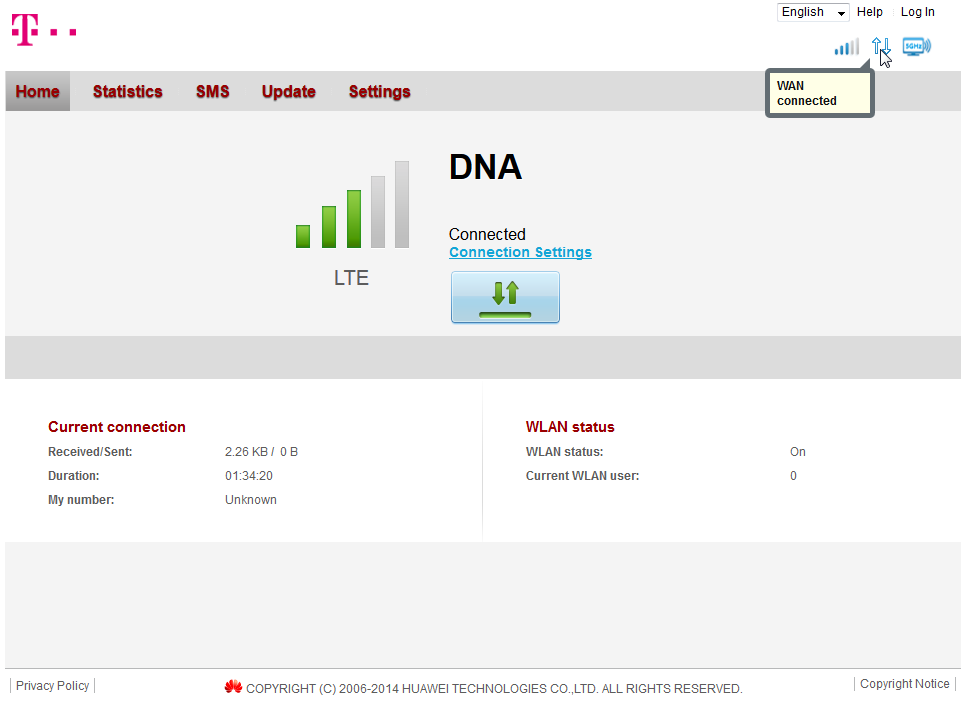
In the main screen, very little surprises to anybody who has seen an E5186:
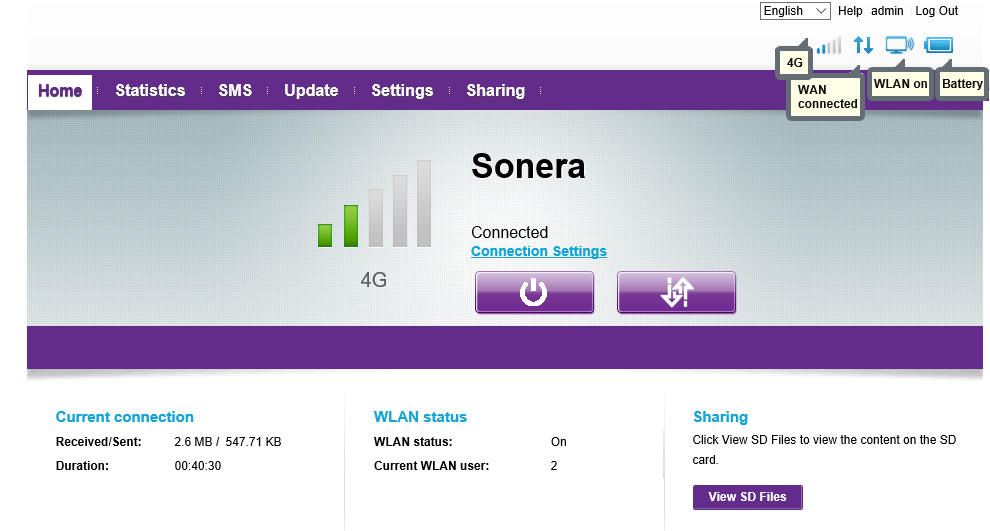
This unit was customized for TeliaSonera Finland and it has 3 languages to choose from: English, Swedish and Finnish.
Some firmware details:
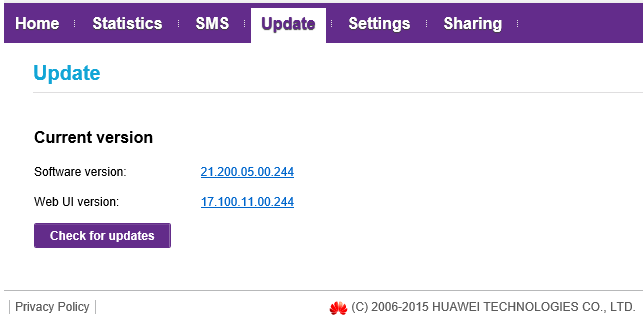
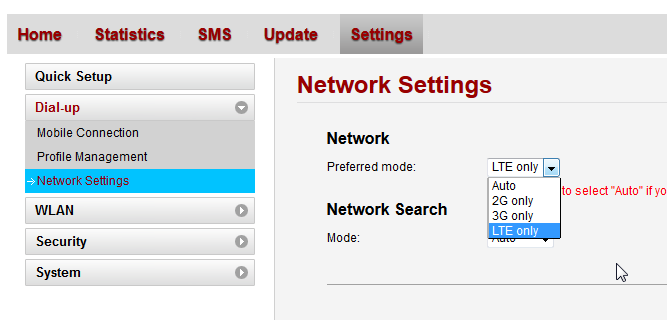
The network settings were also exactly like an E5186:
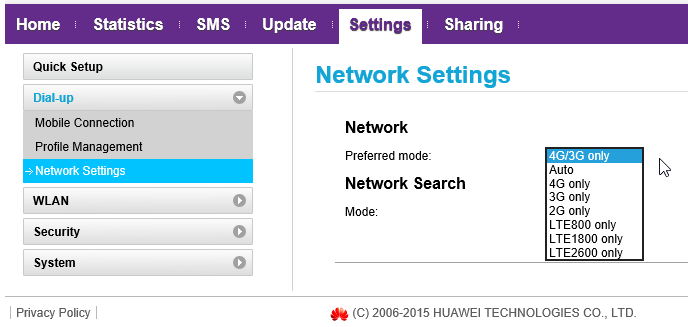
At this point I was pretty sure, that an E5577 is just a miniature E5186.
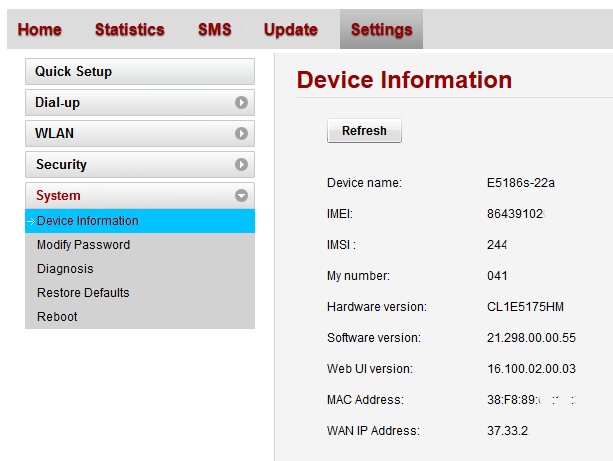
The device details are:
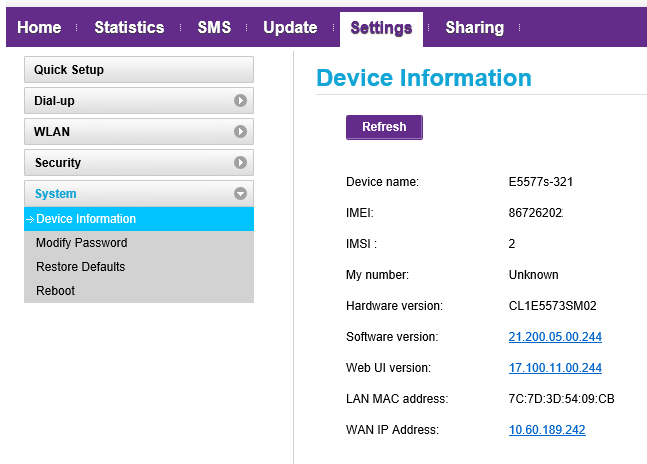
As you can see, there are plenty of options to go change. I just didn't present all of them here. Very little interesting stuff there.
AJAX API
Since E5186 has a very good AJAX interface for the GUI, and this is just a miniature version of it. This had to have the same:
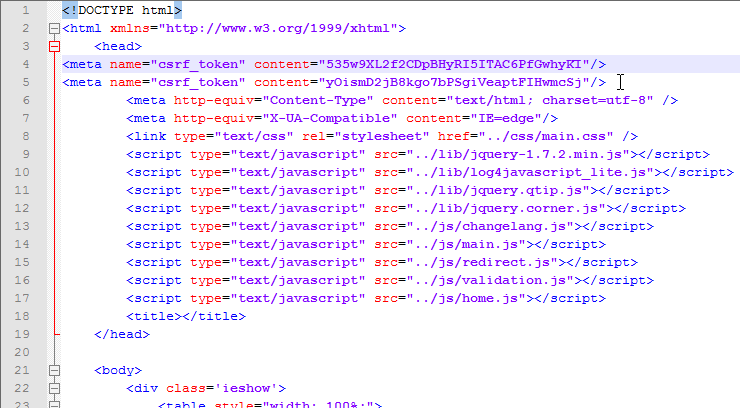
I even ran some queries just to test it:
/api/device/signal:
<pci>96</pci>

<sc></sc>

<cell_id>36657366</cell_id>

<rsrq>-7dB</rsrq>

<rsrp>-108dBm</rsrp>

<rssi>-79dBm</rssi>

<sinr>2dB</sinr>

<rscp></rscp>

<ecio></ecio>

<mode>7</mode>
Everything I threw at it returned exactly similar results, than E5186. Which of course is a very good thing.
Final words
This was a very pleasant exploration to a familiar device. I have really nothing negative to say about this router.
As I just pulled this from my article-queue, I had a chance to do some follow-up with the owner. She said, that it had been performing well and no issues had been encountered.
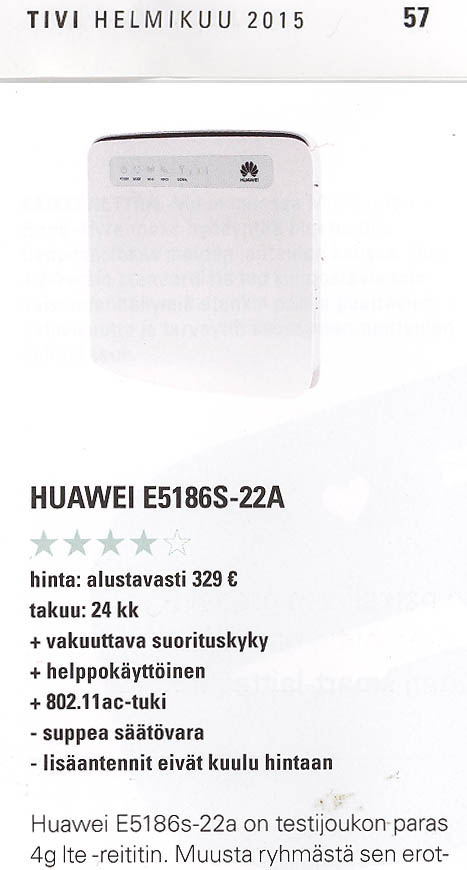
Earlier last year I was playing around with a ZTE MF910, which is a exact competitor for Huawei E5577. The MF910 isn't a robust box on a long run. Occasionally it loses the 4G-connection and requires some Tender/Love/Care to kick it back on-line. On my tests, it was an ok piece of plastic, but obviously non-computer users don't want to mess aroud with their hardware, they just want it to work when needed. The ZTE's box won't deliver on that.
Given a E5577 and MF910, having exactly the same price and all, my choice would be the Huawei.
Temperature measurement limits of La Crosse WS2357
Thursday, February 4. 2016
Guess what happens right before hell freezes over? Your weather station indicates dew point of 136 °C. Kinda funny.
Good thing that Weather Underground allows you to edit by removing data points. So, there are couple gaps in my graphs now:
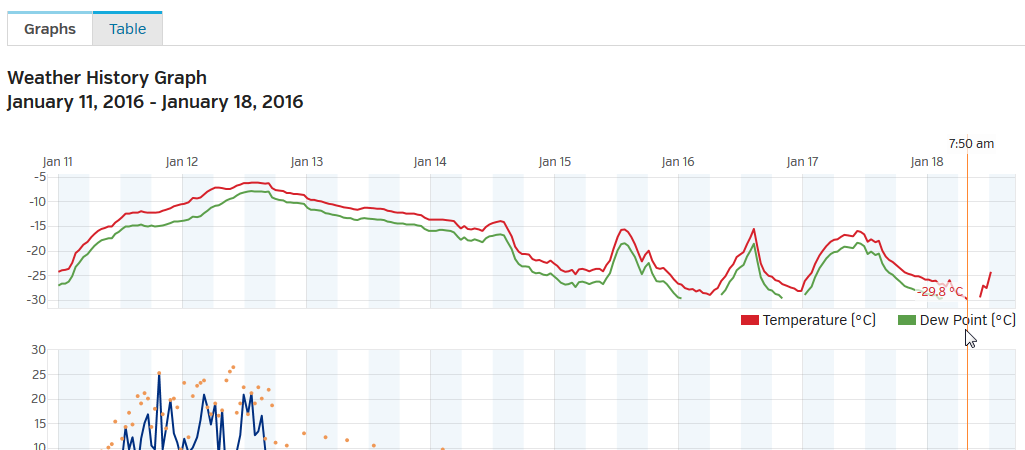
The reson for this weird behaviour can be found from the spec:

OMG! The lower bound of outside temperature measurement is -29.9 °C. In Finland that can be reached occasionally.
Fortunately I'm using open source software, Open2300. With very little debugging I found the code:
double temperature_outdoor(WEATHERSTATION ws2300, int temperature_conv)
...
return ((((data[1] >> 4) * 10 + (data[1] & 0xF) +

          (data[0] >> 4) / 10.0 + (data[0] & 0xF) / 100.0) - 30.0));


double dewpoint(WEATHERSTATION ws2300, int temperature_conv)
...
return ((((data[1] >> 4) * 10 + (data[1] & 0xF) +

          (data[0] >> 4) / 10.0 + (data[0] & 0xF) / 100.0) - 30.0));
There is a formula to convert raw data read from RS-232 -line to celsius.
My patch to fix this is:
--- svn/rw2300.h 2015-01-19 23:42:17.728311172 +0200

+++ JaTu/rw2300.h 2016-02-04 23:58:45.675123710 +0200

@@ -24,6 +24,7 @@

 #include <math.h>

 #include <sys/types.h>

 #include <sys/stat.h>

+#include <float.h>


 #define MAXRETRIES 50

 #define MAXWINDRETRIES 20

@@ -56,6 +57,8 @@


 #define MAX_APRS_HOSTS 6


+#define TEMPERATURE_OVERFLOW FLT_MIN

+

 typedef struct {

        char name[50];

        int port;

--- svn/wu2300.c 2015-01-19 23:42:16.619287028 +0200

+++ JaTu/wu2300.c 2016-01-18 10:13:21.252092414 +0200

@@ -53,15 +53,18 @@


    /* READ TEMPERATURE OUTDOOR - deg F for Weather Underground */

-

-   sprintf(tempstring, "&tempf=%.2f", temperature_outdoor(ws2300, FAHRENHEIT) );

-   strcat(urlline, tempstring);

-

+    tempfloat = temperature_outdoor(ws2300, FAHRENHEIT);

+    if (tempfloat > TEMPERATURE_OVERFLOW) {

+        sprintf(tempstring, "&tempf=%.2f", tempfloat );

+        strcat(urlline, tempstring);

+    }


    /* READ DEWPOINT - deg F for Weather Underground*/

-

-   sprintf(tempstring, "&dewptf=%.2f", dewpoint(ws2300, FAHRENHEIT) );

-   strcat(urlline, tempstring);

+   tempfloat = dewpoint(ws2300, FAHRENHEIT);

+    if (tempfloat > TEMPERATURE_OVERFLOW) {

+        sprintf(tempstring, "&dewptf=%.2f", tempfloat );

+        strcat(urlline, tempstring);

+    }


    /* READ RELATIVE HUMIDITY OUTDOOR */

--- svn/fetch2300.c 2015-01-19 23:42:17.728311172 +0200

+++ JaTu/fetch2300.c 2016-01-18 10:09:46.762108076 +0200

@@ -35,7 +35,7 @@

    char tendency[15];

    char forecast[15];

    struct config_type config;

-   double tempfloat_min, tempfloat_max;

+   double tempfloat, tempfloat_min, tempfloat_max;

    int tempint, tempint_min, tempint_max;

    struct timestamp time_min, time_max;

    time_t basictime;

@@ -63,7 +63,11 @@


    /* READ TEMPERATURE OUTDOOR */


-   sprintf(tempstring, "To %.1f\n", temperature_outdoor(ws2300, config.temperature_conv) );

+    tempfloat = temperature_outdoor(ws2300, config.temperature_conv);

+    if (tempfloat == TEMPERATURE_OVERFLOW)

+        sprintf(tempstring, "To OVR\n");

+    else

+        sprintf(tempstring, "To %.1f\n", tempfloat);

    strcat(logline, tempstring);


    temperature_outdoor_minmax(ws2300, config.temperature_conv, &tempfloat_min,

@@ -79,8 +83,11 @@


    /* READ DEWPOINT */

-

-   sprintf(tempstring, "DP %.1f\n", dewpoint(ws2300, config.temperature_conv) );

+    tempfloat = dewpoint(ws2300, config.temperature_conv);

+    if (tempfloat == TEMPERATURE_OVERFLOW)

+        sprintf(tempstring, "DP OVR\n");

+    else

+        sprintf(tempstring, "DP %.1f\n", tempfloat );

    strcat(logline, tempstring);


    dewpoint_minmax(ws2300, config.temperature_conv, &tempfloat_min,
There I introduce a hard-limit of TEMPERATURE_OVERFLOW and check if that has been reached. If yes, the invalid value is not sent to WUnderground.
I've contacted the author of Open2300 about this, but haven't received a response.
Huawei E5186 Firmware Upgrade with Multicast Upgrade Tool
Monday, January 25. 2016
Typical firmware upgrade for any entwork applicance is done via web-interface. The obvious catch in that is, that you need to authenticate, move to a suitable page and upload a file to accomplish that. In rare cases, hardware has an "upgrade mode", which allows you to inject a new firmare to the device without any proper authentication. For hacking, this opens a completely new avenue. If one could modify a firmware (and sign it), it would be possible to unlock locked devices, unlock features, or introduce new functionality.
Getting the box to the upgrade mode sounds easy:
turn power off from the device, keep WPS and Wi-Fi buttons pressed, kick on the power and at a suitable time release the Wi-Fi button. Then normal boot process is stopped and the box will wait for a firmware file to be delivered to it. In reality, it's bit tricky. Possible to do, but bit tricky.
Prerequisites
To get the upgrade rolling you'll need following things:
- Huawei E5186s-22a router
- A computer running Windows 7, 8 or 10
- Administrator permissions for changing TCP/IP settings is required
- An ethernet cable to connect the computer to the router's LAN-port
- A firmware file to upload, filename will be something like
BV7R2C0update_<version number>.gz.bin - Multicast Upgrade Tool
- This is not publicly available file
- Tool's filename is
multicast_upgrade_tool.exe, 3354624 bytes - The one I got was packaged into
multicast.rar, 1040927 bytes. - SHA-256 sum of
multicast_upgrade_tool.exeis6224fe8fb0ec628a29ade1d7d5fb2db5183bfd43486037d0cdf8c363e8ed8eca
- WinRar packing utility from http://www.win-rar.com/ installed and working on your Windows
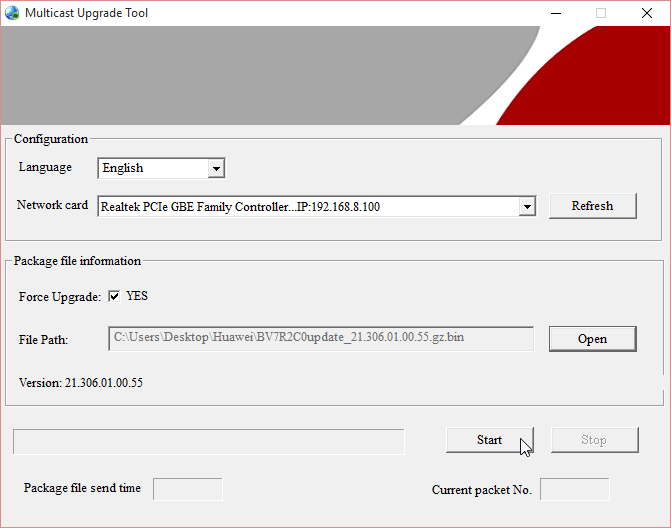
Setup
This is what my setup looks like:
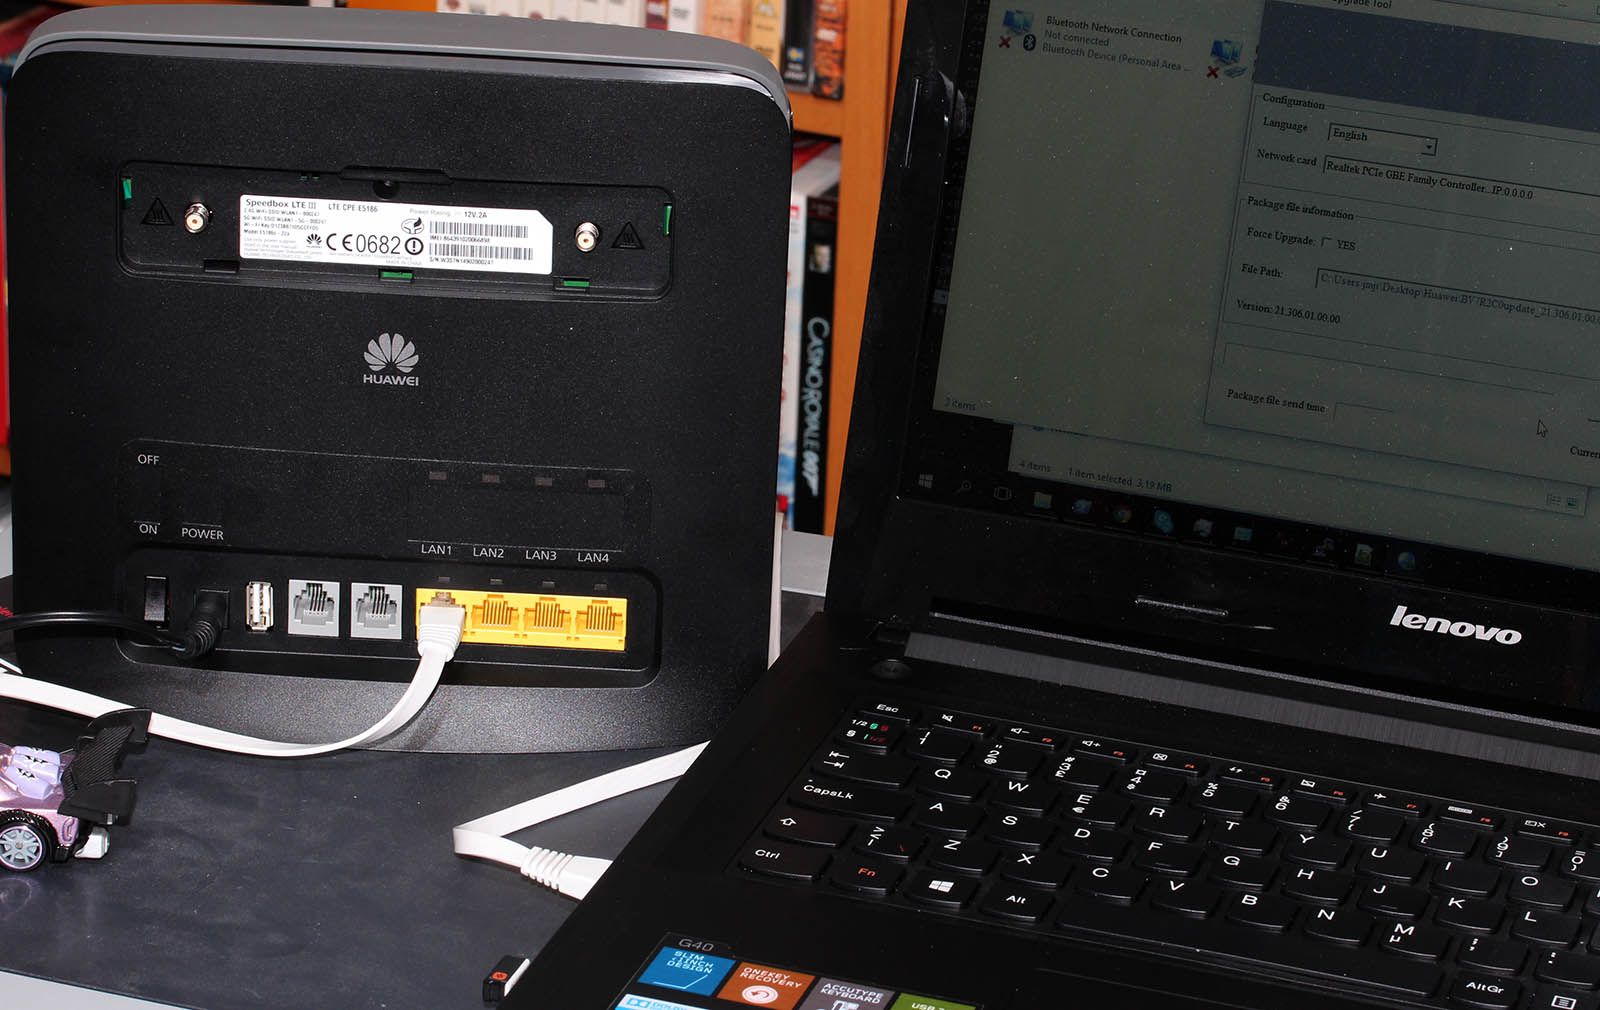
I didn't have any switches or any other network appliance there, I just hooked the other end of the cable to my laptop and one end to the router. (The Kabuto car in the bottom corner is optional )
Next thing you'll need to confirm is your firewall software (or Windows built in one). Depending on what you have it may not allow the outgoing traffic.
The definition of upgrade traffic profile is as follows:
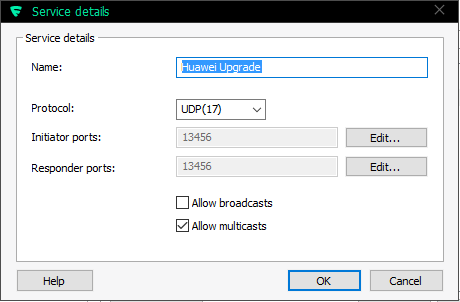
It is UDP, both initiator and responder are at port 13456. The obvious thing that you need to notice is, that traffic is multicast.
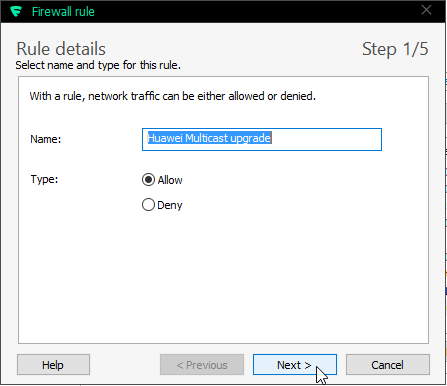
My firewall rule is:
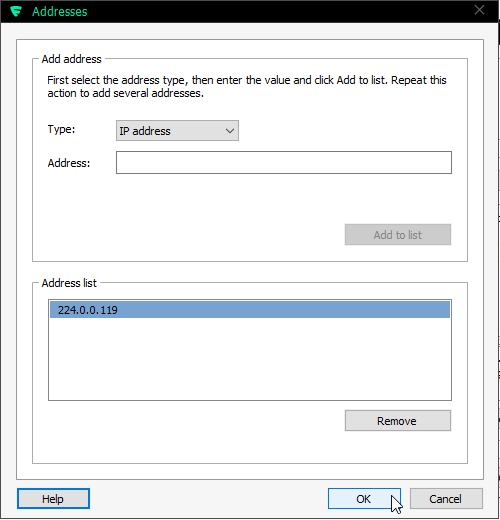
Make sure you'll allow outgoing traffic to multicast address 224.0.0.119. For any layman, that looks like just another IP-address, but it isn't one. It is in multicast address range and will be handled differently by TCP/IP-stack.
As all you TCP/IP savvy people know, multicast works no matter what your computer's IP-address is. That being said, I still recommend you change the computer's IP-address to network 192.168.8/24 which is used by the E5186. It is done from control panel (the screen shots are from Windows 10):
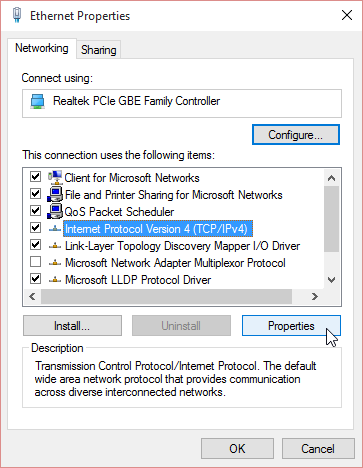
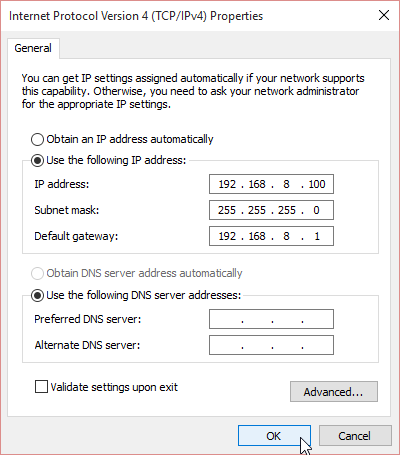
I didn't bother setting up any DNS-servers there. It will work without. The value of 192.168.8.100 is recommended by Huawei manual, so I used that.
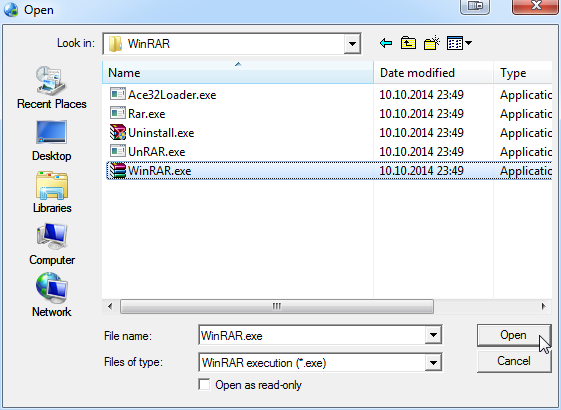
Final setup thing is to make sure your Multicast Upgrade Tool can access WinRAR. On startup this will happen:
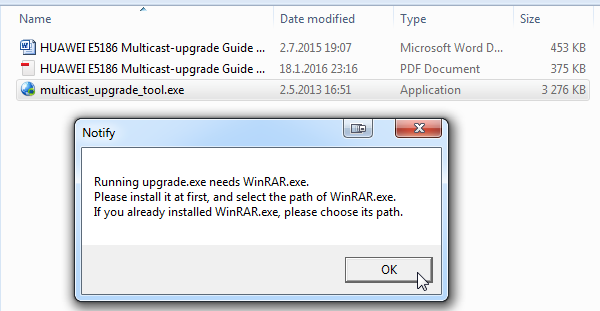
Just point the file selector to your already installed WinRAR:
That's it. That will do for the setup.
Update
Now this is the time to start practicing the upgrade mode -switch on power up.
First the normal, non-interrupt bootup sequence. It will look like this on your LEDs:

Serial console logs indicate, that you'll have 0,850 seconds from power-on to words "not in router upgrade mode" to be logged. So, I strongly suggest, that you'll keeps WPS and Wi-Fi buttons when you flip the power switch.
Your window-of-opportunity to release the Wi-Fi -button is between 0,850 and 1,890 seconds from power-on. If you release earlier, it's same as not pressing them at all. If you'll press them longer, you'll get the phrase "not in router upgrade mode" to the log, meaning that you failed.
This is what a success will look like:

If your blue LED keeps lit, like this:
 Then everything is still ok. I cannot reproduce that every time, but I successfully updated firmwares with that status also. The idea is, that the blue LED keeps lit.
In that state the router is expecting you to start sending the file:
When you're successfully sending, the LEDs will indicate it:
 The Wi-Fi LED will blink. It will go off once a while, but don't worry about it.
You can monitor the number of times, the file has been sent:
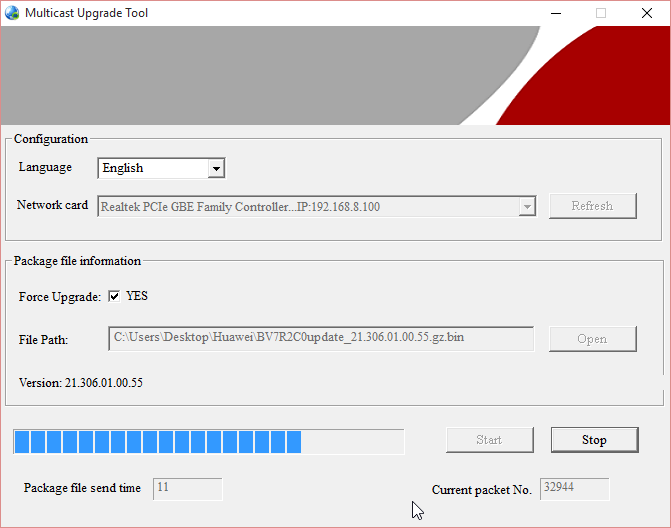
The entire upgrade can take like 10 minutes and you'll be transferring the file any number of times. Once I had to transfer it 11 times, before E5186 got all the bits of it.
Don't lose hope here!
Completing update
When your upgrade is completed and you're ready to power off the router, LEDs will look like this:
 The Wi-Fi LED will go on and off slowly. It will keep doing that forever or until you power of the unit, whichever comes first.
Now you're done!
Go ahead kick the power back on and see how it went.
Huawei E5186 RS-232 pins explained
Saturday, January 23. 2016
For the 2nd time, I got an E5186 loaner (post about the 1st time here). This time with permission to take a closer look inside.
Since this one had already RS-232 wires soldered, I took them for closer inspection. Un-boxing is exactly like in B593, 3 PH-2 screws holding the cover in place. Two at the bottom of the unit (one covered with a warranty paper) and one screw at the back between LTE-antennas.
Layout
After popping the cork, the board's flipside looks like this:
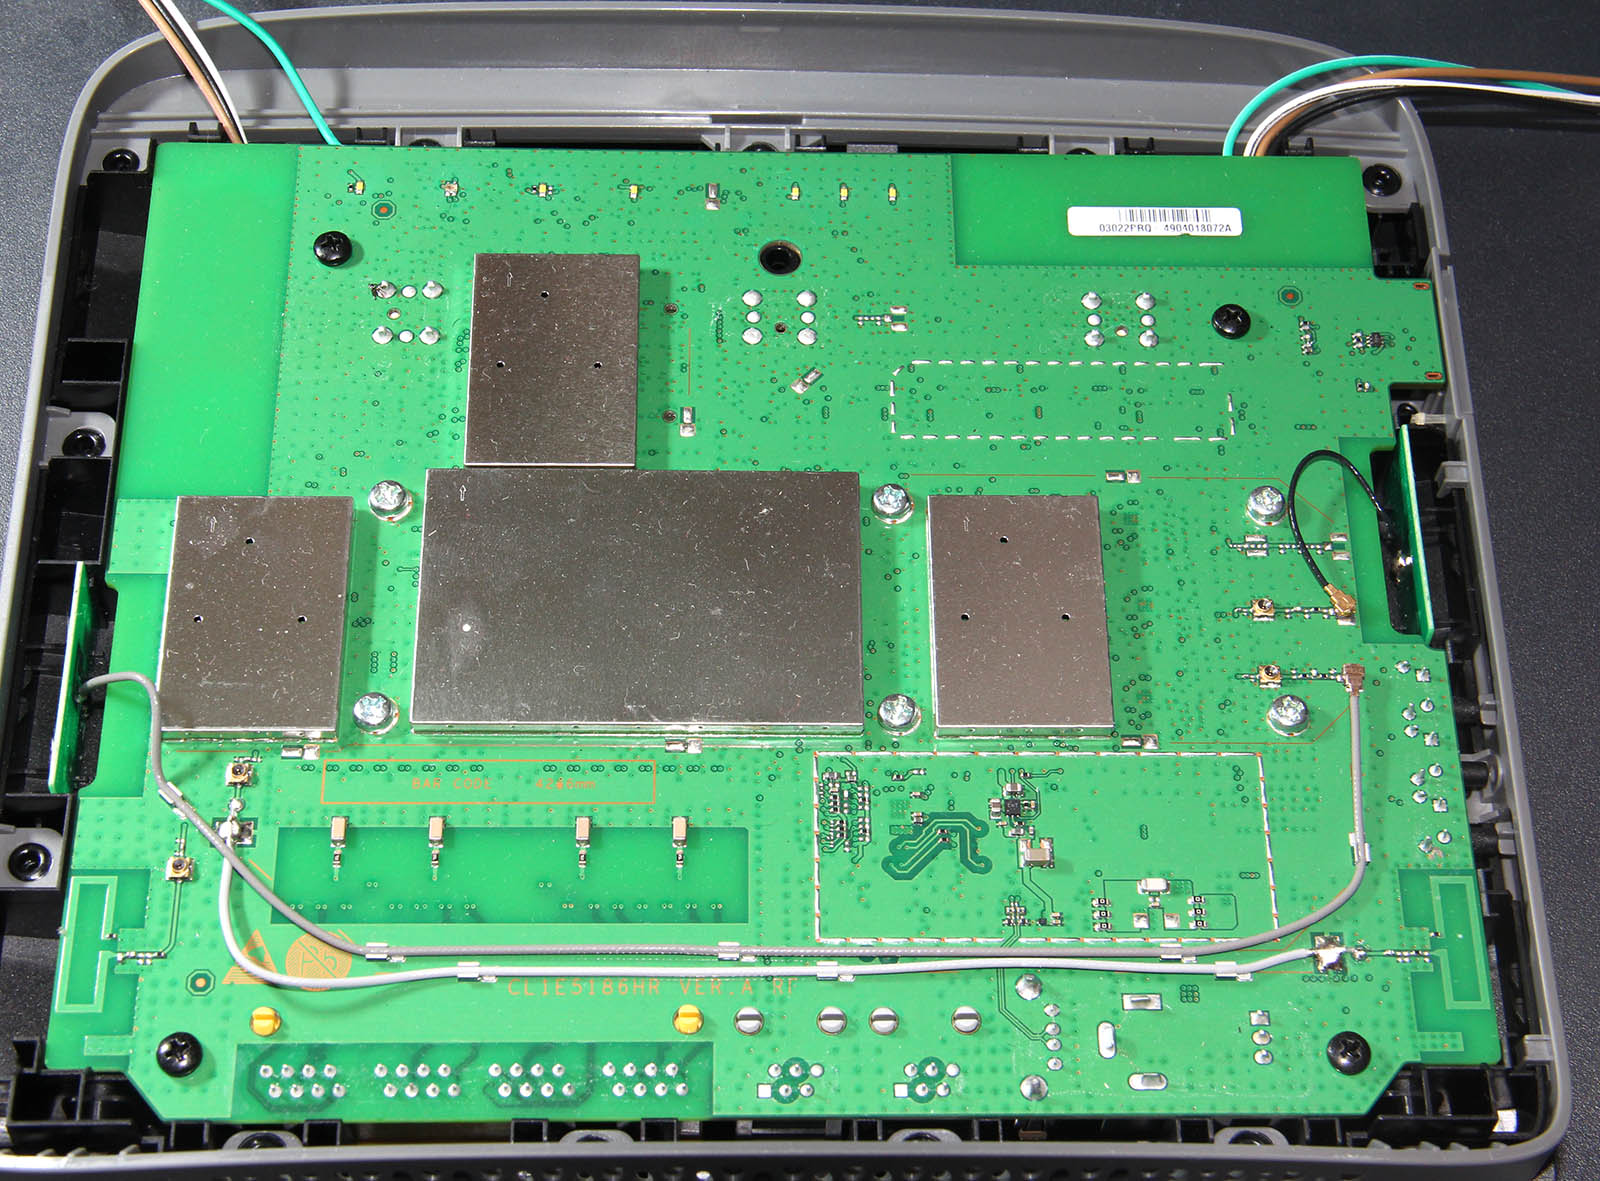
In this unit, there is no need to pry open none of the 4 shiny ESD covers. All the good stuff is on the other side. Again, 4 PH-2 screws holding the board in place.
Board, right side up:

In this case, the obvious clue for me was the already soldered RS-232 wires. I'm also publishing another picture by KOSH, a LTEforum.at activist, describing some of the good parts an E5186 board has:
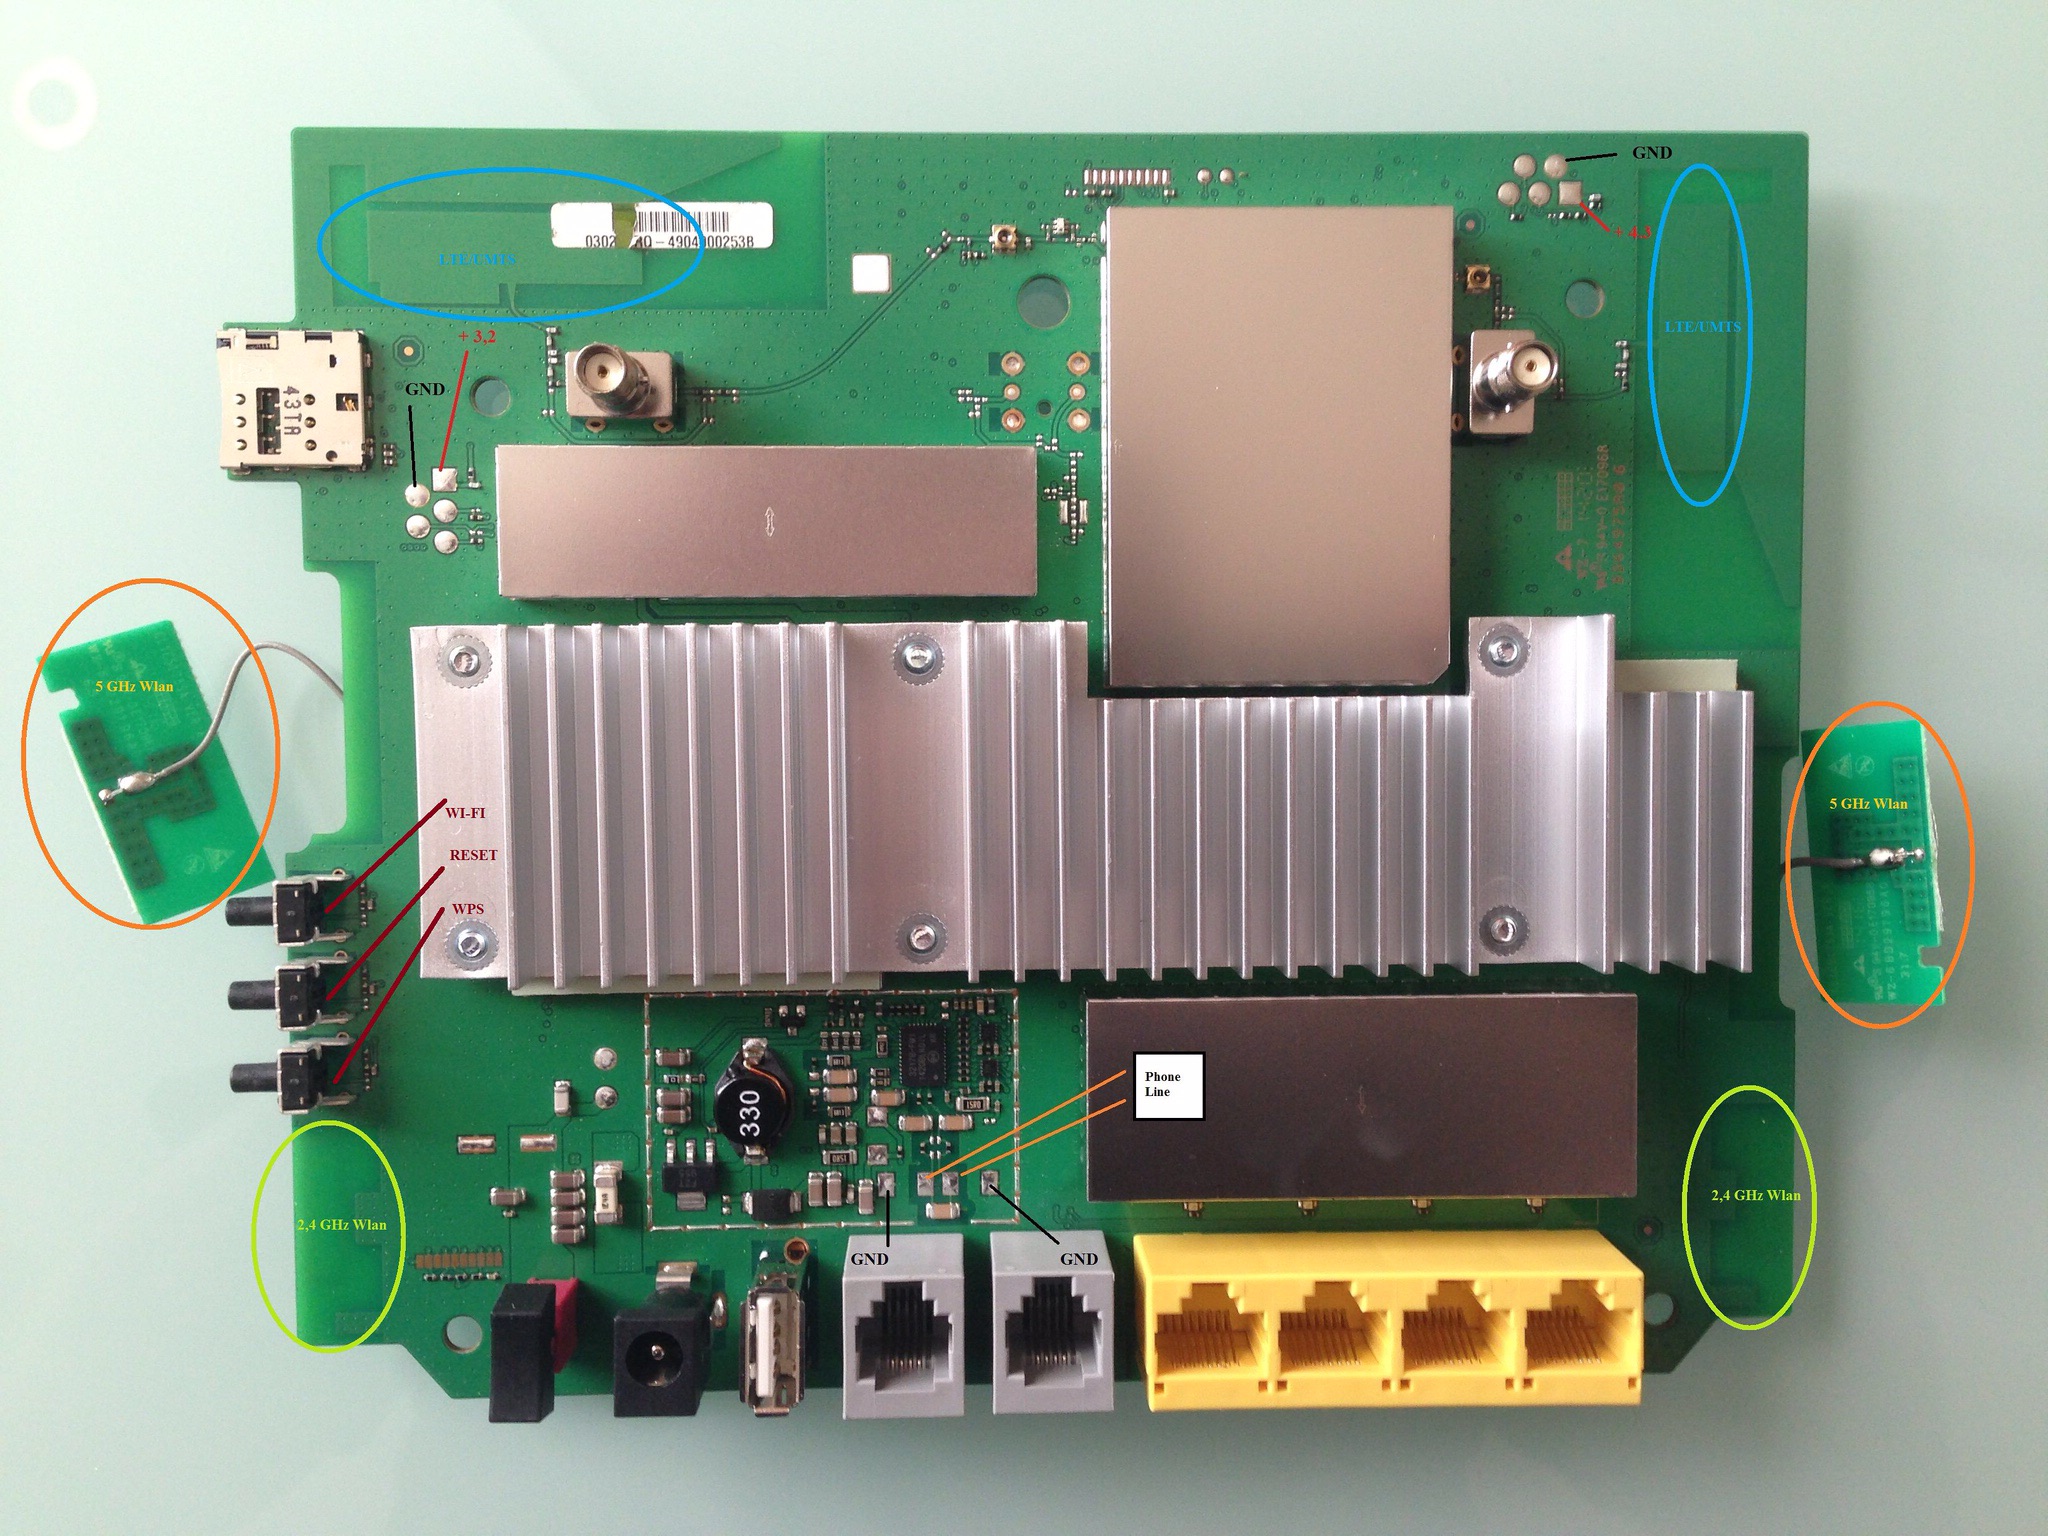
There are 2 of: LTE/UMTS antennas on top corners, 5 GHz WLAN antennas at the sides and 2,4 GHz WLAN antennas on the bottom corners. The picture doesn't point out the locations of RS-232 pins, only the ground and Vcc pins.
Linux
A closer look of the Linux side pins right next to the SIM-slot:
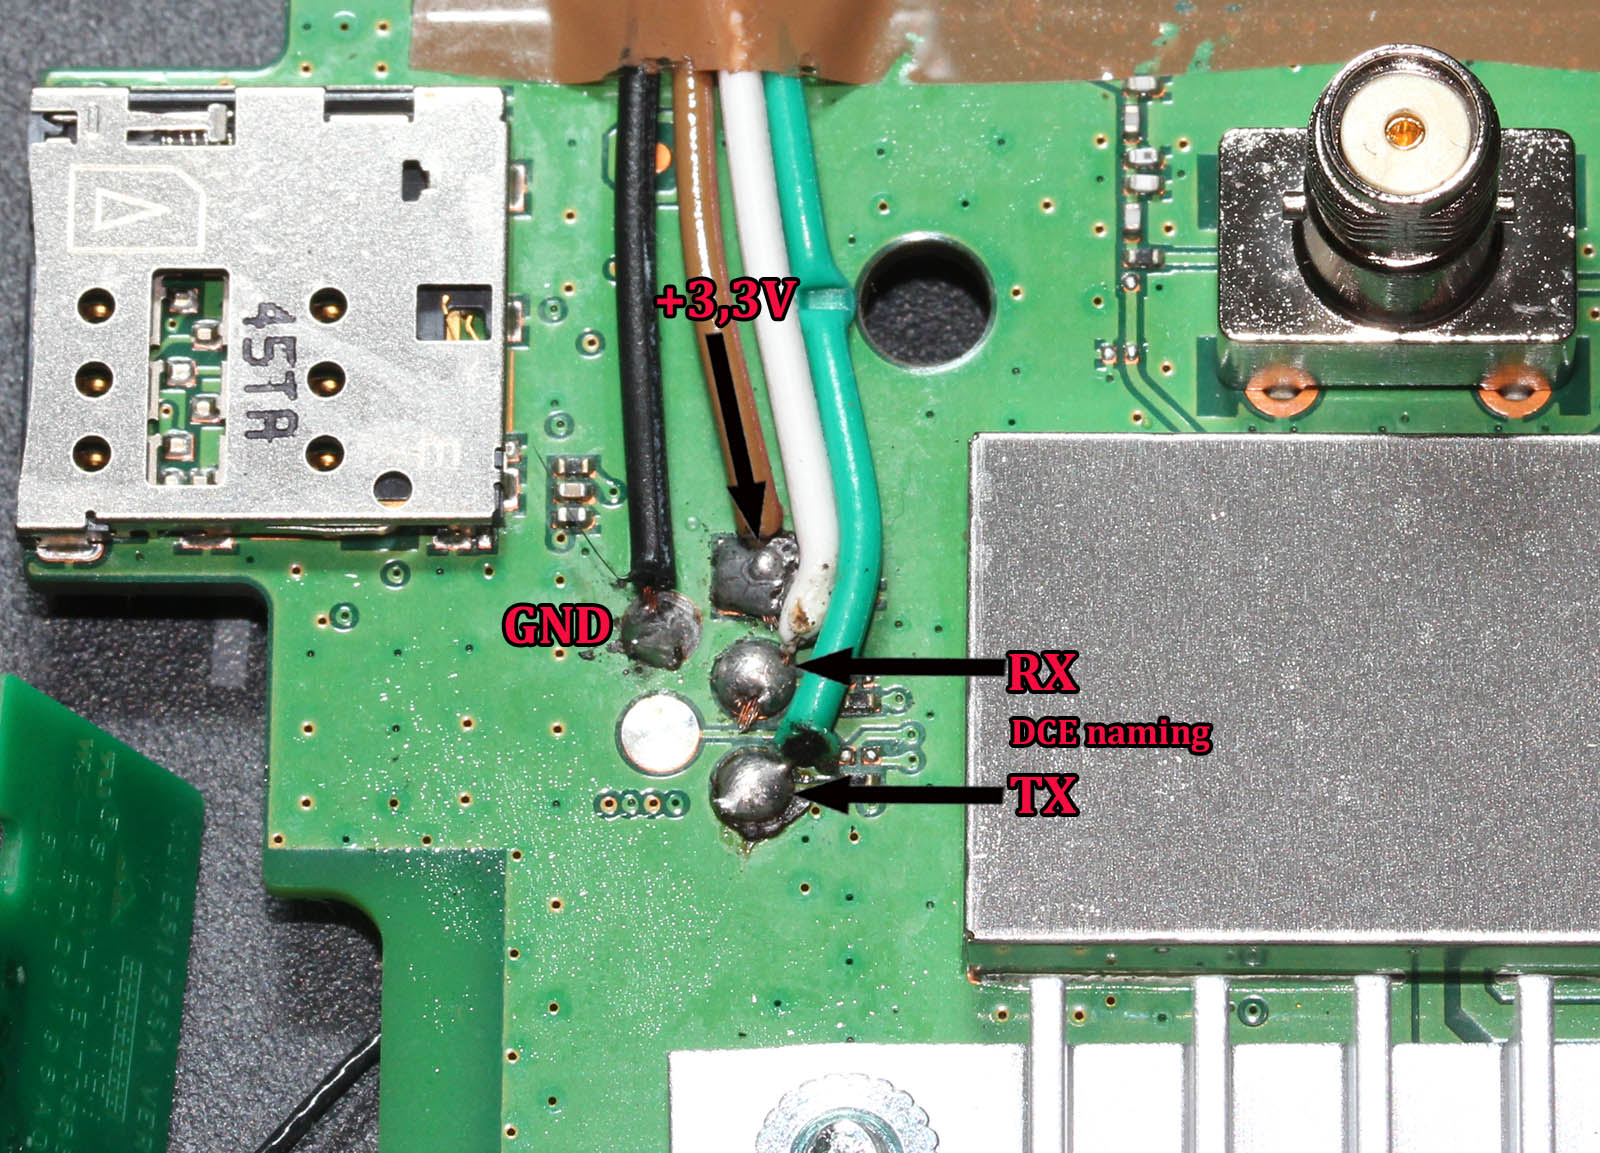
No surprises there, the signal levels of RS-232 were 1,8 volts. It means, that an expensive USB-RS232 adapter is rquired for access. Your run-of-the-mill cheap 3,3 volt adapters are completely useless for this.
The descripions of RX/TX are from the point of the router (DCE), not from your computer (that would be DTE). It means, that any output signal (TX or transmit) described in the picture should be connected to input of the computer (RX or receive).
A bootup output of that port would be:
Digital core power voltage set to 0.9375V

Decompressing...done


CFE version 6.37.14.34 (r415984) based on BBP 1.0.37 for BCM947XX (32bit,SP,)

Build Date: Sat Jun 13 09:28:20 CST 2015 (l00285057@MBB-V7R1-CPE)

Copyright (C) 2000-2008 Broadcom Corporation.


Init Arena,cfe repair version

Config GPIOs.

Init Devs.

Boot partition size = 262144(0x40000)

flash_init: bootsz = [0x80000]

add new online part !!!!!!!!

flash_init:flash_size:[0x8000000][0x2000000|33554432]

DDR Clock: 400 MHz

Info: DDR frequency set from clkfreq=800,*400*

et0: Broadcom BCM47XX 10/100/1000 Mbps Ethernet Controller 6.37.14.34 (r415984)

CPU type 0x0: 800MHz

Tot mem: 131072 KBytes


CFE mem: 0x00F00000 - 0x010AC8E4 (1755364)

Data: 0x00F646F0 - 0x00F65184 (2708)

BSS: 0x00F65190 - 0x00FAA8E4 (284500)

Heap: 0x00FAA8E4 - 0x010AA8E4 (1048576)

Stack: 0x010AA8E4 - 0x010AC8E4 (8192)

Text: 0x00F00000 - 0x00F55E40 (351808)


Device eth0: hwaddr 00-90-4C-0F-0F-00, ipaddr 192.168.1.1, mask 255.255.255.0

gateway not set, nameserver not set

not in router upgrade mode

Loader:raw Filesys:raw Dev:nflash0.os File: Options:(null)

Loading: ..... 5853216 bytes read

Entry at 0x00008000

Closing network.

Starting program at 0x00008000

[ 2.950000] console [ttyS0] enabled, bootconsole disabled

[ 2.950000] serial8250.0: ttyS1 at MMIO 0x18000400 (irq = 117) is a 16550

[ 2.960000] brd: module loaded

[ 2.970000] loop: module loaded

[ 2.970000] [CHIP_COMM] LINE:849: [client] socket send fail!

[ 2.980000] DRV_RHPC: Detect Modem fail with 0x1, run startup status detection thread!!

[ 2.990000] Platform Driver Remote Host Procedure Call init.

[ 2.990000] Enter ecall init

[ 3.000000] Finish ecall init

[ 3.000000] tsk:kthread_run is success!

[ 3.000000] SCSI Media Changer driver v0.25

[ 3.010000] pflash: found no supported devices

[ 3.020000] bcmsflash: found no supported devices

[ 3.070000] Boot partition size = 524288(0x80000)

[ 3.080000] lookup_nflash_rootfs_offset: offset = 0x200000

[ 3.080000] nflash: squash filesystem with lzma found at block 35

[ 3.090000] Creating 4 MTD partitions on "nflash":

[ 3.090000] 0x000000000000-0x000000080000 : "boot"

[ 3.100000] 0x000000080000-0x000000200000 : "nvram"

[ 3.110000] 0x000000200000-0x000002a00000 : "linux"

[ 3.110000] 0x0000004600f8-0x000002a00000 : "rootfs"

[ 3.120000] PPP generic driver version 2.4.2

[ 3.120000] PPP Deflate Compression module registered

[ 3.130000] PPP BSD Compression module registered

[ 3.130000] PPP MPPE Compression module registered

[ 3.140000] NET: Registered protocol family 24

[ 3.140000] SLIP: version 0.8.4-NET3.019-NEWTTY (dynamic channels, max=256).

[ 3.150000] usbmon: debugfs is not available

[ 3.150000] ehci_hcd: USB 2.0 'Enhanced' Host Controller (EHCI) Driver

[ 3.160000] ehci_hcd 0000:00:0b.1: EHCI Host Controller

[ 3.170000] ehci_hcd 0000:00:0b.1: new USB bus registered, assigned bus number 1

[ 3.210000] ehci_hcd 0000:00:0b.1: irq 111, io mem 0x18021000

[ 3.230000] ehci_hcd 0000:00:0b.1: USB 0.0 started, EHCI 1.00

[ 3.230000] hub 1-0:1.0: USB hub found

[ 3.240000] hub 1-0:1.0: 2 ports detected

[ 3.240000] ohci_hcd: USB 1.1 'Open' Host Controller (OHCI) Driver

[ 3.250000] ohci_hcd 0000:00:0b.0: OHCI Host Controller

[ 3.250000] ohci_hcd 0000:00:0b.0: new USB bus registered, assigned bus number 2

[ 3.260000] ohci_hcd 0000:00:0b.0: irq 111, io mem 0x18022000

[ 3.320000] hub 2-0:1.0: USB hub found

[ 3.320000] hub 2-0:1.0: 2 ports detected

[ 3.330000] xhci_hcd 0000:00:0c.0: xHCI Host Controller

[ 3.330000] xhci_hcd 0000:00:0c.0: new USB bus registered, assigned bus number 3

[ 3.340000] xhci_hcd 0000:00:0c.0: irq 112, io mem 0x18023000

[ 3.350000] xhci_hcd 0000:00:0c.0: Failed to enable MSI-X

[ 3.350000] xhci_hcd 0000:00:0c.0: failed to allocate MSI entry

[ 3.360000] usb usb3: No SuperSpeed endpoint companion for config 1 interface 0 altsetting 0 ep 129: using minimum values

[ 3.370000] xHCI xhci_add_endpoint called for root hub

[ 3.380000] xHCI xhci_check_bandwidth called for root hub

[ 3.380000] hub 3-0:1.0: USB hub found

[ 3.390000] hub 3-0:1.0: 1 port detected

[ 3.390000] usbcore: registered new interface driver cdc_acm

[ 3.400000] cdc_acm: v0.26:USB Abstract Control Model driver for USB modems and ISDN adapters

[ 3.410000] usbcore: registered new interface driver usblp

[ 3.410000] Initializing USB Mass Storage driver...

[ 3.420000] usbcore: registered new interface driver usb-storage

[ 3.420000] USB Mass Storage support registered.

[ 3.430000] usbcore: registered new interface driver usbserial

[ 3.430000] USB Serial support registered for generic

[ 3.440000] usbcore: registered new interface driver usbserial_generic

[ 3.450000] usbserial: USB Serial Driver core

[ 3.450000] USB Serial support registered for GSM modem (1-port)

[ 3.460000] usbcore: registered new interface driver option

[ 3.460000] option: v0.7.2:USB Driver for GSM modems

[ 3.470000] USB Serial support registered for pl2303

[ 3.470000] usbcore: registered new interface driver pl2303

[ 3.480000] pl2303: Prolific PL2303 USB to serial adaptor driver

[ 3.480000] u32 classifier

[ 3.490000] Performance counters on

[ 3.490000] Actions configured

[ 3.490000] Netfilter messages via NETLINK v0.30.

[ 3.500000] nf_conntrack version 0.5.0 (1935 buckets, 7740 max)

[ 3.510000] ctnetlink v0.93: registering with nfnetlink.

[ 3.510000] nf_conntrack_rtsp v0.6.21 loading

[ 3.520000] xt_time: kernel timezone is -0000

[ 3.520000] IPVS: Registered protocols ()

[ 3.520000] IPVS: Connection hash table configured (size=4096, memory=32Kbytes)

[ 3.530000] IPVS: ipvs loaded.

[ 3.530000] IPv4 over IPv4 tunneling driver

[ 3.540000] nf_nat_rtsp v0.6.21 loading

[ 3.540000] ip_tables: (C) 2000-2006 Netfilter Core Team

[ 3.550000] arp_tables: (C) 2002 David S. Miller

[ 3.550000] TCP cubic registered

[ 3.560000] NET: Registered protocol family 10

[ 3.560000] lo: Disabled Privacy Extensions

[ 3.570000] tunl0: Disabled Privacy Extensions

[ 3.570000] ip6_tables: (C) 2000-2006 Netfilter Core Team

[ 3.580000] IPv6 over IPv4 tunneling driver

[ 3.580000] sit0: Disabled Privacy Extensions

[ 3.590000] ip6tnl0: Disabled Privacy Extensions

[ 3.590000] NET: Registered protocol family 17

[ 3.600000] Bridge firewalling registered

[ 3.600000] Ebtables v2.0 registered

[ 3.600000] L2TP core driver, V2.0

[ 3.610000] PPPoL2TP kernel driver, V2.0

[ 3.610000] 802.1Q VLAN Support v1.8 Ben Greear

[ 3.620000] All bugs added by David S. Miller

[ 3.640000] Northstar brcmnand NAND Flash Controller driver, Version 0.1 (c) Broadcom Inc. 2012

[ 3.650000] NAND device: Manufacturer ID: 0x2c, Chip ID: 0xf1 (Micron NAND 128MiB 3,3V 8-bit)

[ 3.660000] Spare area=64 eccbytes 56, ecc bytes located at:

[ 3.660000] 2 3 4 5 6 7 8 9 10 11 12 13 14 15 18 19 20 21 22 23 24 25 26 27 28 29 30 31 34 35 36 37 38 39 40 41 42 43 44 45 46 47 50 51 52 53 54 55 56 57 58 59 60 61 62 63

[ 3.680000] Available 7 bytes at (off,len):

[ 3.680000] (1,1) (16,2) (32,2) (48,2) (0,0) (0,0) (0,0) (0,0)

[ 3.690000] Scanning device for bad blocks

[ 3.780000] Options: NO_AUTOINCR,NO_READRDY,BBT_SCAN2NDPAGE,

[ 3.790000] Creating 5 MTD partitions on "brcmnand":

[ 3.790000] 0x000002a00000-0x000003e00000 : "userdata"

[ 3.800000] 0x000003e00000-0x000005200000 : "app"

[ 3.800000] 0x000005200000-0x000005c00000 : "webui"

[ 3.810000] 0x000005c00000-0x000006000000 : "online"

[ 3.810000] 0x000006000000-0x000008000000 : "upg"

[ 3.830000] VFS: Mounted root (squashfs filesystem) readonly on device 31:3.

[ 3.840000] devtmpfs: mounted

[ 3.840000] Freeing init memory: 236K

/sbin/hotplug2: No such file or directory

insmod: ipv6.ko: no module by that name found

insmod: cannot insert '/lib/modules/2.6.36.4brcmarm+/kernel/drivers/net/igs/igs.ko': Operation not permitted (-1): Operation not permitted

hotplug detected product: 12d1/1443/1

hotplug detected product: 12d1/1443/1

insmod: bcm57xx.ko: no module by that name found

boardflags:100
That looks a lot like a B593-s22 booting. A 2.6.36 Linux there running on a 32-bit BCM947XX chip.
LTE
The other RS-232 port has following pins:
It outputs something like this on a boot:
onchip

NF boot!

UnSec_boo Wä123

sec disable

456


[0000005ms]

[0000005ms]

[0000005ms]*********************************************************

[0000006ms]FASTBOOT simple console, enter 'help' for commands help.

[0000006ms]*********************************************************

[0000006ms]balong_version_get_hw_version doesn't judge udp!

[0000007ms]balong_version_get_hw_version: HARDID = 0X00040000

[0000007ms]Hisilicon NANDC_V6.00 initialize...


[0000007ms]NAND device: Manufacturer ID: 0x000000ad, Chip ID: 0x000000ac (Hynix NAND 512MiB 1,8V 8-bit)

[0000008ms]Partition Table list(HEX):ptable 1.00HI6930_V7R2_MCPEm3boot

[0000008ms]NO. |offset |loadsize |capacity |loadaddr |entry |property |count |id |name |

[0000009ms]------------------------------------------------

[000000Ams]00000001: 00000000 ,00000000 ,00040000 ,00000000 ,00000000 ,00004000 ,00000000 ,00000101 ,m3boot

[000000Ams]00000002: 00040000 ,00000000 ,001c0000 ,4fe00000 ,4fe00000 ,00004000 ,00000000 ,00000102 ,fastboot

[000000Bms]00000003: 00200000 ,00000000 ,00200000 ,00000000 ,00000000 ,00004800 ,00000000 ,00000103 ,nvbacklte

[000000Cms]00000004: 00400000 ,00000000 ,00400000 ,00000000 ,00000000 ,00004000 ,00000000 ,00000104 ,nvimg

[000000Cms]00000005: 00800000 ,00000000 ,00400000 ,00000000 ,00000000 ,00004000 ,00000000 ,00000105 ,nvdload

[000000Dms]00000006: 00c00000 ,00000000 ,00200000 ,00000000 ,00000000 ,00004000 ,00000000 ,00000106 ,nvdefault

[000000Ems]00000007: 00e00000 ,00000000 ,00400000 ,00000000 ,00000000 ,00004000 ,00000000 ,0000010d ,oeminfo

[000000Ems]00000008: 01200000 ,00000000 ,0be00000 ,00000000 ,00000000 ,00004001 ,00000000 ,00000116 ,online

[000000Fms]00000009: 0d000000 ,00000000 ,00800000 ,4ffc0000 ,4ffc0000 ,00004000 ,00000000 ,00000107 ,kernel

[0000010ms]0000000a: 0d800000 ,00000000 ,00800000 ,4ffc0000 ,4ffc0000 ,00004000 ,00000000 ,00000108 ,kernelbk

[0000010ms]0000000b: 0e000000 ,00000000 ,00200000 ,00000000 ,00000000 ,00004000 ,00000000 ,00000109 ,m3image

[0000011ms]0000000c: 0e200000 ,00000000 ,00600000 ,00000000 ,00000000 ,00004000 ,00000000 ,0000010b ,dsp

[0000011ms]0000000d: 0e800000 ,00000000 ,00200000 ,00000000 ,00000000 ,00004000 ,00000000 ,0000011b ,misc

[0000012ms]0000000e: 0ea00000 ,00000000 ,02800000 ,50d10000 ,50d10000 ,00004000 ,00000000 ,0000010a ,vxworks

[0000013ms]0000000f: 11200000 ,00000000 ,00100000 ,00000000 ,00000000 ,00004000 ,00000000 ,00000112 ,wbdata

[0000013ms]00000010: 11300000 ,00000000 ,00100000 ,00000000 ,00000000 ,00004000 ,00000000 ,00000113 ,reserve2

[0000014ms]00000011: 11400000 ,00000000 ,00300000 ,00000000 ,00000000 ,00004001 ,00000000 ,00000114 ,reserve3

[0000015ms]00000012: 11700000 ,00000000 ,00c00000 ,00000000 ,00000000 ,00004001 ,00000000 ,0000010f ,om

[0000015ms]00000013: 12300000 ,00000000 ,0ad00000 ,00000000 ,00000000 ,00004001 ,00000000 ,0000010e ,system

[0000016ms]00000014: 1d000000 ,00000000 ,02d00000 ,00000000 ,00000000 ,00004001 ,00000000 ,00000117 ,cdromiso

[0000017ms]00000015: 1fd00000 ,00000000 ,00280000 ,00000000 ,00000000 ,00004000 ,00000000 ,00000118 ,cache

[0000017ms]00000016: 1ff80000 ,00000000 ,00040000 ,00000000 ,00000000 ,00004000 ,00000000 ,00000119 ,recovery-a

[0000018ms]00000017: 1ffc0000 ,00000000 ,00040000 ,00000000 ,00000000 ,00004000 ,00000000 ,0000011a ,recovery-b

[0000019ms]^^^^^^^^^^^^^^^^^^^^^^^^^^^^^^^^^^^^^^^^^^^^^^^^

[0000019ms]fastboot: nv dload cap is 0x00400000.

[000001Ams]fastboot: dload nv invlv_blk_num:7, total_blk_num:32!

[000001Ams]fastboot: dload nv skip total bad blk:0!

[000001Bms]warning: end page size not aligned :addr_logic:0x008e5000,blockleft:0x00000104

[0000025ms]nv boot init ok!

[0000026ms][tsensor]: tsensor init ok!

[0000026ms]board_init ok

[0000028ms]USB FastBoot: V0.9

[0000028ms]Machine ID: 3339 v0

[0000028ms]Build Date: Jun 13 2015, 09:54:53

[0000028ms]

[0000028ms]Serial Number: UNKNOWN

[0000028ms]

[0000028ms]Heap:0x5fd3c220 -- 0x5fd3c860, 1600

[0000029ms][pmu]: volt_id 35's voltage can not be set!

[0000029ms]

[0000029ms][pmu]: volt_id 39's voltage can not be set!

[000002Ams]

[000002Ams]Please distribute uart with command L/V/M...

[000002Ams] heap:0x5fd3c220 -- 0x5fd3c860, 1600

[000002Ams]OCR_AUTO_ENUM_FLAG_ADDR = 4fe1fff8 flag =eab35f51 !

[000002Bms]


[000002Bms] [ ON OFF ] Start up by Cold Reset!,reboot_cmd=0x90a7b368.


[000002Bms]balong_version_get_hw_version doesn't judge udp!

[000002Cms]balong_version_get_hw_version: HARDID = 0X00040000

[000002Cms]balong_version_get_hw_version doesn't judge udp!

[000002Cms]balong_version_get_hw_version: HARDID = 0X00040000

[000002Dms][fastboot]: boot_mode 1

[000002Dms]boot m3image from flash

[000002Dms]ptn:5fd36bbc , ptn->start = 0e000000 ptn->length = 00200000

[000002Dms]ptn:5fd36bbc , ptn->loadaddr = 00000000 ptn->entry = 00000000

[000002Ems]warning: end page size not aligned :addr_logic:0x0e00b000,blockleft:0x000003a8

[000002Fms]boot linux from flash
I don't think this side boots properly, so the output has only HiSilicon NAND-flash and Hynix DRAM mentioned.
Finally
I didn't manage to get any kind of console or prompt. There are couple of points where the Linux-side says "Press Enter to continue...", but event that didn't work. To me, it looks like the unit is not taking any input.
If you have any further information, please drop a comment below.
Doing fiber installations
Sunday, January 17. 2016
Year and half ago I wrote about my new super-fast Internet-connection. Since in this area the fiber-connections are installed to all buildings regardless you're going to use it or not, I had a possibility to start using also the second one. As the connection was already there, all my telco had to do was send the cable guy to install a fiber to copper media converter.
Or, so you'd think. The standard operating procedure seems to be to ship out needed hardware from the telco's central warehouse to me and eventually the cable guy would arrive and do the setup. The sales guy failed to mention this procedure to me. I received a shipment of my brand new toys:
I just unboxed all the stuff and started studying how to do the installation myself. My own experience on the subject is highly limited. Whenever fiber-optics are involved, all the installations are done by trained professionals, not curious hackers like me.
Anyway, this is the media converter a CTS (Connection Technology Systems, aka. Zyxel) HET-3005:
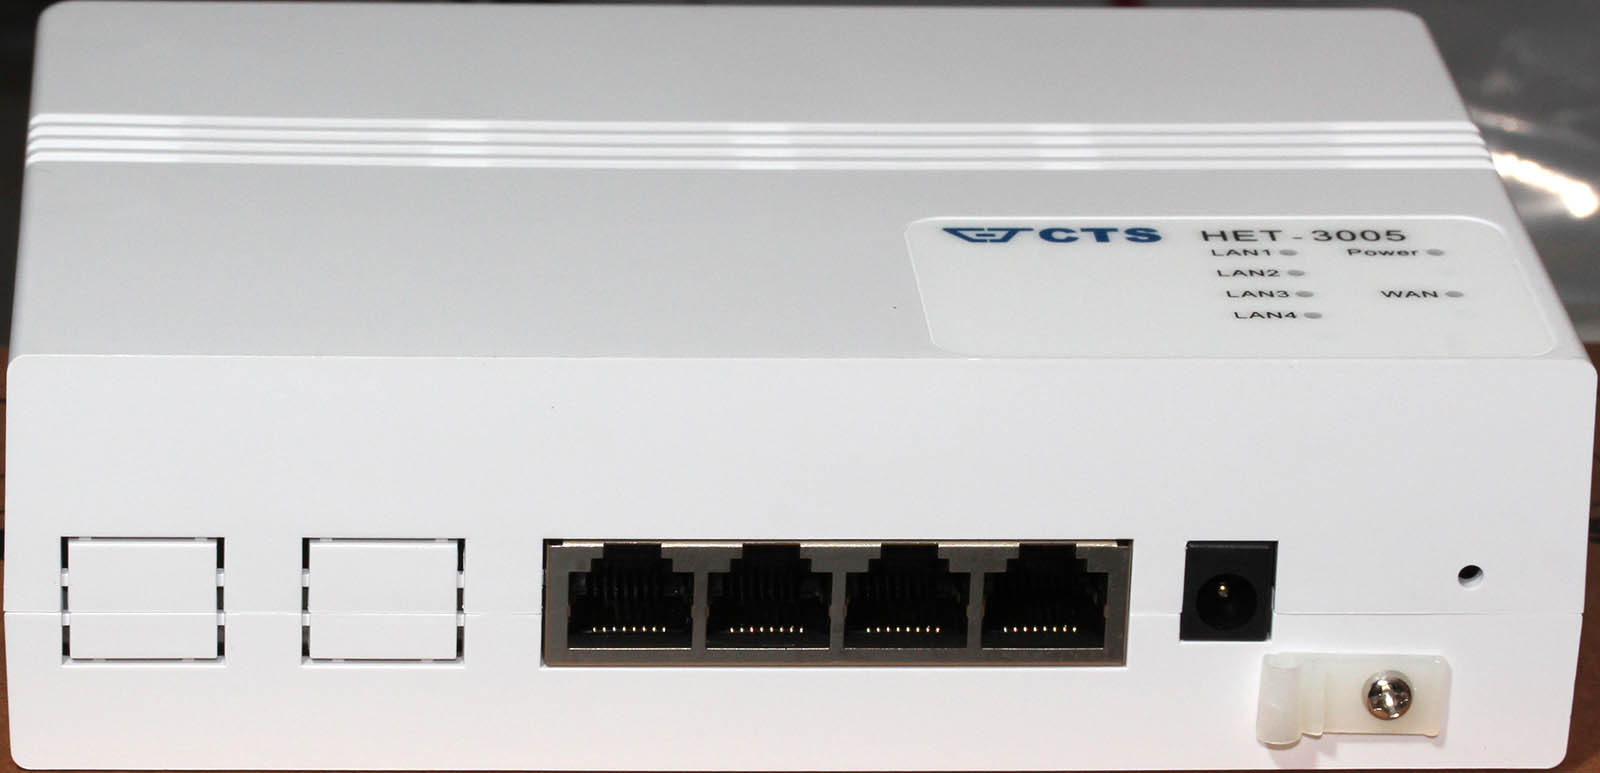
Specs say:
- Interface
- LAN Port: 10/100/1000Base-T RJ-45 x 4
WAN Port: 1000Base-X x 1 or 10/100/1000Base-T x 1
- LAN Port: 10/100/1000Base-T RJ-45 x 4
- Standards
- IEEE 802.3 10Base-T
- IEEE 802.3u 100Base-TX/FX
- IEEE 802.3ab 1000Base-T
- IEEE 802.3z 1000Base-X
- IEEE 802.3x Flow Control
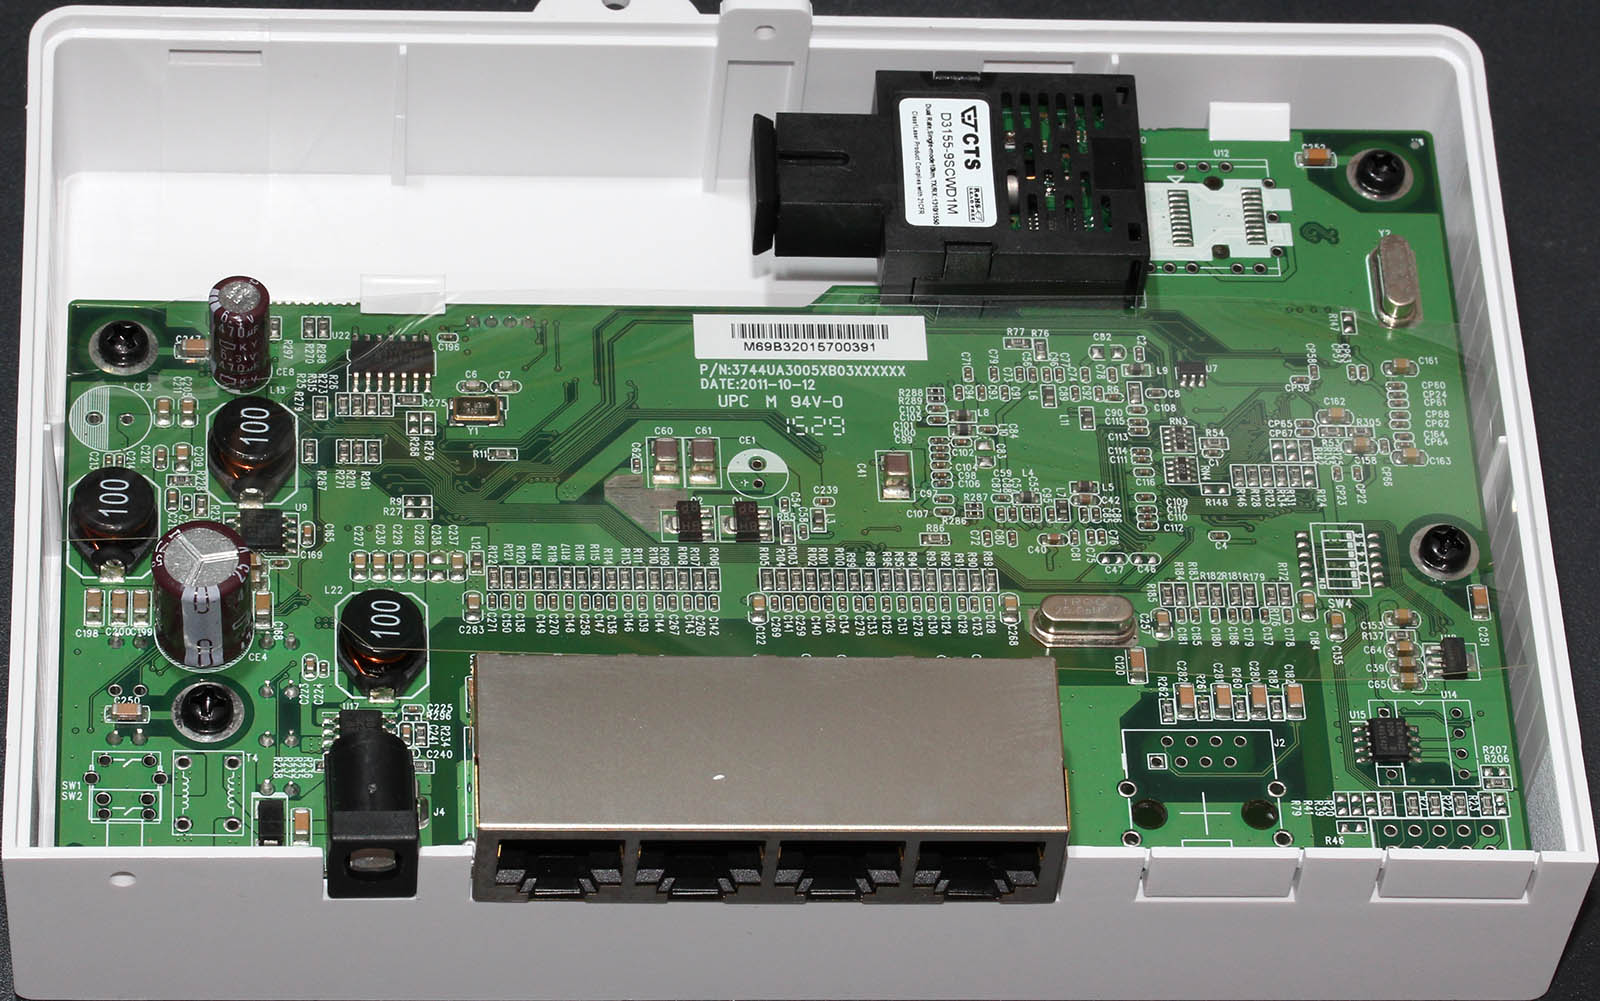
According to manual, a HET-3005 comes in multiple versions. Mine is a model: HET-3005W2A(SM-10/20)-DR, it has following ports in it:
- Fiber Port
- Speed: 1000
- Type: WDM
- Connector: SC
- Distance: 10/20KM
- Ports: 1
- TP Port
- Speed: 10/100/1000
- Ports: 4
In the fiber-world it seems, that connectors are always inside the box, of course I had to pop the hood:
On top of the pic, there is a fiber connector (a SC-connector, I guess):
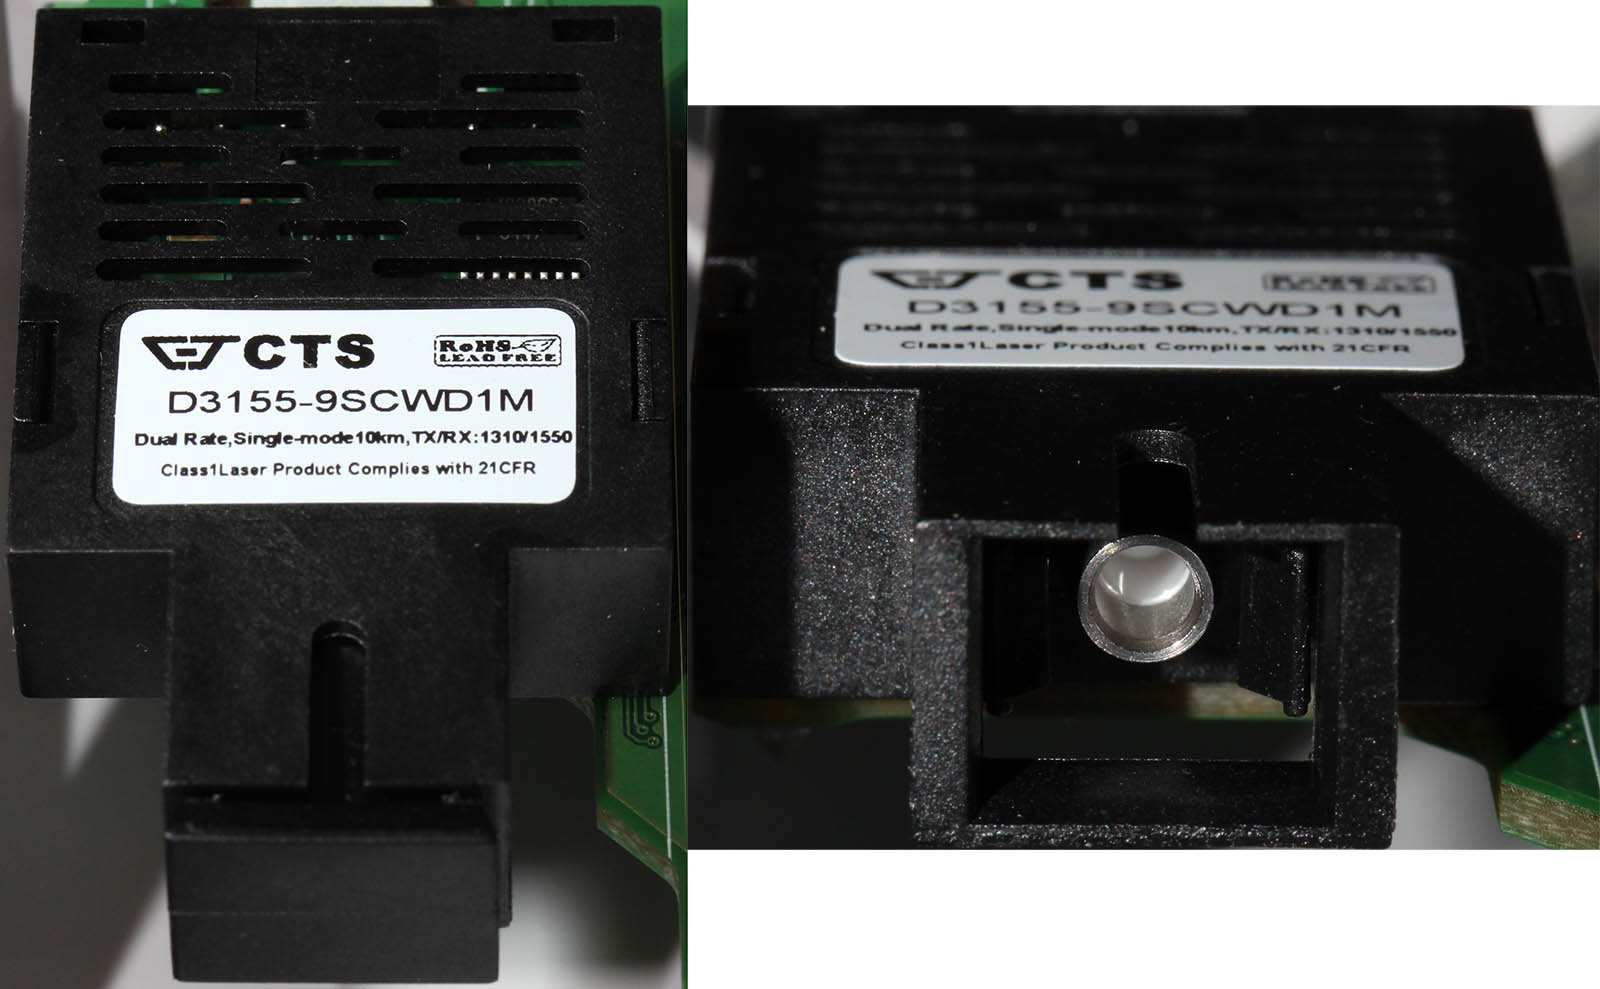
It mentions following details:
- Dual rate
- Single mode, 10 km
- TX/RX: 1310/1550 nm
When studying Gigabit Ethernet, the only possible ones are:
- 1000BASE-LX10
- Single-mode fiber using 1310 nm wavelength 10 km
- 1000BASE-BX10
- Single-mode fiber, over single-strand fiber: 1490 nm downstream 1310 nm upstream 10 km
For obvious reasons of not having dual-rate in it, LX10 goes out. However in BX10, it's funny how specs mention downstream to be 1490 nm, but the equipment has 1550 nm.
So, only with the box, there isn't much to do. Luckily they kinda knew it and in the box there was a suitable patch cable:
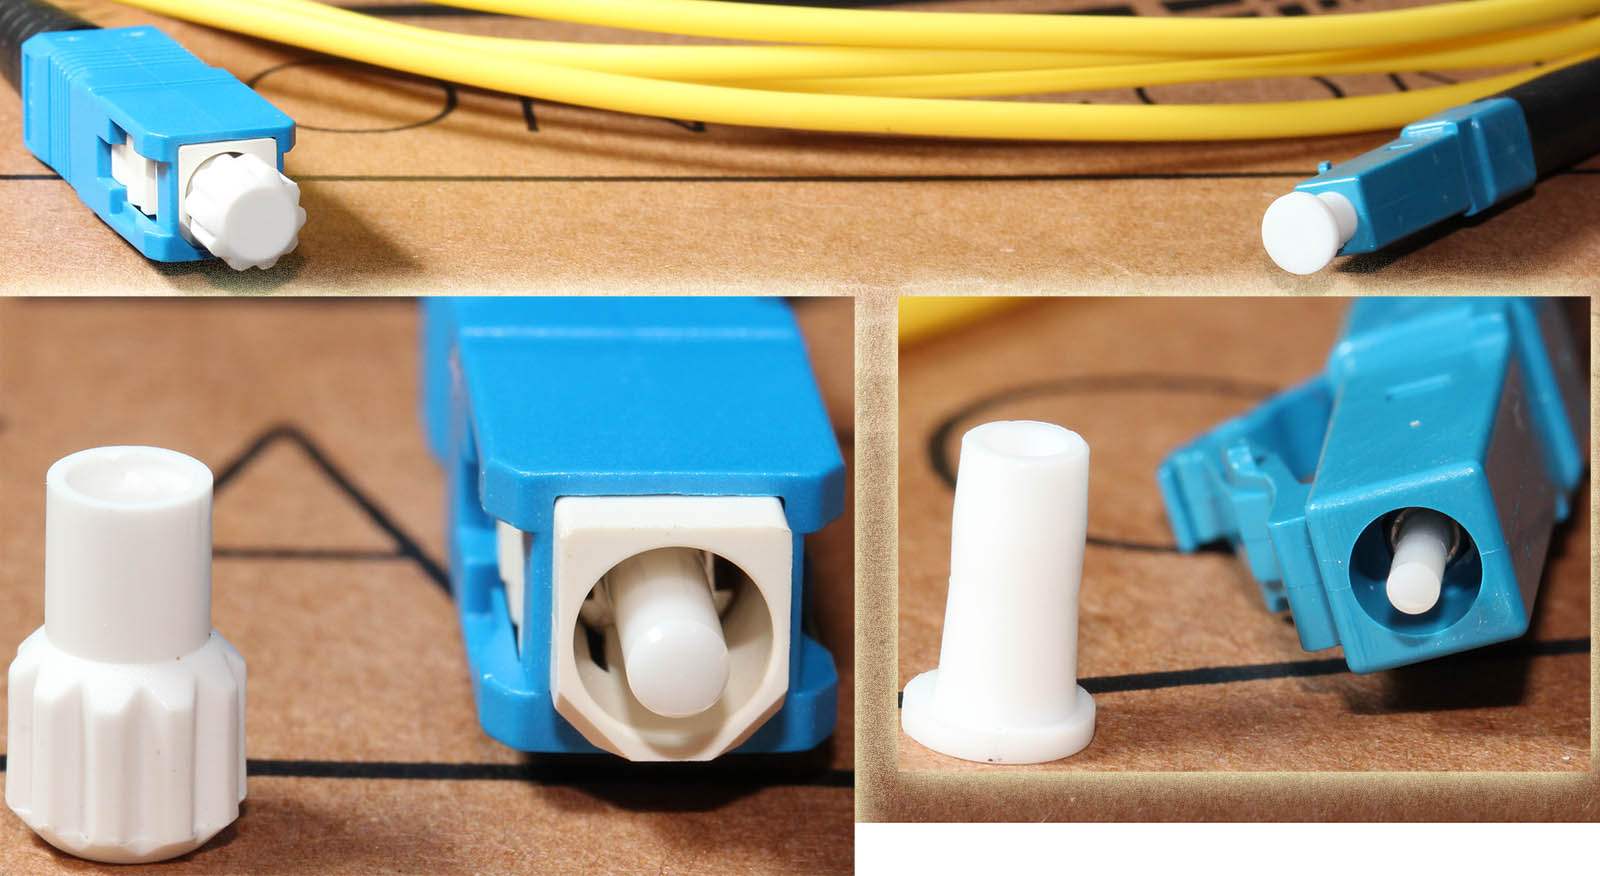
The ends are different. I don't know why, but studying the Wikipedia article about Optical fiber connector says, that IEC 61754-4 defines a SC-connector. A careful analysis of it revealed, that the square one wasn't a match for the HET-3005. The wider one with non-square form fits in nicely:

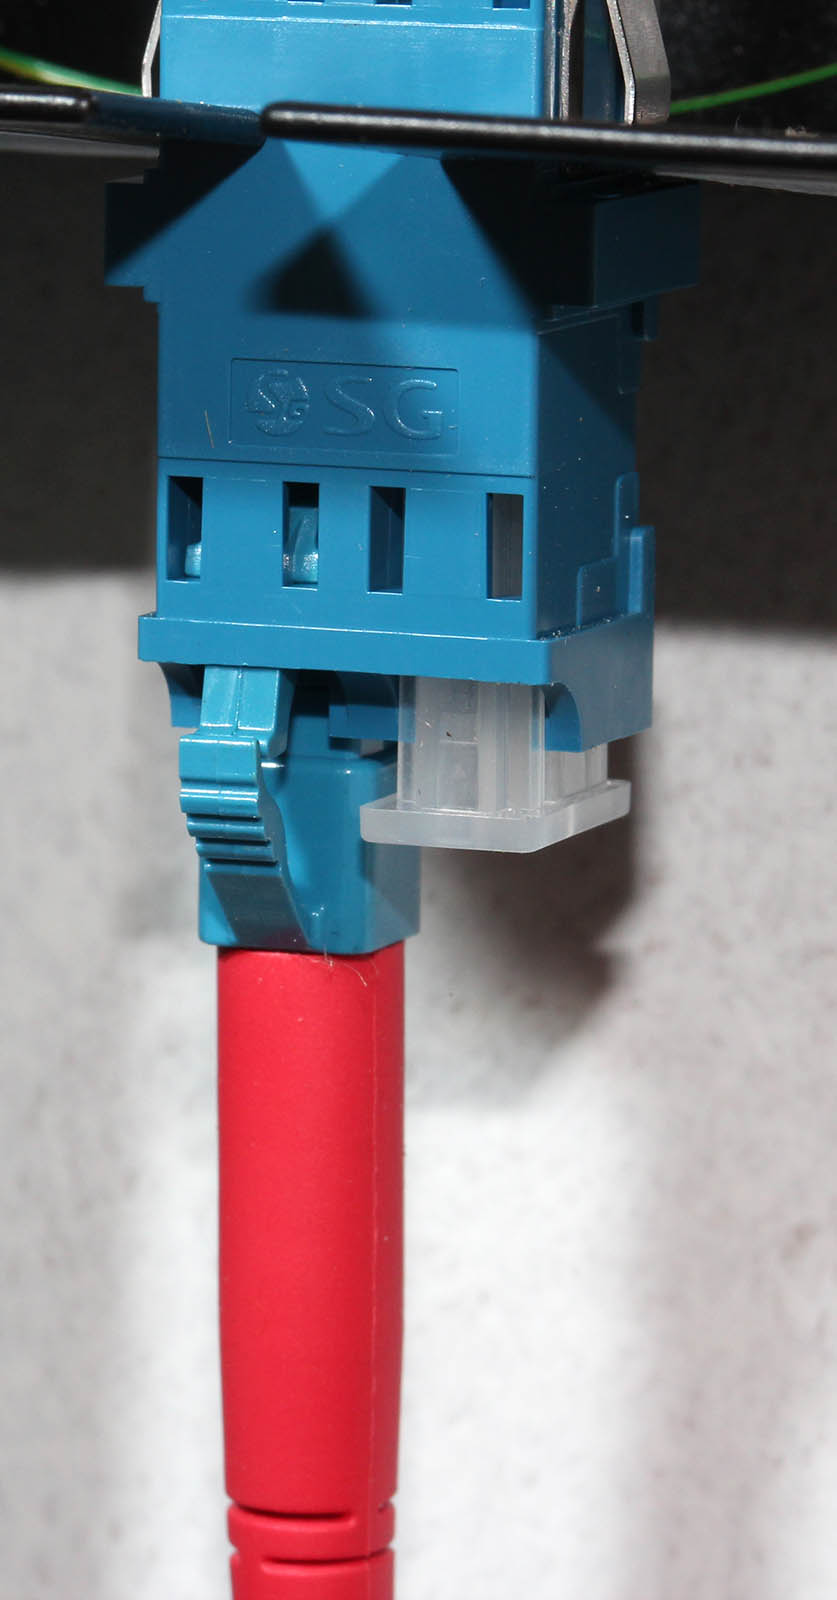
Now I'll need to figure out what to do with the other end. I went to study the connections. A following box with obvious incoming fiber-optic cable rising from the ground was attached to a wall:

Sure thing, I popped the hood on that to see what it had eaten:

At the lower left hand corner, there is a black cable incoming. The cable guy stripped it and exposed the single-mode fibers in it (two of them) and welded them into the fiber of the blue connector. The welds have been properly covered with some sort of shink-wrap and can be seen in the yellow cable holder. Since the black box was a dead end, it had no electrical parts in it, my next focus was the blue connector at the bottom of the box:
That red connector had a fiber running to a box converting fiber to a DVB-C -signal and distributing that on a 75 Ω coaxial cable for TV-signal distribution into my house. However, the right connector was free. I simply had to try it:

Yep! A nice fit. The more important thing was, that it made my media converter box to indicate a functioning WAN-signal.
Just to confirm the SC-connector, I went back to pictures of my Inteno FG500, it had:
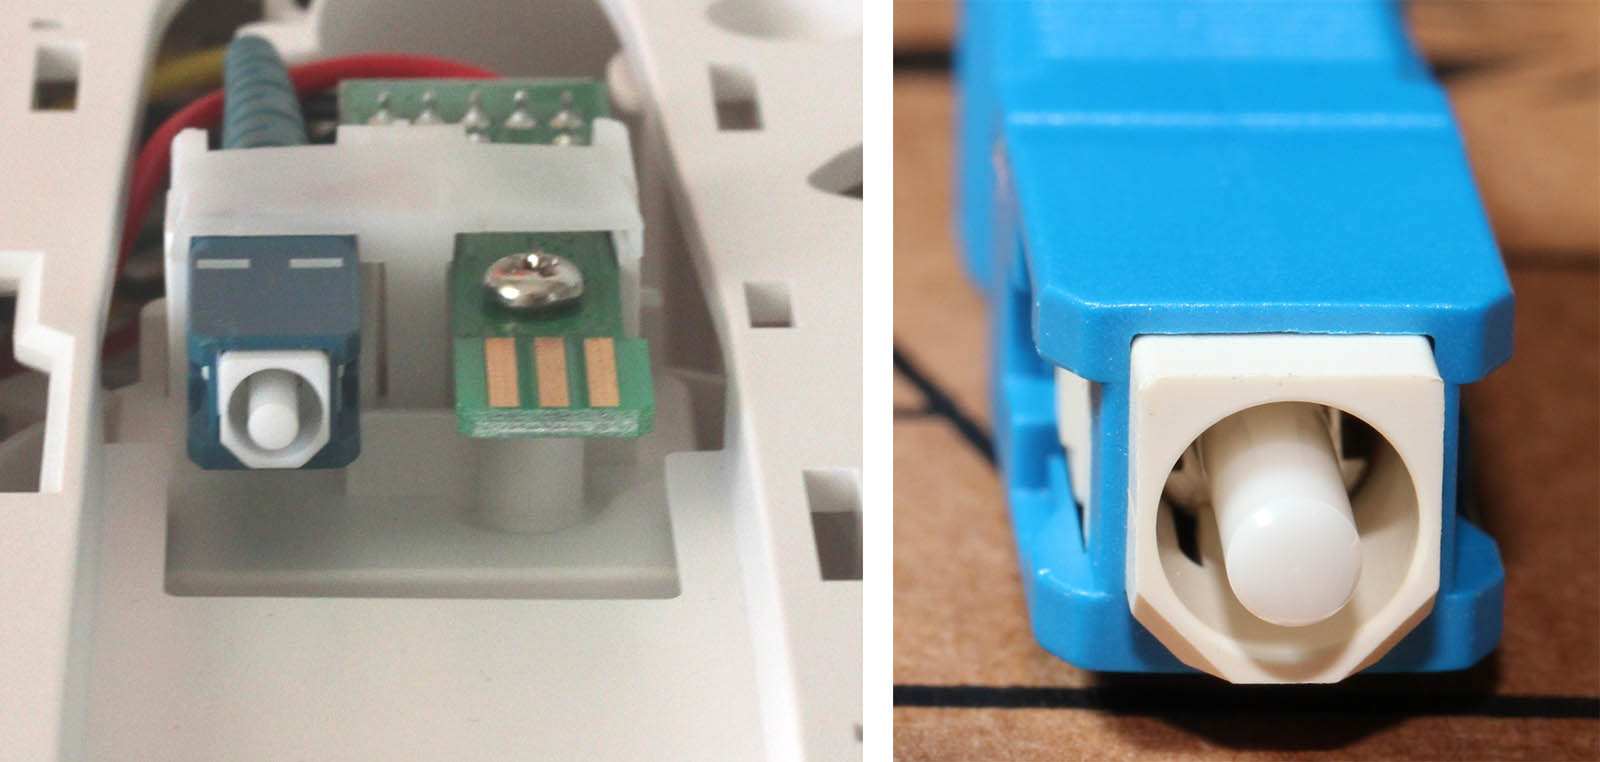
But that's inside the box, it has dual-purpose functionality of doing TV-signal and ethernet in two halves of the same unit.
After couple of days me finishing the install, the cable guy called in and wanted to come do the setup. I just told him that's its all done and ready.
The Cheapest Laptop - Worth Anything? Lenovo G50 Reviewed
Thursday, March 26. 2015
I've been a hacker pretty much all my life. It has been an exciting ride so far, as computers have improved so much ever since I got my first one. If setting my first computer as a reference point, the processors are almost infinetly more powerful (not infinetly, but a lot!), there is million million times more storage and the most important thing: all computers are capable of connecting to a network. I wouldn't mind having my first computer with it's processing power and store, but with an Internet-connection. Lastly, they cost a fraction of that. As I typically have top-shelf computer at my use, I was happy to see what's bottom shelf material made of.
A Lenovo G50 is your average supermarket "now on sale" -computer. It's target audience is definitely not me, but people who don't want to spend much on a computer, but as everybody, they need one.
After the price point (paid 249,- €), the sales pitch is pretty much this:
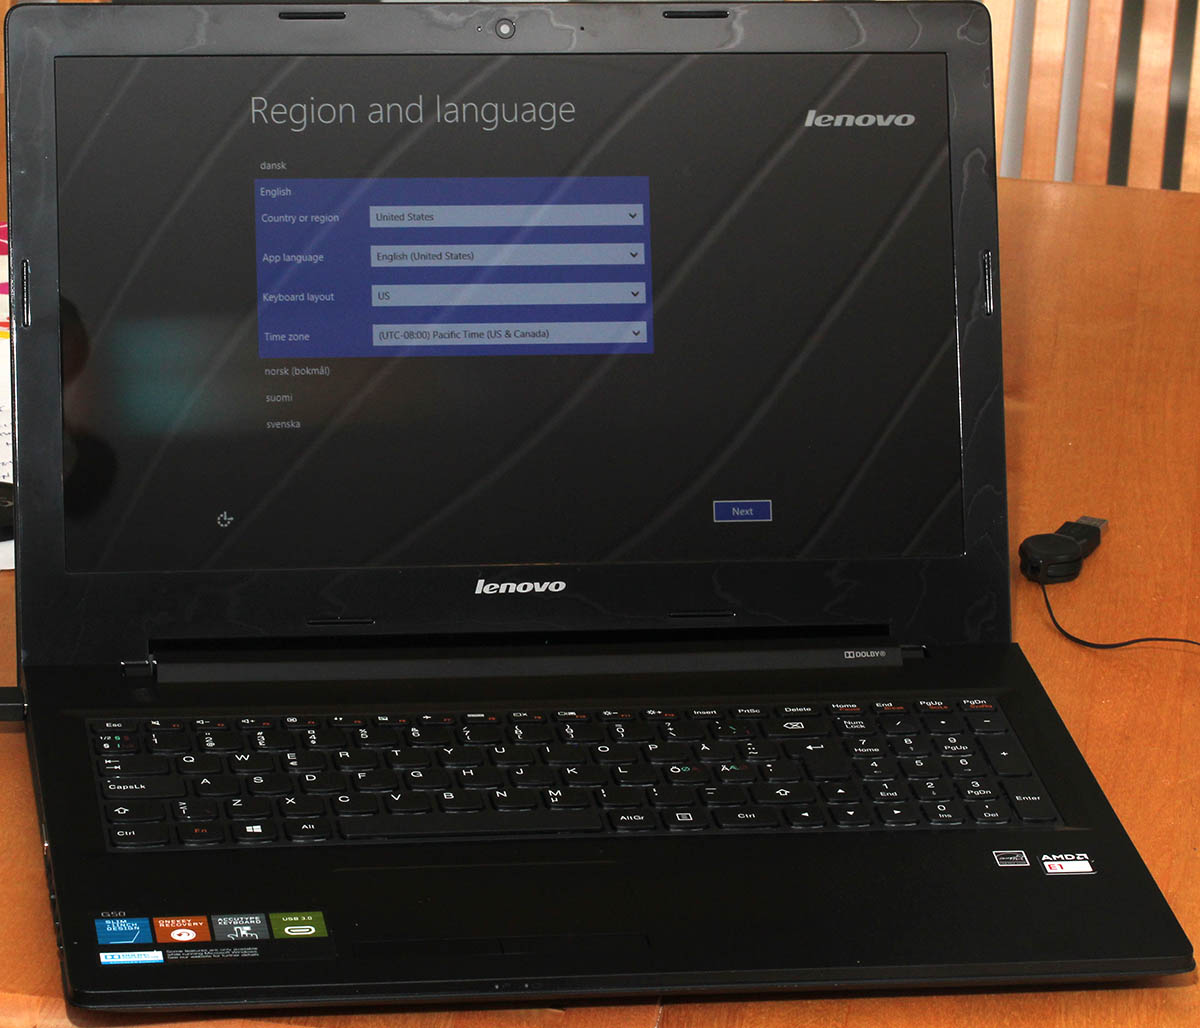
 You get an 1" thick laptop with easy recovery option, a keyboard and USB 3.0 and Dolby Digital Plus Advanced Audio. Obvious marketing talk, as the parts I do understand are 1" thick machine with USB 3.0. Rest is more or less nonsense. Anyway, it looks like this:

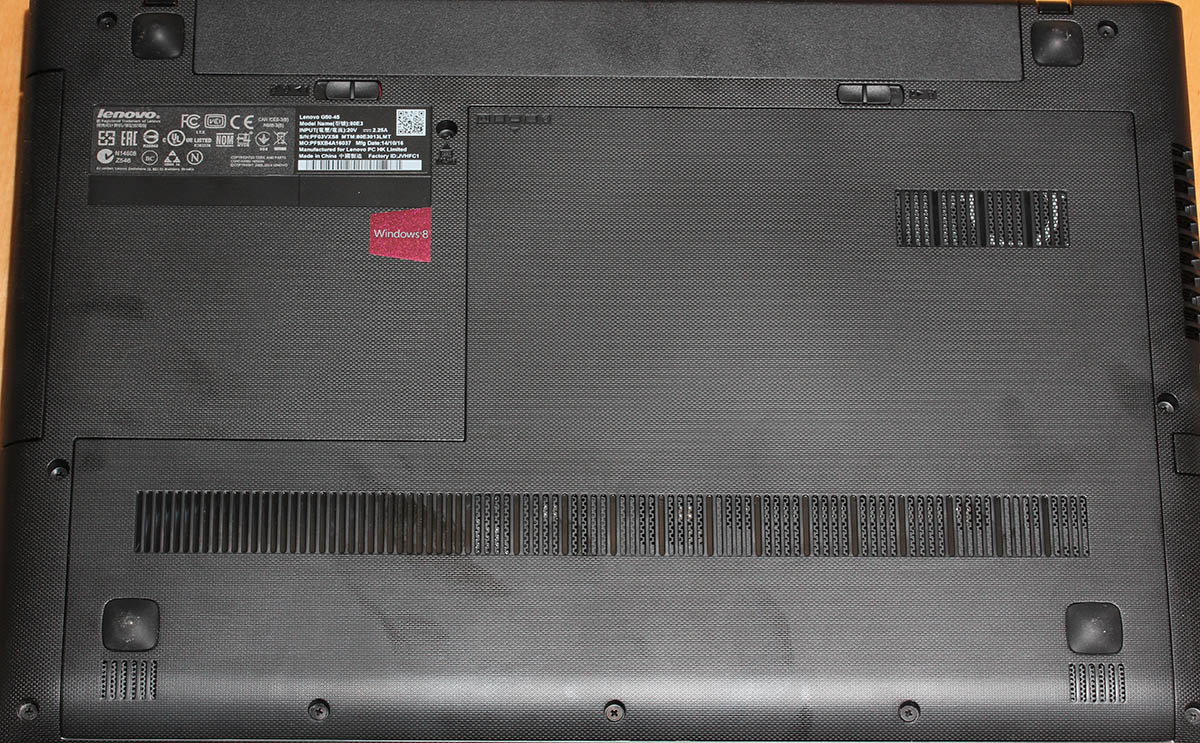
And no, it is not 1" thick:

My measurement shows 26mm + change. But pretty good still. This is the cheapest you can buy.
Connectivity is pretty much what you'd expect:
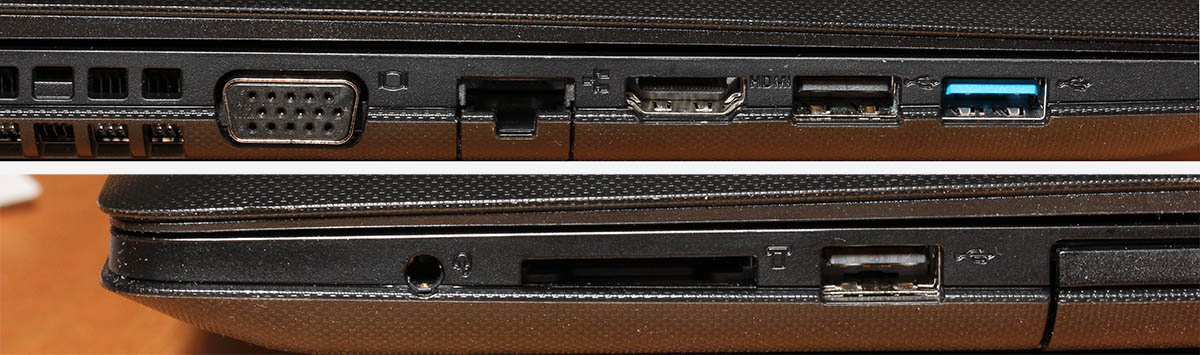
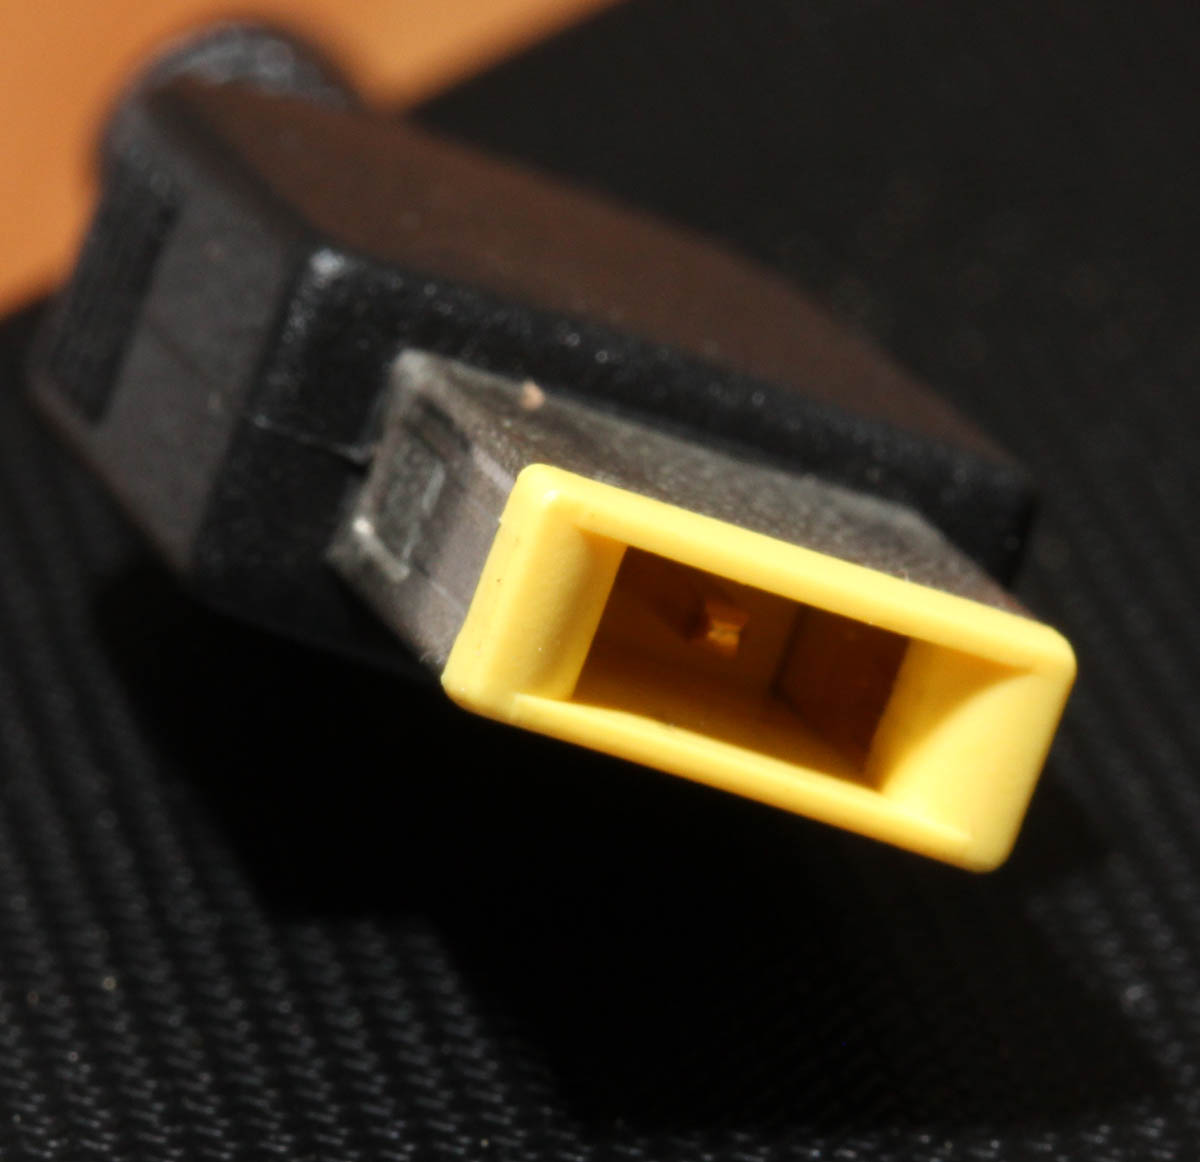
Analog VGA, HDMi, two USB 2.0s, one USB 3.0, RJ-45 for ethernet and an SD-card reader. All useful and necessary (I'm not so sure about the SD-card reader, who uses those anyway). With the power connector they went for the W700 rectangular one, it suits better with the slim models:
The keyboard has a numpad built-in:
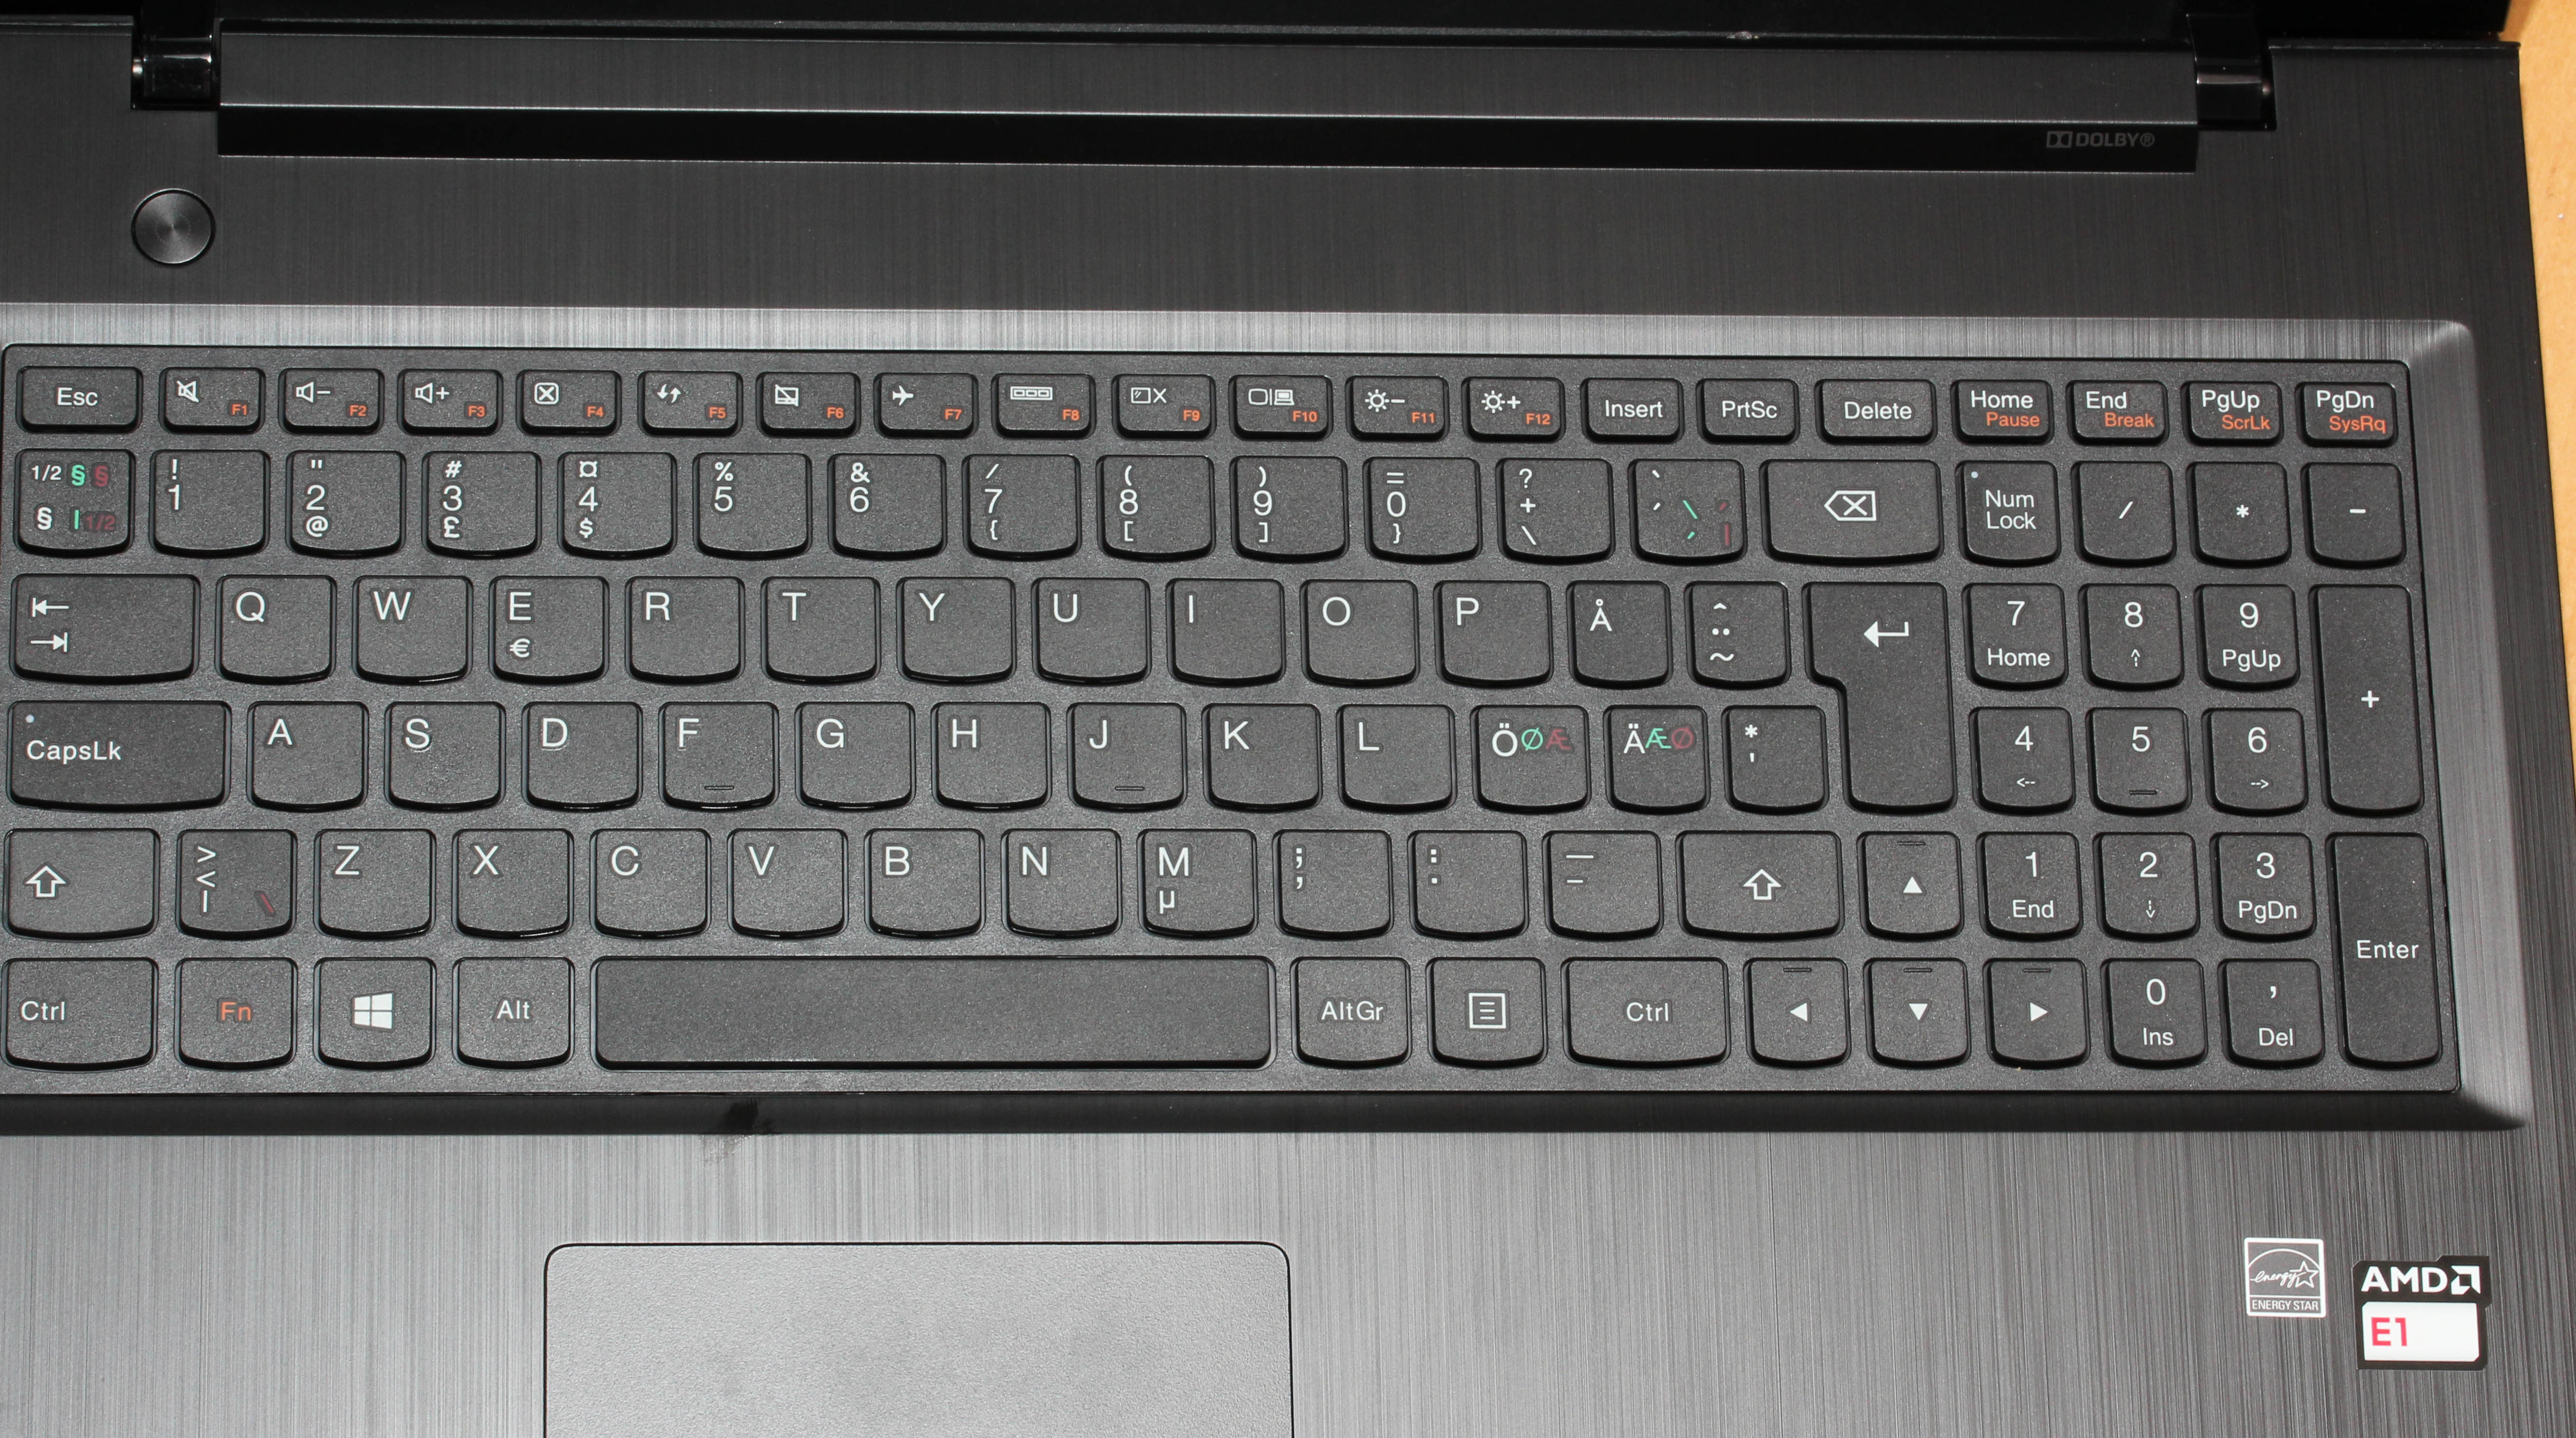
And then there is the cool Dolby-logo:
 With this price, I'd by anything with a Dolby-logo in it! I truly don't know what the Dolby stands for here. My only guess is, that its simply a marketing gimmick.
When kicked into action, the computer looks like this:
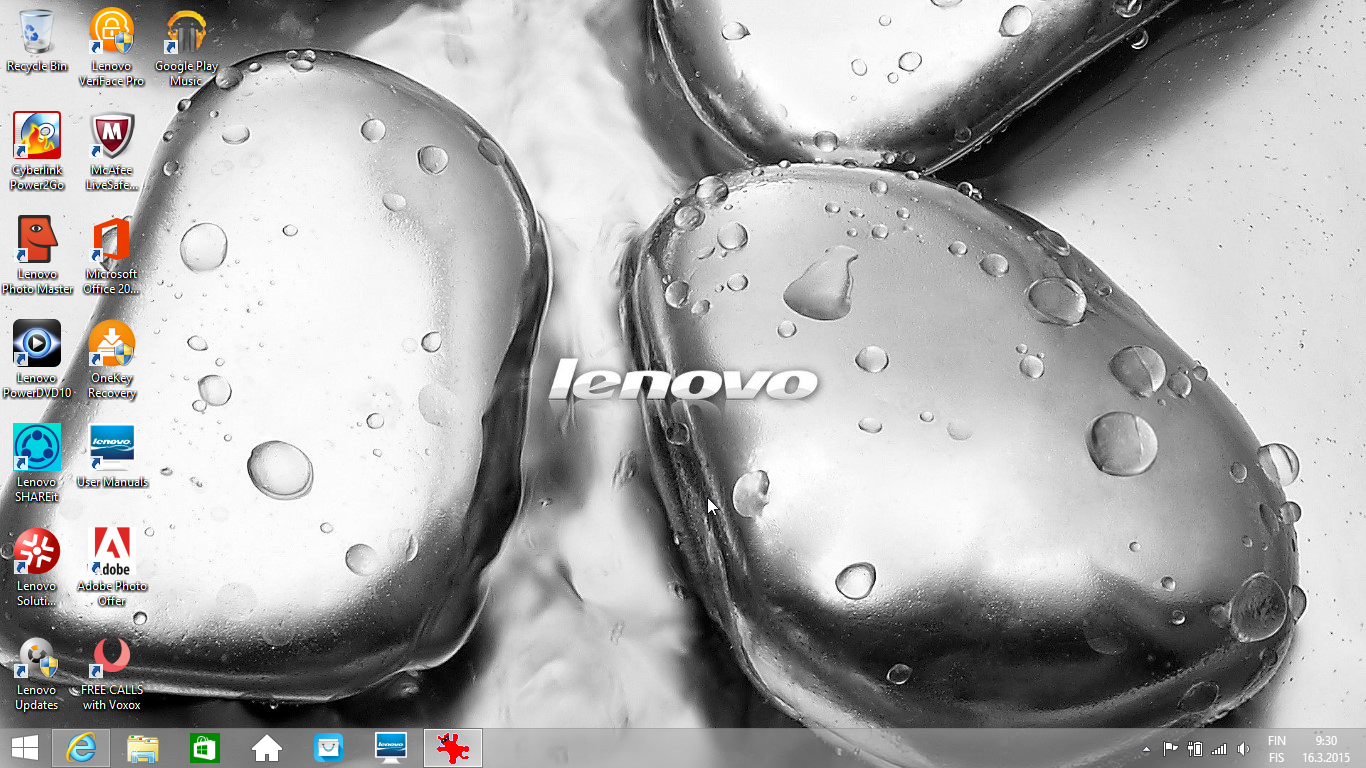 The operating system is Windows 8.1. One of the first things it needed was the Start-button. My choice has been Classic Shell. With that any Windows 8 -variant will be made useful again.
As you can see, there is lot of un-installing to do. One of the things I did un-install was the handy recovery tool mentioned in the advertisement. It didn't look convincing to me. While doing the un-installs, I saw something familiar in the list:
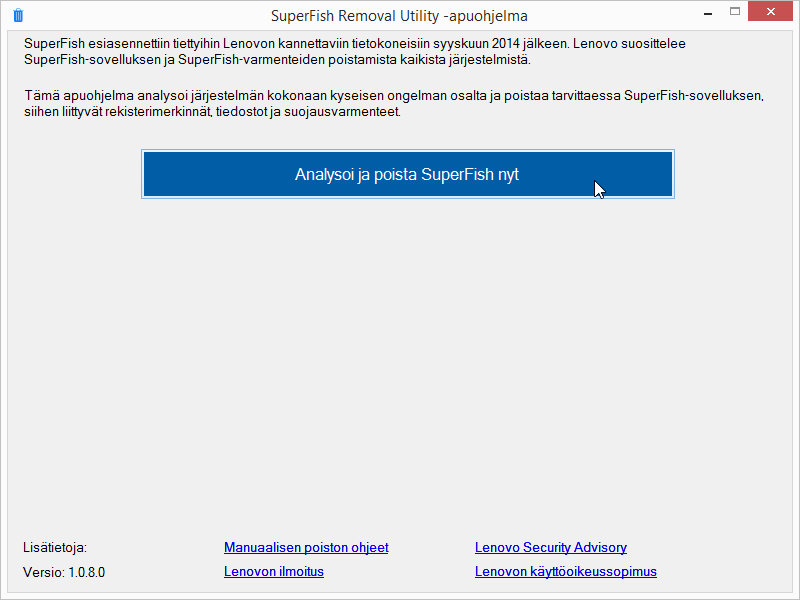
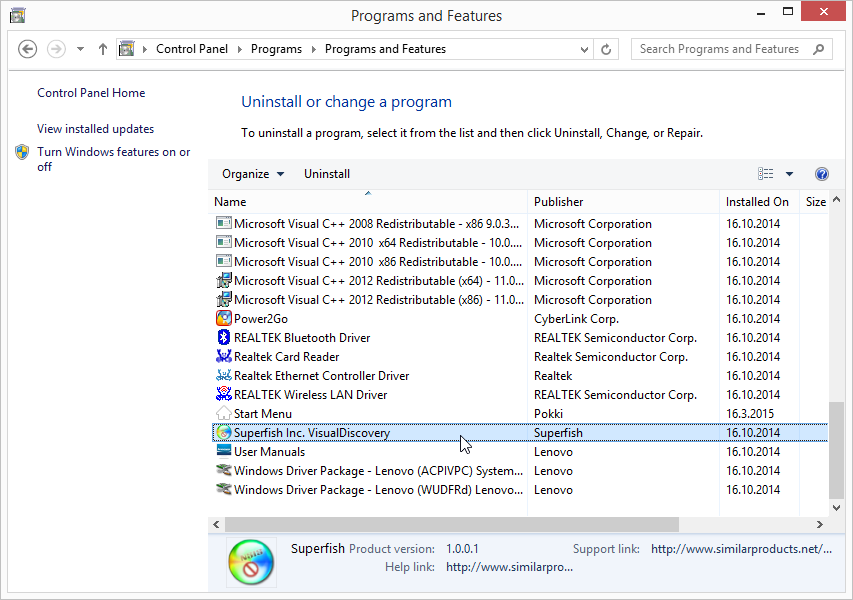 Oh, this model has the spyware Superfish installed. I went for the removal tool:
 It was a PR-disaster for Lenovo. They were clueless what they bundled with people's computers.
The hardware in this laptop is what you'd expect. Cheap.

 The problem isn't CPU or GPU in this case. Even 8 GiB of RAM will never run out, when surfing the web. The problem is slow drive. There is a terabyte of space, but the drive is sooo slow. Pretty much everything I use has an SSD, so getting back to the cheapest spinning platter didn't do me any good.
As a conclusion:
Answer to the question "Is it worth anything?" Yes. Definitely it is.
This is not for serious computing needs, but absolutely worth every penny (cent) for not-so-serious computing needs. Also suitable as secondary equipment for more serious nerds.
Huawei B593 s-22 more RS-232 pins
Tuesday, March 24. 2015
After poking a s-22 around with an oscilloscope I managed to find a serial signal out of it. However, Mr. Asiantuntijakaveri pointed out, that it isn't especially useful. To him that serial stuff looked like the mobile-side baseband. Couple of hours tinkering with VxWorks prompt didn't result much for me. So, back to the scope ...
This is what I found:
Another 1,8 volt serial signal. RS-232 parameters are alike the other one 115200 bps 8N1. I couldn't confirm the DCE RX-pin. There is one with suitable electrical characteristics, but it looks like the box doesn't offer any input capabilities, not at least with default configuration.
The data on boot time looks like this:
v?l?space?write magic succsse!%x

24680138%s start addr:0x%x size:0x%x

first step

second step

thred step

DDR exam right !!!!!!!!!!!!!!!!!!!!!!!


press space key to enter bootrom:

Start from: vxWorks Kernel.

>>loading: VxWorks ... success.

>>loading: FastBoot ... success.


hw main id:00000400, sub id:00000001activate_fastboot...0x3CD00000

Starting from entry: 0x30004000

[ 0.000000] Linux version 2.6.35.7 (q81003564@MBB-V7R1-CPE) (gcc version 4.5.1 (ctng-1.8.1-FA) ) #1 PREEMPT Mon Jun 3 13:50:16 CST 2013

[ 0.000000] CPU: ARMv7 Processor [413fc090] revision 0 (ARMv7), cr=18c53c7f

[ 0.000000] CPU: VIPT nonaliasing data cache, VIPT nonaliasing instruction cache

[ 0.000000] Machine: Hisilicon Balong

[ 0.000000] Ignoring unrecognised tag 0x4d534d70

[ 0.000000] Memory policy: ECC disabled, Data cache writeback

[000005940ms] Built 1 zonelists in Zone order, mobility grouping on. Total pages: 36576

[000005941ms] Kernel command line: root=/dev/ram0 rw console=ttyAMA0,115200 console=uw_tty0 rdinit=/init mem=144m

[000005941ms] PID hash table entries: 1024 (order: 0, 4096 bytes)

[000005941ms] Dentry cache hash table entries: 32768 (order: 5, 131072 bytes)

[000005942ms] Inode-cache hash table entries: 16384 (order: 4, 65536 bytes)

[000005957ms] Memory: 144MB = 144MB total

[000005957ms] Memory: 133780k/133780k available, 13676k reserved, 0K highmem

[000005957ms] Virtual kernel memory layout:

[000005957ms] vector : 0xffff0000 - 0xffff1000 ( 4 kB)

[000005957ms] fixmap : 0xfff00000 - 0xfffe0000 ( 896 kB)

[000005957ms] DMA : 0xff600000 - 0xffe00000 ( 8 MB)

[000005957ms] vmalloc : 0xc9800000 - 0xf0000000 ( 616 MB)

[000005957ms] lowmem : 0xc0000000 - 0xc9000000 ( 144 MB)

[000005957ms] modules : 0xbf000000 - 0xc0000000 ( 16 MB)

[000005957ms] .init : 0xc0008000 - 0xc0028000 ( 128 kB)

[000005958ms] .text : 0xc0028000 - 0xc06ca000 (6792 kB)

[000005958ms] .data : 0xc06ca000 - 0xc0701520 ( 222 kB)

[000005958ms] SLUB: Genslabs=11, HWalign=32, Order=0-3, MinObjects=0, CPUs=1, Nodes=1

[000005958ms] Preemptable hierarchical RCU implementation.

[000005958ms] RCU-based detection of stalled CPUs is disabled.

[000005958ms] Verbose stalled-CPUs detection is disabled.

[000005958ms] NR_IRQS:160

[000005958ms] Console: colour dummy device 80x30

[000005958ms] Calibrating delay loop... 897.84 BogoMIPS (lpj=4489216)

[000006218ms] pid_max: default: 4096 minimum: 301

[000006218ms] Mount-cache hash table entries: 512

[000006218ms] CPU: Testing write buffer coherency: ok

[000006219ms] start log trace.

[000006223ms] NET: Registered protocol family 16

[000006224ms] Serial: BalongV7R1 UART driver

[000006224ms] dev:uart0: ttyAMA0 at MMIO 0x90007000 (irq = 102) is a Balong rev0

[000006435ms] console [ttyAMA0] enabled

[000006461ms] bio: create slab at 0

[000006465ms] hi_gpio_probe:gpio sync in acore.

[000006469ms] hi_gpio_probe:gpio sync over.

[000006474ms] SCSI subsystem initialized

[000006478ms] enter Acpu-softtimer-modeule-init!!!

[000006482ms] softtimer_module_start_success-,1-- >>>>>>>>>>>>>>

[000006488ms] start create the softtimer thread!!!

[000006492ms] end the Acpu_softtimer_init() !!!

[000006497ms] usbcore: registered new interface driver usbfs

[000006503ms] usbcore: registered new interface driver hub

[000006508ms] usbcore: registered new device driver usb

[000006513ms] ***************************************************************

[000006520ms] begin to init mutilcore: 0000

[000006524ms] hw id: main,0x400, sub,0x1

[000006528ms] ===== beg mem usr function =====

[000006532ms] begin to init mutilcore: 222

[000006536ms] start BSP_ICC_Init

[000006539ms] g_pstIccCtrlChan = 0xf2fc02c0

[000007098ms] ##### icc init success!, cnt=1971, connet=1

[000007103ms] end BSP_ICC_Init

[000007106ms] begin to init mutilcore: 333

[000007110ms] begin to init mutilcore: 444

[000007113ms] BSP_MODU_IFCP

IFC Process init success!

[000008606ms] A:start icc cshell...

[000008609ms] cshell_icc_open success,cshell_udi_handle is 5898241

[000008615ms] free_ok

[000008617ms] the lcr_reg is 3

[000008620ms] pTemp is 0xc8a90000

[000008623ms] UDI_BUILD_DEV_ID is 0x300

[000008626ms] start NVM_Init

[000008629ms] MSP_IPC udi_open Start

[000009297ms] MSP_IPC udi_open End Handle = 5a0002

[000009715ms] end NVM_Init

[000009718ms] begin to init mutilcore: 555

[000009721ms] BCM43239_WIFI_Release: Entering...

[000009726ms] DRV_HSIC_Release: Entering ...
Actually there is like 1000 lines more log, but it's just Linux loading. Including in the log there are SSH-passwords for 2 users admin and user. They are exactly what sshusers.cfg will have after boot.
It will take couple of seconds for the bootloader to kick on the Android-side. The bootloader serial-data starts flowing in immediately, but this one sleeps a while and starts after that.
Side buttons exaplained
I have previously touched the subject of WiFi / Reset / WPS -buttons. Also I got a comment about un-bricking a s-22, but that didn't help me much. This is related to serial output in a sense, that pressing the buttons will have effect on the serial output.
Now that I have a clear view of what's happening at the box I'd like to take this opportunity of describing the three buttons' behaviour:
- (device running normally) WiFi button pressed for over 1 second: WiFi on/off
- no surprises there, you can do this from Web-GUI too
- (device running normally) Reset button pressed for over 2 seconds: Factory reset
- (device running normally) Reset button pressed for less than 2 seconds: no-operation
- (device running normally) WPS button pressed: on/off
- no surprises there, you can do this from Web-GUI too
- (device running normally) WiFi and WPS buttons pressed: no special functionality, will toggle WiFi and WPS as they would be pressed separately
- (device running normally) WiFi, Reset, WPS buttons pressed: no special functionality
- (device not powered) WiFi button pressed while powering on: baseband (VxWorks) serial console displays Android console briefly and stops
- Linux-side serial console will be completely silent
- (device not powered) WPS button pressed while powering on: no-operation
- (device not powered) Reset button pressed while powering on: no-operation
- (device not powered) WiFi and WPS buttons pressed while powering on: enter bootloader menu
- (device not powered) WiFi, Reset and WPS buttons pressed while powering on: enter bootloader menu
If you have other suggestions about the buttons, please drop me a comment.
Huawei B593 s-22 RS-232 pins
Thursday, March 19. 2015
As I told earlier, I bricked one. It was a loaned one, so I really got burned on that. There was not much to do, but pop the hood of the s-22 and hope to find something interesting there. An interesting thing would be serial console (RS-232) or JTAG.
Here goes:
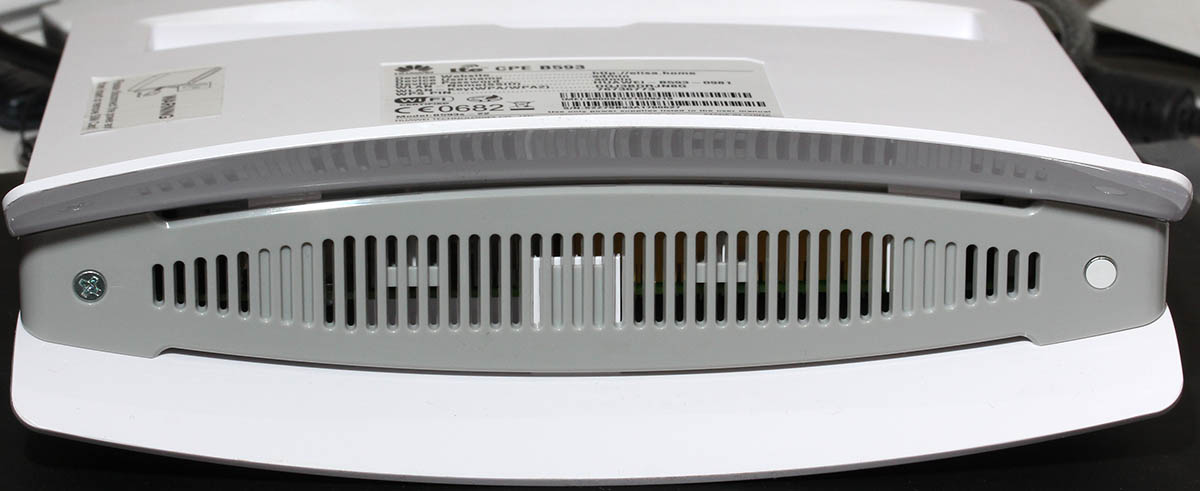
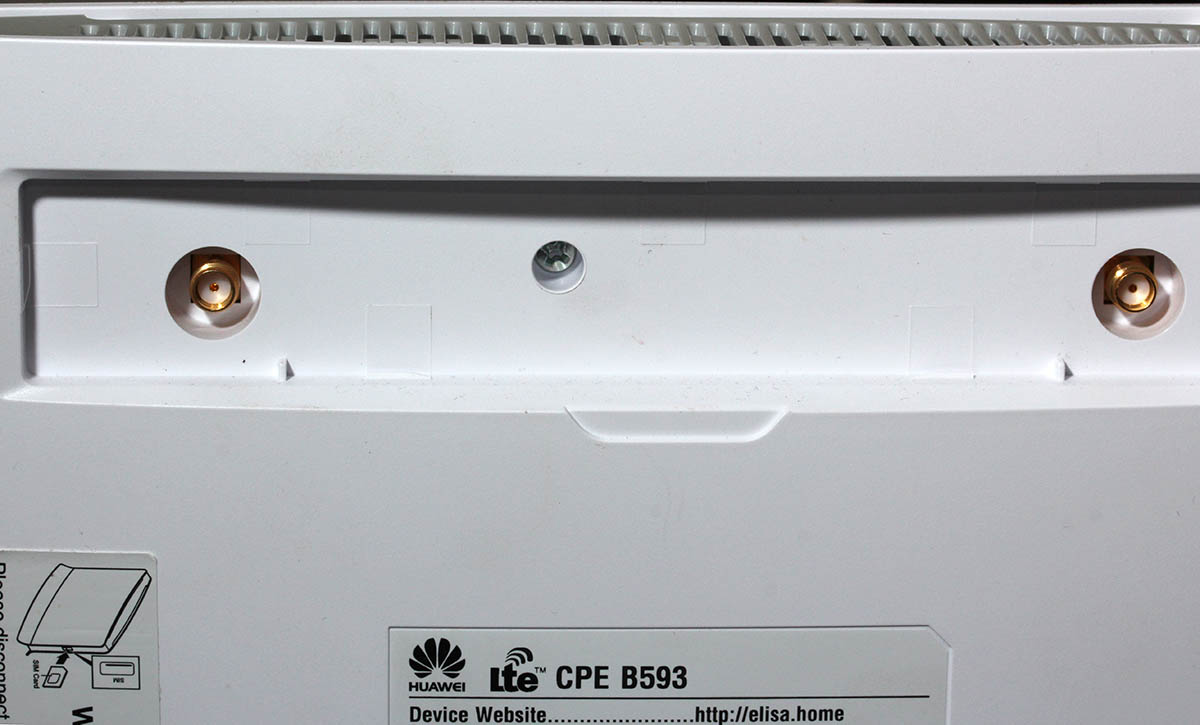
There are 3 Phillips PH-2 screws holding the unit together. One screw always has a thin paper on top of it. It is a "Huawei-thing". If the paper is broken, it will void your warranty. Remove the 3 screws, and you can pry the box open:
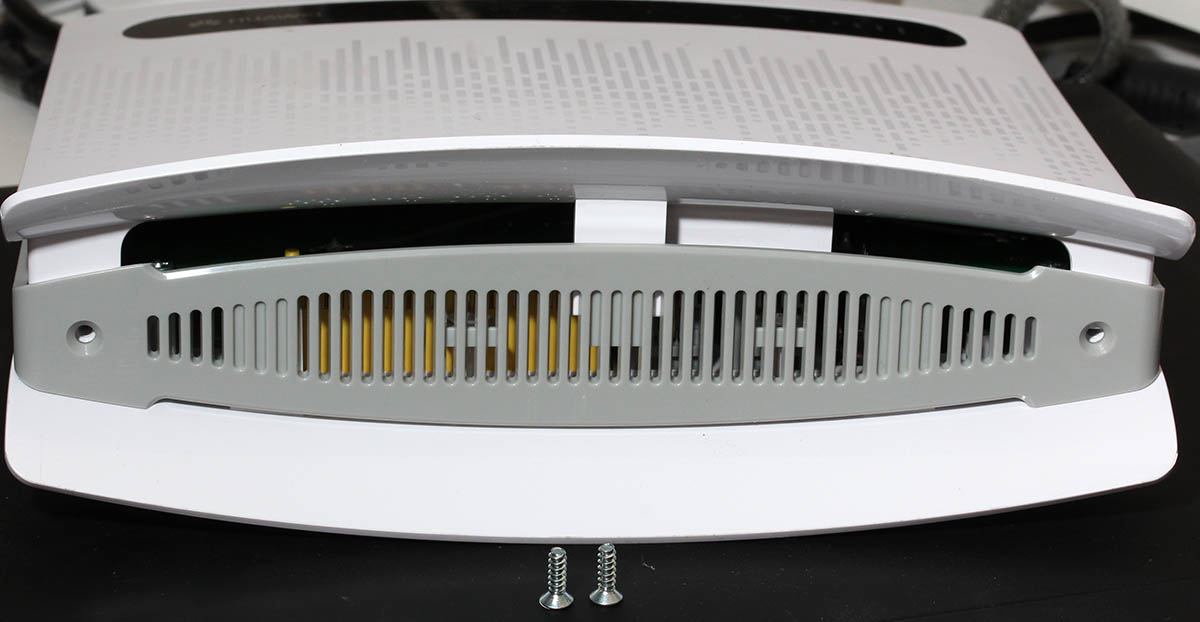
Then the front cover is gone, you have the wrong side of the motherboard in front of you. You need to detach the MoBo from the back cover. There are 4 Phillips PH-2 screws holding it:
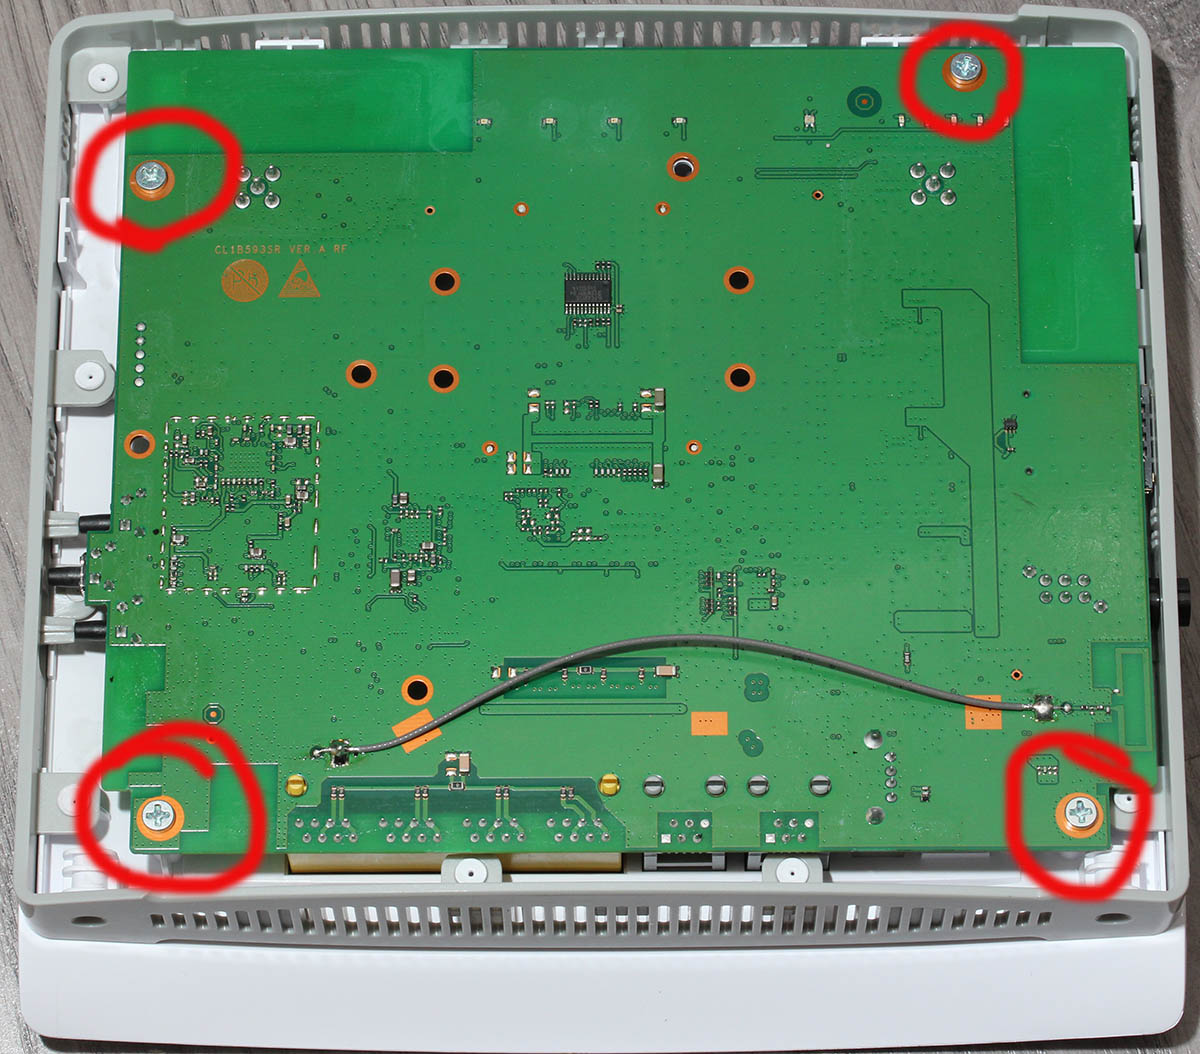
Now you're seeing the real thing:
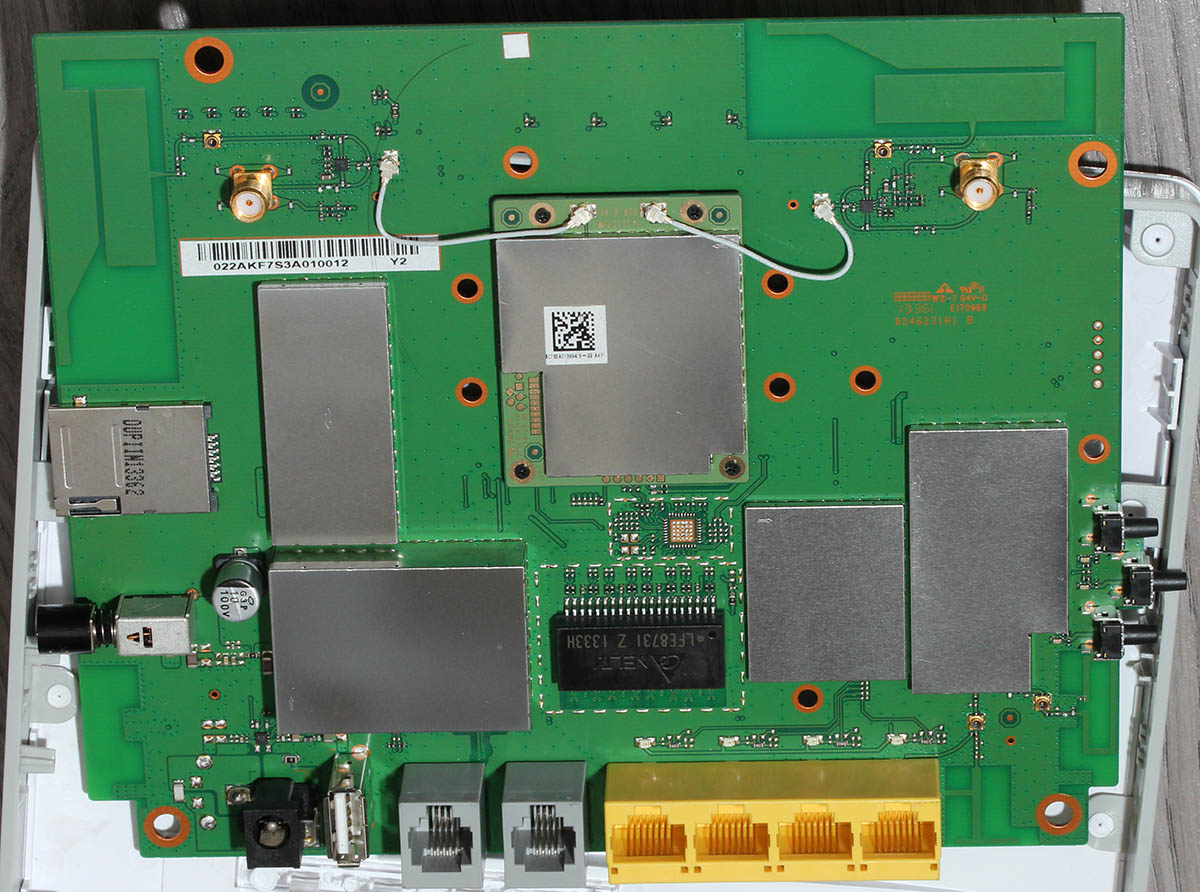
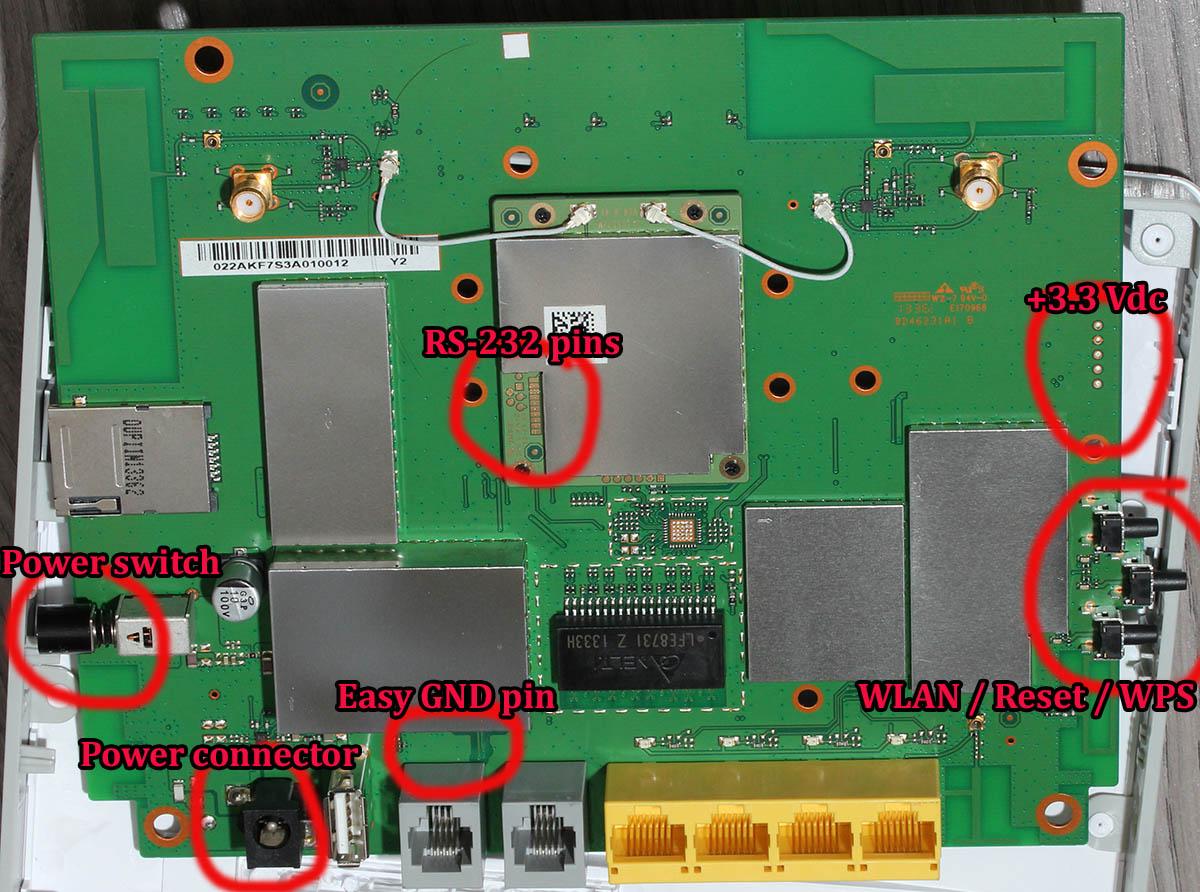
Here is a layout of all the good stuff:
Mr. Asiantuntijakaveri gave me a hint to check couple pins near the CPU for serial signal. I attached an oscilloscope into couple of interesting pins and got following:

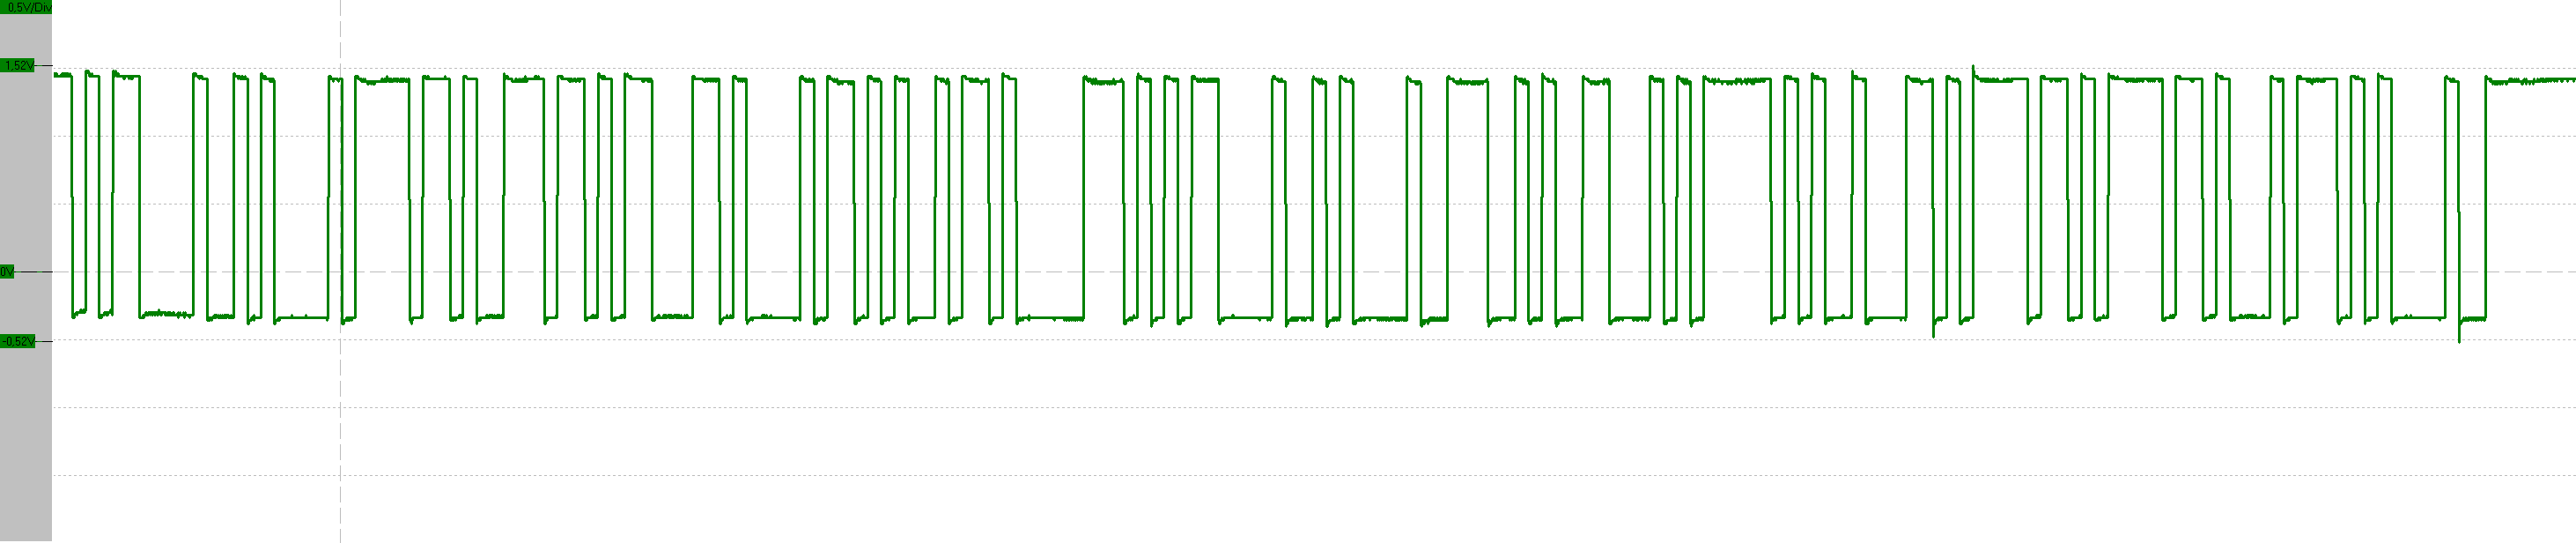
Definitely an RS-232 signal. Based on the timings, looks like 115200 bps. Just as in B593 u-12. The only thing was about the voltage. My scope said 1,792 volts peak-to-peak. That's way too low for my 3,3 volt TTL to RS-232 converter. I put in a purchase order for more capable (expensive) adapter and eventually UPS-guy brought it to me:
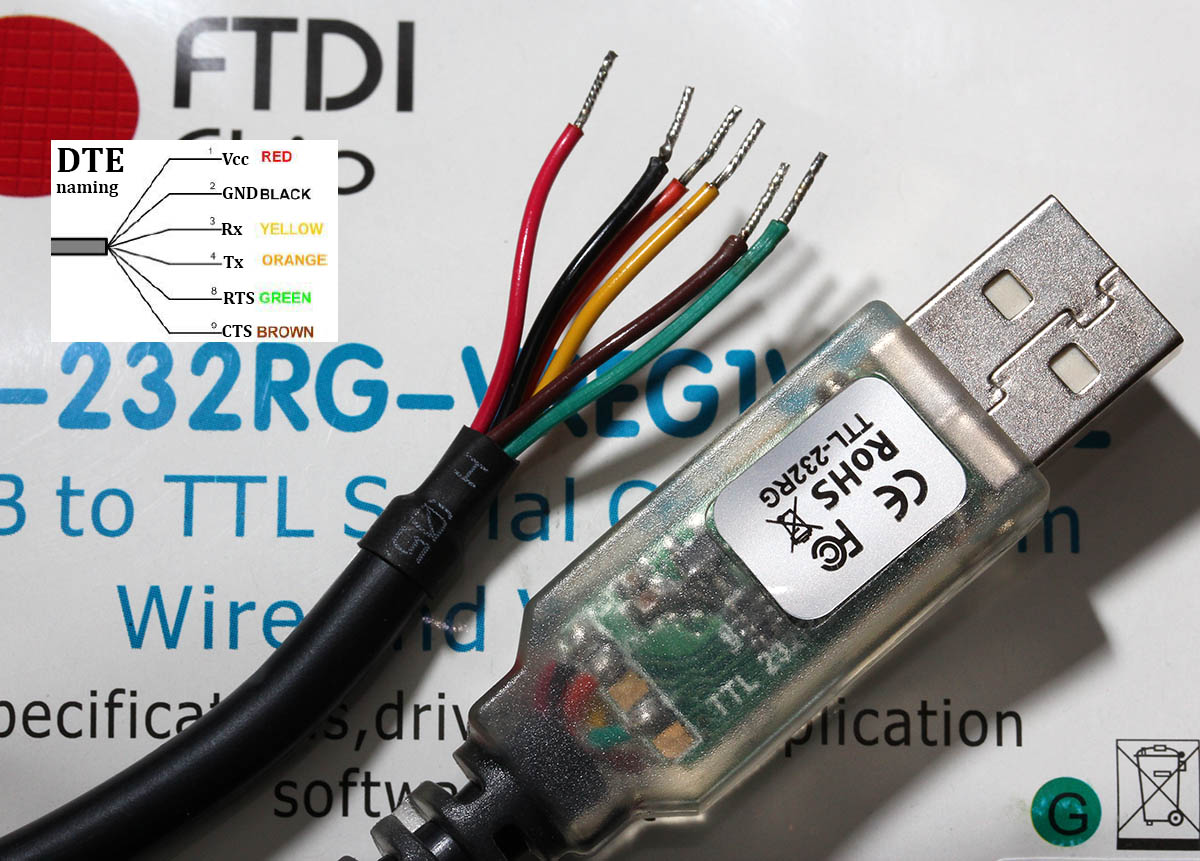
The one I have is Future Technology Devices International TTL-232RG, TTL-232RG-VREG1V8-WE to be specific. Their spec says: VREG1V8 = USB to UART cable with +5 to +1.8V TTL level UART signals and WE = wire end. A Linux sees it as a Bus 005 Device 004: ID 0403:6001 Future Technology Devices International, Ltd FT232 USB-Serial (UART) IC. It is fully working after plugging in both on a Linux and Windows 7.
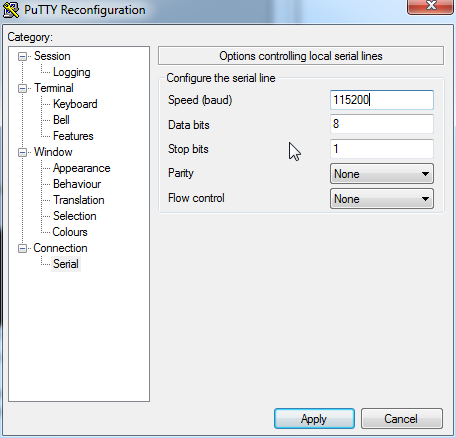
I put this into a PuTTY (115200 N81, no flow control):
And yes, there are results:
onchip
NF_boot!
UnSec_boo
v?l?space?%s start addr:0x%x size:0x%x
first step
          second step
                     thred step
                               DDR exam right !!!!!!!!!!!!!!!!!!!!!!!

press space key to enter bootrom:
Start from: vxWorks Kernel.
>>loading: VxWorks ... success.
>>loading: FastBoot ... success.

hw main id:00000400, sub id:00000001activate_fastboot...0x3CD00000
Starting from entry: 0x30004000
That's it no more. Not very useful. Then Mr. Asiantuntijakaveri gave me another hint. Try the three-finger-salute, press WiFi, Reset and WPS buttons and then kick on the power. An u-12 will go to some sort of serial-console service mode. And yes, a s-22 does the same. All I have to do is have all three buttons pressed, kick the power on and immediately release all them. Now I have on serial:
first step
second step
thred step
DDR exam right !!!!!!!!!!!!!!!!!!!!!!!

press space key to enter bootrom:
enter load backup
IMAGE_BOOTROM load from:0x00340000>>loading: BootRom ... try inflate.
image length: 000A412A
ram_inflate_addr: 34F4382E
inflating...
return value: 00000000
inflate success! data check OK!

hw main id:00000400, sub id:00000001Starting from entry: 0x300040Target Name: vxTarget

Adding 5472 symbols for standalone.


 ]]]]]]]]]]]]]]]]]]]]]]]]]]]]]]]]]]]]]]]]
 ]]]]]]]]]]]]]]]]]]]]]]]]]]]]]]]]]]]]]]]
 ]]]]]]]]]]]]]]]]]]]]]]]]]]]]]]]]]]]]]]
      ]]]]]]]]]]]  ]]]]     ]]]]]]]]]]       ]]              ]]]]         (R)
 ]     ]]]]]]]]]  ]]]]]]     ]]]]]]]]       ]]               ]]]]
 ]]     ]]]]]]]  ]]]]]]]]     ]]]]]] ]     ]]                ]]]]
 ]]]     ]]]]] ]    ]]]  ]     ]]]] ]]]   ]]]]]]]]]  ]]]] ]] ]]]]  ]]   ]]]]]
 ]]]]     ]]]  ]]    ]  ]]]     ]] ]]]]] ]]]]]]   ]] ]]]]]]] ]]]] ]]   ]]]]
 ]]]]]     ]  ]]]]     ]]]]]      ]]]]]]]] ]]]]   ]] ]]]]    ]]]]]]]    ]]]]
 ]]]]]]      ]]]]]     ]]]]]]    ]  ]]]]]  ]]]]   ]] ]]]]    ]]]]]]]]    ]]]]
 ]]]]]]]    ]]]]]  ]    ]]]]]]  ]    ]]]   ]]]]   ]] ]]]]    ]]]] ]]]]    ]]]]
 ]]]]]]]]  ]]]]]  ]]]    ]]]]]]]      ]     ]]]]]]]  ]]]]    ]]]]  ]]]] ]]]]]
 ]]]]]]]]]]]]]]]]]]]]]]]]]]]]]]
 ]]]]]]]]]]]]]]]]]]]]]]]]]]]]]       Development System
 ]]]]]]]]]]]]]]]]]]]]]]]]]]]]
 ]]]]]]]]]]]]]]]]]]]]]]]]]]]       VxWorks 6.8
 ]]]]]]]]]]]]]]]]]]]]]]]]]]       KERNEL: WIND version 2.13
 ]]]]]]]]]]]]]]]]]]]]]]]]]       Copyright Wind River Systems, Inc., 1984-2009

 CPU: ARM RealView PBX-A9.  Processor #0.
 Memory Size: 0x4efa000.  BSP version 2.0/0.
 Created: Jun 03 2013, 13:52:34
 ED&R Policy Mode: Deployed

-> GU base addr: 0x3e200000
HIFI base addr: 0x3f800000
===== beg mem usr function =====
Hisilicon NANDC_V4.00 initialize...

NAND device: Manufacturer ID: 0xad, Chip ID: 0xbc (Hynix NAND 512MiB 1,8V 16-bit)
ptable_yaffs_mount: /yaffs0 ...yaffs: Mounting /yaffs0
yaffs: yaffs_GutsInitialise()
yaffs: yaffs_GutsInitialise() done.

OK.

ptable_yaffs_mount: /yaffs1 ...yaffs: Mounting /yaffs1
yaffs: yaffs_GutsInitialise()
yaffs: yaffs_GutsInitialise() done.

OK.

ptable_yaffs_mount: /yaffs2 ...yaffs: Mounting /yaffs2
yaffs: yaffs_GutsInitialise()
Collecting block 1136, in use 39, shrink 0, wholeBlock 0
Collecting block 1136, in use 34, shrink 0, wholeBlock 0
Collecting block 1136, in use 29, shrink 0, wholeBlock 0
Collecting block 1136, in use 24, shrink 0, wholeBlock 0
Collecting block 1136, in use 19, shrink 0, wholeBlock 0
Collecting block 1136, in use 14, shrink 0, wholeBlock 0
Collecting block 1136, in use 9, shrink 0, wholeBlock 0
Collecting block 1136, in use 4, shrink 0, wholeBlock 0
yaffs: yaffs_GutsInitialise() done.

OK.

ptable_yaffs_mount: /yaffs5 ...yaffs: Mounting /yaffs5
yaffs: yaffs_GutsInitialise()
yaffs: yaffs_GutsInitialise() done.

OK.

Collecting block 301, in use 34, shrink 0, wholeBlock 0
Collecting block 301, in use 29, shrink 0, wholeBlock 1
0x34ef9d7c (tRootTask): PMU PWR IRQ1 : 0x0

0x34ef9d7c (tRootTask): PMU PWR IRQ2 : 0x20

0x34ef9d7c (tRootTask): PMU PWR IRQ3 : 0x0

0x34ef9d7c (tRootTask): PMU REG IRQ1 : 0x0

0x34ef9d7c (tRootTask): PMU REG IRQ2 : 0x20

0x34ef9d7c (tRootTask): PMU REG IRQ3 : 0x0

0x34ef9d7c (tRootTask): PMU REG H_N_STATUS(0x43)  : 0x0

0x34ef9d7c (tRootTask): PMU REG H_N_STATUS(0x44)  : 0x0

0x34ef9d7c (tRootTask): PMU FLAG REG 0x4  : 0x0

0x34ef9d7c (tRootTask): PMU FLAG REG 0x5  : 0x0

0x34ef9d7c (tRootTask): PMU FLAG REG 0x6  : 0x0

0x34ef9d7c (tRootTask): PMU FLAG REG 0x7  : 0x5

0x34ef9d7c (tRootTask): PMU FLAG REG 0x8  : 0x0

0x34ef9d7c (tRootTask): hw main id:0x400, sub id:0x1
0x34ef9d7c (tRootTask): PMU NVM_Read ERROR.
0x34ef9d7c (tRootTask): getFactoryMode:not in factory mode!
0x34ef9d7c (tRootTask): BootRom update_getWebUIUpdateFlag: 0x8B6A7024
0x34ef9d7c (tRootTask): dloadIsDoBackupUpdate: need to do the backup update!
0x34ef9d7c (tRootTask): getBackupBinState: open file failed!
0x34ef9d7c (): task deadexcutePreBackupUpdate: the backup bin is invalid!
0x34ef9d7c (): task deadclearBkupUpdateFlag: succeed to clear the backup update flag!
0x303c32f0 (tUSBTask): BSP_USB_GetDevDescIdx: MDM+PCUI+DIAG in Bootrom image

0x303c32f0 (tUSBTask): Starting USBware stack, Version 3.4.30.21
Oh yes! I was getting somewhere. On an enter I got a prompt and threw in some commands:
[M]->?
C interp: syntax error.
[M]->help

help                           Print this list
dbgHelp                        Print debugger help info
edrHelp                        Print ED&R help info
ioHelp                         Print I/O utilities help info
nfsHelp                        Print nfs help info
netHelp                        Print network help info
rtpHelp                        Print process help info
spyHelp                        Print task histogrammer help info
timexHelp                      Print execution timer help info
h         [n]                  Print (or set) shell history
i         [task]               Summary of tasks' TCBs
ti        task                 Complete info on TCB for task
sp        adr,args...          Spawn a task, pri=100, opt=0x19, stk=20000
taskSpawn name,pri,opt,stk,adr,args... Spawn a task
tip       "dev=device1#tag=tagStr1", "dev=device2#tag=tagStr2", ...
                               Connect to one or multiple serial lines
td        task                 Delete a task
ts        task                 Suspend a task
tr        task                 Resume a task

Type  to continue, Q or q to stop:

tw        task                 Print pending task detailed info
w         [task]               Print pending task info
d         [adr[,nunits[,width]]] Display memory
m         adr[,width]          Modify memory
mRegs     [reg[,task]]         Modify a task's registers interactively
pc        [task]               Return task's program counter
iam       "user"[,"passwd"]    Set user name and passwd
whoami                         Print user name
devs                           List devices
ld        [syms[,noAbort][,"name"]] Load stdin, or file, into memory
                               (syms = add symbols to table:
                               -1 = none, 0 = globals, 1 = all)
lkup      ["substr"]           List symbols in system symbol table
lkAddr    address              List symbol table entries near address
checkStack  [task]             List task stack sizes and usage
printErrno  value              Print the name of a status value
period    secs,adr,args...     Spawn task to call function periodically
repeat    n,adr,args...        Spawn task to call function n times (0=forever)
version                        Print VxWorks version info, and boot line
shConfig  ["config"]           Display or set shell configuration variables

Type  to continue, Q or q to stop:
strFree   [address]            Free strings allocated within the shell (-1=all)

NOTE:  Arguments specifying 'task' can be either task ID or name.

value = 10 = 0xa
[M]->
I don't yet know what to do with all that, but ... if I do, I'll tell about it. The part "press space key to enter bootrom" sounds interesting. I don't know if I can un-brick this thing from VxWorks-side.
So, about the pins. First a ground is needed. Typically it's available almos everywhere. There are couple of easy points to get the ground from, especially in the PSU-area. Of all the easily available GND-pins I chose this one:
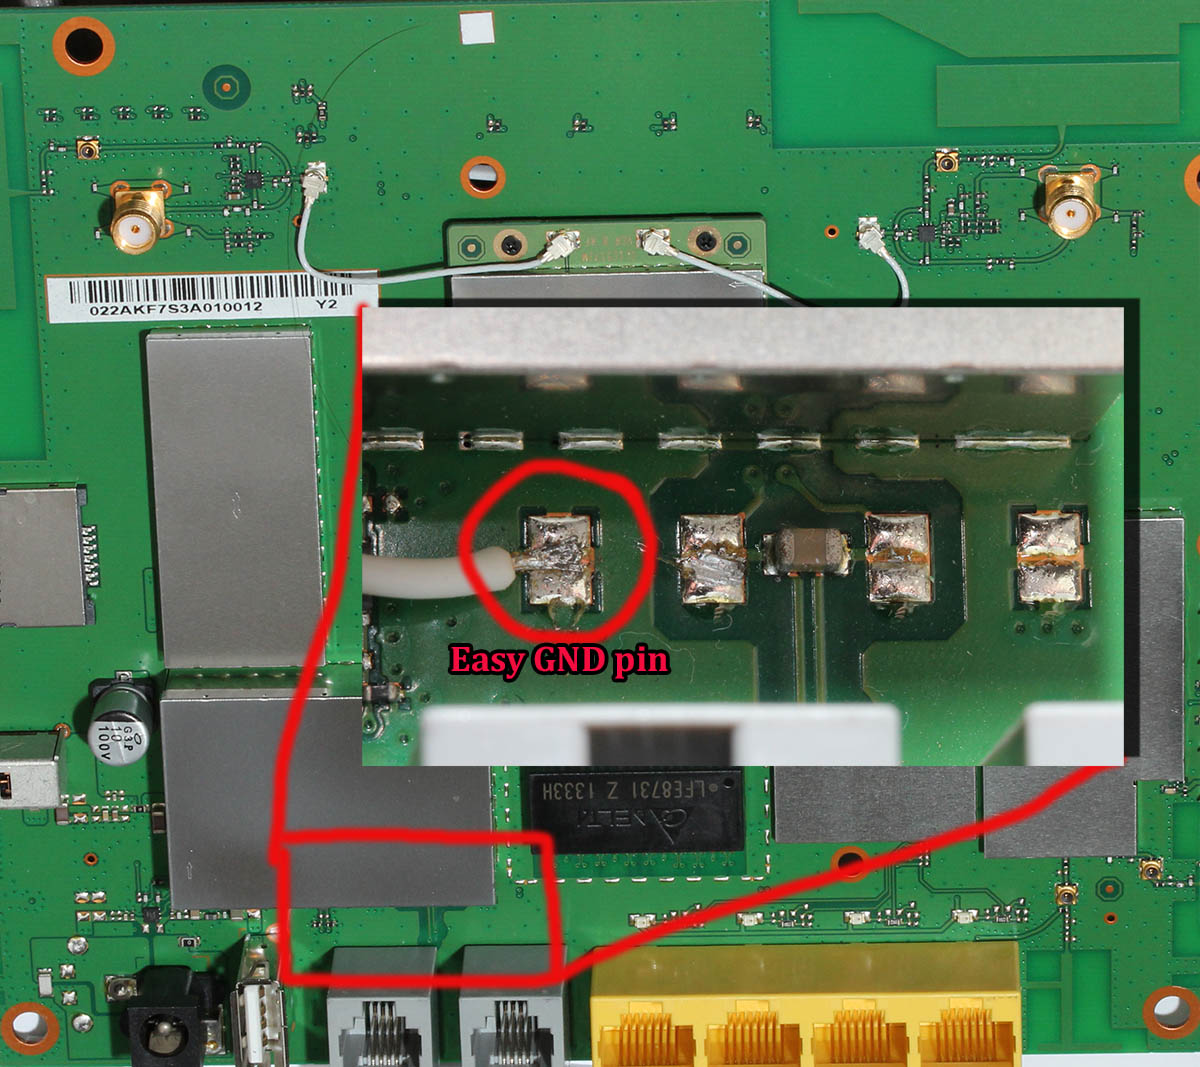
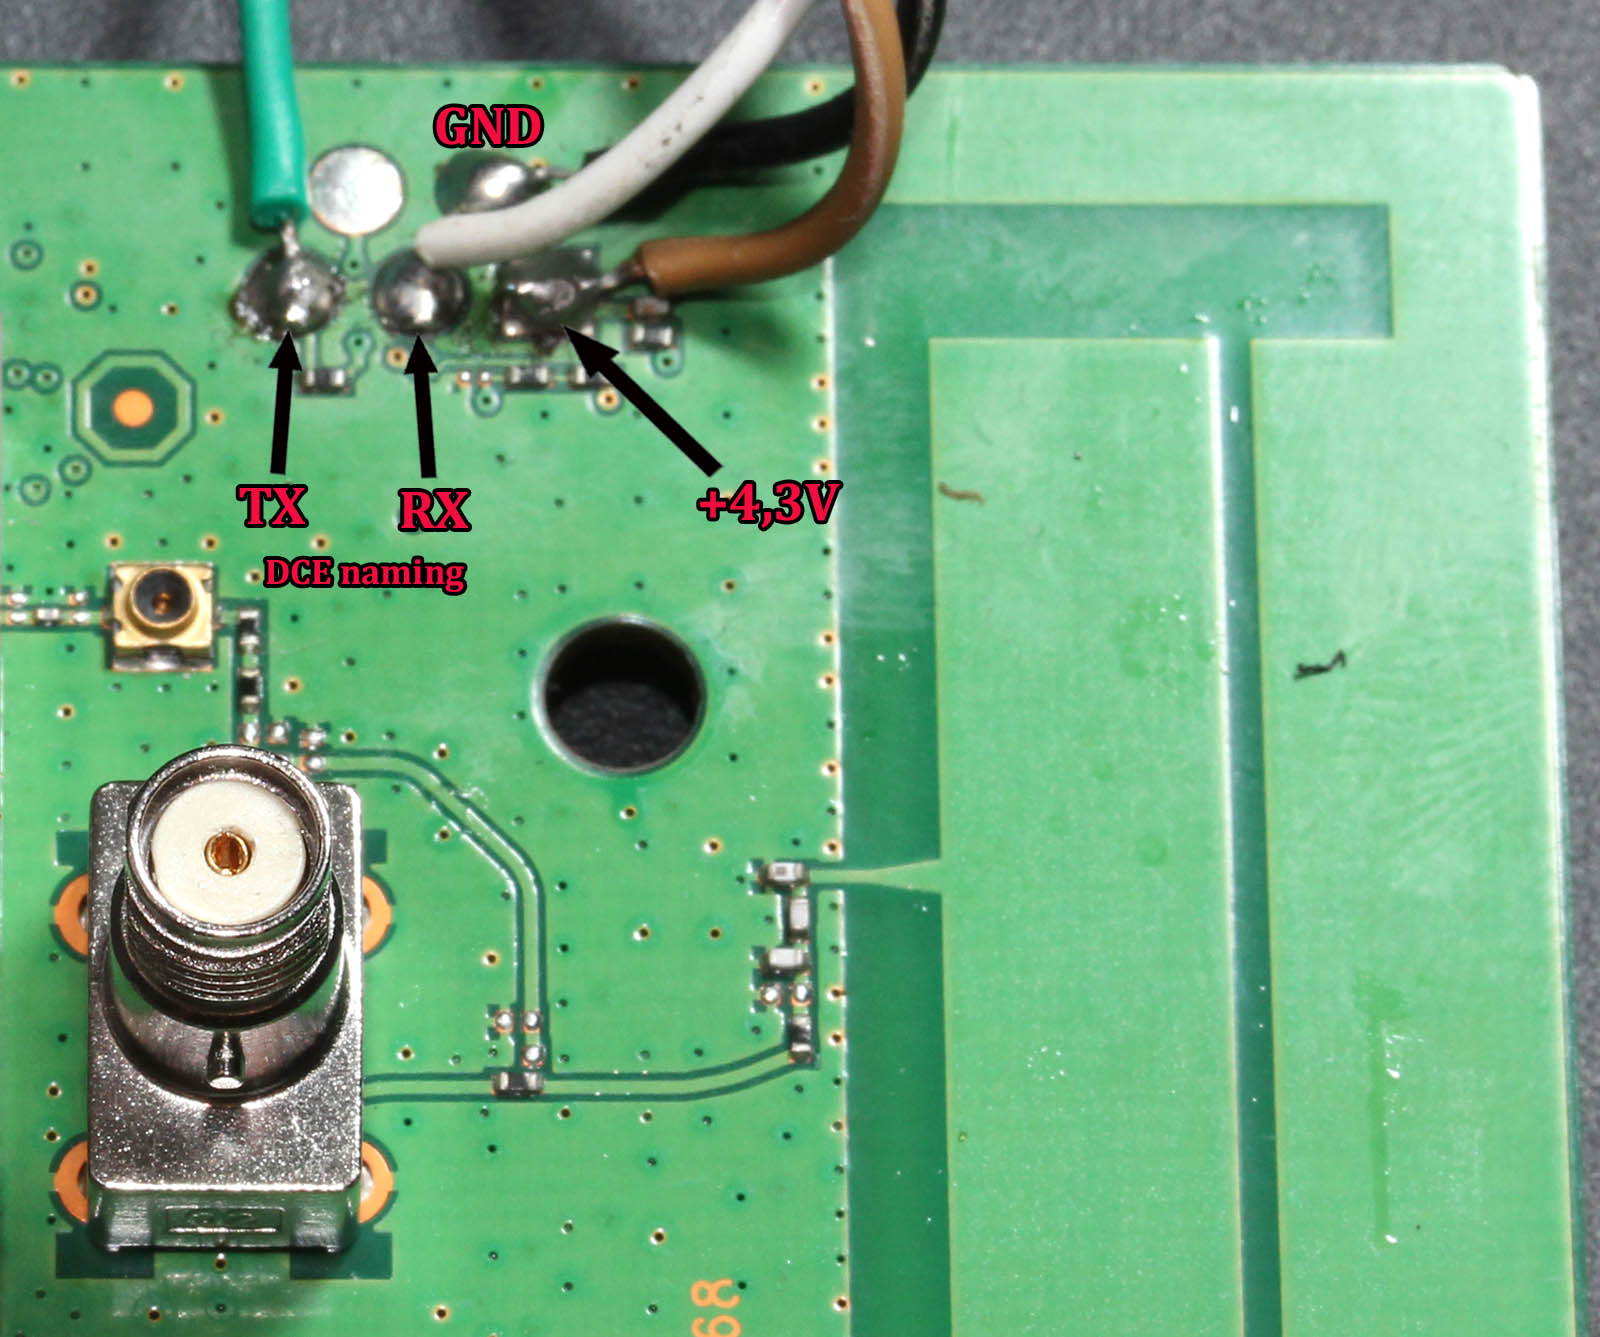
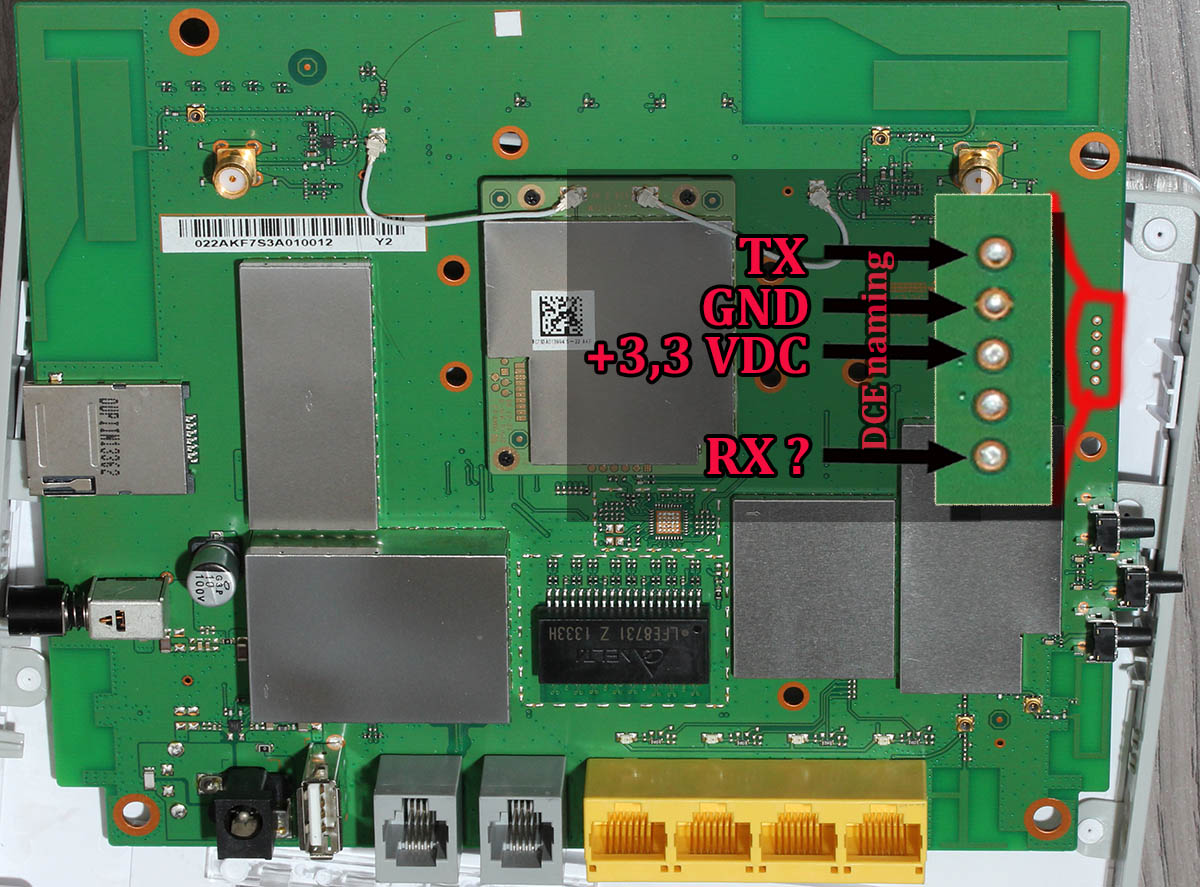
The choice was made by a simple logic, it was just an easy one to solder. Then the RS-232 DCE pins at the CPU-unit:
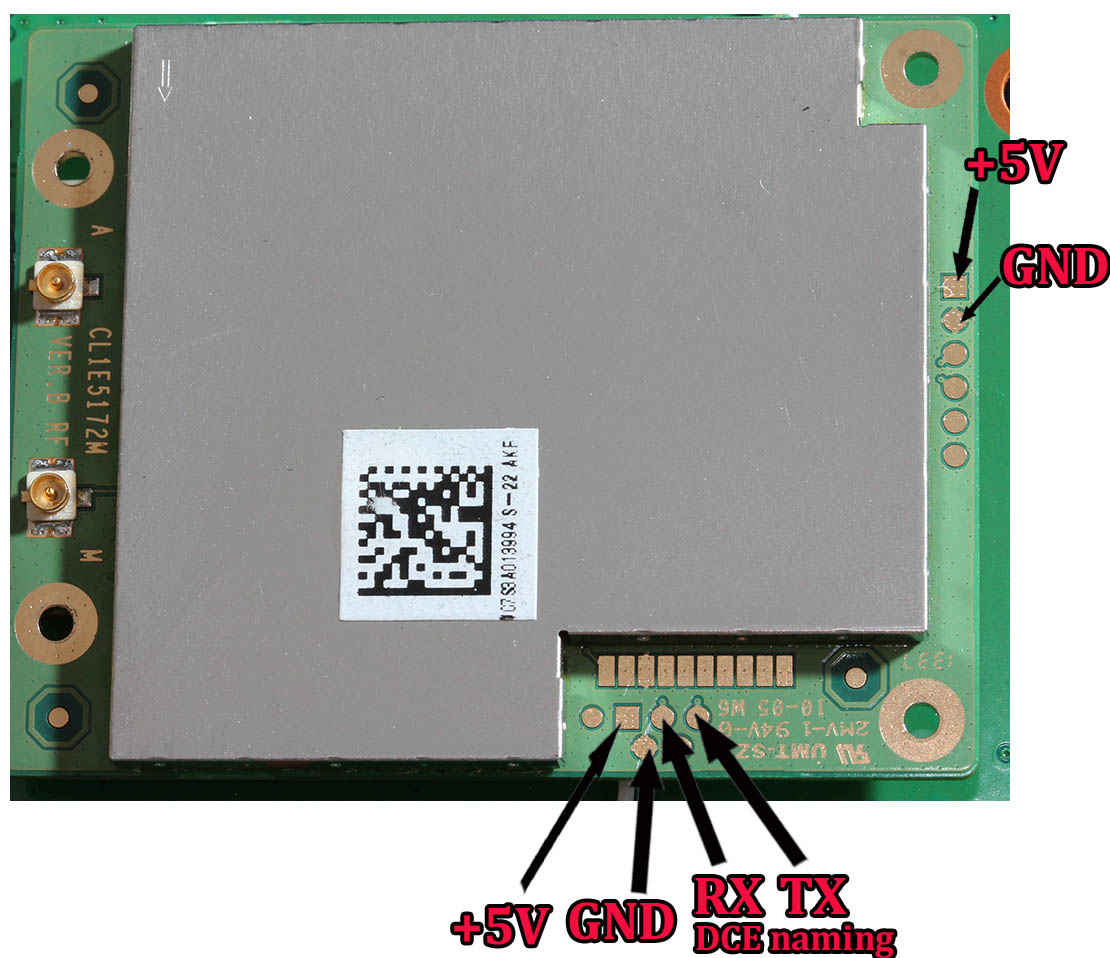
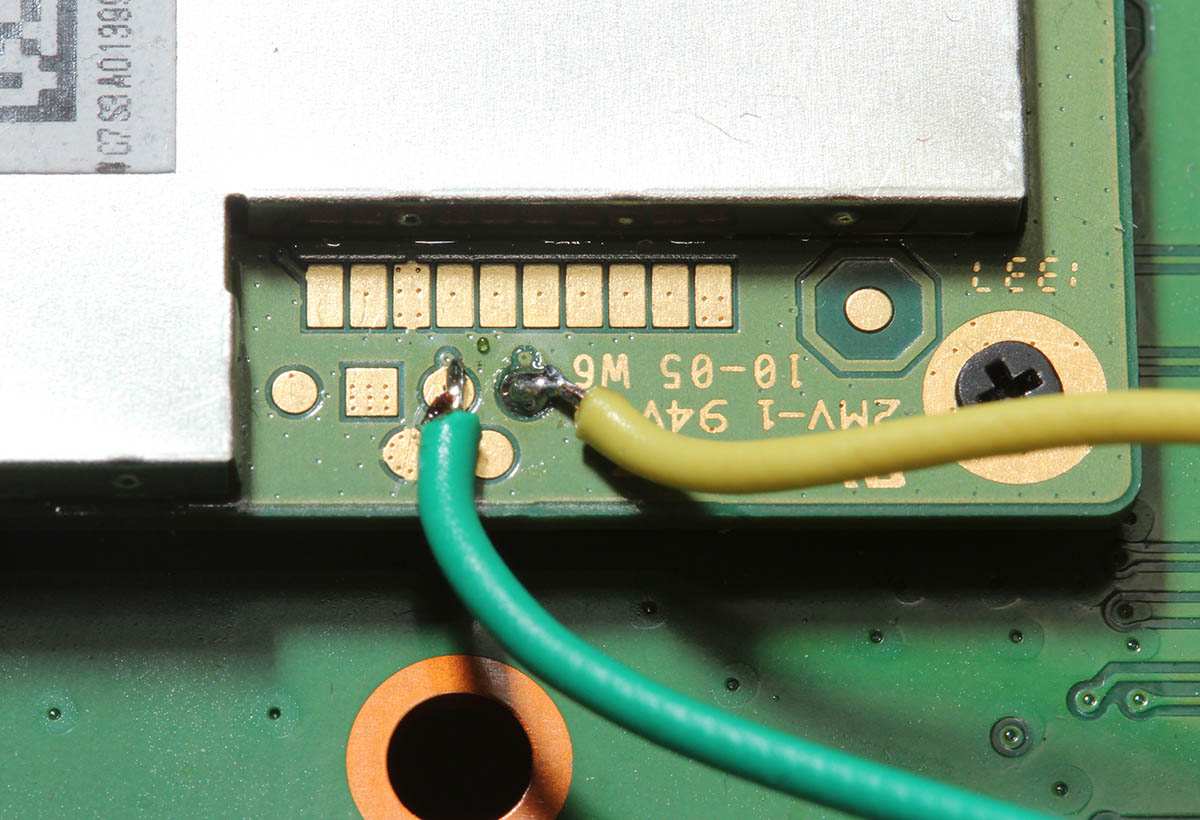
The metallic thing is simply a cover, the actual CPU is under that hood. I did check that one out, but I didn't find anything interesting under that one. Also understand about serial signals, that transmit and receive are from the point of the router (DCE), not from your computer (that would be DTE). You can think of it like this: when DCE transmits (TX), it will go to receive (RX) of a DTE.
If you do your own hacks, know that the power system on a s-22 is weird one. Input is 12 VDC, majority of the Vcc pins have 5 VDC, but I seriously doubt that the system would run on that voltage. If you need it, there is one easily accessible pin with 3,3 VDC:
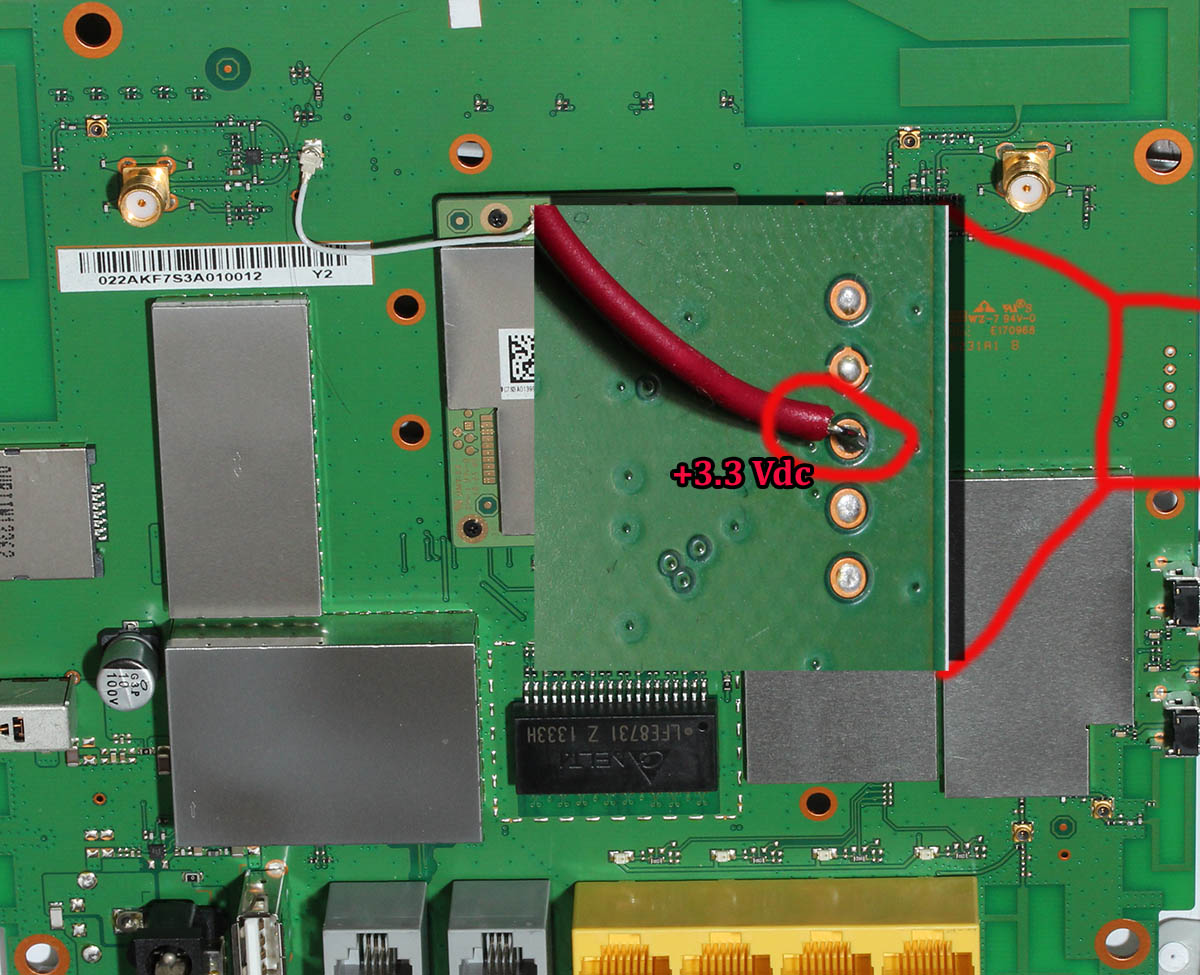
At the time of writing, the box is still bricked. But this time I have something to work with.
Update 24th Mar 2015:
There is more information available about this subject in this article.
Huawei E5186 AJAX API
Monday, March 16. 2015
Huawei E5186 (prototype) reviewed
Thursday, March 12. 2015
As I mentioned earlier, a reader of this blog got a Huawei E5186 and I got to test drive it. The model is still in prototype and the semi-official rumour is, that it will be released Q2/2015. As usual, they are not sold directly by Huawei, but by telcos. The one I had was from Germany, T-mobile. The mobile side is pretty much same as in B593s-22, the exact model I had was in fact E5186s-22. Frequencies and modulations are: LTE FDD DD800/900/1800/2100/2600 and TDD 2600. It is very likely, that inside the box is a HiSilicon Android running on a ARM-chip.
It looks exactly like a B593. Here are the pics:
The first things I noticed, that the Tel1 and Tel2 RJ-11 connectors are missing. Also: no USB!! What! I found information from discussion boards, that this particular T-Mobile version is a "poor man's model". There does exist other E5186 models, which have USB and the Tel-connectors.
As a B593 has, there are dual antenna connectors and they are SMA:
For testing this router I didn't need external antennas, the RF-side is much more sensitive than in a B593. In a location where I normally have one bar (without external antenna), this one got three (out of five). Nice!
If you'd want to pop the hood, it opens like B593 does, from the bottom:
All Huawei-hardware has a thin paper on top of one screw. This is to indicate if that screw was removed to void any warranty. I didn't open it, it wasn't my own box.
The web-GUI is completely new:
Everything looked brand new, so had to port-scan the thing:
PORT   STATE SERVICE
53/tcp open  domain
80/tcp open  http
MAC Address: 38:F8:89:03:1C:36 (Unknown)
What a surprise! Nothing there. Nothing! No SSH, no FTP, no Samba, no HTTPS. A B593 has plenty of ports open, but this beast is closed as a clam.
A cursory check on the HTML and JavaScript prooved, that entire front was re-written. B593 front has issues on security and functionality, this thing is entirely jQuery / AJAX -based thing. All the requests transfer XML. I was expecting JSON, but hey, it works. I guess there is something on back-end, which runs better on XML.
As the stripped-down hardware suggests, the web-GUI has very little options:

No real surprises there. The only thing, that really caught my eye, was the 5GHz WLAN which B593 doesn't have. There must be some new electronics inside.
This is the device information screen:
As it happened, also Finnish magazine happened to review the E5186. I don't have a permission for reprint, but here is a small glimpse what they said:
As a conclusion, the mag loved the box. I don't know which version they had, but this one without USB I don't especially love. It's too pricey without the port. Under the hood, the AJAX-API has a ton of features not available via your web browser. I'll get back to that subject later.
ZTE MF910 Wireless Router reviewed
Sunday, March 1. 2015
I had a chance to setup a modern 4G/3G/2G router. Of course I took pics and share the details here!
This is what a ZTE MF910 looks like:

Pretty much the first thing that comes to my mind is: "It's a cell phone!" Yes, indeed. It is. It is an Android phone. My guess is, it is 99% of a cell phone when compared to an Android in your pocket. It is small, it has an USB-charger, runs hours from a battery. It is shiny (pretty difficult to get decent pictures of it). It has a display (no touching or anything expensive). And it costs 99,- €. There is very little differentiating it, except that it doesn't have a speaker and a microphone. I didn't pop the hood of it (that thing isn't mine, I was just helping to set it up), but I'm thinking it has all the chips and electronics a phone would have.
Screen will indicate connection type (2G/3G/4G), bars, Internet status (ok, both arrows up and down), Wi-Fi enabled, how many clients are connected to the Wi-Fi, battery charge level, operator name, cumulative time connected and the cumulative transmitted bytes.
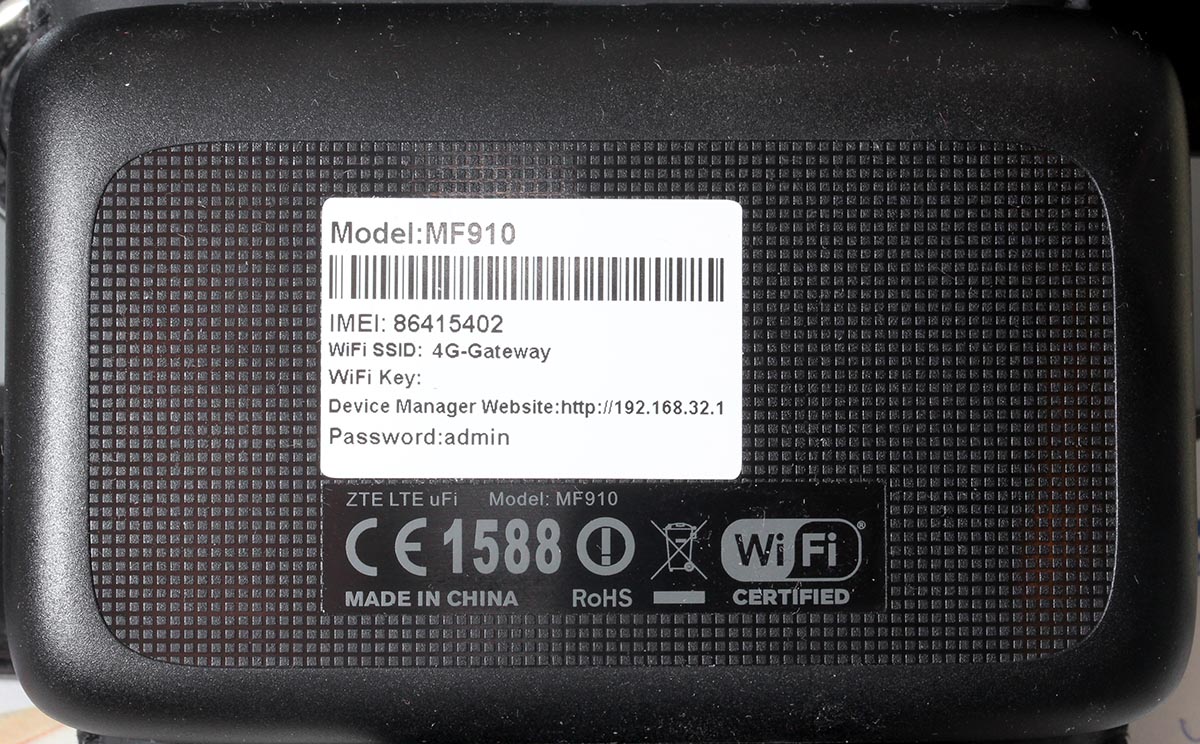
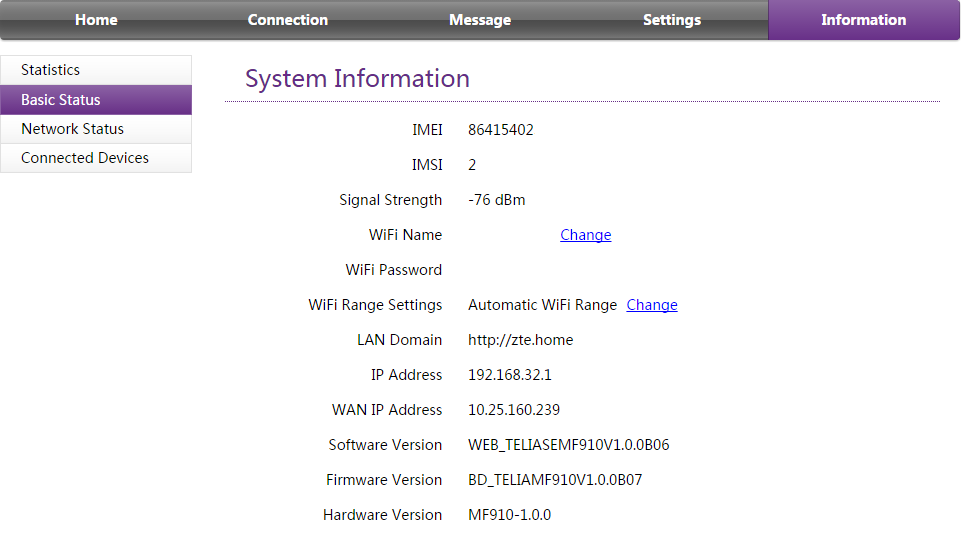
On the back there are out-of-the-box defaults and mandatory IMEI-information. The TAC-code for this one is 86415402 and I couldn't find it from any TAC databases. Must be quite a new one. What I didn't find is how to replace the battery. I guess you cannot, it is like a cell phone. It doesn't feel hot or anything when running, looks like the electronics design is also modern. It puts all the electrons where you'd expect them to go, not to dissipate heat.
Here is a clear difference to a phone:
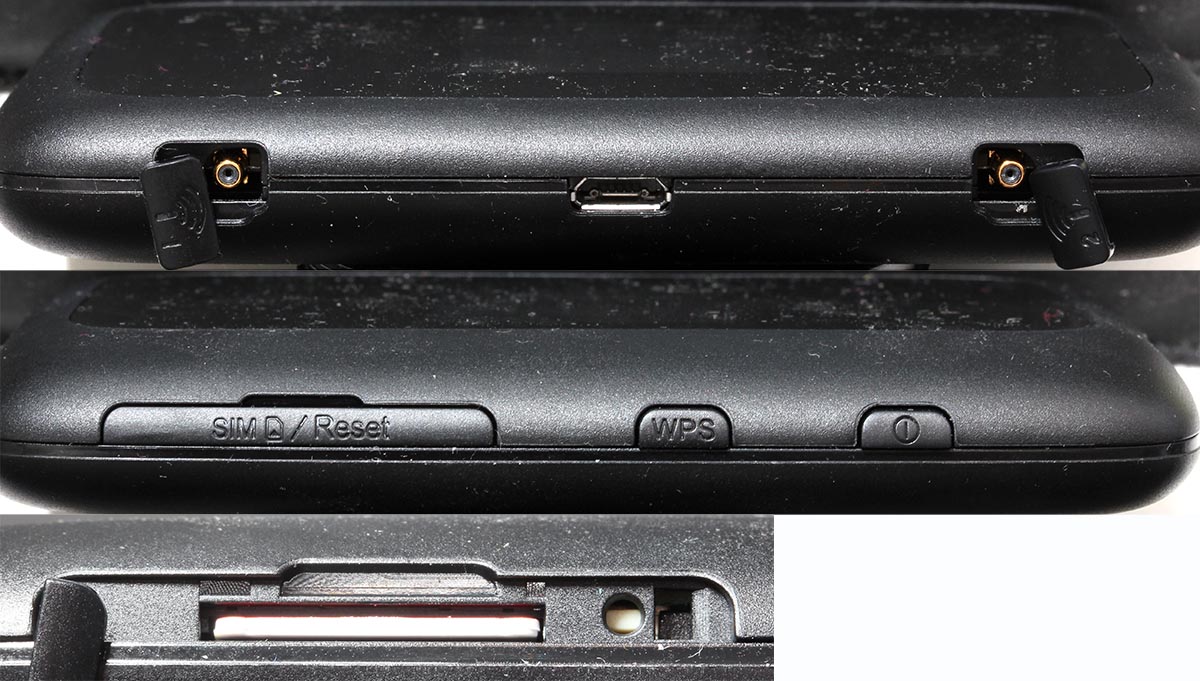
There are two antenna connectors (TS9) on the sides. As all LTE equipment always has 2 antennas (your phone does, you just won't see them), there needs to be connectors for both of them. The intended purpose for this is to convert cellular connection into Wi-Fi. As sometimes the cell network connection is poor, adding a proper antenna (or two) can make a difference. Power button has one extra feature including the obvious one. If you press it shortly, it will display the default WLAN SSID and password on the screen. Funny thing: if you change them, the screen won't display the new ones. On the as-expected, there is a mini-SIM -slot and mini-A USB for the charger.
The antenna connector is a quirky one:
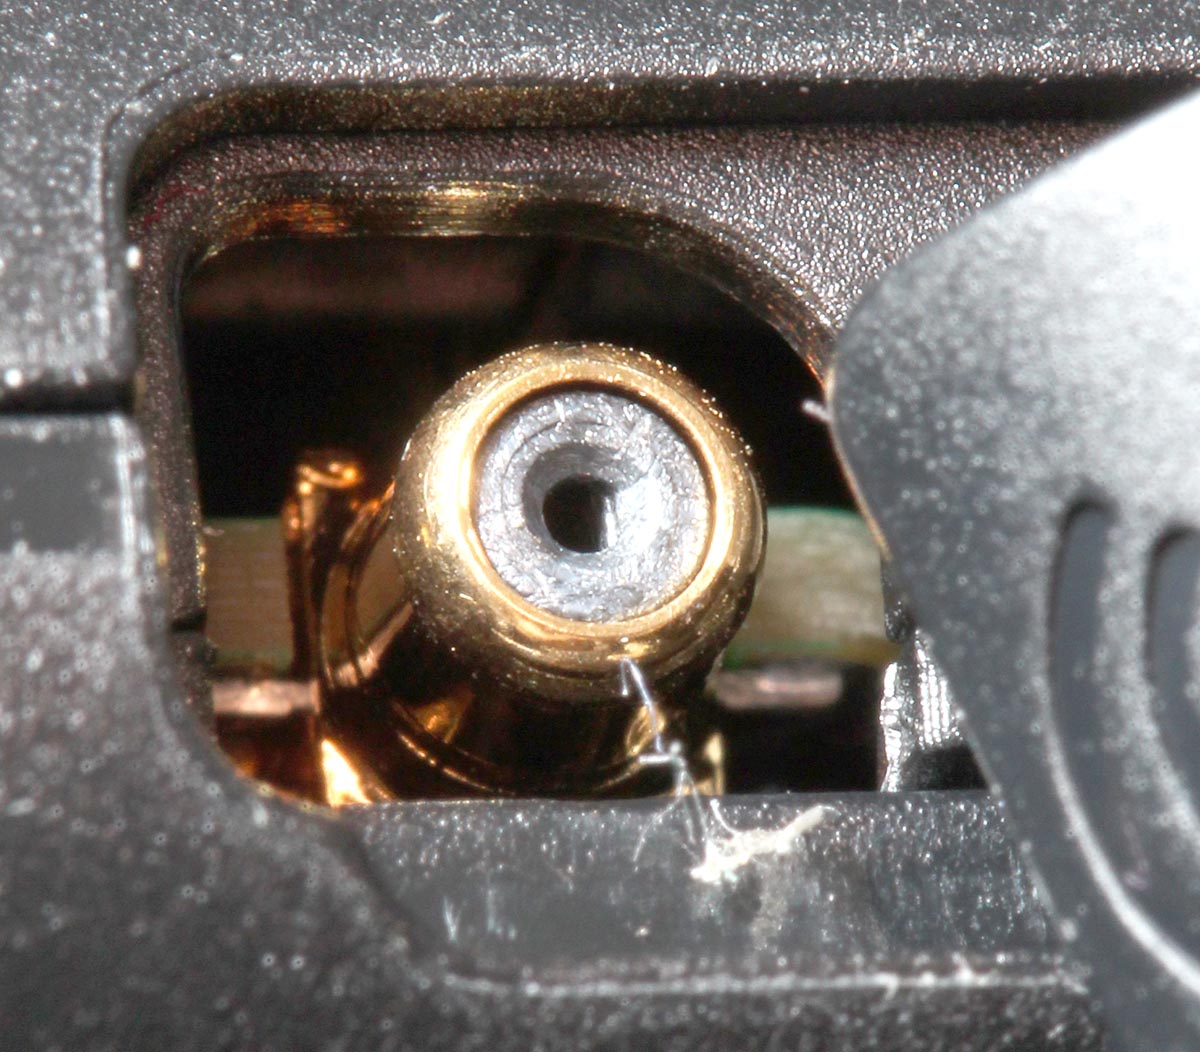
I couldn't find anything to connect to it. Any typical small appliance (like Huawei USB-sticks) have CRC9-connector, or the bigger routers (like Huawei B593) have SMA-connectors. I guess the new TS9 is suiting better for some reason.
When the SIM-card in inserted, power button pressed and box is up and running, it connects automatically to internet. It distributes an IP-address to any client devices and enables the management web-console. It looks like this:
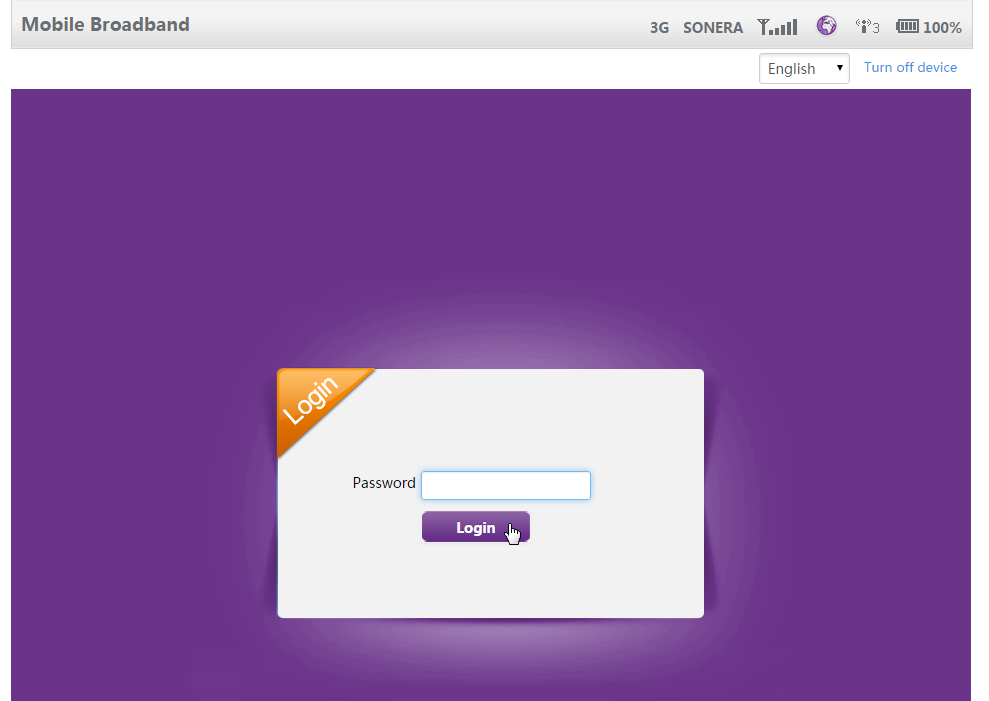
There is a decent selection of langauges for the GUI:
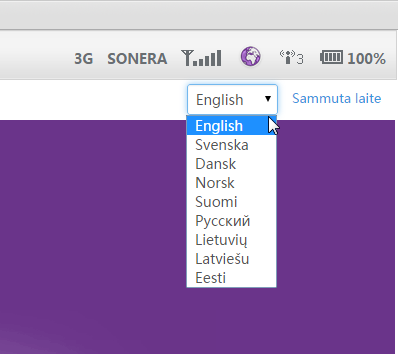
And the top right corner status indicator is good one:

It provides a lot of information without need to login. This is what it looks like once in:
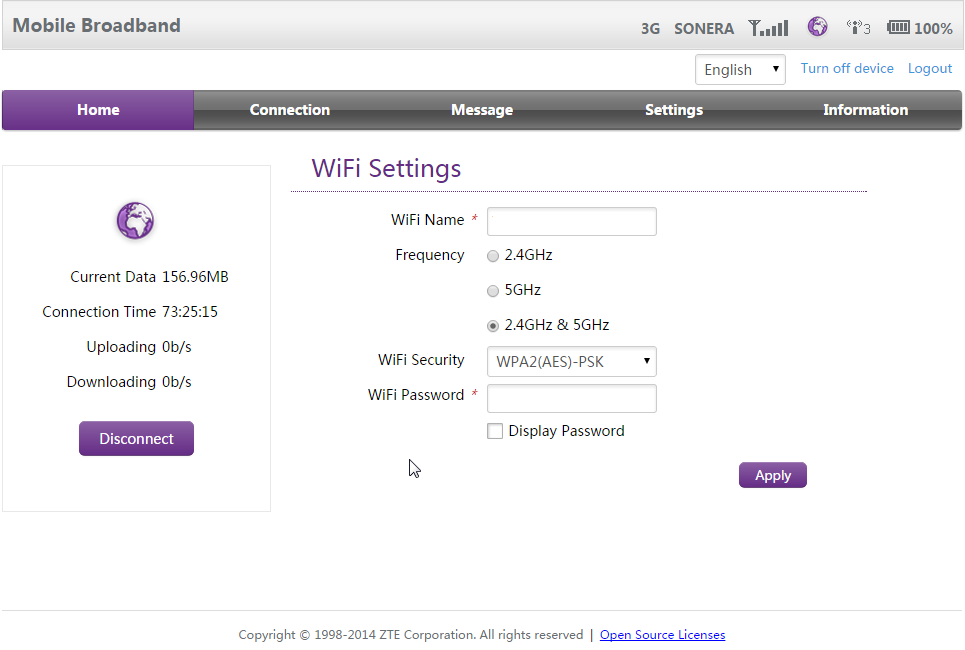
There is no need to look for Wi-Fi settings. They are right there after a login. In general I really love their approach, lot of useful features and really well thought web-GUI implemented. Also the existence of 5 GHz WLAN tells about a modern design. A while ago only 2,4 GHz existed in routers such as this.
The Internet connection details are:
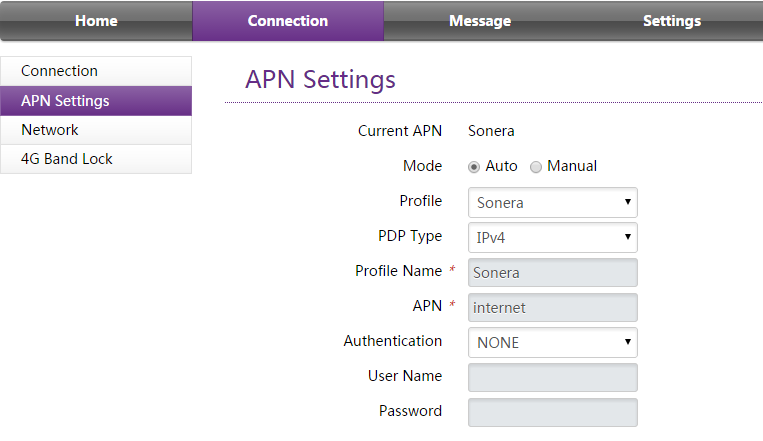
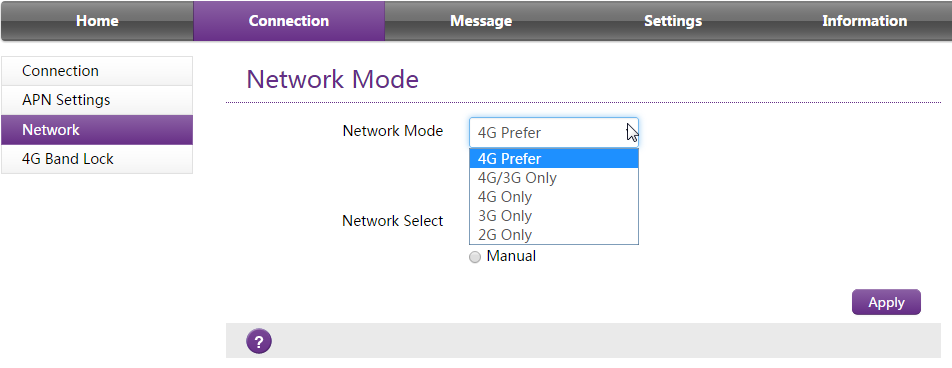
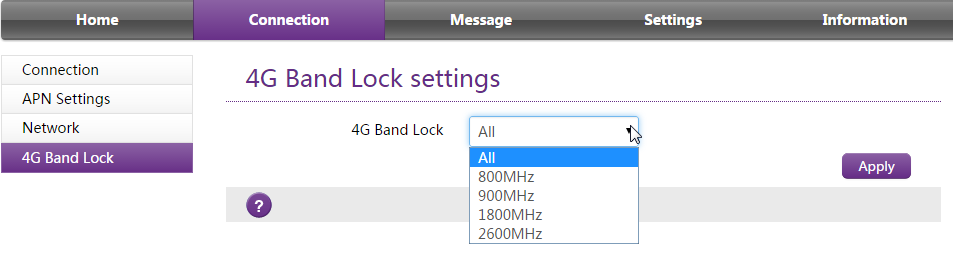
APN I didn't touch, it just worked. Network mode (2G/3G/4G) may be necessary if reception has issues. The most important thing is, that this box has a built-in freq lock in it. No need of hacking or any quirks. This is by far the most commonly asked question nowadays, how do you lock B593 into a frequency. With this el-cheapo box, setting is right there! Nice.
I also love the status screens:
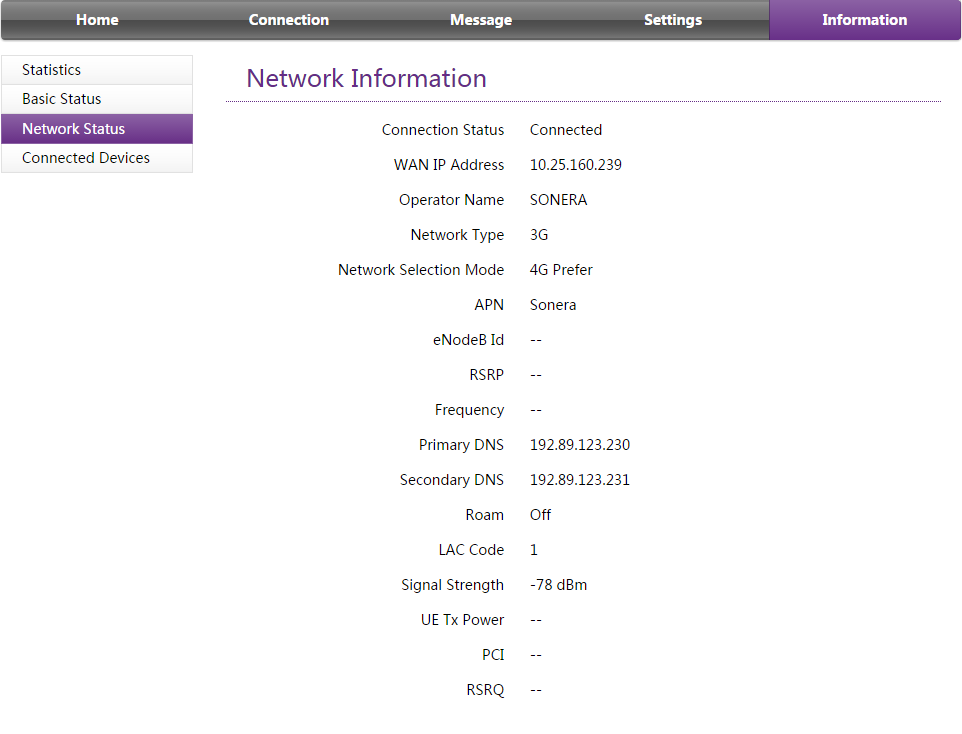
Lot of relevant information right at your screen! This is exactly what everybody else should be doing. Unfortunately the network status screen is optimized heavily for LTE-connections and on UMTS it won't tell much.
As a conclusion I have to recommend this cheaply built piece of plastic for any router needs. It certainly is worth the money and has just the right features in it. The only thing that worries me is the constant charging: will it survive future years? I don't care if the thing wouldn't run from the battery, but will the charger alone be enough to run it?
First B593 s-22 exploit: Setup FTP to get /var/sshusers.cfg
Monday, February 23. 2015
I have a new version of B593_exploit.pl published. See this article about previous info.
This version has s-22 FTP hack added to it. u-12 has the classic FTP USB-share flaw where it is possible to create a FTP share of the /. Unfortunately in this box Huawei guys made the web GUI a bit smarter, you cannot do such a nice share anymore. The fortunate part is, that the guys don't check for that at the save. If you manage to lure the ../.. past the GUI, you can do it. That's what the exploit is about.
Example run:
./B593_exploit.pl 192.168.1.1 admin --ftp-setup \
  ftpuser ftppassword
That command will share the first USB-device found at the filesystem root of the box. You have to have a physical USB-storage attached. It doesn't have to have anything on it and it won't be affected during the process. But setting a path will fail, if there is no USB-storage.
I had problems with the FTP-client, it kept complaining about FTP passive mode. I switched the client into NcFTP and that solved my problem.
When in the box the SSH passwords are at the classic /var/sshusers.cfg. If configuration is of interest to you, it can be found from /app/curcfg.xml. When the admin user's password is known, it is only a trivial task to SSH into the box and gain a shell access.
While looking around the box, I got carried away with the lteat-command. I managed to brick the box. But that's an another story.)


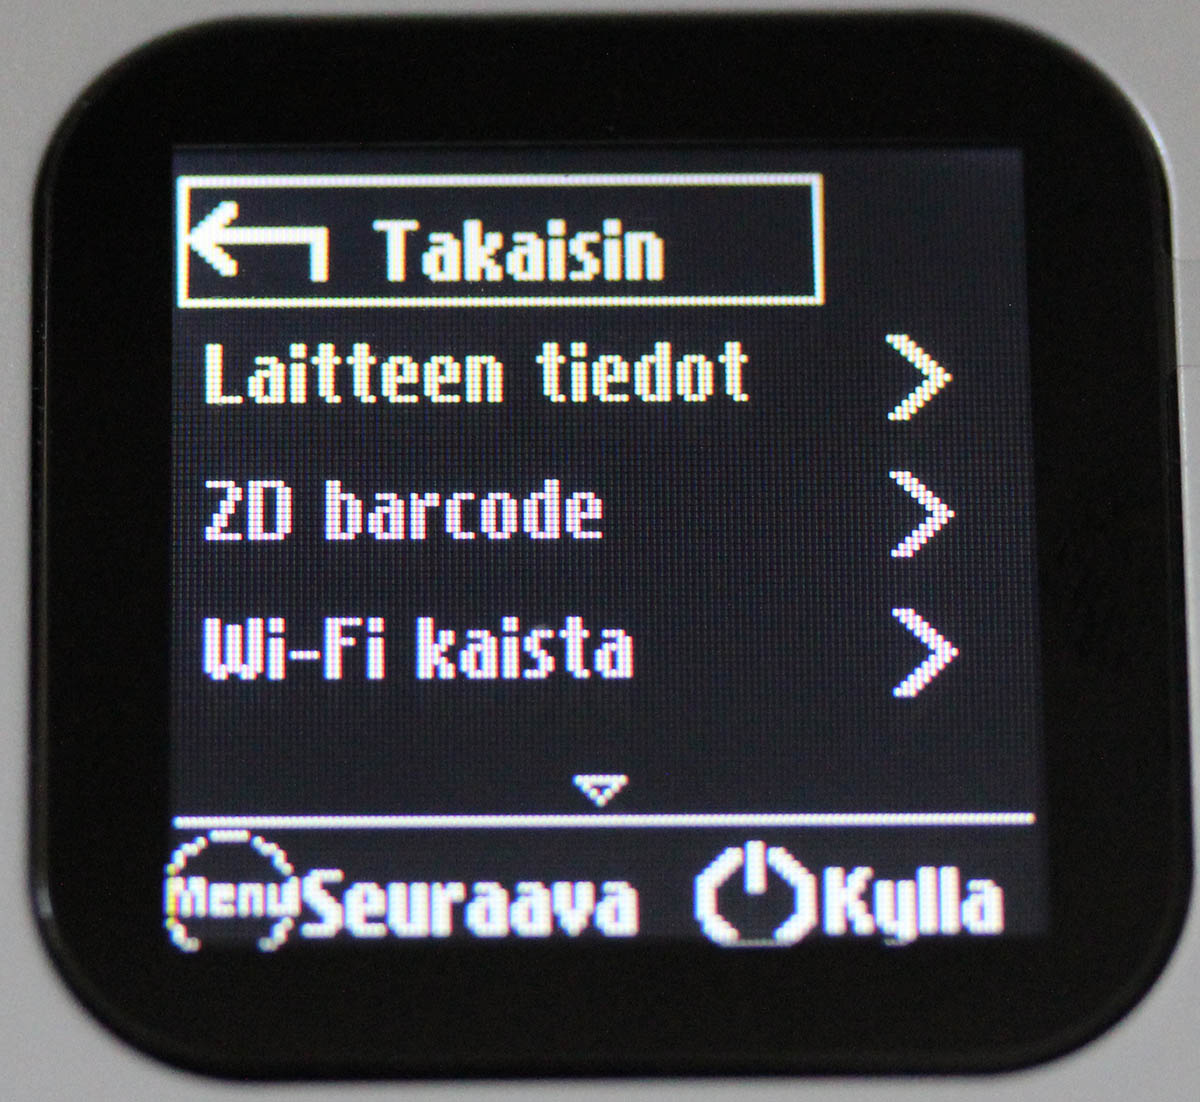