Schneier's Six Lessons/Truisms on Internet Security
Monday, November 11. 2019
Mr. Bruce Schneier is one of the influencers I tend to follow in The Net. He is a sought after keynote speaker and does that on regular basis. More on what he does on his site @ https://www.schneier.com/.
Quite few of his keynotes, speeches and presentations are made publicly available and I regularly tend to follow up on those. Past couple of years he has given a keynote having roughly the same content. Here is what he wants you, an average Joe Internet-user to know in form of lessons. To draw this with a crayon: Lessons are from Bruce Schneier, comments are mine.
These are things that are true and are likely to be true for a while now. They are not going to change anytime soon.
Truism 1: Most software is poorly written and insecure
The market doesn't want to pay for secure software.
Good / fast / cheap - pick any two! The maket has generally picked fast & cheap over good.
Poor software is full of bugs and some bugs are vulnerabilities. So, all software contains vulnerabilities. You know this is true because your computes are updated monthly with security patches.
Whoa! I'm a software engineer and don't write my software poorly and it's not insecure. Or ... that's what I claim. On a second thought, that's how I want my world to be, but is it? I don't know!
Truism 2: Internet was never designed with security in mind
That might seem odd 2019 saying that. But back in the 1970s, 80s and 90s it was conventional wisdom.
Two basic reasons: 1) Back then Internet wasn't being used for anything important, 2) There were organizational constraints about who could access the Internet. For those two reasons designers consciously made desicisions not to add security into the fabric of Internet.
Where still living with the effects of that decision. Whether its the domain name system (comment: DNS), the Internet routing system (comment: BGP), the security of Internet packets (comment: IP), security of email (comment: SMTP) and email addresses.
This truism I know from early days in The Net. We used completely insecure protocols like Telnet or FTP. Those were later replaced by SSH and HTTPS, but still the fabric of Internet is insecure. It's the applications taking care of the security. This is by design and cannot be changed.
Obviously there are known attempts to retrofit fixes in. DNS has extension called DNSSEC, IP has extensions called IPsec, mail transfer has a secure variant of SMTPS. Not a single one of those is fully in use. All of them are accepted, even widely used, but not every single user has them in their daily lives. We still have to support both the insecure and secure Net.
Truism 3: You cannot constrain the functionality of a computer
A computer is a general purpose device. This is a difference between computers and rest of the world.
No matter how hard is tried a (landline) telephone cannot be anything other than a telephone. (A mobile phone) is, of course, a computer that makes phone calls. It can do anything.
This has ramifications for us. The designers cannot anticipate every use condition, every function. It also means these devices can be upgraded with new functionality.
Malware is a functional upgrade. It's one you didn't want, it's one that you didn't ask for, it's one that you don't need, one given to you by somebody else.
Extensibility. That's a blessing and a curse at the same time. As an example, owners of Tesla electric cars get firmware upgrades like everything else in this world. Sometimes the car learns new tricks and things it can do, but it also can be crippled with malware like any other computer. Again, there are obvious attempts to do some level of control what a computer can do at the operating system level. However, that layer is too far from the actual hardware. The hardware still can run malware, regardless of what security measure are taken at higher levels of a computer.
Truism 4: Complexity is the worst enemy of security
Internet is the most complex machine mankind has ever built, by a lot.
The defender occupies the position of interior defending a system. And the more complex the system is, the more potential attack points there are. Attacker has to find one way in, defender has to defend all of them.
We're designing systems that are getting more complex faster than our ability to secure them.
Security is getting better, but complexity is getting faster faster and we're losing ground as we keep up.
Attack is easier than defense across the board. Security testing is very hard.
As a software engineer designing complex systems, I know that to be true. A classic programmer joke is "this cannot affect that!", but due to some miraculous chain, not ever designed by anyone, everything seems to depend on everything else. Dependencies and requirements in a modern distributed system are so complex, not even the best humans can ever fully comprehend them. We tend to keep some sort of 80:20-rule in place, it's enough to understand 80% of the system as it would take too much time to gain the rest. So, we don't understand our systems, we don't understand the security of our systems. Security is done by plugging all the holes and wishing anything wouldn't happen. Unfortunately.
Truism 5: There are new vulnerabilities in the interconnections
Vulnerabilities in one thing, affect the other things.
2016: The Mirai botnet. Vulnerabilities in DVRs and CCTV cameras allowed hackers to build a DDoS system that was raid against domain name server that dropped about 20 to 30% of popular websites.
2013: Target Corporation, an USA retailer, attacked by someone who stole the credentials of their HVAC contractor.
2017: A casino in Las Vegas was hacked through their Internet-connected fish tank.
Vulnerability in Pretty Good Privacy (PGP): It was not actually vulnerability in PGP, it was a vulnerability that arose because of the way PGP handled encryption and the way modern email programs handled embedded HTML. Those two together allowed an attacker to craft an email message to modify the existing email message that he couldn't read, in such a way that when it was delivered to the recipient (the victim in this case), a copy of the plaintext could be sent to the attacker's web server.
Such a thing happens quite often. Something is broken and its nobody's fault. No single party can be pinpointed as responsible or guilty, but the fact remains: stuff gets broken because an interconnection exists. Getting the broken stuff fixed is hard or impossible.
Truism 6: Attacks always get better
They always get easier. They always get faster. They always get more powerful.
What counts as a secure password is constantly changing as just the speed of password crackers get faster.
Attackers get smarter and adapt. When you have to engineer against a tornado, you don't have to worry about tornadoes adapting to whatever defensive measures you put in place, tornadoes don't get smarter. But attackers against ATM-machines, cars and everything else do.
An expertise flows downhill. Today's top-secret NSA programs become tomorrow's PhD thesis and next day's hacker tools.
Agreed. This phenomenon can be easily observed by everybody. Encryption always gets more bits just because today's cell phone is capable of cracking last decade's passwords.
If you want to see The Man himself talking, go see Keynote by Mr. Bruce Schneier - CyCon 2018 or IBM Nordic Security Summit - Bruce Schneier | 2018, Stockholm. Good stuff there!
New Weather Station - Davis Vantage Vue - Part 2 of 2: Linux installation
Tuesday, November 5. 2019
This is a part two out of two on my Davis Vantage Vue weather station installation story. Previous part was about hardware installation.
Datalogger expansion
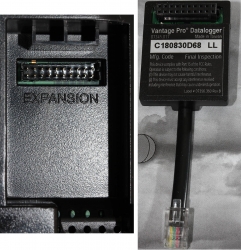
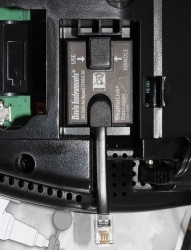
The indoors console has a slot for expansion devices. I went for the RS-232 WeatherLink datalogger expansion:
RS232 Cabling
The datalogger has a very short cable and a RJ-11 connector on the other end. The obvious good thing is the common availability of telephone extension cords to get past the 5 cm cable lenght of the datalogger. A regular landline telephone typically has such RJ-11 connectors in it and what I did was to get an inexpensive extension cord with suitable lenght.
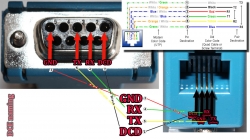
For computer connectivity, with datalogger box has a blue RJ-11 to RS232 converter. The four connected pins of the converter are as follows:
RS232 and Linux
Most computers today don't have a RS232-port in them. To overcome this, years ago I bought a quad-RS232-port USB-thingie:
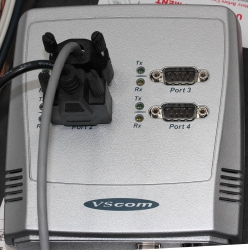
If you look closely, Port 1 of the unit has a DIY RS232-connector attached into it. That's my Vantage Vue cable connected to the indoors console. Also, note the lack of the blue RJ-11 to RS232 converter unit. I reverse engineered the pins and soldered my cable directly to a D-9 connector to get the same result.
Now the hardware parts is done. All the connectors are connected and attached to a PC.
Software
Half of the work is done. Next some software is needed to access the data in the data logger.
For Windows and macOS
Those not running Linux, there is WeatherLink software freely available at https://www.davisinstruments.com/product/weatherlink-computer-software/. It goes without saying, the software is useless without appropriate hardware it gets the inputs from. I never even installed the software, as using a non-Linux was never an option for me. So, I have no idea if the software is good or not.
For Linux
As you might expect, when going to Linux, there are no commercial software options available. However, number of open-source ones are. My personal choice is WeeWX, its available at http://www.weewx.com/ and source code at https://github.com/weewx/weewx.
Install WeeWX:
- Download software:
git clone https://github.com/weewx/weewx.git - In git-directory, create RPM-package:
make -f makefile rpm-package SIGN=0 - As root, install the newly created RPM-package:
rpm --install -h dist/weewx-3.9.2-1.rhel.noarch.rpm - That's it!
Configure WeeWX:
- (dependency) Python 2 is a requirement. Given Python version 2 deprecation (see https://pythonclock.org/ for details), at the time of writing, there is less than two months left of Python 2 lifetime, this project really should get an upgrade to 3. No such joy yet.
- (dependency) pyserial-package:
pip install pyserial - Run autoconfig:
wee_config --install --dist-config /etc/weewx/weewx.conf.dist --output /etc/weewx/weewx.conf- In the array of questions, when being asked to choose a driver, go for
Vantage (weewx.drivers.vantage)
- In the array of questions, when being asked to choose a driver, go for
- Inspect the resulting
/etc/weewx/weewx.confand edit if necessary:- Section
[Station]week_start = 0
- Section [StdReport]
HTML_ROOT = /var/www/html/weewx
- (optional for Weather Underground users), Section
[StdRESTful]- Subsection
[[Wunderground]] - Enter station name and password
enable = true
- Subsection
- Section
- Configuring done!
Now you're ready (as root) to start the thing with a systemctl start weewx.
On a working system, you should get LOOP-records out of weewxd instantly. After a little while of gathering data, you should start having set of HTML/CSS/PNG-files in /var/www/html/weewx. It's a good idea to set up a web server to publish those files for your own enjoyment. This is something you don't have to do, but I strongly advice to enable HTTP-endpoint to your results. I will immensly help determining if your system works or not.
One reason I love having a weather station around is to publish my data to The Net. I've been tagging along with Weather Underground for years. There has been good years and really bad years, when Wunderground's servers have been misbehaving a lot. Now that IBM owns the thing, there has been some improvements. The most important thing is there is somebody actually maintaining the system and making it run. Obviously, there has been some improvements in the service too.
Aggregation problem
When I got my system stable and running, I realized my wind data is flatline. In nature it is almost impossible for not to be windy for multiple days. I visually inspected the wind speed and direction gauges, they were working unobstructed. However, my console did not indicate any wind at all.
After multiple days of running, I was about to give up and RMA the thing back to Davis for replacement, the console started working! That was totally unexpected. Why: 1) the system did not work, 2) the system started working without any actions from me. That was the case for me. As the problem has not occurred since, it must have been some kind of newness.
What next
Now that everything is up, running and stays that way. There's always something to improve. What I'm planning is to do is pump the LOOP-records to Google BigQuery.
As a side note: when new information is available, it will be emitted by weewxd as LOOP: <the data here> into your system logs. However, that data isn't used. After a period of time, your Vantage Vue will aggregate all those records into a time-slot record. That will be used as your measurement. Since those LOOP-records are simply discarded I thought it might be a good idea to base some analytics on those. I happen to know Google BigQuery well from past projects, all that I need is to write a suitable subsystem into weewx to pump the data into a correct place. Then it would be possible to do some analytics of my own on those records.
New Weather Station - Davis Vantage Vue - Part 1 of 2: Hardware installation
Monday, November 4. 2019
Last July, there was a severe hailstorm in my area. At the time, I wrote a blog post about it, because the storm broke my weather station. Since fighting with nature is futile, I'm blaming myself for relying on La Crosse -approach of using zipties to attach the components to a steel pole. Given my latitude, 61° north, during summer it can be +30° C and during winter -30° C. The huge variation of temperature combined with all the sunlight directed to nylon straps will eventually make them weak. So, here is my mental note: Next time use steel straps!
I did that when I got my new weather station. This post is about the hardware and getting it fastened securely. The next part is about getting the device talking to my Linux and pumping the results to The Net.
Davis Vantage Vue
After careful consideration, I went for a Vantage Vue from Davis Instruments.
Since this is a serious piece of hardware, in their ranking this 500,- € piece is a "beginner" model. In Davis catalog, there are "real" models for enthusiasts costing thousands of $/€. I love my hardware, but not that much. ![]()
What's in the box
For any weather station from cheapest 10,- € junk to Davis, there's always an indoor unit and outdoor unit.
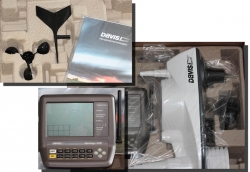
In the box, there is paper manuals, altough I went for the PDF from their site. Indoors unit is ready-to-go, but outdoors unit has number of sensors needing attaching. Even the necessary tools are included for those parts, which require them. Most parts just click into place.
The Vantage Vue console is really nice. There is plenty of buttons for button-lovers and a serious antenna for free placement of the indoor unit. The announced range between units is 300 meters. I didn't test the range, but the signal level I'm getting in my setup is never below 98%. Again, serious piece of hardware.
Installing sensors
Some assembly is required for the outdoors sensor unit. I begun my assembly by attaching the replaceable lithium-ion battery.
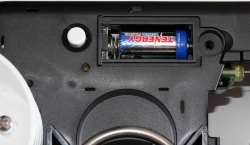
The Li-Ion battery is charged from a solar cell of the sensor unit. I have reports from Finland, that given our lack of sunshine during winter, the sensor unit does survive our long and dark winter ok. I have no idea how long the battery wil last, but I'm preparing to replace that after couple of years.
Next one, anemometer wind vane:
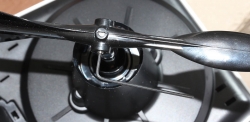
Gauge for wind direction requires fastening a hex screw, but the tool in included in the box. Wind speed gauge just snaps into place. Unlike wind vane, which is hanging from the bottom of the unit, speed gauge is at the top of the unit, so gravity will take care of most of the fastening.
On the bottom of the sensor unit, there is a slot for a bucket seesaw. When the bucket has enough weight in it, in form of rainwater, the seesaw will tilt and empty the bucket. Rain is measured on how many seesaw tilts will occur. Again, this is a real scientific measurement unit, there is an adjustment screw for rain gauge allowing you to calibrate the unit. On top of the rain gauge, there is a scoop. On the bottom of the scoop, you'll need to attach a plug keeping all the unwanted stuff out of the bucket:
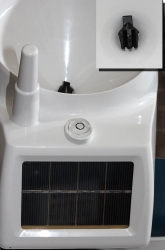
Also note three details in the pic: the solar cell, transmitter antenna and a level bubble helping you during installation of the sensor unit.
Outdoors sensor unit done
This is how the final result looks like for me:
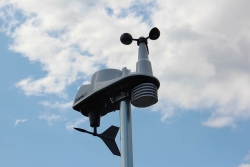
Idea during installation is to make sure the sensor unit has the solar cell directed to south (180°) allowing it to capture maximum sunlight on Northen Hemisphere. This also serves the base of direction for the wind vane. Obviously, you can adjust the deviation from the console if needed. People living in Southern Hemisphere definitely need to do that. Also, you may have something special in your install, the option is there. Remember, this is a serious piece of scientific measurement hardware.
Indoors unit
A running console looks like this:
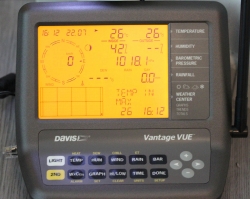
In the screen, the top half is always constant. The buttons "temp", "hum", "wind", "rain" and "bar" can be used to set the bottom half of the screen to display temperature, humidity, wind, rain or barometric pressure details.
As you can see, I took the picture on 22nd July (2019) at 16:12 (pm). It was a warm summer day +26° C both indoors and outdoors. Day was calm and there was no wind. The moon on 22nd July was a waxing cresent. Given my brand new installation, there were not yet measurements for outdoors humidity. The lack of humidity also results in lack of dew point.
People writing the console software have a sense of humor:
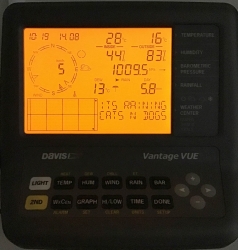
Console display indicates rain (an umbrella) and a text "Its raining cats'n'dogs". Hilarious!
As you can see, the indoors temperature is rather high, +28° C. In reality, that didn't reflect the truth. Later I realized, that keeping the light on will heat the console indoors sensor throwing it off by many degrees. Now I tend to keep the light off and press the "light"-button only when it is dark.
Powering indoor unit
Most people would get the required three C-cell batteries, whip them in and forget about it... until the batteries run out and need to be replaced.
Davis planned an option for that. What you can do is to ignore the battery change and plug the accompanying 5VDC 1A transformer into a wall socket and never need to change the batteries. I love quality hardware, you have options to choose from.
Datalogging
The primary purpose of me owning and running a weather station is to extract the measurements to a Linux PC. An el-cheapo weather stations offer no such option for computer connectivity. Mid-range units have a simple USB-connector (limited to max. cable lenght of 5 meters), some even RS-232 connectivity (max. cable lenght up to 100 meters). When going to these heavy-hitter -models from Davis Instruments, out-of-the-box there is nothing.
To be absolutely clear: Davis Vantage Vue can be attached to a computer, but it is an extra option that is not included in the box.
Here is a picture of USB datalogger expansion unit for Vantage Vue:

Optimal installation in my house requires the console in a place where it's easily visible and accessible. But its nowhere near a computer, so RS232 is the way I go.
I'll cover the details of datalogger expansion, cabling and Linux setup in the next post.
Deprecated SHA-1 hashing in TLS
Sunday, November 3. 2019
This blog post is about TLS-protocol. It is a constantly evolving beast. Mastering TLS is absolutely necessary, as it is one the most common and widely used components keeping our information secure in The Net.
December 2018: Lot of obsoleted TLS-stuff deprecated
Nearly an year ago, Google as the developer of Chrome browser deprecated SHA-1 hashes in TLS. In Chrome version 72 (December 2018) they actually did deprecate TLS 1 and TLS 1.1 among other things. See 72 release notes for all the details.
Making TLS 1.2 mandatory actually isn't too bad. Given Qualsys SSL Labs SSL Pulse stats:
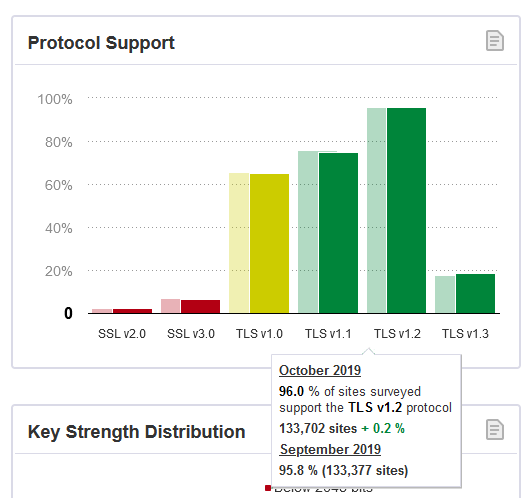
96,0% of the servers tested (n=130.000) in SSL Labs tester support TLS 1.2. So IMHO, with reasonable confidence we're at the point where the 4% rest can be ignored.
Transition
The change was properly announced early enough and a lot of servers did support TLS 1.2 at the time of this transition, so the actual deprection went well. Not many people complained in The Net. Funnily enough, people (like me) make noise when things don't go their way and (un)fortunately in The Net that noise gets carried far. The amount of noise typically doesn't correlate anything, but phrase where there is smoke - there's fire seems to be true. In this instance, deprecating old TLS-versions and SHA-1 hashing made no smoke.
Aftermath in Chrome
Now that we have been in post SHA-1 world for a while, funny stuff starts happening. On rare occasion, this happens in Chrome:
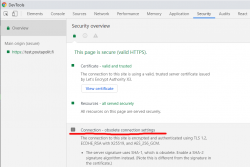
In Chrome developer tools Security-tab has a complaint: Connection - obsolete connection settings. The details state: The server signature users SHA-1, which is obsolete. (Note this is different from the signature in the certificate.)
Seeing that warning is uncommon, other than me have bumped into that one. An example: How to change signature algorithm to SHA-2 on IIS/Plesk
I think I'm well educated in the details of TLS, but this one baffled me and lots of people. Totally!
What's not a "server signature" hash in TLS?
I did reach out to number of people regarding this problem. 100% of them suggested to check my TLS cipher settings. In TLS, a cipher suite describes the algorithms and hashes used for encryption/decryption. The encrypted blocks are authenticated with a hash-function.
Here is an example of a cipher suite used in loading a web page:
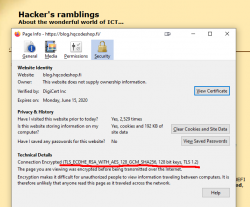
That cipher suite is code 0xC02F in TLS-protocol (aka. ECDHE-RSA-AES128-GCM-SHA256). Lists of all available cipher suites can be found for example from https://testssl.sh/openssl-iana.mapping.html.
But as I already said, the obsoletion error is not about SHA-1 hash in a cipher suite. There exists a number of cipher suites with SHA-1 hashes in them, but I wasn't using one.
Second clue is from the warning text. It gives you a hint: Note this is different from the signature in the certificate ... This error wasn't about X.509 certificate hashing either. A certificate signature looks like this:
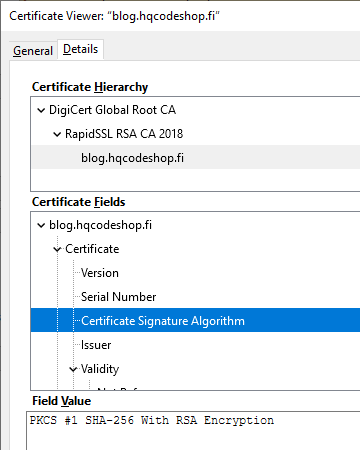
That is an example of the X.509 certificate used in this blog. It has a SHA-256 signature in it. Again: That is a certificate signature, not a server signature the complaint is about. SHA-1 hashes in certificates were obsoleted already in 2016, the SHA-1 obsoletion of 2018 is about rest of the TLS.
What is a "server signature" hash in TLS?
As I'm not alone with this, somebody else has asked this question in Stackexchange: What's the signature structure in TLS server key exchange message? That's the power of Stackexchange in action, some super-smart person has written a proper answer to the question. From the answer I learn, that apparently TLS 1 and TLS 1.1 used MD-5 and/or SHA-1 signatures. The algorithms where hard-coded in the protocol. In TLS 1.2 the great minds doing the protocol spec decided to soft-code the chosen server signature algorithm allowing secure future options to be added. Note: Later in 2019, IETF announced Deprecating MD5 and SHA-1 signature hashes in TLS 1.2 leaving the good ones still valid.
On the wire, TLS server signature would look like this, note how SHA-1 is used to trigger the warning in Chrome:
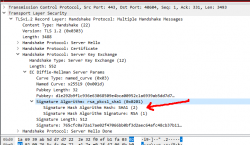
During TLS-connection handshake, Server Key Exchange -block specifies the signature algorithm used. That particular server I used loved signing with SHA-1 making Chrome complain about the chosen (obsoleted) hash algorithm. Hard work finally paid off, I managed to isolate the problem.
Fixing server signature hash
The short version is: It really cannot be done!
There is no long version. I looked long and hard. No implementation of Apache or Nginx on a Linux or IIS on Windows have setting for server signature algorithm. Since I'm heavily into cloud-computing and working with all kinds of load balancers doing TLS offloading, I bumped into this even harder. I can barely affect available TLS protocol versions and cipher suites, but changing the server signature is out-of-reach for everybody. After studying this, I still have no idea how the server signature algorithm is chosen in common web servers like Apache or Nginx.
So, you either have this working or not and there is nothing you can do to fix. Whoa!
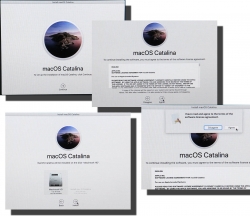
macOS Catalina upgrade from USB-stick
Saturday, November 2. 2019
macOS 10.15 Catalina is a controversial one. It caused lot of commotion already before launch.
Changes in 10.15 from previous versions
64-bit Only
For those using legacy 32-bit apps Catalina brought bad news, no more 32-bit. Me, personally, didn't find any problems with that. I like my software fresh and updated. Some noisy persons in The Net found this problematic.
Breaking hardware
For some, the installation simply bricked their hardware, see Limited reports of Catalina installation bricking some Macs via EFI firmware for more details. This is bad. When UEFI upgrade does this kind of damage, that's obviously bad. The broken macs can be salvaged, but it's very tricky as they won't boot.
Installer size
For that past many years, I've had my OS X / macOS USB-stick. I own couple of macs, so you'll never know when OS installer will be needed. For catalina:
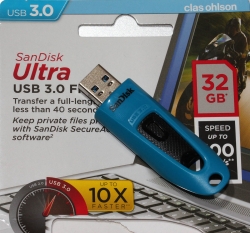
8 GiB wasn't enough! Whaaaaat? How big the installer has gone. So, I had to get a new one. Maybe it was about time. At the USB-stick shop I realized, that minimum size of a stick is 32 GiB. You can go to 128 or 256, but for example 8 isn't an option anymore.
Stupid alerts
The worst part in Catalina is the increased level of nagging:
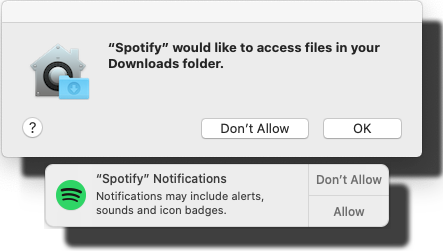
Every single app is asking me permission to do something. As usual, the questions are obscure at best. This same phenomenon is happening in Windows and Android. You're presented a question as a response to your action and the question has almost no relevance to anything you're trying to do. Yet the people designing these operating systems think it will vastly improve security to present user a Yes/No question without proper basis.
An example: For the above Spotify-question I chose to respond No. I have no idea why or for what reson Spotify needs to access any of the files in my Downloads-folder. That's so weird. Playing music doesn't mean you get to access my stuff. ![]()
Get macOS Catalina installer
The process has not changed. Go to App Store of your mac and choose macOS Catalina. It will take a while to download all of 8 GiB of it.
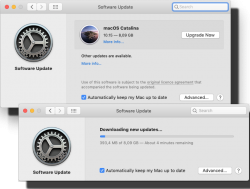
When the installer has downloaded and automatically starts, you need to quit the installer.
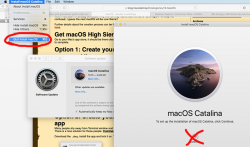
If you'd continue, the installer would upgrade your mac and at the final phase of upgrade, it would delete the precious macOS files. You need to create the USB-stick before upgrading. This is how couple past macOS versions save your disc space.
Create your USB-stick from command line
For reason I don't fully understand, DiskMaker X version 9 failed to create the stick for me. It did process the files and seemed to do something, but ultimately my USB-stick was empty, so I chose to do this the old fashioned way. Maybe there is a bug in the DiskMaker X and a new version has thata one fixed. Check it yourself @ https://diskmakerx.com.
Insert the USB-stick into the mac and from a command prompt, see what the physical USB-drive is:
diskutil list
My mac has the USB-stick as:
/dev/disk3 (external, physical)
The other drives are flagged either 'internal, physical', 'synthesized' or 'disk image'. None of them are suitable targets for creating Catalina installer stick.
Note:
Most of the commands below need root-access. So, either su - to a root-shell or prefix the commands with sudo.
Format the USB-stick. The obvious word of caution is: This will erase any data on the stick. Formatting doesn't wipe the sectors, but given a completely empty filesystem, your bits are quite lost there alone. Command is:
# diskutil partitionDisk /dev/disk3 1 GPT jhfs+ "macOS Catalina" 0b
The output is as follows:
Started partitioning on disk3

Unmounting disk

Creating the partition map

Waiting for partitions to activate

Formatting disk3s2 as Mac OS Extended (Journaled) with name macOS Catalina

Initialized /dev/rdisk3s2 as a 28 GB case-insensitive HFS Plus volume with a 8192k journal

Mounting disk

Finished partitioning on disk3

/dev/disk3 (external, physical):

   #:                    TYPE NAME                 SIZE       IDENTIFIER

   0:   GUID_partition_scheme                     *30.8 GB    disk3

   1:                     EFI EFI                  209.7 MB   disk3s1

   2:               Apple_HFS macOS Catalina       30.4 GB    disk3s2
Now your stick is ready, go transfer the macOS installer files to the stick. The newly formatted stick is already mounted (run command mount):
/dev/disk3s2 on /Volumes/macOS Catalina (hfs, local, nodev, nosuid, journaled, noowners)
Installer files are located at /Applications/Install\ macOS\ Catalina.app/Contents/Resources/:
cd /Applications/Install\ macOS\ Catalina.app/Contents/Resources/

./createinstallmedia \

  --volume /Volumes/macOS\ Catalina/ \

  --nointeraction
Output is as follows:
Erasing disk: 0%... 10%... 20%... 30%... 100%

Copying to disk: 0%... 10%... 20%... 30%... 40%... 50%... 60%... 70%... 80%... 90%... 100%

Making disk bootable...

Copying boot files...

Install media now available at "/Volumes/Install macOS Catalina"
Now your bootable USB-media is ready!
Upgrade
Boot your mac, press and hold your option-key pressed to access the boot-menu:
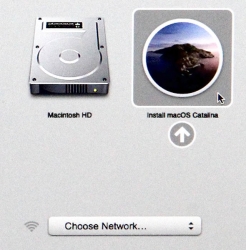
A menu will appear, select Install macOS to upgrade:
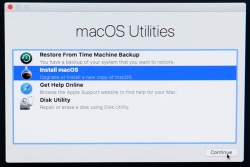
Only after those yes, I agree -clicks your upgrade kicks in. This is the part you can go grab a large cup of coffee, no user interaction is required for 30 to 60 minutes:
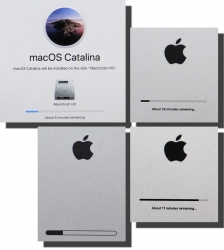
During the upgrade, there will be couple of reboots. My thinking is, that first the upgrade will do any hardware upgrades, then the actual macOS upgrade.
When you see the login-screen, your upgrade is done:
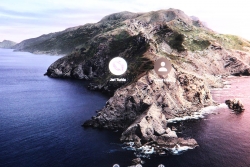
That's it! You're done. Enjoy your upgraded mac operating system.
