Passwords - Part 3 of 2 - Follow up
Thursday, June 17. 2021
This is part three of my two-part post. My thoughts on passwords in general are here and about leaked passworeds here.
I'm writing this to follow-up on multiple issues covered in previous parts. Some of this information was available at the time of writing but I just had not found it in time, some info was published afterwards but was closely related.
Troy Hunt's thoughts on RockYou2021
His tweet https://twitter.com/troyhunt/status/1402358364445679621 says:
Unlike the original 2009 RockYou data breach and consequent word list, these are not “pwned passwords”; it’s not a list of real world passwords compromised in data breaches, it’s just a list of words and the vast majority have never been passwords
Mr. Hunt is the leading expert on leaked passwords, so I'm inclined to take his word about it. Especially when he points the RockYou2021 "leak" to contain CrackStation's Password Cracking Dictionary. Emphasis: dictionary. The word-list will contain lists of words (1,493,677,782 words, 15GB) in all known languages available. That list has been public for couple of years.
IBM Security survey
Press release Pandemic-Induced Digital Reliance Creates Lingering Security Side Effects. Full report PDF.
In number of visualizations contained in the report, there is this one about password re-use:
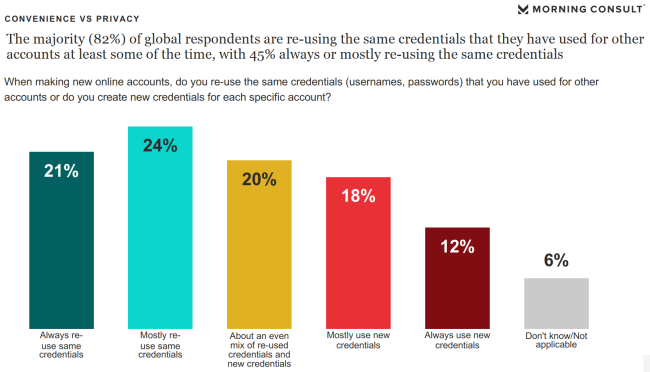
65% of participants are using same passwords always, mostly or often. That's seriously bad! ![]()
However, this is nothing new. It is in-line with other surveys, research and available data.
STOP re-using your passwords. NOW!
If you aren't, educate others about the dangers. Help them set up password managers.
Microsoft
ZDnet article Microsoft's CISO: Why we're trying to banish passwords forever descibes how Microsoft will handle passwords.
1: Employees at Microsoft don't have to change their passwords every 71 days.
Quote from Microsoft and NIST Say Password Expiration Policies Are No Longer Necessary :
Microsoft claims that password expiration requirements do more harm than good because they make users select predictable passwords, composed of sequential words and numbers, which are closely related to each other. Additionally, Microsoft claims that password expiration requirements limit containment because cybercriminals almost always use credentials as soon as they compromise them.
Nothing new there, except huge corporation actually doing it. This policy is described in NIST 800-63B section 5.1.1.2 Memorized Secret Verifiers, which states following:
Verifiers SHOULD NOT require memorized secrets to be changed arbitrarily (e.g., periodically).
However, verifiers SHALL force a change if there is evidence of compromise of the authenticator.
Also, multiple sources back that up. Example: Security Boulevard article The High Cost of Password Expiration Policies
2: "Nobody likes passwords"
A direct quote from Microsoft CISO Bret Arsenault:
Because nobody likes passwords.
You hate them, users hate them, IT departments hate them.
The only people who like passwords are criminals – they love them
I could not agree more.
3: End goal "we want to eliminate passwords"
Even I wrote, this can not be done in near future. But let's begin the transition! I'm all for it.
The idea is to use alternate means of authentication. What Microsoft is using is primarily biometrics. That's the same thing you'd be doing with your phone, but do the same with your computer.
Doing passwords correctly
When talking about computers, security, information security, passwords and so on, it is very easy to paint a gloom future and emphasize all the bad things. Let's end this with a positive note.
Auth0 blog post NIST Password Guidelines and Best Practices for 2020 has the guidelines simplified:
-
Length > Complexity: Seconding what I already wrote, make your passwords long, not necessarily complex. If you can, do both! If you have to choose, longer is better.
-
Eliminate Periodic Resets: This has already been covered, see above. Unfortunately end-users can not do anything about this, besides contact their admins and educate them.
-
Enable “Show Password While Typing”: Lot of sites have the eye-icon to display your password, it reduces typos and makes you confident to use long passwords. Again, nothing for end-user to do. The person designing and writing the software needs to handle this, but you as an end-user can voice your opinion and demand to have this feature.
-
Allow Password “Paste-In”: This is a definite must for me, my passwords are very long, I don't want to type them! Yet another, end users can not help this one, sorry.
-
Use Breached Password Protection: Passwords don't need to be complex, but they must be unique. Unique as not in the RockYou2021 8.4 billion words list. This is something you can do yourself. Use an unique password.
-
Don’t Use “Password Hints”: Huh! These are useless. If forced to use password hint, I never enter anything sane. My typical "hint" is something in fashion "the same as always".
-
Limit Password Attempts: Disable brute-force attempts. Unfortunately end-users can not do anything about this. If the system you're using has unlimited non-delayed login attempts, feel free to contact admins and educate them.
-
Use Multi-Factor Authentication: If option to use MFA is available, jump to it! Don't wait.
-
Secure Your Databases: During design and implementation every system needs to be properly hardened and locked-down. End users have very little options on determining if this is done properly or not. Sorry.
-
Hash Users’ Passwords: This is nearly the same as #9. The difference is, this is about your password, it needs to be stored in a way nobody, including the administators, have access to it.
Finally
All the evidence indicates we're finally transitioning away from passwords.
Be careful out there!
Passwords - Part 2 of 2 - Leaked passwords
Monday, June 14. 2021
This is the sencond part in my passwords-series. It is about leaked passwords. See the previous one about passwords in general.
Your precious passwords get lost, stolen and misplaced all the time. Troy Hunt runs a website Have I been Pwned (pwn is computer slang meaning to conquer to gain ownership, see PWN for details). His service typically tracks down your email addresses and phone numbers, they leak even more often than your passwords, but he also has a dedicated section for passwords Pwned Passwords. At the time of writing, his database has over 600 billion (that's 600 thousand million) known passwords. So, by any statistical guess, he has your password. If you're unlucky, he has all of them in his system. The good thing about Mr. Hunt is, he's one of the good guys. He wants to educate and inform people about their information being leaked to wrong hands.
8.4 billion leaked passwords in a single .txt-file
Even I have bunch of leaked and published sets of passwords. Couple days ago alias kys234 published a compilation of 8.4 billion passwords and made that database publicly available. More details are at RockYou2021: largest password compilation of all time leaked online with 8.4 billion entries and rockyou2021.txt - A Short Summary. Mr. Parrtridge even has the download links to this enormous file. Go download it, but prepare 100 GiB of free space first. Uncompressed the file is huge.
How long are the leaked passwords?
From those two articles, we learn that there are plenty of passwords to analyse. As I wrote in my previous post, my passwords are long. Super-long, as in 60-80 characters. So, I don't think any of my passwords are in the file. Still, I was interested in what would be the typical password lenght.
Running a single-liner (broken to multiple lines for readability):
perl -ne 'chomp; ++$cnt; $pwlen=length($_);

if ($lens{$pwlen}) {++$lens{$pwlen};} else {$lens{$pwlen}=1;}

END {printf("Count: %d", $cnt); keys(%lens);

while(my($k, $v) = each(%lens)) {printf("Len %d: %d\n", $k, $v);}}'

rockyou2021.txt
Will result in following:
Count: 8459060239

Len 6: 484236159

Len 7: 402518961

Len 8: 1107084124

Len 9: 1315444128

Len 10: 1314988168

Len 11: 1071452326

Len 12: 835365123

Len 13: 613654280

Len 14: 436652069

Len 15: 317146874

Len 16: 215720888

Len 17: 131328063

Len 18: 97950285

Len 19: 65235844

Len 20: 50282947
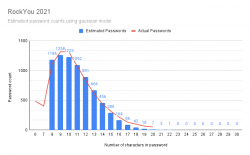
Visualization of the above table:
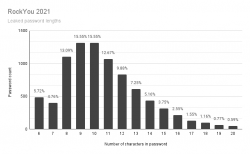
It would be safe to say, typical password is 9 or 10 characters short. Something a human being can remember and type easily into a login prompt.
Based on leaked material, how long a password should be?
The next obvious question is: Well then, if not 10 characters, how long the password should be?
Instant answer is: 21 characters. The file doesn't contain any of those.
Doing little bit of statistical analysis: If you're at 13 characters or more, your password is in the top-25%. At 15 or more, youre in top-7%. So, the obvious thing is to aim for 15 characters, no less than 13.
Given the lack of super-long passwords, I went a bit further with Rstudio. I went for the assumption, the password lenghts would form a gaussian bell curve. I managed to model the data points into a semi-accurate model which unfortunately for me is more inaccurate at the 18, 19, 20 characters than with the shorter ones.
If you want to improve my model, there is the human-readable HTML-version of R notebook. Also the R MD-formatted source is available.
Red line is the actual measured data points. Blue bars are what my model outputs.
Result is obvious: longer is better! If you're at 30 characters or more, your passwords can be considered unique. Typical systems crypt or hash the passwords in storage, making it is not feasible to brute-force a 30 char password. Also the reason why leaked RockYou2021 list doesn't contain any password of 21 or more characters: THEY ARE SO RARE!
Looks like me going for 60+ chars in my passwords is a bit over-kill. But hey! I'm simply future-proofing my passwords. If/when they leak, they should be out of brute-force attack, unless a super-weak crypto is used.
Wrap up
The key takeaways are:
- Password, a memorized secret is archaic and should be obsoleted, but this cannot be achieved anytime soon.
- Use password vault software that will suit your needs and you feel comfortable using.
- Never ever try to remember your passwords!
- Make sure to long passwords! Any password longer than 20 characters can be considered a long one.
Passwords - Part 1 of 2
Sunday, June 13. 2021
In computing, typing a password from keyboard is the most common way of authenticating an user.
NIST Special Publication 800-63B - Digital Identity Guidelines, Authentication and Lifecycle Management in its section 5.1.1 Memorized Secrets defines password as:
A Memorized Secret authenticator — commonly referred to as a password or, if numeric, a PIN — is a secret value intended to be chosen and memorized by the user.
Note how NIST uses the word "authenticator" as general means of authentication. A "memorized authenticator" is something you remember or know.
Wikipedia in its article about authentication has more of them factors:
- Knowledge factors: Something the user knows
- password, partial password, pass phrase, personal identification number (PIN), challenge response, security question
- Ownership factors: Something the user has
- wrist band, ID card, security token, implanted device, cell phone with built-in hardware token, software token, or cell phone holding a software token
- Inference factors: Something the user is or does
- fingerprint, retinal pattern, DNA sequence, signature, face, voice, unique bio-electric signals
Using multiple factors to log into something is the trend. That darling has multiple acronyms 2-FA (for two factor) or MFA (multi-factor). Also notable single-factor authentication method is to open the screen-lock of a cell-phone. Many manufacturers rely on inference factor to allow user access into a hand-held device. Fingerprint or facial recognition are very common.
Since dawn on mankind, humans have used passwords, a knowledge factor. Something only select persons would know. With computers, it began in MIT, where Mr. Fernando Corbató introduced it the first time. And oh boy! Have we suffered from that design choice ever since. To point out the obvious flaw in my statement: Nobody has shown us anything better. Over 70 years later, we're still using passwords to get into our systems and software as there is an obvious lack of good alternative.
SSH - Practical example
Going for a bit deeper into practical authentication: SSH - Secure Shell, the protocol used to access many modern computer systems when HTTP/HTTPS doesn't cut it.
Borrowing figure 2-2 from chapter 2.4. Authentication by Cryptographic Key of the book SSH: The Secure Shell - The Definite Guide:
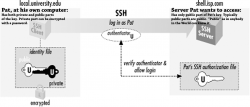
This figure depicts an user, Pat. To access a server shell.isp.com Pat will need a key. In SSH the key is a file containing result of complex mathematical operation taking randomness as input and saving the calculated values into two separate files. The file called "public key" must be stored and available on the server Pat is about to access. The second file "private key" must be kept private and in no circumstances nobody else must have access to results of the math. Having access to the set of files is an ownership factor. If Pat would lose access to the file, it wouldn't be possible to access the server anymore.
In this case Pat is a security conscious user. The private key has been encrypted with a password. Authentication process will require the result of the math, but even if the file would leak to somebody else, there is a knowledge factor. Anybody wanting to access the contents must know the password to decrypt it.
That's two-factor authentication in practice.
Traditional view of using passwords
Any regular Joe or Jane User will try to remember his/her passwords. To actually manage that, there can be a limited set of known passwords. One, two or three. More than four is not manageable.
When thinking about the password you chose, first check You Should Probably Change Your Password! | Michael McIntyre Netflix Special, or at least read the summary from Cracking Passwords with Michael McIntyre. Thinking of a good password isn't easy!
As Mr. McIntyre put it, many systems require the password to be complex ones. Xkcd #936 has a cartoon about it:
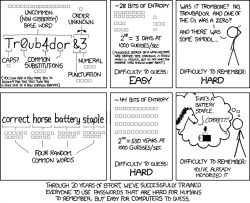
You may remember something long enough, but you won't remember many of them. Especially when there are tons of complex instructions on selecting the password. The NIST 63B in section 5.1.1.2 Memorized Secret Verifiers states following:
When processing requests to establish and change memorized secrets, verifiers SHALL compare the prospective secrets against a list that contains values known to be commonly-used, expected, or compromised.
For example, the list MAY include, but is not limited to:
- Passwords obtained from previous breach corpuses.
- Dictionary words.
- Repetitive or sequential characters (e.g. ‘aaaaaa’, ‘1234abcd’).
- Context-specific words, such as the name of the service, the username, and derivatives thereof.
Those four are only the basic requirements. Many systems have a set of rules of their own you must comply. Very tricky subject, this one.
My view on passwords
The attempt of trying to remember passwords or PIN-codes is futile. The entire concept of user simply storing a random(ish) word into brain and being able to type it via keyboard will eventually fail. The fact this will fail is the one fact bugging me. Why use something that's designed not to work reliably every time!
How I see password authentication is exactly like Pat's SSH-key. He doesn't know the stored values in his SSH private and public keys. He just knows where the files are and how to access them. In fact, he doesn't even care what values are stored. Why would he! It's just random numbers generated by a cryptographic algorithm. Who in their right mind would try to memorize random numbers!
My view is: a person needs to know (knowledge factor) exactly two (2) passwords:
- Login / Unlock the device containing the password vault software
- Decrypt password for vault software storing all the other passwords into all the other systems, websites, social media, work and personal, credit cards, insurance agreement numbers, and so on
Nothing more. Two passwords is manageable. Both of them don't need to be that long or complex, you will be entering them many times a day. The idea is not to use those passwords in any other service. If either of those two passwords will leak, there is only yourself to blame.
My own passwords
Obviously I live by the above rule. I have access (or had access at one point of time) to over 800 different systems and services. Yes, that's eight hundred. Even I consider that a lot. Most regular people have dozen or so passwords.
As already stated: I don't even care to know what my password to system XYZ is. All of my passwords are randomly generated and long or very long. In my password vault, I have 80+ character passwords. To repeat: I do not care what password I use for a service. All I care is to gain access into it when needed.
There are two pieces of software I've vetted and have my seal-of-approval of password storage: Enpass (https://www.enpass.io/) and BitWarden (https://bitwarden.com/). I've had numerous (heated) conversations with fans of such software products as Keepass, Lastpass, and so on. They are crap! I don't need them and won't be using them. My first password vault was SplashID (https://splashid.com/), but they somehow fell out of my radar. They were secure and all, but lack of flexibility and slow update cycle made me discontinue using them.
In case of my vault file leaking, to make it very difficult to crack open my precious data from SQLite Encryption Extension (SEE) AES-256 encrypted file there is a two-factor authentication in it. Anybody wanting access needs to know the encryption password and have the key-file containing a random nonce used to encrypt the vault.
Future of passwords
Using passwords is not going anywhere soon. A lot of services have mandatory or semi-mandatory requirement for multiple factors. Also additional security measures on top of authentication factors will be put into place. As an example user's IP-address will be saved and multiple simultaneous logins from different addresses won't be allowed. Second example: user's access geographic location will be tracked and any login attempts outside user's typical location will require additional authentication factors.
Passwords leak all the time and even passwords stored encrypted have been decrypted by malicious actors. That combined into the fact humans tend to use same passwords in multiple systems, when somebody has one of your passwords, the likelihood of gaining access to one of your accounts jumps a lot. In the net there are tons of articles like Why Is It So Important to Use Different Passwords for Everything? As doing that is a lot of hassle, many of you won't do it.
Cell phones or USB/Bluetooth dongles for authentication will gain popularity in the future, but to actually deploy them into use will require a professional. Organizations will do that, not home users.
Next part in my passwords-series is about leaked passwords.
R.I.P. IRC
Wednesday, May 26. 2021
That's it. I've done IRCing.
Since 1993 I was there pretty much all the time. Initially on and off, but somewhere around -95 I discovered GNU Screen and its capability of detaching from the terminal allowing me to persist on the LUT's HP-UX perpetually. Thus, I had one IRC screen running all the time.
No more. In 2021 there is nobody there anymore to chat with. I'm turning off the lights after 28 years of service. I've shut down my Eggdrop bots and be on my way.
Thank you! Goodbye! Godspeed!
Python 3.9 in RedHat Enterprise Linux 8.4
Tuesday, May 25. 2021
Back in 2018 RHEL 8 had their future-binoculars set to transitioning over deprecated Python 2 into 3 and were the first ones not to have a python. Obviously the distro had Python, but the command didn't exist. See What, No Python in RHEL 8 Beta? for more info.
Last week 8.4 was officially out. RHEL has the history of being "stuck" in the past. They do move into newer versions rarely generating the feeling of obsoletion, staleness and being stable to the point of RedHat supporting otherwise obsoleted software themselves.
The only problem with that approach is the trouble of getting newer versions. If you talk about any rapid-moving piece of softare like GCC or NodeJS or Python or MariaDB or ... any. The price to pay for stableness is pretty steep with RHEL. Finally they have a solution for this and have made different versions of stable software available. I wonder why it took them that many years.
Seeing the alternatives:
# alternatives --list

ifup      auto    /usr/libexec/nm-ifup

ld        auto    /usr/bin/ld.bfd
python auto /usr/libexec/no-python
python3 auto /usr/bin/python3.6
As promised, there is no python, but there is python3. However, officially support for 3.6 will end in 7 months. See PEP 494 -- Python 3.6 Release Schedule for more. As mentioned, RedHat is likely to offer their own support after that end-of-life.
Easy fix. First, dnf install python39. Then:
# alternatives --set python3 /usr/bin/python3.9

# python3 --version

Python 3.9.2
For options, see output of dnf list python3*. You can choose between existing 3.6 or install 3.8 or 3.9 to the side.
Now you're set!
Upgraded Internet connection - Fiber to the Home
Monday, May 24. 2021
Seven years ago I moved to a new house with FTTH. Actually it was one of the criteria I had for a new place. It needs to have fiber-connection. I had cable-TV -Internet for 11 years before that and I was fed up with all the problems a shared medium has.
Today, we're here:
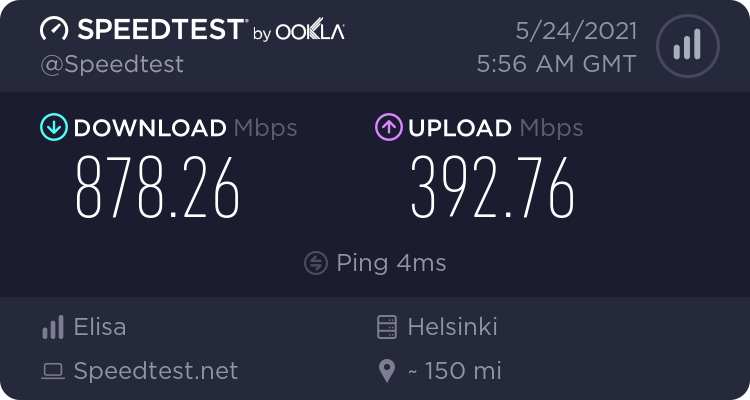
Last month my Telco, Elisa Finland, made 1 Gig connection available in this region and me being me, there is no real option for not getting it. I had no issues with previous one, connection wasn't slow or buggy, but faster IS better. Price is actually 8€ cheaper than my previous 250 Mbit connection. To make this absolutely clear: I'm paying 42€ / month for above connection.
To verify result, same with Python-based testing speedtest-cli --server 22669:
Retrieving speedtest.net configuration...

Testing from Elisa Oyj (62.248.128.0)...

Retrieving speedtest.net server list...

Retrieving information for the selected server...

Hosted by Elisa Oyj (Helsinki) [204.66 km]: 4.433 ms

Testing download speed.....................

Download: 860.23 Mbit/s

Testing upload speed.......................

Upload: 382.10 Mbit/s
Nice. Huh! ![]()
Stop the insanity! There are TLDs longer than 4 characters - Part 2
Sunday, May 23. 2021
What happens when IT-operations are run by incompetent idiots?
For reference, I've written about State of Ubisoft and failures with top level domain handling.
I'm an avid gamer. I play games on daily basis. It is not possible to avoid bumping into games by giant corporations like Activision or Ubisoft. They have existed since 80s, have the personnel, money and resources. They also keep publishing games I occasionally love playing.
How one accesses their games is via software called Ubisoft Connect:
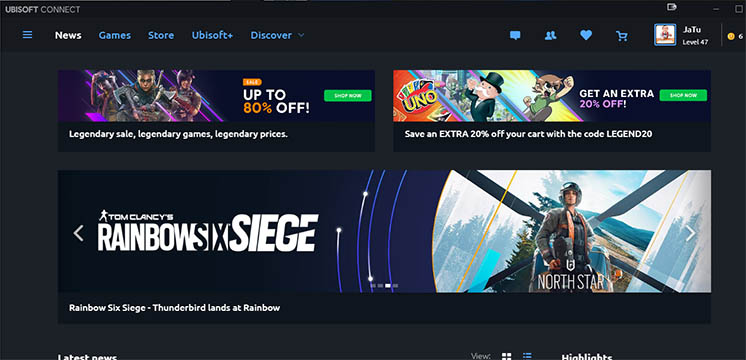
You need to log into the software with your Ubisoft-account. As one will expect, creating such account requires you to verify your email address so, the commercial company can target their marketing towards you. No surprises there.
Based on my previous blog posts, you might guess my email isn't your average gmail.com or something similar. I have multiple domains in my portfolio and am using them as my email address. With Ubisoft, initially everything goes smoothly. At some point the idiots at Ubisoft decided, that I needed to re-verify my email. Sure thing. Let's do that. I kept clicking the Verify my email address -button on Ubisoft Connect for years. Nothing happened, though. I could click the button but the promised verification email never arrived.
In 2019 I had enough of this annoyance and approached Ubisoft support regarding the failure to deliver the email.
Their response was:
I would still advise you to use a regularly known e-mail domain such as G-mail, Yahoo, Hotmail or Outlook as they have been known to cause no problems.
Ok. They didn't like my own Linux box as mailserver.
Luckily Google Apps / G Suite / Google Workspace (whatever their name is this week) does support custom domains (Set up Gmail with your business address (@your-company)). I did that. Now they couldn't complain for my server to be non-standard or causing problems.
Still no joy.
As the operation was run by incompetent idiots, I could easily send and receive email back and forth with: Ubisoft support, Ubisoft Store and Ubisoft marketing-spam. The ONLY kind of emails I could not receive was their email address verification. Until Apri 23rd 2021. Some jack-ass saw the light and realized "Whoa! There exists TLDs which are longer than 4 characters!" In reality I guess they changed their email service provider into Amazon SES and were able to deliver the mails.
This in insane!
SD-Cards - Deciphering the Hieroglyphs
Monday, April 5. 2021
Luckily xkcd #927 isn't all true. When talking about memory cards used in cameras and other appliance, SD has taken the market and become The Standard to rule all standards.
In my junk-pile I have all kinds of CF, MMC and Memory Sticks all of which have became completely obsoleted. Last usable one was the Memory Stick into my PSP (Playstation Portable). For some reason the stick became rotten and I'm hesitant go get a "new" one. That Sony-specific standard has been obsoleted waaay too long. Not to mention anything about 2012 obsoletion of PSP. ![]()
So, SD-cards. There is an association managing the standard, SD Association. Major patents are owned by Panasonic, SanDisk and Toshiba, but they've learned the lesson fom Sony's failures (with Betamax and Memory Stick). Competition can get the SD-license with relax-enough terms and make the ecosystem thrive keeping all of us consumers happy.
SDA defines their existence as follows:
SD Association is a global ecosystem of companies setting industry-leading memory card standards that simplify the use and extend the life of consumer electronics, including mobile phones, for millions of people every day.
Well said!
That's exactly what countering Xkcd #927 will need. An undisputed leader with good enough product for us consumers to accept and use.
SD Standards
SD-cards have existed for a while now and given progress in accessing bits in silicon, the speeds have changed a lot. This is how SDA defines their standards for consumers:
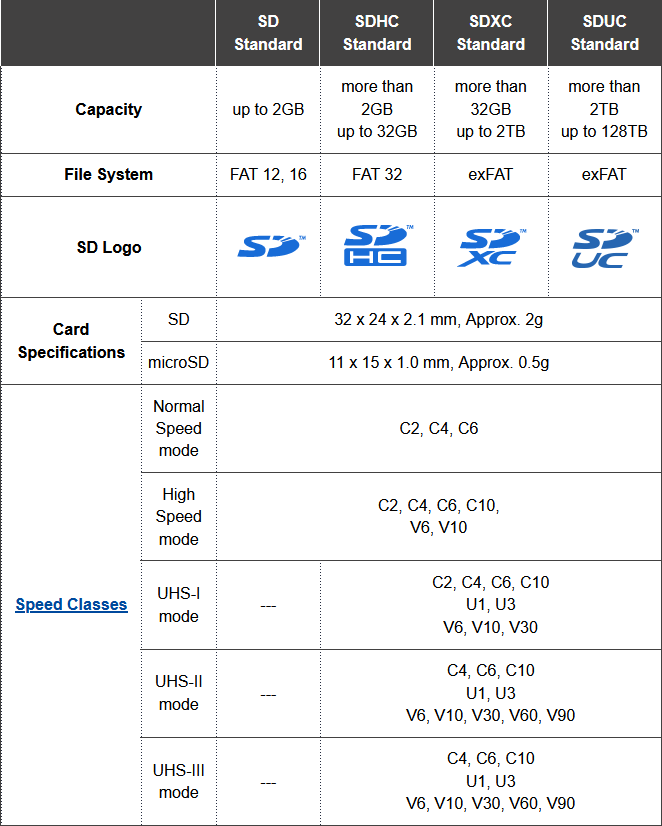
There are four different standards reaching the most recent SDUC. Those four can have five different classifications of speed having multiple speed modes in them. Above table is bit confusing, but when you look at it bit closer, you'll realize the duplicates. As an example, speed modes C4 and C6 exist in all of the 5 speed classes spanning from early ones to most recent.
If you go shopping, the old SD-standard cards aren't available anymore. SDHC and SDXC are the ones being sold actively. The newcomer SDUC is still rare as of 2021.
As the access for all of the standards require different approach from the appliance, be really careful to go for a compatible card. Personally I've seen some relatively new GPS devices require SDHC with max. filesystem size of 32 GiB. Obviously the design and components in those devices are from past.
SD Speeds
Why is this all important?
Well, it isn't unless the thing you're using your SD-card with has some requirements. Ultimately there will be requirements depending on what you do.
Examples of requirements might be:
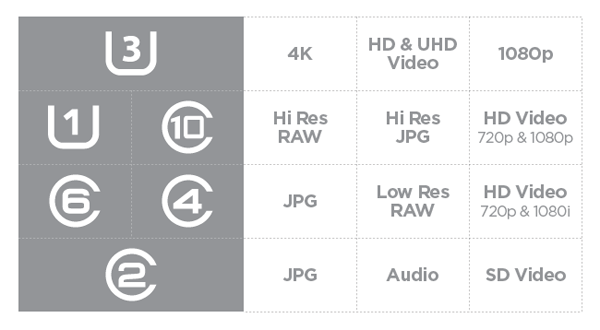
- Storing still images from a camera, for that pretty much all of the cards work, any U-class card will do the trick
- Storing video from a camera, for that see V-class, U-class might choke on big data streams
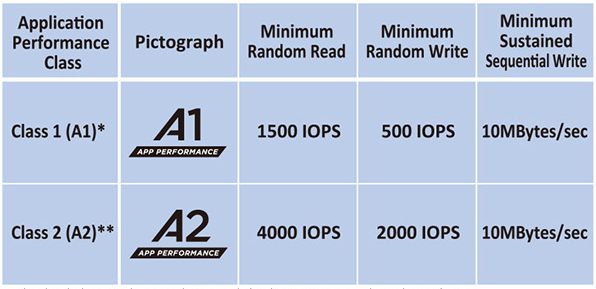
- Reading and writing data with your Raspberry Pi, for that see A-class, U-class will work ok, but might lack the random-access performance of the A-class
Symbols indicating speed would be:
Examples
To make this practical, let's see some real-world readers and cards to see if any of the above symbols can be found in them.
Readers
In above pic are couple reader/writer units I own. Both are USB 3.0, but the leftmost one is a very simple micro-SD -reader. For "regular" size SD-cards I use the bigger box, which can access multiple cards at the same time.
Readers (writers) won't have a speed class in them. They will have the SD-standard mentioned. Please be aware of USB 2.0 speed limitations if using any of the old tech. Any reasonably new SD-card will be much faster than the USB-bus. When transferring your already recorded moments, speed is not an issue. When working with large video files or tons of pics, make sure to have a fast reader.
Card, 128 GB
Here is a micro-SD from my GoPro. Following symbols can be seen on the card:
- Manufacturer: Kingston
- Form factor. Micro SD
- Standard: SDXC, II is for UHS-II speed
- Capacity: 128 GB, ~119 GiB
- Speed classification: U3, V90 and A1
- Comment: An action camera will produce a steady stream of 4K H.265 video, that's what the UHS-II V90 is for. A card with this kind of classification is on the expensive side, well over 100€.
Card, 32 GB
Here is a micro-SD from my Garmin GPS. Following symbols can be seen on the card:
- Manufacturer: SanDisk
- Capacity: 32 GB, ~30 GiB
- Form factor. Micro SD
- Standard: SDHC, I is for UHS-I speed
- Speed classification: U3, V30 and A1
- Comment: I'm using this for a dual-purpose, it serves as map data storage (A1) and dash cam video recorder (V30) for HD H.264 video stream. UHS-I will suit this purpose fine as the video stream is very reasonable.
Card, 16 GB
Here is a micro-SD from my Raspberry Pi. Following symbols can be seen on the card:
- Manufacturer: Transcend
- Capacity: 16 GB, ~15 GiB
- Speed classification: 10
- Form factor. Micro SD
- Speed classification: U1
- Standard: SDHC, I is for UHS-I speed
- Comment: Running an application-heavy Raspi might benefit for having an A-class card, instead of U-class which is better suited for streaming data. This one is an old one from a still camera which it suited well.
Card, 8 GB
Here is a micro-SD which I'm not actively using anymore. Following symbols can be seen on the card:
- Capacity: 8 GB, ~7.4 GiB
- Form factor. Micro SD
- Standard: SDHC, I is for UHS-I speed
- Speed classification: U1
- Comment: An obvious old card lacking both A and V speed classes
Additional info
For further info, see:
- SD Association - Speed Class
- Picking the Right SD Card: What Do the Numbers Mean?
Rotting bits - Cell charge leak
Storage fragmentation. It is a real physical phenomenon in NAND storage causing a stored bit to "rot". This exact type of failure exists both in SD cards and SSD (Solid-State Drive). If the same exact storage location is written constantly, eventually it will cause the cell charge to leak causing data loss. As manufacturers/vendors are aware of this, there are countermeasures.
Typically you as an end-user don't need to worry about this. Older cards and SSDs would start losing your precious stored data, but given technological advances it is less and less an issue. Even if you would create a piece of software for the purpose of stressing out an exact location of storage, modern hardware wouldn't be bothered. You may hear and read stories of data loss caused by this. I see no reason not to believe any such stories, but bear in mind any new hardware is less and less prone of this kind of failure.
Finally
While shopping for storage capacity, I'll always go big (unless there is a clear reason not to). Bigger ones tend to have modern design, be able to handle faster access and have really good resistance to data loss.
My suggestion for anybody would be to do the same.
Google Drive spam
Friday, April 2. 2021
A completely new type of spam has been flooding my mailbox. Ok, not flooding, but during past week I've got 7 different ones. The general idea for this spam delivery method is for the spam to originate from Google. How in detail the operation works, is to either exploit some innocent person's Google Account or create a ton of brand new Google Accounts to be used briefly and then thrown away. What the scammers do with the account is on Google Drive they'll create a presentation. There is no content in the presentation, it will be completely empty and then they'll share the document with me. Ingenious!
Shared presentation looks like this (hint: its completely blank):
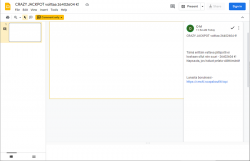
The trick is in the comment of the share. If you add a new user to work on the same shared file, you can add own input. These guys put some spam into it.
When the mail arrives, it would contain something like this:
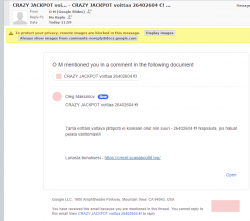
This approach will very likely pass a lot of different types of spam-filtering. People work with shared Google Drive documents all the time as their daily business and those share indications are not spam, its just day-to-day business for most.
Highlights from the mail headers:
Return-Path: <3FDxcYBAPAAcjvttlu0z-uvylws5kvjz.nvvnsl.jvt@docos.bounces.google.com>

Received-SPF: Pass (mailfrom) identity=mailfrom;

    client-ip=209.85.166.198; helo=mail-il1-f198.google.com;

    envelope-from=3fdxcybapaacjvttlu0z-uvylws5kvjz.nvvnsl.jvt@docos.bounces.google.com;

    receiver=<UNKNOWN>

DKIM-Filter: OpenDKIM Filter v2.11.0 my-linux-box.example.com DF19A80A6D5

Authentication-Results: my-linux-box.example.com;

    dkim=pass (2048-bit key) header.d=docs.google.com header.i=@docs.google.com header.b="JIWiIIIU"

Received: from mail-il1-f198.google.com (mail-il1-f198.google.com [209.85.166.198])

    (using TLSv1.3 with cipher TLS_AES_128_GCM_SHA256 (128/128 bits)

     key-exchange X25519 server-signature RSA-PSS (4096 bits) server-digest SHA256)

    (No client certificate requested)

    by my-linux-box.example.com (Postfix) with ESMTPS id DF19A80A6D5

    for <me@example.com>; Thu, 25 Mar 2021 09:30:30 +0200 (EET)

Received: by mail-il1-f198.google.com with SMTP id o7so3481129ilt.5

    for <me@example.com>; Thu, 25 Mar 2021 00:30:30 -0700 (PDT)

Reply-to: No Reply <p+noreply@docs.google.com>/code>
Briefly for those not fluent with RFC 821:
Nothing in the mail headers would indicate scam, fraud or even a whiff of spam. It's a fully legit, digitally signed (DKIM) email arriving via encrypted transport (TLS) from a Google-designated SMTP-server (SPF),
Given trusted source of mail, the only feasible attempt to detect this type of spam is via content analysis. Note: as an example of detecting and blocking unsolicited email, I've past written my thoughts how easy it is to block spam.
Well, until now it was. Darn!
Behind the scenes: Reality of running a blog - Story of a failure
Monday, March 22. 2021
... or any (un)social media activity.
IMHO the mentioned "social" media isn't. There are statistics and research to establish the un-social aspect of it. Dopamin-loop in your brain keeps feeding regular doses to make person's behaviour addicted to an activity and keep the person leeching for more material. This very effectively disconnects people from the real world and makes the dive deeper into the rabbit hole of (un)social media.
What most of the dopamin-dosed viewer of any published material keep ignoring is the peak-of-an-iceberg -phenomenon. What I mean is a random visitor gets to see something amazingly cool. A video or picture depicting something that's very impressive and assume that person's life consists of a series of such events. Also humans tend to compare. What that random visitor does next is compares the amazing thing to his/hers own "dull" personal life, which does not consist of a such imaginary sequence of wonderful events. Imaginary, because reality is always harsh. As most of the time we don't know the real story, it is possible for 15 seconds of video footage to take months or preparation, numerous failures, reasonable amounts of money and a lot of effort to happen.
An example of harsh reality, the story of me trying to get a wonderful piece of tech-blogging published.
I started tinkering with a Raspberry Pi 4B. That's something I've planned for a while, ordered some parts and most probably will publish the actual story of the success later. Current status of the project is, well planned, underway, but nowhere near finished.
What happened was for the console output of the Linux to look like this:
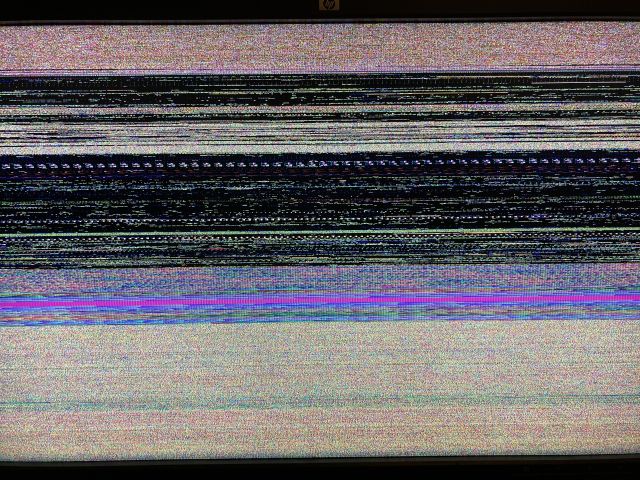
That's "interesting" at best. Broken to say the least.
For debugging of this, I rebooted the Raspi into previous Linux kernel of 5.8 and ta-daa! Everything was working again. Most of you are running Raspian, which has Linux 5.4. As I have the energy to burn into hating all of those crappy debians and ubuntus, my obvious choice is a Fedora Linux Workstation AArch64-build.
To clarify the naming: ARM build of Fedora Linux is a community driven effort, it is not run by Red Hat, Inc. nor The Fedora Project.
Ok, enough name/org -talk, back to Raspi.
When in a Linux graphics go that wrong, I always disable the graphical boot in Plymouth splash-screen. Running plymouth-set-default-theme details --rebuild-initrd will do the trick of displaying all-text at the boot. However, it did not fix the problem on my display. Next I had a string of attempts doing all kinds of Kernel parameter tinkering, especially with deactivating Frame Buffer, learning all I could from KMS or Kernel Mode Setting, attempting to build Raspberry Pi's userland utilities to gain insight of EDID-information just to realize they'll never build on a 64-bit Linux, failing with nomodeset and vga=0 as Kernel Parameters to solve the problem. No matter what I told the kernel, display would fail. Every. Single. Time.
It hit me quite late in troubleshooting. While observing the sequence of boot-process, during early stages of boot everything worked and display was un-garbled. Then later when Feodra was starting system services everything fell. Obviously something funny happened with GPU-driver of Broadcom BCM2711 -chip of VideoCore 4, aka. vc4 in that particular Linux-build when the driver was loaded. Creating file /etc/modprobe.d/vc4-blacklist.conf with contents of blacklist vc4 to prevent VideoCore4 driver from ever loading did solve the issue! Yay! Finally found the problem.
All of this took several hours, I'd say 4-5 hours straight work. What happened next was surprising. Now that I had the problem isolated into GPU-driver, on IRC's #fedora-arm -channel, people said vc4 HDMI-output was a known problem and was already fixed in Linux 5.11. Dumbfounded by this answer, I insisted version 5.10 of being the latest and 5.11 lacking availability. They insisted back. Couple hours before me asking, 5.11 was deployed into mirrors sites for everybody to receive. This happened while I was investigating failing and investigating more.
dnf update, reboot and pooof. Problem was gone!
There is no real story here. In pursuit of getting the thing fixed, it fixed itself by time. All I had to do is wait (which obviously I did not do). Failure after failure, but no juicy story on how to fix the HDMI-output. On a typical scenario, this type of story would not get published. No sane person would shine any light on a failure and time wasted.
However, this is what most of us do with computers. Fail, retry and attempt to get results. No glory, just hard work.
Book club: Formula 1 All The Races - The First 1000
Sunday, March 21. 2021

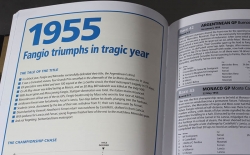
This one is a simple directory or reference manual of first thousand F1 races. If you want your copy, go for Formula 1 All The Races - The First 1000 @ Veloce Publishing.
For a non-fan, the book is as dry as a phone book. For a true fan like me, there are short descriptions of seasons and every single grand prix driven. Personally, I love reading about the early days. TV was barely invented, but wasn't such a huge part of F1 as it is now. What I do is fix a rerefence point from the book and fill in the gaps by googling for additional information. This works well as not all of the races are that interesting.
In short: Definitely not for everyone, but only for fans (pun intended).
Windows 10 Aero: shaker minimize all windows - disable
Friday, February 26. 2021
I'm not sure, but Windows 10 minimizing all currently open windows when you drag a window to left and right has to be the worst feature.
Sometimes I love to arrange the windows properly to make work better on a multi-display environment. As nerds at Microsoft read me adjusting the window position as "shaking" they decide to minimize all of my open ones. Since today, I've been looking hard both left and right, but found no actual use for this "feature" (bug). The gesture guessing is inaccurate at best. Also, IF (emphasis on if) I want to minimize all of my currently open windows, I'd love to clearly indicate the wish for doing so. I hate these artificial stupidity systems which try to out-smart me. They never do.
If you're like me and want nothing to hear from that, there is no actual option for getting rid of the madness. The ONLY option seems to be to edit registry, so let's do that.
Registry-file is very trivial:
Windows Registry Editor Version 5.00


[HKEY_CURRENT_USER\Software\Microsoft\Windows\CurrentVersion\Explorer\Advanced]


"DisallowShaking"=dword:00000001
Import that and you're done. For further info, read article How to Enable or Disable Aero Shake in Windows 10 @ TenForums.
Camera tripod-connector thread
Sunday, January 31. 2021
I'm sure everybody who has ever held a camera knows there is a thread for tripod somewhere bottomside of the camera. This is what my Canon EOS would look like from the belly-side:

Why all cameras have that specific threading is because manufacturers want to be ISO 1222:2010 -compliant. Reading Wikipedia article Tripod (photography), Screw thread, reveals the spec having a 1/4-20 UNC or 3/8-16 UNC thread. There is also a phrase "Most consumer cameras are fitted with 1/4-20 UNC threads."
According to mandatory Pulp Fiction reference, in Europe we have the metric system. Personally I have no idea what is a 1/4 inch Whitworth UNC thread mentioned in Stackexchange article Why aren't tripod mounts metric? Following up on the history, to my surprise, that particular camera thread can be traced at least to year 1901. There seems to be suggestions to circa 1870 and name T. A. Edison being mentioned, but none of that can be corroborated.
Time warping back to today.
My work has been remote for many many years. Given the global pandemic, everybody else is also doing the same. As every meeting is done over the net, I've made choices to run with some serious hardware. If you're interested, there is a blog post about microphone upgrade from 2019.
The camera is a Logitech StreamCam. What I rigged it into is the cheapest mirophone table stand I could order online. The one I have is a Millenium MA-2040 from Thomann. The price is extremely cheap 20,- €. However, cheap it may be, but it does the job well.
It doesn't require much thinking to realize, the ISO-standard thread in StreamCam is 1/4", but a microphone stand will have 3/8" or 5/8" making the fitting require an adapter. Thomann page states "With 5/8" threaded connector for recording studios and multimedia workstations". Logitech provides options in their package for camera setup. The typical use would be to have monitor/laptop-bracket which makes the camera sit on top of your display. Second option is the 1/4" setup. To state the obvious: for that you'll need some sort of tripod/stand/thingie.
Here are pics from my solution:

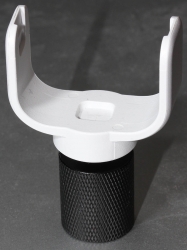

When you go shopping for such adapter, don't do it like I did:

Above pic is proof, that I seriously suck at non-metric threads. From left to right:
- female 1/2" to male 1/4" adapter (bronze), not working for my setup
- female 3/8" to male 1/4" adapter (black, short), not working for my setup
- female 5/8" to male 1/4" adapter (black, long), yes! the one I needed
- female 5/8" to male 1/4" adapter /w non-UNC thread (silver), not working for my setup
For those wondering:
Yes. I did order 4 different adapters from four different stores until I managed to find the correct one. ![]()
Also, there is nothing wrong with my laptop's camera. I simply want to position the camera bit higher than regular laptop camera will be.
Python Windows: Pip requiring Build Tools for Visual Studio
Wednesday, January 13. 2021
Update 26th Feb 2023:
This information has been obsoleted during 2022. Information in this article regarding Python and Visual Studio Build Tools download location is inaccurate. For latest information, see my 2023 update.
Python, one of the most popular programming languages today. Every single even remotely useful language depends on extensions, libraries and stuff already written by somebody else you'll be needing to get your code to do its thing.
In Python these external dependencies are installed with command pip. Some of them are installed as eggs, some as wheels. About the latter, read What are wheels? for more information.
Then there is the third kind. The kind having cPython in them needing a C-compiler on your machine to build and subsequent install when the binaries are done. What if your machine doesn't have a C-compiler installed? Yup. Your pip install will fail. This story is about that.
Duh, it failed
I was tinkering some Python-code and with some googling found a suitable library I wanted to take for a spin. As I had a newly re-installed Windows 10, pip install failed on a dependency of the library I wanted:
building 'package.name.here' extension
error: Microsoft Visual C++ 14.0 is required. Get it with "Build Tools for Visual Studio": https://visualstudio.microsoft.com/downloads/
Yes, nasty error that. I recall seeing this before, but how did I solve it the last time? No recollection, nothing.
The link mentioned in the error message is obsoleted. There is absolutely nothing useful available by visiting it. I'm guessing back in the days, there used to be. Today, not so much.
What others have done to navigate around this
Jacky Tsang @ Medium: Day060 — fix “error: Microsoft Visual C++ 14.0 is required.” Nope. Fail.
Stackoverflow:
-
How to install Visual C++ Build tools? Nope. Fail.
-
Microsoft Visual C++ 14.0 is required (Unable to find vcvarsall.bat) Yesh!
This problem is spread far and wide! Lot of people suffering from the same. Lot of misleading answers spreading for multiple years back.
Visual Studio 2019 Build Tools
Page is at https://visualstudio.microsoft.com/visual-cpp-build-tools/
(The link is in the vast river of comments in the last Stackoverflow-question)
Click Download Build Tools, get your 2019 installer and ...
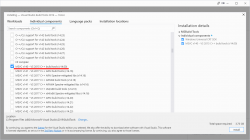
BANG! Nope, it won't work. Failure will indicate a missing include-file:
c:\program files\python38\include\pyconfig.h(205): fatal error C1083: Cannot open include file: 'basetsd.h': No such file or directory
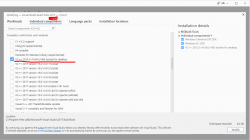
My solution with 2017 tools
Download link as given to you by Microsoft's website is https://visualstudio.microsoft.com/thank-you-downloading-visual-studio/?sku=BuildTools&rel=16 (2019). As it happens, 2019 will contain 2015 build tools, we can assume 2017 to do the same.
If you hand edit to contain release 15 (2017): https://visualstudio.microsoft.com/thank-you-downloading-visual-studio/?sku=BuildTools&rel=15
Yaaash! It works: pip will end with a Successfully installed -message.
Finally
Tricky subject, that. Looks like all the years have done so many changes nobody is able to keep a good track of all. What a mess! Uh.
New SSD for gaming PC - Samsung EVO 970 Plus
Tuesday, January 12. 2021
My gaming PC Windows 10 started acting out, it wouldn't successfully run any updates. I tried couple of tricks, but even data-preserving re-install wouldn't fix the problem. It was time to sort the problem, for good. The obvious sequence would be to re-install everything and get the system up and working properly again.
Doing such a radical thing wouldn't make any sense if I'd lose all of my precious data while doing it. So, I chose to put my hand to the wallet and go shopping for a new SSD. That way I could copy the files from old drive without losing anything.
A Samsung 970 EVO Plus SSD. It was supposed to be much faster than my old one, which was pretty fast already.
Installation into Asus motherboard:
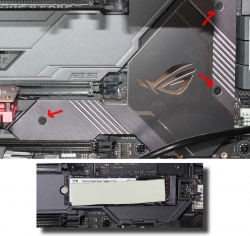
The M.2-slot is behind a block of aluminium acting as a heat sink. All cards, including the GPU needed to be yanked off first, then three screws undone before getting a glipse of the old 1 TiB M.2 SSD.
Note: In my MoBo, there is a second, non-heatsink, slot for what I was about to do. Transfer data from old drive to new one. I think it is meant to be used as a temporary thing as the drive is sticking out and isn't properly fastened.
Putting it all together, installing Windows 10 20H2 and running a benchmark:
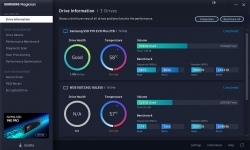
Twice the performance! Every time you can boost your PC into 2X of anything, you'll be sure to notice it. And yup! Booting, starting applications or games. Oh, the speed.
Note: In a few years, the above benchmark numbers will seem very slow and obsolete. Before that happens, I'll be sure to enjoy the doubled speed. ![]()
