Huawei B593 u-12 firmware spreadsheet
Tuesday, July 15. 2014
Running AT-commands on your B593
Thursday, May 29. 2014
This is something I've wanted to do for a long time. Ever since I got my B593. Jevgenij has been hacking his B593 and dropped me a comment that he found command /bin/lteat from his box. Obviously I had to SSH into mine to confirm this:
# ssh admin@192.168.1.1 /bin/sh
admin@192.168.1.1's password:
-------------------------------
-----Welcome to ATP Cli------
-------------------------------
ATP>shell
BusyBox vv1.9.1 (2013-07-25 14:10:15 CST) built-in shell (ash)
Enter 'help' for a list of built-in commands.
# ls -l /bin/lteat
-rwxrwxrwx 1 0 0 34604 /bin/lteat
... and oh yes! Such a command is there. It is an interactive AT-command shell!
Warning!
Running these AT-commands will mess up with your box. The modem does not like to be messed up and my box didn't connect to internet after doing this. There is a simple fix to just reboot the router.
Let's explore some possibilities.
Manufacturer information
Running the AT-command shell:
# lteat
AT>
This is something that worked already in the 80s modems. The classic modem information:
AT>ati
Manufacturer: Huawei Technologies Co., Ltd.
Model: EM920
Revision: 11.433.61.00.07
IMEI: 868031008680310
+GCAP: +CGSM,+DS,+ES
OK
The 15-digit IMEI is broken into two pieces. First 8 numbers are the Type Allocation Code (or TAC). The second part is the 7 number unique id of my unit. That's why I'm not revealing it here.
If we punch the TAC into a http://www.nobbi.com/tacquery.php it will yield a result of:
86803100
Manufacturer = Huawei
Model = B593
Hints = LTE/UMTS Router
Which is not very surprising. That is something we already know.
Telco information
Let's see what we can get from my telco. I found a nice reference List of AT commands to be very helpful. Running command:
AT>AT+COPS=3,2
AT+COPS=3,2
OK
AT>AT+COPS?
AT+COPS?
+COPS: 0,2,"24405",2
OK
The 24405 is my PLMN code (note: this can be found from web GUI's diagnostics wireless status also). According to article Mobile country code, it breaks down to two parts:
Mobile Country Code = MCC = 244
Mobile Network Code = MNC = 05
According to the table:
MCC = 244 = Finland
MNC = 05 = Elisa
Again, something that I already know.
Location information
To dig a bit deeper ... Every cell tower has unique code. I found information about that from a discussion forum with topic Huawei USB LTE Modem, E3276 K5150 E398 (Modems). The forum says that:
AT+CREG?
+CREG: 2,1, YYYY, XXXXX, 2
OK
Y = LAC
X = Cell ID
Added: Note that both are in hex so need to convert it
Let's try that one out:
AT>AT+CREG=2
AT+CREG=2
OK
AT>AT+CREG?
AT+CREG?
+CREG: 2,1, 620C, 123ABC, 2
OK
Now we have:
LAC = 620C (hex) = 25100 (decimal)
Cell ID = 123ABC (hex) = 1194684 (decimal)
Again, I'm not going to reveal my exact location here!  The cell-ID published here is something I made up.
I tested all the gathered information of:
MCC = 244
MNC = 05
LAC = 25100
cell-ID = 1194684
in OpenCellID's search engine, but they don't seem to have my coordinates in it. Maybe I should add them. Your's may very well be there.
According to Wikipedia article, there are a number of databases for cell-IDs, but most of them are commercial and I don't have a license to use them. In general they simply have exact GPS-coordinates of cell towers and they can be used to get a rough estimate of your location.
Signal quality
The last one I did was to get exact signal quality. A B593 has 5 bars in it, which is accurate enough for most users. The hardware has the quality info in much more detailed level. The AT-command list says:
Signal quality
Command: AT+CSQ
Response: +CSQ: <rssi>,<ber>
Let's try that out:
Query for the ranges:
AT>AT+CSQ=?
AT+CSQ=?
+CSQ: (0-31,99),(0-7,99)
OKQuery for the signal quality:
AT>AT+CSQ
AT+CSQ
+CREG: 1, 620C, 123AC1, 2
AT+CSQ
+CSQ: 23,99
OK
Whoa! It also returned a LAC and another cell-ID. The cell-ID is pretty close to the original one, but not exactly the same. Anyway, the Received signal strength indication (RSSI) is 23 and Bit Error Rate (BER) is 99.
By Googling I found out following information about RSSI:
RSSI (dBm) = RSRP + 10*log10(RB) + | RSRQ | + other noice, temperature noice etc.
You may also see the RSSI vs RSRP: A Brief LTE Signal Strength Primer for details about the signal math.
To put all the logarithms and four-letter-acronyms into layman terms. This table was published in the discussion forum in Finnish by user with nickname timtomi. Signal levels are from poor to excellent:
| 0 | <-113 dBm | poor, signal breaks up and all kinds of nasty |
| 1 | -111 dBm | poor, signal breaks up and all kinds of nasty |
| 2 | -109 dBm | works, but signal fluctuates, especially upload |
| 3 | -107 dBm | works, but signal fluctuates, especially upload |
| 4 | -105 dBm | works, but signal fluctuates, especially upload |
| 5 | -103 dBm | works, but signal fluctuates, especially upload |
| 6 | -101 dBm | works, but signal fluctuates, especially upload |
| 7 | -99 dBm | still better than ADSL |
| 8 | -97 dBm | still better than ADSL |
| 9 | -95 dBm | still better than ADSL |
| 10 | -93 dBm | still better than ADSL |
| 11 | -91 dBm | still better than ADSL |
| 12 | -89 dBm | full download, good upload |
| 13 | -87 dBm | full download, good upload |
| 14 | -85 dBm | full download, good upload |
| 15 | -83 dBm | full download, good upload |
| 16 | -81 dBm | full download, good upload |
| 17 | -79 dBm | excellent! good signal and ping |
| 18 | -77 dBm | excellent! good signal and ping |
| 19 | -75 dBm | excellent! good signal and ping |
| 20 | -73 dBm | excellent! good signal and ping |
| 21 | -71 dBm | excellent! good signal and ping |
| 22 | -69 dBm | excellent! good signal and ping |
| 23 | -67 dBm | excellent! good signal and ping |
| 24 | -65 dBm | excellent! good signal and ping |
| 25 | -63 dBm | excellent! good signal and ping |
| 26 | -61 dBm | excellent! good signal and ping |
| 27 | -59 dBm | you're right next to the cell tower! |
| 28 | -57 dBm | you're right next to the cell tower! |
| 29 | -55 dBm | you're right next to the cell tower! |
| 30 | -53 dBm | you're right next to the cell tower! |
| 31 | > -51 dBm | you're right next to the cell tower! |
| 99 | |
not known or not detectable |
The BER is typically 99 which means that none could be measured. In general there shouldn't be any errors in the transmission, so 99 is likely what you'll get also.
Replacing Compaq 615 hard drive with a SSD
Wednesday, May 28. 2014
This is a HOWTO instruction for replacing a spinning platter hard drive with a modern faster solid-state drive. Since Compaq 615 has Windows 7 Home Premium OEM installed, I'll blog about the Windows Activation in more detail on my next post.
This kind of Compaq laptop is quite generic PC. Majority of this information applies to almost any laptops I've disassembled. It's about the location of the drive, location and number of screws, but the information in general covers the operation of replacing a drive with another one.
I started this project with checking for Manuals for Compaq 615 Notebook PC @ HP. The good stuff is at PDF-document with title Compaq 615 Notebook PC and Compaq 610 Notebook PC - Maintenance and Service Guide.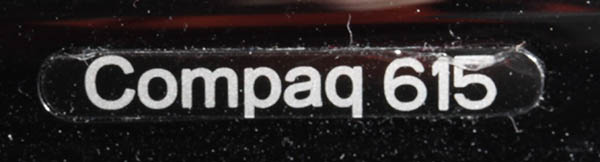
It will contain all the information a service technician would need to successfully operate on this kind of hardware. On page 4-8 it has the hard drive replacement procedure documented.
Anyway, this is something I've done a lot. I briefly checked out the location of the drive and the screws that needed un-screwing. Here is a pic from the flipside of the laptop: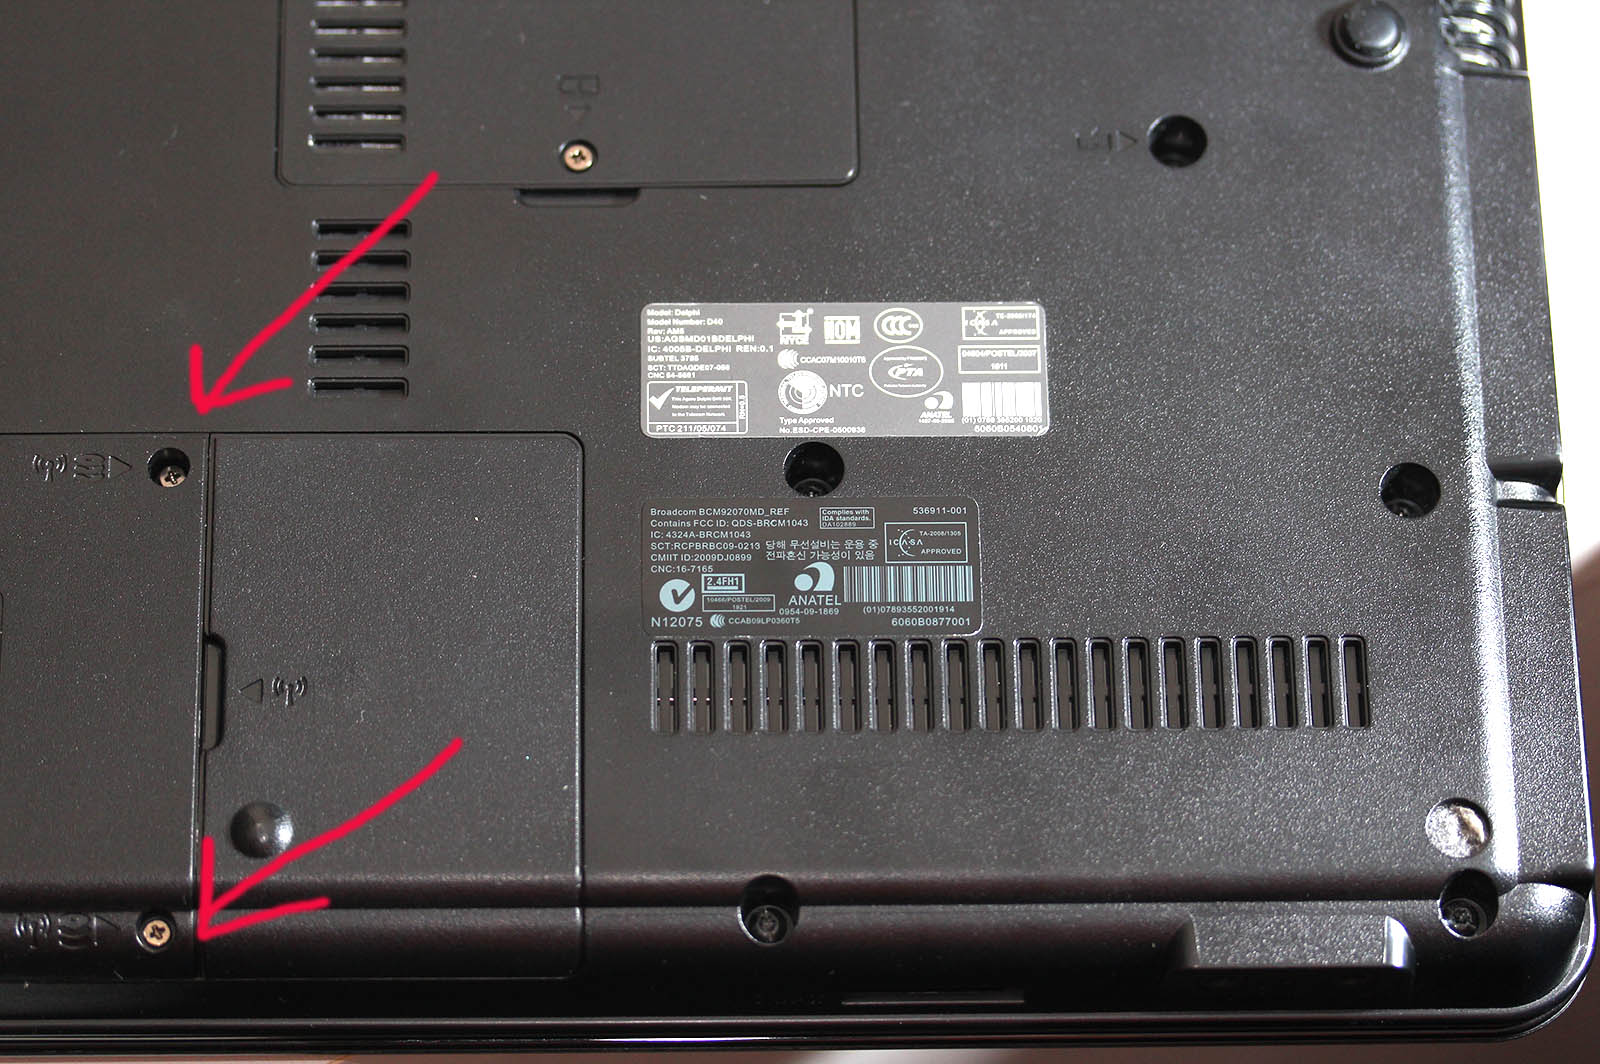
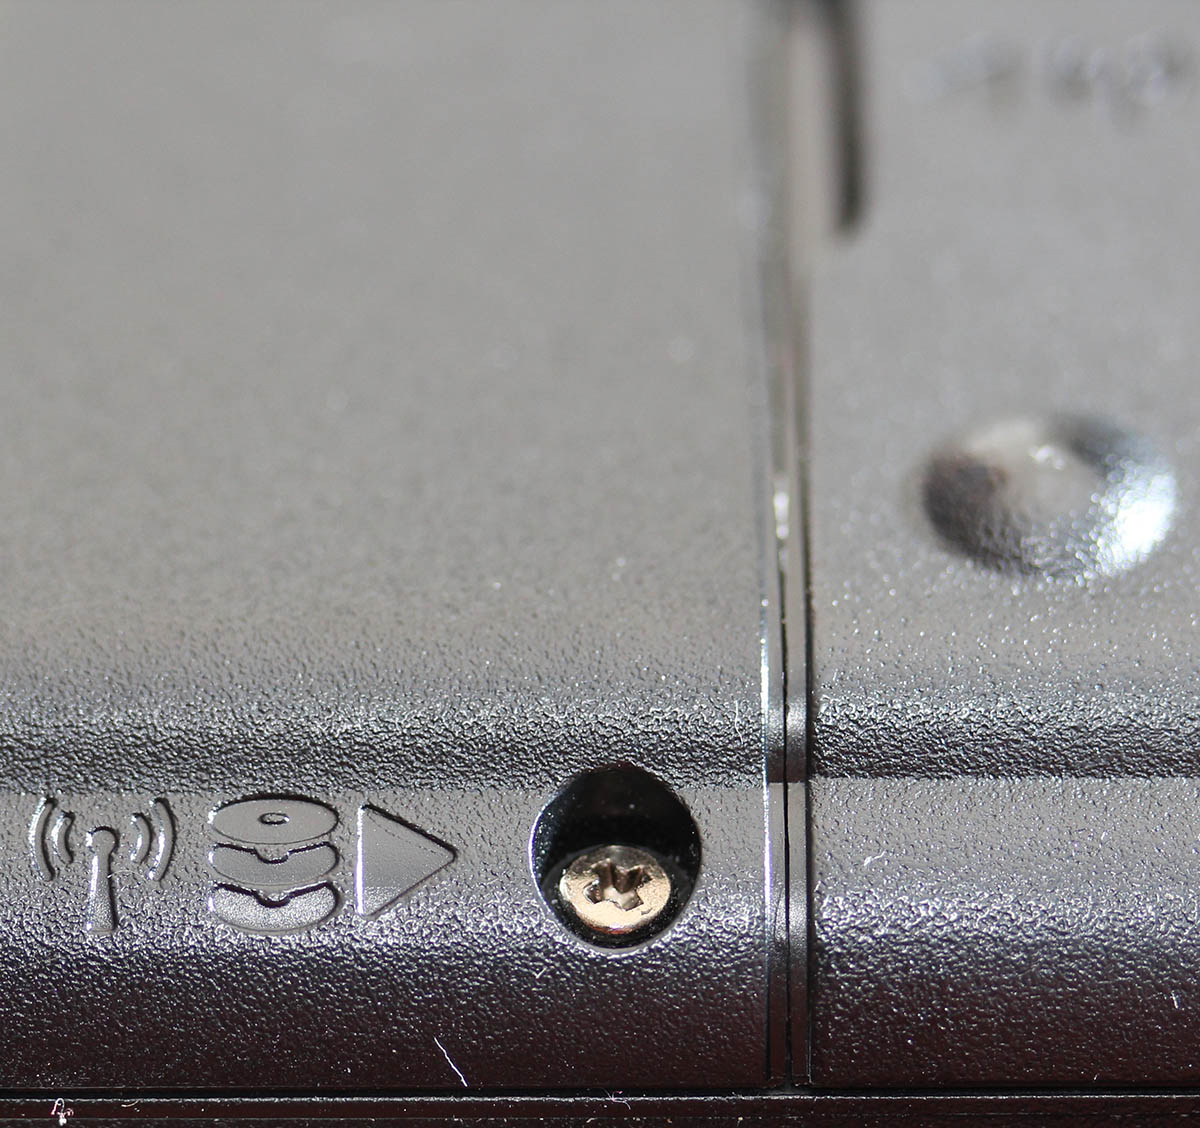
Those two screws hold a HDD-cover in place. The screws even have a HDD-symbol next to them. Un-screw both of them with a small Phillips head screwdriver: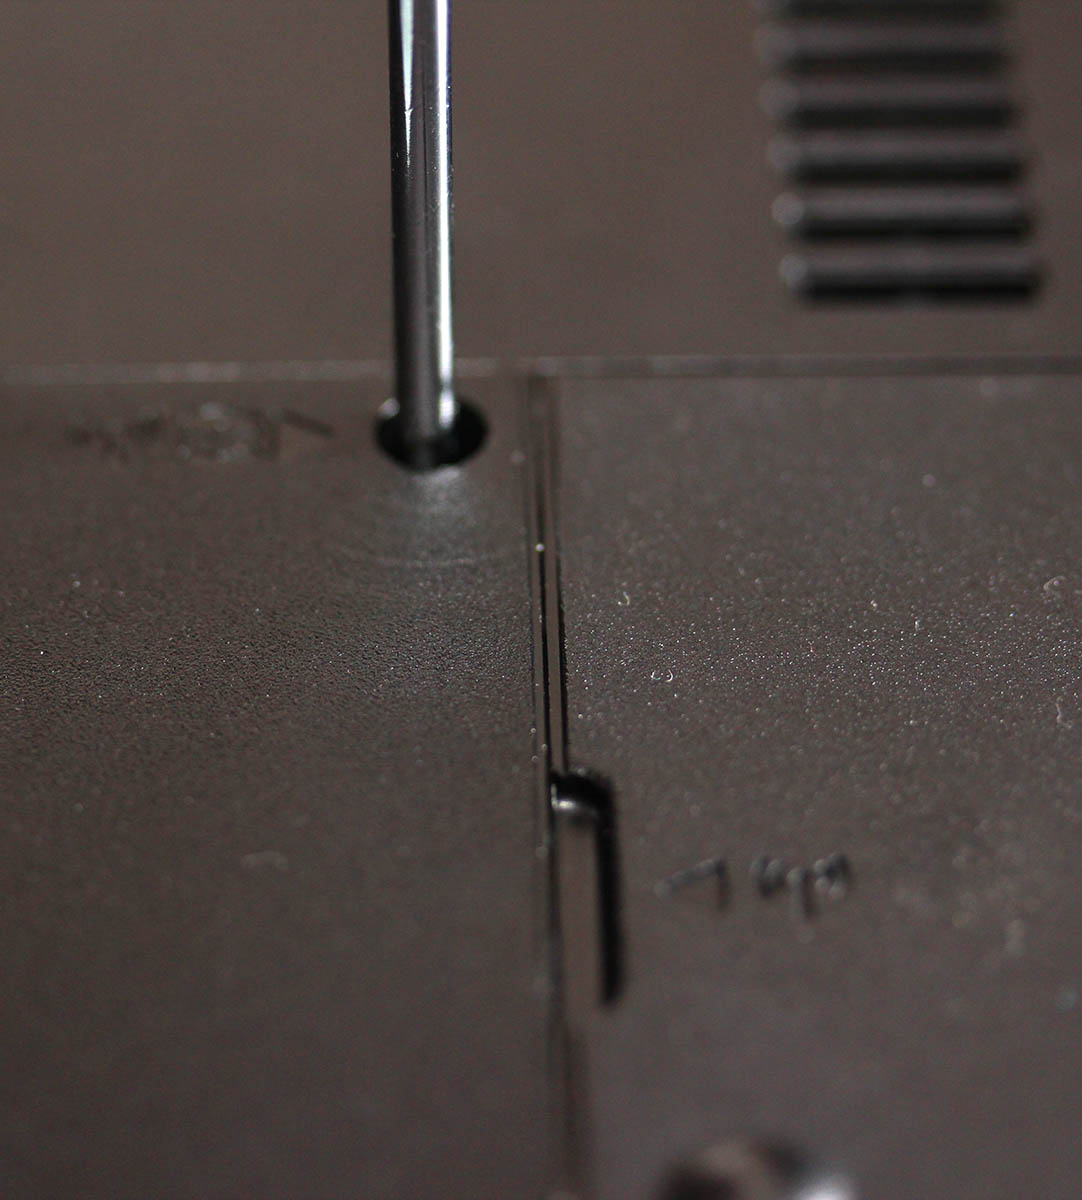
Remove the HDD-cover by pulling up from the side you removed the screws from. The drive is visible: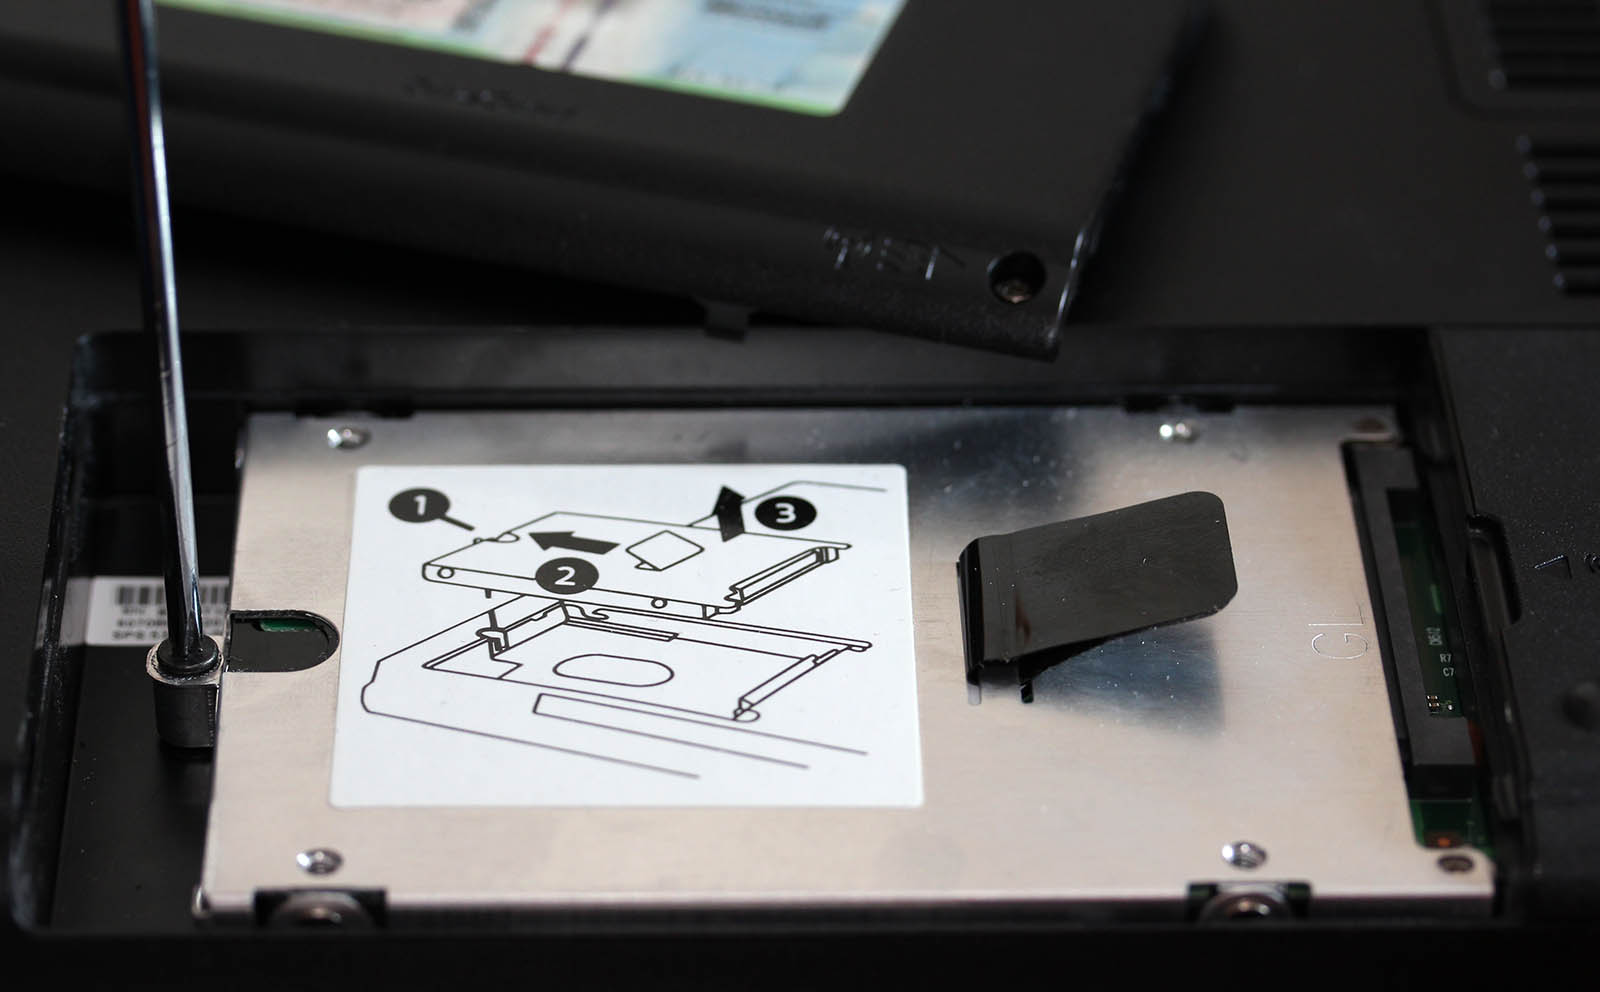
The drive is held in place by a single Phillips head screw. Remove that too. Pull up from the drive screw bracket and the drive will slide left and reveal a standard S-ATA -connector: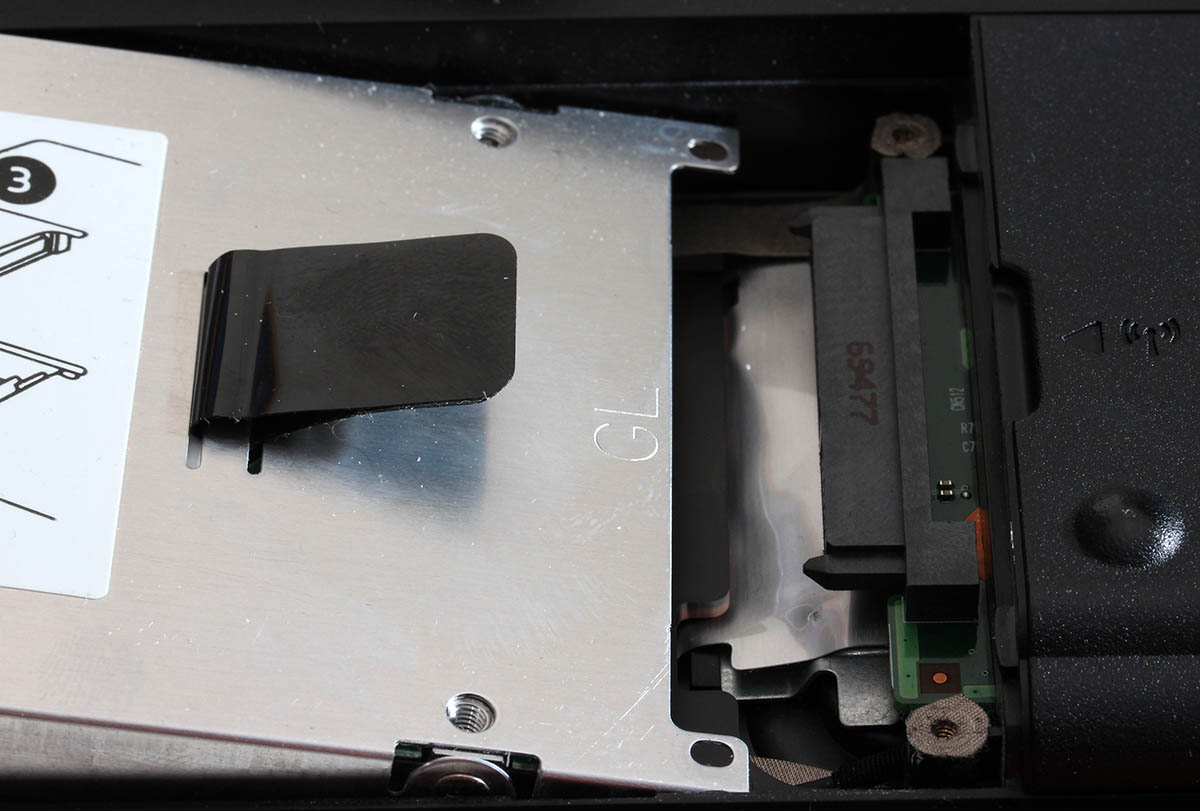
Now you have the drive completely detached from the laptop. The actual hard drive is connected to a metal cradle with 4 Phillips head screws. Un-screw them: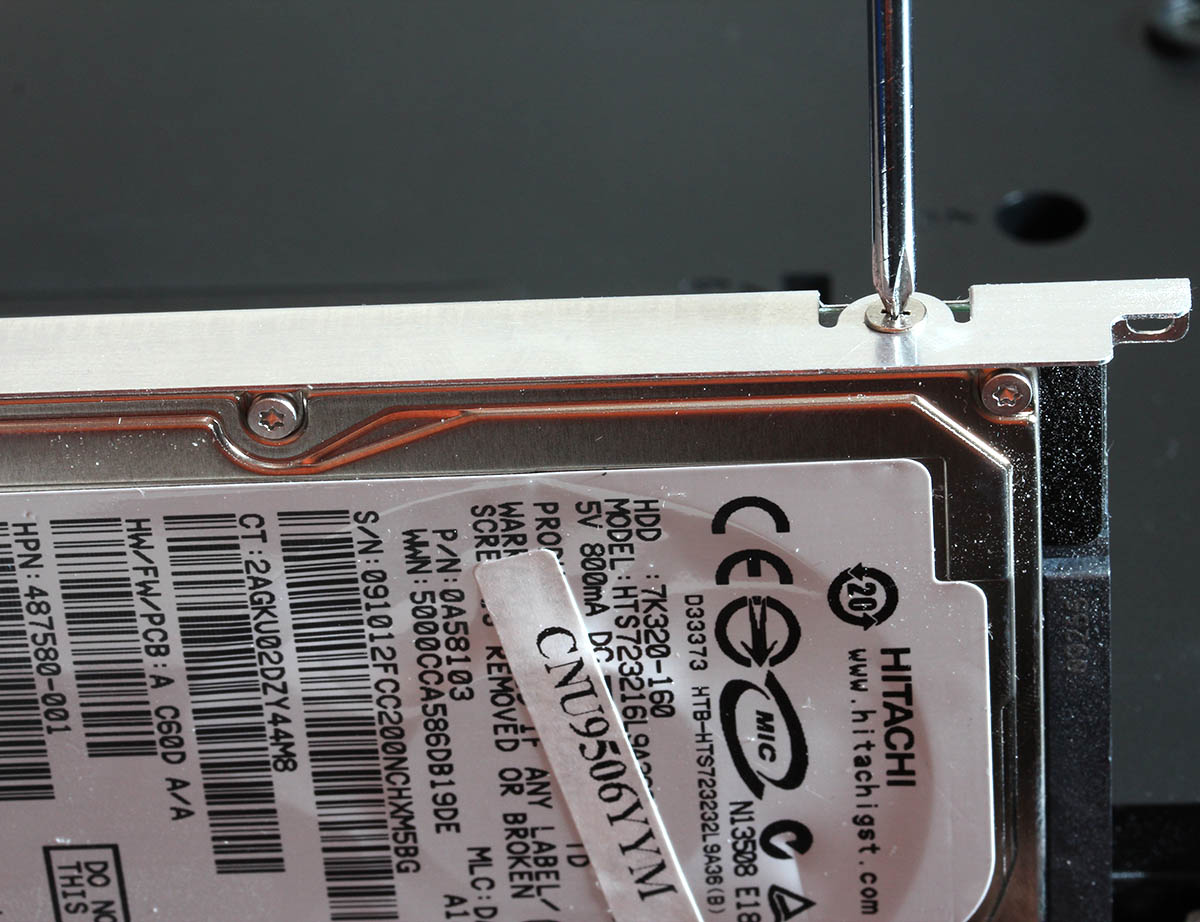
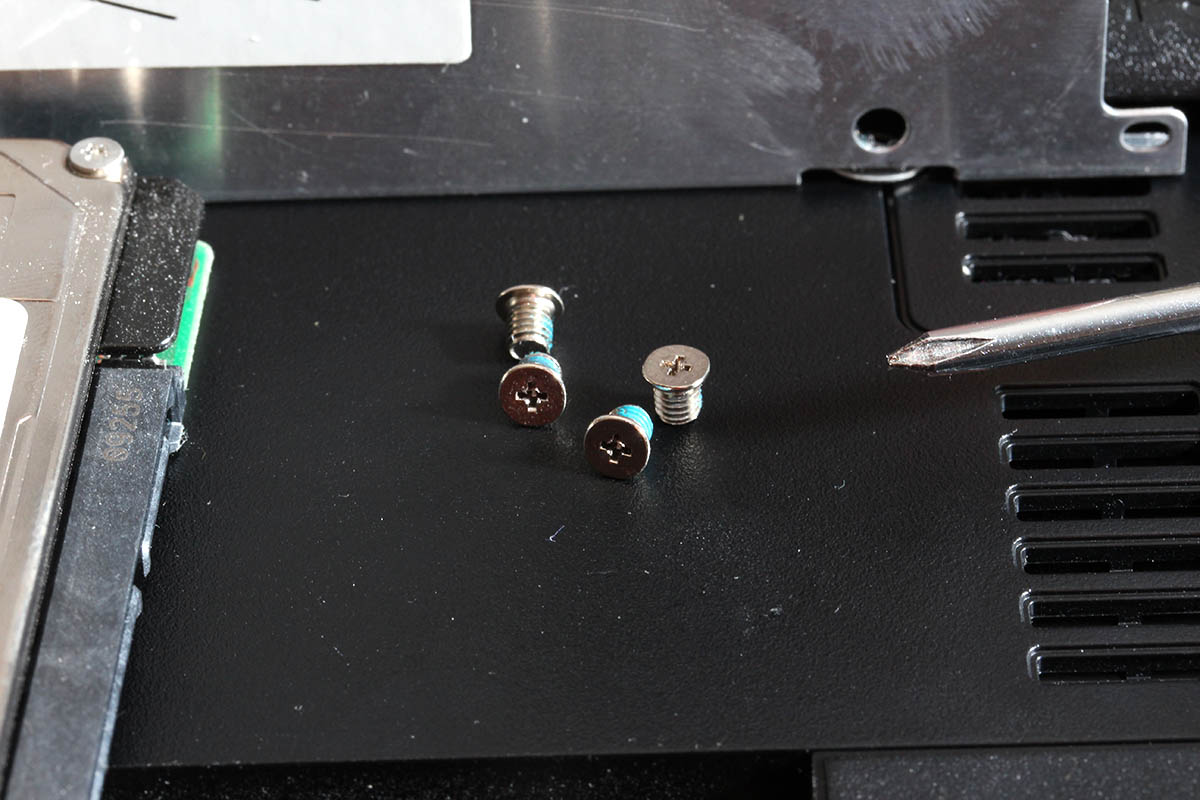
As you can see, the screws are really small. The screws are quite tight, see the blue substance in the screws. It is threadlocker and its purpose is to make sure a screw is tightly attached. If you don't have the proper sized screwdriver, you will destroy the notches of these screws making removal really difficult. This is the only part of disassembly, where I needed to apply some force just to make sure that the screwdriver wouldn't slip.
The next step is to attach the new SSD-drive to the cradle: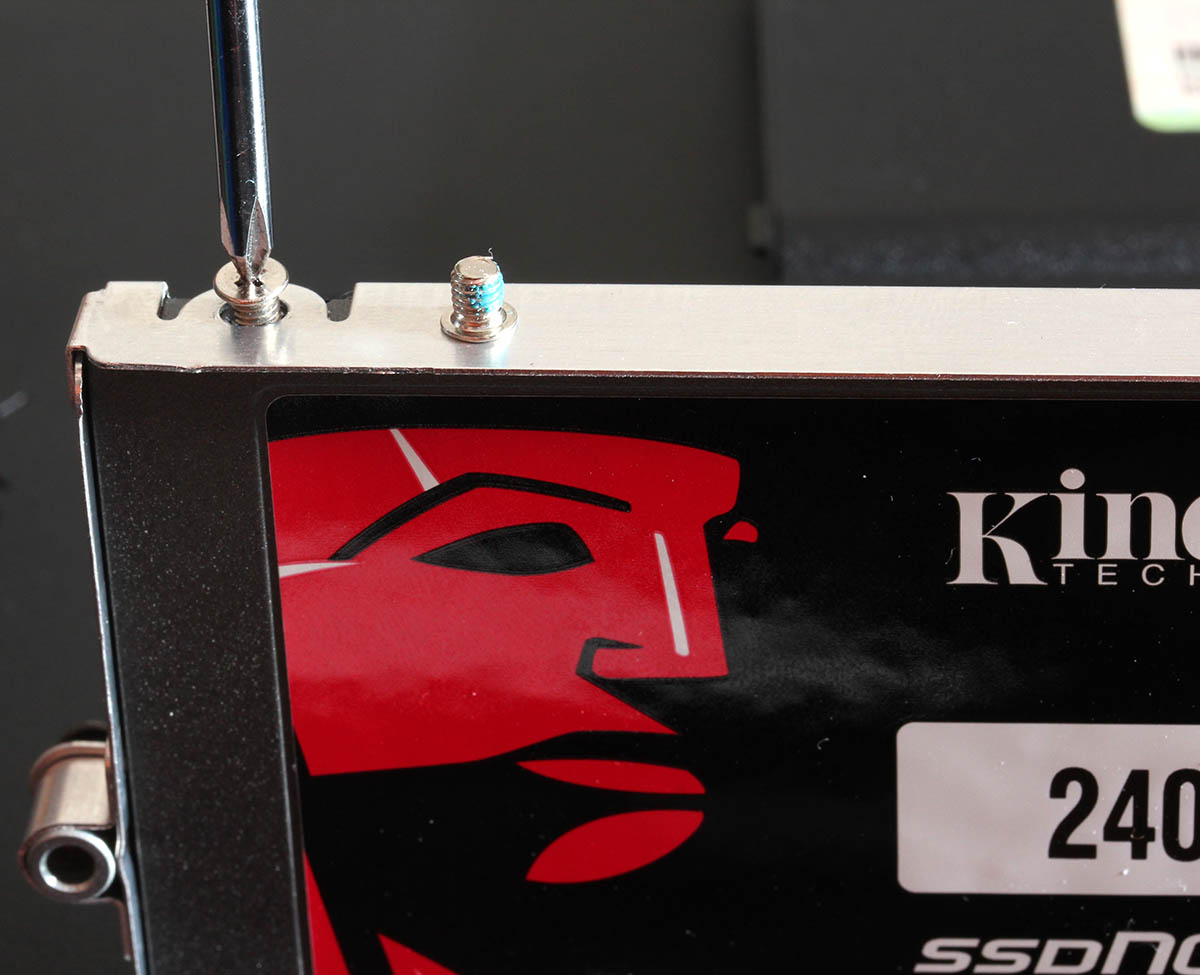
Think really carefully which way the drive needs to be attached to the cradle. There are four possible options, but only one of them will yield success. You will see quite soon the position the cradle needs to be in the laptop. The hard part is to figure out which way the drive needs to be to succesfully connect to the S-ATA -connector of the laptop.
When the hard part is done, all you need to do is slide the cradle back to S-ATA connector and secure the screw holding the cradle at place. Then put the HDD-cover back and secure the two screws for the cover.
All this will take around 10 minutes on experienced hands. If this is your first laptop maintenance work, reserve a hour. Nothing here requires much force to be applied. If you are applying much force, you're doing something wrong.
Good luck on your project!
Telia Sweden SP102 firmware for u-12
Tuesday, May 27. 2014
Jevgenij dropped me a comment about new firmware. It is from Telia Sweden and you can get it from here http://www.telia.se/privat/support/mobiltbredband/uppdaterausbmodemorouter#huaweib593formac=&tabMenu_0=huaweib593formac The direct download link is https://www.telia.se/dms/mgnl-ext-dms/www-telia-se-ui/installation-files/se_telia_r-m-h-s.tar/se_telia_r-m-h-s.tar.bz2 The firmware seems to have nice features, SMS and even to force for 2G-operation. He highly recommends this one. This looks very promising, perhaps I'll try this myself.
I upgraded my B593 with this one and can confirm that it works well. GUI-languages are: Svenska, Suomi, Pусский, Norsk, Dansk, Eesti, Lietuviu and Latviešu. No setup wizard. Has external antenna support. No VoIP. No DDNS. Mode selector has 5 options: auto, auto 3G/4g, 2G only, 3G only and 4G only. SMS in/out. No DLNA. So it is little bit light on features, but is fully exploitable and SP102!
The file will contain a SP102 for u-12. Altough The Exploit does not work, it seems to have a nice bug in it. When you're FTPing into it, it will open also SSH-port! Whaat!
Warning:
SSH passwords are reset to something the telco set. However, USB/FTP-hack will work and you can get the /var/sshusers.cfg and look at the plaintext password from there.
Extracting /var/curcfg.xml from NVRAM [Solved!]
Wednesday, May 21. 2014
John do, a reader of this blog made a serious break-trough! Via SSH on B593 prompt, he found the flashtest-command. Before this I had no knowledge about such command, but see what I can do with this new information:
# flashtest
Usage: flashtest {info|read|write|erase|export|load} {addr} {len} [data]
Format:
flashtest help
flashtest info
flashtest read addr len
flashtest write addr len {data}
flashtest erase addr len
flashtest export addr len
Well ... the info sound interesting. Let's see:
# flashtest info
flash block size : 0x40000 (256k Bytes)
flash block num : 0x40 (64 Blocks)
flash total size : 0x1000000 (16M Bytes)
flash partation info :
---------------------------------------------------------------
Name Address Usage
---------------------------------------------------------------
Boot 0x0---0x40000 Bootloader
Image 0x40000---0xA40000 Main image
Image 0xA40000---0xE00000 Subject image
Curcfg 0xE00000---0xE40000 Curcent config
Faccfg 0xE40000---0xE80000 Factury config
Tmpcfg 0xE80000---0xF00000 Temp config
Fixcfg 0xF00000---0xF40000 Fixed config
Logcfg 0xF40000---0xF80000 Log config
TR069 0xF80000---0xFC0000 TR069 cert
Nvram 0xFC0000---0xFFFFFF Nvram
Current config! Really!? (Mis-typed as Curcent config). The run-time -only /var/curcfg.xml's real storage has eluded me this far. Let's explore that further:
# flashtest export 0xE00000 65536
Read data: addr = 0xe00000, len = 0x10000 ...
Begin write to file
Export done
What did it do? Where it wrote to? Some poking around reveals:
# cd /tmp/
# ls -l
---------- 1 0 0 65536 flashinfo.bin
Oh yes! The next thing is to get my hands on to the file. In the B593 firmware's Busybox there is only a limited set of tools.
Let's use the USB/FTP-hack for transferring the file. The idea is to plug an USB-stick into B593. Any FAT32-formatted stick will do, it is totally irrelevant if there are files or not. Early firmwares are known to have a flaw in them. You can mount the entire filesystem into FTP-server and transfer file to/from the box. Setup goes like this:![]()
Make sure you have the FTP-server running, add a user to the new mount and set the directory as ../.. It is really important to do that! That effectively breaks out of /mnt/usb2_1 into /. See this pic:![]()
I added user with name test. Now let's see if the FTP-connection works from an external machine:
# ftp 192.168.1.1
Connected to 192.168.1.1 (192.168.1.1).
220 bftpd %v at 192.168.1.1 ready.
Name (192.168.1.1:user): test
331 Password please.
Password:
230 User logged in.
Remote system type is UNIX.
Using binary mode to transfer files.
ftp> cd /tmp
250 OK
ftp> dir
227 Entering Passive Mode (192,168,1,1,166,124)
150 BINARY data connection established.
---------- 1 0 0 65536 May 21 19:26 flashinfo.bin
226 Directory list has been submitted.
ftp>
Oh yes! The extracted NVRAM-binary is there. Let's download it:
ftp> get flashinfo.bin
local: flashinfo.bin remote: flashinfo.bin
227 Entering Passive Mode (192,168,1,1,144,190)
150 BINARY data connection established.
226 File transmission successful.
65536 bytes received in 0.06 secs (1092.41 Kbytes/sec)
A brief analysis of the file reveals:
# hexdump -C flashinfo.bin | head -3
00000000 3e 00 64 fe 3c 3f 78 6d 6c 20 76 65 72 73 69 6f |>.d.<?xml versio|
00000010 6e 3d 22 31 2e 30 22 20 3f 3e 0a 3c 49 6e 74 65 |n="1.0" ?>.<Inte|
00000020 72 6e 65 74 47 61 74 65 77 61 79 44 65 76 69 63 |rnetGatewayDevic|# hexdump -C flashinfo.bin | tail -5
000064f0 65 77 61 79 44 65 76 69 63 65 43 6f 6e 66 69 67 |ewayDeviceConfig|
00006500 3e 0a 00 ff ff ff ff ff ff ff ff ff ff ff ff ff |>...............|
00006510 ff ff ff ff ff ff ff ff ff ff ff ff ff ff ff ff |................|
*
00010000
The first 4 bytes of 3e 00 64 fe are bit of a mystery. I don't know what the 3e 00 is for, but the 64 fe is obvious! It is the length of the XML-file following the header bytes. I can confirm that the entire /var/curcfg.xml is there. Unchanged. Intact!
My next move is to try altering the curcfg.xml and write it back. There is a chance of locking myself out of my own B593, so ... I need to be really careful with this. If everything works as I expect, my next move is to write tools for allowing people to access their devices as they want to.
I'd like to extend my gratitude to Mr. John do. This really is ground-breaking stuff allowing us to new lengths with Huawei B593 hacking. Thank you, sir!
Huawei B593 different models revisited: u-12 vs s-22
Friday, May 16. 2014
This is something that has been bugging me since November. In my post about different models, I stated that I have a u-12 (and still do). Last year I did setup a s-22 to a friend and got to see that it is pretty much the same. However, "pretty much the same" is not exactly the same.
The s-22 is a newer model and it has been well established, that it has a TDD 2600 MHz added into it. All the FDD frequencies are exactly the same than in u-12.
In the comments of my post, a user suggested that s-22 differs from u-12 by having only one USB-connector. At the time I was unable to find proof of that, all the pictures I could found of alleged s-22 units had no difference for a u-12 unit.
Now the situation has changed. In my ventures of the wonderful Internet I found an article What's the difference between HUAWEI B593s-22 and B593u-12? and it has a picture of both units side by side in it. Nice! But which one is which?
Just to make sure that s-22 is in the left and u-12 is in the right, I'll post a fresh picture of my own u-12 unit:![]()
Also to close the case I also found a vendor page with a nice picture of s-22 in it, see HUAWEI B593s-22 4G LTE CPE [B593s-22]. It has a picture of the unit in the page, and their s-22 looks exactly the same than the left unit in the picture, and exactly NOT the same than my u-12. Apparently s-22 does not have a power switch, it lacks the side USB-connector and SIM-card -slot has been changed into a tray. Lot of differences to spot, actually.
So I'm confident that s-22 is very much re-designed both in hardware and firmware. The hardware side is surely changed because of the new(ish) 4G TDD radio interface. And while Huawei engineers were at it, they changed also the firmware in number of ways, one of them being to resist hacking attempts better than their 1st gen version did. This is also a well established fact, s-22 firmware has a completely different structure than u-12 firmware.
Now me and everybody else should be able to identify the units by a simple visual inspection.
German Telekom SP104/SP105 firmware for u-12
Thursday, May 15. 2014
B593 firmware version numbers
Monday, May 12. 2014
I got a comment about the firmware version numbers. How can you tell which one is a newer and which one is older? Well ... Huawei really does make this one difficult. I'm guessing all this has to do with the fact that any regular user should be insulated from the fact that his/hers hardware is manufactured by Huawei. Your beloved telco should be their face and you should be doing business with them and only them. Screw that! This is 2014 and the age of social networking in the Internet. Openness is the only real way to go.
Here is what I gatehered for B593 u-12. This is a list of firwares from oldest to newest:
| Firmware name |
HW ver |
Release |
Telco / Custom by |
Version / Service Pack |
|---|---|---|---|---|
| V100R001C00SP052 | V100 | R001 | C00 | SP52 |
| V100R001C26SP054 | V100 | R001 | C26 | SP54 |
| V100R001C260SP055 | V100 | R001 | C260 | SP55 |
| V100R001C07SP061 | V100 | R001 | C07 | SP61 |
| V100R001C35SP061 | V100 | R001 | C35 | SP61 |
| V100R001C186SP065 | V100 | R001 | C186 | SP65 |
| V100R001C00SP070 | V100 | R001 | C00 | SP70 |
| V100R001C00SP073 | V100 | R001 | C00 | SP73 |
| V100R001C55SP102 | V100 | R001 | C55 | SP102 |
This is for B593 s-22:
| Firmware name | HW ver | Release | Build | Debug | Version / Service Pack | Telco / Custom by |
|---|---|---|---|---|---|---|
| V200R001B180D20SP00C1064 | V200 | R001 | B180 | D20 | SP00 | C1064 |
| V200R001B180D15SP00C00 | V200 | R001 | B180 | D15 | SP00 | C00 |
Just to be clear:
I don't know any of this to be factually correct, nor I can back any of this up from an "official" source. Feel free to correct me or suggest any other interpretation.
Update 18th May 2014:
Bilbo dropped me a comment with a link into https://app.box.com/s/0uim7fp7j4dzet2bpmhp. It provides more details about version numbering scheme Huawei uses. I did update the table headers with this new information.
APC Smart-UPS battery change
Monday, April 14. 2014
My home Linux box is always on and to make sure it stays on I have an uninterruptible power supply for it. APC is very well supported in Linux by open-source apcupsd. Pretty much all other UPSes are supported by NUT, but for some strange reason APC has a separate project.
Update 20th May 2018: There is a new post about APC UPS batteries here.
Couple days ago the UPS started to beep. My house had electricity and there was no apparent fault. Except that I got an e-mail from apcupsd "UPS battery needs changing NOW". Aow crap! The batteries had reached their end of life. I confirmed the status with apcaccess and got status of:
STATUS : ONLINE REPLACEBATT NOBATT
Every 12 hours, the UPS releases a burst of beeps and I find that very annoying. It was time to go shopping for new batteries. Luckily my unit uses Replacement Battery Cartridge #7, which is popular and generally well available and the price ~200 € isn't too bad. The next thing is to get the old ones out and new ones in. APC user's manual says that battery pack is hot-swappable, so it should be an easy thing to do. Apparently the first thing to do is remove the front cover:

It has nice holes on the sides. I guess the idea is to put your fingers into them an pull hard.

When the front cover is loose, a ribbon-cable and a metal cover is revaled.
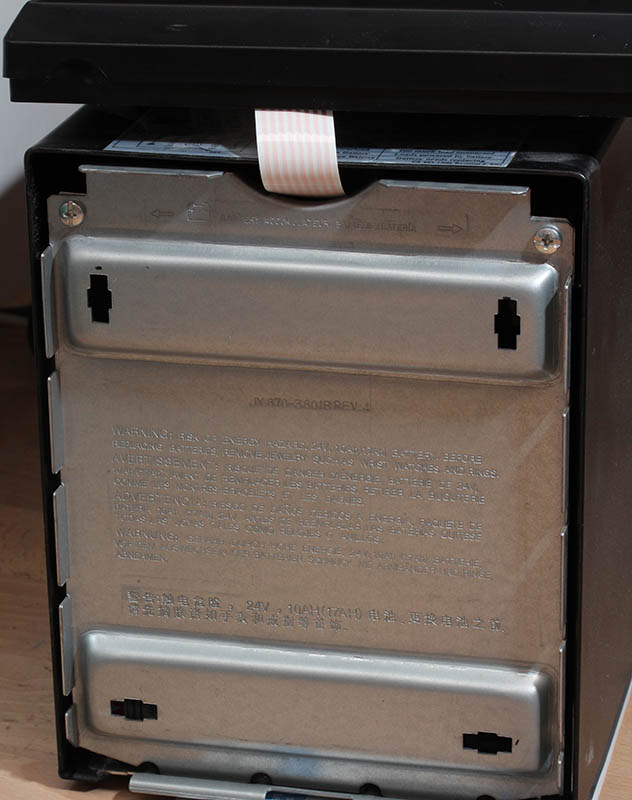
There are two phillips-head screws to hold the metal cover in place:
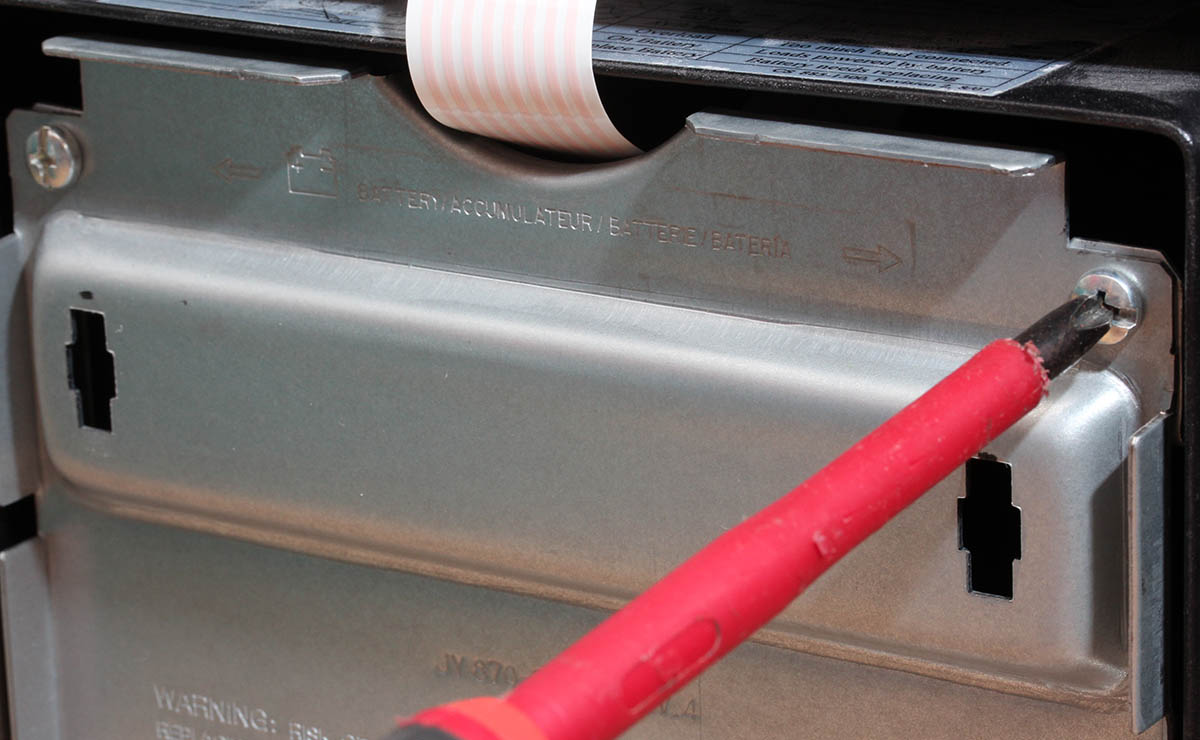
When the metal cover is removed, the battery pack is visible:
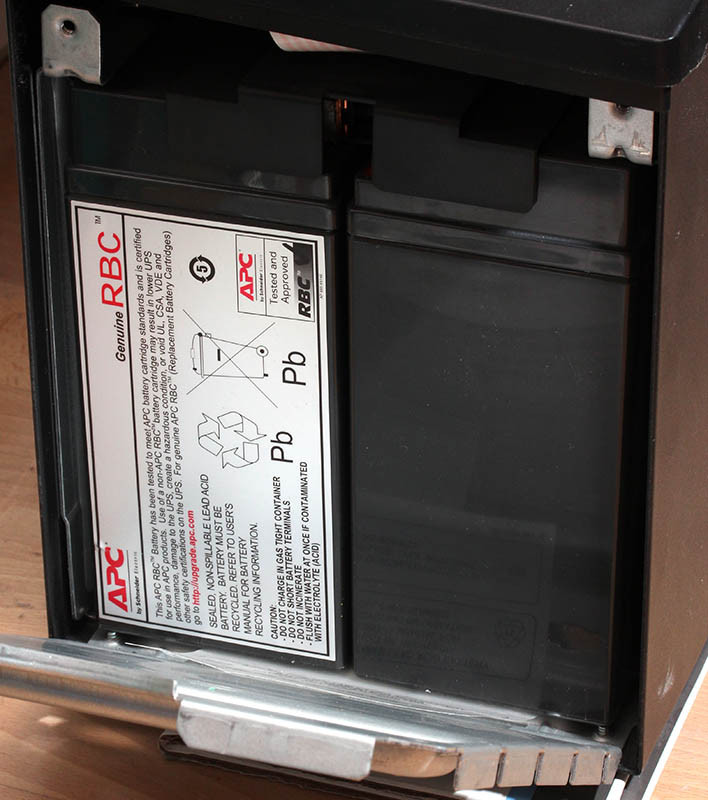
There is a plastic tab at the bottom. I guess it is there, so that batteries can be pulled out. Now that the metal cover is removed, the batteries are not attached to anything:

The final thing to do is to disconnect the battery pack:

Now the UPS keeps beeping a lot. It is annoyed by the fact, that it cannot find a battery. Since I don't have any original APC software on my computer I found out that the audible beep can be silenced. First make sure that the apcupsd is not running:
systemctl stop apcupsd.service
Now the apctest can be used to change any of the UPS-parameters:
# apctest

2014-04-14 20:42:05 apctest 3.14.10 (13 September 2011) redhat

Checking configuration ...

Attached to driver: usb

cable.type = USB Cable

mode.type = USB UPS Driver

Please select the function you want to perform.
6) View/Change alarm behavior
Current alarm setting: ENABLED

Press...

 E to Enable alarms

 D to Disable alarms

 Q to Quit with no changes

Your choice: Select function: d


New alarm setting: DISABLED
Now there is the blissful silence. It is much nicer to operate with the new battery pack.
Obviously the idea is to reverse the instruction. Connect the new battery, slide it in and tighten the screws and attach the front cover back.
I guess, the new battery should last at least 3 years before I'll be getting a completely new UPS. There simply is no point in running a really old UPS with brand new batteries. I guess the UPS technology will still evolve so that a new tech is required after half a decade.
Polkomtel firmware for u-12
Sunday, April 6. 2014
3 Italy firmware for u-12
Friday, March 28. 2014
Cisco ASA protected SSH-connection hangs - [Fixed]
Thursday, March 13. 2014
Using own SSL certificate in Cisco ASA
Tuesday, March 11. 2014
Yesterday I was mighty pissed about Oracle's Java breaking my stuff. Then it occurred to me: I shouldn't be using self-signed certificates in the first place! See my post about Certificate Authority setup: Doing it right with OpenSSL, where I wrote "My personal recommendation is to never use self-signed certificates for anything". And there I was! Darn. 
I figured, that there must be a way of stop the stupidity and install an own certificate to the network appliance. Then I bumped into ASA 8.x: Renew and Install the SSL Certificate with ASDM, a PDF-document from Cisco instructing how to achieve that. Nice! Exactly what I needed.
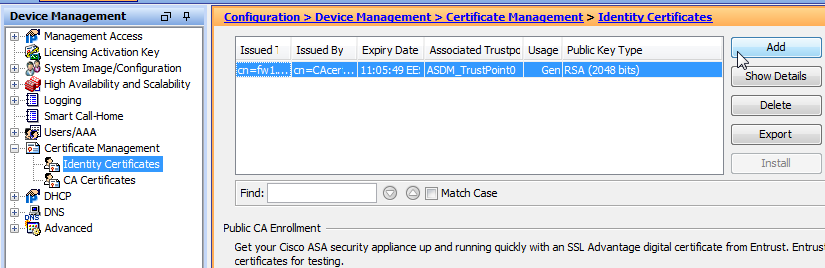
This is how to do it. Log into ASDM and go to Configuration -> Device Management -> Certificate Management -> Identify Certificates. It looks like this:
![]()
There you can find Add-button:
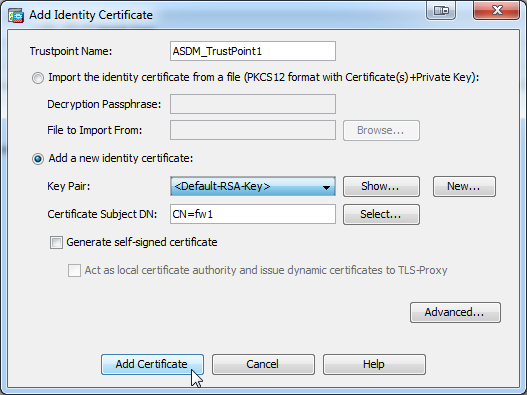
You should add a new identify certificate. I used the Default-RSA-Key, but Cisco's own documentation says to generate a new one. In case SSH-keys need to be regenerated, the SSL-certificate won't work anymore. In my case I can simply recreate the certificate also, so it is not an issue to me. After you click Add Certificate:
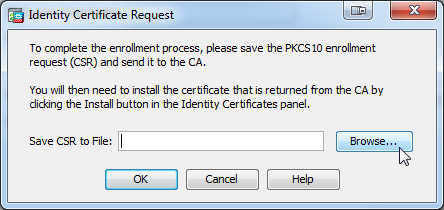
You will get a dialog to save the Certificate Signing Request (CSR) into a local drive to be sent to a Certification Authority (CA) to be processed.
After your CSR has gone trough and you have your certificate in PEM-format go back to ASDM and select Install this time. You will get a dialog:
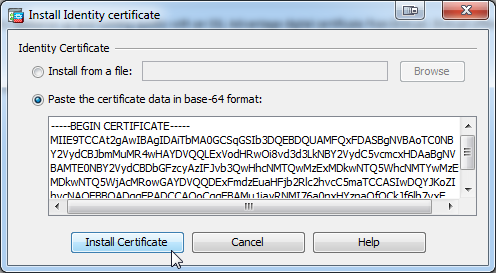
Upload or copy/paste the PEM certificate there and click Install Certificate. After that you'll have an identity:
![]()
Now the next thing to do is to start using the newly created identity. In Configuration -> Device Management -> Advanced -> SSL Settings there is an option to choose an identity to use when ASDM is being accessed via HTTPS or ASDM-IDM.

To get better results from Qualsys SSL Labs server test I did following changes:
- SSL-version is set to TLS V1 Only, that is TLS 1.0 only. 1.1 nor 1.2 is not available.
- For encryption I'm only using:
- 112-bit 3DES-SHA1
- 128-bit RC4-SHA1
- 128-bit RC4-MD5
- The AES-encryptions for 128-bit or 256-bit failed on my box for some reason. If you have them, please use those! The chosen 3 crypto algos provide reasonable security, but the AES-ones are better.
After an Apply the new certificate is in use. You can verify that via a web browser from HTTPS-interface or go to Control Panel's Java security settings and remove the self-signed certificate from secure site certificates -list. The ASDM-login will work again.
It's alive! Printer ran out of paper
Monday, February 17. 2014
This one really made me laugh. The entire situation was like from T-2: "Skynet begins to learn at a geometric rate. It becomes self-aware at 2:14 a.m."
My new printer ran out of paper and it sent me an e-mail about it.
Subject: [CLP-410 Series]Paper Empty
System Error: M1-5112 Tray 1 is empty. User intervention required to add paper to Tray 1. Printing can continue if the required media is available from other trays, all other machine services (if installed) are unaffected. .
The e-mail had all the information about the printer, its IP-address, serial number and printed page counts. If I would have 17 of those, it would be possible to differentiate which one is in trouble.
Looks like they just might be taking over after all. I tried looking my printer's Instagram, Facebook and Twitter accounts, but could not find them.
AMI BIOS iKVM (Asus Z8PE-D12) failing to open console redirection
Friday, February 14. 2014
I was trying to see the remote console of one of my servers:
![]()
It said: "Could not create token for this session. Max session limit might have reached". This was yet another reminder that Asus iKVM isn't the sharpest tool in the box, it generally responds slowly and sometimes it does weird things. Thanks to Java, it wasn't easy to get the console application running, it said a number of things, including a complaint:
![]()
... but after sorting out a number of Java issues it spat out an error-message with XML-content of:
<jnlp spec="1.0+" codebase="http://192.168.1.11/Java">
<information>
<title>JViewer</title>
<vendor>American Megatrends, Inc.</vendor>
<description kind="one-line">JViewer Console Redirection Application</description>
<description kind="tooltip">JViewer Console Redirection Application</description>
<description kind="short"> JViewer enables a user to view the video display of managed
server via KVM. It also enables the user to redirect his local keyboard, mouse for
managing the server remotely. </description>
</information>...
<resources>
<j2se version="1.5+"/>
<jar href="release/JViewer.jar"/>
</resources>
<application-desc>
<argument>192.168.1.11</argument>
<argument>7578</argument>
<argument>
<html>
<head>
<title>Document Error: Page not found</title>
</head>
<body>
<h2>Access Error: Page not found</h2>
<p>Could not create token for this session. Max session limit might have reached
</p>
</body>
</html>
</argument>
</application-desc>
</jnlp>
I found out somebody who had the same issue at Asus' discussion forums article [Problem]iKVM Remote Control Console w/ Java exception error. There was a suggestion to unplug the power cord. In my case the server is couple hundred kilometers away in a secure data center where I certainly do not have any access. Sure, I could write the support and ask them to do that but ... I'm pretty sure there has to be a way to reset the BMC remotely.
Then I remembered something I did a while ago with ipmitool on Linux-shell. Running:
# ipmitool bmc help
MC Commands:
reset <warm|cold>
guid
info
There is a reset-command in the list. Google led me to an article "Restarting an IBM BMC without restarting the server itself". I wasn't sure what would happen. My first guess was that it would do the same thing as typing "google" into a Google search - the entire world would implode to a singularity. So it is very important not to that. But I really needed the remote console. I was willing to try:
# ipmitool bmc reset cold
Sent cold reset command to MC
Nothing serious happened immediately. The Linux was responsive and world didn't come to an end. After a minute or so, ipmitool bmc info -command yielded a response! The IPMI was back on-line. A logon to web-console:

Yep. I had my console back.
I sure hope that all remote console manufacturers would stop using Java for their apps. It is such a bitch to get a Java application working on after 1.7.0_51 was released. See: "Java 7u51 will not accept JNLP with self-signed certificate?" about other people complaining about that. Anyway, all ended well and I didn't have to drive to the server to do some maintenance.

